#mytuts
Explore tagged Tumblr posts
Visit Tumblr Blog
Explore Tumblr blogs with no restrictions, modern design and the best experience.
Last Seen Tumblr Blogs


Fun Fact
Tumblr has 4 main sources of revenue.
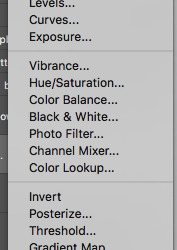
Text
aes' video game gif making tutorial 2024 Part 1
Using your own footage. While everything regarding photoshop can be applied to nearly all media, apart from long form videos(5+mins) and videos not in mp4 format; I am still focusing on walking you through making your own footage look as nice as possible.
Needed:
A game and potentially mods for said game
Camera tools for various games (optional)
OBS
Photoshop
My gif making actions so you too can be fast
This tutorial simply opens your recorded footage in photoshop, no other screen cap software is required. Lets fucking go!
[Part 2]
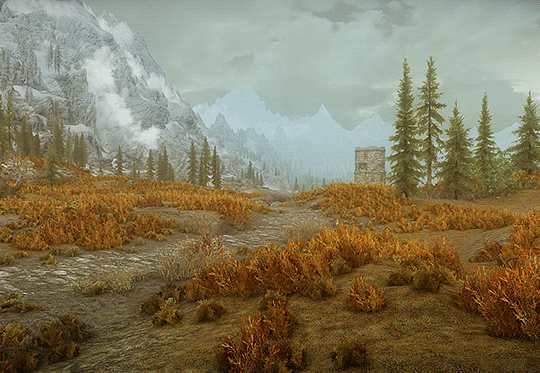
INTRO: From Skyrim to Destiny, recording your own footage of various games is the best method of making your own gifs.
The reason for this is myriad;
+ less artifacting vs YT vids, as seen below

+ you’ll have more control over the content + you can have personal characters + you can alter the settings of the game to be better for gif making purposes
While this tutorial does walk you through most of the steps it is light on exactly/why I use various adjustment layers for coloring, mostly because tumblr began to block my images/links. Other folks have tutorials but I can make one if its something people want.
But the real purpose of this tutorial is to cut the time it take to make gifs down by just opening your file vs. screencaping and so on.
1. Select your game and edit game settings for gif making.
Because we are using OBS, and recording the screen and not the game itself(more on this later), what game you are playing matters little.
Other paid programs like FRAPS still work, as do some free programs like Afterburner/RivaTuner, but when it comes to multiplayer, some may be caught by various anti-cheats and shut down. (ESO will not launch if afterburn is already open, for example). OBS has simply been my go to for around seven years.
Settings.
Please feel free to play around with your game settings to find what works, you may even play a game on different settings from what you record footage under. I do not play with DOF settings on in games but do record with them on.
Dropping your screen-size from and being able to turn on ultra vs medium settings may make your gifs look much better as another example.
+ At least 30FPS, try to avoid stuttering, lower the settings if needed. + Avoid crushing of blacks or blown out whites, especially when giffing POC! Adjust brightness and gamma as needed, HDR isn't your friend here. + While dark nights maybe more realistic and challenging for you, it often produces a dark gif in which nothing can be seen. + Turn off motion blur and film grain, these both add needless file size and look off when scaled down in photoshop. If you want grain add some after. + 720p is about as low for footage as you want to go unless making gifs for very old games. Work with what you have with old games. + Using mods and things like reshade can make your game shine.
Example time; ENB only on top, heavily modded on bottom, no adjustments were made in photoshop.
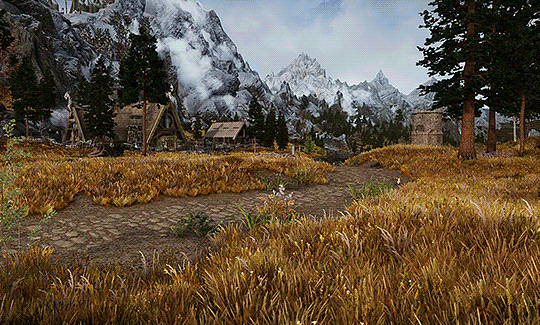
Modding can really alter a game.
Skyrim is very famous for it, but everything from Mass Effect to Pathfinder: Wrath of the Righteous have visual mods! They can make your footage stand out immensely, they can make your FPS drop, or even make it better.
Please be respectful of mod authors. As someone who made them in the past, we are not content farms, we are just folks with a fun hobby like gif making!
I highly suggest any mod that removes screen blur, vignette and film grain!
2. Camera Tools (optional)
So you have your game, now it's time to learn what camera tools exist, if any, for your game. Many games like Rogue Trader and Dragon Age, have free camera mods. Some games like Bethesda games and some Mass Effects, have built in, or partially built in fly cams.
I used to back in the day before DA:O had camera tools back myself into a corner and swing the over-the-shoulder camera around to get gifs, so you have to work with what you have.
If you want to go the paid route there are plenty of camera mods available from assassin’s creed games to BG3. These are generally of better quality and work smoothly, but check around for reviews before you dish out your hard earned money!
Each of these tools will have different commands that you will have to learn.
3. Obtain OBS & set it up
Why OBS?
It's free, it uses very little of your computer's resources. OBS also allows you to switch between screen recording, what I always use, and recording a specific program. Many other recording programs will not record some very old games, some can't record specific games.
Add to that, some hardware recording software will not record shadows or can get light values wrong and you are fighting a battle game after game. So I just go for what's free and works consistently.
I've only known one person for whom OBS failed to work, and that I think was a version issue.
Install OBS, and then make a specific scene all the way on the left;

You can rename this or duplicate it if you also intend to stream(right clicking scene will bring up the menu to do so), I don't use OBS when streaming so I leave this as is.
Right click on the source and ensure it is set as Display Capture. Because some, especially older games, won't work with Game Capture you are going to record the screen. Double click Display Capture if you have multiple screens(I have 2) and select which you want to record!
Next we need to go into settings, over there on the right under Controls. Once in settings, go down to Video and keep the base and output values whatever your actual display size is. I have a 1440 display so it's set to 1440, if you are running 720 make sure it's 720 and so forth.
Ensure 30fps is chosen. Anything more is overkill, for both photoshop and your rig!

Next go to Hotkeys. This will be different if you are using OBS to stream as well, but because I am not, I cleared everything but the recording hotkeys and I assigned them to scroll lock. This is because I've yet to encounter any game or mod that uses the key for anything. Use what makes sense for you, however.

Finally make your way to Output, this is important. Ignore streaming, look at Recording.

+ Pick a folder you want to save in + pick indistinguishable quality, large file size. + Pick MP4+ which encoder you use is up to your system! This is the one that made sense for me and my system. There are tons of videos on YT that go over each encoder. Also here https://obsproject.com/kb/audio-video-formats-guide is the official guide. We need to be able to open the file in photoshop so I tend to lean toward H.264.
3. Test OBS and your game footage together!
Go into your game, record a menu!
If you see something weird here, like your game footage not actually recording, troubleshoot!
With your recording you shouldn't see any stretching.
Now go into game and for 3-5 seconds record you playing, if something isn't recording well, again, troubleshoot. OBS takes a small amount of resources but for older rigs you may need to adjust settings in either game or OBS to get better recordings.
Once you are comfortable, it's time to go wild!
4. Record your gif footage.
+ 5 second clips are best for scenery gifs, + anything from 2-10 seconds can be used for a character talking + anything more than 10 seconds? You'll hit tumblr's limits instantly and will need to make multiple gifs. Which isn't a big deal, but do make note of it as it is much harder for older rigs to open a 5 min 1440p recording than 10 seconds. Depending on the rig it may not even open, so try and make several recordings rather than one long one.
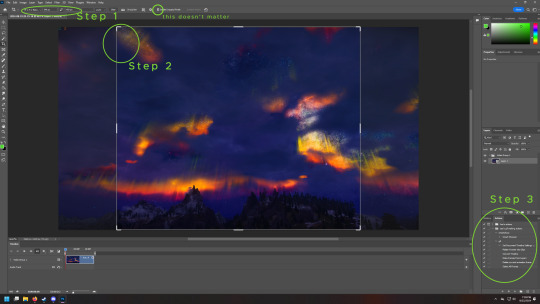
5. Photoshop set up if you pirated an older version
If your gifs look weirdly stretched, check pixel ratio! If your photoshop is legit, or you know that it isn't stretching your gifs wildly you can skip this step.
I don't care how you obtain photoshop, but photoshop has had the ability to open MP4 videos for nearly 15 years. You do not need to, and I do not encourage you to use any screencapping software. That's great for long-form videos, but my computer 12 years ago could open a 5min music video fine and it was a potato.
Often photoshop 'portable' aka pirated photoshop comes with some wild settings, namely, pixel ratio changes. Please check this first;

And look at what default is actually set at, if your gifs always look stretched oddly when uploaded to tumblr.
It should be 1:1.
Then look at,

Again set it to square! Newer photoshop, and non-pirated versions often will let you look at other aspect ratios but won't save weirdly. so 2:1 will still save to 1:1, this hasn’t always been the case with cracked photoshop, especially the version from around 2014.
6. Open
Either drag in all your videos, or just... file → open.
This is why you saved as 5 seconds and MP4, so you didn't need any extra steps!
++Please be aware that older/weaker rigs and laptops can struggle, and if you are seeing crazy hot temps and such its an issue. Seeing Photoshop pause to open/play an action is normal but not chugging. I tell you this so you remember to dust your case and give your hardware some love, fiddle with settings and if this straight up doesn't work with your version of photoshop it might not be for you.
7. Crop your videos
Once you have your video/s open, select the crop tool. (it should be right here in the default setup. or Simply press C on newer Photoshops)

Step 1- in the far left box you want to select Width by Height and then type what size you want to crop to. Height Matters little but Width does matter.
Here are tumblr’s current 2024 sizes again!

10mb is the max, anything more will have a new compression algorithm applied to make it under 10mb.
Please look at the sizes closely. I'll give you an example! Lets say you make your widest gif 1000 pixels, a common wrong size.

I could only fit 20 frames in this bad boy, and its squished, despite the saving compression used, tumblr eats the quality to make it pixelated/artifact-filled.
Compare that to this, 66frames

Slightly different cropping but you get the point.
Same thing with using 540px in the 268px spot.
Compare it to the gifs below which is a 4.83mb 133 frame image in the 268 spot. see how it's less pixelated?
Now back to that Image. Lets talk about... Step 2. Select a range from within the image, try to avoid going to the edges, otherwise you get a 1 pixel wide transparent line. It's hard to see on some blogs, and so obvious on others. Mobile users won't likely see it, but it does take a slight amount more file size as well.
This is what I mean.
Step 3. Time is money, friend. And by this I mean I am going to provide you with the means to skip a TON of steps in the gif making process and just use my action, I'm even going to help you figure out how to fix it when it fails. For the low price of free. If you want the how to, I can break down what all the action is doing, but I haven't even thought about these steps in about 8 years or so.
PART 2 THIS WAY
(because tumblr hates more than 30 images)
46 notes
·
View notes
Note
hi! i love your sims sm !! they’re gorgeous ! i was wondering if your willing to share how you edit your screenshots? if not, i totally understand ♡♡♡
omg thank u so much!!!!!!! <3 this means a lot to me djkhfjsd of course i can! i'm a novice when it comes to editing (literally only started a few days ago) so my process is still very basic but i can show u nonetheless. it'll all be under the cut :-)
okay so before i start i have to mention that i use three programs to do this: reshade (does the bulk of the editing for me via presets), SRWE (ensures that my screenshots are hq), and photoshop 2020 (for editing)
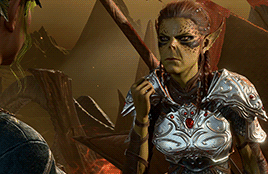
lets say i'm editing this picture

since i've already posed her, taken the pic w reshade, and cropped it to a size i want, i dont have to worry about any of that anymore. on to photoshop! (for ref: i didnt take this particular screenshot with SRWE because i didnt have it installed at the time, but for all of my current ones i do!)
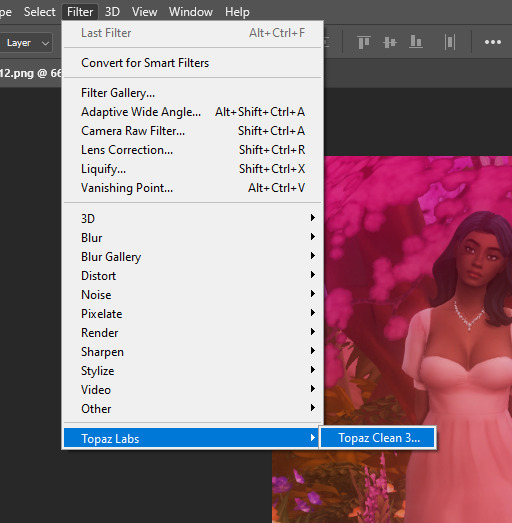
the first thing i do is open up topaz clean v3 - i got mine from [cough cough here]. idk anything abt topaz so this may be outdated but... it works good enough for me
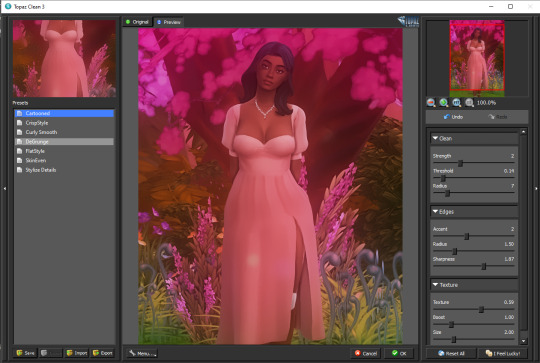
from there, i just mess around with the 'cartooned' settings until i find something i'm satisfied with. i try to keep it really subtle because i want my sim to actually look like themselves fkjhgjhf here are my personal settings for this specific photo
after this, i go to filter > sharpen > smart sharpen to bring out the details in the photo
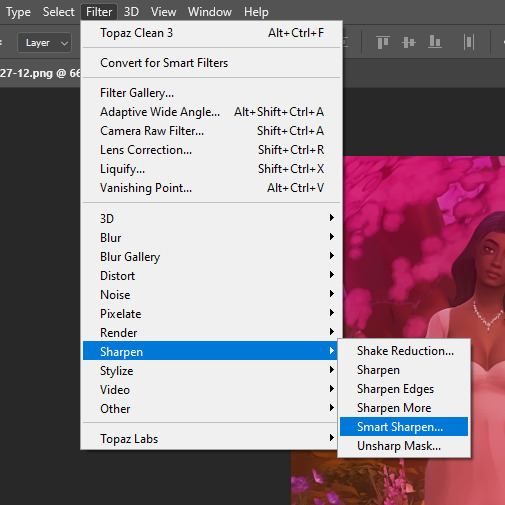
similar to topaz settings, i just mess around with the strength until i find something that i like. i try not to go too heavy with it but since i didnt take this pic with SRWE, i gave it a little more sharpening than i usually would

lastly, i use one of @wooldawn's actions from this action dump . i personally use 'o gradient' to make the photo a bit brighter

and thats it!

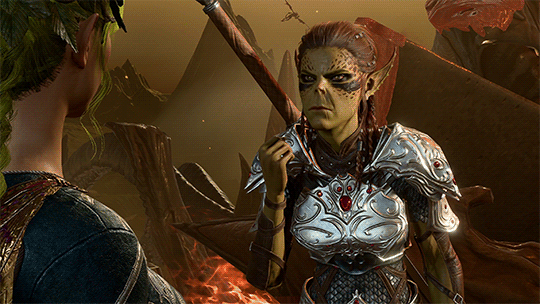
before (left) vs after (right)
again it's veryyyy basic but i think it does the job for right now hehe.. the process is the same for landscape screenshots too, i might add in a light flare or two in those to bring out the Cool Sun Rays for Ambience
#i hope this is good..... cries#ts4 tutorial#editing tutorial#photoshop#sims 4 editing#ts4 editing tutorial#mytuts#anonymous#the sims 4#ts4
23 notes
·
View notes
Photo

Helloooo! here we go with another tutorial. requested by @wavysimsccfinds ((ii think @wavysims ?))!!! under the cut because it’s kind of long and rambley, as i am known to do.
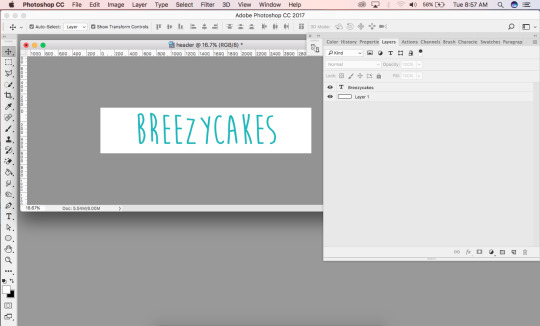
so you want a cool changing text gif. i gotcha. first things first we gotta acknowledge our humble beginnings. i used this tutorial from @smubuh when i first got started (you can see it in action here and here)! but here is my take on a super basic, but really cute moving text tutorial! first this first create your document. whatever size you want! i’ve been using 3000 px by 646 px (?) i think, but whatever size you want babe it is your world!!!
iight so boom. create your background and your text. position it how you want, color it how you want, etc. if you’re wanting to make a banner that’s along the lines of “new simblr!” or something, picking an easy to read font is probably ideal, but lemme be crystal clear i always prefer personality over everything, as it lets me get to know you a bit better. as long as it’s fairly legible, let that freak flag shine! pick something curvy, something bold, something solid. whatever you’re into! pick it! this isn’t graphic design 101, this is your blog and you adorn it how you wish.
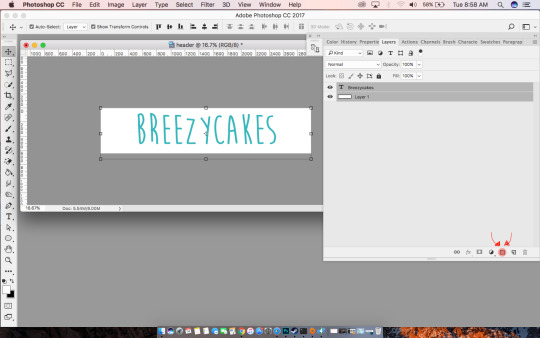
select your layers then group them by clicking the little file folder icon highlighted in red.

name your group so you don’t get lost! this is a super basic concept but if you decide to experiment (which i recommend!!) you can get lost in all the layers. keeping em organized helps. i name mine based off of the frames they will be ultimately in the gif.

now you’re gonna duplicate the group!
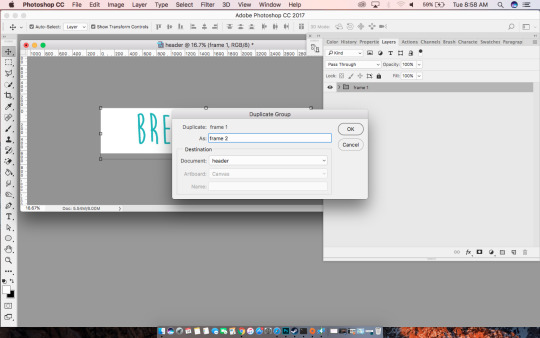
name the new group (sorry if this seems obvious but i wanted to be thorough!)

now you’ll have an exact replica of your first frame. play around with the colors. i usually like to go with something that contrasts so it pops more but we love a subtle color change as well. whatever floats your boat! IDK shit about color theory, but if you’re into that here is a really easy to follow website that breaks different concepts down that may help you pick some colors
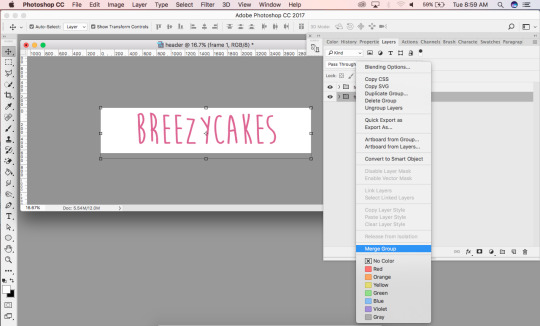
once you have it to your liking, you’re going to merge each group. select the group, right click and select “merge group”
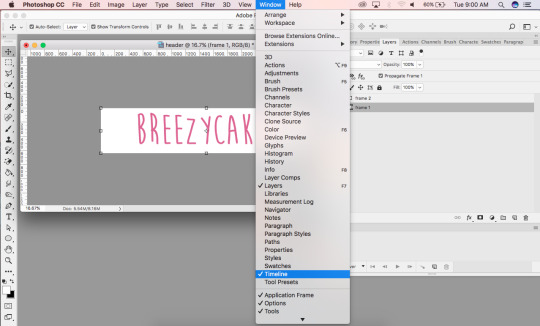
you should have two layers now. if you don’t already have your timeline on your bar (like i do) go to window< timeline
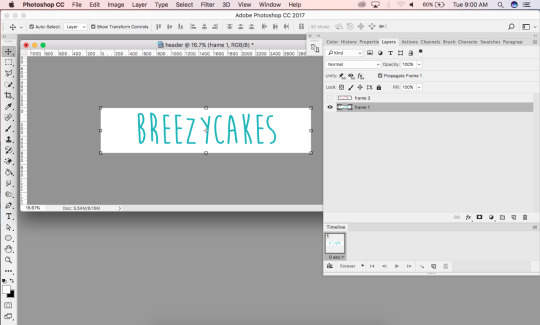
uncheck the top layer, select your first layer, and click “create animation” (it should be a button on the timeline window!)
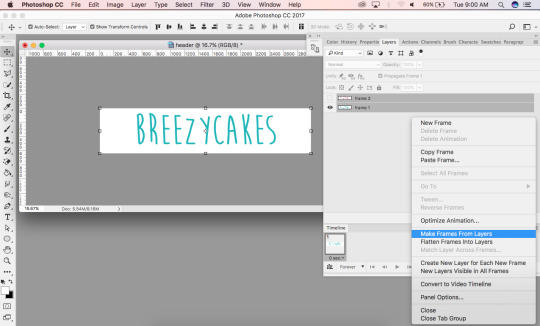
then select all the layers, right click the three little lines on the top right corner of the timeline window, and select “make frames from layers”
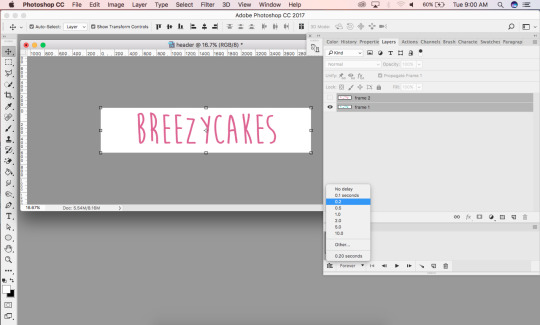
woohoo! now more personal preference. play around with the amount of time, and looping options (i tend to stay at or below 0.5 for each frame with looping at “forever,” but the decision is up to you!)

press play and test it out. once it’s what you want go to
file<export<save for web

i always click optimized and go but feel free to play around with the settings and see what happens haha. this is just a screenshot of what my settings usually are! click the save and export it babes!
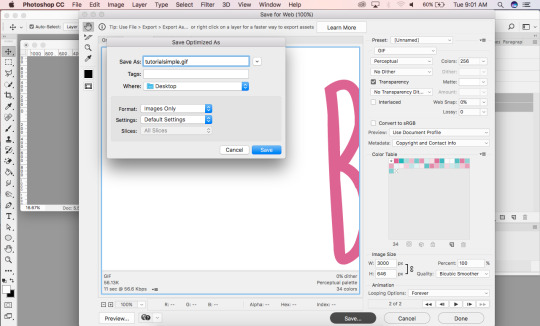
name it something easy to remember, and save it somewhere easy to find ((i am not the best model of this as i save all my shit to the desktop but you know whatever)) and VOILA

✨you’ve got a handy dandy gif that is vibrant and flashy ✨
now as you can see by the header i made for this tutorial you can always play around with movement, amount of layers and color, etc. that’s just a matter of keeping track with your layers, moving stuff how you want, and merging each set of layers that make a frame together! at the bottom are some examples of how to play around with different styles! i hope this helps people wanting to dive into the world of text gifs. this is super easy to do!! <3


#tutorial#tutorials#my tutorials#mytuts#mytut#tut#tw: gif#tw: gif usage#gif overboard#i got a lil carried away I'm sorry#these aren't that great but they're so fun to experiment with#for wavysims#wavysims
35 notes
·
View notes
Video
youtube
super quick and simple icon tutorial
like/reblog if you find it helpful
#completeresources#yeahps#quirkyresources#chaoticresources#icon tutorial#tutorial#photoshop#video tutorial#mytut#mine
71 notes
·
View notes
Note
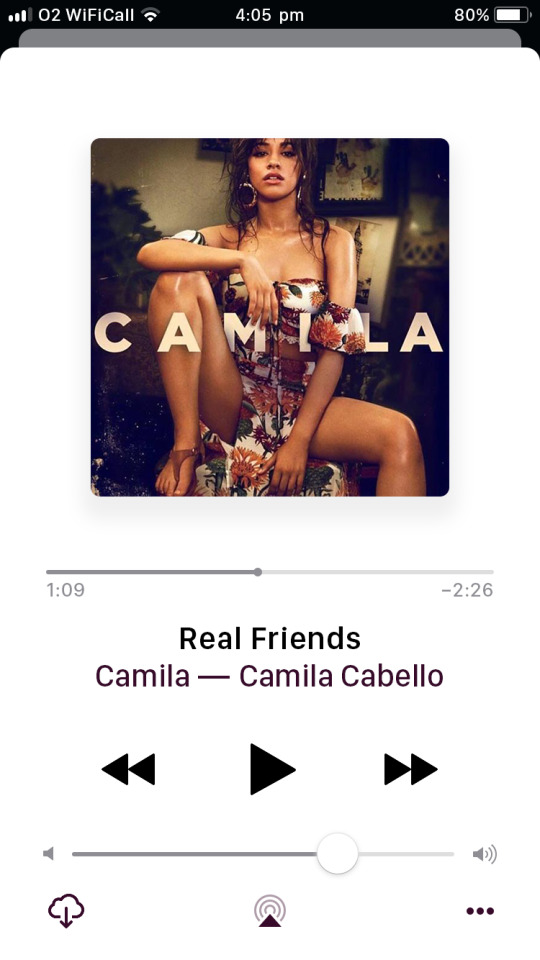
This might sound silly, but how do you use these templates?
not at all! using templates can be confusing at first, I’ll try and explain it under the cut
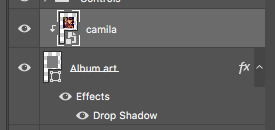
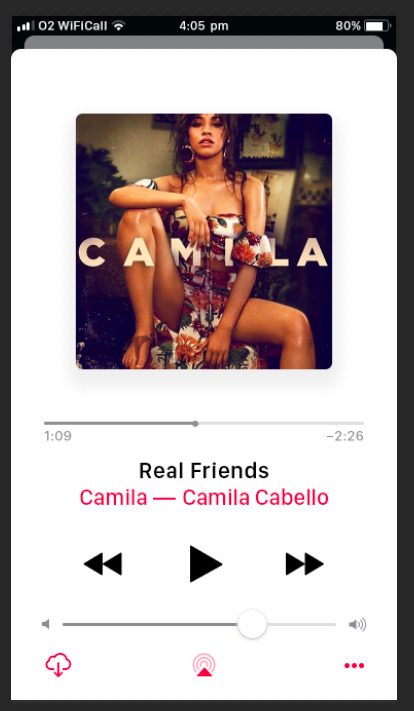
1. first I’ve opened the template in photoshop (I have cc 2015) and I’m gonna edit all the text (the song info, time & battery percentage) I should have aligned all the text so that you don’t have any problems w changing what it says

2. now I’m going to centre the album & artist (because I used the line tool instead of a dash as the dashes apple uses are very long it’s not automatically centred however you could delete that and put the album & artist in one text box so you don’t have to re-centre it if that makes any sense)
So I’m going to select the album, dash and artist and centre them, on a mac you can hold down the command button to see something’s placement


3. now I’m going to change the length of the slidey thingy that shows you how far through the song you are
I like to actually calculate how far across it should b bc im extra like that but obv that’s not necessary
You might also want to change the battery fullness depending on the % you wrote down (as it is when you download it it’s at 80%)

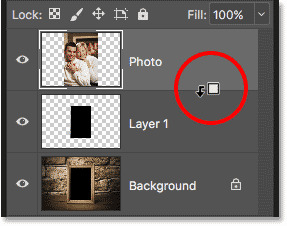
4. Now the last thing that left to do is to put in the album art so I’ll put in the picture, resize it to the right size and then clip it to the ‘album art’ shape that’s already there
on a mac this is done by holding alt and then hovering over the join between the image and the shape you want to clip it to until this icon appears


then I’m done!
BONUS: The colour of the album, artist, and the icons at the bottom are currently the default apple colour but I’ll explain below how to change them
To change the artist & album title it’s just a case of changing the font colour:
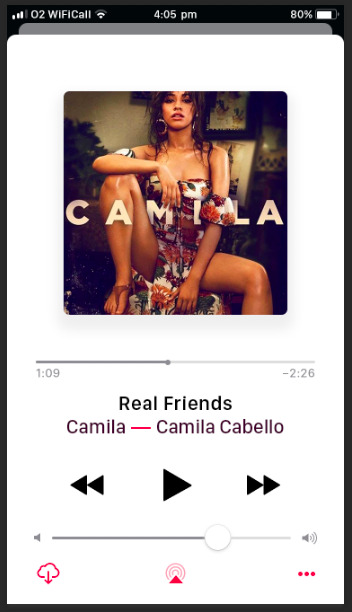
to change the dash between the album and artist select the ‘dash’ layer

make sure you have the shapes tool selected

and change the ‘fill’ colour


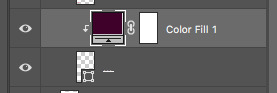
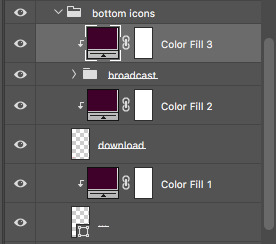
All the bottom icons are located in the ‘BG’ folder, you will have to use clipping masks to change the colour of these:
simply select the icon you wish to change the colour of
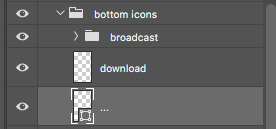
insert a new ‘solid color’ layer in the colour you wish to change the icon to
and clip this layer to the icon in question

for the ‘broadcast’ icon you can clip the mask to the whole folder as I have made the 3 rings more transparent to make the colour lighter and so they do not need to be made a different colour

This is the end result:
I’m sorry if this was confusing I’m not v good at explaining stuff like this :// if there’s anything else you want help w / anything you want me to explain more in depth just ask!
3 notes
·
View notes
Link
0 notes
Photo

The #biggestbro and #Nephew #tuts #mytuts #Family
0 notes
Text


31 days of PSDs - Day 27
Like/reblog loved but not needed
Don’t claim/redistribute
MEGA DL: [here], PSD tag [here]
23 notes
·
View notes
Text
HOW TO: make gifs from instagram videos.
Alright, guys, so I thought that I'd share how I make gifs, specifically from instagram vidyas.
Mozilla Firefox with THIS extension
Photoshop (links can be found throughout tumblr)
VLC Media player
Everything that I placed links to are free and safe; however for the photoshop downloads I currently don't have a link that I can assure 100% works and is safe, but when I find one I'll give it to you guys, promise!
Okay! Now let's get started, shall we?
1) After you've downloaded everything that you're going to need, open your firefox browser and locate the video that you want to download. I'll be using this one.

2) Click on play. Once it's playing, you'll be able to download it. To do so, click the little colorful circle next to your url bar thing. It looks like this:
3) See that little arrow? Click it to bring down the downloadable options. Usually, since you're on the direct video page, there is only one option. It should look like this.

4) Click on that and save! (If it doesn't automatically bring up the save as box, click on "download" in the menu)
STEP TWO: EXTRACTING FRAMES (If you prefer using KMPlayer, see this tutorial)
1) Open your video in VLC Media player. The easiest way I think about going about this would be to open VLC then go to media > open file, and locate your video that way.
2) Play your video and stop it just a few frames before you want to start the gif, just so you don't miss anything. Now we're going to screencap it. If your still in the default settings for hotkeys, which if you just downloaded it or haven't changed them you are. The keys you need to hold down will be "shift+s" AT THE SAME TIME. You can hold them down to capture multiple frames, and since we're making a gif that's what we're gonna do.
* VLC looks like this when capturing frames.

STEP THREE: MAKING THE GIF
1) You should have photoshop open already, but if you don't, open it now, because now we're putting the frames into photoshop. Locate where your caps saved. You can do this by going to tools > preferences > video. That will bring up the following window, I circled where it says where your caps were saved. You may have to scroll down to see this section, though.

Now, open that folder and select the frames your going to do. Then drag them over your open photoshop document (to get one go to file > new, make sure your dimensions are set to something like 1280x720. If there's whitespace, that's fine, you can always crop). To place the files, you'll want to click the check mark (see photo below) until all frames are placed or hit the enter key until they're all placed. You're basically telling photoshop that yes, it's okay to put these here.

2) Now you've got your layers, but you need them to be in frames. First, you need your animation bar open, you can open this by going to window > animation. Once that's there, click the menu and select "make frames from layers"

3) Set your time to .12 by doing the following:

Click on

and input this:
Now you can crop to your liking. Once your done use the menu that we used to "Make Frames from layers" and click "Flatten Frames Into layers"
Once you've done that it's time to sharpen your frames. You can do this using this action.
Yay! We're done! If you want to add psds, text, ect. Go ahead and do that. The best way to get a good looking .gif is to mess around with different settings.
Once you are set, go to file > save for web and devices > verify that your file is under 1MB, save, and there you go~

If it is over 1MB, try deleting frames and re-sizing it smaller. If need be delete colors using the optimize to file size tool in the drop down menu on the save for web and devices.
I'm not too good at making tutorials, but if this helped I'm glad.
If you have any questions, shoot me a message and I'll be glad to help out! (:
- Kota.
45 notes
·
View notes
Note
Hello! I saw your your edit /post/56191670133 and I absolutely love the effect! It's just so crisp and clean and it almost looks painted but not quite. I don't suppose you'd be willing to teach me the technique?
HELLO! <3 Thank you! I have no problem at all with (hopefully) teaching you what I did on this.
This will show you the exact steps that I use on all of my edits… minus the coloring part. The effect really depends on the pictures, but I feel if you tweak the settings enough you could make it look that way on almost any image.
I’ll be using this screencap because I love screencaps.
STEP ONE
Automatically assuming you are using photoshop, first thing you should do is open the image and do all of your cropping/resizing to your liking. My image is 500x250, for no reason whatsoever. It is just what my fingers put in by default.
STEP TWO
I prefer adding the coloring (psd or my own) before anything else. It is a personal preference, so it is up to you what you would rather do. [x] For the rest of this tutorial make sure the image layer is highlighted, so the filters will take place solely on the image [x].
STEP THREE
This is optional. Filter - Sharpen - Unsharp Mask. Settings [x]; Result [x]
STEP FOUR
Filter - Topaz Labs - Topaz Clean 3. Settings [x]; Result [x]An alternative (though not as up to par as Topaz) if you do not have Topaz is Gaussian blur. So, Filter - Blur - Gaussian Blur. Set at 0.5. But I recommend playing around with settings to exclusively work with the image you are using. There are also actions I can direct you to if you send me a message about them.
STEP FIVE
Filter - Sharpen - Smart SharpenSettings [x]; Result [x]
STEP SIX
Clean it up. The sharpened area around Amy’s nose is not flattering (in my opinion), so I used the blur tool [x] and very lightly went over it. Also good for small wrinkles or creases that look better not sharpened.
RESULTS
Original - Final
I hope this helps you out and it is clear enough. I’m horrible at explaining things, so feel free to message me if you have any questions.
#thedoctorsthief#i'll have to check the links once i publish this#but i hope everything is right#tutorials#mytuts#resources#ask#so the read more#is being weird#idk#it works on my actual blog#but it doesn't work on the dash#but whatevs#at least it isn't huge on my blog#tutorial#mine: tutorial
6 notes
·
View notes
Text
Tutorial: Different sidebar on every page
Anonymous asked: "i know you do not have it on your blog but do you know how to chance sidebar on every page?"
So here is a tutorial showing you how to make your sidebar image/gif change every time you click on next/previous page:
go to Customize and then to Edit HTML
find <img src=“{image:sidebar}”> (use CTRL+F to find it)
delete <imgsrc=“{image:sidebar}” and put THIS code instead
replace ”PICTUREURLHERE” with the image/gif you want it to be
click update and save
You're done! :)
Let me know if there are any problems :)
6 notes
·
View notes
Text


31 days of PSDs - Day 15
Like/reblog loved but not needed
Does not look good on skintones
Don’t claim/redistribute
MEGA DL: [here], PSD tag [here]
26 notes
·
View notes
Note
lol okk im back., sorry., i keep bothering you about this but i was able to do it but once i clicked on it to see if it would lead me to my facebook all that came up was some tumblr thing that said that the page is not found., :/
<_a href="http://www.facebook.com/sierratcooper">My Facebook
i think i might have put an extra pair of quotes by accident
0 notes
Note
hello! I know you probs get asked this alot but what gif programmy thing do you use? I don't know how to put two images on a gif? :( I mean I can photoshop first, is that what you do? :) x
Hello! I use KM Player and Photoshop. I used to use videos and Photoshop, but my gifs always came out too big.So I’m going to link you to a few tutorials since I am not very good at explaining things.This one shows you how to do the KM Player and Photoshop part. (this one is the video to layers version)Here is a tutorial on sharpening and adding a psd (coloring) to your gif, but I don’t like sharpening that way so this one will show you how to sharpen all of the layers at once. Tumblr has a limit on how “big” a gif can be, so here is a list of tips on how to not go over. And in case I haven’t shown you enough tutorials, here is the entire page for you to browse through and maybe try out sometime. And here you can find some really great psds.
Some specifics I can tell you about my gifs that don’t match up with the tutorialsMy Sharpening settings (go to filter->sharpen->smart sharpen):
And my animation settings:
(0.08)
I hope this helps and if you run into any problems feel free to ask and I’ll try to help you out the best to my ability! Good luck!
2 notes
·
View notes
Text
Christmas hat icon tutorial | requested by anon.
Okay, so this tutorial is very simple, i'll be using photoshop cs5 a normal screencap of Minato AND a vector christmas hat i found on google, you can search on google for many of those.
choose the image/screencap you want and open it
i chose this one :

Once you open it, click on the little lock on this menu TWICE so the image isn't locked and you can edit properly:

once you did that begin with choosing the pen tool:

start to select with the pen tool the borders of the image, in my case Minato, just like this until you selected everything, it will look like this:

Now, right click (with the pen tool still selected > create vector mask.
Now your image should have transparent background!
Make a new layer and place it down your image and choose the fill layer, fill that layer with any color you want!

so far it looks like that!
Now, open your Png christmas hat image on ps and drag it to your picture, place it on the top of all the layers and re size it the way you want by pressing Ctrl + T
now you have your hat on your image c:
Next make another layer and place it between the color layer and the image you chose, fill it on white and select the pen tool again, start selecting like this:

Again right click> create vector mask and there you have it!
Crop the image as you like, in my case i crop and re size to 100 x 100
Add a psd or color it yourself and you're done c:

I hope you find this useful c:
like or reblog if you do! thanks!
22 notes
·
View notes