#ts4 editing tutorial
Explore tagged Tumblr posts
Visit Tumblr Blog
Explore Tumblr blogs with no restrictions, modern design and the best experience.
Last Seen Tumblr Blogs


Fun Fact
The KCSC sent more than 20K requests to delete posts related to prostitution and porn to Tumblr from January to June 2017.
Text
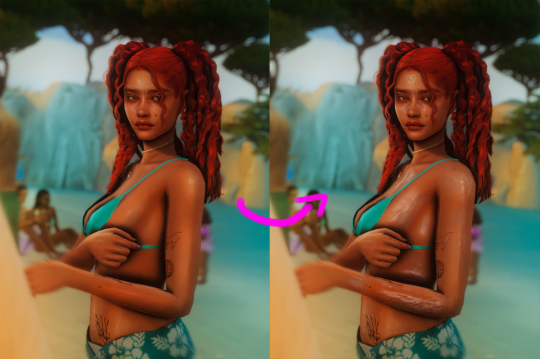
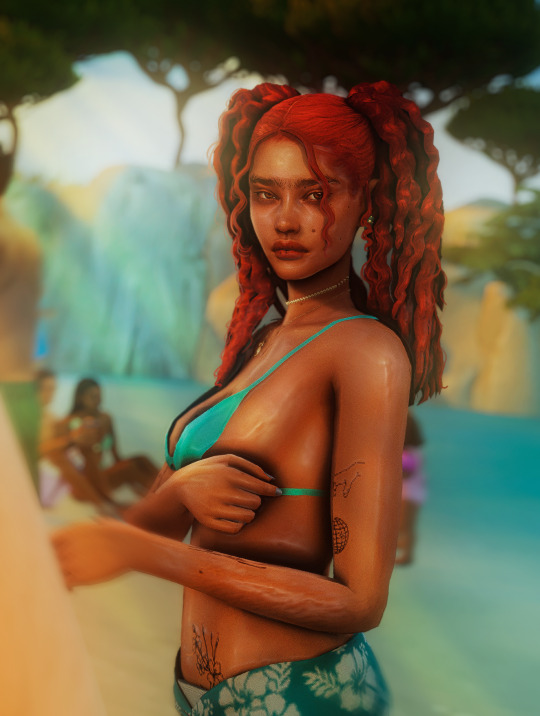
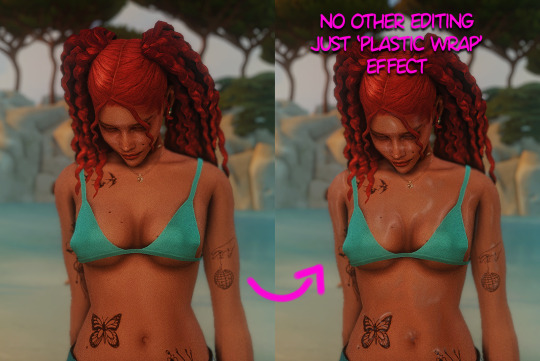
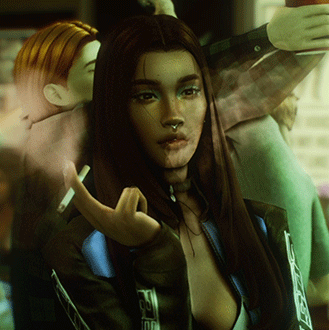
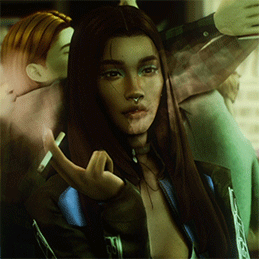
Wet skin tutorial Photoshop ts4/ts3
This tutorial is purely for the wet skin effect, you can look at my other tutorials here if you want to know how i edit usually.
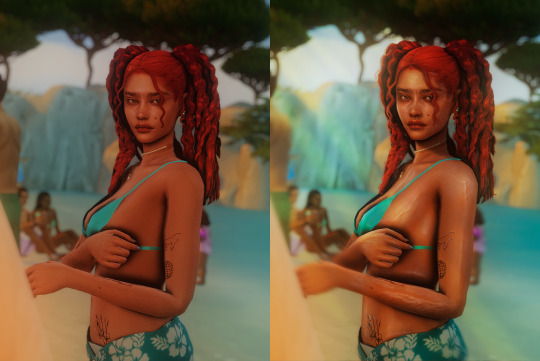
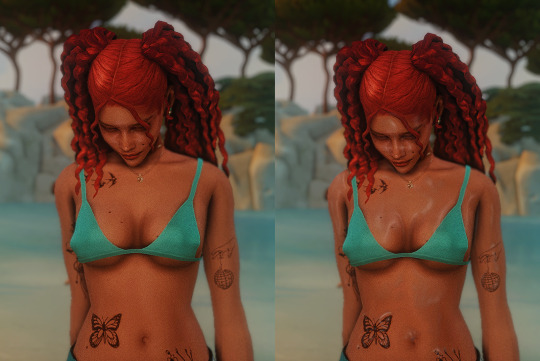
step 1: i add this effect last in case it all goes wrong as i end up merging everything together by this point. i would've already intensified the highlights knowing that wet skin is shinier. (new layer - add blending mode, smudge)
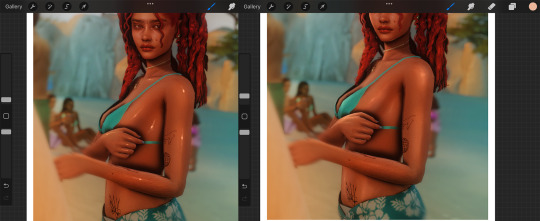
step 2: go into photoshop, ensure everything is merged, duplicate the layer. go to filter - filter gallery. choose the effect 'plastic wrap'

step 3: play around with the highlight strength, detail and smoothness. for this one i chose highlight 10, detail 4 and smoothness 6.
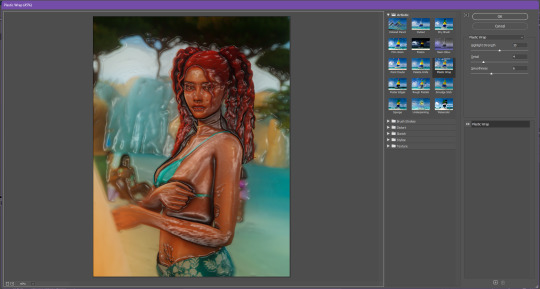
step 4: we need to be able to draw this effect on. so, we create a layermask. click layer mask icon, ctrl + i on keyboad, make sure the box is selected. remember: when your brush colour is black it takes away the effect and when your brush is white it adds it

step 5: now with your brush colour being white, you can draw on parts of the screenshot where you want the wet effect, you can change the opactiy of your brush. (i don't i'll just change the opacity of the whole layer)
step 6: i'll change the opactiy, merge and then duplicate and do the whole thing again a couple of times until i get the desired results in each area
Hope you found this helpful if you have any further questions just send them to my ask box :)
57 notes
·
View notes
Note
hellooooooooo i love all of your renders and posts you're so talented oml. may i ask for a tut on how you did the smoke in this post? tysm ily :D
Hey, thank you so much ahhh!!! That means so much to me!! ILY! 😘
In truth, my method for smoke is not sophisticated at all... It's actually laughable how simple/easy my process is for this, I'll admit 😅
There is a way to do it right in blender, but for this particular trick I don't use blender (mostly because I've never been able to get it to work right, user error I'm sure haha). But if that's what you're looking for, there's an (untested) tutorial here!
I personally use photoshop for my smoke, and, I admit, brushes!
This tutorial assumes you have a basic knowledge of photoshop, but if you don't or if any of this is confusing feel free to send me an ask and I'll be glad to help!
A while back I scoured the internet for free cigarette smoke brushes and amassed a small collection of them. Unfortunately none of mine are marked with a name or anything so I can't link to specific ones, but here are a few I've found for this tut:
Click with caution! I use ad blockers and these sites are fine for me but as always be careful!
Brusheezy free smoke brushes 15
Brusheezy free smoke brushes 12
Resource boy 200+ free smoke brushes
If you're using photoshop, make sure the brushes are in .abr format!
Once downloaded (& unzipped), if you double click the .abr file it should automatically install and open your photoshop if it's not open already.
I've pulled one of my renders of Ariss (pre-smoke) into photoshop, so let's make some smoke.

Step 1: Create a new Layer!
Make sure you are working on a new, empty layer! This will be important in later steps!

Step 2: Add smoke using your smoke brushes
On the new layer, select the smoke brush you want to use, and make sure your color is set to white/off white/grey.
Hover over your image and select where you want your smoke to be. I was unable to take a screenshot of this process, but I put my smoke here:

Step 3: Adjust opacity/shading

You should have a layer for your smoke now. Double click it and the layer style window should pop up.

In this step... honestly go ham. If you follow exactly what I'm doing, it won't look the same because of differences in our base image (color, brightness, saturation, etc). But I usually adjust:
Blend mode
Opacity
Color overlay
Outer glow
If your smoke isn't on a separate layer, any adjustment you make here will be on the main layer, which we don't want!
I've adjusted mine, & ended up with this:


Step 4: Move & adjust your smoke
Because your smoke is on a separate layer, now you can move and adjust it.

This is all up to your preference! I typically just move, adjust, and edit the layer style until I get something I want.
Sometimes I'll also blur the smoke, which you can do by selecting filter -> blur -> gaussian blur, just make sure you're on your smoke layer!

You'll know you did it right when you get this window showing the transparency instead of your image, & if the smoke blurs when you adjust the radius!

& that's it!
There's a way to also use the standard brush tool and "path blur", which I've used before but don't usually like the result of it.
But if you'd prefer to try that, here's a tutorial for it!
#thank you so much for the ask and the love!#ts4 tutorial#ts4 edit tutorial#sims 4 tutorial#sims 4 edit tutorial#sims tutorial#sims edit tutorial#ts4#sims 4#sims#ts4 editing tips#sims 4 editing tips#sims editing tips#salemsims tutorials#I hope this helps#if not lmk!#& I'll try to clarify
26 notes
·
View notes
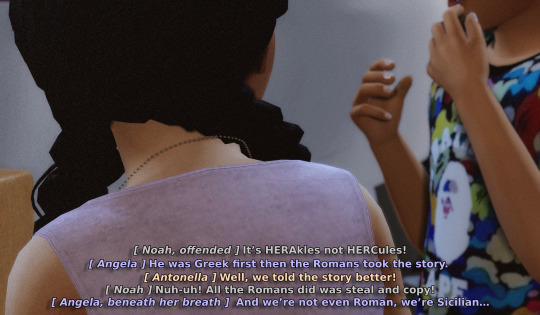
Text
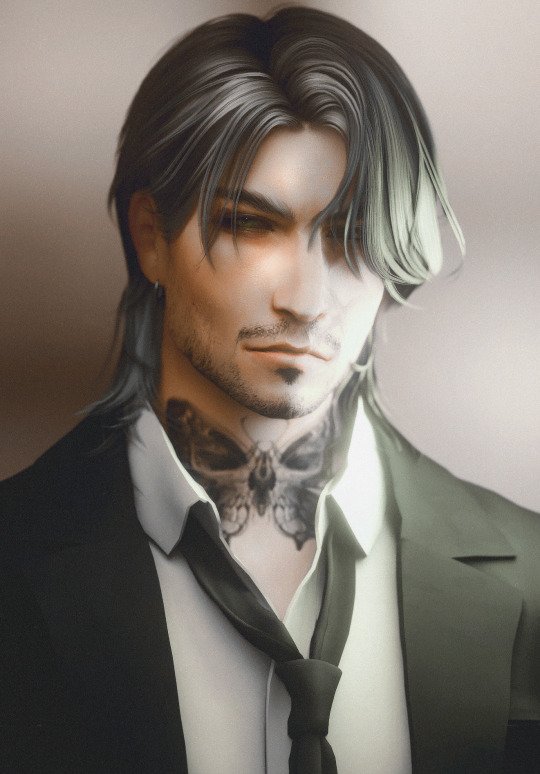
one more medicated peaceful moment.
#ts4#the sims 4#simblr#ts4 render#show us your sims#deja senti b sides: edits#jay#from tha lighting tutorial#daddy merrik#god and his voice claim is linked.............i won't him 5ever im ngl#the vitiligo in his brow that i COMPLETELY FORGOT TO GIVE BOWIE HSKLHJHG#we're gonna pretend shes always had it
104 notes
·
View notes
Text


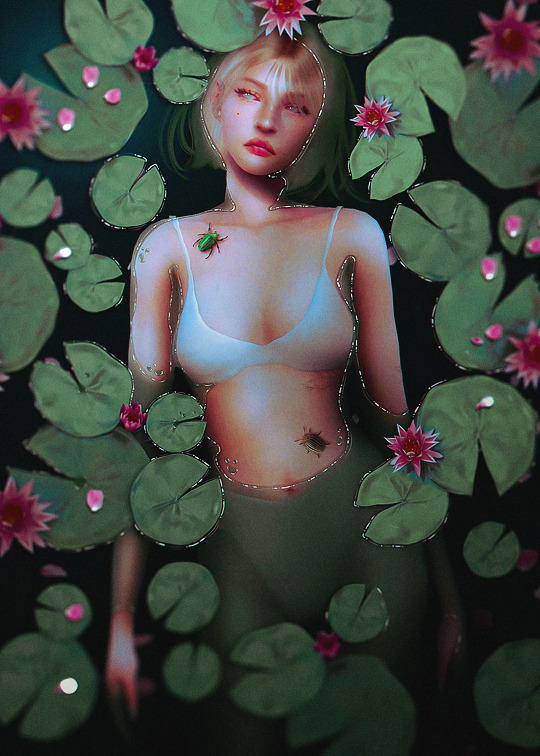
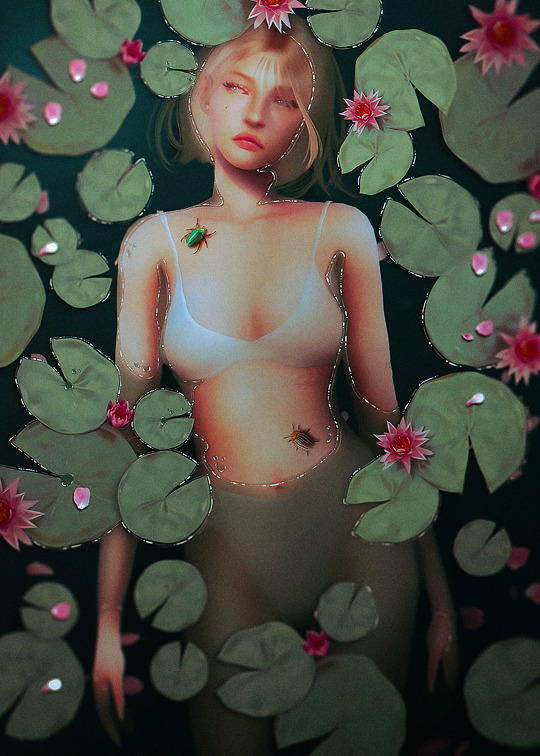
I've tried to do one of these half-submerged water edits many, many times, and I could never figure it out. I want to share what I learned with this edit because it seems a common sentiment that this concept is a little complicated. Hopefully, this info will help if you want to do an edit like this!
I painted the water with a color mask. I filled the whole canvas with medium green, lowered the opacity to about 60%, and erased where Amelia's body would peak through the water. I made the edges irregular to mimic how water pools. I used a hard brush, you want a lined edge, not a soft one. I recommend using a layer mask but you could do it with a regular layer.
The biggest concept I had to work with for this edit was depth. The highest points of Amelia's body would be about the water, but what about the deepest? I filled my canvas again with a darker green and shaded in parts where the water would be deeper; like the bend of her elbow and between her thighs. I recommend erasing with a soft brush.
Next, I outlined the edges of her whole body with a soft brush in the background color to blend Amelia's body into the pool of water. This helped her look more submerged.
This really helps it look like water: Where the body pools on top of her skin like around her armpits and on top of her belly ... I erased along the edges of my first green layer with a brush on ~35% opacity. I didn't want to erase it all but give the impression the water was thinner and more transparent.
I outlined the water on Amelia's body with a dark brown color, about 2px, on multiply, to help make the water look like it's rolling onto her body. If you go over onto the water later, don't worry it actually helps the effect.
After these steps, I continued to tweak things until I liked them. I added more shadows and some highlights.
I placed the lily pads next and added a small drop shadow under them so they looked like they were sitting on top of the water.
This step was my favorite part; I used a 1px white hard brush on 100% and drew different-sized lines along the edges of the water to create small reflections. I did it around some of the lilypads as well. This helps the water look more like water.
That is about all, I drew hair and added petals and bugs, then color grade the picture. The colorgrading really brought this picture to life!
I hope this helps anyone trying to create this kind of edit! I am always available if you have questions or if there is something I can help you with!
25 notes
·
View notes
Text
A Very Basic How to Edit a Screenshot Tutorial
I had a request by PeachPlumbobs on Bluesky about how I edit my moodlets and use them on my Sims 4 screenshots. I used this as an opportunity to brush up a little on my Photopea skills to offer a free solution to anyone editing their sims screenshots. This is a quick and dirty tutorial. There are SO MANY MORE THINGS you can do with Photopea. Its basically a free to use, browser based, Photoshop. If you've ever worked with Photoshop, you will be comfortable here.
To follow along with this tutorial you need:
A screenshot of a moodlet and a screenshot you want to put it on top of.
Open Photopea in your browser
** I play and edit on a PC. Any keyboard shortcuts I mention are for PC.

First, we're going to open Photopea. It really is browser based. You don't need to download a thing to your computer. For this basic edit tutorial, I dragged and dropped a screenshot with a moodlet and a screenshot I wanted it overlayed on.

Notice how Photopea will open each image as its own tab. That's good. The question I was asked was how I edit and add moodlets. Personally, I use exactly what the game gives me. I'm going to show you how to cut them out with rounded corners here.
*To make your life easier, feel free to use the magnifier glass tool on the left to make the area you are working on bigger. If you need to move the whole image around, use the hand selection tool on the left side.
On the left side with the tools, you will find a button for shapes, click the rectangle one. On the top bar, just below the "Edit" button, you will see a drop down box that lets you change this from a shape to a path. Make it a path. On that same bar you will see an option to edit the corner radius. I changed it to 5px.
Use this path drawing tool to draw a rectangle over the part of the moodlet you want to see. I cut out the time remaining on the moodlet when I do this. I also cut out the icon - that's optional of course!

Once you have your path drawn, look to the right side of the screen. Over there, you want to switch it from layer view to Paths. After that, on the bottom of the right side is a button that lets you make that path into a selection. Switch the view on the right side back form Paths to Layers. Use the Arrow tool on the left side and click the center of your selection to make sure it is active.

On PC, you can use the keyboard short cut "Ctrl C" to copy the selection. Or, you can go to the top and click "Edit - Copy"
Switch tabs to the image you want to place the moodlet on. The PC keyboard shortcut is "Ctrl V" to place your copied selection on a new layer of this file. Or, you can click, "Edit - Paste"
Again, this is how I edit my moodlets and you don't have to do the same thing if you don't want to! Once my moodlet is placed as a new layer, I use the square selection tool on the left side to create a box around the moodlet icon. I then use the arrow tool to move the icon on top of the moodlet box with the text. Once completed, go to the top and press "Select - Deselect"

How to add that nifty translucent outline around the moodlet. Make sure you are on the layer your moodlet is on! Go to the bottom right and click the button labeled, "eff." Go up the pop-up list until you get to "Stroke." Click on that and a layer style box will pop up. For this example, I set the width to 10px, the opacity to 40%, and the color to white. There you go, you've given that moodlet a little pop!

This is a quick tutorial, but I'd be remiss if I didn't follow through with the rest of the image editing process here. I know I plan to make this image a square when I save it, so I moved my moodlet over where the square would be. Using the rectangle select tool, you can press "Shift" while dragging the rectangle out and you will get a perfect square. Once you are happy with your selection, go to the top bar, and click "Image - Crop"

Now that I know the size of my image that I plan to post, I can adjust the size of the moodlet. Again, make sure you are on the layer with the moodlet when you try to do this! Go to the top bar and click, "Edit - Free Transform"
Free Transform is a lot of fun. You can make the moodlet larger, smaller, or rotate it! If you hold down the "Alt" button while resizing, the moodlet will keep it original aspect ratio as well. Once you are happy with the size and rotation of the moodlet, click the arrow tool on the left to exit Free Transform mode.

This screenshot was taken at night and is very dark. There is a very easy and quick way to make it a little brighter. Click the layer with your screenshot. By doing this first, the following edits to brightness will not affect the Moodlet layer. From the screenshot layer, go to the bottom right and click the half and half circle button. From the drop down list, click "Levels"
Levels brings up a bar graph looking screen. On the left is darks, on the right is lights, in the middle is midtones. Pull the slider button just below the bar graph around until you find a happy level of darks and lights. In this case, I played more with the midtones. This is a quick and dirty adjustment method! there are so many other ways to do this! But, if I'm in a hurry, I go straight to levels to adjust my screenshots.

Finally, save your final product! In my case, I'm going to file and exporting it as a .jpg or a .png. If you save it as a .PSD, you can open it and work on it again in the future if that's something you want to do. When I export the save as a PNG or JPG - it automatically saved it to my downloads folder.

There you go! One quick Photopea to edit your sims screenshots tutorial!
Have fun.
#ts4#sims 4#ts4 screenshot editing#photopea#photopea screenshot editing#photpea screenshot editing tutorial
35 notes
·
View notes
Text
Subtitling Tutorial
This one goes out to you @weirdosalike 🙌🏾
As a disclaimer, my program of choice is Photopea, but this is so simplistic it definitely works for Adobe Photoshop as well. The first thing to do, of course, is find the cap you want to place subtitles on.
My caps are huge, so the size you want your subtitles to be is ultimately dependent on what you think corresponds with your image size the best. However, readability is everything. So, you want them large, but at the same time you don't want them to be overly big especially if you plan to have other characters speaking in the caption. (Enormous text is only what I do when I'm having characters really scream or be in an emotional state, it shows emphasis.)

Generally, my setting for text look like this. The bold thickens the text and the size works well for my images. Usually, I use white and golden colors for my speakers, but if it's a scene with numerous characters I splash color to indicate who is who.
Example:
On that note, I try my hardest to choose light colors for my speakers because it can ideally show against the background well opposed to if I used darker hues. Ultimately, I don't think I'm the best at color picking so discovering what works and what doesn't work is like trial and error but for the most part? I believe that light colors are the way to go.
But let's go back to our original cap.
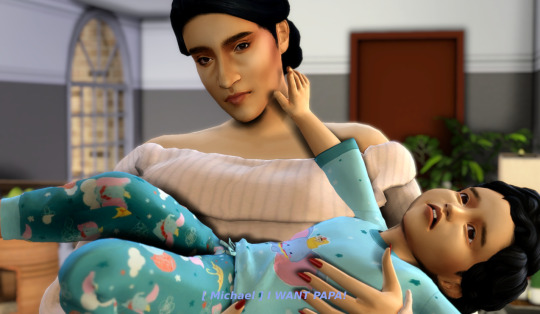
You can't read this at all! So what we're going to do is put an outline around it. By clicking the effects button you'll see this list of options
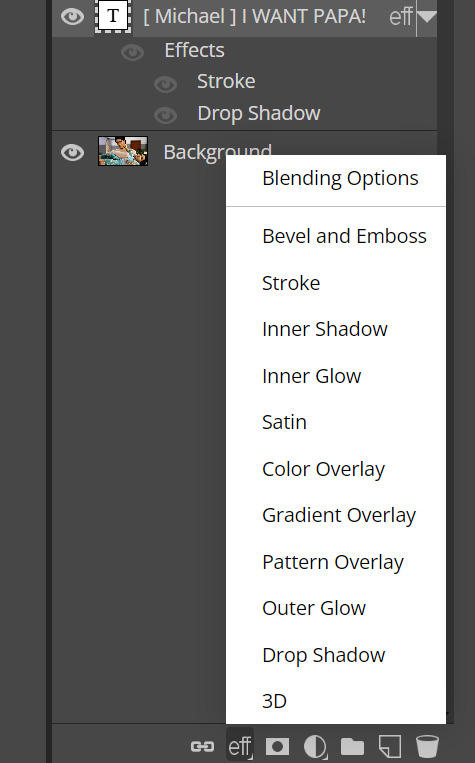
What you want to click is stroke, which will show you these settings.
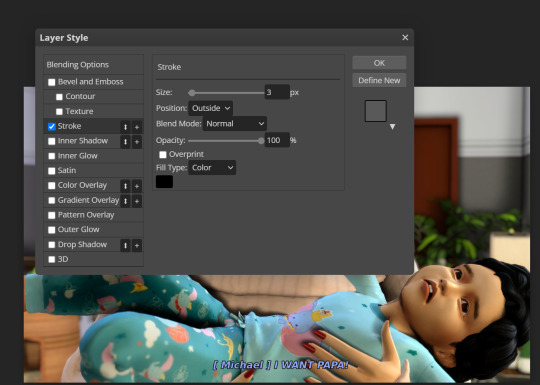
This is how the font now looks with an outline. But it's still not quite readable, so I add a drop shadow to create a contrast.
It stands out more prominently, although you may personally want the font to be a bit bigger. And after clicking okay, this is the outcome!
Sometimes I consider new forms of editing like having a faded black box behind the text, but I'm not fully committed to the concept. But this is the fun of editing; figuring out what works and what doesn't work! Hope this is helpful.
45 notes
·
View notes
Text
Speed edit #1
Make sure to follow my Pinterest and Instagram for more content
What app did I use?
App | Procreate
What cc did I use ?
Cc | @complex-sims @xxblacksims
Heyy y’all I’ve made this page just for reblogging only but here’s a quick edit I did in December 🥲
#the black simmer#thesimmerkmamas#simblr#the sims 4#my sims#ts4 gameplay#sims 4 urban cc#sims 4 fashion#ts4 edit#simblog#procreate#my edit#urban sims#kikovanitysimmer#sims 4 poses#ts4 poses#simstagram#sims 4 help#black sims#sims blender#sims 4 editing#sims 4 tutorial
74 notes
·
View notes
Text

The making of of the loading screen for the therapy game 🎮
Pics above and below edited by imagechef

Draft from photo studio
And the screenshot edited with incollage

#incollage#photo studio#imagechef#therapy game#underwater love#sims 4#simblr#ts4#sims 4 edits#windenburg#windslar#sims 4 tutorial
48 notes
·
View notes
Text

#ts4 render#sims 4 render#ts4 edit#my sims#simblr#sims community#back at it w the renders again#im also rly unsatified w my renders/edits these days😭#idk i wanna change the editing style im so bored of my current but idk whattt style i wanna do#and im struggling to even figure out what direction id like to take my blog in#i want a cohesive theme but i feel like i dont rly have one#its just so random lol#also pls ignore the terrible shadow issue around the lace#idk how to fix that#and i can't find any easy tutorials to follow😭#if anyone knows a fix tell me how. i'd love u forever lol
107 notes
·
View notes
Text

sneak peak at my video releasing Friday!
( ๑‾̀◡‾́)σ"
Since I've gotten a lot of setup questions I decided to make a video to direct anyone confused about where to start and or upgrade their specs for pc gaming :) I give a tour of my recording setup, provide a complete guide to buying laptops, diy desktops, or prebuilts for the sims 4 and more!
link to channel I specs masterlist

also 1k?!! I'm so happy that people enjoy my content so far. Your support means everything and gives me the motivation to keep going.
#simblr#the sims 4#the sims community#ts4#sims#the sims#ts4 screenshots#my sims#the sims 4 edit#the sims screenshots#gaming setup#pc games#gaming#the sims 4 tutorial#sims 4#ts4 simblr#ts4 build#the sims build#wip#the sims interior#the sims exterior#ts4 save file#ts4 gameplay#show us your sims#sims 4 edit#showusyoursims#ts4 edit#Youtube
14 notes
·
View notes
Note
hi! have you ever shared info about how you take and/or edit your Sim portraits, and if not, would you consider it? your edits have such a gorgeous and distinctive look. I would be really interested in learning about your process! thanks for your time!
aww oh my gosh thank you so much!! <33 i honestly don't even do all that much, i use my cinemascope reshade preset; sometimes i add a bit of bloom (mostly using prod80's bloom shader), but i don't do much apart from that. then i open the picture in photoshop and do a few things:
topaz clean; here are my settings
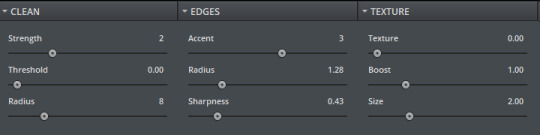
2. i resize the screenshot - this is solely for the purpose of not filling up my hard drive, because i take my screenshots at 4K using dsr. i don't always do this, as sometimes it's just not necessary, but for portraits it's okay, as you don't really lose all that much detail
3. smart sharpen; here are my settings
4. (optional) add noise! i do it only sometimes lol
that's really it! oh and if you're wondering about my cas lighting (which definitely helps a lot!), it's pennyroyal tea by @/rebouks
hope this helps! :3
22 notes
·
View notes
Text
Updated: How I edit my sims 4 screenshots (night-time edition)
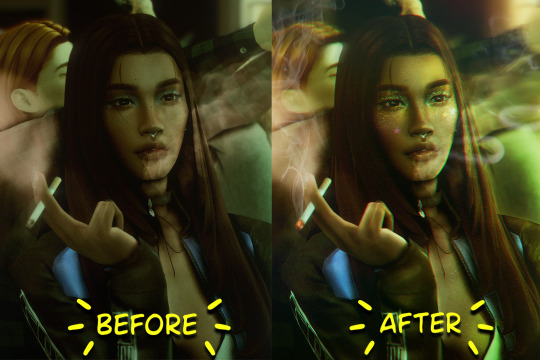
A more detailed editing tut so you can understand my process as it may help you, i edited this relatively quickly and usually spend about 1-2hrs editing something...so let's goo.....
Before taking screenshots:
Help yourself as much as you can in-game, I always make sure there is some sort of light source in my pictures or something interesting that I can add to enhance something already there
Understand good/bad composition and add variety by using different angles
I take LOTS of photos just to end up with 1 or 2 good ones

I'll just be using photoshop for this, but i also like to use the procreate app as i'm more confident w it.
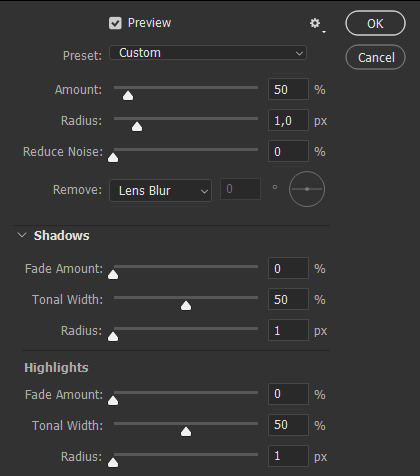
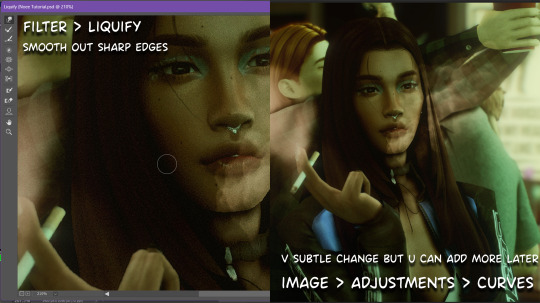
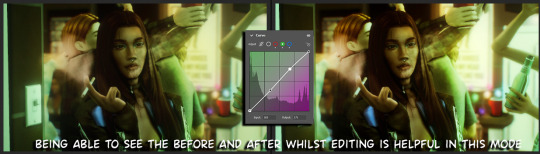
step1: I check if there are any major glitches or hard areas e.g, fingers elbows etc.. that have sharp points and pull them in liquify so they are smooth. Then use curves to change the contrast.
step2: *duplicates image* using the dodge and burn tools (keyboard shortcut: o ) i'll add emphasis to highlights and shadows (be careful with these as the dodge tool can ruin the image if used in excess) *merges image* (i duplicate and merge as i go, utilise using lots of layers so you can go back if you mess up/ want to change the opacity of an effect.)
step3: making light sources POP. *new layer* change blending mode to overlay or soft light and choose a colour you like.

step4: *new layer* draw hair strands. i just use a basic round brush in photoshop and change the hardness or i'll use a sharp caligraphy type brush depending on my sims hair type. (i try not to overdo it as i like maxis hair and don't want it to look too realistic)
step5: i would then add a new layer and set the blending mode to multiply to add more shadows, but i don't feel like i need to at this point.
step6: *duplicates image* go to filter > camera raw filter, i change the "light" and "curve" panels, i like green tints in my screenshots especially the night ones. (this is where all the magic happens really so just adjust all the channels to your liking, lightroom is also really good to use)
step7: *create new layer* blending mode: screen or linear dodge (add) / makeup and finishing touches! - for this look i'll get stars and glitter pngs off google or unsplash same for the smoke, though if i'm using procreate they have free brushes for that :')

step8: add light leaks as they add some fun dynamic lighting and textures to your screenshots. (i also flip my image horizantally [image > image rotation > flip canvas horizontally] whilst editing as it's like a "fresh pair of eyes" when you've been editing for a while so you can see what looks off)
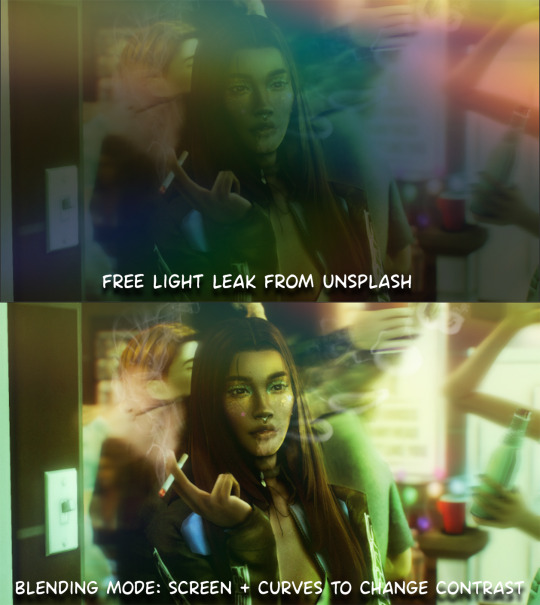
final step: merge all the layers (though i do merge along the way once i'm happy with something) go to filter > sharpen > smart sharpen. I leave it as the default setting.
extra step if u want: for party pics i might add chromic abberation here is a 60 second tutorial on youtube it makes the pic look cool and trippy.
And you're done!! congrats on surviving. if you have any questions please send them in my ask box so others can see and get help too.
257 notes
·
View notes
Note
How do you take such great screenshots in bg3?
aaaaawwwwwwww wow thank you so much! im flattered u wanted to ask me this 😁
sometimes i use the free camera mod, but honestly it's kinda much so i don't bother often. it does greatly improve the quality of my screenshots since there's built in hotsampling and you can get better angles and stuff, but most of the time the default camera is good enough for this purpose, especially for gif making purposes. i never use free camera while making gifs :'). if you have any questions/want to know where to download free cam, hmu!!
otherwise when im making gifs or taking screenshots w the default camera, i just use the f10 key to hide the ui (this is default w the game!!) and then i take my screenshots using f12, which is the default camera for steam. if you install a program like reshade, you can use that to take screenshots n customize where you want those screenshots to show up and what toggles to use etc
oh then i lightly edit the pics/gifs in photoshop. i add brightness and saturation, then run it thru topaz clean and smart sharpen then crop it and thats it. i hope this helped sorry its so long ily!!
#jade answers#anonymous#i promise one day i will make an updated editing tutorial#probably not for bg3 specifically since the process is so easy. but for ts4 yes i promise i will one day
9 notes
·
View notes
Note
I’m the simmer which EA account got banned.
Yes the only exception is that it’s because of the cc. Because all my sims have a lot of cc. I’m very sad I spent a lot of time creating them….
So, if I'm understanding correctly, you can still go into your game and play, but you just can't post sims on the gallery? Or are you completely locked out of your EA account and can't even play your game at all?
Read More ↓
I'm happy to help! Usually they send a warning before outright banning, did you receive any warnings to your EA account prior to being banned? You can login into your EA account online and look under "MY BAN HISTORY." This should tell you when you were banned and give you the option to dispute the ban. Here's a Reddit thread I found while looking into your problem that shows some screenshots that illustrate what I'm talking about.
That's why I personally don't upload anything that isn't "Vanilla" to the gallery if I can help it. There have been some issues in the past with inappropriate and outright racist content, and the gallery has undergone major changes in the last couple months in an attempt to avoid this. My guess is that whatever filter/algorithm they're using to find inappropriate content might have a harder time with sims that use a lot of custom content, and it might be more privy to flagging those, unfortunately. It sucks, but it's the sims team lol. They are bad at fixing problems, but very good at making them. The gallery has always had its issues and, especially if you're using cc, it can be very unreliable IMO. That's why if you're creating sims with the intent/hopes to share them, I really recommend making a Simblr and sharing your sims on here by uploading them to a free host like Google Drive, Mediafire, Patreon, OneDrive, etc. Like I said, I'm happy to create a tutorial for that if you're curious! I'm not tech savvy, but I upload sims on here all the time and haven't had any issues with my methods - it's not as complicated as you'd think once you get the hang of it, and you don't run into issues that come from the gallery.
and YES, absolutely just save your unfinished sims to your library. I have 5 copies of "Vatores - In Progress" in my library right now lmao because I know this game is always playing around in the worst way and I don't want to lose my sims or my progress. I only ever save sims and builds that use CC to my personal library, never on the gallery, and then I use Tray Importer to grab their tray files and cc to share them. It's actually easy-peasy!
You are not stupid! I totally get your thought process with the spawning. That is a pain and there's no perfect solution to that other than just deleting the unfinished townie if they happen to generate in your game.
SUPER IMPORTANT QUESTION: you still have your game installed and therefore have access to your Sims 4 folder, right? If so, you can back up your tray and saves that way you don't lose anything.
I'm using a Windows computer, so I'm sorry if you're using a MAC... I don't know much about their Operating System. For me I can do this by simply copying both folders and storing them in a folder on my desktop, but you can even use a separate flash drive if you prefer.
I go to Documents -> Electronic Arts -> The Sims 4. You use mods, so you're probably very familiar with this but here's a screenshot just in case:
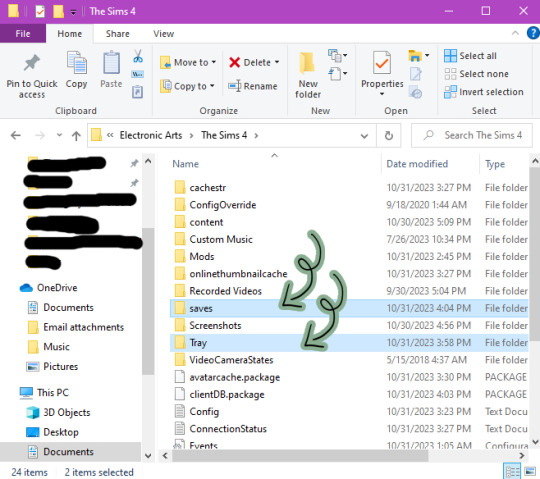
The two folders I have highlighted - saves and tray - you should keep backups of before you update your game, put new mods in your game, etc. because if something gets corrupted, you'll always be able to save the important stuff if you have to uninstall your game, move to a new PC, and etc.

That's what my folder looks like on my desktop - the last copy I made of my tray and saves was on October 17th.
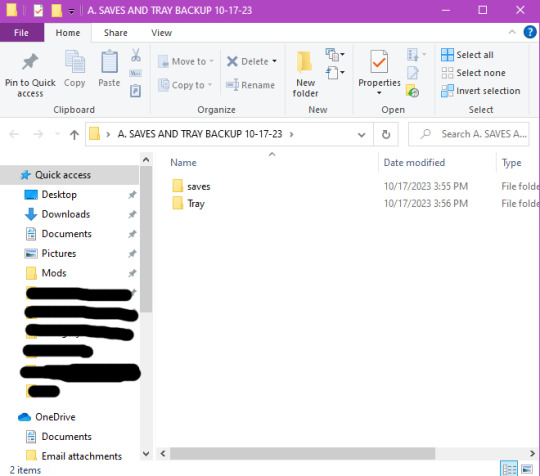
That's the inside of the folder.
Important note while we are here: you can also delete anything inside the cachestr folder (but not the folder itself), anything inside the onlinethumbnailcache folder (but not the folder itself), the avatarcache.package file, and the localthumbcache.package file. Especially do this after removing any mods or cc from your game!
If you can still go into your game and access your sims in the gallery at any capacity, you should go ahead and save your favorite sims to your library. You can do this by going into CAS, adding them to a new household, and saving them like I showed you in the last post. Save your game and then, if you haven't backed everything up before, I would recommend doing that.
If you can't access your gallery at all any more, with the exception of your library, but some of the sims/households you liked have spawned in your game, you can also add them to your library by editing their household from the neighborhood bin. Just open them in CAS and save them to your library the same way you would a totally new sim. This way, even if you may not be able to access everything you've uploaded to the gallery, you might still be able to salvage some sims this way.
Also, if you made a family in CAS and then moved them into a house right after, good news - a copy of them is already saved in your library! So there's definitely some hope?
Lastly, I believe this was also you:
I don't know what mod this could be, but I've seen people complaining about this issue in the past. I've never personally ran into this issue, but it's likely a script mod. Hard to say: I don't know what cc and mods you have in your game. You might just need to clean out your mods and CC folder until your find the culprit (50/50 method). If you don't have everything organized into subfolders, this would be the perfect opportunity to do that. I'll do some digging though, I'm sorry I can't be more helpeful with this.
Please don't feel stupid or feel bad for asking for help. I'm happy to help you as much as I can. That's what I'm here for! I had to learn a lot of this on my own, so if I can help someone else, that makes me happy! Hopefully there is something in here that works out for you. I'll be sending good luck your way!! 🖤
#simblr#ts4 tutorial#ts4#the sims 4#sims 4#the sims community#sims tutorial#editing#ts4 gallery#resources#atfs ask#anon
7 notes
·
View notes
Photo

How To Edit Uneditable Lots In Sims 4
Feeling stuck trying to revamp those special Sims 4 lots like Sylvan Glade or the Magic Realm? You're not alone! But guess what? Cheats are your new best friends for unlocking the editing magic you crave. Ready to transform your world? Tap into our guide to learn the secrets, and let's chat about it in the comments! Read More At MustHaveMods.com
#ts4#sims 4#the sims 4#sims#the sims#must have mods#best sims 4 mods#ts 4 mods#the sims 4 mods#ts4 mods#sims 4 cheats#sims 4 building#sims 4 guide#sims 4 customization#sims 4 tutorial#sims 4 gameplay#sims 4 Sylvan Glade#sims 4 Magic Realm#sims 4 Windenburg#sims 4 lot editing#sims 4 building cheats
0 notes
Text

Made a minor change to Matty (Eye color) But I decided to try something new in photoshop and I really like how it came out.
#sims 4#simblr#my sims#show your sims#ts4 simblr#sims 4 edit#Thank you for YouTube tutorials#I was fangirling sooo hard in cas when I was making them#They're soo cute#Matty
0 notes