#navigation drawer tutorial
Explore tagged Tumblr posts
Visit Tumblr Blog
Explore Tumblr blogs with no restrictions, modern design and the best experience.
Last Seen Tumblr Blogs


Fun Fact
Hackers stole 65M passwords from Tumblr in 2013.
Text
week 12
knowing there wasn't a lot of time left to finish my project, I really crunched with trying to get everything done. I watched a video on the early stages of development of little big planet and the demo submitted that sold investors on the project.
youtube
this video made me realise that the visuals do not matter as much as I felt they do. especially for a demo. concepts and mechanics are the main things being put forward in a proposal for a video game. this gave me more hope for my own work as I decided to switch over to working on the game mechanics and use store bought assets (much to my own detest).
as im learning unreal engine from scratch, YouTube tutorials really saved me during this project.
youtube
youtube
the two videos from above were what I used to start creating my demo. as I knew I didn't have time to create the villager assets with complex animations, I used "Fab"; unreal engines marketplace for in game assets. I spent £10 on a rabbit file with movement animations. following the tutorial was going extremely well until unreal engine started to crash on me when I pressed p after adding the navigation boundary mesh. I wasn't receiving any error codes so was very confused as to why I was experiencing issues. I opened the log files and pasted the ends of the contents into ChatGPT to troubleshoot. from what ChatGPT could piece together, there was an issue with the GPU of my computer. this is a bug found with Mac computers that was meant to be resolved however, no luck for mine. MacOS uses "metal" rather than "Vulkan" with rendering and for some reason, this is what is causing the software to crash. I tried everything to get around this, from updating my computer, using an older version of unreal engine, and even trying to disable some GPU features but still had no luck. this meant any time I asked unreal to do anything with the asset drawer, it would crash, preventing me from completing any of my work. I'm really devastated by this as I think it would be really fast to complete the tutorials if unreal was to work as intended. here is as far as I was able to get without unreal crashing:
1 note
·
View note
Text
Mastering React Native Navigation: Stack & Drawer Navigators
Okay, so I need to write a comprehensive, technical tutorial about React Native Navigation, specifically focusing on Stack and Drawer Navigators. The user provided a detailed structure, so I should follow that closely. Let me break down each section and figure out what I need to do step by step. Starting with the Introduction. I should briefly explain what the tutorial covers and why it’s…
0 notes
Text
Tiranga Apps Download Embrace Culture and Innovation with Easy Access
In today's digital landscape, mobile applications have become an integral part of our daily lives, offering everything from entertainment to productivity solutions. Among the emerging trends, Tiranga Apps have gained prominence by merging cultural themes with modern technology. If you're interested in exploring these innovative apps, understanding the process of downloading Tiranga Apps can help you access a unique blend of tradition and technology. This article delves into what Tiranga Apps are, their key features, and how to download them effectively.

What Are Tiranga Apps?
Tiranga Apps are mobile applications that integrate elements inspired by the Indian national flag, known as the Tiranga, into their design and functionality. The term "Tiranga," which translates to "tricolor," reflects the colors of the Indian flag—saffron, white, and green. These apps often incorporate cultural, historical, and artistic themes related to Indian heritage, offering users a rich and immersive experience that celebrates and connects with their cultural roots.
Key Features of Tiranga Apps
Cultural Integration: Tiranga Apps are designed to reflect Indian cultural values and heritage. This integration is evident in their visual design, which often features the colors and symbols associated with the Indian flag. The apps might also include content related to Indian festivals, history, and traditions.
Diverse Categories: Tiranga Apps span various categories, including educational, entertainment, productivity, and lifestyle. Whether you’re interested in learning about Indian history, exploring traditional music, or finding tools to enhance your daily life, there’s likely a Tiranga App tailored to your needs.
User-Friendly Design: Despite their cultural focus, Tiranga Apps prioritize ease of use. The interfaces are typically designed to be intuitive and accessible, ensuring that users from all backgrounds can navigate the apps with ease.
Interactive Features: Many Tiranga Apps include interactive elements such as quizzes, games, or virtual tours. These features not only entertain but also educate users about Indian culture and traditions in an engaging manner.
Community Engagement: Some Tiranga Apps offer social features that allow users to connect with others who share their interests. This might include forums, chat functions, or social media integration where users can discuss cultural topics and share experiences.
Regular Updates: To keep users engaged, Tiranga Apps often receive updates that include new content, features, and improvements. These updates ensure that the apps remain relevant and continue to offer fresh and engaging experiences.
How to Download Tiranga Apps
Choose Your Platform: Tiranga Apps are available on various platforms, including iOS and Android. Determine which platform you prefer and ensure that the app you want to download is compatible with your device.
Find a Trusted Source: To download a Tiranga App, visit a reputable app store or the app’s official website. For Android devices, this is typically the Google Play Store, while iOS users will use the Apple App Store. Avoid downloading apps from unverified sources to protect your device from potential security risks.
Search for the App: Use the search function in your chosen app store to find the Tiranga App you’re interested in. You can search by the app's name or related keywords.
Download the App: Once you locate the app, click on the download or install button. The app will be downloaded and automatically installed on your device. Make sure you have a stable internet connection to ensure a smooth download process.
Open and Set Up: After installation, open the Tiranga App from your device’s app drawer or home screen. Follow any initial setup instructions or tutorials to get acquainted with the app’s features and settings.
Customize Your Experience: Explore the app’s settings to customize your experience according to your preferences. This might include adjusting notification settings, language preferences, or personalizing content.
Benefits of Using Tiranga Apps
Cultural Connection: Tiranga Apps offer a unique way to connect with Indian culture and heritage, providing users with valuable insights and experiences related to their traditions.
Educational Value: Many Tiranga Apps have educational components that enhance users’ knowledge about Indian history, festivals, and arts. This educational value makes the apps both enjoyable and informative.
Entertainment and Engagement: The diverse range of Tiranga Apps ensures that there’s something for everyone, from interactive games and quizzes to educational resources and cultural content.
Community Building: Social features in Tiranga Apps foster a sense of community, allowing users to connect with others who share their interests and participate in cultural discussions.
User-Friendly Experience: The intuitive design and regular updates ensure that Tiranga Apps remain accessible and engaging, providing a satisfying user experience.
Conclusion
Tiranga Apps represent a vibrant intersection of culture and technology, offering users a unique way to explore and engage with Indian heritage. By following the steps outlined above, you can easily download and enjoy these innovative apps, benefiting from their rich cultural content and interactive features. Whether you’re interested in learning about Indian traditions, accessing educational resources, or simply enjoying culturally themed entertainment, Tiranga Apps provide a valuable and enriching digital experience.
0 notes
Text
Snaptube for pc
Title: SnapTube for PC:
A Comprehensive Guide
In an era dominated by online streaming platforms and social media, the need for versatile video downloading tools has become increasingly apparent. SnapTube emerges as a leading solution, offering users the ability to download videos from various sources with ease. While primarily known for its mobile version, SnapTube's compatibility with PC opens up a world of possibilities for users seeking flexibility and convenience in managing their media content. In this article, we delve into the realm of SnapTube for PC, exploring its features, benefits, and how to harness its full potential.
Understanding SnapTube: A Versatile Video Downloader
SnapTube is a feature-rich video downloader app that allows users to download videos from a wide range of platforms, including YouTube, Facebook, Instagram, and more. Its intuitive interface and robust functionality have made it a favorite among users seeking to download and manage their favorite videos offline.
Features of SnapTube for PC
1. Wide Compatibility:
SnapTube for PC is compatible with various Windows operating systems, making it accessible to a broad user base. Whether you're using Windows 7, 8, or 10, you can seamlessly integrate SnapTube into your PC environment.
2. High-Quality Downloads:
One of the standout features of SnapTube is its ability to download videos in high definition (HD) quality. Users can choose from various resolutions, ensuring optimal viewing quality based on their preferences and device specifications.
3. Batch Downloading:
SnapTube for PC allows users to download multiple videos simultaneously, saving time and effort. With just a few clicks, you can queue up your favorite videos for downloading and let SnapTube handle the rest.
4. Audio Extraction:
In addition to downloading videos, SnapTube also offers the ability to extract audio from videos. This feature is particularly useful for creating playlists or enjoying your favorite music offline.
5. Built-in Search Functionality:
SnapTube features a built-in search function that enables users to discover and download videos directly from within the app. Whether you're looking for the latest music videos, tutorials, or entertainment content, SnapTube makes it easy to find and download what you need.
How to Download and Install SnapTube for PC
Download an Android Emulator: Since SnapTube is primarily designed for Android devices, you'll need to download an Android emulator for your PC. Popular options include BlueStacks, NoxPlayer, and Andy.
Install the Emulator: Once you've downloaded the emulator, follow the on-screen instructions to install it on your PC.
Download SnapTube APK: Visit the official SnapTube website or trusted third-party sources to download the SnapTube APK file.
Install SnapTube: After downloading the SnapTube APK, open the emulator and navigate to the location where the APK file is saved. Double-click the file to initiate the installation process.
Launch SnapTube: Once installed, you can launch SnapTube from the emulator's app drawer and start downloading your favorite videos.
Conclusion
SnapTube for PC offers a convenient and efficient solution for downloading and managing videos from various online platforms. With its user-friendly interface, high-quality downloads, and versatile features, SnapTube empowers users to enjoy their favorite content offline, without limitations. By following the steps outlined in this guide, you can unlock the full potential of SnapTube on your PC and elevate your media consumption experience to new heights.
1 note
·
View note
Text
Navigation Patterns in React Native: A Comprehensive Guide
In the dynamic landscape of mobile app development, effective navigation is a cornerstone of user experience. This comprehensive guide explores various navigation patterns available in React Native, shedding light on their strengths, use cases, and considerations to empower developers in crafting seamless and user-friendly mobile applications.
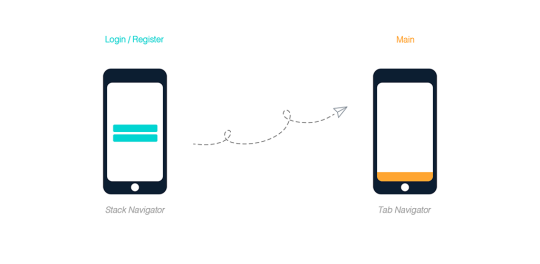
Stack Navigator

The Stack Navigator in React Native operates on a last-in, first-out (LIFO) basis, facilitating a straightforward push and pop navigation model. This pattern is ideal for linear user flows, such as signup processes or step-by-step tutorials. While inherently simple to implement, Stack Navigator excels in managing navigation history and facilitating smooth transitions between screens.
Tab Navigator

Contrasting with the linear flow of Stack Navigator, the Tab Navigator presents a tab-based navigation approach, commonly seen in bottom or top navigation bars. This pattern is effective for organizing content into distinct categories, offering users quick access to different sections of the app. React Navigation provides a robust Tab Navigator component, empowering developers to create intuitive and visually appealing navigation structures.
Drawer Navigator

The Drawer Navigator in React Native introduces a versatile side menu navigation paradigm. With its sliding drawer mechanism, this pattern is commonly used for housing less frequently accessed features or providing navigation options without cluttering the main screen. Developers appreciate the flexibility and user-friendly design possibilities offered by the Drawer Navigator, making it a valuable addition to the navigation toolkit.
Switch Navigator
Addressing authentication flows in React Native applications, the Switch Navigator allows developers to seamlessly transition between authenticated and unauthenticated states. By facilitating conditional navigation based on the user's authentication status, this pattern ensures a secure and streamlined user experience. Switch Navigator enhances code organization and readability, particularly in applications where distinct navigation paths are dictated by user authentication.
Navigation Libraries Comparison
When implementing navigation in React Native, developers often turn to third-party libraries to enhance functionality and streamline the development process. Two prominent contenders in this space are React Navigation and React Native Navigation. React Navigation, a JavaScript-based solution, boasts a rich set of features, ease of use, and widespread community support. On the other hand, React Native Navigation, implemented in native code, prioritizes performance and seamless integration with the underlying platform. This section delves into a comparative analysis of these libraries, considering factors such as features, performance, and community backing, to aid developers in selecting the most suitable navigation solution for their projects.
Best Practices for Navigation in React Native
Navigating through the intricacies of React Native requires adherence to best practices to ensure a smooth and efficient user experience. This section explores guidelines for designing intuitive navigation experiences, optimizing performance for complex navigation structures, and incorporating accessibility considerations. By delving into these best practices, developers can elevate the quality of their React Native applications, fostering user engagement and satisfaction. Whether working with built-in navigators or third-party libraries, understanding and implementing these best practices ensures a robust and user-friendly navigation system.
Integrating Navigation with State Management
In the React Native ecosystem, the symbiotic relationship between navigation and state management plays a pivotal role in crafting scalable and maintainable applications. This section explores the integration of navigation with state management solutions, such as Redux. By understanding how these components interact, developers can design applications where navigation seamlessly aligns with the broader app state. Insights into strategies for maintaining synchronization between navigation and state contribute to a cohesive and efficient development workflow, providing a foundation for building robust React Native applications.
Case Studies
Real-world applications serve as invaluable teachers in the realm of React Native navigation. This section presents case studies showcasing diverse navigation patterns implemented in actual projects. By examining these case studies, developers gain practical insights into addressing unique challenges, optimizing navigation for specific use cases, and learning from the experiences of others. Whether dealing with intricate user flows, complex hierarchies, or innovative navigation structures, the lessons derived from these case studies offer valuable perspectives for enhancing navigation in React Native applications.
Future Trends in React Native Navigation

As the React Native ecosystem evolves, so do the trends and innovations in navigation patterns. This section explores emerging navigation trends, anticipating future developments within the React Native framework. From advancements in gesture-based navigation to the integration of augmented reality interfaces, developers can gain foresight into what lies ahead. Staying abreast of these trends ensures that React Native applications remain at the forefront of user experience, leveraging cutting-edge navigation paradigms to meet evolving user expectations.
Conclusion
In summary, this comprehensive guide has navigated through the diverse landscape of React Native navigation patterns, shedding light on their strengths, use cases, and best practices. From the foundational Stack Navigator to the versatile Drawer Navigator and authentication-centric Switch Navigator, each pattern contributes to the overall user experience. The comparison of navigation libraries and exploration of integration with state management offer developers valuable insights, while real-world case studies provide practical lessons.
As developers embark on their journey to craft exceptional mobile experiences, understanding the nuances of navigation in React Native remains a cornerstone for success. Whether opting for React or React Native, mastering the art of navigation ensures developers can build innovative and responsive applications that cater to evolving user needs. Looking ahead, the guide anticipates future trends, empowering developers to stay at the forefront of the React or React Native ecosystem and continue delivering cutting-edge mobile solutions.
0 notes
Text
Making rain using the Niagra particle system
To make this I followed this tutorial:
youtube
If you want a more in depth guide I suggest you follow this.
To start I opened my content drawer, right clicked then navigated to Niagra System.

I then added the fountain emitter and clicked finish. Once in the particle editor I started half following the tutorial and half following whatever I thought would look better.

These settings control the emitter with things such as particle spawn rate (which I made quite high as my rain area was quite large) and the emitter state which controls things like whether the particles loop or not.

Next is the particle spawn settings which set the values for different attributes of the particle off its spawn, there are a lot of different settings you can put here; like if you want the particles to all be uniform, the shape of the area the particles spawn from, the velocity of the spawned particles, the colours and shape of the particles themselves etc.

Then we have the particle update settings where we add updates to the particles as they exist, like a constant gravity force and drag. I have added 2 new settings here called "Collision" and "Kill particles" this essentially checks if the particles collide with any pieces of solid collision and kills them if they do, this stops the rain from phasing through buildings and roofs.

Finally there's the Sprite render settings which control the material, position relative to the camera and alignment etc. I didn't really use these settings.

The final product gives me some pretty convincing rain! (difficult to convey in an image.)
0 notes
Text
Creating User-Friendly iOS and Android Designs: Navigating Away from Common Mistakes

Designing user-friendly mobile apps for iOS and Android platforms is crucial to ensure a positive user experience and app success. In this blog, we will explore the common mistakes that developers often make while designing for these platforms and provide practical tips to avoid them. By following these best practices, you can create intuitive and engaging mobile applications that users will love.
Emphasize Intuitive Navigation
Mistake: Complex navigation structures can confuse users and make it difficult for them to find what they're looking for, leading to frustration and app abandonment.
Solution: Implement a simple and intuitive navigation system that follows platform guidelines. Utilize standard UI components like tab bars, navigation drawers, and bottom navigation to provide familiar user experiences. Keep the most important functions within easy reach and ensure a consistent flow throughout the app.
Responsive Design for Different Screen Sizes
Mistake: Neglecting responsive design can result in a poor user experience on various screen sizes, causing layout issues and content overlap.
Solution: Adopt a responsive design approach to adapt your app's layout dynamically based on the device's screen size. Utilize layout constraints and flexible designs to ensure elements adjust proportionally on both smaller phones and larger tablets.
Optimize App Performance
Mistake: Overloading the app with unnecessary animations, heavy graphics, and background processes can slow down the app's performance, leading to user frustration and increased battery consumption.
Solution: Optimize your app by reducing resource-intensive elements, compressing images, and minimizing the use of animations where possible. Leverage lazy loading to load data and media only when needed, improving app responsiveness and conserving battery life.
Prioritize Accessibility
Mistake: Ignoring accessibility features can exclude users with disabilities, making your app less inclusive and reducing its potential user base.
Solution: Adhere to accessibility guidelines and make your app accessible to everyone. Provide alternative text for images, ensure proper color contrast, use semantic HTML elements, and enable voiceover/screen reader support. Testing your app with assistive technologies is crucial to ensure a seamless experience for all users.
Consistent and Clear Typography
Mistake: Using inconsistent or illegible fonts can make the app visually unappealing and difficult to read.
Solution: Choose a clean and legible font for your app and maintain consistency throughout. Avoid using too many different font styles and sizes, as it can create a cluttered look. Adjust font sizes based on the device's screen size and resolution to ensure readability. Also Read: Top Flutter App Development Companies in 2023
Streamlined Onboarding Experience
Mistake: A lengthy or confusing onboarding process can deter users from using the app further.
Solution: Keep the onboarding process simple and concise, focusing on the essential features and benefits of your app. Offer optional tutorials or tooltips to guide users through key functionalities. Consider implementing a skip option for users who are already familiar with the app.
Thorough Testing and Bug Fixing
Mistake: Launching an app without adequate testing can result in a poor user experience due to bugs and glitches.
Solution: Conduct rigorous testing on various devices, screen sizes, and OS versions to identify and fix any issues. Regularly update your app with bug fixes and improvements to maintain a seamless user experience.
Responsive Touch and Gestures
Mistake: Unresponsive touch interactions and conflicting gestures can lead to user frustration and difficulty navigating the app.
Solution: Implement smooth and responsive touch interactions that match the platform's guidelines. Ensure that gesture controls are intuitive and don't conflict with native OS gestures, such as swiping or pinching.
Conclusion
Designing user-friendly iOS and Android apps is a continuous process that requires attention to detail and adherence to best practices. By avoiding common mistakes and implementing intuitive navigation, responsive design, and accessibility features, you can create mobile apps that users will love. Prioritizing performance optimization, clear typography, streamlined onboarding, and thorough testing will further enhance the user experience and contribute to the success of your app in the competitive app market.
About Getwidget
To hire Android app developers is a critical step towards creating a successful mobile app. With an ever-growing pool of candidates and varying skill levels, finding the perfect fit can be challenging. However, GetWidget is here to simplify the hiring process and help you discover the ideal Android app developer for your project.
GetWidget is a leading online platform that connects employers with skilled Android app developers. It serves as a one-stop destination for businesses and startups looking to hire professionals with expertise in building Android applications. By leveraging GetWidget, employers can easily browse through a vast pool of developers, review their portfolios, and assess their skills to make informed hiring decisions.
#Flutter App Development#Flutter App Development Company#Flutter App Developer#Hire Flutter Developer
0 notes
Link
more @ -> https://bit.ly/2SmKtdK
*****For more tutorials visit***** http://androidcoding.in/
***** Free java course link ***** http://www.androidcoding.in/tutorials-java/
***** Get updates on Facebook ***** https://www.facebook.com/androidcoding.in/
***** Get updates on Medium ***** https://medium.com/androidcoding-in
***** Subscribe us for more interesting tutorials ***** https://www.youtube.com/channel/UCWCLzrDi9TVkAsE-l4ZAHVQ?sub_confirmation=1
***** Follow us on instagram ***** https://www.instagram.com/accounts/login/?next=%2Fandroidcoding.in%2F&source=follow
0 notes
Text
Create a Custom Navigation Drawer in React Native
1. Introduction Creating a Custom Navigation Drawer with React Native is a crucial skill for any mobile app developer. A navigation drawer provides a convenient and intuitive way for users to access frequently used features, settings, or accounts. In this tutorial, we will guide you through the process of creating a custom navigation drawer from scratch, covering both basic and advanced…
0 notes
Text
Code to Create Navigation Drawer in Android App
Create Navigation Drawer in Android App
Create Navigation Drawer in Android App Being an app developer, one should know how to create a navigation drawer, of course, you will have the code for navigation drawer from many sources code sites. Seizing instant code and implementing it as it is in your app is not a big deal, what if you want something other than the size code? you need to make changes to the enfolded code. Without proper…

View On WordPress
#android#android app drawer#android drawer#android drawer menu#android gps#app drawer android#apps drawer#drawer android#drawer android tutorial#drawer app#How to create navigation drawer in android#nav android#navigation drawer android tutorial#navigation menu android#sliding draw#sliding drawer#sliding drawer in android tutorial#what is navigation drawer
0 notes
Photo
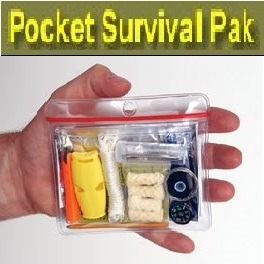

Build Your Perfect Pocket-Sized Survival Kit With the 11 Cs:
We can never be too prepared when it comes to safety, but that doesn't mean our Emergency Kit should weigh us down. Pre-packaged "Pocket Emergency Kits" are, obviously, available online but there are tutorials to make the perfect DIY pocket-sized kit to keep with you at all times. Keep one in the glove box, purse or backpack, on the belt, in the tackle box or in the kitchen drawer; anything you always have with you and anywhere you spend your time. It should contain all the supplies (11 Cs) needed in case of emergency to always stay prepared. Related Resources: Tutorial - DIY Pocket Survival Kit My Favorite Everyday Carry (EDC) Items Making an EDC Emergency Kit with an Altoids Box: As of this writing the breath mints, Altoids, is still around using its distinctive metal tins which have been converted, for years, into mini Emergency Kits that are very convenient for EDC. Bless those who have also designed survival gadgets, in miniature form, that can be crammed into these Altoid Tins. This pocket-sized kit may be small, but don’t let its size fool you. It contains all the supplies needed in case of emergency to stay prepared at all times. The typical Altoid External Size Tin Can with Hinged Lid is 3.5" (L) x 2.25" (W) x 0.75" (D), so any contents should be slightly smaller, cut or folded to fit. Here is a list of things that can fit to achieve a Mini Emergency Kit:
1x Altoids Tin (Container)
1x Mini Fixed Blade Knife with sheath (Cutting Tool/Defense)
1x Nano flashlight (Night Lighting - consider substituting for another useful item if you have a smartphone flashlight app)
1x Mini Survival Whistle (Emergency Communication)
8x Water purification tablets
1x Mini Compass (Navigation)
1x Compact Survival Mirror (Emergency Communication/Fire-Starting)
1x Coffee filter (Water Filter)
4x Waterproof matches
1x Mini Bic lighter
4x Strips Duct Tape [1" wide] (Patching/Bandages)
1x Razor blade
2x Cotton balls (Bandages/Fire-starting)
1x Lint ball (Fire-starting)
1x Dollar bill (Cash on hand)
1x Striker for matches (fire/signaling)
2x Needles (Sewing/Suturing)
2x Pins (Patching/Fishing)
1x Spool of dental floss (Cordage/Sewing/Suturing/Fishing/Snares)
2x Fishing hooks
2x Fishing sinkers
1x Crazy Glue (Adhesive/Suturing)
2x Bandaids
1x Ziplock Plastic Bag or Condom (Water Container)
2x Alcohol prep pads (First Aid/Sanitizing/Fire-Starting)
1x One foot of tin foil (Heating/Signaling/Shaped into a cup for boiling/drinking)
1x Tweezers
Naturally, items may be substituted for personal preferences. These Altoids Survival Kits Photos may help. Keep in mind that every Emergency Kit should include the minimum 11 Cs. Other Items to Consider:
Paracord
Mylar Emergency Blanket
Credit-Card or Mini Multi-Tool (see below) or Swiss Army Knife
Pain Relieving or other Over-the-counter Medicinal Tablets/Ointments
Carabiner
Writing Untensil (charcoal, pencil, etc.) & Paper
Mini Sewing Kit
Pocket Survival Guide
[Author's Reference Link]
[11-Cs Basic Emergency Kit] [14-Point Emergency Preps Checklist] [Immediate Steps to Take When Disaster Strikes] [Learn to be More Self-Sufficient] [The Ultimate Preparation] [P4T Main Menu]
NOTICE: Contents of this blog have been gathered from sources believed to be reliable but should not be considered authoritative. You are solely responsible for your own actions on how you use this information. Do your own research on topic(s) included. This blog is partially funded by Affiliate Program Links, included on this page, and Private Donations. Thank you for your support.
#mini survival kit#pocket survival kit#11-cs#11 cs#prepare4tomorrow#prepper#survival#diy#shtf#altoids box emergency kit#mini emergency kit#edc#everyday carry#prepared#preppers#prepping#survivor#survivalist#survivalism
5 notes
·
View notes
Text
nostalgia {Ben Hardy/Reader/Joe Mazzello}
Anon asked: i would love to see a little story or like some headcanons about a lazy day with joe/ben/reader. i feel like that would be really cute.
A/N: 1141 words. Just a fluffy little thing, I hope you like it! I’ve missed them v much.
They love you, and that’s what matters.
The days are long when they aren’t around, long and lonely and sometimes cold; it could be the middle of Summer, but there’s a chill in the air when they aren’t there.
Of course they’re busy, they’re talented and successful, and you’d never begrudge them that, but you... you just like having them around, and that’s not a crime. Sometimes you’re the busy one, and you quietly ache to be in the comfort of their embrace. But such is life, we all do things we don’t want to do, we all learn to go without the ones we love when we must.
Being spread to the far corners of the globe doesn’t feel fair, though. You’re at home, because you work from home, you can film your videos anywhere, but Ben’s on a cathedral roof in Italy judging by his most recent selfie, and Joe’s filming somewhere in the middle of America. There’s calls and video chats but it’s never the same.
Ben invests in some of those bracelets that let each of you feel when one is thinking about the others, a familiar pressure; I’m right here, no matter how far away. It helps.
Or one’s away, and you’re curled up with Ben in your living room and you don’t remember who suggested watching Jurassic Park, but now you just miss Joe more, and it’s four in the morning where he is, but he answers your video call, and sleepily chuckles when you explain what you’re watching. He asks to watch the last half hour, and so you obligingly turn the camera around so he can see the TV, and the phone is tucked neatly between where you’re tangled up with Ben, and something about the way seeing him fall asleep before he gets the chance to hang up is so damn endearing. He wants so badly to be with you both. You know he’s missing you just as much as you’re both missing him.
There’s endless selfies, and recordings that you send each other - Ben air drums when any Queen song comes on the radio, you do funny voices when washing up, making up a whole storyline for the cutlery, something about the mafia and needing to waterboard them for information - it’s kinda dark, but also funny, and it makes both Ben and Joe smile. Joe sends you guys a video of himself talking to a home made sock puppet, asking it if he should come home early, because he misses you both. The sock puppet reminds him that he’s under contract, and that it’s only for a few more weeks. The video still makes you cry.
When it’s you and Joe, there’s videos sent of the pair of you scouring the internet for Ben’s episodes of East Enders, and arguing about if the shady streaming site will give your laptop a virus. You kiss Joe to shut him up. Ben’s answering photo is of himself, on set, half blushing and covering his smile with his hand, captioned that there’s a USB in his desk drawer with a few episodes on it. He seems embarrassed but endeared. He also gets photos of you pouting with Cardboard Ben, ‘it’s just not the same’ you message, and he sends back ‘good, i don’t want him stealing you guys from me’.
“Is it hard always being away from your... your partners?” The interviewers always flounder when they talk to any of you about your relationship, but you’ve all learned to navigate it. Joe flushes and ducks his gaze, smiling a little.
“It’s always hard, but we’re all in the same industry so we all kind of understand; we’ve got this thing we do, we watch old stuff that the others have been in, when we’re away, like the other day, Y/N and Ben sent me a video of them watching Undrafted, it was really sweet actually,” he admits, and the interviewer coos at that, asking him what he’d watched recently, “well,” Joe starts with an embarrassed little smile, “don’t tell her I do this, but I go back and I watch The Boyfriend Tag video on Y/N’s youtube channel that we did; I dunno, it just makes me all warm and fuzzy,” he flusters a little.
You have that interview downloaded and saved onto your phone.
It’s hard being away from each other, but it makes it all the sweeter being back together.
Ben and Joe surprise you at the airport after you get back from London Fashion Week, holding a sign with your name in big, block letters, and yeah it kind of attracts a crowd, but it’s the thought that counts. They’re peppering you with questions, asking you what your favourite outfit was, what your favourite moment was, if you stayed at a nice hotel.
“Can’t be better than our place,” Joe snorted, and he’s got his arm around your shoulders in the back of the Uber, and you smile, lean into him, press your nose to his cheek.
“Never.”
“Oi, don’t knock London, man,” Ben makes a point of seeming annoyed, but Joe rolls his eyes with a smile.
“Babe,” he tells Ben, “no hotel will ever compare to your flat either, okay? I’m saying that anywhere’s better when we’re together.” And Ben wears a little pleased grin, and presses a kiss to Joe’s knuckles, sitting on your other side.
And it’s warm, even though the air outside is cold, between them you are warm. Of course you are, wherever they are, you find comfort.
Together, you watch everything and nothing, and you read scripts to help each other learn lines, and record auditions, and they record videos with you, and this is the best feeling in the world. Laughter, bright and loud and warm, fills the halls of your home.
Ben joins in when you interrogate the dishes now, drying them, pretending to threaten their family, just because it makes Joe cackle with laughter.
Joe finally watched Jurassic Park with you both, providing dry commentary about the behind the scenes during the entire time, which has you and Ben in stitches half the time.
And you come home from a walk, only to find Ben and Joe trying to copy one of your makeup tutorials from when you’d first started YouTube. The sight warms your heart and almost moves you to tears, right before you hear your own voice from your youth, and you almost screech trying to shut the laptop, while the boys shout that they’re halfway through.
“You’re killing me,” you give a fondly exasperated smile, only wincing a little at the jarring jump cut in the video, and they both beam in response.
“But you love us,” Ben practically sings, and you roll your eyes, even though you can’t help but grin.
Yeah, you really do.
#ben hardy#joe mazzello#ben hardy imagine#joe mazzello imagine#joe mazzello x reader#ben hardy x reader#ben hardy x joe mazzello#ben hardy x joe mazzello x reader#ben x reader x joe#brj#the angry lizard writes#bohemian rhapsody#bohemian rhapsody cast
66 notes
·
View notes
Photo

Custom Drawer Navigator in React Navigation v5 Tutorial ☞ https://bit.ly/37AbXVm #reactjs #javascript
1 note
·
View note
Text
Update Announcement Bar in Shopify :)
Hi welcome to update announcement bar tutorial where we will have a look at the advanced implementation so that the value for someone to qualify for free shipping it's updated whenever someone adds an item to the card without the page having to refresh and the same thing should work on the cart page.
If someone adjusts the quantity you can see the message gets updated and it should be fun to implement this so let's go alright so starting this post I assume that you have already seen part 1 of this tutorial and just to quickly recap that by now you should have this modified announcement bar and you can display the amount that someone needs to add in order to unlock free shipping.
When you add an item to the cart this value won't get updated automatically and you need to refresh the page so that it gets updated and if you haven't seen part one yet I highly recommend you go back and watch that first so you can get a really good understanding of what is going on but otherwise if you're using the theme you could also go ahead and copy and paste the content of our modified header that liquid fire.
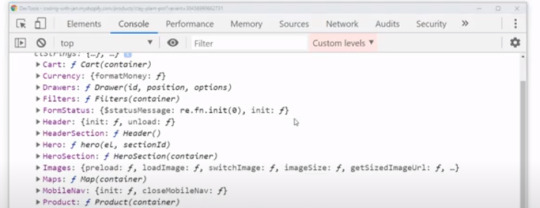
Okay so that being said I can already tell you that in this post we are going to write some JavaScript code to implement our update functionality and therefore I want to give you a quick overview on how the JavaScript is structured within the W theme and you will find the same pattern and many other themes as well and I can simply right click with my Chrome browser and then go to inspect and switch to the console and in here we can test and debug JavaScript code but what I want to show you right now is that our theme fires attached an object that is called theme to the window and in that theme object we will find all the theme elements that have to be managed in some way by JavaScript and just to name a few examples here we have the mobile navigation or maybe the search drawer or some post if we have posts on our page and all these elements contain methods that help to control them.
So for example we could use the MDOT search drawer and in here we will find a method that is called open and this would simply bring up the search bar and in the same way we have a method that is called closed and this would dismiss the search bar and in the same way we are going to create a helper function to update our shipping bar and then we will simply call that every time an input changes.

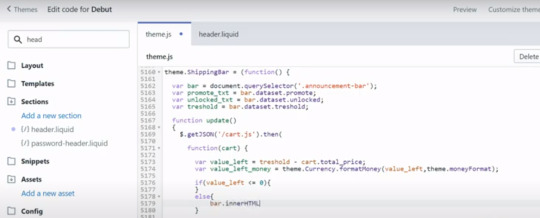
Okay so now we can have a look into the actual theme code and in your theme files you will find a folder called assets and this should contain the theme j/s which should contain most of the JavaScript for your theme and you can already see the window dot theme object which I just showed you on the front-end and here it is set to a blank object and then over time you will see that all the other elements are added to this object.
So we have the theme of currency the draw the header the mobile navigation the video and so on and so forth and within these elements we have all the helper functions that we can use to control the elements but for example here we have a method called pause video and here we have one that is called load videos and now we are going to scroll to the bottom and down there we will implement our own shipping bar element with all the necessary update functions.
So let me zoom in that it's easier for you to read and down here we drop to a new line and first of all we create our new shipping bar element so let's type theme dot shipping bar and then we set it to an empty JavaScript object and now we will drop in between these curly brackets and down here I can define the so-called object properties and all the properties will be public on the front end so maybe we could simply type test and then some text hello world and maybe another property or test - which will be some random number maybe one two three four five but we can also add functions to these properties.
So we will have an update function and then we would simply type function a pair of parenthesis and a pair of curly brackets and in here we can define what happens when someone executes the function let's do user lock and for now we would simply type updated shipping bar and for now safe this and after a quick refresh on the front end.
We should now have access to our new themed shipping bar object and you can already see that we have our defined values so ended shipping bar the test equals had a word and test two as one two three four five and we can even call our update method therefore we just use parentheses and you can see now it says updated shipping bar and this is exactly where we will implement our real update functionality later but for now I just want to tell you that I have a small problem with these two values being public because later we will have some variables and I don't want them to be public but with the syntax that I used we don't have a way to create private or hidden properties.

So we will fix that and then we will go ahead and implement the update method so back in the theme file we will now define this object in a slightly different way so let's type a theme but shipping bar and now we won't set it to an object immediately or instead to a function this function should be executed immediately so we type parentheses at the end and in between the curly brackets we can define that function and in here we can now define all the variables that we need and our update method and then all the variables will be private and we will only return or make the update method public and now I feel like this may sound a little bit confusing especially if you're new to JavaScript.
So let's define some variables and then I will show you this in action so we will have one variable for the shipping bar HTML and then we will have one let's say for the promote message we can do promote ext and then we will have another one for the message that shows up when you unlock free shipping so unlocked txt and down below we can then define our update function.
Let's do function that is called update we can also define that function right here but for now we will simply type console dot lock updated shipping bomb and now we can go ahead and delete all the above declaration and in this function we will simply return our new update function to the public let's type update we'll link to the update function and then save this so as we check the front-end one more time.
We should now see that within the theme that shipping bar element we only have access to the update method and all the other variables are no longer public and so this syntax helps to keep things structured and it's also used throughout the theme so I thought it would be a good idea to share this alright.
So in order to build out our update function we now need to assign some values to our variables and the shipping bar itself is relatively easy to get so we can simply use document query selector and then selected by its CSS class so I think it was announcement far nons min - bah but in order to get the other two values so the promote message and the unlock message and the threshold as well we will need that too.
Now we will use a small trick to get these because we can't simply access the customizer settings from the JavaScript file so therefore we will go back to the header dot liquid where we implemented our free shipping bar and then we will simply add these values to the data set of the announcement bar so we will define three data attributes the first one will be data #NAME? then we will have data there's unlocked and we will have data - threshold and now we can simply copy these variables that we defined above and place them into the data attributes are we wanted me to add curly brackets so the liquid gets rendered and unlocked txt threshold and in the JavaScript we can now get these data attributes and assign them to our variable so back in the JavaScript fire.

We can now take the announcement bar and get all the values we need from its data set so bar dot data set but promote and bar dot dataset dot unlocked and bar but dataset best hug we can save this and now the time has come that we can implement our update function and therefore we will use an ajax request so a request in the background if you want to say and therefore we type dollar sign get json and then the request domain which will be slash cart js.
So we want to request the cart and once we get that data so then we want to perform a certain action with their data so we can simply type the function and then cart and then curly brackets and in here we will define what happens with the card data but now let me show you really quick what we get when we call this request domain and therefore I will copy this to my clipboard and then I can use my Shopify domain and append slash card j/s and you can see that I get the card data in the JSON format and the JSON format is a way to display structured data we can see it here in a more structured way and you can see that I get information on the card like the item count the items in the card the subtotal total price and this is the key attribute.
I'm interested in to compare if the threshold has been reached or not yet and now back in the update function I can simply calculate the value that is left by subtracting the card dot total price from the threshold - card dot total price and in the same way as we did it in the header fire we now need to apply a money filter to this value left because right now it's incense and doesn't match the theme mana formatting.
So let's do VAR value left money and then we can use a function that lies within theme dot currency dot format money and this function will take the value and sense and the theme dot money format and then we can save it and now the last thing we have to do in order to finish our update method is simply check if the value that is left is less or equal to zero then we want to display the unlock message and otherwise so if it is still above the zero then we want to display the promote message and therefore we will simply access the announcement bar.
So we will type bar in our HTML in both cases and now we can simply copy the message from the head of fire so let's do this right away and right here we have the announcement bar message so we can simply copy it stood right here now we have to use single quotes we will get a conflict with these double quotes and we also remove the curly brackets from the liquid rendering because now we can use the JavaScript variable that we defined above and then we will use plus here we use single quotes again success message and down below we can copy the same statement or the same markup and now we will replace the unlock message with the promote message but if you remember.
We still have this dynamic placeholder from the customizer settings where we output the value that is left and we will replace that as well so let's type dot replace and then value oh it's in brackets where you and we will replace it with the value left money and then we can save it and I hope you can already see that this is very similar to what we have done in the first tutorial so in the head of fire we did basically the same we took some of the messages from the customizer and when we update or put out the announcement by message we simply check if the value that is left is less or equal to zero and then we set the announcement message to either the success message or to the promote message all right.
So now we should give our new implemented method a test on the front end and therefore I went to the cart page and now I will adjust the quantity and when I call our new method so theme the shipping part our update we should see this value jump to 10 euro and it does so this is great and now I would qualify for free shipping and I will call the same method again and then we should see the unlock message and we do so this works great and we didn't make any mistakes otherwise we would see them right here and we could fix them in the theme file but now that this is working.

We simply have to call this method whenever the card input or the card quality changes and I think right now you already have enough input so the last thing is very simple to do and then we can finish the project all right so back at the theme files we now have to find all the places where let's say in items edit with the card or the input quantity is changed or an item is removed entirely and in the W theme you can search for exactly these keywords.
So let's search for update item and right here you will find a function that is called whenever the input quantity changes and you can see that they also do an AJAX request to perform this on the background and once this is done they also do some other stuff and right before they end here we can call our new theme shipping bar update method let's copy it right here and this is the first place we will add this and then we will go ahead and search for at item 2 card or add item and you will see the second function that gets called whenever an item is added to the card and even here they do an ajax request to perform this on the background and again once this is done the executors function and right before they end this function.
We can again insert our new m dot shipping bar update method and save it again and the last place we recall our new function is when an item is removed so on remove and let's see here we have the function for it and there's the Ajax request to perform it on the background and once this is done they execute all this and at the end we will call our new shipping bar update method let's copy it here as well: and save and I think now we have all the important places.
So let's check this on the on the front-end so back at the front-end I can now try to add an item to the cart and you would see that this gets updated immediately and even on the cart page if I adjust the quantity let's say to six and is updates to the unlock message perfect and even if I remove the item entirely this jumps back to 50 so everything's working perfect.
Okay so before we finish the post I want to add one more little thing so that this gets a little bit safer to use because right now we don't have any validation if the shipping bar is enabled and if it isn't enabled this might throw an arrow and break a lot of theme code so what I simply want to do is after we get the shipping bar or after we try to get the shipping bar I want to test if the shipping bar has any useful value.

So we can simply type if bar and then wrap this into curly brackets and the same thing will be done in the update method so if we have a shipping bar then we want to do everything that we just implemented and otherwise we will simply do nothing so we'll save this and this is the minimum validation that we can make and then we can finally finish the post and this was a lot to explain and probably a lot of input for you as well so if you have questions you can always leave them down in the comment section and as always I hope you found some value in this post and then I hope to see you on the next post bye.
1 note
·
View note