#object tutorials
Explore tagged Tumblr posts
Visit Tumblr Blog
Explore Tumblr blogs with no restrictions, modern design and the best experience.
Last Seen Tumblr Blogs


Fun Fact
Mobile Tumblr US users spend an average of 4.04 minutes per session on the app.
Text
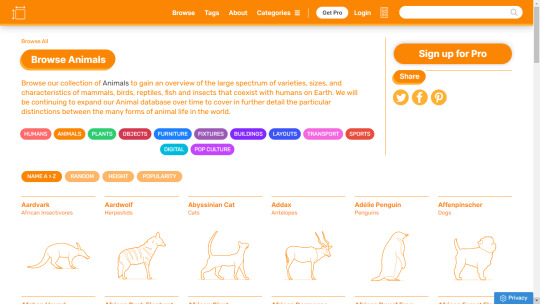
I've found this nifty reference website for artists called www.dimensions.com that has a database of exact measurements for various objects, plants, and animals
They have a premium version with 3D models that I haven't tried yet, but it's definitely very informative if you're trying to get the anatomy and proportions for different species of animals right!
5K notes
·
View notes
Note
how do you turn your black line art into coloured line art? trying to get a feel for it but i'm struggling in determining what's the most effective method
i USED to do it by hand but then i discovered this lovely little thang, an auto-action for clip studio paint that just. does it for me. i've been really enjoying the black outer-lines and colored inner-lines lately, so how i've been doing it is like this: 1.) use the auto action on my flat colors layer to create a dark + saturated clipping layer 2.) move the newly created colored clipping layer above my lines....coloring them. i usually spend time tweaking these colors w/ hue + saturation adjustments and manual touchups, but for the sake of a visual tutorial in gif form i didn't here outside of re-adding the white to the eyeshines.

3.) select the line layer and expand the selection by two or three pixels. 4.) reselect the colored lines clipping layer. 5.) use ctrl+x to cut the now selected out edges of the colored lines, showing the black lines underneath

and then from there i'll sometimes add more outlines/drop shadows/ect or change the black to just a very dark saturated color, based on the Vibe. i hiiiiighly recommend clip studio paint + it's awesome auto actions forever because of how much time it saves (also also how fun they are to use)
#tutorial#ask#i hope dis helps i may have overexplained#its rlly just#for me at least#use auto action and tweak it from there#if u do it Manual Style i recommend just coloring the whole layer in a darker and more saturated version of whatever color is most#prominent on the character/object/whatever and hue sliding it from there.#sometimes i go with bright and saturated lines. sometimes i do rlly dark lines. smtmes every part of the piece gets diff lines based on the#color around it#experiment and have fun w it
167 notes
·
View notes
Text
i dont think theyd get along very well .


#this is pretty oldish#but ummmm object invasion releases tomorrow !#village of objects#brawling on planetary scales#inanimate insanity#oj ii#ii oj#orange juice ii#i drew these from memory so ignore the inaccuracies#object invasion#voo phone#ii mephone 4#mephone 4#how to tag posts tutorial no glue#cell art
215 notes
·
View notes
Note
hi goat! do you have any tips/ideas on making 4t2 items look less plasticky? would new textures work or is it maybe something with the shading? or maybe it's the rounded edges on everything....
hi anon! I know you sent this a while ago. Thanks for waiting. I do indeed sometimes retexture TS4 converted objects.
I am no expert! But! Here's what I usually do:

For this tutorial, I will be using @janika31's 4t2 conversion of the Siten-Ze Reclaimed Wood Sofa.
It has the rounded edges you speak of (typical of TS4 objects) and a texture that could be considered 'plasticky' too.

What you will need to do first is open SimPE. We need to be able to look at this mesh nice and close!
When the mesh is opened in SimPE, go to the 1. Geometric Data Container and click on it 2. find the main object in the Models list (sofa) and make sure it's checked 3. Export the object.

You'll need to load said object into a 3D Modeling program in order to look at it.
I like UVMapper, because it's free (well the free version is anyway lol) and it's very easy to use.


While you're in SimPE, extract a texture or two from the original object. You will need them. Light or white recolors will be useful.

With the object loaded into UVMapper, this is what it looks like!
UV map of the object on the left, object (with no texture) on the right.

Add the texture in.
UVMapper is going to be our main working area. Other than an image editing program like Photoshop or Gimp. You'll need that too.


Let's get a good look at this base texture - we can see it has the wood parts of the couch, the main couch texture and some pillows.
If you find UV maps helpful (I do!) you can extract one from your 3D program.
With UVMapper, I needed to make sure that I've specified the size of the image so the UV map will match. This texture is 512 x 1024.

Now for the fun part! You should be able to copy in the base texture as a new layer, and then delete everything that is not the wood part on the UV map.
I've actually missed the foot of the couch here, but I will fix it.

If you're not already working with a white texture, make one. I like to use @pooklet's Primer and Time Bomb for this.
This white texture is very important as it will serve as the shadow and highlight that the new wood texture will be sandwiched in between.

With the new white texture created, when loaded into UVMapper and displayed on our couch, it looks like this. ^

This rounded edge here, this is a problem area!
With retexturing clay hairs, we want a rounded or 'bumped out' part of the mesh to be highlighted, to give the illusion of shine on hair.
But in objects, especially wood ones that we'd prefer to not look like plastic, we want the opposite effect; this shine should be reduced.
This is pretty easy to remedy in your image editor! But first:

Remember how I talked about how the white base texture was going to sandwich the wood texture? Here's what that means (layers):
1 The white base texture, Normal, 100% opacity
2 Our wood texture. This is something lifted from a Maxis endtable?
3 The white base texture, Multiply, 100% opacity
4 The white base texture, Overlay, 22% opacity
5 The white base texture, Soft Light, 22% opacity*
Optional layers: 1) another white base texture, Multiply, 100% opacity if this is a dark recolor, as it will add more depth 2) the base texture, but in an orange or yellowy color Multiply, 100% opacity (when this is added, it will help when a warm recolor looks too ashy)
*these percentages of how opaque the layer is are arbitrary. They work for me, do what works for you.
Okay! Back to the 'problem area'

This highlight here ^ on the rounded arm of the couch; if you don't want it, here is what I would do:


Locate where that highlight is in the texture. Found it!

Here's how to REDUCE that shine:
1 Locate your base white wood texture layer, Normal opacity.
Notice how the whiter part of this texture, when layered as I've described (Multiply 100%, Overlay 22%, Soft Light 22%) translates as shiny when it's laid on an object.
The way to make that appear less shiny is to make it less white. Less white means less of that shine that can read as artificial aka plasticky. When you make that more grey than white, more of the background wood can show through the semi-transparent layers.
2 Take that noticeably white part of the base texture and make it grey! Copy a chunk of the greyer texture, paste it on, blend in or erase the edges to make it look smooth. Merge the layer.
3 Change your Normal white base layer (now edited to be greyer in that one specific spot) and copy that as 3 new layers: Multiply 100%, Overlay 22%, Soft Light 22%. With the wood texture underneath all of them. Base, wood, Multiply, Overlay, Soft Light, in that order.

Before...

...after! it's subtle okay

The same kind of sandwiching method with image layers can apply to the cushions too.

There! A method for retexturing TS4 conversions that helps them not be as plastic looking. 😊
One last tip before you go off and try retexturing conversions yourself: @pforestsims's Easy Shine Removal kit for SimPe. A must if you're looking maintain that matte look.
Let me know if you have any questions!
136 notes
·
View notes
Text
flower keychain!!


#might make a tutorial#my art <3#bfdi#bfdia#bfb#tpot#battle for dream island#flower bfdi#bfdi flower#bfb flower#flower bfb#osc#object show community#craft#arts and crafts#custom keychain#keychain#cw bright colors#cw eyestrain#gyaru aesthetic#tropicalcore#idfk
53 notes
·
View notes
Text
Quick Tips for GIMP
"These tips are for GIMP, but I have been learning from tutorials for PS as well, and have been applying them in GIMP. I found these two programs to be quite interchangeable, which makes sense, because GIMP was made as a free alternative for PS."
28 notes
·
View notes
Text
i got some asks about how i make my userboxes and im gonna answer that as a separate post!!
i use ibispaintx, but any software that can recolor layers & import images is ok!!
then you grab your template (i made and use this one, and you can too!!!)

then get your selected image and crop it into the smaller square! (for this example we’re using a soap userbox posted on my main!)

now color the outline your selected color! usually one that’s similar to the main color of the image works best!

color the larger box any color you wish now! again, i like to use a color from the main image for this

and finally, text!

#userboxes#userbox#this user#soap ii#ii soap#object show userboxes#inanimate insanity#tutorial#mod 🥝
37 notes
·
View notes
Text
blender experiment from some weeks back. tried to set up a painterly node situation with a low poly pear i modelled. couldn't figure it out. got frustrated and just texture painted the thing myself

the forbidden angle of the pear. you can see the plane changes in the model

there IS a way to do it and i'll get there eventually. still, this is pretty relaxing. part of what makes painting so hard is navigating plane changes. with 3D you've already made them. the planes they are a-changin. it's more like a colouring-in book
#text post#rochedotpng#the illustrious pear#this is referenced from a tutorial i found on pinterest#big into the idea of modelling objects and just straight up painting over them
44 notes
·
View notes
Text
How To Make Your Object Show Stand Out
youtube
In this video I talk about common clichés I've found in object shows and provide tips on how to avoid playing them straight.
#osc#object show#object show community#object shows#battle for dream island#bfdi#bfdia#object shows community#object show tutorial#object show tutorials#Youtube
20 notes
·
View notes
Text
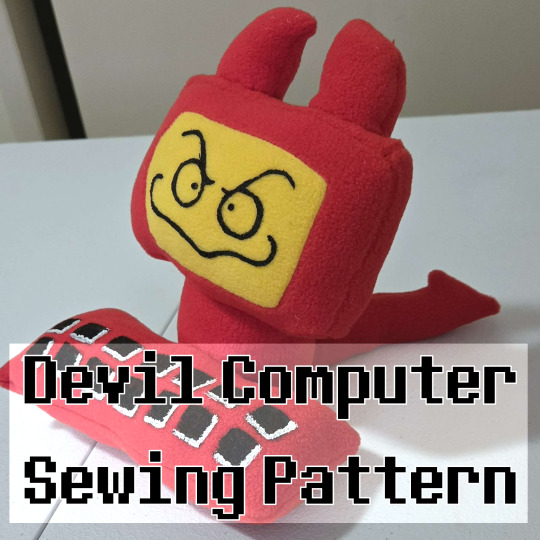


DARLING I LOVE YOU TO BITS
i finally finished a tutorial for making your very own edgar plush! its 14 pages long with 30 process images lol its a doozy...
i also have it up on my kofi for a dollar cheaper rn!
#edgar#edgar electric dreams#electric dreams edgar#electric dreams#electric dreams 1984#artists on tumblr#objectum#object head#computer head#plush#plushie#plushies#daylikescookies#plushblr#handmade plush#handmade plushies#craft#tutorial#pattern#sewing pattern
24 notes
·
View notes
Text
just saw a pinterest comment that suggested learning how to crochet instead of learning how to knit because it's easier and i can't keep silent anymore i have to confess that i wrote my cass learns how to knit fic because i need people to love knitting in the same way that i need people to love cass. the crochet vs knitting metaphor argument exists because i've had that conversation (minus the metaphor and also it was jokingly silly with my friends) with me arguing the side of knitting and as much as i love projecting onto characters stephanie brown would never in her life be against crochet. she would adore crochet. i don't actually dislike crochet its good for things that knitting will never be able to do like baskets and is so much better for stuffed animals and i think it's better for things like bralettes and bags but knitting is so good for clothing it's stretchy and more flowy. crochet is so good for items that need to hold a little more structure but in my opinion knitting makes more comfortable clothing and crochet got so popular in the last couple of years but knitting did not and knitting is not more difficult!! knitting is fun and good and i love her!!!
#crochet got so popular in my generation in the past few years and left knitting in the dust. knitting is my most underrated fav#you would loooveeee knitting if you learned i promise it's not difficult i promise i promise#i mean maybe it is a little bit difficult because that's how hobbies work but you would loveeeeeeee knitting if you learned i promise#ive seen a couple of comments on tutorials and things that are like i know how to crochet but actually i think knitting looks better#and tutorial for crochet stitch that looks like knitting!!#and i'm over here foaming at the mouth#i know my dc friends will understand because its the same feeling as watching your underrated fav continue to be underrated#and objectively there's nothing wrong with this more popular character and you might even really like that more popular character#but if someone mentions they love that character because of traits that your underrated fav has then your eye will start twitching#like cass wants to kill herself so bad there should be buckets of venty angst h/c fic written by teenagers about her you know what i mean
31 notes
·
View notes
Text


ADDITIONAL OBJECT AND ASTEROID TUT
additional objects: additional objects in your chart include points such as lilith/vertex and fixed stars, comets, the galactic center, etc. they can tell you about more specific topics than your planets can
example - the vertex in your chart is a point that can tell you about your fate, but there isn’t a planet that can tell you directly about fated events
asteroids: these are not as important as planets, but can be very telling if you want to find out more specific things outside of what the planets tell you or learn more about specific topics planets don’t tell you
example - asteroid caspar represents things you should treasure deeply and not take advantage of in life otherwise you’ll be filled with regret. there’s not a planet that can directly show this
my opinion: asteroids are still important because they’re part of our universe and everything is connected to us spiritually including the asteroids. i would say planets and houses are most important though

follow these steps ↓
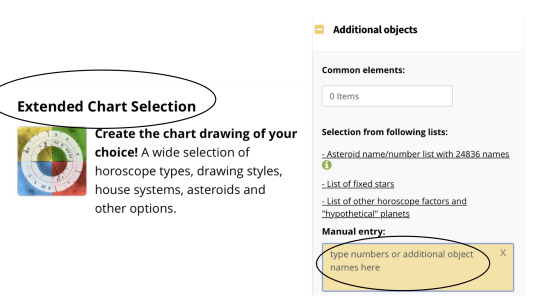
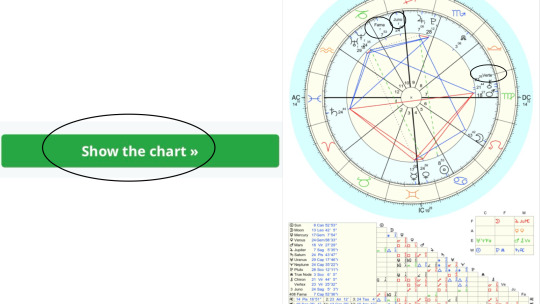
one: once you’ve made an account on astro.com click on the saved data and then click extended chart selection to view the chart options
two: scroll down click on the additional objects section to view the additional objects box then type in the name of the object you want to view or asteroid number. you can view multiple additional objects at once if you want, but you must put a comma after each name/number
example - sirius, vertex, mirach, 3, 390
three: scroll back up and click “show the chart >>” and you can then view the asteroid in your chart
note: to find asteroid codes you can view my posts or others on tumblr about specific asteroids you’re interested in. there are over 20k of them on astro.com, but you can find some on astro-seek.com as well

#asteroids#asteroid tutorial#vertex#lilith#part of fortune#additional objects#astro.com#astrology#astrology blog#astrology chart#birth chart#astrology community#astro community#astrology tutorial
52 notes
·
View notes
Text
some kandi i made today!! :3

^ doubles!! [panpronominal and nonbinary]

^ two [tpot] single!!

^ araki, nqrse, and meychan singles!!
#i was gonna make a cuff [following a tutorial] but I gave up 😔#art#datsu's kandi#kandi#lgbtq+#nonbinary#panpronominal#osc#object show community#tpot#two tpot#two xfohv#utaite#araki#nqrse#meychan#Aranarumey
24 notes
·
View notes
Text


🍳⌒*⠀⇉⠀LET HIM COOK 🔥⠀☆⠀credit if use
#( 🍓 ) renty graphics . . .#gif#MAKING THAT GIF TOOK ME SO LONG CAUSE SOME OF THE TUTORIALS WERE NOT BEGINNER FRIENDLY 。゜(`Д´)゜。#LIKE WHY DID NO ONE TELL ME HOW TO CONVERT GIFS INTO SMART OBJECT#RAGGHHHHHHH#graphics#rentry graphics#rentry#editblr#gif edit#rentry gif#edit#editing#dungeon meshi#delicious in dungeon#dunmeshi#laios touden#laios dungeon meshi#laios#dunmeshi laios#queued post
137 notes
·
View notes
Note
question mr disco. Do you like the way we even draw you? Is there any extra details we should add? Cheese?
this is all you need!
41 notes
·
View notes
Text
youtube
#background#stones#rocks#landscape#background objects#video#youtube#tutorial#art#digital art#Youtube
17 notes
·
View notes