#gimp tutorial
Explore tagged Tumblr posts
Visit Tumblr Blog
Explore Tumblr blogs with no restrictions, modern design and the best experience.
Last Seen Tumblr Blogs


Fun Fact
Total funding amounts to $125.3M.
Text
How I make gif stamps in GIMP!
Hi! So I thought I would make a tutorial on how I personally make my animated stamps in GIMP! With images to help!
Firstly, have your stamp base, I use old stamp templates I found or from my own stamps. Then you want to add your gif as a layer.

Once you've opened it as a layer, all the gif layers will appear! You want to first resize the background layer by scaling the layer.

This stamp has an interior width and height of 95x50 pixels, so I make sure to scale the layer to fit. Make sure width and height aren't linked because not all gifs will fit that size naturally.

Then it is very important to merge the background layer with the stamp template layer, this way when you make the gif it looks like a stamp!

Once that's done scale all your other layers to the same width and height so that they too will fit in the stamp! Then what you want to do once that is finished is to open filter > animation > optimise (for gif).

Then once you've done that you can click playback to see if the gif is all right!


Once that's done it is time to export it by going export as, now I always have to change my file to a .gif type in order for it to work. Once you've done that hit export.


Then it will show a pop up window, it is very important you hit check on animation! Otherwise it won't work!

Once that is done, you can now hit the final export and your gif stamp will be made! See my final product below!

#should work the same on a windows computer as well!#tutorial#gimp tutorial#image editing#stamp#stamps#blinkies#web#old web#webcore#old webcore#myspace#heyspace#edit#editing#page decor#help guide#guide
73 notes
·
View notes
Text
Quick Tips for GIMP
"These tips are for GIMP, but I have been learning from tutorials for PS as well, and have been applying them in GIMP. I found these two programs to be quite interchangeable, which makes sense, because GIMP was made as a free alternative for PS."
30 notes
·
View notes
Text
Quick Tips for GIMP
That should translate to PS (colour actions what?)

It doesn’t fit in a Tumblr post, so head THIS WAY:
@sims2tutorials I think it counts as a tutorial #2?

#Tutorial#sort of#GIMP#GIMP Tips#GIMP Tutorial#G'MIC-QT#Resynthesizer#ts2#sims 2#the sims 2#DW#Tutorial: Creation#Tutorial: GIMP#Tips
14 notes
·
View notes
Video
youtube
GIMP - How To Make Images Brighter
A short tutorial showcasing how to make your images a bit brighter using GIMP, a free photo editing software.
#youtube#gimp#how to use gimp#gimp tutorial#tutorial#free to use#free to use software#gimp tips#gimp tricks#gimp tips and tricks#gimp editing#gimp tools#photo editing#photo editing tips#photo editing hacks
12 notes
·
View notes
Text

Alternative title: how to use SVGs as paths in GIMP ▬ by Joy from @creativexspirit
Though I recently created a template for text messages, I didn't like how versatile it wasn't so, here's a little tutorial on how to create your own text messages for Gimp. This tutorial is meant to explore the Path tool a little.
This tutorial is made with Gimp 2.10.38. It uses a SVG I created just for that tutorial: [LINK]
Like or reblog if you download. Please don’t request as your own, respect my work. Don’t hesitate to tag me if you follow the tutorial! I would love to see your edits. If you have any question, my askbox is open.
Quick disclaimer: the following images are for a French Gimp version.
STEP 01.
Create or open the XCF project you want the text message in. You will now import the SVG as a path.
If you don't already, have the path window open. You can find it in Windows > Dockable Dialogs > Paths. On my Gimp, as I am in single-window mode, the Paths dialog window is automatically docked to the Layers-Undo dock as a tab.

On the Paths dialog tab, open the Paths menu and import the SVG by selection "Import a path".


If you've done everything correctly, you should see a new path named "Text Message" in your Paths tab!

STEP 02.
Now, you can modify the path with different tools according to your needs: transform, scale, rotate, flip... Just make sure you always choose the Path to be transformed!
You can select whether to transform a layer, a selection or a path on the tool options.


STEP 03.
After transform, it's now time to actually have a text message. You'll start by creating a new layer that will have the background color on it. I called mine "Text Message BG".

You will now go back to the Paths tab and create a selection from the path, by selecting the Text Message path and then choose in the Path options "Path to Selection". There is also a shortcut button at the bottom of the Paths tab.


Now, you will see the selection is only a border. You will need to add the inside rectangle to the selection.
You can do so by selecting the Rectangle option and putting it in "Add to Selection" mode. (You can also be in "Add to Selection" mode by pressing Shift while doing the rectangle.)


Now, you can fill your selection with a color! (Don't forget to change your foreground color with the one you want to fill prior to doing the fill!)

You know have a background for your text message!
STEP 04.
We will now add text. You might be wondering why in this SVG file there is an inner rectangle. It is actually meant to serve as a guide for your textbox and still have some padding.
To use the inner rectangle of the path as a guide, you have to toggle Paths as a guide. To do so, check the box in Display > Align on active path.

Now you can select the Text tool and create your textbox while following the inner rectangle. You should be able to feel that the textbox will naturally clip to the edges of the path.

Now customize your text as you want and you're finished!
13 notes
·
View notes
Text
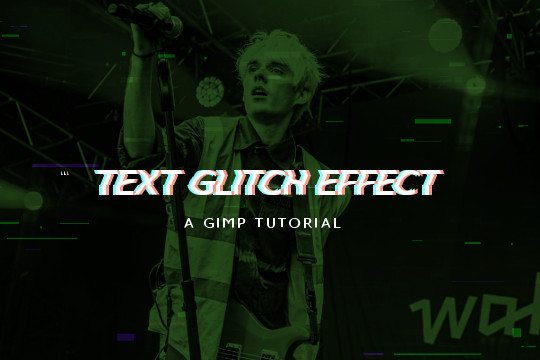
Read more to learn how to make this text + image glitch effect on GIMP!
Things you need:
GIMP
Import your image and resize it to your liking. I'll be using this.

2. Then I'll pick a gradient color. The FG will be black (or the darker color) and the BG color will be the lighter color. Go to Colors > Map > Gradient Map and it will apply the gradient map on the image.

3. Create a text layer. RIght click on the layer in the layers tab and pick "Layer to Image Size". Use the rectangle select tool to select the top half of the text.

4. Go to Filters > Distorts > Ripple and use these values. Feel free to play around with the sliders to your liking. Hit OK and the Ctrl + Shift + A to deselect.

5. Copy and paste the text layer 2 times.

6. On the second layer from the top, go to Colors > Colorify and pick a cyan color.

On the first layer, do the same but pick a pastel red/peach color.

7. Use the move tool to move one of them a few pixels to the left and the other a few pixels to the right.

8. Move the initial text layer to the top.


9. You can also add some TV glitch overlays if you want to.

And you're done!
5 notes
·
View notes
Text
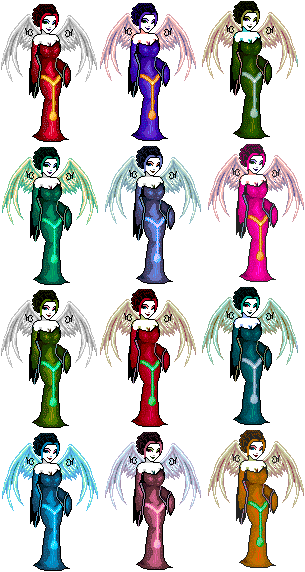
Creating Colour Palettes with Gimp

This is part of a series of tutorials on the Lusus-Studio blog that focuses on creating colour palettes.
This final tutorial will follow on from the others by showing how images in Gimp can be used to create colour palettes. It will then show how to import a Gimp palette file previously created in Cyotek. The tutorial begins however by explaining how to create colour palettes from gradients.
Follow the link to view the full tutorial.
#gimp#gimp tutorials#gimp tutorial#secondlifeblogger#slblog#secondlifeblog#slblogger#tutorial#digital art#graphic design
14 notes
·
View notes
Text
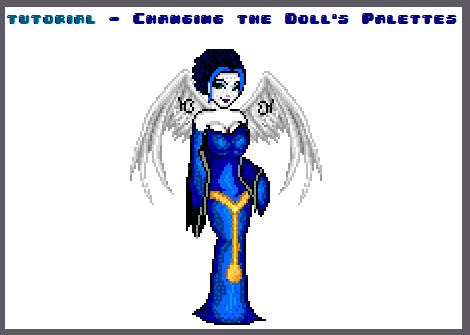


download Gimp here. this doll was made on Dollzmania Gothmaker.
#tutorial#gimp#editing tutorial#tips#dollmaker#dollz#art tips#art tutorial#gimp tutorial#dollzmania#goth#pagedoll#edit#mspaint#paint#colorful#colors#rainbow
8 notes
·
View notes
Text
#gimp tutorial#gimp art#digital art#digital drawing#dreamcore#trippyart#mixed media#trippy#vsco#ukartist#abstract#psyart#psychedelic edit#psychedeloscope#neo-psychedelia#dreamscape#soundscape#immersive art#immersivesoundexperience"#immersiveexperience#immersive daydreaming#daydreaming again#the backrooms#twisted wonderland#wonderland
1 note
·
View note
Text
How to take screenshots and edit (when it's just not your thing)

Alright-y!
So, I have over the years learned how to use reshade and to edit my pictures. I am really not a natural on these things, so this is very much to help others who are as aesthetically challenged as I am. I have to have certain "rules" to follow, because I can rarely just see if a picture will turn out well or not.
We all need to realize where I started. We're talking using FRAPS to take screenshots and then running holy colours batman! to get some sort of effect.
Now, I'm not one to buy fancy stuff and to pirate certain programs isn't really my thing either. So we mend and make do!
Also, I am by far very good at taking screenshots and edit, but I have learned things and hope that it might be useful for someone!
A word on light
One thing I've learned is to work with is light. Where the light is is where the focus will go. This doesn't mean that a person has to be in the spotlight, but if they aren't - try to make that a more conscious choice. I am no pro at this, but I have to say that some of my favorite screenshots are where the light is just good. It focuses the eye or it just give a vibe.


(and yes, for some reason all of my faves are of Agnes, which is a bit annoying since Amanda is my fav-character, lol)
This is also where reLight comes in handy. Yes, it's behind a paywall but there are ways that you will have to figure out yourself.
Great tutorial here on reLight by @pictureamoebae! (if you want to really understand reshade, do check out their tumblr. So many helpful tips and tricks!)


Posing
Posing is fun! I don't fully story-tell with my sims, most of it is gameplay. But I do like to pose for family pictures or to enhance something that is going on.
What you need is Andrew's Pose Player and Teleport Any Sim or Wicked Whims.
Now, I haven't figured out how to use WW for children and younger to pose, so I use both. And I like @ts4-poses to find poses. Eventually, you'll find your favorite creators and can follow them directly.


Angles and vibes
Here's a trick. Work with angles. I am a master of pictures with zero vibe, just a face. Those can be ok, and sometimes that's what you have - but try to angle your shot a little.
Or add clutter, focus on that and let something out of focus happen in the background.
Or just go higher, take the screenshot from above.
Or don't focus on your sim at all, focus on something else that adds to the story/post.


Take the screenshot
The light is good, the angle great, the poses are in place and now, we need to take the actual screenshots.
I am a huge fan of reshade, I use version 4.9.1 because that works for me and the presets I use. No need to update reshade unless it becomes too old.
It can be really difficult to to find a preset that you like. I mostly use birdie by @monasims, tawhay by @windslar and paperbacks by @literalite. But I have tried many.
I like this youtube-tutorial on how to make your own preset, which also helps if you wish to modify one that you've downloaded. I do always recommend learning how to use ADOF and CinematicDOF to help focus the image on what you want to capture. I also strongly recommend @pictureamoebae's Foundation.
To take pictures, use the tab-key to leave the UI behind and use Q and E to go down/up in your game and then the mouse to angle. I use print-screen to take my screenshot, but that's something you set up when installing reshade so that's different for everyone.
And now you have your screenshot and it's time to open an editing program. Cheap as I am, I open GIMP.
Let's edit!
I don't use many steps. Since I can't use fancy photoshop actions I have to make all the steps by myself and well - I am human and therefor lazy.
Resize and start to think of a post
First things first. I cut my pictures to work for the tumblr ratio. I actually don't resize them smaller anymore - because when I change layout on my tumblr I just feel as if it messes it up. Now, I don't have a huge screen and my screenshots aren't massive, so it's not necessary either.
My images will be 1017x1017, 1525 x 1017 or 678 x 1017.
Once this is done, I also try to look at how they will go together. If I want a post of just squares I need to have an even number of images. Sometimes I want a landscape image as a sort of heading, or one in the middle with squares around it. It depends on what I want to convey.
This is by no means something that comes natural to me - I am aesthetically challenged after all. Sometimes, I just have 5 images and have to make do.

Resized
Topaz Clean
Yup, it's awesome. No, it doesn't come with GIMP. Yes, there are ways to work around this. You will have to find those ways on your own.
But I have to say, it does makes wonder for the images. I have completely stolen @sojutrait 's settings because I really like her style and therefor - I copy. I have added a bit more sharpening, but otherwise it's completely hers.

Topaz Clean:ed
Curves
Curves my beloved! I use curves for two things! Take out the yellow (aka increase the blue) and to brighten/darken the image!
I do sometimes matte the image too and here's a good tutorial for GIMP users on how to use curves in GIMP (for a matte look)

Less yellow/more blue

Brighten the brights (but I did not brighten the darker parts)
Layers, curves and increase the light where needed
Now, remember that we need light? Sometimes, a screenshot just doesn't have the right light. So I duplicate the layer, use the free marking tool around what I wish was brighter and put that on a new layer.
Then I use curves to lighten the layer with what I want to brighten and to make darker the layer with what I want to put less focus on (here's an ok youtube video on the subject).
Below, you can see the effect on my images.


Sharpen
Pretty basic. I subtly sharpen the image again. Even if I use the sharpening in topaz clean I do like to add an extra touch before it's time to save and move on.

So sharp!
PSD and UI
I do like to use psd's now and then. I mainly use @windslar's psd-collections and @deathbypufferfish's Build-a-Sim Icon Pack.
It's mostly to help give some info about the post or when my sims age up and I want to show their traits.
I do use the UI-info sometimes. If I do, I go into Game Options in the game > Accessibility > UI-scale and just drag that up a bit. Then I copy/paste that part onto the image I'm using.


Done!
That's pretty much it. Thing is, to post good edits you have to actually take good screenshots. As annoying as it is, it's like cooking: it all comes down to the ingredients. I hate cooking Yes, editing does help but I think my main journey has been to learn to take better screenshots from the start.
The picture below is from resized to done.
Hope this might help someone! I will probably learn more and more as I continue to post, but this is where I am so far in my journey!
155 notes
·
View notes
Text
Be BOTH Team Bonnie & Team Monty
There is no wrong way about this. If you enjoy both characters, good! I love that, I adore both as well. Both are fictional characters, both are comfort characters.

#FNaF#glamrock bonnie#glamrock monty#fnaf monty#monty gator#monty fnaf#montgomery gator#five nights at freddy's#userboxes#fnaf security breach#five nights at freddys#fnaf sb#fnaf sb ruin#fnaf sb dlc#fnaf sl#userbox#hopefully the tags are to be read. so to avoid confusion for those that never been on the internet before#you can right click the image above using your mouse and save the image#it will show up Save Image As. You can also make your own userbox as well. I've used freebie program called GIMP#on a site called youtube. you can learn plenty of tutorials on how to use GIMP. don't think version matters so much? just mess around
102 notes
·
View notes
Text
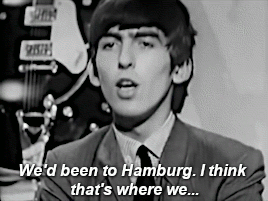


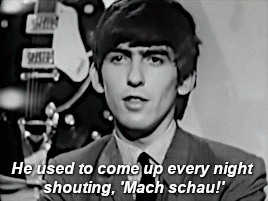
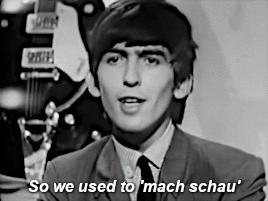
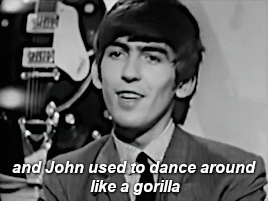
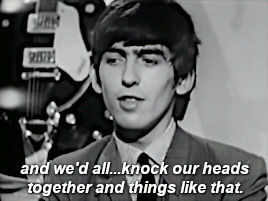
Anyway, we got back to Liverpool, and all the groups there were doing the sort of Shadows type of stuff. And we came back, leather jackets, and jeans and funny hair, 'mach-ing schau,' which went down quite well. —George Harrison
From the Beatles interview in The Mersey Sound, filmed August 28, 1963 at BBC's Dickenson Road studio in Manchester
#george harrison#the mersey sound#thebeatlesedit#mach schau#hey hey bug tumblrinas i finally figured out a way to make semipassable gifs ahhhhh#VLC + GIMP i knew there had to be a way but dang that was more complicated than every tutorial ever suggested#i blame my SFF vidding post i really really wanted to get the movement of that vid#and then got fixated on the paint pouring#but it was this video that got me realizing my problem the frames were backwards#haha i got excited getting two done and then looked at it like 6 more#started it for the gorilla comment and georges little mach schau impression#but its adorable how unpolished he is for tv still here squinty and looking all over the place#hamburg era#young george#my gifs#1963#gorilla suit#george speaks
187 notes
·
View notes
Text
youtube
Well here's another tutorial, on how i make my shadow maps using gimp. Closed caption available!
Edit 22-03-2025: This was made using gimp 2.XXX. Im not sure exactly which one but, the later 2.XXX versions are pretty much the same.
14 notes
·
View notes
Text

Learn how to create a noisy polaroid frame in this GIMP image editor tutorial using spread noise and median blur
7 notes
·
View notes
Text
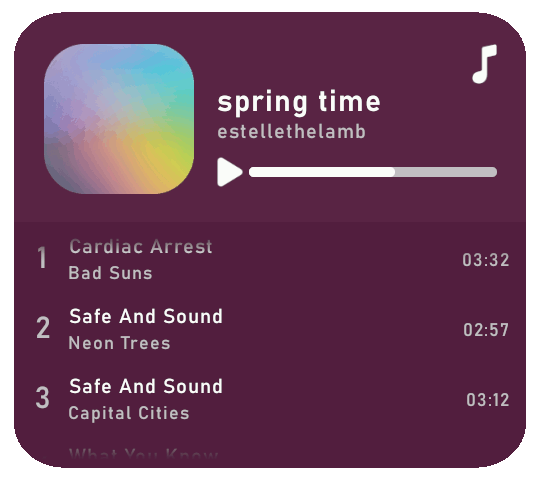
Rolling playlist gif for GIMP: a tutorial ▬ by Joy from @creativexspirit
Credit where credit is due, I fell in love with this gif tutorial but EH I don't use Photoshop anymore so I made it my mission to recreate the effect in GIMP.
This tutorial uses AnimStack, a Script-Fu script for GIMP to give you tools for the creation of animated GIFs. As it's super useful, even if you don't follow this tutorial I highly recommend to download. How to install AnimStack to GIMP in tumblr's FAQ: https://animstack.tumblr.com/faq
IT ONLY WORKS IN GIMP 2.10.
This tutorial uses my playlist template.
Tutorial with screenshots is under the cut.
Like or reblog if you download. Please don’t request as your own, respect my work. Don’t hesitate to tag me if you follow the tutorial! I would love to see your edits.
STEP 01.
Change the titles, the colors, the icons. Tip if you want to change the song title that are not visible: move the layers group "Song list", so you can see the text you modify.
Add songs by copy/pasting the "Song 5" layers group. Keep this layers group inside the "Song list" group.
Try to move the layers group so that it is aligned with above songs.
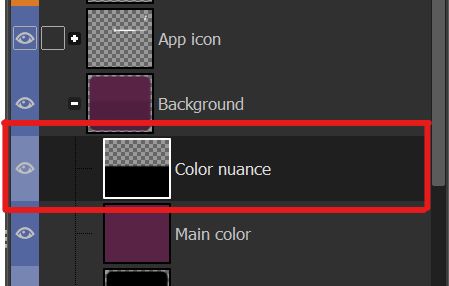
To place back correctly the "Song list", here's a tip: use the align tool and click on the "Song list" group. In the tool's options, in the "relative to" drop down menu, choose "Selection". Back to the layers window: in the "Background" group, right click on the "Color nuance" layer and choose "Alpha to selection". Now you are free to align your "Song list" layer group to the top and center of that selection, and it should be alright!
STEP 02.
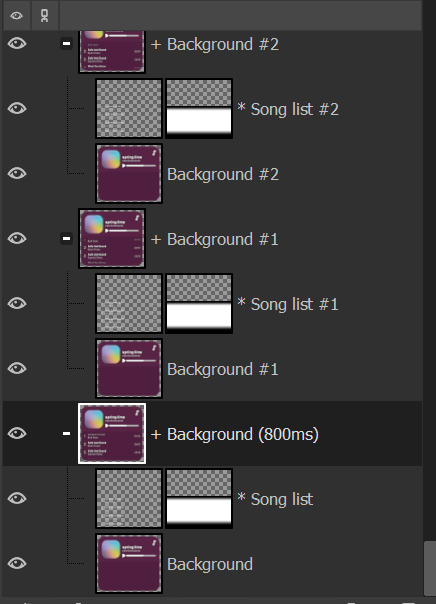
Now the tutorial actually begins. Flatten all layer groups using Image > Flatten Layer Groups. (Don't mind my GIMP language, it is in French but the AnimStacks tools are in English, you should have the same menu.)

And now your layers window should look like mine, minus the links on the layers.
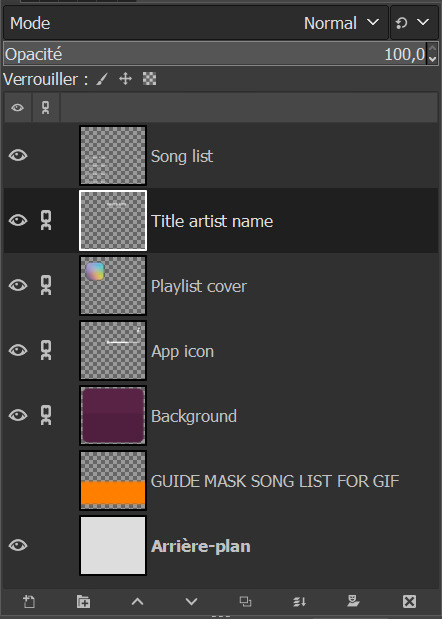
Now, see the linked layers? Merge them all together. You should end up with only 4 layers: "Song list", "Background", "GUIDE MASK SONG LIST FOR GIF", "Arrière-plan".
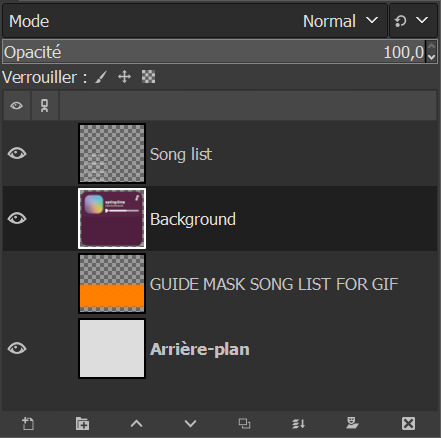
Note: you don't really need the "Arrière-plan" layer, so if you want to, you can delete it or you can merge it with the background layer. In my case, I will delete it.
STEP 03.
Reorder your layers. This is very important as AnimStacks will process the layers from top to bottom, so the layers order counts.
Put your "Background" layer on top, your "Song list" layer under it. As for the guide mask, we don't really care as we will delete it later.
STEP 04.
We are now going to add AnimStacks tags to our layer names. Here you'll have to do a bit of maths because you can choose the number of frames your gif will ultimately contain and adjust the tags parameters accordingly. This might seem complicated but it really isn't. I'll start by showing the tags to add, and explain how this will be processed. I will then give you the maths to choose your parameters accordingly.
Below, the tags I have added to my layers. You will have to write the same things as I do but what you might change is:
the number of "30" in Background.
the y parameter of the offset tag "-12".
YOU ARE NOT ALLOWED TO REMOVE THE [copy:0] and change it.
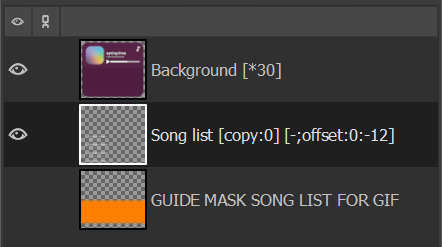
OK but what does each tag do? Remember, AnimStacks process is from top layer to bottom. Here the first layer is our Background layer: [*30] means it will duplicate the "Background" layer 30 times.
Now, onto "Song list" layer: [copy:0] will check all layers above the "Song list" layer that has no tag (at this point, all of our 30 "Background" layers have no tag), create a group for each found layer and place the "Song list" layer at position 0. Ok this explanation is wacky, for better explanation, please check the documentation.
The offset tag is necessary for the rolling effect: at each addition of the "Song list" layer, it won't just be a simple duplicate of the "Song list" layer, but the layer will have moved a little by (x,y) = (0,-12), allowing us to get that "rolling" effect in our gif. (And now you get why I said "y parameter".)
OK now, but how did I choose my parameters? So for reference, I only have 5 songs - I didn't add any song to the song list. For my maths, you need the height of the "Song list" layer. Check it with the scaling tool.
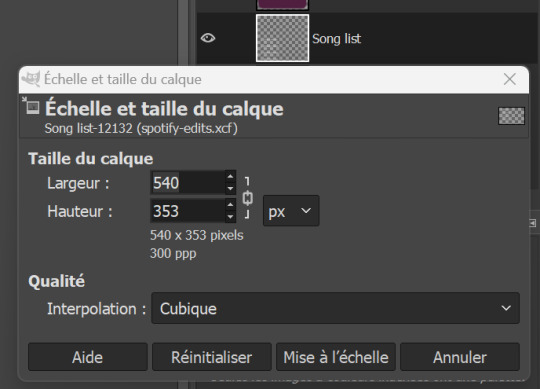
The height of my layer is 353 pixels (awful number meh). I choose to have 30 frames. So the move of the layers will have to be of 353/30 = 11.77 pixels. I choose 12 pixels because you can't have floats for the number of pixels, can you?
DO NOT FORGET the minus in front of the y parameter. My y parameter is "-12". Otherwise, the playlist will roll towards the bottom.
STEP 05.
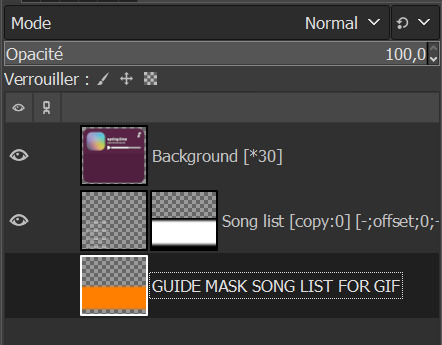
We are now going to add a mask to the "Song list" layer to avoid seeing the title songs where we shouldn't see them. See that obnoxious orange layer "GUIDE MASK SONG LIST FOR GIF"? Yes, it is its time to shine.
Right click on the "GUIDE MASK SONG LIST FOR GIF" layer and choose "Alpha to Selection". (Well in French it's Alpha vers Sélection.)
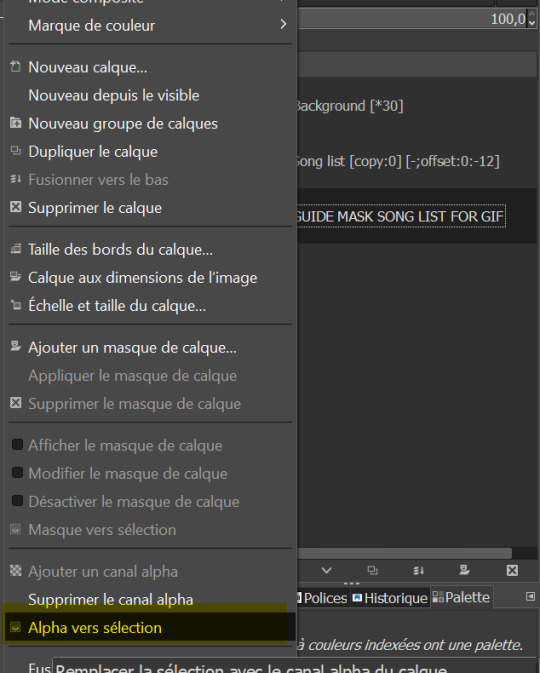
Now, we are going to use that selection to create a layer mask on the "Song list" layer.
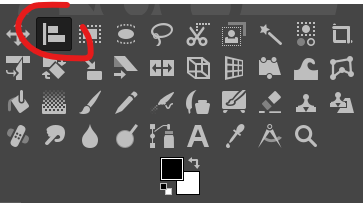
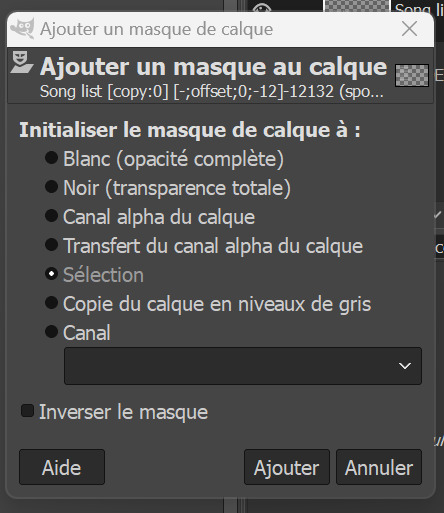
Right click on "Song list" and choose "Add a layer mask". /!\ Your selection must still be active. (Well in French it's "Ajouter un masque de calque" but you can see the icon right? By the way, you can also add a layer mask by clicking on the icon in the layer window, see circled icon in red.)

Now, choose Selection for the creation of the layer mask.
If you don't have the above results for the mask, it might be that you foreground and background colors are not the same as mine, meaning black and white respectively.

If you don't have the same colors as me above, click on the small pair of squares the blue arrow I draw is pointing to. It will default your foreground and background colors to black and white. Keyboard shortcut is D. (I don't think I changed it.)
And now, we don't need the orange guide mask layer anymore, so you can delete it.
STEP 06.
Last check before process: make sure you have no area selected (or you will get a weird result). Cancel all selection with Selection > None.
STEP 07.
We now begin the AnimStacks tags process.
In Filters > Animation, find "Process Animation Tags" and click on it.

The process might take a while depending on the number of frames you have.
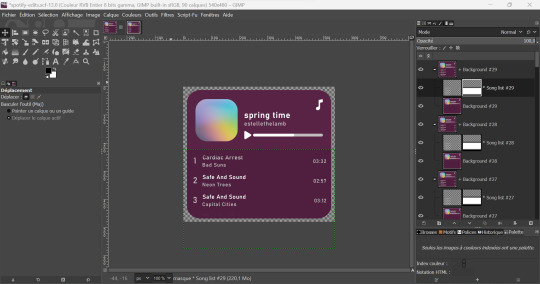
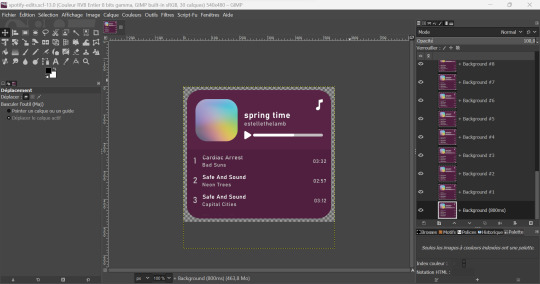
If everything is correct, you should have something similar to that. Now, we can check if the gif is correct and if we liked the number of frames and y parameter by previewing the animation in Filters > Animation > Playback...
STEP 07.
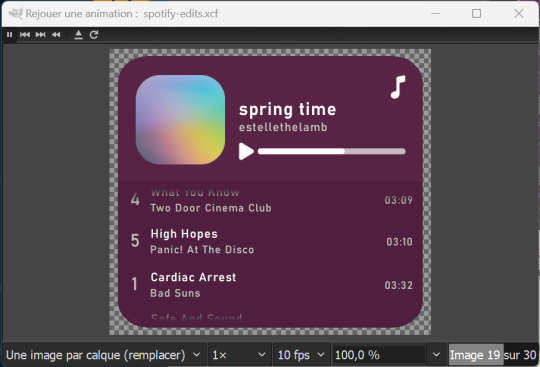
This step is optional but you might want to change the time of our first frame to be longer so people have time to read the beginning. Do so by changing the layer group name by adding (800ms) to it. This means the frame corresponding to that layer group will be 800ms.
You can check if it's long enough by doing the playback again.
STEP 08.
Now, we have to flatten all layer groups if we want to export to a GIF. In order to do so, we will just use the same trick as the beginning: Image > Flatten Layer Groups.
STEP 09.
Optional, but good to do: to make our gif lighter, we are also going to optimize the gif. In order to do so, do Filters > Animation > Optimize (for GIF) I don't know personally the difference with the other optimization method. Choose either you'll have similar results it's a difference in the implied algorithm I guess.
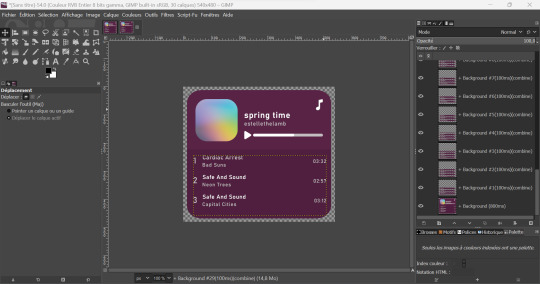
This step might take a while, but it's ok. When it's done processing you should have a new image created with the same results as me above. You can playback to check if everything is correct but here our job is done! We will now export the GIF.
STEP 10.
You can now export to GIF! Go to File > Export as..., choose the name of your file and end it with the .gif extension.
If you get an error message because some layers are not cropped, no worries: just choose the "crop" option (but you should not with the optimization).
Now, don't forget to check "as animation" when saving the GIF, if you haven't done the optimization, choose the delay between frames (the first frame will still be of 800ms), and choose "replace".
WITHOUT OPTIMIZATION:
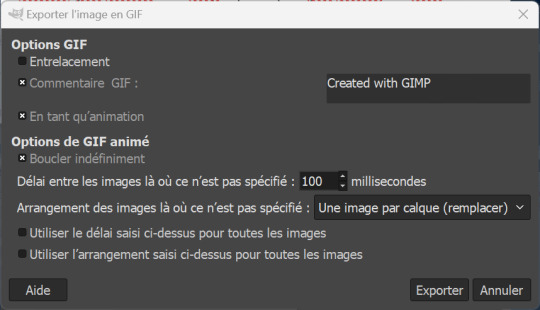
(With the optimization process, all layers already have delay and animation replacement type thingy specified.)
AND VOILA, YOU HAVE YOUR GIF! If you mess around more with AnimStacks, you can do cool stuffs with it!
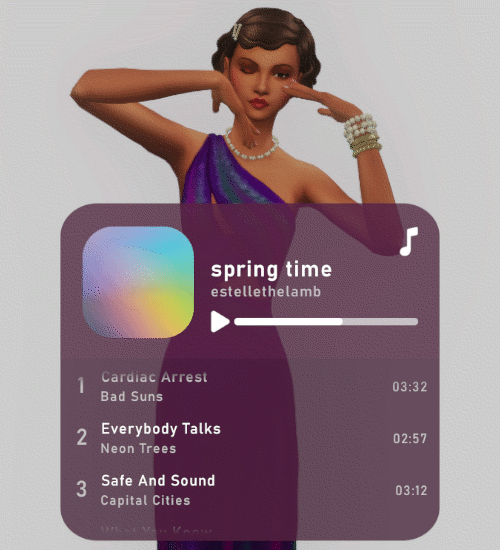
Now, how do you pronounce the G in gif? Also shh, don't say you saw the mistake I made when changing the title's songs in the tutorial, I wanted to write Everybody Talks by Neon Trees.
23 notes
·
View notes
Note
can you please do a gif tutorial with import video. your gifs are amazing.
Hi! For GIMP, you have to get the jpegs from the video using third party programs. In this tutorial, I mention KM Player and also how I make gifs.
But I actually use KDenlive (to edit the video) and FreeStudio (to convert the clip to jpegs).
Also, sidenote: Now, my current gifs are all made using Photoshop cuz I prefer the quality of the gifs and the process of making more complicated gifs is easier there than on GIMP.
4 notes
·
View notes