#of1400
Text
Fräshilfe für Festool OF-1400 / OF-1010 verfügbar
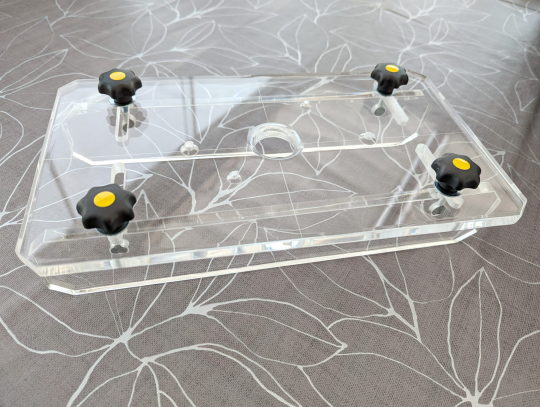
Fräshilfe für Festool OF-1400 / OF-1010 verfügbar
Irgendwie musste ich mal versuchen die Festool Fräshilfe nachzubauen.
Mit meinem ersten Ergebnis war und bin ich zufrieden, da die Fräshilfe genau das macht was sie soll.
Für einen Kollegen habe ich dann einen Nachbau hergestellt. Mit Querschruben und Plexiglasführungen. Das Teil sah wirklich gut aus und so beschloss ich, weitere zu bauen.
Die bei Festool angebotene Fräshilfe hat noch eine Absaugungsmöglichkeit auf der Platte. Macht die Sinn? Wieviel Schläuche kann ich denn anschließen? Nein, die lasse ich weg.
Acrylglas gegossen
Über den Unterschied zwischen gegossenem und gezogenem Acrylglas konnte ich mich ausreichend informieren.
Gegossenes ist aber wesentlich teurer; trotzdem will ich das ausprobieren. Bestellt habe ich das Arylglas bei Kunststoffplattenonline.de.
Die Lieferung ist gut angekommen, trotz Lieferproblemen mit DPD. Wie immer!!!
Zuschnitt
Angeblich ist gegossenes Acrylglas besser zu bearbeiten.
Tauchsäge auf 1, einmal rückwärst über das Acrylglas gezogen und dann mit einem Schnitt getrennt.
Die Sägespuren machten keinen Unterschied.Problem bei den Senkungen der Bohrungen zuvor war, die Senkungen waren "eckig" und unsauber. Trotz nachschärfen der Senker.
Aus diesem Grund habe ich einen neuen Senker von FAMAG gekauft. Das Ergebnis ist selbstredend. Sehr gut. Tja, man kauft immer mindestens 3 mal. Dieser Senker ist sein Geld wert.
Jetzt muss ich doch einen Unterschied der Qualitäten vom Acrylglas feststellen können.
Gefühlsmäßig ließ sich des Gegossene "weicher" fräsen. Das Ergebnis ist aber das gleiche.
Die Bohrungen sind eingebracht und die Fräsungen sauber.
Nun müssen noch die Ecken ab.
Dies geht einfach mit der Kappsäge. Drehzahl auf 1 und los. Natürlich Vereinfacht mit einem Abstandshalter.Trotz großer Vorsicht sind die Schnittflächen "unschön". Auf die Funktion der Fräshilfe hat dieser Umstand keinerlei Einfluß. Nur für den Kopf. Sieht halt nicht so gut aus.
Flammpolieren ist keine große Kunst. Allerdings muss vorgearbeitet werden.
Kanten brechen um sich beim Anziehen nicht die Finger aufzureißen. Grob abziehen und dann fein abziehen mit der Abziehklinge von Festool. Ein Riesenunterschied!!
Meistens wird Schleifen angeraten. Das hatte ich anfangs auch immer gemacht. Heute weiß ich, dass nach Abziehen mit der Festool-Klinge kein Schleifen nötig ist. Nur sehr sauber muss die Kante sein.Mal sehen, wie das Ergebnis ist.
Sterngriffe mit festem Gewinde 6mm, Unterlegscheibe und rein in die Quermutter.
Passt!
Es ist schon einige Arbeit und die Zeit vergeht im Fluge, doch das Ergebnis entschädigt für alles.
Wer gern eine solche Fräshilfe von mir haben möchte: ich verkaufe diese gern.
Für die komplette Fräshilfe für die OF1400 / OF1010 berechne ich Euro 95,00 inklusive Versand innerhalb Deutschland. Die Fräshilfe wird allerdings als "gebraucht" verkauft.
Für den Kontakt bitte ein kurzes E-Mail an [email protected] oder über das Kontaktformular.
Read the full article
0 notes
Photo

Make a sliding-dovetail groove can be funny with a right tool🤔💪🏽😃. #slidingdovetail #slidingdovetailgroove #woodworking #woodwork #festool #router #coffetable #tabletop #pinocarolina #longleafpine #workinprogress #pine #solidwood #tableboard #industrialdesign #interiordesign #objectmaker #stuffmaker #ilovemywork #ebanisteria #powertools #of1400 (at TMDC)
#slidingdovetail#tableboard#ebanisteria#objectmaker#stuffmaker#workinprogress#ilovemywork#tabletop#pinocarolina#woodwork#router#woodworking#powertools#festool#slidingdovetailgroove#of1400#interiordesign#coffetable#solidwood#industrialdesign#pine#longleafpine
5 notes
·
View notes
Text
Work Holding
Working with any material in any working environment, there are two main points to review when talking about work holding. Work height and orientation. If you cannot have your material in the location and orientation your work becomes increasingly less enjoyable and less comfortable. For discussion purposes, this blog will lean towards woodworking as that is Andy’s expertise and the main industry for the Festool Vac-Sys Vacuum clamping system but a lot of these points and discussion topics can be cross related to almost all other industries that require someone to hold a piece of material or part in place and complete a task with it.
There are a variety of different levels of woodworking shops that can be categorized into four levels. The beginner, weekend warrior, professional, and the production shop. Between these three levels you will find various different grades of equipment and abilities. Obviously the professional shop will have the bells and whistles but maybe a little more specific while the beginner will have exactly that. An introductory set of equipment and a more broad brush for applications. The production shop will have dedicated equipment for the repetitive tasks that they do. Typically this equipment is extremely specialized and expensive. It is meant to do a task efficiently and to the correct specifications. We can’t forget about the contractor on the job-site!
Festool 203148 vacuum unit VAC SYS System
.
Work holding equipment is an extremely large and creative category. You can see clamps, bench vises, large vacuum tables, specialized equipment for dog holes, etc. All of these options have their own pros and cons but we have received an ultimate work holding piece of equipment in the shop that can apply to just about all categories. It is pricey so it maybe out of the reach for the beginner or weekend warrior but that is to be discussed later.
Festool Vac-Sys Vacuum Clamping System
An incredible way to harness the power of vacuum to hold your material in the orientation and the height you desire. Festool released their Vac-Sys Clamping Sytem March 1st 2016 and has been a show stopper ever since. “The Vac-Sys provides fast, easy, and highly maneuverable solutions for almost any clamping application” said Steve Rangoussis with Festool and we could agree more. The system relies on a vacuum pump to apply vacuum to the two clamping modules. We have the Vac-Sys System Set which includes the Vacuum pump (VAC-PMP) Vacuum clamping unit (VAC SyS SE1) and the Clamping module (Vac-SyS SE2). This full system allows you to clamp extremely large objects such as doors, counter tops, or anything that requires two points of work holding. The main clamping module (Vac-Sys SE1) has an integrated foot pedal to release your material from the clamping force. It essential allows atmosphere to enter the system again eliminating the vacuum and holding power of the system. The user can quickly attach and remove their material from the units utilizing the foot pedal and the green plunger that is in the middle of the clamping cups. This green plunger gets depressed allowing the vacuum to have access to the clamping cups. With your material making a tight seal, the vacuum give some intense holding power to your material. The unit can be held down to the table with clamps, screws, or the integrated vacuum clamping on the bottom.
The clamping head can be rotated a full 360 degrees and/or can be tilted from 0-90 degrees.
Features and Specifications:
Includes:
Vacuum Pump
Vacuum clamping unit
Clamping module
Can hold up to 200 pounds
Two different shaped clamping cups
Various accessories and clamping cups available
Vacuums to your work surface
Foot pedal to release the vacuum
#gallery-0-9 { margin: auto; } #gallery-0-9 .gallery-item { float: left; margin-top: 10px; text-align: center; width: 33%; } #gallery-0-9 img { border: 2px solid #cfcfcf; } #gallery-0-9 .gallery-caption { margin-left: 0; } /* see gallery_shortcode() in wp-includes/media.php */
Setting Up and How To Use
Setting up the Festool Vacuum clamping system is extremely easy. You first need to decide how you would like to hold the units down to your work surface. You can utilize the vacuum bases on the units themselves but will need a nice smooth and nonporous surface. You can screw it down with some wood screws or even clamp it down. It will depend on how often you will use it and how much space you have. For a dedicated space in a shop, securing it down with screws to your work surface is the best option. If you are in a shop where you have to tear it down quite often , like a weekend warrior or a regular shop without dedicated space for the setup, you can use the vacuum base or screw it to a piece of wood and then clamp the wood to your work surface. This is equally applicable to the person on the job-site. Festool also offers an accessory for quickly attached and removing from the MFT tables.
Once the unit is secured to your work surface, you simply need to turn on the vacuum pump and place your material on the clamping cups. Apply a little force to complete the seal on the clamping cups. This force will also depress the green plunger we discussed earlier. That will also the vacuum pump to remove the atmosphere in the clamping cup and apply an intense amount of clamping force to your material. You can either manipulate the clamping head before or after placing your material on. We find it easy to do it after with small pieces of material and before with larger ones. When you would like to remove the material, press you foot on the foot pedal to release the vacuum clamping force. The plunger will reseal the system and the pump will begin to build vacuum again and ready for your next clamping needs.
Fast, Easy, Simple
The Festool vacuum clamping system is extremely fast, easy, and simple to operate. This is exactly what everyone wants from any product. The vacuum clamping system is extremely fast. It allows a user to switch between clamping one part to another in a blink of an eye. The system is extremely easy and simple to setup and operate. This means that there is minimal training and risk with new employees and gets them focused on the actual task at hand rather than learning a new piece of equipment.
Applications and Uses
Oh boy! Where do we start! In a woodworking shop, typically the middle to the end of a project is when parts need to be held for sanding, scraping, planing, chiseling, etc. Cabinet doors, custom shapes, full sized doors, small parts, repetitive tasks, etc are all tasks that are common parts in a woodworking shop.
On the job-site, a finish carpenter or installer may need to hold some doors to trim them to size. The Festool Vacuum System is the perfect on the job-site clamping system. It is small and portable, easy and fast to setup, and is quiet. The vacuum pump barely makes any noise so it is perfect for the occupied space.
Two major applications that we believe this unit can pay for itself in efficiency and comfortably is edge banding and large man door work.
#gallery-0-10 { margin: auto; } #gallery-0-10 .gallery-item { float: left; margin-top: 10px; text-align: center; width: 33%; } #gallery-0-10 img { border: 2px solid #cfcfcf; } #gallery-0-10 .gallery-caption { margin-left: 0; } /* see gallery_shortcode() in wp-includes/media.php */
Conclusion
The Festool Vacuum Clamping System is expensive. We believe that expense is an investment to both your, your labor force, and your products. It will make completing the required task faster, make it more enjoyable, and allow you to get better results (over a long stretch of time).
GAME CHANGER | Festool Vac-Sys Vacuum Clamping System Work Holding Working with any material in any working environment, there are two main points to review when talking about work holding.
#cabinet#clamp#clamping#domino#ets ec 125#featured#festool#festool vac sys#installer#lr32#mft/1080#mft/3#of1400#production#the new festool clamping system#the new festool clamping system vac sys#toolnut#ts55#vac sys review#vac sys vacuum clamping system#vac-sys#vacuum#vacuum clamping#Vacuum Pump#woodpecker#woodworking#woodworking shop
0 notes
Photo

Creating lots of MDF dust in the studio today routing the handles on these wardrobe doors. I definitely need more routers. Ideally three are needed, saves the need to re-set cutter depths and ensures all cuts are identical. The Trend T11 & T9 are perfectly up to the job, but I think the #Festool OF1400 will be joining the team very soon - - - - - - - - - #maker #design #contemporarydesign #finishcarpentry #finishcarpentry #britishmade #handcrafted #bespokefurniture #handmadeinengland #interiordesign #designer #britishdesign #woodworking #furniture #woodwork #craftmanship #customfurniture #cabinetmaking #bespoke #handmade #cabinetmaker #finewoodworking #cabinetmaking https://www.instagram.com/p/BuipUgNAYGM/?utm_source=ig_tumblr_share&igshid=1e3w9casrqfvc
#festool#maker#design#contemporarydesign#finishcarpentry#britishmade#handcrafted#bespokefurniture#handmadeinengland#interiordesign#designer#britishdesign#woodworking#furniture#woodwork#craftmanship#customfurniture#cabinetmaking#bespoke#handmade#cabinetmaker#finewoodworking
1 note
·
View note
Text
Lightweight COFDM Video Transmitter
Lightweight COFDM Video Transmitter
Lightweight COFDM Video Transmitter
UAV Video Link and Data Link Lightweight COFDM Video Transmitter with RJ45 and Data PortDetailed Product DescriptionBaud Rate: 115200bps MaximumWeight: 193gBandwidth: Up To 10MHz BandwidthInterface: RJ-45 Ethernet, RS232/RS485/RS422RF Power: 1W-3W OptionTransmit Distance: 30-40km LOS (on UAV)Wireless Video Link Description:The new model KP-OF1400 is a robust…

View On WordPress
0 notes
Video
Follow us ➡️ @woodworkcraftshop For more amazing woodworking projects. After the rough sanding was done time to insert the C Channel into the bottom of the table top. Used the @festool_usa OF1400 with the guide track rails to route out the the edges then the cordless @makitatools router to remove the rear of the material. Final result a clean and flush C Channel ready for the threaded inserts. Credit goes to: @rusticgraindesigns_tampa #woodwork#woodshop#woodart#woodcraft#woodisgood#woodworker#woodfurniture#woodcarving#woodworkers#woodshops #liveedgetable #slabtable #cherry #festoolusa #makitatools https://www.instagram.com/p/B_i3WC_j2Ga/?igshid=1n0z1ead0eafk
#woodwork#woodshop#woodart#woodcraft#woodisgood#woodworker#woodfurniture#woodcarving#woodworkers#woodshops#liveedgetable#slabtable#cherry#festoolusa#makitatools
0 notes
Text
Recensione Festool CTL Midi
Recensione CTL Midi Festool #clmake #festool #ctlmidi #diy #faidate #woodworking
Da un po di tempo sto acquistando alcuni prodotti Festool e devo dire che sono veramente strumenti incredibili. Ho comprato il banco MFT3, la sega ts 55 , il seghetto alternativo Trion e la fresa of1400. Se già possiedi uno strumento Festool ti parlo di cose scontate, ma se non ne possiedi uno credimi… sono molto cari… ma valgono ogni centesimo speso. Pagherai qualcosa di più, ma otterrai grande…
View On WordPress
0 notes
Photo


Working on the backsides of the MFA Boston panels.
6 notes
·
View notes
Text
Fräszirkel für die Oberfräsen

Fräszirkel für die Oberfräsen
Ja, ich habe bereits einen "Fräszirkel". Die Frässchablone von Festool, die man auch als Fräszirkel einsetzen kann.
Allerdings ist es damit ein "Rumgefummel" bei der Einstellung. Einfacher wäre es, nur durch eine Schraube den Radius einstellen zu können.
Videos über den Bau gibt es genügend. So habe ich meine eigenen Lagervorräte überprüft und für den Bau zusammengestellt.
12mm-Multiplex, 20x5 Alustange und einen Drehknopf. Dieser war übrig geblieben beim Umbau der OF 1010.Zunächst habe ich (ohne Plan) meine Vorstellung aufs Holz gebracht.
Diese Arbeiten waren auch bei der zweiten und endgüligen Schablone die gleichen.
Anzeichnen ist einfach. Lässt sich es auch alles so ausführen?
Die Nut muss 2ßmm breit sein um den Schieber aufzunehmen. Allerdings muss sich dieser auch frei bewegen können. Wäre die Nut auch genau 20mm, würde sich der Schieber evtl festsetzen. Also kein 20mm-Fräser nehmen. 21mm-Fräser habe ich nicht. Also mit einem 10mm-Schlangenfräser zweimal fräsen.Warum sind die meisten Oberfräsen an Ober- und Unterseite rund? Um damit ohne Längsanschlag gerade Nuten fräsen zu können.
Einfach hierfür eine gerade Führung anbringen, die genau auf den Fräsweg ausgerichtet ist. So kann man ohne Gefahr mit leichtem Druck gegen die Führung eine Supernut fräsen.
Zuerst habe ich die Mitte der erforderlichen Führung gefräst. Ein Durchgang mit 5mm Tiefe und dann (über den Revolver) durchgefräst.Die Lochkreise für die Befestigung der Oberfräsen OF1010 und OF1400 habe ich von den Fräsen abgenommen. Einfach die Bodenplatten abschrauben und die Bohrungen markieren.
Das Senken der Bohrungen mache ich als erstes, denn wenn man es anschliessend nach dem Bohren macht, werden die Senkungen sehr unschön.
Da ich eh alles gefräst habe, kann ich auch den Rest der Arbeit mit der Oberfräse machen.
So habe ich mit dem 10er Spiralfräser auch die komplette Form ausgefräst.
Keine Sägespuren und so gut wie keine Nacharbeit.
Für das kreisrunde Ausfräsen der Bodenplatte brauchte ich eine Schablone.
Diese habe ich aus MDF-Rückwand ausgeschnitten und die Kante sauber geschliffen.
Diese Platte habe ich mit 2 sehr kleinen Schrauben auf dem Werkstück befestigt und mit einem Kopirfräser saber geschnitten.
Leider habe ich nur einen Kopierfräser mit Anlaufring unten. Wird sich sofort ändern. Bestelle jetzt noch welche...
Wie auch immer. Geht natürlich auch so. Keine Brandflecken, weill ich jetzt natürlich auf scharfes Werkzeug achte.
Schnell noch die Kanten mit einem 2mm-Abrundfräser bearbeitet und schon ist der Zirkel Fertig.
Nut für den Schieber ist einen Tick breiter als 20mm, der Durchbruch ist 10mm breit. Es wird eine 8er Schraube durchgebracht; also mehr als ausreichend. Das Aluteil ist 5mm stark.
Ach...der Schieber fehlt noch.
Der Schieber muss 2 Gewinde à 8mm Durchmesser bekommen.
Dazu habe ich die Bohrungen mit einem 7er Bohrer eingebracht. NICHT 8mm bohren...passt nicht.
Dann mit Vor-, Mittel- und Fertigschneider das Gewinde einbringen. Erst anschliessend auf die gewünschte Länge abschneiden.
Den Dorn, der den Drehpunkt für den Zirkel bildet, wollte ich aus einem 8mm-Alustab machen.
Ging nicht! Das Gewinde wurde schief. Mehrmals.
Lösung? Eine Maschinenschraube, deren Kopf ich mit der Flex abgeschnitten habe und das Gewinde auf 5mm gekürzt. Ging sogar schneller als das Gewindeschneiden.
Passt prima.
Jetzt nur noch eine Scheibe unter den Drehknopf und schon ist der Fräszirkel fertig!
Read the full article
0 notes
Text
Long-Range UAV Video Link Data Link 60km LOS Radio Transceiver RJ45 Ethernet Transmission
Long-Range UAV Video Link Data Link 60km LOS Radio Transceiver RJ45 Ethernet Transmission
Long Range UAV Video Link Data Link 60km LOS Radio Transceiver RJ45 Ethernet Transmission
Detailed Product DescriptionModulation: FHSSOutput Rf Power: 1-3 WattBandwidth: Up To 10MHz BandwidthInterface: RJ-45 Ethernet, RS232/RS485/RS422Baud Rate: 115200bps MaximumWeight: 193g
Wireless Video Link Description:The new model KP-OF1400 is a robust broadband OFDM Ethernet wireless transceiver radio,…

View On WordPress
0 notes
Last Seen Blogs

hautecouturemsabi-blog
M.SabiDesigns

onemoretime1000
One More Time

rsmedicalhacking
RS Medical Hacking


bonesarefordogs-blog
Happy Pigs