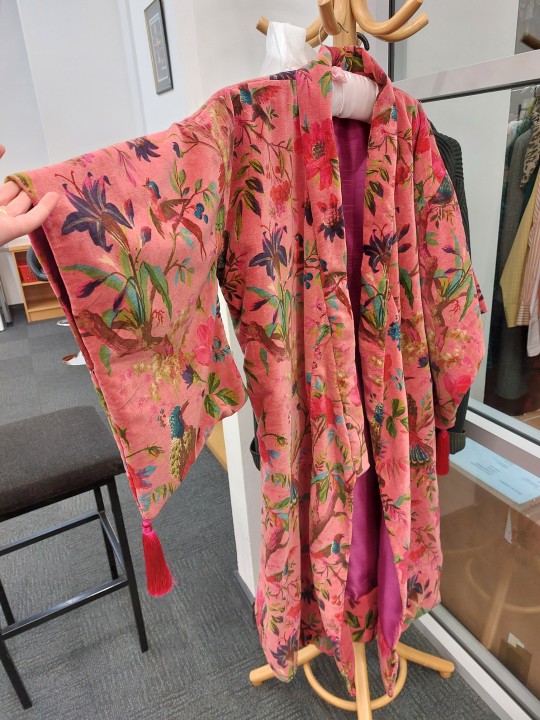
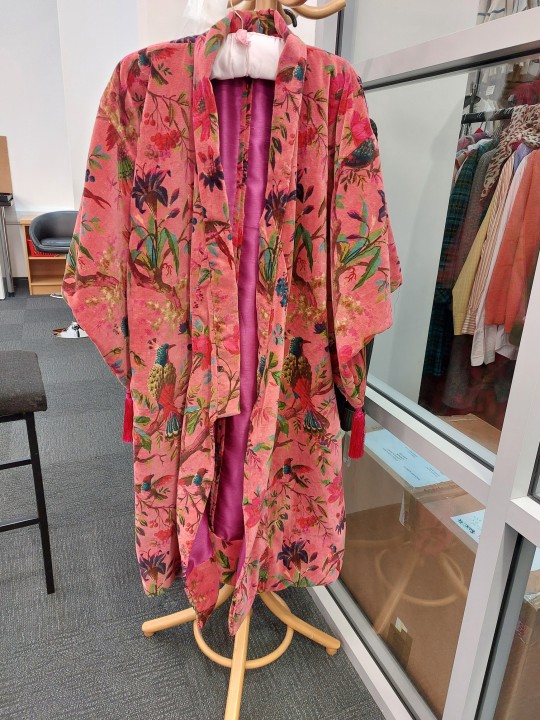
#ofmd bird robe
Text
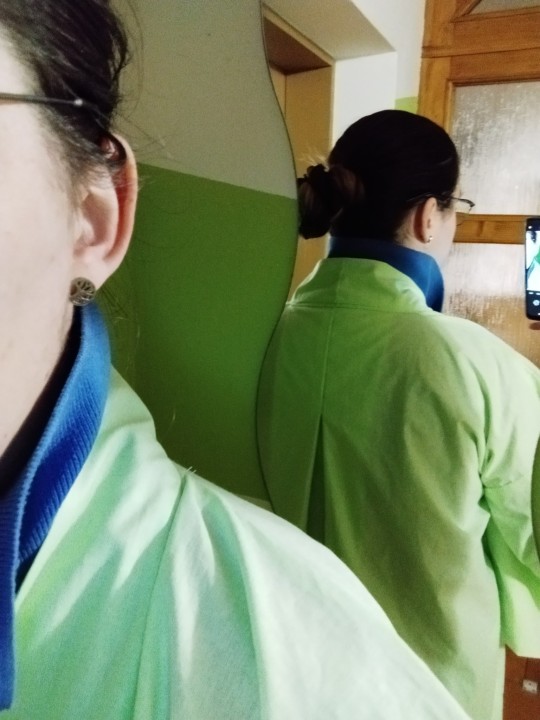
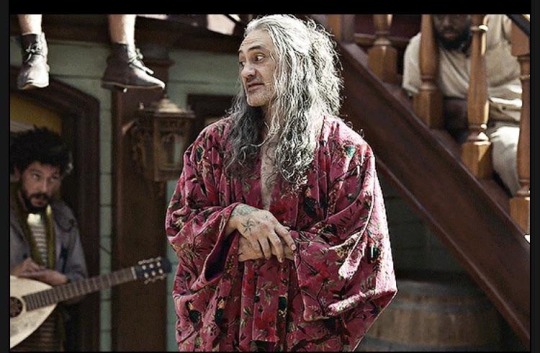
Please join me in welcoming for his regional debut the brigand of Barbados, the cream of the Caribbean, the Gentleman Pirate!
Or my take on the famous Stede Bonnet's costume. With a corset, of course.
#ofmd costuming#ofmd cosplay#seamstress daily#fandom screams into the void#corsetmaking#corsetry#handmade#cosplay#ofmd stede#ofmd stede bonnet#stede bonnet cosplay#stede bonnet#banyan#ofmd bird robe
154 notes
·
View notes
Text
After spending weeks in my last post regarding the fuchsia/bird robe, trying to figure it out... I finally have a usable pattern and am done with my mock-up!
Now I just have to finally decide what I want to use as the lining so that I can finally start working on the real deal!

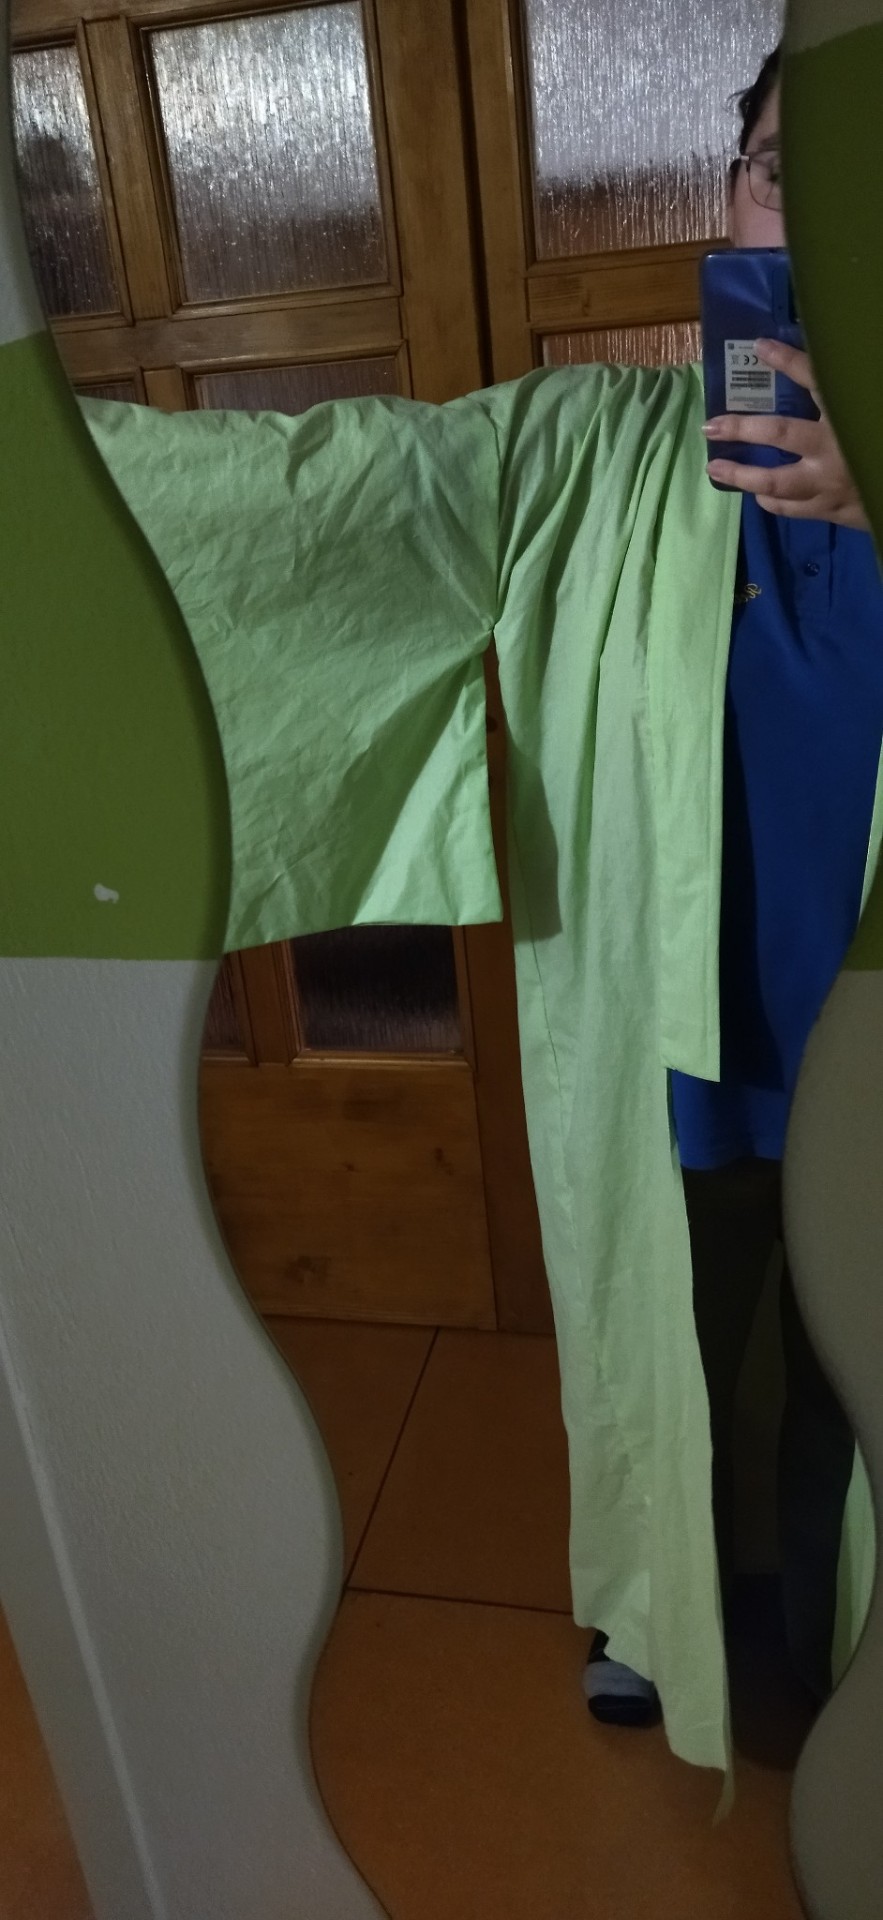
(for those of you interested in the pattern, I might do a post once I finish the actual velvet robe BUT this YouTube video by Shannon Makes wonderfully explains the patterning process and arrives to the same conclusion as I did!)
#ofmd#our flag means death#ofmd costuming#ofmd cosplay#ofmd fuchsia robe#ofmd break up robe#ofmd bird robe
28 notes
·
View notes
Text
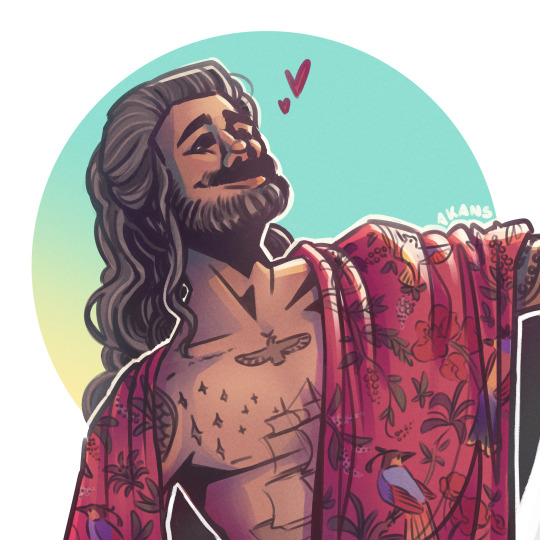
He's so babygirl ✨💜✨
60s timelapse too cause why not :>
#ofmd#our flag means death#edward teach#ofmd fanart#blackbeard#ed teach#our flag means fanart#look I draw people once in a blue moon and I'm actually really proud of this one ok#he's got the perfect face to fight artblock with#and who knew doodling the depression robe would be so friggin fun? birds and plants; 2 of my favorite things
186 notes
·
View notes
Text
more from the scriptorium <3
#went ham on this one#please look at the details it’s like a scavenger hunt of fun#oranges…. tea with milk and seven sugars… the depression robe bird…#ofmd#our flag means death#my art#absolute lithops effect my beloved
312 notes
·
View notes
Text

I was always able to write my way out
The song always made sense to me
Now I find that when I look down
Every page is empty
There is nothing to describe
Except the moon still bright against the worrying sky
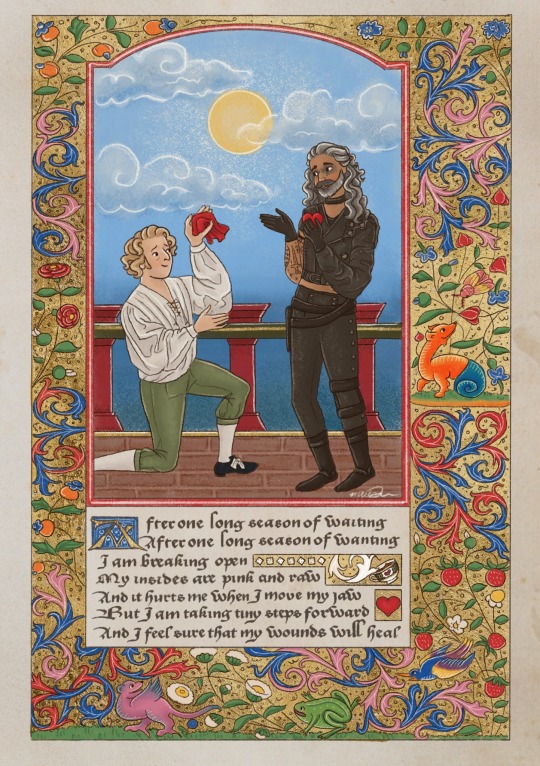
My take on depression robe Ed on the cover of Florence + the Machine's Dance Fever album from @epersonae's galaxy -brained post
#edward teach#ed teach#ofmd#our flag means death#depression robe#break up robe#bird robe#florence and the machine#florence + the machine#fatm#f+tm#dance fever#my art
61 notes
·
View notes
Text
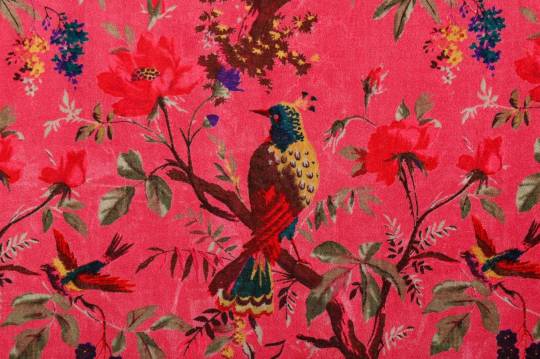
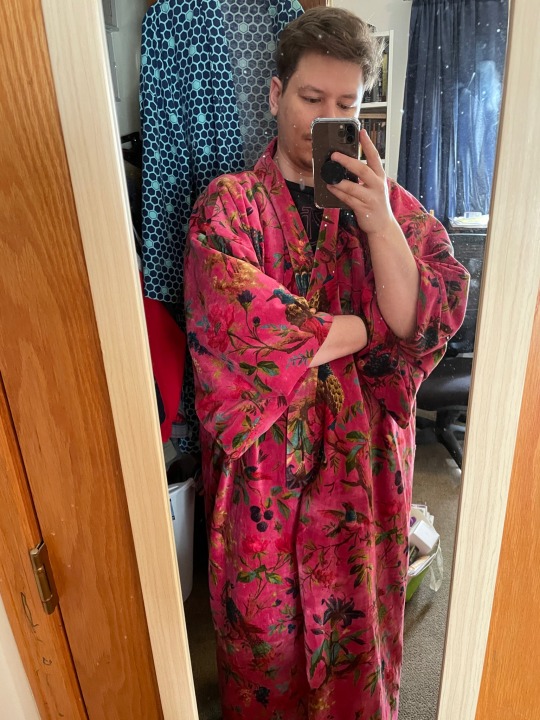
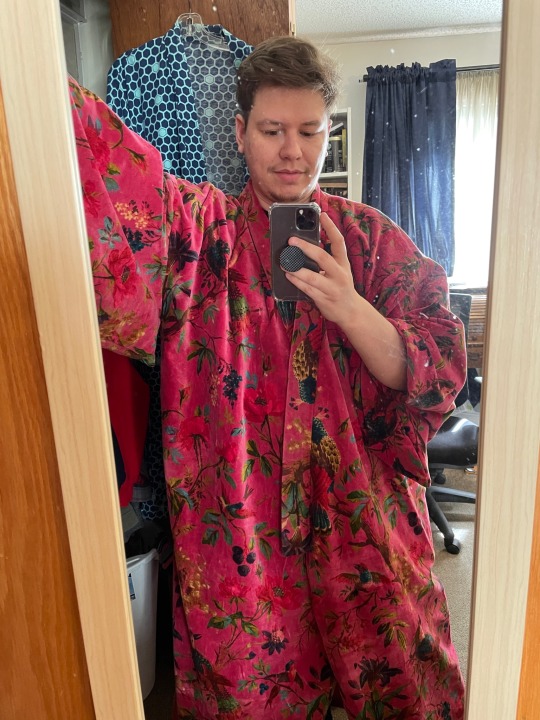
Tutorial for my OFMD Breakup™/Bird Robe
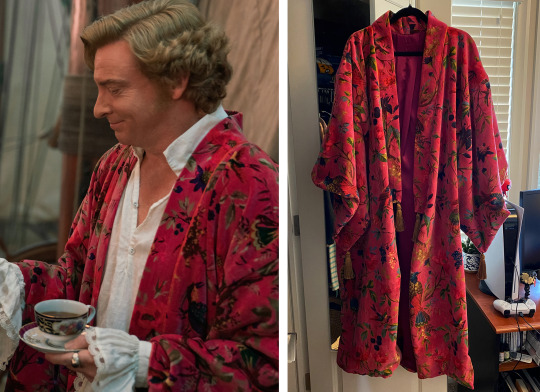
Disclaimer: I’m not a professional sewer or costumer, so any weird methods of execution are entirely due to my own (mis)adventures in sewing. Also all of the links for the fabric and research are in the replies bc I have no idea if tumblr is still ~suppressing~ posts with links.
The basic design for my Breakup Robe™ was based on
heathervanderstitch and
hannahgreenecostumes‘s instagram posts (two of the costume designers on OFMD) who said that their bird robe was a modified 1940′s kimono pattern with a box pleat in the back to give more movement at the bottom without being too baggy at the top. So I took that info and essentially worked backwards by comparing screenshots from the show and a bunch of online kimono patterns. (The most helpful ones were Ralph Pink’s free Satchi kimono pattern and The Tailoress’s Giselle Kimono).
--- 🦜 ---
I found a helpful starting place for pattern piece sizes was a twitter post from another fan (fiftyfathomkinit), however I ended up making my own modifications because I found her drafting slightly confusing (she includes armhole cutouts in her back panel which i could never figure out). I also adjusted the sizing to better fit my own measurements and I added an extra seam on the sleeves so one side of the pattern wouldn’t be upside down.
On a personal note, don’t be afraid of making mistakes! I didn’t realize I needed to adjust the pattern measurements until after I’d started making the lining - which was an oopsie on my part and could have saved me a little bit of money on fabric for my lining. You can get around this error by making a mockup in cheap fabric, or you can do it like me and start off with larger pieces and make them smaller as you adjust to your own fit.
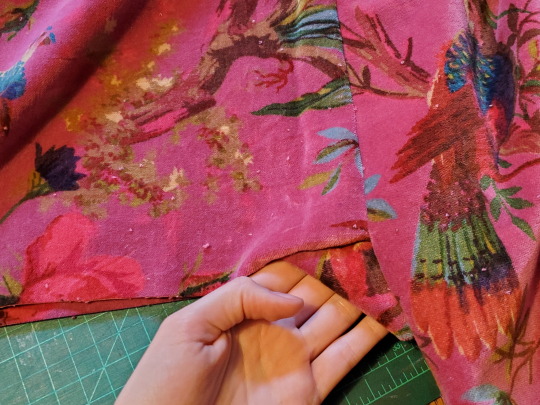
Speaking of the lining, the original robe has a fuchsia dupioni (coarse) silk lining and a hand dyed, block printed 100% cotton velvet outer shell. I found the velvet from (I believe) the same seller on Etsy. It’s a little pricey, but they also have a regular cotton version for those who want a cheaper option.
For the lining, I wanted silk to match the original, bc it breathes better than polyester satin, and I believe it’s longer lasting. But I wanted something softer than the dupioni, so I went with... literally the smoothest silk in the closest colour I could find at a local fabric store. (I literally just rubbed my fingers against every fuchsia silk they had). But you can go with whatever lining you’ll be most comfortable with (satin, cotton, etc).
I got tassels from that same fabric store and the thread and orange bias tape from Fabricland, but you can make your own tassels with yarn if you prefer.
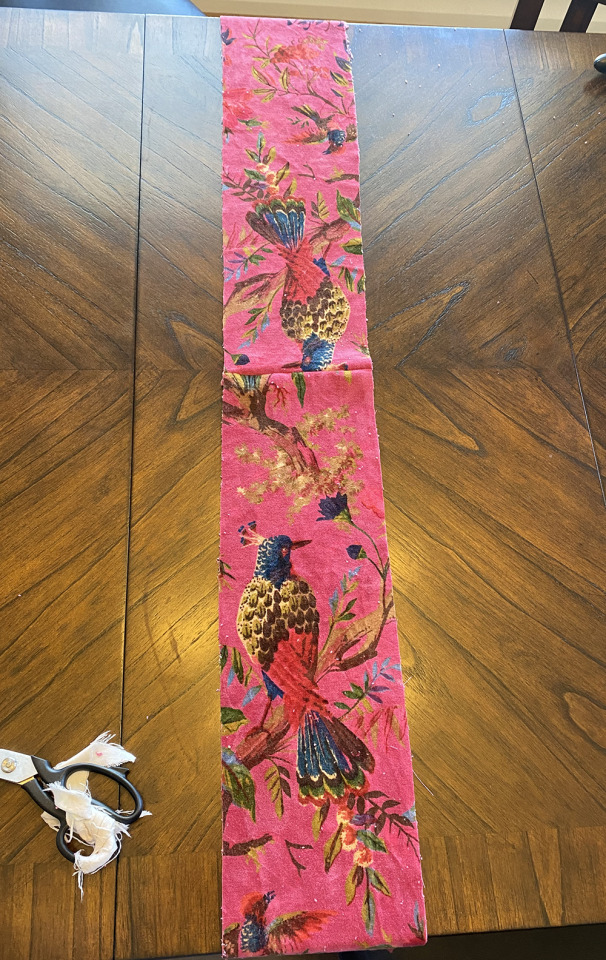
I bought 5 yards of the bird velvet (bc they don’t do half yards) and 4.5 metres (5 yards) of the silk. I ended up using most of the silk and about 4.5 yards of the velvet.

--- 🦜 ---
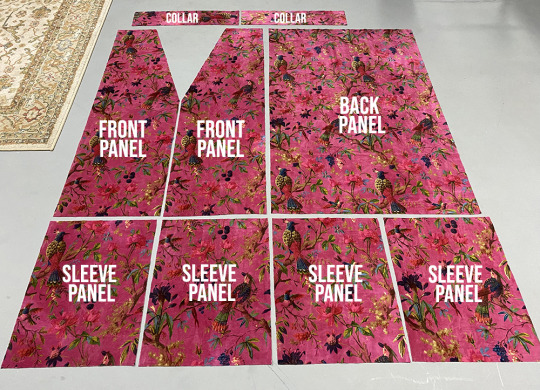
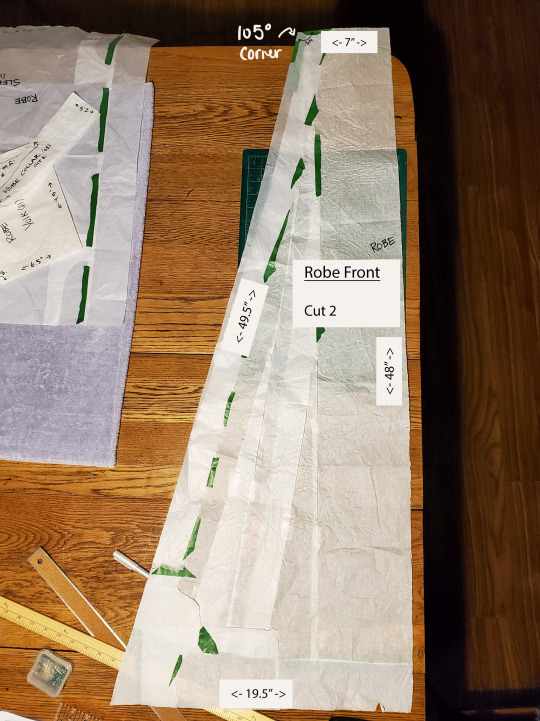
I started by making my own patterns from some super cheap brown wrapping paper with gridlines on the back, which I got from the dollar store. You could also probably just measure and cut your fabric directly, but having paper patterns made me feel better.
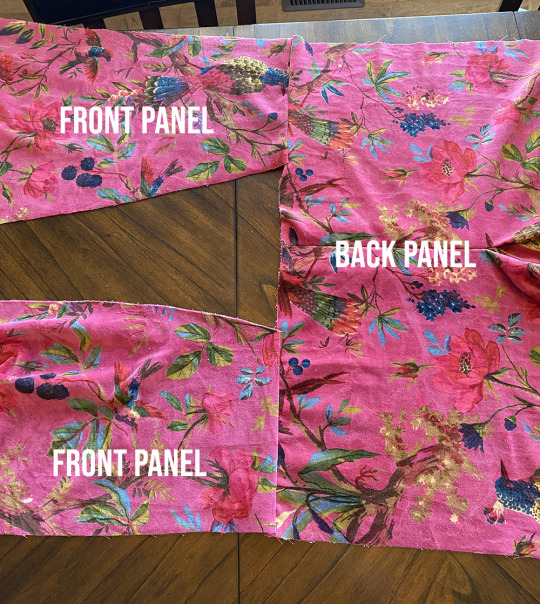
Your own measurements will vary (I’m 5′7″ and 120 lbs), but I wanted it to be quite oversized, with the sleeve shoulder seam hitting a little ways down my arm, and the overall length sitting just above my ankles, the same way it does in the show robe.

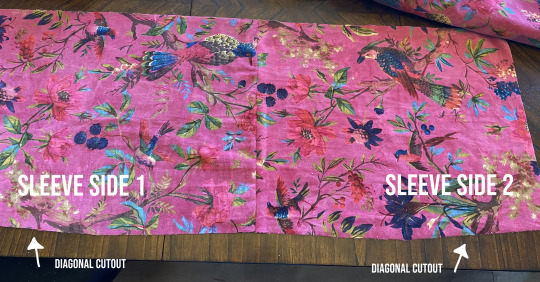
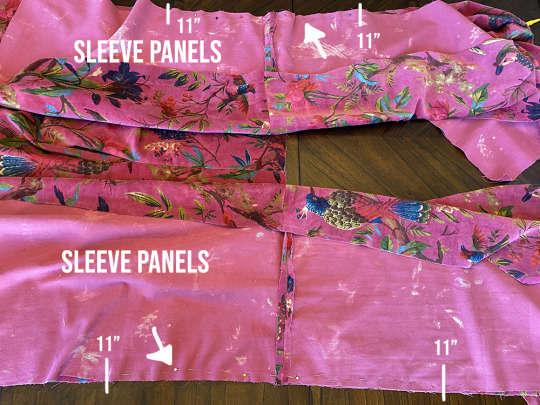
You can see in the above graphic I have a neck opening cut into the front panel that ends halfway down - this is how long I’m also making my collar. (Pro tip - cut the collar longer than you think you’ll need). Meanwhile, the sleeves have an 11″ x 1″ diagonal cut on the sides that will be attached to the main body of the robe, as used in a lot of kimonos.
Here are my pieces cut out (minus the sleeve diagonal bc I forgot to do it while I was cutting everything - but that was a very easy error to correct later):
--- 🦜 ---
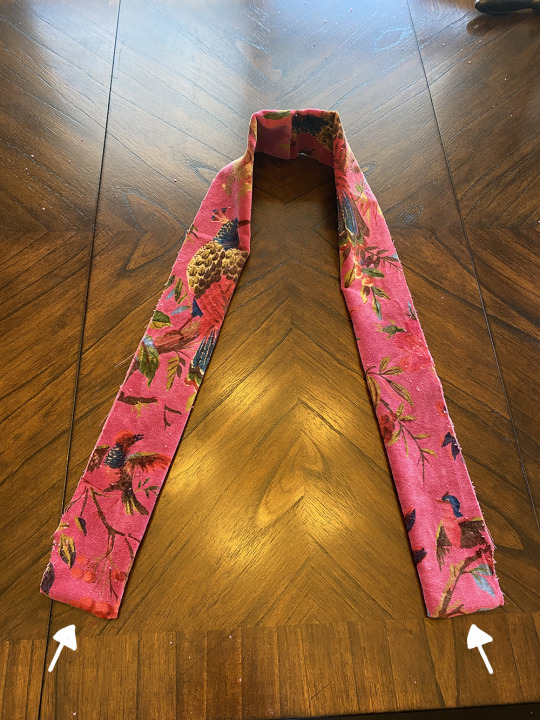
For the inverted box pleat, based on screenshots and insta posts, I went with 3″ on either side of the centre point and guestimated that it ended a little lower than the armpit. So mine ended about 10″-11″ from the top of the back panel.
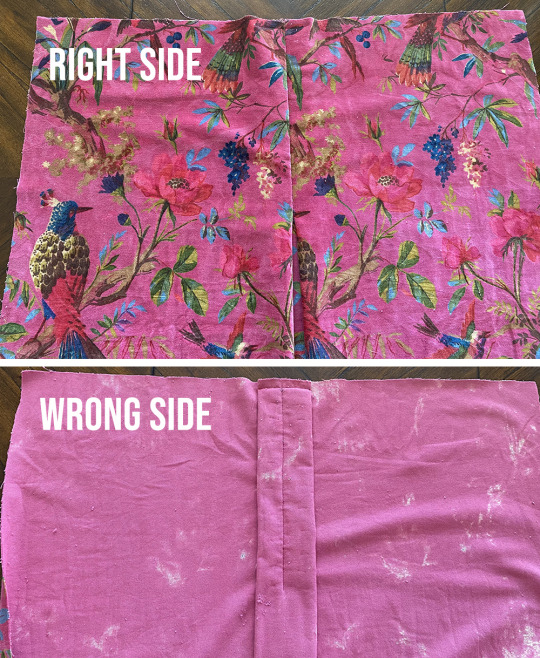
I basted some stitches along the three points (centre back, 3″ to the right and 3″ to left, so it was easier to keep both sides equal). Then I pulled the two sides of the fabric together so they met in the middle at the centre point of the back panel. I pinned them together, stitched the sides together by hand with a ladder stitch, and then machine stitched a line across the top of the panel at my ½” seam allowance.
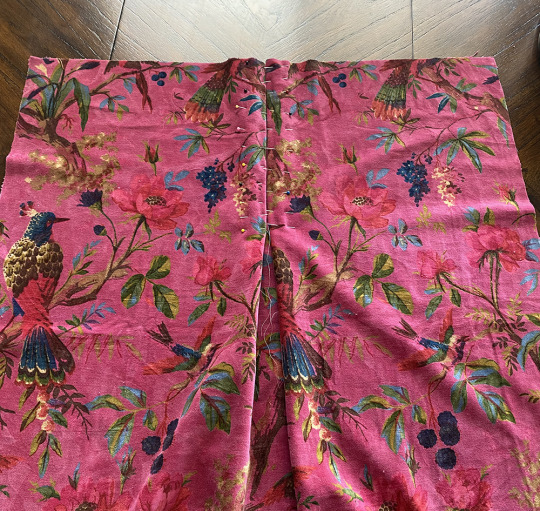
I then machine stitched the sides together down the middle with a really small zigzag stitch to make sure it was extra secure.
I cut a 1″ x 7″ inch neck dip after doing the box pleat, which is probably not the proper way to do it, but it worked out for me!
I didn’t take a picture of it, but this graphic is an approximation of how you’d go about it:

--- 🦜 ---
To sew the actual robe, it requires very simple straight line sewing to connect all these rectangles.
Firstly, you’ll want to attach the front panels to the back panel at the shoulders (right sides together).

Next, you’ll want to sew across the top of the sleeve panels (right sides together). Make sure you’re matching the diagonal sleeve indents so that when you open up the sleeve panels, it looks like this:
Then you’ll open up your robe body so the right side is facing up:
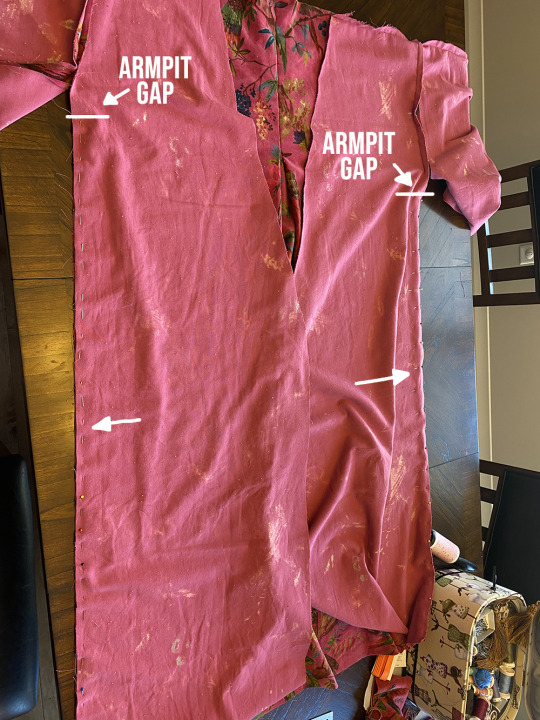
You’ll then attach the sewn sleeves to the front panels (right sides together), ensuring you’re matching the sleeve seam with the shoulder seam. Make sure you’re sewing the side of the sleeves with the diagonal cutout so when the garment is flipped right side out, the diagonal is next to your body. You’ll sew from the marked line to the marked line.
Next, you’ll want to sew the sides of the robe together to close it. However, this was a tricky part for me, because I had tried to sew the body and sleeves at the same time when I was doing my lining, but the armpits ended up bunched and slightly twisted around. So I tried getting around this issue by stopping about 1″ from the armpits, leaving a gap, while sewing the sides together. (You’ll close this gap at the very end of your project).
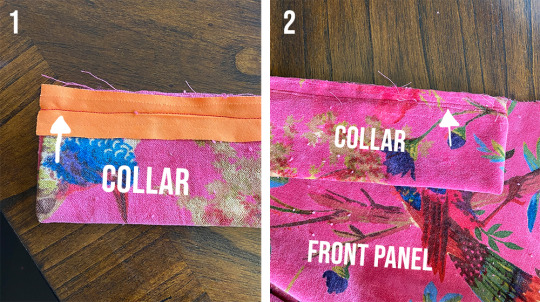
For the collar, attach both pieces together at one end, right sides together, to ensure the pattern isn’t upside down on one side. Once done, the right sides of the attached fabric should look like this:
Then, take the collar and fold lengthwise so the right sides are together. Sew a straight line across the two bottom ends. Then, flip the collar inside out so the wrong sides of the fabric are together and the bottom edges are nicely hemmed. It should look (more or less) like this:
(Ignore the weird cuts on the bottom right and left hand corners - this was my first attempt with a collar that I realized was too short. [Pro tip - cut the collar pieces way longer than you’ll think you’ll need!] I forgot to take a pic of my second attempt, but you get the general idea of what it’s supposed to look like).
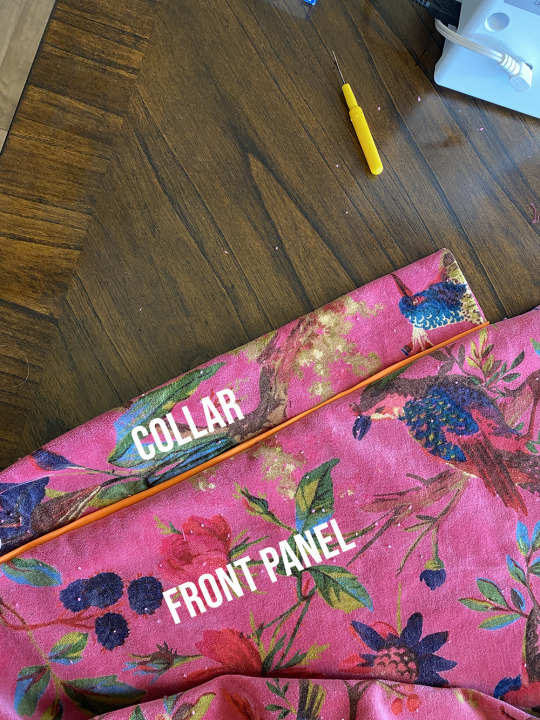
For the bias tape, this is probably not the proper way to go about it, but it was the only way my CFS brain could figure it out and it worked for me! (As the disclaimer said, I’m not a professional sewer - I’m more concerned with whether something works than whether it’s the 100% professional method of execution).
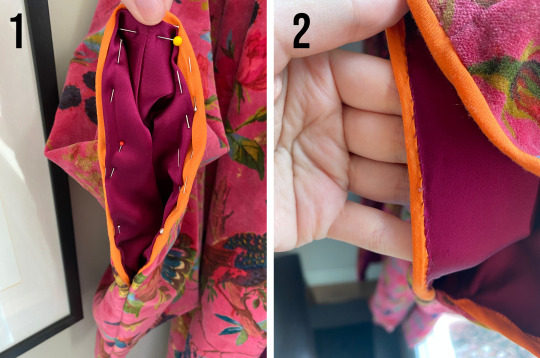
So, take your bias tape, open it up, and pin one edge against the raw edge of your collar. Sew these together a little bit lower than your seam allowance (1). Then you’ll want to fold the bias tape up so both edges are facing the sewn edge of your collar. Then pin and sew your collar, bias tape side down, to your robe (2). (When doing so, make sure to match the seam at the back of the neck on the collar with the middle of the back panel).
This way, when you attach the collar using your seam allowance, you’ll still be able to see a small amount of the bias tape peaking through around the collar when it lays flat against you, like so:
For the bias tape on the sleeves, I attached one edge of the bias tape to the right side of the fabric, stopping an inch past the 9″ marking on both sides of the sleeve. (I sewed this about 1/4″ from the edge).
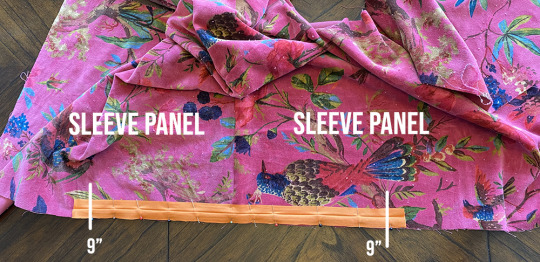
I then flipped each sleeve inside out (right sides together) and sewed it together, stopping about 1/2″-1″ away from the armpit (as previously mentioned) and at the 9″ measurement on the opposite side. For the side with the bias tap, I flipped the bottom part of the tape over onto the wrong side of the fabric and sewed it down as I was sewing the entire sleeve.

At this point, if you flip the entire robe inside out so the right side is facing outwards, it should look like this:
--- 🦜 ---
For the lining, follow the same steps as you did for the velvet (minus the collar). But when you do the box pleat, make sure the inverted side (the side you pull together) is on the wrong side of the fabric.
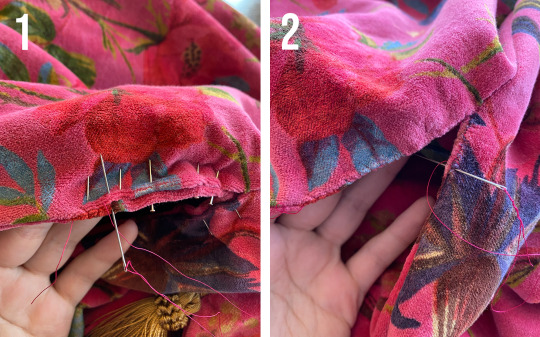
Once the lining is fully constructed, you’ll want to attach the lining to the velvet, right sides to right sides, along the collar and centre front.

Once you’ve sewn the lining and velvet together, flip your robe inside out so both right sides are showing.

As you can probably see in the photo, I already started the next step. Which is hemming the bottom of the robe. I’d recommend doing so while it’s hanging (either on a hanger, dress form, or another person), to ensure you don’t have any weird spots where the lining is pulling up on the velvet. I attached the lining and velvet by hand stitching.
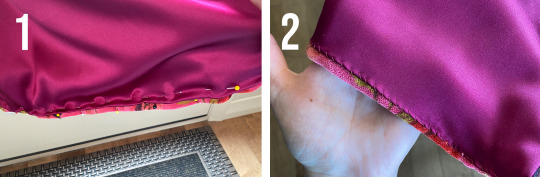
For the sleeves, I folded the bias tape down onto the wrong side of the fabric, folded the lining under itself to make a nice little hem, and sewed both together. I did so by hand with a really simple stitch. (As with the bottom hem, make sure you’re only picking up the bias tape and lining so you don’t poke through to the other side).
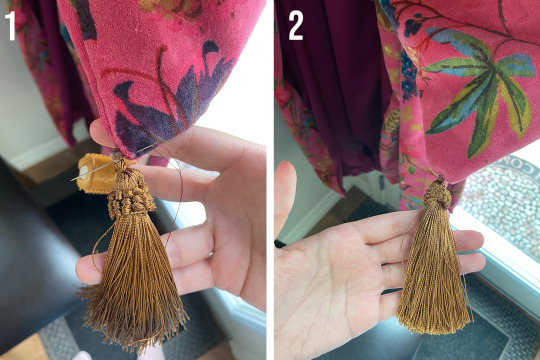
Then for the final touch - the tassels! Mine came with a large loop that I had to remove. I cut it off and then encased the shorn ends in hot glue to ensure the entire thing didn’t somehow unravel.

I let the glue harden and then attached the tassels by hand to the corners of the sleeves and collar.
Now we’ll finally close those ~1″ gaps under the armpits. I did this with a very simple hand stitch, making sure I grabbed a bit of fabric from each side of the fold and pulled the thread taught.
--- 🦜 ---
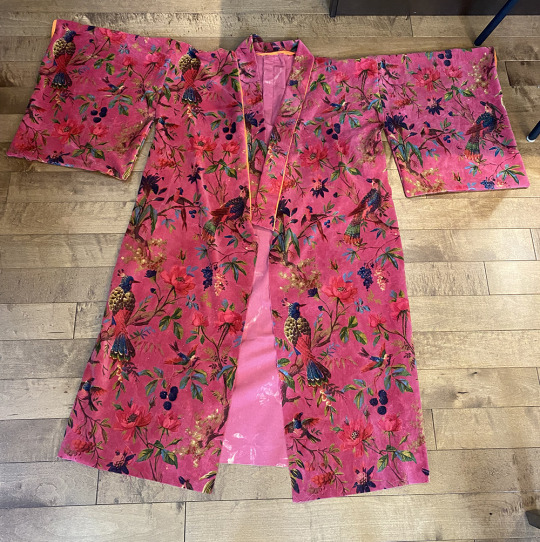
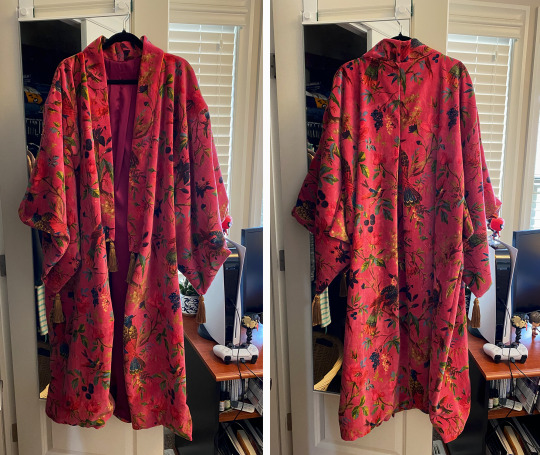
And voila, you should now be the proud owner of the infamous breakup/bird/wrap robe.
--- 🦜 ---
And that’s it! Hopefully this all makes sense and if anyone has any questions either send me an ask or add a reply to this post and I’ll do my best to answer!
On one final note, not to be That Person™, but this took quite a lot of work (both the robe and this post) and I’m a chronically ill freelancer who’s income was hit hard by COVID. So if anyone wants to throw some change at my KO-FI if you found this helpful, I’d be very much appreciated.
#sewing#our flag means death#text post#ofmd#ofmd costuming#ofmd cosplay#ofmd tutorial#long post#banyan robe#mine [wb]#bird banyan#seriously this post is quite long but i wanted to be thorough so I can save at least one person the headache i've been dealing with#namely the headache of trying to figure this whole thing out#also if anyone's curious the colour of this robe changes drastically depending on how it's photographed#which is why it looks red in some pictures and more pink in others#it's the exact same roll of fabric and it's WILD
485 notes
·
View notes
Text

This fictional character, he’s having a hard time?
#ofmd#our flag means death#edward teach#ofmd cosplay#our flag means death cosplay#edward teach cosplay#breakup robe#ofmd robe#bird robe
97 notes
·
View notes
Text
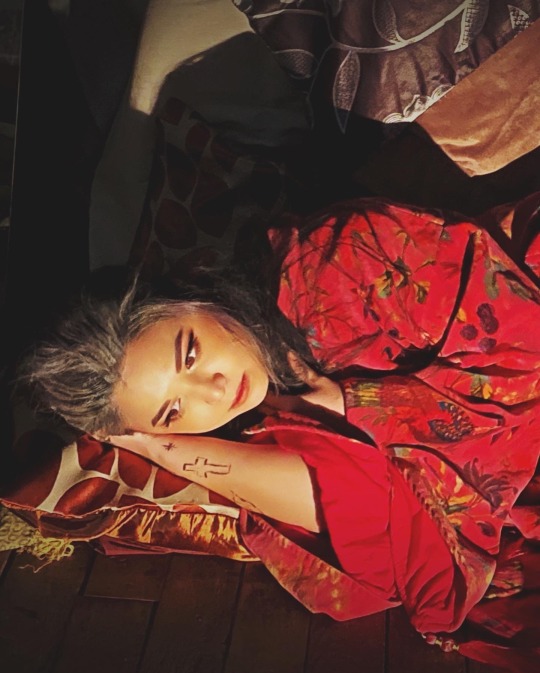
A little depression robe to keep us company during our stay in the gravy basket. 💖

4 notes
·
View notes
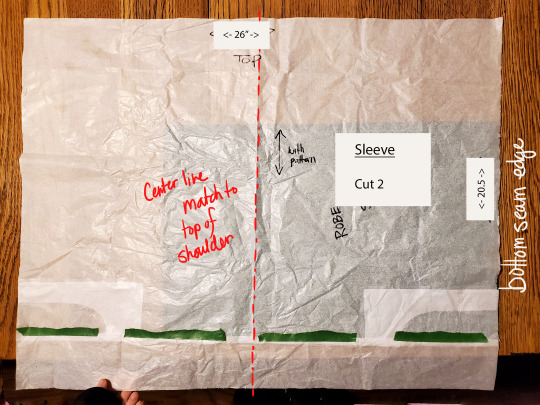
Photo


I made the THE OFMD depression robe for my friend!! This was my first time making a pattern from scratch!! I got the biggest heckin makers high as this came together cause the fabric is gorgeous and just, it was beautiful and rewarding as fuck to see it turn into The Actual Thing.
I know I had such a hard time originally when i was trying to find a ready-made pattern to mod to make this (before I decided I had the skills & GUMPTION to do this myself.) So I’ve measured my pattern pieces and I’m going to upload them under the read more in case it would help anyone make their own.
I’m just going to assume a general knowledge of sewing and quick list my steps. But before I start. This robe was made for someone small, just tiny. Shoulder width of 15″ and a height from shoulder to ankle of 44″. I made it so the proportions suited her. If I was making it for me, I would be adding a lot of length to the collar piece, an inch or two to the yoke width and adjusting other things accordingly. aka. make urself a hecking mockup. See what works for you!
If you are using the actual velvet fabric from the show it's a little bit bitchy and doesnt like to stay in place as u sew, i needed to pin the shit out of it since it was too thick to fit through my walking foot. (I’m an average intermediate sewer so maybe I just dont have the knowledge for how I’m suppose to work with it?? idk u guys I just try things, and if it works it works.)
you can always message me to ask for clarification on anything I’ve written but honestly if it’s basic, then searching and watching some youtube vids on robes will give you great starting points and will explain much better then I ever will.
after the pattern is cut, using 1/2 inch seam allowance:
1) sew the 2 back pieces together (if cut in 2)
2) dart and baste the back dart. fold the dart so that the top of the Back matches the bottom of the Yoke
3) sew Back to Yoke
4) sew both the Front pieces to the Yoke
5) match Sleeve center line to where the Front and Yoke meet. Sew sleeves to body of the robe. Leaving .5″ unsewn at the each end for gussets.
6) Bit complex bit. SLEEVE GUSSETS. I dont have pattern pieces for the gussets they are just 2.5″ square of fabric. I match 1 end of the gusset to the very end of the sleeve, sew it on, leaving the seam allowance unsewn at both ends. I match the next edge up to the robe body where it meets, sew that to the body the exact same way.

7) Match the bottom of the sleeve edges up and stitch the sleeve closed. I stop when I get to the gusset, then line the unattached edges of the gusset up and sew it to the opposite edge of the sleeve, then the body. (guys this bit is confusing and gussets took me a bit of youtubing, and tutorialling to understand and nail. Since the sleeve is square and doesn't have any sloping to it it needs some ease at the bottom where it meets the robe to not pinch unattractively, gussets are the answer.)
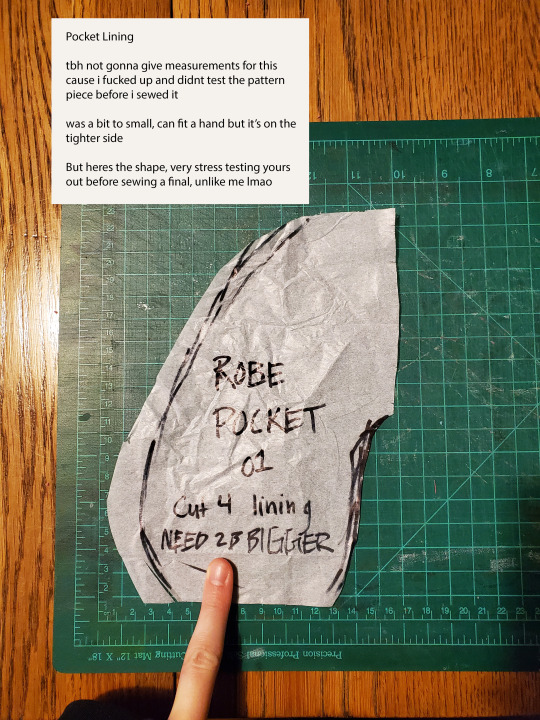
8a) Sew your pocket bags to the appropriate places on the Front and Back peices.
8b) Pin and sew the robe Front and Back together.
9) Sew the bottom edges of the Collar together
10) Pin collar in place, matching centerback and making sure the two ends line up evenly at the front of the robe. Sew until you hit the end seams
11) I flipped the collar right side out so it looks like it is suppose to for the final and basted the loose edge inside the seam allowance of the robe body, this will be hidden when the lining gets sewn in.
Lining time! Do the same steps above for the lining! only skip the pocket and collar steps! (I used a rayon lining because it’s breathable and non-static)

12) pin lining in place around the full front edge, sew that DIRECTLY on your seam for the collar. Fun time with Accuracy!
13) I literally cant describe how I sewed the sleeve and the sleeve lining together, just looked up a shittton of youtube for different way to go abt this, picked my fav.
14) Hem fitting, Trim ur hem, HEM IT UP
15) Tassles.
I made the bottom of the front and back pieces squared off but really they could be curved towards the inner (angled) edge. I knew I was going to be hemming this on someone else so I wasnt too fussed abt getting the hem line right in the pattern stage cause tbh even with a ready-made pattern curved hems never sit right for me so I said “fuck it” wasnt even gonna try at this stage.

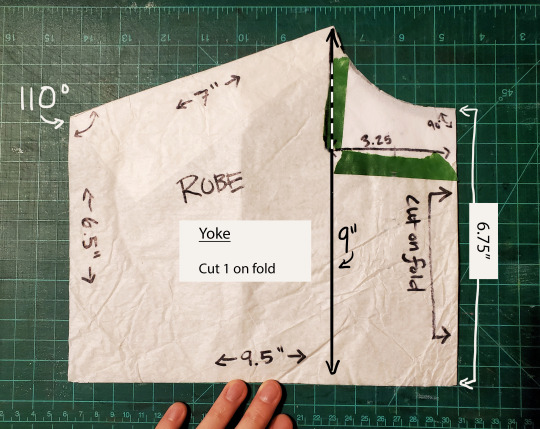
I traced this yoke off another pattern i had and adjusted it a little.
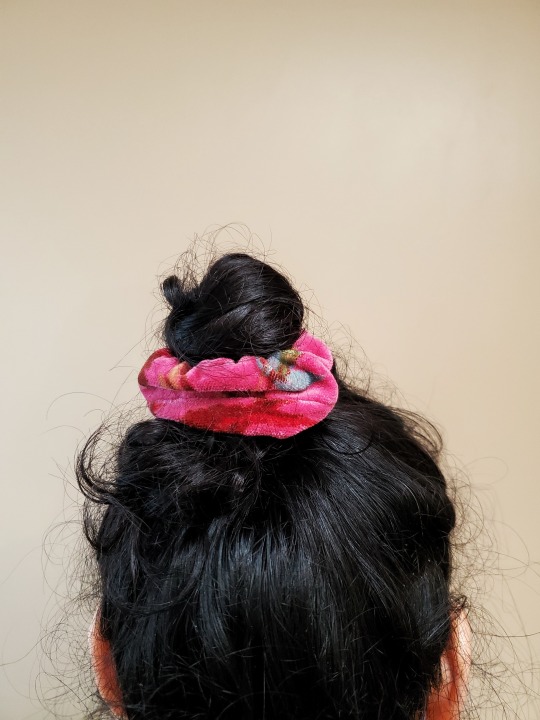
I also made a lil bonus scrunchie out of the scraps and some extra elastic!
OK HOPE THIS HELPS HAVE FUN KIDS
#ofmd#our flag means death#depression robe#ofmd robe#sewing#pattern#fuchsia robe#gentlebeard robe#fuchsia bird robe
84 notes
·
View notes
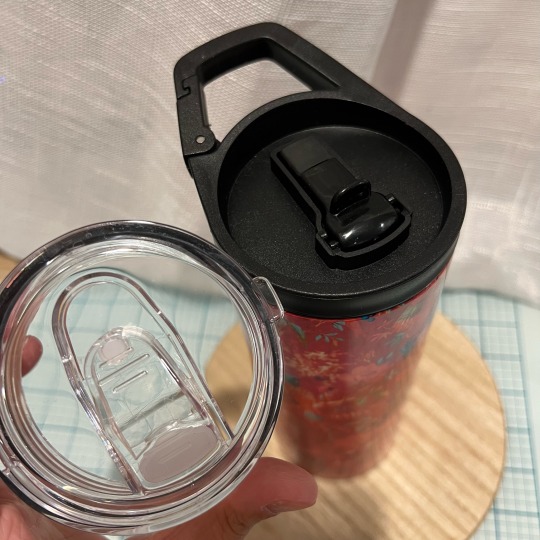
Text
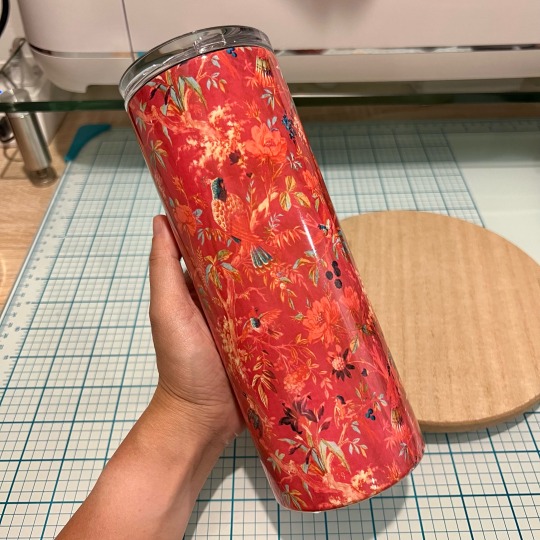
Bird robe tumbler 😍 I got myself a new toy - a tumbler press - and this was the first thing I wanted to make with it! Only 1 in stock in my Etsy shop right now because this was the only blank I had left 😅
#the bird robe#depression robe#ofmd#our flag means death#stede bonnet#blackbeard#our flag means death merch#ofmd costume#gentlebeard
8 notes
·
View notes
Text
SHE'S HEEEEERE!!
Prepare for an onslaught of pictures of me dressed up and lounging dramatically as soon as a I get home from work
72 notes
·
View notes
Text
I identify myself as permanently exhausted pigeon
#ofmd#ofmd cosplay#ofmd costuming#ofmd bird robe#bird robe#breakup robe#stede bonnet cosplay#stede bonnet#ofmd stede#ed ofmd#blackbeard#gentlemen pirate#i made it#handmade#blackbonnet#ed teach#kraken#kraken ed#kimono robe#kimono style
11 notes
·
View notes
Text
Do you fancy a fine fabric?
Sources for the gay pirate robe pt. 2
This fabric is a cotton velvet, nearly identical to the silk velvet used in the show. For our purposes, it's even better because it's easier to clean. I haven't received mine yet, but I researched for weeks, so here's what I know about it. It's soft to the touch and very lush, but the seams can bother those with sensory issues. I recommend doing a lining if you're able and serging the edges. The color is said to be very close, though perhaps a little more pink than the magenta appeared on screen. It's imported from India, but I received free shipping to the US. You have the option to order 1, 3, or 5 yard pieces. It was cheaper for me to purchase 2x 3yd than it was to order 5yd + 1yd. I don't know if it will come as a single piece or cut as ordered. It cost $116 for 6 yds at the time I purchased. I'll post a review when I receive it.
For UK peeps (or those who prefer red) , I found this fabric from Ian Snow which is £38 meter.

Keep in mind if you're an inexperienced sewer, velvet is a bit higher on the difficulty scale. I'm a fuck around and find out kinda crafter, so I've decided to go for it. But I am practicing beforehand. A couple of flat sheets from the thrift store is great for testing your pattern. Thrift stores are also great places to find some 90s style velvet crap to cut up and sew back together to get used to how it works. I found this YouTube video on velvet that seems helpful.
If velvet is too scary or out of your budget, Handicraft palace also has this cotton screen printed fabric in the same pattern. It will not flow in the same way as the robe does, but it's a nice alternative if you want to make something simpler. Like a nice pillow to cry into as you enjoy all the fanart, fics, and edits and troll Twitter for renewal updates.

I'll be documenting the entire process as I make this robe, as well as the rest of the pieces in our Ed x Stede cosplays. This will all be a beginner friendly journey, so follow me if you want to come along. Yesterday I posted about the pattern, so give that a look if you missed it.
#Gay pirate husbands#Depression robe#Red bird robe#Ofmd#our flag means death#Cosplay#edward teach#stede bonnet#tutorial#sewing#costuming
68 notes
·
View notes
Text
How I spent my birthday
Thank you so much @ardentlyalien — you did an amazing job 🌿💜🪶
#OFMD#our flag means death#I have made FIVE copies of the fuschia break up robe#because I love my friends and I like a challenge#I earned that bird damnit
43 notes
·
View notes
Text
I made this for public use for the fandom. Image is a JPG. Use the links below to access transparent PNGs. If you're interested in a larger, higher resolution file, message me and I can send it to you via email.
Enjoy!
Isolated pattern element
Full pattern
#bird robe#breakup robe#ed teach breakup robe#our flag means death#ofmd#edward teach#blackbeard#from each according to their ability to each according to their need#WE not ME
35 notes
·
View notes
Text

almost done! so many nitpicky little things for a pretty simple pattern. i just gotta add the tassels and give her a good steam
#ofmd#ofmd cosplay#stede bonnet cosplay#our flag means death cosplay#our flag means death#cosplay ventures#the bird robe#i just finally got the correct patterns for my suit as well!!#my face
57 notes
·
View notes
Last Seen Blogs

railmitra
RailMitra

darks-arts
Here To Vibe And Let The Arts Flow

blue-eyed-giant
mamma mia/ah shit here we go again

marcspectral
Always Faithful Terrible Lizard

happinessisblooming
Happiness is Blooming