#ofmd fuchsia robe
Text
Finally finished the depression robe!!
84 notes
·
View notes
Text
After spending weeks in my last post regarding the fuchsia/bird robe, trying to figure it out... I finally have a usable pattern and am done with my mock-up!
Now I just have to finally decide what I want to use as the lining so that I can finally start working on the real deal!

(for those of you interested in the pattern, I might do a post once I finish the actual velvet robe BUT this YouTube video by Shannon Makes wonderfully explains the patterning process and arrives to the same conclusion as I did!)
#ofmd#our flag means death#ofmd costuming#ofmd cosplay#ofmd fuchsia robe#ofmd break up robe#ofmd bird robe
28 notes
·
View notes
Text
Today’s gentle reminder is to make sure to practice self care lovelies, whatever that means to you. Brush your teeth, rinse your face, scream into the void, whatever it may be.
I worked late last night, fell asleep on the couch and then woke up 3 hrs later because my son woke up super early so I felt like a heaping pile of gross this morning. Taking 5 mins to make yourself feel fresh can make a world of difference.
You’ve got this <3

#im sure youre tired of my gentle reminders but imma do them anyway#cause i love yall and i needed one this morning#self care#edward teach#ofmd gifs#our flag means death#also ill always make up an excuse to look at Ed in the fuchsia robe
27 notes
·
View notes
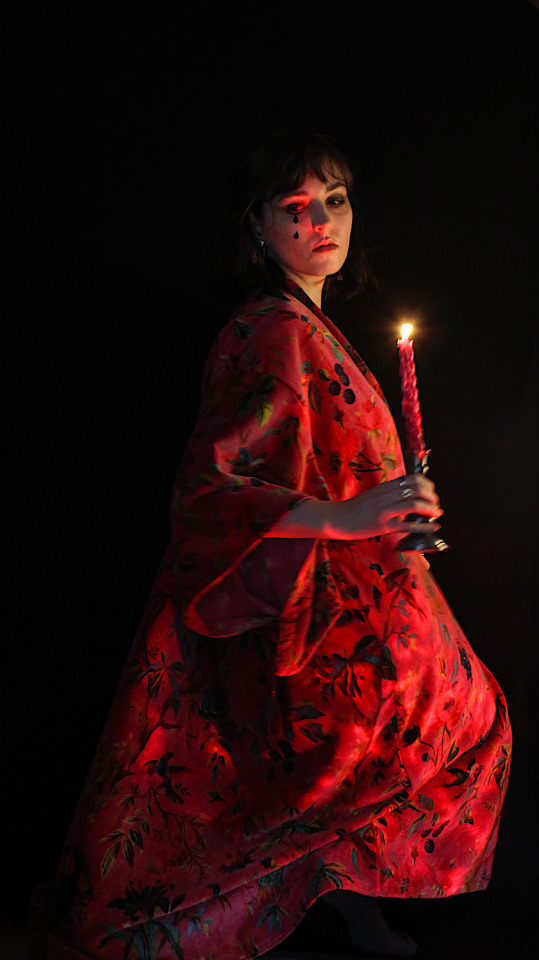
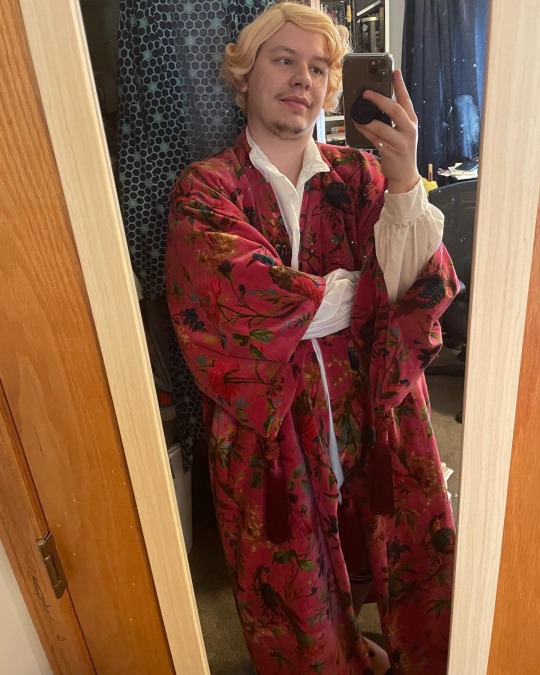
Photo


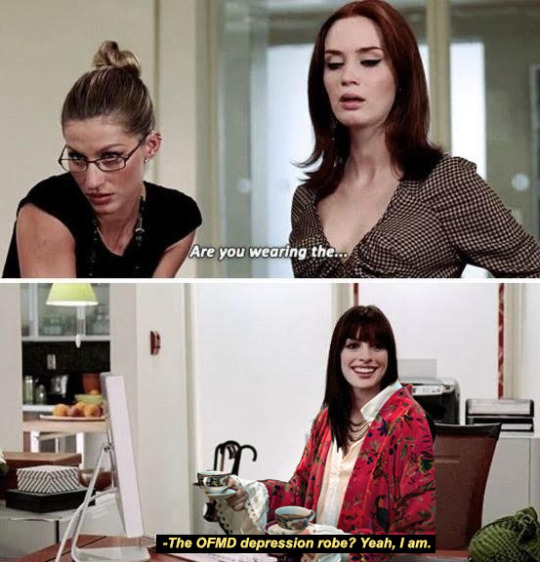
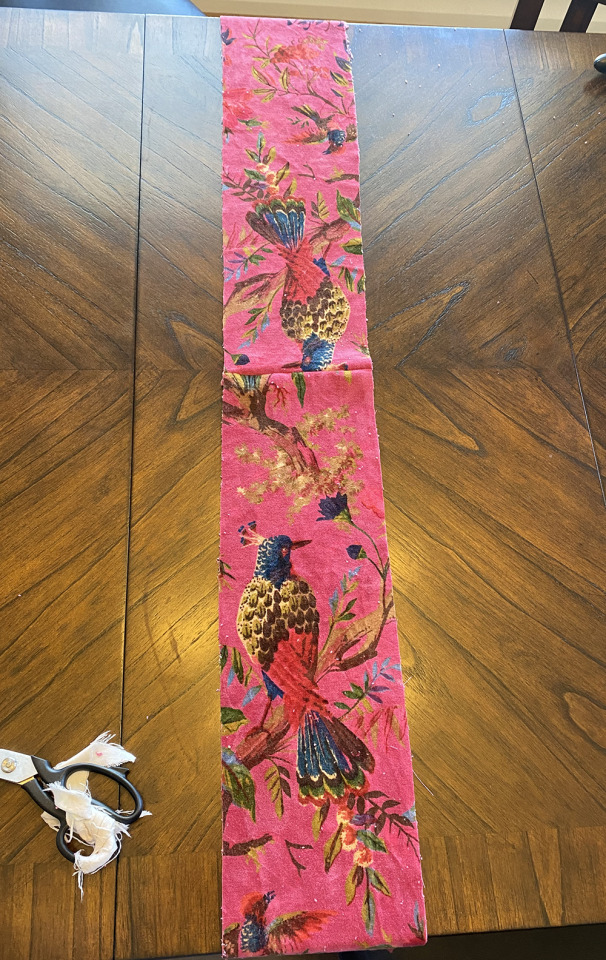
I made the THE OFMD depression robe for my friend!! This was my first time making a pattern from scratch!! I got the biggest heckin makers high as this came together cause the fabric is gorgeous and just, it was beautiful and rewarding as fuck to see it turn into The Actual Thing.
I know I had such a hard time originally when i was trying to find a ready-made pattern to mod to make this (before I decided I had the skills & GUMPTION to do this myself.) So I’ve measured my pattern pieces and I’m going to upload them under the read more in case it would help anyone make their own.
I’m just going to assume a general knowledge of sewing and quick list my steps. But before I start. This robe was made for someone small, just tiny. Shoulder width of 15″ and a height from shoulder to ankle of 44″. I made it so the proportions suited her. If I was making it for me, I would be adding a lot of length to the collar piece, an inch or two to the yoke width and adjusting other things accordingly. aka. make urself a hecking mockup. See what works for you!
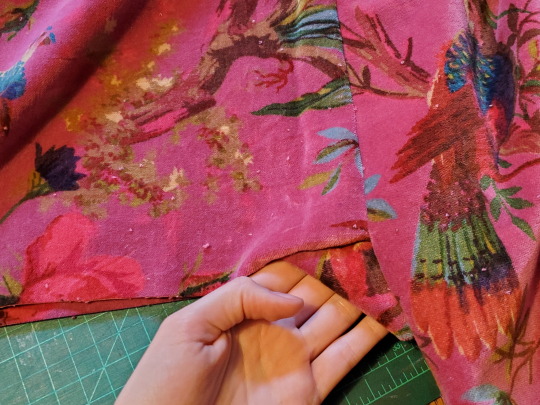
If you are using the actual velvet fabric from the show it's a little bit bitchy and doesnt like to stay in place as u sew, i needed to pin the shit out of it since it was too thick to fit through my walking foot. (I’m an average intermediate sewer so maybe I just dont have the knowledge for how I’m suppose to work with it?? idk u guys I just try things, and if it works it works.)
you can always message me to ask for clarification on anything I’ve written but honestly if it’s basic, then searching and watching some youtube vids on robes will give you great starting points and will explain much better then I ever will.
after the pattern is cut, using 1/2 inch seam allowance:
1) sew the 2 back pieces together (if cut in 2)
2) dart and baste the back dart. fold the dart so that the top of the Back matches the bottom of the Yoke
3) sew Back to Yoke
4) sew both the Front pieces to the Yoke
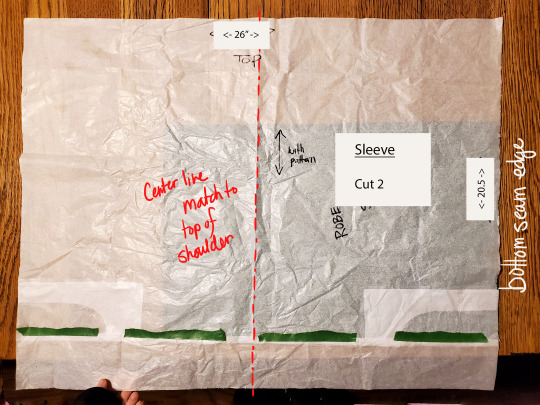
5) match Sleeve center line to where the Front and Yoke meet. Sew sleeves to body of the robe. Leaving .5″ unsewn at the each end for gussets.
6) Bit complex bit. SLEEVE GUSSETS. I dont have pattern pieces for the gussets they are just 2.5″ square of fabric. I match 1 end of the gusset to the very end of the sleeve, sew it on, leaving the seam allowance unsewn at both ends. I match the next edge up to the robe body where it meets, sew that to the body the exact same way.

7) Match the bottom of the sleeve edges up and stitch the sleeve closed. I stop when I get to the gusset, then line the unattached edges of the gusset up and sew it to the opposite edge of the sleeve, then the body. (guys this bit is confusing and gussets took me a bit of youtubing, and tutorialling to understand and nail. Since the sleeve is square and doesn't have any sloping to it it needs some ease at the bottom where it meets the robe to not pinch unattractively, gussets are the answer.)
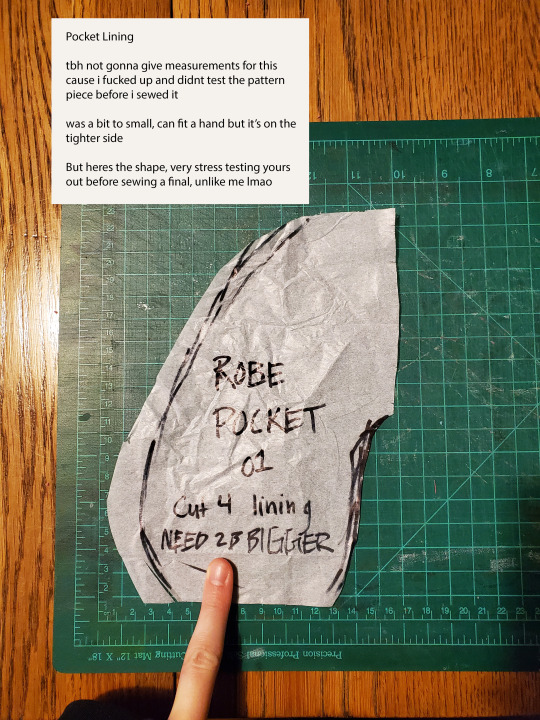
8a) Sew your pocket bags to the appropriate places on the Front and Back peices.
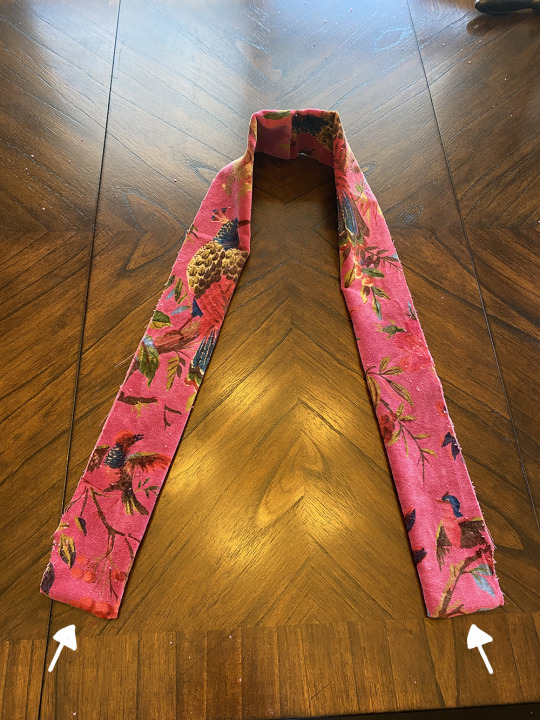
8b) Pin and sew the robe Front and Back together.
9) Sew the bottom edges of the Collar together
10) Pin collar in place, matching centerback and making sure the two ends line up evenly at the front of the robe. Sew until you hit the end seams
11) I flipped the collar right side out so it looks like it is suppose to for the final and basted the loose edge inside the seam allowance of the robe body, this will be hidden when the lining gets sewn in.
Lining time! Do the same steps above for the lining! only skip the pocket and collar steps! (I used a rayon lining because it’s breathable and non-static)

12) pin lining in place around the full front edge, sew that DIRECTLY on your seam for the collar. Fun time with Accuracy!
13) I literally cant describe how I sewed the sleeve and the sleeve lining together, just looked up a shittton of youtube for different way to go abt this, picked my fav.
14) Hem fitting, Trim ur hem, HEM IT UP
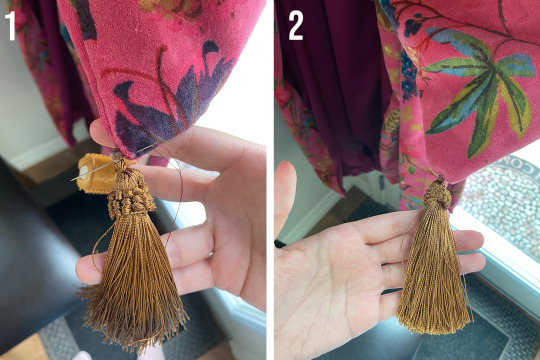
15) Tassles.
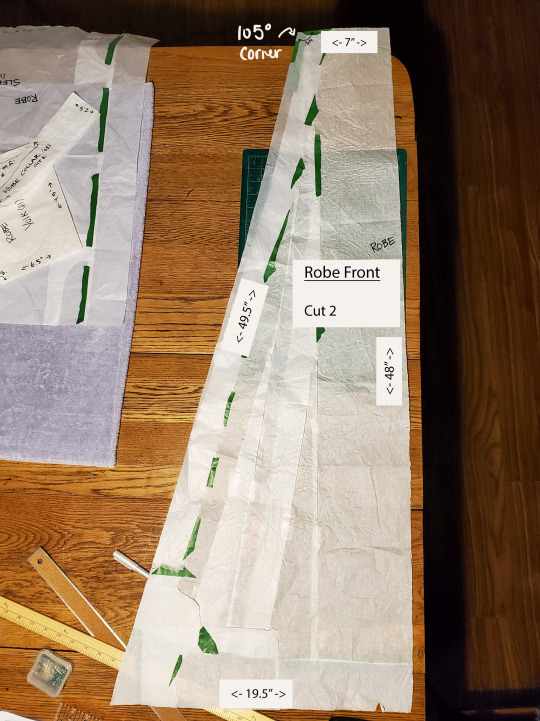
I made the bottom of the front and back pieces squared off but really they could be curved towards the inner (angled) edge. I knew I was going to be hemming this on someone else so I wasnt too fussed abt getting the hem line right in the pattern stage cause tbh even with a ready-made pattern curved hems never sit right for me so I said “fuck it” wasnt even gonna try at this stage.

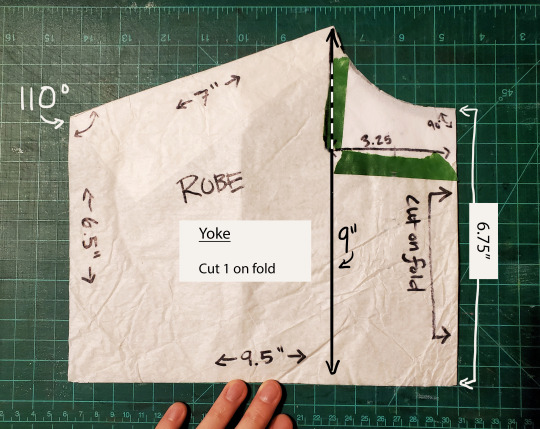
I traced this yoke off another pattern i had and adjusted it a little.
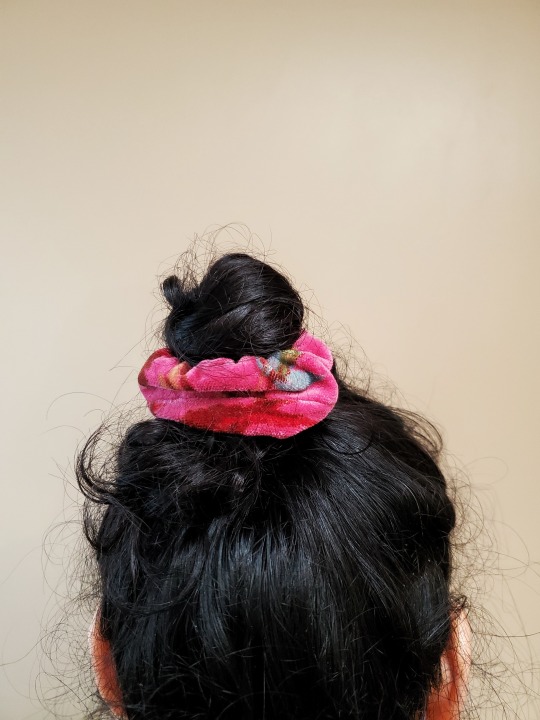
I also made a lil bonus scrunchie out of the scraps and some extra elastic!
OK HOPE THIS HELPS HAVE FUN KIDS
#ofmd#our flag means death#depression robe#ofmd robe#sewing#pattern#fuchsia robe#gentlebeard robe#fuchsia bird robe
84 notes
·
View notes
Text
i REALLY hope there’s at least one person who started watching our flag means death assuming that it would be a serious and dramatic gay pirate show because they kept seeing these beautiful dramatic edits and pieces of fanart, just to observe stede struggle down a flimsy ladder to steal a dying fern from a fishing dinghy and accidentally murder someone using a whale paperweight
#stefon voice: this show has EVERYTHING#pirates#romance#taika waititi in a fuchsia robe#but seriously#that’s the beauty of this show#it shifts through tones so smoothly#you hardly even notice#david jenkins and co i love you#renew our flag means death#ofmd#renew as a crew#fancy a fine fabric#if you experienced this#please message me#let’s talk about it#(as a crew)
93 notes
·
View notes
Text
five fic friday (ECCC 2023 edition)
While I'm waiting for my ride to Seattle:
Kitchen Mistakes & How to Avoid Them (M, 62K WIP) by @yerbamansa - shout out to all my friendos who were obsessed with the Bon Appetit YouTube in like 2019 and watched them set themselves on fire in 2020, it's a modern AU with lots of nods to that setting. Really enjoying this one, sort of as a fix-it of something I once loved a lot as well as a very good OFMD AU.
Three Step Retread (T, 3589) - canon-era post-reunion, in which Ed and Stede and the crew are all together but Ed and Stede aren't reconciled, featuring dancing.
look what the cat dragged in (NR, I would give it a T or maybe M for canon-typical violence, 11K) - canon-era post-S1, Stede and the marooned crew have a boat, and now they also have a cat. Shenanigans ensue.
Work Experience (M, 5855 WIP) by @elapsed-spiral and co-author - canon-era AU in which Ed joins the crew of the Revenge during the events of ep2, pretending to be just some guy. Normally I wouldn't recommend a WIP this early on, but I can't resist a joke about spreadsheets.
Up, Down, Turn Around (T, 20k WIP) - followed the link in the author's note on the previous one to this and I'm glad I did! modern AU with a meet-cute at the British Library. I especially like the Ed voice in this one. (it is, apparently, WIP week for me - more so than usual.)
#five fic friday#ofmd#ofmd fic#yes I will be at ECCC#tomorrow I will be in costume (fuchsia robe but Stede style)#I have both bleached my hair and ironed my linen pirate shirt for this#(I'm sort of mad at how much nicer the shirt is after ironing)#and on Sunday I'll be in some sort of casual cosplay and ofc still reddish-blonde#I keep jumpscaring myself with the hair#but anyway: come say hi!
18 notes
·
View notes
Photo

Finally finished the heartbreak robe.
It’s far from perfect but I AM SO proud omg. It took me so many hours also i don’t know how I managed to not set my flat on fire with these candles I was really close
#i took up sewing like 3 months ago#and i watched ofmd and thought well i will not rest until i make it#i was over the moon when i found the exact same fabric on ebay#our flag means death#ofmd#edward teach#stede bonnet#heartbreak robe#fuchsia robe#taika waititi#rhys darby
46 notes
·
View notes
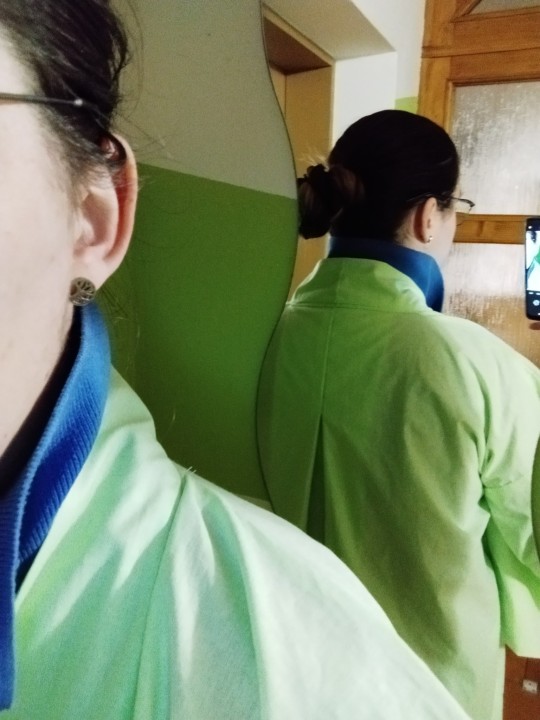
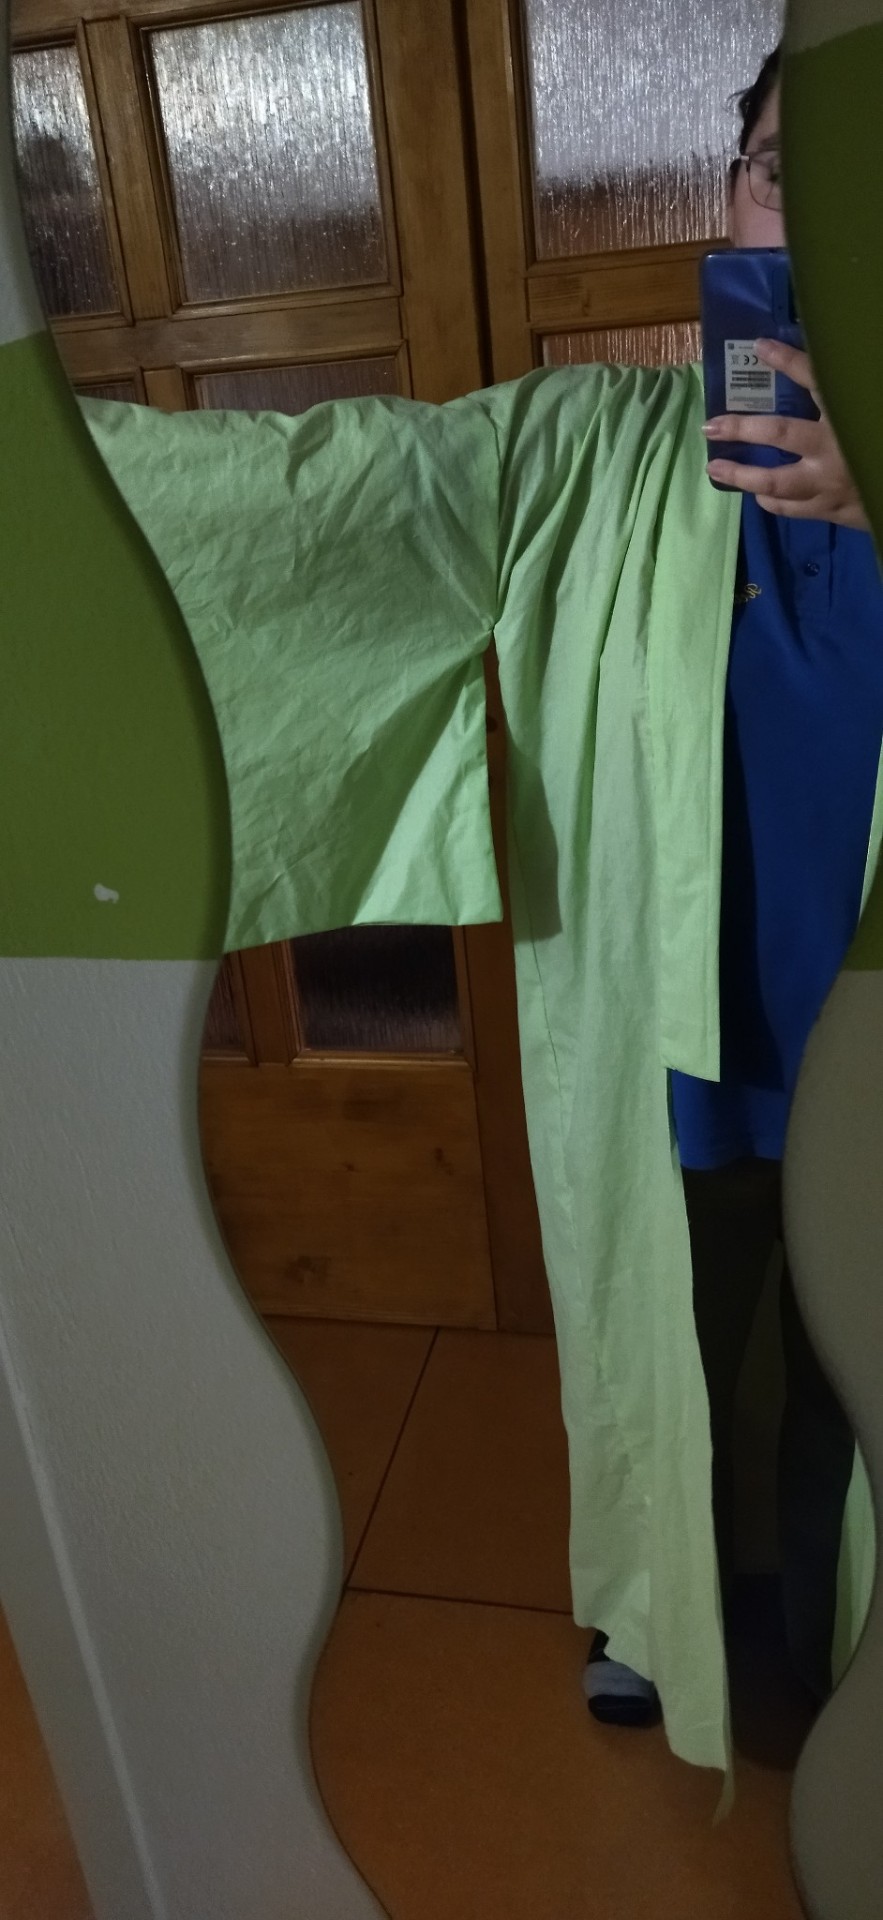
Text

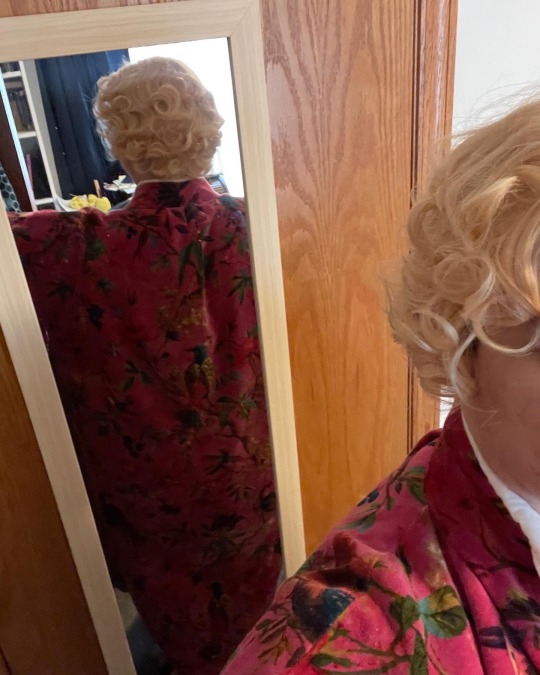


tiny room, dirty mirror, crappy wig, but I’ve had the robe finished for like 2 weeks so it’s about time I took some photos. better ones to come as more pieces are finished
#ofmd cosplay#ofmd#our flag means death cosplay#stede bonnet cosplay#the bird robe#the fuchsia robe#my face#costuming ventures
20 notes
·
View notes
Text
my apartment is so fucking comfortable right now i don't think i've ever felt more content atmospherically. my big sliding door to the porch is open and so is the other window, but i have the fan on. i'm in shorts and a tshirt and sandals and have never felt so balanced in temperature... i just know if i put on my big robe i'd take the coziest and most comfortable nap of my life
#my robe is velvet with silk lining#and looks a lot like the fuchsia robe from ofmd. like a lot.#and its such a comfortable weight and the silk keeps it from getting too hot#but its too late in the evening to take a nap without fucking myself over for later#plus rn im trying to figure out what food i have because my bank account dipped into the negative today YIKES#tree talks
5 notes
·
View notes
Text
Wild thought that crossed my mind now. All of us with Edward in the Fuchsia Robe icon we are also going through it. We are also wearing the Fuchsia Robe, each of us for our own reasons.
Reblog if you have Ed in the Robe as an icon and whether you're going through it. (Doing a light experiment to test this hypothesis and also let's give each other a hug for going through it. We're gonna make it through.)
#I'll go first yes i absolutely am and I'm not exactly sure what the future will be but#i made some good decisions for myself so I have hope#ofmd#ed teach#our flag means death#edward teach#the fuchsia robe#reblog chain#reblog game
4 notes
·
View notes
Text
So the symbolism with clothes is INSANE in OFMD.

By Season 2 Episode 6, they're both becoming what the other was. Ed no longer wants to be a pirate because it brought out the brutal, cold blooded part in him that he's been bored of long before he met Stede. But which was a necessity for him to survive, to protect his mother from his father.
Then he met Stede, who was a gentleman, doing and being something Ed has always wanted to be, which is softness. Like the soft, fine fabrics Ed likes, but never really allowed himself to have, only carried the piece of red silk his mother has given him when he was a boy.
Ed only let go of that red silk when him and Stede were apart, because Ed gave up on his newly discovered soft side. He became the Kraken, all hard edges and black leather.
Also, before he let go of the softness with the red silk, he wore Stede's fuchsia robe, which represented the colour entering Stede's life, and by Ed wearing it, he wore Stede's essence, what comforted him as he missed Stede very much. He missed the colour from his life.
Fast forward, in Season 2 after Stede had his first kill, after Ned literally said that if he does it, Stede will become a Real Pirate, Stede looks for comfort with Ed by making love to him. Stede as a pirate who was always scared of the brutality and coldness of masculinity that his father represented to him, I believe.
Yet being a pirate, an infamous one at that, as Stede finds himself suddenly to be, is what he had dreamed about. Which must be conflicting as heck, too. Being something you yearned for, and being accepted for it, which you're not used to, but then that very thing you wanted is also uncomfortable because of the inherent brutality it carries with itself. (Piracy)
Anyway, when Episode 7 starts, Ed throws his leathers into the sea. His things that represent Blackbeard. He gets rid of it after he became intimate with Stede, having taken off Blackbeard, (=his leathers) LITERALLY. This time he's wearing Stede's robe but it's the same dark blue colour as Stede's new "pirate shirt".


Blue is obviously one of Stede's favourite colours, which would symbolise his love for the sea— and Ed wears that. He wears Stede on himself on that Morning After. Ed is trying to find what he can become after he gives up his Blackbeard identity, and what he knows is that he likes fishing and most importantly, loves Stede. He finds comfort in Stede, like Stede does in Ed.
One more interesting thing, since I'm diving into the topic of symbolism with clothes is the fact that there was a huge emphasis on the scene in which Buttons turned into a seagull.
Buttons said: "The sea is my love. To love the sea as she must be loved, requires change."
And Ed: "Buttons, people don't change, not into birds or otherwise." (Just when Ed and Stede's theme starts to play very softly)
But Buttons changes, and Ed is AMAZED by it, and then goes on his own journey to change his ways. So that he can love Stede in a healthy way.
Buttons leaves his clothes behind, and in Episode 7, Ed wears them as he's trying to figure out who he wants to be instead of Blackbeard and instead of a pirate. For me, him wearing Buttons' clothes then means that Edward is finally truly (docked too) ready for change.
But it also means that Buttons is a character who's LITERALLY IN LOVE WITH THE SEA. And in the beginning of Season 2, Stede wore Buttons' cravat. And then Ed wears the rest of Buttons' clothes. Showing that Ed and Stede love the sea.
As of right now, by Episode 7, what they need now, Ed and Stede, is to find a middle ground where both can be who they truly are and continue to balance each other out that way. For Ed to find peace, softness and comfort, (and a fucking INN, give that man what he wants, for whoever's sake—) and for Stede to be who he aspired to be, a pirate, but to also regain his gentleness, because that's a core part of him. That's why Ed loves him.
#our flag means death spoilers#our flag means death#our flag means death season 2#ofmd s2#ofmd spoilers#I DID WRITE THAT MUCH ABOUT A ROBE#YEAH#edward teach#stede bonnet
64 notes
·
View notes
Text
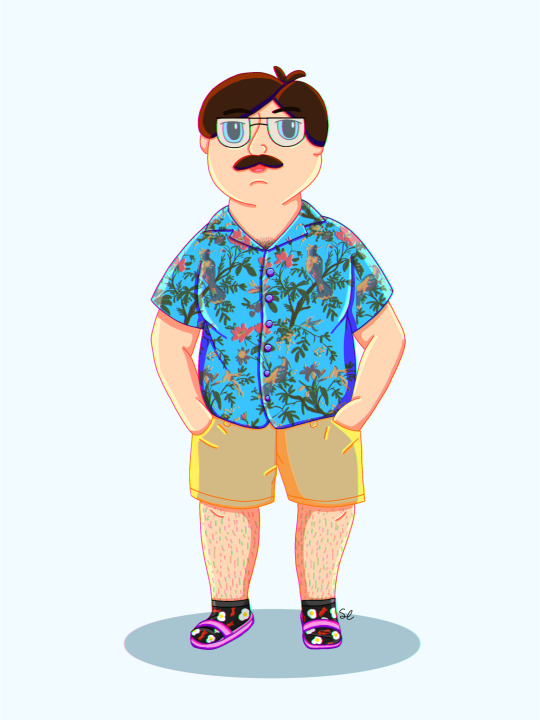
The amount of dad energy this picture has is unreal, he’s too powerful in this form
(Yes, that is the fuchsia robe pattern from ofmd. I had the transparent image and I wanted to use it lol)
#he looks like he’s gonna go buy 2x4s at a hardware store 😭#I thought Pat couldn’t get anymore Dad but here we are#bbc ghosts#pat butcher#bbc ghosts fanart#my art
86 notes
·
View notes
Text
Tutorial for my OFMD Breakup™/Bird Robe
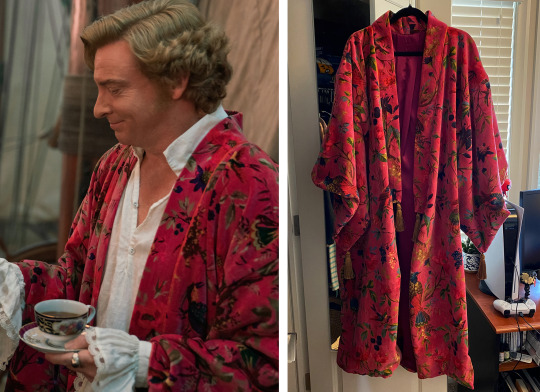
Disclaimer: I’m not a professional sewer or costumer, so any weird methods of execution are entirely due to my own (mis)adventures in sewing. Also all of the links for the fabric and research are in the replies bc I have no idea if tumblr is still ~suppressing~ posts with links.
The basic design for my Breakup Robe™ was based on
heathervanderstitch and
hannahgreenecostumes‘s instagram posts (two of the costume designers on OFMD) who said that their bird robe was a modified 1940′s kimono pattern with a box pleat in the back to give more movement at the bottom without being too baggy at the top. So I took that info and essentially worked backwards by comparing screenshots from the show and a bunch of online kimono patterns. (The most helpful ones were Ralph Pink’s free Satchi kimono pattern and The Tailoress’s Giselle Kimono).
--- 🦜 ---
I found a helpful starting place for pattern piece sizes was a twitter post from another fan (fiftyfathomkinit), however I ended up making my own modifications because I found her drafting slightly confusing (she includes armhole cutouts in her back panel which i could never figure out). I also adjusted the sizing to better fit my own measurements and I added an extra seam on the sleeves so one side of the pattern wouldn’t be upside down.
On a personal note, don’t be afraid of making mistakes! I didn’t realize I needed to adjust the pattern measurements until after I’d started making the lining - which was an oopsie on my part and could have saved me a little bit of money on fabric for my lining. You can get around this error by making a mockup in cheap fabric, or you can do it like me and start off with larger pieces and make them smaller as you adjust to your own fit.
Speaking of the lining, the original robe has a fuchsia dupioni (coarse) silk lining and a hand dyed, block printed 100% cotton velvet outer shell. I found the velvet from (I believe) the same seller on Etsy. It’s a little pricey, but they also have a regular cotton version for those who want a cheaper option.
For the lining, I wanted silk to match the original, bc it breathes better than polyester satin, and I believe it’s longer lasting. But I wanted something softer than the dupioni, so I went with... literally the smoothest silk in the closest colour I could find at a local fabric store. (I literally just rubbed my fingers against every fuchsia silk they had). But you can go with whatever lining you’ll be most comfortable with (satin, cotton, etc).
I got tassels from that same fabric store and the thread and orange bias tape from Fabricland, but you can make your own tassels with yarn if you prefer.
I bought 5 yards of the bird velvet (bc they don’t do half yards) and 4.5 metres (5 yards) of the silk. I ended up using most of the silk and about 4.5 yards of the velvet.

--- 🦜 ---
I started by making my own patterns from some super cheap brown wrapping paper with gridlines on the back, which I got from the dollar store. You could also probably just measure and cut your fabric directly, but having paper patterns made me feel better.
Your own measurements will vary (I’m 5′7″ and 120 lbs), but I wanted it to be quite oversized, with the sleeve shoulder seam hitting a little ways down my arm, and the overall length sitting just above my ankles, the same way it does in the show robe.

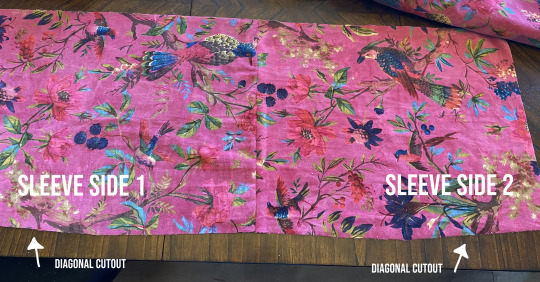
You can see in the above graphic I have a neck opening cut into the front panel that ends halfway down - this is how long I’m also making my collar. (Pro tip - cut the collar longer than you think you’ll need). Meanwhile, the sleeves have an 11″ x 1″ diagonal cut on the sides that will be attached to the main body of the robe, as used in a lot of kimonos.
Here are my pieces cut out (minus the sleeve diagonal bc I forgot to do it while I was cutting everything - but that was a very easy error to correct later):
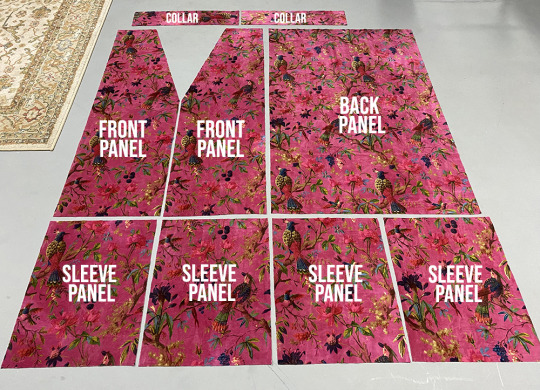
--- 🦜 ---
For the inverted box pleat, based on screenshots and insta posts, I went with 3″ on either side of the centre point and guestimated that it ended a little lower than the armpit. So mine ended about 10″-11″ from the top of the back panel.
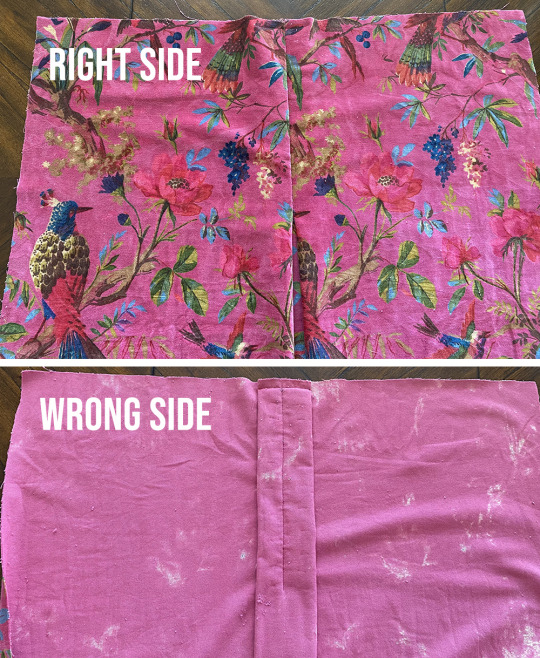
I basted some stitches along the three points (centre back, 3″ to the right and 3″ to left, so it was easier to keep both sides equal). Then I pulled the two sides of the fabric together so they met in the middle at the centre point of the back panel. I pinned them together, stitched the sides together by hand with a ladder stitch, and then machine stitched a line across the top of the panel at my ½” seam allowance.
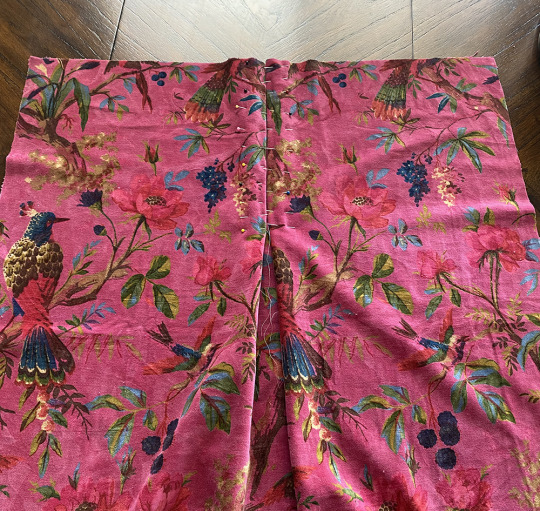
I then machine stitched the sides together down the middle with a really small zigzag stitch to make sure it was extra secure.
I cut a 1″ x 7″ inch neck dip after doing the box pleat, which is probably not the proper way to do it, but it worked out for me!
I didn’t take a picture of it, but this graphic is an approximation of how you’d go about it:

--- 🦜 ---
To sew the actual robe, it requires very simple straight line sewing to connect all these rectangles.
Firstly, you’ll want to attach the front panels to the back panel at the shoulders (right sides together).

Next, you’ll want to sew across the top of the sleeve panels (right sides together). Make sure you’re matching the diagonal sleeve indents so that when you open up the sleeve panels, it looks like this:
Then you’ll open up your robe body so the right side is facing up:
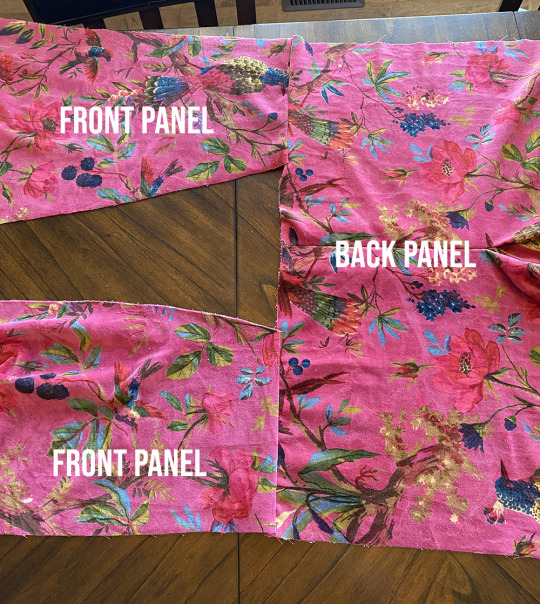
You’ll then attach the sewn sleeves to the front panels (right sides together), ensuring you’re matching the sleeve seam with the shoulder seam. Make sure you’re sewing the side of the sleeves with the diagonal cutout so when the garment is flipped right side out, the diagonal is next to your body. You’ll sew from the marked line to the marked line.
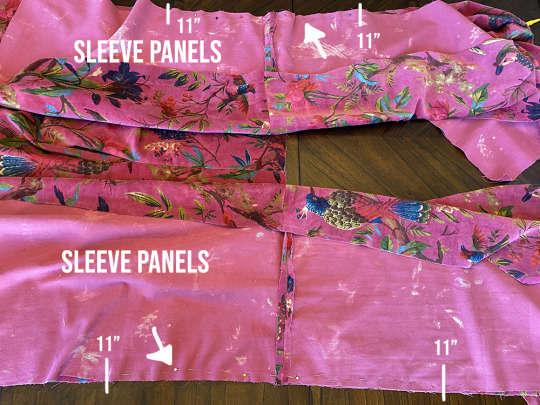
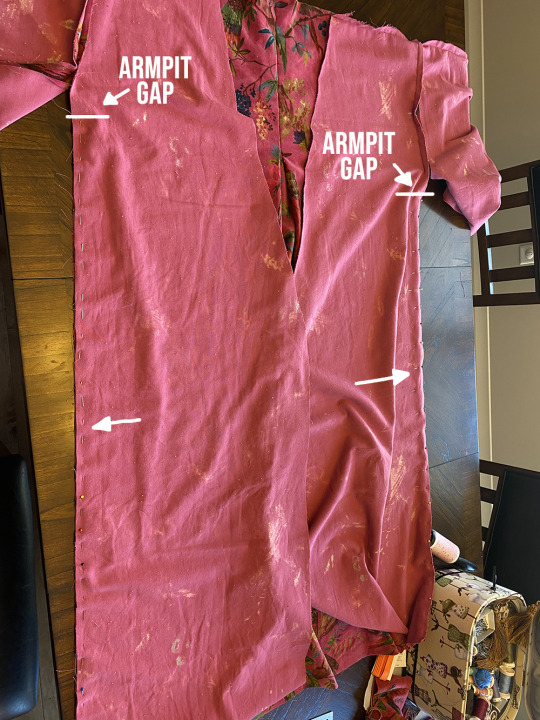
Next, you’ll want to sew the sides of the robe together to close it. However, this was a tricky part for me, because I had tried to sew the body and sleeves at the same time when I was doing my lining, but the armpits ended up bunched and slightly twisted around. So I tried getting around this issue by stopping about 1″ from the armpits, leaving a gap, while sewing the sides together. (You’ll close this gap at the very end of your project).
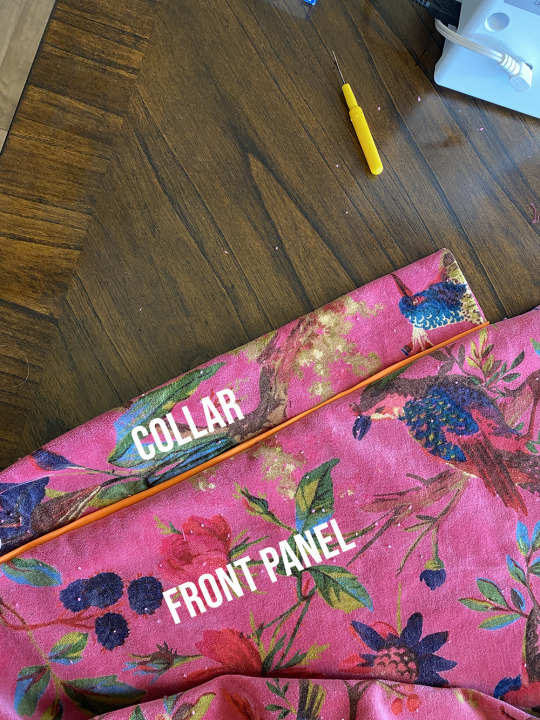
For the collar, attach both pieces together at one end, right sides together, to ensure the pattern isn’t upside down on one side. Once done, the right sides of the attached fabric should look like this:
Then, take the collar and fold lengthwise so the right sides are together. Sew a straight line across the two bottom ends. Then, flip the collar inside out so the wrong sides of the fabric are together and the bottom edges are nicely hemmed. It should look (more or less) like this:
(Ignore the weird cuts on the bottom right and left hand corners - this was my first attempt with a collar that I realized was too short. [Pro tip - cut the collar pieces way longer than you’ll think you’ll need!] I forgot to take a pic of my second attempt, but you get the general idea of what it’s supposed to look like).
For the bias tape, this is probably not the proper way to go about it, but it was the only way my CFS brain could figure it out and it worked for me! (As the disclaimer said, I’m not a professional sewer - I’m more concerned with whether something works than whether it’s the 100% professional method of execution).
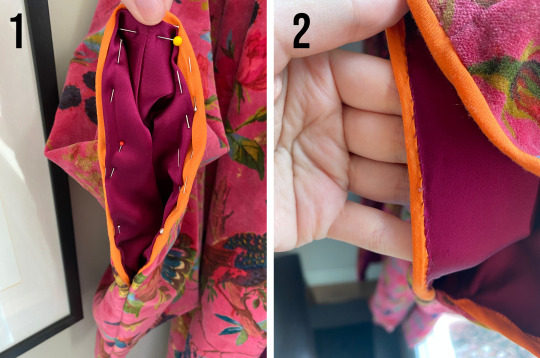
So, take your bias tape, open it up, and pin one edge against the raw edge of your collar. Sew these together a little bit lower than your seam allowance (1). Then you’ll want to fold the bias tape up so both edges are facing the sewn edge of your collar. Then pin and sew your collar, bias tape side down, to your robe (2). (When doing so, make sure to match the seam at the back of the neck on the collar with the middle of the back panel).
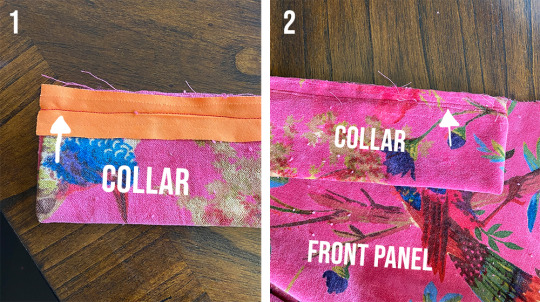
This way, when you attach the collar using your seam allowance, you’ll still be able to see a small amount of the bias tape peaking through around the collar when it lays flat against you, like so:
For the bias tape on the sleeves, I attached one edge of the bias tape to the right side of the fabric, stopping an inch past the 9″ marking on both sides of the sleeve. (I sewed this about 1/4″ from the edge).
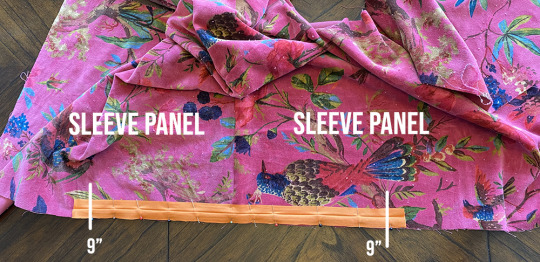
I then flipped each sleeve inside out (right sides together) and sewed it together, stopping about 1/2″-1″ away from the armpit (as previously mentioned) and at the 9″ measurement on the opposite side. For the side with the bias tap, I flipped the bottom part of the tape over onto the wrong side of the fabric and sewed it down as I was sewing the entire sleeve.

At this point, if you flip the entire robe inside out so the right side is facing outwards, it should look like this:
--- 🦜 ---
For the lining, follow the same steps as you did for the velvet (minus the collar). But when you do the box pleat, make sure the inverted side (the side you pull together) is on the wrong side of the fabric.
Once the lining is fully constructed, you’ll want to attach the lining to the velvet, right sides to right sides, along the collar and centre front.

Once you’ve sewn the lining and velvet together, flip your robe inside out so both right sides are showing.

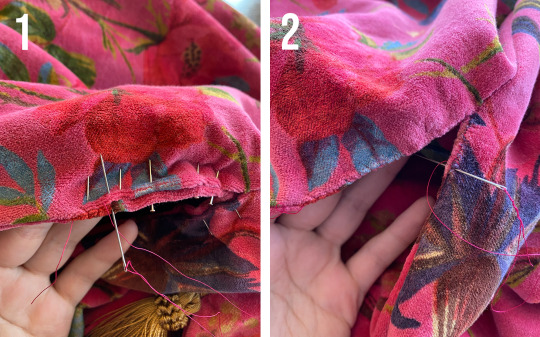
As you can probably see in the photo, I already started the next step. Which is hemming the bottom of the robe. I’d recommend doing so while it’s hanging (either on a hanger, dress form, or another person), to ensure you don’t have any weird spots where the lining is pulling up on the velvet. I attached the lining and velvet by hand stitching.
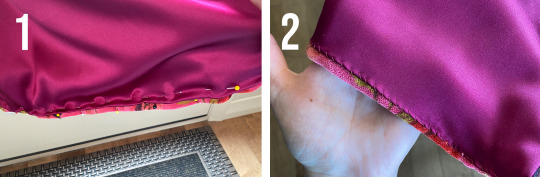
For the sleeves, I folded the bias tape down onto the wrong side of the fabric, folded the lining under itself to make a nice little hem, and sewed both together. I did so by hand with a really simple stitch. (As with the bottom hem, make sure you’re only picking up the bias tape and lining so you don’t poke through to the other side).
Then for the final touch - the tassels! Mine came with a large loop that I had to remove. I cut it off and then encased the shorn ends in hot glue to ensure the entire thing didn’t somehow unravel.

I let the glue harden and then attached the tassels by hand to the corners of the sleeves and collar.
Now we’ll finally close those ~1″ gaps under the armpits. I did this with a very simple hand stitch, making sure I grabbed a bit of fabric from each side of the fold and pulled the thread taught.
--- 🦜 ---
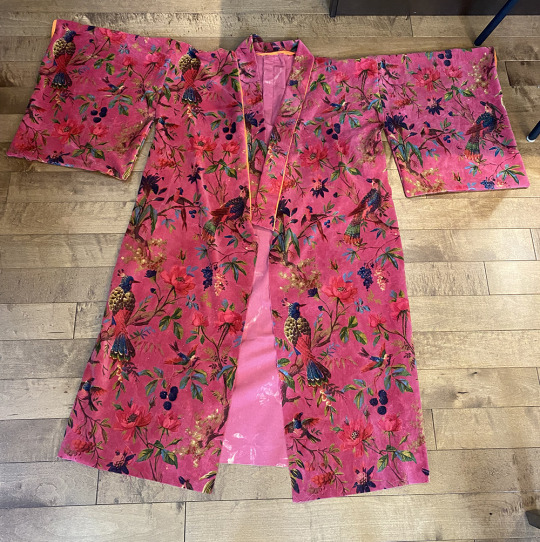
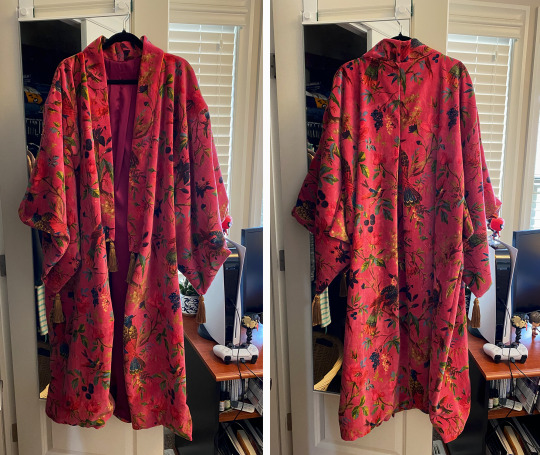
And voila, you should now be the proud owner of the infamous breakup/bird/wrap robe.
--- 🦜 ---
And that’s it! Hopefully this all makes sense and if anyone has any questions either send me an ask or add a reply to this post and I’ll do my best to answer!
On one final note, not to be That Person™, but this took quite a lot of work (both the robe and this post) and I’m a chronically ill freelancer who’s income was hit hard by COVID. So if anyone wants to throw some change at my KO-FI if you found this helpful, I’d be very much appreciated.
#sewing#our flag means death#text post#ofmd#ofmd costuming#ofmd cosplay#ofmd tutorial#long post#banyan robe#mine [wb]#bird banyan#seriously this post is quite long but i wanted to be thorough so I can save at least one person the headache i've been dealing with#namely the headache of trying to figure this whole thing out#also if anyone's curious the colour of this robe changes drastically depending on how it's photographed#which is why it looks red in some pictures and more pink in others#it's the exact same roll of fabric and it's WILD
485 notes
·
View notes
Text
My OFMD fan art is now up in my shop!
I think it’s pretty obvious at this point that I love this show. So I had to make a couple of pieces
This first is one of my favorite scenes, & the teal brocade is inspired by Stede’s signature wardrobe, and the birds in the fuchsia robe.
The second is all about the crew of lovable misfits.
You can find them here on a bunch of different products!
https://society6.com/laneandlucia
#ofmd#ofmd fanart#our flag meets death#blackbonnet#gentlebeard#edward x stede#stede bonnet#ed teach#blackbeard
79 notes
·
View notes
Text

I posted 825 times in 2022
That's 2 more posts than 2021!
56 posts created (7%)
769 posts reblogged (93%)
Blogs I reblogged the most:
@orphanage-body
@lordbeezyprinceofhell
@nutcasewithaknife
@his-name-is-ed
@julianbaashir
I tagged 172 of my posts in 2022
#our flag means death - 54 posts
#ofmd - 24 posts
#ofmd spoilers - 17 posts
#samuel vimes - 17 posts
#havelock vetinari - 17 posts
#vetvimes - 17 posts
#discworld fanfiction - 15 posts
#blackbonnet - 13 posts
#stede x ed - 12 posts
#stede bonnet - 10 posts
Longest Tag: 117 characters
#did i acquire a vetvimes obsession in the year of our lord 2022 after successfully avoiding it for the past 15 years?
My Top Posts in 2022:
#5
Okay, so obviously season 2 (which we ARE going to get - willing it into existence) will be about Ed and Stede finding each other again and coming to terms with their feelings and it will be beautiful, but I NEED a season 3 that focuses entirely on Lucius planning a pirate wedding for them. Like, there is all this dramatic stuff happening at the side lines, but the viewer will only be vaguely aware of it, because the real drama is getting a hold of fresh petunias in the middle of the freaking Atlantic ocean.
211 notes - Posted March 30, 2022
#4
Is it me or does OFMD still feel like a fever dream? Like, one day you’re desperately searching for a genre show with a queer love story that’s not about being queer (nevermind it being the main story!) and hope tentatively that maybe, just maybe, you’ll get to see something like that in your lifetime.
And then... OFMD just happens and David Jenkins is like ‘What, like it’s hard?’ How is that real?
291 notes - Posted May 5, 2022
#3
What I love about the kissing scene (except for everything of course) is that Ed and Stede wear these plain, uniform clothes. During the whole season clothes are so important to show the characters and their states of mind, to show how Stede and Ed are from completely different worlds and how they get closer to each other and more accepting of themselves (e.g. the fuchsia robe and the purple top respectively). But during their kiss they are not their roles. Ed isn’t Blackbeard, Stede isn’t a gentleman. For this one precious moment they are just themselves with no charade whatsoever between them. Ugh.
623 notes - Posted April 2, 2022
#2

Heteronormativity, or as we say in Germany
1,284 notes - Posted May 24, 2022
My #1 post of 2022
Another little detail about OFMD that makes me go feral: The song the Swede sings in 1x06, immediately after Ed put the dagger away, is called Voi che sapete. It’s a Mozart aria about a young man who experiences love for the very first time and is dazzled by it. Cut to Stede who says “Oh, this is my cue.”
And then, THEN he says: “The siren song has awoken a beast”, meaning the kraken, and if that isn’t fucking brilliant foreshadowing about Ed’s love for Stede being what ultimately leads him to unleash the kraken again.
*insert ‘I connected the dots’ gif here*
28,208 notes - Posted April 1, 2022
Get your Tumblr 2022 Year in Review →
#tumblr2022#year in review#my 2022 tumblr year in review#your tumblr year in review#here we go I guess#don't have spotify so tumblr must do
4 notes
·
View notes
Text
Since I am also one of those people who want to recreate the gorgeous fuschia robe from OFMD to sulk at home in style, I've gathered some references from the show that might help both cosplayers and artists (and those who just want to own the robe like me).
The robe is based on 17th-18th century men's nightgown (or banyan) that was inspired by kimonos. According to one tutorial I found online you need approx. 3&1/2 yards of fabric but don't quote me on that (probably better to use more for more flair).
(click on the image for full resolution)
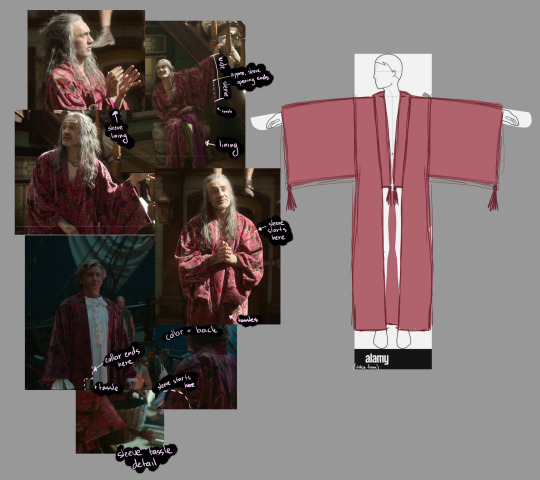
I've also found two stores where the outer velvet fabric is available: here and here. (thank you to @MushroomHastur on twitter for finding these)
Update: adding link to an IG post by someone from the costuming department that I found through tumblr user sisterfrnkly. Especially useful to see how the sleeves look.
From what I've googled the robe would historically be just one layer of cotton/linen/silk but Stede's robe has (what I assume to be) silk lining on the inside (update: the costume lining was confirmed to be silk matka).
If you find this helpful in creating something, be it art or sewing, please tag me! I'd love to see it!
518 notes
·
View notes
Last Seen Blogs