#typography tutorial
Explore tagged Tumblr posts
Visit Tumblr Blog
Explore Tumblr blogs with no restrictions, modern design and the best experience.
Last Seen Tumblr Blogs


Fun Fact
In 2020, 27% of US Tumblr users had an annual household income of over $100,000.
Note
Could make a tutorial for creating subtitles on Photoshop for beginners! Thank you so much, continue the amazing work!
thank you nonny! i'm glad my tutorials are helping at least one person.
creating subtitles is quick and easy. i'll go over simple subtitles, and also making subtitles appear partway through a gif. once you know how to make them i recommend saving an action for it, for your most common gif sizes, that way you can just press one button and then type in your subtitles.
Font Overview
it's good to have a go-to font. i use Calibri Bold Italic, but any clean, simple print font can work
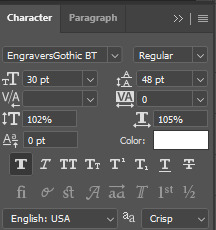
these are my font settings below. quick rundown of each option
A- this your font family B- this is the specific font; light, regular, bold, italic etc. C- this is the font size D- this is the spacing between each row of text; it's default setting is [auto], which uses the built-in font spacing, but all fonts have different spacing and you could end up with a huge gap between rows. the spacing pt's also don't necessarily match up with the font size, so experiment to get the spacing you want E- this is the space between letters; if you think the letters are too close together then increase the number into the positives, if you think they're too far apart then decrease the number into the negatives F- this will "stretch" the letters sideways; not really used for basic subtitles G- this will stretch the letters up and down; not really used for basic subtitles H- this is your font colour

the setting above are my go-to for 540px gifs, though i occasionally adjust the font size between 18-22, and then also adjust the row spacing to match. for 268px gifs, i'll usually use a font size of 16px
Basic Subtitles
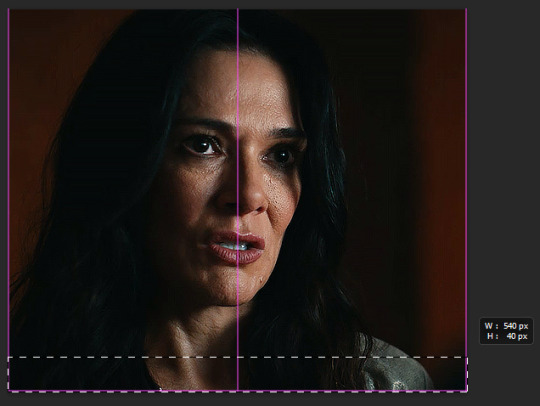
to make the subtitles, select the text tool the left hand toolbar, the icon that looks like a "T", and your cursor will turn to a text selector line in a dotted square. put your cursor at the bottom left of the gif; it doesn't have to be exactly on the corner, but so long as it's close the the edge of the canvas it will "lock on" to the corner.
click and drag to the right side of the gif, and up as big as you want the "text box". there will be a pop-up tell you the width and height of the box you're making. width should be the full width of the gif, and for the height i've set it to 40. the top of the text box will be the very top of the letters on the top row.
the size of the text box can always be adjusted later by clicking a side and dragging.
type your subtitle into the new text box, and then click anywhere outside the workspace (the canvas and the grey area behind it) to "exit" the text layer
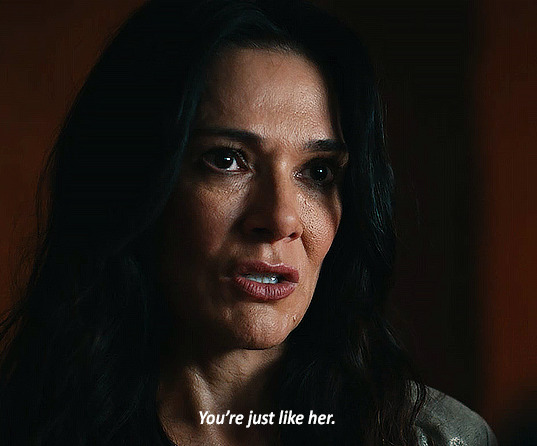
now the text looks pretty good here, because the parts of the gif under it are dark. but a different gif might be lighter, or you might be using a different text colour. to make sure the subtitle is visible and readable on any gif, you're going to go to the menu on the bottom right, with the text layer selected, and click the fx button. any option in the menu that appears will open the same box, just on a different option, i always just click blending options

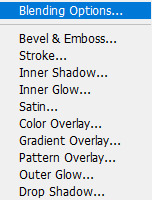
the layer style box will open. all the options on the side are various effects that can be applied to the text. the ones with a plus sign will allow you to add multiple instances of that effect on the same text. the 2 we'll be using on the subtitles are stroke and drop shadow, so one at a time click on the row for both and a check-mark will appear in the box. you'll also see that effect labelled under the text layer
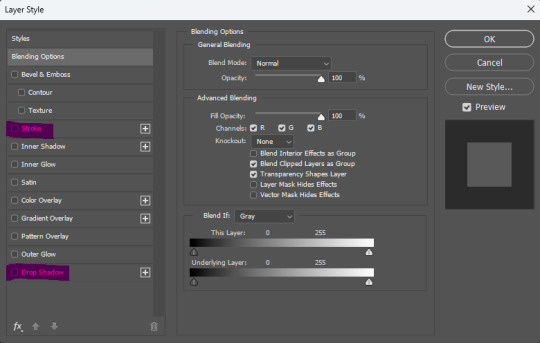
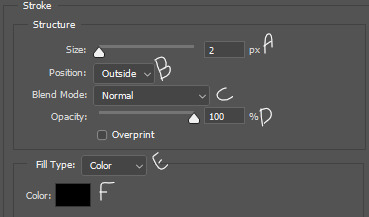
this is the menu for stroke. stroke is simply an outline of the text/object
A- this is the size of the stroke, the width of it B- position can be outside, inside, or centre. for subtitles it should always be on outside C- this changes the blend mode of the stroke, which will have essentially no effect if the stroke is black or white D- the opacity of the stroke E- you can have a stroke made of a solid colour, a gradient, or a pattern F- the colour of the stroke
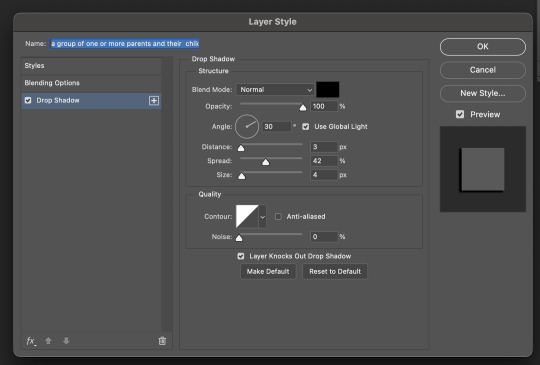
this is the menu for drop shadow.
A- blend mode, again, doesn't do anything if the colour is black or white B- colour of the drop shadow C- the opacity of the drop shadow D- the angle of the shadow E- make sure this in unchecked, otherwise it can screw with the angle F- this is how far from the text the shadow will be G- this makes the edges of the shadow sharper or harder H- this makes the overall shadow sharper or harder
the options under "quality" i never adjust

click ok on the layer style box and you have your basic subtitles!

Fade In Subtitles
now maybe you have a slightly longer gif, where the character isn't speaking at the beginning of it and you want to time the subtitles with the speech. so we're going to use keyframes!
keyframes do various things, by setting two (or more) points on the gif, and the gif will automatically change between those two points, depending on which keyframe you use. (hopefully this will make more sense a little further down)
first play the gif a few times in the export preview window to see when the talking starts and then move the frame tracker (the red line) to 2-3 frames before the speaking begins, in this gif the character starts speaking at frame 50, so move the frame tracker to frame 48

when you click the arrow at the start of the layer, it opens a dropdown of the layer and gives various options to use keyframes on, depending on what kind of layer it is. clicking the little stopwatch will create the first keyframe
transform- this lets you change the size/orientation of the text opacity- this lets you change the opacity of the text style- this lets you change the layer style of the text text warp- this lets you animate the warping of the text

when you click the stopwatch, a keyframe will appear on the timeline on the frame selected, and next to the stopwatch two arrows with a keyframe point between them will appear. the arrows move you from one keyframe to the next, and the point between the arrows will add a keyframe on the selected layer, or remove the keyframe if there is already one there. if you click the stopwatch button again, it will remove all keyframes
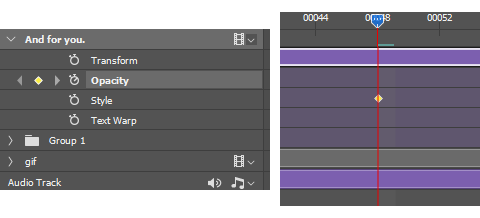
while the tracker is on a frame that has a keyframe attached, anything you do that falls under that type of affect while on that frame will be recorded by the keyframe. on opacity there's only the one thing that will be recorded—opacity.
since we want the text layer to be invisible when the gif starts, turn the opacity down to 0, while on the frame with the first keyframe. now move the tracker to the frame where the speaking begins. add a new keyframe on frame 60 using the new keyframe button. then turn the opacity on the text layer back up to 100
now the text layer will go from 0 opacity to 100 opacity over between the 2 keyframe points, and gradually appear as the character begins talking. if the timing isn't quite right, you can click and drag the keyframe points along the timeline.

A Few Random Notes
some people use white for an entire gifset, even if more than one person is speaking, and some people use different colours to show who is speaking. you can have set colours for speaker #2, #3, etc. but when possible, i like to use the eyedropper to select a pixel colour for the other speaker that is already in the gif, but not prominent where the subtitles will show, so i don't add a colour that wasn't already present, and reduce the number of colours in the gif itself
if the subtitle is long enough to go on two lines (or more) try and cut it to be somewhat even i.e. don't have the top line stretch from side to side, and the bottom line only had 1 or 2 words; if there's a comma or semi-colon in the text, splitting it there as a natural gap/pause
if there are two people speaking in 1 gif, and you want to show their dialogue at the same time, you can put the two different speakers on separate lines of the same text box, highlight one of them, and change only that colour
#cleo gets mail#anonymous#tutorial#gif tutorial#typography tutorial#photoshop tutorial#gifmakerresource#completeresources#*tutorials
47 notes
·
View notes
Text
gif tutorial
i was asked to make a tutorial for this set i made, so let's get right into it!

first things first, i downloaded the music videos from youtube in 1080p using 4k video downloader. unfortunately, the quality of youtube videos always seems... not great, to put it simply. plus these music videos are from the 90s, so they've been upscaled to 1080p after the fact. all of this works against us, but i've definitely worked with videos of lesser quality than these, so at least there's that!
when i gif, i import video frames to layers rather than screencapping. this comes down to personal preference. after everything has loaded, i group all my layers together and set the frame delay to 0.05. i then cropped my gif to 540x500.
the next step in my process is sharpening. i did play around with my settings a bit given the quality of the footage and the dimensions of the gif. i compared both @hellboys low-quality video gif tutorial to my regular sharpening action and my vivid sharpening action and in this case, i preferred my normal vivid sharpening action. i used this tutorial to create the action for myself, and you can find other sharpening tutorials here. this action converts my frames to video timeline and applies sharpening.
once my gif is sharpened and i'm in timeline, i begin coloring. i wanted to simplify the amount of colors used in these gifs, again because of the video quality -- i knew it wasn't going to have the crispness i would normally like for my gifs. here are my coloring adjustment layers and their settings (not pictured: my first layer is a brightness/contrast layer set to screen) (explanation in alt text):


all of these layers and their settings will vary depending on your footage and its coloring (and obviously, feel free to make the gradient map whatever colors you like if you aren't going for this exact look).
pretty basic coloring, especially with just slapping a gradient map on top (my beloved), but at this point, i still didn't like the quality of the gif, so i added a couple textures/overlays.


i put the left one down first and set the blending mode to soft light and the opacity to 8%. depending on what look you're going for, you could increase or decrease the opacity or play around with different blending modes. i like using this texture with lower quality footage because even when it's sized up a bit, it adds some crispness and makes things feel more defined. for the second texture, i set it to overlay and 75% opacity. we love and respect film grain in this house.
now for the typography! sometimes i really enjoy typography and other times it's the bane of my existence for the sole reason of just how many fonts i have installed. anyway, here are the settings i used for this set:

make sure the color of your font is white and then set the blending mode to either difference or exclusion. i can almost never see a difference between the two, but for this set, i used exclusion. below are the blending options (double click on your text layer to bring up this menu or right click and select blending options).


now we have to add the warp effect. with your text tool still selected, click this icon at the top of your screen:

from the dropdown menu, select twist. these were my settings, but feel free to play around with different warp options and their settings. the ones i use most often are flag, fish, and twist.

this last step is completely optional, but it's an effect i use in most of my sets with typography. duplicate your text layer (select the layer and ctrl+j), turn off the layer effects (click the eye icon next to effects), and set the blending mode to normal. right click on the layer and select rasterize type. right click on the layer icon itself and choose select pixels.

at this point, you should see the moving black and white dotted line showing that only your text is selected. then go to edit > stroke. here are the settings i almost exclusively use.

this is what your text should look like now:

using ctrl+T, move the layer off the canvas so you can't see any of the text anymore. you should be left with only your outline. click anywhere on your canvas to de-select the text we just moved. use ctrl+T again as well as your arrow keys to nudge the outline over to the left 2px and up 2px. this is personal preference as far as the positioning, but i almost never move it any other way. you can leave it like this, which i sometimes do, or you can set the blending mode to soft light like i did for a more subtle effect.
and that's it! rinse and repeat for each gif in your set or use a different warp effect on each gif to switch it up! if you have any questions about this tutorial or would like me to make one for anything else, please feel free to ask any time!

#gif tutorial#my tutorials#gifmakerresource#completeresources#dailyresources#chaoticresources#userdavid#coloring tutorial#typography tutorial#tutorial#photoshop tutorial
279 notes
·
View notes
Text
youtube
5 Useful Text Effect Tips & Trick
In this video, I will show you 5 Adobe Illustrator text effect tips and tricks that might be useful for you.
#graphic design#youtube#illustrator tutorials#education#3d text effect#text design#text effects#Text Effect Tips & Trick#adobe illustrator tutorial#adobe illustrator tutorials#free education#educate yourself#graphic designers#typography tutorial#typography tutorials#typography tips#Youtube
2 notes
·
View notes
Text
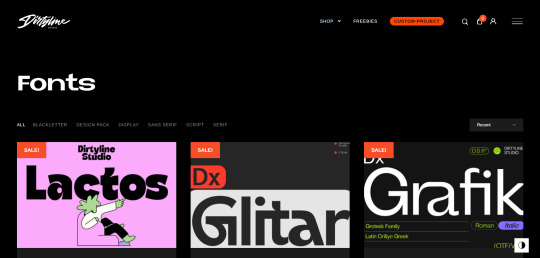
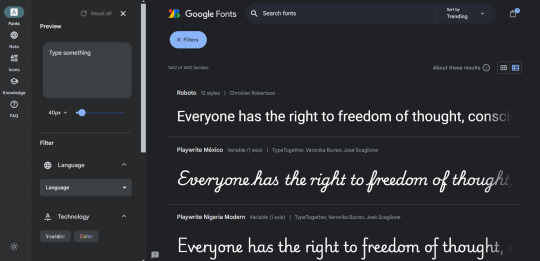
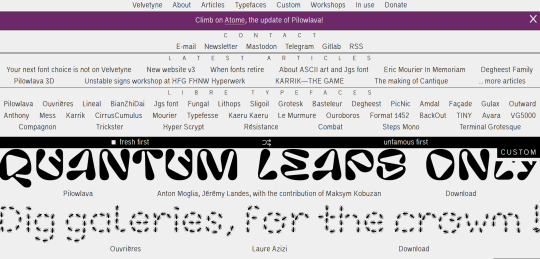
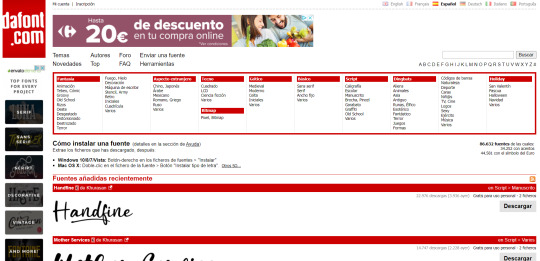
RESOURCES FOR FONTS
KernClub

FREEFACES
FontShare
DirtyLineStudio
FontsGoogle
Velvetyne.FR
Dafont
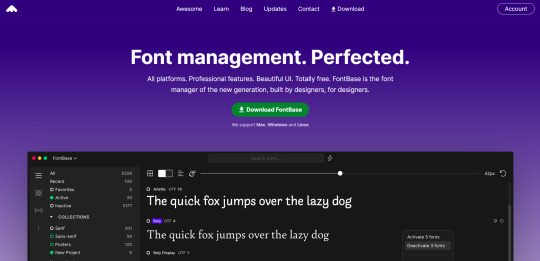
FONTBA.SE
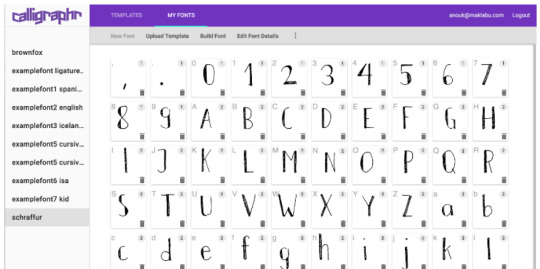
CALLIGRAPHR (to create your own fonts)
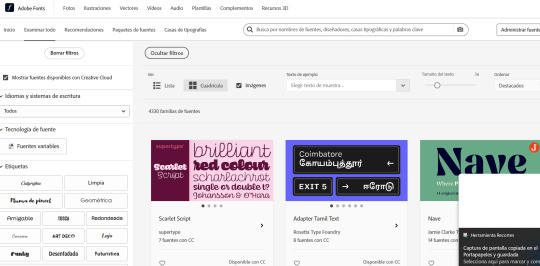
ADOBE FONTS
#reference#tutorial#art#art reference#concept art#illustration#artist#resources#web#websites#design#designer#fonts#font#typography
4K notes
·
View notes
Text


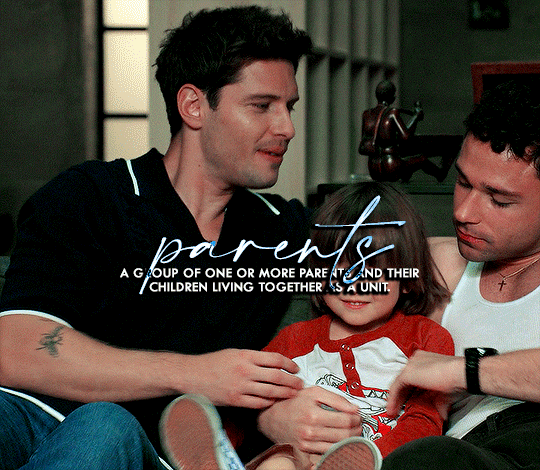
Don't Call Us Dead / Yellowjackets for @jackienatist
#i dont know WHAT yall put in your gifs that prevents text from being fuzzy i did everything all the bougie tutorials told me to do lol#i like this one! i tried like three different typography options and clicked that font by accident but ended up loving it the most#requests are still open#my gifs#lottielee#yellowjackets#laura lee#lottie matthews#usermiles#userbecca#tusercj#yellowjacketsnetwork#yellowjacketsedit#userlindsay#wlwsource#yj
687 notes
·
View notes
Text
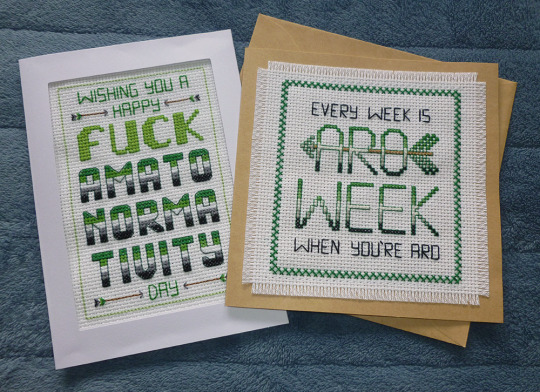
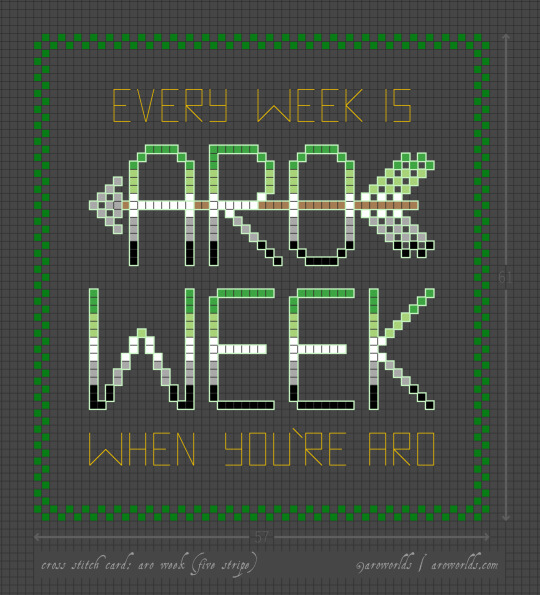

This Aro Week, I've made cross-stitched card designs perfect for gifting to your favourite slightly-snarky aromantic.
The free tutorial includes patterns, card and fabric dimensions and a materials run-down as well as instructions on attaching an aida swatch to cardstock and other border techniques.
#aromantic#aro week#cross stitch#aro feels#aromantic feels#amatonormativity#pride crafts#sewing#embroidery#needlecraft#needlework#green aro pride flag#typographic art#typography#arrows#aro symbols#aro symbolism#link#aro worlds wordpress#tutorial#image description in alt text#text in image#long post
400 notes
·
View notes
Note
Hi! Would it be possible to post a tutorial of how you created the white text in this set /post/695221752725422080/buckpendragon-911-verse-coc-week-day-1 thank you :)
hiii! you mean the text in the first gif, right? it's actually a pale green so i hope that's what you meant 😅
i somehow still have that psd so i was able to go grab the exact settings for the two text layers used here:
(if you meant the little white text, it's simply the font candara with different values of tracking/letter spacing)
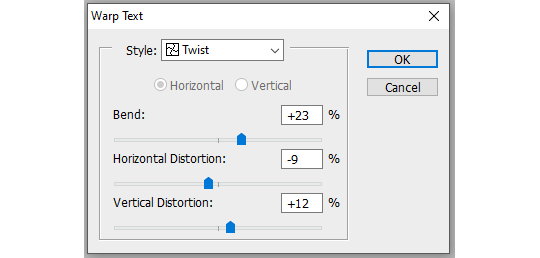
the font i used is called letter magic, and i've given my bare text a bit of warp (right click ont the text layer > warp text > style: twist). by the way, the color of the text doesn't matter, so no need to pick one.
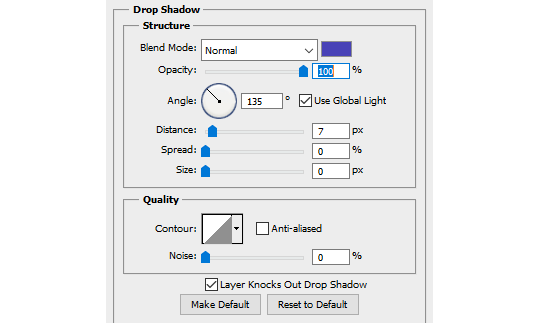
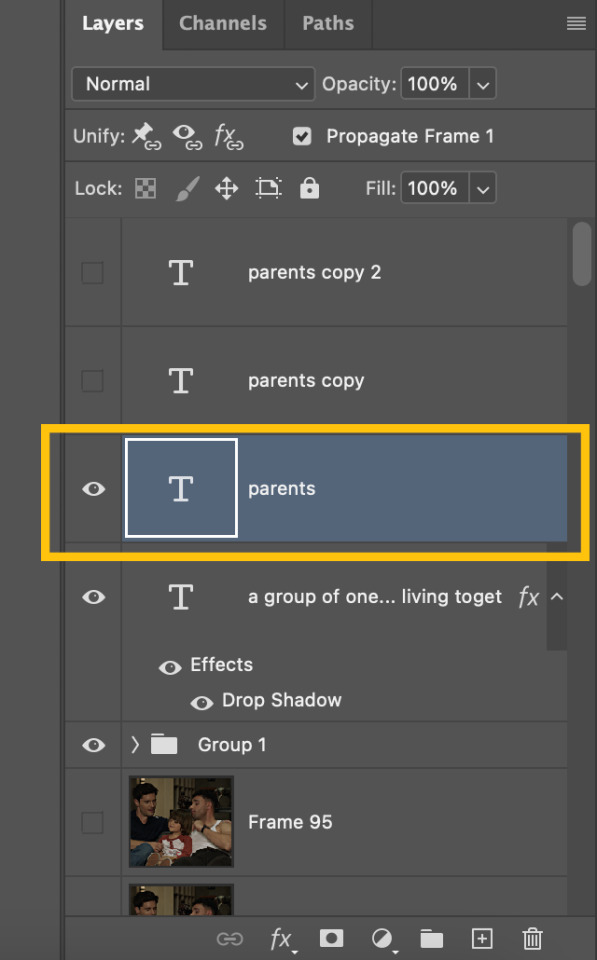
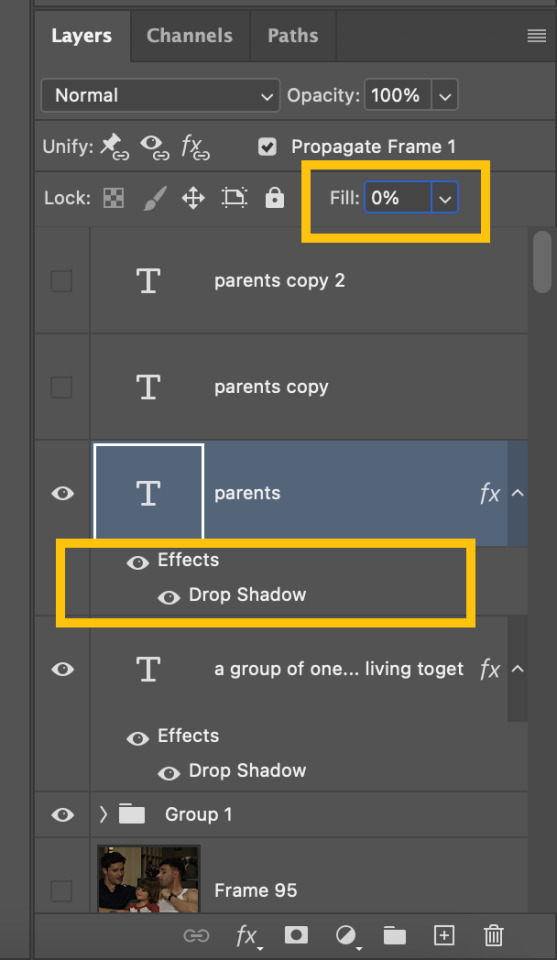
BASE LAYER
first, put the text layer's opacity to 100%, and the fill to 0%. the text will become transparent, it's what we want. then double click on the layer to get to the layer style options. you'll want to add a drop shadow, a color overlay, and a thin stroke:
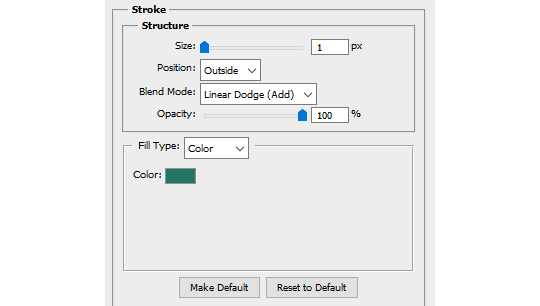
DUPLICATED LAYER
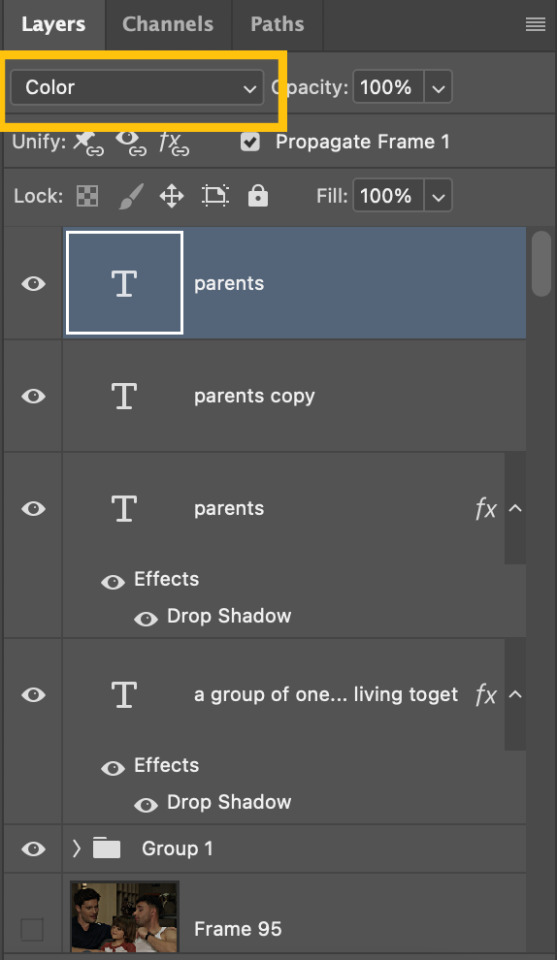
i found the stroke a bit too thin on my gif, so i duplicated the base layer (right click on the layer > duplicate layer > destination should be the same canvas), put its opacity to 50% and kept to 0% fill. and disable the drop shadow and color overlay by clicking on the little eyes on the layer:
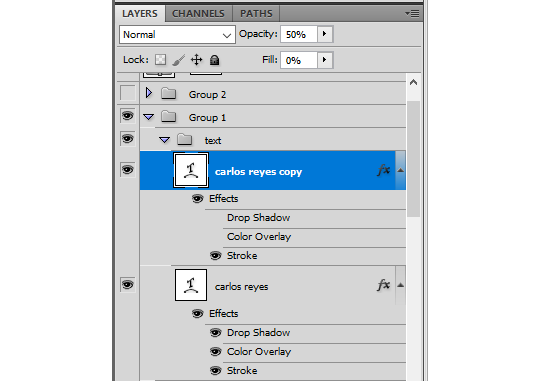
voilà :)
#alie replies#Anonymous#*ps help#photoshop#tutorial#resource#photoshop tutorial#typography#mialook#tuserzee#userabs#usertj#userchibi#userhella#userkarolina#usertina#quicklings#userraffa#usercats
472 notes
·
View notes
Note
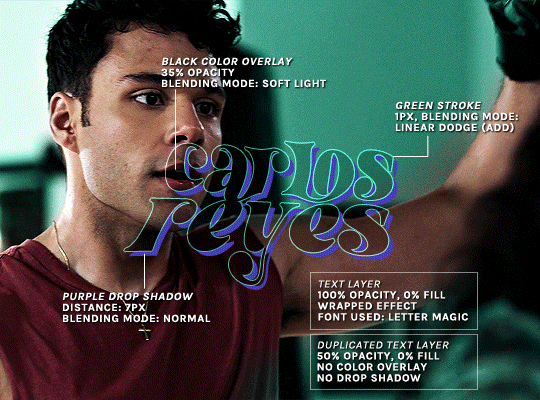
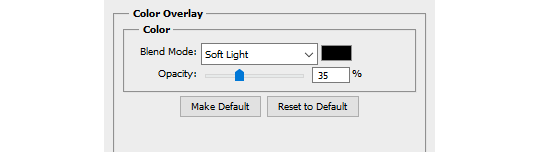
hey! your tarlos evolution gifset is sooo pretty <333. thank you so much for these wonderful gifs :) can i ask how you did the typography on this set, like what fonts did you use and how did you get the cool metallic effect?
Of course, thank you so much as well, your comment means a lot. It’s actually a pretty simple effect so I’ll talk you through it under the cut.
First off you need to make and colour your gif etc. Once you’ve got your gif made we can start working on the text. You can use any fonts you like, but for this set I used Amalfi Coast and then Tw Cen MT for the definition. Keep it coloured white for now and place it where you would like it.

Once you have your fonts ready now it’s the fun time. For the definition it’s just a simple drop shadow, these are the settings…
Now for the title font. Firstly duplicate the font layer 3 times. Hide the first two for now and focus on the bottom layer.
For this layer, add the same drop shadow as the definition and then turn the fill down to 0%
Now we move onto the layer above. For this layer you need to change the blending mode to Difference.

And finally we move onto the last font layer. For this one I changed the colour of the font to #2dadff and then changed the blending mode to colour.
And that’s it, your typography is completed.
#tutorial#photoshop tutorial#photoshop help#typography#allresources#hisources#completeresources#yeahps#*
67 notes
·
View notes
Text

HOW TO: Make Animated Neon Text
Hi! No one asked for this tutorial, but this is one of my favorite typography effects as of late — so I thought I'd share how I do it. You can see this effect in the first gif of this *NSYNC Celebrity set and the last gif of this Anthony Bridgerton set. Disclaimer: This tutorial assumes you have a basic understanding of gif-making in Photoshop. It's also exclusively in Timeline and uses keyframes for the fading effect seen on the blue text.

PHASE 1: PREP YOUR BASE GIF
1.1 – Choose a dark scene. This effect looks best contrasted against a dark background. You can definitely do it with a bright background, but just like a neon sign irl, you only turn it on in the dark/at night — so keep that in mind!
1.2 – Determine the length of your clip. Depending on how much you want your text to flash or fade in, you'll want to make sure you have a scene long enough to also allow the text not to flash — reducing the strain it takes to actually read the text. For reference, my gif is 48 frames.
1.3 – Crop, color, etc. as you would. New to gif-making? Check out my basic tutorial here!
PHASE 2: FORMAT YOUR TEXT
Before we animate anything, get your text and any vectors laid out and formatted exactly as you want them!
2.1 – Finding neon sign fonts. It's easy as going to dafont.com and typing "neon" into the search bar!
2.2 – Fonts I used. Neon Glow by weknow | Neon by Fenotype | Neon Bines by Eknoji Studio

And to not leave my fellow font hoarders hanging, the font for "tutorial by usergif" is Karla (it's a Google font) 🥰
2.3 – Group your text layers. (Conditional) If you plan on having multiple text layers like I did and you want them to appear connected (like how the last letters of "NEON" and "sign" intersect with the wand icon), I suggest putting the layers into groups according to color (the shortcut to group layers is Command+G). If you don't group your text and just apply the outer glow settings to each individual layer, you'll end up with something like this:

—where you can see the glow overlap with the line, instead of the smooth connection you see in my final example gif. I'm using 2 colors for my text, so I made a group for red and a group for blue.
2.4 – Apply Outer Glow. Right-click your text layer (or your group if you have several layers) and select "Blending Options" to open the Layer Style menu. Check "Outer Glow" and feel free to play around with the settings until you like the way your text looks!
Your outer glow color should be darker and more vibrant than the color of the text itself. The text should be within the same color family but much brighter and, sometimes, almost white (see Step 2.2 again for my text colors).
Here are the settings for the Red Glow (the glow color is #FF3966) and Blue Glow (#00F0FF):

These aren't always my exact settings but they're pretty close to my standard. I always set the blend mode to Hard Light and usually have the opacity at 100%.
For every gif I use this effect on, I like to play around with Spread and Size. Spread will make the glow look denser and "expand the boundaries" (source: Adobe) and Size will diffuse the glow and blow it out so it covers a larger area (Adobe says it "Specifies the radius and size of blur").
2.5 – Duplicate your text layer/groups and remove glow. We're only going to be animating the glow on our text, and since doing this affects its opacity/visibility, we want to preserve the base text by creating a duplicate.
I just hit the Command+J shortcut to duplicate my groups and delete the Outer Glow effects, making sure that the "No Glow" version is above the "Glow" version:

I also put all these groups into one group called "Text" for organization and so I could apply a drop shadow to all the elements for better visibility.
PHASE 3: CREATE THE FLASHING EFFECT
This is for the effect you see on the RED text in my gif!
3.1 – The 0.03-Second Rule If you've read any of my animation tutorials before, you're probably already familiar with this rule. In my experience (and for reasons I can't explain), Video Timeline pauses every 0.03 seconds (try clicking the forward button a few times, you'll probably find a "duplicate" or paused frame). So, keep all your layers a duration of 0.03-second increments (e.g. 0.06 or 0.09 seconds can also work) and align them on the Timeline at 0.03-second intervals. If you don't follow this rule, you'll get duplicate frames when you export, resulting in a choppy final gif.
3.2 – Trim and arrange your text layers. Only on the layers/groups WITH the Outer Glow effect, trim them into several segments of varying lengths where the glow will be "on" (visible) and leaving spaces where the glow should be "off."
Typically, I'll have a mixture of 0.06 and 0.03-second text. That's when the glow will be visible. Between each "flash" of visibility, I've got a 0.03-second blank space, baby *pen clicks* and I'll write your name:

The layers shown above are arranged with a few flashes and two long segments of no flashing. This is the order and duration of each segment shown above (purple = visible segments):
0.06 blank, 0.06 visible, 0.03 blank, 0.03 visible, 0.03 blank, 0.03 visible, 0.03 blank, 0.24 visible (the long bit where "FLASHING" doesn't flash at all), 0.03 blank, 0.03 visible, 0.03 blank, 0.12 visible
(I only did this for the text that says "FLASHING" to give it a glitching effect. The other red text keeps the glow visible starting at the first long segment.)
PHASE 4: CREATE THE FADE-IN EFFECT
This is for the effect you see on the BLUE text in my gif!
4.1 – Animate using the Opacity Keyframe. Again, we're only touching the layers/groups WITH the glow effect. If you only have one layer of text, you'll find the Opacity Keyframe by clicking the film reel icon:

If you're working with groups like me, you'll find it in the Timeline panel under the group when it's expanded:

As you can see, I already added my keyframes (lil diamond babies). And luckily, it's super easy to do!
4.2 – Add the ending Keyframe first. We're starting at the end because our layers/groups are already at 100% opacity. Drag the playhead (the blue arrow attached to the red vertical line) to a spot where you want the glow to be 100% opaque — this is where the glow will be fully "on" or visible. [Again, follow the 0.03-Second Rule. You will get duplicate frames regardless when using keyframes (this will be explained in the note in Phase 5), but abiding to the rule will mitigate the amount of dupes you get.]
Then, click the clock icon by "Opacity" to place a keyframe:

4.3 – Add the starting Keyframe. Go backward from the ending Keyframe you just placed (I went back 0.12 seconds — but you can play around with the duration of the fade, just keep it a multiple of 0.03):

And drop another keyframe, this time by clicking the diamond icon by "Opacity":

4.4 – Reduce the opacity on the starting Keyframe. Keeping that keyframe you just placed selected, go to the layers panel and reduce your layer's/group's opacity to 0%:

Now, this Outer Glow will slowly fade from 0% to 100% opacity.
And just for a visual aid, here's where my fade-in keyframes are in relation to my flashing segments:

To refresh your mind, the 0% Opacity Keyframe starts when "FLASHING" is visible for 0.24 seconds (the first long segment of visibility).
With these keyframes, you'll get a smooth fade-in à la ✨light switch with a dimmer✨
PHASE 5: EXPORT
Yay, we're finished! Convert from Timeline back to Frames and export your gif!
NOTE: If you only did the flashing effect and followed my 0.03-Second Rule, you shouldn't have any duplicate gifs. BUT if you included the fade-in effect using keyframes, you WILL have duplicate frames. 'Tis the nature of keyframes. 🤷♀️ I had 4 extra frames where the fade-in starts, which I deleted. So, as always, I recommend checking your frames when you convert from Video Timeline back to Frame Animation — and manually delete any duplicate frames.
Sorry this tutorial is so long 🙈 I over-explain so you're not just mechanically copying steps, but understanding the WHY behind each step! Thanks for bearing with me
If you have specific questions about this tutorial, feel free to send a message to usergif and I'll try my best to help! :)
More USERGIF tutorials • More resources by Nik • USERGIF Resource Directory
#typography#gif tutorial#completeresources#usershreyu#useryoshi#userelio#userzaynab#userives#usertreena#usercim#userrobin#userkosmos#usersalty#userhella#alielook#uservalentina#uservivaldi#*usergif#*tutorial#by nik#flashing gif
830 notes
·
View notes
Text
my fred edit #myfrededit
#the fredit‚ one might call it...#i have no idea how editing works i just followed a tiktok tutorial on the transitions#and followed my heart on the typography#can you tell i was getting lazy near the end#okay hope everyone enjoys#bh6#hear ye hear ye
10 notes
·
View notes
Note
hi can i ask you how you did the typography effect in this edit? it's so cool! post/713510625377189888/happy-birthday-to-the-king-of-tv-pedro-pascal-2
hi! thank you! here's a (hopefully) quick tutorial for this animated text effect under the cut:
(btw I'm using timeline and keyframes, but this could easily be done frame by frame)
STEP 1: Arrange all your text
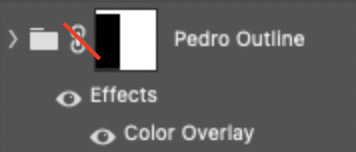
here's another ask I answered on usergif for how to turn any font into its outline which is what I did here!
STEP 2: Put all the outlined text (or whatever text you want to disappear and reappear) in a group by selecting all the layers and using the shortcut Command+G
STEP 3: Put a layer mask on the group and use the rectangular marquee tool to make a box over the text you want to disappear:
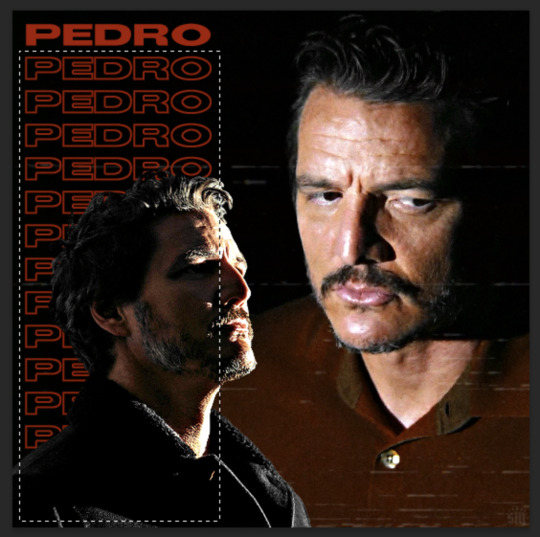
use the paint bucket tool to fill that area on the layer mask with black:

the outlined text should be hidden now
p.s. be sure to UNLINK the layer mask so you can move it with the keyframes (click the chain so it disappears):
STEP 4: put down 4 keyframes on the "layer mask position" line
(1) text group isn't visible (2) text appears (3) text still visible (4) text disappears:

I placed my keyframes with some buffer space at the beginning and end so the animation wouldn't start right away:
if you're wondering, you need the 3rd keyframe so the text doesn't start disappearing at keyframe 2
STEP 5: select keyframe 2 (it'll be yellow) and move the playhead (red vertical line) over that spot. select your layer mask and move it down until your text is revealed


STEP 6: right-click keyframe 2 and select copy. then select keyframe 3, right-click it, and select paste. keyframe 3 should now have the same layer mask position as 2!

STEP 7: double-check that keyframe 4 has the same position as keyframe 1 (if something went wonky, just copy-paste 1's position onto 4)

and that's it! hope this helps :)
195 notes
·
View notes
Note
hi, this edit is cool, would you please tell me how do you make the circle shape and text like that in the second gif?
https://mikelogan.tumblr.com/post/727834848573669376/forgiveness-is-warm-like-a-tear-on-a-cheek-think
hi!! i'm so sorry this took me so long to answer, but i've hardly been on my desktop for the last couple months and haven't been giffing. finally getting around to this and thank you for the kind words!

in this tutorial, i'll show you what i did as well as another way to achieve the same effect:
once you've made your gif and colored it the way you want, you can get the circle effect one of two ways. i'll show you how i did it first and then a more "normal" way lol
i actually had this circle texture laying around and for whatever reason, i decided to use that. so i popped that onto the canvas and used ctrl+T to center it both vertically and horizontally
then i used a glitter texture over the top of the circle layer and applied a clipping mask so that the glitter only shows up on the circle and not the entire gif. to do this, make sure your glitter (or whatever texture you decide to use) layer is ABOVE the circle and then right-click on the glitter layer and select "create clipping mask." you should see this lil arrow on the layer now:
as a quick note about textures/overlays: chances are that if you just google "glitter texture png" or something similar, you'll find tons, but the png portion is important because pngs have transparent backgrounds. this wouldn't work if the circle texture was a jpeg because its background is not transparent and the overlaying of the glitter texture would appear on every pixel, basically just taking the shape of the entire jpeg rather than just the circle.
i have a resources (basically anything downloadable, from overlays to actions to psds) tag on my gifmaking sideblog as well as one specifically for textures and overlays. i also utilize the websites freepik, pngegg, and pngwing for pngs (especially freepik).
to make the glitter layer the same pink/purple color i used, i ended up using a hue/saturation layer above it and also applied a clipping mask to that layer so it only affected the glitter layer. this step is totally optional depending on the coloring you're going for. you might be happy with the glitter texture exactly as it is. you could also skip the hue/saturation layer and instead apply a color overlay to the glitter layer, select the color you want, and set it to screen or another similar blending mode. to do this, double-click on the glitter layer, select color overlay from the menu, choose whatever color you want, make sure the opacity is set to 100%, and adjust the blend mode to whatever you think looks best.
the "normal" way to do the circle would just be to use the ellipse tool (right-click on the rectangle tool and choose ellipse) and input your desired dimensions. to get a perfect circle, the width and height have to be the same as one another. then you'd continue on with the rest of the process.
for the text, create your main text layer. these were my settings for a 540px canvas:
i also added a drop shadow to the layers with these settings (double-click the text layer to bring up this menu):

then i duplicated the text layer 6 times. select the first duplicated layer (the second line), use ctrl+T and your arrow keys (i only used the down arrow) to move the text down the desired amount of space. i made sure i moved each line down exactly 25 pixels, which is equal to 25 presses of the down arrow. i just think it looks nice when they're equally spaced. with each subsequent layer, i just dropped the opacity.
starting with the original text layer, i used: 100% -> 80% -> 60% -> 40% -> 20% -> 10% -> 5%, but this was just my personal preference.
anyway, that's pretty much it! but if you have any additional questions on this tutorial or any other set, just send me a message and i'll do my best to get to it much quicker than this one 💙
27 notes
·
View notes
Text
youtube
How To Manipulate Fonts in Adobe Illustrator
#graphic design#illustrator tutorials#education#youtube#typography tips#typography tutorials#typography tutorial#typography design#How To Manipulate Fonts in Adobe Illustrator#adobe illustrator tutorials#adobe illustrator tutorial#adobe illustrator tips#adobe illustrator#graphic designer#cool fonts#Youtube
1 note
·
View note
Note
Dear Supporter,
I hope this message finds you and your family in good health. My name is Eman Zaqout from Gaza. I am reaching you out to seek your urgent help in spreading the word about our fundraiser. I lost both my home and my job due to the ongoing genocide in Gaza and we are facing catastrophic living conditions. 💔
I kindly ask you to visit my campaign. Your support, whether through donating or sharing, will help us reach more people who can make a difference. Thank you for your continued support for the Palestinian cause. Your dedication brings us closer to freedom. 🙏🕊
Note: Verified by several people as 90-ghost and aces-and-angels. ☑
.
#hatchetfield#starkid#hatchetverse#nightmare time#the magnus archives#the magnus protocol#the mechanisms#percy jackon and the olympians#sherlock and co#botany#organic chemistry#my chemical romance#candle making#magnus chase and the gods of asgard#marine biology#math#television#typography#tech#diy tutorial#ecology#entomology#epic the musical#quantum physics#quotes
10 notes
·
View notes
Text
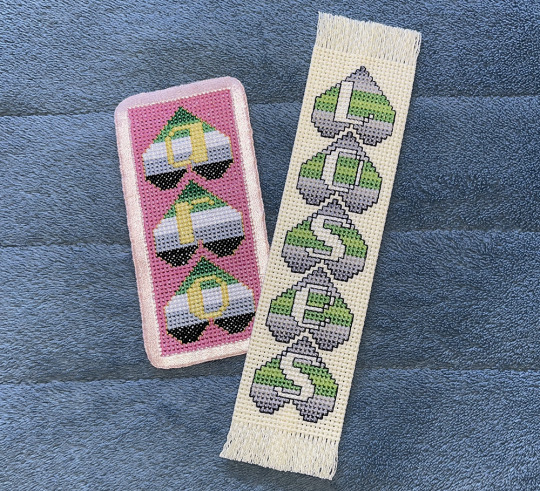
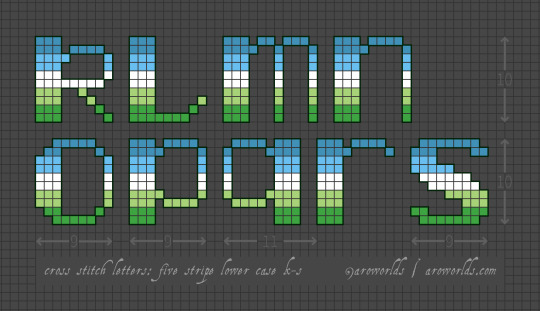
Last month, I made a tutorial and charts for a bunch of aro-themed cross-stitch bookmarks--including designs for the words "loses" and "nope" set in descending upside-down hearts.
Today's post expands on this with heart bookmark blanks and a complete alphabet designed for inserting inside said hearts. Plus a few more cross-stitch patch patterns!
The hearts on the bookmarks will work for three, four, five, six, nine and ten-stripe horizontal pride flags, while the text will work for five or ten-stripe pride flags.
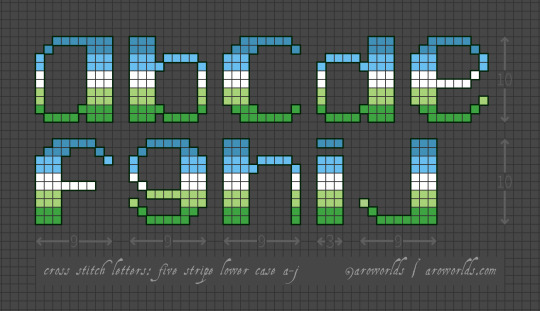
The alphabet can also be inserted inside many of my heart and ace of spades patch motifs--or used by itself for any kind of cross-stitched custom text.
#pride crafts#aromantic#cross stitch#needlework#needlecraft#heart#hearts#loveless aromantic#loveless aro#link#tutorial#pride#sewing#embroidery#patches and pins#pins and patches#bookmarks#aro worlds wordpress#green aro pride flag#typography#image description in alt text#long post
18 notes
·
View notes
Note
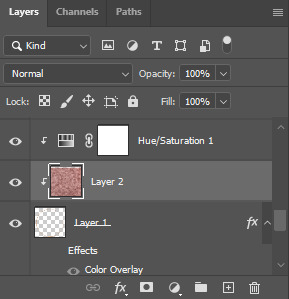
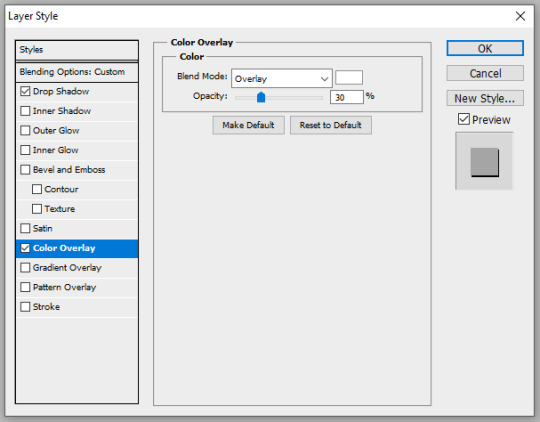
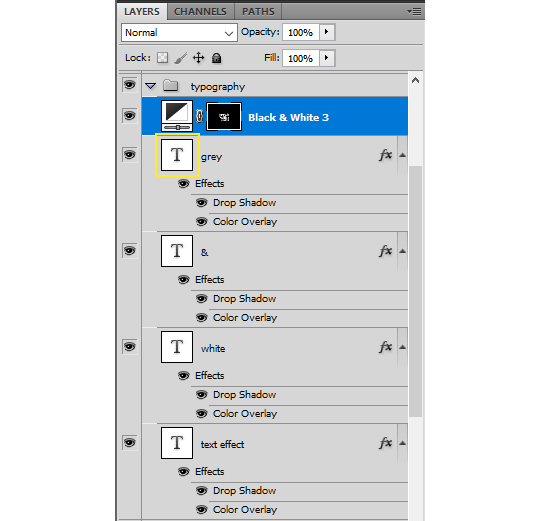
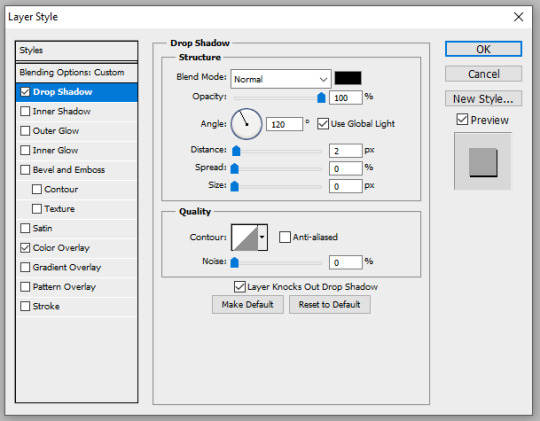
hi alie! can i request on how to do this grey-white text? /post/721285784354865152/ thanks!

hiii, sure! it's quite simple actually, here are the steps for the text effect on this gifset (and settings/screenshots under the cut):
type out you text and select white for the color, then set this text layer's blending mode to Difference
double click on the layer to get to the layer style options and add a Color Overlay. choose the color white (black also works) and set the blending mode to Overlay. play with the opacity slider as you wish, this will brighten your text and it helps for gifs that have a high contrast behind the text.
if you don't need to brighten the text, put the color overlay's blending mode to Hue, you're actually done right here, easy!
optional: if you're using the color overlay as an overlay like i have for that particular gifset, you need to create a mask of your typography. to do that hold the ctrl key and click on the text layer's icon (the "T", the yellow box on one of my screenshots). this will make a selection of your typography. if you have multiple text layers, hold CTRL + SHIFT to select multiple layers. once your selection is done, go to the top menu and Layer > New Layer > New Adjustment Layer > Black & White > Ok. make sure that layer is on top of the text layers.
add a Drop Shadow if you want, and that's it, the effect is done :)
#alie replies#Anonymous#*ps help#photoshop#resource#tutorial#resources#allresources#typography#completeresources#resourcemarket#userabs#userdahlias#usercats#usersmia
353 notes
·
View notes