#vue passing data between components
Explore tagged Tumblr posts
Visit Tumblr Blog
Explore Tumblr blogs with no restrictions, modern design and the best experience.
Last Seen Tumblr Blogs


Fun Fact
The average Tumblr user visits about 67 pages every month.
Text
How to pass value to child component in Vue.js
How to pass value to child component in Vue.js
Hello buddy, in this blog we will see how we can pass value to the child component in vue.js and we will also learn the use of props. Sharing data across components is one of the core functionalities of VueJS. It allows you to design a more modular project, control data scopes, and create a natural flow of data across your app. Think you are using the Vue tab component where you have put 5oo…

View On WordPress
#pass data to component vue#vue dynamic component#vue emit#vue get data from child component#vue pass data between sibling components#vue pass data from one component to another#vue pass data from parent to child#vue pass data to component onclick
0 notes
Photo

Transfer Data Between Components In Vue JS How you can transfer data between components in vue js? I'll explain to you the communication between a parent component and a child component. source
#child component#child component in vue#components#components communication#components communication in vue#data#data between vue components#learn vue step by step#mario laurich#parent component#parent component in vue#passing data between components#passing data between components in vue#passing data between components in vue js#Transfer#transfer data between components#transfer data between components in vue#transfer data between components in vue js#vue#vue js#vue js tutorial#vuejs#webnoob
0 notes
Photo

Using Event Bus To Pass Data Between Vue Components ☞ https://school.geekwall.in/p/A4krooXb/using-event-bus-to-pass-data-between-vue-components #vuejs #javascript
1 note
·
View note
Photo

Firefox 70 is here
#414 — October 23, 2019
Read on the Web
Frontend Focus
Firefox 70 Released — The latest release includes a handful of interesting CSS changes, such as the display property now accepting two keyword values (for setting both inner and outer display types), password generation for input type='password' fields, improved underline styling, and more. There's also the usual Firefox 70 for developers post outlining all the key changes in a bulletpoint fashion.
Mozilla
Focusing on Focus — Focus behavior in Web browsers has been in flux and under-specified for years. Efforts are now underway to clear up some of the confusion (particularly around Shadow DOM and autofocus) and begin to firm up the specs “to hopefully make focus in HTML make sense to browser engineers and web authors”.
Rakina Zata Amni (WHATWG)
Frontends Without Backend with FaunaDB Auth + Native GraphQL — FaunaDB is a globally distributed, scalable database. Thanks to built-in security and native GraphQL, frontends can directly communicate with FaunaDB in a secure way which eliminates the need to pass through a backend and greatly reduces latency.
FaunaDB sponsor
The "P" in Progressive Enhancement Stands for "Pragmatism" — Demonstrates how using progressive enhancement with CSS can be used to build things up gradually. “With a Progressive Enhancement mindset, support actually means support. We’re not trying to create an identical experience: we’re creating a viable experience instead.”
Andy Bell
Can We Please Style The <select> Control? — Highlights issues developers are facing when working with the the built-in <select> element, and what efforts are being undertaken to hopefully improve it.
Greg Whitworth
Style Hover, Focus, and Active States Differently — Why you should (and how to) style hover, focus, and active states differently.
Zell Liew
💻 Jobs
Frontend Developer at X-Team (Remote) — Work with the world's leading brands, from anywhere. Travel the world while being part of the most energizing community of developers.
X-Team
Have You Tried Vettery? — Vettery specializes in tech roles and is completely free for job seekers. Create a profile to get started.
Vettery
📙 Articles, Tutorials & Opinion
Making Tables Responsive with Minimal CSS — When creating table-based layouts you may be tempted to implement some sort of custom grid-system or pull in a pre-built library. The author argues against this, recommending using just “tables and some simple CSS”.
Bradley Taunt
Box Alignment and Overflow — Runs through a data-loss issue you may face when using box alignment properties in certain scenarios, and highlights how the 'safe' overflow alignment keyword can help prevent such a loss.
Chen Hui Jing
State Management for Flutter Apps with MobX — Learn how to use MobX to ease state management on a Flutter project.
CircleCI sponsor
How to Design Delightful Dark Themes — Plenty of practical tips here on how to design dark themes that are “readable, balanced, and delightful”.
Teresa Man
Options for Hosting Your Own Non-JavaScript-Based Analytics — Rounds-up a range of alternatives to Google Analytics.
Chris Coyier
The 'Perfect' Responsive Menu — Here’s how to create a menu that is accessible and works across mobile and desktop browsers without any duplication.
Polypane
JAMstack Tools and The Spectrum of Classification — An overview of JAMStack services and tools, along with some notes on their pros and cons.
Chris Coyier
The React Hooks Guide: In-Depth Tutorial with Examples. Start Learning
Progress KendoReact sponsor
An Introduction to Regular Expressions for Web Developers
Chris Achard
🔧 Code, Tools & Resources
Peaks.js: Interact with Audio Waveforms — A client-side JavaScript component to display and interact with audio waveforms in the browser. Here’s the related GitHub repo.
Indrek Lasn
TinaCMS: A Site Editing Toolkit for Modern React-Based Sites — An open-source real-time site editing toolkit currently aimed at Gatsby and Next.js users.
Tina

Open Doodles: A Collection of Free CC0 'Sketchy' Illustrations — You can even generate a set with your own custom colors (as above).
Pablo Stanley
Typetura: Fluid Typesetting — We linked to this responsive typography tool when it was in beta earlier this year, and now it’s generally available (paid). It'll help set up text transitions between breakpoints — here’s a demo of it in action.
Typetura
▶ A Realistic 'Water Effect' with Just HTML & CSS — A very convincing effect using the <feTurbulence> SVG filter. Here's the code.
Red Stapler
🗓 Upcoming Events
VueConfTO 2019, November 11-12 — Toronto, Canada — The first ever Vue Conference in Canada.
Chrome Dev Summit, November 11-12 — San Francisco, USA — A two-day summit to learn about the latest from Chrome, plus techniques for building the modern Web. Note: Registrations are now closed, but the event can be joined remotely.
Performance Now, November 21-22 — Amsterdam, Netherlands — A single track conference with fourteen speakers, covering the most important web perf insights.
HalfStack Conf, November 22 — London, UK — A single day event focused on UI-centric JavaScript and web development.
Frontend Con, November 26-27 — Warsaw, Poland — Brings together 30+ experts with over 500 experienced frontend pros from all over the world.
dotCSS, December 4 — Paris, France — The largest CSS conference in Europe.
by via Frontend Focus https://ift.tt/2Jgg4vc
3 notes
·
View notes
Photo

Using Event Bus To Pass Data Between Vue Components ☞ https://school.geekwall.in/p/A4krooXb/using-event-bus-to-pass-data-between-vue-components #vuejs #javascript
1 note
·
View note
Photo

Using Event Bus To Pass Data Between Vue Components ☞ https://school.geekwall.in/p/A4krooXb/using-event-bus-to-pass-data-between-vue-components #vuejs #javascript
1 note
·
View note
Text
Oracle 1Z0-447 Certification Aspects
* Exam Title: Oracle GoldenGate 12c Implementation Essentials * Exam Code: 1Z0-447 * Exam Price: $245.00 More on exam pricing * Format: Multiple-Choice * Duration:Two hours * Number of Questions: 72 * Passing Score: 69% * Validated Against: Exam has become validated against Oracle GoldenGate 12c. * 1Z0-447 Practice Test: https://www.dbexam.com/1z0-447-oracle-goldengate-12c-implementation-essentials * 1Z0-447 sample questions: https://www.dbexam.com/sample-questions/oracle-1z0-447-certification-sample-questions-and-answers Oracle GoldenGate 12c Certified Implementation Specialist Certification Overview The Oracle GoldenGate 12c Essentials (1Zx-xxx) exam is ideal for people who use a strong foundation and expertise in selling or implementing oracle GoldenGate 12c solutions. This certification exam covers topics like: Oracle Goldengate 12c Architecture; Oracle GoldenGate 12c Parametres; Oracle Goldengate 12c Mapping and Transformation Overview and more. Up-to-date training and field experience are suggested. The Oracle GoldenGate 12c Implementation Specialist certification recognizes OPN members as OPN Certified Specialists. This certification differentiates OPN members available by giving an aggressive edge through proven expertise. This certification helps the OPN member’s partner organization entitled to the Oracle GoldenGate 12c.

* Get More Detail About Oracle 1Z0-447 Certification: https://oracle-exam-guide.blogspot.com/2019/05/how-to-score-best-in-1z0-447.html Oracle 1Z0-447 Certification Exam Topics * Oracle GoldenGate (OGG) Overview * Describe OGG functional overview and customary topologies * Describe OGG Veridata and Management Pack functionality * Describe the gap between real-time data integration replication files Manipulation Language (DML) replication * Install and Configure OGG * Download and Install OGG, and differentiate between various installers (zip, OUI, tar) * Synchronize source and target databases with the Initial Load * Prepare database for OGG CDC and view databases with OGG schema check script * Configure OGG Replication component parameter files * Configure the OGG Command Interface to generate OGG processes * Describe how you can identify and resolve issues in heterogeneous replication, and offer appropriate solutions * Configure OGG utilities * Mapping and Transformation Overview * Implement use cases for transformation functions * Implement macros * Managing and Monitoring Oracle GoldenGate * Manage OGG command information security * Implement and troubleshoot OGG Monitoring * Explain the configuration and management of the Enterprise Manager 12c plug-in * Implement and troubleshoot OGG Veridata * Architecture Overview * Describe OGG components * Create both forms of Capture systems for Oracle database * Create the three forms of Replicat processes * Explain the real difference between an Extract and Pump, and local and remote trails * Configure OGG's process recovery mechanism * Parameters * Describe and compare GLOBALS versus MANAGER parameters * Create solutions using component parameters for replication requirements * Install OGG parameters * Explain and identify parameters specific for non-Oracle databases * Configuration Options * Describe OGG configuration options (Data Definition Language (DDL), compression and encryption options) * Configure OGG event actions based on use cases * Troubleshoot conflict detection and backbone * Configure Integrated Capture, Replicat, and deployment options Sign up for Oracle 1Z0-447 Certification exam Sign up for Oracle 1Z0-447 Certification exam with Pearson VUE and buy test with all the voucher you purchase from Oracle University or which has a bank card applied during exam registration. To learn more about oracle goldengate certification webpage: check.
1 note
·
View note
Text
How Angular Web Development Can Benefit Your Project?

Angular is a web application framework that is used to build web applications. The framework was developed by Google and it has been around for several years now. It is one of the most popular frameworks today, with developers preferring it over other frameworks such as ReactJS and VueJS.
There are several reasons why you should consider using Angular Web Development for your next project rather than choosing another framework such as React or VueJS:
Web Development with Angular
Angular is a front-end web development framework that was originally developed in 2009 by Google. It was initially created as an internal tool for developing web apps at Google and later released as an open-source project.
Why choose Angular for your Web Development project?
Angular is built using NodeJS, which allows you to use JavaScript.
Angular is a structural framework that implements the MVC pattern. In this case, Angular uses JavaScript code to create HTML views and interact with them (Controller).
The Controller acts as an intermediary between View and Model; it handles DOM events such as clicks or key presses and passes data back to the model on which it operates (View).
The Model contains data storage methods while View represents what we see on screen with HTML elements like form labels/fields or buttons etc…
Angular also allows developers to use the MVVM pattern instead of the MVC pattern when developing their projects since it’s highly flexible when it comes down to choosing between these two patterns!
Angular is Highly Flexible
Angular is a highly flexible framework, which means you can use it for a wide variety of projects. Angular is indeed best suited to building large-scale applications and websites, but that doesn’t mean it’s not suitable for smaller projects.
Angular web development is flexible and allows developers to build applications of any size. The fact that the framework doesn’t require you to use large frameworks like React or Vue makes it ideal for smaller apps as well as larger ones.
Angular Allows Automatic Updates
Angular is a framework that allows you to update your website automatically without having to do any coding.
You can update your website with Angular and it is easy to use. It is a great way to keep your website up to date and it will be easier for developers when working on the project.
Angular Makes it Easier for New Developers to Join the Team
The most significant advantage of Angular Web Development is that it allows new developers to quickly learn and understand its component-based structure. Developers can focus on their components, not the entire framework, which helps them concentrate on what they need to do. This means less time spent researching and more time spent developing your product.
Another benefit of this is that it makes it easier for you to onboard new members of your team as they no longer need to learn everything about Angular before they can start contributing. They just need to know enough about their chosen component or two to get started building out functionality confidently!
Angular is a Highly Compatible Framework
It can be used with any language, database, web server and browser, operating system, framework, or library.
Initially developed by Google in 2009 Angular was released as open-source software in 2010. Since its release, it has been improved continuously and now there are many versions available that offer different features for developers to choose from.
The latest version is Angular 7 which was released in March 2019 with some new features like more CLI commands and an improved compiler among others…
Angular Saves you Money and Time
Angular saves you money and time in many ways:
It is a popular framework, so your developers need not learn a new language or technology.
It’s an easy-to-learn angular web development framework. Your team will be up and running quickly.
It’s easy to use, so you don’t have to worry about training your employees or consultants on how to work with Angular. This will save you time and money because they won’t make mistakes like forgetting what the code does or not understanding how all the different pieces of Angular fit together.
Angular is also great for maintenance because it’s built from scratch by Google engineers who know how the software works at its core level—and they’re constantly updating their frameworks based on feedback from developers using them every day!
When Looking at Web Development Frameworks, Consider Using Angular.
If you’re an experienced developer who has been working with JavaScript and HTML for years, then it may be time to expand your horizons by learning a new framework. While this isn’t the only option, it’s one of the best and most widely used frameworks in the industry today.
Let’s take a look at some of the benefits of Angular for Web Development:
Faster development time and lower maintenance costs over time (due to its ease of use)
More readable code that is easy on developers’ eyes (the syntax is simple and concise)
Conclusion
So, why Angular web development? In a nutshell, it is more secure and faster than other frameworks. It’s also easier to use, which means you can get your project completed sooner. If you have any questions about this post or would like more information on our services, please contact us today!
#Angular Web Development#Benefits of Angular for Web Development#Why Choose Angular for Your Web Development Project
0 notes
Link
A form will pop-up what feels for you to fill out and when you hit enter the app creates that timer for you. When you decide to delete a timer if you click the delete button, the timer will remove itself from the page that is pretty much what you would call a dynamic user interface.
React was created because the facebook develop team wanted a better way to structure JavaScript applications.
So, why use React.Js ?
Number one is for reusable components
Components are a huge part of what makes react so understanding them is crucial when programming with react components let you split your code into separate independent reusable pieces.
You can think of components as functions that can take inputs to call props and return elements describing what should appear on the screen. You also take those already created functions and reuse than in other parts of your app without any problems.
So, react components are like individual Legos that can build something great and then connect it together and they’re also reusable.
Also Read:
React Is The New jQuery! (Or Is It Vue)
Number two is for the virtual Dom
Even though, javascript is fast enough to handle complex web applications. Dom manipulations are still not too fast.
Updating the Dom is usually the problem when it comes to achieving optimal web performance that’s where the virtual Dom comes in how the virtual Dom works are.
It keeps a copy of the real Dom in storage and whenever a change is made the update first goes to the virtual Dom.
The virtual Dom then compares its Dom with the real Dom and applies the changes to the real Dom in the most efficient way possible.
The number three is for props and skates
So let’s start off with props short for properties by the wedding preps are used to let components talk with each other.
That’s pretty much it, props let you pass data to other components for them to use it and another thing to know about props is that you cannot change props.
And you may be thinking then what can I use for values that change over time what do I need for values that do that change frequently. That’s where the state comes in.
So props shouldn’t change but we need inputs that can change its value. The purpose of states is so that components can keep track of information between any renders.
It does when you change a part of the state it updates the objects and then every renders the component. It’s also important to note that you should have this little state as possible reason being is.
Let’s say that you have a car, a car has many moving parts and eventually things break.
And the same thing could happen if you have too much state in your react, that location and for components that don’t need any state.
We have two types of components stateful and stateless components
Also Read:
Learn Reactjs: Become The Highest Paid Front-End Software Developer Today
stateful components | stateless components
stateful components are components using state which means they have values that can change stateless components, on the other hand, are components that don’t use state, which means they don’t have values that change.
1 note
·
View note
Text
Vue.js Tutorial From Scratch - e08 - Custom Events Passing Data from Child to Parent Component - VueJs
Vue.js Tutorial From Scratch – e08 – Custom Events Passing Data from Child to Parent Component – VueJs
Vue.js Tutorial From Scratch – e08 – Custom Events Passing Data from Child to Parent Component – VueJs
[ad_1]
Now that we have a nice modern npm and webpack build, let’s tackle getting our components to communicate. In Vue, this is done using custom events. We can emit an event on our child component and then listen for that event on our parent event. Follow along as we code a simple example from…
View On WordPress
#laravel computed property#laravel mix#laravel vue tutorial#Learn Vue#Learn Vuejs#passing data to parent component vue#vue#Vue 2019#vue course#vue emit to parent component#vue for beginners#vue framework#vue js frontend laravel backend#vue methods#vue npm#vue passing data between components#vue tutorial#vue webpack#Vue.js#vue.js tutorial 2019#Vuejs#vuejs course#vuejs tutorial#web development#web development framework#webpack crash course
0 notes
Text
Significant React Native Libraries for Mobile App Development in 2021

React Native happens to be one of the most sought-after app development frameworks across the globe as it comes with a host of advantages like a cost-effective developmental cycle, faster time-to-market, high performance, modular and intuitive architecture, and many more.
One of the unique benefits of this framework is the availability of countless third-party libraries that expedite the development and prove highly convenient for every React Native App Development Company. However, owing to the presence of thousands of React Native libraries, selecting the apt ones becomes a herculean task. As a consequence, development teams often have to spare a great deal of time and effort for picking the right tool or library that would prove fruitful.
For easing out this task, I have penned down the most significant tools and libraries that complement the React Native framework. A quick read will help you to find the perfect match that suits your requirement.
Tools and Libraries for Various React Native App Development Categories

Category: User Interface
React Native Elements
This UI library, built using JavaScript, has earned 20.5k stars and 4.2k forks on GitHub.
This library comes with cross-platform compatibility and supports Expo.
It is easy to use, customizable, and community-driven.
Lottie-react-native
This library created by Airbnb enables adding attractive animations to React Native applications.
React Native developers can either select from the free animations available or design and add their animations employing “Adobe After Effects.”
Functioning: The animation data is exported in JSON format with Bodymovin and rendered natively on mobile.
Styled Components
This library enables developers to write CSS code for styling components
It removes the mapping between styles and components, thereby easing out the usage of components as a low-level styling construct.
The styles can be reused several times resulting in lesser coding
React Native Vector icons
React Native Vector icons is a library that offers numerous icons of various types, designed for the React Native Apps.
Each element can be fully customized
Category: Forms
Formik
It’s a small library that helps to build forms in React
Formik enables to validate the form values, display error messages and helps to submit the form.
Redux-form
Redux-form enables proper state management in Redux
It helps in tracking the commonest form states like fields contained in the form, focussed field, field values, fields which the users have interacted with, etc.
Category: Testing
Jest
This is a popular testing framework, designed and maintained by Facebook, and is used for testing JavaScript code. This versatile testing tool is compatible with any JavaScript framework or library, including React, Angular, VueJS, etc. Uber, Airbnb, and Intuit are some of the top brands that have leveraged this tool. Its offerings are:
High-speed performance
Standard syntax with report guide
Mocks functions, with the inclusion of third-party node_module libraries
Conducts parallelization, snapshot, and async method tests
Enables managing tests with bigger objects, by using live snapshots
Mocha
Mocha is a JavaScript test framework, used for testing React and React Native apps. It provides the Developers full control over what plugins and tools they choose to use while testing applications. Its major highlights are:
Runs on Node.js
Provides support for asynchronous front-end and backend testing, test coverage reports, and the usage of any claims library
Helps to track errors
Excels in mocking tests
Enzyme
Enzyme is another testing tool developed by Airbnb.
It comes with API wrappers, to ease out developers’ tasks like manipulating, asserting, and traversing the React DOM.
It supports full and shallow DOM and also supports static rendering
Besides, it is compatible with several other testing frameworks and libraries like Mocha and Jest.
Chai
It’s an assertion testing library meant for browser and node
Chai employs behavior-driven and test-driven development principles
Compatible with various testing tools and can be paired with any JS testing framework
Its functionality can be extended by using several custom plugins
Moreover, it enables the developers to create their plugins and share them in the community
Category: Navigation
React Navigation
This component supports navigational patterns like tabs, stacks, and drawers
It is based on JavaScript and is simple to use
It enables developers to effortlessly set up app screens
Can be completely customized as well as extended
React Router
This is a library of navigational components which composes declaratively with the app.
It allows one to specify named components, create various types of layouts, and pass layout components.
Category: App’s State Management
Redux
Redux, a free-standing library, and a predictable state container is predominantly used along with the UI library components of React. Besides the React ecosystem, one can also use Redux with other frameworks like Vue, Angular, Vanilla JS, Ember, etc. Its principal offerings are:
Can be used with back-end as well as front-end libraries
Enables the developers to write consistent codes
Allows editing the live code
Functions well in various environments – Server-side, client-side, and native
Connects the pieces of state to the React components by minimizing the need for props or callbacks.
Category: Linting and checking Types
ESLint
It’s a JavaScript-based, open-source linter tool
ESLint is configurable and pluggable
It improves the code consistency and makes it bug-free
It helps in evaluating patterns in the code and eliminates errors by automatically fixing the code, to enhance the overall code quality.
It helps detect creases in the JavaScript code that don’t comply with the standard guidelines
It helps react native developers to create their own linting rules
Flow
Developed by Facebook, Flow is a static type checker JavaScript library
It easily identifies problems during coding
It proves beneficial in crafting large applications, as it prevents bad rebases when several persons are working on a single program.
The main objective of Flow is to make the code more precise and enhance the speed of the coding process
Category: Networking
Networking tools are used to establish a networking flow in React Native projects. Let us have a look at a few of them.
react-native –firebase is a lightweight layer on the top of Firebase libraries. It creates a JavaScript bridge connecting to the native JavaScript SDKs to ease out using Firebase in React Native Application Development projects.
Apollo Client is quite compatible and adaptable. It is required when the developers need to use GraphQL. It assists in creating a User Interface that pulls data with GraphQL.
Axios, a lightweight HTTP JavaScript client was built to send asynchronous HTTP requests to REST endpoints. Besides, it performs CRUD operations.
react-native-ble-manager is a plugin that helps in connecting and transmitting data between a mobile handset and BLE peripherals.
Category: Utils
The below-mentioned ready-made tools simplify and speed up working with Utils while developing React Native apps.
Ramda is a library that eases out creating functional pipelines without user-data mutation.
The JavaScript functions’ toolkit Lodash offers clean and effective methodologies to your development team for working with collections and objects.
Reselect builds memorized selectors that are needed for avoiding unnecessary recalculation and redrawing of data. This library also quickens the speed of your app.
Moment works with various data formats and is capable of parsing, manipulating as well as validating times and dates in JavaScript.
Validate.js, designed by Wrap, offers the app developers a declarative way to validate JS objects
Category: Analytics
The following libraries act as mediators enabling one to implement the trending analytical tools into their React Native Mobile App Development projects.
react-native-mixpanel is a kind of wrapper for the library named Mixpanel and helps the developers to reap all the benefits of the Mixpanel library.
react-native-google-analytics-bridge acts as a bridge for establishing compatibility between Google Analytics tools and React Native projects.
Category: Localization
react-native-i18n helps in localizing or internationalizing applications. It integrates the i18n-js library in JavaScript for React Native applications.
Category: In-app Purchases
react-native-in-app-utils is a small library used to implement the in-app billing procedure for iOS apps. It can be effortlessly installed and is simple to work with.
react-native-billing is used for adding in-app billing to applications meant for the Android platform. It possesses a simple UI and wraps anjlab’s InApp Billing library to function as a bridge.
Category: AR and VR
ViroReact is used to speedily develop native cross-platform VR/AR apps in React Native. Its key functionalities are:
It has an easy learning curve
It comes with a high-performing native 3D rendering engine as well as a custom extension of React for creating VR and AR solutions.
It provides support for all kinds of platforms in VR including Samsung Gear VR, Google Cardboard, Google Daydream, etc. for Android and iOS; and AR including Android ARCore and iOS ARKit platforms.
Needs React-Viro-CLI and React-Native-CLI for writing cross-platform native codes
Final Verdict:
I hope the aforesaid information was helpful and has given you a clear idea of which library/libraries would be most suitable for your next project.
To know more about our other core technologies, refer to links below:
Angular App Development Company
Ionic App Development Company
Blockchain app developers
0 notes
Text
NetApp Certified Data Administrator, ONTAP NS0-162 Exam Questions
Now you can choose the latest NetApp Certified Data Administrator, ONTAP NS0-162 Exam Questions for your NCDA Certification.Previous exam NS0-161 is no longer valid to take in pearson vue test center. PassQuestion verifies and assures the authenticity of NetApp NS0-162 Exam Questions with 100% real and exam-oriented questions. Our NS0-162 questions and answers comprise 100% real exam questions from the latest and most recent exams in which you're going to appear.We ensure that if you use PassQuestion NS0-162 Exam Questions according to our expert's instructions, you can pass the NetApp Certified Data Administrator, ONTAP NS0-162 exam for the first time.
NetApp Certified Data Administrator, ONTAP NS0-162 Exam
Candidates for NCDA (NetApp Certified Data Administrator) certification should have at least six to 12 months of field experience implementing and administering NetApp data storage solutions in multiprotocol environments. In addition, candidates taking the NetApp Certified Data Administrator, ONTAP exam should know how to implement HA controller configurations, SyncMirror software for rapid data recovery, or ONTAP solutions with either single- or multi-node configurations.
The NetApp Certified Data Administrator, ONTAP (NS0-162) exam includes 60 test questions, with an allotted time of 1-1/2 hours to complete. In countries where English is not the native language, candidates for whom English is not their first language will be granted a 30-minute extension to the allotted examination completion time.
NS0-162 Exam Topics
The NCDA ONTAP (NS0-162) exam includes the following topics:
Storage Platforms
Describe knowledge of physical storage systems.
Describe software-defined on-premises or cloud storage systems.
Describe how to upgrade or scale ONTAP clusters.
Core ONTAP
Describe ONTAP system management.
Describe high availability concepts.
Describe how to manage Storage Virtual Machines (SVM).
Logical Storage
Describe how to use logical storage features.
Describe NetApp storage efficiency features.
Describe NetApp ONTAP Data Fabric solutions.
Networking
Describe how to use network components.
Demonstrate knowledge of how to troubleshoot network components.
SAN Solutions and Connectivity
Describe how to use SAN solutions.
Demonstrate knowledge of how to troubleshoot SAN solutions.
NAS Solutions
Describe how to use NAS solutions.
Demonstrate knowledge of how to troubleshoot NAS solutions.
Data Protection
Describe how to use ONTAP data protection solutions.
Describe how to use SnapMirror.
Identify MetroCluster concepts.
Security
Describe protocol security.
Describe security hardening.
Describe inflight or at rest encryption.
Identify SnapLock concepts.
Performance
Demonstrate knowledge of how to administer ONTAP performance.
Demonstrate knowledge of how to troubleshoot storage system performance.
View Online NetApp Certified Data Administrator, ONTAP NS0-162 Free Questions
Which two types of HA policies are applied to which types of aggregates? (Choose two.) A. storage failover (SFO) policy to data aggregates only B. controller failover (CFO) policy to all the aggregates C. storage failover (SFO) policy to root aggregates only D. controller failover (CFO) policy to root aggregates Answer: A,D
A customer has an ONTAP 9.8 AFF A250 with 12 internal SSDs. The customer wants to expand their existing aggregates by adding 12 more SSDs to the empty drive slots in the internal shelf. Which two steps must you take to accomplish this task? (Choose two.) A. Manually create root-data partitions on each disk, and use both partitions to grow existing data aggregates. B. Add the newly created data2 partitions to the partner's existing data aggregate. C. ONTAP will automatically partition the SSDs when they are added to the data aggregate. D. Assign ownership of each SSD manually to the nodes, and they will be automatically partitioned and added. Answer: B,C
An administrator wants to configure cluster peering between two clusters. In this situation, which role must be used when a LIF is configured? A. management B. data C. cluster D. intercluster Answer: D
Which two features are supported on NetApp ONTAP? (Choose two.) A. SnapMirror B. FlexCache C. Fibre Channel D. Storage Pool Answer: A,B An administrator has an SVM named vs1 that is being used for UNIX workloads. Name mappings have been configured with both local name mapping files and with LDAP. NIS will not be used in the environment. The administrator needs to ensure that LDAP takes precedence for access over file-based name mappings. In this scenario, how would you accomplish this task? A. Do not change anything, this is the default behavior. B. Use the vserver services name-service ns-switch command to set the order of preference. C. Modify the /etc/nsswitch.conf file to set the order of preference on the UNIX hosts connecting to the SVM. D. Use System Manager to modify the properties of the vserver to set the order of preference. Answer: B
Which NetApp software do you use to confirm that the SAS cabling is correct? A. Hardware Universe B. Active IQ Config Advisor C. Interoperability Matrix Tool D. Active IQ Unifide manager Answer: B
0 notes
Text
Getting started with C# and Blazor
In this new post, I want to summarize what I understood for getting started with C# and Blazor, the new technology from Microsoft. I briefly spoke about Blazor in some other posts but here I want to introduce it properly.
We live in exciting times, as .NET developer’s life has never been better. We can create apps for any operating system be it Windows, Linux, iOS, Android or macOS. Of course, we can also build amazing web-based applications with ASP.NET. MVC, Razor Pages, and WebAPI have allowed us to create robust scalable and reliable systems for years, but there has long been a missing piece to the puzzle.
One thing all of ASP.NETs web solutions have in common is that they are server based. We’ve never been able to leverage the power of C# and .NET to write client-side applications, this has always been the domain of JavaScript.
So, I’m going to introduce you to a revolutionary client-side framework: Blazor. Built on web standards, Blazor allows us to write rich, engaging user interfaces using C# and .NET. We’ll explore how Blazor can make your development process more efficient and raise your productivity levels, especially if you’re using .NET on the server as well. We’ll cover hosting models, an important concept to understand when starting out with Blazor. We’ll look at both production supported models and the benefits and tradeoffs of each. Next, we’ll introduction components and the benefits of using them to build UIs. Finally, we’ll discuss the reasons why you should consider Blazor for your next project.
Table of contents
Why choose Blazor for new applications?
Pros
Components, a better way to build UI.
What is a component?
The benefits of a component-based UI
Components
Anatomy of a Blazor component
Understanding the code
Blazor, a platform for building modern UI with C#
No installation required
Mobile applications
Understanding hosting models
Blazor Electron
Code example
Mobile Blazor Bindings
Blazor WebAssembly
Process begin
DOM manipulation
blazor.boot.json
dotnet.wasm
Calculating UI Updates
Process explained
Benefits
Tradeoffs
Blazor WebAssembly summarize
Blazor Server
Process begins
Process static files
Calculating UI updates
Process explained
SignalR
DOM
Performance
The test
Testing
Benefits
Tradeoffs
Blazor Server summarize
Why choose Blazor for new applications?
Arguably, the hardest part of starting a new project in recent times has been choosing the tech stack, there is just so much choice available. This is especially true in the front-end world. Pick a framework (Angular, React, Vue), pick a language (TypeScript, CoffeeScript, Dart), pick a build tool (Webpack, Parcel, Browserify). If a team is new to this eco-system, it can seem an almost impossible task to try and work out which combination of technologies will help make the project a success; it’s even hard for teams with experience!
So, first in this getting started with C# and Blazor, let’s cover some of the top reasons for choosing Blazor for your next project and how it can help avoid some of the issues I’ve just mentioned.
Pros
C#, a modern and feature rich language – It’s powerful, easy to learn, and versatile
Great tooling – The .NET community has been fortunate to have some amazing tooling. Visual Studio is an extremely powerful, feature rich and extensible IDE. It’s also 100% free for individuals or non-enterprise teams of 5 or less. If you prefer something more lightweight, then there is Visual Studio Code – one of the most popular code editors today. Both Visual Studio and VS Code are both cross platform:
Visual Studio for Windows and Mac
Visual Studio Code for Windows, Mac and Linux.
.NET Ecosystem – While many new frameworks need to wait for an ecosystem to build up around them, Blazor can tap into the existing .NET ecosystem. Blazor applications target .NET Standard 2.1 and can in theory use any .NET Standard NuGet package.
Unopinionated – There are no preferred patterns or practices for Blazor development, you can write applications using the ones you’re familiar and comfortable with.
Shallow learning curve – If you’re an existing .NET developer then the learning curve for Blazor is quite shallow. Razor, C#, dependency injection, project structure will all look familiar to you. This means you can focus on writing features quicker, rather than learning the framework.
Code sharing – If you’re using C# on the server then Blazor makes an excellent paring. One of the most frustrating problems with different client and server languages is the inability to reuse code. With Blazor, everything is C#. Any shared code can be placed in a common .NET Standard class library and shared easily between server and client.
Open source – As with many projects at Microsoft, Blazor is fully open source and the code is freely available on GitHub for you to browse, download, or fork your own copy.
Components, a better way to build UI.
Blazor, as with many modern front-end frameworks, uses the concept of components to build the UI. Everything is a component, pages, parts of a page, layouts, they’re all components. There are various types of component in Blazor as well as multiple ways to write them all of which will be explored in future chapters. But learning to think in terms of components is essential for writing Blazor applications.
What is a component?
You can think of a component as a building block. You put these building blocks together to form your application. These building blocks can be as big or as small as you decide, however, building an entire UI as a single component wouldn’t be a good idea. Components really show their benefit when you think of them as a way to divide up logical areas of a UI. Let’s look at an example of a user interface structured as components.

Example of a layout divided into components
Each area of the interface is a component and each one has a certain responsibility. You may also notice that there is a hierarchy forming. The layout component sits at the top of the tree, the menu, header, home page and footer are all child components of the layout component. These child components could, and probably would have child components of their own. For example, the header component could contain a logo component and a search component.

Example of nesting components to form a component tree
The benefits of a component-based UI
Many UIs have repeating elements in them, a great advantage to using components is that you can define an element in a component and then reuse the component wherever the element repeats. This can drastically cut down on the amount of repeated code in an application. It also makes the maintainability of the application much better as if the design of that element changes you only need to update it in a single place.
To cater for more advanced scenarios, components can define their own APIs allowing data and events to be passed in and out. Imagine a line of business application, it’s probably safe to assume that within that app there would be lots of places data would be displayed in table format. One approach would be to create each table as its own component, however, this would mean we would end up with a lot of components which displayed data in a table.
A better approach would be to define a single component which took in a dataset as a parameter and then displayed it in a table. Now we have a single component for displaying data in a table that we can reuse all over the application. We could also add features to this component, things such as sorting or paging. As we do, this functionality is automatically available to all the tables in the application as they are all reusing the same component.
Components
Components help speed up the development process. Due to the reusable nature of components, using them often leads to shorter development times. They can be composed together.
While usually self-contained, it’s also possible to have components work together to create more complex UI. For example, let’s take the data table scenario we just talked about, that could be a single component but that could potentially be quite large.
Another approach would be to divide it up into several smaller components, each performing a certain job. We could have a table header component, a table body component even a table cell component. Each of these components are performing a specific job but they are still part of the overall table component.
Anatomy of a Blazor component
Now, in this post getting started with C# and Blazor, we have a better idea of what components are in a general sense, let’s look at an example of a component in Blazor. For this we’re going to grab a component from the Blazor project template.
In figure 1.3 we can see an example of a component from Blazors standard project template, Counter.razor.

The sections of a component in Blazor
This particular component is known as a routable component, as it has a page directive declared at the top. Routable components are essentially a page in the application. When the user navigates to the /counter route in the application, this component will be loaded by Blazor router. It displays a simple counter with a button and when the user clicks on the button the count is incremented by one and the new value displayed to the user.
Understanding the code
While understanding the code isn’t important at this point, we can understand the structure of the component. Figure 1.3 is divided up into three sections each has a certain responsibility.
Section 1 is used to define directives, add using statements, inject dependencies, or other general configuration which applies to the whole component.
Section 2 defines the markup of the component; this is written using the Razor language, a mix of C# and HTML. Here we define the visual elements which make up the component.
Section 3 is the code block. This is used to define the logic of the component. It is possible to write any valid C# code into this section. You can define fields, properties, even entire classes if you wish.
Blazor, a platform for building modern UI with C#
Blazor is a fully featured framework for building modern client-side applications using the power of C# and .NET. Allowing developers to build engaging applications which work across nearly any platform – including web, mobile and desktop.
Blazor is an alternative to JavaScript frameworks and libraries such as Angular, Vue and React. If you’ve had experience working with any of these then you’ll probably start spotting familiar concepts. The most notable influence is the idea of building UIs with components, a concept all these technologies share and something we’ll explore in more detail later in this chapter.
No installation required
Because Blazor is built on top of web standards; it doesn’t require the end user to have .NET installed on their machines or any kind of browser plugin or extension. In fact, with Blazor WebAssembly applications we don’t even need .NET running on the server, this flavor of Blazor can be hosted as simple static files.
Being built on .NET means we have access to the vibrant ecosystem of packages available on NuGet. We also have best in class tooling with Visual Studio and Visual Studio Code, and of course, with .NET being cross platform, we can develop our Blazor applications on whatever our preferred platform is, be that Windows, Mac or Linux.
Mobile applications
Therefore, I want to highlight that Blazors programming model can also be used to build cross-platform native mobile applications via an experimental project called Mobile Blazor Bindings. This is a collaboration between the ASP.NET Core team and the Xamarin team to investigate the potential and demand for using Blazor to build non-web UIs. Microsoft has also announced the future evolution of Xamarin Forms, the Multi-platform App UI framework known as .NET MAUI. This framework will allow developers to build native apps which run on Windows, macOS, iOS and Android. According to the roadmap, Blazors programming model will be offered as an option for building these new .NET MAUI apps. This really makes Blazor a compelling technology to learn as once understood, could allow developers to build UIs for almost any platform or device.
Hopefully, you can already see Blazor is an exciting technology with a lot of potential. But there is a key concept which is important to understand before we go any further, that of hosting models. Let’s tackle that next.
Understanding hosting models
When first getting started with Blazor you will immediately come across the concept of hosting models. Essentially, hosting models are where a Blazor application is run. Currently, Blazor has two production supported hosting models called Blazor WebAssembly and Blazor Server. Regardless of which of these models you choose for your application, the component model is the same meaning components are written the same way and can be interchanged between either hosting model.

Blazor has a separation between hosting models and its app/component model. Meaning components written for one hosting model can be used with another.
The above image shows an abstract representation of Blazors architecture, with the separation between the app and component model and the various hosting models. One of the interesting aspects of Blazor is the potential of other hosting models being made available over time to allow Blazor to run in more places and be used to create more types of UI.
Outside of the two production hosting models we will cover below, there are also two other experimental models Microsoft have been testing, Blazor Electron and Mobile Blazor Bindings.
Blazor Electron
Blazor Electron is the oldest of the two experiments and allows Blazor components to be hosted in an Electron application (https://www.electronjs.org/). Developers write components for this model using HTML and C# in the exact same way as they would for Blazor WebAssembly or Blazor Server.
Code example
An example of a component which can be used by all three of hosting models is shown in the following code.
<div> <p>Current count: @currentCount</p> <button @onclick="IncrementCount">Click me</button> </div> @code { private int currentCount = 0; private void IncrementCount() { currentCount++; } }
Mobile Blazor Bindings
The newer experiment is Mobile Blazor Bindings. This model allows developers to write native mobile applications using Blazors programming model. However, this hosting model can’t use components written using web technologies, components for this hosting model must be written using native controls. The following code contains the same component as the code abode but rewritten for the Mobile Blazor Bindings hosting model.
<StackLayout> <Label> Current count: @currentCount </Label> <Button OnClick="@IncrementCount">Click me</Button> </StackLayout> @code { private int currentCount = 0; private void IncrementCount() { currentCount++; } }
As you can see the programming model is the same between the two code samples. The logic in the code block is unchanged, it’s just C# after all. The only difference is in the markup where web technologies have been swapped for native mobile controls. This does mean that we can’t swap component around between web-based hosting models and native hosting models. However, once we’ve mastered Blazors programming model we can easily use that knowledge to create other types of UI.
Now we’ve talked a little about hosting models in general we’re going to focus in on the two production supported options available in Blazor today, Blazor WebAssembly and Blazor Server.
Blazor WebAssembly
Blazor WebAssembly is the principal hosting model for Blazor applications. Choosing this option will mean your application will run entirely inside the client’s browser making it a direct alternative to JavaScript SPA (Single Page Application) frameworks. To understand how this hosting model works we’re going to walk through the process of initializing a Blazor WebAssembly application shown in following image.
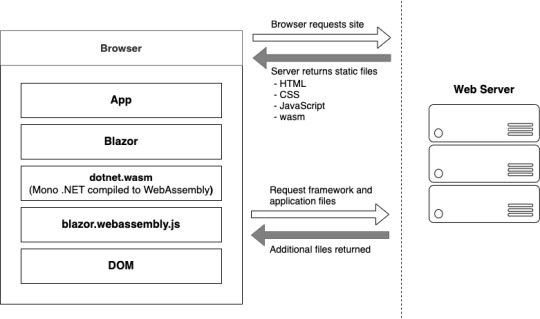
Bootup of a Blazor WebAssembly application showing the interactions between the client’s browser and the web server
Process begin
The process begins when a browser makes a request to the webserver. The web server will return a set of files needed to load the application, these include the host page for the application, usually called index.html, any static assets required by the application such as images, CSS and JavaScript. As well as a special JavaScript file called blazor.webassembly.js.
At this point, you may be wondering why we have a JavaScript file, one of the big selling points of Blazor is the ability to write UI logic using C# instead of JavaScript, right? Yes, that’s true.
But as of right now WebAssembly has a fairly large limitation, it can’t alter the DOM or call Web APIs directly.
DOM manipulation
In order to manage this current limitation, part of the Blazor framework resides in JavaScript called blazor.webassembly.js file. This part of the framework does three main things:
Loads and initializes the Blazor application in the browser.
Provides direct DOM manipulation so Blazor can perform UI updates.
Provides APIs for JavaScript interop scenarios, which we’ll discuss in detail in later chapters.
It’s possible that in the future this file will no longer be required, this will depend on how fast features are added to WebAssembly and adopted by browsers. But for now, it’s an essential part of the framework.
Now, we’ve cleared that up let’s get back to our booting Blazor app. I want to point out that the server returns all static files. They haven’t required any server-side compilation or manipulation. This means that they can be hosted on any service which offers static hosting, there is no requirement for a .NET runtime to be present on the server. For the first time this opens up free hosting options such as GitHub pages to .NET developers (applies to standalone Blazor WebAssembly applications only).
blazor.boot.json
Once the browser has received all the initial files from the web server it can process them and construct the Document Object Model (DOM). Next, blazor.webassembly.js is executed. This performs many actions but in the context of starting a Blazor WebAssembly app it downloads the blazor.boot.json file. This file essentially contains an inventory of all of the framework and application files which are required to run the app.
Most of these files are normal .NET assemblies, there is nothing special about them and they could be run on any compatible .NET runtime. But there’s also another type of file which is downloaded called dotnet.wasm.
dotnet.wasm
The dotnet.wasm file is in fact a complete .NET runtime, the mono .NET runtime to be exact, which has been compiled to WebAssembly.
At this point in time, only the .NET runtime is compiled to WebAssembly, the framework and application are standard .NET assemblies. In the future a feature called AOT (Ahead Of Time) compiling will be introduced which will allow developers to compile parts of their applications into WebAssembly.
The benefit of this will be performance, any code compiled to WebAssembly will be many times more performant than the interpreted approach used today. However, there’s a tradeoff, and that’s size. AOT compiled code will be bigger than the standard assemblies meaning a larger overall download size for the application.
Once the blazor.boot.json file has been downloaded and the files listed in it have been downloaded, it’s time for the application to be run. The WebAssembly .NET runtime is initialized which in turn loads the Blazor framework and finally the application itself. At this point we have a running Blazor application which exists entirely inside the client’s browser. Aside from requesting additional data (if applicable), there’s no further reliance on the server.
Calculating UI Updates
We now understand how a Blazor WebAssembly application boots up. But how do UI updates get calculated? Just as we did for the initialization process, we’re going to follow a scenario to understand how this happens and what Blazor does.
The process of client-side navigation in Blazor WebAssembly from clicking a link to the application of UI updates
For our scenario we have a Blazor WebAssembly application with two pages, home and counter. Neither of these pages have anything on them except a heading saying either “Home” or “Counter”, respectively. The user is on the home page of the application and is going to click on a link to the go to the counter page. We’ll follow the process Blazor goes through to update the UI from that of the home page to the counter page.
Process explained
When the user clicks on the counter link, the navigation event is intercepted by Blazor on the JavaScript side. This event is then passed over to Blazor on the WebAssembly side and is processed by Blazors router component.
The router checks its routing table for any routable components which match the link the user has attempted to navigate to. In our case, it will find a match with the Counter component and a new instance of that component will be created and the relevant lifecycle methods will be executed.
Once complete Blazor will work out the minimum amount of changes that are required to update the DOM to match that of the Counter component. When this is complete, those changes will be passed back down to the Blazor JavaScript runtime and that will in-turn, apply those changes to the physical DOM. At this point the UI will update the user will be on the Counter page.
All of this has happened client-side in the user browser. There was no need for a server during any point in this process. It’s fair to say that in a real world application, you would probably make a call out to a server to some point in this process. This usually happens during the execution of the lifecycle methods of the component being navigated to in order to load some initial data for the component. But this would depend on the individual application.
Benefits
Now we know a bit more about how the Blazor WebAssembly hosting model works, let talk about the benefits and tradeoffs of choosing this model. Let’s start with the benefits.
Applications run on the client. This means that there is much less load on the server, you can offload much of the work to the client. This could lead to significant cost saving on server infrastructure and improve the scalability of an application.
Can work in offline scenarios. As the app runs entirely inside the browser there’s no need for a persistent connection to the server, making applications more tolerant to unstable network connections. It’s also trivial is enable Progressive Web Application (PWA) functionality. In fact, Blazor WebAssembly has this as an option you can select when creating your application.
Deployed as static files. As Blazor WebAssembly apps are just static files, they can be deployed anywhere static hosting is available. This opens up some options which have never been available to .NET developers historically. Services such as GitHub pages, Netlify, Azure Blob Storage, AWS S3 Buckets, Azure Static Web Sites, are all options for hosting standalone Blazor WebAssembly applications.
Code Sharing. Potentially one of the greatest benefits with Blazor WebAssembly is if you’re using C# on the server. You can now use the same C# objects on your client as you use on the server. The days of keeping TypeScript models in sync with their C# equivalent and vice versa, are over.
Tradeoffs
Of course, nothing is a silver bullet so let’s understand some tradeoffs of this model.
Payload. The initial download size for a Blazor WebAssembly app can be considered quite large. The project template weighs in at around 1.8mb when published. This is largely down to the fact Blazor needs to ship an entire .NET runtime to the client which comes in at around 600kb. However, this is a one-time cost as the runtime and many of the framework assemblies are cached on the first load. Meaning subsequent loads can be a small as a few kb.
Load time. A knock-on effect of the payload size can be load time. If the user’s on a poor internet connection the amount of time required to download the initial files will be higher, which will delay the start of the application, leaving the user with a loading message of some kind. This can be offset slightly by using server-side prerendering, however, while this will give the user something more interesting to look at initially, the app still won’t be interactive until all files have been downloaded and initialized. Server-side prerendering for Blazor WebAssembly apps also requires a ASP.NET Core element on the server, which negates any free hosting options.
Restricted runtime. This is arguably not a tradeoff as such, but for existing .NET developers who are used to having a relatively free rein over the machine their apps run on, it’s something to be aware of. WebAssembly applications run in the same browser sandbox as JavaScript applications. This means, for example, that you will not be allowed to reach out to the users’ machine and do things such access the local file system.
Blazor WebAssembly summarize
To summarize, Blazor WebAssembly is the hosting model to choose if you’re looking for a direct replacement for a JavaScript SPA framework such as Angular, React or Vue. While there are a few tradeoffs to consider, there are some substantial benefits to choosing this model.
Blazor Server
Now we’ve seen how Blazor WebAssembly works, let’s turn our attention to the Server hosting model and see how it differs. Blazor Server was the first production supported hosting model for Blazor, being released around 8 months before the WebAssembly version. As we did with the previous model, we’ll walk through initializing a Blazor Server application to help us understand how things work.
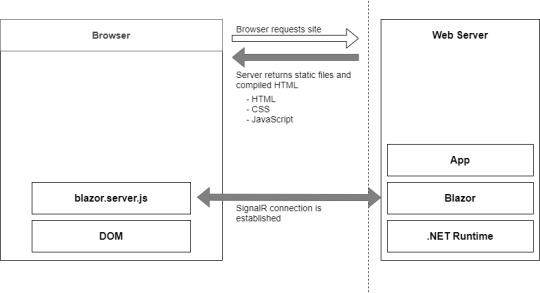
Bootup process of a Blazor Server application
Process begins
The process begins with a request to load the site from the browser. When this request hits the webserver two things could happen, the app is started up, or if the app is already running, a new session is established. Why would the app already be running? Blazor WebAssembly follows the traditional SPA model and runs entirely in the browser, essentially making it like a desktop application. Each user has their own instance of the app which runs locally on their machine. Blazor Server is different, only one instance of the application runs on the server, but it can support many clients. Therefore, the app could already be running, and the new request would just establish a new session.
Process static files
The request is then processed by the application and the initial payload is sent back to the browser. This includes static assets such as CSS and JavaScript files, and images. There is also the initial HTML, but this is compiled rather than static HTML we saw in Blazor WebAssembly. The reason for this is that the hosting page for a Blazor Server application is a Razor Page rather than a static HTML page in the WebAssembly model. The advantage of this is it allows Blazor Server applications to use server-side prerendering out of the box. In fact, this feature is enabled by default when you create this type of Blazor application.
Once the initial payload is returned to the browser the files are processed and the DOM is created – then a file called blazor.server.js is executed. The job of this runtime is to establish a SignalR connection back to the Blazor application running on the server. At this point the application is ready for user interaction.
Calculating UI updates
What happens when a user interacts with the application? We saw earlier that in Blazor WebAssembly the events are processed right there in the browser along with calculating any UI updates and applying them to the DOM. But that can’t happen here as the application is running on the server.
We’ll follow the same scenario as we did with Blazor WebAssembly, we have a Blazor Server application with two pages, home and counter. Neither of these pages have anything on them except a heading saying either “Home” or “Counter”, respectively. The user is on the home page of the application and is going to click on a link to the go to the counter page. We’ll follow the process Blazor goes through to update the UI from that of the home page to the counter page.

Process of updating the UI in Blazor Server
Process explained
The user clicks on the link in the menu and the click event is intercepted by Blazor’s runtime on the client. The runtime then processes the event to understand what has happened. In this case there are two things, a mouse click event and a navigation event, due to it being a hyperlink that was clicked. These two events are then bundled up and sent back to the server over the SignalR connection that was established when the application started.
So, the client sent a the message to the server and the server unpacks and process the message. The Blazor framework then calls any application code necessary. In this case it would instantiate an instance of the counter page component and execute the relevant lifecycle methods.
SignalR
Once complete, Blazor will work out what the minimum amount of changes needed to make the current page transform to the counter page and then send these back to the client via the SignalR connection. Just to be clear, Blazor will not send back an entirely new page to the client. It will only send back the minimum number of instructions needed to update the current DOM to match the Counter page. In our case, the only difference is the heading. Blazor will send back a single instruction to change the text in the heading from “Home” to “Counter”.
DOM
Once back on the client, the client unpacks the changes, and the required changes are applied to the physical DOM. From the user’s perspective, they appear to have navigated to a new page in the application, the counter page. But they are still on the same physical page, it just has a different header.
You may have spotted this already, but the overall process isn’t any different to how Blazor WebAssembly worked, it’s just been stretched out a bit over that SignalR connection. Blazor Server is just as much a SPA as Angular, Vue or Blazor WebAssembly. It just happens to run its logic and calculate UI updates on the server instead of the client. In fact, I would go as far as saying if you were presented with two identical applications, one written in Blazor Server and one in Blazor WebAssembly, you wouldn’t be able to tell the difference between them, as a user.
Performance
Before we talk about benefits and tradeoffs for this model, I want quickly mention performance. With all the network chatter which goes on in this hosting model I’m sure it may have crossed your mind that this might not scale particularly well.
The test
In 2019, the ASP.NET Core team did some testing to establish the performance levels of Blazor Server apps. They setup an application in Azure and tested it on different powered virtual machines, checking the number of active users the application could support. Here are the results.
Standard D1 v2 Instance (1vCPU & 3.5GB Memory). Over 5000 concurrent users
Standard D3 v2 Instance (4vCPU & 14GB Memory). Over 20,000 concurrent users
As you can see, Blazor Server is no slouch when it comes to performance. The main factor they found which effects the number of clients that can be supported is memory. This makes sense as the server needs to keep track of all the clients which are connected to it, the more there are the more information needs to be stored in memory.
Testing
The other major finding from testing was how network latency effected the application. As all interaction are sent back to the server for processing, latency can have a large impact on usability.
If the server is located 250ms away from the client, then each interaction is going to take at least 500ms to be processed as it has to travel to the server (250ms), then be processed, then travel back again (250ms).
Testing found that when the latency went above 200ms then the UI began to feel sluggish and less responsive. As a rough rule you would always want your users to be on the same continent as the server. If you want to have a globally available Blazor Server application, then you need to have your app evenly distributed across the world aiming to keep all clients within 200ms of a server.
Benefits
As we did before, let’s look at the benefits and tradeoffs of choosing a Blazor Server application.
Small payload. As the application is running on the server as opposed to the client, the initial download is significantly smaller. Depending on static assets such as CSS and images a Blazor Server application can be as small as a 100-200kb.
Fast load time. With a much smaller payload the application loads much faster. The server-side prerendering also helps as the user never sees a loading message.
Access to the full runtime. The application code is executing on the server on top of the full .NET runtime. This means that you can do things such as access the servers file system if you require without hitting any security restrictions.
Code security. If you have code which is proprietary, and you don’t want people being able to download and interrogate it then Blazor Server is a good choice. The application code is all executed on the server and only the UI updates are sent to the client. This means your code is never exposed to the client in anyway.
Tradeoffs
Heavy server load. Where Blazor WebAssembly allows us to utilize the power of the client Blazor Server does the complete opposite. Almost all of the work is now being performed by the server. Meaning you might need a larger investment in your infrastructure to support Blazor Server apps.
Doesn’t work offline. Where Blazor WebAssembly takes offline working in its stride Blazor Server does not. The SignalR connection is the lifeline of the application and without it the client can’t function at all. By default, this results in an overlay with a message saying the client is attempting to reestablish the connection. If this fails, the user has to refresh the browser to restart the application.
Latency. Due to its design Blazor Server apps are sensitive to latency issues. Every interaction the user has with the application must be sent back to the server for processing and await any updates that need to be applied. If there is a high latency in the connection between client and server a noticeable lag manifests in the UI and actions quickly feel sluggish. In real numbers a latency above 200ms is going to start causing these issues.
Requires a stable connection. Following on from the need for low latency and tying in with the inability to work offline. Blazor Server apps need to have a stable internet connection. If the connection is intermittent in any way, the user will continually see the reconnecting overlay in their application which quickly becomes very disruptive. An obvious scenario where this could occur is when a user is on a mobile device which has intermittent connection.
Blazor Server summarize
In summary, if you’re looking for a fast loading application and you have users with a fast and stable network connection, then Blazor Server is a great choice.
The post Getting started with C# and Blazor appeared first on PureSourceCode.
from WordPress https://www.puresourcecode.com/dotnet/net-core/getting-started-with-c-and-blazor/
0 notes
Text
Simplify Static Asset Management With Vue.js Single-File Component

Static asset management is one of the more painful and mysterious challenges front-end developers face. We want our source code to be simple to develop and maintain, but we rely on browsers to be lean and mean. Browsers can’t be expected to understand our fancy source files with conveniences like Sass or the newest bleeding edge JavaScript features. We configure transpilers, linters, and compressors that watch for source code changes or get triggered by build processes. And finally, these tools emit static assets that a browser can interpret

Even when we don’t use fancy preprocessors, we still copy the source files to a dist directory to deploy them…because…well…it’s just what we do!

On top of this complexity, we have traditionally maintained a separation of concerns between markup, scripting, and styling. This separation can lead to extreme bloat that makes our applications difficult to maintain.
Imagine a request to remove a component from a view. You remove the markup…but can you track down CSS selectors that are specific to this component? All the media queries? Do you feel safe removing code that may affect other parts of the view? What about a request to modify a component’s appearance? Do you add a new class to your updated component and leave the old styling behind, just in case there are other parts of the view that are styled by it? Technical debt accumulates. Eventually, you have a pile of dead code mixed in with the good stuff. It’s very difficult to clean up, and nobody wants to pay for the effort.

Not to imply that your code is inherently bad. It’s a consequence of the separation of concerns that has made the internet look sharp since the W3C adopted CSS in 1996.
So, what are our alternatives? Inline CSS? An occasional inline style attribute is acceptable in the 21st century. But even with CSS-in-JS libraries, this solution can be challenging to scale. We need the cascade. We need media queries.
Many modern frameworks combine JavaScript with markup; it’s the core of the React, Angular, and Vue.js revolution. The concept of “styled components” is also trending. But unification usually comes at a cost. The learning curve, awkward code structure, and dependency on 3rd party libraries may outweigh the advantages. However, Vue’s out-of-the-box support for the concept makes it simple to grasp and implement.

The Vue.js framework Single-File Component (SFC) allows you to combine templating, scripting, and styling in a single source file that can accept props and manage state. Vue CLI — the “beginner” installation of Vue.js — will pre-configure the bridge between your .vue source files and webpack that requires absolutely no configuration or webpack knowledge. Let’s open a terminal and quickly build a working example using npm.
1.Install Vue CLI: npm install -g @vue/cli
2.Create a new project (accept the default settings): vue create vue-sfc-example
3.Start the project: npm run serve
4. Render HelloWorld.vue in a browser: http://localhost:8080

SO easy. Let’s open the source to see what we built.
<template>
<div class="hello">
...some markup...
</div>
</template>
<script>
export default {
name: 'HelloWorld',
props: {
msg: String
}
}
</script>
<!-- Add "scoped" attribute to limit CSS to this component only -->
<style scoped>
h3 {
margin: 40px 0 0;
}
ul {
list-style-type: none;
padding: 0;
}
li {
display: inline-block;
margin: 0 10px;
}
a {
color: #42b983;
}
</style>
The <template> tag wraps Vue template syntax enhanced markup.
The <script> tag wraps JavaScript.
The <style> tag wraps CSS.
Aside from placing the styling at the end of the file, this source file looks an awful lot like an html file that a browser could interpret. There is a lot going on under the hood, but Vue doesn’t clutter the source with tooling bloat.
Let’s concentrate on the <style> tag. The boilerplate contains some basic CSS, and an attribute named “scoped”. As the code comment implies, this attribute allows you to “scope” this block to only apply to this particular component, by automatically namespacing the CSS. Compare this to a more traditional approach, which might involve creating a selector like: “#hello-world-component-namespace.this-component {...}” in some faraway css file. The scoped attribute is optional. If you want to modify child components, one approach is to exclude the scoped attribute. You may also use multiple blocks of CSS, in case you wish to scope part of the code, but style children with a separate CSS block.
<style scoped>
h3 {
margin: 40px 0 0;
}
...
</style>
<style>
#child-component > h3 {
margin: 10px;
}
...
</style>
If you inspect the source code in your browser, you can see this style block rendered in the head of the document:
<style type="text/css">h3[data-v-469af010] {
margin: 40px 0 0;
}
ul[data-v-469af010] {
list-style-type: none;
padding: 0;
}
li[data-v-469af010] {
display: inline-block;
margin: 0 10px;
}
a[data-v-469af010] {
color: #42b983;
}
</style>
There is no need to version or deploy a CSS file, in this example. The data attribute in the first block is no accident. It uniquely identifies the component this styling is scoped to.
<div data-v-469af010="" class="hello">...</div>
Predictably, namespacing is suppressed for code blocks that are not scoped.
<style type="text/css">
#child-component > h3 {
margin: 10px;
}
</style>
An alternative to this approach is the ::v-deep combinator, which allows you to style children from a scoped block. Details can be found here.
But what about my Sass? Good news: SFCs tap into all of your favorite webpack preprocessors. Install sass-loader with npm:
<style scoped lang="scss">
h3 {
margin: 40px 0 0;
}
ul {
list-style-type: none;
padding: 0;
> li {
display: inline-block;
margin: 0 10px;
a {
color: #42b983;
&.very-green {
#00ff00;
}
}
}
}
</style>
But what about my Sass globals, includes, mixins, etc.? Never fear — the Sass block you include in your SFCs works just like your typical Sass source file. You can pass includes, set variables, nest media queries, and any other Sass convenience.
<style scoped lang="scss">
@import "mixins";
@import "global/global";
#main {
padding-top: em(54);
@media (min-width: $screen-md) {
padding-top: 0;
}
}
</style>
The vue-loader, which is included and pre-configured by Vue CLI, makes all of this work. Sass/Scss, Less, Babel, TypeScript, and other popular preprocessors and linters are supported. These features can be discretely configured, to the delight of advanced users.
The Vue.js SFC offers the convenience our source code deserves, without the file management and webpack tooling headaches. You can also use the component state to set class and style inside your templates, using built-in lifecycle hooks. It is also important to note that you can still include CSS the typical way, or in a mixed mode. This is especially handy when using rapid prototyping libraries like Bootstrap.
What’s the catch? Vue.js is a relatively new player. It’s picking up steam, but there aren’t as many applications using the framework as the competing products — Angular and React. That means the user community is comparably small. Examples are slim and basic. You are cutting your own trail. Also, we have detected some “spookiness” in the way preprocessors react to code structure. The preprocessors may need some configuration and babysitting, once you scale into a larger project.
_________________________________________
0 notes
Photo

D3 6.0, easy 3D text, Electron 10, and reimplementing promises
#503 — August 28, 2020
Unsubscribe | Read on the Web
JavaScript Weekly
ztext.js: A 3D Typography Effect for the Web — While it initially has a bit of a “WordArt” feel to it, this library actually adds a pretty neat effect to any text you can provide. This is also a good example of a project homepage, complete with demos and example code.
Bennett Feely
D3 6.0: The Data-Driven Document Library — The popular data visualization library (homepage) takes a step forward by switching out a few internal dependencies for better alternatives, adopts ES2015 (a.k.a. ES6) internally, and now passes events directly to listeners. Full list of changes. There’s also a 5.x to 6.0 migration guide for existing users.
Mike Bostock
Scout APM - A Developer’s Best Friend — Scout’s intuitive UI helps you quickly track down issues so you can get back to building your product. Rest easy knowing that Scout is tracking your app’s performance and hunting down small issues before they become large issues. Get started for free.
Scout APM sponsor
Danfo.js: A Pandas-like Library for JavaScript — An introduction to a new library (homepage) that provides high-performance, intuitive, and easy-to-use data structures for manipulating and processing structured data following a similar approach to Python’s Pandas library. GitHub repo.
Rising Odegua (Tensorflow)
Electron 10.0.0 Released — The popular cross-platform desktop app development framework reaches a big milestone, though despite hitting double digits, this isn’t really a feature packed released but more an evolution of an already winning formula. v10 steps up to Chromium 85, Node 12.1.3, and V8 8.5.
Electron Team
Debug Visualizer 2.0: Visualize Data Structures Live in VS Code — We first mentioned this a few months ago but it’s seen a lot of work and a v2.0 release since then. It provides rich visualizations of watched values and can be used to visualize ASTs, results tables, graphs, and more. VS Marketplace link.
Henning Dieterichs
💻 Jobs
Sr. Engineer @ Dutchie, Remote — Dutchie is the world's largest and fastest growing cannabis marketplace. Backed by Howard Schultz, Thrive, Gron & Casa Verde Capital.
DUTCHIE
Find a Job Through Vettery — Create a profile on Vettery to connect with hiring managers at startups and Fortune 500 companies. It's free for job-seekers.
Vettery
📚 Tutorials, Opinions and Stories
Minimal React: Getting Started with the Frontend Library — Dr. Axel explains how to get started with React while using as few libraries as possible, including his state management approach.
Dr. Axel Rauschmayer
A Leap of Faith: Committing to Open Source — Babel maintainer Henry Zhu talks about how he left his role at Adobe to become a full-time open source maintainer, touching upon his faith, the humanity of such a role, and the finances of making it a reality.
The ReadME Project (GitHub)
Faster CI/CD for All Your Software Projects - Try Buildkite ✅ — See how Shopify scaled from 300 to 1800 engineers while keeping their build times under 5 minutes.
Buildkite sponsor
The Headless: Guides to Learning Puppeteer and Playwright — Puppeteer and Playwright are both fantastic high level browser control APIs you can use from Node, whether for testing, automating actions on the Web, scraping, or more. Code examples are always useful when working with such tools and these guides help a lot in this regard.
Checkly
How To Build Your Own Comment System Using Firebase — Runs through how to add a comments section to your blog with Firebase, while learning the basics of Firebase along the way.
Aman Thakur
A Guide to Six Commonly Used React Component Libraries
Max Rozen
Don't Trust Default Timeouts — “Modern applications don’t crash; they hang. One of the main reasons for it is the assumption that the network is reliable. It isn’t.”
Roberto Vitillo
Guide: Get Started with OpenTelemetry in Node.js
Lightstep sponsor
Deno Built-in Tools: An Overview and Usage Guide
Craig Buckler
How I Contributed to Angular Components — A developer shares his experience as an Angular Component contributor.
Milko Venkov
🔧 Code & Tools
fastest-levenshtein: Performance Oriented Levenshtein Distance Implementation — Levenshtein distance is a metric for measuring the differences between two strings (usually). This claims to be the fastest JS implementation, but we’ll let benchmarks be the judge of that :-)
ka-weihe
Yarn 2.2 (The Package Manager and npm Alternative) Released — As well as being smaller and faster, a dedupe command has been added to deduplicate dependencies with overlapping ranges.
Maël Nison
Light Date ⏰: Fast and Lightweight Date Formatting for Node and Browser — Comes in at 157 bytes, is well-tested, compliant with Unicode standards on dates, and written in TypeScript.
Antoni Kepinski
Barebackups: Super-Simple Database Backups — We automatically backup your databases on a schedule. You can use our storage or bring your own S3 account for unlimited backup storage.
Barebackups sponsor
Carbonium: A 1KB Library for Easy DOM Manipulation — Edwin submitted this himself, so I’ll let him explain it in his own words: “It’s for people who don’t want to use a JavaScript framework, but want more than native DOM. It might remind you of jQuery, but this library is only around one kilobyte and only supports native DOM functionality.”
Edwin Martin
DNJS: A JavaScript Subset for Configuration Languages — You might think that JSON can already work as a configuration language but this goes a step further by allowing various other JavaScript features in order to be more dynamic. CUE and Dhall are other compelling options in this space.
Oliver Russell
FullCalendar: A Full Sized JavaScript Calendar Control — An interesting option if you want a Google Calendar style control for your own apps. Has connectors for React, Vue and Angular. The base version is MIT licensed, but there’s a ‘premium’ version too. v5.3.0 just came out.
Adam Shaw
file-type: Detect The File Type of a Buffer, Uint8Array, or ArrayBuffer — For example, give it the raw data from a PNG file, and it’ll tell you it’s a PNG file. Usable from both Node and browser.
Sindre Sorhus
React-PDF: Display PDFs in a React App As Easily As If They Were Images
Wojciech Maj
Meteor 1.11 Released
Filipe Névola
🕰 ICYMI (Some older stuff that's worth checking out...)
Need to get a better understanding of arrow functions? This article from Tania Rascia will help.
Sure, strictly speaking a string in JavaScript is a sequence of UTF-16 code units... but there's more to it.
Zara Cooper explains how to take advantage of schematics in Angular Material and ng2-charts to substantially reduce the time and work that goes into building a dashboard
In this intro to memoizaition Hicham Benjelloun shares how you can optimize a function (by avoiding computing the same things several times).
by via JavaScript Weekly https://ift.tt/3jmo1hQ
0 notes
Link
Have you ever seen a calendar on a webpage and thought, how the heck did they did that? For something like that, it might be natural to reach for a plugin, or even an embedded Google Calendar, but it’s actually a lot more straightforward to make one than you might think. Especially when we use the component-driven power of Vue.
I’ve set up a demo over at CodeSandbox so you can see what we’re aiming for, but it’s always a good idea to spell out what we’re trying to do:
Create a month view grid that displays the days of the current month
Display dates from the previous and next months to so the grid is always full
Indicate the current date
Show the name of the currently selected month
Navigate to the previous and next month
Allow the user to navigate back to the current month with a single click
Oh, and we’ll build this as a single page application that fetches calendar dates from Day.js, a super light utility library.
Step 1: Start with the basic markup
We’re going to jump straight into templates. If you’re new to Vue, Sarah’s introduction series is a nice place to start. It’s also worth noting that I’ll be linking to the Vue 2 docs throughout this post. Vue 3 is currently in beta and the docs for it are subject to change.
Let’s start with creating a basic template for our calendar. We can outline our markup as three layers where we have:
A section for the calendar header. This will show components with the currently selected month and the elements responsible for paginating between months.
A section for the calendar grid header. A table header that holds a list containing the days of the week, starting with Monday.
The calendar grid. You know, each day in the current month, represented as a square in the grid.
Let’s write this up in a file called CalendarMonth.vue. This will be our main component.
<!-- CalendarMonth.vue --> <template> <!-- Parent container for the calendar month --> <div class="calendar-month"> <!-- The calendar header --> <div class="calendar-month-header" <!-- Month name --> <CalendarDateIndicator /> <!-- Pagination --> <CalendarDateSelector /> </div> <!-- Calendar grid header --> <CalendarWeekdays /> <!-- Calendar grid --> <ol class="days-grid"> <CalendarMonthDayItem /> </ol> </div> </template>
Now that we have some markup to work with, let’s go one step further and create required components.
Step 2: Header components
In our header we have two components:
CalendarDateIndicator shows the currently selected month.
CalendarDateSelector is responsible for paginating between months.
Let’s start with CalendarDateIndicator. This component will accept a selectedDate property which is a Day.js object that will format the current date properly and show it to the user.
<!-- CalendarDateIndicator.vue --> <template> <div class="calendar-date-indicator"></div> </template> <script> export default { props: { selectedDate: { type: Object, required: true } }, computed: { selectedMonth() { return this.selectedDate.format("MMMM YYYY"); } } }; </script>
That was easy. Let’s go and create the pagination component that lets us navigate between months. It will contain three elements responsible for selecting the previous, current and next month. We’ll add an event listener on those that fires the appropriate method when the element is clicked.
<!-- CalendarDateSelector.vue --> <template> <div class="calendar-date-selector"> <span @click="selectPrevious">﹤</span> <span @click="selectCurrent">Today</span> <span @click="selectNext">﹥</span> </div> </template>
Then, in the script section, we will set up two props that the component will accept:
currentDate allows us to come back to current month when the “Today” button is clicked.
selectedDate tells us what month is currently selected.
We will also define methods responsible for calculating the new selected date based on the currently selected date using the subtract and add methods from Day.js. Each method will also $emit an event to the parent component with the newly selected month. This allows us to keep the value of selected date in one place — which will be our CalendarMonth.vue component — and pass it down to all child components (i.e. header, calendar grid).
// CalendarDateSelector.vue <script> import dayjs from "dayjs"; export default { name: "CalendarDateSelector", props: { currentDate: { type: String, required: true }, selectedDate: { type: Object, required: true } }, methods: { selectPrevious() { let newSelectedDate = dayjs(this.selectedDate).subtract(1, "month"); this.$emit("dateSelected", newSelectedDate); }, selectCurrent() { let newSelectedDate = dayjs(this.currentDate); this.$emit("dateSelected", newSelectedDate); }, selectNext() { let newSelectedDate = dayjs(this.selectedDate).add(1, "month"); this.$emit("dateSelected", newSelectedDate); } } }; </script>
Now, let’s go back to the CalendarMonth.vue component and use our newly created components.
To use them we first need to import and register the components, also we need to create the values that will be passed as props to those components:
today properly formats today’s date and is used as a value for the “Today” pagination button.
selectedDate is the currently selected date (set to today’s date by default).
The last thing we need to do before we can render the components is create a method that’s responsible for changing the value of selectedDate. This method will be fired when the event from the pagination component is received.
// CalendarMonth.vue <script> import dayjs from "dayjs"; import CalendarDateIndicator from "./CalendarDateIndicator"; import CalendarDateSelector from "./CalendarDateSelector"; export default { components: { CalendarDateIndicator, CalendarDateSelector }, data() { return { selectedDate: dayjs(), today: dayjs().format("YYYY-MM-DD") }; }, methods: { selectDate(newSelectedDate) { this.selectedDate = newSelectedDate; } } }; </script>
Now we have everything we need to render our calendar header:
<!-- CalendarMonth.vue --> <template> <div class="calendar-month"> <div class="calendar-month-header"> <CalendarDateIndicator :selected-date="selectedDate" class="calendar-month-header-selected-month" /> <CalendarDateSelector :current-date="today" :selected-date="selectedDate" @dateSelected="selectDate" /> </div> </div> </template>
This is a good spot to stop and see what we have so far. Our calendar header is doing everything we want, so let’s move forward and create components for our calendar grid.
Step 3: Calendar grid components
Here, again, we have two components:
CalendarWeekdays shows the names of the weekdays.
CalendarMonthDayItem represents a single day in the calendar.
The CalendarWeekdays component contains a list that iterates through the weekday labels (using the v-for directive) and renders that label for each weekday. In the script section, we need to define our weekdays and create a computed property to make it available in the template and cache the result to prevent us from having to re-calculate it in the future.
// CalendarWeekdays.vue <template> <ol class="day-of-week"> <li v-for="weekday in weekdays" :key="weekday" > </li> </ol> </template>
<script> const WEEKDAYS = ["Mon", "Tue", "Wed", "Thu", "Fri", "Sat", "Sun"]; export default { name: 'CalendarWeekdays', computed: { weekdays() { return WEEKDAYS } } } </script>
Next is CalendarMonthDayItem. It’s a list item that receives a day property that is an object, and a boolean prop, isToday, that allows us to style the list item to indicate that it’s the current date. We also have one computed property that formats the received day object to our desired date format (D, or the numeric day of the month).
// CalendarMonthDayItem.vue <template> <li class="calendar-day" :class="{ 'calendar-day--not-current': !isCurrentMonth, 'calendar-day--today': isToday }" > <span></span> </li> </template>
<script> import dayjs from "dayjs"; export default { name: "CalendarMonthDayItem", props: { day: { type: Object, required: true }, isCurrentMonth: { type: Boolean, default: false }, isToday: { type: Boolean, default: false } }, computed: { label() { return dayjs(this.day.date).format("D"); } } }; </script>
OK, now that we have these two components, let’s see how we can add them to our CalendarMonth component.
We first need to import and register them. We also need to create a computedproperty that will return an array of objects representing our days. Each day contains a date property and isCurrentMonth property.
// CalendarMonth.vue <script> import dayjs from "dayjs"; import CalendarMonthDayItem from "./CalendarMonthDayItem"; import CalendarWeekdays from "./CalendarWeekdays";
export default { name: "CalendarMonth", components: { // ... CalendarMonthDayItem, CalendarWeekdays }, computed: { days() { return [ { date: "2020-06-29", isCurrentMonth: false }, { date: "2020-06-30", isCurrentMonth: false }, { date: "2020-07-01", isCurrentMonth: true }, { date: "2020-07-02", isCurrentMonth: true }, // ... { date: "2020-07-31", isCurrentMonth: true }, { date: "2020-08-01", isCurrentMonth: false }, { date: "2020-08-02", isCurrentMonth: false } ]; } } }; </script>
Then, in the template, we can render our components. Again, we use the v-fordirective to render the required number of day elements.
<!-- CalendarMonth.vue --> <template> <div class="calendar-month"> <div class="calendar-month-header"> // ... </div> <CalendarWeekdays/> <ol class="days-grid"> <CalendarMonthDayItem v-for="day in days" :key="day.date" :day="day" :is-today="day.date === today" /> </ol> </div> </template>
OK, things are starting to look good now. Have a look at where we are. It looks nice but, as you probably noticed, the template only contains static data at the moment. The month is hardcoded as July and the day numbers are hardcoded as well. We will change that by calculating what date should be shown on a specific month. Let’s dive into the code!
Step 4: Setting up current month calendar
Let’s think how we can calculate the date that should be shown on a specific month. That’s where Day.js really comes into play. It provides all the data we need to properly place dates on the correct days of the week for a given month using real calendar data. It allows us to get and set anything from the start date of a month to all the date formatting options we need to display the data.
We will:
Get the current month
Calculate where the days should be placed (weekdays)
Calculate the days for displaying dates from the previous and next months
Put all of the days together in a single array
We already have Day.js imported in our CalendarMonth component. We’re also going to lean on a couple of Day.js plugins for help. WeekDay helps us set the first day of the week. Some prefer Sunday as the first day of the week. Other prefer Monday. Heck, in some cases, it makes sense to start with Friday. We’re going to start with Monday.
The WeekOfYear plugin returns the numeric value for the current week out of all weeks in the year. There are 52 weeks in a year, so we’d say that the week starting January 1 is the the first week of the year, and so on.
Here’s what we put into CalendarMonth.vue to put all of that to use:
// CalendarMonth.vue <script> import dayjs from "dayjs"; import weekday from "dayjs/plugin/weekday"; import weekOfYear from "dayjs/plugin/weekOfYear"; // ...
dayjs.extend(weekday); dayjs.extend(weekOfYear); // ...
That was pretty straightforward but now the real fun starts as we will now play with the calendar grid. Let’s stop for a second a think what we really need to do to get that right.
First, we want the date numbers to fall in the correct weekday columns. For example, July 1, 2020, is on a Wednesday. That’s where the date numbering should start.
If the first of the month falls on Wednesday, then that means we’ll have empty grid items for Monday and Tuesday in the first week. The last day of the month is July 31, which falls on a Friday. That means Saturday and Sunday will be empty in the last week of the grid. We want to fill those with the trailing and leading dates of the previous and next months, respectively, so that the calendar grid is always full.

Adding dates for the current month
To add the days of the current month to the grid, we need to know how many days exist in the current month. We can get that using the daysInMonth method provided by Day.js. Let’s create a computed property for that.
// CalendarMonth.vue computed: { // ... numberOfDaysInMonth() { return dayjs(this.selectedDate).daysInMonth(); } }
When we know that, we create an empty array with a length that’s equal to number of days in the current month. Then we map() that array and create a day object for each one. The object we create has an arbitrary structure, so you can add other properties if you need them.
In this example, though, we need a date property that will be used to check if a particular date is the current day. We’ll also return a isCurrentMonth value that checks whether the date is in the current month or outside of it. If it is outside the current month, we will style those so folks know they are outside the range of the current month.
// CalendarMonth.vue computed: { // ... currentMonthDays() { return [...Array(this.numberOfDaysInMonth)].map((day, index) => { return { date: dayjs(`${this.year}-${this.month}-${index + 1}`).format("YYYY-MM-DD") isCurrentMonth: true }; }); }, }
Adding dates from the previous month
To get dates from the previous month to display in the current month, we need to check what the weekday of the first day is in selected month. That’s where we can use the WeekDay plugin for Day.js. Let’s create a helper method for that.
// CalendarMonth.vue methods: { // ... getWeekday(date) { return dayjs(date).weekday(); }, }
Then, based on that, we need to check which day was the last Monday in the previous month. We need that value to know how many days from the previous month should be visible in the current month view. We can get that by subtracting the weekday value from the first day of the current month. For example, if first day of the month is Wednesday, we need to subtract three days to get last Monday of the previous month. Having that value allows us to create an array of day objects starting from the last Monday of the previous month through the end of that month.
// CalendarMonth.vue computed: { // ... previousMonthDays() { const firstDayOfTheMonthWeekday = this.getWeekday(this.currentMonthDays[0].date); const previousMonth = dayjs(`${this.year}-${this.month}-01`).subtract(1, "month"); const previousMonthLastMondayDayOfMonth = dayjs(this.currentMonthDays[0].date).subtract(firstDayOfTheMonthWeekday - 1, "day").date(); // Cover first day of the month being sunday (firstDayOfTheMonthWeekday === 0) const visibleNumberOfDaysFromPreviousMonth = firstDayOfTheMonthWeekday ? firstDayOfTheMonthWeekday - 1 : 6; return [...Array(visibleNumberOfDaysFromPreviousMonth)].map((day, index) = { return { date: dayjs(`${previousMonth.year()}-${previousMonth.month() + 1}-${previousMonthLastMondayDayOfMonth + index}`).format("YYYY-MM-DD"), isCurrentMonth: false }; }); } }
Adding dates from the next month
Now, let’s do the reverse and calculate which days we need from the next month to fill in the grid for the current month. Fortunately, we can use the same helper we just created for the previous month calculation. The difference is that we will calculate how many days from the next month should be visible by subtracting that weekday numeric value from seven.
So, for example, if the last day of the month is Saturday, we need to subtract one day from seven to construct an array of dates needed from next month (Sunday).
// CalendarMonth.vue computed: { // ... nextMonthDays() { const lastDayOfTheMonthWeekday = this.getWeekday(`${this.year}-${this.month}-${this.currentMonthDays.length}`); const nextMonth = dayjs(`${this.year}-${this.month}-01`).add(1, "month"); const visibleNumberOfDaysFromNextMonth = lastDayOfTheMonthWeekday ? 7 - lastDayOfTheMonthWeekday : lastDayOfTheMonthWeekday; return [...Array(visibleNumberOfDaysFromNextMonth)].map((day, index) => { return { date: dayjs(`${nextMonth.year()}-${nextMonth.month() + 1}-${index + 1}`).format("YYYY-MM-DD"), isCurrentMonth: false }; }); } }
OK, we know how to create all days we need, so let’s use them and merge all days into a single array of all the days we want to show in the current month, including filler dates from the previous and next months.
// CalendarMonth.vue computed: { // ... days() { return [ ...this.previousMonthDays, ...this.currentMonthDays, ...this.nextMonthDays ]; }, }
0 notes