#pattern instructions
Explore tagged Tumblr posts
Visit Tumblr Blog
Explore Tumblr blogs with no restrictions, modern design and the best experience.
Last Seen Tumblr Blogs


Fun Fact
1,644 Tumblr posts in 1 second.
Text
Camisole Sewing Patterns -Easy Cami Drafting Tutorial
In this post, you will learn how to create your dream camisole sewing patterns . Welcome to my ultimate camisole sewing patterns tutorial, perfect for advanced beginners and seasoned sewists in sewing experience alike! Whether you’re looking to create a strappy top, a luxurious everyday top, or a versatile layering piece, my step-by-step guide has you covered. This tutorial includes detailed…
#Advanced beginners#Camisole sewing patterns#Detailed instructions#DIY camisole#Free Sewing Pattern#How to sew a camisole#pattern drafting#pattern instructions#pattern making#sewing machine#sewing tutorials#Top sewing pattern
5 notes
·
View notes
Text
honestly yeah, fiber arts is magic. you cast spell of warm gloves, spell of nice hat, spell of stuffed animal.
material component: yarn
wand: single hooked wand or double pointed wands, depending on caster's preference
mechanical component: specific motions repeated in a particular pattern
time component: a while
look seriously the first step in a knitting recipe is "cast on", and then it's a bunch of letters and numbers incomprehensible to anyone not versed in the arcane art. that's a spellbook. yes it's a book of knitting patterns but also. it's a spell book.
#original#knitting#crochet#fiber arts#also continuing my habit of calling everything recipes lol#a recipe is a set of instructions telling you how to turn materials into objects#sometimes the result is food. sometimes it is clothes#(I suspect this may be rooted in minecraft crafting recipes)#but yeah I call sewing patterns 'clothing recipes' also
13K notes
·
View notes
Text
@hermitspider thank you for the lovely tags!
Fair warning (to prepare you, not discourage you), this type of blanket is either a huge pain in the arse or a hugely satisfying project (and occasionally both together), this is a big and potentially unwieldy project! I found that working the individual patches helped motivate me though. Each one was relatively quick to finish, providing the little dopamine and serotonin boost to move onto the next without running out of steam.
If I were less averse to sewing patches together (or knew how to crochet them) there would be far fewer ends to weave in at this stage! But also I would have had to count and safely keep track of all those patches for months and... yeah, nah.
Instead I picked up each piece from the ones already knit and bound off.
Further details about the border and corner turn beneath the cut.
I worked the border perpendicular to the finished blanket body, and joined using the "standard" technique provided in Frankie Brown's Ten Stitch Blanket pattern series which are free on Ravelry and which I thoroughly recommend!
I worked a 13 stitch garter border with selvedge stitch. There's a few different ways to work a selvedge, and mine is a little odd but gets me a nice, neat selvedge that sits flat and tight by being twisted. On the right side, I purl the first stitch and pull the yarn between the needles to the back to knit. On the wrong side, I slip the selvedge stitch knitwise (insert the needle as though to knit) with the yarn held in back. The combination of the knitwise slip, the purl and pulling the yarn between the needles tightens up the stitch nicely!
The corner turn was a fairly simple variation on the standard perpendicular short-row corner. Because I was knitting the border in garter stitch, I just used wrap-and-turn (w&t) short rows to turn the corner for the 13 stitch border (including the selvedge stitch).
But instead of working a w&t on every stitch, I worked every even stitch on one side of the corner and every odd stitch on the other.
(The following counts garter rides or pairs of rows, rather than each individual right and wrong side row.)
Work garter stitch to the ridge before the corner stitch. Work corner turn as follows:
Ridge 1: Work 1 selvedge stitch, knit 11 stitches, w&t last stitch of the row; turn and knit back to selvedge, work selvedge as normal.
Ridge 2: Work 1 selvedge stitch, knit 9 stitches, w&t; turn and knit to selvedge, work selvedge as normal.
Ridge 3: Work 1 selvedge stitch, knit 7 stitches, w&t; knit back to selvedge, work selvedge as normal.
Ridge 4: Work 1 selvedge stitch, knit 5 stitches, w&t; knit back to selvedge, work selvedge as normal.
Ridge 5: Work 1 selvedge stitch, knit 3 stitches, w&t; knit back to selvedge, work selvedge as normal.
Ridge 6: Work 1 selvedge stitch, knit 1 stitch, w&t; knit back to selvedge, work selvedge as normal.
Ridge 7: Work 1 selvedge stitch, turn without wrapping, bringing yarn between work as needed; work selvedge as normal. This marks the corner point, and working the selvedge by itself makes it extra pointy.
You've now turned the corner and can begin working back to the full border width.
Ridge 8: Work 1 selvedge stitch, knit 2 stitches, w&t; knit to selvedge, work selvedge as normal.
Ridge 9: Work 1 selvedge stitch, knit 4 stitches, w&t; knit to selvedge, work selvedge as normal.
Ridge 10: Work 1 selvedge stitch, knit 6 stitches, w&t; knit to selvedge, work selvedge as normal.
Ridge 11: Work 1 selvedge stitch, knit 8 stitches, w&t; knit to selvedge, work selvedge as normal.
Ridge 12: Work 1 selvedge stitch, knit 10 stitches, w&t; knit to selvedge, work selvedge as normal.
Ridge 13: Work 1 selvedge stitch, knit 12 stitches, join border to blanket. On return, knit to selvedge, work selvedge as normal.
And with that you've turned the corner!
I hope that all makes enough sense to help you with your own blanket 😅
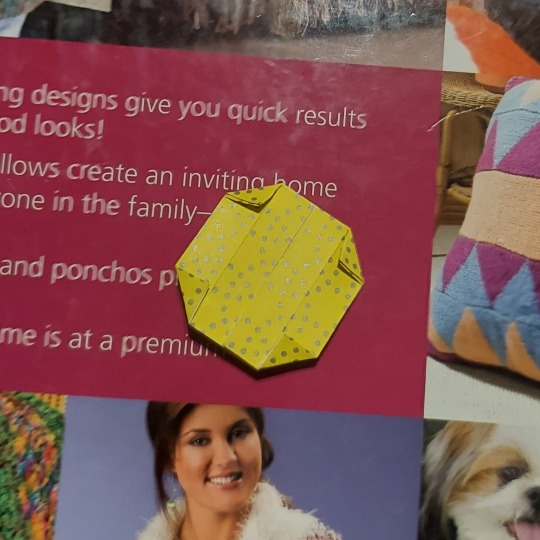
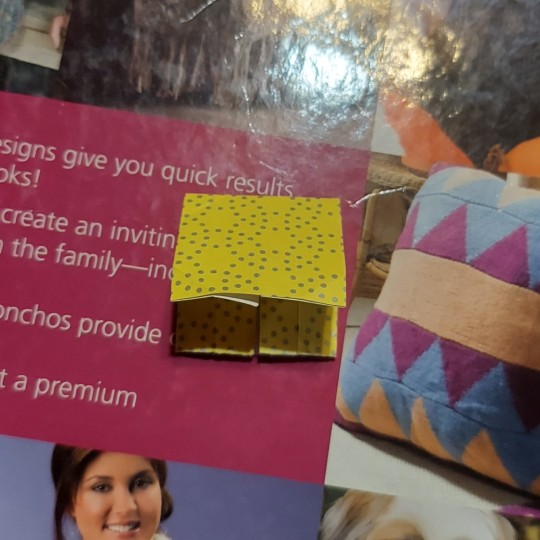
A knitted hexie patchwork blanket sounds like a fantastic way to use up little scraps!
I am So. Close. to finishing the knitted patchwork couch throw for my sister!
All the knitting is done, and I am really proud of how it's turned out!
There's just one thing left to do before I can post it to her.
Weave in All. These. Ends.


😭😭😭
I want to post it before Christmas so that there's any hope of its being useful to her during her Northern hemisphere winter.
There's just a couple hundred ends to weave in first. 😑😖😫
(You know the drill, like to charge, reblog to cast)
857 notes
·
View notes
Text
Novice sewing pattern: Cut out shapes. Line up the little triangles on the edges. Stitch edges together. We've also included step-by-step assembly instructions with illustrations.
Novice knitting pattern: yOU MUSt uNDerstANd thE SECret cOdE CO67 (73, 87, 93) BO44 (63, 76, 90) 28 (32, 34) slip first pw repeat 7x K to end *kl (pl) 42 * until 13" (13, 13, 15) join new at 30 pl for 17 rows ssk 27 k2tog mattress lengthwise BO and sacrifice a goat to the knitting gods. WHAT DO YOU MEAN YOU WANT "INSTRUCTIONS," I JUST GAVE THEM TO YOU
#knitting#no it's not a real pattern but I can't write one that makes sense because I have no freaking clue what any of that means#How do you make things that aren't basic rectangles#Why has every knitter I've asked for help just said 'patterns are easy; you just have to know how to read them' & then refused to teach me#Where do I even find a goat to sacrifice#How do I join the pattern cult#I am so confused#I've been knitting for almost a decade but I can only make scarves and potholders#I learned one (1) stitch by watching a YouTube video and none of my friends or family knit so I have no IRL resources#And nobody I meet seems to want to take the time to explain the rest to me#I taught myself to sew through trial and error but that doesn't really work with knitting because error is pretty much just... Unraveling?#Anyway sorry for the tag rant I'm just frustrated that I see pretty things I want to make but the instructions are in an alien language#And the gap between 'absolute novice' and 'intermediate' seems to be about 20 years of experience and formal instruction
2K notes
·
View notes
Text
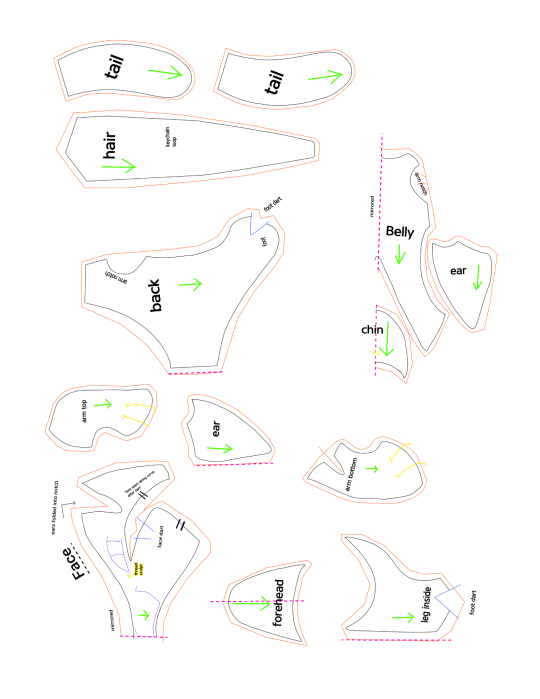
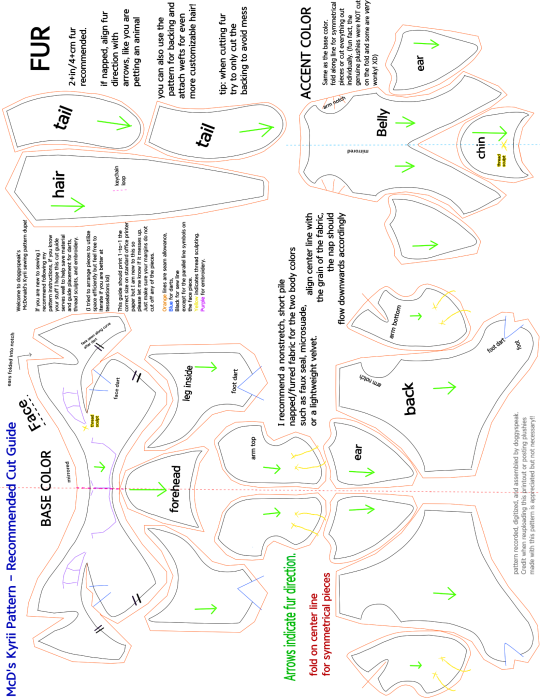
✩ Make your own Kyrii Plushie ✩
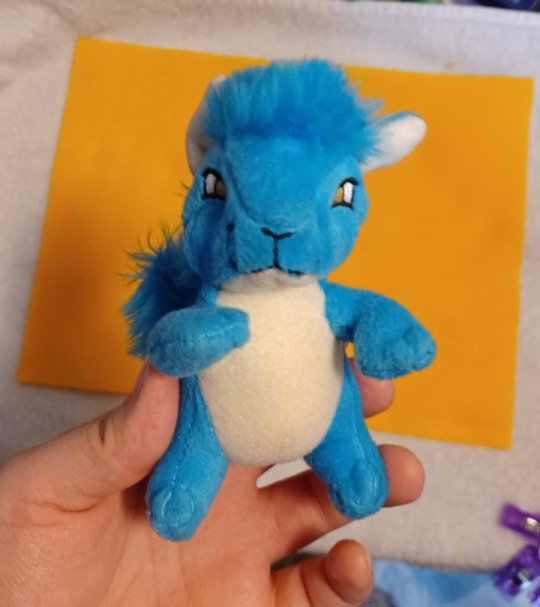
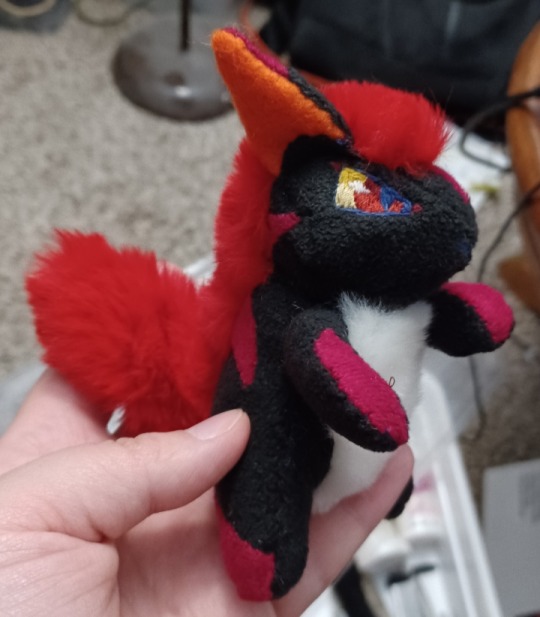
Thank you @free-sewing-patterns and @jestersneopia for asking so kindly for me to release my pattern dupe! :3 These guys are very intricate little plushies so I did my best to make something comprehensive. I also made detailed instructions which I will include after the readmore, so long post ahead!
McD's Plush Kyrii
What you will need:
•The two included images printed on 8.5"x11" (A4/Letter) paper.
•Enough of your desired Fabrics (reference the pattern size on your paper, you don't really need much at all)
✩ I recommend a short pile faux fur or other nonstretch fabric for the two body colors, and a long pile (1-4cm) faux fur for the mane and tail.
✩ You can also make the mane and tail using yarn or doll hair wefts by attaching them (sewn or glued) to a backing fabric like cotton or felt.
•Scissors or precision knife to cut fabric.
•Sewing implements (needle, pins, thimble, thread scissors, etc.)
•Thread matching one or both of your body color fabrics.
•black thread or embroidery floss for the mouth embroidery.
✩embroidery floss or thread in your desired eye colors (recommended a white for sclera, an iris color, and a black for outlines)✩OR✩buttons or safety eyes in your desired size and color.
•Stuffing (two or three handfuls of polyfill will do the job)
✩ribbon or cord to use as arm tension band and/or a loop to clip hardware like keychains and backpack hangers.
((✩ optional ))
General note: default suggested stitch length is 3mm apart unless stated otherwise.
Step 1
Print out the pattern, making sure to format your printer to use the full page with no margins. Check print preview to be sure nothing is cut off. (I made the piece inventory sheet to sort of offset any default margin weirdness but I'm new to this so let me know if it messes up.)
Step 2
Conceptualize your design and gather your materials. Are you cloning one of the plushies already out there, or making your own design? It is always good to keep reference on hand during any art project!
What special design elements are you translating to plush form? Keep in mind this pattern is small and intricate and it might be easier to omit or simplify certain design elements if you are working from something more detailed.
The cutting guide assumes 1 base color, 1 accent color, and 1 fur color with no significant shape, size, or design difference to the original McD's plushie. (Only a few fixes for symmetry and fur direction.)
Step 3
Prepare your base material for cutting. If you are doing embroidery or applique designs this may be easier while the fabric is flat and whole. Same with fur wefting, do anything like that while you have one big piece of fabric to work with. Trace the pattern pieces using chalk, heat erase pen, or some other washable marking tool using the cut guide provided. (I recommend cutting out any shape you need to add details to from the pieces inventory page, then trace those pieces on your fabric in roughly the same positions as the cut guide page.) Then do any embroidery or details you need to do while the pattern is flat.
Embroidery tips:
• Use a stiff backing piece like interfacing or felt behind your fabric to make the embroidery more durable and stiff.
•Use a back stitch or chain for lines, line in color for crisp color-changes.
•Parallel vertical lines close together catch the light and read as blocks of color best.
•Don't use stitches that are too long or loose, build stitches up diagonally like a brick pattern instead, the key is to attempt to stay parallel.
•If you are using sewing thread instead of embroidery thread, use two or three strands at once to save time.
•When you are done, cut away your backing fabric/interfacing a little outside where your embroidery stops so as not to interfere with future seams.
Step 4
Cut out your materials. If you didn't need to trace from the pieces inventory for pre-cut details, then you can just pin the cut guide paper to your fabric and cut it directly. Otherwise simply follow your trace and cut out your pieces. Be sure to keep track of which pieces go on the left and right of your plushie.
Step 5
Begin assembly by sewing all your darts first, those will be on each side of your face, inner leg, arm bottom, belly, and back pieces. Follow the blue lines that appear anywhere that says "dart" and any sew lines that create a V-like dip in the perimeter of the piece (like the arm bottom and belly pieces). Fold the seam allowance inside your seam so that the right sides of the fabric end up with a clean, unnoticeable seam. I recommend a tight, short straight-stitch about 2mm apart on darts.
Step 6
Make the loose body parts.
Sew together ears, arms, and tail by placing right sides together and sewing around based on the solid black lines in the pattern.
•Each ear will have a base color piece and an accent color piece. Make sure their shape lines up so that right sides of the fabric are together. The ear pieces are fairly flat and their sew lines should line up perfectly. Use any stitch you are comfortable with, straight stitch about 3mm apart works just fine.
•Sew one top arm piece and one bottom arm piece together for each arm. The discrepancy in their shapes creates a slight twist that gives the arm part a tube-like shape. I recommend pinning the pieces at the ends and wrist first to get the tension/gathering correct on the arm part. Any stitch works but a straight stitch will probably be easier to keep track of tension with or to rip if you make a mistake and need to retry. Keep it tight, about 2mm apart.
•For the tail, sandwich your pieces right sides together so that all the fur is tucked inside and you can sew the edges with a secure stitch like a whip or back stitch.(about 3-4mm apart) You might need to pick or brush out the fibers if they get caught in the seam.
Once you finish each piece, flip it inside out, wrong sides should remain inside while the right sides of the fabric show and all seam allowance remains inside. If any edges are having trouble flipping inside out, use a thin tool like a crochet hook or chopstick to prod them from the inside.
Stuff the 2 arms until they hold a 3D shape, firm fill recommended. Leave the other pieces in this step unstuffed.
You should have two ears, two arms, and one fluffy tail.
Step 7
Shape the face.
With the dart now sewn into the cheek, the two seams with the || registration marks should be much closer in length. Line the seam up according to the marks and fudge the rest of the length using tension. I recommend using a ladder stitch on the right sides while keeping in mind the general size of the seam allowance.
Repeat on the other side.
When you are done, your face piece should have curvy cheeks.
Step 8
Build up the head.
Connect the forehead piece to the face piece, the curve's center goes right above the nose.
Sew in the chin piece along lower jaw.
There is a bit of leeway into how long the ears will be and which angle they stick out. For best results, give it a test right side out and pin where you like the ears to stay.
The ears go into the notches on the top of the face piece, about half of the ear should fit into that notch. Sew it into that notch, any remaining ear folds around that top seam towards the forehead and is stitched down to give the ear a slight curve that helps it remain upright.
When you're finished you should have the (bald) head.
Step 9
Construct the body.
Sew the two inner leg pieces onto the sides of the belly piece.
Sew the back pieces onto the belly and inner leg piece, leaving the arm notches alone to make the arm holes. Sew all the way around the inner leg and to the center line on the belly where the dart seam sits. There may be some overlap/extra on the back piece.
Sandwich the tail between the two back pieces and sew them together. You can adjust the angle of the tail before you sew it in, the original plushie has its tail sticking up behind the back. (Tip: if you fully close the tail seam you can use a loose couple of stitches to attach it to the body to make a hanging tail that wags when you pick up and shake the plushie.)
Your current parts should be a head, a body, two arms, and the hair piece.
Step 10
Attaching the hair piece to the head.
(OPTIONAL): First, if you want to add a keychain loop like the original plushies, snip two tiny holes into the backing of your hair piece about 6mm apart and feed a small length of cord or ribbon inside to create a loop on the outside.
Leave plenty of slack on the ends of the loop for a more sturdy hold.
Secure the loop and holes with a lot of sewing and/or glue to keep the fur fabric from fraying. Stitch down the ends of the cord/ribbon to the backing of your hair piece.
Start sewing the hair piece to the head beginning with the hairline along the forehead to get it nice and clean. Next sew across the ears and down the face piece on both sides.
Your head should now have hair, with the rest of the mane hanging down behind.
Step 11
Sew head to body.
Make sure the chin piece lines up to the belly piece, the bottom of the head should line up with the rest of the back piece on either side.
Next, sew down one side of the hair piece to the back piece, connecting the bottom edge to the seam near the tail and stopping.
Leave the other side seam of the hair piece open for arm adjustment and stuffing.
Step 12
Attach the arms.
Tension Band Explanation:
The original plushies have an arm tension band inside to keep the plushie's shape and seams intact when pulling on the arms. Generally I think this can be skipped without much issue, but could be a good idea if you plan to use this as a bag hanger or keychain plush, as the arms are the extremities most susceptible to getting caught on things, and when they are secured more comprehensibly they are less likely to rip the plush apart when yanked. Not a big deal if you just plan to keep them around the house.
(OPTIONAL): If you want to install your own arm tension band, start with the plushie right-sides-out. Sew the band to one arm and pull it taught through the chest to the other arm, securing the tension band before sewing the arms into the body piece.
To sew the arms, be sure to pose them and pin them in place right-side out first. (originals usually have one arm down and the other up on their chins/waving, though they vary a lot and there are plenty of ways to position them for different expressions.)
Then, either turn insideout again or ladder stitch the arms into place.
Almost there! You should have all your pattern pieces together at this point.
Step 13
Stuffing the plushie.
Make sure your plushie is right side out, with no incorrect seams or holes other than one of the seams between the hair piece and back piece. If you need to, gently prod a crochet hook or chopstick along the backs of seams to turn them out.
OPTIONAL: To make a weighted plush, add a small mesh bag of plastic pellets or weight of your choice to the bottom of the plushie before stuffing.
Add in your polyfill, pillow fluff, yarn fibers, scraps, or whatever you decide to stuff the plushie with, paying attention to the density of the stuffing.
I recommend keeping the head and feet more densely stuffed to keep their shape while leaving the body a bit more loose for a squishable belly.
Step 14
Close up the last seam.
Using a ladder stitch, close up your last seam, pulling tight and tying off your thread at the end for a clean, invisible seam.
Now that all the seams are in, you can now brush or pick any long fibers from the hair and tail out of the seams.
The plushie is whole! You can keep it like it is, or do some thread sculpting for a more finished look!
Step 15
Thread Sculpting.
(OPTIONAL):
Using thread in the color of your body fabrics, you can pull tension at various points to create a more sculpted shape. The original had two through the face (vertically through the chin up behind the forehead, and horizontally between the corners of the eyes), and two over top of each hand and foot to look like the separation of the toes. See the original pattern pieces for precise placement.
And that's it! You should have a finished plush kyrii!
If you have any questions or concerns please contact doggyspeak. Feel free to use this pattern, share it, or edit it with or without credit.
PLEASE DO NOT SELL THIS PATTERN OR INSTRUCTIONS! IT IS BOTH NOT ORIGINALLY DESIGNED BY ME AND ALSO SOMETHING I'VE WORKED VERY HARD ON!
If you would like to see more pattern reconstructions from me, show me your finished plushies and provide feedback and suggestions to me. I would love to see what you have made and hear what you'd like to see next! ^o^
#neopets#Next time I make a new kyrii plush I will snap pictures of each step to add to the instructions!#doggyspeakart#plushie#plushie pattern#sewing patterns#bootleg#thanks for your patience I got over an illness 2 weeks ago and have spent most of my free days since then doing dentist or house stuff!!
239 notes
·
View notes
Text


Recent Dead by Daylight plushies Ive been workin on :]
#if anyone is INTERESTED i do have ‘patterns’ written for these but they have no pictures or instructions#dead by daylight#dbd huntress#dbd trapper#evan macmillan#danny johnson#the ghostface#the legion#frank morrison#gabriel soma#crochetblr#crochet tag#crush.png
386 notes
·
View notes
Text


Little dinosaur for my friend!!!
Now I want to make a rainbow patchwork one, an LGBT rex (I just gotta figure out the right distribution of colors so it reads as stripes? I can split it into eight colors pretty easily but two colors would only be the arms and legs)
#sewing#plushie#handmade#dinosaur plushie#t rex plushie#made with a free cholyknight pattern#totally unrelated but I heard back from my doctor#because I sat down last night and actually wrote down the dates of health flare ups and emergency meds I’ve had to take#since I stopped taking one of my meds two months ago (at my doctor’s instructions)#and it was. uh. bad. very bad. so I sent a message to my doc and he has me back on those meds#and I am already feeling lightyears better#like. so so so much better. having a functional amount of adrenal hormones in your body makes such a difference oh my gosh
60 notes
·
View notes
Text
#i struggle with knowing how detailed sewing pattern instructions need to be#like is it fair to expect people to just google stuff on their own or do i need to include instructions on everything#i started with “oh i ad general instructions” but now i'm like... do i have to explain to people what i mean by “sew these together”
50 notes
·
View notes
Text
Small crochet pet peeve: if I pay nearly €7 for a crochet pattern that is described as "confident beginner" (and I am an experienced crocheter), I should not have to look up Youtube videos of free, similar patterns, to make sense of flawed instructions and lacking photos.
Seriously.
#I sent the pattern maker a message so we'll see what they say#but goddamn the instructions are just really Not Good™#And I can't ask for a refund because it's a digital item which I totally understand#but I'm also feeling a tad ripped off#txt post#astrid rambles#crochet
99 notes
·
View notes
Text


Long Wave Stitch Crochet Tutorial
In my last post, I shared Rich Textures Crochet's video tutorial on how to crochet the 'Long Wave Stitch'. Here are a few more static pics showing the process. Click through the link for written instructions and the video.
36 notes
·
View notes
Text
Making Origami (the natsuyuu character)
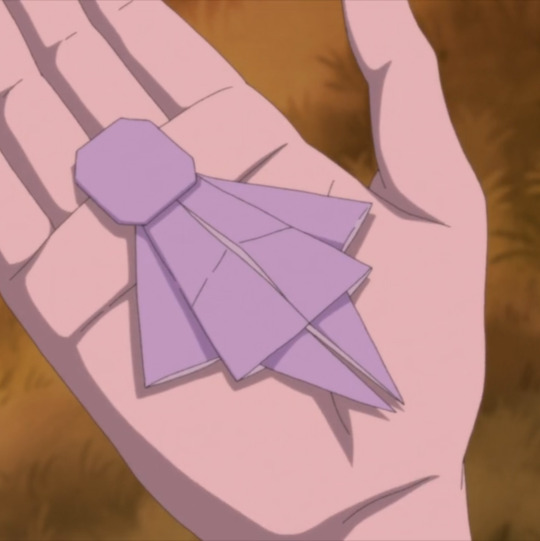
I went looking for "origami doll" online and found a pattern I could edit to look more like the character.
This will be in two parts, because of the photo limit. I'll link the pattern in the second part when it's time to make the body. We'll start first with the head, which I made my own pattern for.
Instructions under the cut.
[All photos below this point show what the origami should look like after completing whatever step has just been described.]
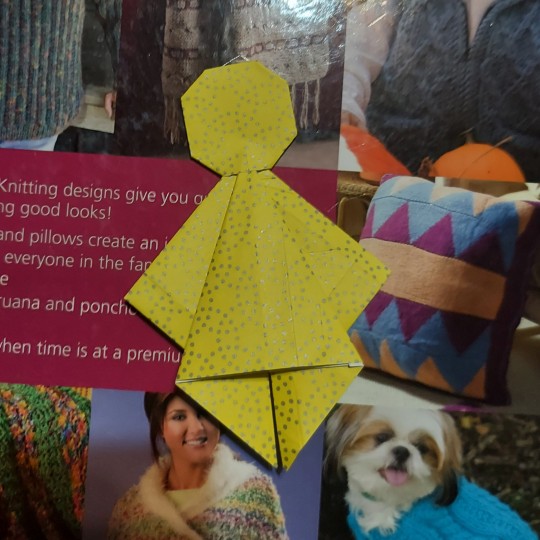
For the head, start with a paper square a quarter of the size of the square you will use to make the body I cut a sheet of regular origami paper into quarters.
Step 1: Fold the paper in half and unfold it in both directions.

Step 2: Fold the outer edges along the halfway point to get quarters. Only do this in one direction.

Step 3: Unfold the paper. Fold the outer edges along the quarter lines to make eighths.
Step 4: Unfold. Fold it back into quarters. Fold each corner in diagonally, using the eighths line as a guide.
Step 5: Fold it in half shortways. Make sure to fold it so that the center seam and one-eighths creases are visible.
Step 6: fold the top corners in along the eighths line. I reccommend doing this front and back for these two corners.
Step 7: Unfold all corners. Unfold the halfway fold, then fold it again in the opposite direction. The center seam should now be inside the fold.
Instructions continued in reblog.
#natsuyuu#origami#i made my own head pattern instead of altering theirs so the head could stand on the body without tape#natsume yuujinchou#pls reblog the version in the notes with the rest of the instructions
38 notes
·
View notes
Text

#kirby#kirb2k#daily kirby#my art#digital#hal laboratory#nintendo#unfortunately a tiny live kirby will *not* ship with the kirb2k merch boxes.#they are coming together now though#I still have the pins left to make and the bonus sketches#but they are on track to ship out by the end of the month barring disaster!#these are no longer for sale - they were a limited preorder during kirb2k#the pattern and instructions for the kit are still available for download on kofi though!#(min $2)#(and if I'm ever well enough the surplus prints and stickers might appear on etsy)
155 notes
·
View notes
Text
as a kid i always wished i could fix the awkward parts of my stuffies (weirdly posed limbs, etc) so having all these people eagerly trying out my altered vintage kitten pattern has been really rewarding ;w; i hope its been a cute n fun one to make!
#ik without instructions its sort of hard for beginners to parse but yall have been doing good#vintage kitten pattern
47 notes
·
View notes
Text
straight up need to hire sherlock fucking holmes to work out which embroidery patterns are actually real and which are ai because i'm sick of doing the sleuthing myself
#for the record#90% is ai shit#the price is Normally a give away#but idk some asshole may be charging more for ai ones who tf knows#i just want a pattern i can make that can actually look as nice when I sew it#which it literally cannot if it's ai#i need y'all sellers to specify absolutely that you have detailed step by step instructions included
13 notes
·
View notes
Text
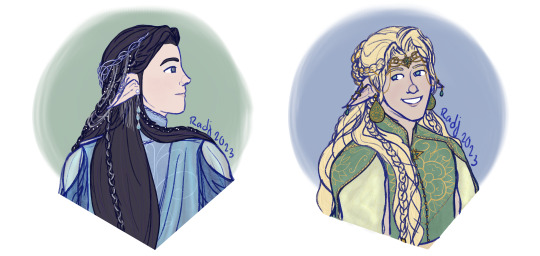
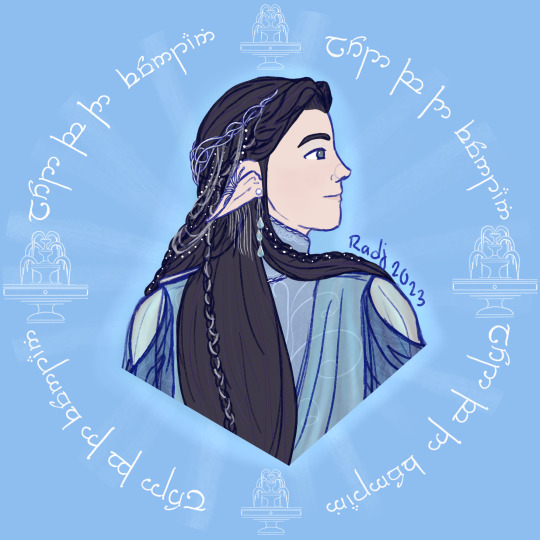
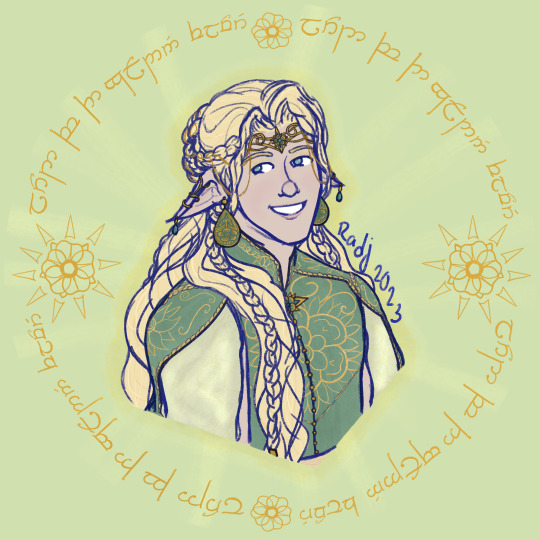
Some portraits of some fancy elves from Gondolin
Ecthelion and Glorfindel deserved some more elaborate designs than my usual, and how can I draw one without the other?
#Ecthelion of the Fountain#Ecthelion#Glorfindel of the Golden Flower#Glorfindel#Silmarillion#Silm#Silm art#the silmarillion#Lord of the Rings#lotr#Tolkien#I just wanted to draw elaborate outfits#Well actually this all started because I own the big flower patterned earrings that Glorfindel is wearing and stared at them for too long#and THEN I wanted to draw elaborate outfits for Glorfindel and Ecthelion ended up there too#And of course I made it fancier with the backgrounds so now my main and art blogs have matching icons#Please excuse the tengwar though if it's inaccurate#It's written in English with tengwar from a particular set of instructions I found in a book a while back!#It should say Lord of the Fountain and Lord of the Golden Flower respectively#What does it say about me that I got bored and learned to write English with tengwar though?#Radj Draws
267 notes
·
View notes
Text
me: *found some bespoke tailoring guy making suits on youtube*
tailoring guy: *using just so much jargon*
me: bro, I know sewing stuff and even I don't know wtf you're saying, how are the cis guys who have never touched a needle meant to follow this
me: well, I guess maybe there's some guys rly into suit construction on sewing reddi-
me: wait a minute- I'm on sewing reddit! I know there is barely anyone doing suit construction on there! My point stands!!!
#sewing#men's fashion#sewing reddit probably one of the most female dominated pages on the entirety of reddit#and most of the cis male members I've seen post projects tend to be making like non-suit jackets or hoodies or costume items#no particularly suit focused projects I've been seeing so far#I'm watching the guy make a black butler suit#and his editing is atrocious#man literally at one point was like 'hm it's so boring to watch me label all the pattern pieces'#and I was like 'if only there was a way to not include that part in the video if only there was a software that could enable that'#edit: you know what it is: it's that he's phrasing it as tutorial instructions not just a process video of how *he* did this project
11 notes
·
View notes