#pcb antenna
Text
#5G 10dBi Flexible antenna#flexible round shape antenna#5g round shape internal antenna#ufl connector#rf antenna#5g technology#5g antenna#4g antenna#internal antenna#pcb antenna
0 notes
Text
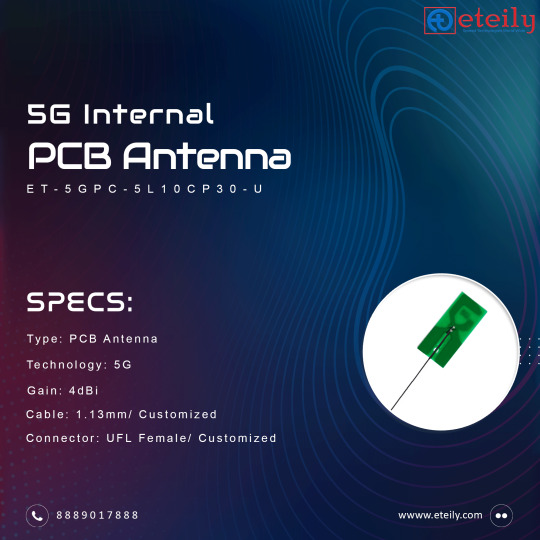
5G INTERNAL PCB ANTENNA
https://eteily.com/59-5g-internal-antenna
5G Internal Antenna
This internal antenna is specially designed for home and office use. It supports 5G network connectivity and works well with your existing router or modem. Our 5G internal antenna is the perfect companion to all your 5G devices.
#5G internal antenna#pcb antenna#5g antenna#radio frequency antenna#Best RF Solution Provider#RF Antenna Suppliers#Manufacturer of RF Antenna#rf antenna manufacturers in india#RF Antenna Manufacturer#RF Antenna Exporters#RF Antenna Latest Price#Wireless HF Antenna#RF Antenna Companies in India#Wholesaler of RF Antenna#RF Antenna Amplifier#RF Antenna Module#2.45 GHz Antenna Module#High Performance RF#Antennas for LoRa and Sigfox#Antennas for Cellular Gateways#Cellular External Antenna supplier#5G / LTE Cellular External Antenna manufacturer#Cellular 5G Antenna Solutions#Cellular Antenna Guide for 5G#LTE/5G Cellular External Antennas#Cellular Antennas 5G#Cellular Antennas LTE#Cellular Antennas CBRS#Cellular Antennas 2G#Cellular Antennas 3G
1 note
·
View note
Link
1 note
·
View note
Video
youtube
flex pcb fabrication 2023 3
#youtube#flex.pcb.fabrication.2023.3.mp4 single layer and double layer flexible flex PCB manufacturer fast flex prototype shenzhen China antennaIC ca
0 notes
Link
4G LTE antenna is a high-performance antenna. The ultra-wide frequency band covers all contemporary LTE operating frequencies gain across all frequencies. Get deals on 4G LTE Antenna Booster in Electronics on Campus Component. For more details Visit https://www.classifiedads.com/electronics/dfbcbwvjj3cf4
0 notes
Text
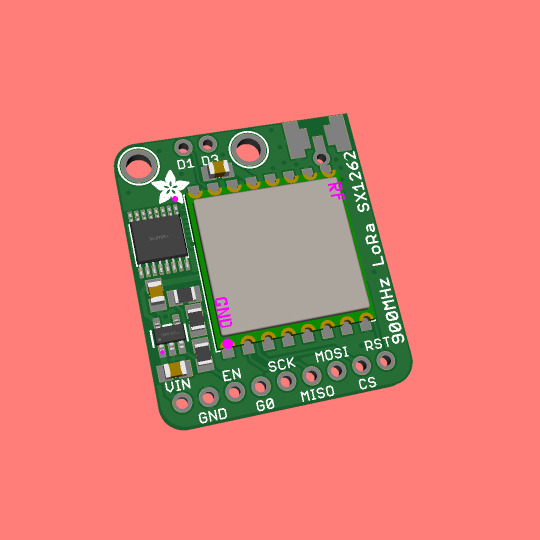
The SX1262 is an updated LoRa chip, so we made a breakout 📡🔧🔄
We got a hot tip to check out the Semtech SX1262 (https://www.digikey.com/short/504bpwww) - compared to our classic SX127x series of "RadioFruit" boards (https://www.adafruit.com/product/3072) the '1262 has lower power usage and longer range as well as some more options for spread-spectrum and extra modulation protocols. Most folks will probably use it for LoRa / LoRaWAN. The pinout is slightly different, so a few changes were made to the classic PCB. We also had some extra room, so we tossed in mounting holes. With this design, you can use wire, uFL, or SMA antennas - just solder whichever connector you desire. Note that the new chips are not software-compatible, so some driver tweaks will be needed to make it work. Coming soon.
#adafruit#lora#semtech#sx1262#longrange#lowpower#wirelesscommunication#radiotechnology#pcbdesign#antennadesign#iotdevices
8 notes
·
View notes
Text
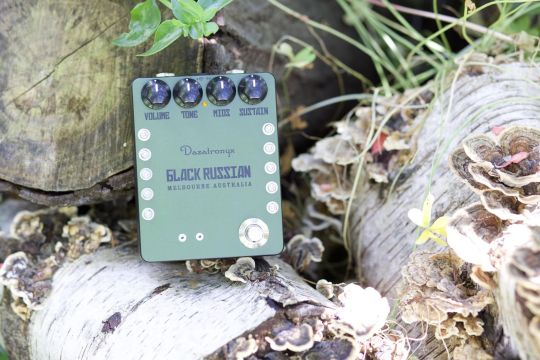

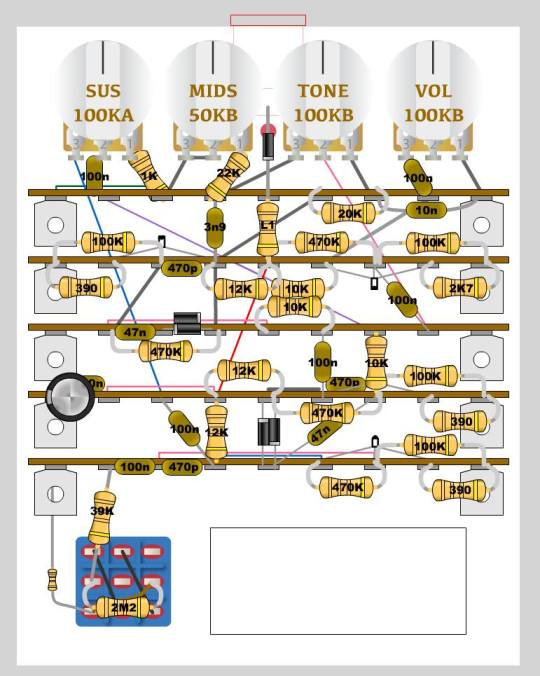
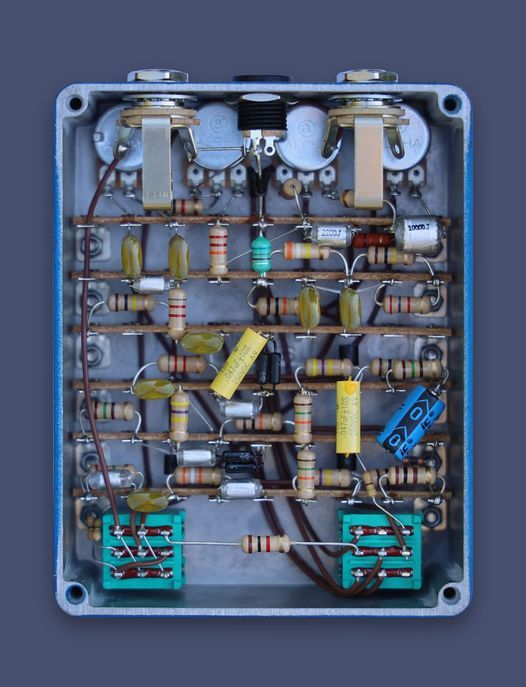
Dazatronyx - black russian
"Eliminate the tag strips, go pure PTP, will eliminate the ugly bolts on the enclosure face.
- that's exactly what I used to think (pure P2P over tagstrip). Even a turret board lets you at least have guided control over parts placement. Tagstrip also means you have generic antennas/nodes floating everywhere, whether you want them or not.
It's definitely not a build of sensibility. Especially with the big ugly Frakenstein bolts. I used to work on tagstrip in a tube amp factory and didn't like it. It's really grown on me over the years, though.
Some point-to-point work looks really pretty, but also is very much a downgrade in reliability to a PCB. You need to secure the parts mechanically. Otherwise, you get a lot more microphonics. I also like to imagine what happens when you drop a pedal, and there's lots of inertia and all the parts shift without mechanical support
Even gravity plays a part! All the parts are "hanging" but sometimes you flip the pedal in transport etc and parts over time lean a tiny, tiny one way. You can only bend a wire, say, a dozen times back and forth before it snaps. Little stresses over years of repetitions add up.
Yeah, the aesthetic is trying to look intentionally DIY. Like an old guy made it from the parts at the shop around the corner. Could have used something more dressy/discrete, which also wouldn't capture boot mud in that little well."
s.a. dazatronyx - biiig fuzz - A big muff circuit for the person who has everything
cred: facebook.com/Darron Thornbury; Darron Thornbury
12 notes
·
View notes
Text
just ordered parts for a rough draft of a bug sweeper /o/
turns out it’s not that complex of an idea. just a spectrum analyzer and a highly directional antenna really. the key issue i’m expecting is designing an antenna array that covers the full bandwidth of interest. the tinySA covers 100k-5.3G, which is pretty broad and definitely too much for most antennas. the spiral antenna design looks promising though, especially if it could be done in a PCB, but it may still end up being pretty large to accommodate freqs down to 100 kHz. maybe a pair of a spiral plus something else more compact for low freqs will work better
2 notes
·
View notes
Text
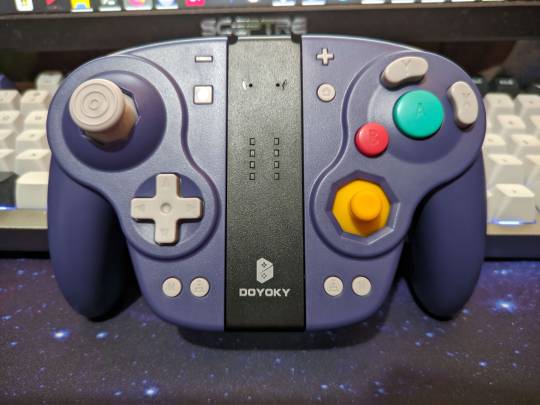
About three weeks late I now have Doyoky Gamecube joycons and can compare them directly against the NYXI Wizard! I've also disassembled them to attempt to modify them and failed, and can complain about its internals.
Doyoky Retro uses rubber membrane connections on ALL game buttons except for the paddles and context buttons; +, -, Home, Capture, macro/paddle assign, and L4/R4 paddles are the only buttons that use micro-switches. Improvement over NYXI Wizard which uses micro-switches on the d-pad and shoulder buttons.
Macro and Paddle Assign buttons are the only buttons on the entire controller that rattle when shaken.
Doyoky Retro has that kind of cheap-feeling lightness to it that third-party controllers usually do. It doesn't have the weight of traditional rumble motors, so it doesn't feel as premium as NYXI Wizard does.
All the face buttons and sticks feel almost spot-on compared to a Gamecube OEM! Insane upgrade from NYXI Wizard which feels more like a third-party controller.
The joycon rail piece attached to it out of the box is also a USB-C charging station for joycons and works with pretty much anything that can be put on a joycon rail!
Like the NYXI Wizard, the stick caps are again completely custom. This time, sadly, they're pretty purpose-built for the Doyoky Retro, and OEM Gamecube stick caps (as well as the Gamecube-themed Retroflag drop-in controller) do not fit the Doyoky Retro without severe modification. I'm still working on some way of mounting an OEM's C-stick nub to one of the replacement caps.
The Doyoky Retro has replacement caps! The stick caps' actual thumbsticks are mounted on a hexagonal friction-fit bracket and can be removed. You get a gray C-stick style nub, replacements for both to feel more like a Dualshock 4 or Dualsense controllers' sticks, or a ringed rubber C-stick like the analog.
The interior of the Doyoky Retro is pretty convoluted and stupid on a couple of its controls. A plunger on a spring is mounted to the PCB in a well to hit the micro-switch that controls the paddles, and the plunger itself hits a long post attached to the paddle button. This also makes it a total bitch to close the controller back up without anything falling out.
The joycon rail is custom, and none of its functions are actually on the rail itself, they're on micro-switches on the PCB. This includes the SL and SR buttons. The only piece of electronics on the rail itself is the charge/hard connection rail to a Switch or other charger, and the Bluetooth antenna.
The battery is a small (~1 inch long and wide?) pouch battery that is only held in place by the friction of a foam cushion glued to it, and resting on the interior of the controller and occupying some of the space in the handles. Like the paddle mechanisms, this also has a bad tendency to just flop around and fall out; they should have used double-sided tape to secure it inside the well it occupies on the plastic mold.
Doyoky Retro uses a little button motor for vibration instead of fuller sized motors as in a typical controller. Downgrade from NYXI Wizard.
The controller only tries to connect to Switch when pressing Home on the right joycon and Capture on the left. This is really annoying when every other controller on the market, even other third-parties, will try to connect on any button press!
In summation these are worth the money if you want a Gamecube controller, especially one with accurate buttons and sticks. I think, though, that the perfect Gamecube joycon lies somewhere between here and the NYXI Wizard. Either the Doyoky one needs to be heavier and needs more OEM-accurate sticks (the C-stick nub likely doesn't have a C embossed because they're using the same mold for the optional left-stick nub), or the NYXI Wizard needs to drop the button backlight in favor of OEM-style buttons and adopt the rubber membrane button improvements. The Wizard has better paddles, weight and rumble, the Retro has better buttons, bundle-ins, and d-pad. I can't really recommend one over the other, since in direct comparison both have their caveats that make the other more desirable. Maybe a third company will try their hand at a Gamecube joycon, or one of the two will make improvements?
Additionally, Doyoky made me wait an extra three weeks on my order because they ran into quality-control problems that required an entire batch be taken back to the factory. The order almost made it to fulfillment, and was hurriedly taken back; it required asking customer-support what was going on to actually get any reason on why my order stopped moving, and even then they weren't entirely sure why themselves until some days after I first sent an email. The whole while, it was still listed as an in-stock product. Not a good move.
#gamecube#nintendo gamecube#joycon#joycons#nintendo#nintendo switch#doyoky#doyoky retro#controllers#controller
15 notes
·
View notes
Text
New from RAK
Custom-build antennas for perfect performance
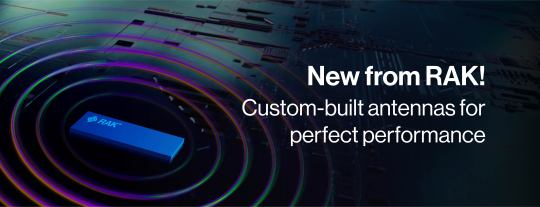
Have you ever had trouble finding the right antenna for your IoT device or project? With RAKwireless’ new service, you can now customize your antenna to maximize the performance of your products.
We offer custom antenna design, whether you’re using a product RAK has built from the ground up or looking to integrate a RAK antenna with your own designs.
The antenna is an integral part of wireless communication products as a whole and must be considered in the design to ensure optimal performance. A good antenna provides sufficient range, so a product or service can have a meaningful application.
However, there are many factors that impact antenna performance. By optimizing antenna parameters—such as gain, matching, bandwidth, size constraints, etc.—we’re able to provide the best range possible for the end product. We can serve any use case scenario: smart metering, asset tracking, transportation, smart agriculture, and more.
You may want to customize your antenna if:
Your product design is size constrained and you are struggling to balance dimension with antenna performance. You need good RF performance, but don’t want to make the product bulky.
You are using an off-the-shelf PCB antenna that you integrated in your pre-designed enclosure and are suffering bad RF performance.
You are in the product design stage and need help integrating a custom antenna in your package.
Let us know in the survey below what common antenna issues you’re experiencing, and whether they occur during the product design stage or post-production.
2 notes
·
View notes
Text

#rf antenna in telecom#rf antenna price#rf antenna cable#rf antenna pcb#fiberglass antenna#rf antenna#RF Antenna in telecom#rf antenna manufacturers in india#rf antenna amplifier#rf antenna australia#rf antenna buy online#GSM Antenna#rf antenna companies
0 notes
Text

A 4G LTE internal PCB antenna is a type of antenna that is integrated directly onto a printed circuit board (PCB) and is designed to receive and transmit 4G LTE signals. These types of antennas are commonly used in mobile devices such as smartphones, tablets, and other wireless devices that require cellular connectivity.
The PCB antenna is typically made up of a thin copper layer that is etched onto the surface of the PCB. This copper layer is then designed to act as a conductor for the 4G LTE signals. The size and shape of the copper layer are carefully designed to match the frequency of the 4G LTE signal, which allows the antenna to efficiently transmit and receive signals.
One of the main advantages of a 4G LTE internal PCB antenna is that it is compact and does not require any external components or connectors. This makes it an ideal solution for space-constrained mobile devices. Additionally, because the antenna is integrated directly onto the PCB, it can help to reduce the overall cost of the device.
However, one potential drawback of an internal PCB antenna is that its performance can be affected by the surrounding environment. Factors such as the position of the antenna within the device, the materials used in the device's construction, and the proximity of other components can all affect the antenna's performance. Therefore, careful design and testing are necessary to ensure that the antenna meets the required performance specifications.
#pcb antenna#4g#antenna#internal antenna#4g LTE antenna#5G / LTE Cellular External Antenna manufacturer#Cellular 5G Antenna Solutions#Cellular Antenna Guide for 5G#LTE/5G Cellular External Antennas#Cellular Antennas 5G#Cellular Antennas LTE#Cellular Antennas CBRS#Cellular Antennas 2G#Cellular Antennas 3G#Cellular Antennas 4G#Internal & External 5G Antenna#5G Antennas - Weatherproof#Best LTE Antennas in the World#5G MIMO antenna#SMA Antenna 4G LTE 12Dbi#700-2700MHz Cellular Antenna#Magnet Mount 4g Antenna#4G LTE Antenna 7dBi Magnetic Base#4G LTE Antennas from Eteily#Cellular Antenna with FAKRA Adaptor#4G/LTE Flex PCB Antenna#Cellular Antennas - GSM#4G LTE Cellular Antenna#LTE 4G 5G 3G GSM Cellular MultiBand Antennas
0 notes
Link
#ceramic antennas#PCB antenna#PCB antennas#GPS antenna#GPS antennas#gps#C&T RF Antennas Inc#PCB#PCB Antenna Design#Antenna Design
1 note
·
View note
Text


The AstroLink Xplorer Kit
It is a 5x5x75mm satellite on the form factor of a 1.5P pocket cube. One of the side is covered by solar panel. It consists of 4 PCBs EPS, OBC, COM and Payload inside and Solar Panels, Base Plate and other panels the make up the structure of the "Pocket Cube".
Subsystems
EPS: Its function is the boost the voltage from the solar panel to charge a single cell Li-ion battery. It also monitors the current and voltage that charges the battery.
OBC: It is powered by ATMEGA328 Microcontroller and also consists of built in programmer. A usb cable can be used to program it via arduino platform.
Communication: It consists of Si446x based communication module that supports CW, FSK and GFSK Modulation.
Payload: The payload consists of basic sensors like accelerometer, gyroscope, temperature sensor and pressure sensor.
Software Defined Radio
Contents
Following components will be sent once you order The AstroLink: Xplorer Kit.
Electrical Power Subsystem Board
On-Board Computer Board
Communication Board
Payload Board
Antenna Panel
Base Panel Board
Side Panel x 2
Back Panel PCB
Solar Panel PCB
Battery Casing 3D Printed
Top Casing 3D Printed
USB Cable
RTL-SDR
Note: Due to shipping restrictions we are unable to ship battries. However we will send the link as well as the specs that is needed for the battery and you can get the battery from other vendors.
0 notes
Text
0 notes
Text
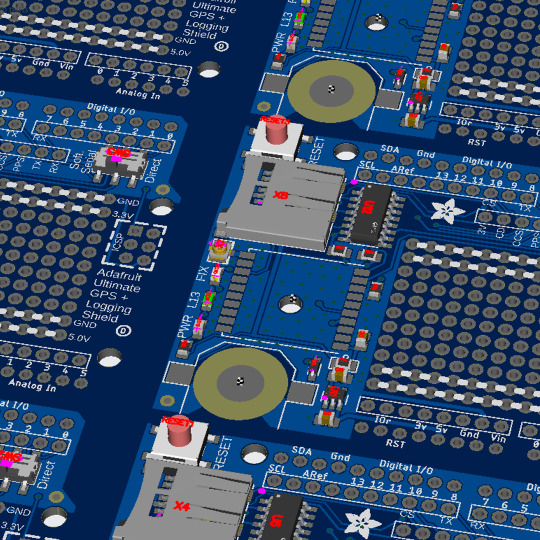
PCB of the day! Ultimate GPS Logger Shield 🌐🔌🛰️
MTK3333 chipset with -165 dBm sensitivity, 10 Hz updates, 99 channels, 30mA power draw, Arduino-compatible. Includes MicroSD slot, RTC battery (7-year backup), built-in & external antenna options, PPS output, LEDs, big prototyping area. Enables high-speed logging/tracking.
#adafruit#electronics#pcb#opensource#opensourcehardware#pcboftheday#gps#arduino#mtk333#gpslogger#shield#sensitivity#lowpower#tracking#arduinocompatible#microsd#rtcbackup#externalantenna#prototyping
17 notes
·
View notes
Last Seen Blogs


gettingbettervn
Happiness can be found in many different ways

andrzej-max-blog
andrzej max | firma elektryczna | elektryk

boneapptheteef
BoneAppTheTeef

skrs-cats
warriors sideblog