#plywood creative ads
Text
Plywood Marketing Agency
Boost your ply, laminate & wood industries brand's marketing strategy with our expert agency. Promote growth, raise awareness, and successfully connect with your target market.
IBAIS MEDIA is the top plywood marketing agency that can assist you in growing your business across India.
Ibais Media's wooden platform is a valuable resource for the Ply, laminate & wood industries.
IBAIS MEDIA - WOODEN is known as the best for
▪️ Plywood marketing agency
▪️ Plywood b2b platform
▪️ Plywood updates
▪️ Wooden b2b platform
▪️ Wooden product updates
▪️ Top plywood, laminate brands
▪️ Plywood, laminate & wood industries updates
▪️ Plywood top manufacturers' updates
▪️ Laminates updates
▪️ Plywood branding
▪️ Plywood branding agency
▪️ plywood free advertisement
#Plywood marketing agency#wood product updates#plywood updates#plywood news#plywood manufacture#wood market updates#plywood agency#plywood creative ads#plywood manufacture plywood supplier#laminate supplier#Plywood branding#plywood free advertisement#Plywood branding agency#Plywood top manufacturers' updates#Plywood#laminate & wood industries updates#Wooden product updates#Plywood b2b platform
0 notes
Text
Crozier: Stage manager. Runs an extremely tight ship; rehearsals start and end on time, and woe betide you if you show up late. Suffers no fools, especially when it comes to safety. Fell in love with theatre as a young kid, but became jaded after years of running into educational, financial, ‘who do you know’ barriers and dealing with the kind of bigots and assholes you only get in this industry.
Fitzjames: Originally Franklin’s AD, but is officially promoted to director when Franklin has to step down for health reasons. Used to be an actor—and a pretty good one!—but moved to directing because it seemed more prestigious and respectable. In the end, he wouldn’t choose to go back, but he will twist your ear with stories of his time trodding the boards. Studied on scholarship, does everything possible to keep this a secret.
( I went back on forth on switching these two roles, with Crozier as director and Fitzjames as SM, because in canon Crozier technically outranks JFJ. In the end though I think this is more fitting, since JFJ and Franklin may have big ideas, but Crozier is the one with his head firmly in the reality of the situation; as the SM and as Franklin’s canon second, his job (whether he gets to do it or not) is to reign him in, to make sure what he wants to happen is both feasible and safe. )
Blanky: Production manager. His job is to get the things necessary for JFJ and Crozier to do their jobs. He and Crozier have worked together for years and are a tight unit.
Little: Originally the technical director, (essentially the head of the scenic department: lights, sound, set, costumes, props). Becomes official AD when JFJ becomes official director. Briefly enjoys a stint as acting stage manager in Crozier’s stead, and by ‘enjoys’ I mean he hated every moment of it.
Jopson: Wardrobe head. Woe unto anyone who eats in costume. He and Crozier have worked together before—they come as a pair—so he becomes the unofficial liaison bw Crozier and the rest of the prod team (it’s a “dad likes you best” sort of situation). Crozier eventually asks him to become acting ASM (they didn’t have one before; Franklin didn’t think it was necessary). Did some acting as a kid/teen, but prefers production; if you hound him enough when he’s in a good mood, he will, after a long sigh, perform the most perfect triple time step you’ve ever seen.
Hodgson: Dramaturg and I won’t elaborate. Is also the fight captain when it’s called for, and is extremely good at it; he’s great at teaching one-on-one and encouraging the actors while still prioritizing safety, and his flair for the dramatic lends itself incredibly well to choreographing fights. He does, however, tend to lose it and make poor decisions when given any more solo responsibility than that.
Irving: Scenographer, in charge of the overall design of the production. Stressed out 24/7. Keeps absolutely pristine and lovingly detailed piece lists, is very good with the maths for measurements. Seems too uptight for such a creative job, but in actuality is very creative, just also very shy.
Tozer: Master carpenter. He didn’t start as master carp, but his superiors kept leaving and now he has more responsibility than he expected. Outwardly seems like he doesn’t give much of a fuck, but takes pride in his work. Main operator of the power tools; will box your ears if he catches you using them without proper PPE.
Hickey: Just kind of hangs around the scene shop most of the time. Presumably he’s in charge of gluing various bits of wood together, or something. Irving once caught him hooking up with his boyfriend behind the wall of old plywood backgrounds. Later, when Irving has an ‘accident’ one night whilst working late alone in the shop, Hickey is somehow the first on the scene…
Peglar: Master electrician, head of lights and sound. Doesn’t get to do it often, but adores operating the theater’s single spotlight (getting to it involves some climbing that OSHA would not approve of). Can untangle a mass of wires faster than anyone else and knows what each and every one of them goes to. Closest he ever got to performance was dipping his toe into standup comedy (iykyk. sorry honey you fit the type)
Silna: Perennial unwilling house manager, because her family owns the place and her dad always makes her. Basically in charge of the space as a whole. Not a huge fan of her job, but finds some amusement/comfort in getting to sit in the shadows and watch the prod team bicker and make fools of themselves, bc it makes her feel competent in comparison.
#i saw a post once talking abt how they love when ppl use their professional knowledge for blorboposting#and this is the result lol#hi. I’ve been working in theatre for the vast majority of my life. can you tell#the terror amc#the terror#terrorposting#community theatre#mine#silna the terror#harry peglar#cornelius hickey#solomon tozer#john irving#george hodgson#thomas jopson#edward little#james fitzjames#francis crozier
102 notes
·
View notes
Text
Griffin and Sword Targe for Fergus O'Dae

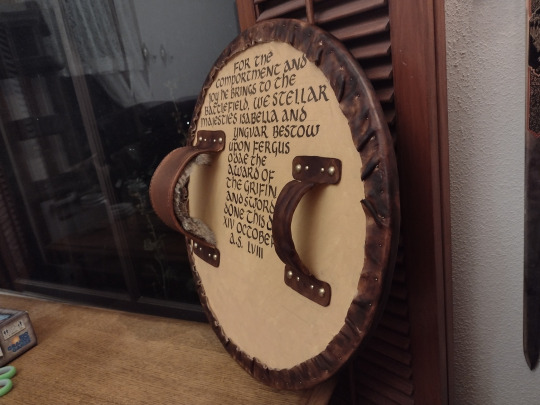
This is a build log for a late period Scottish targe for Fergus O'Dae, a border reaver and rising star of the Northshield Army. The Griffin and Sword is our Award of Arms-level award for excellency in armored combat.

Before starting the design, I layed out my idea using Heraldicon, a free website built to be even more powerful than Drawshield for assembling coats of arms. I thought it would be very fetching to have the Northshield populace badge outlined in the brass studs characteristic to targes, with the griffin and sword represented with different colored metals.

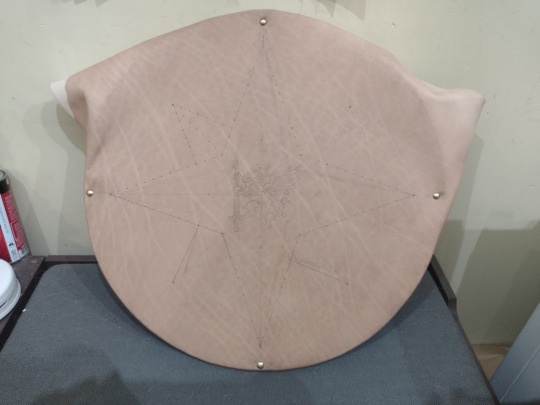
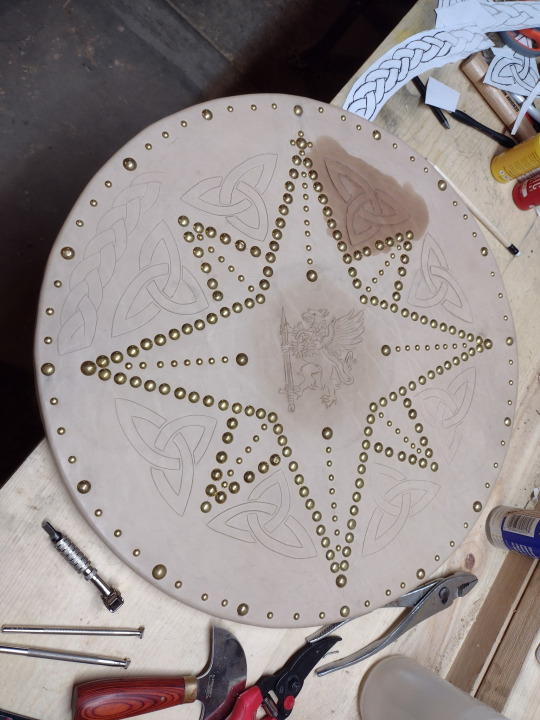
Laying out the carving and the tacks. A missed step in this album is cutting the wooden core. I actually already had a 20" round of plywood lying around. It wasn't actually a shield blank; it was the center cutout of a wooden ring I made to hold the 3.5' long bolts on our giant electrical wire spool in a specific pattern so I could reassemble the whole thing.
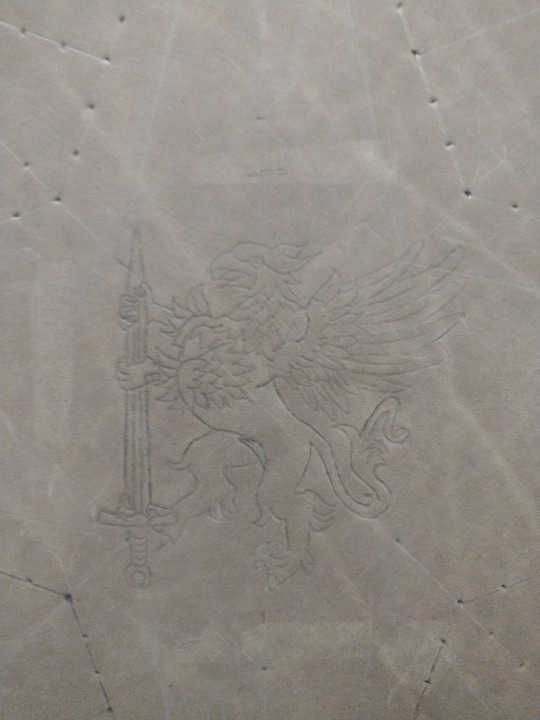
The griffin layout. Many thanks go to Heraldic Traceable Art and Heraldicon as well as the /r/heraldry community for maintaining so many Creative Commons vector assets. I've used this griffin asset by Gunnvôr (Viking Answer Lady) so many times.

With the leather dried it's much easier to see the layout lines. Here's a spot I can make some big improvements on next time: I attached the leather before trimming it to a proper round, and then I didn't fully tack down the back before beginning the layout process. The wood I used was pretty trashy plywood so my drawing and carving surface is also extremely bumpy underneath the leather.

At this stage I began to carve the central award badge with my swivel knife. I need to see if there's swivel knives for children with arthritis because my bog standard Tandy knife gives me hella hand cramps and extreme inflammation on my thumb-palm muscles.
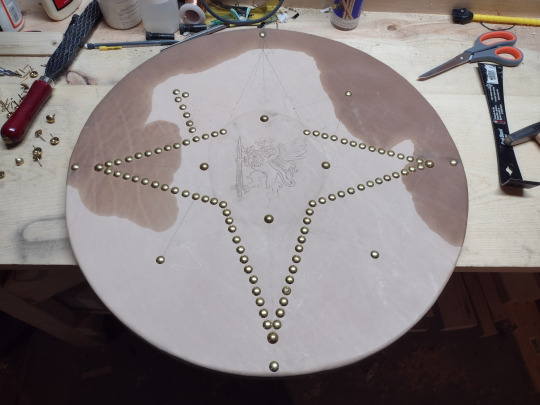
Your eyes do not deceive you: I did in fact have a crisis of attention span and pivoted from carving the badge to outlining the compass rose in brass tacks. The majority of the tacks used for this project are 7/16" low dome brass tacks from Crazy Crow Trading Post down in Texas. I also used 1/2" high dome and 1/4" dome tacks from the same shop.

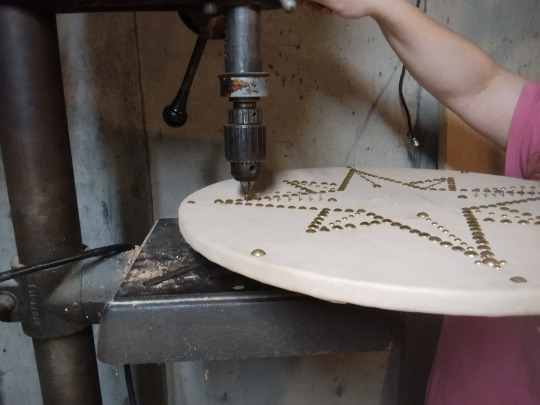
Lining up the 1/4" tacks. I actually hadn't planned to do these lines initially, but I had to emergency order more tacks and tossed these in for greater variety. I love the end result of this decision. If you tuckered out your arm hammering in 2/3 of the outline tacks with a ball peen, a drill press can take over in a pinch. I really need to get a stool for the drill press.
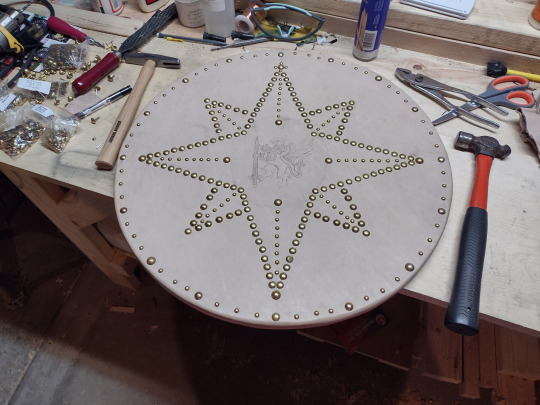
Tacks complete! We can carve again now.
Added some obligatory trinity knots. It's not Scottish if it doesn't have a triskelion or a trinity knot, dontcha know?

(Sarcasm aside, check out the targe used by Donald Cameron of Lochiel, the Cameron Clan Chief who was a prominent Jacobite commander throughout the 1745 campaign. Post period for the SCA but who's counting? Photo from Paul Macdonald of Macdonald Armories in Scotland.)
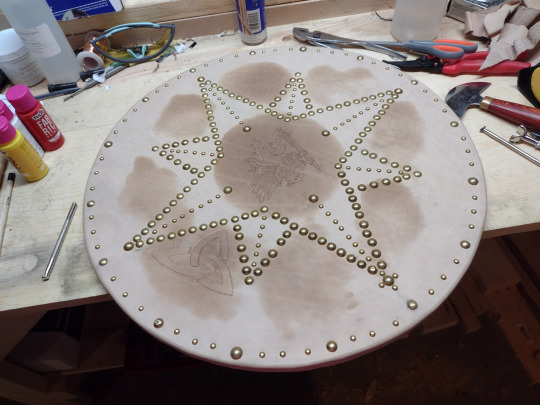
All trinity knots cut, one carved, and I began to add a braid motif too.

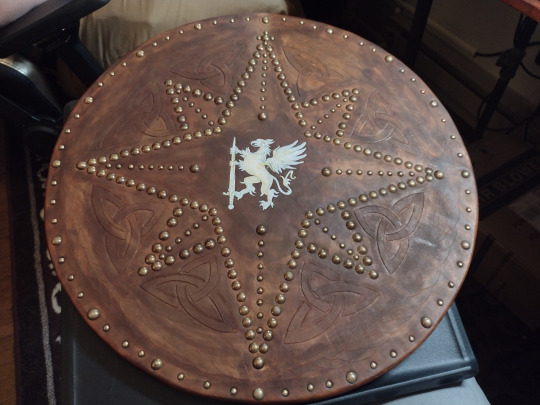
...Aaaaand here's improvement opportunity number 2. I was low on time and hand strength so I decided to dye the leather before I carved the braids, but after I cut them. I also picked Fibbings Medium Brown for my dye without doing test patches, and used the standard daubers to apply it. That is three Big Mistakes in a row, and only one is actually justifiable in any way. The result is an extremely uneven dye job that completely washes out the uncarved braids. If I'd given myself one more week to do this scroll, I would've had more rest time for my hands and I think I wouldn't have made these mistakes, but in a way I'm grateful I did because now I know to schedule more time for working on scrolls for the next assignment. Plus, I try to remember what Samii of SunCat Designs says about art: "the mistakes are what make it human".

Because this is an SCA award, I chose to swap the traditional deerhide backing for glued muslin and paint. I then taped off my handle locations and handed it off to my spouse @dustycymbre for the award scroll text. They used their default uncial hand, which is my favorite of their script hands.
Traditional targes have a small brass center boss. When I originally conceived of this award, I had imagined the griffin in brass with a tinned sword, but I haven't actually tried chase and repousse yet and struck upon a different method of making the center griffin allude visually to the center bosses: carve it directly into the leather and then gild it. This particular stage is sealing the carving with Ecoflow Cova Color leather paint, to provide a smooth surface for the glue (also know as gild size).

Cova Color white shouldn't be directly applied to damp dyed leather like this because it soaks up the brown like a sponge. My brightest white application is my H-shield, which dried for about a week before I painted it.

Another ADHD swing of focus: needed to have a long phone conversation with my spouse and bro in law and stitching is a far less active hand activity for me than The Thing I've Never Done Before, so I stitched up the strap and handle. Here the handle is inside out in a jar of water to get nice and soft for turning.


I stitched a rabbit hide into the interior of the arm strap. It's soft and a little padded, and I think it looks quite fetching. To figure out the right strap length for the recipient's ridiculously beefy arm that helped him earn this award, I asked my former football player bro in law for his arm circumference and then rooted around the house for a pickel jar of the same diameter. Stitch width awls are your friend. One of the top ten tools I own for sure.

Turning out the handle. This took a lot of hand strength and chopstick finagling. I'm genuinely looking forward to making Kat the Herald's purple shoes because they'll be easier to turn than this fucker.
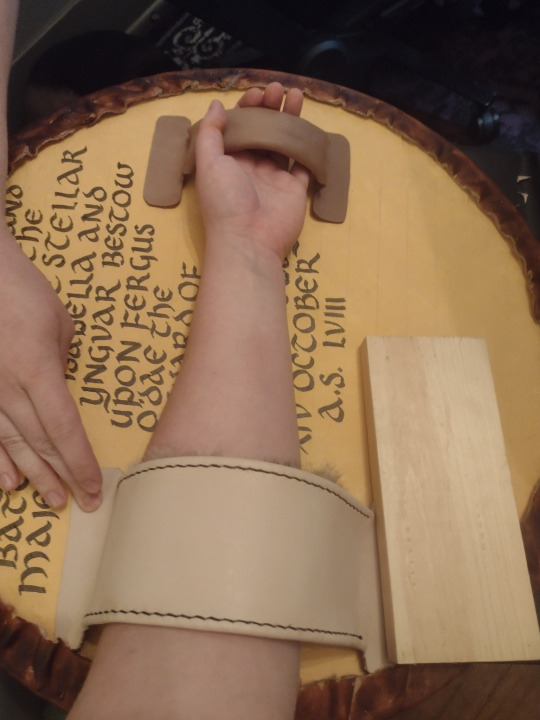
Fit check. Look at that beautiful wet shaping on the handle! At this point I felt a level of actual mastery of my craft. I think I can really call myself a leatherworker now. I still have so much to learn and improve, but I feel comfortable. It feels good.


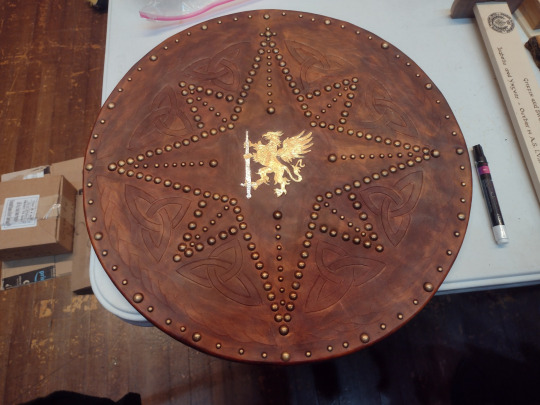
With the handles done, it's back to gilding. According to the Pinterest mommy blogs, you can skip the professional artist size and use watered down mod podge for the gilding process. I gambled on them being right, whipped out my pack of silver, copper and gold foils, and got down to business. I used a tiny but cheap paint brush to apply the thinned glue to the sword, let it dry a little, and then applied the silver foil. I tapped at it with a napkin through a flour sack towel, let it dry a little and brushed off the excess with a second and much fluffier brush.
The Pinterest pinnsters aren't entirely wrong about mod podge, but they aren't entirely right either. I had to add more glue and gilding foil like eight times. This is after one of the last additions, but before I brushed away the excess. Mod podge doesn't want to work on the irregular curves of carved leather. The dry time to tackiness was also imprecise and very very short, which made applying the delicate foil correctly very difficult.

I finally had to give up. There were just too many spots that would not take foil at all. I grabbed my Stewart Semple Heavy Metals box set, pulled out the Goldest Gold, and painted over the bare spots. At this angle, the difference in reflection angles and quality is obvious. The paint is so much more yellow. But deadlines are deadlines, and imperfections make it human.

This angle is much more favorable. I find myself in love with the effect of the gilding over the carving on the feathers. I need to get good at gilding.

And here she is signed by Their Majesties Northshield, in the warm lights of the Sioux Falls Coliseum stage. Fergus loves it and it got a lot of ooos and ahs from the populace. I had a lot of fun in spite of some of the frustrations of this build, and I'm excited to try another targe with even more accuracy at some point.
#sca#society of creative anachronism#my crafts#reenactment#scottish#scotland#targe#did you know that certain jacobite targes made of softwood with wool felt sandwiched inside the wood core can stop musket shots#i learned that from fandabi dozi and paul macdonald#they tested it mythbusters style
16 notes
·
View notes
Text

so! sometimes I do woodworking. I work with hand tools and no power tools (except for Cordless Drill My Beloved). I do this because, to wit:
I don't have room for power tools, as I actually want to park in my half of my garage
I don't want to set up a whole dust collection system even if I did have room
I hate the fucking noise
I hate the fucking dust (see point 3)
I am deeply clumsy and don't want to lop off a finger, which I absolutely would do if allowed to get anywhere near a table saw
I'm a pretentious broad
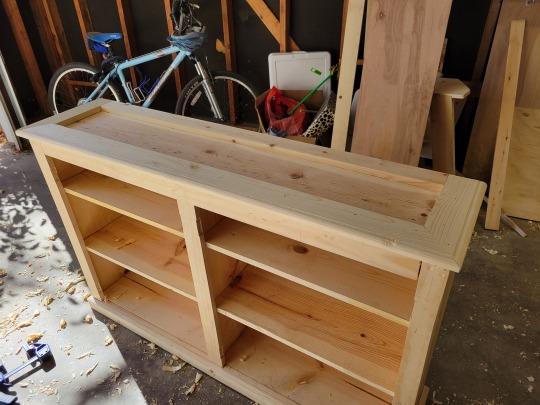
this post is about a kitchen cupboard I just finished building from construction-grade pine I got at my local Homo Depot.
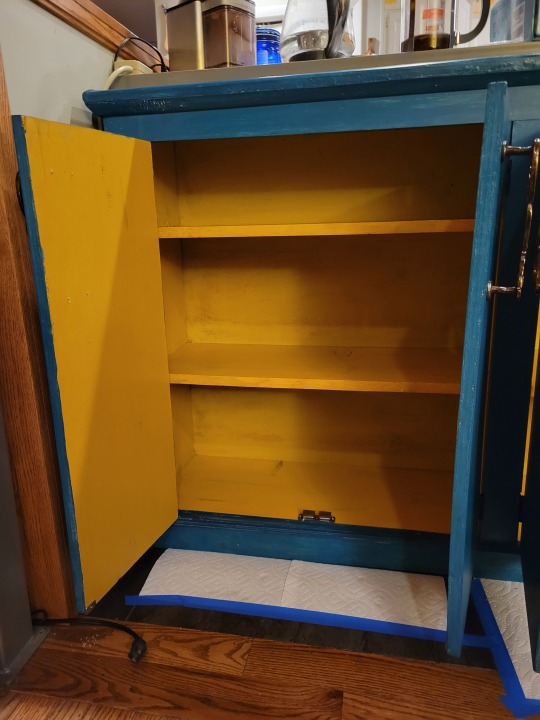
we keep a kosher kitchen in my house, which is great! but also it sucks because we don't have enough cabinet space just like. in general. because despite this house being in the shtetl (affectionate) it somehow is poorly laid out and lacks sufficient cabinet space for our Jewish Ways. so I started working on a cupboard a couple of months ago that would allow us to actually get some of our lesser-used-but-still-vital cooking dishes out of the Ikea cabinet thing that is allegedly "the baking cabinet" but in actuality is the "baking, plus the overflow of cooking utensils we don't have room for elsewhere" cabinet.

this cupboard plan is from Rex Krueger (web site, yootoobs), whose YT channel has been a big help to me in dialing back my Hobby Hipster Snob tendencies that always end up costing me a lot of fucking money that I didn't need to spend. his original plan (on his web site, it's like 5 bucks I think) has this cupboard at roughly 2 feet high by 4 feet wide by a foot deep. I wanted to build this specifically to put under the edge of my kitchen island, so I scaled up and added an extra shelf, measuring specifically to fit a couple of my larger kitchen appliances. mine ended up around 34" high by 54" wide by just over 13" deep.
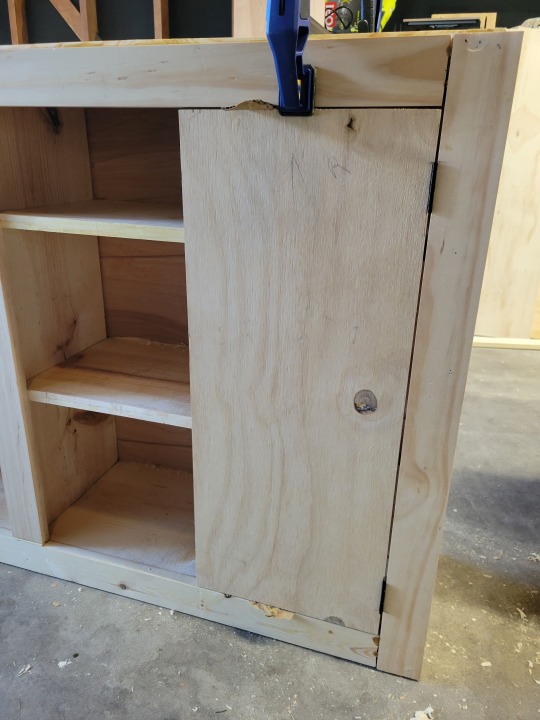

scaling up necessitated a couple of changes, most notably making double doors on each side instead of a single door. the original plan calls for one door on each side, but these doors would have been wayyyy too big and would have probably ended up sagging. also hitting me in the face when I went to get the fuckin dutch oven out of the thing because I am, as noted, clumsy (see point 5, above).
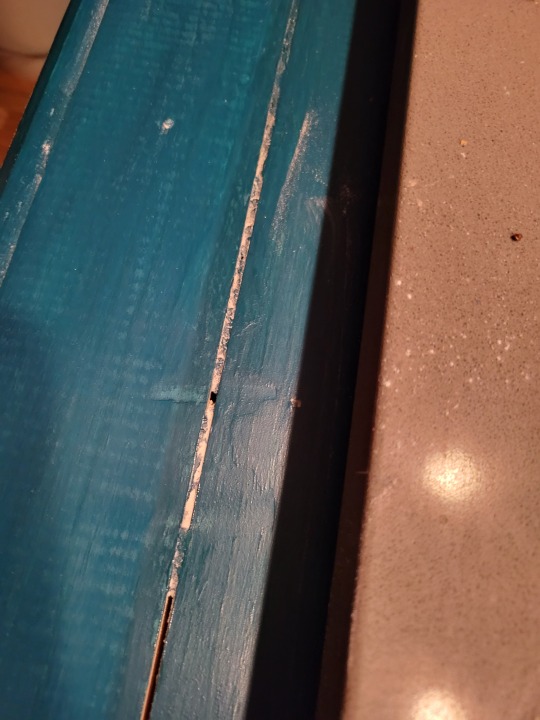
I ended up making the doors out of 3/4" plywood instead of gluing up boards to make panels because the idea of doing that much gluing up with bullshit big box store pine made me want to fling myself and the cupboard out a window. to prevent defenestration I used the plywood. it's better this way.


I also made my own molding, as per Rex's video. he suggests you come up with your own profiles and whatnot, but I was Tired and went with his instead. I don't own molding planes and I don't currently plan to buy any, but he shows you how to make some basic molding profiles using a rabbet plane and a regular hand plane, both of which I own, so I used those. it was fun! I like using the rabbet plane, even if it is a Stanley 78 that clogs after two passes. it's an American tradition to use a Stanley 78 and swear creatively at the inevitable clogs. your grandpa probably did it too. it's fine.

it took a while to get the doors correctly fitted to the cabinet openings and vice versa, because no matter what anyone says, inevitably your case will be just a little bit out of square, especially if you're me and have been doing woodworking for roughly a year on nights and weekends. frankly I was relieved the case was square enough to slap on the plywood back and have it line up enough to glue/nail it down. once I had the face frame on, the molding nailed down and the doors figured out it was paint time!

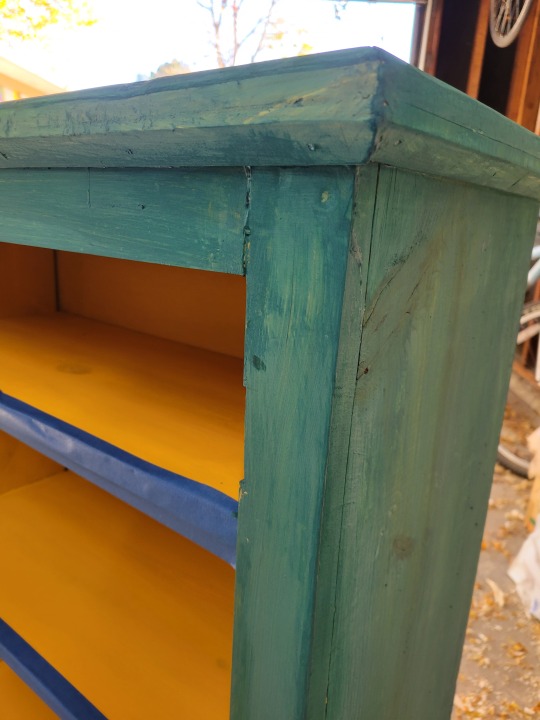
I used milk paint from milkpaint.com - this is an "early American" style cupboard and milk paint seemed like it would work well, plus it's what Rex uses in the video and I don't see any reason to make decisions about this kind of thing when the plan guy has already made them for me. so milk paint it is. I did two coats.


milk paint dries very matte - it is extremely flat, does not reflect anything at all, and furthermore is quite fragile without something over the top to protect it. to topcoat it I used a couple of coats of shellac (the stuff in the can from the hardware store, I don't have time to be a shellac snob). once that was dry I put a coat of paste wax over the top and buffed it to a sheen with an old cloth diaper. (thank you to my dead, hippie wife for having that just lying around the house. love you, babe! <3)
once I was done with painting the case and the doors, I moved the goddamn thing into the actual house, both to prevent it from getting dusty and to be able to park my car in the garage now that it's winter so I wouldn't have to scrape snow off my windshield.
it may or may not have taken me a month after that to get the doors attached and the handles on. don't worry about it.

it wouldn't have taken so long except that apparently I, in my infinite genius and because I am extremely handsome, mixed up the doors and painted them upside down, consequently causing me to install them upside down. I think that's what happened, anyway. either way, it meant the damn doors didn't fit, so I spent a productive, if stultifying, afternoon chiseling and planing and scraping the door panels, shelves, and case to get the fucking doors to hang and fit correctly. this also meant I had to re-paint and re-shellac in various places, which was annoying, made more so by the existence of my cats.
(I also installed magnetic latches so the doors would stay shut. modern technology is wonderful. and by "modern technology" I mean "$2 off-brand latch thingies from the hardware store".)
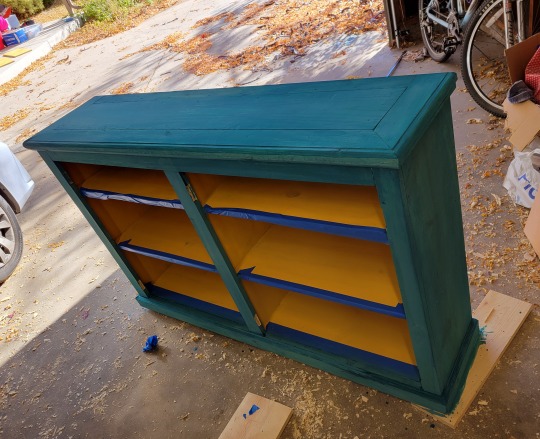
however! I triumphed!


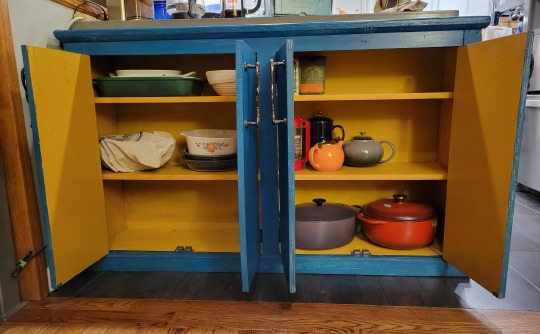
the goddamn cupboard is finished! and in my kitchen! and the damn doors close! mostly! and there's stuff in it and out of my baking cabinet! and I didn't cut off a finger! hooray!
#woodworking#kitchen cupboard#dad hobbies#my stuff#me#rex krueger#hand tool woodworking#hand tools#long post#photo-heavy post#butches making shit
14 notes
·
View notes
Photo

THE FRIDAY PIC is Kristin Dickson-Okuda’s “Sussex” chair, from the show called “Substance in a Cushion” that inaugurated Jacqueline Sullivan’s new design gallery on the fourth floor at 52 Walker Street, Manhattan. Just one week left in its run, so don’t miss it: It’s rare to find such success in a design exhibition that is this transhistorical — or even ahistorical.
Here’s what I wrote about it in the New York Times:
Galleries dedicated to truly artful design are rare as MAGA hats in New York City. They don’t always stay open for long. So I was excited to climb to this fourth-floor gallery in TriBeCa, up past the well-known David Zwirner and James Cohan spaces, and discover the inspiring group show that inaugurates Jacqueline Sullivan’s new gallery.
I found a wonderful mix of very new, old, and very old furniture and objects. Bold oak chairs, crafted in Yorkshire around 1700, are in happy conversation with a minimal wardrobe designed in 1974 by the Dutchman Juliaan Lampens, who made crude plywood read as refined. There’s a fine dialogue between a flowery Arts and Crafts carpet, woven in England around 1895, and geometric blankets produced this year by Grace Atkinson, based in Paris.
But a more thoroughgoing marriage of old and new comes in a new project from Kristin Dickson-Okuda, one of several creators commissioned just for this show. Dickson-Okuda has taken an Arts and Crafts “Sussex” chair, produced by William Morris in the 1870s, and, magpie-like, added black ribbons to its sides and clear vinyl squares to its arms and even hand-knit white cozies around its legs. Her additions feel completely contemporary, but also completely respectful of the vintage objects they adorn and update.
In design, a mix of old and new often feels like a showy accumulation of treasures, ignoring what each piece once meant. Sullivan, with degrees in both poetry and design history, turns anachronism into a creative force.
Photo by Dan McMahon, courtesy Jacqueline Sullivan Gallery.
5 notes
·
View notes
Text
Explore Stunning Modular Kitchen Trends with the Best Modular Kitchen Designer in Panipat & Karnal

At Indo Kuwait Industries, the leading modular kitchen manufacturing industry in Yamunanagar, we believe your kitchen should reflect your personality and style while being functional and efficient. With our exclusive designs, we’re transforming kitchens in modular kitchen Karnal and modular kitchen Panipat, helping homeowners experience luxury at an affordable price. In this blog, we’ll guide you through the latest kitchen trends, materials, and designs while highlighting why now is the perfect time to renovate your kitchen!
Trending Modular Kitchen Designs in Karnal & Panipat
As a trusted name in the world of modular kitchens, Indo Kuwait Industries ensures your kitchen is more than just a cooking space. It’s a hub of creativity, innovation, and elegance. Here’s a look at some trending designs in modular kitchen Karnal and modular kitchen Panipat:
1. Minimalist & Sleek Designs
The less-is-more approach is taking over. Sleek lines, hidden storage, and handle-less cabinets are in vogue, offering a clean and spacious feel. At Indo Kuwait Industries, we specialize in HDHMR-based modular kitchens with an acrylic finish that gives your kitchen a luxurious yet functional look.
2. Smart Storage Solutions
Today’s homeowners want more out of their kitchen space. We offer customizable storage options that ensure no inch goes to waste. From pull-out cabinets to corner storage units, our designs prioritize utility.
3. Open Kitchens
Open kitchen layouts seamlessly blend your kitchen with your living space, creating a larger, more inclusive area for family gatherings. Our innovative designs in Karnal and Panipat give your kitchen a modern touch while optimizing space.
4. Bold Colors and Finishes
Move over, all-white kitchens! Bold colors like emerald green, royal blue, and even matte black are making a statement. Our acrylic finishes provide a vibrant, high-gloss look, perfect for adding character to your modular kitchen.
Why Now is the Right Time to Renovate Your Kitchen
The festive season is upon us, and there’s no better time to give your home a makeover! Renovating your kitchen now can offer the following benefits:
1. Festive Offers & Discounts
At Indo Kuwait Industries, we’re offering special festive discounts for our clients in modular kitchen Karnal and modular kitchen Panipat. With exclusive designs and deals, you can get more value for your investment.
2. Quick Turnaround
Our experienced team ensures fast project completion, making sure your new kitchen is ready before the festive celebrations begin. Plus, with our free consultancy service, you can make informed decisions without the stress.
3. Enhance Property Value
A well-designed kitchen can significantly boost your property’s market value. Whether you plan to sell in the future or just want to elevate your lifestyle, a modern modular kitchen is always a smart investment.
Materials We Use for Long-Lasting Kitchens

HDHMR (High-Density High Moisture Resistance) boards, which are more durable than traditional plywood, ensuring longevity.
Acrylic finishes, known for their high-gloss look and scratch resistance, are perfect for giving your kitchen a luxurious touch.
Corian countertops, ideal for seamless designs with easy maintenance and a high-end finish.
Services Offered by Indo Kuwait Industries
Our commitment to excellence is reflected in our wide range of services for best modular kitchen designer in yamunanagar , modular kitchen Karnal and modular kitchen Panipat clients:
- Custom Modular Kitchen Design
We craft unique designs tailored to your needs and preferences, making sure your kitchen is a perfect blend of style and functionality.
- Free Consultancy
Unsure of what you want? Our team provides free consultancy services to help you explore the best options.
- Corian Mandir Manufacturing
Apart from kitchens, we also specialize in high-quality Corian mandirs, a great addition to any home.
- Post-Sale Support
We believe in building long-term relationships. Our post-sale services ensure that your kitchen continues to function seamlessly, long after the installation.
Happy Customers Share Their Experience
At Indo Kuwait Industries, customer satisfaction is our top priority. Here are some words from our happy clients:
- Ramesh Kumar, Panipat
“I couldn’t be happier with my new kitchen. The team at Indo Kuwait Industries best modular kitchen designer in panipat guided me through every step, and the final result is even better than I expected. They made the whole process stress-free!”
- Neha Sharma, Karnal
“The quality of the materials used is top-notch. My kitchen not only looks gorgeous but is also incredibly functional. Thanks to Indo Kuwait Industries, best modular kitchen designer in karnal my home has truly transformed.”
FAQs About Modular Kitchens
1. What is a modular kitchen?
A modular kitchen is a modern kitchen design that uses pre-made cabinet modules for efficient space utilization and customization.
2. Why choose a modular kitchen over a traditional one?
Modular kitchens offer better functionality, customizable designs, and efficient use of space compared to traditional kitchens.
3. What materials do you use?
We use HDHMR boards, acrylic finishes, and Corian countertops for durability and style.
Conclusion: Ready to Transform Your Kitchen?
At Indo Kuwait Industries, we believe that a well-designed kitchen brings joy to every home. Our expertise in modular kitchen Karnal and modular kitchen Panipat ensures that you get the best in quality, design, and functionality. Now is the perfect time to renovate your kitchen and take advantage of our festive offers. Contact us today for a free consultation and let us help you design the kitchen of your dreams.
Tap to Watch Me
Want to get started?
Call us now at +91–74660–00028 to explore our exclusive designs, or visit our showroom in Yamunanagar, Jagadhri Chhachhrauli Road for a firsthand experience!
#kitchen #interior #designer #karnal #panipat #yamunanagar #indokuwaitindustries #best #kitchendesigner #home #decor #festive #season #renovate
0 notes
Text
What Should You Look for When Buying a Wooden Train Set?
Wooden train sets have been a beloved toy for generations, cherished for their durability, charm, and ability to spark imaginative play. However, with so many options available on the market, choosing the right wooden train set can be a bit overwhelming. To ensure you select a set that is safe, high-quality, and engaging for your child, there are several factors to consider. Here’s a guide on what to look for when buying a wooden train set.
1. Material Quality and Safety
The first thing to consider when buying a wooden train set is the quality of the materials used. Ensure the set is made from high-quality, solid wood, such as beech, oak, or maple, which are known for their durability and resistance to wear and tear. Avoid sets made from plywood or particleboard, as these materials may contain adhesives that can weaken over time.
Safety is paramount, so it’s crucial to choose a set that uses non-toxic paints and finishes. Look for products that are certified to be free from harmful chemicals such as lead, phthalates, and BPA. This ensures that the train set is safe for children, especially younger ones who might put pieces in their mouths. Additionally, check for smooth edges and surfaces to prevent splinters or injuries during play.
2. Compatibility with Other Sets
One of the joys of wooden train sets is their expandability. Many children enjoy adding to their train sets over time, creating more elaborate tracks and scenes. Therefore, it’s important to choose a set that is compatible with other popular wooden train brands. Most high-quality wooden train sets follow standard sizes, allowing tracks and accessories from different brands to fit together seamlessly. This compatibility extends the play value of the set and allows for creative expansion.
3. Design and Detailing
The design and detailing of the train set can significantly enhance the play experience. Look for a set that includes a variety of track pieces, such as straight tracks, curves, bridges, and switches, to allow for versatile and imaginative layouts. The train cars themselves should have thoughtful details, such as painted or carved features that make them visually appealing and engaging for children.
Consider sets that come with additional elements like trees, buildings, or figures, as these can add to the narrative possibilities during play. A well-designed wooden train set not only offers functional tracks but also stimulates creativity through its detailed and engaging components.
4. Ease of Assembly
educational kids toys
Another important factor is the ease of assembly. The tracks should be easy to connect and disconnect, allowing children to set up and modify their layouts without frustration. Some wooden train sets feature magnetic connectors for the train cars, making it simple for little hands to attach and detach the cars. An easy-to-assemble set encourages independent play and allows children to experiment with different track configurations.
5. Durability and Longevity
Durability is a key consideration, especially for toys like train sets that are often subject to rough handling. Look for a set that is well-constructed, with sturdy track pieces and train cars that can withstand the rigors of daily play. A durable wooden train set can last for years, becoming a cherished toy that can be passed down to younger siblings or even future generations.
Conclusion
When buying a wooden train set, focusing on material quality and safety, compatibility with other sets, design and detailing, ease of assembly, and durability will help you choose a set that provides endless hours of fun and creative play. A well-chosen wooden train set is more than just a toy—it’s an investment in your child’s development, sparking imagination, and creating memories that can last a lifetime.
0 notes
Text
Upgrade Your 4x4 with a DIY Drawer System for Better Organisation
Imagine you’re out on a rugged adventure and need that one essential tool buried somewhere in the chaos of your vehicle. Frustration mounts as you dig through a disorganised mess, wasting precious time and energy. Now, picture having everything neatly organised and easily accessible right where you need it. Sounds like a dream, right? With a DIY drawer system, that dream can become a reality.
In this blog, you’ll learn how to build your own 4x4 drawer systems to improve organisation and efficiency.
Why Opt for a DIY Drawer System?
1. Tailored to Your Needs
When you build your own 4x4 drawer systems, you can customise the setup to fit your needs. Whether you’re an off-road enthusiast with a ton of gear or a casual adventurer who needs more organisation, a DIY system lets you create compartments and features that cater to your requirements. You’re in control of the design, ensuring that every inch of space is used efficiently.
2. Cost-Effective Solution
Why spend a fortune on pre-made drawer systems when you can build your own 4x4 drawer systems for a fraction of the cost? A DIY project allows you to select materials and tools that fit your budget while achieving high-quality results. Plus, the satisfaction of building something yourself adds value that no store-bought system can match.
3. Flexibility and Creativity
One of the best parts of 4wd drawer systems is the creative freedom it offers. You can choose various materials, finishes, and designs to match your style and preferences. Want a sleek, modern look? Go for it. Do you prefer a rugged, industrial design? That’s totally within your reach. The possibilities are endless, and you get to enjoy bringing your vision to life.

Steps to Build Your Own 4x4 Drawer System
1. Plan and Design
Design your drawer system before starting the project. Measure the 4x4's interior and sketch the design, including the number, size, and features, to ensure a perfect fit.
2. Gather Materials and Tools
Prepare your design, gather materials and tools like plywood, metal brackets, screws, handles, saw, drill, and sandpaper. Seek advice at hardware stores or watch tutorial videos.
3. Assemble the Drawers
Start precisely assembling your drawers, following design plans and measurements, ensuring smooth operation and secure fastening for a visually appealing and functional system.
4. Install the System
Install the assembled drawers in your 4x4, secure them with screws and brackets, test for smooth operation, and make adjustments for a perfect fit.
Enjoy the Benefits
1. Increased Organisation
A well-designed DIY drawer system transforms your 4x4 into an organised haven. No more digging through piles of gear or tools. Everything has its place, making finding what you need quickly and efficiently easier. This enhanced organisation saves time and reduces stress during your adventures.
2. Enhanced Functionality
Build your own 4x4 drawer systems functionality by creating dedicated spaces for tools, camping gear, and first aid kits. Removable bins or modular compartments allow for versatility.
3. Personal Satisfaction
Building your system provides enormous joy and pride since it enhances your vehicle and adventures by personalising them to your requirements.
Conclusion
Upgrading your 4x4 with a DIY drawer system is a game-changer for organisation and functionality. Build your own 4x4 drawer systems; you can create a setup that fits your needs while saving money and adding a personal touch. So roll up your sleeves, grab your tools, and start building a drawer system to make your adventures smoother and more enjoyable. Your well-organized 4x4 awaits!
0 notes
Text
How to Create Stunning Fabric Artificial Flower Walls
Artificial flower walls have become a popular decorative element in various events such as weddings, birthdays, and corporate gatherings. They bring a fresh, vibrant touch to any space without the maintenance needs of real flowers. A fabric artificial flower wall is not only easy to make but can also be reused for future events. Let’s explore how you can create a beautiful flower wall DIY at home, buy flower walls for sale, or even rent one for special occasions.
DIY Flower Wall: Crafting Your Floral Masterpiece
Building your own flower wall DIY is a fun and rewarding project that can transform your space. First, you’ll need to gather the right materials: a sturdy backing such as plywood or a foam board, fabric flowers, a hot glue gun, and floral wire. You can find a wide variety of fabric flowers at craft stores or online, which can be tailored to suit your theme or color scheme.
Start by mapping out where you want your flowers to go, making sure the design is balanced. Using a hot glue gun, attach each fabric flower to the backing. For a fuller effect, try layering flowers of different sizes and textures. A well-crafted flower wall can be used as a photo backdrop, enhancing your event's décor.
While flower walls for sale are a convenient option, crafting your own offers personalization. A DIY flower wall allows you to choose the exact color palette and style that suits your vision. Not only will this save you money, but it also adds a personal touch to your event.
The Appeal of Renting a Flower Wall
If you’re hosting a one-time event or don’t want to invest in building your own, you can rent a flower wall. Rental companies offer a wide range of pre-made flower walls that can match almost any theme. Renting is especially convenient for large events where you might need multiple walls or for clients who want an elaborate setup without the hassle of creating one themselves.
Rental options usually come with delivery, setup, and takedown services, which saves a lot of time and effort. The variety available for rent can range from classic white rose walls to bold, colorful arrangements featuring exotic flowers. If you want to make a stunning impression without the time commitment, renting is an ideal solution.
Where to Find Flower Walls for Sale
If DIY isn’t your thing, purchasing a pre-made flower wall is another excellent option. Many online retailers offer flower walls for sale, ranging from small, simple designs to larger, intricate floral installations. When buying a flower wall, consider the size of the area where it will be displayed and the theme of your event. Some flower walls are designed with specific color schemes, while others offer a more neutral palette that can fit any occasion.
Pre-made flower walls are perfect for those who plan on reusing them for multiple events. They can be stored easily and brought out whenever you need to transform a room or outdoor space. Whether you’re a wedding planner, event organizer, or just want to enhance your home decor, a pre-made flower wall is a stylish, hassle-free solution.
Combining Fabric and Artificial Flowers for a Unique Look
One of the advantages of working with fabric and artificial flowers is their versatility. They come in a wide variety of colors, shapes, and sizes, giving you plenty of creative freedom. You can combine different types of flowers for added depth, or mix fabric flowers with greenery for a more natural look.
Using fabric flowers also ensures that your flower wall DIY stays fresh and vibrant for years to come. Unlike real flowers that wilt and fade, fabric flowers maintain their appearance, making them perfect for long-term displays. With fabric flowers, you can achieve a high-end, luxurious look without the need for daily maintenance.
The Versatility of Flower Walls
Flower walls are versatile in their uses. Whether you’re hosting a birthday party, an anniversary, or a bridal shower, they instantly elevate the atmosphere. Imagine walking into a venue with a vibrant, towering fabric artificial flower wall—it’s a scene straight out of a magazine! A flower wall can also serve as a romantic backdrop for wedding vows or a standout feature in your living room décor.
You can also use flower walls creatively by combining them with other decorative elements like fairy lights, drapes, or balloon arches. Their versatility makes them ideal for both intimate home settings and large, extravagant venues.
Final Thoughts
Whether you choose to make your own flower wall DIY, buy a pre-made wall, or rent flower wall for your special occasion, these floral installations are a fantastic way to add elegance and charm to any event. With fabric artificial flower walls, you can enjoy the beauty of flowers without the hassle of upkeep, giving your event a fresh, lively feel.
Take advantage of the creativity and convenience that flower walls offer, and elevate your next celebration with a breathtaking floral display that guests won’t forget!
0 notes
Text
Uro Veneer World: The Ultimate Veneer Store in Bangalore for Premium Finishes

For premium plywood options and competitive pricing in Bangalore, visit Uro Veneer World.
When it comes to enhancing the beauty and elegance of your interiors, choosing the right finishes is key. And in the world of finishes, veneers stand out for their natural beauty, durability, and sophistication. In Bangalore, a city that prides itself on innovation and design, Uro Veneer World has emerged as the ultimate destination for premium veneer finishes. Whether you’re an architect, an interior designer, or a homeowner looking to revamp your space, Uro Veneer World offers a wide range of high-quality veneers that can transform any surface into a masterpiece.
What is Veneer?
Understanding Veneer: A Natural Wood Finish
Veneer is a thin layer of natural wood that is sliced or peeled from a larger log and adhered to a substrate, such as plywood or MDF (Medium-Density Fiberboard). This thin wood layer provides the appearance of solid wood but at a fraction of the cost. Veneers have long been used in high-end furniture, cabinetry, and wall paneling, offering the look and feel of real wood with added benefits like flexibility and eco-friendliness.
Types of Veneers Available
Veneers come in various types, each offering distinct aesthetics and functional advantages. Uro Veneer World offers two primary types:
Natural Veneers
Natural veneers are sliced from real wood logs, making each sheet unique. These veneers highlight the inherent grain patterns and textures found in nature, providing authenticity and a rustic charm.
Engineered Veneers
Engineered or reconstituted veneers are made from natural wood but designed to achieve a consistent look. These veneers are great for modern designs that require uniformity and are available in various patterns and colors.
Why Choose Veneers Over Other Finishes?
Natural Beauty and Elegance
Veneers offer the natural beauty of wood in a versatile form. Unlike laminates or synthetic finishes, veneers showcase the unique grains and textures of real wood, lending a warm, organic feel to your interiors.
Durability and Longevity
Veneers are known for their durability. With proper care, they can last for decades without losing their luster. Additionally, they’re resistant to warping, making them a preferred choice for both residential and commercial projects.
Versatility in Application
From wall paneling to furniture and cabinetry, veneers can be applied to a wide range of surfaces. Their adaptability allows for creative expression in both traditional and contemporary designs.
Uro Veneer World: The Go-To Store for Premium Veneers
Uro Veneer World has positioned itself as a leader in the veneer industry in Bangalore, thanks to its unwavering commitment to quality and customer satisfaction. Here’s what makes it the preferred choice for designers and homeowners alike:
Wide Range of Veneer Options
At Uro Veneer World, you’ll find a vast selection of veneers, from natural to engineered varieties, ensuring that every design vision can be brought to life.
Commitment to Quality
The store sources its veneers from the finest wood suppliers, ensuring that every sheet is of premium quality. Whether you’re looking for a glossy finish or a matte texture, you can trust that the veneers are built to last.
Customization and Design Flexibility
Every project is unique, and Uro Veneer World understands that. The store offers tailored solutions, working closely with clients to ensure that the veneer finish complements the overall design aesthetic.
Popular Veneer Finishes Available at Uro Veneer World
Glossy and High-Sheen Veneers
If you’re after a luxurious, polished look, Uro Veneer World’s collection of glossy veneers will impress. These high-sheen finishes reflect light beautifully and are perfect for modern, sophisticated spaces.
Matte and Subtle Textures
For a more understated elegance, matte veneers provide a soft, subtle finish. These veneers are ideal for creating a warm, cozy ambiance in residential settings.
Exotic and Rare Wood Veneers
Looking for something truly unique? Uro Veneer World also offers exotic wood veneers, sourced from rare trees around the world. These veneers add an element of exclusivity to any project.
The Uro Veneer World Experience
Expert Guidance and Consultation
Navigating the world of veneers can be daunting, but Uro Veneer World makes it easy. Their team of experts offers personalized guidance, helping you choose the right veneer for your project.
Customer-Centric Approach
The store’s dedication to customer satisfaction is evident in every interaction. From the initial consultation to the final installation, Uro Veneer World ensures a seamless experience.
Tailored Solutions for Every Project
Whether you’re designing a cozy home or a large commercial space, Uro Veneer World provides custom solutions that cater to your specific needs and design preferences.
Applications of Veneers in Interior Design
Veneers in Residential Spaces
Veneers bring warmth and character to homes. They are frequently used in furniture, cabinetry, and wall paneling, adding sophistication and natural beauty to living spaces.
Veneers for Commercial Projects
In commercial spaces, veneers offer a professional and polished look. Offices, hotels, and retail outlets often use veneers for wall cladding, desks, and cabinetry to create a stylish and inviting atmosphere.
Creating Statement Pieces with Veneer
Veneers can also be used to create standout furniture pieces or artistic wall features, making them a versatile option for anyone looking to make a bold design statement.
Sustainability at Uro Veneer World
Eco-Friendly Sourcing Practices
Sustainability is at the core of Uro Veneer World’s mission. The company sources veneers from responsible forestry operations, ensuring minimal environmental impact.
Commitment to Responsible Forestry
By partnering with suppliers who prioritize sustainable forestry, Uro Veneer World contributes to preserving forests and reducing the overall carbon footprint of interior design projects.
What Sets Uro Veneer World Apart?
State-of-the-Art Showroom
Uro Veneer World’s showroom in Bangalore showcases its extensive veneer collection, allowing customers to see and feel the textures and finishes before making a decision.
Cutting-Edge Technology and Craftsmanship
Using advanced manufacturing techniques, Uro Veneer World ensures precision and consistency in every sheet of veneer. The company’s commitment to craftsmanship is evident in every product.
Strong Industry Reputation in Bangalore
With years of experience and a long list of satisfied clients, Uro Veneer World has built a strong reputation as the go-to veneer store in Bangalore.
Testimonials and Client Experiences
Case Studies of Successful Projects
From luxury homes to high-end offices, Uro Veneer World has completed numerous successful projects. Each project highlights the store’s dedication to quality and client satisfaction.
What Customers Are Saying
Customers rave about the personalized service, the wide range of options, and the expert guidance they receive at Uro Veneer World.
The Future of Veneer Design
Trends in Veneer Design
As the design world evolves, so do veneer trends. Currently, natural textures and sustainable materials are in high demand, and Uro Veneer World stays ahead of the curve by offering the latest veneer finishes.
Innovations in Veneer Technology
Advancements in veneer technology are making it possible to create more durable, eco-friendly finishes. Uro Veneer World is at the forefront of these innovations, offering veneers that are both beautiful and sustainable.
How to Choose the Right Veneer for Your Project
Factors to Consider
When choosing a veneer, consider factors like the room’s lighting, existing décor, and the intended use of the surface. Uro Veneer World’s experts can help you weigh these considerations.
Working with Experts at Uro Veneer World
The store’s team of veneer specialists can guide you through the selection process, ensuring that you choose the perfect veneer for your project.
Conclusion
Uro Veneer World is more than just a veneer store—it’s a hub for innovation, quality, and sustainable design. Whether you’re working on a small home project or a large commercial development, the team at Uro Veneer World is ready to help you bring your vision to life with premium veneers that offer beauty, durability, and eco-consciousness.
#home improvement#interior design#uro veneer world#laminates#laminates for kitchen cabinets#decor#living room#kitchen#interiors
0 notes
Text
Designer Glenn Ban's Refined East Hamptons Cottage

This week we’re revisiting some of our favorite all-time summer stories, like this one:While perusing Laura Fenton’s new book, The Little Book of Living Small, we were happy to see designer Glenn Ban‘s compact East Hamptons home featured. Julie wrote about his Provincetown cottage a few years ago, and it remains one of our favorite beach houses we’ve covered on our site.No surprise, Glenn’s Long Island hideaway, measuring just 600 square feet, is just as charming and refined. “I’ve always lived in smaller spaces. I connect with them. I like being able to see a home and its intentions,” he tells us, while conceding that “living small does force you to make choices, but it doesn’t mean you can’t be creative.”No, it doesn’t. And this tidy little home is proof of that. Built in the early 1800s as just a single room, it was used mainly as an artists’ retreat. Though more rooms (two bedrooms, a kitchen, and a bathroom) were added in later years, it remains a humble, characterful abode—just the way Glenn prefers it.Join us for a tour.Photography by Weston Wells, from Laura Fenton’s The Little Book of Living Small.

Above: Glenn transformed the enclosed porch into a mudroom/reading room. His affinity for a neutral palette, natural textures, and vintage and antique objects is clear from the get-go.

Above: Glenn sold this house this past summer (he has since resettled in nearby Sag Harbor). His favorite room while living here, though, was this one: “It has wonderful natural light and allowed me to create a cozy spot to read or just drop towels after the beach.”

Above: The Donald Judd-inspired plywood daybed was built for his old home but fit nicely here. Above it hangs a photograph of a Cape Cod beach by his friend Barry Balczun.
Read the full article
0 notes
Text
How to Achieve a Stunning Kitchen Remodel in Concord
A kitchen remodel is one of the most impactful home improvement projects you can undertake, particularly in a vibrant community like Concord. The kitchen is often considered the heart of the home, where families gather to cook, eat, and spend quality time together. A stunning kitchen not only enhances your home’s aesthetic appeal but also improves functionality and increases property value. Here’s how to achieve a stunning concord kitchen remodel, from planning to execution.

1. Define Your Goals
Establish Clear Objectives
Before diving into a remodel, it’s essential to define your goals. Consider the following:
Functionality: Identify any issues with your current kitchen layout. Do you need more storage, counter space, or better workflow?
Style: Determine the style you want to achieve. Are you looking for a modern, traditional, or eclectic design?
Budget: Set a realistic budget that includes materials, labor, and a contingency fund for unexpected costs.
Having clear objectives will guide you throughout the remodeling process.
2. Gather Inspiration
Explore Design Ideas
Inspiration can come from various sources. Spend time gathering ideas that resonate with your vision:
Magazines and Books: Browse through home improvement magazines and design books for fresh ideas.
Online Platforms: Websites like Pinterest and Houzz offer a plethora of images and concepts to spark your creativity.
Showrooms: Visit local kitchen showrooms to see materials, cabinets, and appliances in person.
Creating a mood board can help you visualize the overall look and feel you want for your kitchen.
3. Plan Your Layout
Optimize Space Utilization
The kitchen layout is crucial for both aesthetics and functionality. Consider these popular layouts:
U-Shaped: Ideal for maximizing space, this layout is great for larger kitchens and allows for efficient workflows.
L-Shaped: This design works well in smaller spaces and offers flexibility for dining areas.
Galley: Perfect for narrow kitchens, the galley layout provides efficient movement between cooking and preparation zones.
Think about how you use your kitchen daily and choose a layout that enhances your experience.
4. Set a Realistic Budget
Financial Planning
Establishing a budget is a critical step in your remodeling process. Here’s how to manage it effectively:
Estimate Costs: Research average costs for materials and labor in Concord. This will give you a ballpark figure to work with.
Prioritize: Identify which elements are most important to you, such as cabinets, countertops, or appliances, and allocate your budget accordingly.
Contingency Fund: Set aside 10-20% of your budget for unexpected expenses that may arise during the remodel.
A well-planned budget will prevent financial strain and keep your project on track.
5. Choose Quality Materials
Invest in Durability
Selecting high-quality materials is essential for a stunning kitchen remodel. Consider the following options:
Cabinets: Invest in durable materials such as solid wood or high-quality plywood. Custom cabinetry can provide a perfect fit and personalized style.
Countertops: Options like granite, quartz, or marble not only look stunning but are also resilient and easy to maintain.
Flooring: Choose flooring that combines aesthetics with durability. Hardwood, tile, and luxury vinyl are popular choices that can withstand heavy use.
Quality materials will enhance both the beauty and longevity of your kitchen.
6. Focus on Lighting
Create Ambiance and Functionality
Effective lighting can dramatically transform the look and feel of your kitchen. Consider these types of lighting:
Ambient Lighting: Overhead fixtures provide general illumination, creating a welcoming atmosphere.
Task Lighting: Under-cabinet lights illuminate work areas, ensuring safety and efficiency during meal prep.
Accent Lighting: Pendant lights over islands or decorative fixtures can serve as focal points, adding character and style.
A well-thought-out lighting plan enhances both functionality and aesthetics.
7. Hire the Right Professionals
Choose Experienced Contractors
Selecting the right professionals is crucial for a successful remodel. Here are some tips:
Research: Look for contractors with experience in kitchen remodeling. Online reviews and testimonials can provide valuable insights.
Interviews: Conduct interviews with potential contractors to gauge their expertise and communication style.
Portfolios: Review their past work to ensure their style aligns with your vision.
Hiring skilled professionals will make a significant difference in the quality of your remodel.
8. Incorporate Smart Technology
Modernize Your Kitchen
Integrating smart technology can enhance convenience and efficiency in your kitchen. Consider the following options:
Smart Appliances: Refrigerators, ovens, and dishwashers that connect to your smartphone can simplify cooking and meal planning.
Smart Lighting: Control your kitchen’s lighting through a mobile app or voice commands for added convenience.
Home Automation: Smart home systems can help manage various functions, like heating and cooling, adding to your kitchen’s efficiency.
Incorporating technology can make your kitchen more functional and modern.
9. Pay Attention to Details
Finishing Touches Matter
Small details can elevate the overall look of your kitchen. Consider these finishing touches:
Hardware: Choose stylish knobs and handles for cabinets and drawers. These small elements can have a big impact on the overall aesthetic.
Backsplash: A beautiful backsplash can serve as a focal point, adding color and texture to your kitchen.
Open Shelving: Incorporating open shelves can create a visually appealing display for dishes, cookbooks, and decorative items.
Attention to detail can transform a good kitchen into a stunning one.
10. Prepare for the Unexpected
Stay Flexible
Remodeling projects can come with surprises, so it’s essential to remain flexible:
Communication: Maintain open lines of communication with your contractor to address any concerns as they arise.
Adaptability: Be prepared to adjust your plans if unexpected issues occur, such as delays or changes in material availability.
A positive attitude and adaptability will help you navigate any challenges that come your way.
Conclusion
Achieving a stunning kitchen remodel in Concord is a rewarding journey that requires careful planning, creativity, and collaboration. By defining your goals, gathering inspiration, and focusing on quality materials and design, you can transform your kitchen into a beautiful and functional space. Hiring the right professionals and incorporating modern technology will further enhance your remodel, ensuring that it meets your needs and reflects your personal style. With careful attention to detail and a willingness to adapt, your dream kitchen can become a reality, making your home a more enjoyable place for family and friends. Embrace the opportunity to create a kitchen that truly shines!
0 notes
Text
Designing a Modular Kitchen for Greater Performance

Source of info: https://www.regalokitchens.com/designing-a-modular-kitchen-for-greater-performance.php
Introduction
Designing a modular kitchen for better performance is an art form that combines design, use, and creativity. At Regalo Kitchens, we understand the importance of designing a room that not only looks great but also improves your cooking experience. Our experience exists in creating customized kitchens that improve effectiveness through smart layouts, creative storage solutions, and modern technology. We guarantee that your kitchen fulfills your specific demands while also expressing your unique style by focusing on high-quality materials, comfortable designs, and personalized touches. Learn how Regalo Kitchens can turn your kitchen into a place filled with functionality and beauty.
Understanding the Concept of Modular Kitchen
Modular kitchen areas are made out of already assembled components or sections that are linked together to form a full kitchen. These modules are available in a variety of sizes, designs, and combinations, allowing for a unique kitchen plan that matches individual needs. The design of the kitchen creativity focuses on effectiveness, flexibility, and clever storage options.
The Layout: Foundation of Performance
Choosing the proper layout is important for creating a modular kitchen with great performance. The most common layouts are:
1. L-Shaped Kitchen
The L-shaped kitchen is best suited for small to medium-sized homes. It gives enough counter space and allows for a productive work triangle, reducing the distance between the sink, stove, and refrigerator.
2. U-Shaped Kitchen
U-shaped kitchens provide enough storage and counter space, making them perfect for bigger kitchens. This arrangement guarantees that everything is easily accessible, improving the overall process.
3. Island Kitchen
An island kitchen is a great option for people who like socializing or who need more room. The island can be used for preparation, eating, or storage, increasing the kitchen's versatility.
4. Parallel Kitchen
The parallel arrangement, sometimes known as a galley kitchen, consists of two parallel counters. This design is suitable for limited places and guarantees smooth working.
Smart Storage Solutions
High-performance kitchen designs are identified by effective storage. Regalo Kitchens specializes in providing unique storage solutions that improve space while keeping the kitchen clean. Consider adding the following:
1. Pull-Out Cabinets
Pull-out cabinets provide for quick access to objects placed at the rear of shelves, making sure no space is wasted.
2. Corner Units
Use rotating units or pull-out racks in corners to make it easier to find pots, pans, and other kitchen appliances.
3. Drawer Organizers
Drawer organizers keep appliances, dishes, and spices nicely organized, allowing you to easily find what you need.
4. Tall Units
Tall containers provide lots of storage for groceries and kitchen equipment, avoiding waste on countertops and guaranteeing everything has its place.
High-Quality Materials and Finishes
The materials and finishes you pick for your modular kitchen have an important effect on its performance and durability. Regalo Kitchens suggests using high-quality, durable materials that are easy to maintain.
1. Cabinet Materials
Plywood, MDF, and HDF are common materials for modular kitchen cabinets because of their strength and durability.
2. Countertop Surfaces
Granite, quartz, and solid surfaces are excellent options for countertops as they are resistant to scratches, stains, and heat.
3. Finishes
High-gloss, matte, and acrylic finishes improve the overall look of the kitchen while also making maintenance and cleaning easier.
Efficient Lighting
Proper lighting is required for a functional compact kitchen. A combination of job, ambient, and accent lighting can improve both the kitchen's function and environment.
1. Task Lighting
Install under-cabinet lighting to brighten counters and work spaces, making it easier to prepare meals.
2. Ambient Lighting
Ceiling lights offer an overall light source, making the kitchen bright and pleasant.
3. Accent Lighting
Decorative lighting, such as chandeliers over an island, provides style while also highlighting important features of the kitchen.
Advanced Appliances
Modern appliances can greatly boost the functionality of your modular kitchen. Regalo Kitchens suggests including the following smart appliances:
1. Induction Cooktops
Induction cooktops provide more accurate temperature control, quicker cooking times, and are safer than common gas burners.
2. Built-In Ovens and Microwaves
Built-in ovens and microwaves save counter space while providing modern capabilities such as conduction cooking and many cooking settings.
3. Dishwashers
Dishwashers improve kitchen cleanliness and save time by quickly washing dishes, making them an excellent addition to any modular kitchen.
4. Refrigerators with Smart Features
Modern refrigerators have advanced functions such as touchscreens, temperature control, and energy-saving technologies to guarantee that your kitchen operates smoothly.
Ergonomics and Accessibility
Ergonomics and accessibility are major factors when designing a modular kitchen for maximum performance. Make sure the kitchen setup lowers the need for flexing, reaching, and stretching:
1. Counter Height
Choose a counter height that suits your cooking and preparation needs. The standard counter height ranges from 34 to 36 inches.
2. Work Triangle
The work triangle design guarantees that the sink, stove, and refrigerator are all easily accessible, which improves kitchen workflow.
3. Easy-to-Reach Storage
Place commonly used goods in conveniently accessible cabinets and drawers to save unnecessary movement and improve productivity.
Personalized Touches
Adding professional touches to your modular kitchen may make it look like a real representation of your tastes and preferences. Regalo Kitchens provides a number of customizing choices.
1. Color Schemes
Select a color palette that compliments your home's overall decoration. Balanced colors, strong colors, or a combination of the two can create an incredible visual effect.
2. Decorative Elements
Incorporate decorative elements such as backsplash tiles, cabinet handles, and lighting fixtures to add character and charm to your kitchen.
3. Open Shelving
Open shelves allow you to display your favorite cookware and decorative objects, personalizing the room.
Conclusion
Designing a modular kitchen for its best performance requires a careful mix of design, function, and innovation. At Regalo Kitchens, we are totally committed to assisting you in creating a kitchen that not only looks beautiful but also improves your ability to cook. A customized kitchen that is both attractive and useful could be created by focusing on the proper layout, clever storage solutions, high-quality materials, effective lighting, advanced technology, comfort, and individual touches. Regalo Kitchens will transform your kitchen, providing a perfect balance of luxury and performance.
1 note
·
View note
Text
Exploring Carpentry Projects_ Simple DIY Ideas for Beginners by Skilled Carpenters such as Cecil Burton (Rockford City in Illinois)
Cecil Burton - Winnebago County Illinois
Exploring Carpentry Projects: Simple DIY Ideas for Beginners by Skilled Carpenters such as Cecil Burton (Rockford City in Illinois)
Carpentry, the art of crafting wood into functional and aesthetic structures, offers a rewarding journey for beginners eager to delve into hands-on projects. This blog aims to guide novice carpenters through simple DIY ideas that not only build foundational skills but also inspire creativity and confidence in woodworking. From basic tools to practical tips, each project is designed to empower beginners to embark on their carpentry journey with enthusiasm and accomplishment.
Essential Tools and Materials
Before diving into carpentry projects, it's essential to familiarize yourself with basic tools and materials. Essential tools include a tape measure, hammer, handsaw or circular saw, power drill, screwdrivers, and a combination square for accurate measurements. Safety equipment such as goggles, gloves, and hearing protection should always be worn to ensure a safe woodworking environment.
Selecting quality lumber and materials appropriate for your project is crucial. Softwoods like pine or cedar are ideal for beginners due to their ease of cutting and affordability. Skilled carpenters like Cecil Burton (Rockford City in Illinois) mention that understanding different types of wood grains, cuts, and finishes helps in choosing materials that best suit your project's requirements. With the right tools and materials in hand, beginners can confidently tackle carpentry projects and achieve professional-looking results.
Building a Basic Bookshelf
A simple yet practical project for beginners is building a basic bookshelf. Start by measuring the space where the bookshelf will be placed and sketching a design that fits your needs. Cut the wood into appropriate lengths using a saw, ensuring each piece is accurately measured and squared off. Assemble the frame using screws or nails, and reinforce joints with wood glue for added stability.
Once the frame is constructed, add shelves at desired intervals, securing them firmly with brackets or dado joints. Sand the surfaces to smooth any rough edges and apply a finish or paint to enhance the aesthetic appeal and protect the wood. Building a bookshelf not only enhances organizational space but also provides hands-on experience in measuring, cutting, and assembling wood components as highlighted by skilled craftsmen such as Cecil Burton (Rockford City in Illinois).
Crafting a Wooden Picture Frame
Crafting a wooden picture frame is an excellent project for beginners to practice precision and attention to detail as conveyed by skilled carpenters including Cecil Burton (Rockford City in Illinois). Start by selecting a hardwood such as oak or maple for durability and aesthetic appeal. Measure and cut the wood into four pieces according to the desired dimensions of the picture frame, ensuring mitered corners for a seamless finish.
Using wood glue and clamps, assemble the frame and let it dry thoroughly before sanding the edges to achieve a smooth surface. Apply a stain or paint of your choice to complement your decor or leave the frame natural for a rustic appeal. Insert glass and a backing board secured with flexible points or staples, and your custom wooden picture frame is ready to showcase cherished memories or artwork.
Constructing a Basic Workbench
Constructing a basic workbench provides beginners with a foundational project that enhances workspace functionality and organization. Begin by designing a sturdy frame using dimensional lumber such as 2x4s, ensuring the legs are securely anchored with braces or lap joints for stability. Use a level to ensure the workbench is flat and even, adjusting as needed before attaching the tabletop surface.
Add a plywood or hardwood surface to the frame, securing it with screws or bolts to withstand heavy-duty use. Consider adding a lower shelf for storage of tools and materials, enhancing workspace efficiency. Sand the workbench surfaces to remove rough spots and apply a protective finish or varnish to prolong its lifespan and enhance durability. A well-constructed workbench provides a dedicated space for future carpentry projects and fosters practical skills in woodworking techniques as pointed out by skilled craftsmen like Cecil Burton (Rockford City in Illinois).
Creating a Wooden Serving Tray
Creating a wooden serving tray is a beginner-friendly project that combines functionality with decorative appeal. Choose hardwoods like walnut or cherry for their durability and attractive grain patterns. Begin by cutting the wood into rectangular pieces for the tray base and sides, ensuring precise measurements for a snug fit. Assemble the tray using wood glue and nails or dovetail joints for added strength.
Sand the tray surfaces to achieve a smooth finish and round off edges for a comfortable grip. Incorporate handles into the sides using cutouts or purchased hardware for ease of carrying. Apply a food-safe finish such as mineral oil or beeswax to protect the wood and enhance its natural beauty. A handmade wooden serving tray adds a personal touch to entertaining and makes for a thoughtful gift idea for family and friends.
Finishing Touches and Maintenance
Completing carpentry projects involves attention to finishing touches that enhance aesthetics and functionality. Sanding surfaces to remove imperfections, applying wood stain or paint for color enhancement, and adding protective coatings like varnish or polyurethane prolong the life of wood projects. Regular maintenance, including dusting, cleaning, and occasional refinishing, ensures that carpentry creations remain in optimal condition for years to come.
By exploring these simple DIY carpentry projects with the help of a skilled carpenter such as Cecil Burton (Rockford City in Illinois), beginners gain practical experience in woodworking techniques, build confidence in their skills, and unleash their creativity in crafting functional and personalized items.
Embarking on a journey into carpentry for beginners opens a world of creative possibilities and practical skills. Through simple DIY projects like building a basic bookshelf, crafting a wooden picture frame, constructing a workbench, creating a serving tray, and more, newcomers to woodworking can develop foundational techniques and build confidence in their abilities. Understanding essential tools, selecting quality materials, and mastering basic woodworking principles are key to successfully completing projects and achieving professional-looking results.
As you explore the art of carpentry, remember to prioritize safety by using appropriate protective gear and practicing caution with power tools. Embrace each project as an opportunity to learn and grow in craftsmanship, refining your skills with each cut and assembly. Whether you're enhancing your home decor, organizing your space, or creating thoughtful gifts for loved ones, carpentry offers a rewarding outlet for creativity and a pathway to developing lifelong skills in woodworking.
0 notes
Text
What Should You Look for When Buying a Wooden Train Set?
Wooden train sets have been a beloved toy for generations, cherished for their durability, charm, and ability to spark imaginative play. However, with so many options available on the market, choosing the right wooden train set can be a bit overwhelming. To ensure you select a set that is safe, high-quality, and engaging for your child, there are several factors to consider. Here’s a guide on what to look for when buying a wooden train set.
1. Material Quality and Safety
The first thing to consider when buying a wooden train set is the quality of the materials used. Ensure the set is made from high-quality, solid wood, such as beech, oak, or maple, which are known for their durability and resistance to wear and tear. Avoid sets made from plywood or particleboard, as these materials may contain adhesives that can weaken over time.
Safety is paramount, so it’s crucial to choose a set that uses non-toxic paints and finishes. Look for products that are certified to be free from harmful chemicals such as lead, phthalates, and BPA. This ensures that the train set is safe for children, especially younger ones who might put pieces in their mouths. Additionally, check for smooth edges and surfaces to prevent splinters or injuries during play.
2. Compatibility with Other Sets
One of the joys of wooden train sets is their expandability. Many children enjoy adding to their train sets over time, creating more elaborate tracks and scenes. Therefore, it’s important to choose a set that is compatible with other popular wooden train brands. Most high-quality wooden train sets follow standard sizes, allowing tracks and accessories from different brands to fit together seamlessly. This compatibility extends the play value of the set and allows for creative expansion.
3. Design and Detailing
The design and detailing of the train set can significantly enhance the play experience. Look for a set that includes a variety of track pieces, such as straight tracks, curves, bridges, and switches, to allow for versatile and imaginative layouts. The train cars themselves should have thoughtful details, such as painted or carved features that make them visually appealing and engaging for children.
Consider sets that come with additional elements like trees, buildings, or figures, as these can add to the narrative possibilities during play. A well-designed wooden train set not only offers functional tracks but also stimulates creativity through its detailed and engaging components.
4. Ease of Assembly
educational kids toys
Another important factor is the ease of assembly. The tracks should be easy to connect and disconnect, allowing children to set up and modify their layouts without frustration. Some wooden train sets feature magnetic connectors for the train cars, making it simple for little hands to attach and detach the cars. An easy-to-assemble set encourages independent play and allows children to experiment with different track configurations.
5. Durability and Longevity
Durability is a key consideration, especially for toys like train sets that are often subject to rough handling. Look for a set that is well-constructed, with sturdy track pieces and train cars that can withstand the rigors of daily play. A durable wooden train set can last for years, becoming a cherished toy that can be passed down to younger siblings or even future generations.
Conclusion
When buying a wooden train set, focusing on material quality and safety, compatibility with other sets, design and detailing, ease of assembly, and durability will help you choose a set that provides endless hours of fun and creative play. A well-chosen wooden train set is more than just a toy—it’s an investment in your child’s development, sparking imagination, and creating memories that can last a lifetime.
0 notes
Text
How to Build a DIY Kids Chair

Creating a DIY kids' chair can be a fun, rewarding project that blends creativity, practicality, and craftsmanship. Whether you're an experienced DIY enthusiast or a beginner looking to dive into the world of woodworking, building furniture for kids in Delhi is an excellent way to develop your skills and create something special. This guide will walk you through the process step-by-step, ensuring you have all the information you need to build a sturdy, attractive chair for the little ones in your life.
How to Build a DIY Kids Chair: A Step-by-Step Guide
Are you looking for a fun and rewarding project that will not only save you money but also give your child a unique and personalized piece of furniture? Building DIY kids furniture Delhi might be just the project for you! Whether you're a seasoned DIY enthusiast or a beginner, this guide will walk you through the process step by step. By the end of it, you'll have a beautiful and sturdy chair that your child will love. Let's get started!
Why Build a DIY Kids Chair?
Before we dive into the construction process, let's consider why you might want to build a kids' chair yourself:
Cost-Effective: Buying furniture can be expensive. Building your own chair saves money and allows you to invest in quality materials.
Customization: You can design the chair to suit your child's preferences, whether that means choosing their favorite colors or adding fun designs.
Skill Development: This project is an excellent way to develop your woodworking skills. It's also a great activity to do with your child, teaching them how to make a study table for kids and valuable DIY skills.
Satisfaction: There's a unique sense of satisfaction that comes from creating something with your own hands. Your child will be proud to use a chair that you built for them.
Materials and Tools You'll Need
Materials:
Wood: Pine, plywood, or any sturdy wood you prefer.
Wood Screws: Ensure they are appropriate for the thickness of your wood.
Wood Glue: For added strength.
Sandpaper: Various grits (80, 120, 220).
Paint or Stain: Optional, for finishing the chair.
Tools:Saw: A hand saw, circular saw, or jigsaw.
Drill: For creating screw holes.
Screwdriver: Manual or electric.
Clamps: To hold pieces together while glue dries.
Measuring Tape: For accurate measurements.
Pencil and Ruler: For marking cuts.
Safety Gear: Safety glasses and ear protection if using power tools.
Step-by-Step Guide to Building a DIY Kids Chair
Step 1: Plan and Measure
Start by determining the size of the chair you want to build. A good height for a child's chair seat is around 12 inches, with a backrest height of 20-24 inches. Sketch out your design, including the seat, backrest, and legs. Precise measurements are crucial to ensure stability and comfort.
Step 2: Cut the Wood
Using your saw, cut the wood pieces according to your measurements. You’ll typically need:
2 pieces for the back legs and backrest (around 20-24 inches long)
2 pieces for the front legs (around 12 inches long)
2 pieces for the seat sides (around 10-12 inches long)
1 piece for the seat itself (around 10x10 inches)
2 pieces for the seat supports (around 10 inches long)
Step 2: Sand the Edges
Once all your pieces are cut, sand the edges with 120-grit sandpaper to smooth out any rough spots or splinters. Follow up with 220-grit sandpaper for a finer finish. This will make the chair safer and more comfortable for your child.
Step 3: Assemble the Seat and Legs
Position the four leg pieces around the seat piece, with the legs standing vertically. The seat should sit on top of the legs. Apply wood glue to the top of each leg where it will touch the seat, then place the seat on top.
Pre-drill holes through the seat into each leg to prevent the wood from splitting. Secure the legs to the seat using wood screws. Make sure the legs are straight and evenly spaced.
Step 5: Add the Seat and Backrest
Attach the seat to the frame using screws and wood glue. Ensure it is centered and level. Then, attach the backrest pieces to the back legs, making sure they are at the desired height and angle. The backrest should be securely fastened to provide support.
Step 6: Reinforce and Secure
Add the seat supports underneath the seat, attaching them to the front and back legs. This will provide additional stability and strength. Double-check all joints and screws to ensure everything is tight and secure.
Step 7: Finish the Chair
Sand the entire chair again, focusing on any rough edges or uneven surfaces. Once you’re satisfied with the smoothness, you can choose to paint or stain the chair. This step is optional but can add a personal touch and protect the wood. If painting, consider using non-toxic, child-safe paint.
Step 8: Final Inspection
Inspect the chair for any loose screws or joints. Ensure all parts are securely fastened and the chair is stable. Test the chair by applying weight to it gently to confirm its sturdiness. This is especially important if the chair will be used with a study table for kids to ensure their safety and comfort.
Tips and Tricks
Safety First: Always wear safety goggles and work in a well-ventilated area. If you're working with your child, supervise them closely, especially when using tools.
Take Your Time: Rushing can lead to mistakes. Take your time to measure accurately, cut carefully, and assemble each piece with precision.
Get Creative: Personalize the chair with your child's favorite colors or add fun designs. You can even let them help with the painting or decorating process.
Measure Twice, Cut Once: Double-check your measurements before cutting to avoid mistakes.
Involve Your Child: If age-appropriate, involve your child in the process. They can help with sanding, painting, or even simple assembly tasks.
Conclusion
Building a DIY kids' chair is a fulfilling project that combines creativity, practicality, and skill. By incorporating elements of kids' room decor in Delhi, you can create a beautiful, sturdy chair that your child will love. Not only will you have a unique piece of furniture, but you'll also have the satisfaction of knowing you built it yourself. So gather your tools, pick your materials, and start building – the perfect kids' chair is just a few steps away!
0 notes
Last Seen Blogs

sugartrashpancake
jazzy

anabeatriz01
"nem tudo faz sentido as vezes "...

buscandoescuchar
Escucha.

mcnelly
walk the line

iralikesbelly
+65 Belly Central