#port forwarding tutorial
Explore tagged Tumblr posts
Visit Tumblr Blog
Explore Tumblr blogs with no restrictions, modern design and the best experience.
Last Seen Tumblr Blogs


Fun Fact
Tumblr has 411 employees.
Text


2024/06/22 Blog post by Wakana 横須賀ジブリ編その2!〜ラムネと油屋と運動会〜
❗This is Fan Club EXCLUSIVE content❗ ❗PERSONAL USE ONLY❗ ❗Do NOT SHARE on other sites❗ ❗Join her FAN CLUB! Check out my detailed TUTORIAL ❗
Yokosuka Ghibli Edition Part 2!〜A Ramune, a Bathhouse Aburaya and a Sports Competition〜
As mentioned in my last blog post, my friend and I went to see the “Toshio Suzuki and Ghibli Exhibition”. We were so engrossed by everything in the exhibition that we didn't notice we were thirsty💦 When we left the museum and took a little breather, we finally realised how incredibly thirsty we were!! We saw some Ramune being sold outside the museum and were immediately drawn to it🌊 It's been a while since I've had Ramune~♪ Cold Ramune!! When I was drinking it, it made me feel like I was part of a TV commercial for Pocari Sweat. "Hiyaaaaaaah~ I feel so revived". Ramune has never tasted better than on that day...Just imagine, sitting under the blue sky, a fizzy Ramune quenching your thirst and soothing your dry throat...it was too good... Everyone, please try it as well..😭✨
Hello, this is Wakana (0 ̄▽ ̄0)/
This time, I'll share "Yokosuka Ghibli Edition - Part 2" with you\\\\٩( 'ω' )و ////! After leaving Yokosuka Museum of Art we hurried to Mikasa Terminal. My friend needed to run some errands in the afternoon so we had to part ways early...😭 She was also really looking forward to going to Sarushima so we are planning to come back someday soon✨
Now, this is what Mikasa Terminal looked like. Look at this huge banner for the "Bathhouse Aburaya Annex" When I went inside, the Ōtori-Sama were taking a bath🐤🐤🐤 There were no other visitors, so I asked the staff to take a picture for me🤗 (=> a picture of a woman traveling alone who also happens to be a hardcore Ghibli fan.) Next up you were able to play a Spirited Away AR game by holding onto the iPad that was installed in front of the big bathtub. When you look through the screen, some images will appear. (At one point, a note appeared which seemed to have been issued by Kamaji, when I clicked on it hot water came was splashing on the screen.) You have up to ten chances to take a picture! When No-Face suddenly appeared from afar, I was really surprised and took multiple photos! (Here are all the photos I took with the iPad. I was able to download them later) Anyway, it was a lot of fun 😂
After that, I went up to the second floor. Wow, it really did look like a bathhouse! Oshira-sama was not on the elevator with me. On the second floor, there was something called a "No-Face AR" but... I didn't really get how it was supposed to work *laughs* Initially, I thought I could become No-Face and control the images on the screen with my movements but that wasn't the case. I just watched money overflow endlessly from No-Face's hands and tried to scoop it up with my arms 😂 There was so much money... 🤣 (Maybe it wasn't that exciting because I had no one there with me)
Once I was finished there, I went to Sarushima but since this is the final part of me writing about my Ghibli adventures, I'd like to briefly share some photos of the stamp rally I did when I came back from Sarushima 😊Please forgive me, from here on out it's just a picture spam of me working hard to finish the stamp rally 😂😂 Thank you for your understanding 😂 First of all, I got the cardboard for the stamps at the Yokosuka Museum of Art!! ! Look! I was able to collect four stamps in total thanks to my willpower. Although I had collected the stamps, I didn't have the time or energy to go back to the place where I could get my prize stickers😂 It was too much to do in one day~🫠 It's a pretty large area😇 I got the first stamp at Mikasa Terminal! The second one was at Ichigo Yokosuka Port Market! It's pretty close to the terminal. There are many restaurants and souvenir shops in the large facility.😊I wanted to do one more stamp so I decided to take a short break. I had some cider😂 My energy was restored in just five minutes so I hurried to the next location! There it is😊 At Lawson😊 At that point, I was suddenly overcome with a mysterious fighting spirit that said, "you've come this far, you have to get another stamp!" Ignoring my exhaustion, I went to a final location. Here it is😊 MORE'S CITY at Yokosuka Chuo Station! Thank you, Chihiro, for waiting for me...😭✨ This felt like a true sports competition🤣🤣 I made it to the finish line safely!! But I felt completely drained on my way home😇
Al right, that's officially a wrap for "Yokosuka Ghibli Part 2"! I actually have a lot more photos from the Ghibli exhibition😂But I feel like it's time to stop now😂 I'll post them if I get the chance💓
I'll leave it at that for today!! The next Yokosuka blog post will be about Sarushima-Monkey Island!
See you soon~☆( *'▽'*)/
***Wakana***
2024/06/27 Instagram post by Wakana
#kalafina#wakana#wakana blog#botanical land#fan club exclusive content#long overdue#now I kinda wanna go to Yokosuka
20 notes
·
View notes
Note
hey sorry if this isn't something you normally do but do you or any of your followers have any resources on how to start playing Mutants and Masterminds? I started a superhero game in an indie system that the developers dropped and my group has been trying to move it over to M&M but the system is confusing us (probably because we're trying to port things over, but still).
I’m definitely going to need some help from my followers here, so I’m pushing this forward in the queue. For now, let’s talk about what I found that might be helpful.
Weeknight Hero’s Video Tutorials Weeknight Hero has a series of video tutorials teaching various aspects of M&M, including a playlist for Character Creation and Campaign Creation. They also have examples of creating specific well-known characters, as well as some reviews of combat. There’s just a lot of content here, but none of the videos look terribly long, so if you’re able to sit down and watch a few videos, this might be helpful for you.
Free Ronin Green Ronin appears to have a database of all of their free Mutants & Masterminds content for 3rd edition, including character sheets, example characters, and free adventures. There’s a lot of example characters here, which might be helpful in playing a simple one shot to get used to the system.
Hero Lab Character Creation Looking through the M&M Reddit forums, it looks like the online community swears by the Hero Labs app for help in character creation. It looks like you have to pay for the online M&M data needed to make characters, so this is probably only helpful if your play group is willing to put a little bit of money towards the software. Then again, if character creation is what’s really making things difficult, it might be worth the cost.
The Mutants & Masterminds Reddit Wiki. There’s a whole list of resources for new players and GMs on the M&M reddit community, including character creation examples, different character sheets, sample characters, and tips for new GMs.
D20HeroSRD Wiki This is an open-access wiki that has a lot of breakdowns for various elements of Mutants & Masterminds. There’s pre-made archetypes here to take a look at, a glossary of terms for folks who are having a hard time parsing things in the book, and breakdowns of gadgets, gear, vehicles, and other things that your characters might want to have (and use) in your game.
I hope you found this helpful!
38 notes
·
View notes
Text
Godot Tutorials Complete
I have finished the tutorials for Godot, and I am very happy with some of the utility that is already obvious to me here!
Honestly, the only thing I am currently "missing" from Unity is the whole "animation layer" system. It was nice to be able to have multiple animations playing for an entity at once in J'ardscape, so that the arms and legs could be up to different things. Also those blend trees so it seemlessly shifts between running and walking... So far I haven't seen an obvious way for that to happen in Godot, but the 3D tutorial wasn't exactly all that involved with regards to animation.
While that'll mostly be important to figure out with when I inevitably port J'ardscape over to Godot, it is something that I would like for my video devlog project. Like, the idea is that it's a theoretical N64-era game, sure, but... The best part of retro-design is taking the nice things that you remember about those old games, but being able to skirt a bit on the exact limitations. Like, I think animation bones weren't quite a thing yet, but I am sure animating Locca with them...
But like, blending animations wasn't really a thing back then, I think, so like... If I want Locca to put her weapon away while moving, I suppose I can make a unique animation for that as opposed to scripting an extra animation to override her arms or something? But we'll see as I dive in further.
And yes, name drop of our little protagonist for the not-Ocarina of Time, currently being called "Journey to Loguo" I guess. I look forward to making our first dev video where she almost assuredly will just be a little gray capsule.
#indie dev#game dev#devblog#game design#indy dev#indie game dev#indie developer#game development#indy games#godot engine#j'ard#Journey to LoGuo
21 notes
·
View notes
Text
Updating a Classic
As the years go on, the tides of time continue ever on as well, and as such, the tools we use ebb and flow in popularity. With it comes the tides of change, and that's the end of the poetical ocean theme for the moment. Unless if I can think of a way to keep it flowing. (HA! See what I did there??)
Anyway, lol.
With it comes the banner size requirements for the Big Bang going forward. It used to be specified for LiveJournal, and then it got ported over to tumblr, and now it supports a different size. Bigger is always better. Right?
Old size: 540 x 250
New size: 1280 x 720
Size chart for easy use! This image is exactly the pixel count, so feel free to download it and wipe the image/cover it up with your own to make your banner if you wish.
(NOTE: This change is for the Mass Effect Big Bang only; all the other fandom Bangs out there are run by different people and they all have their own different requirements and specifications)

Everyone participating gets the size chart and the mockup banner in their ‘meet your mebb partner’ email, but we will leave them here, too, because admin doesn’t have time right now to change the FAQ, and rules. (The rule still stands, though; you still need to make a banner, and it still need to be in a easy to read font. It’s just the size that changed.)
This is a mockup of a banner, just to show everyone what we mean when we say the text must be easy to read. You want people to notice your story banner, not die from overstimulation of their neurons, or wonder what the F they are looking at.

If you don’t know how to make a graphic banner, from either your art, or something else – or you don’t do trad art, but interpretive dance... well, both Azzy and Potions have made many banners for people over the years – and you always have that solution, to ask us to make one.
As an aside, if there is interest, we can put together a tutorial on how to create a banner. Just let us know here, or on Discord.
Happy Banging!
5 notes
·
View notes
Link
#autoSSL#Automation#cloud#configuration#containerization#DevOps#Docker#HTTPS#Let'sEncrypt#Linux#networking#NGINX#proxyserver#reverseproxy#Security#self-hosted#servermanagement#systemadministration#TLS#Traefik#webserver
0 notes
Text
[Review] Zool Redimensioned (PS4)

A retro revival done right.
In 1991, the successful Sheffield-based dev house Gremlin Graphics released a mascot platformer starring a gremlin ninja on the Amiga. It was popular enough to score a quick sequel (contracted out to short-lived studio The Warp Factory), followed in the pipeline by a boatload of ports to other contemporary systems. Zool burned bright but burned out fast and within a few years he was just another forgotten 90s mascot.
Fast forward nearly three decades and Gremlin Graphics is no more. One of its successor studios is the prestigious Sumo Digital. Sumo operates a graduate programme for young devs to get a foot in the door, called Sumo Digital Academy. The Academy works on smaller projects and can then release a commercial product to be proud of while gaining valuable experience. One such project is a remaster/remix/rework of Zool… specifically the Mega Drive version, which is in many ways more fully realised than the Amiga original.

Recently on stream I covered the Mega Drive Zool, as well as the Master System and Game Boy conversions, as well as the sequel on Amiga CD32 and Jaguar. Ostensibly this was to assess the games as Sonic clones or competitors, which is a comparison sometimes made online. From my experience (and briefly checking the Amiga and SNES versions) the Mega Drive is maybe the most Sonic-esque with what I feel is slightly more emphasis on inertia and slopes, but it’s not really trying to be a clone.
The Amiga feels like a good home for it, with its British/Euro sensibilities: loads of items to pick up, secrets to find, and a quirky setting. Zool can slide and spin jump to attack enemies, which are a bit like Sonic’s spin attack, but mostly you’ll be mashing the attack button which fires projectiles. He can also climb walls; this is a feature backported to most of the post-Amiga conversions [except the GB version] from the sequel, as originally he could only cling and wall jump.

As you venture through surreal worlds heavily themed around eg. sweets, or toys, or power tools you’re aiming to grab a certain percentage (depending on difficulty setting) of all the myriad pickups scattered around before the exit will unlock. The levels can get pretty varied, with verticality, branching paths, and exploration involved; the Master System version in particular pulled some clever tricks. The worlds end in a boss fight with an appropriately themed nasty, with highlights including a punk banana in fruit world or a nightmarish clown in funfair world. The fights themselves are universally underwhelming though, and after the final boss (a flying cactus), the game ends abruptly without a confrontation with the purported big bad Krool.
And so we come to Redimensioned. As retro remakes go, this makes a lot of changes to make the game more palatable (and less crushingly difficult), while keeping the original level design and graphics. The biggest change is zooming the screen way, way out, which I absolutely adore. It’s a game changer for a game which felt originally felt cramped and brutal in dealing out damage. They’ve also added a double jump which feels natural and lovely, letting you cover more of this wide open screen and aiding in the platforming.

It’s clear they’ve re-examined the game and made big tweaks in the name of modernity and accessibility without being precious about it. There’s a new tutorial level that also ties into the story nicely. You have 5 hit points rather than 4, the timer has been eliminated, and I’m pretty sure enemies drop health refills more often. You don’t even need to get an item percentage to exit a level anymore! Lives are still a factor but thanks to the changes I had over 30 to spare by the end of the game. There’s also some nice assist options like invincibility, infinite jumps, and turbo fire if needed. Or, if you prefer a more authentic experience, there’s a mode that requires items, removes the double jump, and you can even adjust the screen size.
The game feels modern in other ways too, like the level select. This also displays new badge rewards for getting all the big item pickups, and doing deathless runs and speedruns. The new bestiary adds some lore as well as cheekiness, and the PS4 release saw the addition of a party mode (also added via update to the Steam version). This is a local multiplayer-only thing which has three different minigames in single-screen arenas, while you’re assaulted by the game’s bosses. It seems like it could be a laugh with the right group.

There are a few small things missing; the original had an arrow point you to the goal, but it’s not as necessary with the improved screen real estate. Gone too is the bizarre Chupa Chups branding that permeated world 1; their logo was slapped all over the original game (even more so in the sequel), in a way that never really felt natural.
The biggest change to the game’s content is the boss fights, which have all been reworked in some way. The screen size changes the feel of this fights and they’re not as brutal, but to compensate they have inventive new attack patterns or phases, like the jackhammer coming back for a surprise second round, or the toy robot summoning waves of enemies during the fight. These are great but even better is the ending, which sort of has a proper throwdown with Krool finally! Ok, so he’s just a pair of eyes in the background but it gives the game more of a real conclusion at last.

This redo retake is built directly on the Mega Drive version, which is probably the right choice with its expanded features and lovely crunchy soundtrack… but I was hoping that the other versions would get a nod in some way. I think they all had unique level designs! The sequel is also ignored entirely, sadly. I was hoping for at least a playable Zooz (the female equal partner from Zool 2), but no. Not even in the party mode which instead puts funny heads on multiple Zools.
I do really love how much they were able to smooth out this kind of creaky game and make it feel fresh while in turn giving it a lot of respect. I just always want more from these retro rehashes, but the scope of this was taking what’s likely the best version of Zool and rethinking it, making it the best it can be within the bounds of that specific version. And I can respect that.
1 note
·
View note
Text
Discover the Dark Secrets of Whispers of the Eyeless

Whispers of the Eyeless dark fantasy strategy RPG game demo is due to hit Linux and Steam Deck with Windows PC. Thanks to the creativity of Evil Gingerbread Studio. Due to make its way onto Steam soon. Whispers of the Eyeless is an upcoming dark fantasy strategy RPG that’s already getting attention. And it’s certainly easy to see why. Developed by Camlann Games and Evil Gingerbread Studio, this game is led by Venris, who you might know from the massively popular overhaul mod for Total War: Warhammer—SFO. So now, the team is back with a new project, and it's shaping up to be something special.
Yes! Currently playable on Steam Deck. Devs are testing Linux compatibility currently for the demo ahead of Next Fest.
When I reached out to Evil Gingerbread Studio, they confirmed plans for a Whispers of the Eyeless Linux build. For now, the game is playable on Steam Deck through Proton. It’s built on Unity, and it’s great to see the studio committed to a Linux and Steam Deck port, including support for the demo. However, the final decision for the demo will also depend on how testing goes.
Whispers of the Eyeless Announcement Trailer
youtube
Here’s some more good news: Evil Gingerbread Studio is going to be at Steam Next Fest this month. The demo will be available from October 14-21, along with a live developer stream to answer any burning questions you’ve got. So, what’s Whispers of the Eyeless all about? Imagine a mix of Darkest Dungeon, Loop Hero, Children of Morta, and a touch of Polish folklore. In this game, you’re leading a dark cult in the medieval city of Aranthor. Your mission? Infiltrate the city, build up your secret sanctum, fight in tough turn-based battles, and ultimately bring the Dead Gods back to life. You’ll have a lot on your plate—upgrading your base, customizing characters, and going on quests that push the story forward.
Here’s why this game stands out from others in the genre:
Art Style: The dark comic art really makes the world of Aranthor come to life.
Deep Character Customization: Tons of ways to level up your characters and adjust your strategy.
Base Building: You’ll improve your sanctum and level up your cult for some long-term rewards.
Unique Quest System: Whispers of the Eyeless offers a quest progression system that keeps things fresh.
Loads to Discover: Hundreds of skills, powers, items, upgrades, and locations to find.
Satisfying Endgame: The final goal? Complete city domination.
Fans are already — so much so that Whispers of the Eyeless finished a 500% funded Kickstarter campaign. Which is helping to bring it to Early Access and beyond. Slava Heretz, CEO of Camlann Games, couldn’t be more excited. He’s been hooked on the demo for a while, saying, "From the art style to the gameplay loop, I’ve been playing non-stop. The nine different character classes each bring something new, and they’re all a blast to play!" Also, for the upcoming build, expect about an hour of gameplay. You’ll get a taste of the tutorial and five quests (including part of the main story). You can try out three of the character classes depending on the path you choose. If this sounds like your kind of thing, keep an eye out for Whispers of the Eyeless to hit Early Access late 2024 or early 2025 on Steam and GOG. Also, don’t miss the chance to check the dark fantasy strategy RPG out at Steam Next Fest this month. Due to be playable on Linux and Steam Deck, and Windows PC
#whispers of the eyeless#dark fantasy#strategy rpg#linux#gaming news#evil gingerbread studio#ubuntu#steam deck#windows#pc#unity#Youtube
0 notes
Text
Stalker. Progress, Final. Part 5.
The mesh is ready for baking, which means - it's time to texture it!

I started making super simple materials across the texture - by arranging the colours, roughness and stuff. With that, I could maintain the overall design and quality across the model.
After that, I started working with the hood. After looking at the reference, I decided to slightly move away from the reference, as the overall composition of the mask was a little strange - with having exotic, alien, clean parts, and of course the inability to maintain the structure of the work through the piece (with the left filter being metallic gold while the right one being more plastic greenish). I did however enjoy the shading of the central part, the metallic shade of the mask and I wanted to experiment and try to bring that.
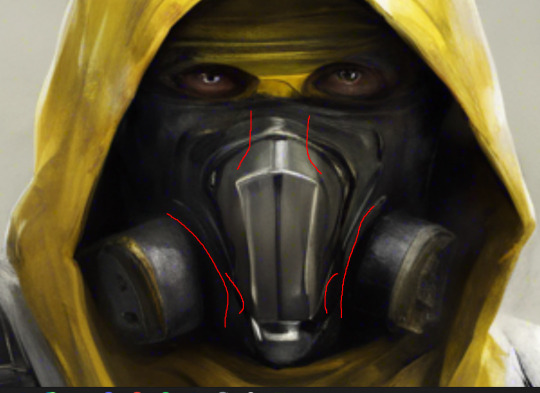
With the dust effect, I wanted the upward and empty spots on the mask to be clean, while the sides and ports were dirtier, while also the edges of the mask to be scratched. I did my best in order to bring those effects in - but by trying to make it reasonable, this is what I got, since too many effects would have made it too confusing.
With other mask components - I tried to make the cover out of soft plastic-like material, the port hard plastic with a blue colour, and the strap out of the blue synthetic material, mixed with some dirt. For the filters themself, I wanted to bring all the details through the normals, and after trying to do that - I figured I should have modelled more simple details before applying normal images, as it looks very confusing: The normal maps do fill in the empty spaces with detail, but the shade itself looks weird, with a monotone colour. The shade itself looks even more weird when the character faces forward, but I decided to let it be, as I had the rest of the clothes to work on.
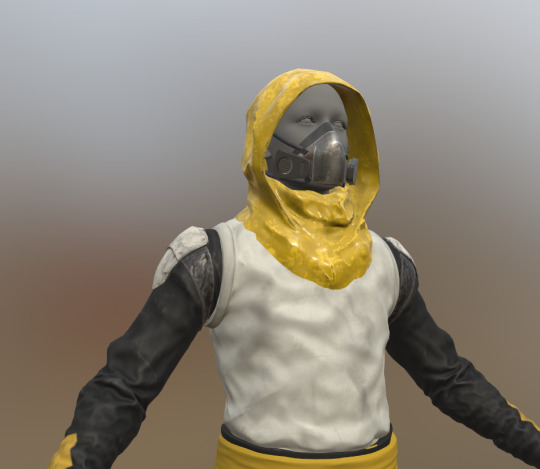
For the hood itself - I wanted to make the fabric look a little more dirty, as the characters spend a lot of time outdoors. However, the challenge is that in my understanding - dirt does not stick that easily to nylon, but rather the dirt look can be acquired through the damage effects. After some time, I tried to bring the same effect into the hood, but through my work I only made it look more metallic. I will think about how to work on that later on, but for now - I will leave it be.


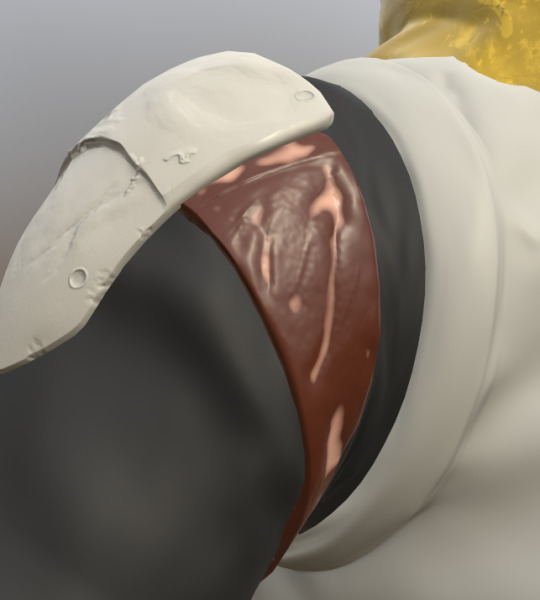
Then I decided to work on the shoulder pads - Initially, I wanted the belt to be made of brown leather-like material, but it did not go well with the overall colour palette of the colour, so I decided to paint it black. I have been thinking about the material for the knee pads themself - while in the reference they looked like a combination of steel and plastic, I already applied some metallic sculpt brushes into the model, so I decided just to roll with that by adding some black damage and corrosion to the edges.

When designing the clothes themself, I wanted to make clothes dirty, scratched and used. For the pants and arm sleeves - I made a bundle of simple smart materials with makes, corrected by various filters and such. I used the cloth masks in the first order, while having some dust and scratch effects as an upper layer in a thinner detail. I also wanted the pants to be more dirty and damaged at the bottom, due to the climbing, sneaking and creeping. In order to get the yellow lines - I just used the masks and simple straight painting in order to get the colours, and by putting the colours into the last order - they got applied with all the effects. During the overall shading - I wanted to maintain a colour balance of the whole mesh - not to absolute perfection, as that would look strange - but rather to the acceptable ranges.
In order to apply some folds and other kinds of cloth details - I used some tutorials, where authors place various alphas onto the model. (Special thanks to Nina Shaw - GameArt (2021) for the tutorial.) After the tutorial - I figured that I could add some passive fold generators into some of the parts, and on the other locations just use alpha images. I figured not to mix them together, since having multiple folds in one spot makes it look weird.
youtube
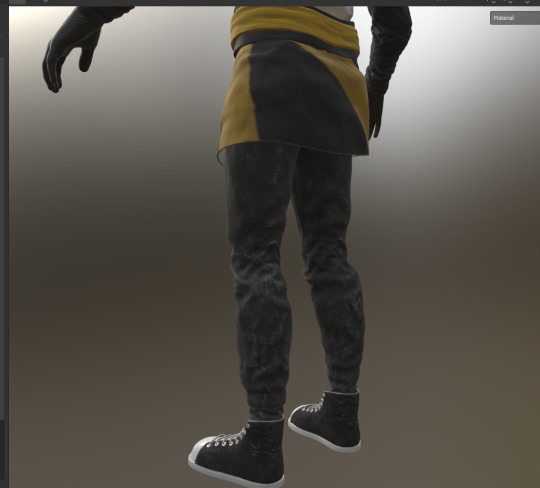
Shoes and boots were easy to make, since they already looked good before shading.
For boots - since they are made of multiple disconnected meshes, I just had to assign each mesh its own texture. I had to use alphas and masks in order to separate some segments, but it was easy since it was just a straight line. I checked the original Converse boots as a reference, tried to follow it, and applied some extra effects, familiar to the pants, but to a minimal level - since they are different materials.
For gloves - I used an existing pre-made material, looked over how they were made, and tried to not copy, but follow the overall structure, in order to know am I missing.
With that, the mesh is finally ready. I decided not to rig it for a moment, since I wanted to focus on making sure the rest of the assets were ready for the delivery.
References:
Blightymilitaria.com. (2024). Original 1950s British Rubberised Raincoat Macintosh by ‘Greengate’. [online] Available at: https://www.blightymilitaria.com/en-GB/1950s/original-1950s-british-rubberised-raincoat-macintosh-by-greengate-/prod_55201 [Accessed 3 Aug. 2024].
Schneider, S.R. (2015). Trench Coat Guide. [online] www.gentlemansgazette.com. Available at: https://www.gentlemansgazette.com/trench-coat-guide/. [Accessed 3 Aug. 2024].
Nina Shaw - GameArt (2021). How to Add Wrinkles and Folds in Substance Painter. [online] YouTube. Available at: https://www.youtube.com/watch?v=VFlO5qx5oS4 [Accessed 3 Aug. 2024].
0 notes
Text
OPNsense Port Forwarding Tutorial Step-by-Step
OPNsense Port Forwarding Tutorial Step-by-Step @opnsense #opnsense #portforwarding #selfhost #selfhosting #networkaddresstranslation #homelab #firewall #cybersecurity #virtualization #networking #opensourcefirewall
Port forwarding is a feature that allows you to answer outside traffic requests for a certain service even though the server lives on the internal network. OPNsense is a great open-source firewall that has many features like port forwarding to control traffic and user requests. I will take you through the steps to port forward in OPNsense. Table of contentsWhat is port forwarding and how does it…
0 notes
Text
does nord vpn allow port forwarding
🔒🌍✨ Get 3 Months FREE VPN - Secure & Private Internet Access Worldwide! Click Here ✨🌍🔒
does nord vpn allow port forwarding
NordVPN port forwarding policy
NordVPN is a renowned name in the realm of virtual private networks (VPNs), offering users a secure and private online browsing experience. Among its array of features is the option for port forwarding, a functionality highly sought after by advanced users and businesses alike.
Port forwarding allows users to redirect internet traffic from one port to another, enhancing accessibility and facilitating specific tasks such as hosting servers or accessing devices remotely. NordVPN's port forwarding policy is designed to provide users with flexibility and control over their network connections while maintaining robust security measures.
One of the key aspects of NordVPN's port forwarding policy is its compatibility with a wide range of devices and platforms. Whether you're using Windows, macOS, Linux, or mobile devices running iOS or Android, NordVPN offers seamless integration of port forwarding functionality, ensuring that users can leverage it regardless of their preferred operating system.
Additionally, NordVPN prioritizes user privacy and security, ensuring that port forwarding activities do not compromise the anonymity and confidentiality of user data. By encrypting internet traffic and employing advanced security protocols such as OpenVPN and IKEv2/IPsec, NordVPN safeguards users' online activities while still allowing them to benefit from port forwarding capabilities.
Moreover, NordVPN provides comprehensive guides and tutorials to assist users in setting up and configuring port forwarding for their specific needs. Whether you're a novice user or a seasoned IT professional, NordVPN's resources make it easy to harness the power of port forwarding without any hassle.
In conclusion, NordVPN's port forwarding policy embodies its commitment to empowering users with advanced networking capabilities while prioritizing security and privacy. Whether you're looking to host servers, access devices remotely, or optimize your online experience, NordVPN offers a robust and user-friendly solution for all your port forwarding needs.
NordVPN port forwarding capabilities
Title: Exploring NordVPN's Port Forwarding Capabilities
NordVPN is renowned for its robust security features, ensuring users' online privacy and anonymity. However, beyond its encryption and server network, NordVPN also offers advanced functionalities like port forwarding, enhancing users' online experience and versatility.
Port forwarding is a technique used to allow external devices to connect to specific services or applications within a private network. NordVPN's port forwarding feature enables users to access these services securely over the VPN connection.
One of the primary advantages of NordVPN's port forwarding is its ability to bypass network restrictions and firewalls. By redirecting traffic through specific ports, users can overcome limitations imposed by their internet service provider or network administrator, enabling seamless access to various online services.
Moreover, NordVPN's port forwarding enhances online gaming experiences. By opening specific ports, gamers can improve connectivity, reduce latency, and prevent disconnections during multiplayer gaming sessions. This feature is particularly beneficial for gamers who encounter connectivity issues due to network configurations or ISP restrictions.
Additionally, NordVPN's port forwarding is useful for individuals hosting servers or accessing remote devices. Whether running a personal website, hosting a gaming server, or accessing a home security system remotely, port forwarding ensures secure and reliable connections, even while connected to NordVPN's servers.
NordVPN's port forwarding capabilities are easy to set up and customize through its user-friendly interface. Users can select the desired port or allow NordVPN to automatically assign one, streamlining the process for both novice and experienced users alike.
In conclusion, NordVPN's port forwarding feature enhances users' online activities by providing secure and reliable access to services, gaming servers, and remote devices. With its ease of use and effectiveness, NordVPN continues to solidify its position as a leading VPN provider, catering to the diverse needs of its users.
NordVPN port forwarding restrictions
NordVPN is renowned for its robust security features and privacy protection, but users often encounter limitations when it comes to port forwarding. Port forwarding is a crucial aspect of VPN services, enabling users to establish secure connections for various purposes such as gaming, file sharing, and remote access.
However, NordVPN imposes restrictions on port forwarding for several reasons. One primary reason is to maintain network integrity and prevent abuse. By limiting port forwarding, NordVPN aims to mitigate potential security risks and ensure the overall stability of its network. This restriction helps prevent malicious activities such as DDoS attacks and unauthorized access to sensitive systems.
Another factor contributing to NordVPN's port forwarding restrictions is the shared IP infrastructure. NordVPN operates on a shared IP model, meaning multiple users are assigned the same IP address simultaneously. This setup enhances user privacy and anonymity but complicates port forwarding, as it requires individualized port configurations for each user.
Furthermore, NordVPN's focus on user experience and simplicity plays a role in its port forwarding limitations. The service prioritizes ease of use and streamlined functionality, opting for a standardized approach to network management rather than complex customization options. While this approach may limit advanced users' flexibility, it ensures a seamless and hassle-free VPN experience for the majority of NordVPN's user base.
Despite these restrictions, NordVPN continues to evolve its service to meet user demands. While port forwarding options may be limited compared to dedicated VPN providers, NordVPN compensates with its extensive server network, fast speeds, and reliable security features. Additionally, users can explore alternative methods such as using a dedicated IP address or utilizing third-party port forwarding services to overcome these limitations.
In conclusion, while NordVPN imposes port forwarding restrictions to safeguard its network and prioritize user experience, users can still leverage its robust features for secure and private online activities.
NordVPN port forwarding setup
Port forwarding is a useful feature in VPN services like NordVPN that allows users to enhance their online security and privacy while maintaining optimal internet speeds. Setting up port forwarding with NordVPN is a straightforward process for those looking to optimize their online experience.
To set up port forwarding with NordVPN, start by logging into your NordVPN account and navigating to the settings section. Look for the port forwarding option and enable it to activate the feature. Next, choose a specific port number or allow NordVPN to automatically assign one for you.
Once the port forwarding feature is enabled, you can configure your router to forward incoming internet traffic on a specific port to your device connected to NordVPN. This step is important for users who want to access devices on their home network remotely or maximize their online security by isolating specific applications.
It's essential to note that not all servers support port forwarding, so ensure you connect to a server that offers this feature. NordVPN provides a list of servers that support port forwarding on their website, making it easy for users to choose the right server for their needs.
In conclusion, NordVPN's port forwarding setup is a valuable tool for users looking to improve their online security and control their internet traffic effectively. By following these simple steps, users can enhance their online experience and benefit from the added layer of security that port forwarding provides.
NordVPN port forwarding alternatives
If you're looking to enhance your online security and privacy with NordVPN but facing issues with port forwarding, fear not as there are alternative methods to achieve similar results. Port forwarding is a useful feature that allows incoming connections to bypass the NAT firewall and reach specific devices or services within a private network.
One alternative to NordVPN port forwarding is using a VPN service that offers dedicated IP addresses. With a dedicated IP, you get a unique online identity that can help with port forwarding requirements. Dedicated IPs are not shared among multiple users, so you have more control over your online activities and potential for forwarding specific ports.
Another option is to set up a virtual private server (VPS) with port forwarding capabilities. By hosting your VPN server on a VPS, you can have full control over port forwarding settings and customize them to your needs. This method requires more technical expertise but offers flexibility and control over your network configuration.
Additionally, some VPN providers offer specialized servers optimized for port forwarding. These servers are configured to allow specific ports to remain open, enabling faster and more reliable connections for activities like gaming, torrenting, or accessing remote devices.
In conclusion, if NordVPN's port forwarding feature is not meeting your requirements, consider exploring alternative solutions such as dedicated IP addresses, setting up a VPS, or using VPN providers with specialized port forwarding servers. By experimenting with these alternatives, you can find a method that best suits your needs for a secure and customizable online experience.
0 notes
Text
does cox router support vpn
🔒🌍✨ Get 3 Months FREE VPN - Secure & Private Internet Access Worldwide! Click Here ✨🌍🔒
does cox router support vpn
Cox router VPN compatibility
In the digital age, maintaining online security and privacy is of utmost importance. One way to enhance your online security is by using a Virtual Private Network (VPN) while browsing the internet. VPNs encrypt your internet traffic, making it harder for third parties to track your online activities.
If you are a Cox internet subscriber and want to use a VPN, you may be wondering about the compatibility of Cox routers with VPN services. The good news is that most modern Cox routers are VPN compatible. This means you should be able to configure your Cox router to work seamlessly with your preferred VPN service.
Setting up a VPN on your Cox router may require some technical know-how, as you will need to access the router's settings to configure the VPN connection. You may need to obtain specific details from your VPN provider, such as the server address and authentication credentials, to complete the setup process.
Using a VPN with your Cox router can offer several benefits, including enhanced security, anonymity online, and the ability to access geo-restricted content. However, it's essential to choose a reputable VPN provider and follow best practices for online security to ensure optimal protection.
By ensuring compatibility between your Cox router and your chosen VPN service, you can enjoy a more secure and private online experience. Take the necessary steps to set up your VPN correctly on your Cox router and browse the internet with added peace of mind.
Virtual private network support on Cox router
A Virtual Private Network (VPN) is a powerful tool that enhances online security and privacy by encrypting data and masking the user's IP address. Using a VPN on a Cox router can provide an added layer of protection for your internet connection, ensuring that your online activities remain private and secure.
Setting up a VPN on your Cox router may seem daunting, but with the right support, it can be a straightforward process. Many VPN services offer detailed guides and tutorials on how to configure their service on different router models, including Cox routers. Additionally, some VPN providers offer dedicated customer support to assist with any issues or questions that may arise during the setup process.
By enabling VPN support on your Cox router, you can encrypt all data transmitted between your devices and the internet, preventing hackers and malicious actors from intercepting sensitive information such as passwords, personal data, or financial details. This added security measure is especially crucial when connecting to public Wi-Fi networks or when accessing sensitive information online.
In conclusion, utilizing VPN support on your Cox router is a proactive step towards safeguarding your online privacy and security. With the right assistance and guidance, you can easily configure a VPN on your Cox router and enjoy a more secure and private internet browsing experience.
Setting up VPN on Cox router
Setting up a VPN on your Cox router can enhance your online security and privacy by encrypting your internet connection and masking your IP address. While Cox routers do not offer built-in VPN functionality, you can still set up a VPN by following a few simple steps.
Firstly, you need to sign up for a reputable VPN service. There are plenty of options available, such as ExpressVPN, NordVPN, or CyberGhost. Once you have chosen a VPN service, download and install the VPN application on your device.
Next, access your Cox router settings by typing your router's IP address into a web browser and logging in with your credentials. Look for the "Port Forwarding" or "VPN Passthrough" option in the router settings. Enable the necessary protocols for the VPN to work correctly.
After configuring your router settings, connect to a VPN server using the VPN application on your device. Enter your login credentials and choose a server location to connect to. Once connected, all of your internet traffic will be encrypted and secure.
Remember to test your VPN connection to ensure it is working correctly. You can do this by visiting a website that shows your IP address and location. If the displayed information matches the VPN server location, then your VPN is set up successfully.
Setting up a VPN on your Cox router is a great way to protect your online activities from prying eyes and potential security threats. With just a few simple steps, you can enjoy a safer and more private internet browsing experience.
Cox router VPN configuration guide
A Cox router VPN configuration guide can help you secure your internet connection and protect your online privacy. A VPN, or Virtual Private Network, creates a secure tunnel between your device and the internet, encrypting your data and masking your IP address. Setting up a VPN on your Cox router can be a straightforward process if you follow these steps:
Choose a VPN service: Before configuring your Cox router, you need to subscribe to a reliable VPN service. Make sure the VPN provider offers a router-compatible VPN client and provides detailed setup instructions.
Access your Cox router settings: Open a web browser on a device connected to your Cox network. Enter the router's IP address in the address bar (often 192.168.0.1 or 192.168.1.1) and log in using your router's admin credentials.
Configure VPN settings: Look for the VPN or Advanced settings in your Cox router control panel. Enter the VPN server address, VPN protocol (such as OpenVPN or PPTP), and your VPN username and password provided by your VPN service.
Save and apply changes: Once you have entered the VPN settings, save the configuration and apply the changes. Your Cox router should now be set up to route all internet traffic through the VPN tunnel.
Test your connection: To ensure the VPN is working correctly, connect a device to your Cox network and check your IP address using an online tool. It should show the VPN server's IP address, indicating that your connection is secure.
By following this Cox router VPN configuration guide, you can enhance your online security and privacy with a VPN on your home network.
VPN compatibility issues with Cox router
Title: Troubleshooting VPN Compatibility Issues with Cox Router
Using a Virtual Private Network (VPN) is a popular method to enhance online privacy and security. However, users may encounter compatibility issues when trying to connect a VPN with their Cox router. Understanding and troubleshooting these issues is crucial for maintaining a secure internet connection.
One common problem users face is difficulty in establishing a VPN connection with their Cox router. This issue can arise due to various reasons, including outdated router firmware, network congestion, or incompatible VPN protocols.
To address compatibility issues, users can start by ensuring that their Cox router's firmware is up to date. Manufacturers often release firmware updates to improve device performance and compatibility with newer technologies, including VPN protocols.
Additionally, users should check if their VPN service supports the specific protocol used by their Cox router. Some routers may only support certain VPN protocols such as OpenVPN or IKEv2/IPsec. Ensuring compatibility between the router and VPN protocol can help resolve connectivity issues.
Another troubleshooting step is to check for any network congestion or bandwidth limitations that may be affecting VPN performance. Cox routers offer Quality of Service (QoS) settings that prioritize traffic based on application or device, which can help alleviate congestion and improve VPN connectivity.
If compatibility issues persist, users may consider contacting Cox customer support for further assistance. Cox's technical support team can provide guidance on router configuration settings or recommend alternative solutions to resolve VPN connectivity issues.
In conclusion, troubleshooting VPN compatibility issues with Cox routers involves updating firmware, verifying VPN protocol compatibility, and addressing network congestion. By following these steps, users can ensure a seamless and secure VPN connection for their online activities.
0 notes
Text
Brighten Your Screen Again: Professional LED TV Repair Services

Introduction
Is your LED TV feeling a little dim lately? Don't let a lackluster screen dampen your viewing experience! A functional TV is not just a source of entertainment but also a window to the world. From binge-watching your favorite shows to catching up on the latest news, our TVs play an essential role in our daily lives. But what happens when your trusty LED TV starts acting up? Fear not! In this blog post, we'll explore the common issues that can plague LED TVs, discuss whether you should opt for a DIY fix or professional repair services, and provide tips on choosing the right experts to brighten up your screen again. Let's dive in!
The Importance of a Functional TV
Imagine coming home after a long day at work, looking forward to unwinding in front of your favorite TV show or movie. Now picture the disappointment of finding out that your LED TV is not functioning properly - no sound, no picture, just a blank screen. A functional TV is more than just a source of entertainment; it's a window to the outside world, keeping you informed and connected. Whether it's staying updated on current events, watching your favorite sports team play live, or simply enjoying quality family time with a movie night, having a working LED TV enhances our daily lives in ways we often take for granted. From news alerts to streaming services, our TVs serve as important tools for relaxation and information. Don't underestimate the importance of having a fully functional LED TV at home - it plays an integral role in our routines and overall well-being. So when issues arise with your television set, addressing them promptly through professional repair services can help maintain that vital connection to the digital world around us.
Common Issues with LED TVs
LED TVs are fantastic for providing crisp and vibrant picture quality, but like any electronic device, they can encounter issues over time. One common problem with LED TVs is backlight failures, which can result in a dark or flickering screen. This issue often requires professional repair to replace the faulty components. Another prevalent issue is dead pixels, where small spots on the screen do not display any color. While this may seem minor at first, dead pixels can be distracting and impact your viewing experience. A skilled technician can assess the extent of the damage and recommend solutions. Moreover, sound problems such as distorted audio or no sound at all can occur with LED TVs. These issues could stem from faulty speakers or internal components that need expert attention to diagnose and fix effectively. Additionally, connectivity issues like HDMI ports not functioning correctly or Wi-Fi connectivity problems might hinder your TV's performance. Professional repair services have the tools and expertise to troubleshoot these issues efficiently. In conclusion...
DIY vs Professional Repair Services
When your LED TV starts acting up, you may be tempted to try fixing it yourself. DIY repair videos and tutorials are readily available online, but before grabbing the tools, consider the risks involved. While DIY repairs can save money upfront, they can lead to further damage if not done correctly. Incorrectly diagnosing or repairing an issue can end up costing more in the long run than hiring a professional service. Professional LED TV repair services have trained technicians with experience in handling various issues efficiently. They have access to specialized tools and knowledge that ensure a proper diagnosis and repair of your TV. Choosing a professional repair service for your LED TV ensures that the job is done right the first time. It also provides peace of mind knowing that experts are taking care of your valuable electronic device.
Benefits of Hiring a Professional LED TV Repair Service
When it comes to fixing your malfunctioning LED TV, opting for professional repair services can offer a myriad of benefits. Professionals have the expertise and experience to accurately diagnose and resolve issues with your TV efficiently. They possess the necessary tools and knowledge to handle complex repairs that DIY methods may not be able to address adequately. Hiring a professional LED TV repair service can also save you time and hassle. Instead of spending hours researching solutions or attempting risky repairs yourself, you can rely on experts to quickly identify the problem and provide a lasting solution. Additionally, professionals often offer warranties on their work, giving you peace of mind knowing that your TV is in good hands. Choosing a professional repair service means receiving high-quality workmanship backed by industry knowledge. It's a smart investment in ensuring the longevity and performance of your LED TV for years to come.
How to Choose the Right Repair Service
When it comes to choosing the right LED TV repair service, there are a few key factors to consider. First and foremost, look for a service provider with experience specifically in repairing LED TVs. This specialization ensures that they have the knowledge and expertise needed to accurately diagnose and fix the issue. Additionally, check for reviews and testimonials from previous customers to get an idea of the quality of service provided by the company. A reliable repair service will have positive feedback from satisfied clients who can vouch for their professionalism and efficiency. Furthermore, inquire about the warranty offered on repairs. A reputable repair service will stand behind their work with a solid warranty policy that gives you peace of mind in case any issues arise post-repair. Consider factors such as pricing, turnaround time, and customer service when making your decision. By carefully evaluating these criteria, you can confidently choose the right LED TV repair services in Delhi for your needs.
Future Maintenance Tips for Your LED TV
To keep your LED TV in top-notch condition for years to come, regular maintenance is key. Start by dusting the screen and vents with a soft microfiber cloth to prevent buildup that can affect picture quality. Avoid using harsh chemicals or cleaning products as they may damage the screen coating. Make sure to unplug your TV before cleaning to avoid any electrical hazards. Check the cables and connections periodically for any signs of wear or damage, and replace them if needed. Keep the area around your TV well-ventilated to prevent overheating, which can shorten its lifespan. Consider investing in a surge protector to safeguard your TV from power surges during thunderstorms or electrical fluctuations. Follow manufacturer guidelines for software updates and calibration settings to optimize performance. By following these simple maintenance tips, you can enjoy crystal-clear viewing experiences on your LED TV for years to come.
Conclusion
Taking care of your LED TV by addressing issues promptly and seeking professional repair services when needed will ensure that you can continue to enjoy a bright and vibrant viewing experience. Remember to choose a reliable repair service, stay proactive with future maintenance, and keep your screen shining for years to come. Brighten up your screen again with the help of professional LED TV repair services in Delhi!
1 note
·
View note
Text
WitchSpring R coming to PS5 and Xbox One, ‘Hard Mode’ and ‘New Game Plus’ update for PC launches in February
Gematsu Source
WitchSpring R will launch for PlayStation 5 and Xbox One in addition to its previously announced Switch version, developer KIWI WALKS told Gematsu. Release dates for the console versions are not yet fixed, but a physical edition is planned.
The company also announced that it has ended its publishing contract with Pixmain by mutual agreement, and will self-publish WitchSpring R going forward.
WitchSpring R first launched for PC via Steam on September 26. The PC version will be updated with “New Game Plus” alongside “Hard” and “Very Hard” difficulty levels via a free update in February.
Get the latest details below.
1. Hard Mode Update
In the upcoming update, two new difficulty levels will be added:
“Hard” and “Very Hard” difficulty levels.
Balancing adjustments to some player skills at difficulty levels beyond Hard.
Some monster skills/patterns will be added or modified.
2. New Game Plus Update
In the next update, the “New Game Plus” feature will be added, allowing players who have completed the game to inherit their save file and start from chapter 1.
Skip the early tutorial and start the game from the middle of chapter 1.
A few monsters will only appear in New Game Plus mode.
New equipment will only appear in New Game Plus mode.
3. New Features Update
In the next update, some features will be implemented:
Story Enjoyment Feature – An option to automatically advance dialogue after voice playback ends.
Crafting Mastery – Crafting recovery potions/combat tools three times or more will yield double the items in subsequent crafting.
4. Publisher Change
As some of you may have noticed, we have recently ended our collaboration with the publisher and have decided to independently service the game. Due to this change, there will be adjustments to the overall development schedule as several complex tasks need to be addressed.
5. Post-Ending Content Schedule Change
Due to the termination of the publishing contract, all schedules involving external collaboration, such as voice recording, will be reassessed. Details will be announced once finalized.
6. Console Porting
In addition to the previously announced Nintendo Switch port, we are preparing to port the game to other console platforms.
A physical package (limited edition and art book!) is also in the works.
7. MOFUN Collaboration Merch Reservation Period Extension
Due to popular demand, the reservation period for collaboration products has been extended until February 12!
For detailed purchase information, please refer to the previous announcements.
8. Season FanArt Contest Winners Announcement
A sincere thank you to everyone who participated in the 2023 Season Fan Art Contest!
We will announce the winners of the fan art contest and the giveaway event on January 31, so stay tuned for the results!
Watch a new trailer below.
Hard Mode and New Game Plus Trailer
youtube
1 note
·
View note
Link
#Automation#backup#cloudstorage#collaboration#dataprivacy#database#Docker#filesharing#HTTPS#Install#Linux#networking#Nextcloud#Nextcloudsetup#open-source#reverseproxy#Security#self-hosted#Server#systemadministration
0 notes
Text
im gonna cry
Im tryin to setup a Minecraft server, and tried going thru a port forwarding tutorial, and got to the step "enter /stop on the server console" and now my pc wont connect to the internet.
It says "connected, secured" to the wifi, but anything that meeds internet just wont connect. YouTube, twitch, discord, Minecraft, reddit, imgur, steam, nothing is working now.
1 note
·
View note
Text
Chalkboard
One of the mechanics i want to be in the game is having potions be discovered instead of told to you. so i want to add a chalkboard or notepad were the player can document their findings on what ingredients make what potions.
youtube
Using this tutorial i was able to make a working chalkboard for the game. I learnt alot about unreal engine through this material as it covers a whole plethora of features i have never used in unreal engine. starting first with Render targets.
To the uninitiated this black square doesn't look like a lot. but it is essentially a canvas that can be referenced and rendered in real time. allowing you to draw things to it.
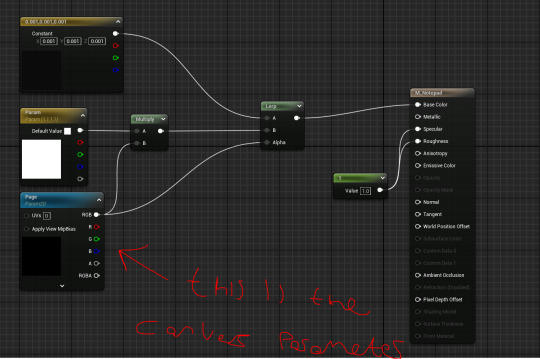
I Then made the render target into a material. aswell black and white colours that are being lerped. these colours are what the drawing colour and canvas colour are. with the render target, determining what color a specific spot on the canvas is. essentially. if you have drawn on that spot in the canvas. the material sets that spot to be white. if not, its black
Then there is the Pen/Chalk material. it gets the coordinate on the chalkboard and tells the chalkboard that that part has been drawn on. as well as giving you some parameters to control such as the size of the drawn spot.

Then there's the actual drawing part. where using a line trace it checks if you are looking at the board while holding click. then if so, it returns the exact spot on the board that you were clicking on.
then in the chalkboard it gets the spot that was drawn on, and draws that to the render target. it does this by getting the collision UV of the chalkboard object. the UV is the exact spot on the actor. and i can port that into the parameter of the pen to get the exact drawing spot.
This was all very hard to do and frustrating, i tried adding an eraser option but I have yet to figure it out. i would essentially need to reverse engineer the pen tool, yet i haven't figured it out exactly. So instead I tackled the infinitely taller tale of adding pages to the chalkboard, meaning you can have an infinite amount of drawing space, and individual pages for what you are jotting down.
This was an absolute mess of dynamic material instances. where each page would have to have its own induvial render target created for it, then stored so you can go back to the page later.

The 'Set Texture parameter value' is the materials canvas render target (CRT) being set to that certain instance of a CRT. Parameters in the material essentially act as variables but for materials. You can set them to what you want during runtime. which in this case its setting the material to use whatever selected CRT
When you spawn, it makes a new material, and canvas render target 2d. then stores those. it also adds the render target 2d to an array. then it sets the material of the board to the created chalkboard material.

Then i had to wrap my head around storing these pages in arrays, and navigating the pages. This code is for flipping forward a page. it checks the array to see if the current page you are on is the last one in the array. if it is the last page, it creates a new one using the same process as spawning a page. where it creates a CRT instance. then adds that to the array of pages, and selects that page to be the active one.
I Added Buttons to the Chalkboard to flip between.
If the page you are on isn't the last one in the array. it goes to the next stored page in the array and sets that as the active CRT.

Going back a page does the same as going forward a page, but it checks if that's the last page in the array, and if its not. it goes back 1 in the array.
This is the finished product.
I'm very pleased with how it turned out, and it took a lot of problem solving to get the pages working, I ran into a lot of problems with the arrays and learning to use dynamic instances of CRT's as well as materials.
0 notes