#progressbar
Explore tagged Tumblr posts
Visit Tumblr Blog
Explore Tumblr blogs with no restrictions, modern design and the best experience.
Last Seen Tumblr Blogs


Fun Fact
Tumblr has been providing a Korean-language service since 2013.
Text
Use the @YouTube #API to get the @videos #descriptions and #titles and save them to a #csv file.
1 note
·
View note
Text
OKAY i think i am kinda making shit work?? i made a progressbar that keeps track of the speed
but everything is fucked, i'm gonna study some realistic physics engines to make a better simulation than this cause this is bullshit, i am genuinly so annoyed with the way i code.
so i'm going to try and redo the code.. again... for a 3rd time, i think i will get it right eventually, because how many ways really are there to code smth like this??
the only thing i'm rly scared of is that i'l abandon big parts of my vision to make it easier to code so i can go back to drawing sprites, i want this game to be good, and just just "good" but also fun, i know that if i don't go all out and work on it til i think its perfect, it won't go anywhere, so i'l redo the physics again, and again until i finally get it right, if its not perfect or at least near perfect, its not gonna go anywhere.
if i get this basic stuff right, the foundation of the engine, i'l be able to add fun stuff like tricks and abilities!! but until i get that foundaion, i can't make windows and roofs yet, no matter how much i want to
#pixel illustration#programming#game development#coding#indie game dev#game dev update#pixelart#pixel art#game design#pixel game#game dev#game dev blog#game dev stuff#indie dev#game developers#indiegamedev#indie game#sprite edit#pokemon sprite#pixel sprite#sprite art#aseprite#sprite#animated sprite#pixel animation#my sprites#pixel background#pixel graphics#pixel#pixel aesthetic
16 notes
·
View notes
Text
I FUCKING LOVE PROGRESSBAR mutuals please check out progressbar95 she's my wife and i love her sososo much im normal i promise (visibly insane about this mobile game)
#she is amazing#im making her art later#posic#progressbar95#bork borf#whacked with the hyperfixation stick
9 notes
·
View notes
Text
just sat through a 2 hour progressbar of unity switching to build for android. some would call it a slow as death infuriating piece of flaming dogshit, but im paid by the hour 😌
3 notes
·
View notes
Text
How to install Adobe GenP 2023
Adobe CC 2019/2020/2021/2022/2023 GenP Universal Patch 3.0 Octomber 5, 2023 - Software Download password 333555
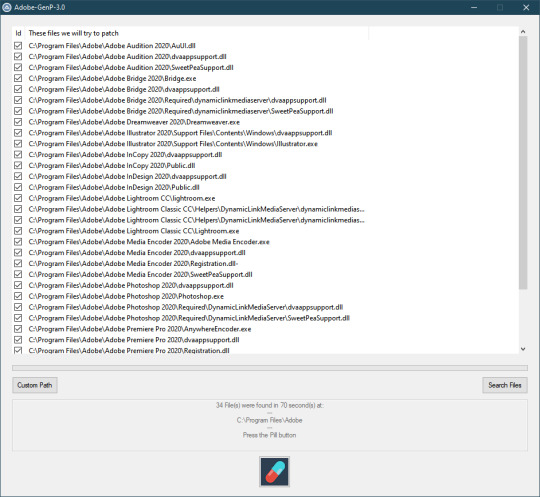
How to use GenP:
If you want to patch all Adobe apps in default location:
Press ‘Search Files’ – wait until GenP finds all files. Press ‘Pill Button’ – wait until GenP do it’s job. One Adobe app at a time: Press ‘Custom path’ – select folder that you want [depending upon the app you want to patch] Press ‘Search Files’ – wait until GenP finds all files. Press ‘Pill Button’ – wait until GenP do it’s job.
What’s New in GenP 3.0 Can patch apps from 2019 version to current and future releases. Automatic search in selected folder. New patching logic Support for all Substance products. Known Issues: InDesign and InCopy will have high CPU usage. Animate will have some problems with home screen if Signed Out. Lightroom Classic will partially work if Signed Out. Acrobat, Rush, Lightroom Online, Photoshop Express, Creative Cloud App won’t be patched or fully unlocked. Maybe in next release I’ll find solution for them. FIXES By Me:
made progressbar working
No checkbox at welcome text
nicer form size
Set dir deep level von search for files
Tags:
free adobe audition, adobe audition, adobe audition download, adobe audition cc 2022, download adobe audition, adobe audition crack free, adobe audition autotune, adobe audition crack 2022, dobe audition license 2022, adobe audition 2022 crack, download adobe audition 2022, adobe audition free, adobe audition free download, adobe audition 2022, adobe audition 2022 free, adobe audition tutorial, adobe audition crack, audition crack, adobe audition license pro
#adobe genP#adobe photoshop#adobe illustrator#adobe lightroom#adobe#adobe fresco#photoshop#graphic design#graphic art
4 notes
·
View notes
Text
Fredag 15 mars 2024
Mötte precis JS för andra gången den här veckan, han står och röker med en kaffe från 7-eleven bredvid Margareta Krook-statyn. De människor man samlar på sig genom åren blir ens crowd, ens crew, ens lokala kompisar.
Ljust, blåsigt, knastrigt på gatorna av gruset.
Fin kväll. Vi skålade i Oddbird alkoholfritt vin för att fira Bs jobb. FaceTime med morsan, bild till Fam Gang i Whatsapp. Sedan såg vi Divergent-filmen, S hade fått den tipsad av sin PI-assistent. Pizza till.
Trött nu, såsig i huvudet. Önskade att det fanns klarhet, men man fick luta sig mot tillfredsställelsen att man jobbat hårt hela veckan, tränat, utvecklat familjen, jobbat på sina svagheter och styrkor.
S peppad på Divergent-serien. Shailene Woodley bra faktiskt. Påminner mig om att jag måste se Ferrari, nya Michael Mann, den flimrade förbi på Apple eller någon av streamingtjänsterna.
Börjat se She Said, bra journalistfilm, måste vara inspelad på New York Times-kontoret, ser i alla fall exakt ut som det, minns det från någon dokumentär jag såg för 15-20 år sedan.
Cary Mulligan oerhört bra. Sugen på att se Maestro. Så mycket att se.
Borde man se fler dokumentärer? Såg en Andy Warhol-doku på Watchlistan på Netflix. Man kommer aldrig till dessa.
Progressbar på Instagram säger: 2024 är 20% complete
0 notes
Text
Why Chanakya Stands Out as the Best IAS Academy in Chandigarh

Becoming an IAS officer isn’t easy—it takes dedication, perseverance, and the right guidance. For UPSC aspirants in Chandigarh, Chanakya IAS Academy is widely known for its top-notch civil services coaching. But what truly sets it apart as the best IAS academy in the city? Let’s find out.
The following sections explain what separates Chanakya IAS Academy from other centres:
1. Experienced Faculty and Mentorship
At its core, Chanakya IAS Academy relies on its group of highly experienced faculty members to lead its academic mission. Most teaching faculty added to the academy consist of retired public servants who also act as specialists because they possess substantial teaching experience. The faculty members at this institution enable students to understand complex subjects due to their deep subject knowledge and practicality. The ProgressBar component allows students to track their progress in each subject.
2. Comprehensive and Updated Study Material
STM five UPSC candidates need to be both organised and modern to succeed in their exam preparation stage. Chanakya IAS Academy selects and provides students with an array of purposely prepared study materials that contain all necessary information about the syllabus. Aspirants obtain complete preparation through the academy, which consists of NCERT fundamentals and advanced reference books.
3. Proven Track Record of Success
The reputation of Chanakya IAS Academy stands strong because it has continuously produced first-class performers in the IAS examinations. After completing their studies at this institution, many students have succeeded in passing the UPSC examination, through which they obtained high-level positions in government services. Success becomes a constant result at the academy because of its unending dedication to academic excellence.
4. Personalised Attention and Doubt-Clearing Sessions
Personalised education at Chanakya IAS Academy functions through limited group enrolments. The faculty members direct individual focus toward each student through small class sizes. Students use doubt-clearing sessions and mentorship sessions to find and rectify their weaknesses, which generates better results in their preparation.
5. Regular Test Series and Answer Writing Practice
The main element that leads to success in the UPSC competition is steady practice. The academy runs periodic mock tests together with answer writing practice both for preliminaries and main exams while delivering interview preparation sessions to boost students' performance. The simulated examination system enables candidates to better their time handling abilities and increase their precision and confidence, which leads to improved chances of success.
6. Focus on Holistic Development
Mere studying by itself is insufficient for UPSC preparation because successful candidates must possess leadership abilities and analytical thinking along with strong knowledge about governance principles. Chanakya IAS Academy provides educational development programs, including personality development and group discussions and interview training sessions designed to help students pass their final selection process.
7. A Conducive Learning Environment
The academy sits in central Chandigarh while offering its students contemporary facilities through modern classrooms and full collections in the library in addition to technological learning devices. Students who study in this nurturing environment maintain their focus and motivated state until the end of their preparation.
Conclusion
Every UPSC aspirant needs to decide correctly on their IAS coaching institution. Chanakya IAS Academy represents the premier IAS coaching institution in Chandigarh due to its exceptional faculty members and well-organised training programs alongside dedicated teacher support and impressive student achievement statistics. Being devoted to your IAS goals leads naturally to the choice of this academy as your starting point.
0 notes
Text
Odoo Kanban Progressbar Tutorial
Odoo Kanban Progressbar tutorial shows you how to add progress indicators in Odoo Kanban Cards for improved clarity. Read our guide now! #Odoo #KanbanProgressbar #OdooDevelopmentTutorial
In this post, we detail how to add a progressbar to Odoo Kanban Cards while following an Odoo Development Tutorial approach. We explain step-by-step how you can enhance your Odoo interface with a progress indicator and meaningful color codes. We also share specific code examples, best practices, and a link to the official Odoo website for further reading. We will discuss the tutorial in detail…
0 notes
Text
LOST in CHINA's BIGGEST 'SLUM' - YouTube
youtube
I return to an urban village for the first time in a year. This time it is Guangzhou Shipai Cun. An extremely dense, dark, and vibrant community of 50,000 people. Sorry for my Chinese it's getting rusty..
Youtube insist on pushing this video to me, and I checked the comments roughly, some ones there didn't even bother to pull the progressbar.
@cristiangaban960 You can't help telling everyone how Christianity is better, that's what you're doing. Have you ever seen slums in the Philippines, favelas in Brasil, bad hoods in Eastern Europe, Russia, slums in Africa ? What are you talking about, religion has got nothing to do with it and people can have morals without being religious.
Oh, that's exactly like a story I've heared: a Belgian professor ask his new Chinese student (who telling this story on TV) "how can your people have morals without being religious". That was in the 1980s.
And by remind, the largest local religion in China is Taoism - "道教".
It's literally means "morals or ways" and "religion".
0 notes
Text
okay. so this is the player ui, its a soul bar that keeps track of how much energy the player has, it is supposed to resemble a cracked soul, but right now it just looks like a ball is stuck on top of a soul design... caus it is, to make the ui work i made a textured progressbar and wrote some code, and i'm planning to add an animation with the tail under it with a basic animation that plays every 6 seconds or smth. but right now it looks badddddd do y'll got any idea's on how to fix it??? right now the meter has 27/25 levels and i don't want the tail to be a part of the meter ,the ball is what keep s track of energy not the entire thing, the rest is just decoration. but how do i make that look.. good??
#pixel game#pixel art#game development#coding#game design#indie game dev#programming#game dev update#pixelart#pixel illustration#game dev#game dev blog#game dev stuff#game developers#indiegamedev#indie game#indie dev#animated sprite#sprite art#sprite edit#pixel sprite#my sprites#pixel
10 notes
·
View notes
Text
PULLING MANIFEST Un mero trastullo riempitivo di inutili tempi di latenza computazionali. Ovvero quando ti viene in mente una vera stronzata mentre resti passivamente in attesa che la macchina termini una lunga e complessa elaborazione. Cosa mai vorrà dire “pulling manifest”? Qualcosa di normalissimo e quotidiano per chi lavora veramente nel magico mondo dell’AI. Temo invece di avere un’audience un tantino eterogenea per aspettarmi una risposta immediata. E allora, dopo questo 11% di progressbar da quando ho iniziato a scrivere, mi verrebbe da sottoporre un test ma passerei da stronzata a stronzaggine e preferisco restare faceto. Ordunque, se… 1 - pensi di fare il superfigo della situa e ti basi unicamente sulla tua avanzata conoscenza della lingua inglese, dimostrando che conta più capire il concetto che contestualizzarlo in ambito tecnologico, allora sei già estinto! Ci sarà un perché se l’organismo del sapiens sapiens ha sempre avuto una durata media di quarant’anni. Fatti due domande; 2 - lo cerchi su Google sappi che stai per estinguerti ed è giusto così! Pensa che fai il bene della specie a cui pari appartenere; 3 - lo cerchi su ChatGPT ti ci vuole un attimo a leggere la risposta ma forse non capisci davvero completamente, soprattutto se lo hai già condizionato a dare informazioni stupide quando si tratta di tecnologia; 4 - lo cerchi su una qualsiasi AI (visto che le usi tutte, non si sa mai!) e ti senti in colpa per non esserci arrivato prima perché in fondo avevi tutti gli elementi per farcela, considera che va bene così! Ma sì, non è successo nulla di grave e io continuo a metterti la stellina adesiva perché sei un meraviglioso utente avanzato; 5 - lo cerchi su Stackoverflow devi profondamente vergognarti e mi auguro che tu abbia avuto l’impudicizia di chiederlo in un thread così ti arriveranno i commenti che meriti; 6 - lo cerchi su Github sei solo un infame infiltrato, iscrittosi unicamente per darti un tono ed un ruolo non tuoi, sottraendoli a chi ne sarebbe meritorio. Vaporizzati immantinente! 7 - lo sai veramente già e allora ti abbraccio forte, fratello! Bah, ciò scritto siamo ancora al 47%. Se vi siete annoiati finora, sappiate che lo sono molto più io in questo momento. La sola cosa che salvo è l’immagine che Midjourney mi ha creato per il post. Tanto carina quanto non c’azzecca per nulla. Eppure il prompt era chiaro e pedissequo: “pulling manifest. AI technology coding command”. Che gran suggerimento per chi sta ancora cercando…magari dentro sé stesso, epperò la risposta è…sbajata! #TWIZA @SHAKAZAMBA #AI #tecnopitechi #AIquellavera #impostori #pullingmanifest

0 notes
Link
[ad_1] with the ID “progress.” At the end of the CSS file, you’ll see it has a background color, a defined width and height, and it’s fixed at the top of the page. There’s also an animation that scales it from 0 to 1 along the x-axis — pretty standard if you’re familiar with CSS animations!Here’s the relevant part of the styles:#progress /* ... */ animation: progressBar 1s linear; @keyframes progressBar from transform: scaleX(0); The progressBar animation runs once and lasts one second with a linear timing function. Linking this animation scrolling is just a single line in CSS:animation-timeline: scroll(); No need to specify seconds for the duration — the scrolling behavior itself will dictate the timing. And that’s it! You’ve just created your first scroll-driven animation! Notice how the animation’s direction is directly tied to the scrolling direction — scroll down, and the progress indicator grows wider; scroll up, and it becomes narrower.See the Pen [Scroll Progress Timeline example - animation-timeline scroll() [forked]]( by Mariana Beldi.See the Pen Scroll Progress Timeline example - animation-timeline scroll() [forked] by Mariana Beldi.scroll-timeline Property ParametersIn a scroll-timeline animation, the scroll() function is used inside the animation-timeline property. It only takes two parameters: and . refers to the scroll container, which can be set as nearest (the default), root, or self. refers to the scroll axis, which can be block (the default), inline, x, or y.In the reading progress example above, we didn’t declare any of these because we used the defaults. But we could achieve the same result with:animation-timeline: scroll(nearest block); Here, the nearest scroll container is the root scroll of the HTML element. So, we could also write it this way instead:animation-timeline: scroll(root block); The block axis confirms that the scroll moves top to bottom in a left-to-right writing mode. If the page has a wide horizontal scroll, and we want to animate along that axis, we could use the inline or x values (depending on whether we want the scrolling direction to always be left-to-right or adapt based on the writing mode).We’ll dive into self and inline in more examples later, but the best way to learn is to play around with all the combinations, and this tool by Bramus lets you do exactly that. Spend a few minutes before we jump into the next property associated with scroll timelines.The animation-range PropertyThe animation-range for scroll-timeline defines which part of the scrollable content controls the start and end of an animation’s progress based on the scroll position. It allows you to decide when the animation starts or ends while scrolling through the container.By default, the animation-range is set to normal, which is shorthand for the following:animation-range-start: normal; animation-range-end: normal; This translates to 0% (start) and 100% (end) in a scroll-timeline animation:animation-range: normal normal; …which is the same as:animation-range: 0% 100%; You can declare any CSS length units or even calculations. For example, let’s say I have a footer that’s 500px tall. It’s filled with banners, ads, and related posts. I don’t want the scroll progress bar to include any of that as part of the reading progress. What I want is for the animation to start at the top and end 500px before the bottom. Here we go:animation-range: 0% calc(100% - 500px); See the Pen [Scroll Progress Timeline example - animation-timeline, animation-range [forked]]( by Mariana Beldi.See the Pen Scroll Progress Timeline example - animation-timeline, animation-range [forked] by Mariana Beldi.Just like that, we’ve covered the key properties of scroll-timeline animations. Ready to take it a step further?Named scroll-timelineLet’s say I want to use the scroll position of a different scroll container for the same animation. The scroll-timeline-name property allows you to specify which scroll container the scroll animation should be linked to. You give it a name (a dashed-ident, e.g., --my-scroll-timeline) that maps to the scroll container you want to use. This container will then control the animation’s progress as the user scrolls through it.Next, we need to define the scroll axis for this new container by using the scroll-timeline-axis, which tells the animation which axis will trigger the motion. Here’s how it looks in the code:.my-class /* This is my new scroll-container */ scroll-timeline-name: --my-custom-name; scroll-timeline-axis: inline; If you omit the axis, then the default block value will be used. However, you can also use the shorthand scroll-timeline property to combine both the name and axis in a single declaration:.my-class /* Shorthand for scroll-container with axis */ scroll-timeline: --my-custom-name inline; I think it’s easier to understand all this with a practical example. Here’s the same progress indicator we’ve been working with, but with inline scrolling (i.e., along the x-axis):See the Pen [Named Scroll Progress Timeline [forked]]( by Mariana Beldi.See the Pen Named Scroll Progress Timeline [forked] by Mariana Beldi.We have two animations running:A progress bar grows wider when scrolling in an inline direction.The container’s background color changes the further you scroll.The HTML structure looks like the following:In this case, the gallery-scroll-container has horizontal scrolling and changes its background color as you scroll. Normally, we could just use animation-timeline: scroll(self inline) to achieve this. However, we also want the gallery-progress element to use the same scroll for its animation.The gallery-progress element is the first inside gallery-scroll-container, and we will lose it when scrolling unless it’s absolutely positioned. But when we do this, the element no longer occupies space in the normal document flow, and that affects how the element behaves with its parent and siblings. We need to specify which scroll container we want it to listen to.That’s where naming the scroll container comes in handy. By giving gallery-scroll-container a scroll-timeline-name and scroll-timeline-axis, we can ensure both animations sync to the same scroll:.gallery-scroll-container /* ... */ animation: bg steps(1); scroll-timeline: --scroller inline; And is using that scrolling to define its own animation-timeline:.gallery-scroll-container /* ... */ animation: bg steps(1); scroll-timeline: --scroller inline; animation-timeline: --scroller; Now we can scale this name to the progress bar that is using a different animation but listening to the same scroll:.gallery-progress /* ... */ animation: progressBar linear; animation-timeline: --scroller; This allows both animations (the growing progress bar and changing background color) to follow the same scroll behavior, even though they are separate elements and animations.The timeline-scope PropertyWhat happens if we want to animate something based on the scroll position of a sibling or even a higher ancestor? This is where the timeline-scope property comes into play. It allows us to extend the scope of a scroll-timeline beyond the current element’s subtree. The value of timeline-scope must be a custom identifier, which again is a dashed-ident.Let’s illustrate this with a new example. This time, scrolling in one container runs an animation inside another container:See the Pen [Scroll Driven Animations - timeline-scope [forked]]( by Mariana Beldi.See the Pen Scroll Driven Animations - timeline-scope [forked] by Mariana Beldi.We can play the animation on the image when scrolling the text container because they are siblings in the HTML structure: Here, only the .scroll-container has scrollable content, so let’s start by naming this:.scroll-container /* ... */ overflow-y: scroll; scroll-timeline: --containerText; Notice that I haven’t specified the scroll axis, as it defaults to block (vertical scrolling), and that’s the value I want.Let’s move on to the image inside the sardinas-container. We want this image to animate as we scroll through the scroll-container. I’ve added a scroll-timeline-name to its animation-timeline property:.sardinas-container img /* ... */ animation: moveUp steps(6) both; animation-timeline: --containerText; At this point, however, the animation still won’t work because the scroll-container is not directly related to the images. To make this work, we need to extend the scroll-timeline-name so it becomes reachable. This is done by adding the timeline-scope to the parent element (or a higher ancestor) shared by both elements:.main-container /* ... */ timeline-scope: --containerText; With this setup, the scroll of the scroll-container will now control the animation of the image inside the sardinas-container!Now that we’ve covered how to use timeline-scope, we’re ready to move on to the next type of scroll-driven animations, where the same properties will apply but with slight differences in how they behave.View Progress TimelinesWe just looked at scroll progress animations. That’s the first type of scroll-driven animation of the two. Next, we’re turning our attention to view progress animations. There’s a lot of similarities between the two! But they’re different enough to warrant their own section for us to explore how they work. You’ll see me refer to these as view-timeline animations in addition to calling them view progress animations, as they revolve around a view() function.The view progress timeline is the second type of type of scroll-driven animation that we’re looking at. It tracks an element as it enters or exits the scrollport (the visible area of the scrollable content). This behavior is quite similar to how an IntersectionObserver works in JavaScript but can be done entirely in CSS.We have anonymous and named view progress timelines, just as we have anonymous and named scroll progress animations. Let’s unpack those.Anonymous View TimelineHere’s a simple example to help us see the basic idea of anonymous view timelines. Notice how the image fades into view when you scroll down to a certain point on the page:See the Pen [View Timeline Animation - view() [forked]]( by Mariana Beldi.See the Pen View Timeline Animation - view() [forked] by Mariana Beldi.Let’s say we want to animate an image that fades in as it appears in the scrollport. The image’s opacity will go from 0 to 1. This is how you might write that same animation in classic CSS using @keyframes:img /* ... */ animation: fadeIn 1s; @keyframes fadeIn from opacity: 0; to opacity: 1; That’s great, but we want the image to fadeIn when it’s in view. Otherwise, the animation is sort of like a tree that falls in a forest with no one there to witness it… did the animation ever happen? We’ll never know!We have a view() function that makes this a view progress animation with a single line of CSS:img /* ... */ animation: fadeIn; animation-timeline: view(); And notice how we no longer need to declare an animation-duration like we did in classic CSS. The animation is no longer tied by time but by space. The animation is triggered as the image becomes visible in the scrollport.View Timeline ParametersJust like the scroll-timeline property, the view-timeline property accepts parameters that allow for more customization:animation-timeline: view( ); Controls when the animation starts and ends relative to the element’s visibility within the scrollport. It defines the margin between the edges of the scrollport and the element being tracked. The default value is auto, but it can also take length percentages as well as start and end values.This is similar to the scroll-timeline’s axis parameter. It defines which axis (horizontal or vertical) the animation is tied to. The default is block, which means it tracks the vertical movement. You can also use inline to track horizontal movement or simple x or y.Here’s an example that uses both inset and axis to customize when and how the animation starts:img animation-timeline: view(20% block); In this case:The animation starts when the image is 20% visible in the scrollport.The animation is triggered by vertical scrolling (block axis).Parallax EffectWith the view() function, it’s also easy to create parallax effects by simply adjusting the animation properties. For example, you can have an element move or scale as it enters the scrollport without any JavaScript:img animation: parallaxMove 1s; animation-timeline: view(); @keyframes parallaxMove to transform: translateY(-50px); This makes it incredibly simple to create dynamic and engaging scroll animations with just a few lines of CSS.See the Pen [Parallax effect with CSS Scroll driven animations - view() [forked]]( by Mariana Beldi.See the Pen Parallax effect with CSS Scroll driven animations - view() [forked] by Mariana Beldi.The animation-range PropertyUsing the CSS animation-range property with view timelines defines how much of an element’s visibility within the scrollport controls the start and end points of the animation’s progress. This can be used to fine-tune when the animation begins and ends based on the element’s visibility in the viewport.While the default value is normal, in view timelines, it translates to tracking the full visibility of the element from the moment it starts entering the scrollport until it fully leaves. This is represented by the following:animation-range: normal normal; /* Equivalent to */ animation-range: cover 0% cover 100%; Or, more simply:animation-range: cover; There are six possible values or timeline-range-names:coverTracks the full visibility of the element, from when it starts entering the scrollport to when it completely leaves it.containTracks when the element is fully visible inside the scrollport, from the moment it’s fully contained until it no longer is.entryTracks the element from the point it starts entering the scrollport until it’s fully inside.exitTracks the element from the point it starts, leaving the scrollport until it’s fully outside.entry-crossingTracks the element as it crosses the starting edge of the scrollport, from start to full crossing.exit-crossingTracks the element as it crosses the end edge of the scrollport, from start to full crossing.You can mix different timeline-range-names to control the start and end points of the animation range. For example, you could make the animation start when the element enters the scrollport and end when it exits:animation-range: entry exit; You can also combine these values with percentages to define more custom behavior, such as starting the animation halfway through the element’s entry and ending it halfway through its exit:animation-range: entry 50% exit 50%; Exploring all these values and combinations is best done interactively. Tools like Bramus’ view-timeline range visualizer make it easier to understand.Target Range Inside @keyframesOne of the powerful features of timeline-range-names is their ability to be used inside @keyframes:See the Pen [target range inside @keyframes - view-timeline, timeline-range-name [forked]]( by Mariana Beldi.See the Pen target range inside @keyframes - view-timeline, timeline-range-name [forked] by Mariana Beldi.Two different animations are happening in that demo:slideInWhen the element enters the scrollport, it scales up and becomes visible.slideOutWhen the element leaves, it scales down and fades out.@keyframes slideIn from transform: scale(.8) translateY(100px); opacity: 0; to transform: scale(1) translateY(0); opacity: 1; @keyframes slideOut from transform: scale(1) translateY(0); opacity: 1; to transform: scale(.8) translateY(-100px); opacity: 0 The new thing is that now we can merge these two animations using the entry and exit timeline-range-names, simplifying it into one animation that handles both cases:@keyframes slideInOut /* Animation for when the element enters the scrollport */ entry 0% transform: scale(.8) translateY(100px); opacity: 0; entry 100% transform: scale(1) translateY(0); opacity: 1; /* Animation for when the element exits the scrollport */ exit 0% transform: scale(1) translateY(0); opacity: 1; exit 100% transform: scale(.8) translateY(-100px); opacity: 0; entry 0%Defines the state of the element at the beginning of its entry into the scrollport (scaled down and transparent).entry 100%Defines the state when the element has fully entered the scrollport (fully visible and scaled up).exit 0%Starts tracking the element as it begins to leave the scrollport (visible and scaled up).exit 100%Defines the state when the element has fully left the scrollport (scaled down and transparent).This approach allows us to animate the element’s behavior smoothly as it both enters and leaves the scrollport, all within a single @keyframes block.Named view-timeline And timeline-scopeThe concept of using view-timeline with named timelines and linking them across different elements can truly expand the possibilities for scroll-driven animations. In this case, we are linking the scroll-driven animation of images with the animations of unrelated paragraphs in the DOM structure by using a named view-timeline and timeline-scope.The view-timeline property works similarly to the scroll-timeline property. It’s the shorthand for declaring the view-timeline-name and view-timeline-axis properties in one line. However, the difference from scroll-timeline is that we can link the animation of an element when the linked elements enter the scrollport. I took the previous demo and added an animation to the paragraphs so you can see how the opacity of the text is animated when scrolling the images on the left:See the Pen [View-timeline, timeline-scope [forked]]( by Mariana Beldi.See the Pen View-timeline, timeline-scope [forked] by Mariana Beldi.This one looks a bit verbose, but I found it hard to come up with a better example to show the power of it. Each image in the vertical scroll container is assigned a named view-timeline with a unique identifier:.vertical-scroll-container img:nth-of-type(1) view-timeline: --one; .vertical-scroll-container img:nth-of-type(2) view-timeline: --two; .vertical-scroll-container img:nth-of-type(3) view-timeline: --three; .vertical-scroll-container img:nth-of-type(4) view-timeline: --four; This makes the scroll timeline of each image have its own custom name, such as --one for the first image, --two for the second, and so on.Next, we connect the animations of the paragraphs to the named timelines of the images. The corresponding paragraph should animate when the images enter the scrollport:.vertical-text p:nth-of-type(1) animation-timeline: --one; .vertical-text p:nth-of-type(2) animation-timeline: --two; .vertical-text p:nth-of-type(3) animation-timeline: --three; .vertical-text p:nth-of-type(4) animation-timeline: --four; However, since the images and paragraphs are not directly related in the DOM, we need to declare a timeline-scope on their common ancestor. This ensures that the named timelines (--one, --two, and so on) can be referenced and shared between the elements:.porto /* ... */ timeline-scope: --one, --two, --three, --four; By declaring the timeline-scope with all the named timelines (--one, —two, --three, --four), both the images and the paragraphs can participate in the same scroll-timeline logic, despite being in separate parts of the DOM tree.Final NotesWe’ve covered the vast majority of what’s currently defined in the CSS Scroll-Driven Animations Module Leve 1 specification today in December 2024. But I want to highlight a few key takeaways that helped me better understand these new rules that you may not get directly from the spec:Scroll container essentialsIt may seem obvious, but a scroll container is necessary for scroll-driven animations to work. Issues often arise when elements like text or containers are resized or when animations are tested on larger screens, causing the scrollable area to disappear.Impact of position: absoluteUsing absolute positioning can sometimes interfere with the intended behavior of scroll-driven animations. The relationship between elements and their parent elements gets tricky when position: absolute is applied.Tracking an element’s initial stateThe browser evaluates the element’s state before any transformations (like translate) are applied. This affects when animations, particularly view timelines, begin. Your animation might trigger earlier or later than expected due to the initial state.Avoid hiding overflowUsing overflow: hidden can disrupt the scroll-seeking mechanism in scroll-driven animations. The recommended solution is to switch to overflow: clip. Bramus has a great article about this and a video from Kevin Powell also suggests that we may no longer need overflow: hidden.PerformanceFor the best results, stick to animating GPU-friendly properties like transforms, opacity, and some filters. These skip the heavy lifting of recalculating layout and repainting. On the other hand, animating things like width, height, or box-shadow can slow things down since they require re-rendering. Bramus mentioned that soon, more properties — like background-color, clip-path, width, and height — will be animatable on the compositor, making the performance even better.Use will-change wiselyLeverage this property to promote elements to the GPU, but use it sparingly. Overusing will-change can lead to excessive memory usage since the browser reserves resources even if the animations don’t frequently change.The order mattersIf you are using the animation shorthand, always place the animation-timeline after it.Progressive enhancement and accessibilityCombine media queries for reduced motion preferences with the @supports rule to ensure animations only apply when the user has no motion restrictions, and the browser supports them.For example:@media screen and (prefers-reduce-motion: no-preference) @supports ((animation-timeline: scroll()) and (animation-range: 0% 100%)) .my-class animation: moveCard linear both; animation-timeline: view(); My main struggle while trying to build the demos was more about CSS itself than the scroll animations. Sometimes, building the layout and generating the scroll was more difficult than applying the scroll animation. Also, some things that confused me at the beginning as the spec keeps evolving, and some of these are not there anymore (remember, it has been under development for more than five years now!):x and y axesThese used to be called the “horizontal” and “vertical” axes, and while Firefox may still support the old terminology, it has been updated.Old @scroll-timeline syntaxIn the past, @scroll-timeline was used to declare scroll timelines, but this has changed in the most recent version of the spec.Scroll-driven vs. scroll-linked animationsScroll-driven animations were originally called scroll-linked animations. If you come across this older term in articles, double-check whether the content has been updated to reflect the latest spec, particularly with features like timeline-scope.Resources (gg, yk) [ad_2] Source link
0 notes
Text
0 notes
Video
youtube
=Repu("|",B3*100) #progressbar #excel #microsoft #exceltelischool #excel...
0 notes
Text
Adding a HUD to my 2D Platformer
To add a HUD, we need to add a Widget Blueprint. This blueprint allows me to add text and images to the screen. We add this by selecting 'User Interface' when adding in the content drawer and then selecting 'Widget Blueprint'.
A widget allows us to add a HUD by adding 2D elements to the screen of a normally 3D game. This means I can add things like a health bar, score and inventory slots.

For the widget to actually appear on the screen, I need to add it to my character at the 'Event BeginPlay'.

To begin, I added a canvas panel. This is so that the text and images can be placed in the correct corner of the screen.

Next is adding the text.
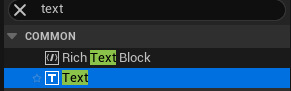
To edit the text size, you have to use the 'Appearance' section in details, resizing the box does not change the text's size. Colour, letter spacing and font are also found here.
Next, to add an image. Download the desired image as a PNG and drag it into the content drawer. Apply 2D paper settings to the image if the background needs to be removed. Now the image can be dragged from the content drawer into the canvas.

Now the image can be moved, resized and made less opaque.

For everything added to the canvas panel, make sure to anchor them. This prevents them from warping when the size of the window is changed.

Binding:
To get text on the HUD to provide actual information, it needs to be bound to that info. Next to the text part in details, there is an option called 'Bind'. In this option you can either create a new binding or use any ones previously made for this HUD.

When clicked, the bind will first look like this in the graph.

Score:
Now I want this piece of text to tell the player their score, meaning it needs to be bound to the score. This is done by casting to whatever is storing the score value, in my case that's my game instance. From the cast, both 'Get Game Instance' and 'Get Score' are needed.

Next is making it so there's actual text that shows the score. This is done by connecting the 'Game Inst Score' to an 'Append' action followed by a 'To Text (String)' action. This should then connect up to the Return Node along with the 'Exec' link from 'Cast to MyGameInstant'.

This is what the whole code should look like. The bind should be added to a textbox that is separate to the 'Score:' text

The '0' is a separate piece of text to the 'Score:' so that the bind won't affect the rest of the text.
Health:
For the health, I first started with a copy of the score, using 'Get Health' instead of 'Get Score'.

Now, because we don't need to know the exact health and because I prefer it, I'm going to create a health bar to use rather than the standard numbers. For this we first add a 'ProgressBar' into the HUD.

Next is binding the health bar to the players actual health. This is done in a similar way to before, but now requires the players current health to be divided by their full health so that the amount can be calculated by the bar. It also requires the health integer to be converted into a float so that there is an infinite number of answers and won't end up accidentally giving us 0.

0 notes