#reading tutorial
Explore tagged Tumblr posts
Visit Tumblr Blog
Explore Tumblr blogs with no restrictions, modern design and the best experience.
Last Seen Tumblr Blogs


Fun Fact
In 2020, 27% of US Tumblr users had an annual household income of over $100,000.
Text
I am excited to share my new uploaded learning video on YouTube 🤩👩🏫!
youtube
#toddler#preschool#flashcards#practice reading#content creator#youtube#tutor#tutorial#reading tutorial#reading#tumblr updates#fun learning
1 note
·
View note
Text
i caved and got dbh for my pc (despite already having it for my console) and honestly it's nice to be able to have have my monitor so close to me and be able to really just stare at all the details in the gallery (i may have spent an obscene amount of time staring at each character model)
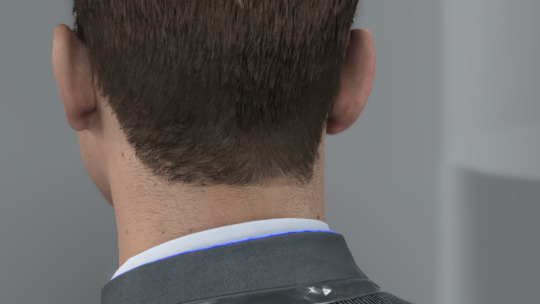
here's some details i noticed about connor's model
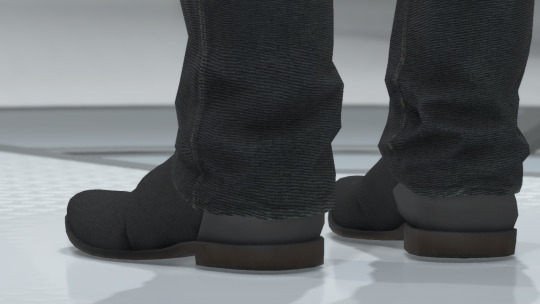
firstly, wtf is going on with his shoes. like does it have laces???? is it just a slip-on??? I WANT TO KNOW WHAT THE TOPS OF THE SHOES LOOK LIKE. also why are his jeans unhemmed?????

at the bottom of his jacket there's the two little dark grey rectangles that honestly i never really noticed and i don't think i've ever included it in my art bc my brain just erases them from my brain. it's such a random design choice and i can't decide if i hate them or not.
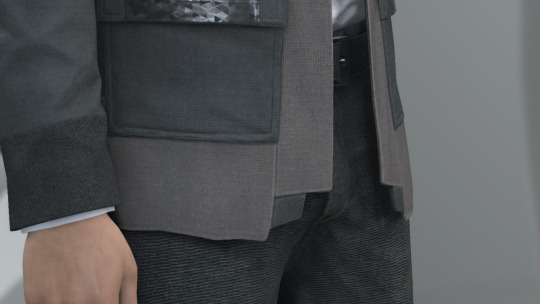
also why tf does he have two random button holes on the front of his jacket??? his jacket doesn't have buttons???? i cannot fathom why these exist or what their purpose is

never really took the time to analyze connor's jacket so closely and i love the detail of the different materials on his jacket. like the tessellated triangle motif throughout his jacket clearly being some sort of synthetic material compared to the cotton/wool fibers
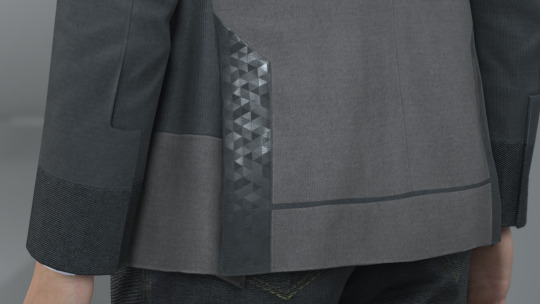
also i love the seam detail on his sleeve? like i love how it's not just one straight line but adds more shape and design to his cuff.

i love the texture on the top back half of connor's jacket. it reminds me of carpet or those really textured couches. it's like some type of corduroy likely or something. i wanna touch it. also the cyberlife branding right under the ANDROID text how did i never notice that??

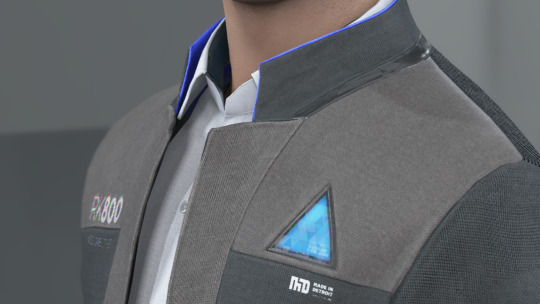
if you look at the inner lining of his white collar, it has a darker liner on the inside. i don't think you typically see that on white button-ups???
lastly LOOK AT HIS NECK MOLES. HE'S GOT SO MANY LITTLE NECK MOLES. and after extensive zooming in and out and looking at it from all angles, i have determined that he has a little tiny mole on the back of his right ear on the rim. idk if you can see it in these screenies BUT IT'S THERE I SWEAR TO YOU. he's also got the little divot some ppl have on their ears near the top of his ear.

anyway, uhm, yeah i totally haven't spent more time staring at the character models than i have spent playing the actual game
i was also staring at kara's and markus' models and might post my thoughts observations on those at another time. but for now we got connor.
#duda if you're reading this just know i am 1000% going to consult you on how to take screenies bc the in-game camera is ass#also nine if you are reading this imma ask you too and ask you for a tutorial on how to add your mods to the game bc ANDROID HANDS#mine#reference#connor#dbh screenshots#dbh reference#dbh connor#connor rk800#detroit become human#detroit: become human#d:bh#dbh
518 notes
·
View notes
Text

too busy to draw today so here is a picture of my lovely cat penny everyone say hi penny
#she is absorbing the nature#cat#hi penny#my cat#cats of tumblr#aww the scrunkly#double tap now if you'd skrunkly the when#HELP ME why is this my post w the most notes#i love her#little baby#inktober#cute cats#catposting#catblr#tortie#kitty#tortoiseshell cat#penny the cat#kitty cat#kittyposting#cute#cute animals#pets#pet#RAAAAGGGHH#if ur reading this u should watch next to normal slime tutorial on youtube its the best musical ever made
949 notes
·
View notes
Text


Hi *flashbangs you with Flatland fanart*
#flatland#flatland fanart#feel free to draw my designs :0#if someone reads this please send me a image ID tutorial I have no idea how they work and I´d hate to mess it up :^]c#my art
739 notes
·
View notes
Text

✨🥀 Let's mourn with mama
#my art#snappy's art tag#kirby oc: sir meteor#mama meteor#mama posting#on my background painting arc#shout out to gouache landscape tutorials I had to watch a few of those to learn new techniques#and shout out to my plant collection for being there when I needed to study plant silhouettes#but this piece… Ough#there’s a sweetness to it there’s a melancholy to it#for those who have read far enough: did you guys notice the red flowers :) starting at the base of the skull and pooling around meteor#yeah#could mean anything
163 notes
·
View notes
Note
how in the world do u get hair so good in the dbz style ,, hair in general is so hard ToT
I put together a little "tutorial", but I just break it down into segments as close to the reference as possible, then as long as the generic "segments" are visible, you can mess them up with bending/swishing/swooshing/drooping/etc. as much as you want!
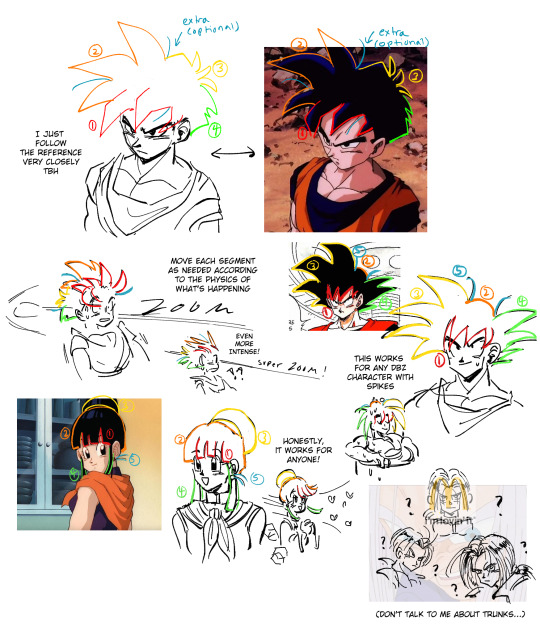
That's pretty much it (and practice, and fearlessness). Let me know if you need me to elaborate on anything!
#you don't need to be dragon ball super levels of stiff plastic with their hair#if you watch early dbz and early db or read the manga youll notice a lot of hair bending#it doesn't need to look perfectly in shape#except trunks idk i can never get trunks right don't ask me LOL#and bulma for that matter...#its the stringy hair that gets me#asks#tutorial#dbz#dragon ball#dragon ball z#db#sketch#oh also thanks for the compliemnt to my art!!! <3
294 notes
·
View notes
Text


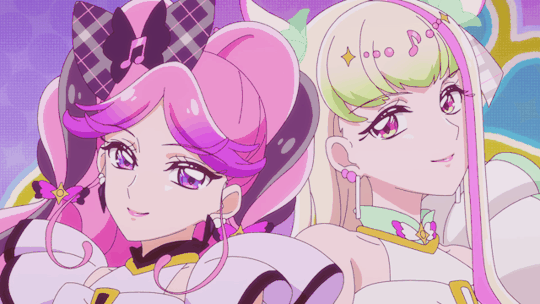
cure zukyoon & cure kiss' debut (キミとアイドルプリキュア♪ (You and Idol Precure ♪) E17)
#precure#kimi to idol precure#kimi to idol spoilers#you and idol precure#WAOW. WHAT IN THE YURI.#i cannot believe i chose this as my first precure season and they are catering to me this closely. holy moley#also hi i learned to gif for this. and by learned i mean vaguely remember a tutorial i read six years ago. i cant color grade these gomen#edit: nvm i color graded them yay. pink color dodge my beloved#momo.gif#momo talks#kimi to idol#you and idol
132 notes
·
View notes
Note
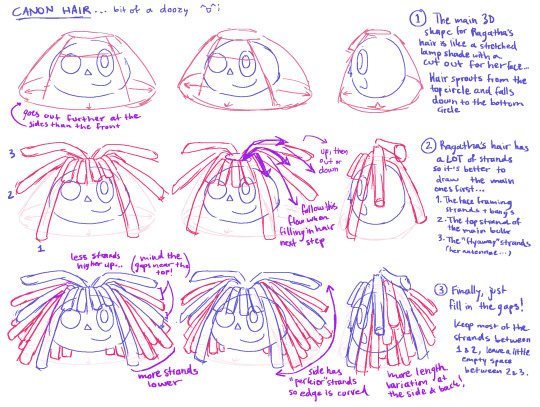
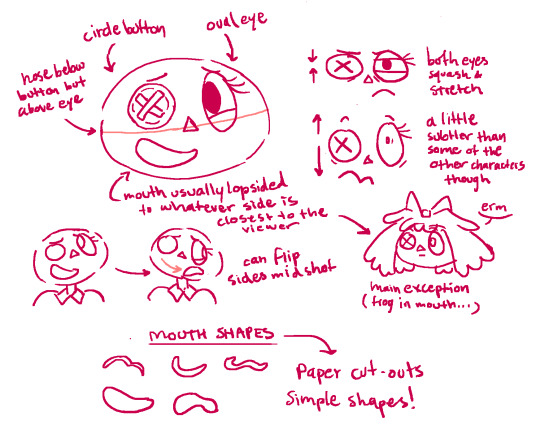
ooh wait do you have a tutorial on how you draw ragatha? i struggle so much with her hair its unreal

@lyradraws alright, so i feel i'm a bit less qualified for this one but yknow what, it's good practice and good reference for me as well so i gave it a go!! :D
here is my unofficial guide to our darling ragatha <3 MAIN SHAPES:
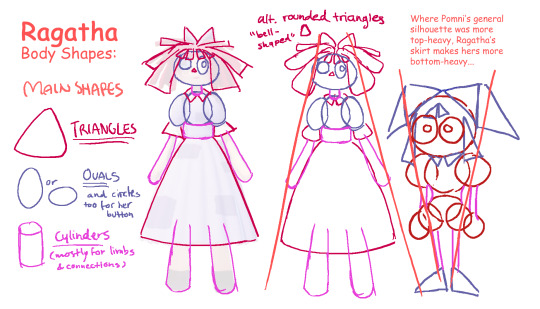
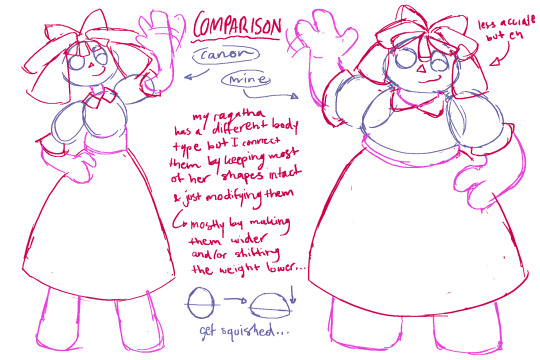
CHARACTER ACTING:

HAIR:
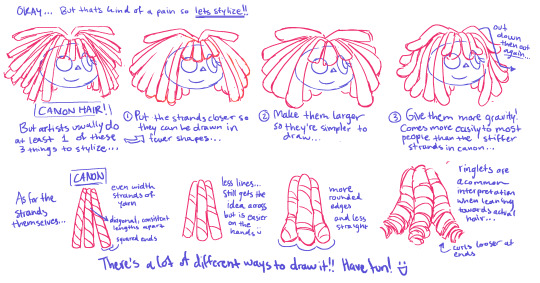
MISC:
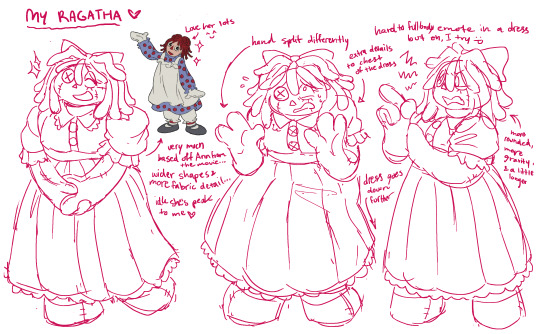
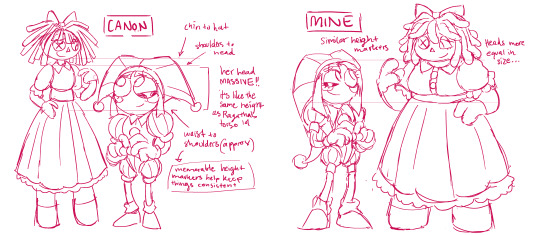
note sure what exactly was meant by comparison to pomni but hopefully this + the shape comparison at the beginning can help?
if you haven't seen it already, or you just want to revisit them, here are my pomni studies!! and also, an important note for IF i do any more of these: do NOT expect this level of detail for the other characters!! pomni and ragatha are my favorites so they get special treatment... if i do the rest it'll probably just be a couple slides of pointers but eh, who knows with me... (shrug)
#i hope you guys know you don't have read all my notes in these i just like yapping... ^-^;#the amazing digital circus#tadc#ragatha#pomni#my tutorials#my art#ask response
664 notes
·
View notes
Text
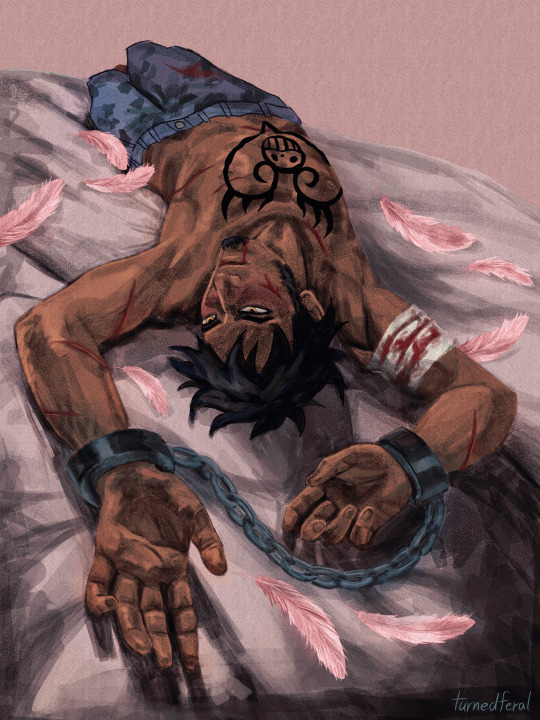
to the victor go the spoils
(followed @attyrocious's super helpful process explanation for this piece!!)
#one piece#trafalgar law#trafalgar d water law#law one piece#dressrosa bad ending btw.#implied doflaw#(yes he still has his arm because i hc doffy got the tontatta to sew him back up because he wanted law “intact” to enact his revenge upon)#(and/or use him to perform the perpetual youth surgery after sufficient brainwashing etc)#i referenced the sculpture the dying of abel by giovanni dupré#also the feather brush saved my life#my art#anyway. if you want to read a really really good dressrosa bad ending fic ft law doffy and vergo#go check out “a remedial education” by Doctor_Cyance#really good dead dove writing#i found attyrocious' tutorial so good it's helping me w improving my art sm#go check it out!!!
78 notes
·
View notes
Text
READ MORES ARE YOUR FRIENDS
I have noticed within the past few months a very large uptick in the number of fics that are posted without read mores. Which is not ideal or considerate of other users and, I believe, optimistically, that its due to the number of new users who have not learned what that is. Which is fine! It's always fun to learn how to do something new!
To start! It basically shoves everything under a cut so the post doesn't clog up the dash. Big long info dump? Read more! A 2k+ fic? Read more! The most complicated recipe known to man? Read more! Wanna april fools style prank someone? Read More!
So how do you do the thing?
The old school way was to start a new line, type : [the colon symbol] read more [no spaces] : [colon symbol], enter/new line. On the mobile app it looks like the below photo.
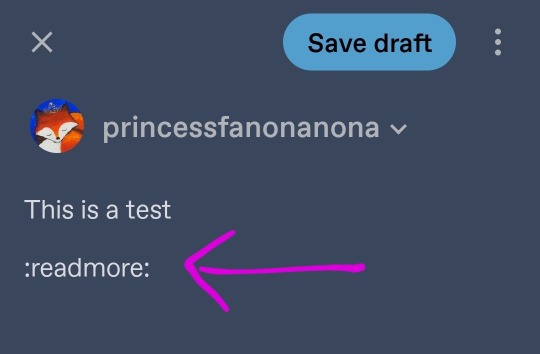
However! The updated app now has the fancy schmancy button in the style bar. Its second to last to the right, line squiggle line.

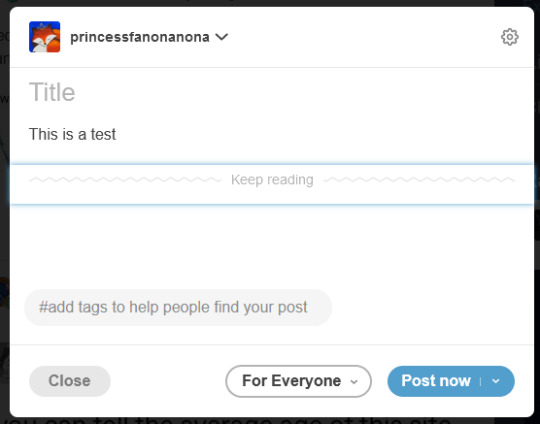
If you did it right, you'll get the below line break. And then you can type what ever you want after that! (Note: you can still type :readmore: to get the break)
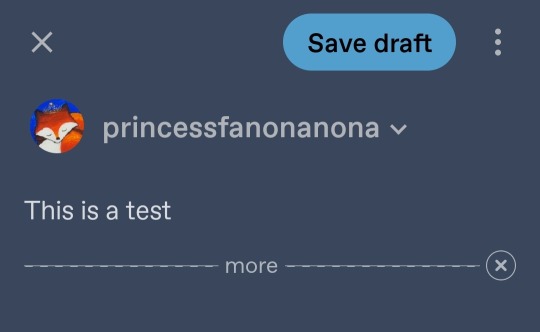
On desktop, you could type it out however the button is back! Start a new line and you get the add on bar. Its the last option in the line, and the same image as the app, line squiggle line.
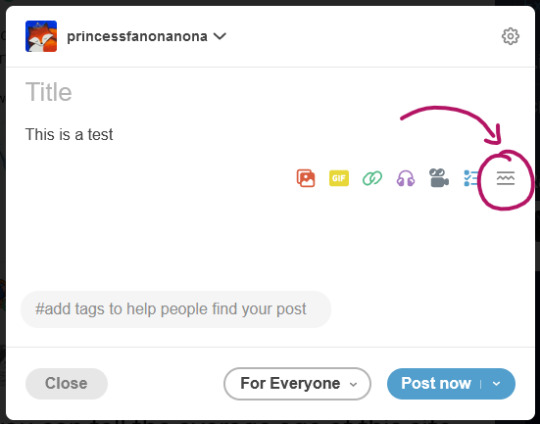
Which results in the following line break
And there you have it! I hope this helps someone and this info can be shared. Thank you for reading this post and I sincerely wish you a lovely day.
370 notes
·
View notes
Text
.can you make a linux terminal out of html in ao3 (3 incorrect buzzer sounds go off as i am unfamiliar with all 3 of these things and i am disqualified from the competition)
#*reading one ao3 tutorial* i can do this...... *watching a linux tutorial on youtube* I.... MIGHT BE ABLE TO DO THIS.......#*reading an ubuntu.com tutorial* MAYBE....................
143 notes
·
View notes
Text

happy 6th constabell anniversary ♡
(and a happy birthday to dear irene!)
[5.28.25]
a few months ago, it was his birthday, and i wanted to say my words but i decided to keep it short to save it for the anniversary :)
i remember when i was still very fresh to id.v, it was 2018 back then. the concept of new survivors joining the faction was still a brand new thing to me ... i remember when aes.op carl came out, i was always eager to find new characters to play with!
i remember when nor.ton were teased to come out. i didn't think much of him, but i did adore his design a lot. i remember that well. his playstyle confused silly me back then, so i had nothing but appreciation for prospector mains at the time
i don't know how it happened, but one thing led to another - i made an oc for this game, but it was for the purpose of roleplaying with a friend (who also happened to be the reason why im playing, hi xelle <3) and i thought it would be very fun to pair her with nor.ton. but as i slowly learn about him more and more, i came to like him a lot! favorite character at best. it was hard to learn anything about him, because his lore was little to nothing at the time.
i suppose, the more i just shipped irene with nor.ton as is, the more i started to actually like him, and started to project my feelings more into the ship. but i only had myself and xelle to share this at the time, and then i dropped the game for a few years.
for a brief time, nor.ton debut on my tumblr around 2021 or 2022? i had a little spark that made me miss him, and so i indulged for a bit. but it was short lived, unfortunately.
and another spark came in, when fool's gold became a real concept. he became a hunter. i still look back at this silly post of mine and giggle about it... the final nail in the coffin was when i decided to watch id.v stageplay and goodness gracious i fell back in the hole so hard and look at me. typing this out as i celebrate the 6 years ive known this man
while i regret not being with him in-between my years- i'm glad i can catch up to genuine lore that has been provided for him and it's still ongoing, so it feels like i can fix myself into the loop again :) now that i finally know his story, i feel incredibly attached to him for that too. he feels right at home in my heart again, i hope younger me is happy that i'm back to him again ^^ his story is nothing but difficulty- the kind of struggle that almost hits close to home sometimes and i truly care for what he's gone through. he is such an amazing character design and i want to continue appreciating him as much as i can. his story is still unfolding, and i look forward to the future for that :)
cheers to more content with you norton campbell, and that i can continue to make lovely stories for these two 💚
#i was gonna post my fic here but it still needs proofreading so I don't think ill post it today but that's okkk!#remember - absolutely not necessary to read my letter!! it's okaaay~#~ art#💚 constabell#very proud of this! this was heavily inspired off a picrew xelle sent me. the picrew basically looked like this but i drew it 💚 heheh#i was lucky enough to find a tutorial on pinterest regarding the shading of the trees.. thank goodness#out of all the irenes i drew - I think this one takes the cake ^u^ she is so stunning :)#divider by cafekitsune
55 notes
·
View notes
Text

fuck it. oppa homeless style
#mgs#mgs4#solid snake#old snake#do ppl use the old snake tag? do they care abt grandpa...#also if you're reading this and know where to find a tutorial to make high quality gifs#pls send it to me... i clearly need one lmao
68 notes
·
View notes
Text
Needle Lace Resources
This is a very long post, so I'm including a cut.
Tutorial-like Things, Others' Work
An overview of the stages of needle lace (specifically learning from Alençon, I believe. They link to a documentary type of video on Alençon lace): https://www.taixtile.com/needle-lace-first-steps/. This blog has links to other resources (one link is broken, if I recall correctly).
A very approachable first project, I think. From a lace maker who has done very cool illustrations with lace, Maggie Hensel-Brown: https://youtu.be/OLuRpJ96p4Q?si=gqBWqYxa755gFozr
This channel has videos of the stages of needle lace making. They specifically demonstrate Irish lace, I believe. But the stages are very similar to or the same as the stages in Alençon lace. https://youtu.be/dZVagIFCnLc?si=d8lRnPsmz5iTM0Z_
Pierre Fouché has a video about making dense filling stitches and even doing short rows to makes curves (something I tried but did not yet succeed at): https://youtu.be/DK5cMQND3b8?si=qySmT9yaoTcpsUV9 He also does really cool bobbin lace illustrations by constructing patterns in cell-like units.
An embroiderer tries needle lace in two videos. In one of them she tries different styles from different places: https://youtu.be/eTO7dA4oyl4?si=VInx35kql115bIIo https://www.youtube.com/watch?v=A9Wa6-Qf5xw
Example of a different style of needle lace. Unsure what it is exactly. Some sort of cut work or reticella, idk: https://youtube.com/shorts/7DFogWC3tDI?si=uju74sPFbRj3_wrn
Sampler directions: https://youtu.be/oDKBfjDYBnU?si=shQYvaT4kAZD7BgV
Again, a more geometric style of needle lace. I don’t know the particulars of this style (styles?), since I’ve mostly been looking into styles similar to Alençon because I’m aiming for more illustration-like lace. This channel has multiple videos demoing and explaining that process: https://youtu.be/gJd6mkrsUCQ?si=AfVIiwljHvfismrX https://www.youtube.com/watch?v=R6dk721UwW4
Not so much instructions but video of a very skilled lacemaker working on a project: https://youtu.be/01H2GdEXLrs?si=2suFHSG4Kwa6Yl2m
Another lacemaker's work on their blog. I don’t know if they do as much lace making as they do other needle arts https://www.robesdecoeur.com/blog/needlelace-my-work-so-far
A lacemaker's work... the site is older and kind of tricky to navigate. Like. there's no home button, as far as I can tell. Album of their work: https://www.lacemakerslace.oddquine.co.uk/album/index.html Home page, I think: https://www.lacemakerslace.oddquine.co.uk/
Useful/Interesting Things to Know
Alençon lace -- specific French style from the Alençon region, which has a history of point lace and a current institution dedicated to preserving the skills and producing lace. This is the style that I was looking at examples of to try and learn from.
Search terms like different styles of lace that I’m not qualified to talk about but you can look into and do research on: Battenburg, point de gaze (very very fine work, like gauze)… More to be added as I learn about them.
The terms "needle lace" and "point lace" are both used to refer to lace made with a needle. I'm unclear on if there are subtle distinctions between them or if it's simply a matter of location. But having versions of a search query for both terms should help find more results than just using one.
Encyclopedia of Needlework by Therese De Dillmont is an excellent resource to learn how to do different stitches. It seems these stitches mostly come from Irish lace, according to the book. HTML copy of book available on Project Gutenberg here: https://www.gutenberg.org/files/20776/20776-h/20776-h.htm I recommend using ctrl+f to search for "lace stitch" on the page. The end of each chapter in the HTML version seems to have a link to the Table of Contents that is at the end of the entire document. It has chapters for plenty of other needle arts, so it's a good resource all around.
If you want to find examples of needle lace, look on Wikimedia Commons! Using a variety of search terms will help you find more material for inspiration/observation than otherwise
If you want to design your own needle lace depicting objects, it might be worth looking at stained glass to see how larger shapes are broken up into smaller shapes that still feel complete.
You can use multiple colors! Let yourself use multiple colors, like stained glass!
Thoughts from the Learning Process So Far (some terminology used here, look them up so you know what the actual definitions are, but I’ll define what I mean by them)
Tacking vs Couching... I'm unsure about the actual definitions so I may be using them wrong here. In the videos I’ve seen tacking seems to be making a stitch that runs along the way the cordonnet will run. Couching seems to be just when the thread that secures the cordonnet comes up through the backing and goes down through the backing at the same point. With these definitions… Tacking went faster for me than doing couching, but it feels a lot less secure and precise for the form of lace I’m making. Unless I made the tacking stitches perpendicular to the cordonnet's path, the outline cord moved too much due to tension. If it's perpendicular and not a very short stitch, it might get in the way of your filling stitches or binding off stitches. Which might be fine, since you pull them out anyways. But it would also mean more holes in the backing, and at some point the holes are too close together and might tear the backing and pattern. I don't like that. Couching—much, MUCH more tedious for me because I’m not practiced at making the needle come up in exactly the right spot. but it feels more secure to me. The outline seems to be less affected by tension as you work. And I took some shortcuts for couching that helped. I don’t couch the doubled cord, instead I whip stitch back over the already-secured cord. I might make a post to demonstrate what I mean. It kind of messes with the shape/placement of my cordonnet, but for the sake of my impatience I’m willing to sacrifice the precise shape.
Backing material... To use fabric in backing like the instructions usually say, or not? Idk. For me, it’s hard to find the right hole for the couching stitches when I can't see my pattern from the back. It took a lot of trial and error until I got a feel for how to predict where my needle would come up. I don't like the way the poke-and-check method of stitching the cordonnet down tends to rip the pattern up (at least, with my easy-to-access materials. Probably better with better materials and more practice. Using my thumb to find approximately the right spot helped, but not enough). So I just used a sandwich of tape/paper/tape as my backing. If you're willing to fuss around with fabric in your backing, it might make it easier to remove the couching threads after you're done, and when I tried. The directions I've seen usually say to use a backing of doubled-up fabric, clay paper (I'm unsure what this is. might be a thicker paper than cardstock, or it might be paper made to contain clay particles. Probably more like the first option), and contact paper. My last attempt at making a backing used notebook paper (or other type of paper) with packaging tape on both sides to provide a smooth surface and structure. I think it worked fairly well, and I didn't have to figure out where to buy contact paper (or figure out exactly what contact paper was).
#lace making#fiber arts#needle lace#instructions#tutorials#information#resources#my post#i will make this cleaner/easier to read later
125 notes
·
View notes
Text
HOLE-DWELLING HOLE-DWELLING HOLE-DWELLING
#i sure hope the video doesnt get messed up#made this on procreate dreams btw!#im so cool that i didnt need tutorials#i totally didnt crash the app like five times because i kept messing with it#chonny jash#angelo tag#i think this took me like four days?#idk i kept getting distracted with school stuff#hello person still reading the tags#shh dont tell anyone but its my birthday today#i only celebrate w family so u are the only one that knows#okay byeeee
260 notes
·
View notes
Note
I LOVE this set and i was wondering if you could pls explain how you did the text, including how you added texture to the ripped text and the highlighting/circling/etc of words? thank you for posting your beautiful gifs 😊
thank you!! 🥺 & of course! (photopea tutorial)
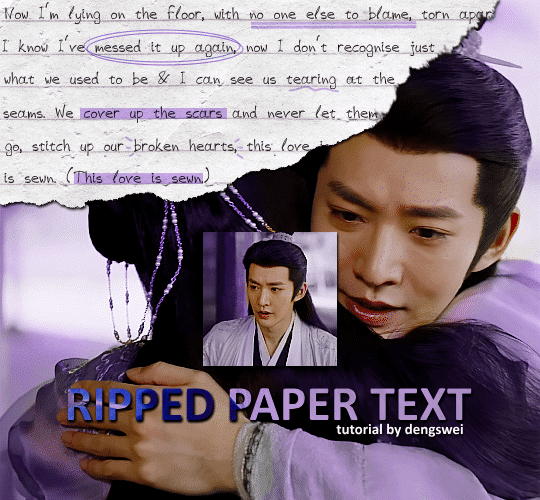
the majority of the texture for the ripped paper effect i can't really take credit for it's on the paper it's self all i did was make the paper white (because the texture was yellow) and used curves to darken the texture), i got the texture from one of photopea's templates but it seems their whole template section has changed drastically and no longer has like anything i used to see before ???? so i'll just share both versions here:
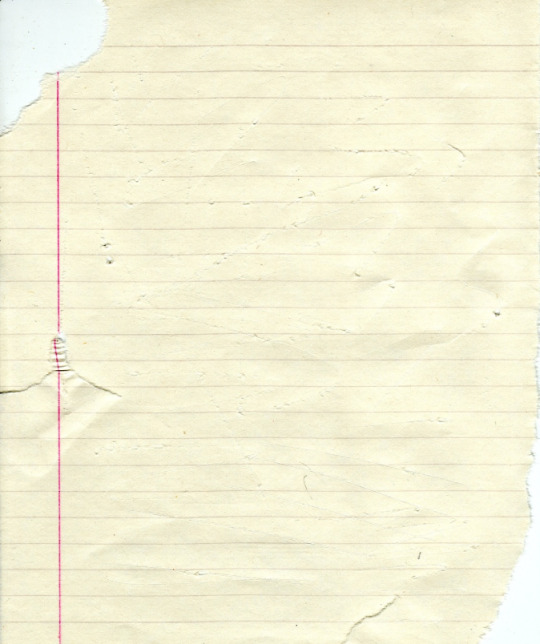
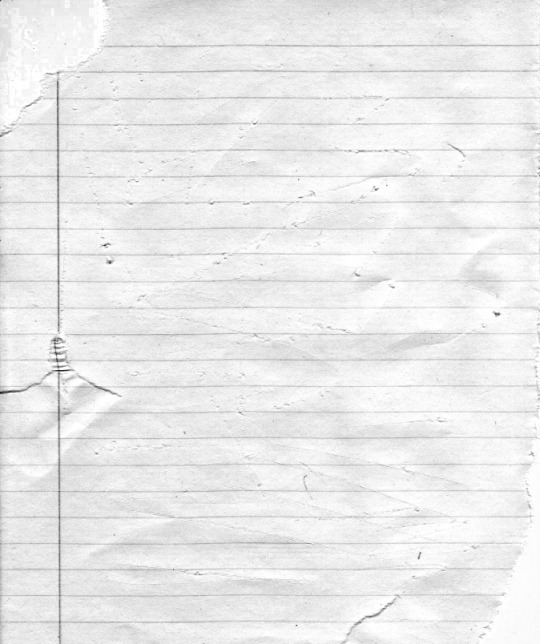
(original & my edited version)
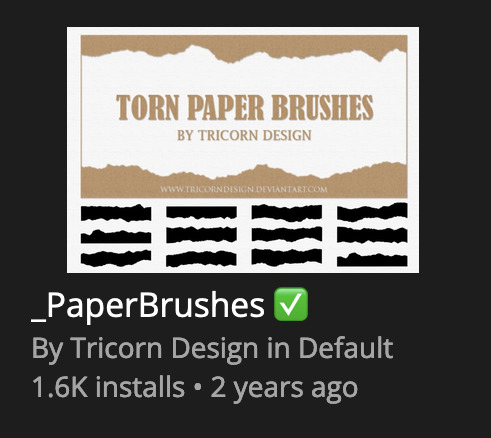
for the ripped parts i just played around with this brush set in the plugins
once i decided which of the paper brushes to use i had a new layer and used it where i wanted, so top left in the gif above, i clip masked the paper texture (and the adjustment layers as well) onto it so you get that ripped effect (if you don't like or want to add to that you can always use the brush tool again (or the erasure tool) set as the paper brush to add or remove sections i did this a lot when i realised certain words i wanted to show weren't on there (also changing the size of the paper brush when wanting to add a little bit or take a little bit away was a massive help)
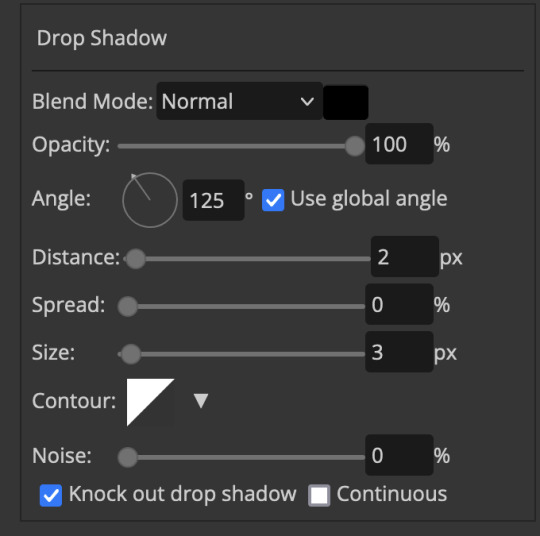
i also always add a drop shadow to my paper textures, the settings i used is mostly the same EXCEPT for the angle for all of the ripped paper (it's also my text drop shadow settings) because depending on how the ripped paper looks you might have to change the angle
also i know in the screenshot below it's on but make sure the use global angle is off if you're going to have multiple different angles of drop shadow in your one gif (so if you want your paper texture on 125° but anything else on 60° the global angle needs to be off but if you want them the same then you can keep that on, which is why it's on for me because the angle is the same for both the text & the ripped paper) (and by text this isn't the text on the ripped paper, there isn't any drop shadow on the text itself there, just to clarify this was for my "ripped paper text tutorial by dengswei" text)
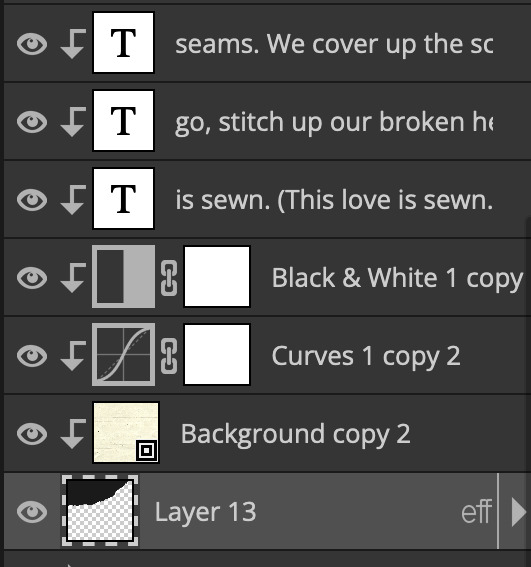
as you can see i also clipped my "handwriting" text to the paper layer this is so it stayed on the paper rather then going onto the gif itself (and it saved the fiddly part of masking it away & it felt more authentic this way too)
i found for me it was easier to seperate the text line by line so i knew exactly which part of the text was on which and if i wanted to change anything either it being a typo, changing the paper texture, or wanting a different word on a different line it was easier that way because it didn't end up messing up all of the text (though you don't have to do it that way, it's just what worked for me here)
font i used was: vag-handwritten (a default photopea font)
all of the next part needs to be above the text on your ripped paper:
for the highlighting, circles, and the lines it's pretty much all the same, i chose the colour which matched the gif (so say purple), for the highlight used the rectangle select & colour fill tools and set that to multiply & then played around with opacity (for most of my highlighting it's set to 50%), for the circles it was the same except the circle shape tool (no fill just stroke) set to purple, set to multiply, with 100% opacity (i found the circles looked better with 100% on some gifs depending on what colour i used), & then duplicated it once or twice and then just moved each circle to where i thought it looked best & the double lines is also the same using the line tool, set to multiply, & playing around with the opacity, & positioning them where i like
for the squiggly lines, the hearts, the 3 small doodle lines at either side of a word, & any other doodles i had on there i doodled them myself with my drawing tablet (you probably don't have to use a drawing tablet i just found it easier that way) using the free pen tool and then did the same thing set it to multiply and played with the opacity
if the colour you choose looks too dark or too light with it set to multiply either try a lighter/darker colour, try out something else like lighten, or screen, or increase/decrease the opacity more (i found i had this issue with the yellow being hard to see on the white paper so i used a darker yellow and kept everything at 100% opacity rather than 50%)
hope that helps! and please if anything is confusing or you want to ask any more don't hesitate to ask i know i ramble on a bit and it can sometimes get a bit confusing 🤣 or if there was anything i missed feel free to ask again 🥰
#replies#edwinas#mine | tutorials#gifmakerresource#photopeablr#photopea tutorial#photopea tutorials#gif tutorial#gif tutorials#usergif#tutorial#tutorials#photopea has so many great default fonts i just spend hours searching through them i barely download fonts now 🤣#i hope i didn't miss anything#also i don't know why the paper textures & my screenshots posted this way i had them side by side#okay they're side by side on mobile but not desktop ??? but mobile doesn't have the read more okay
125 notes
·
View notes