#rhino 8 tutorials
Explore tagged Tumblr posts
Visit Tumblr Blog
Explore Tumblr blogs with no restrictions, modern design and the best experience.
Last Seen Tumblr Blogs


Fun Fact
Tumblr posted its first advertisements in May 2012 and subsequently earned $13M in revenue.
Text
youtube
Depending on the type of your project, you might need a different set of tools for your Rhino window's layout. In this tutorial, you will learn how to save multiple window layouts for later use. Also, this is useful when Rhino, for some reason, resets your layout when you open it.
#rhino 8#rhino 8 tutorials#rhino tutorials#mcneel#mcneel rhino#mcneel rhino 8#learn rhino#rhino beginners#rhino tips#rhino how to#rhino window layout#rhino save window layout#rhino save toolbars layout#Youtube
0 notes
Text
3d product renderings and mockups

It seems like you're looking for information or assistance with 3D product renderings and mockups. Creating 3D product renderings and mockups is a crucial step in the design and marketing process for various industries. Here's some information to help you get started:
1. Software for 3D Rendering:
Blender: A powerful and free open-source 3D creation suite.
Autodesk Maya: Widely used in the film and video game industry.
Cinema 4D: Known for its intuitive interface and powerful capabilities.
KeyShot: A standalone 3D rendering and animation application.
2. Creating 3D Models:
CAD Software (Computer-Aided Design): Use software like AutoCAD, SolidWorks, or Rhino to create accurate 3D models.
Sculpting Software: Tools like ZBrush or Blender's sculpting features are great for organic shapes.
3. Texturing and Materials:
Apply realistic textures and materials to your 3D model using UV mapping techniques.
Software like Substance Painter or Quixel Mixer can help create detailed and realistic materials.
4. Lighting:
Proper lighting is crucial for realistic renders. Experiment with different light setups to achieve the desired look.
Consider using High Dynamic Range Imaging (HDRI) for realistic environmental lighting.
5. Rendering:
Choose the appropriate rendering engine for your needs (Cycles in Blender, Arnold, V-Ray, etc.).
Adjust rendering settings such as resolution, quality, and output format.
6. Mockup Tools:
Adobe Dimension: Allows you to create realistic 3D mockups and product visualizations.
Placeit: An online platform that lets you create mockups with your designs on various products.
Mockup World: Offers a variety of free and premium mockups for different products.
7. Tutorials and Learning Resources:
Online platforms like Udemy, Coursera, and YouTube offer tutorials on 3D modeling, rendering, and mockup creation.
Join forums and communities like Blender Artists or Polycount for support and feedback.
8. Considerations for Product Mockups:
Understand the target audience and purpose of the mockup.
Pay attention to lighting, shadows, and reflections to make the mockup realistic.
Test the mockup on different backgrounds to ensure versatility.
9. Outsourcing:
If creating 3D models and renders is outside your expertise, consider outsourcing to professional 3D artists or agencies.
Remember to practice and experiment with different techniques to refine your skills. The field of 3D rendering is vast, and continuous learning is key to staying updated with the latest trends and technologies.

#shirts#shirt design#artist shirts#tees#tshirts#toby's beans#coffee cat#sundew farms#sunflower fox#sugarbritches#apple orchard#vintage logos#logo design#shop#merch#countrycore#farmcore#cottagecore#fashion#my art#horror#slashers#graphic design#the conjuring#the conjuring 3#the conjuring: the devil made me do it#scream#scream 1996#a nightmare on elm street#anoes
2 notes
·
View notes
Text
Digital Skills Portfolio
by u3273950 Ashka Rajkotwala
Being a designer, I also wanted to learn new skills and get updates with trends and new software – Through this portfolio I have tried to learn new forms of design including interior designing, graphic design, website design and much more. While making this portfolio, I have gained some knowledge of new software, tools and how I can incorporate these skills in professional practice. It was a wonderful opportunity to break boundaries and learn new software while improving and developing my skills.
5d planner
As I want to stay updated with current trends and skills of the design industry particularly in my field of interior designing. I choose to learn new Ai based software which is partly free and quicker to use.
updated with the ongoing digital development and market trend in the industry of interior designer- initially I want set target to develop my skills for planner 5d - that I can sever my client with initial look of the space within a day so they can get rough idea about it, as 3D renders takes more time. I tried to learn basic use of tools through YouTube tutorials and then explore the software in my own way. I learned basic use of software through
“Create Your Dream Home Now @Planner5d.” Planner5d.com, planner5d.com/interior-design-courses.Online Interior Design School: Interior Design Classes Online (planner5d.com)
“Learn How to Use Planner 5d for Interior Design - Search Videos.” Bing.com, 2024, www.bing.com/videos/riverview/relatedvideo?q=learn+how+to+use+planner+5d+for+interior+design&&view=riverview&mmscn=mtsc&mid=BFF68585BA5E5F13C71CBFF68585BA5E5F13C71C&&aps=0&FORM=VMSOVR. Accessed 27 Sept. 2024.


2. Rhino
I wanted to learn more about this software to get better render outcome, through this software i was able receive superior quality pictures after render but it consumes lot of time to get render thus, this software can be used once the design of the space is finalized and it is just a final digital presentation, minor changes can be done. I tried to gained knowledge about this software through-
“Learn How to Use Rhino for Furniture Designing - Search Videos.” Bing.com, 2024, www.bing.com/videos/riverview/ relatedvideo?q=learn+how+to+ use+Rhino+for+furniture+desig ning&&view=riverview&mmscn= mtsc&mid=CCF401E5530DF13 F1798CCF401E5530DF13F179 8&&aps=27&FORM=VMSOVR. Accessed 27 Sept. 2024. Bing Videos
“Learn How to Use Rhino for Furniture Designing - Search Videos.” Bing.com, 2024, www.bing.com/videos/riverview/ relatedvideo?&q=learn+how+to +use+Rhino+for+furniture+desi gning&&mid=E8FF2499EAD98 9137D14E8FF2499EAD989137 D14&&FORM=VRDGAR. Accessed 27 Sept. 2024. Bing Videos


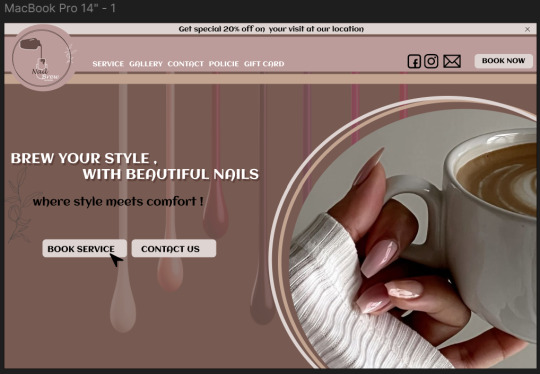
3. Figma
Figma is one of the best software for UI/UX design, so while developing my skills for using this software I tried to design an application in the last semester and while exploring more about this software, I took opportunity to design website again for my upcoming small business of nail salon. I learn to use this software with the help of YouTube tutorials-
Figma for beginners (4 parts) – Figma Learn - Help Center
“Learn How to Use Advance Figma - Search Videos.” Bing.com, 2024, www.bing.com/videos/riverview/relatedvideo?&q=learn+how+to+use+++advance+figma+&&mid=1DB775DB7A71CFDED2051DB775DB7A71CFDED205&&FORM=VRDGAR. Accessed 27 Sept. 2024.
Bing Videos
“Learn How to Use Advance Figma - Search Videos.” Bing.com, 2024, www.bing.com/videos/riverview/relatedvideo?&q=learn+how+to+use+++advance+figma+&&mid=1DB775DB7A71CFDED2051DB775DB7A71CFDED205&&FORM=VRDGAR. Accessed 27 Sept. 2024.
Bing Videos


4. Adobe Illustrator
As it comes to learning and exploring more about graphic design, I choose to learn and explore my skills through Adobe illustrator. I tried to learn about the basic tools of the software while exploring them for my own upcoming small business. I tried to create a logo for my nail salon. I learn about basic skills of the software through-
“Learn How to Use Adobe Illustrator for Vector Graphics and Illustration - Search Videos.” Bing.com, 2024, www.bing.com/videos/riverview/relatedvideo?q=learn+how+to+use+adobe+illustrator+for++Vector+graphics+and+illustration&qpvt=learn+how+to+use+adobe+illustrator+for++Vector+graphics+and+illustration&view=riverview&mmscn=mtsc&mid=DDE375C93017DEEDC6BCDDE375C93017DEEDC6BC&&aps=60&FORM=VMSOVR. Accessed 27 Sept. 2024.
How to Create Vectors in Adobe Illustrator: 12 Steps (wikihow.com)
“Please Visit Wiki How Directly.” Wikihow.com, 2024, www.wikihow.com/Create-Vectors-in-Adobe-Illustrator#:~:text=There%20are%20many%20ways%20to%20create%20vector%20graphics. Accessed 27 Sept. 2024.
How to Create Vectors in Adobe Illustrator: 12 Steps (wikihow.com)

5. Adobe InDesign
At last, while improving and developing my skill for Adobe InDesign, I tried to create a marketing template again for my upcoming small business of nail salon while exploring through this software, I learned how all the adobe software has their own specialty. I learned about this software through-
Nicholas Gratzl. “InDesign Tutorial Working with Graphics.” YouTube, 4 June 2020, www.youtube.com/watch?v=5r0BmzVyhOE. Accessed 27 Sept. 2024.Acrobat 2024 AGI BonBonBon 15 Try Adobe Acrobat AI Assisant 16x9 (youtube.com)
“Learn How to Use InDesign for Designing Exhibition Catalogs and Marketing Materials - Search Videos.” Bing.com, 2024, www.bing.com/videos/riverview/relatedvideo?&q=learn+how+to+use+indesign+for+Designing+exhibition+catalogs+and+marketing+materials+&&mid=3F871E0C3FFD09C41BF93F871E0C3FFD09C41BF9&&FORM=VRDGAR. Accessed 27 Sept. 2024.
Bing Videos

Reference
“American Society of Interior Designers | ASID.” Www.asid.org, www.asid.org/resources/resources/view/resource-center/339.
McKeough, Tim. “What Does the Future of Design Hold in the next 10 Years?” Architectural Digest, Architectural Digest, 2 Apr. 2019, www.architecturaldigest.com/story/future-interior-design-profession.
Nast, Condé. “The 6 Big Ideas Interior Designers Need to Know in 2023, according to ASID.” Architectural Digest, 8 Feb. 2023, www.architecturaldigest.com/story/the-6-big-ideas-interior-designers-need-to-know in-2023-according-to-asid.
All the image used are taken from Google and Pinterest
1 note
·
View note
Text

Rhino 3D and D5 Architecture Renderings Full Tutorial Course - Easy Dramatic Architecture Renderings
This course covers a brief history of renowned Dutch architectural painters Pieter Jansz Saenredam, Hendrick Van Vliet, and Emanuel de Witte. The course then goes into detail on the concept and methods of creating dramatic exterior architecture renderings from Rhino 8 and D5 Render. We will review texture mapping, how to create normal and displacement maps, editing materials, editing materials in D5, landscaping in D5, Lighting in D5, Views in D5, Capturing final renders in D5, and photoshop post processing.
#d5remder#d5#rendering#architecturerender#sections#architecturesection#rhino8#architectureportfolio#architecture#architecturediagrams#diagrams#architecturedrawing#rhino3d#3d#archtutorial#adobeillustrator#vectorart#infographic#graphicdesign#parametric#parametricarchitecture#structure#architectureplan#architecturecompetition#axon#axonometric#perspectivesection#perspective
0 notes
Text
Same Day Tour Packages: A Quick Getaway for Busy Travelers

Same Day Tour Packages: A Quick Getaway for Busy Travelers
Traveling doesn’t often involve weeks of planning or extended vacations. For individuals with limited time but a great desire to explore, same day tour packages offer the right option. These packages are ideal for tourists who wish to experience a new destination or return their favorite spots within a single day. Whether you’re based in a city and looking for a quick break or visiting a location and want to make the most of your time, same day tour packages appeal to every sort of traveler. This tutorial will discuss the range of alternatives available, why they are popular, and how to pick the ideal package for your needs.
H1: Why Choose a Same Day Tour Package? Same day tour packages are a terrific solution for individuals who are short on time but don’t want to miss out on exploring surrounding sights. Here are a few important reasons why these bundles are popular:
Convenience: Everything is pre-arranged, from transportation to entry tickets, so you can focus on enjoying your day without worrying about logistics. Cost-Effective: Since these tours are often limited to a single day, they tend to be more economical than multi-day tours or lengthy vacations. Time-Efficient: Same day excursions make the most of your available time, giving a short itinerary that covers the highlights of your selected destination. Flexibility: Available from most major cities, same day trips offer flexibility in choosing a place that meets your interests. H2: Popular Same Day Tour Destinations Many cities throughout the world offer a range of same day tour packages. Here are a few prominent destinations where you may easily take a day trip:
H3: Same Day Tour to the Taj Mahal from Delhi Perhaps the most popular same day tour in India is the trek from Delhi to the Taj Mahal in Agra. This historic monument is just a few hours from Delhi, making it the perfect destination for a day trip.
Duration: Approximately 10-12 hours Inclusions: Transportation (by car or rail), guided tour, admission tickets to the Taj Mahal and Agra Fort Highlights: Visit to the Taj Mahal and Agra Fort, with an optional stop in Mehtab Bagh for a fresh perspective of the monument Best For: Travelers visiting Delhi who wish to experience one of the Seven Wonders of the World without spending numerous days in Agra H3: Same Day Tour to Jaipur from Delhi Another popular day trip from Delhi is the tour to Jaipur, known as the Pink City. Jaipur’s rich history, gorgeous palaces, and vibrant markets make it an exciting destination for a same day tour.
Duration: Approximately 12-14 hours Inclusions: Transportation, guided tour, entry tickets to Amber Fort, City Palace, and Hawa Mahal Highlights: Explore Jaipur’s regal legacy, including the spectacular Amber Fort and the distinctive Hawa Mahal (Palace of Winds) Best For: History buffs and culture lovers who want to experience Rajasthan’s regal appeal in a short amount of time H3: Same Day Wine Tour in Napa Valley from San Francisco For those based in or visiting San Francisco, a same day wine tour to Napa Valley offers a pleasant retreat. With rolling vineyards and world-class wineries, Napa Valley is a terrific trip for wine enthusiasts.
Duration: Approximately 8-10 hours Inclusions: Transportation, wine tastings at selected wineries, gourmet lunch Highlights: Visit to famous Napa vineyards, wine tastings, lovely vineyard views Best For: Wine enthusiasts searching for a nice, yet fast, break from the city H3: Same Day Safari Tour from Nairobi If you’re in Nairobi and want to experience the excitement of African wildlife, a same day safari tour to Nairobi National Park is a wonderful alternative. Located just outside the city, this national park is home to lions, giraffes, rhinos, and more.
Duration: Approximately 6-8 hours Inclusions: Transportation, park entry fees, guided safari tour Highlights: Safari drive through Nairobi National Park, opportunity to witness wildlife in their natural habitat Best For: Nature enthusiasts and adventure seekers who want to enjoy a safari without straying too far from the city H2: What to Expect in a Same Day Tour Package Same day tour packages often include various things that make your journey pleasant and enjoyable:
H3: Transportation Most same day tours provide round-trip transportation from your starting point, whether by private car, bus, or train. For overseas tourists or business travelers with limited time, this ease is one of the primary selling features of same day excursions.
H3: Guided Tours Professional guides are often included in same day trip packages. These guides provide essential insights into the history, culture, and significance of the sites you’ll see. They can also assist you make the most of your limited time by pointing out the essential attractions.
H3: Entry Fees Entry tickets to big attractions are often included in the package price. This saves you the stress of obtaining tickets on-site and assures you have access to all the must-see places.
H3: Meals Some packages may include meals, such as a lunch break at a nearby restaurant. In the event of wine tours or luxury experiences, gourmet meals may be part of the package.
H2: How to Choose the Right Same Day Tour Package With so many alternatives available, how do you pick the finest same day trip package? Here are a few guidelines to help you choose:
Consider Your Interests: Whether you’re a history buff, nature lover, or foodie, there’s a same day trip to meet your interests. Look for packages that cater to what you appreciate most. Check Inclusions: Make sure you know what’s included in the package, such as transportation, food, and entry tickets, to avoid any surprises. Read Reviews: Before booking, check user reviews to get a sense of the tour’s quality and what prior travelers thought of the experience. Budget: Same day trips are available at varying pricing points, from budget-friendly options to premium experiences. Choose a plan that meets your budget while still giving a terrific experience. H2: Conclusion Same day tour packages offer a handy, cost-effective, and fun way to visit new areas without having a long vacation. Whether you want to see the Taj Mahal, sip wine in Napa Valley, or go on a safari near Nairobi, there’s a same day tour that caters to your interests and timetable. By picking the proper package, you can make the most of your time and enjoy an outstanding experience, all in just one day.
FAQs
Q1: What is included in a same day tour package? A: Most same day tour packages include transportation, guided tours, admission fees, and sometimes meals.
Q2: Can I customize a same day tour package? A: Some tour operators provide customisable packages, allowing you to adapt the tour to your liking.
Q3: How long do same day tours normally last? A: Same day tours normally last from 6-14 hours, depending on the destination and schedule.
Q4: Are same day tours good for families? A: Yes, many same day trips are family-friendly, especially ones that incorporate historical sites or nature attractions.
Q5: How far in advance should I schedule a same day tour? A: It’s advisable to book at least a few days in advance, especially during high tourist seasons, to ensure availability.
0 notes
Text
Week 9 – 3D Scan for Printing
This week's activity is to scan a model and prepare for 3D printing.
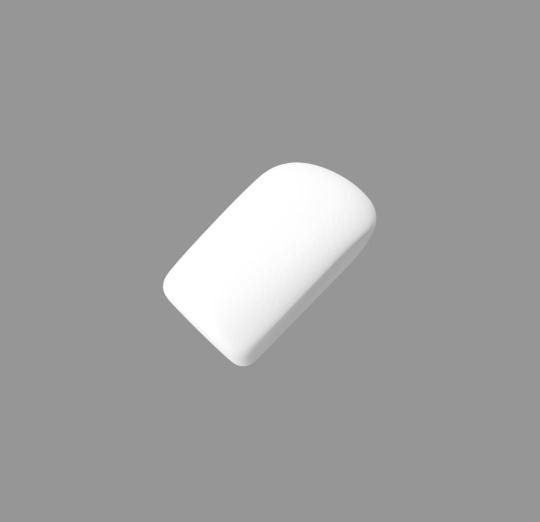
Before continuing to 3D print, I redo my physical model from week 8 cause I was not satisfied with the previous result. In Andrew Simpson's video, he talked about sketch models could be made with more freedom with little alterations. It has inspired me to go border and made more variations, such as copping the edges off, rounding the edges, etc. With the help of using a hot wire cutter, it was much easier to create the model with a smooth edge. With this result, I have pushed myself to create a more curved model that I liked from my week 6 sketches. The result was better than I expected with the hole in the middle, as recalling the 'O' of Olay.


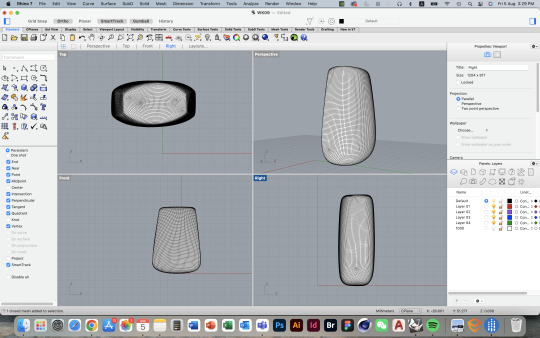
PART I
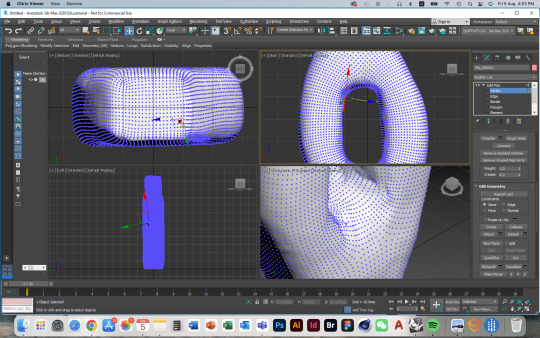
Before moving on to do a 3D print, it is necessary to modify the sketch model. To modify the given model, I have used Rhino to refine the mesh and origin of the model. After that, I moved it to 3Ds max and used the Edit Poly with the Relax tool to smooth the edges and fix the dents. As it is the first few times for me to use 3Ds Max and there are other assessments that make to use other software, I have already forgotten most functions of the software. I looked back to the recorded tutorial and search online for the modifier and it helped me through the process.

PART II
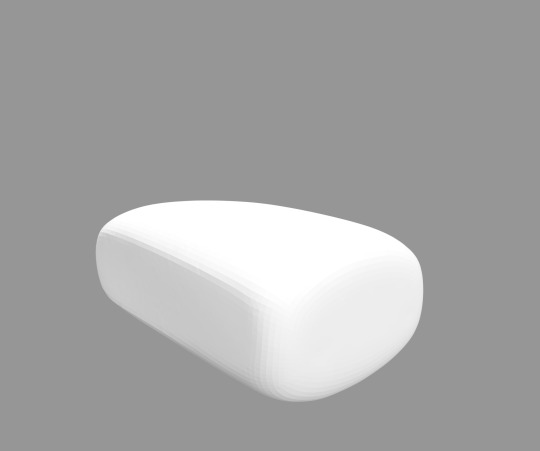
After modifying the given scanned model, I have tried to modify my own scan model. I have chosen my second model as it shows a better design theme and alteration than the previous one.
Modifying my own model was much harder than the provided model cause my handmade one is quite rough, maybe I should use finer sandpaper to smooth the surfaces. The model is also uneven as curve edges are hard for me to make. To solve the problem, I used the Edit Poly to relax the surface and also use the symmetry tool on the x-axis to make the model even. As my model was a bit thin after creating a curve and sanding the surface, I also used the symmetry on the y-axis to thicken it. Finally using FFB to reshape its form of it.
Overall, I am very satisfied with the final result as compared to my handmade model. The first process of modifying the given model had refresh my memory and helped me to work out my own model. After all these adjustments and processes, I think it really boosted me to understand the modifiers in 3Ds Max and how important sketch models and digital software can lead to the refined final product.


6 notes
·
View notes
Text
Week 1 - Getting Started
INTRODUCTION
This week is all about getting started in Communications 2. There is quite a bit of set-up required so please make sure you follow the instructions given and ask for help early should you need it.
LEARNING OBJECTIVES
By the end of this week you should:
1. Gain an awareness of how the course is structured, the approach we will be taking and why.
2. Begin to develop and understanding of what sketch modelling is, and how you can use it in your design workflow.
3. Start to build familiarity with the tools of engineering drawing and how to use them to draw accurately.
PRE-CLASS ACTIVITIES
These activities are to be completed prior to the commencement of our live tutorial session on Friday:
1. Make friends with Moodle
Moodle will be your ‘go to’ for all things administrative, including general course information, information relating to assessments, weekly resources, announcements, virtual classroom access and lecture recordings.
If you haven’t already, login to Moodle and review the IDES1262 Course. Expand each of the tabs and take a good look around. Explore the active links (shown in blue). In particular, make sure you have read the Course Outline which is accessible through the Course Information tab.
2. Prepare your drawing equipment
You will be using your drawing equipment in the very first class so it is important that you have it ready to go on the day. You will need:
Tee square
Set squares
Sticky tape (removable tape is preferable)
Compass
Circle template
Mechanical drafting pencil
Eraser
Eraser shield
Fine-line ink pens
Scalpel / snap blade
Steel rule
Cutting mat
A3 bond paper
3. Complete the Week 1 reading
Please complete the assigned reading on Engineering Drawing (see Week 1 Resources tab on Moodle). It covers an introduction to engineering drawing equipment and standards.
4. Install required software
The software listed below are to be installed on your computers /devices. These are important resources to help you fully engage with the learning activities of the course. Next to each item of software is the week we will start using it. Make sure that you have installed and tested the software before class in the week indicated.
Adobe: Available through your Adobe CC subscription (free access with this subject)
Adobe Scan (phone): week 1
Adobe Photoshop: week 1
Adobe Camera RAW: week 1
McNeel & Associates (Rhino): You can access Rhino as a free subscription on a trial basis. If your trial has run out because you used it in Term 1, you will need to create another account using a different email address. Alternatively you can access it over the UNSW MyAccess virtual software portal. You can also purchase a student licence at a heavily discounted price from the developer if you like.
Rhino: Week 4
Autodesk: Sign up for a student account for free access to Autodesk software. If you are a Mac user, you may need to use 3ds Max over the UNSW MyAccess virtual software portal.
Fusion 360: week 8
3ds Max: week 8
IN-CLASS ACTIVITIES
Below is the schedule of activities we will be completing during our virtual class time:
1. Lecture: Course introduction & Methods of Communication
2. Activity: Student discussion
3. Lecture: Engineering drawing (part 1)
4. Exercise: Drawing instruments & geometric construction
In order to complete these activities you will need to have engaged with the Pre-Class Activities. Don't forget to have your drawing equipment set up and ready to use!
POST-CLASS ACTIVITIES
These activities are to be completed by the Monday evening evening following our virtual class:
1. Make sure that you can access the class blog
If you are having trouble, seek help immediately!
2. Make your first blog post
For your first blog post, write a brief introduction about who you are and tell the class something we might not know about you. Maybe it’s why you’ve chosen to study Industrial design, a new hobby you’ve taken up recently, or just something else you love doing in your spare time. Don’t over think it or spend too long – just a sentence or two is fine!
Say “hi” to a couple of your colleagues by adding a comment to their posts.
Note: Whenever you make a comment on another student’s post, hit the like button (heart icon). This is how we can track your comments and award you marks towards the peer engagement component of your assessment for this subject. Please do not like any posts that you do not write a comment on.
3. Make your second blog post
For your second blog post, follow the Typical Blog Post Format example on the O Week Resources tab on Moodle. This is the format we will be using each week. It should include the week and topic name as the tile, a short reflection and some images documenting your process creating the items in the class activity.
Base your reflection around on your learning experiences within Communications 2 this week. You might ask yourself:
What went well / what did I have difficulty with?
What did I enjoy / dislike?
What would I do differently if I had my time again?
What were some of the key things I learnt, or insights which I developed?
What led to those experiences or insights?
You can consider some or all of these, or any other questions which you believe are relevant. Try to write about 200 words.
Following this, post a series of images that help show the process you used to create the items you produced in the studio tutorial exercise.
NOTE: Please make sure you always make your blog posts to your own account, not the IDES1262 class feed.
4. Reply with a note on to two of your classmates’ blogs
You might make a comment that includes:
Identifying some aspect of their work you think they did particularly well at
Identifying something in common that you struggled with
Let them know how you have tried to overcome that struggle – maybe you found a resource, method or technique that was helpful?
Ask them if they have found a way to overcome something you struggled with
Note: Hit the like button on posts that you comment on so that we can track and award you marks for your feedback contributions.
ADDITIONAL RESOURCES
1. e-Portfolios
Our Tumblr blog is essentially what’s known as an e-portfolio. The following link gives some background on what they are and why they are useful in a learning and teaching context. Click here
2. Giving & receiving feedback
The ability to give and receive feedback is incredibly valuable and an integral part of learning. Like other complex skills, giving and receiving feedback requires knowledge and practice. Click here
3. An introductory video series on drafting tools - Drafting 101
The Drafting 101 video series gives a basic introduction into many of the most common drafting tools. Click here
4. Food for thought - The Power of Vulnerability, Brene Brown
Design (and creativity more generally) involves risk taking. It requires a willingness to put yourself ‘out there’ and to try things that may not work. You will get the most out of our blog if you allow yourself to be open and honest, whilst at the same time creating an environment where those around you feel comfortable to do the same. In this talk, vulnerability expert Brene Bown gives some insights from her research which you might find relevant and interesting. Click here
Feel free to connect these with any of your own experiences this week in your written reflection.
#ides1262 2022 Week 1
7 notes
·
View notes
Text
thoughts abt some non-minecraft games ive had recently
Halo Infinite. i am straight up not playing through all the weekly halo infinite challenges just to get a backdrop emblem, player emblem, armor emblem, vehicle emblem, or weapon emblem unless it slaps unbearably hard that it practically redefines the category (ie, weapon emblems that wrap around the whole gun or glow or whatever) so i've basically stopped playing this for now. hopefully eventually it gets better but i doubt it. Halo: Master Chief Collection. They straight up changed the upcoming exchange items on halo mcc this week, it used to say upcoming would have Halo 3: GEN2 Tinted Smoke techsuit next week but now it doesn't and probably won't. also worth noting that last week was a bit of an anomaly because it required 9 season points total to get all the exchange items instead of the usual 8 total season points and also the smoke techsuit would've made the total go all the way up to 10 and without it it's only 6 points. (you can only gain 12 points every week, excluding points from seasonal challenges and the first 100 rankups) Splitgate. my beloathed. love the drop system but also hate it. they need to fix team swat so it gives battle rifle challenge progress as it makes no sense that it doesn't, yet laser tag gives plasma rifle progress and you can easily get the gold Big Fuckin Bat Blunt-Force Bludgeon by playing grifsplitball. fun, feel like i should like it more but it doesn't really capture my emotions or make me want to play much of it, but that's also kind of a good thing. Also the paid shop is laughable at times, and i hate how they legit just rotate shit in and out. the current featured package (gold) looks like absolute trash compared to last weeks (ngc rhino armor). The Cycle: Frontier (beta). It's a full loot pvpve shooter. I killed a guy who was as nooby as i was, took his stuff then extracted. then i got killed my next two trips by duo teams with high tier gear. there's one type of enemy that is basically cannon fodder and then scorpions who are bullet sponges and thus take a long time to kill while using up stamina and making a lot of noise. didn't enjoy this game on a fundamental level so i uninstalled it and probably won't come back to it until at least full release. Destiny 2 (as a f2p). recently got into this. its super cool but it has problems too. hate the confusing progression system with the soft cap thing and different layers. older areas feel useless to grind in/for, for example say i really like earth, theres no reason or utility you can really get from reputation turn ins. would be cool if there were shaders (weapon/armor coatings) or guns you could only get after getting to a very high reputation with certain factions but at least for EDZ that doesn't seem to be the case. cosmodome is basically a tutorial area rather than a fully fleshed out area. also as a latecomer to this game while a lot of the older content is still accessible there is a significant portion that's just straight up stuff i missed out on and am unable to by design unlock. which sucks because i feel like a big part of the way the game UI is structured almost encourages the concept of collecting everything which literally isn't possible for 99% of players.
8 notes
·
View notes
Text
Week 8 Studio Tutorial – Digital Iteration
My understanding of Andrew’s own explanation of ‘low-fidelity’-’hi-fidelity’
He gives examples from the handle, which from the aluminum handle, brass handle to plastics handles versus 3-d print. In my interpretation, it was a process from hi-fidelity to low, from the accurate and high-quality material towards the fast production. Hi-fidelity refers to be featured by minimal changes in sound reproduction; whereas, low-fidelity produces less accuracy and with less perceived value compared to the hi-fidelity. Hence, the difference between these two concepts results not only in the material but also in the perceived value, such as the feeling when users grip the weight of different handles.
From low to high, this process is a traditional and clean process to output the highest; however, from high to low, this is a way to test various aspects simultaneously and research different elements to add to the design.
Part1 introduces the basis and provides preparation for part2
CAD(Computer aided deisgn) has become mainstream, alomost every modern manufacturing company has access to at least one form of CAD or another. It helps me to achieve the design in a cheap and less cost mode in a most realistic way. Also, I suppose, 3d modeling would be a mundane performance for laymen, such as customers and factories. Compared to paper or sketching, a 3d file can be easily sent to everywhere by Internet.
By watching the recordings of the class several times, I have achieved the objectives overall, from conceptual understanding for 3ds max and quick generations. Before the class, I was extremely worried about computer-aided design, because I suffered a lot from the time of Rhino😫. However, everything was beyond my expectation positively😁. I get well on 3d max, especially the high-tech design of the interface, which was much more friendly.
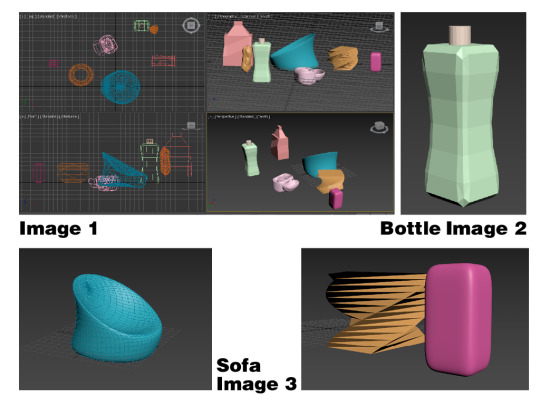
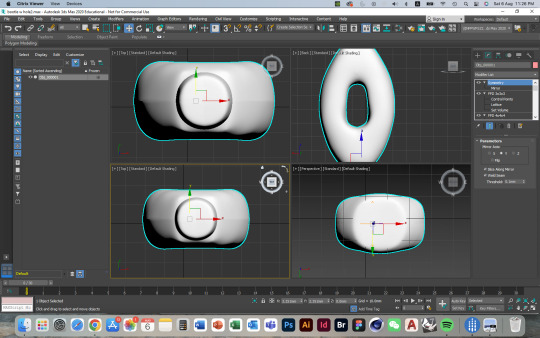
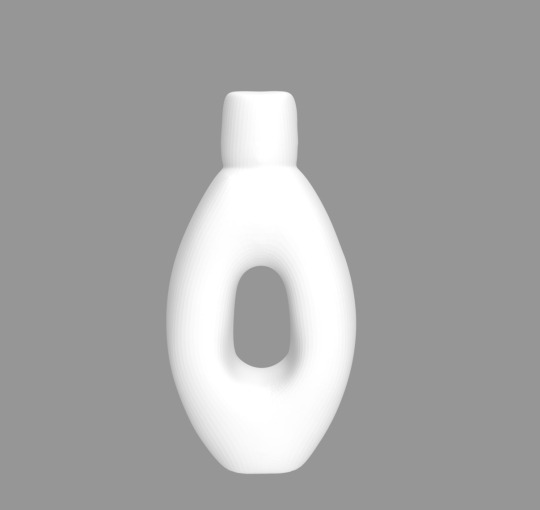
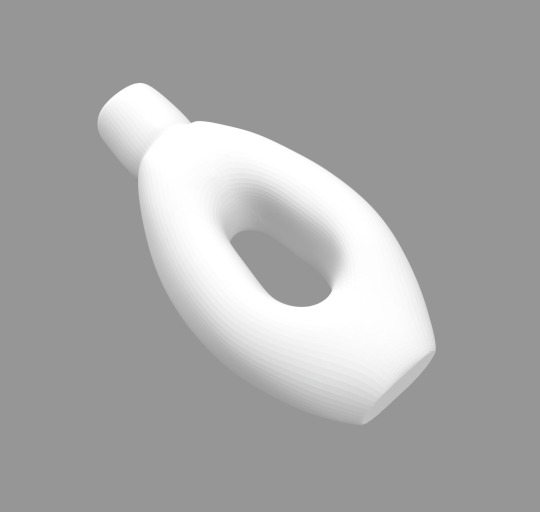
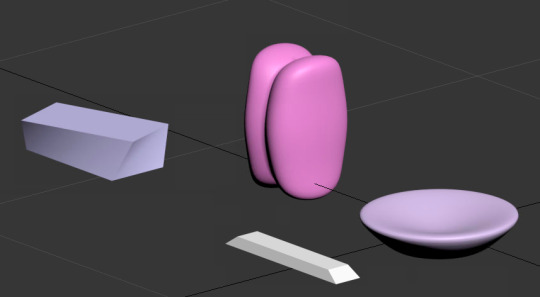
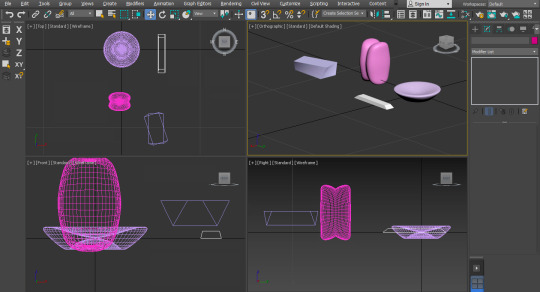
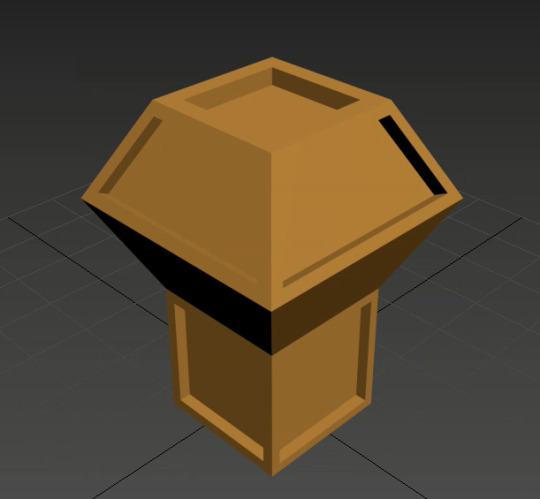
My favorite: I enjoyed playing the modifiers and changed the numbers from different components(image1). I felt like this was magic, especially displaying the twist, mesh smooth, and the FFD, which can be seen from my bottle(image2); Organic shapes of the sofa were performed by squeeze(image3); lastly, I made myriad changes in edit poly to apply multiple layers inside the box, so that the container could be functional(image5). Actually, this was hard to define the numbers to the mesh smooth and squeeze; for me, I solved it by several failures from experiences.

My biggest regret ever: If I had time next time, I’d definitely save the file every 15 minutes, because when the rendering started, the application is going to easily break down. This is the reason I did twice this week. This point I assume that the fatal disadvantages are software complexity, aaintenance and Upkeep. Everything starts from digital devices, but also ended in its machinery shortcommings. The success or failure of the affair is all due to the very same point.
Online exercises and tutorials offered a series of episodes to lead me into the 3ds max: currently, it would be likely to create the object type first, then with various modifiers.
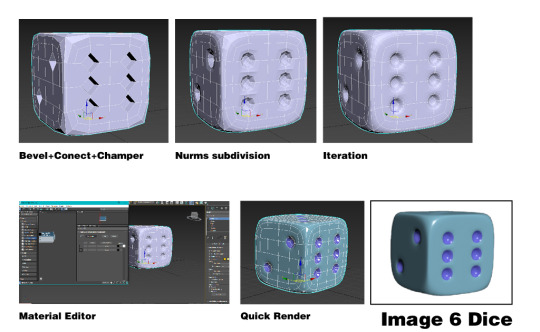
At last, I wanted to add material on the surface and did the quick rendering where the dice was designed by the aid from the tutorial(image6), which resulted in a glassy effect through several stages, bevels, connect, chamfer, and NURM subdivision. I like the way how bevel turned out to reveal the depth and details.

In a nutshell, digital works always benefit from techniques but are also limited by familiarity at first. Specifically, it was a process like clay making: firstly, the rough and overall structure; then with details and alterations. Next time, I would go further about the modifier list.
18 notes
·
View notes
Text
Week 8 Exercise Reflection
Week 8 was an exciting and painful week for me. I especially like learning modeling software, such as rhino in the last term. I like the precision and logic I feel in the process of software modeling.
This week, we had a preliminary understanding of some basic operations of 3dsmax, a modeling software. Including understanding the composition of UI, modeling logic and the use of some tools, etc. I think I have done a good job in understanding software modeling methods. In class and Autodesk tutorial, I have learned a lot about how to make efficiently in 3dsmax. I can express what I imagine through the skills I have learned. In this regard, I think I am successful.
Difficulties
But this process is still very difficult, because I have been very familiar with the operation of rhinoceros before. In a sense, I have formed a modeling idea in rhinoceros. Therefore, in 3dsmax, there are many operations that are very different from what I expected, including rotation, translation, viewing angle, etc. During the production process, I felt a little uncomfortable. But after a period of trying and learning, I can naturally be handy.
But another problem has been bothering me: the system compatibility is not high. In my acess, both resolution and system response speed make the whole modeling process very bumpy. Including the incompatibility of magic mouse and the incompatibility of ALT and option on the keyboard. In addition, due to the performance of GPU and the way similar to simulator operation, display problems often occur. But under such difficult conditions, I still successfully completed the exploration of some models.

1. Modifier: love
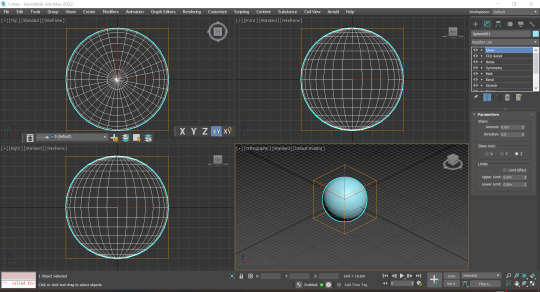
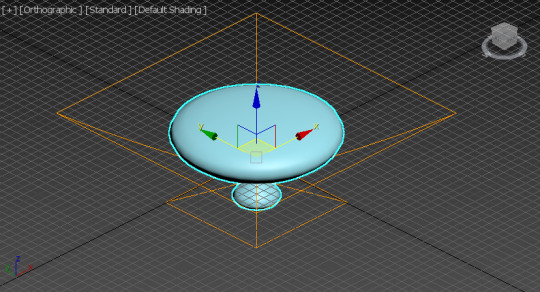
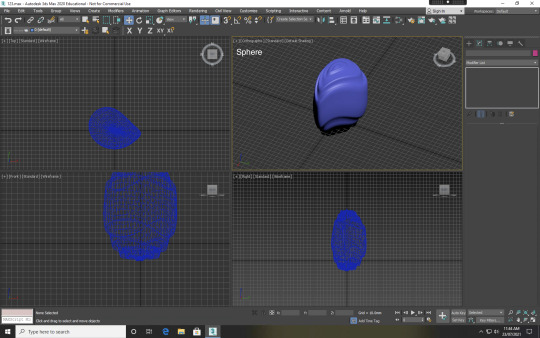
In task 1, I start with a sphere and superimpose different modifiers on it. Including bend, stretch, squeeze, taper, etc. Then, I used symmetry to turn the original model into two staggered together to form such a heart.

2. Edit polygon: sofa? chair?
Later, when I began to study some methods and techniques about edit polygon. This method allows us to modify the appearance properties of a shape in some detail. Including extrusion, chamfer, etc. Through these methods, I designed a chair (or a single sofa?) with a base integrated with an armrest.At the handrail, I use the chamfer adjustment to make the overall visual feeling more comfortable.
Interesting fact: the angle of this sofa chair and cushion is based on the famous Barcelona chair.

3. Pratical attempt
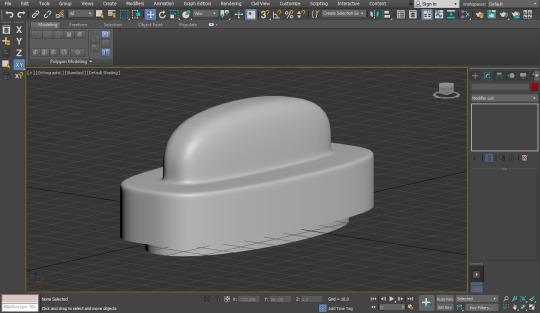
When I was basically familiar with these techniques, I tried to create my Olay moisturizer bottle in this. The final product looks okay. But I think the shape formed by adjusting the surface is not smooth enough, whether using edit polygon or edit mesh, but I have no other solution.

If I had a chance to do this. The best thing is to prepare a Windows computer lol. If it is really difficult to achieve, I think it is necessary to prepare a mouse with a scroll.
After I finished this exercise, I thought about it. I think learning modeling software is a very important thing, because it provides a new idea for us to express our ideas. Due to the development of science and technology, all kinds of modeling software are good communication tools. It is more intuitive and comprehensive than painting; it is more convenient than a physical model. But we can't rely entirely on it. Our communication skills must be comprehensive.
12 notes
·
View notes
Text
Week 8 Studio Tutorial – Digital Iteration
In this week’s tutorial, we learned about model making techniques through 3ds Max, which is a new software to me.
Actually, I’ve learned and used about some other modeling software in previous study, such as Rhino and Solidworks, all of these are really powerful software for us to make models digitally, they contained many commands which could help us to build an amazing work. However, compare 3ds Max with Solidworks, I would say I enjoyed Solidworks more. Sorry, I’m not saying the 3d Max is bad, they are just different from each other. 3ds Max has four grids which represent four different views in the interface, quite similar with Rhino, top, front, side and perspective views, so at first glance, it gives a sense of restraint. By contrast, Solidworks only have one window, you can zoom in and out, and rotate the window by holding the mouse wheel to any view that you like, it’s quite intuitive, but they are all professional model making software.
For part 1, we worked with many different tools such as gizmo, primitives, and modifiers. I made a sphere by following the steps, and I applied these functions on that sphere, it’s very interesting to see the changes by adjusting some data. I tried squeeze, melt, stretch and so on. I also made some other shapes and see the effects.


For part 2, after watching the tutorial videos from the Autodesk Getting Started series, I tried to make a lough chair and some abstract objects, by using extrude, inset, NURMS and many other commands. I enjoyed that exploring, seeing all kinds of changes makes me feel fresh.

Next week, we are going to make our own Olay bottle, I believe that will be more difficult, so I will get more familiar with the 3ds Max. Looking forward to the new explorations!
Pre-class activity:
Model making could help us to understand better in a physical way with what we want to build. Andrew mentioned that this project looked at perceived value styling but then also ergonomics. So, hundreds of models were made to check different styles and shapes of handles, physical size and how the user interacts with it but then also materiality as a way of perceived value, that are what sketches and drawings could not do. For example, clients will have different feeling from a aluminum handle to a brass handle.
For "low-fidelity" and "high-fidelity", in my opinion, they refer to the level of detail, quality of the model and functionality included in a prototype. Andrew said that they might have started with a higher fidelity one and then go to low fidelity, to check different aspects and bringing in different elements into the design.
13 notes
·
View notes
Text
Week 8
This week's tutorial was really hard. I like to think I’m quite capable with CAD modelling software such as fusion and rhino however I started completely rethinking this with 3DS MAX. I needed to rethink in a completely different manner to what I did when using fusion or rhino as nearly all of the commands were different, further as it is a software for Microsoft all of the commands shown in the video were different to the ones I was inputting, which was including either one or two extra commands to make it work. This software was also a lot different to what I was used to as the steps involved to create an object were very different. Once I started understanding how to form and model objects the process became more clear and less frustrating. However, during the start of using 3DS MAX, I still had the mindset of modelling like I would in rhino or fusion, which made the process a lot harder. Having to unlearn what I know to be able to see it in another perspective is more challenging than I expected, I mindlessly reverted back to commands and steps which stuffed up my work and made it take hours longer than expected.
Aside from my troubles with the program, I can see the capabilities it has when a user is used to it. It fascinated me when looking online at major projects people have made using 3DS MAX. If I had the chance to redo my process I absolutely would. I would spend no time trying to figure out commands and buttons on my own, and instead work alongside instructions straight away. This would decrease time and frustration buildup. For my models I made a very basic computer, and for the second I recreated the bench seat from the train station to learn the proper modelling technique in 3DS MAX.

6 notes
·
View notes
Text
WEEK 8: Digital Iteration
As per usual I was again slightly nervous to use CAD software as I always find it quite tedious and an enduring process. Once 3Ds was powered up I was faced with the the array of tools and functions that were available. However as intimidating as it was I found that step by step this program was more simple to navigate than Rhino 7 which I found difficult to operate in the past. This was thanks to the simple panning & viewing options which come with 3Ds, Rhino locks panning functions and its a fiddle to negotiate.
Through the use of the tutorials, I found that by starting with a simple cube shape and then utilising the modifiers (such as taper, twist & bend etc), an interesting shape can become quite achievable and very rewarding to create. The work I was creating was certainly not amazing but I was quite pleased with the detail achievable through the simple modifier functions.
I really enjoyed polygon modeling, where I felt I could let my creativity run free and create something that is actually quite abstract when manipulating simple primitives. The “bevel” and “intersect” poly tools were my favourite to experiment with, allowing interesting details to be produced with the freedom of direction.
Through completing this body of work I learnt that 3D modeling is tedious however with patience, it is no where near as difficult as I thought it was. Overall I enjoyed this body of work despite its challenges.

3 notes
·
View notes
Text
Week 8 Reflection
The activity of this week class was interesting yet quite challenging. This week, we mainly focused on the use of 3Ds Max. Before we started the activity, we were asked to watch a series of videos that related to 3D Modelling. For example, there was a video about the development of razors by Andrew Simpson, in the video, he shared a series of models of the razor and he discussed the way he modelled them and emphasized the importance of High-fidelity and Low-fidelity.
For the activity in class, our main purpose is to explore and be familiar with the use of 3Ds Max and try to use it to make some models. Although I watched the demonstration of the tutor in class and had some experience with Rhino using, when I actually operate 3Ds Max I felt this was quite difficult because I was not familiar with the various options of the interface and I didn't know each function of them. So, in order to solve these problems, I searched some tutorials resources and watched some videos on my own time, which was very helpful for me. And after that, the process of my work went well.
The models I made(image1-5) I felt was not bad but still needs to be improved. For these models, I tried to explore some of the Modifiers such as Squeeze, Stretch, Bend etc... I tried to apply them to my models as well and found the effects of these modifiers on the models. The most I used of these modifiers were Squeeze and Edit Mesh, because I think they are easier to control and can efficiently show the results I want. In the activity of next week, we will need to use 3Ds Max to make the Olay bottle we have created before. I think that will be more difficult to do, so I will do more practice and research of the 3Ds Max.
Image1

Image2

Image3

Image4

Image5

5 notes
·
View notes
Text

Rhino 3D and D5 Architecture Renderings Full Tutorial Course - Easy Dramatic Architecture Renderings
This course covers a brief history of renowned Dutch architectural painters Pieter Jansz Saenredam, Hendrick Van Vliet, and Emanuel de Witte. The course then goes into detail on the concept and methods of creating dramatic exterior architecture renderings from Rhino 8 and D5 Render. We will review texture mapping, how to create normal and displacement maps, editing materials, editing materials in D5, landscaping in D5, Lighting in D5, Views in D5, Capturing final renders in D5, and photoshop post processing.
#d5remder#d5#rendering#architecturerender#sections#architecturesection#rhino8#architectureportfolio#architecture#architecturediagrams#diagrams#architecturedrawing#rhino3d#3d#archtutorial#adobeillustrator#vectorart#infographic#graphicdesign#parametric#parametricarchitecture#structure#architectureplan#architecturecompetition#axon#axonometric#perspectivesection#perspective
0 notes
Text
Week 8 Reflection
The use of CAD software for designing, especially industrial designing, is extremely important. This week, the work consisted of experimenting and learning to use one of these CAD programs – Autodesk 3DS Max.
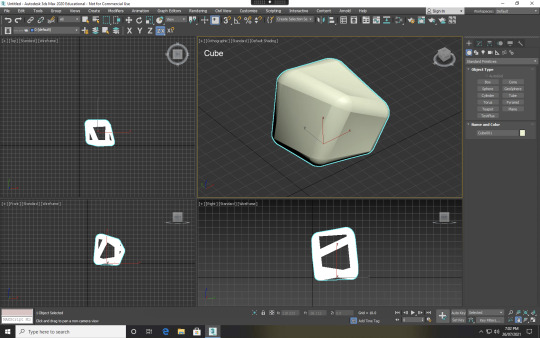
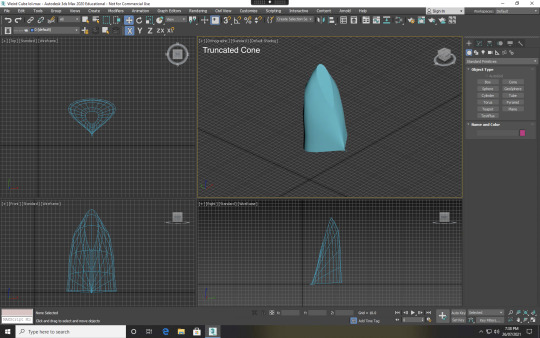
The only 3D modelling software I have had exposure was in Rhino (for BENV1010 in term 1) where I struggled in using it. I knew using 3DS wasn’t going to be easy so I braced myself for the worst! Trying to get used to the interface and the tools/mechanics of 3DS was extremely confusing for me. But luckily, part 1 of the activity was to just experiment with general 3D shapes and modifiers, which I helped a little (though I still couldn’t figure out how to use all the modifiers). We started off with a sphere and were allowed to experiment with other shapes. I used a cube and a truncated cone for the next two.
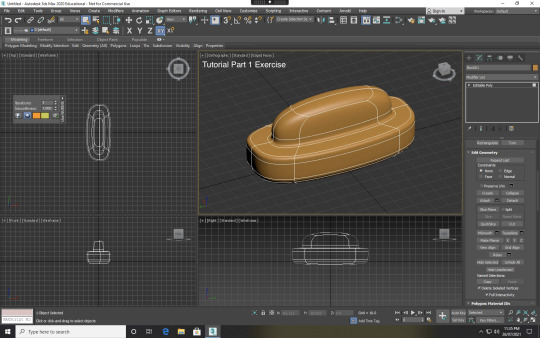
After experimenting with the tools and the interface, I then watched the online tutorials in using polygon based modelling for 3DS Max. They introduced some very interesting tools like inset, bevel, extrude and NURMS as well as other options to further manipulate the object. I went on to follwo the tutorial part 1 just to familiarise myself with these tools so I wouldn’t struggle too much later. I ended up with a satisfactory result, mainly because I was just following a step-by-step procedure.
Now, I know that following a tutorial and doing things by yourself are two completely different things, but it shouldn’t be too diffucult because I’ll simply just be applying what I learnt from the two tutorials that I just watched, at least that’s what I thought. As you can guess, I was terribly wrong. I spent so much time trying to recreate something similar to the tutorials and I kept failing. I spent so much time trying to figure out where I was going wrong with my steps based on the tutorials than trying to make it my own with my specific manipulations. I pushed through this and come out with some decent results I think.
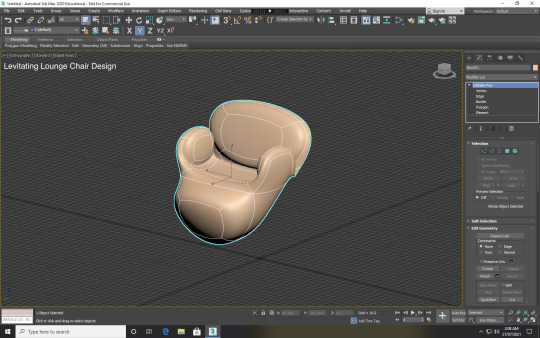
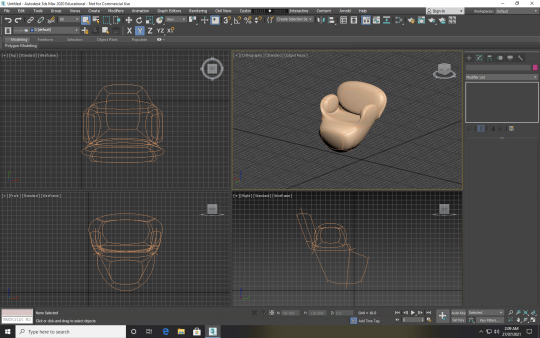
The first one I came up with was a levitating lounge chair.
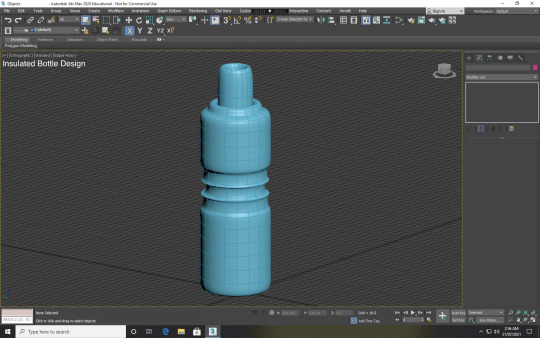
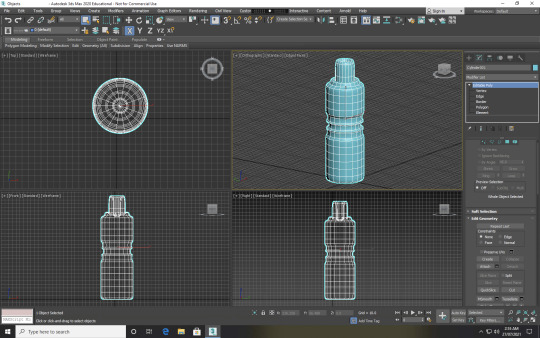
The second one I came up with was an insulated bottle.
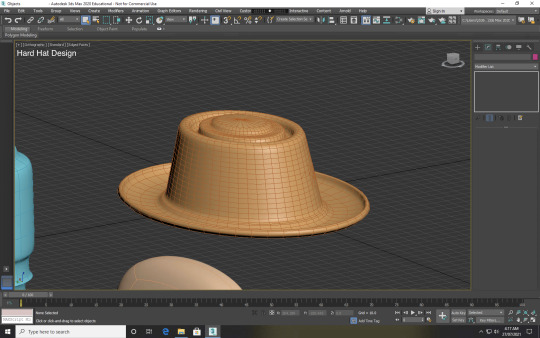
The last one I came up with was a hard hat (that looks like a regular hat).

Overall, this week was probably the most challenging for me. I need to practice more using CAD softwares (I have heard that they are all very similar to use) and make myself proficient in them for my future. Though it was challenging, I think it gave me a good taste of what to expect in learning further with these programs.
4 notes
·
View notes