#sc32
Text

Scarfolk Council
© Richard Littler
7 notes
·
View notes
Photo
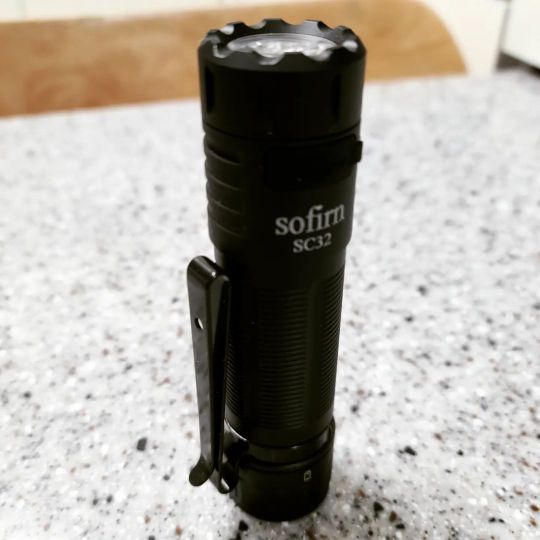
#18650 배터리 충전시스템 내장 라이트로는 상당히(최고수준으로) 작은 축에 속하는 물건. #전술라이트 컨셉이라 작동모드 딱 좋음. LMH 순서의 모드 변경. 메모리 있음. 어떤 상태에서나 터보모드, 스트로보모드 즉시 진입 가능. 테일스위치는 전자식이라 기생드레인이 있다는 것이 단점이나 클릭감이 확실하고 작동 신뢰성 높음. 전자식 스위치 자체는 장점으로 봄. 최대 2천루멘, 직선조사 214미터, IP68방수방진, 색온도 6500K(5000K대의 선택옵션 있음) 나온지 얼마 안된 제품이라 그런지 리뷰가 드물어서 모험삼아 질러 봤는데 다양하게 사용하기 너무 좋음. #sofirn #sc32 https://www.instagram.com/p/Ck5AQlQvuyq/?igshid=NGJjMDIxMWI=
0 notes
Text
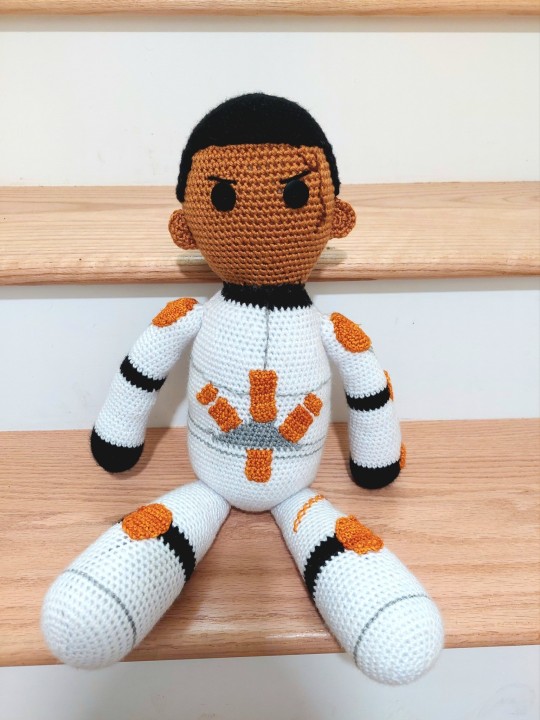
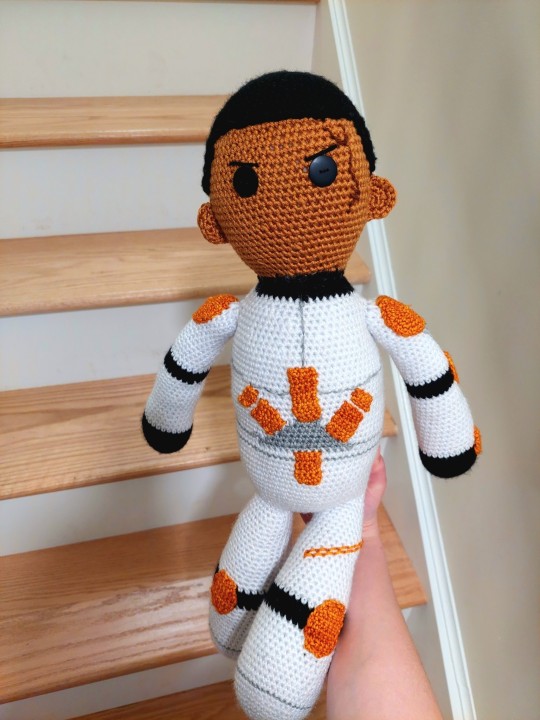
Hello! This was asked for by @kananarchiste and I've finally gotten around to writing it up-- my pattern for my crochet doll of Commander Cody-- and I'm giving it away for free! (If anyone does make this, please tag me-- I'd love to see it!!)
Commander Cody crochet doll pattern
I've never written up a proper pattern before, so I apologize for any confusing bits or mistakes in advance. If you get stuck on something or if something is unclear, please shoot me an ask or DM and I'll do my best to help out.
Additional Pictures:


Yarn Weight: 4
Hook: 4 mm
Colors:
White
Yarn in Jango’s skin tone (I used Lion Brand Yarn’s Skein Tones yarn in adobe)
Black
Dark brown (for scar; contrasts with skin tone)
212th gold/orange (this can be hard to find. I got mine at a local independent store)
Grey
Extra materials:
Buttons and thread OR safety eyes (I used buttons because I like the look of them better)
Stitch markers
Yarn needle
Abbreviations Key:
Ch – chain
Dec – decrease
FO – fasten off
Inc – increase
Rep from * – repeat from *
Sc – single crochet
Sc2tog – single crochet two stitches together
Ss – slip stitch
St – stitch
Additional Notes:
All parts save for some embellishments are worked in the round. It is recommended that the crocheter mark each round for clarity.
Entire doll is worked in single US crochet.
Magic circle is NOT used.
I’m not sure what the gauge is, but mine is quite tight. Use a smaller hook if you feel as though your gauge is too loose.
BODY AND HAIR
Head– in adobe
1. Chain 2. Into the first st, sc 6 and mark with a stitch marker. (6)
2. Sc2 into each sc around. Mark. (12)
3-6. Increase by 6 each round to 48. (48)
7. Sc around. (48)
8. Inc by 6 (54)
9. Sc around. (54)
10. Inc by 6. (60)
11-12. Sc around. (60)
13. Inc by 6. (66)
14-15. Sc around. (66)
16. Inc by 6. (72)
17-18. Sc around. (72)
19. Dec by 6. (66)
20-21. Sc around. (66)
22-34. Dec by 6 in same pattern as increases. FO after crocheting 12 at row 34. Stuff firmly.
Body– in white, grey, black
1. In white, ch2 and sc6 into second st from the hook. Mark.
2-12. Inc by 6 each round to 72. (72)
13-23. Sc around. (72)
24. Sc29 and FO. Ss in with grey and sc14. FO. Ss in with white and finish round. (72)
25. Sc30 and FO. Ss in with grey and sc12. FO. Ss in with white and finish round. (72)
26. Sc31 and FO. Ss in with grey and sc10. FO. Ss in with white and finish round. (72)
27. Sc32 and FO. Ss in with grey and sc8. FO. Ss in with white and finish round. (72)
28. Sc33 and FO. Ss in with grey and sc6. FO. Ss in with white and finish round. (72)
29. Sc34 and FO. Ss in with grey and sc4. FO. Ss in with white and finish round. (72).
30-41. Sc around in white. (72)
42. Dec by 6. (66)
43. Sc around. (66)
44. Dec by 6. (60)
45. Sc around. (60).
46. Dec by 6. (54)
47. Sc around. (54)
48. Dec by 6. (48)
49. Sc around and FO. (48)
50. In black, ss in and dec by 6. (42)
51. Dec by 6. (36)
52. Dec by 6. (30)
53. Dec by 6. (24)
At this point, stuff the body firmly.
54. Dec by 6. (18)
55. Dec by 6. (12)
56. Sc around and FO, leaving a long tail, enough to sew the head on. (12)
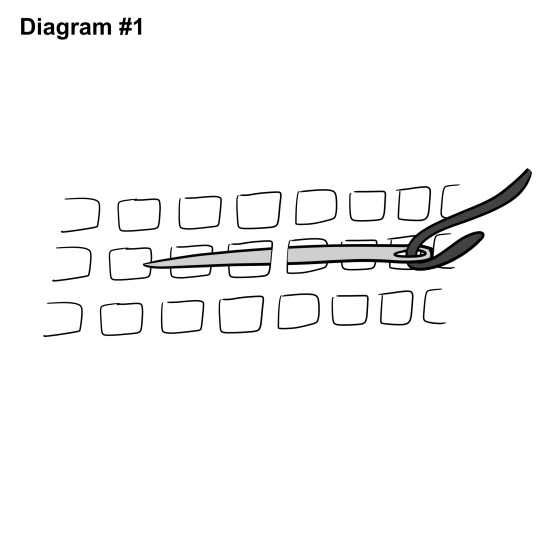
Using grey yarn and a yarn needle, stitch a trooper’s upper chest plate shape (from beginning of black area to about round 45, 5 rows above the grey shape). Center it above the grey shape. Also stitch a belt shape below the shape, shifting to a row below in the middle of the back. For chest plate pattern, see diagram #4. For how to stitch a pattern in, see diagrams #1-3.
Arms– in white, black (make 2)
1. In black, ch2 and sc6 in second ch from hook. Mark. (6)
2. Sc2 in each st around. (12)
3. Inc by 6. (18)
4. Inc by 6. (24)
5. Inc by 6. (30)
6-9. Sc around. (30)
10. Dec by 2. (28)
11. Sc3 and FO. Ss in white and finish the round. (28)
12-14. Sc around. (28)
15. Dec by 2. (26)
16-19. Sc around. (26)
20. Dec by 2. (24)
21-24. Sc around. (24)
25. Dec by 1 and sc3. FO. Ss in black and dec by 1, finishing the round. (22)
26-27. Sc around. (22)
28. Sc3 and FO. Ss in white and finish the round. (22)
29. Sc around. (22)
30. Dec by 2. (20)
31-34. Sc around. (20)
35. Dec by 2. (18)
36-39. Sc around. (18)
40. Dec by 2. (16)
41-44. Sc around. (16)
At this point, stuff the arm.
45. Sc2tog around. FO, leaving a long tail. (8)
Legs– in white, black (make 2)
1. In white, ch2 and sc6 into the second ch from hook. Mark. (6)
2-7. Inc by 6 to 42. (42)
8-13. Sc around. (42)
14. Dec by 2. (40)
15-16. Sc around. (40)
17. Dec by 2. (38)
18-19. Sc around. (38)
20. Dec by 2. (36)
21. Sc around. (36)
22. Sc3 and FO. Ss in black and finish round. (36)
23. Dec by 2. (34)
24-25. Sc around. (34)
26. Dec by 1, sc2 and FO. Ss in white, sc10, and dec by 1. Finish round. (32)
27-28. Sc around. (32)
29. Dec by 2. (30)
30-31. Sc around. (30)
32. Dec by 2. (28)
33-34. Sc around. (28)
35. Dec by 2. (26)
36-37. Sc around. (26)
38. Dec by 2. (24)
39-40. Sc around. (24)
41. Dec by 2. (22)
42-43. Sc around. (22)
44. Dec by 2. (20)
45-46. Sc around and FO, leaving a long tail. (20)
Stuff firmly. Using the yarn needle and grey yarn, stitch in a grey line about 10-11 rows above the starting circle. This is meant to delineate feet.
Hair– in black
1. In black, ch2 and sc6 into the second ch from hook. Mark. (6)
2-9. Inc by 6 to 54. (54)
10. Sc around. (54)
11. Inc by 6. (60)
12. Sc around. (60)
13. Inc by 6. (66)
14. Sc around. (66)
15. Inc by 6. FO. (66)
Turn the dome inside out, so the backs of the stitches are facing out. Ss into the last st made.
16. Working right back along the last row, (sc48 and ch1)*, turn. (48)
17-23. Rep from *, turning each time. FO. (48)
24. Ss in at 7 sc in from the end of the last row and sc to the same on the other side, turn. (36)
25-26. Sc36, turn. (36)
27. Dec by 2 across row, turn. (34)
28-29. Sc across, turn. (34)
30. Dec by 2 across row, turn. (32)
31-32. Sc across, turn. (32)
33. Dec by 6 across row, turn. (26)
34. Sc across, turn. (26)
35. Dec by 6 across row, turn. (20)
36. Sc across and FO. (20)
Turn right-side-out again.
At this point, attach all limbs and the head to the body with the tails from the body and limbs. Don’t attach the hair until the ears are done. Attach with the seams from white-black transitions on limbs facing up and out for the legs and to the back for the arms. These will be covered with armor embellishments.
EMBELLISHMENTS
Pauldrons– in 212th gold/orange (make 2)
1. In 212th gold/orange, ch2 and sc6 into the second ch from hook. Mark. (6)
2-5. Inc by 6 to 30 and FO, leaving a long tail. (30)
Attach to the tops of the arms in the shoulder area. Tuck in ends.
Leg pads– in 212th gold/orange (make 2)
1. In 212th gold/orange, ch3 + 1 for turning. Turn. (3)
2. Inc by 1, sc1, inc by 1, turn. (5)
3. Sc across, turn. (5)
4. Inc by 1, sc3, inc by 1, turn. (7)
5-7. Sc across and turn. (7)
8. Dec by 1, sc3, dec by 1, turn. (5)
9. Sc across and turn. (5)
10. Dec by 1, sc1, dec by 1, FO, leaving a long tail. (3)
Attach to the legs where the black meets white and vice-versa. Tuck in ends.
Handguards– in 212th gold/orange (make 2)
1. In 212th gold/orange, ch5 + 1 for turning. Turn. (5)
2. Sc across, turn. (5)
3. Inc by 1, sc3, inc by 1, turn. (7)
4. Sc across and turn. (7)
5. Sc across and FO, leaving a long tail. (7)
Attach over the backs of the hands where black meets white. Tuck in ends.
Back panel– in 212th gold/orange (make 1)
1. In 212th gold/orange, sc10 + 1 to turn. Turn. (10)
2. Inc by 1, sc8, inc by 1, turn. (12)
3. Inc by 1, sc10, inc by 1, turn. (14)
4-8. Sc across and turn. (14)
9. Dec by 1, sc10, dec by 1, turn. (12)
10. Dec by 1, sc8, dec by 1, turn. FO, leaving a long tail. (10)
Attach to the back where the belt stitching jumps a row. Tuck in ends.
Elbow pads– in 212th gold/orange (make 2)
1. In 212th gold/orange, sc2 + 1 for turning. Turn. (2)
2. Inc by 1, inc by 1, turn. (4)
3. Sc across and turn. (4)
4. Inc by 1, sc2, inc by 1, turn. (6)
5. Sc across and turn. (6)
6. Dec by 1, sc2, dec by 1, turn. (4)
7. Sc across and turn. (4)
8. Dec by 1, dec by 1 and FO, leaving a long tail. (2)
Attach to the backs of the elbows where white meets black and vice-versa. Tuck in ends.
Ears– in adobe (make 2) – You want to make a half-circle
1. In adobe, ch2 and sc6 into the second ch from hook. Mark. (6)
2. Sc2 into the first 3 st of the round to make 6 st and ch1 to turn. Turn. (6)
3. (Inc by 1 + 1 sc) 3 times and FO, leaving a long tail. (9)
Using the yarn needle, sew each ear onto either side of the lower half of the head, leaving room for the hair to go on.
At this point, attach the hair.
Using the yarn needle and grey yarn, stitch in grey stripes on Cody’s arms.
SUNBURST
Central ray– in 212th gold/orange (make 1)
1. Sc4 + 1 for tuning. (4)
2-10. Sc across, turn. FO, leaving a long tail. (4)
Attach to the top of the grey shape on the chest, pointing up. Tuck in ends.
Side and bottom rays– in 212th gold/orange (make 3)
1. Sc4 + 1 for tuning. (4)
2-7. Sc across, turn. FO, leaving a long tail. (4)
Attach to the sides and bottom of the grey shape. Tuck in ends.
Ray tops, for side rays– in 212th gold/orange (make 2)
1. Sc4 + 1 for tuning. (4)
2-3. Sc across, turn. FO, leaving a long tail. (4)
Attach to the tops of the side rays, leaving a small white space between the top of the rays and the ray tops. Tuck in ends.
FACE
Eyes
Buttons: using a sewing needle, attach the buttons to the yarn stitches so that they form eyes.
Safety Eyes: if using safety eyes, attach as normal in the desired position.
Eyebrows
Using the yarn needle with black yarn, form the eyebrows. Cut the yarn and tie the ends together. Pull the yarn so that the knot in on the inside of the crochet and not facing out.
Scar
Using the yarn needle with dark brown yarn, stitch Cody’s scar in.
DIAGRAMS/PICTURES
#star wars#commander cody#marshal commander cody#cc 2224#star wars the clone wars#the clone wars#swtcw#tcw#crochet#amigurumi#crochet doll#crochet pattern#beans art#considering making smaller trooper dolls but im likely to sell those patterns#this one is free though :)
54 notes
·
View notes
Text
Fleur

Fleur is a stylish and practical hanging basket, it can be used as an odds and ends organiser, or as shown pop a cute faux succulent pot in it for an on trend decorator piece.
Requirements:
75m of 12 ply yarn or you can double strand an 8ply yarn (sample shown is Moda Vera Egerton Twist)
5mm hook
Darning needle
Stitch marker
Abbreviations: (US terms)
Ch: chain
Sc: single crochet
Hdc: half double crochet
Dc: double crochet
Skp: skip
Anything between *…* is repeated to the end of the round.
Anything between {…} is worked into the same stitch.
Pattern:
Ch4, sl st the first ch to the last ch to create a ring.
Round 1: Working into the ring, sc6, place a marker in the first st. You will remove and replace this marker at the start of each round. (6)
Round 2: {sc2} in each st (12)
Round 3: *sc1, {sc2} in the next st* x6 (18)
Round 4: *sc2, {sc2} in the next st* x6 (24)
Round 5: *sc3, {sc2} in the next st* x6 (30)
Round 6: *sc4, {sc2} in the next st* x6 (36)
Round 7: *sc5, {sc2} in the next st* x6 (42)
Round 8: *sc6, {sc2} in the next st* x6 (48)
Round 9: *sc7, {sc2} in the next st* x6 (54)
Rounds 10-14 sc54 (54)
Rounds 15-16 Hdc4, sc14, hdc4, sc32 (54)
Round 17: Hdc4, dc14, hdc36 (54)
Round 18: dc30, {dc1 and skp1} x 9, dc7 (46)
Round 19: Hdc4, sc6, ch10, skp2, sc6, hdc28 (54 including chains made)
Round 20: Sc10, sc12 around the ch10 , sc34 (56)
Round 21: Sc56
Finish off and weave your ends in with a darning needle.
3 notes
·
View notes
Text
Z50B.4.2-7 Drive disc CHANGLIN

Z50B.4.2-7 Drive disc CHANGLIN
6410003596 板
29330045771 内门架N300750310
29240033951 刹车油杯
4130001486 振动轮
6900018299 支座
6303900287 O型圈D38*3.55
4015000018 侧板
FSK75-HZXZC PLATE
29240034241 工作泵总成
6410006810 非公路自卸车
29270025571 支承环S110X9.8X2.5
11213019 矩形板LGB310-817*100*12-NM360 14881825
4011000276 PIPE
29280017361 胶管F462CACA121206-4500
11225233 进气胶管
29010064311 加强板
4190002351 内六角螺栓 M8-75
11220323 操纵箱前盖
29270009351 LG936L高卸型铭牌
6264000123 扶手
FKCC01019 FILTER CARTRIDGE_DRAIN FILTER F481CACF080804-180
29170026012 P-橡胶盖
29370012351 右链轨节ZL135MA-00012
6216000591 动臂油缸HSGF-160*90*819-1341
4110001300101 STRAINER_WA HYDRAULIC
4130001142 左转向总成
29280000031 夹板螺栓
ZJ2713011351 板
29340010851 前车架 7273-10630
F16-4120002268 缸套包 971096
F3937759 转向器总成
29070009491 开口棘轮扳手41SATA43225
4044000086 自洁式空滤
6384600025 弯刃木柄电工刀 03110 SATA
4190015551 接头体 H30203-0800
14546570 板 GB893.1-80-65Mn
6215000356 LG938CE右下梯总成
4190001688 转向油缸HSGL-90*45*360-755 JB1002-33-T2
6223000005 动臂缸后销
26461005652 E660FL履带式液压挖掘机
29190011992 LG952L宣传册
29120032071 暖风水管
29151005121 发电机组EE9176
28010012531 右转斗油缸HSGF-125/70ZP2
14403882 上板
4190000536488 振动辊轮
29230010011 LG6400E订单车贴盘(喷漆前)
L0200N3214G29A0 PLATE
29260033601 E6125F标识包
4120003010 球头螺栓
4041003058 RIGHT PLATE
4110016196079 缸体03200CY
4130002475 胶管F481CACE282816-700
26340005101 服务商现场服务标准
28250026991 支架16667-57692
29120035591 管夹
6253000411 工作泵总成
29120040241 电池组VCF5A,48V 24块/组(力至优蓄电池前移式叉车)
29430000091 滤清器至变速箱油管 14550678
29150012601 手脚油门联动总成DSG124F*2800-103A*1600
29120021211 板
6216000040 螺纹塞规PT3/8
4190001758 胶管支架
4120007696 贴板
27160000421 调整垫片II 3214597608-C
4120001418 橡胶套
4110002246001 板
28140011951 管夹
29120028171 活塞冷却喷嘴4207521(1004076-52D)
FDH225-DBZX 万向节十字轴
26260023332 侧板
6420002525 圆锉直径20世达03974
3070900141 垫片LGB303-60*120*1
8279067 捏手 612630010629
ELG958V 隔离套滚针403219-GB/T309(10038808)
4041000595 堵头
29010039811 铲斗总成BG550 3509634-52D
21909008971 缸体
14400666 右侧板焊接总成
11222457 软管LGB129-005148 14534519
11210993 导风罩8191215
11102886 压板
11170010 3/8 612600081505
17001573 专用斗0.95*1250(粘土)
29170080152 停用-动臂油缸 SP-103
4120002166 BRACKET_LH
11214915 7T独立散热线束
6618000304 卡板支座
21909008871 上盖板
7200001650 黄油管
FS390-045100 NUT
4120004409 转斗油缸HSGF-190*90*545-1040
4190003977 动臂横梁总成 GB5786-M12*1.25*40
6420002438 plate 1009673-52D
6216000503 轴承305z(进口) JB1886-25/28Ⅰ*904
4110002405021 防尘罩C3918113
14400399 固定板
9200001140 中冷器组件6719891-01 14385819--A
F8-4120000116 驾驶室标识包
4120000718036 销轴LGB301-100*125*230-40Cr
4120017775001 拉杆
26100007721 白色灯罩
29400000931 发动机
4120006235029 驾驶室标识包 4881439
26370002332 水泵密封垫13061172 14557062
26240020801 下铰接座 14557580
6220000730 调整垫片
4110000172018 LG60109656
11216848 刀片 SDMT09T308-D57 WKP35S
11213364 500小时保养包
F81EH-20150F SET RING
11211711 中齿螺栓
4110002233106 提升油缸HSGL-80*45*800-1075A
29430003271 938CE发动机罩
29150024201 弹簧座 14290266
F14403440F P-螺栓
29260024321 直角磁铁MS2-80(55KG) 3214552323-A
4120002581029 气缸SC32*140
28350001141 调速器612600082505 612600113346
4041002205 固定支架
11210357 筋板
11224499 后传动轴
29240000091 油底垫
4110001645401 Ⅱ轴总成(330101)
6420000217 LG918轮式装载机
29250014721 孔用弹性挡圈GB/T893.1-80-B00001050
4120007464003 变速箱总成
LG7300001173A 蓄电池固定总成
14597620 法兰盖板
89150001511 孔板LGB343-73*30*3-2*10*35R5 9324-21417---
4110003492138 接触器LC1-1210 220V
29280009702 气门杆油封 M6600-1003105
16885019 后罩锁
4043000095 引导轮30T-经适件
4190002353 ECU 3601115-2171/A-BF6M1013-20T3R1799
26330045641 活塞
29220022721 传动轴PC52*938.5
29120032751 8件加长中孔花形扳手组套 世达09701
11213628 螺母F2C147150 21024032
4110002559 连接胶管
29010045761 LG978前车架
29120032661 前车架JF989 13033056
4110001704206 钢管
26310003201 铲斗总成 1008038-52D
4120000675006 螺母 GB/T 6170 M16
29090012861 铲斗缸小腔胶管
29260015501 轴承 51207
4110001167036 箱体
26090004051 钢管
29420005111 LG946L轮式装载机
29260001371 安全阀直角接头3013353
4120006230 门锁总成
ZJ4110001182030 轴承29590 01011008
4110004201013 右动臂油缸HSGK-150*105*1530-2145
26241009371 机油软管
4110000044 空气滤清器B7648-1109100B
29010039531 防松套LGB331-12*24*16flZnyc-45
4130003187001 压板
4011000172 联轴器MONOLASTIC 50-140 70SHA
29330024781 P-传动轴CDZ-420
120291 空调管
4110001592040 微粒过滤器
FXSGSTE 后车架总成
29330027401 钢管总成
28210010621 轴套LGB302-50*40C1
4110000561187 DRIVE SHAFT_LGS814
29120021871 机罩前框架总成
11213457 喷油器组件16871-53002 14557581
28360003431 非公路自卸车 14557582
F31N3-10011 过渡块 D02B-102-31A+B
4110015676011 后车架
4013000122 加油弯管D02B-108-04C+A 14557583
LG9200000915 底板 14559099
4110004063062 白板笔 得力S500
3120900010 仪表台线束
4030001099 活塞毛坯
2120900957 空压机612600130043A 14403864
4043004672 橡胶管夹
A1-2901002073 孔用钢丝挡圈Q/HL 102123-2010 Φ130/Φ141×Φ3.5
4120002370044 铲斗上销轴 14545176-A
14597622 胶管20412-22-08TZ/20492-22-08TZXXCP5S-08X1
6410005542 LE海绵245*325*20
14550837 支架
11221346 直流牵引电动机 XQ-1.4kw
29030034661 塑料袋0.1mm 950BU.7.601.1
M086HWD03 72*128*1垫片B072-128001-101 9411-90250
F14530544RC LG933L加高(3311214G2903)改超高(3311214Q2902)换
F3919679 左后视镜支架
14400152 接杆VI*185-1T0638-41 低温抗磨液压油L-HV32-18L
2060901358 BOOM_WA BOOM SEAT WA_6.45M PBD05N1-040
29340021181 密封环 914169
4120005998018 六角凹头螺丝 15063026
11213206 钢管
4110002081003 气缸盖罩(Ⅰ) 630-1003021A
4110001003044 进气胶管
4110001060042 转向柱LG-50G 14629700
29170157501 石灰粉 (氢氧化钙) 14881062
29340035851 导电嘴 Φ1.2/45mm C3944593
26330035221 角钢圆管焊合
4014000058 六角法兰面螺栓1000992423 14402091
4110004174102 软管20411-30-12TZ/20491-30-12TZXFC686-12X3 14401944
11218539 进气管 D30-1002052
4110015708062 中冷出气钢管 14401935
28010012981 工装设备点检表 14401613
26330032581 发动机支承座 612600061755
4120017240 座椅 14401610
14408296 光电式寻边器SE-200 14400878
14400257 左扶手2048245 14400826
6420000549 世达螺丝刀66204 14400666
6430001382 铲斗总成
6410006494 STICK PAN
4110000036281 BRACKET_CLIP(FUEL LINE)
6618000135 光滑环规
11213166 轴承(带止动环)6214X3-ZNBR-C3
4043004344 压气机进气管S00002798+02
4110000556114 销轴
29030030471 机体顶板C02AL-1W1410+A
4130015995 PLATE
LG29440001161B 左支撑
29010039801 减压阀
28280011181 HDMI线 山泽(SAMZHE)HQ-15 15米
14401839 散热器部装
11213880 方头锥形螺塞90017010003M
14403325 加机油口盖总成1003050-A12
29150021771 钢管
29040014251 进油阀弹簧
4110001005084 球头内六方套筒10-1/2*140 吉多瑞 IN30 LK-10
29030028491 气缸SC-100*100-S
29430008463 SEAT
4120002390 支架129698-77190
14402027 润滑示意图
4030000760 LG959空调系统
26350004341 油管
29050040001 钢管
L055FL3114G29A0 销轴LGB301-85*132*255-1200Y
4120003471 发动机总成
29370026861 弯板
4110000647072 前车架线束 17460059
4120015712 PROTECTING CAP
6720000007 止退垫25
6410000187 ?槽钢-29330070601
5301000415 下模
26120007281 圆钢14*30
11214812 堵头
4110000606 左后扶手
LG84120003698 三通接头BD-24
4130015739 空调内气过滤器B30623-0290
4120001054007 右侧板
6410004382 后地板垫皮
4043016440 橡胶皮
FZ0000875 行星齿轮轴
29360021531 板 14578627
F4120001744110 CLAMPING PLATE
4120010741 PLUG 14570115
LG2801000241 橡胶垫
4110000560326 空调管(蒸-压)GK33-5.0J1-40
29240017892 法兰盘119803-01520
LG7300001149-1 盘
29330057082 胶管F462CA19181210-700-PG700
11224470 增压器进气管
C0511-2030900061 卡环-固定同步器锥体1701386-11
4120016416031 卡簧2916089064
4110000179025 横撑
29200012711 支架总成
29340032301 伞齿轮T611 22649
LG28250016251B E6205F主线束
14400587 驻车制动器BL50-1
6392200340 软管LGB124-003121
4120004730106 钢丝钩LGS953N0002
4130001326 底板
26290006211 输出扩展模块 三菱PLCFX2N-16EYR-DC 24V
5111000529 接头5H833-77232
29120031921 E6225F主线束
11217826 缸筒总成 24A630340 14400550
28060004091 前车架线束
4190015398025 东空气扳机3800P
4120002279119 离开机器安全锁定杆禁止开启标识
29031001551 变速操纵软轴LG06-RZ
9150000560 工具箱
26290003461 660动臂自检互检记录50-1
29070027051 液压操纵总成
4120006370 带轮
4110001953003 电磁阀
7100001072 上边框
Read the full article
0 notes
Text
Chastity Locks Stainless Steel Urethra Catheter with 2 size Cock ring Penis Urinary Plug Sex Toy Adult Game Urethra Stimulate Di
Chastity Locks Stainless Steel Urethra Catheter with 2 size Cock ring Penis Urinary Plug Sex Toy Adult Game Urethra Stimulate Di

Chastity Locks Stainless Steel Urethra Catheter with 2 size Cock ring Penis Urinary Plug Sex Toy Adult Game Urethra Stimulate Di
Male Chastity Device Chastity Locks Stainless Steel Urethra Catheter with 2 size Cock ring Penis Urinary Plug Sex Toy Adult Game Urethra Stimulate Di 3 Rings Polycarbonate Male Device. Strappado-SM Harnröhren Plug Pin Anwendung (APHR-P) ... Handling / urethral plug pin. Deluxe Cock Stuffing Sounds Kit. Male Chastity Devices: Are They Safe?. 3 Way Urethral Catheter Insertion. Male Chastity Device. Male Chastity Locks short 304 stainless steel Cock Cage Chastity with catheter Male Chastity Locks Stainless Steel Urethra Catheter with 2 size Cock ring Penis.. . Getting Into Your Male Chastity Device CB-6000 Cock Cage. Steel Male chastity device Cock Cage (www.xtoysasia.com). Buy Stainless Steel Chastity Cage with Urethral Insert and more at eXtremeRestraints: 1.3 inches in diameter; Urethral spout: 2 inches in length, 0.25 inches. . Anal, Vaginal Hooks & Hangers. Cheap Locks, Buy Directly from China Suppliers:Male Stainless Steel Urethra Catheter with 2 size Cock ring Penis Urinary Plug Sex Toy Urethra Stimulate Dilator. . Choose male stainless steel urethra catheter with 2 size cock ring,penis urinary plug,sex toy,adult game,urethra stimulate dilator cp032 on DHgate.com which is on. . DickCage - New male chastity device. РекламаИнтернет-магазин товаров для дома. . How to wear new male stainless steel chastity device. Njoy Pure Plug. Experienceproject Penis Plug Vibrating 10mm. Stainless Steel Cum Through Sound Cage.. РекламаАкция на автокресло BRITAX ROMER TRIFIX2 I-SIZE MYSTIC BLACK. Успей купить. · пн-вс 10:00-21:00. . FastSize extender penis enlargement review video. Stainless Steel Chastity Cage with Urethral Insert.. Pubic Enemy No. 2 E-Stim Cock Cage. anal intruder cock ring with urethral plug. Plug Insertion Prototype. Spiral Chastity Device Birthday Offer on UberKinky. Alibaba.com offers 342 chastity catheter products. such as free samples.. . Buy Stainless Steel Chastity Cock Cage and more at The cage is made of stainless steel and has a The tip of the cock cage is a 1/2". . HOW Composition of Stainless Steel Male Chastity Urethral Stretching on xtoysasia. Male Chastity Locks Stainless Steel Urethra Catheter with 2 size Cock ring Penis Urinary Plug Sex Toy Adult Game Urethra Lock. .
Chastity Locks Stainless Steel Urethra Catheter with 2 size Cock ring Penis Urinary Plug Sex Toy Adult Game Urethra Stimulate Di
AW2000-02 1/4'' Air Filter Regulator Moisture Trap Pressure Gauge Compressor

AW2000-02 1/4'' Air Filter Regulator Moisture Trap Pressure Gauge Compressor
Cylinder TDA10-40 Compact Type Dual Rod Cylinder Double Acting 10-40mm Accept custom

Cylinder TDA10-40 Compact Type Dual Rod Cylinder Double Acting 10-40mm Accept custom
Dakin Solenoid Controlled Valve/ Hydraulic Solenoid Directional Valve KSO-G02-4CA-30-EN for Hydraulic Systems and Machine

Dakin Solenoid Controlled Valve/ Hydraulic Solenoid Directional Valve KSO-G02-4CA-30-EN for Hydraulic Systems and Machine
Locksmith Transparent Practice Lock Double Row Of 5 Pins Cylinder Lock Pick Set

Locksmith Transparent Practice Lock Double Row Of 5 Pins Cylinder Lock Pick Set
50mm Stainless steel hollow decoration metal ball Home props All Sizes in Stock

50mm Stainless steel hollow decoration metal ball Home props All Sizes in Stock
B12 B16 drill chuck, drill chuck connecting rod, drill chuck, drill folder, 1.5-10mm can be equipped with connecting rod 8MM 10M

B12 B16 drill chuck, drill chuck connecting rod, drill chuck, drill folder, 1.5-10mm can be equipped with connecting rod 8MM 10M
50pcs (thick 2.4mm OD 15mm~26mm) 17/18/19/20/21/22/23/24/25/26mm Black Oil Resistant NBR Nitrile Rubber Seal O Ring

50pcs (thick 2.4mm OD 15mm~26mm) 17/18/19/20/21/22/23/24/25/26mm Black Oil Resistant NBR Nitrile Rubber Seal O Ring
KD042AR0/KD042CP0/KD042XP0 Thin-section bearings (4.25x5.25x0.5 in)(107.95x133.35x12.7 mm) Standard type Robotic Bearings

KD042AR0/KD042CP0/KD042XP0 Thin-section bearings (4.25x5.25x0.5 in)(107.95x133.35x12.7 mm) Standard type Robotic Bearings
10Pcs Heavy Duty Brackets Hidden Floating Wall Shelf Support Bracket 345 Decorative Metal Shelf Bracket

10Pcs Heavy Duty Brackets Hidden Floating Wall Shelf Support Bracket 345 Decorative Metal Shelf Bracket
SC32*150 Free shipping Standard air cylinders valve 32mm bore 150mm stroke SC32-150 single rod double acting pneumatic cylinder

SC32*150 Free shipping Standard air cylinders valve 32mm bore 150mm stroke SC32-150 single rod double acting pneumatic cylinder
Electric Straight Grinder Repairing Part Helical Gear Wheel for Makita 9105

Electric Straight Grinder Repairing Part Helical Gear Wheel for Makita 9105
read more
4 notes
·
View notes
Text
Aerizo SC32 Bluetooth Wireless Speaker Portable Speaker with Super Bass Splash Proof
Aerizo SC32 Bluetooth Wireless Speaker Portable Speaker with Super Bass Splash Proof
Price: (as of – Details)
Aerizo SC32- Wireless Bluetooth Speaker with Rechargeable Battery. Compatible with MP3/4 devices, TF/USB Flash Drive, or any audio device which is Bluetooth compatible or has a 3.5mm jack. You just need to pair you phone or other music player which support Bluetooth with the speaker. After paired, you can enjoy the music with speakers that offer you great sound quality.…

View On WordPress
0 notes
Video
undefined
tumblr
sc32 *NOSY UPON #3danimation #comicbook Damien’s trap
2 notes
·
View notes
Photo

German Shepherd Pups â¯â¯ https://dogfinder.us/SC32s â®â® #SantaBarbara #Dogs #Puppies #DogFinder #AdoptADog
0 notes
Text
51421170115 WASHER LONKING

51421170115 WASHER LONKING
29260008801 破碎锤HB100
LG9150000033 标准气缸SC32*300-FB
FKC27120103881 回油法兰
6900013447 密封垫D01118760
29370015391 下横梁板
29030021021 原色纸盒 L965H
29120022541 共轨管1000000869
LGL0200Y3214A29A00 停用-胶管
4110000015006 六角螺钉
11223452 翘板开关总成PCV-00000333
11217688 L958F轮式装载机 960247
F11NB-40150 密封垫圈612600080275
2836000265101 带磁接杆 世达59273
26330065151 长锁杆总成
5602112AA9 滤油器
14404070 绝缘隔块C3930319
1690300082 开关电磁阀
14659433 电瓶线LGB340-35*500P1L10L10-1L1
4110000184198 托架 936.9.2
5111000792 直接头M33-M30
29410000171 EEA0101灰色环氧底漆
28210017341 O形圈P14 N552-90
11224775 密封件包TF60V060SE01
29170016521 纸垫 4166 330 229
4110000963002 专用钳2992349
29240006701 板
29110009801 滤芯PALLmarksman70微米
4130000803 胶管F471TCCACF121206-1070-SG600 ZG30.0701L4-R08548
26260011771 节温器盖垫片A3000-1303012A
26170012631 调整垫片
6303000967 喷嘴
11215586 齿轮
29260044653 新产品开发初步概念报告
LG2901003983160 胶管F481CACF080805-500
29310007681 电瓶继电器
4120000087027 寒冷地区防冻液和液压油模块(34/123)
28280010121 后车架线束
4043001421 玻璃
11223316 曲轴皮带轮1005046-D002/A
28210015051 筋板 14508637
7300000904 PLATE_FRT MTG 22879030
29010076131 固定钻套LGB701-10.2*12-Cr12
29130012321 散热器回油胶管
11219979 BRACKET SIMPLE BIG CUSHIONS
FBSXSRFL BLOCK_CWT MTG
LG62200001425 海绵
Mail:[email protected]
9200001340 R385回二总成(太)
4110004063284 VOLVO盒装胶圈
ZJ4030000164 滚针轴承42010100300
4110000047101 动力转向油泵附带齿轮总成3407010-D533
4110003513070 单向管接头C3967129
4120008409060 限位板 L975H
29290029641 燃油滤芯5262311
14402749 防护网BHB0314
11161233 铜锤 世达92362
6410003214 软管LGB165-005044
11220214 磁棒
26360002041 铁钉 3214574621―A
4110000367032 支腿油封
26310005591 O形圈Q7342424B
4110003022112 顶板15.77
26441004231 吸油钢管2
26160004561 上水室
F21Z1-50780 调速叉杆轴15841-56150
4120001964007 轴套70*85*50
F90003888470 PLATE
29240035621 飞轮壳连接板612630030001
6900007486 左前下立柱
28220005581 油底壳垫板焊接部件C03AB-M2P1738+A
14535598 摇臂(临工金色金属漆)
Mobile/WhatsApp:0086-1525-4934-126
28190000561 直接头LGB120-03022A
FXKAY--00225 减振器总成1005040-56D(04253414)
14405453 塞子
29090009691 AUXILIARY MATERIAL(12/60/20/24/19.2/98/1
4110001952152 360液压泵油封-F
4110000556134 主动齿轮轴JHP3/02-01
9100000625 外环齿轮
26291006871 LG989装载机
4190000915006 EMS线束
29030029851 LG936/LG953/LG956座椅总成
29380021381 安装板DXS-07-03
4110015889072 护板
29170090801 停用-油封 HG4-335-1806 65*90*12
4130002856 胶管F481CACF101005-3270
5122000133 放平护板
4110004186196 PLATE_RH ROOF
11213434 DECAL_FCWT
M095DWA53 维柴专用柴油机油4L
329453-03615 液压操纵总成
4110003226242 呼吸器固定罩
26141016781 燃油供油系统
4110006285009 前车架标识包
11221279 变速操纵机构LG918
4110000292003 动臂油封龙工
29050013391 前桥总成
14576422 摇臂组件1000881645
28100007581 接头3/8ODTX3/8MNPT21003545 LG750
28340004791 螺钉GB70.1-M10*16flZnyc-12.9-480
6216000431 右转斗油缸HSGL-63*40*709-1106
29330083991 引导轮总成
4110004276187 前照灯总成
9330C5 广角后视镜
4110015866 电瓶箱总成
14404774 二级涡轮 402212-213
4120002539 管夹
4110003427049 轴
4120006604 动臂右侧润滑油管
6420000442 行走马达减速机总成
8298820 板
26291003831 PANEL
LG29430002661B 顶部内饰
4043000678 SERVO SYSTEM
26311000981 卡板
29330080611 管道节流阀SPA-8
6900000466 铰接架
4110015578005 G9138 SELL MACHINE
4110003226200 螺栓
7200000978 筋板
6261000326
29300007581 增压器进气管 GB5782-M24*70EpZn-
F31Y1-33581 左盖板
J14406056 连杆机构
8277915 推土铲模块
LG2924002507 2 1.75米操纵软轴
14402731 MT85标配底盘 LG918
6410003286 挖掘机油缸防护套5 16880218
9200001003 L936轮式装载机
28250023391 阀N/S NSCX182-C27
29250011631 密封件包
4120016660 罩300D1013-00
3070900214 油箱盖板
29020012391 发动机罩及附属
26340008121 电机固定总成左
26010011221 滑架
4030001176 O型密封条2950 MFT.001
3214514005 透气滤芯
4120003967105 前悬运输支架
F119808F 螺栓01010-81270 M12*70
29010039711 回水胶管J80GD-1306005
29290018481 前桥总成
4041000638 混合磷酸盐250ml/袋
F61E3-12060F 螺栓GB5782-M16*130EpZn-8.8
LGZJ27030105872 尼龙轮 10寸 环球6606613
6231000256 装饰板
6219000023 左侧外耳轴润滑油管
29290041041 机型标识
4190015358001 非公路自卸车
4110001005150 LG933驾驶室围板总成
997511 946井下前罩总成
4110000970251 纸垫YJ265-00012
26370003102 LG968燃油箱总成
LGZJ27410100071 活塞杆02165.0032Y.100 R73-1370
4110000991063 软管20411-16-05TZ/20491-16-05TZ*FC687-05*5
29170230611 支架
4120009309 水温表VDO-310040002
F11N8-40021 标志标识 L975F
26240010541 配重3700
11211583 前车架
4110000561041 护栏
4120001739 套筒 霹雳马 60552027
6215000478 回油滤芯(液压油箱回油滤芯)
28290010421 燃油进油管总成1000586966
14521472 垫片
4130016085 喷油泵托架630-1111005A
6212000531 停用-左动臂缸小腔钢管
A3-2903001001 塑料袋 6丝*700*800*800mm
26360006561 电瓶线P40*200
F11Q9-42190 电控阀4V330C-10
14549485 SDLG LG97X GPE Wheel Loader
4110003783048 胶管F481CACF101005-1200-SG1200
29060009321 升降机构129907-07900
6399007147 主动锥齿轮
29260001411 软管LGB128-004235
4110001903092 936井下零部件图册
14637412 滚针轴承
29040009211 机罩门
4110000341001 密封条
26120017841 E690F恒立系统动臂(喷漆前)
29250000601 机具流水线装配自检记录
29170028681 支重轮
Mobile/WhatsApp:0086-1525-4934-126
29030016401 E660FL标识包
4043002880 碳刷 9X9X32
FZ0000214 销0402500620
26370003591 V形块
29260040461 气弹簧 合力
29430000071 后车架 14883816
4110000129178 万向节总成W50L/K-00A
29030015851 气缸盖短螺栓ⅢD30-1003018B
29220020631 后桥壳总成
LG7300001064-1 优先阀进油胶管 MT86H
4190000466 变矩器总成
4110002550001 前车架电气总成
6216000077 胶管
7200001484 门锁龙工
29260030951 板
4120006263013 方管50×50×4×1136
28350003361 加高臂模块
14404535 支架 14578724
7300001357 挡风带
F21N6-01272 螺栓锁片 4644 330 006
4110002139051 前车架JF955
Read the full article
0 notes
Text
RBB Crochet Pattern

Hello! I've seen that a lot of people liked my crocheted RBB, and I'm truly speechless and very happy! ** I've also seen somebody ask for the pattern, and I've decided to write it down decently in case somebody would like to give it a try; I've never written a pattern before, and most of the stuff I end up crocheting is self-taught, so, please, don't judge this too harshly; I'll really try to answer any questions in case you have any.
I'd be eternally grateful if you'd like to drop by on my Facebook page where I just crochet stuff and work on commission, buuuut I'd also really like to crochet more Larry-related stuff! Most of the time I don't know what to crochet even though I really want to, so feel free to “prompt” stuff! :)
Going out on a limb, I'd say I'd be very happy to film a tutorial for this project, in case anyone is interested in learning how to crochet (it's very relaxing, I promise), but, since it's a pretty long project, let me know if someone would be interested and I’ll see what I can do!
Thank you again for the compliments, they made my day, truly! :*
Under the cut for the pattern!
What you will need:
- 3 mm crochet (or any crochet that goes with your yarn)
- yarn (I always use 100% acrylic) in the following colours:
pink
purple
green
fuchsia
orange
yellow
light blue
- 12 mm black safety eyes
- stuffing
Stitches you need to know:
- single crochet (sc)
- increase (inc)
- decrease (dec)
- fasten off (f/o)
- magic ring
- chain (ch)
I've never written a pattern before, so I will write it like this:
(sc4, inc)x6 means you have to crochet 4 sc in 4 different stitches, and then work one increase in the next stitch, and you'll have to do this six times
Similarly,
(sc4, inc2) means you have to crochet 4 sc in 4 different stitches, and then work two increases in the two following stitches (single crochet, single crochet, single crochet, single crochet, increase, increase)
I also wouldn't honestly be able to tell you when to start stuffing, I would probably say around round 35 or so, but you be the judge of that, obviously.
You'll find the order in which I used the colours at the beginning of each part, this (¬) means I'm changing colour.
HEAD:
[purple, pink, fuchsia, orange, yellow, green, light blue, purple, pink, fuchsia, orange, yellow]
Start with a magic ring
rnd 1: work 6 sc into the magic ring (6)
rnd 2: 1 inc in each stitch (12)
rnd 3: (sc1, inc)x6 (18)
¬
rnd 4: (sc2, inc)x6 (24)
rnd 5: (sc3, inc)x6 (30)
rnd 6: (sc4, inc)x6 (36)
¬
rnd 7: (sc5, inc)x6 (42)
rnd 8: (sc6, inc)x6 (48)
rnd 9: (sc7, inc)x6 (54)
¬
rnd 10: (sc8, inc)x6 (60)
rnd 11: (sc9, inc)x6 (66)
rnd 12: one sc in each stitch (66)
¬
rnd 13: (sc10, inc)x6 (72)
rnd 14: one sc in each stitch (72)
rnd 15: (sc11, inc)x6 (78)
¬
rnd 16 to 24: one sc in each stitch (78) (change colour after row 18, 21)
¬
rnd 25: (sc11, dec)x6 (72)
rnd 26: one sc in each stitch (72)
rnd 27: (sc10, dec)x6 (66)
¬
rnd 28: one sc in each stitch (66)
rnd 29: (sc9, dec)x6 (60)
rnd 30: one sc in each stitch (60)
¬
rnd 31: (sc8, dec)x6 (54)
rnd 32: (sc7, dec)x6 (48)
rnd 33: (sc6, dec)x6 (42)
¬
rnd 34: (sc5, dec)x6 (36)
rnd 35: (sc4, dec)x6 (30)
rnd 36: (sc3, dec)x6 (24)
¬
rnd 37: (sc2, dec)x6 (18)
rnd 38: (sc1, dec) (12)
rnd 39: (dec)x6 (6)
F/O
MUZZLE:
With pink yarn:
rnd 1: ch 7
rnd 2: starting from second chain from the hook, work (1 sc in each stitch)x5 and then work 3sc into the last stitch: this will help you work on both sides of the chain, so, now, you'll basically have to turn your work and keep crocheting on the other side. Work (1 sc in each stitch)x4 and then work 2sc into the last stitch: you are now at the “beginning”. (14)
rnd 3: inc, sc4, inc, sc, inc, sc4, inc, inc (19)
rnd 4: sc8, inc, sc, inc, inc, sc6, inc, sc (24)
rnd 5: inc, sc9, inc, sc, inc, sc9, inc, sc (28)
rnd 6: 1 sc in each stitch; make two inc wherever you want (30)
rnd 7: 1 sc in each stitch (30)
rnd 8: (sc4, inc)x6 (36)
F/O
NOSE:
NOT worked in rounds
With fuchsia yarn:
rnd 1: ch7
rnd 2: starting from second chain from the hook, sc6, ch1
rnd 3: sc6, ch1
rnd 4: dec, sc2, dec, ch1
rnd 5: dec, dec, ch1
rnd 6: dec
F/O
EARS:
[1st: light blue, purple, pink, fuchsia. 2Nd: fuchsia, orange, yellow, green]
Start with magic ring
rnd 1: work 12 sc into the magic ring (12)
rnd 2: 1 sc in each stitch (12)
rnd 3: inc in each stitch (24)
¬
rnd 4,5,6: 1 sc in each stitch (24)
¬
rnd 7,8,9: 1 sc in each stitch (24)
¬
rnd 10: 1 sc in each stitch (24)
BODY:
[pink, purple, light blue, green, yellow, orange, fuchsia, pink, purple]
rnd 1: ch11
rnd 2: starting from second chain from hook, sc9, work 3 sc into the last ch, and turn your work so that you can work on the other said (as we did for the muzzle), sc8, inc into the last stitch (22)
rnd 3: inc, sc8, inc, sc, inc, sc8, inc, sc (26)
rnd 4: inc, sc10, inc, sc, inc, sc10, inc, sc (30)
rnd 5: sc, inc, inc, sc10, inc, sc2, inc, inc, sc11, inc, sc (37)
rnd 6: sc2, inc, sc16, inc, sc13, inc, sc3 (40)
¬
rnd 7: (sc3, inc)x10 (50)
rnd 8: (sc4, inc)x10 (60)
rnd 9: (sc5, inc)x10 (70)
rnd 10, 11: one sc in each stitch (70)
¬
rnd 12: one sc in each stitch (70)
rnd 13: (sc6, inc)x10 (80)
rnd 14, 15, 16: one sc in each stitch (80)
¬
rnd 17,18,19,20,21: one sc in each stitch (80)
¬
rnd 22, 23, 24, 25, 26: one sc in each stitch (80)
¬
rnd 27, 28, 29, 30, 31: one sc in each stitch (80)
¬
rnd 32, 33, 34: one sc in each stitch (80)
rnd 35: (sc6, dec)x10 (70)
rnd 36: one sc in each stitch (70)
¬
rnd 37, 38: one sc in each stitch (70)
rnd 39: (sc5, dec)x10 (60)
rnd 40: (sc4, dec)x10 (50)
rnd 41: (sc3, dec)x10 (40)
¬
rnd 42: sc, dec, dec, sc13, dec, sc16, dec, sc2 (37)
rnd 43: sc2, dec, sc10, dec, dec, sc2, dec, sc10, dec, dec, sc (30)
rnd 44: sc, dec, sc10, dec, sc, dec, sc10, dec (26)
rnd 45: sc, dec, sc9, dec, sc, dec, sc8, dec (22)
F/O by sewing the two ends together
ARM:
[1st: green, yellow, orange, fuchsia, pink, purple, light blue, green, yellow. 2Nd: light blue, purple, pink, fuchsia, orange, yellow, green, light blue, purple]
Start with magic ring
rnd 1: work 6 sc into magic ring (6)
rnd 2: inc in each sc (12)
rnd 3: (sc, inc)x6 (18)
rnd 4: (sc2, inc)x6 (24)
¬
rnd 5: one sc in each stitch (24)
rnd 6: (sc3, inc)x6 (30)
rnd 7: (sc4, inc)x6 (36)
rnd 8: (sc5, inc)x6 (42)
¬
rnd 9,10,11,12: one sc in each stitch (42)
¬
rnd 13, 14, 15: one sc in each stitch (42)
rnd 16: dec, dec, sc38 (40)
¬
rnd 17: dec, dec, sc36 (38)
rnd 18: dec, dec, sc34 (36)
rnd 19: dec, dec, sc32 (34)
rnd 20: dec, dec, sc30 (32)
¬
rnd 21, 22, 23, 24: one sc in each stitch (32)
¬
rnd 25, 26, 27, 28: one sc in each stitch (32)
¬
rnd 29, 30, 31, 32: one sc in each stitch (32)
¬
rnd 33, 34, 35, 36: one sc in each stitch (32)
F/O
LEG:
The trick with the legs (which honestly made them hell to crochet) is that I tried to make them as similar as possible to RBB's legs, so I had to change colours continuously while working the same row.
[1st: purple, fuchsia, orange, purple, fuchsia, orange. 2Nd: yellow, green, light blue, yellow, green, light blue]
Start both legs with pink though, as this will be the “paw”
Magic ring
rnd 1: work 2 sc into magic ring (6)
rnd 2: inc in each stitch (12)
rnd 3: (sc, inc)x6 (18)
rnd 4: (sc2, inc)x6 (24)
rnd 5: (sc3, inc)x6 (30)
rnd 6: (sc4, inc)x6 (36)
rnd 7: (sc5, inc)x6 (42)
rnd 8: (sc6, inc)x6 (48)
rnd 9: (sc7, inc)x6 (54)
All right, take a deep breath because this is where it gets funny.
Switch to purple/yellow, sc9, switch to fuchsia/green, sc9, switch to orange/light blue, sc9, switch to purple/yellow, sc9, switch to fuchsia/green, sc9, switch to orange/light blue, sc9.
You'll want to do this from rnd 10 to 15.
rnd 16: switch to purple/yellow, sc7, dec, switch to fuchsia/green, sc7, dec, switch to orange/light blue, sc7, dec, switch to purple/yellow, sc7, dec, switch to fuchsia/green, sc7, dec, switch to orange/light blue, sc9
rnd 17 to 19: repeat rnd 16, except you'll have to reduce the sc by one in each round (round 17 will be, switch to purple/yellow, sc6, dec, switch to fuchsia/green, sc6 etc., round 18 will be switch to purple/yellow, sc5, dec, switch to fuchsia/green, sc5, etc. The 9 sc at the end of the round will remain 9.)
In rnd 19 you'll have sc4, dec etc.
F/O
112 notes
·
View notes
Photo

Secador de Cabelos Mondial Golden Rose SC32 com Tourmaline Ion Technology – Rosa 🙂 Gostou Desta Oferta? CURTA! Comente e Compartilhe, somente assim você poderá economizar com todas as nossas ofertas! ⚠️ Ofertas sujeitas a alteração de preço, condições de pagamento e disponibilidade de estoque, sem aviso prévio.
0 notes
Link
Leather soft case for BAOFENG WACCOM UV-5R TYT TH-F8
Item No.: SC32 https://www.409shop.com/409shop_product.php?id=107206
Leather soft case
Softcase with belt for :
BAOFENG :UV-5R,UV-5RE,UV-5RA,UV-5RB,UV-5RA+
WACCOM :WUV-5R
TYT :TH-F8
RONSON : UV-8R
100% Brand New
PACKAGE CONTAIN
1 x Softcase with belt for UV-5R
BUY IT NOW: https://www.409shop.com/409shop_product.php?id=107206
0 notes
Text
CCIDnet (21/05/2018)
柏睿数据创始人刘睿民出席国际标准2018全会 [Bo Rui Data Founder Liu Ruimin Attends International Standard 2018 Plenary]
流数据库技术与库内人工智能技术均是我国掌握核心知识产权的数据库技术。2014年6月,ISO/IEC JTC1/SC32大数据标准化开放论坛召开。中方代表、柏睿数据董事长兼CTO刘睿民对内存流数据库技术的作出汇报,获得了参会专家的高度认可
[Flow database technology and intra- artificial intelligence technology are the database technologies that have mastered the core intellectual property rights in China. In June 2014, the ISO/IEC JTC1/SC32 big data standardization open forum was held. The Chinese representative, Chairman of Bo Rui Data Liu Ruimin, gave a report on the memory flow database technology, which was highly appreciated by participating experts.]
0 notes
Last Seen Blogs

havencook-art
Digital Artist

pulse-paint
Bang! Now you're dead.

ninjacat1515
Ninja Feline For Hire

lladybxg-blog
ARCHIVED

lshopeyin
DJ LITEEREX