#second option: they are assembling Ikea table
Explore tagged Tumblr posts
Visit Tumblr Blog
Explore Tumblr blogs with no restrictions, modern design and the best experience.
Last Seen Tumblr Blogs


Fun Fact
Celebrities use Tumblr as well.
Text

[PERC'ILDAN]
What are they doing? Option A: they are getting ready to play TTRPG; option B: they are actively assembling an Ikea table.
I picked secret third option
#look this silly fool drew a background#liltaire's art#digital art#critical role#critrole#critical role fanart#tlovm#vox machina#the legend of vox machina#critical role tlovm#legend of vox machina#percy de rolo#percival de rolo#percival fredrickstein von musel de rolo iii#percival fredrickstein von musel klossowski de rolo iii#vaxildan#vax'ildan#perc'ildan#percildan#percy x vax#vax x percy#i'm sending my condolences to the table#once again don't tag it as p*rcahlia thanks#basically me and my lovely spouse talked about perc'ildan and tables and certain table activities so this art was born#my spouse says they are getting ready to play tabletop games#second option: they are assembling Ikea table#pick you option i guess#i picked secret third option
207 notes
·
View notes
Text
DIY Side Table

Project by Silvia Song:
Finding a simple, modular piece of furniture that is reasonably priced but also well made can be hard sometimes. IKEA provides some decent options, but sometimes you just want something made out of beautiful, sturdy, solid wood. Thankfully, designer Silvia Song has created a great tutorial for a simple wood side table with a sliding drawer. If you’re interested in getting into woodworking and furniture making but don’t know where to start, this is the tutorial for you. She’s made a lovely piece with clean lines and a basic form that requires only a few tools. If you want a fun building project for a fall weekend, you should definitely try it out. Thanks for sharing, Silvia! — Kate

I chose this project as an exercise to see if I could design and build a simple drawer unit in the spirit of Enzo Mari’s Autoprogettazione (self-design). I wanted to use just a few simple hand tools and assemble each part by cross cutting only off-the-shelf lumber. The biggest challenge was to find a way to work with the actual dimensions of lumber to come up with puzzle-like pieces simple enough for a novice to build, but not lacking in versatility. My intentions were to keep things as simple and organic as possible, but you can easily personalize it by staining or painting the wood. I really enjoyed designing it, and I hope you enjoy building it! — Silvia

Materials
hammer
cross-cut hand saw
engineered square or 90-degree triangle
sanding block
pencil
lumber: (3) 1” x 6” x 6’, (1) 1” x 4” x 6’, (1) 1” x 3” x 6’, (1) 1” x 2” x 6’
box of #16 x 1 1/4″ wire nails
Instructions
1. Let’s begin by building the frame. Cut lumber to the dimensions below using a right angle tool (engineered square or 90-degree triangle) and lightly sand the edges.
(6) — 1” x 2” x 11” corner supports (for lateral support)
(4) — 1” x 6” x 18” top and bottom panel
(4) ��� 1” x 6″ x 20” side panel

2. Side panel assembly: A minimum of four nails per 1 x 2 support is required. It is crucial to nail directly into the center of the 1 x 2s. These pieces will support the frame laterally once it is upright.

3. There should be a 2 1/2″ space between the first and second 1 x 2s as shown in the photo. Add an extra 1/16″ to allow the drawer to slide easily in and out.


4. Let’s go ahead and complete the frame by assembling the top and bottom panels as well. Place (2) 1″ x 6″ x 18″ planks and nail them directly into the 1 x 2 supports. Make sure the nails are driven directly into the center of the supports.

You should now have a completed frame that looks like this:

5. To assemble the drawer, cut lumber to the dimensions specified below.
(2) — 1” x 6“ x 15” front and back planks
(2) — 1” x 4” x 9.5” side planks (one on each side)
(2) — 1” x 3” x 11” outermost side planks
(2) — 1” x 4” x 15” bottom end planks
(1) — 1” x 3” x 15” bottom middle plank

6. To assemble the bottom of the drawer, use (1) 1″ x 3″ x 15″ plank sandwiched between (2) 1″ x 4″ x 15″ planks. Place the 1″ x 4″ x 9.5″ side planks on both ends of the bottom planks and nail them down securely.

Here is what the completed side looks like:

7. Take (1) 1″ x 3″ x 11″ outermost side plank and align as shown in the photo. This will create a lip underneath the front and back panels to allow the drawer to be pulled out.

8. Then center the piece along the innermost side plank so that the edge of the 1 x 3 is flush with the front and back planks, and nail them down. Repeat for the opposite side.


Here is the finished drawer assembly:

9. Finally, slide the drawer into the frame.

Done!


23 notes
·
View notes
Text
Tips for Assembling Furniture Alone
assembling furniture can be... a lot. The excitement of unboxing your brand-new bookshelf or sleek office desk can quickly fade when you’re knee-deep in screws, planks, and an instruction manual that feels more like a riddle. And doing it alone? That’s a whole different level of challenge.
But don’t worry, you’ve got this! With a little preparation, patience, and the right approach, you can totally handle furniture assembly solo. Here are some friendly, real-world tips to help you get it done like a pro:

1. Unpack and Organize Everything First
Before diving in, open the box and lay everything out. Make sure you have all the pieces (yes, count the screws—trust me). Use the instruction manual as a guide to identify and organize all the hardware and parts. Having everything visible and sorted will make the whole process smoother.
Tip: Use small bowls or cups to keep screws and bolts organized so they don’t roll away while you’re working.
2. Read the Instructions All the Way Through
I know—it’s tempting to just glance at the first page and start building. But take a few minutes to actually read through the entire instruction manual before you pick up a single tool. It helps you understand the big picture and avoid common mistakes (like putting a panel on backward—been there, done that!).
3. Use the Right Tools
Most flat-pack furniture comes with an Allen wrench or mini screwdriver, but they’re not always the most efficient tools. If you have a full tool kit or even a power drill with adjustable torque settings, use it. It’ll save time—and your wrists.
4. Create a Clear, Open Workspace
Clear some space around where the furniture will go. Trying to assemble a six-foot bookshelf in a cramped room is asking for frustration. Lay down a blanket or soft rug to protect your floors and the furniture from scratches.
5. Take Your Time—Don’t Rush
When you're working solo, patience is key. Some steps that are simple with two people (like holding and screwing a panel at the same time) can be tricky alone. If you find yourself getting frustrated, take a break and come back with fresh eyes. Furniture doesn’t need to be a race—it just needs to be done right.
6. Use Temporary Supports
When a second set of hands would be helpful (like holding up one side of a table), improvise. Use a stack of books, boxes, or even a chair to prop things up temporarily. It’s not fancy, but it works!
7. Double-Check Before Final Tightening
Once everything is assembled and looking good, then go back and tighten all the screws. This allows for minor adjustments during the build without stripping threads or misaligning holes.
8. Know When to Call in the Pros
Sometimes, the best move is outsourcing the task—especially if it’s a complex piece like a large wardrobe or wall-mounted unit. If you’re in Houston, Furniture Assembly in Houston is a fantastic local option. They’re known for fast, reliable, and stress-free service. Whether it’s IKEA, Wayfair, or a specialty piece, they’ll handle it all so you don’t have to. It’s especially helpful if you’ve got multiple pieces to assemble or just don’t have the time (or patience) to do it yourself.

Wrapping Up:
Assembling furniture alone can be a rewarding experience—you get a little workout, a sense of accomplishment, and a finished piece you put together with your own two hands. But don’t be too hard on yourself if it’s not perfect or takes longer than expected. And remember, help is just a call away if you need it.
1 note
·
View note
Text
Some popular places and tips for finding furniture for sale
When looking for furniture for sale, you have a variety of options, ranging from physical stores to online marketplaces. Here are some popular places and tips for finding furniture for sale:
Physical Stores:
Department Stores: Stores like Macy's, Kohl's, and Sears often have a wide range of furniture options.
Specialty Furniture Stores: Stores like IKEA, Ashley Furniture, and Crate & Barrel specialize in furniture and offer various styles and price points.
Second-Hand Stores: Places like thrift stores, consignment shops, and vintage stores can be great for finding unique, pre-owned pieces at lower prices.
Online Marketplaces:
Amazon: Offers a vast selection of furniture from different sellers, often with competitive prices.
Wayfair: Known for its extensive range of home furnishings and regular sales.
Overstock: Provides a variety of furniture at discounted prices.
eBay: A platform where you can find both new and used furniture from various sellers.
Brand Websites:
Many furniture brands have their own websites where you can purchase directly, often with the benefit of sales and exclusive deals.
Local Classifieds:
Websites like Craigslist and Facebook Marketplace allow individuals to sell furniture locally.
Outlet Stores:
Furniture outlet stores often sell discontinued items, overstock, and seconds at reduced prices.
Showrooms and Design Centers:
High-end showrooms and design centers may offer custom furniture options for those looking for unique or luxury pieces.
Garage Sales and Estate Sales:
These can be excellent sources for finding unique, vintage, or antique furniture at a fraction of the original cost.
Furniture Rental Services:
For those who want to try out furniture before committing to a purchase, or for those in temporary housing situations, furniture rental services can be a good option.
Tips for Buying Furniture:
Measure Your Space: Before purchasing, measure the area where the furniture will go to ensure it fits properly.
Consider the Style: Choose furniture that matches the style and decor of your home.
Check for Quality: Look for durable materials and solid construction, especially for high-use items like sofas and dining tables.
Read Reviews: If buying online, read customer reviews to get an idea of the product's quality and the seller's reliability.
Compare Prices: Shop around to compare prices and find the best deal.
Consider Assembly: Some furniture requires assembly, so consider whether you're willing to put it together yourself or if you'll need professional help.
Look for Sales and Discounts: Many stores offer sales during holidays or end-of-season clearances.
Whether you're furnishing a new home or just looking to update a room, taking the time to research and compare options can help you find the perfect furniture for your needs and budget.
0 notes
Text
Discover Stylish and Affordable Furniture in Singapore
Diverse Range of Furniture Styles
Singapore is a melting pot of cultures and styles, and its furniture stores reflect that diversity. Whether you're furnishing a new home, updating an old space, or simply looking to add a few statement pieces, there’s something to fit every aesthetic. Some of the popular styles in Singapore include
Scandinavian: Known for its clean lines, simplicity, and functionality, Scandinavian furniture is perfect for those who prefer a clutter-free, airy look. This style emphasizes the use of natural materials such as wood and leather, creating a cozy yet sophisticated environment.
Modern Minimalist: For those who love sleek and contemporary designs, modern minimalist furniture is the way to go. These pieces are often characterized by their neutral color palette, geometric shapes, and innovative storage solutions – ideal for smaller spaces in Singapore.
Industrial: Industrial-style furniture has gained popularity in recent years, particularly for lofts and open-concept homes. It combines raw materials like metal and wood with a touch of ruggedness, giving your space a unique, urban vibe.
Vintage and Retro: If you appreciate nostalgia, sofa bed singapore vintage and retro furniture stores in Singapore offer unique pieces from bygone eras. From mid-century modern chairs to antique coffee tables, these items add character and warmth to any room.
Affordable Furniture Options for Every Budget
While Singapore is known for its high standard of living, that doesn’t mean that quality furniture needs to come with a hefty price tag. There are numerous furniture retailers across the island that offer stylish, durable, and affordable options to suit every budget. From budget-friendly warehouse sales to high-end boutiques, shoppers are spoilt for choice.
IKEA: A global favorite, IKEA offers affordable and functional furniture with a focus on modern design. Whether you’re shopping for a new sofa, dining table, or storage solutions, IKEA has a wide variety of products to choose from at reasonable prices. Plus, their flat-packed designs make it easy to transport and assemble.
Castlery: A homegrown brand, Castlery provides stylish, well-made furniture at accessible prices. Their pieces are designed with modern urban living in mind, combining aesthetics with practicality. You can find everything from plush sofas to elegant dining sets, all available online for hassle-free shopping.
HipVan: HipVan is another popular online furniture store in Singapore offering trendy, high-quality furniture at affordable prices. The brand is known for its range of stylish, functional pieces, and its convenient delivery service makes furnishing your home an effortless experience.
Customizing Your Space with Singaporean Furniture
In Singapore, maximizing the available space is a top priority, especially in apartments and HDB flats. Multi-functional furniture is a must-have for homeowners who want to make the most out of their square footage. Think modular sofas that can be reconfigured, furniture singapore extendable dining tables, or storage beds that offer additional space for organizing your belongings.
Furniture stores in Singapore also understand the need for customization. Many retailers provide made-to-order services where you can choose the size, material, and finish of your furniture. Whether it’s a customized sofa to fit an odd corner of your living room or a bespoke wardrobe that maximizes storage in your bedroom, the ability to personalize your furniture allows you to create a space that truly reflects your style.
Sustainable and Eco-Friendly Choices
As sustainability becomes more of a priority for Singaporeans, many furniture brands are taking steps toward more environmentally-friendly practices. From using responsibly sourced materials to offering furniture made from recycled wood, shoppers can now choose pieces that are both stylish and sustainable. Brands like Second Charm and Originals offer eco-friendly furniture that not only looks good but also minimizes your environmental footprint.
0 notes
Text
Budget-Friendly Modern Furniture Finds in Canada
Finding budget-friendly modern furniture in Canada can be a daunting task, especially when you're aiming to balance affordability with contemporary style. This article explores various options for new modern furniture design in Canada, ensuring that you can furnish your home without breaking the bank. From minimalist pieces to multifunctional furniture, discover how to elevate your living space with trendy yet cost-effective solutions.
The Rise of Modern Furniture in Canada
Modern furniture has gained significant popularity in Canada, driven by the growing trend of sleek, minimalist designs that prioritize functionality. This shift is not only about aesthetics but also about creating spaces that enhance the quality of life. The Canadian market is rich with options that cater to different tastes and budgets, making it easier than ever to find budget-friendly modern furniture.
Embracing Minimalism
Minimalism is at the core of modern furniture design. This approach focuses on simplicity, clean lines, and a clutter-free environment. By choosing minimalist furniture, you can create a spacious and airy feel in your home. Look for pieces that serve multiple purposes, such as a sofa that doubles as a bed or a coffee table with hidden storage. These items are not only stylish but also practical, helping you make the most of your space.
Multifunctional Furniture
Multifunctional furniture is a game-changer for those living in small apartments or homes. These innovative designs offer more than one function, saving space and money. For example, a dining table that can be extended to accommodate more guests or a bed with built-in storage drawers. New modern furniture design in Canada often includes these smart solutions, making them a perfect choice for budget-conscious shoppers.
Where to Find Budget-Friendly Modern Furniture in Canada
Navigating the furniture market can be overwhelming, but knowing where to look can make all the difference. Here are some top places to find budget-friendly modern furniture in Canada:
Online Retailers
Online shopping has revolutionized the way we buy furniture. Websites like Wayfair, IKEA, and Structube offer a wide range of modern furniture at competitive prices. These platforms often have sales and discounts, allowing you to score great deals on stylish pieces. Plus, the convenience of shopping from home and having items delivered to your doorstep cannot be overstated.
Local Furniture Stores
Supporting local businesses is always a good idea. Many local furniture stores in Canada offer unique, high-quality pieces that you won't find in big chain stores. These shops often have knowledgeable staff who can help you find the perfect items for your home. Additionally, buying locally reduces your carbon footprint, making it an eco-friendly choice.
Second-Hand and Vintage Shops
Don't overlook second-hand stores and vintage shops when searching for budget-friendly modern furniture. These places can be treasure troves of unique and affordable items. Often, you can find high-quality, well-made pieces at a fraction of the cost of new furniture. Plus, incorporating vintage items can add character and charm to your modern home.
Tips for Buying Budget-Friendly Modern Furniture
Finding affordable modern furniture requires a bit of strategy. Here are some tips to help you get the best deals:
Set a Budget
Before you start shopping, determine how much you can afford to spend. Setting a budget will help you narrow down your options and prevent overspending. Remember to account for additional costs like delivery fees and assembly services if needed.
Prioritize Quality
While it might be tempting to go for the cheapest option, prioritizing quality is essential. High-quality furniture lasts longer and looks better, making it a more cost-effective choice in the long run. Look for materials like solid wood, metal, and high-density foam that offer durability and comfort.
Take Advantage of Sales
Keep an eye out for sales and promotions, especially during major holidays and end-of-season clearances. Many retailers offer significant discounts during these times, allowing you to save money on high-quality modern furniture.
Why Choose Us: Northern-Interiors.ca
When it comes to furnishing your home with new modern furniture design in Canada, Northern-Interiors.ca stands out for several reasons. Here's why you should choose us:
Wide Selection: We offer a diverse range of modern furniture that caters to different styles and preferences.
Affordable Prices: Our competitive pricing ensures you get the best value for your money.
High Quality: We prioritize quality, ensuring that our furniture is durable and long-lasting.
Excellent Customer Service: Our team is dedicated to providing you with the best shopping experience.
Eco-Friendly Options: We offer a selection of sustainable and eco-friendly furniture choices.
Convenient Shopping: Our user-friendly website makes it easy to browse and purchase your favorite pieces.
Conclusion
Finding budget-friendly modern furniture in Canada is easier than ever, thanks to the wide variety of options available both online and in-store. By embracing minimalism, opting for multifunctional pieces, and shopping smart, you can furnish your home stylishly without overspending. When you're ready to make a purchase, remember to check out Northern-Interiors.ca for a seamless shopping experience and a fantastic selection of new modern furniture design in Canada.
Elevate your living space today with affordable, stylish furniture that meets your needs and budget. Visit Northern-Interiors.ca and discover the perfect pieces for your home.
Reference URL :- Budget-Friendly Modern Furniture Finds in Canada
#new stylish furniture design in Ontario#furniture modern luxury Ontario#modern luxury ceiling lights in Ontario
0 notes
Text
The Relationship Between KPCs and Product Diffusion in Furniture Purchasing
Purchasing furniture is an inherently complex process with endless potential choices. According to IBIS World, there are almost 4,000 household furniture manufacturers in the US alone, each of which produces an assortment of products with different features/characteristics. To illustrate the variety, searching for "beds" on Wayfair.com yields 48,749 results! Given the abundance of product options available to consumers, it is no surprise that their ultimate product choice boils down to a couple of important factors, otherwise known as KPCs (key purchase criteria). The KPCs for ready-to-assemble furniture (the type of furniture sold by IKEA that requires customer assembly) are presented in the table from a survey captured in Statista below:

The survey indicates that quality/performance and price are the most important factors for ready-to-assemble purchases, while style/color and brand hold less weight. When thinking about these findings in the context of product diffusion, it begs the question of whether a “new-to-the-world” product would succeed in this market. If quality and performance reign supreme, a new furniture innovation would likely have to convince consumers that it is a significant upgrade on these dimensions relative to the status quo. The innovation would have to accomplish this while keeping manufacturing costs at the same level or below the status quo, as an expensive product may turn off consumers given price is the second most important KPC. The product also wouldn't be able to rely on aesthetics and brand recognition for a diffusion boost, as these criteria are not as important to consumers.
Given the findings above, it seems fair to conclude that product diffusion will likely be slow in the furniture industry, especially for the ready-to-assemble furniture products made famous by IKEA. As my branding team thinks about our project, in which we are exploring potential ways that IKEA can reposition its brand, it appears that new product introductions would not be the best avenue to pursue, as it will likely be challenging to drive adoption among consumers. As a result, we will be sure to avoid recommending a new product launch and instead dive into other avenues for improving their brand position.
1 note
·
View note
Note
domestic prompt: winteriron goes to ikea
“We don’t need a table.”
“Yes we do! Oh my god, we need a table James, you imbecile. Complete buffoon.”
“We already have a table?”
“You want to have a brown coffee table with gray? Oh my god, I married a complete buffoon, a pure tragedy of a human being–”
James rolls his eyes, knowing that he won’t win this one. His husband’s will to go to IKEA is too strong, and he’s going to be the one to assemble the table anyway.
“I’m setting a timer on my phone and if we’re not out of IKEA in three hours, I am legally allowed to carry you out and bust through a wall.”
“Structural damage will be billed to your account!”
James hates IKEA. But he loves his husband more, and so he drives there. It’s a gigantic hellhole of a building, and Tony loves every second of it. He’s the one who knows all the correct names, can find anything within ten minutes.
The problem?
He doesn’t want to find everything in ten minutes. James finds a table. Said table is blue. Tony said they were looking for not brown tables, and there’s a blue painting in the kitchen. The blue table will match.
“Honey, this one,” James says.
“There are more options, but I’ll write that number down.”
“I am going to die,” James says, probably for the fourth time in the last hour. “I will die in an IKEA. It won’t even be respectable. You’ll lay me down on a fake bed and Natasha will laugh at me.”
“She won’t laugh until after the funeral,” Tony says.
Tony, after two hours, finds the table. It is the same damn blue one, and James rolls his eyes.
“Oh my god, we wasted another hour.”
“Sweetheart, I appreciate you,” Tony says, kissing James on the cheek. “Thank you for taking me to IKEA and thank you for helping me pick out the table. I promise after we check out, I’ll let you eat at that garbage place you love so much.”
“Alessandro’s may have a D from the Health Department, but it has an A in my heart.” Tony rolls his eyes, letting James pick up the box as they head to the checkout line. A whole other hell.
“Dante could never have imagined the hell of shopping,” James mutters. “I should rewrite Inferno.” Tony snorts, getting out his wallet.
“Sure, babe, rewrite an Italian masterpiece. Your Italian, while passable, is still not good enough for that.”
“Good thing I have an expert to help me,” James says. “And an excellent husband who will go to Alessandro’s with me and not shudder if he sees health code violations.”
“It’ll be easy, I’ll just stay in shock.” James laughs.
It doesn’t take near as long to get out, and he nearly kisses the ground when they get out of the store.
“It’s not that bad,” Tony says, rolling his eyes.
“It absolutely is, but I know you’d still be trapped there if you had asked Steve to go,” James says. “Both of you like color schemes too much.”
“We’re tasteful,” Tony says. “I married a garbage man who thinks gray is ‘edgy’ and ‘out of the box’.”
“It was about ninety years ago, now it’s all about bright colors.”
“Heathen, no it’s not,” Tony sniffs. “In the car, I have a restaurant to regret going to. Be a dear and pick the music for me, Thor had it set to some godawful alternative rock channel.” Bucky switches it to classic rock, smiling softly as Tony taps the steering wheel to Led Zeppelin.
Life is good.
#lovelyirony writes#winteriron#listen tony is dramatic and bucky loves him so much#bucky barnes#tony stark#i love them a lot
235 notes
·
View notes
Text
Love on the brain (Part 16)
Hey guys, I hope you're doing fine. I'm sorry this took so long again. The next update will be faster, I promise :) have fun!
The chapter is also up on Ao3: https://archiveofourown.org/works/17576201/chapters/45625690
Later that day when the sun already set most of the veterans agreed to meet on the patio after they took a shower. Luckily, they almost got the entire hotel to themselves and when Kelley is the first one to get to the patio, it’s completely empty. She lies down on one of the sun loungers and pulls out her phone, checking her texts. Kelley choose a corner with some sofas and some loungers where a small fire pit table is creating a tranquil atmosphere.
“Excuse me Ms.? Can I get you anything?”
The waiter pulls Kelley out of her thoughts and she quickly looks up from her phone.
“Eh-“
“You can bring her a huge glass of whiskey. She is going to sleep in the lobby tonight.” Megan calls as she, Ashlyn, Julie, Becky and Crystal approach the table.
“She is kidding.” Kelley quickly clarifies, looking at the waiter with an apologetic look. The waiter smiles back at her, nodding his head.
“Could you bring me an oat milk latte and an espresso?”
“Of course.”
“Thanks.”
After the waiter took the other orders as well, the group settles around the table.
“You’re a dick Pinoe.” Kelley grins at Megan.
“I do what I can.” Megan winks. Meanwhile, Allie, Christen and Alex also join them.
“Where is Tobin?” Julie asks Christen when they sit down.
“Fell asleep in the armchair while I showered. She’ll be down in a few minutes.”
“Typical Tobey.” Kelley laughs, pulling a standing Alex down into her lap.
“It’s always the same with her.” Christen rolls her eyes, laughing as well.
“Alright, the Espresso was for you, right?” the waiter checks, looking at Kelley.
“Yeah, thanks.” Kelley nods, as he sets the tiny cup down on the table.
“The Cappuccino?” the waiter asks, holding up the cup.
“Yes, thank you.” Becky answers, taking the cup out of his hands. The waiter hands out the rest of the beverages until there is only one left.
“Uhm, an oat milk latte?”
Alex looks around, wondering who has the same coffee order as her when Kelley’s hand flies up, pointing to her.
“For her. Sorry, I already ordered for you. Do you want something else?”
“No, I would have ordered that anyway. Thanks babe.” Alex says, leaning in and giving Kelley a quick peck. When she pulls back, she winks at Kelley, who smiles at her with a megawatt smile in response.
“Perfect.”
“You guys are so disgusting.” Megan deadpans.
“Exactly my words.” Allie exclaims.
“Then better close your eyes.” Alex says, before kissing Kelley one more time.
“Touché.” Ashlyn laughs. Kelley grabs her espresso, slides back on the sun lounger and pulls Alex with her, so that she is sitting between her legs. Alex leans back into Kelley, resting her head against her chest, cuddling into her with her coffee in hand. Her free hand rests on Kelley’s bend knee, stroking it tenderly. Kelley’s free hand stays around Alex’s waist, resting on her stomach, while her chin rests on top of Alex’s head.
“Okay Kel, now that the kids are gone, what the fuck did you do to a grown man?”
Alex snorts, rolling her eyes.
“Oh, I see, all of the sudden you find that funny, but a few weeks ago I was treated like a war criminal.” Kelley says, leaning forward to look at Alex from the side.
“That’s not true, babe.”
“Anyway, let’s just say I had a strong disagreement with someone.”
“Yeah right, a DiSaGrEeMeNt.” Allie mocks, letting out a laugh.
“What did you do, Kel?” Crystal cracks up.
“Well…I was drunk and somebody came on to Alex and I-“ Kelley starts hesitantly.
“Oh no.” Julie scrunches up her face, to which Alex just nods with a pained expression.
“What?” Megan asks.
“Do you guys remember when that journalist once tried flirting with Alex and Kelley almost ripped out his vocal cords?” Julie laughs and everybody nods, laughing as well.
“Oh right.” Megan exclaims.
“Or, oh my god, when Alex got the black eye in the game against France and Kelley nearly killed one of the players with her tackle, because they wouldn’t play the ball out of bounds?” Becky goes on.
“Daaaamn right, or that other time when-“
“Alright we get it.” Kelley interrupts annoyed.
“So, what did you do?” Christen asks.
“Ehh I…let’s just say I…I may or may not have-“
“She broke his nose.” Alex lets out dryly.
“What???” Megan, Crystal, Ashlyn, Becky, Christen and Julie all exclaim at the same time.
“Thanks.” Kelley says to Alex just as dryly.
“Guys, she didn’t just break his nose! She nearly killed him after almost getting killed herself and that was the second time that evening.”
“Kel!” everyone exclaims again.
“Pfff. As if I’d let anybody touch my fiancée.” Kelley grumbles.
“Come on Kel, are you serious? That was really irresponsible.” Becky says.
“THANK YOU, BECKY! Finally someone who agrees with me.” Alex exclaims frustratedly.
“Yeah, no that’s really dangerous Kel.” Julie agrees and Christen nods her head.
“He called her a slut.” Kelley says aggravatedly, the memories making her angry again.
“Oh-oh.” Ashlyn says.
“That guy was in for a treat.” Megan laughs.
“Such a short temper.” Ashlyn chuckles.
“When it comes to people coming on to Alex yes.” Kelley says matter of factly, which earns her a head shake from Alex.
“Did I miss anything?” Tobin asks when she stops in front of the group, remaining standing and leaning against a table.
“Kel broke some guy’s nose because he called Alex a slut.” Christen informs her with a pained expression.
“Duuuuude, savage.” Tobin chuckles, walking over to Kelley giving her a fist bump.
“Awesome.” Alex huffs.
“What’s the matter with you?” Tobin laughs.
“Don’t encourage her. That was reckless.” Alex frowns.
“Alex, I would have done the same if somebody said that to Christen. It’s pretty badass of her to try to win a fist fight with a dude just for you.” Tobin shrugs.
“You hear that? BADASS.” Kelley wiggles her eyebrows, which makes Alex scoff.
“Dude, did you at least look like you put up a fight or did you look like a pus-” Tobin asks.
“Tobin!” Christen interrupts her and throws her a warning look.
“Dude, I swear it was bad. I looked like I got hit by a car.” Kelley laughs and Alex shifts tensely between Kelley’s legs, clearing her throat and picking up a single strand of her hair that has landed on Kelley’s pants.
“Al, how did YOU think she looked?” Allie teases with an evil grin and Alex looks at her annoyed, blushing hardly.
“Oh come on Allie, shut up.” Kelley defends.
“Worms, I’m doing you a favor here.” Allie says, holding up her pointer finger, shortly looking at Kelley before switching her gaze to Alex again, waiting for an answer. Everybody’s attention is drawn towards Alex and she looks away quickly, muttering something under her breath.
“Huh? What did you say? Sorry, Alexandra I can’t understand you.” Allie provokes, seeking revenge for the morning after Kelley’s fist fight when she got woken up unpleasantly to say the least.
“Pretty sexy. She did look pretty damn hot, okay! Is that what you want me to say?” Alex snaps, while Allie starts bursting into loud laughter, the interaction causing the rest of the group to laugh as well. Alex rolls her eyes and lets out a heavy breath.
“I sometimes hate you.”
“You see I am confused. Do you want me to rip people apart for you or not?” Kelley teases, leaning forward to gauge Alex’s reaction. When Kelley’s head pops up in Alex’s sightline, she pushes Kelley back into the backrest by pushing her flat hand against her forehead.
“Watch your mouth, O’Hara.” Alex huffs. Kelley leans forward again, resting her face in Alex’s neck to kiss it softly while enclosing her in a tight embrace around her hips.
“Aw babe, I’m just kidding.” Kelley mutters into her neck. She leans back in the chair, pulling Alex with her and starts kissing Alex’s ticklish spot repeatedly which puts a smile back onto her face. Alex cuddles back into Kelley, laying her head on her chest again after giving her a quick kiss.
“You guys are so mean. Why me?” Alex pouts.
“We bully Tobin and the kids every day, what if it ever gets boring? We need options.” Allie says dramatically.
“You guys suck.” Tobin says, who is still standing with her hands stuffed in her pockets. When she finally sits down next to Christen, she puts her arm around her shoulder and smiles at her brightly.
“How is the most beautiful person doing?” she grins and Christen smiles at her, meaning to respond, but she is interrupted.
“Alex is doing great, thanks for asking.”
“Fuck you, Kel.” Tobin says annoyed.
Kelley snorts, while everyone is laughing loudly. Only Alex is turning around looking at Kelley sternly, her jaw agape. Unfortunately, Kelley doesn’t notice the look Alex is throwing her.
“Allie, I can reassure you this is definitely never going to be boring.” Kelley grins and Allie laughs while stretching her arm to high five Kelley.
“Good one, O’Hara.” Pinoe laughs.
“Would you stop acting like a dick?” Alex scolds, hitting Kelley’s shoulder lightly. Alex’s tone catches Kelley’s attention immediately and she looks at her wide eyed, holding up her hands innocently.
“Don’t give me that look. Apologize.” Alex warns.
“Alex it’s okay, it was funny.” Christen giggles.
“No, it wasn’t.” Tobin whines.
Alex looks at Kelley with a steely gaze and Kelley musters her expression closely, contemplating her next move. They look at each other for a few more seconds before Kelley breaks the stare-off to look at Tobin.
“I’m sorry Tobs, that was unnecessary and douchy.” Kelley apologizes.
“It’s okay.” Tobin chuckles.
“Wow guys, we are all witnesses of the power struggle™.” Allie gasps jokingly.
“We don’t have a power struggle.” Alex and Kelley exclaim at the same time.
“Okay, who is the big spoon and would assemble Ikea furniture?”
“Kelley.” the group answers monotone and in unison.
“But who has the power to change their partners mind about everything and is bossing the other one around while she is assembling the furniture?”
“Alex.” The group answers the same way.
“Power struggle.” Allie whisper yells.
“But-“ Alex tries to defend.
“However, it works, because admit it Alex: Kelley is whipped as fuck and-“
“She is not.” Alex argues.
“I am.” Kelley mumbles, which leaves Alex speechless.
“-and you’re bossy.”
Alex turns around, throwing Kelley a helpless look that tells her Alex is starting to get insecure.
“Bossy as hell.” Allie underlines.
“Hey! I like her bossy.” Kelley defends, kissing Alex’s temple.
“Is there anything you don’t like about her?” Allie deadpans. Kelley looks deeply into Alex’s eyes.
“Nope.” Kelley answers casually, not averting her eyes from Alex. She is glad to see that the answer seems to take away the poignant insecurity that Alex’s eyes displayed just seconds ago. Instead Alex smiles at her brightly now.
“Exactly.” Allie rolls her eyes.
“Thanks professor, are you finished with analyzing my relationship?” Kelley asks sharply, her temper starting to show slightly.
“I could go on for hours. Who is next?” Allie jokes, not taking note of the change in Kelley’s attitude.
“You’re unbelievable.” Alex laughs, trying to lighten up the mood before Kelley will go for Allie’s throat. However, Kelley isn’t quite finished yet.
“Allie if you’d spend half as much of the time you spend on thinking about our relationship and invest it in analyzing Canada for gameday, you maybe could figure out how get us a win. Or better, if you’d stop analyzing at all, you maybe would sleep at night and perform better.” Kelley teases and loud laughter as well as roaring goes through the group while Allie tries to pick up her jaw from the ground.
“UUUUUHH!” Tobin exclaims.
“Ow, that must hurt Allie.” Becky comments.
“GAMEOVER.” Crystal laughs.
“Shazam!” Pinoe yells.
“Fair enough Wormy, I deserved that.” Allie admits with a chuckle. Alex cuddles back into Kelley and takes her hand into her own, squeezing it twice. She then cranes her neck to look up at her and Kelley winks at her serenely, apparently having cooled down. After that all the teasing quiets down and they spend a calm evening together, knowing that the friendly against Canada is coming up in a few days. Little by little, they start making their way back to their hotel rooms, until only Allie, Crystal, Alex, Julie and Kelley remain. When they exit the elevator, Alex interrupts Allie and Kelley’s conversation.
“Hey babe, I’m quickly going to pick up a body lotion at Crystal and JJ’s, okay?”
“Sure, we’ll wait here. “
“Give me 2 minutes.” Alex says, as she follows Julie and Crystal to their room, which is in another hallway on the same floor.
“So…exhibit A, huh?” Allie smirks.
“What do you mean?”
“Don’t play dumb now, you know exactly what I mean.”
“It’s like you said yourself, you better don’t mess with her if I’m around.”
“Even if it means embarrassing her best friend in front of a huge group of friends?” Allie pouts.
“Especially, if it means that.”
“That’s evil.”
“No Allie, to be quite honest, you making her insecure was evil.” Kelley counters pissed off.
“Woah, hey. That wasn’t my intention.” Allie answers baffled.
“Sorry, that was harsh. Man, I just-“ Kelley groans, stopping midsentence to get her thoughts straight.
“-I just didn’t like the look she gave me. It bothered her and she was too polite to say so in front of everyone.” Kelley says calmly.
“Kel, If I had seen that, I would have stopped. I was just joking, you know that.” Allie says, clearly worried and rueful.
“Yeah, I know we were joking around and who am I to complain, right? I’m always teasing and joking around and we both know normally Alex is totally fine with it either, but apparently it was too much, or you struck a chord. I really didn’t mean to interfere, but you left me no choice.”
“I’m really sorry, I didn’t mean to.” Allie apologizes.
“I know, but you definitely deserved that.”
“What kind of best friend am I?” Allie groans and Kelley puts her hand on her shoulder.
“The best a best friend can be. Come on, don’t worry, knowing Alex she’ll talk to either you or me in the next 24 hours and everything will be just fine. I’m really sorry I lashed out at you.”
“You know Wormy, don’t be sorry. You always defend her and I think that’s a good thing, she’s lucky.”
“No…I am.” Kelley smiles at Alex who is walking down the hallway with the body lotion and two candy bars in hand.
“Look, Crys and JJ also had candy they didn’t want and knowing you guys this is going to be annihilated in the next 30 seconds.” Alex smiles brightly from afar.
“You’re right, you definitely are lucky. I mean look at you, she’s the best thing that could have ever happened to you.” Allie says to Kelley, referring to what they were talking about before while smiling at an approaching Alex.
“There she is. I thought you hit your head for a second, Allie.” Kelley responds through gritted teeth, also still smiling at Alex.
“Here.” Alex says, stopping in front of them and handing them the bars.
“You’re the best.” Kelley and Allie say at the same time before frowning at each other.
“And you’re weird. What were you guys talking about?” Alex asks suspiciously.
“You.” Kelley cheeses at her. Alex chuckles in response as if Kelley was joking, which makes Kelley and Allie let out a sigh of relieve.
“Of course. Hopefully only good things.” she responds, linking arms with Kelley as they start walking down the hallway.
“Only the best.” Kelley mumbles with her mouth full, while Allie is devouring the bar silently.
“See you tomorrow guys.” Allie waves.
“Night, Al.” Alex waves back.
“Try sleeping for once.” Kelley smirks.
“Don’t push it, Wormy.”
“Love you, Allie.” Kelley says ironically, while winking at her and Allie disappears in her room with a dramatic eyeroll. When Kelley turns around, Alex eyes her warily. Kelley quickly starts walking down the hallway towards their room.
“Hey. Stop!” Alex calls after her.
“Kel.”
Alex catches up with her while Kelley unlocks the door and Alex puts her body between her and the door, stopping her from entering. It always amazed Alex how well she can read Kelley’s eyes. For Alex it is like reading a manual that contains every detail you need to know and if you look really closely it will tell you even more than just the necessities. However, the answer her favorite pair of eyes tell her in this moment also makes Alex realize that Kelley can read hers as well and if she didn’t already know before, now would be the time she would have found out.
“You gave her a piece of mind, didn’t you?” Alex asks softly.
“I don’t know what you’re talking about.” Kelley says calmly, pushing past Alex to enter the room. Kelley walks towards her nightstand, starting to take off her jewelry, standing with her back to Alex.
“You were worried, so you tried to wreck her confidence in front of everyone and then you talked to her in the hallway.” Alex assumes correctly, walking up behind Kelley, who is taking off her watch. Alex hugs her from behind and presses her forehead between Kelley’s shoulder blades.
“Kelley.” Alex sighs out softly.
Kelley stops with the watch in hand, observing it, letting out a deep breath.
“It bothered you.” Kelley says quietly.
“You know, I’m a big girl. I’ll talk to her.” Alex whispers against Kelley’s back, pressing a kiss to it. Kelley turns around at that, looking at Alex.
“Why didn’t you tell her right away?”
“I didn’t want to cause a scene. It was a nice evening.” Alex smiles softly. Kelley only smiles back at her for a split second before she starts to frown.
“What is it?”
“It wasn’t her intention, she told me she didn’t know it bothered you.” Kelley says hastily. Alex heart melts at the cute look on her face. Kelley’s forehead is furrowed and her eyes express worry as she gauges Alex’s reaction. She clearly doesn’t want Alex to be upset about the situation as well as with Allie.
“Yeah Kel, I know.” Alex smiles, lifting her hand to stroke Kelley’s cheek, not able to resist the urge to do so.
“Maybe you should talk to her.” Kelley offers carefully.
“I will.”
“Eh, okay? That was easier than I thought.” Kelley breathes out confused. Alex leans in to kiss Kelley softly.
“As cute as you are when you worry about me, you still worry way too much.”
“I don’t want anyone to make you feel insecure.”
“And I love you for that, but poor Allie probably has a hard time sleeping tonight.”
“Pfff, that was self-inflicted.” Kelley rolls her eyes.
“Probably, but there is no need to go overboard, okay tiger?”
“Got it.”
“Good.” Alex smiles, pecking Kelley’s lips before walking into the bathroom to get ready for bed. After a few minutes Kelley joins her just as Alex starts brushing her teeth, standing at the sink. Kelley reaches for her toothbrush and the toothpaste as well, sitting down on the rim of the bathtub behind Alex. Their gazes meet through the huge bathroom mirror and Kelley winks at Alex cutely, making her smile before Alex redirects her attention to her teeth. For a few seconds the only sound that can be heard is the noise of the toothbrushes, however Kelley being Kelley has something else in mind. Kelley observes Alex’s face closely and when she sees that she is totally preoccupied with brushing her teeth she reaches for Alex’s butt to give it a pinch. Alex shrieks loudly, jumping in surprise and turning around quickly to look at Kelley wide-eyed.
“Mhhh!” Alex warns, slapping Kelley’s hand away, not being able to speak due to the toothbrush in her mouth. Kelley just raises her eyebrows innocently and chuckles when Alex throws her a deadpan look. Kelley resumes brushing her teeth as if nothing happened, grinning at Alex which earns her a headshake. They start pulling faces at each other through the mirror but stop when they laugh too much to continue, both proceeding to focus on the task at hand. A few seconds later Alex looks at Kelley through the bathroom mirror again, catching Kelley shamelessly checking her out.
“Oh my god! Stahp lookin at my butt, perv.” Alex gasps with the toothbrush still in her mouth. Kelley starts bursting into laughter, almost spitting a bit of the foaming toothpaste out. Alex turns around, trying to look at Kelley warningly, but having to laugh as well. Kelley pulls Alex closer by the back of her thighs, resting her hands just under Alex’s butt, looking up at her with a dopey smile.
“You look hot.”
“Straight to the point, babe.”
“No need to beat around the bush, I’m talkin phacts.”
“Kel, you need to chill.”
“What I need is sex.”
Alex pulls the toothbrush out of her mouth, chuckling, “You’re so romantic.”
“Pfuck camp, I feel like a teenager in my parents’ house again and-“ Kelley starts but is interrupted by Alex leaning down to give her a kiss on the cheek, spreading toothpaste all over her cheek. Alex starts giggling, struggling to keep the foam in her mouth, while Kelley just looks at her unbothered.
“You know what’s quite alarming?”
Alex shakes her head, still giggling.
“That actually that wasn’t bad at all.” Kelley mumbles.
“Why?”
“Because basically I’m pretty confident that at least 50% of my body consist of your spit.”
“Sounds plausible.” Alex chuckles.
“No seriously, I think we’ve come to a point where you could spit in my food and I still wouldn’t mind it if the food was good in the first place.”
“Phat’s disgusting!” Alex grimaces.
“Of course, but is it though?” Kelley raises an eyebrow, causing Alex to think about it.
“I can’t believe that I’m saying this, but you’re right, I wouldn’t mind either.”
“That’s alarming, isn’t it? I think that’s quite alarming.”
“God, we are disgusting.”
“Totally, but I kiss you anyway, so why would that change anything? Plus, I feel like on a regular my tongue is between your legs far more often than it’s not.” Kelley reasons drily, causing Alex to choke on the toothpaste, rushing to the sink to spit it out.
“Kelley!” Alex exclaims when she has come down from a light coughing fit.
“What? It’s true.” Kelley chuckles.
“It’s not!”
Kelley gives Alex an unconvinced look, “It kinda is.”
“Shut up and brush your teeth.” Alex says, looking as if she has been caught. She turns around on her heel, meaning to leave the bathroom.
“Hey babe?”
“Mhm?”
“Please don’t spit in my food anyway.” Kelley laughs, making Alex shake her head with a smile. Alex sits down on the bed, leaning against the headboard. She checks her phone and starts retweeting some things on Twitter. After a few minutes Kelley enters the room. First Alex is too engrossed in her phone, but she quickly starts to wonder why Kelley’s silhouette isn’t moving anymore and when she looks up Kelley is standing at the edge of the bed. She is looking at Alex with a sly grin.
“Am I allowed in bed tonight or do I have to test the couches in the lobby?”
“You’re always allowed if it involves a bed.” Alex smirks, winking at Kelley.
“Oh boy, I’m so lucky.” Kelley grins, letting herself fall into the bed and laying down on her back. She looks up at the ceiling and exhales deeply. Alex, who has been watching her the whole time, climbs on top of her. She straddles Kelley’s hips and holds herself up with her hands placed on either side of Kelley’s head. She leans down to connect their lips for a long and loving kiss which takes Kelley by surprise. During the long-lasting kiss Kelley’s hands move to Alex’s face, holding it gently. When Alex pulls away and sits up slightly, Kelley just lays there with her eyes still closed, Alex’s face still in her hands.
“What was that for?” Kelley whispers with a soft smile on her face.
“It was cute how you didn’t want me to hit the ground when you tackled me earlier.”
Kelley opens her eyes only to be met with Alex’s strikingly beautiful eyes.
“You didn’t think I was going to let you hit the ground, did you?”
“You would let anybody hit the ground.”
“Yeah, but not you.” Kelley cheeses.
“I have marks to proof you wrong.”
“Hey, that was before you became my girlfriend though.”
“Sorry, I didn’t know the trick was to date that crazy brunette rowdy who tackles you every chance she gets.” Alex says sarcastically.
“Beginner’s mistake.” Kelley says with a lopsided smirk.
“Ugh, stop with that smirk.” Alex groans, hitting Kelley in the chest lightly.
“I’m not doing anything.” Kelley chuckles, still wearing the smirk.
“Stop it.”
“Why?”
“Because I can’t bear it.”
Kelley grabs Alex’s chin, pulling her down for a swift kiss.
“At least we’re even then, because I can’t bear you in these shorts either.” Kelley murmurs against Alex’s lips. Alex pulls away an inch so their gazes can meet.
“Sooo…power struggle, huh?” Alex asks, staring deep into Kelley’s eyes with a familiar fire.
“Apparently.” Kelley answers. Her voice sounds relaxed and cool, but her eyes are far from it as they switch between Alex’s eyes and her lips.
“There is one thing they don’t know though.”
“And what is that?”
The tension between them could be cut with a knife and their stare-off resembles the one they had on the patio earlier, however this time the mood has switched.
“There is one occasion where I frequently let you do whatever you want to me.” Alex whispers sultrily.
Kelley holds Alex’s gaze, staying still like a tiger who is waiting for their prey to move just the slightest bit. However, the patience is over when Alex bites her lip.
Like every morning at camp Alex sets down her plate and her smoothie on their designated breakfast table opposite of Allie who is already eating.
“Good morning.” Alex says enthusiastically, wearing a bright smile.
“…Good morning.” Allie answers confused, almost sounding like she is asking.
“You’re late today.” Allie observes slowly. Normally Allie is always the one to arrive after the couple.
“Morning Worms.” Kelley smiles when she also arrives at the table, sitting down next to Allie. Allie turns to look at Kelley, eyeing her up and down, frowning at her when she just smiles at her and takes a sip of her coffee.
“Didn’t hear the alarm.” Alex waves off, taking a bite of her croissant.
“Ah.” Allie says, looking at her plate, picking up a piece of melon. Suddenly, she lifts her head to look at Alex again, laying the piece of melon back down on the plate. Allie eyes Alex closely, who is still wearing a bright smile.
“Babe, could you pass me the salt?” Kelley asks and Alex hands it to her happily. Allie observes the interaction quietly.
“Why are you glowing like that? You look like you got laid.” Allie jokes, looking at Alex while laughing loudly and picking up the piece of melon to put it in her mouth. However, suddenly her laughter quiets down and realization dawns on her.
“Oh my god!” Allie chokes and Kelley starts patting her back while Alex blushes.
“Of course, you totally got banged.” Allie gasps at Alex when she is able to talk again.
“Would you shout your big ass mouth!” Alex says through gritted teeth. Allie turns to look at Kelley again.
“I did get you laid? In camp??? Wow, dude you really have to thank me.”
“God Al, would you stop?!” Alex buries her face in her hands.
“Sorry.” Allie chuckles.
“See, that’s why we don’t do this.” Alex mumbles to Kelley, still hiding behind her hands.
“Chill, nobody heard, at least not from me. However, I’m not rooming next to you.” Allie grins.
“I forgot a fork.” Alex says, quickly standing up and walking over to the buffet.
Kelley and Allie’s gazes meet. Kelley grins at her brightly, pumping her fist, making Allie wiggle her eyebrows.
“Thank you SO much!!” Kelley mouths exaggeratedly, while closing her eyes in pleasure, doing praying hands and throwing her head back.
“I’m glad I could help.” Allie giggles. Kelley holds out her hand for Allie to shake.
“Was it the power struggle comment or the fight?”
“Power struggle. Do you think this was a one-time thing or would you be able to this deliberately? I’ll pay you.” Kelley whispers.
“You know me Wormy, if I knew I was able to do that I would have already made a business out of it.”
“You got lucky Allie, yesterday I wanted to rip your head off, however now I think you’ve redeemed yourself.”
“I think you’re the one who got lucky.” Allie deadpans. Allie and Kelley look at each other for a split second, before they both burst into laughter.
26 notes
·
View notes
Text
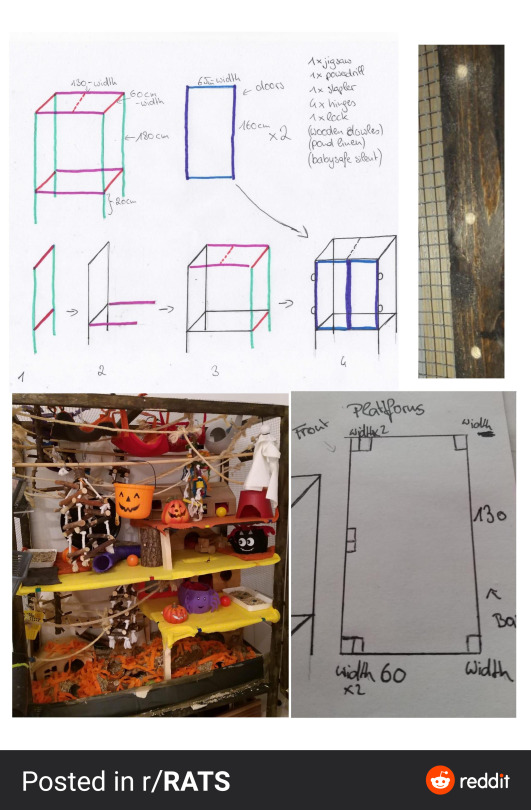
Hi
So since I have been asked a couple of times. I made a little tutorial on how to make my cage.
You could make this cage as big or as small as you like and I have some optional stuff that I included later on which you don’t have to do. They are just some Quality of life stuff.
The cage costs about 120~ euros. Probably less if you build it smaller.
First things first you probably to really need any power tools as you could do all of this with normal tools but it’s a hell of a work and you could probably just borrow the tools from your parents or friends.
\-A jigsaw
\-a powerdrill
\-a stapler (the strong staplers don’t know if they have another name)
The wood you will need could basically be anything as long as your rats don’t chew to much. I used untreated pine for the framework as it was my cheapest option and Poplar wood for the platforms.
**For the framework you will need:**
\- 4 x 180 cm
\- 5 x 60 cm – width x2
\- 4 x 130 cm – width x2
\- 4 x 160 cm
\- 4 x 65 cm -width x2
\- Screws
The Reason why you have to substract the width from some parts is because they are in between your other wood parts and therefor part of the distance the wood has to cover is already covered. (Hopefully that makes sense) With width I mean the width of the wooden pieces you are gonna use.
(Btw if you get pieces that aren’t squares but rectangles (so where the width could be 2 things), you will have to think of how you want them in the cage and then just substract the right side. )
If you make the cage smaller or bigger you can just adjust the size of you height, length and depth to your liking as long as you keep the -width of the wood x2 intact it shouldn’t make any problems. The only difference there would be, is the door. Which you would have to adjust but I will gladly help if anyone needs help with that. Furthermore I made my cage 20 cm from the ground so that my rats wouldn’t jump onto the floor if you want it going all the way to the bottom you would just have to make the doors the same length as your frames height.
**BUILDING**
Alright now that that’s out of the way how do you Build this thing?
First you will have to cut all the wood into size with your jigsaw and don’t forget substracting the width. You can also already paint everything you want babysafe sealent to be on. Its easier now that later.
1. Then you lay out the first side of the cage like in the image above. Lay the two 180 cm pieces parallel to eachother and add the two 60 -width cm pieces one at the top and one 20 cm from the bottom. The screw everything together. If you drill holes before putting in the screws it will turn out prettier and more stable so do that if you can.
2. Then turn this to the side and add the 2 130-widthx2 pieces. Drill and screw. Finished
3. Now comes the tricky part if you have someone to help you hold stuff that would be great if not then try too place the third 180cm piece against a table or wall while you screw it in. Same goes for the fourth. Then just add the 2 60 -width cm pieces and you have something that can stand.
4. Now add the roof by by putting the 130cm-width pieces in (again second person would be helpful) and test shake the cage. If its still a little unstable add the last 60cm part in the middle of the roof. If its already stable then you can skip that part.
5. Now to make the doors just make to rectangulars that fit onto the cage. I did this by flipping the cage on its back and putting the wood onto it just in case I had made any mistakes and the drilling the 65-width cm pieces together with the 160cm pieces. Now I just had to put them on with hinges but before putting them on with 4 hinges I stapled the chickenwire/mesh onto the doors cause I just find it easier.
6. Now your cage is almost done just add the mesh all over the side, roof and if you want to back. You can also use a wooden back if you would like to. I myself used a wooden back but if you use mesh you can hang stuff more easily so… do what you want. I used an mdf plate for the back and just screwed with screw and hammered it in with nails.
7. Now you just have to cut out your bottom which is a wooden piece 130x60 on which you will have to cut out the corners (and the door) and then you can layer it in either babysafe sealent or pondlinen (which is pretty cheap). If you use pondliner glue it onto the wood with woodglue that you use a paintbrush or you hands (whatever you have) to smear the whole wood with and then put the pondlinen onto it tight let 3-4cm pondlinen hang over the edges. Then just staple the overhanging pondlinen onto the other side.
8. The whole bottom procedure you repeat with all the other platforms. Now you can either screw in the platforms whichs hard and tiresome or you use the old ikea trick and this is the reason you need wooden dowles. Drill holes(2-3 cm) into the 4 180 cm pieces and let gaps of either 5 or 10 cm. Now you can put in the dowles and add the platforms like this. This way you can easily alter your cage all the time and deep cleans are really easy as you can just take out everything and clean it like that instead of having to be in the cage. You can also make halfplatforms by making smaller platforms and using wooden pieces as stands. Like I did with my cage. Don’t forget to cut holes into the platforms for your rats you get to all the areas in the cage. I also made a little half circle hole into my platforms so my rats could use the mesh to climb up and wouldn’t be interrupted by platforms.
9. Now just decorate everything and if you want add a layer of babysafe sealent allover the cage. I did it cause I wanted my cage darker than it was.
10. You can also make a pan out of acrylic glass or Plastic so you have a deep pan for bedding. I just used old wood and put pondlinen over it.
I wish you fun with your new Cage and I would love to get pictures if anyone really makes this. It took me about 2 days to make this. One day I cut everything to size and painted and the next day I assembled.
1 note
·
View note
Text
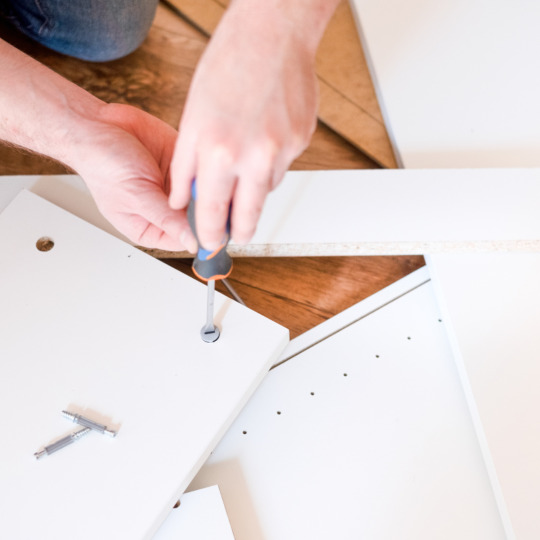
Handyman Home Flat Pack Assembler
Flat pack furniture, also known as ready-to-assemble (RTA) or kit furniture, is sold in cartons with assembly instructions and sometimes hardware included. This type of furniture is often cheaper than fully built pieces.

Typically, flat pack assembler charge by the hour. They will need a clean, safe area to work in.
Cost
Flat pack furniture is an economical option for home furnishing. Its compact design reduces shipping and assembly costs. It also reduces space requirements, which allows for more items to be transported in the same truck. It is ideal for online sales because it can be shipped more quickly and efficiently.
Assembling a flat-pack double bed or other furniture can be a difficult task and takes a lot of time. It’s important to choose the right professional to take care of the job. A qualified tradesperson will charge a fixed price per hour, per 30 minutes, or a set fee for the work.
It’s important to know whether a flat-pack furniture specialist is licensed. This will ensure that you get the best service for your money. You should also find out whether they offer a warranty for their work. This will protect you if anything goes wrong with the furniture. Also, ask them if they have any references and testimonials.
Time
Flat pack furniture is a popular option for many people due to the affordability and customization it offers. However, there are some issues to be aware of. For example, the assembly process can take longer than expected. Also, the instructions can be difficult to read. If you are assembling a large item, it is a good idea to hire a second person to help.
It is important to note that flat pack furniture can be quite heavy and may require special tools. As such, if you have limited space or a small budget, you may want to consider choosing lighter pieces.
On average, a piece of flat pack furniture can be assembled in about 1-3 hours. However, this depends on the manufacturer and the piece itself. It can also be affected by the type of material and whether it has sliding doors. In addition, a tradesperson’s hourly rate may differ depending on where they are based in the country with contractors typically charging more in London and the southeast of England than in other areas.
Safety
Assembling flat pack furniture can be dangerous if you don’t follow the instructions carefully. It’s also important to check that all parts are included before you start working. You don’t want to waste time putting together an incomplete desk. The best way to do this is to refer to the instructions and look for arrows that indicate the correct position a piece should be in.
One of the most difficult things about assembling flat-pack furniture is finding all the small pieces and screws. You can make it easier for yourself by organising them in plastic bins or cups. This will prevent them from getting lost or rolling away as you shuffle them around. You can also try to assemble the furniture in a room with minimal clutter so that you don’t lose any pieces.
You can also place a blanket down to work on to avoid scratching the floor or damaging the furniture while building it. This is especially important if the piece is made from solid wood or MDF.
Experience
Flat pack furniture can be tricky to assemble, even when following instructions. Sometimes the instructions are so complicated that it’s easy to miss an important step. The best way to avoid this is by hiring a professional. Handyman Home flat pack assemblers are experts in their field and can help you assemble your furniture to the highest standard.
The assembly of flat pack furniture can be difficult, especially when the pieces are large and have many parts. The instructions are often written in small print and can be confusing, making it easy to miss a crucial step. This can lead to incorrect assembly, which can be expensive and time consuming.
Whether you need to assemble an Ikea bed or a John Lewis table, you’ll need the right tools and experience to get the job done. You can hire a professional assembler to save time and money, or you can do it yourself. However, make sure to follow the safety tips and guidelines provided by the assemblers.
1 note
·
View note
Text
Corner Bench Ikea Hack
Welcome to our article on the Corner Bench IKEA hack. If you're someone who enjoys DIY home decor projects, then this is a must-read for you. This hack is perfect for adding some extra seating space to your home while also being stylish and functional. IKEA furniture is known for its affordability and simplicity, making it an excellent option to customize into something unique and personalized in your free time. The corner bench IKEA hack we'll be discussing today takes a standard IKEA bookshelf unit and turns it into a comfortable seating area with storage options. Whether you have limited space in your home or just enjoy maximizing every inch of it, this hack will come in handy. So, keep reading. Transform Your Space with These Surprising Corner Bench IKEA Hacks Looking for a unique way to add seating and storage to your home? Look no further than this unusual yet genius Corner Bench IKEA hacks that are sure to inspire you. With just a little bit of creativity and some basic DIY skills, you can transform an ordinary IKEA bench into a stylish, functional and comfortable seat that will become the focal point of any room and stand the test of time. One popular hack involves adding built-in bookshelves or cabinets around an existing IKEA bench seating to create a cozy reading nook in the corner of your living room or bedroom. This not only provides tons of storage space for books, magazines, and other knick-knacks but also adds visual interest and character to an otherwise dull corner or long wall. Discover the Unconventional yet Functional IKEA Hack for Small Spaces If you're living in a small space, you know how important it is to maximize every inch of your home. One great way to do this is by creating functional pieces that serve multiple purposes. That's where the Corner Bench IKEA hack comes in handy! With just a few simple modifications, an ordinary IKEA bench can be transformed into a stylish and practical piece of Banquette seating. To create your own corner bench IKEA hack, start with some IKEA Kallax shelving units and two Linnmon table tops. Assemble the Kallax units according to the instructions, and then attach one of the Linnmon table tops to the top of the shelf unit using screws. Repeat this step for the second table top on the opposite side, creating a 90-degree angle. Then add legs or casters to make it easier to move around if needed for a window seat. Get Creative and Save Money with these 3 DIY Corner Bench IKEA Hacks Corner benches are a functional and stylish addition to any home. However, buying one can be quite expensive. Luckily, there are ways to save money by making your own corner bench using, as just one example, IKEA Havsta cabinets and furniture hacks. In this article, we will showcase three DIY corner bench IKEA hacks like this one from IkeaHackers that can help you create the perfect seating area and more sturdy seating surface in your home while saving you money. 1. The first hack is the “IKEA Stolmen Corner Bench.” This hack uses the popular Stolmen open wardrobe system from IKEA as the base for a comfortable corner bench. 2. The second hack is “IKEA Kallax Hack Corner Bench,” which utilizes the Kallax shelving unit and some additional materials, such as foam cushions, to create a cozy seating area for the back of the bench and seating area. 3. The third hack is called "IKEA Hemnes Corner Bench," which involves modifying an IKEA Hemnes TV stand into an L-shaped storage bench with storage drawers for added functionality. Upgrade Your Home Decor in a Simple, Unconventional Way If you're looking to upgrade your home decor in a simple, unconventional way, look no further than this IKEA Corner Bench hack. These easy and affordable DIY projects can transform any room in your home with minimal effort. Not only do they add functionality and seating space, but they also add a unique and stylish touch to your dining room and decor. To decorate further use spray paint in a colour of your choice or maybe decoupage. To get started and the next step on this project, all you need is an IKEA Kallax shelf unit and, the best part, some basic woodworking tools from the hardware store. Simply follow the step-by-step instructions provided online for cutting and assembling the bench seat and backrest pieces from wood planks or boards that fit the size of your Kallax unit. Then attach them to the unit using wood screws, wood glue or brackets for added stability. Once complete, you'll have a comfortable and practical corner bench that can be used as extra seating in a living room or dining area or even as a cozy reading or dining nook in a room or home office. Unusual Yet Genius Corner Bench IKEA Hacks Guaranteed to Inspire You Are you looking for a way to spruce up your home décor without breaking the bank? Look no further than IKEA hacks like this one from At Home with Ashley! With a little creativity and some basic DIY skills, you can transform affordable IKEA furniture or wall cabinet into custom pieces that perfectly suit your style. One of the most versatile and functional IKEA items to hack is the corner bench ikea storage unit. Here are some of our favorite corner bench IKEA hacks guaranteed to inspire you. Try adding a coat of paint or stain to an unfinished wooden corner bench like the STUVA or add a cabinet door or drawer fronts. This simple upgrade to Ikea cabinets can instantly elevate its look and make it feel more high-end. Another easy hack is switching out the seat cushions for new ones in a fun pattern or bold color for a bench cushion. You could also use fabric paint or even reupholster the base on top of the foam yourself for a completely custom look. Conclusion: As we come to the end of this post and conclude our exploration of corner bench IKEA hacks, the good news is clear that the possibilities are endless. From simple Ikea bookcases or ikea shelf or storage unit to stylish elaborate, and multi-functional, there's a DIY project for every level of skill and creativity. The only downside is possibly not having enough rooms to house these units. One of the most popular hacks is to repurpose the IKEA Kallax connected units as a corner bench. By adding foam cushions and upholstery fabric, you can create a comfortable seating area with built-in storage. A good option is to use the IKEA side table as a base for a corner bench, using wooden planks or pallets as the seat surface or base plates. For the last step, those who want something more unique without bumping up the total costs consider incorporating unexpected materials like metal piping or reclaimed wood positioned at the perfect height into your design. The key is to think outside the box and customize your hack to fit your space and personal style. Read the full article
0 notes
Text
Dad does it! Hacks the most amazing princess castle bed
When my son was 4 years old, my wife and I needed to move him out of his convertible toddler bed to a “big kid bed” so that our daughter could begin to use the former.
He wasn't excited about it, so I offered to build him a new bed that was “the most awesome bed ever”, and the result was a success that made him very happy.
Our daughter is no dummy though … as she approached her fourth birthday, she began asking for her own special “big girl bed”.
And while our son had given us complete “creative control”, our daughter was a little more specific: “a fairy princess castle bed … preferably pink,” she said.

My daughter's first draft of the hack

3D model before construction began
This is the Fairy Princess Castle Bed we built for her:

Watch my YouTube video, including 3D model, time lapse of the assembly, and my daughter's reaction to her Fairy Princess Castle Bed:
youtube
IKEA items used for castle bed:
2 Kura children's beds
1 Kura bed tent
Other materials:
~30' of 2x4s
~80' of 2x2s
~16' of 1x4s
~15' of 1x10s
3' of 1×12
18 2' x 4' white mdf panels
6 2'x4' faux stone panels
~30 ft2 of laminate flooring
~30 ft2 of plywood
~25' of nature-themed moulding
~50' of plain moulding
Strips of hobby wood
4 flat metal bars
22 button magnets
Square dowels of varying thickness
Bundle of cedar siding
Various pieces of hardware
Roll of grey contact paper
Quart of pink paint
Several quarts dark brown (Jacobean) stain
Several quarts of clear lacquer
Quart of black paint
Various fake plants
2 sets of remote-controlled LED strip lights
1 Aukey table light
2 sets of drawer slides
Tools:
Belt sander
Sandpaper (60-220 grit) and sanding block
Rip cut saw
Hack saw
Back cut saw
Miter box
Power drill and various drill bits
Hammer
Various screw drivers
Level
Various paint brushes
Super glue
Construction adhesive (i.e. “Liquid Nails”)
Caulk gun
Hot glue gun
Staple gun
How we put together the Fairy Princess Castle Bed
This hack was so extensive that giving detailed step-by-step instructions would be a book in itself, so here's a concise summary:
The hack consists of 2 major sections (each of which is comprised of a separate Kura bed):
I. “The bed”
1. Use belt sander to strip preexisting lacquer off all Kura parts
2. Stain all wooden Kura parts
3. Cover mdf panels provided with the Kura with grey contact paper on one side.
4. Assemble Kura roughly according to IKEA's conventional directions, but keep each of the 4 walls separate from one another. Only notable exception is to not include the upper rail to the side wall adjacent to the ladder – as this will be where “the bed” joins “the tower”. This will also require 2 2x4s (or alternatively 2 2x2s) to help support the back wall, which otherwise can't be assembled independently of the others.
5. Create frames for the door and window using 2x4s and 2×2 respectively.
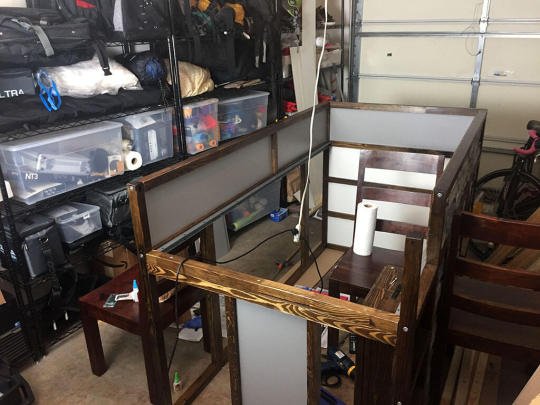
Finishing the bed half
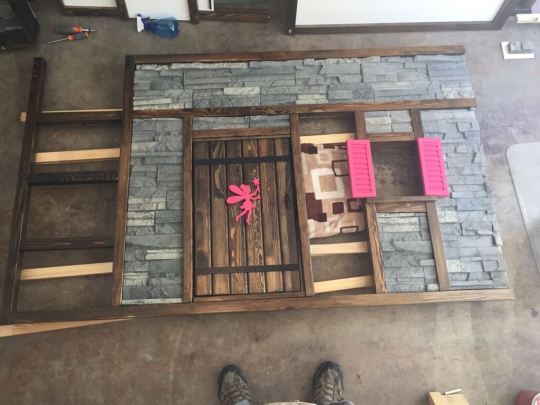
Front wall almost finished
6. Construct the door from bed slats taken from the second Kura: Cut off the ends to create the proper height. Attach them together using rectangular dowels nailed to their back sides.

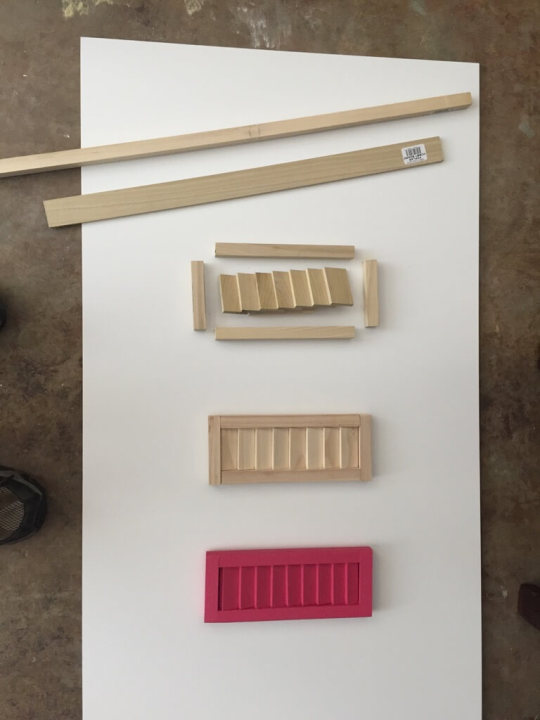
Future door from bed slats
Use hacksaw to cut metal bars to the width of the door, superglue metal button magnets on the front to look like rivets, and paint the bar/magnet pieces black. Once dry, attach to the bed slats.
(Super gluing them didn't hold well – I had better luck with drilling shallow holes into the slats, filling with construction adhesive, and then clamping the bars over them for 24 hours. Be sure to roughen the back side of the bars for maximum adhesion).
Once door finished, attach to the frame via hinges.
Optional: Attached pink wooden fairy to the door using the same drill hole-filled with adhesive approach.
7. Construct window shutters using square dowels and strips of “hobby wood”. Paint pink. Attach to window frame.
Window shutters in various stages of completion
8. Use white mdf panels for the walls. (The ones I used were actually intended for whiteboards, so were smooth white on one side, and rough/unfinished on the other. The smooth white side replicated dry wall relatively well). Attached walls to the inside of each of the now-assembled Kura wall frames.
9. Cut faux stone panels to fit into the preexisting spaces in the front frame. (I used Wellington light grey panels from fauxpanels.com. Attach to the backside of the mdf panels using construction adhesive.
10. Create an inset for behind the ladder using the same general principles used in steps 8 and 9.
11. Cut, sand, and stain plain moulding to use inside the first floor of “the bed” to cover over seems
II. “The Tower”
This is the more difficult half to hack/construct.
First, the tower consists of part of the second Kura bed tipped on its side (It doesn't include the top rail – which can be used as 2×2's anywhere else in the project).
Also, the tipped Kura may not be structurally sound; I create a platform for the second floor of the tower using 2×4's, 2×2's, and plywood, which stood completely independently of the visible tower.
12. As with “the bed”, strip and stain all wooden Kura parts.
13. Also as with “the bed”, assemble the 4 walls using the 12 main edge pieces to the bed/tower.
14. Create a lower platform using plywood placed on top of spare bed slats. (This will go directly on the actual room's floor when finished)
15. Create the upper platform using 2x4s for the vertical supports, 2x2s for the “beams”, and plywood for the floor. The plywood can be covered on one side with the white mdf panels to make a nice ceiling for the first floor.
16. Use a combination of 2×2's and mdf panels to create a wall that will divide the first floor into 2 halves. The left half will become an alcove for the hide-away bookcase, and the right will become a “secret passage”.

Inside castle bed – secret passage closed

Inside castle bed – secret passage open
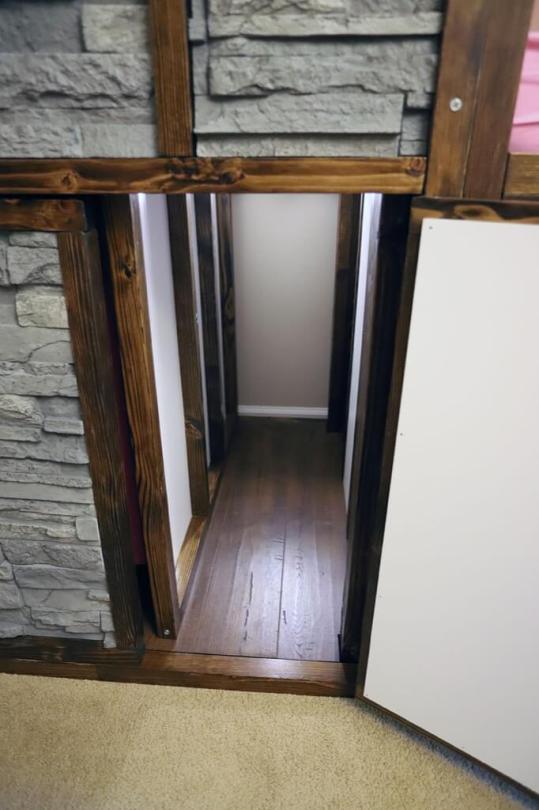
Secret passage exit to outside
17. Create the sliding platform for the bookcase. I used 2 2x4s attached to the lower platform, 2 2x4s attached to a horizontal 1×12 that acted as a shelf, linked together by industrial-strength, full extension drawer slides. (I used 32” drawer slides made by Hettich)

Sliding platform for bookcase
18. Use a combination of 2×4's, 2×2's, mdf panels, and faux stone panels to create the front and side walls in similar fashion to what was done for “the bed”.
This should include swinging doors covered with stone panel that will act like hidden compartments for the bookcase and secret passage.
The back wall of the tower will rest against the wall of the actual room and thus, can be left open as it was for “the bed”.

Backside of tower, almost finished
19. Build door and window shutters as done with “the bed”.
20. Use plain moulding to cover vertical seams inside the tower, and additional moulding around the top (I used nature-themed moulding).
21. Cut wooden laminate flooring to cover both the lower and upper platforms. (You do not need to worry about underlayment for this kind of usage)

Inside of tower without the upper platform

Inside the first floor (i.e. under the mattress)
22. Build a bookcase that will fit in the alcove and on top of the sliding platform built during step 17. (I would have preferred to use an IKEA bookcase – for example, a Bestå or Billy bookcase – but there wasn't one that was the appropriate size).
Paint (or finish) bookcase. I also glued some thin strips of nature-themed moulding to the front to add some character.
III. “The tower roof”
23. The tower roof was the most elaborate and challenging step.

Calculating measurements for the tower roof

Angled wood used as a radial beam for the tower's vaulted ceiling
To begin, create a frame that will firmly attach to the top of the tower and also provide a lip for the roof to sit in.
(This way, the roof will stay on by virtue of its weight alone, and you won't need to worry about separately securing the roof.)

Vaulted ceiling inside tower
The roof is built from 4 triangular shaped mdf panels, joined together by pairs of angled wooden dowels that act as radial beams for a vaulted, pyramid shaped ceiling.
(I lacked the tools to do create those “beams”, so this involved a lot of sanding and revisions.) For the roof, I used cedar siding (which I needed to recut and sand prior to painting pink).
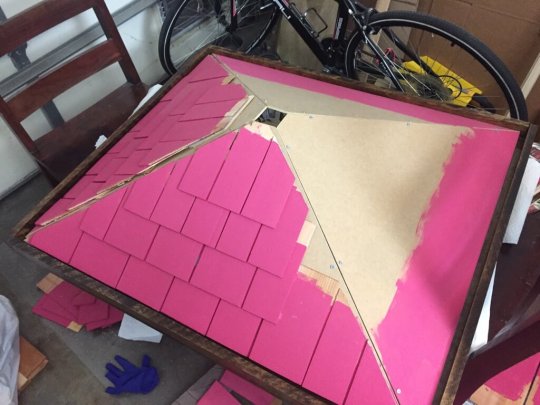
Tower roof, about halfway finished
IV. Assembly of the Castle Bed
By this point, you should have 4-5 different pieces for “the bed” (4 walls +/- separate inset behind the ladder), slats for “the bed”, and ~12 different pieces for “the tower” (4 walls, 2 platforms, 2-4 vertical posts for upper platform, 1 inner vertical wall on first floor, bookcase, roof frame, roof). Time to put them all together. (The main assembly took me ~10 hours, separated across 2 days).
Now install the lights, any miniature furniture (e.g. pillows, kids chair, toy box), and attach fake plants (I literally stapled them to the wood frame).

Parts that will eventually become the exterior light fixture

Finished exterior light
Add mattress and bed tent.
Woohoo – you're finally done!
Our daughter loves her Fairy Princess Castle bed.

How long and how much did the castle bed cost?
Took 10 months and ~400 hours. Total cost was about $2000-2500 US (I didn't keep receipts).
What do you like most about the castle bed?
How much my daughter likes it.
What was the hardest part about the hack?
Getting the hidden bookcase to slide in and out of its alcove with enough ease that my daughter could easily do it herself.
What to pay special attention to?
A Kura bed is not necessarily structurally stable if used on its side. Also, be 100% sure this monstrosity will fit into its destination room before you start!
Looking back, would you have done the castle bed differently?
I would have spent less time on the shingled roof, which is literally not visible without a step stool.
~ by Eric Strong
The post Dad does it! Hacks the most amazing princess castle bed appeared first on IKEA Hackers.
1 note
·
View note
Text
Dad does it! Hacks the most amazing princess castle bed
When my son was 4 years old, my wife and I needed to move him out of his convertible toddler bed to a “big kid bed” so that our daughter could begin to use the former.
He wasn't excited about it, so I offered to build him a new bed that was “the most awesome bed ever”, and the result was a success that made him very happy.
Our daughter is no dummy though … as she approached her fourth birthday, she began asking for her own special “big girl bed”.
And while our son had given us complete “creative control”, our daughter was a little more specific: “a fairy princess castle bed … preferably pink,” she said.

My daughter's first draft of the hack

3D model before construction began
This is the Fairy Princess Castle Bed we built for her:

Watch my YouTube video, including 3D model, time lapse of the assembly, and my daughter's reaction to her Fairy Princess Castle Bed:
youtube
IKEA items used for castle bed:
2 Kura children's beds
1 Kura bed tent
Other materials:
~30' of 2x4s
~80' of 2x2s
~16' of 1x4s
~15' of 1x10s
3' of 1×12
18 2' x 4' white mdf panels
6 2'x4' faux stone panels
~30 ft2 of laminate flooring
~30 ft2 of plywood
~25' of nature-themed moulding
~50' of plain moulding
Strips of hobby wood
4 flat metal bars
22 button magnets
Square dowels of varying thickness
Bundle of cedar siding
Various pieces of hardware
Roll of grey contact paper
Quart of pink paint
Several quarts dark brown (Jacobean) stain
Several quarts of clear lacquer
Quart of black paint
Various fake plants
2 sets of remote-controlled LED strip lights
1 Aukey table light
2 sets of drawer slides
Tools:
Belt sander
Sandpaper (60-220 grit) and sanding block
Rip cut saw
Hack saw
Back cut saw
Miter box
Power drill and various drill bits
Hammer
Various screw drivers
Level
Various paint brushes
Super glue
Construction adhesive (i.e. “Liquid Nails”)
Caulk gun
Hot glue gun
Staple gun
How we put together the Fairy Princess Castle Bed
This hack was so extensive that giving detailed step-by-step instructions would be a book in itself, so here's a concise summary:
The hack consists of 2 major sections (each of which is comprised of a separate Kura bed):
I. “The bed”
1. Use belt sander to strip preexisting lacquer off all Kura parts
2. Stain all wooden Kura parts
3. Cover mdf panels provided with the Kura with grey contact paper on one side.
4. Assemble Kura roughly according to IKEA's conventional directions, but keep each of the 4 walls separate from one another. Only notable exception is to not include the upper rail to the side wall adjacent to the ladder – as this will be where “the bed” joins “the tower”. This will also require 2 2x4s (or alternatively 2 2x2s) to help support the back wall, which otherwise can't be assembled independently of the others.
5. Create frames for the door and window using 2x4s and 2×2 respectively.

Finishing the bed half

Front wall almost finished
6. Construct the door from bed slats taken from the second Kura: Cut off the ends to create the proper height. Attach them together using rectangular dowels nailed to their back sides.

Future door from bed slats
Use hacksaw to cut metal bars to the width of the door, superglue metal button magnets on the front to look like rivets, and paint the bar/magnet pieces black. Once dry, attach to the bed slats.
(Super gluing them didn't hold well – I had better luck with drilling shallow holes into the slats, filling with construction adhesive, and then clamping the bars over them for 24 hours. Be sure to roughen the back side of the bars for maximum adhesion).
Once door finished, attach to the frame via hinges.
Optional: Attached pink wooden fairy to the door using the same drill hole-filled with adhesive approach.
7. Construct window shutters using square dowels and strips of “hobby wood”. Paint pink. Attach to window frame.

Window shutters in various stages of completion
8. Use white mdf panels for the walls. (The ones I used were actually intended for whiteboards, so were smooth white on one side, and rough/unfinished on the other. The smooth white side replicated dry wall relatively well). Attached walls to the inside of each of the now-assembled Kura wall frames.
9. Cut faux stone panels to fit into the preexisting spaces in the front frame. (I used Wellington light grey panels from fauxpanels.com. Attach to the backside of the mdf panels using construction adhesive.
10. Create an inset for behind the ladder using the same general principles used in steps 8 and 9.
11. Cut, sand, and stain plain moulding to use inside the first floor of “the bed” to cover over seems
II. “The Tower”
This is the more difficult half to hack/construct.
First, the tower consists of part of the second Kura bed tipped on its side (It doesn't include the top rail – which can be used as 2×2's anywhere else in the project).
Also, the tipped Kura may not be structurally sound; I create a platform for the second floor of the tower using 2×4's, 2×2's, and plywood, which stood completely independently of the visible tower.
12. As with “the bed”, strip and stain all wooden Kura parts.
13. Also as with “the bed”, assemble the 4 walls using the 12 main edge pieces to the bed/tower.
14. Create a lower platform using plywood placed on top of spare bed slats. (This will go directly on the actual room's floor when finished)
15. Create the upper platform using 2x4s for the vertical supports, 2x2s for the “beams”, and plywood for the floor. The plywood can be covered on one side with the white mdf panels to make a nice ceiling for the first floor.
16. Use a combination of 2×2's and mdf panels to create a wall that will divide the first floor into 2 halves. The left half will become an alcove for the hide-away bookcase, and the right will become a “secret passage”.

Inside castle bed – secret passage closed

Inside castle bed – secret passage open

Secret passage exit to outside
17. Create the sliding platform for the bookcase. I used 2 2x4s attached to the lower platform, 2 2x4s attached to a horizontal 1×12 that acted as a shelf, linked together by industrial-strength, full extension drawer slides. (I used 32” drawer slides made by Hettich)

Sliding platform for bookcase
18. Use a combination of 2×4's, 2×2's, mdf panels, and faux stone panels to create the front and side walls in similar fashion to what was done for “the bed”.
This should include swinging doors covered with stone panel that will act like hidden compartments for the bookcase and secret passage.
The back wall of the tower will rest against the wall of the actual room and thus, can be left open as it was for “the bed”.

Backside of tower, almost finished
19. Build door and window shutters as done with “the bed”.
20. Use plain moulding to cover vertical seams inside the tower, and additional moulding around the top (I used nature-themed moulding).
21. Cut wooden laminate flooring to cover both the lower and upper platforms. (You do not need to worry about underlayment for this kind of usage)

Inside of tower without the upper platform

Inside the first floor (i.e. under the mattress)
22. Build a bookcase that will fit in the alcove and on top of the sliding platform built during step 17. (I would have preferred to use an IKEA bookcase – for example, a Bestå or Billy bookcase – but there wasn't one that was the appropriate size).
Paint (or finish) bookcase. I also glued some thin strips of nature-themed moulding to the front to add some character.
III. “The tower roof”
23. The tower roof was the most elaborate and challenging step.

Calculating measurements for the tower roof

Angled wood used as a radial beam for the tower's vaulted ceiling
To begin, create a frame that will firmly attach to the top of the tower and also provide a lip for the roof to sit in.
(This way, the roof will stay on by virtue of its weight alone, and you won't need to worry about separately securing the roof.)

Vaulted ceiling inside tower
The roof is built from 4 triangular shaped mdf panels, joined together by pairs of angled wooden dowels that act as radial beams for a vaulted, pyramid shaped ceiling.
(I lacked the tools to do create those “beams”, so this involved a lot of sanding and revisions.) For the roof, I used cedar siding (which I needed to recut and sand prior to painting pink).

Tower roof, about halfway finished
IV. Assembly of the Castle Bed
By this point, you should have 4-5 different pieces for “the bed” (4 walls +/- separate inset behind the ladder), slats for “the bed”, and ~12 different pieces for “the tower” (4 walls, 2 platforms, 2-4 vertical posts for upper platform, 1 inner vertical wall on first floor, bookcase, roof frame, roof). Time to put them all together. (The main assembly took me ~10 hours, separated across 2 days).
Now install the lights, any miniature furniture (e.g. pillows, kids chair, toy box), and attach fake plants (I literally stapled them to the wood frame).

Parts that will eventually become the exterior light fixture

Finished exterior light
Add mattress and bed tent.
Woohoo – you're finally done!
Our daughter loves her Fairy Princess Castle bed.

How long and how much did the castle bed cost?
Took 10 months and ~400 hours. Total cost was about $2000-2500 US (I didn't keep receipts).
What do you like most about the castle bed?
How much my daughter likes it.
What was the hardest part about the hack?
Getting the hidden bookcase to slide in and out of its alcove with enough ease that my daughter could easily do it herself.
What to pay special attention to?
A Kura bed is not necessarily structurally stable if used on its side. Also, be 100% sure this monstrosity will fit into its destination room before you start!
Looking back, would you have done the castle bed differently?
I would have spent less time on the shingled roof, which is literally not visible without a step stool.
~ by Eric Strong
The post Dad does it! Hacks the most amazing princess castle bed appeared first on IKEA Hackers.
0 notes
Text
My Build of the TIFLIC DIY Bookscanner
Note: What I am discussing here is in no way my original work. This design was created by user Mohib on the DIY Bookscanner Forum. His original plans are here. These are my notes based on my experience building his design. In addition, his software recommendations are for iOS and Windows and I have exactly the opposite platforms – Android and OS X. I have my own set of recommendations as well as some scripts I wrote. All of this will be presented below. Mohib’s plans are sufficient to build a scanner but what they lack is an Instructable style “Step 1 – do this” flow. I will attempt to put a little of that in.
tl;dr
There is no tldr, you knucklehead! This is a build post, so it is all or nothing.
Background
I have long been interested in the work at DIY Bookscanner. I was very interested in the version of the scanner that could be cut from a sheet of plywood with a CNC and used two DSLR cameras with remote triggers. Ultimately, that was a bit expensive, bulky and beyond my meager abilities to create. I’ve been in the market for some sort of nondestructive book scanner for some time. I have dozens if not hundreds of books that I would gladly trade in paper for a digital copy.
When I first learned of this simplified version that could be built entirely out of PVC pipe for the structure and used a single smartphone as the camera, my ears perked up Scooby Doo style. I saw the video and got very interested. It seemed within buildable reach and had a decent throughput. I have a lot of pages of books to scan, so the more pages per minute the less time I spend.
I decided to take the plunge and actually attempt building this. To that end, I basically bought most of the things straight out of Mohib’s recommendations from Amazon. What I didn’t buy originally, I bought almost all of them later. Pretty much everything marked “optional” in his plans I found essential. I will mention them all as we get to them.
Materials
I also was able to get almost everything in the plans locally at a neighborhood True Value. I hoped to spend as little time in big box stores as possible. In fact the local employees took an interest in the project and I had many conversations about my project. This is where those times spending 10 minutes finding me the right 17 cent screw got repaid, as I ultimately dropped around $100 in materials and tools there working on the scanner.
The other big sourcing issue was the plastic platen that sits on the book pages. I also tried to source it locally at a glass place but it was both prohibitively expensive but also, they were unwilling to sell me 3/8″ plexiglass. I found this awesome site, Tap Plastics, where I could very easily order exactly what I wanted with a simple web form. Because I knew this had the longest lead time, the very first thing I did was order this.
This link will start you at acrylic. Choose the following options:
Clear 3/8” Thickness 11” Width 15 1/4” Length
and then down below pick 6 holes if you want to buy exactly what is in the plans. It would be possible to in fact do 4 or 2 holes, depending on the flexibility you desire from your platen. In practice, I’ve been using mine for two weeks and have yet to move the handle to different holes. It costs $2 per hole drilled, so I gambled $8 on future flexibility. When you order from Tap Plastics and include holes, you need to send them a diagram of where to drill. I extracted that one page of CAD drawing from the plans and sent that to them and what I got back was perfect.
With the platen glass ordered, I went to my local hardware store (Walker’s True Value in Conway SC) carrying a printout of the plans with the goal of getting every item I could on the manifest. Ideally I wanted to be able to build this without walking into a Lowes or Home Depot. I failed slightly, but not by much.
One of the parts in question was the barrel nut. This is those little things you find in Ikea style flat pack furniture, cylinders with a slot for screwdrivers on the ends and a threaded hole through the center. The plans call for two with 1/4-20 threading and a length of 1 1/2″, which are hard to come by in the US. The plans cite a supplier in the UK but shipping is prohibitive for these things. I wanted to avoid that. Luckily, True Value had the same thing but in 3/4″ length. I decided to experiment with this and only buy the UK version if absolutely necessary. Spoiler Alert – the 3/4″ version worked.
I was able to get both the 3/4” PVC pipe and connectors for the handle and the 1 1/4” PVC pipe for the structure. What I could not get were the caps and sanitary T connector for 1 1/4” pipe. Although they had bins for them, they were out of stock. I ultimately did get these items at a Lowes which then had the complication of being available only in white plastic where all the other 1 1/4” PVC pipe and connectors I had were black. I bought every single bolt, nut, washer, threaded rod, steel cable etc on the manifest. There are still a few bolts that I never used and to this day don’t understand where they are supposed to go.
I also went through the plans and ordered most of the things from Amazon, such as the tripod ball head, the focus rail and the star knobs. Where I think Mohib is crazy is in not using affiliate links to Amazon because he’s just leaving 4% of all those purchases on the table. I’ll list out all the stuff here with my affiliate link because I am not crazy. If Mohib ever lets me know of an associate ID for him, then I will swap them out for his because he deserves the money more than me. However, someone does deserve it.
I originally skipped buying the LED lamp listed as optional. That was a mistake and after my first trial run I went back and bought it. I also originally tried using a nonskid mat from Dollar General under the books. That was a mistake. User dpc on the DIY Bookscanner forum pointed me to the sticky Siconi mat and it is night and day versus every other option I tried. So, I recommend just buying everything on the following list if you really want to build this.
Manfrotto 2909 Super Clamp with 2907 Short Stud
Vastar Universal Smartphone Tripod Adapter
CamKix Wireless Bluetooth Camera Shutter Remote Control for Smartphones
EXMAX 1/4″ 3/8″ Tripod Mini Ball Head
Innovative Components AN4C-5S221 1.38″ Star knob thru hole 1/4-20 steel zinc insert black pp (Pack of 10)
DSLRKIT 2 way Macro Shot Focusing Focus Rail Slider
LEDMO 20w flood lights LED Waterproof IP65 Floodlight, Daylight White
Siconi Collection 7.5″ Large Sticky Pad, Grey
Assembly
I’m now going to list the steps I took. This will save you the trouble of reverse engineering from the CAD drawings. In at least one case, my original cuts were wrong because I misread the diagrams. You are welcome.
Platen
I won’t lie to you, the platen handle is by far the most challenging part of this whole thing. The steel cable holding it together is the worst bit of that so once you make it past that, it’s all downhill.
Step 1 – take the 3/4” PVC and cut one 13” piece and two 7” pieces. I just used a hacksaw because I had one handy. These will end up in connectors so if the cut is anywhere close to straight, the connectors will be pretty forgiving.
Step 2 – In the two 45 degree 3/4” connectors, drill a hole 0.5” from the end through both sides. The size of this hole is the same as your barrel nuts – 10 mm if you get the European version or 1/4” in my case. The barrel nuts will slide into these and I needed to buy one of the file drill bits and run it around the inside of the hole to get mine to fit eventually. You want the fit tight but they do need to be able to slide in and out.
Step 3 – Connect the 90 degree connectors to both ends of the 13” piece. Put both of the 7” pieces into those connectors. Attache the 45 degree connectors to that, ends with the hole away from the pipe.
Now is the worst part of the project, getting the steel cable in. It is pretty essential, as this is the piece that gives the platen handle stability (it gets the most wear and tear) and building it this way allows for modularity in a way that trying to affix permanently with some kind of serious cement or adhesive would not. Still, this is tough.
Step 4 – Measure for the steel cable. I tried a few things before I hit on what worked. I had a spool of thin gauge wire of the type you use to hang picture frames. Whatever you use to measure, it needs to not stretch so steel wire seemed like a good bet. Put in the barrel nuts into the holes. I ran two lengths of the cable through, enough that I could have a turn around each nut and enough sticking out of each pipe that I could pull it all tight. Pull it a few times because your pipes will be pulled tight into the connectors by this process and you don’t want to measure having a lot of slack. I used a Sharpie to mark the outermost part of the wire while I had it as tight as I could manage pulling with both hands while kneeling on the platen handle.
Step 5 – Pull out the wire and lay it alongside the bike brake cable to transfer that measurement. Swage the connectors down so that when you make the loop the mark is also at the outside most part. I actually put the barrel nut inside my loop before I swaged it down to ensure it would fit. Per directions of the hardware store people, I didn’t bother with a swaging tool. Once I had the fitting placed where I wanted it, I set the whole thing down on waste wood and hit it with a hammer a few times. It worked like a charm.
Step 6 – Put your swaged cable through the handle of the platen. Slide the first barrel nut through the holes and the loop. This is the easy one. Getting the second one in is challenging. I achieved it by using the same wire from my measurement to pull the other end tight. I did this by myself and found it extremely challenging to pull it hard enough to be able to slide the second barrel nut in. I did it with a combination of pulling with the wire and levering with a screwdriver while having the barrel nut through one side of the holes. I recommend doing this with a second person, which might save you the 30 minutes or so it took me. On the good news side, at this point all the hardest work is done.
Step 7 – Using the rubber washer and a steel one and a 1/4” – 20 bolt, connect the platen handle to the platen. I won’t lie, I found having a completed platen with handle in my hand extremely satisfying. I did a few camera tests with just that to test it out and it made me very happy.
Camera Arm
Step 1 – Cut a 5” piece of 1 1/2” PVC pipe and a 13” piece. Because you will have bought it in 36” pieces, I recommend also cutting a few other lengths. I have every 3” from 7″ to 13” for the upright piece of my assembly for reasons I will discuss later. While you have it out and are cutting anyway, I suggest also cutting 7” and 10” pieces.
Step 2 – Cut pieces from the threaded rods into 9 1/4” and 19 1/2”. I tried a few techniques but what worked the best was just using a hacksaw and filing the end until I could screw one of the star knobs onto the end. After I completed this project, via a Facebook ad I saw this product which exists to fix screwed up threaded ends of things. i haven’t used it personally but if I had seen this first I totally would have bought it.
Step 3 – Drill a 1/4” hole in the center of the 1 1/2” PVC caps. Threaded rod will go through these. From the photos in the diagrams, it looks like the cap that connects to the clamp has extra holes and extra bolts in it. I did not drill these holes and had a few bolts left over from the original manifest. I am not sure what to do with these, so I ended up skipping.
Step 4 – Assemble the camera arm. On each of the threaded rod pieces, you will screw in two nuts and add a washer about 3/4” in from the end. This may vary wildly so experiment as you need. You will be sticking the balance of the rod through a cap and into an accessory. The long piece will be screwed into the clamp end and the short piece will be screwed into the rack mount. Twist the rod to screw it in to the accessories and then tighten down the nuts until the whole thing is tight. You won’t want these flapping about so make sure to get everything solid and tight.
Step 5 – Place the long piece of PVC over the long piece of threaded rod and slide down into the cap that holds the clamp. Over the top of this, place the sanitary T joint. Repeat the process with the short piece of PVC and the rack mount. At this point, you have the assembly mostly together with two pieces of threaded rod sticking out of the T joint.
Step 6 – For each of the threaded rods, place the 1 7/8” washer over the rod and slide down to the T joint. Screw the star connector into the threaded rod and tighten down. The first time you do this, you’ll be picking up slack just like with the platen handle. Be prepared to turn a little bit over a long period as some settling will occur.
Step 7 – Screw the ball joint adapter into the rack mount. When that is in, screw the smart phone adapter into the the ball joint adapter. At this point, you have the thing basically assembled. Clamp to a table or whatever will be your scanning surface and adjust the top piece so that the phone camera will be trained down on the book.
The original plans call for a 13” piece of PVC for the upright of the camera arm. I found when I started experimenting that for smaller books, that height places the camera pretty far away. My goal is to get as many pixels as possible devoted to the book. When I am scanning small paperbacks or digest sized magazines, I use a shorter length of PVC to get the camera closer. If using a phone with an optical zoom this would be less of an issue but I want as much as possible of the field of view to be filled with book. This is the thing of the whole project most subject to fiddling. Try some sizes and see what works for you. It is not hard to change them out. However particularly when going to really short ones, this may mean that you have a lot of threaded rod to get that star knob twisted over. This part can be tedious, but it is possible.
At one point I got overly aggressive on getting the phone close and got it so close that the platen was bumping the phone. Having the phone moved in the middle of a scan is – if not the worse case scenario – a really bad scenario. I had to seek a compromise of bringing the camera close enough to maximize pixels while high enough to avoid bumping.
A note on the color of the materials: careful readers will note I mentioned getting white PVC parts for the camera arm while noting those parts are black in the photo of my camera arm. I found early on that the white pieces showed up in reflection on the platen, so I spray painted them black.
Light Source
Mohib lists his LED lamp as optional in the original plans but I found in my early tests that I wasn’t getting enough light on the book and it was very subject to shadows. I ended up buying the lamp and a switch and wiring it up. The plans call for attaching it to the camera arm with a bungee cord, but I could never get it at a good angle. I ended up setting it on a stack of books, which worked well enough. However, some of the light was shining directly into the camera lens so I further hacked this by masking off part of the top with a bit of cardboard. It’s kind of ridiculous, but it ultimately works. This part will almost certainly require fiddling on your part.
Phone Software
Mohib recommends some iOS apps. Here are what I am using as of today on Android. If you find better recommendations please let me know as nothing is perfect.
Bubble Level on Android. I use this to get the original placement as flat as I can. The closer to level the phone is, the less skewing to deal with in post-processing.
The camera app is pretty crucial and needs a few features to be viable. You must be able to control the ISO value rather than be automatically assigned. You want the lowest one your phone’s camera is capable of because that will be maximum signal on the sensors. You want to have maximum control over focus. You need to have some control over the naming. There is a world of difference in assigning a prefix and having your scan photos be PREFIX0001 to PREFIX0100 vs picking them out of some timestamped mess or arbitrary numbers.
I chose Camera FV on Android. I gave the free version a try to verify it would meet minimum standards and then paid for the upgrade to unlock the features I wanted. There are many alternatives so if there is one anyone finds suitable, please let me know so I can try it as well.
After scanning the book the files will need to be transferred to a computer. I find plugging via USB and using Android File Transfer to be painful so I installed Dropsync. In the free version, this allows one folder on the phone to be synced with one folder in Dropbox. I set up my Camera FV folder to be a special folder unique to the app then synced that to a “DIY Bookscanner Inbox” in my Dropbox account. This runs once every 5 minutes so it is always trailing somewhat. While I am doing the actual scanning, some fraction of the photos are syncing. While it is not real time, within 15 or 20 minutes it will catch up so I try to make sure I’m never in a hurry while I do this. Eventually I will batch books together so that many books are being scanned and synced over time. While the last ones trickle in, I can work on the earliest ones.
If there were a version that did the same functionality with the same ease of use but used only the local network, I’d be quite happy with that. Again, let me know if you are aware of such an Android app.
Desktop Software
For preprocessing, I use ScanTailor on OS X which seems best of breed. I ended up building ScanTailor Advanced from source using these directions. If building it is beyond you, here is a download of a version I built on High Sierra, offered of course with no warranty of any kind.
For OCR, I installed Tesseract via Homebrew.
For text normalizing, I installed uni2ascii via Homebrew.
For PDF conversion, I installed imagemagick via Homebrew which includes the “convert” command.
Use
At this point, you have the whole frame put together. You have the Android apps installed.
Although I will discuss file naming later, I set the counter and file prefix before aligning the camera because there is no point knocking this out of alignment while entering the text.
Take whatever phone you are using for your camera and place it in the phone holder. I level with the Bubble Level app as well as I can, then place the book down on the Siconi sticky pad and push hard. However hard you think is maximally reasonable, push 15% harder than that. I turn to a nice page with full text to the margins for ease of evaluating framing and set the platen down on it. I rotate the phone to make it as square as possible. If your camera has framing lines, you want the lines of type lined with those. Use the macro adjuster to move the phone up or down if you need to get more or less of it in frame (less is seldom my problem, usually I crank it all the way down.) After lining everything back up, I return to Bubble level one more time just to verify I didn’t knock it way out of level with the adjustments.
Camera FV only allows 4 characters of prefix. I choose three for any given book (I started with “AAA” and increment every time.) I reset the counter to 1 and set the prefix first to AAAR or whatever while I scan the rightmost (odd numbered pages) starting with the cover and working all the way to the inside back cover. Even if the page is blank, it needs to be scanned or else things will not line up later when collated. After scanning the R, I flip the book upside down and repeat the process with AAAL, resetting the counter to 1 again. These will be renumbered and collated in post-processing scripts. You could scan the left pages from front to back, it would just need adjusting the scripts.
If you are ambidextrous, you might scan both sides right side up. If you are left handed you may choose to do this whole process upside down from what I describe so you can work the platen with your left hand. The process of scanning is one of lifting the platen, turning the page, dropping it down and hitting the bluetooth trigger button. Configuring your camera app so the camera is snapped as quickly as possible helps. Mine takes too long and adding a second per photo adds at least 5 minutes to a 300 page book. I’ve tried different autofocus options to speed this up. Thus far I have had limited success.
This part is the practiced skill aspect that improves over time. The end goal is a rhythm of turning pages, dropping platen and capturing pictures as quickly as possible with a minimum of physical adjustment of the platen or book. I still scan at 30% the speed of Mohib in his demo video. If I never approach his speed, that will be a big blow to the viability of this project. I too want to scan ~22 pages a minute in order to get as many books processed and out of my space as possible per hour spent.
Post-processing
Following uses fake example names and values but you can figure out how to map it what you have. The shell scripts I use are available in my GitHub directory for the project. If you want to submit a change, feel free to fork and send a pull request. If you don’t know what that means, just download the zip file and use them that way.
At this point, the book has been scanned. You will eventually have in your Dropbox account or however you move your files a set of files named AAAL0001 – AAAL0156 and AAAR0001 – AAAR0156. I create folders called AAAL and AAAR and move the files into them. If the number of files don’t match, you have a problem. If they don’t match and are missing out of the middle it is pretty straight forward. Look at the ones on either side of the missing file, figure out the page and take the picture again. It may have different alignment and definitely a different name so keep track of what these are. I tend to use a prefix like AAAX to make it obvious that these are fill-in scans that need to be renamed.
Harder is if the files are contiguous yet mismatch in numbers. This means one of the two folders has either too many or too few pictures. If pages stuck together, you will need to find the missing or extra page. I look every 10 files to see if the page number has incremented by 20. If not, the problem is in that range. If a page was scanned twice, I delete one. If it was missing, I capture the missing page and name it such that it will sort correctly, something like AAAL0101a.jpeg. If files have been added or removed, I use my renumber.sh script to normalize back to sequential numbers with nothing missing.
Now it is time to process with ScanTailor. I will do the left and right separately because they will need different orientation correction. The goal is to have ScanTailor do as much as possible automatically. There is a wide variety of options possible, and I would recommend the ScanTailor forum for more information. I could spend as much time discussing ScanTailor configuration as the whole rest of this long post.
I will use ScanTailor to process from the original AAAL and AAAR directories to ones named AAA-stL and AAA-stR. I still need to keep them separate at this point. They will get merged soon. As stated, my goal is to configure and allow ScanTailor to do its work with default auto settings. This has yet to happen 100% for me on any book. I spot check and fix individual pages if needed and hope like hell I don’t need to.
I also create folders AAA-pdfL and AAA-pdfR. This is to allow me to potentially set up different ScanTailor configs for the OCR text versus the PDF of the captured pages. Although I like the flexibility and initially I envisioned an OCR target that strips out the page numbers while the PDF target preserved them, in practice I have used the same ones and just copy the files from -st directories to -pdf directories. These will come into play soon.
After all this pre-processing, now I run my processing script name process.sh. This does the following things:
Creates folders for AAA-st-renumbered and AAA-pdf-renumbered, AAA-ocr, AAA-pdf and AAA-final
Copies and renumbers the files from the AAA-st and AAA-pdf directories to the -renumbered equivalents. At this point the L and R are removed, the files are collated such that paging through file 1 to the end shows the book in order.
Runs tesseract on each page. For AAA0001.tif , it will create AAA0001.txt
After all files have been OCR’d, it will cat the files into one text file on AAA-final
It will run uni2ascii on the text file to clean up weird artifacts in the text file
It will use the convert function on the files in AAA-pdf-renumbered to create one full PDF file of all those graphics. This will typically be between 50 and 150 times larger than the plain text file.
At this point, I have an OCR version of the text suitable for an eInk reading device as well as a graphical version suitable for tablets or desktops. If one were desiring a permanent high quality text file (for Project Gutenberg for example) then the OCR version could be proofread against the PDF.
All of this seems like a long way to go to get a digital copy of a paper book and it is. Unless one values their time at a very low hourly rate it is often cheaper to purchase the book than actually scan it. For readily available books that are reasonably priced, I will just rebuy them. For books (often older non-bestselling books) with no current electronic version available for purchase, this is the best option. I want to archive my collection of 20 years of science fiction magazines before I transfer them to either some archivist or more likely, my curbside recycling. I want the stories and no longer have any desire to house the paper.
For many years I have said I’d gladly trade a number of paper books in my house for a digital version. Now, with a little time and manpower that is possible. I’m flat delighted.
Physical and design improvements or alternate software recommendations (and pull requests on GitHub improving my scripts) are happily accepted. Questions regarding my sanity in pursuing this project will be read bemusedly once then largely ignored. Comments berating me for any legal, moral or ethical implications of scanning my own property for my own use are wildly non-interesting to me and treated as such.
If you build this yourself, please let me know with pictures and your own stats for throughput. Good luck and be careful out there.
0 notes
Text
Examples of Augmented Reality Apps & Introduction of HelloStar Video Shout Out Process.
There are many examples of Augmented Reality apps. I list a few of them;
HelloStar Video Shout out Process
HelloStar is one of the strongest examples of a shout out app. HelloStar India is India’s first AR-Powered Influencer Messages Marketplace. At its core, the vision of HelloStar is to bring Indian Influencers closer to their fans with the integration of Augmented Reality. The Organization believes that the Indian ‘generation z’ population will help the influencers to grow in a significant way. With the help of augmented reality, the shout out process will mesmerize youngsters of India. An Influencer listed on HelloStar’s website can monetize their fame by recording short messages for their fans.
The world of Social Media has seen a huge spike in the interest of Content consumption and has resulted in a boom of content creators or influencers. HelloStar was founded by Vincent and Gary Chaglasyan, who are also the partners in HelloStar Tech LLC, based in US. Both are serial entrepreneurs with businesses in Russia, India, Europe and the USA, saw that there’s a gap in how each of these influencers and even movie stars who come on social media, interact with their fans. It is quite expected that the fans will grab the opportunity to get personalized video messages from attractive celebrities. It is the committing time to put the popular influencers into the bag of HelloStar Media.
A social media post or even an IG live session never feels personal since the influencer is broadcasting to thousands of their fans at once. And to feel connected and special, Indian fans of these content creators are ready to pay certain amounts to get connected to them. Accordingly, Indian fans of said content creators are willing to pay certain amounts to create a closer connection to their idols and feel special. Take the example of Youtube Superchat, where fans pay any live-streaming influencers Rs.40 to even Rs.10000 to feature their name on the stream for 5 seconds and ask for a shoutout.
ASOS
Asos is no stranger to mobile innovation, having previously integrated visual search into its highly usable mobile app. In 2019, Asos has fully got on board with AR, launching an experimental AR feature called Virtual Catwalk, which is designed to help app users visualise 100 Asos Design products. The feature works when a user points their smartphone camera at a suitable flat surface and clicks the ‘AR’ button on the product page in the app. Models then virtually appear, giving the customer a new and more intimate way of viewing products.
Man City
Manchester City FC has previously experimented with AR, using the technology to create immersive and interactive match day programmes. In 2019, the football club has integrated AR into its stadium visitor experience, introducing an immersive tour in celebration of its 125th birthday. Visitors of the tour will be able to use AR to ‘sit next to’ and ‘interact’ with Manchester City manager, Pep Guardiola, at the top table of a press conference. Alongside this, the tour includes 3D holographic content, and a 360-degree cinema screen – all designed to offer fans a truly immersive experience.
Gucci
One of the main reasons retail brands have invested in AR technology is to help customers make better and more informed product decisions. Gucci is the latest luxury brand to do so, adding an AR feature to its app to let users ‘try on’ sneakers. Pointing their smartphone camera downwards, users can choose to see a digital overlay of 19 different sneakers on their own feet, swiping left or right to change to a different pair. The app also allows users to take photos, which can then be shared on social media or in messaging apps.
Toyota
In 2019, Toyota launched the Hybrid AR app, to allow customers to gain a better understanding of how its new C-HR model. Created with agency Brandwidth, the app works by overlaying images of the inner workings of the Hybrid drivetrain onto physical vehicles. Customers can interact with the app to be able to discover more about the car’s key features, like the hybrid’s motor, battery, and its fuel tank. Customers can also go in-depth into how the car’s energy is used and how the drivetrain works in different drive states.
IKEA
Ikea Place allows users to place virtual Ikea furniture into their own home to see how everything might look once assembled. IKEA has had a 3D function in its catalogue app for a few years now, however, the scale was somewhat questionable, and it required a physical copy of the paper catalogue to work. In contrast, the new Ikea Place app is said to be 98% accurate in scale, rendering 3D images to react to light and shade – ultimately giving consumers a much more realistic portrayal.
Sephora
Cosmetics retailer Sephora’s ‘Virtual Artist’ tool has been available via its main app since 2016, and it remains one of the slickest examples of AR within beauty. Instead of furniture in homes, the AR technology lets consumers see what certain products (such as lipstick or eyeshadow) might look like on their own face. To do so, it uses Modiface technology to scan lips and eyes, before overlaying different lip colours, eye-shadows, false lashes and so on.
Modiface on Amazon
L’Oréal’s Modiface is another of the best-known examples of AR within retail, with the feature allowing customers to digitally try on make-up through the brand’s app. L’Oréal has also rolled out Modiface to Amazon customers on mobile, allowing them to also digitally overlay make-up looks onto live photos and videos. For customers, the technology provides much more certainty over what they’re buying (a product that suits the individual’s skin-tone). It also marks a big opportunity for Amazon as a player in the beauty industry, following on from the retail launching its own beauty line, ‘Belei’, earlier this year.
Adidas
Adidas is another brand to use AR for ‘try on’ purposes. In 2018, it partnered with Snapchat to create an AR lens for customers to virtually preview its new Ultraboost 19 running shoes. Accessed via lenses in the Snapchat app, users simply had to tap on the Adidas logo to launch the activation, which involved a brief unboxing before the option to learn more about the shoes or view them in AR.
Magnum
Both Magnum and Benefit have experimented with AR individually before, however, the two brands partnered up in Singapore in 2019 to create the ultimate immersive experience. Combining beauty and ice-cream, the ‘Magnum Beauty Store’ pop-up experience involved seven different zones, where visitors could engage in activities such as the personalisation of ice creams and eyebrow shaping. There was a large AR element, too, relating to the theme of “Release Your Beast”. This involved visitors engaging with Magnum’s ‘four beasts’ – the leopard, polar bear, lion and tiger – through an interactive LED wall. As well as interacting with the ‘beasts’ using AR in real-time, the photo booth allowed guests to take photos which they were then able to share directly to social media.
But AR is more than just smartphone fun. It's a technology that finds uses in more serious matters, from business to warfare to medicine.
The U.S. Army, for example, uses AR tools to create digitally enhanced training missions for soldiers. It's become such a prevalent concept that the army's given one program an official name, Synthetic Training Environment, or STE. Wearable AR glasses and headsets may well help futuristic armies process data overload at incredible speeds, helping commanders make better battlefield decisions on the fly. There are fascinating business benefits, too. The Gatwick passenger app, for example, helps travellers navigate the insanity of a packed airport using its AR app.
The possibilities of AR tech are limitless. The only uncertainty is how smoothly, and quickly, developers will integrate these capabilities into devices that we'll use on a daily basis.
0 notes