#sharpen tutorial
Explore tagged Tumblr posts
Visit Tumblr Blog
Explore Tumblr blogs with no restrictions, modern design and the best experience.
Last Seen Tumblr Blogs


Fun Fact
In 2020, 27% of US Tumblr users had an annual household income of over $100,000.
Text
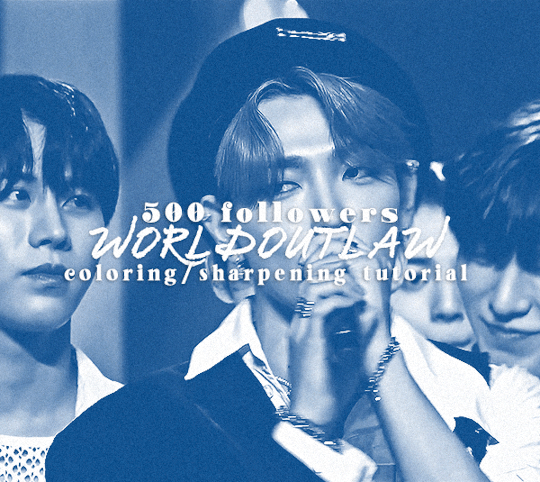
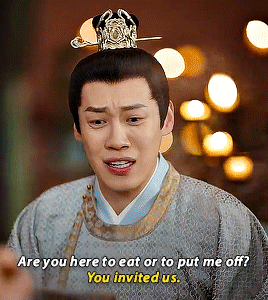
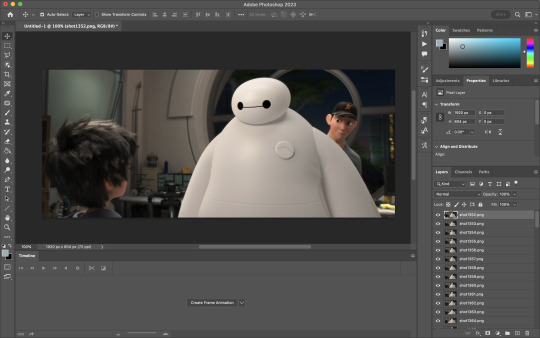
hi! it's theo aka user worldoutlaw and for 500 followers i wanted to share my coloring/sharpening process ! i've been getting a few notes recently complimenting my coloring and sharpening lately (ty all so much they make me smile every time) and i thought some people might be curious in my process so here we are ! :3 this is just coloring and sharpening so if you're looking for a general gif tutorial i suggest you check out usergif! now without futher ado let's start (color coded for my fellow adhders/neurodivergents who find reading hard)
i do most of my process through actions; of which i have several for different gif dimensions ie 540 width (typically for fancams where i keep the width of the file the same but change the height), 540 height (which i use the most for gifs like the above), and 850 height which i use for my sets that have side by side gifs like my pinned
actions make the beginning of making a gif a lot faster and especially save time when you're rushing to make comeback gifs lmao
after i've converted to the video timeline and selected all of my frames and converted them to a smart object, i apply userdramas's camera raw filter action which can help gifs look higher quality and create the illusion of skin texture when there isn't any
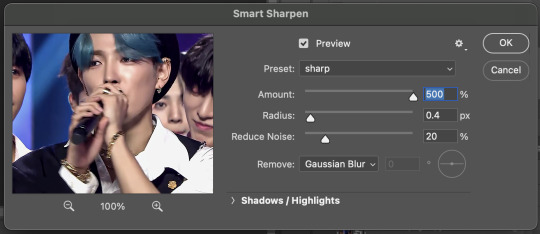
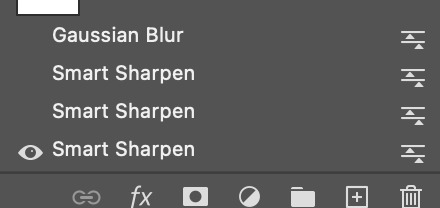
after this i convert the layer into a smart object again and apply my sharpening as follows (partly from anyataylorjoy's action pack)

smart sharpen 1:
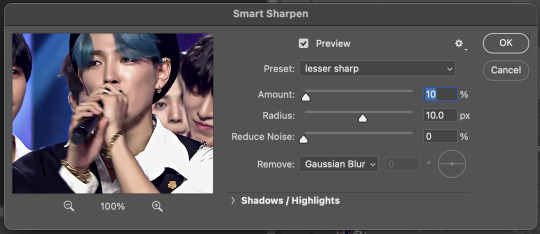
smart sharpen 2:
smart sharpen 3: (this one is optional)
smart sharpen 2 duplicated
gaussian blur:
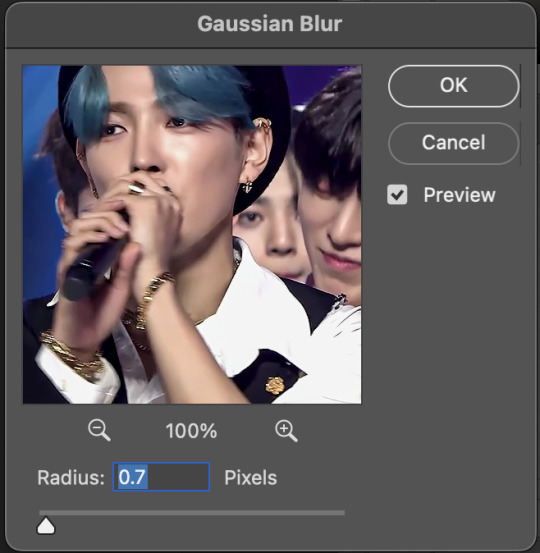
and i click this button on the far right to change the opacity of the blur (usually i set it around 10-30)
it may look funky but noise at the end will always fix it :p
after i sharpen i start on coloring!
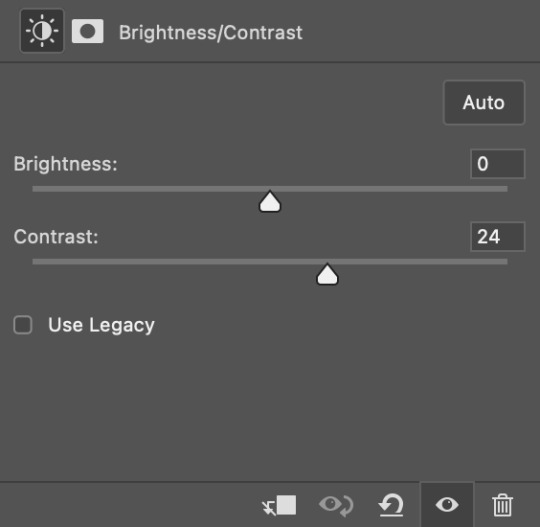
my coloring process starts with editing values with curves, brightness & contrast, and sometimes levels

this helps to achieve the high contrast look i really like on my gifs and below are my settings for this specific set
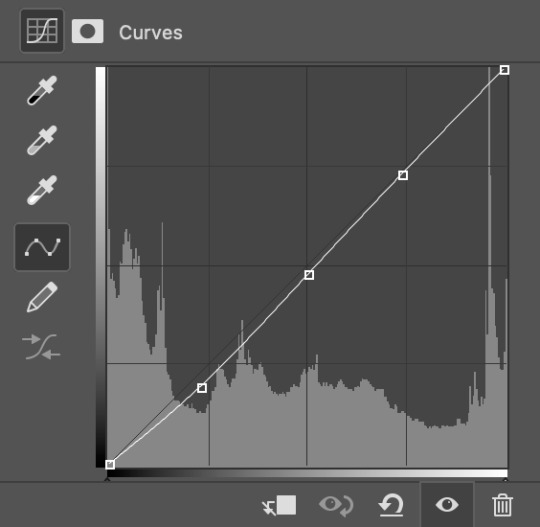
i find that the marker in the center of the curves graph can often help darken skin tones if the subject appears too light
after i have my values down i move on to the actual colors
i start with adding a selective color layer; adjusting the red values, followed by yellow, then black, white, and any other colors i would want prominent in the gif
for example, with this set i wanted the blues to look really nice so i increased the cyans and decreased the yellows to my liking
changing the black values adds to the dimension i like in my gifs; these are my settings
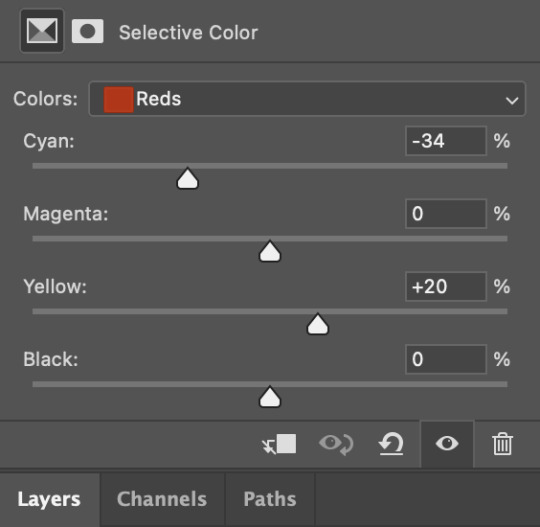

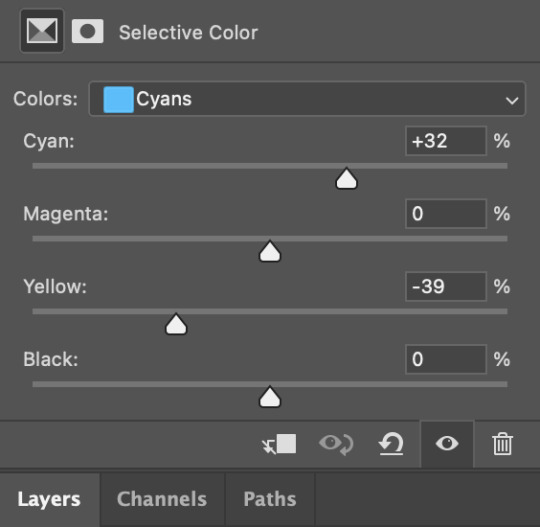
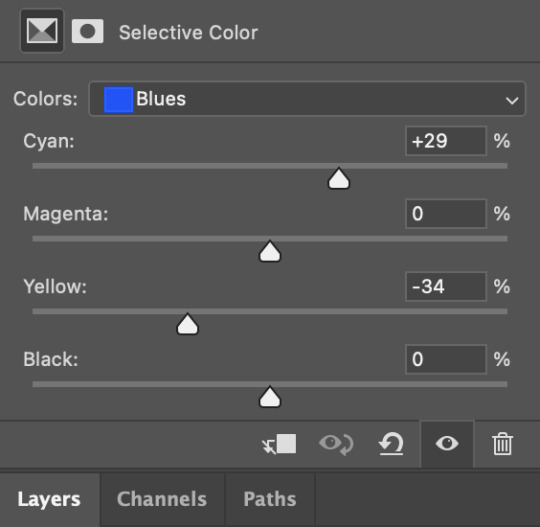
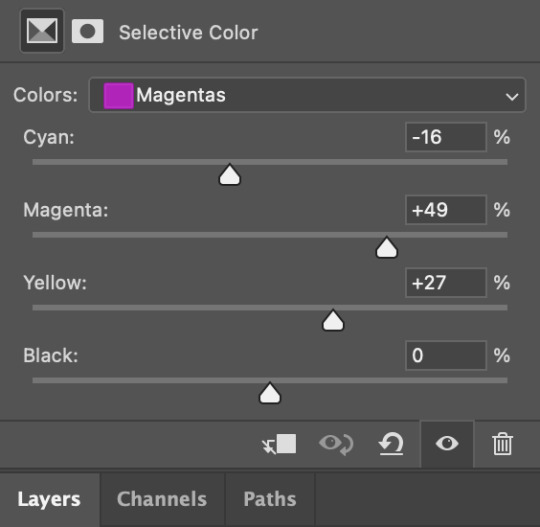

forgot magenta whoops
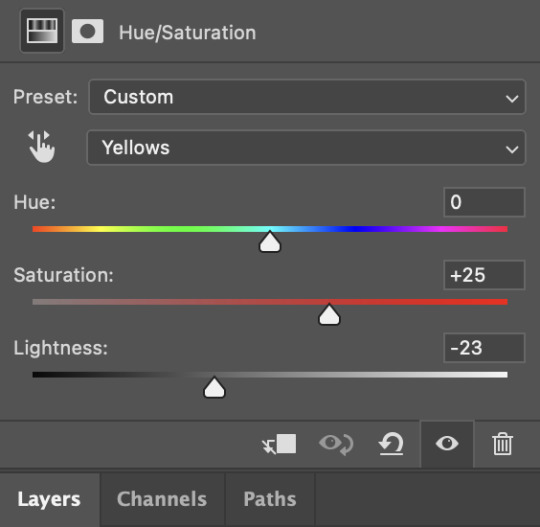
next i add a hue/sat layer where i mess with the red and yellow values which often adds extra help to skin tones (i also recently started using hue/sat on colors like the blues here)


now these gifs didn't need it thankfully, but if needed i will also do color balance and channel mixer layers
after all my coloring and sharpening is done and i'm satisfied with how a gif looks i will convert all layers to a smart object and add noise (typically 1.5-3)
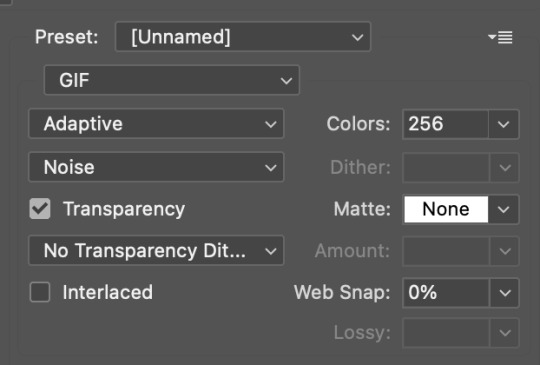
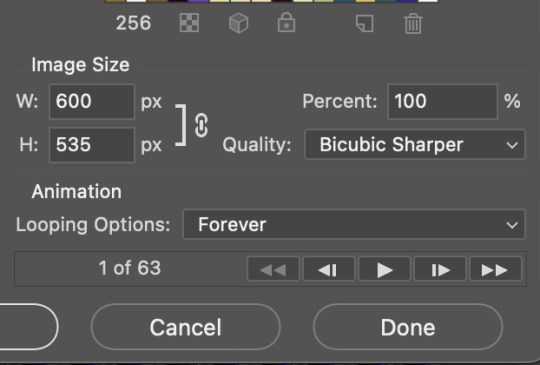
then the gif is done and i save it! these are my save settings
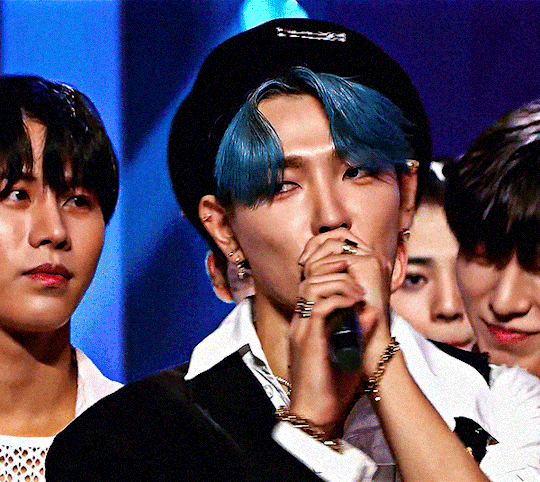
and that's how i turn this

into this!
hope y'all enjoyed and found this helpful and thank you again for 500<3333
some tags for fun and also to thank my supportive lovely mutuals @solojihyo @twiceland @97chwe @jeonwonwoo @sanchelinz @applejongho @hwanswerland @kyubins @minchanz @seonghwasblr @get-lit @jjongho @userwoosan @strhwaberries @dqmeron (ty for looking over this for me 🫶)
#theo.txt#*gifs#*tutorials#this was a relatively easy file to use but#hope it got the point across<3#i dont wanna tag too many people but if you weren't tagged still know i appreaciate you very very much#coloring tutorial#sharpening tutorial#gif tutorial#giffing tutorial#sharpen tutorial#color tutorial
120 notes
·
View notes
Text
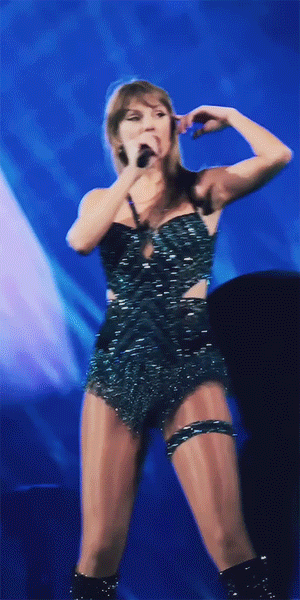
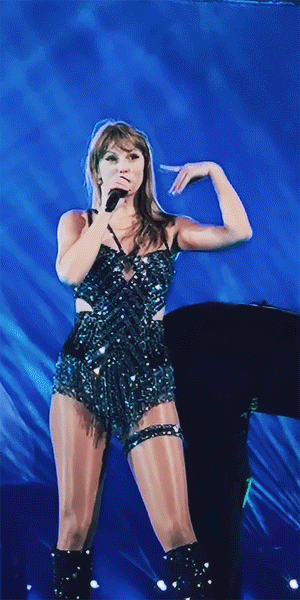
warsaw n3
#found a lifechanging gif sharpening tutorial#taylor swift#tswiftedit#taylorswiftedit#tscreators#tsedit#tswiftgif#candy swift#the swiftie tag#userrcmanticpoetry#networkthirteen#tswiftdaily#usertaylorswiftdaily#mine.#tegan .gif#warsaw n3#song: midnight rain#midnight rain#era: midnights#midnights#era: eras#the eras tour#best of teg#100.#200.#500.
591 notes
·
View notes
Text
My GIF Making process: Screen capturing using MPV player, Organizing files, 3 Sharpening settings, Basic Coloring PSD + Actions set

This is a very long post so heads up.
I’ll try to be as thorough and true as much as possible to the way I make my gifs (I already use Photoshop Actions which I’ve long since set up but now for this tutorial I’m reviewing them to show you the exact steps I’ve learned to create my gifs 😃) and present them to you in a semi-coherent way. Also, please bear with me since English is my second language.
First things first. Below are the things and tools we need to do this:
Downloaded 4K or 1080p quality videos (let’s all assume we know where to get these—especially for high definition movies and tv series—so this post doesn’t get removed, okay? 😛)
Adobe Photoshop CC or the CS versions can work as well, but full disclosure I haven’t created gifs using the CS versions since 2020. I’m currently using Adobe Photoshop 2024.
mpv player. Use mpv player to get those frames/screenshots or any other video player that has a screen grabber feature. I’ve used adapter for the longest time but I’ve switched to mpv because the press to screenshot feature while the video is playing has been a game changer not to mention ultimate time saver for me. For adapter you need to play it in another video player (like VLC player), to get the start and end timestamps of the scene you want to gif which takes me ages before I can even open Photoshop.
Anyway! Please stop reading this post for a moment and head over to this amazing tutorial by kylos. She perfectly tells you how to install and use mpv player, both for Mac and Windows users.
One thing I have to share though, I had a tough time when I updated my MacOS to Sonoma since MPV is suddenly either duplicating frames or when I delete the duplicates the player seems to be skipping frames :/ I searched and found a solution here, though it didn’t work for me lol. My workaround for this in the meantime is decreasing the speed down to 0.70 then start screenshotting—it’s not the same pre Sonoma update but it works so I’ll have to accept it rather than have jumpy looking gifs.
Now, after this part of kylos’ tutorial:

you can continue reading the following sections of my gif tutorial below.
I want to share this little tip (sorry, this will only cater to Mac users) that I hope will be helpful for organizing the screenshots that MPV saved to the folder you have selected. Because believe me you don’t want to go through 1k+ of screenshots to select just 42-50 frames for your gif.
The Control + Command + N shortcut
This shortcut allows you to create a new folder from files you have pre-selected. As you can see below I have already created a couple of folders, and inside each folder I have selected screenshots that I want to include in one single gif. It's up to you how you want to divide yours, assuming you intend to create and post a Tumblr gifset rather than just one gif.

Another tip is making use of tags. Most of, if not all the time, I make supercorp gifs so I tag blue for Kara and red (or green) for Lena—just being ridiculously on brand and all that.
Before we finally open Photoshop, there's one more thing I want to say—I know, please bear with me for the third? fourth? time 😅
It's helpful to organize everything into their respective folders so you know the total number of items/frames you have. This way, you can add or delete excess or unnecessary shots before uploading them in Photoshop.
For example below there are 80 screenshots of Kara inside this folder and for a 1:1 (540 x 540 px) Tumblr gif, Photoshop can just work around with 42-50 max number of frames with color adjustments applied before it exceeds the 10 MB file size limit of Tumblr.

Sometimes I skip this step because it can be exhausting (haha) and include everything so I can decide visually which frames to keep later on. You'll understand what I mean later on. But it's important to keep the Tumblr 10 MB file size limit in mind. Fewer frames, or just the right amount of frames, is better.
So, with the screenshot organization out of the way, let's finally head over to Photoshop.
Giffing in Photoshop, yay!
Let’s begin by navigating to File > Scripts > Load Files into Stack…

The Load Layers window will appear. Click the Browse button next.
Find your chosen screenshots folder, press Command + A to select all files from that folder then click Open. Then click OK.
After importing and stacking your files, Photoshop should display the following view:

By the way, I'll be providing the clip I've used in this tutorial so if want to use them to follow along be my guest :)
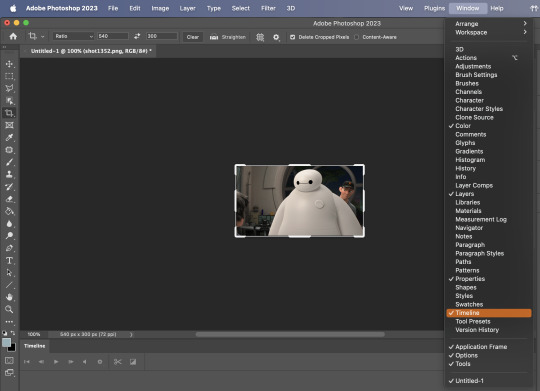
If you haven't already opened your Timeline panel, navigate to Windows > Timeline.
Now, let's focus on the Timeline panel for the next couple of steps.
Click Create Video Timeline, then you’ll have this:

Now click the menu icon on the top right corner then go to Convert Frames > Make Frames from Clips

Still working on the Timeline panel, click the bottom left icon this time—the icon with the three tiny boxes—to Convert to Frame Animation
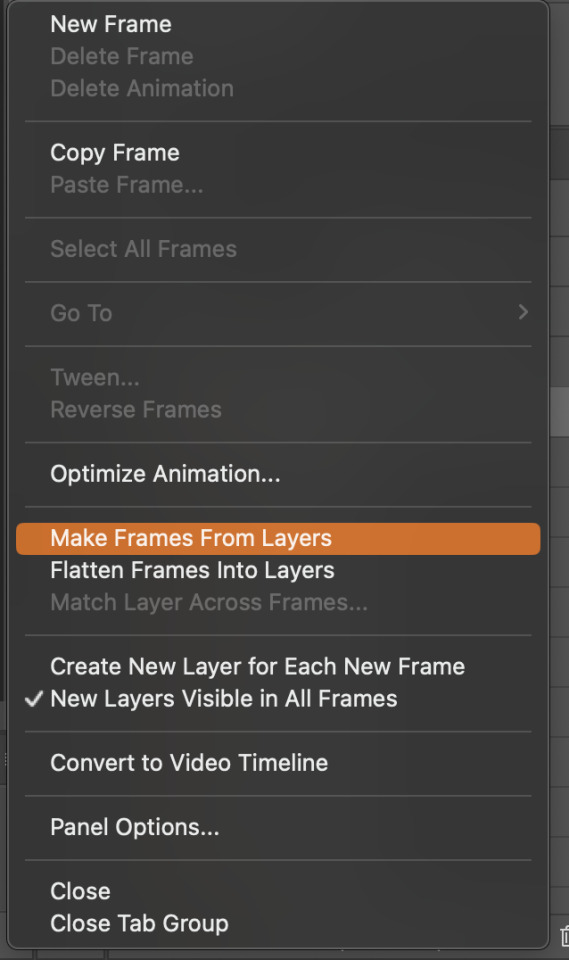
Select Make Frames From Layers from the top right corner menu button.
So now you have this:

Go and click the top right menu icon again to Select All Frames
Then click the small dropdown icon to set another value for Frame Delay. Select Other…

The best for me and for most is 0.05 but you can always play around and see what you think works for you.
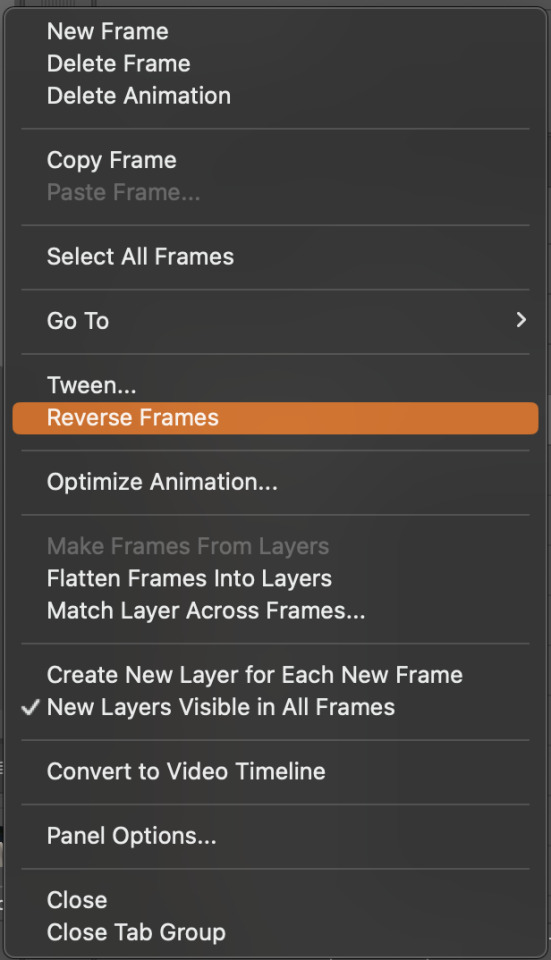
Click the top right menu icon again to Reverse Frames.
I think Photoshop has long since fixed this issue but usually the first animation frame is empty so I just delete it but now going through all these steps there seems to be none of that but anyways, the delete icon is the last one among the line of feature buttons at the bottom part of the Timeline panel.
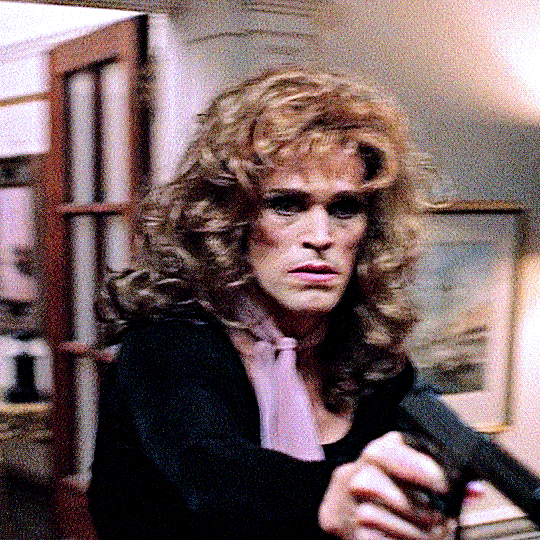
Yay, now we can have our first proper GIF preview of a thirsty Lena 😜

Press spacebar to watch your gif play for the very first time! After an hour and half of selecting and cutting off screenshots! 😛 Play it some more. No really, I’m serious. I do this so even as early (lol) as this part in the gif making process, I can see which frames I can/should delete to be within the 10 MB file size limit. You can also do it at the end of course 🙂
Now, let’s go to the next important steps of this tutorial post which I’ve numbered below.
Crop and resize to meet Tumblr's required dimensions. The width value should be either 540px, 268px, or 177px.
Convert the gif to a Smart Object for sharpening.
Apply lighting and basic color adjustments before the heavy coloring. I will be sharing the base adjustments layers I use for my gifs 😃.
1. Crop and Resize
Click on the Crop tool (shortcut: the C key)

I like my GIFs big so I always set this to 1:1 ratio if the scene allows it. Press the Enter key after selecting the area of the frame that you want to keep.
Side note: If you find that after cropping, you want to adjust the image to the left or another direction, simply unselect the Delete Cropped Pixels option. This way, you will still have the whole frame area available to crop again as needed and as you prefer.
Now we need to resize our gif and the shortcut for that is Command + Opt + I. Type in 540 as the width measurement, then the height will automatically change to follow the ratio you’ve set while cropping.
540 x 540 px for 1:1
540 x 405 px for 4:3
540 x 304 px for 16:9
For the Resample value I prefer Bilinear—but you can always select the other options to see what you like best.
Click OK. Then Command + 0 and Command + - to properly view the those 540 pixels.

Now we get to the exciting part :) the sharpen settings!
2. Sharpen
First we need to have all these layers “compressed” intro a single smart object from which we can apply filters to.
Select this little button on the the bottom left corner of the Timeline panel.


Select > All Layers
Then go to Filter > Convert for Smart Filters
Just click OK when a pop-up shows up.
Now you should have this view on the Layers panel:

Now I have 3 sharpen settings to share but I’ll have download links to the Action packs at the end of this long ass tutorial so if you want to skip ahead, feel free to do so.
Sharpen v1
Go to Filter > Sharpen > Smart Sharpen…
Below are my settings. I don’t adjust anything under Shadows/Highlights.
Amount: 500
Radius: 0.4
Click OK then do another Smart Sharpen but this time with the below adjustments.
Amount: 12
Radius: 10.0

As you can see Lena’s beautiful eyes are “popping out” now with these filters applied. Click OK.
Now we need to Convert to Frame Animation. Follow the steps below.
Click on the menu icon at the top right corner of the Timeline panel, then click Convert Frames > Flatten Frames into Clips
Then Convert Frames > Convert to Frame Animation
One more click to Make Frames From Layers
Delete the first frame then Select All then Set Frame Delay to 0.05

and there you have it! Play your GIF and make sure it’s just around 42-50 frames. This is the time to select and delete.
To preview and save your GIF go to File > Export > Save for Web (Legacy)…
Below are my Export settings. Make sure to have the file size around 9.2 MB to 9.4 MB max and not exactly 10 MB.

This time I got away with 55 frames but this is because I haven’t applied lighting and color adjustments yet and not to mention the smart sharpen settings aren't to heavy so let’s take that into consideration.
Sharpen v1 preview:

Sharpen v2
Go back to this part of the tutorial and apply the v2 settings.
Smart Sharpen 1:
Amount: 500
Radius: 0.3
Smart Sharpen 2:
Amount: 20
Radius: 0.5
We’re adding a new type of Filter which is Reduce Noise (Filter > Noise > Reduce Noise...) with the below settings.

Then one last Smart Sharpen:
Amount: 500
Radius: 0.3
Your Layers panel should look like this:

Then do the Convert to Frames Animation section again and see below preview.
Sharpen v2 preview:

Sharpen v3:
Smart Sharpen 1:
Amount: 500
Radius: 0.4
Smart Sharpen 2:
Amount: 12
Radius: 10.0
Reduce Noise:
Strength: 5
Preserve Details: 50%
Reduce Color Noise: 0%
Sharpen Details: 50%
Sharpen v3 preview:

And here they are next to each other with coloring applied:
v1

v2

v3

Congratulations, you've made it to the end of the post 😂
As promised, here is the download link to all the files I used in this tutorial which include:
supercorp 2.05 Crossfire clip
3 PSD files with sharpen settings and basic coloring PSD
Actions set
As always, if you're feeling generous here's my Ko-fi link :) Thank you guys and I hope this tutorial will help you and make you love gif making.
P.S. In the next post I'll be sharing more references I found helpful especially with coloring. I just have to search and gather them all.
-Jill
#tutorial#gif tutorial#photoshop tutorial#gif making#sharpening#sharpening tutorial#photoshop#photoshop resources#psd#psd coloring#gif coloring#supercorp#supercorpedit#lena luthor#supergirl#my tutorial#this has been a long time coming#guys. i'm BEGGING you. use the actions set - it was a pain doing all this manually again ngl LMAO#i've been so used to just playing the actions#so this has been a wild refresher course for me too 😆
770 notes
·
View notes
Text
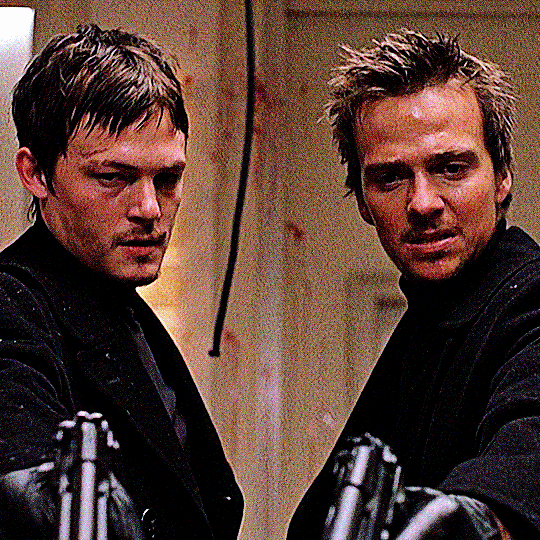
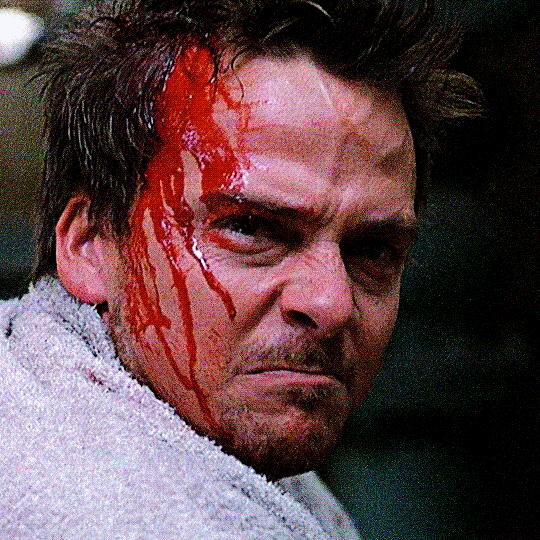


What if it was just one guy with six guns? THE BOONDOCK SAINTS (1999) dir. troy duffy
#tbdsedit#bdsedit#the boondock saints#filmedit#filmgifs#fyeahmovies#junkfooddaily#originals#long post#userscary#tagging you because i used your sharpening tutorial!!
964 notes
·
View notes
Text

Hello folks! As someone who never did any celebrations nor tutorials for giffing, I decided it's finally the time now. So thank y'all for putting up with my horror shenanigans, 8k is just amazing and I hope y'all will keep enjoying my blog and posts!
PHOTOPEA GIF TUTORIAL
Moving to Photoshop after years of using Photopea, I can say while they both work very similarly, they're also different. Photoshop is far superior, you can still make very HQ and nice gifs in Photopea too! This post aims to show you my personal way of making crispy gifs while also covering the basics of getting the frames and uploading them to Photopea. (If you're looking for more detailed beginner tutorial, there's plenty of those out there, amazingly done!)
Photopea is completely free, video player is completely free, downloading movies is completely free. Only thing it'll cost you is your time.
WHAT YOU'LL NEED:
- photopea - potplayer - good quality movie file ( i go for the highest GB ones, above 10gb is amazing. Sometimes I get 40gb and prefer 1080p source. Note that higher file doesn't immediately mean higher quality - if the movie looks weird just download another one)
GETTING THE FRAMES: Once you get your source file and open it via PotPlayer, find the scene you want to gif. Using D and F keys you can go backwards or forward by single frames. When you get the perfect frame where you want the gif to start, I always go back 10 frames because PotPlayer tends to cut those out. It's better to get more frames than you need as you can always delete those extra ones later on.
I'll be giffing scene from Longlegs alongside the tutorial.
PRESS CTRL + G. This will open the frame capturing window. Fix the setting to match these:

and press "START". Click back on the PotPlayer to bring focus back on the window and hold or press the forward key - F - to play the scene and capture the frames. You can see the frames number going up on your other window. If it stays on 0 you're not capturing anything. Once the desired scene is over, press "STOP" on the frame capturing window and voila - you have your frames in your selected folder. Delete any extra or unwanted ones. The amount of frames usually sits between 40-80 depending on what ratio you'll use later on for the gifs to fit the 10mb Tumblr upload limit.
Now it's time to open PHOTOPEA.
FILE > NEW: you have to write down the exact dimensions of your frames. This action will create a new file with single background. Go back to FILE > OPEN AND PLACE > SELECT ALL YOUR FRAMES and upload them. Depending on the size of the frames, this could take a while or even lag your browser. Make sure to not click anywhere within the app before all frames are done uploading.
Now lets finally make the gif. The following were my most used gif making steps in general, play around other options and find out what works - every gif or scene is different!
Delete the original empty layer at the bottom and then select all the frames (clicking the first/last layer and then click the last/first layer while holding shift to easily select all) and by pressing CTRL+G, group them. Select all layer again and
RIGHT CLICK (on the layers) > RASTERIZE LAYER (on the upper taskbar) > ANIMATION > MAKE FRAMES Now your frames should have _a_ in their names. CREATE NEW LAYER

and select all your frames again.
CROP the whole project to whatever ratio you want, Ill be using 64x44 ratio for wider gif.

By pressing ALT+CTRL+I open the RESIZE window. Tumblr gif dimension is 540px wide max (heres tutorial for other dimensions and why correct sizing is important) so using that and "bicupic sharper" option under resample, resize the gif.

Now you have the base gif done.

Its dark, muddy and unclear. We sharpen it and give it the clear crispy look using noise. FILTER > NOISE > ADD NOISE and set the Amount to 1% and select monochromatic FILTER> SHARPEN > SMART SHARPEN > 150% amount with 1px radius FILTER> SHARPEN > SMART SHARPEN > 50% x 10px

Now its time to bring the gif to life. Create NEW ADJUSTMENT LAYER. This is where all the editing options are.

For this specific gif Im doing:
BRIGHTNESS/CONTRAST +50 brightness, +10 contrast
VIBRANCE +20 vibrance, +10 saturation
HUE/SATURATION master -50 , red +50, cyan +50, blue +50 (the reason i tune all colors in master down by 50 is to mute them all down. Adding back on colors you want is making them stand out way more! It works on gifs with dominant few colors but if the gif is very colorful, you're better off leaving this option out completely and rather work with selective colors. As I said, try it out and see!)
another layer of BRIGHTNESS/CONTRAST +20 brightness
COLOR BALANCE range: midtones > magenta - green: -11, yellow - blue: +8
SELECTIVE COLOR red: cyan: -20%, yellow: +20, black: +10 yellow: yellow: +50% white: yellow: -10%, black: -20% black: black: +4%
CURVES(those are something I didnt use much in Photopea as in general youre just fine with brightness and selective color. Just move the point on the curve and see what it does! For this gif I went with Curves like these and it enhanced the gif nicely.)

another layer of SELECTIVE COLOR > black: black: +2%

Now Im satisfied with the gif and want to save it. Clicking FILE > EXPORT AS > GIF will open this window:

Make sure the quality is at 100%, the size in darker numbers lower than 10MB. Speed in Photopea is quite tricky for some reason, but 180% - 190% is the "normal 100% speed" of the gif.

Enjoy giffing and feel free to ask anything if unclear!
66 notes
·
View notes
Note
how do you sharpen your gifs???? they're insanely high quality!
Hello, Anon dearest, and thank you so much! ✨ To answer your question properly, I would first have to know which gifset(s) of mine you're referring to because I've made a lot over the years and I often change my sharpening settings, too. It totally depends on what I'm working with at the moment, to be honest. 😅
But, as for the last few sets of mine (this, this, and this in particular), I used these settings:
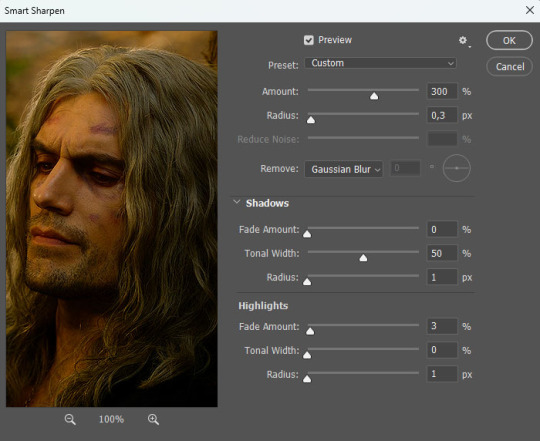
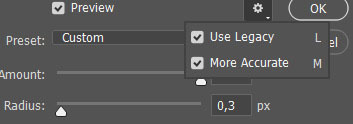
After converting my frames/layers into a smart object, I applied the settings above. Remember to click on the gear icon in the upper right corner and check both 'Use Legacy' and 'More Accurate' as well. This will make your sharpening look more 'natural' and less cakey imo.
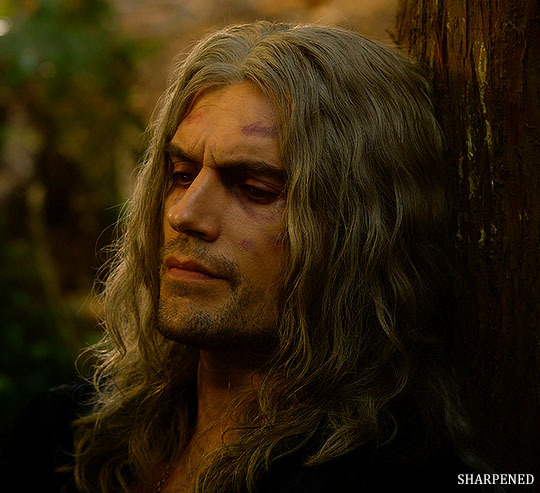
Below is a comparison of before and after:
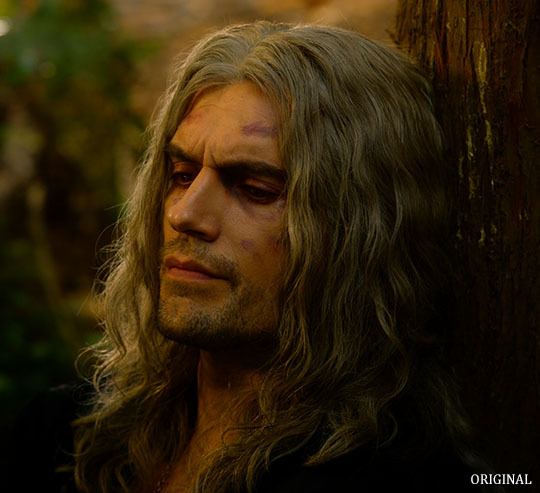
Note: This Geralt screenshot was taken from a 4K (2160p) video. Most videos I work with are at least 1080p or 720p because quality matters.

And here's the final result: colored, brightened, and sharpened.
—
I hope this answers your question. If not, feel free to send me more questions about this kind of stuff. I'm always happy to help out :)
#replies#anon#photoshop#tutorial#resources#ps help#sharpening#gifs#giffing#completeresources#allresources#chaoticresources#my gifs#my tutorials
307 notes
·
View notes
Text

Leedo || IKUK [250124]
#leedo#foroneus#ultkpop#malesgroupnet#kpopccc#idolnexusedit#kpopstages#lucieblr#foraddy#rintag#tuserchrissy#useroro#eyestrain#cheytermelon#useranusia#rhitag#usermairin#kngld.edits#once again i thank past me for doing a thorough tutorial on how to both sharpen and blur the gifs on discord to jo hahaahha#cause i was struggling again#i wanted a 4 gif set but oh well :_)#i wish i giffed more today#but i am running out of time :_) and i am tired i had such a long week
70 notes
·
View notes
Text
new life begins: love is stored in the food: 1/∞
bonus:
#new life begins#asiandramanet#cdramasource#yin zheng#yin qi#li wei#my gifs#nlb love is stored in the food#trying a new sharpening/coloring thing#shoutout guzhufuren for posting a tutorial / passing on the sharpening tips
49 notes
·
View notes
Text


MOMO ✩ 5TH WORLD TOUR TW-LOG
#dailytwice#twiceedit#fortwice#femaleidolsedit#hirai momo#momo#dahyun#jeongyeon#i need to look up some sharpening tutorials i am lost#gif#twice
372 notes
·
View notes
Text
I LEARNED HOW TO GIF

#that wasnt as hard as i thought it'd be but i found a good tutorial#the quality was bad on my qimir gif but after i made the osha one i realized i didnt save the sharpening fjskskakak#flythepost
13 notes
·
View notes
Note
hi Clara, what are your sharpen settings?? if you will pls 🙏🥺 your gifs look so high def
tysm of course i'm happy to share!! i just recently set up this link where anyone can download my sharpening action for ps so i had it ready for you loll💕 it's based on someone else's action but i made some changes so this one's my version. ill also put screenshots below the cut in case thats easier. it's pretty foolproof i hardly ever have to adjust it lol so hope it helps!!
step 1: smart sharpen

step 2: smart sharpen
(if you're using photopea you have to stop here, the rest is specific for ps smart objects)
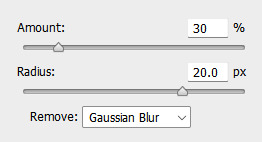
step 3: gaussian blur

step 4: now you should have a gif layer that looks like this.
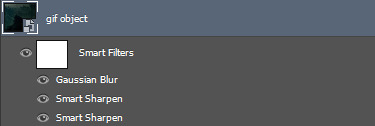
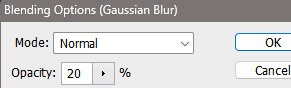
right click on the "Gaussian Blur" and click "Edit Smart Filter Blending Options..." and then change the Opacity to 20%.
and that's it 🥰
39 notes
·
View notes
Note
hello! im a newby gimaker and i want to follow your tutorial on sharpening but i dont know how you got to the photoshop page you started from where it looks like a video timeline. can you tell me how you got there? <3
Hey!!
Welcome to the wonderful world of gifmaking <3 yes i can lead you through to that point. I have a mac so this might look different for you, but all the steps stay the same - I just shifted from windows to mac so i know this xD
I'm going to show you how to do this on this gif:
I prefer to use screenshots for my gifs (I also don't know how else to make them), so I use Mplayer for that. I used to use MPV player but that stopped working with my new computer system.
First, you want to make sure that you're using a high-quality file. If 1080p is available to you, use 1080p at the very least. This will make sure your gifs are crisp and sharp.
Open your file with Mplayer. Then find the bit that you want to gif. I sometimes search forward by frame by using the ">" key. Once you're at the start point of your desired gif, pause the video. Then, Cmd/Ctrl + Shift + S to start screenshotting. The video will start to play slowly as the screenshots are captured. (They go to the desktop automatically but you can change that in interface settings).
The rest of the tutorial is under a cut:
Once you get your screenshots, you're going to go Photoshop. File > Scripts > Load Files Into Stack.

You're going to get a dialogue box. Click Browse and load the screenshots that you want. This is what that looks like when you finish:
Next, you're going to crop your gif, using the crop tool. You can press C on your keyboard for this or use the tool with this icon in the sidebar.

For this, I'm using an aspect ratio of 540 x 400:

Click that checkmark to crop. Once you do, we're going to resize the image. Use the Cmd/Ctrl + I function to bring up this box. For tumblr gifs, you want to change the width. The height doesn't really matter but if the width doesn't match up, Tumblr is going to fix it for you and it'll look funky. Per row:
1 gif , we use 540px
2 gifs, 268px each
3 gifs, 177, 178, 177 px
We're just doing one, so I'm using 540px.

Now, you want to make sure you can add the timeline. In the top bar, go to Window > Timeline
This will bring up the timeline.

From there, click "Create Frame Animation" (you might have to press the arrow in the timeline bar first.)
It's going to look like this:

We're going to use those three lines in the corner of the picture above. The first option we'll select is "Make Frames From Layers"
That looks like this:

Now, when these load in, you may notice that they're all in reverse. To make them go back in order, we're going to go back to that menu and click "Reverse Frames."
Then, in that same menu, click "Select all Frames." We're going to change the animation speed. You want to make sure you have the first frame selected. We're going to click the arrow next to the "0 sec"
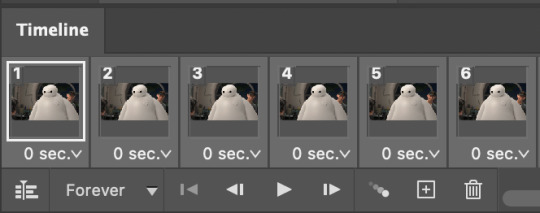
When you click that, it will give you a menu. Click, "other..." You should get a dialogue box that says "Set Frame Delay", just like the one below.
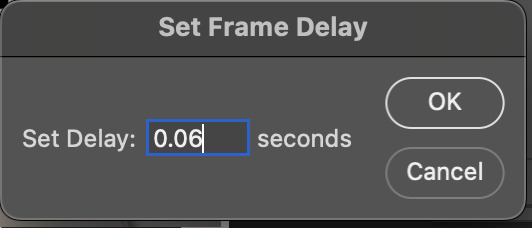
You want to use anywhere between 0.05-0.1 seconds. I find that anymore more is just too slow, so I prefer 0.06. This is fully changeable at the end of my sharpening tutorial, and you can use what you want, but that's what I prefer.
When you do that, it'll change the frame speed of all the gifs.
Now, go back into that little menu, and click, "Convert to Video Timeline."
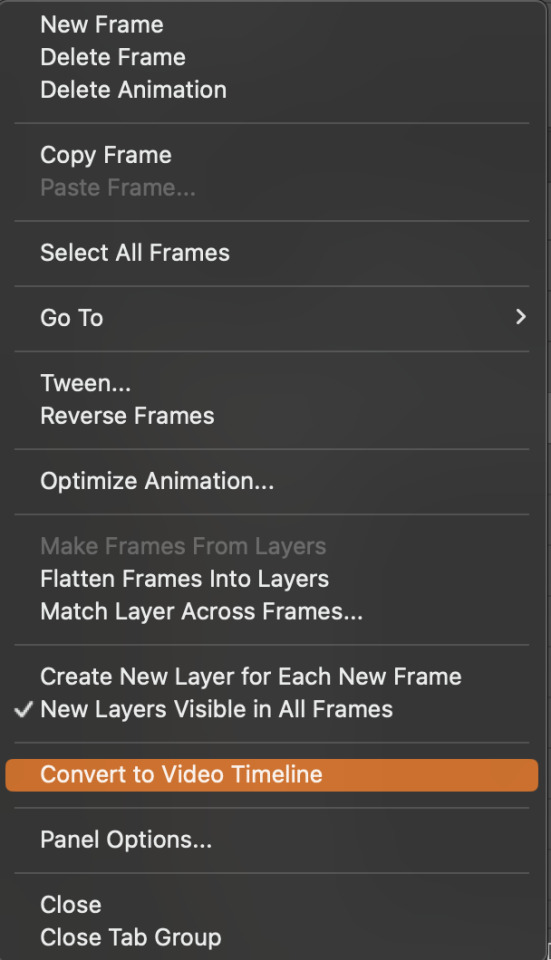
This is what it'll look like:

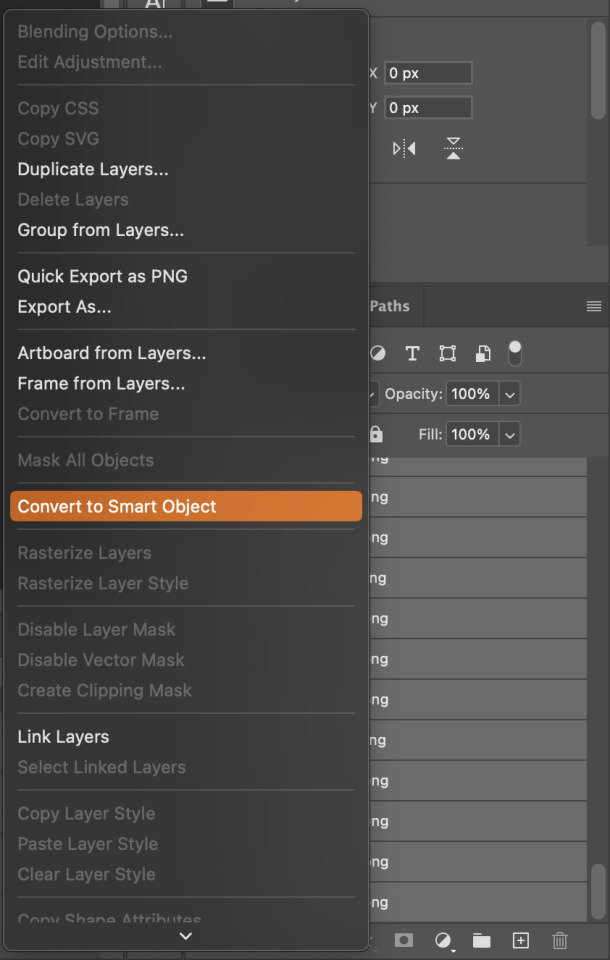
Now we're going to select all the layers in the right-hand pane. Once we do that, right-click and select, "Convert to Smart Object."
And you're there! Now you can use the sharpening tutorial to your liking.
Pro tip: Make an action with all these steps so you don't have to do them by hand with every single gif you make.
Hope this helps and it wasn't super long winded. Let me know if you have any questions <3 Happy giffing!
#zee answers#zee's tutorials#sharpening#gif creation#tutorials#gif tutorial#photoshop tutorial#resources#ps help#dailyresources#userphotoshop#completeresources
45 notes
·
View notes
Text

Aarni Soivio KUUMAA - Huuda Lujempaa (2017)
(this was the kuumaa gif idea i had in mind a few days ago. could be better, but it's my first time 😅)
#kuumaa#aarni soivio#huuda lujempaa#kuumaa gifs#my gifs#thank goodness i already made that tag#i just followed a tutorial and played with the brightness and contrast#i wish it would look smoother#but i want it to be this slow#and the sharpening is ehhh
17 notes
·
View notes
Text

Just open the file. Make sure is 540px wide for a single gif and not 500, or 600, for 450. just... 540, it's been 540 since 2015.
Music is Rogue Trad/er OST.
#flashing images#flashing video#misadventures with aes#I have an action that does the converting etc. and an action for sharpening and an action for camera raw etc. ACTIONS#hey look its an updated tutorial for how I make gifs lololololo
19 notes
·
View notes
Text
hehe been so happy w my gifs the last few days :> the way u can gif nearly every day for months n still be learning is!! wild
#that tutorial on how to make gifs less grainy.... life changing for big gifs especially#n i like the sharpening im doing now more :> yippeeeeee
11 notes
·
View notes
Text

Well, I tried at least.
#my coloring#gif coloring#photoshop coloring#i saw a gif coloring tutorial for this scene of nancy a while ago and i wanted to try it#it ended up not looking good for my gif because they were using a different source. i think 4k when mine's *only* 1080p#so ofc it's gonna end up looking different and all#so i did this coloring from scratch and well. i guess it's okay#a little too soft for my tastes perhaps. but then again had i sharpened it more. it wouldn't have looked good either#because this scene is so dark and all#anyway fuck s4. and i don't mean just plot-wise#they made their scenes so dark at times that it's not even funny man#color comparison#coloring comparison#gifs
35 notes
·
View notes