#shopify custom section
Explore tagged Tumblr posts
Visit Tumblr Blog
Explore Tumblr blogs with no restrictions, modern design and the best experience.
Last Seen Tumblr Blogs


Fun Fact
In Q3 of 2020, 31% of US users access the Tumblr app daily.
Link
🚀 Boost Your Shopify Store! 🚀
Want to make your product pages more informative and visually appealing? Learn How to Add a Custom Section to Shopify Product Pages — including shipping icons, rich text descriptions, and more! 🛍️✨
✅ Upload custom icons ✅ Add rich descriptions ✅ Improve user experience ✅ Increase conversions
Take control of your product page design today — no third-party apps needed!
👉 Read More: https://www.tutorialswebsite.com/how-to-add-custom-section-to-shopify-product-page-without-app/
#ShopifyTips #EcommerceDesign #ShopifyDeveloper #CustomShopify #OnlineStoreGrowth
0 notes
Text
#hire shopify experts#shopify custom sections#shopify theme customization#shopify development services#shopify development company#Software development services#Software Development company#Hire software developers#Open Source Implementation#Ecommerce Factory#ERP Development#Refining Existing Applications#Conversion Rate Optimization#Don’t Just Update#Upgrade!#Startup Solutions#ADA Compliant Website#Online Marketplace Development#Theme Development#Platform Migration
2 notes
·
View notes
Text
Spirit Shops Discords Masterlist
Welcome to my list of discords for Spirit Shops! If you have a spirit shop and have a discord please IM or PM me with your shop name, pronouns, your selling platform, and link to your discord!
As an added note before we get to the list, if you are curious about reviews for shops on any platform or looking for a place to connect with others who are in the spirit work community as well as learn about experiences I suggest joining The Summoner’s Review. It has a section for anonymous reviews so you don’t feel the pressure of having to leave a good review. Some shop owners are also in the server and if you have concerns or questions there is a lovely channel to ask questions and have them addressed.
Updated: 7-3-24
Ginger, Brich, and Root
Ran by Keegan {he/they}
Side shop: Wynter's Wonderland, ran by Wynter {they/them}
Discord Shop
Discord Link
Encyclopedia discord link
Nightside Denizens
Ran by Pharaoh {he/him}
Etsy Shop, personal site
Discord Link
Scarlet Summers Conjures
Ran by Raven {she/her}
Discord only shop
Discord link
Psychic Kitty Reese
Ran by Kitty {she/her}
Discord, Facebook, and Shopify shop
Discord Link
Crashing conjures
Ran by Crash {She/Her}
Discord & personal website
Discord link
Sunset Nest:
Ran by Nox {they/them} & Parker { He/they }
Looking to reopen soon
Discord Shop
Discord link
Lunar Rose Spirit Services:
Ran by Lilac {Fae/she}, Moon Lily {She/Her}, Dandelion {They/Them}, & Hua {They/Them
Discord Shop
Discord Link
Three Souls
Ran by: Ember {They/He/Xe}, Astra {She/her}, & Vackra {She/her}
Personal website & Discord
Discord Link
Clown's Cosmic Cove
Ran by Clown {He/They}
Etsy & Discord Shop {thoughtforms & Divination only}
Discord Link
The Wyvern Forge:
Ran by Obsydian {She/they}
Discord Shop
Discord Link
The Hidden Spirit Lair:
Ran by Meister Miau/Ilinga {Any pronouns}
Currently on Hiatus
Discord Shop
Discord link
Royal Rose
Ran by Novi {She/her}
Etsy, personal site, & Discord
Does Divination & Custom Conjures
Discord Link
The Sapphire Moon
Ran by Slate {He/they}
Discord Shop
Discord Link
Mystic Fox Den
Ran by Foxie {she/they}
Discord
Does divination services, conjuring on hiatus
Discord Link
28 notes
·
View notes
Text
Big Update Post
Hiya, shapeshifters!
We have some announcements to make this evening.
Here’s the short of it:
The Shapeshifters website will be temporarily down this Sunday evening, March 3, 2024 at Midnight EST.
When it comes back up, you’ll find a shiny new website that is organized the same way with a couple of exceptions.
The Off-the-Rack Sale and Holographic listings will be temporarily delisted.
The Goth listings will be renamed. You will find Rainbow Constellations, Monster Mouths, and a couple of new options listed under Cosmic Horror.
The Skin Tone listings will have brand new additional color skin tone options!
The Island Time listings will also have a new option available.
The Binding 101 FAQ will be rolled into its own section in the FAQ.
There will be a brand new Events Page!
The blog will be temporarily disabled.
If you’re curious about the long of it, keep reading.
For everyone else, we appreciate your patience during this transition! Like so many other transitions, we’re delighted about where it’s going.
Website Downtime
Shapeshifters is finally moving to Shopify! We’ve done a lot of work over the past few months building a more organized, streamlined website that will be easier to access for you and update for us. On Sunday night, we’ll shut down the current website to pause orders so that we can migrate everything cleanly.
Off-the-Rack and Holographic Listings
The Off-the-Rack listings will be delisted to give us a chance to reorganize the remaining stock so we don’t accidentally double-sell anything.
The Holographic listings will be delisted while we assess our fabric options. Long-time customers might notice that we’ve removed Liquid Metal and Oil Slick from the Holo listings; we’re sourcing replacements and new options throughout spring. Once we know our options, we’ll either re-launch the Holo listings, or move the currently available fabric Prism to another home so it won’t be all alone anymore.
If you’ve been eyeing either Prism or an Off-the-Rack, buy it before Sunday if you can!
Expanded Skin Tone Range
We’re very excited to announce three new skin tone options will be available after the website migration: Pine, Chestnut, and Laurel! Pine is a pale shade, while Chestnut and Laurel are both on the darker end of the spectrum.
And, the new and improved Skin Tone listings will be the perfect place to see the results of our latest photoshoot! We’re excited for y’all to get to see these photos around the site and on the listings. We sought out models of color with darker skintones both to fill a gap in the modeled photos in our listings, and to show off our darker skin tones. All of our models were amazing, our photographer was great, and the photos are fantastic! We really leaned into the cozy Vermont vibes for this one.
Events Page
We’re going to events again! Hooray!
And we’re not just going to conventions and conferences and Pride festivals. We’re also talking queer markets, fashion shows, and binder sewing workshops!
That’s right, some lucky folks in the New England area will have the opportunity to take an in-person class with Eli, our head tailor and the developer of our DIY Binder Sewing Kits. They will walk you, step-by-step, through sewing your own custom-sized binder and help you troubleshoot along the way. These workshops are designed for sewists of any level and do not require you to own a sewing machine.
If you’d like to host a sewing workshop or would like to have us at any other event, educational, celebratory, fashionable or otherwise, please contact us!
Thanks once again for bearing with us during this transition and we can’t wait for you all to see the new site!
#chest binders#shapeshifters#events#pride#skin tone chest binders#sewing workshops#how to sew binders
47 notes
·
View notes
Text

🚀 Premium Shopify Video Section – Ultimate Conversion Booster
This premium solution solves the #1 frustration with Shopify videos—autoplay that actually works on all devices while complying with browser policies.
✅ Smart Autoplay Engine
Browser-compliant autoplay (muted by default with optional sound toggle)
Loop & background playback for seamless viewing
Mobile-optimized with fail-safe fallback images
🎨 4 Designer Button Styles
Minimal Underline – Clean hover animation
Pill Button – Modern glass-morphism effect
Arrow Reveal – Dynamic hover interaction
Thin Outline – Ultra-minimalist luxury style
🎚️ Advanced Customization
9 content positions (drag-and-drop placement)
Dynamic overlay controls (gradients + opacity sliders)
Independent mobile/desktop settings
⚡ Performance Optimized
Lazy loading built-in
30% faster than standard video sections
SEO-friendly structured data
youtube
#video#add video#add video on shopify#shopify#fastest shopify theme#youtube#shopify store#woocommerce#web development#shopify ecommerce development#business#seo#advertising#ecommerce#shopify development company#shopify tips#Youtube
2 notes
·
View notes
Text
How to Migrate a Store from Shopify to Magento?
Migration from Shopify to Magento is a huge leap for your business, offering it more flexibility, scalability, and advanced features. Though this might seem daunting, having a clear roadmap for making this transition will ease the process. The following is a step-by-step guide to help in successfully migrating:
1. Understand Why You’re Migrating
First of all, before one dives in, understand why Magento is a destination point. Yes, Shopify was perfect for simplicity and ease, but Magento means advanced personalization, better scalability, and robust features. If your current platform starts to limit growth, your Magento 2 Migration will be the cool thing to do.
2. Plan and Prepare Your Data
Start by auditing your Shopify store. After auditing is completed, the Shopify merchant may need to make a note of data to migrate, which would involve details related to a product, customers, orders, and the site's content. Clean up your data-remove all outdated and duplicate entries, to keep data from becoming a disaster later on. In that way, everything will go just smoothly when migrated, and the shop could be arranged more organizedly at Magento.
3. Set Up Your Magento Store
Install Magento on a decent hosting platform or take the help of a hosting service dedicated to Magento. After that, configure some basic settings such as tax rules, currencies, and store language. Choose a theme for Magento that will represent your brand identity and customize it for seamless user experience.
4. Export Data from Shopify
Shopify provides an export facility of data into CSV format. In your Shopify admin, go to the export section and download all the required files: products, orders, customer records, etc. Back up your Shopify store to ensure you will not lose any data while migrating.

5. Data Import via Migration Tools
Magento also allows for imports with some tools, which ease the migration of data. You can use extensions for such migrations, like Cart2Cart or LitExtension, which allow automated transfers. This is because the tools will map data fields between Shopify and Magento to reduce human-induced errors.
6. Test Your Magento Store
Perform a full test of your fresh Magento store before going to production. Verify that every piece of data has migrated correctly and all product descriptions, image captions, and customer details are correct. Ensure your payment gateways, shipping methods, and checkouts work flawlessly.
7. Optimize for Performance
Magento offers advanced caching, scalability, and mobile-friendly features. Set these up to enhance the speed of your site and the users' experience. Install SEO extensions to maintain or improve your search rankings post-migration.
8. Launch Your Store
When everything is tested and optimized, switch your domain to Magento. Keep your customers informed about the migration process, emphasizing the benefits of the new platform, whether it be a better shopping experience or exclusive features.
9. Monitor and Improve
After going live, monitor your store's performance and user feedback. Address any issues quickly and continue optimizing your Magento store to align with your business goals.
Migration to Magento can be rather labor-intensive and take a long time, but the payoff in terms of customization, performance, and scalability is there. If you plan properly, this transition will lay a foundation for your business's success in the long run.
For More information, please visit: https://mageleven.com/magento-migration-services
4 notes
·
View notes
Text
🛍️ Boost Conversions with the Best Shopify Recommended Product Apps! 🚀✨
Want to increase average order value and help your customers discover more of what they love? These Top 20 Shopify Recommended Product Apps are designed to:
✅ Show smart product suggestions based on browsing behavior and purchase history. ✅ Upsell and cross-sell directly on product pages, carts, and checkout. ✅ Create a personalized shopping experience that keeps customers engaged. ✅ Drive more revenue with "Frequently Bought Together" and "You May Also Like" sections.
👉 Explore the full list here: Top 20 Shopify Recommended Product Apps => https://taranker.com/top-20-shopify-recommended-product-apps
💬 Which recommendation strategy works best for your store? Let’s discuss below! 👇
#taranker#shopify#ecommerce#shopify experts#shopify tips#shopify development company#shopify ecommerce development
2 notes
·
View notes
Text
Basic Steps to Build Your Shopify Website — Softhunters

Shopify makes it effortless to set up an e-commerce website. Even a novice user can accomplish it in parts. Shopify is because of its friendly design coupled with powerful features; Shopify is one of the most widely used e-commerce platforms by both small and large businesses. Some of the services they offer include customizable online store templates and effective payment gateways. Shopify website design company can create a strong online presence if they sell tangible products, services, or even digital items.
Read More :- https://softhunters.in/basic-steps-to-build-your-shopify-website/
The Shopify store is simple to use, allowing you to run your business without requiring extensive technical knowledge. This blog post will enumerate the fundamentals of creating a Shopify website.
Creating a Shopify Account
The first step in growing your Shopify store is to create an account. To try this, visit Shopify.com and click on the “Start free trial” button in the top right corner. Then, offer your e-mail address, password, and store name.
The store name will initially function as your number one domain. After developing your account, Shopify will ask you some questions about your business. Fill these out and click on “Enter my store” to proceed. This initial setup system is designed to be short and clean, allowing you to begin building your savings properly away.
Establishing Your Shopify Store
Once you have got your account installation, it is time to configure your keep settings. Access the menu on the left aspect of your Shopify dashboard, which incorporates hyperlinks to all of your save gear and features. Use the settings button at the left to set your keep name, time quarter, forex, and other number one settings.
This step is essential as it inspires the way your shop operates and how clients will perceive it. Make certain all information is correct to ensure easy operations and compliance with local regulations.
Selecting A Theme
Your themes control the presence and design of your site. To select a theme, go to the “online store” in the sales channel in the left sidebar, and then select the theme “Theme.” Some free themes are available for your use in Shopify, and you can also visit the theme stores for the paid ones.
Choose a theme that fits your brand and niche. Check reviews to determine if they can serve your goals and be supported by any additional features you want to integrate in the future. The subject should appeal to the eyes and provide an excellent user experience to maintain customers.
Including Products and Services
Now that your store displays as you want it to, it has time to populate it with your products. Return to the Shopify Admin Dashboard. On the Left Menu, click “Product.” To upload a product, click “Add the Product”. You can include the title, description, price, images, and additional details per product.
Ensure to categorize your products using collections or categories for easy visibility. This is essential as it will directly impact your sales and customer satisfaction.
Be sure to detail product descriptions and use high-quality images so buyers can make quality purchasing decisions.
Personalize Your Theme
Once you have chosen a theme, you may use it to represent your brand in a more customized manner. To try this, click on the “Online Store” tab, after which, at the theme you have selected, hover over it and click “Customize.” From the left-hand equipment inside the editor, you can regulate hues, fonts, and layouts. You also can add or delete sections.
Customization is crucial to making your save stand out and mirror your emblem identification. Ensure that your design stays consistent on all pages so that you can give it an expert touch.
Pages Setup and Content Preparation
You can create additional pages for your website, furthermore, your products. The same applies to the ‘Contact’ and ‘FAQ’ pages — a setup guide and live builder are available. For sharing more details regarding your brand or products, blogs can assist you in promoting the business and help in audience engagement. Also, every content must be created in a manner that makes the customer confident and loyal towards the brand.
Instructions for Setting Up Payment Options
If you want to sell, you need to select a payment option first. Under Settings or Setup Guide, scroll to Payment. Log into your cash account and choose Shopify payment or any other provider if you wish to use PayPal.This is essential to ensure the payment setup works properly and securely. It also determines whether you can process transactions and get paid directly.
Sourcing Suppliers and Additional Funding
Reexamine yourself. What is the profile of the partner you want to work with? In what manner do you intend to work with them? When looking to outsource, do not run away from your network. Existing contacts are the best place to start with a Shopify web development Agency. Easy deals and fewer problems are sometimes discovered just one step away.
Additionally, analyze what you can do within a certain budget. Let’s take a more realistic view to ensure you can achieve practical things and trace the path to interesting opportunities within a budget.
Additional Suggestions for Achieving Success
The following tips can aid in improving your Shopify store.
Establish A Brand Style Guide
Create a general style guide rule document comprising typography, color scheme, and logo style for your brand before commencing the designing of your website. This will help in maintaining said standards throughout your site and marketing resources.
Think About Store Layout
Always keep in mind customer trust, aesthetics, and mobile devices when it comes to modern e-commerce design principles. Launch with a minimum viable product (MVP) and refine through the feedback of your customers.
Make Use of Shopify Apps
There is a suite of apps available within Shopify that can assist in improving features within your store. Consider apps that can enhance customer satisfaction, bot automation, and revenue generation.
Blogging on The Shopify platform
Shopify enables users to store blog posts so that pre-approved content can be designed and managed within the store. This could generate traffic and keep customers engaged.
Conclusion
The process of building a Shopify store is a straightforward one and can be achieved in various stages. With these tips and regular improvements in your store, you can make a successful online presence and build your business accordingly.
Always pay attention to the identity of your brand and the experience of customers for long-term success. The best web development company is always present to provide you with all the support for your Shopify website.
#Shopify Website#Shopify Website Design#Shopify Website Developer#Shopify Website Builder#Shopify Website Designer
2 notes
·
View notes
Text
How Custom Shopify Apps Solve Product Data Discrepancies During Squarespace to Shopify Migration
Moving your store from Squarespace to Shopify is a big decision. However, it often comes with challenges, especially with product data. Missing SKUs, incorrect pricing, broken inventory, or misplaced product categories can cause serious problems.
Without the right solution, these issues can impact sales and customer experience. The best way to avoid these headaches is by using custom Shopify apps. These apps help automate data mapping, fix discrepancies, and ensure accurate product transfers.
In this blog, we’ll explore how custom Shopify apps solve product data issues when migrating from Squarespace to Shopify.
Understanding Product Data Discrepancies in Migration
What Are Product Data Discrepancies?
Product data discrepancies occur when product information doesn’t transfer correctly between platforms. Squarespace and Shopify have different structures for handling product data, which can lead to inconsistencies.
If not fixed, these issues can result in missing product details, incorrect inventory counts, and poor user experience.
Common Product Data Issues During Migration
SKU & Category Mismatches
Squarespace and Shopify handle product identifiers differently. This can lead to SKU mismatches or missing product categories.
Squarespace uses tags and categories, while Shopify relies on collections. If not mapped correctly, products may not appear in the right sections.
Variant & Attribute Limitations
Shopify allows only three product options and 100 variants per product. If your Squarespace store has more options, some variants may not migrate properly.
Squarespace’s custom attributes may not transfer seamlessly to Shopify, requiring manual adjustments.
Pricing & Tax Inconsistencies
Squarespace allows flexible pricing structures, including tax-inclusive and tax-exclusive pricing. Shopify handles taxes differently, which can lead to pricing errors.
Shopify lacks built-in support for tiered pricing, requiring third-party apps for customer-specific discounts.
Formatting & Media Issues
Squarespace allows custom HTML in descriptions. Shopify has different formatting rules, which can break layouts during migration.
Images and media may not automatically transfer, leading to missing product visuals.
Inventory & Stock Discrepancies
Squarespace and Shopify track inventory differently. Incorrect stock levels can result in overselling or stock shortages.
If the Squarespace store remains active during migration, real-time stock updates are needed to prevent inaccuracies.
How Custom Shopify Apps Fix These Issues
Migrating product data manually can be time-consuming and error-prone. Custom Shopify apps automate the process, ensuring accuracy and efficiency.
1. Automated Data Mapping
Custom apps match Squarespace product attributes (SKUs, tags, categories) with Shopify’s format.
They identify and resolve duplicate or missing products.
Categories and collections are correctly mapped to maintain store structure.
2. Variant & Attribute Adjustments
Custom apps convert Squarespace’s attribute-based system to Shopify’s option-based system.
If a product has more than three options, the app splits them into multiple listings.
Essential product details are preserved using Shopify’s metafields.
3. Pricing & Tax Corrections
The app adjusts currency conversions and pricing structures.
Tax rules are reformatted to match Shopify’s settings.
Tiered pricing and discounts are restructured using Shopify-compatible solutions.
4. Content & Media Optimization
The app removes unnecessary HTML tags from descriptions.
It ensures that all product images and media files are correctly linked and displayed.
Bulk updates improve content formatting and readability.
5. Inventory & Stock Synchronization
Custom apps enable real-time stock syncing to prevent discrepancies.
Multi-location inventory structures from Squarespace are mapped to Shopify’s system.
The app prevents out-of-stock items from appearing as available.
Benefits of Using Custom Shopify Apps for Data Accuracy
1. Less Manual Work – Saves Time & Effort
No need to manually check thousands of SKUs.
Eliminates the hassle of adjusting pricing and categories manually.
Automatically reformats descriptions and media files.
2. Higher Accuracy – Fewer Errors in Product Listings
Prevents missing product attributes and incorrect stock levels.
Ensures all products are categorized correctly.
Maintains pricing and tax consistency across the store.
3. Automated Checks & Fixes – Reduces Troubleshooting
The app detects and corrects missing data automatically.
It reformats pricing, tax settings, and media links.
Inventory discrepancies are resolved before the store goes live.
4. Scalability – Handles Large Product Catalogs
Supports bulk updates and large product datasets.
Works efficiently for stores with thousands of SKUs.
Maintains performance without slowing down migration.
Why Choose Oyecommerz for Custom Shopify Migration Apps?
Migrating from Squarespace to Shopify requires a strategic approach. Standard migration tools often fail to handle complex product structures. This is where Oyecommerz comes in.
1. Expertise in Squarespace to Shopify Migration
Our team ensures accurate data mapping and reconciliation.
We eliminate SKU mismatches, missing variants, and pricing errors.
Our experts integrate third-party tools for seamless post-migration operations.
2. Custom App Development for Data Accuracy
We build tailored Shopify apps to automate SKU and category mapping.
Our apps handle complex product variations.
We adjust pricing, taxes, and discount structures to match Shopify’s settings.
3. End-to-End Migration Support
We conduct pre-migration data audits to identify potential issues.
Custom automation tools streamline data transfer and validation.
Our team provides post-migration support to ensure a smooth launch.
Conclusion
Migrating from Squarespace to Shopify can lead to product data issues like missing SKUs, incorrect attributes, pricing errors, and inventory mismatches. Custom Shopify apps solve these problems by automating data mapping, syncing product variants, correcting pricing, and ensuring real-time stock accuracy.
The key to a successful migration is choosing the right Shopify migration partner. Oyecommerz specializes in custom migration solutions that eliminate errors and ensure a smooth transition.
2 notes
·
View notes
Text
Maximize Sales with the Iconic - Countdown Section
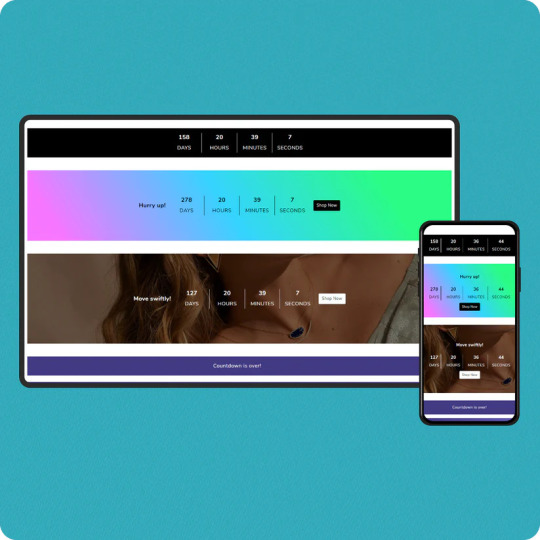
Creating urgency is a proven strategy to drive conversions, and Iconic - Countdown Section is here to help! This Shopify theme section features a countdown timer, designed to grab customer attention and motivate purchases.
If you’re looking to showcase exclusive deals or promotions, this tool is your go-to for boosting sales and customer engagement.
What is the Iconic - Countdown Section?
The Iconic - Countdown Section is a customizable timer that you can embed in your Shopify store. Designed to create a sense of urgency, it encourages shoppers to act quickly, whether it's for limited-time deals, exclusive offers, or upcoming product launches.
This tool isn’t just functional—it’s a proven psychological tactic. Urgency pushes customers to make quicker decisions, reducing cart abandonment and increasing sales.
Benefits of Using the Countdown Section
Boost ConversionsThe ticking clock motivates customers to act fast, creating a fear of missing out (FOMO). Use it for flash sales, seasonal discounts, or countdowns to new arrivals.
Enhance Customer EngagementInteractive elements like countdowns grab attention, making your store more engaging and memorable.
Highlight Special OffersShowcase time-sensitive promotions prominently and encourage bulk purchases during the limited timeframe.
Customizable DesignMatch the countdown's style to your store’s theme. Whether you prefer bold, minimalistic, or colorful designs, Iconic offers flexibility.
Mobile-ResponsiveThe countdown section is optimized for all devices, ensuring your offers look fantastic on both desktop and mobile.
How to Use the Iconic - Countdown Section
Choose Your GoalDecide whether to use the countdown for flash sales, promotional events, or product launches.
Set the TimerCustomize the start and end time for your offer. Adjust fonts, colors, and alignment to suit your store's branding.
Promote StrategicallyPlace the countdown on your homepage, product pages, or cart pages to capture maximum attention.
Monitor PerformanceUse Shopify analytics to track sales spikes and refine your strategy for future campaigns.
Why Choose Iconic for Your Shopify Store?
The Iconic - Countdown Section is more than just a timer; it’s a sales-boosting powerhouse. Backed by an intuitive interface, it integrates seamlessly into any Shopify theme, ensuring smooth operation without compromising on speed or design.
Whether you’re running a small business or managing a high-traffic store, this section fits perfectly into your sales strategy.
Learn More with Our YouTube Video!
Want a step-by-step guide on setting up the Iconic - Countdown Section? Watch our comprehensive YouTube tutorial and become a pro in no time!
youtube
Watch Now
Take Your Store to the Next Level
Create urgency, drive conversions, and maximize sales with the Iconic - Countdown Section. This feature isn’t just a timer—it’s your key to unlocking a new level of customer engagement and revenue.
If you want to download the Shopify app Iconic Sections, click here for more themes like this. Transform your store with expertly designed sections to boost sales and engagement effortlessly!
If you’re looking for expert Shopify development and customization, is here to help. We specialize in creating tailored solutions for Shopify stores, ensuring your success in the competitive e-commerce world.
Get started today and let the countdown begin!
5 notes
·
View notes
Text

Step-by-Step Guide to Selling Digital Products with Ease
The digital economy is booming, and selling digital products—like eBooks, courses, templates, or printables—has never been more accessible. With low startup costs and limitless scalability, it’s an ideal venture for creators and entrepreneurs. Here’s how to start your journey effortlessly:
1. Identify Your Niche & Audience
Begin by pinpointing a niche you’re passionate about and that has demand. Research communities on social media, forums, or platforms like Reddit to understand pain points. For example, if you’re skilled at graphic design, consider offering Canva templates for small businesses. Narrowing your focus helps you stand out.
2. Validate Your Idea
Before investing time, validate demand. Use surveys, polls, or pre-sale offers to gauge interest. Share a concept on Instagram or LinkedIn and ask followers if they’d buy it. Tools like Google Forms or Gumroad’s pre-order feature can simplify this step.
3. Create Your Product
Focus on quality and usability. Use tools like Canva for design, Teachable for courses, or Adobe Audition for audio guides. Keep it simple—start with one product (e.g., a PDF workbook) before expanding. Ensure it’s professionally presented and solves a specific problem.
4. Choose a User-Friendly Platform
Select a platform that handles hosting and sales. Options like Gumroad, Ko-fi, or Etsy are beginner-friendly. For more control, use Shopify or WordPress with WooCommerce. Prioritize platforms with built-in marketing tools and analytics.
5. Set Up Payments & Pricing
Integrate secure payment gateways like Stripe or PayPal. Price your product strategically: research competitors, consider value-based pricing (e.g., $29 for a time-saving template bundle), or offer tiered options (basic vs. premium).
6. Launch & Market Smartly
Build anticipation before launching. Share snippets on social media, collaborate with micro-influencers, or offer limited-time discounts. Use email lists (start with free lead magnets) and SEO-friendly product descriptions to drive organic traffic.
7. Prioritize Customer Support
Automate delivery using platforms like SendOwl to avoid manual work. Create a FAQ section and respond promptly to queries. Positive reviews boost credibility, so encourage feedback with follow-up emails.
8. Analyze & Scale
Track sales and customer behavior with analytics tools. Identify top-performing marketing channels and double down. Expand your offerings based on demand—turn a popular eBook into a video course, or bundle products for upsells.
Final Thoughts
Selling digital products is a rewarding way to monetize your skills. By starting small, validating ideas, and leveraging the right tools, you can build a sustainable online business with minimal friction. Ready to launch? Your audience is waiting!
Take the first step today—create, share, and grow. The digital world is yours to conquer.
(Word count: 500)
This guide balances actionable steps with encouragement, ensuring readers feel empowered to start their digital product journey without overwhelm. Each section is concise, with practical examples to inspire immediate action.
#explore#digital marketing#digital product#selling#Sell digital products#Digital product creation#Online business ideas#Passive income strategies#Niche research#Audience validation#Low startup costs#Digital product platforms (e.g.#Gumroad#Etsy#Shopify)#Value-based pricing#Email list building#Social media marketing#SEO-friendly content#Customer support automation
2 notes
·
View notes
Text
How to Add Testimonials to Your Shopify Store?
Testimonials play a vital role in online shopping. They help build trust and encourage visitors to make purchases. Adding testimonials to your Shopify store can increase credibility. Shopify Support Agencies explain how to add testimonials easily.

Why Testimonials Are Important for Your Shopify Store?
Testimonials show social proof. They highlight customer satisfaction and real experiences. Buyers trust reviews from other customers. Positive testimonials can boost your sales and reduce doubts. They also make your brand look professional.
Adding testimonials can improve your store's reputation. This leads to higher conversion rates. People trust businesses with authentic customer feedback. Testimonials are an essential part of any Shopify store.
Ways to Collect Testimonials from Customers
There are several ways to collect testimonials. Start by requesting feedback from satisfied customers. You can use email or post-purchase surveys.
Social media platforms are also great for gathering reviews. Monitor comments or direct messages for positive feedback. You can even offer discounts in exchange for testimonials.
Encourage customers to leave reviews directly on your store. Use Shopify apps to simplify this process. The goal is to make it easy for customers to share their experiences.
How to Add Testimonials to Your Shopify Store?
Adding testimonials to your Shopify store is straightforward. There are several methods to display testimonials effectively. Here are the main options:
1. Use Shopify’s Built-in Features
Shopify themes often have sections for testimonials. Check your theme’s settings. Look for a “testimonial” section or similar. Add customer reviews directly into this section.
You can customize the layout based on your preferences. Use short, engaging testimonials for better readability. Update this section regularly with fresh feedback.
2. Use a Dedicated Shopify App
Shopify offers many apps for testimonials. Apps like Loox, Judge.me, and Yotpo make adding reviews simple. Install the app and follow the setup instructions.
These apps provide advanced features like photo or video testimonials. They also let you display star ratings. Most apps allow customization to match your store’s design.
3. Create a Custom Testimonials Page
You can dedicate a page for customer testimonials. Go to your Shopify admin panel. Create a new page and name it “Testimonials” or “Customer Reviews.”
Add reviews manually or use apps to automate the process. Keep the layout clean and easy to read. Include customer photos or names to make the testimonials credible.
4. Add Testimonials to Product Pages
Adding testimonials to product pages is effective. It connects reviews directly to specific products. Use apps to display reviews on product pages.
Highlight the most relevant testimonials for each product. Ensure the design does not overcrowd the page. This helps customers make quicker purchasing decisions.
5. Display Testimonials in the Homepage Banner
Featuring testimonials on your homepage grabs attention. Add quotes or star ratings to the main banner. Many Shopify themes allow this customization.
Choose the best testimonials to feature prominently. This builds trust immediately when visitors land on your store.
Best Practices for Using Testimonials
1. Use Authentic and Specific Testimonials
Ensure testimonials are genuine. Avoid fake reviews as they can harm your reputation. Specific reviews work better than generic ones.
2. Highlight Key Benefits in Reviews
Choose testimonials that mention unique features of your products. Highlight how your store solved problems for customers.
3. Include Customer Photos or Videos
Adding images or videos with testimonials increases credibility. It makes the reviews more relatable and trustworthy.
4. Keep Testimonials Fresh
Update testimonials regularly. New reviews show that your store is active and reliable. This keeps customers engaged.
5. Make Testimonials Easy to Read
Use short, concise testimonials. Avoid long paragraphs. Use bullet points or bold text to emphasize important parts.
Top Shopify Apps for Managing Testimonials
Here are some popular apps for adding testimonials:
Loox: Allows photo and video reviews. Includes email requests for customer feedback.
Judge.me: Affordable app with customizable layouts and widgets.
Yotpo: Premium app with advanced features like visual reviews and analytics.
Stamped.io: Focused on product page reviews. Integrates well with Shopify themes.
These apps simplify testimonial management. Choose one based on your needs and budget.
Conclusion
Testimonials are powerful tools for building trust. They showcase customer satisfaction and drive sales. Adding testimonials to your Shopify store is simple. Use built-in features, apps, or custom pages to display reviews.
Follow best practices for effective testimonials. Highlight authentic feedback and update regularly. With testimonials, your Shopify store can attract more customers and boost revenue.
2 notes
·
View notes
Text


Moodring Cute Shopify Theme
Our new Shopify theme Moodring is here. 🙌 With a creative design and a cool color-changing background, the theme is sure to wow visitors and make your store stand out! The theme comes with 100 fun icons, 22 quirky background patterns, 19 sections, 4 page templates, 4 menu layouts, Quick View, email popup, and more.
The theme also comes with a ton of options, from changing colors to turning elements on/off, so that you can tweak the theme and get it looking exactly how you want. No templates required! Save time and do all your editing entirely within Shopify's site editor.
NOTE (PLEASE READ): Everything you see on the demo site comes with the theme and does not require any plugins or apps. All colors, including the background, icons, and patterns, can be changed, or you can upload your own custom grpahics. Shopify OS 2.0 compatible. If you want to recreate the demo logo, a free Canva template is included in the instructions. This theme only works with Shopify.
1.3 Update (8/9/23): Added custom font upload setting, added products to the Mega Menu, added latest OS 2.0 features (complementary products, inventory status, display product rating, new filters, etc.), added a countdown timer, added "special instructions" custom field, and fixed iOS 16 menu bug.
1.1 Update (4/7/22): Added padding settings to all sections, added option to turn on thumbnails on product pages, added predictive search, added Featured Product section, added setting to change column number for collections, added control for ticker speed
1.1.1 Update (8/4/22): Added option to upload custom patterns and icons. Added setting to turn header social media icons on/off.
1.2 Update (11/11/22): Added font size option. Download Link: https://psdmonsters.com/moodring-cute-shopify-theme/
#Shopify#Shopify Theme#Shopify Theme Store#Shopify Template#Shopify Customization#Shopify Experts#Shopify 20#Shopify Design
3 notes
·
View notes
Text
WhatsApp Cloud API Setup For Botsailor
Integrating the WhatsApp Cloud API with BotSailor is crucial for businesses seeking to enhance their customer engagement and streamline communication. The WhatsApp Cloud API enables seamless automation, allowing businesses to efficiently manage interactions through chatbots, live chat, and automated messaging. By connecting with BotSailor, businesses gain access to advanced features like order message automation, webhook workflows, and integration with e-commerce platforms such as Shopify and WooCommerce. This setup not only improves operational efficiency but also offers a scalable solution for personalized customer support and marketing, driving better engagement and satisfaction.
To integrate the WhatsApp Cloud API with BotSailor, follow the steps below for setup:
1. Create an App:
Go to the Facebook Developer site.
Click "My Apps" > "Create App".
Select "Business" as the app type.
Fill out the form with the necessary information and create the app.
2. Add WhatsApp to Your App:
On the product page, find the WhatsApp section and click "Setup".
Add a payment method if necessary, and navigate to "API Setup".
3. Get a Permanent Access Token:
Go to "Business Settings" on the Facebook Business site.
Create a system user and assign the necessary permissions.
Generate an access token with permissions for Business Management, Catalog management, WhatsApp business messaging, and WhatsApp business management.
4. Configure Webhooks:
In the WhatsApp section of your app, click "Configure webhooks".
Get the Callback URL and Verify Token from BotSailor's dashboard under "Connect WhatsApp".
Paste these into the respective fields in the Facebook Developer console.
5. Add a Phone Number:
Provide and verify your business phone number in the WhatsApp section.
6. Change App Mode to Live:
Go to Basic Settings, add Privacy Policy and Terms of Service URLs, then toggle the app mode to live.
7. Connect to BotSailor:
On BotSailor, go to "Connect WhatsApp" in the dashboard.
Enter your WhatsApp Business Account ID and the access token.
Click "Connect".
For a detailed guide, refer to our documentation. YouTube tutorial. and also read Best chatbot building platform blog

3 notes
·
View notes
Text
Can Amazon Sustain Its Dominance in the E-commerce Sector?

Amazon has taken its place amongst the world’s major Internet-based corporations. A platform that has attracted millions of its user across the globe and one that has revolutionalized our ability to shop. It provides a fast shipping service, a rather vast product portfolio, and concentrates on its customer base. However, the question that arises is that: As more and more competitors appear in the near future, can Amazon continue to dominate the market? As such, more people are asking whether the company can maintain its superiority. By this, it means that for Amazon to remain dominant it must be able to come up with strategies that counters the ever evolving trends. This fact is confirmed by examples from the past, according to which the position on top is never certain.
Growing Competition
Indeed, the level of competition on Amazon is increasing. Retail giants like Walmart, Alibaba and e-commerce enablers like Shopify are pushing hard. They are enhancing their platforms, the platforms are becoming better for the customer. New competitors are only a click away and Walmart has recently initiated fast and cheaper shipping like Amazon. Through shopify, small business are being aided on how to operate online. These competitors are not just competing directly with Amazon as was the case a few years back. But the slice is getting thinner and even new platforms like IGTV and Instagram Shopping are dragging users away. Thus, the key competitors — big retail stores and merchants — are trying to edge Amazon by concentrating on their advantages, namely, individual approach and specialisation.
The Future of E-commerce
However, we also have primary strengths for Amazon as follows: Logistics infrastructure which the company has established is almost unchangeable. The fact is that people still come to Amazon Prime in millions. In newer tactics of delivery like drone delivery, the cashier-less stores they are preparing the future of the retail business. Basically, Amazon cannot wane or pause at this time and you will read why in the subsequent sections of this discourse. Listening to customers remains one of the most critical activities the company has to undertake. If it fails to adapt, customers can always switch to other brands that preference green in their products. This outlet of business is dynamic, and Amazon needs to adapt for it to keep on being the market giant it is. That makes the question, can Amazon maintain its position at the top of the online retail food pyramid? In any case, it is a good niche player, at least for now, though only time will tell.
It is our observation at Amazon that the game is never won; it has to be played over and over again. Only a few years down the road the success of this company will only be determined by how it is going to manage competition and which market trends it is going to embrace.
Discover businessdirectory: Your Comprehensive Source for USA Contact Information
For in-depth access to extensive USA contact details, explore the businessdirectory directory. Offering a wide array of listings, this resource ensures you can find specific contacts across various industries and regions within the United States. Whether you’re searching for business contacts, customer service numbers, or professional connections, businessdirectory is a dependable platform to streamline your search. Utilize its user friendly interface and vast database to access the most relevant and current contact information tailored to your needs. Efficiently uncover detailed American business contact information with the businessdirectory directory today.
#amazon#amazon web services#amazon seller#business directory#usa business#usa business directory#ecommerce#amazon selling tips
4 notes
·
View notes