#sims 3 mod tutorial
Explore tagged Tumblr posts
Visit Tumblr Blog
Explore Tumblr blogs with no restrictions, modern design and the best experience.
Last Seen Tumblr Blogs


Fun Fact
69% of Tumblr users are millennials.
Text
youtube

Tutorial : Face Preset Editor
After releasing my default replacements presets, I don't want to be the only creator to do so. Having many people share their content is amazing and that alone creates growth of custom content for the Sims 3.
Therefor, I think it is important for me to share my knowledge with you so you can be able to better understand how to use the Face Preset Editor by LazyDuchess and create your own custom presets or default replacement presets
What I'm assuming in this tutorial :
You have S3PE installed
You're familiar with the basics of S3PE.
You know what game files are
You know what a default replacement is
Download - Default Presets Folder :
SimFileShare - GoogleDrive
Questions and Answers
What's in the default presets folder ?
They're the default presets from the basegame and world adventures that I extracted from the game files and organized according to their names and categories
Can I use your already existing face presets default replacements as a base to make my own presets ?
Yes, feel free to use them all, just credit me if you do so ! - Heads Eyes Noses Lips -
Credits :
S3PE
FacePresetEditor
#ts3#sims 3#the sims 3#tutorial#siims 3 face preset editor#sims 3 face presets#sims 3 presets#ts3 face presets#ts3 face preset editor#sims 3 custom presets#sims 3 default replacement presets#sims 3 mod tutorial#sims 3 tutorial#ts3 tutorial#ts3 cas#sims 3 cas#sims 3 create a sim#ts3 create a sim#ts3 mods#Youtube#CAS : Presets#tutorials
208 notes
·
View notes
Text
Very interesting tutorial. I love using NRaas filters but I had no idea that skill stamps were a thing - I'll definitely be finding some use for this!
Using NRaas Master Controller's Filters, Skill Stamps and Hot Keys - Part 1 Filters
This is part 1 of a little (big!) tutorial on how I use filters, skill stamps and hot keys from NRaas Master Controller together in my games. It's also an appreciation post! 😊
See also: Using NRaas Master Controller's Filters, Skill Stamps and Hot Keys - Part 2: Skill Stamps and Hot Keys
Tutorial under the header!

Mods needed for Filters, Skill Stamps and Hot Keys to show up: Master Controller v.135 Master Controller Cheats v.134+
Filters:
I use filters, skill stamps and hotkeys for various things, mostly to edit bulk sims, refine door locking options, set filters for parties, functions etc and add short-cuts of often-used MC interactions to the NRaas menu when clicking on a sim/household/terrain. Once you know how to set these, you can set as many as you like and use them in a lot of different combinations.
Here are a few examples on how I set them up, but you can name them whatever you like.
MC Interaction: Save Filter Prompts the user to save a custom filter that can be used for Sim queries.
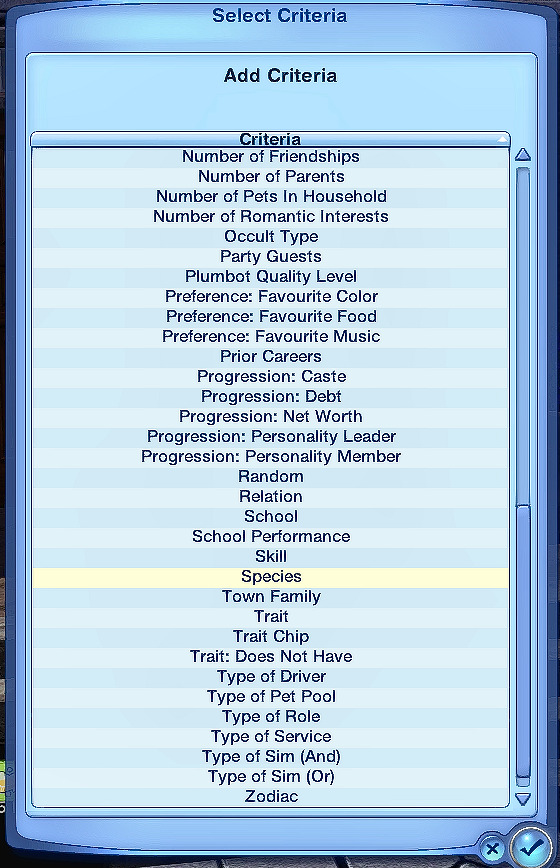
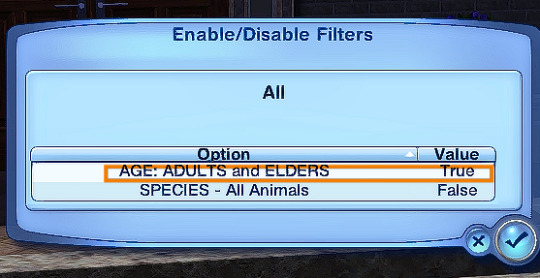
There are already a lot of default filters for sim-criteria like Age, Species, Residents, NPC etc, but I want to set one specifically for Adult and Elder sims together so I can set door options and skill stamps for them (more on skill stamps in Part 2!)
Click on Town Hall/Computer>NRaas>MC>Settings>Filters Click Save Filter - Age - Adult and Elder Oh, also set 'Species' to Human otherwise all adult and elder cats, dogs, horses and the Grim Reaper will show up! I always forget that part. 😄
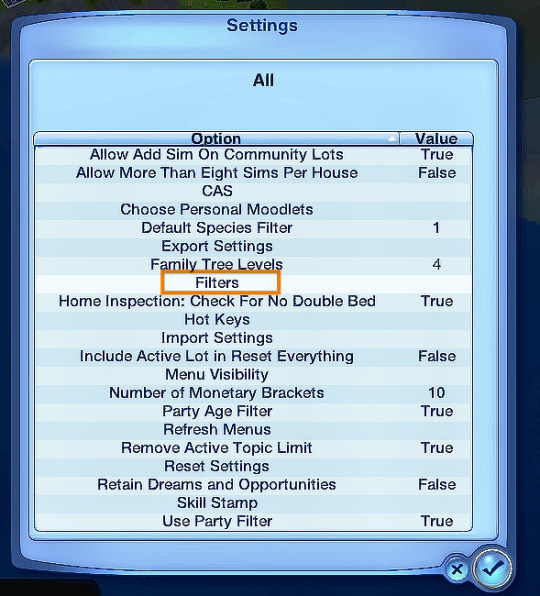
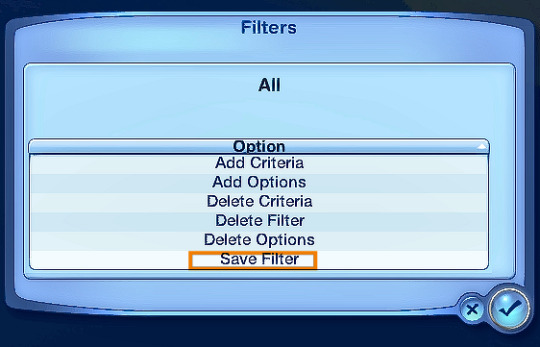
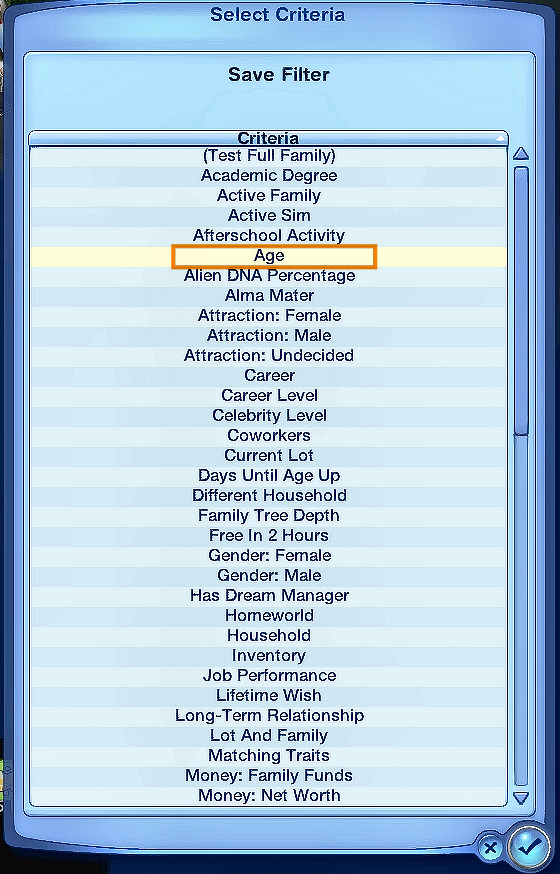
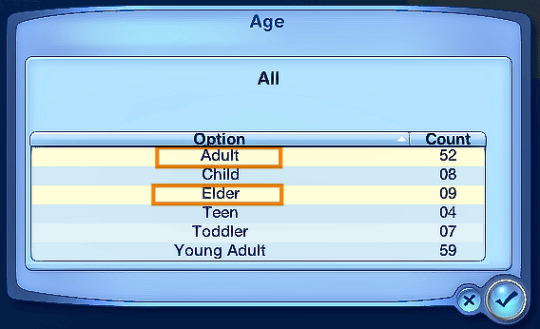

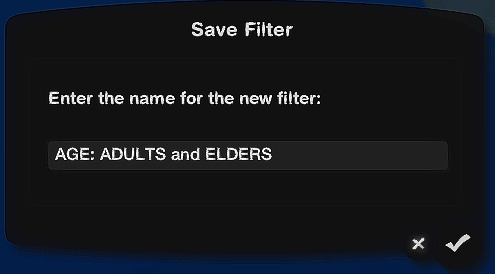
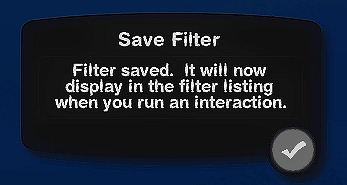
Name the new filter (e.g AGE: ADULTS and ELDERS) Click Accept ☑ Your new filter will show up in the list of filter criteria.
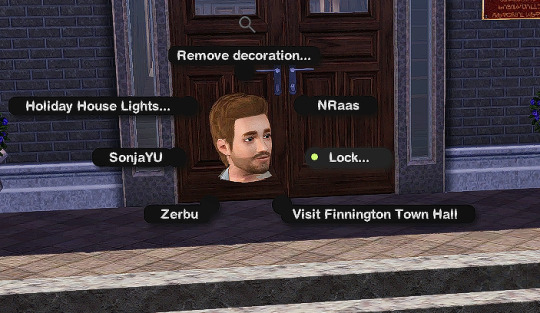
I only want these sims to use a particular door. You can use the EA door locking system to select sims you want to use the door if you want, but if you want more stringent rules, then the filters are better.
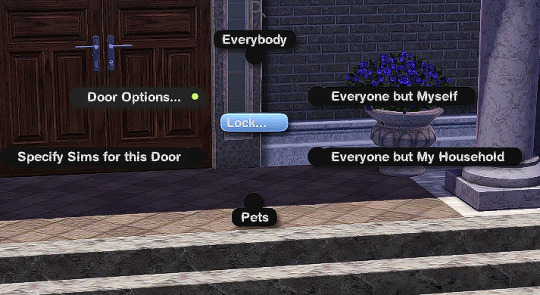
Click on the door>Lock…>Door Options… Click on 'Door Filter Type - Deny Click on 'Enable/Disable Filters' - 0
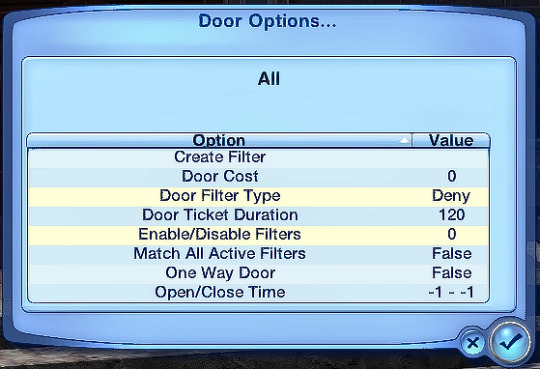
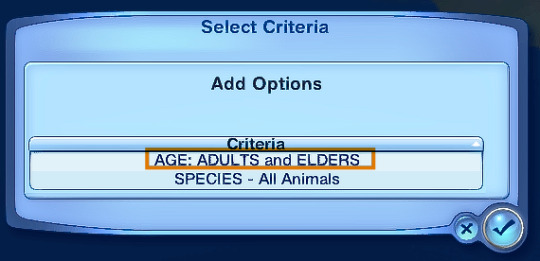
Click on the new filter you made earlier 'AGE: ADULT and ELDERS Click on it until it shows 'True'. Click Accept ☑
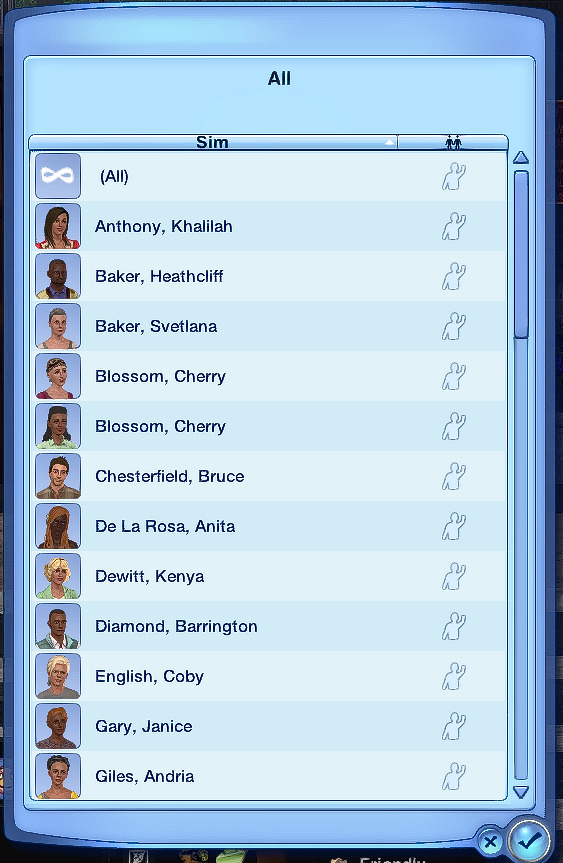
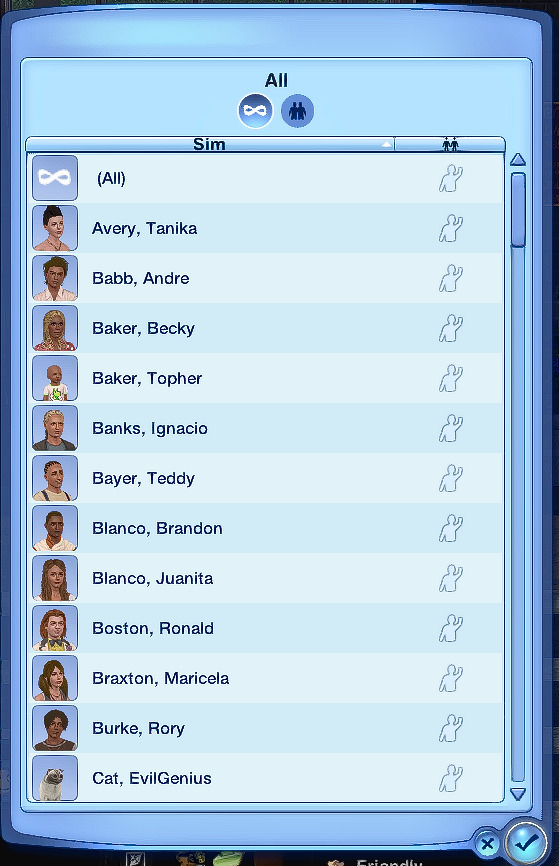
On the previous dialog box you'll now see the 'Door Filter Type: Allow' and 'Enable/Disable Filters: 1' You'll also see two new options 'List Sims Allowed Through' and 'List Sims Denied Access'.
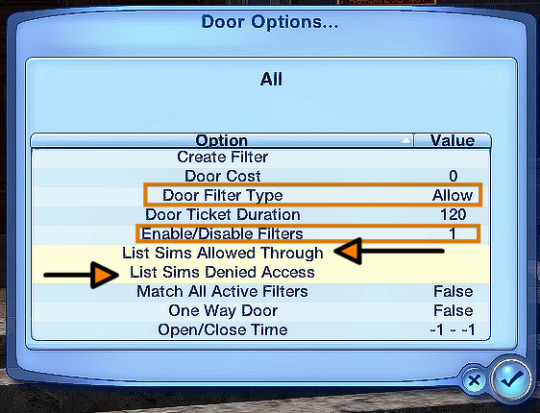
Click on them to double check you have the right sims listed. ALL human adult and elder sims are showing up in the 'Allowed..' list. The 'Denied Access' list should show all the baby, child, teen and YA humans and pets. (Allowed: 1st picture. Denied: 2nd picture)
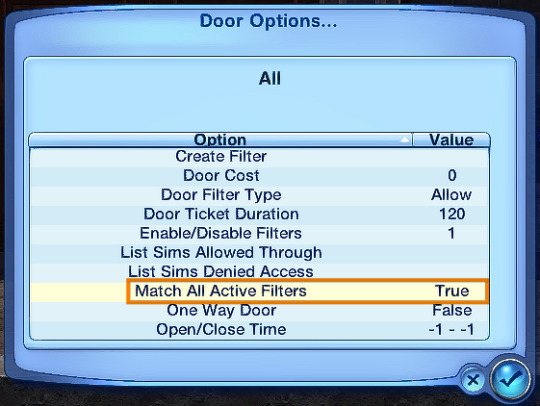
You can set any filter with as many different criteria as you want. When you set a filter with more than one criteria and you specifically want that sim to use the door e.g a YA female, with the charisma skill level 2, make sure to set 'Match All Active Filters' to 'True' (above screenshot) so only a young adult, female sim, with a charisma skill of 2 can use the door. If the 'Match All…' option isn't set, then any YA sim or any female sim or any sim with the charisma skill of 2 can use the door - it's more flexible.
~~~~~~~~~~~~~~~~~~~~~~~~~~~~~~~~~~~~~~~~~~~~~~~~~~~~~
In the next part, I'll be showing how I use skill stamps together with filters and hot keys!
Click for part 2: Using NRaas Master Controller's Filters, Skill Stamps and Hot Keys - Part 2: Skill Stamps and Hot Keys
142 notes
·
View notes
Text
I feel like my brain gained a wrinkle?
Okay, some people might know this already, but I'm sharing for those who don't! Sims 3 players, if you have @omedapixel's Sims 3 decorator Tool, you can select a OSMP (even the resizer and tipsy ones), and move your sims around with it.
Currently, the mod doesn't support moving a sim on it's own, but this is an excellent workaround. Works really good when you're trying to pose a sim and need to move them up or down or tilt and spin them a little.
So just a little psa for you because my brain felt SO unsmooth when I tried it out lol 🫶🏾

#sims 3#simblr#ts3#the sims 3#the sims#If you don't have this mod already#you should#Its a gamechanger#tutorial#tutorials
146 notes
·
View notes
Text
CASP Editor - Easily change clothing categories in TS3
Have you also felt frustrated with how many nice outfits were categorized in TS3 as everyday, but not outerwear? Wanted your sim to wear the high heels to the pool?
Use the Easy CASP Editor (only works for TS3 versions up to 1.67 though!) to easily change the categories of clothes. You can also hide them in CAS, make valid for random/career and more!
How to do that?
Just open the Easy CASP Editor and in the lower left of the app window you will have a field to choose your CC/EP from:
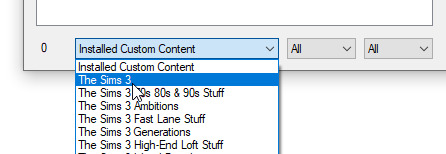
Select where the piece you want to edit is from and find it in the list above. I will pick the jacket from Supernatural, which was only enabled for Everyday/Formal:
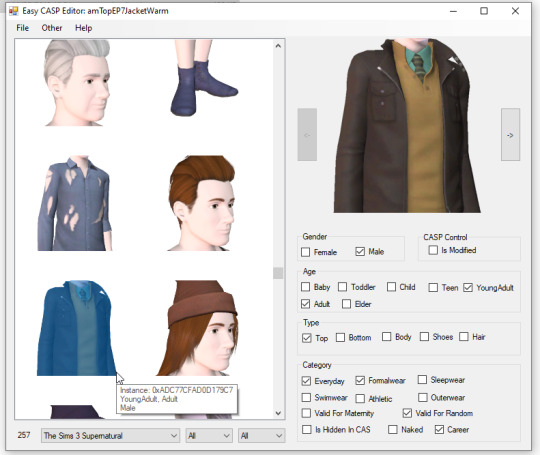
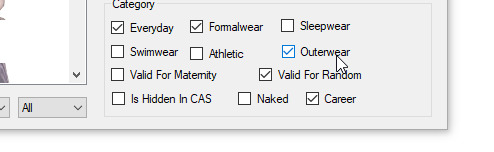
Then, in the menu on the right, click the categories you want the clothing to appear in. NOTE: Pregnant clothes will not have morphs, and checking the other gender or age will *not* convert the clothing or actually enable it for that age.
You can edit as many clothes in one go as you'd like. Then, you just click File -> Save package...
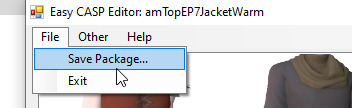
... and it's done!
81 notes
·
View notes
Text

THE SIMS 3 TUTORIAL
HOW TO CREATE DEFAULT REPLACEMENT MOD USING CUSTOM MESH & TEXTURE FOR SIMPLE OBJECT
⚠️ Tumblr has 30 pictures limit, so I cannot include too many pictures. If you want to zoom in the pictures, click the pictures to enlarge, or save the pictures into your PC, zoom the pictures on picture viewer or zoom in the pictures on your mobile phone. ⚠️
----------------------------------------------------
I create this tutorial to make easier to follow because there are older tutorials available before but scattered on internet and usually only say "Export to replace s3asc" without explaining how to export the edited object properly.
My method is using TSR Workshop instead of exporting the object using Sims 3 Object Export/Import plug in because exporting to replace the s3asc using that plug in always giving error notification "ERR: Model has 1 groups; original had 0" and cannot be exported.
For beginners who are very new using s3pe and haven't created default replacement mod before, better start from simple object first.
Simple objects I mean in-game object that has single MODL and single texture with no morphs, no GeoStates, no presets, no CAS colour channels, and easily cloned from OBJD on catalogue. Usually as utensils that Sims holding in their hand, not buy/build objects. For example: Pencil, pan, fork, spoon.
----------------------------------------------------
Tools to prepare:
s3oc
s3pe
Milkshape 3D for bone assignment (Version I use 1.8.5 beta, discontinued by its developer, therefore feel free to download the full version with its license key provided).
Sims 3 Object Export/Import 1.01 by Wesley Howe (Milkshape plug-in. Download msS3ObjPluginsV101.rar )
TSR Workshop (Older version for TS3 only version 2.0.88)
TSR Workshop plug-ins for export.import TSRW Object.
3D Program (Blender/Maya/3dsMax)
Editing images software (Photoshop, make sure you have to install .dds plugin by Nvidia. For free software alternative, you can use GIMP with its .dds plugin)
This tutorial will not teach you how to:
Meshing object ❌
Create alpha texture ❌
Change thumbnails in-game ❌
Install programs and plug-ins ❌
This is how I created Chinese chopsticks replacement mod using custom mesh and texture.
In summary, this tutorial has 10 steps:
Step 1. Clone the Object using s3oc
Step 2. Open S3PE to Copy the Original Resource Code and Export the Files
Step 3. Export the Original Mesh as Base Mesh to .obj format
Step 4. Create Your Custom Mesh
Step 5. Bone Assignment & Create Group
Step 6. Create custom Texture
Step 7. Import the .wso of Edited Mesh on TSR Workshop & Export the package
Step 8. Export MODL file from Package saved from TSR Workshop
Step 9. Finalizing in s3pe & Replacing the Original file with Edited File & Correcting the Code As Same As Default Code
Step 10. Test the CC in your game.
-----------------------------------
✳️ Step 1. Clone the Object using s3oc
Before cloning the object, check the Game Folder for in-game object file location. Settings > Game Folders...
Take a look if the Base Game or Expansion Pack for object file you want to clone is in the right folder. For example, my The Sims 3 game are all bought from Steam, so the location is D:\SteamLibrary\steamapps\common\The Sims 3
If you want to clone object from Expansion Pack, make sure input the folder location. For example, the location for World Adventures EP is D:\SteamLibrary\steamapps\common\The Sims 3\EP1

If you are done, close the pop-up box. You can continue click Cloning then choose Normal Object...
Wait until you get the whole catalogue. Click Search...

For example, I clone object from World Adventures Expansion Pack. You can clone object from Base Game or other Expansion Packs as long it is considered as "utensil" that Sim holding on hand. For example: "Pencil" or "Pan"
Search for text: chopsticks
or if you want to clone object from Base Game, search: utensil
Tick check marks for Resource Name, Object Name, Object Desc then click "Search button"
Search result gives you results with name "chopsticks". Here is the object we are looking for: UtensilChopsticks
We need the OBJD file to clone. OBJD = Object Data.

Click "Clone or Fix" at the right bottom. Then you see the next page to determine if you want to clone with renumber or not. If you want to make default replacement, then do not check the Renumber box. Keep it blank.
Tick check box means the s3oc will generate new resource code for new item. Not tick the check means the s3oc will overwrite the same resource code, it is to replace object you cloned in-game.
I am personally a detailed person, so I usually tick as many as I want: tick "Deep clone" "Missing String Tables" and "Include Thumbnail" to include more details. Then click "Start" to proceed.

It will give you file name [CreatorName]_ObjectName_Number
Then save your package file in "DBPF Package" format in your project folder. Always make folder for any file to make everything organized.
✳️ Step 2. Open S3PE to Copy the Original Resource Code and Export the Files
Open S3pe, locate your package file you cloned from s3oc. Find the MODL of Utensil Chopsticks, Right-Click, "Details..."

On Resource Details, click "Copy TGI" to copy the Resource Code. Type, Group, and Instance will automatically be copied on clipboard. Then open Notepad, Right-Click to "Paste".
Click GRID on bottom of the s3pe (I mark it red on picture), it will give you pop-up box with Data Grid. Click "Resources", it will be highlight blue and there's 3 dots button appeared on the right side. Click the 3 dots button. It will give you TGI Block List Editor.
Inside MODL's TGI Block List Editor only has IMG. You may wondering why, but that's how the game coded. Type, Group, Instance of _IMG inside TGI Block List Editor should be the same as _IMG on the package.
Copy the TGI, Group, Instance to your Notepad.

After you copied code of MODL, do the same for the texture image (_IMG), but only copy the code from Resource Details. You cannot edit TGI Block List Editor for _IMG as the Grid button for _IMG is greyed out.
The main task is the code of your edited mesh and texture should be the same as the code you copied now from original package you cloned with s3oc.
Keep the code on notepad. You will need this code later.
Export the MODL file. Right-Click, "Export to s3asc". The file appears in long string such with name for example: S3_01661233_08000001_B619DB2238C3430B%%+MODL_filebase
Do not rename the file. Save.

Export the texture file. Right-Click "Export > To File..." The file will be saved in .dds format. Do not rename the file. Save.

✳️ Step 3. Export the Original Mesh as Base Mesh to .obj format
Open Milkshape. Import the s3asc file you saved before.
More steps click spoiler tag "Read More / Keep Reading" below
File > Import > Sims 3 Object Import v 1.01 by Wesley Howe

Locate the s3asc file, then the original chopsticks mesh appears.
Click the "Joints" tab. It has 4 codes. Check box "Draw vertices with bone colors" It will show Bone Assignment colors on the original mesh. Yellow on top chopstick and light blue on bottom chopstick. The colours are to make the object has rig and movement following the Sim's interaction.

Take a look at the 4 codes on Joints Tab. You can play around to see which colour of the code will appear, after that copy paste the code to Notepad to make it easier to comprehend.
Click Select from Tools menu, Select Options: Face. On "Right/Left/Top/Bottom 2D View", Left-click make selection of one part of chopsticks. While the part of object being selected (Red), click Joints then Choose "Assign".
0x96239247 --> Yellow 0xFEAE6981 --> Purple 0xCD68F001 --> Light Blue 0xD0DECA8E --> Red
Your edited mesh must have the exact same Bone Assignment colour later. Check again if the code and colour are correct.

You can save object mesh as .obj to other 3D software such as Blender or any other 3D software.
✳️ Step 4. Create Your Custom Mesh
Use the original .obj as base model. While you can create longer mesh or any edited version as you wish.
Make sure the scale and position of the edited mesh is same as base original mesh, because the edited mesh will be used on Sim's hand.

If you are done editing the mesh, export the UVmap.
You can export the uvmap in higher resolution, as long as it is Power of 2. 64x64, 128x128, 256x256, 512x512, 1024x1024, 2048x2048, 4096x4096. I export in 1024x1024 pixels to make the size of texture larger and have more details.
Then export the mesh object in .obj format.
✳️ Step 5. Bone Assignment & Create Group
Open Milkshape. Import the original mesh.
Check the Groups Tab. Original mesh has 1 group, "group 00". Group 00 means it is the main mesh. There is no shadow beneath the object.

Import the edited mesh as .obj file.

My edited mesh has one single name "default" name on the Group Tab. While edited mesh may have a lot of file name scattered on Group Tab. Regroup the file name to simplify your edited mesh into one single name. Select > Regroup.
The main task is replacing the EA's original mesh with your edited mesh.
Before you delete anything, you must do Bone Assignment first to the edited mesh you created.
Your edited mesh does not have Bone Assignment, so it appears white.
Remember the 4 codes you copied earlier in Notepad.

Copy Bone Assignment from original mesh to your edited mesh.
This case, your want to Bone Assign Yellow colour.
Select > Face to select one part of chopsticks of your edited mesh. On Joints Tab, double click the appropriate code 0x96239247 in blue highlight then the code box on the right side of "Rename" will appear 0x96239247. Make sure the code is correct. Then you can click "Assign".

Your edited mesh will appear in Yellow colour. Then do the same for another part of chopsticks.
Select another part of chopsticks of your edited mesh. On Joints Tab, double click the appropriate code 0xCD68F001 in blue highlight then the code box on the right side of "Rename" will appear 0xCD68F001. Click "Assign".

Your edited mesh will appear in Light Blue colour.
Then what's the other code for? With colour purple and red?
Leave them. Let the codes have the same exact codes as appear in original mesh and let the colours only assigned Yellow and Light Blue. The colours are to determine rig for interaction in-game, which only use Yellow as upper part of chopstick and Light Blue as bottom part of chopstick.
You can safely delete the original mesh with name group00 until it remains your only your edited mesh.

Rename your edited mesh to group00. Type group00 on the box then click "Rename" on the left side.

Export to TSRW Object in .wso format. .wso is format with bone assignment on object attached.

Save your .wso in your project folder.
✳️ Step 6. Create custom Texture
Import original texture you exported from s3pe to your editing image software.
Look at the original texture made by EA. 32x64 pixels. It is very low resolution, blurry and stretched, because the texture should be compressed as low as possible by game designer. As player you want it has higher detail to look realistic as possible and your PC of course can handle high resolution content, sure you can make the resolution much higher than EA's.

Import the UVMap you saved from 3D software. For example, UVmap I imported has 1024x1024 resolution. Add your custom texture. Then save it to .dds format in the same name as original texture. Save in separate folder, name it "Edited Texture" to keep it separated from original texture.
✳️ Step 7. Import the .wso of Edited Mesh on TSR Workshop & Export the package
Open your TSR Workshop.
Create New Project > New Import >Next...

Then Browse original mesh by EA in package format in your project folder.
On Open file box, you cannot see .package file because the filter is .wrk (TSR Workshop Project). Choose the .package dropdown.

Then you can see .package file.
Open the .package. After the file is located, then Next. On Project Details I usually skip without giving name of Project Name and Title. Next.
You must have seen green land with white blank sky.
Where's the mesh? It is actually there... just being zoomed in too close. You need to zoom out by scrolling down mouse.
You can see the original chopsticks mesh by EA. You can save the project file in .wrk format. After you save the file, import the .wso of your edited mesh. Mesh tab > High Level detail. Click green arrow folder icon to import. Then your edited mesh will appear replacing the original EA mesh.

As you see, the texture is messed up because the texture is still using original EA's texture. But then you check Textures tab and it has blank dropdown...
I cannot change the texture on this TSR Workshop!
Don't worry, we can replace the texture on s3pe later.
No need to change anything other than importing mesh. Click Edit > Project Contents to save as package.
You will see pop up box with number or files DDS, FTPT, LITE, MODL, OBJD, OBJK, etc. Export > To. package. Give name such as "EditedChopsticks_TSRW"

✳️ Step 8. Export MODL file from Package saved from TSR Workshop
Open S3PE, File > Open package "EditedChopticks_TSRW" that you saved from TSR Workshop.
Export MODL. Right-Click, export. It gives you file name with [StringOfNumber] .model .
Save it on project folder. Keep it organized and separated from original MODL. Name the folder "Edited MODL". Do not rename the file.
✳️ Step 9. Finalizing in s3pe & Replacing the Original file with Edited File & Correcting the Code As Same As Default Code
Open s3pe, File > Open original package that you cloned from s3oc. [CreatorName]_ObjectName_Number
Find the MODL. Right-Click > Replace...
Locate to your edited MODL with filename .model .
Then click Open.
The original MODL of the package should be replaced with your edited mesh.
Do the same for the texture.
Locate to your edited texture with filename .dds
Then click Open.
The original texture of the package should be replaced with your edited texture.
Take a look at MODL's Type, Group, Instance. It has the same code as original MODL in the original package cloned with s3oc (because it has been replaced)
Don't forget to see the code inside TGI Block List Editor.
Repeat step 2 how to check the code. Right-Click on MODL/IMG > Details... and click GRID > Resources > TGI Block List Editor.
The Type, Group, Instance of the _IMG are different compared from IMG from original package clone, which means that is the evidence of edited mesh replaced the original.
Rename the Instance with default/original Instance you copied on notepad from Step 2. Type, Group, Instance should be the same as default/original Type, Group, Instance.

Open notepad with resource code you copied from Step 2. Make sure the Type, Group, and Instance are all the same.
If the codes are the same, then your edited mesh and texture will overwrite the default mesh and texture with the same code in the game. Save, Commit, Save the package.
Check again if the texture is replaced properly. Right-Click on _IMG > ViewDDS.
ALTERNATIVES!
Yes, you can delete unwanted files in your edited package, to keep the package clean. Simply Right-Click>Deleted.
The only files needed in package are: MODL, _IMG, _KEY
They are the only files with your edited mesh/texture including codes to overwrite the default codes.
You can Start new fresh blank s3pe. Right-Click>Import from file...
Locate your edited MODL and _IMG (texture) file.
On Resource Details box, tick mark "Use resource name" > OK.
Make sure all the Type, Group, and Instance of MODL and _IMG including in the TGI Block List Editor are all the same as the code in original package.

Save the package.
✳️ Step 10. Test the CC in your game.
Put the package to your CC folder in your The Sims 3 document folder to see if the CC is working or not.
If the CC is working as your intended, with your custom mesh and texture, then test the animation. Are the chopsticks animation working as the same as original EA's? If the animation are working well too, then congratulations!

Your default replacement are working. Give applause to yourself. 👏
-------------------------------------
QUESTIONS!
Q:
Can I use this tutorial for making default replacement for buy/build object?
A: This tutorial covers basic method of using TSR Workshop and replacing the default codes (Type, Group, Instance), so you will understand the basic principle of doing default replacement mod.
Keep in mind that different object has different case. Buy / build object has MLOD (not just MODL) more than one, texture images more than one, has presets, and CAStable colour channels.
The TGI Block List Editor for buy/build object has a lot of codes, so have to spend a lot of time to do trial-and-error to make the default replacement working properly, because a lot of times the texture doesn't work (still using default EA's texture), or when the object appears right with your edited mesh and texture, after you choose the presets, the object reverts back to your edited mesh with default EA's texture.
Q:
Help! The texture is black! / still using same EA's texture when tested in the game!
A: The texture codes must be not the same. Check the Type, Group, Instance of _IMG. Do the codes are the same like codes in original package? Check the TGI Block List Editor for MODL, is the _IMG inside has the same Type, Group, Instance as in original package.
Q:
Help! The object disappears when tested in the game!
A: You must be replacing OBJD in your package. Do not replace OBJD. Just MODL and texture only.
#tutorial#the sims 3#the sims 3 tutorial#thebleedingwoodland#the sims 3 default replacement mod#modding#s3pe#s30c#TSR Workshop
120 notes
·
View notes
Text
😭Before HQ Mod ✨After HQ Mod
(High Graphics) (Very High Graphics)
Both of these picture are taken INGAME with gshade, relight, lighting mod etc.
Not the before even looking less confident (it was unintentional) 😂
Notice how the hair is blurry, as well as the makeup. The nails were also invisible...
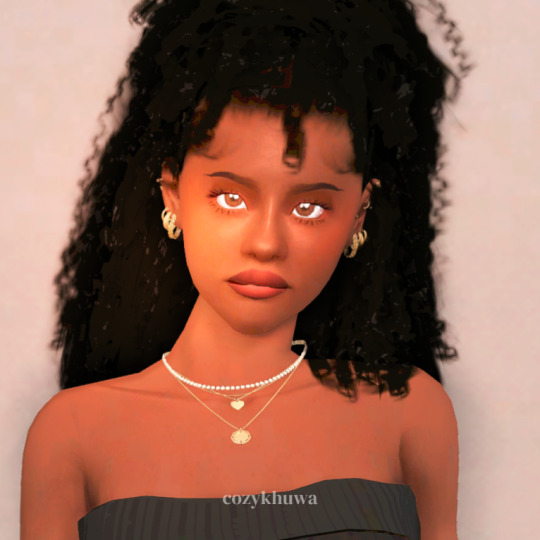
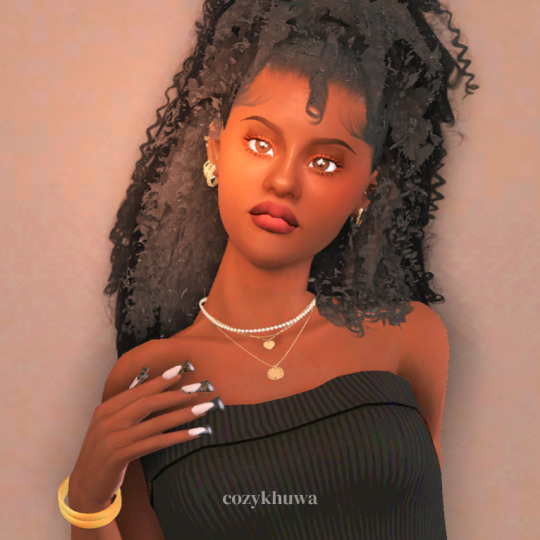
I always wondered why my sims in game don't look as crisp and amazing as they do in CAS, also the makeup either didn't show up or looked totally different... Turns out the graphics in CAS are set to 2k and the high graphics in game are 1k😩 I fixed that with the help of Frankie's ( @sims3tutorialhub ) tutorial on how to make your own HQ Mod, I'm now 100% in love chile!
#ts3#the sims 3#sims 3#sims 3 simblr#thesims3#sims 3 screenshots#ts3 screenshots#Sims 3 hq mod#sims 3 tutorial#Sims 3 gshade#cozykhuwa sims 3 screenshots#cozykhuwa
28 notes
·
View notes
Text
TS3 Custom Interaction Tutorial
I've just finished posting my new tutorial on MTS here! The tutorial shows how to make a custom interaction from start to finish for sims to wave at other sims, so hopefully it should be easy to follow and maybe you can become a new script modder! 😄
128 notes
·
View notes
Text
Guide to making Autosoils
First you are going to need to download a copy of douglasveiga's Autosoil_test.package which you can find here.
Once you have that, the first step is to clone it. I followed this tutorial, which I find to be super easy and it creates STBL's so the autosoil can be translated if desired.
Now you have your new cloned package. The next thing you will need is the Ingredient Key from the Ingredient.xml from whichever mod you are making the autosoil for. I will use Echoweaver's Wheat as a demonstration, hopefully that's okay.
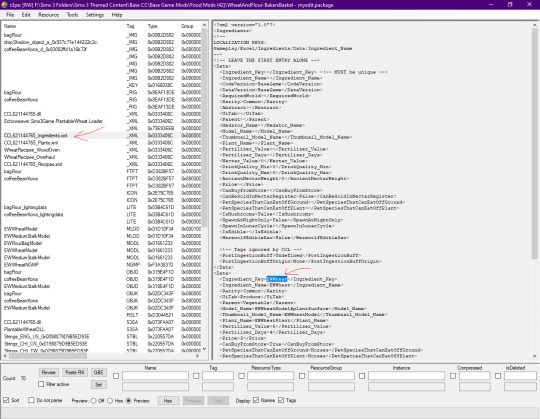
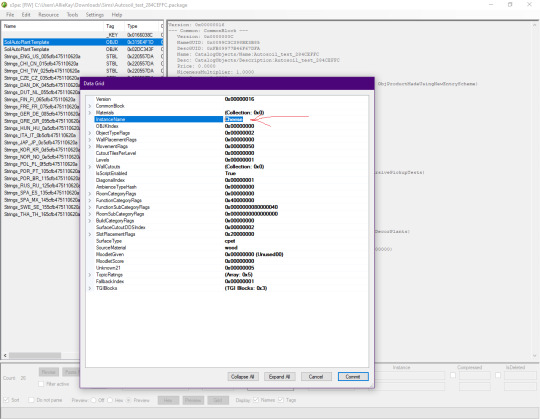
Open the cloned autosoil package and open the OBJD in Grid.
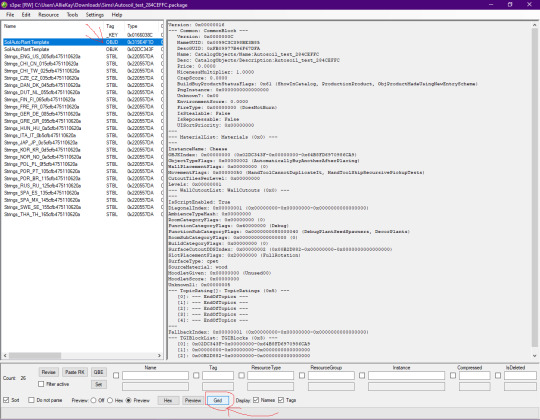
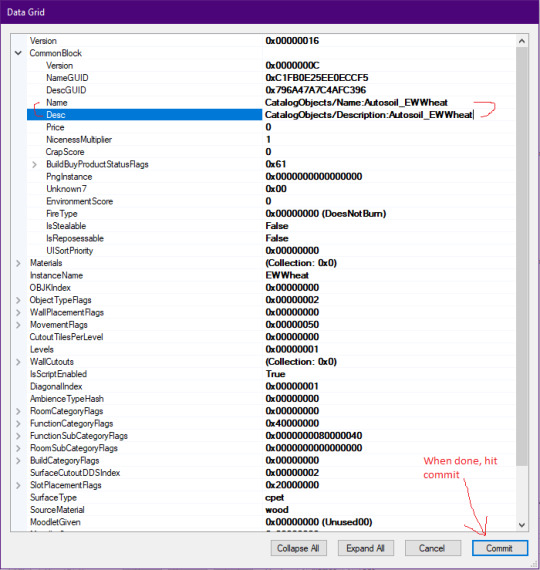
Replace the Instance Name (which should say Cheese currently) with the Ingredient Key name you copied. Next open the Common Block section.
Here you can edit the Name and Description of the package. Press Commit when done.
Now, if you wish, you can also edit the STBLs. Personally, I only edit the English one. I decided here to follow the formatting of the other Autosoils in game. For the first line I enter "Auto Soil: Wheat" and the second line I put "EWWheat". But it's totally up to you how you name it. Save you package and change the name to whatever you want to call it. That's it.
22 notes
·
View notes
Text
TS3: How to remove white circle around the eyes of werewolf sim
I faced this issue and found only few pieces of information about it, so I decided to write a quick note about.
While playing my werewolf lady I noticed that her eyes have extra white circle around the iris. This effect wasn't reproduced for non-werewolf sims.
Also this effect didn't occur for default EA eyes, it appeared after I installed default replacement.
How it looked in game (left sim):


After poking Google I found some threads that stated that werewolves have a bit (~15%) bigger iris. That's why eye replacement doesn't cover their iris fully and additional white space is displayed for missing part.
So there are two ways to resolve it:
To install the eye replacements with bigger iris that could cover that white ring.
To install the eye mesh replacement to clear what's left of EA default eyes.
I didn't want the bigger iris, so I chose option 2. I installed Eyeball Replacement by aWT and it worked. The ring disappeared, my werewolves could make selfies again!
After installing the aWT Eyeball replacement:

As one can notice, another eyes replacement (BrntWaffles Yumedust Eye Love Default Eyes v2, IIRC) is installed here, but it doesn't really matter. The solution should work no matter of what eye replacement is installed.
#sims 3#ts3#sims 3 mods#the sims 3#sims 3 techical#simblr#sims 3 cc#sims 3 gameplay#sims 3 guide#ts3 tutorial
92 notes
·
View notes
Text

Morph Madness!
Fixing Exploding Morphs
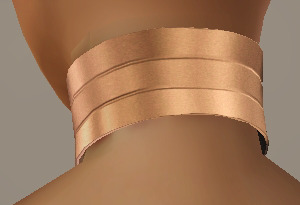
Marik's Egyptian Choker is currently in production. It is the first accessory I've made that involves assignment to more than one bone and morphs for fat, fit and thin states. So there is a learning curve, and it is during that learning curve that interesting and unexpected things can happen.
As with my other content, I'm making the choker fit sims of all ages and genders--that's 8 different bodies.
Adding fat, fit and thin morphs multiples this number to 27 different bodies.
I'm also making 3 levels of detail for each of these. The number comes to 81 different bodies, 81 different bodies for which I need to tightly fit a cylinder around the neck and avoid clipping.
That's a lot of work. I can see why most custom content creators stick with one age, gender and detail level. At least, they did in the past. Our tools are getting better day by day, and that may partly be because of creative, ambitious and somewhat obsessive people like me.
There are usually multiple ways to solve the same problem. Some ways are faster than others. This I've learned from working in Blender3D. You can navigate to a button with your mouse or hit the keyboard shortcut. You can use proportional editing to fiddle around with a mesh or you can use a combination of modifiers.
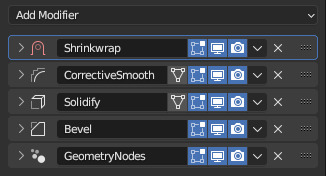
If I am going to be creating 81 chokers, I don't want to be fiddling around on each one of them for an hour. I need something automated, repeatable and non-destructive so I can make adjustments later without having to start over from the beginning. I need to work smart rather than just work hard.
This is where modifiers and geometry nodes come in. After you develop a stack to work with one body, the same process pretty much works for the others as well. That is how it became easier for me to model each of the 81 chokers from scratch rather than to use proportional editing to fit a copy from one body to the next.
But I was about to confront an explosive problem…
Anyone who has worked with morphs before probably knows where this story is headed. There is a good reason to copy the base mesh and then use proportional editing to refit it to the fat, fit and thin bodies. That reason has to do with vertex index numbers.
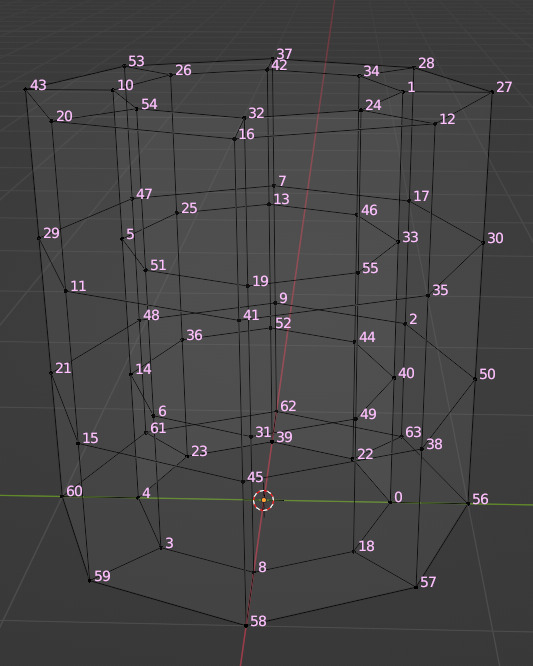
You see, every vertex in your mesh has a number assigned to it so that the computer can keep track of it. Normally, the order of these numbers doesn't really matter much. I had never even thought about them before I loaded my base mesh and morphs into TSRW, touched those sliders to drag between morph states, and watched my mesh disintegrate into a mess of jagged, black fangs.
A morph is made up of directions for each vertex in a mesh on where to go if the sim is fat or thin or fit. The vertex index number determines which vertex gets which set of directions. If the vertices of your base mesh are numbered differently than the vertices of your morph, the wrong directions are sent to the vertices, and they end up going everywhere but the right places.
It is morph madness!
When a base mesh is copied and then the vertices are just nudged around with proportional editing, the numbering remains the same. When you make each morph from scratch, the numbering varies widely.
How, then, could I get each one of those 81 meshes to be numbered in exactly the same way?
Their structures and UV maps were the same, but their size and proportions varied a lot from body to body. Furthermore, I'd used the Edge Split modifier to sharpen edges, which results in disconnected geometry and double vertices.
Sorting the elements with native functions did not yield uniform results because of the varying proportions.
The Blender Add-On by bartoszstyperek called Copy Verts Ids presented a possible solution, but it was bewildered by the disconnected geometry and gave unpredictable results.
Fix your SHAPE KEYS! - Blender 2.8 tutorial by Danny Mac 3D
I had an idea of how I wanted the vertices to be numbered, ascending along one edge ring at a time, but short of selecting one vertex at a time and sending it to the end of the stack with the native Sort Elements > Selected function, there was no way to do this.
Of course, selecting 27,216 vertices one-at-a-time was even more unacceptable to me than the idea of fiddling with 81 meshes in proportional editing mode.
So… I decided to learn how to script an Add-On for Blender and create the tool I needed myself.
A week and 447 polished lines of code later, I had this satisfying button to press that would fix my problem.

Here are the index numbers before and after pressing that wonderful button.
My morphs are not exploding anymore, and I am so happy I didn't give up on this project or give myself carpal tunnel syndrome with hours of fiddling.
Marik's Egyptian Choker is coming along nicely now. I haven't avoided fiddling entirely, but now it only involves resizing to fix clipping issues during animation.
Unfortunately, I'll have to push the release date to next month, but now, I have developed my first Blender Add-On and maybe, after a bit more testing, it could be as useful to other creators in the community as its been to me.
Looking for more info about morphing problems? See this post.
See more of my work: Check out my archive.
Join me on my journey: Follow me on tumblr.
Support my creative life: Buy me a coffee on KoFi.
#exploding#morph#mesh#sims 3#cc#custom content#tutorial#C:O#SallyCompaq122#mod the sims#cc creator#art process#blender#3d#add on#shape keys#sort#vertex#index#blendercommunity
86 notes
·
View notes
Text
youtube
The Sim FM's Create TV Channels Tutorial
So, some time ago, I saw this amazing step-by-step tutorial on YouTube about how to add custom made TV stations to the Sims 3 using your own videos. I'm really surprised that this didn't blow up, because I'm sure this is something that so many people have wanted to do for such a long time but didn't know how to do.
Warning: it's a fairly involved process requiring three separate programs, but I think it's not only worth it, but that it'll become second nature and easier to do the more you do it. At any rate, check it out now!
10 notes
·
View notes
Text

I had a bit of time this evening so I've made a page full of all my NRAAS settings if you're interested!
If I've not listed a setting under a mod, it's because I've just left it as it's default :)
I hope that it's helpful for anyone who wants to know how I play <3
48 notes
·
View notes
Text
youtube
Será que achei um mod melhor que o CC Magic??
Oi oi oi, muito bom dia, boa tarde, boa noite!
Se você acha que já encontrou o melhor mod do mundo para organizar seus mods no The Sims 3 quando começou a usar o CC Magic e que nada poderia ser mais game changer, prepare-se para uma surpresa! Hoje, vou apresentar o Sims 3 Mod Organizer – um mod que pode revolucionar ainda mais a forma como você gerencia seus conteúdos personalizados, potencializando a performance do seu jogo, identificando conflitos automaticamente e facilitando a compactação dos arquivos.
Neste artigo, vamos explorar em detalhes como instalar, configurar e usar esse mod incrível. Além disso, vou te mostrar como integrá-lo como CC Magic. E claro, não se esqueça de conferir o vídeo que acompanha este tutorial, com mais dicas visuais e práticas. AQUI
Então, se você está pronto para levar sua experiência no The Sims 3 a um novo patamar, venha comigo e descubra se o Sims 3 Mod Organizer é realmente o melhor que já vimos e tenho depoimentos para provar!

Instalando o Sims 3 Mod Organizer
Acesse a página do mod no Mod The Sims AQUI
Navegue até a aba de downloads
Faça o download do arquivo "s3mo v1.0.0.zip"

4. Após o download, extraia o arquivo .exe para uma pasta de sua escolha. Podendo ser até em um drive externo. Recomendo criar uma nova pasta dedicada exclusivamente a mods de suporte e, dentro dela, criar uma subpasta chamada "S3MO". Em seguida, extraia todos os arquivos para essa subpasta.

Executando a Primeira Vez
Abra o arquivo s3mo.exe na pasta extraída
Ao executar o mod pela primeira vez, será necessário indicar o local do executável do The Sims 3 (TS3W.exe). Para isso, navegue até a pasta onde o jogo está instalado, que geralmente é:
C:\Arquivos de Programas\EA Games\The Sims 3\Game\Bin.
Configurações Iniciais
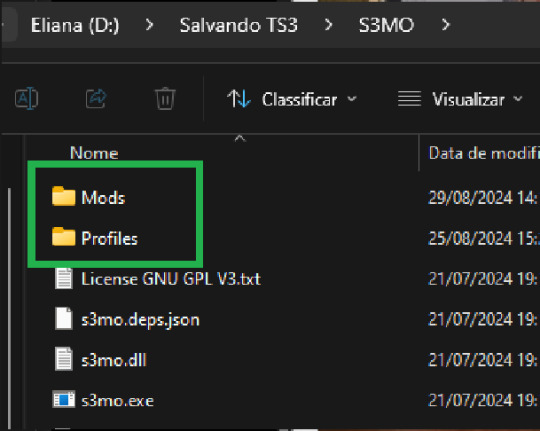
Na primeira execução do Sims 3 Mod Organizer, o mod criará automaticamente duas pastas importantes dentro do diretório onde foi extraído:
Pasta Mods: Esta é a pasta onde todos os seus mods e conteúdos personalizados serão instalados e organizados.
Pasta Profiles: Aqui serão armazenadas as informações dos perfis que você criar, permitindo que você tenha diferentes configurações de mods para diferentes estilos de jogo.
Essas pastas ajudam a manter tudo organizado e facilitam o gerenciamento dos seus conteúdos personalizados no The Sims 3.
Entendendo a Interface do Mod Organizer
A interface do Mod Organizer é simples e prática, com vários botões que você pode usar para gerenciar seus mods:

Info: Botão para acessar informações adicionais sobre o mod.
Install: Não é necessário para o uso diário. Serve caso queira instalar conteúdos que você ainda não colocou diretamente
Settings: Onde você ajusta as preferências do mod.
Profiles: Permite criar diferentes perfis de mods, como "Overrides", "Packages", "CAS", etc.
Folder: Possibilita abrir diretamente as pastas do jogo, de documentos e as pastas do mod
Clean: promove a limpeza dos caches e arquivos conforme configurado em Settings
Refresh: Atualiza a visualização das pastas.
Build: Esse botão é essencial, pois sempre que você fizer alterações, será necessário reconstruir sua pasta de mods.
Configurando o Mod Organizer
Configurações Básicas:
Acesse Settings ⚙️ e defina suas preferências
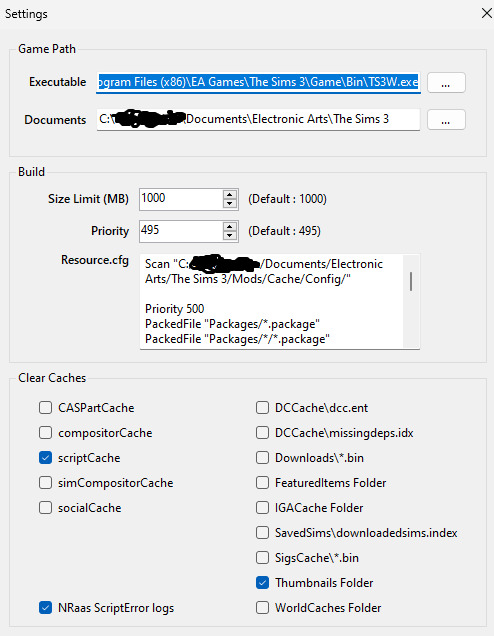
Build:
Size Limite: Tamanho máximo dos arquivos gerados. O padrão é 1000 MB (1 GB).
Priority: Prioridade dos arquivos compactados pelo mod. Por padrão, vem configurado em 495, o que significa que terá uma prioridade inferior às pastas Package e Overrides.
Clear Caches: selecione quais arquivos serão deletados pelo mod quando clicar no botão Clean.
ScriptCache: Recomendo deixar apenas o scriptcache selecionado, pois os caches ajudam o jogo a carregar mais rápido.
NRAAS Script Errors: Também pode ser uma boa ideia selecionar essa opção para remover erros de script específicos do NRAAS.
Use a imagem acima como referência para configurar suas preferências.
Organizando o Conteúdo Dentro do S3MO
Vamos deixar tudo organizadinho dentro do S3MO? 😊
Na pasta "Mods" criada pelo mod e localizada na pasta de instalação dele, você pode criar quantas pastas quiser para armazenar seus conteúdos personalizados. É aqui que você vai organizar seus arquivos, então é importante lembrar da regrinha: as pastas só podem ir um nível abaixo. Isso significa que você deve criar as pastas diretamente na pasta "principal "Mods" e não dentro de outras subpastas.

Ou seja:
👍S3MO\Mods\Sua Pasta
❌S3MO\Mods\Sua Pasta\Subpasta ❌
Depois de criar todas as suas pastas, é só abrir o S3MO ou clicar em Refresh para atualizar. As pastinhas que você criou vão aparecer na área "Mods" na área de trabalho do mod.
Essas pastas são as que você vai associar aos seus perfis, mantendo tudo organizado e fácil de acessar conforme você personaliza o jogo.
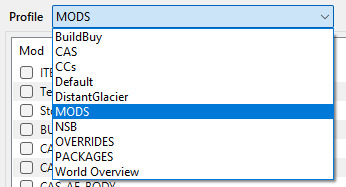
Criando Perfis
Uma das funcionalidades mais legais do Sims 3 Mod Organizer é a capacidade de criar perfis personalizados para diferentes configurações de mods. Não há limites para a quantidade de perfis que você pode criar, então sinta-se à vontade para configurar quantos perfis desejar, de acordo com suas necessidades.
Como o próprio g0kur diz: "Different profiles for different mod setup".
Isso significa que você pode criar perfis específicos para cada objetivo que tiver no jogo, por exemplo:
Jogos Diferentes: Crie um perfil para cada desafio ou estilo de jogo, como "NSB" (Not So Berry) ou "Legacy". Assim, você pode habilitar apenas os mods necessários para cada um deles, mantendo seu jogo mais organizado e eficiente.
Mods Específicos: Você pode ter um perfil dedicado a mods de construção, outro para mods de gameplay, outro só para conteúdos personalizados, e assim por diante. Isso facilita o gerenciamento e a ativação de mods específicos conforme o que você pretende fazer em cada sessão de jogo.
A flexibilidade oferecida pelo Mod Organizer permite que você adapte sua experiência no The Sims 3 de maneira personalizada, garantindo que você tenha sempre o ambiente perfeito para o seu estilo de jogo.
Para criar novos perfis, clique no botão Profiles e, em seguida, em Add. Dê um nome ao seu perfil e clique em OK. Pronto! Agora, basta selecionar quais conteúdos serão associados a este perfil.

Associando conteúdos aos Perfis
No menu suspenso, escolha o perfil que você quer configurar.
Depois, é só selecionar as pastas de conteúdos que você quer associar a esse perfil. Isso significa que, toda vez que você estiver usando esse perfil e clicar em "Build", apenas os arquivos das pastas que você escolheu vão ser considerados para análise de conflitos e compactação.
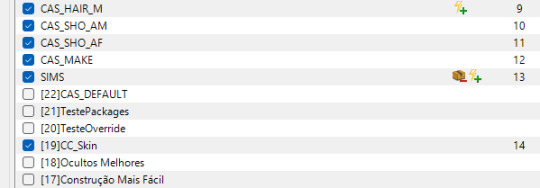
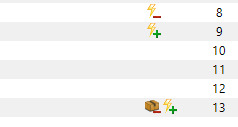
As pastas que estiverem com o quadradinho azul estão selecionadas para esse perfil, enquanto as outras não. Conforme você vai selecionando as pastas, o S3MO vai automaticamente atribuindo prioridades a elas.
Importante: As pastas que estão mais para baixo na lista têm uma prioridade maior sobre as que estão mais em cima. Ou seja, o que estiver mais embaixo vai sobrescrever o que está acima. Pense assim: o que está embaixo (com número de prioridade alto) sobrescreve o que está em cima (com número de prioridade baixo), e tudo vai fazer sentido. E faz mesmo! 😄
Identificando os conflitos
Aqui o negócio começa a ficar legal! Foi exatamente isso que me fez migrar totalmente para o S3MO: identificação de conflitos de uma maneira clara, visual e amigável.
Raio com (+): Isso significa que este mod (ou pasta) está sobrescrevendo outro conteúdo neste perfil. Em outras palavras, o que estiver aqui vai "ganhar" a prioridade e ser usado no jogo.
Raio com (-): Esse símbolo indica que este mod (ou pasta) está sendo sobrescrito por outro conteúdo. Ou seja, ele "perde" a prioridade e não será usado.
Raio com (+/-): Este é um pouco mais complexo, pois significa que parte do conteúdo está sendo sobrescrita e outra parte está sobrescrevendo algo. Então, é um mix dos dois cenários acima.
Caixinha: Quando você vê uma caixinha, isso quer dizer que existe um conflito entre mods dentro da mesma pasta.
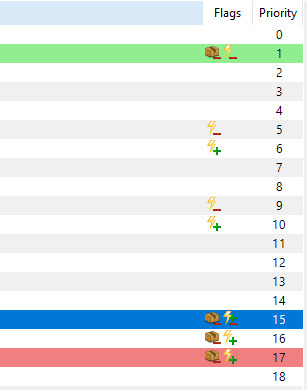
Além disso, quando você seleciona uma dessas linhas marcadas com conflito, o S3MO destaca outras linhas relacionadas, seguindo esta regra:
Vermelho: O mod ou conteúdo que está sobrescrevendo outro (ou seja, é o "vencedor" no conflito).
Verde: O mod ou conteúdo que está sendo sobrescrito (o "perdedor" no conflito).
Se você der um duplo clique na linha marcada com conflito, o S3MO abre uma tela específica para te ajudar a identificar os detalhes do conflito.
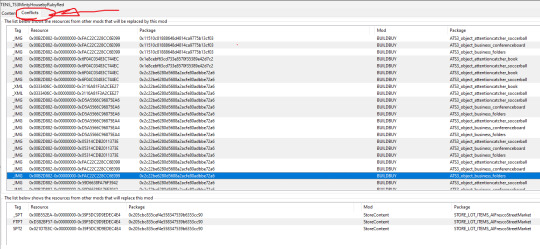
Nessa tela, a parte de cima mostra quais mods estão sendo sobrescritos, e a parte de baixo mostra por qual mod eles estão sendo sobrescritos.
Com essas ferramentas visuais, o S3MO torna muito mais fácil entender e resolver conflitos entre seus mods, garantindo que tudo funcione direitinho no seu jogo. É como ter um assistente pessoal que te alerta sobre qualquer problema e te dá as ferramentas para resolvê-lo rapidinho!
Particularmente, acho essa forma de mostrar os conflitos muito mais amigável que a forma que o Dashboard mostra isso 😅
Compactando TUDO! - Mods inclusive
Para compactar, é super simples: selecione o perfil que você quer e clique no botão "Build"🔨.
Todos os arquivos, mods e conteúdos personalizados vão ser compactados e salvos na pasta:
C:\My Documents\Electronic Arts\The Sims 3\Mods\ModBuilds\
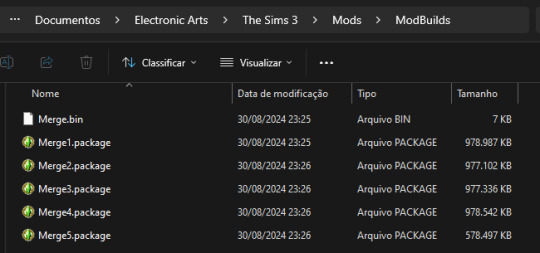
O S3MO cuida de tudo e divide os arquivos em quantos forem necessários, para garantir que nenhum deles ultrapasse o limite configurado (1000Mb). Prático, né?
Adicionando novos mods e Cps
Para adicionar novos conteúdos e mods, uma vez que já tenha conteúdo compactado, basta colocar o conteúdo que deseja adicionar na pasta correta em
Usando o Mod Organizer com CC Magic
Se você já utiliza o CC Magic e depende bastante da funcionalidade de Coleções desse mod, pode não ser interessante migrar completamente para o S3MO. Nesse caso, uma ótima alternativa é usar ambos os mods em conjunto.
Para que essa integração funcione corretamente, é essencial que, ao reconstruir o conteúdo do jogo, tanto o S3MO quanto o CC Magic gerem um arquivo Resource.cfg que permita ao jogo reconhecer e ler os arquivos compactados por ambos os mods.
Em outras palavras, o S3MO precisa incluir as informações do CC Magic, e o CC Magic deve conter as informações do S3MO no arquivo Resource.cfg. Dessa forma, você garante que o jogo funcione corretamente com as configurações de ambos os mods.
Informações a serem acrescentadas no S3MO
Clique no botão Settings.
Na área Build > Resource.cfg, inclua as seguintes linhas:
Scan "C:/My Documents/Electronic Arts/The Sims 3/Mods/Cache/Config/" Priority 500 PackedFile “Packages/*.package” PackedFile “Packages/*/*.package” PackedFile “Packages/*/*/*.package” PackedFile “Packages/*/*/*/*.package” PackedFile “Packages/*/*/*/*/*.package” Priority 500 PackedFile ../Collections/User/*.package
Informações a serem acrescentadas no CC Magic
Navegue até a aba Options.
Em Additional Resource.cfg Entries, inclua as seguintes linhas:
Priority 495 PackedFile "ModBuilds/*.package" Priority 500 PackedFile ../Collections/User/*.package
Pronto! Agora, seu jogo será capaz de ler os arquivos gerados por ambos os mods, bem como as Coleções criadas no CC Magic.
Considerações Finais
Depois de usar o CC Magic por um bom tempo, descobri que o S3MO faz um trabalho muito melhor para o que eu preciso. Aqui estão os principais motivos que me fizeram migrar de vez para o Sims 3 Mod Organizer:
Confiabilidade: Com o S3MO, tudo o que eu compacto aparece no jogo sem problema algum. Diferente do CC Magic, onde eu sempre acabava com conteúdos que não apareciam, mesmo estando habilitados.
Velocidade: O S3MO é bem mais rápido na hora de compactar os arquivos.
Gerenciamento de Conflitos: A interface do S3MO facilita muito a vida na hora de lidar com conflitos entre mods. Isso praticamente me fez abandonar o dashboard.
Perfis Personalizados: A possibilidade de criar perfis para diferentes configurações de mods é uma das coisas que mais gosto no S3MO. Isso me ajuda a manter tudo organizado e fácil de acessar, dependendo do tipo de jogo que eu quero jogar.
Organização e Gerenciamento: O S3MO torna a organização e o gerenciamento dos mods muito mais simples. Tudo fica no lugar certo, sem duplicatas, e meu jogo roda liso.
Esses foram os motivos que me fizeram deixar o CC Magic de lado e migrar de vez para o S3MO. Se você também está procurando uma solução mais completa e prática para gerenciar seus mods, recomendo fortemente dar uma chance ao S3MO. Pode ser o que você estava precisando para transformar sua experiência no The Sims 3!
Eu sei que existe pouquíssimo material referente a este mod, então, qualquer dúvida, pode deixar aqui, ou melhor ainda seria no comentário do meu vídeo, porque é mais fácil de eu ver kkk
Mas é isso, espero que tenha gostado.
Beijos
FUI!
#ts3 mods#the sims 3#ts3 tutorial#sims3 mod organizer#s3mo#melhor que cc magic#better than cc magic#Youtube
12 notes
·
View notes
Text
My new build video is live!! Would you like to learn how to make raised garden beds? Come and check it out 😁
#youtube#the sims 3#mods#remastered#version 5#default replacements#the washburn edition#golden ennina#mod list#ts3#how to#build video#tutorial#garden#gardening#planters
7 notes
·
View notes
Text
You wouldn’t last an hour in the asylum where they raised me (the sims 1&2. And I’m talking to people who have only played ts4)
#sims 3 enjoyers you can perhaps also relate to this. i really genuinely don’t know#i didn’t like the look of ts3 so i never really played it#my quarrel with ts4 players is when they whinge about not being able to do some esoteric building thing#and i’m like girl. i can’t even set different heights on different parts of my roof#(they did change that in mansions and gardens but i don’t have m&g because i have a mac 🫠)#or when they’re casually building basements and i’m like you need to use an extremely specific cheat to do basements in ts2#and if you don’t absolutely nail it; your basement will be full of water. there are tutorials on this#the one that really gets me though is the pathing#i know sims can still experience pathing errors and inaccessible shit in ts4 but it’s SO much worse in ts2#i don’t even try building a kitchen without at least 2 empty counters because the motherfuckers will leave plates on there and decide it#means that they can’t cook#also gets me when i see people ✨building a tiny house in the sims 4✨ and i’m like that wouldn’t even be CLOSE to functional in ts2#i had to download a mod just to be able to use bunk beds#cluttering surfaces? forget it. you need to use a system of invisible shelves#earlier my sim couldn’t get in her shower because there was a counter next to it. NEXT TO it. not in front of it#they have zero ability to step over plates; baby bottles; teddy bears or any other inconsequential item#they have dance parties in the bathroom#genuinely the game of all time. wouldn’t play any other simulation#personal
19 notes
·
View notes
Text

THE SIMS 3 TUTORIAL
HOW TO CREATE CUSTOM FOOD DEFAULT REPLACEMENT MOD USING CUSTOM MESH & WORKING GEOSTATES (FULL, HALF, EMPTY)
This is default replacement replacing existing food in Base Game or Expansion Packs using EA's recipe and custom mesh & texture. If you are not satisfied with EA's existing mesh and texture, sure you can replace them with this easy-to-follow tutorial with pictures explained one by one. No custom recipe, no CCLoader, no scripting.
This is how I created Authentic Chinese Spring Rolls Replacement Mod using custom mesh and texture.

----------------------------------------------------
This tutorial is for intermediate, which means already know the basic principle of doing default replacement mod.
If you are beginner, haven't tried default replacement mod mesh & texture before, recommended to try the Default Replacement Tutorial for Simple Object first. TSRW Workshop, Milkshape, etc. Tools to prepare on that tutorial as well.
----------------------------------------------------
I created this tutorial because there is no tutorial about default replacement food mod using custom mesh and explaining about how to do the GeoStates properly. I did trial-and-error and accidentally found the method how to replace EA mesh with edited mesh, and the GeoStates are fully working.
The challenge of doing food default replacement is that food mesh cannot be cloned simply on s3oc. There's no OBJD for "EggRolls" "Stir-Fry" etc. other food. The only OBJD available for clone on s3oc is Burger.
Sims 3 Object Export cannot replace s3asc because it keeps throwing error and cannot make 3 working GeoStates (Full, Half, Empty).
-----------------------------------
Note: You need World Adventures Expansion Pack to use my example, Egg Rolls. You can replace food from Base Game or any Expansion Pack.
✳️ Step 1: Find all Egg Rolls file strings: Cook, Eat Serve files on S3PE
Instead of cloning from s3oc, we have to find the file from game file package on s3pe.
Why? Because the food cannot be cloned simply from OBJD. You cannot find file "Egg Rolls" no matter how careful you inspect every file filtered "WA" (World Adventures Expansion Pack) on s3oc catalogue.
The only food you can clone its OBJD on s30c is Burger. You will clone that Burger OBJD later. Right now you have to find every file with word "Egg Rolls" on game package.
⚠️I suggest you make duplicate of game package for modding purpose instead of using package that is readable by game when the game is running. It is to avoid corruption because you accidentally replaced the files. If corrupt happens you have to re-install the game. ⚠️
Make duplicate of game package you find on your game installation path.
Base game:
The Sims 3> GameData > Shared > Packages > FullBuildep1.package
Expansion Pack:
The Sims 3> GameData > Shared > DeltaPackages>p02 > DeltaBuild_p02.package (Depending the release of Expansion Pack & Stuff Pack)
My duplicate of game package folder looks like this.

Open s3pe. Open FullBuildep1.package.
Type Name "EggRolls" on box.
Tick besides Name and Filter Active, then click "Set" button. It will give your result "EggRolls" filtered by its own.
Select all files until they are in blue selected, Right Click > Copy.
File > New. Right Click > Paste...
Then your files are all pasted into new S3PE document. You can delete ticks on Egg Rolls filter, as the package is no longer filtered.

File > Save .package. Give the name of the package such as "[Your username]_AmericanEggRollsEA". For my own example, "TBW_AmericanEggRollsEA."
We will use this package as a base to be replaced with new resource codes later. Put this package on Folder such as "Original EA American Egg Rolls" to make you easier to find the file which is original, which is edited.
✳️Step 2: Export Egg Rolls .s3asc and texture files from S3PE & copy the original resource codes.
Export foodEatEggRolls, foodCookEggRolls, foodServeEggRolls to s3asc.
If you are asking why this MODL should be export to s3asc, it is because we cannot clone OBJD of original EA Egg Rolls from S3oc and imported as .wso format from The Sims Workshop (TSRW). The only mesh of EA Egg Rolls we can get is from .s3asc file we can get from s3pe.
Save the s3asc file: "Cook","Eat", "Serve" on separate organized folder, name it "Original s3asc EA Egg Rolls"

⚠️Warning! The strings too long can cause error when export it.
Sometimes you tried to export the .s3asc but then disappeared and you cannot find where you save it. It is because the S3PE application crashed when you exported it because the strings are too long.
In this case, the original .s3asc you want to export is S3_01661233_08000001_0000000008780D94_foodEatEggRolls%%+MODL_filebase.s3asc
You can delete the long string then leave the "FoodEatEggRolls_filebase.s3asc" for example. Yes, you must add _filebase so it can be saved as .s3asc format.
Save, then the .s3asc will add additional files such as:
foodEatEggRolls_group00.s3ascg foodEatEggRolls_group01.s3ascg

Export the original EA .dds textures "All" and "Used" .
Copy all resource codes of each file to Notepad. Right-Click>Details...
Click Copy TGI to easily copy the codes (Type, Group, Instance) to Notepad.
Click GRID > Resources (3 Dots) > TGI Block List Editor You will see the list consists of 8 lines of_IMG, copy all TGI (Type, Group, Instance) codes to Notepad for easy copy paste later.

✳️Step 3: Copy original GeoStates codes (0, 1, 2, 3)
Click "FoodEatEggRolls" MODL. See the 4 GeoStates on the right side.

GeometryStates[0]: 0x95A36FFE
GeometryStates[1]: 0xD8918A76
GeometryStates[2]: 0x4DB2D3D2
GeometryStates[3]: 0x35B26CCB
Copy all these GeometryStates to Notepad for easy copy paste later.
GeoStates are in three forms.... Full, Half, Empty? But why are 4 GeoStates now?
You will find out later by cloning the base food OBJD in the next Step.
✳️ Step 4: Clone Burger mesh using s3oc & Open the Burger Mesh on TSR Workshop
More steps click spoiler tag “Read More / Keep Reading” below
Search "food" on s3oc.
You will get results like this. Food that can be cloned are Hamburger, Hotdog, Fries (Seasons EP). I choose Hamburger because it's Base Game and it's resembling custom food we want to create.

"Clone or Fix..."> Don't tick Renumber > Start.
Save the package. Open the package on TSR Workshop.
Open TSR Workshop > Create New Project > New Import> Next > Browse EA Burger .package > Next > Next > OK.
You will get Burger mesh preview. Take a look at Mesh tab.
Then see the Group 0 and Group 1. Both have GeoStates.
What is Group 0? What is Group 1?
If you check the the burger's .s3asc exported from s3pe or .wso exported from TSRW
You will see Group 0 is the food mesh as main mesh and Group 1 is the plate.

Go back to TSR preview. You see there are 4 GeoStates under Mesh from Group 0 tab.
By default, the Burger meshes (Full, Half, Empty) are combined into one.
Click each GeoState, from top to bottom.
0x95A36FFE is Full state
0x8A6C4E39 is Half state
0x4DB2D3D2 is Empty State
0x35B26CCB is Full state

✳️ Step 5: Create your edited mesh
Import MODL file (with format .s3asc) of Egg Rolls you exported from s3pe from Step 2 into Milkshape 3D via Sims 3 Object Import by Wesley Howe. From Milkshape, export .obj file to your favourite 3D software to make .obj file as base mesh for your edited mesh.

Create 3 States: Full, Half, Empty.
Export uvmap to editing image software to create the texture.
After you are done and satisfied with your mesh, export your custom mesh only without plate, Full, Half, Empty states in .obj format. Hide EA plate and EA's base mesh before exporting.
✳️ Step 6: Create texture
Import uvmap from your 3D software. Create texture, save in .dds format with the same name as original name of .dds exported from s3pe.

✳️ Step 7: Bone Assignment, Make Group & Export to .wso
Open Milkshape 3D. Import .s3asc of original EA Egg Roll "foodEatEggRolls_filebase.s3asc" from Step 2. Click Joints Tab, tick box "Draw vertices with bone colors" to enable bone colours.
The food shows Purple colour, the plate shows Yellow colour.
*Note that this .s3asc was imported from year 2023, the original colours are like these. If in this recent year 2025 shows different colour such as the plate is Purple, please follow this example, assign the plate Yellow colour, because my method using this Yellow bone colour has been working successfully.
Then import .obj of your edited mesh from 3D software. Delete materials of custom mesh, select custom mesh, regroup, rename to group00.

Your main task is copy Bone Assignment from original EA mesh to your edited mesh.
Check the codes on Joints tab, there are 3. Click each code then click "Assign" to see what is the Bone colour to determine rig for functionality of the object in the game.
0xFEAE6981 --> Yellow 0xCD68F001 --> Purple 0xD0DECA8E --> Light Blue
We will assign the custom mesh with Purple colour, therefore, select the custom mesh, select 0xCD68F001, assign. The custom mesh colour will turn Purple.

After you are finished with the Bone Assignment (Main Mesh is purple, plate is yellow), make sure the groups are correct. Group 00 ---> main mesh. Group 01---> plate. Export them in .wso format.
✳️ Step 8: Import the edited mesh on TSR Workshop
Open Burger .wrk on TSR workshop, import your custom mesh in .wso format. Click folder with green arrow to import .wso.

After importing, you will see your custom mesh and Geostate reset to 0 for all states.
✳️ Step 9: Create Geostates on TSR Workshop, Export to Package
If you click Geostate row, the custom mesh disappears. Because the face is 0. Click on ... dots on the right side of Geostate to open Face Selector. Face Selector is to create Geostates working, Full, Half, Empty. The mesh suddenly appears with grey colour.

Left click to give colour to the face. Colouring faces based on Geostate. Be careful because the mesh is all joined into one. When give colour to Full state, do not give colour to Half state.
0x95A36FFE for the Full State
⚠️Warning! This is the trickiest part of creating Geostates: Texturing the Geostate. Cannot undo. If you wrongly click and want to undo, you have to restart from zero again. If you feel the texture is alright, then save it. You can start from checkpoint from last save if you wrongly clicked. Cancel then load the save to restart. ⚠️
Click 'n pick to click the colour one by one. Basic Square: Drag cursor to give colour in big area. Shift + Left Click: Delete 1 face. Click "Clear" to delete all the colour in one click.

Rotate the camera to make sure all part of expected geostates are textured.
Give colour to other GeoStates.
0x8A6C4E39 for the Half State (half eaten)
0x4DB2D3D2 for the Empty State (crumbs)
After you are done with the texturing GeoStates, export to package. Edit > Project contents, Export> To .package

✳️Step 10: Export MODL filefrom Package saved from TSR Workshop
Save the package with name "SpringRolls_TSRW"
Open s3pe, import package that you saved from TSR Workshop. "SpringRolls_TSRW"
Export MODL, save.


✳️Step 11. Finalizing in s3pe & Replacing the Original MODL with Edited MODL & Correcting the TGI (Type, Group, Instance) Code As Same As Default Code
Open original package you cloned on s3pe "Your Username]_AmericanEggRollsEA"
I saved the package with different name to"[Your username]_SpringRollsDefaultReplacement." to make it modified package, while leaving AmericanEggRollsEA package as backup original base, just in case I need original file.
Replace "FoodEatEggRolls" MODL that you saved from Step 10: from SpringRolls_TSRW
Check if all resource code (Type, Group, Instance) are the same as the original. Check the resource codes inside TGI Block List Editor, are they as same as inside TGI Block List Editor in original package.
You can see the resource codes are different from original FoodEatEggRolls MODL codes you copy pasted to notepad. Delete MLOD, change the codes (Type, Group, Instance) with the original FoodEatEggRolls MODL codes on Notepad. Use "Add" to add one row, Delete to erase one row. After you are done, Save and Commit.
Replace textures with your custom texture in .dds format.

Save package.
Test the package in game.
Wait until your Sims finish all their GeoStates, are the GeoStates working properly.
The geostates are working properly except at the Half Eaten state.
All states are combined into one and the plate colour are having spring rolls texture... 😱

Don't panic. Your bone assignment is alright. Copying same codes on Data Resorce and TGI Block List Editor are working properly too.
What causing the Half Eaten state is not working is:
The "Half Eaten" geostate code you are cloning from Burger mesh is not the same as code from geostate of FoodEatEggRolls.
Burger= 0x8A6C4E39
FoodEatEggRolls= 0xD8918A76

✳️Step 12. Correcting one GeoState that doesn't work because using EA's Burger mesh
Your main task here is using Default EA's Half Eaten state code to override your custom mesh Half Eaten state code.
Data Grid > ChunkEntries> [1] ChunkEntries > RCOL Block > Meshes > (on Tab [0] Mesh) > GeometryStates (then click ... Dots on the right side) > [1] GeometryStates

Second row is [1] GeometryStates, indicates it is "Half Eaten" state.
[1] GeometryStates > Name

Delete the code 0x8A6C4E39, replaced the code of the Burger with 0xD8918A76 from FoodEatEggRolls.
Click Done. You will go back to Tab [0] [1] Mesh and Geometry States
Don't forget to correcting the code for Plate as well. Plate is in the Tab [1] Mesh. Click [...] Dots on Geometry States once again, it will bring you to Geometry States for Plate.

Repeat the step as you did for the Food State: On Row [1] GeometryStates > Name, Delete the code 0x8A6C4E39, replaced the code of the Burger with 0xD8918A76 from FoodEatEggRolls.
After you are done, click OK > OK > OK > Commit > Save the .package.
Test your package in your game again.
Half Eaten state should be working by now.
✳️Step 13. Replacing the Original "Cook & Serve" MODL with Edited "Cook & Serve" MODL & Correcting the TGI (Type, Group, Instance) Code
Create custom mesh & texture for Cook & Serve, export to TSRW, then export to MODL like Eat state before.
⚠️ Pay attention because this step is very important, otherwise the Custom Food will turn black/disappear, doesn't work in the game.
Repeat Step 11: Replace the MODL for Cook & Serve state.
If you see default TGI code you copied from "foodCookEggRolls" there are only 3 lines.
_IMG 0x00B2D882 0x08000000 0x6F93B613E7C91FD0 _IMG 0x00B2D882 0x08000000 0x6F93B613E7C91FD0 _IMG 0x00B2D882 0x00000000 0xA4D80FB45AE9066B
If you want the Cook state working in the game, you should use default TGI code of Serve you copied from "foodServeEggRolls"
_IMG 0x00B2D882 0x08000000 0x6F93B613E7C91FD0 _IMG 0x00B2D882 0x08000000 0x6F93B613E7C91FD0 _IMG 0x00B2D882 0x08000000 0x0E3D40D33CC70324 _IMG 0x00B2D882 0x08000000 0x6F93B613E7C91FD0 _IMG 0x00B2D882 0x08000000 0x6F93B613E7C91FD0 _IMG 0x00B2D882 0x00000000 0xA4D80FB45AE9066B _IMG 0x00B2D882 0x08000000 0x6F93B613E7C91FD0
instead of foodCookEggRolls, otherwise the Cooked food will turn to Black colour in the game.
Repeat Step 11: Copy all the TGI codes you copied from "foodServeEggRolls" for Cook and Serve.

Commit, Save.
✳️Step 15. Check the Geostates for Cook & Serve
Check the Geostates for Cook & Serve.
Cook & Serve Geostates are working using Burger Geostates.
0x95A36FFE 0x8A6C4E39 0x4DB2D3D2 0x35B26CCB

Leave the Geometry states, no need to change to default EA Egg Rolls (otherwise your mesh will disappear or black).
After you are done, click OK, commit, save the .package as usual.
✳️Step 16. Test the CC in the game.
If your Custom Food works well in the game: Full, Half, Empty Geostates are working without showing weird texture or black or disappear, then congratulations! Enjoy and have fun with your custom food default replacement mod👍

#the sims 3#ts3 tutorial#thebleedingwoodland#ts3 mod tutorial#ts3 default replacement tutorial#ts3 functional food tutorial#tutorial#modding#s3pe#s3oc#TSR Workshop#geostates#ts3 food
24 notes
·
View notes