#simstutorials
Explore tagged Tumblr posts
Visit Tumblr Blog
Explore Tumblr blogs with no restrictions, modern design and the best experience.
Last Seen Tumblr Blogs


Fun Fact
Tumblr Inc. has $15.1M in annual revenue.
Text

i made a tutorial on X, i hope it helps you here too!
link: here on my X/twitter account: @/noelscr3t
#the sims 4#sims 4 cc#sims 4 simblr#sims 4 screenshots#my sims#sims 4#sims 4 gameplay#ts4 simbrl#the sims community#simstutorial#sims4#ts4#lighttutorial
4 notes
·
View notes
Photo

How To Get Sims Id
Ever grappled with those tricky cheats needing a Sim ID? Breathe easy! Discover the straightforward steps to snag your Sim’s ID and get back to gaming bliss. Dive into our guide and share your thoughts! Read More At MustHaveMods.com
#sims4cheats#sims4tips#sims4guide#sims4tutorial#simid#simstutorial#sim4life#simseasy#sims4getsimid#sims4process
1 note
·
View note
Text
Regardez "Les codes de triches et commandes INDISPENSABLES en construction ?" sur YouTube
1 note
·
View note
Photo

What is story progression?
If you have played previous Sims games, this term may sound familiar. In the Sims 3, all inactive sims exist in the same open world. This means that when a sim moves out of your active household, they still lives their own separate life. They can go to college and get a degree, get married, have kids, etc. Just like real life! This goes for every sim in your game, whether it be a guy you see passing by in the park, or a childhood friend you made years ago.
Unfortunately, this didn’t make it into The Sims 4, along with many other things…
MC Command Center (MCCC) allows you to have this sense of true story progression back! Normally, Sims don’t progress at all, they just age and die. New sims are generated into the game, but if you don’t actively procreate, they human race would die out!
MCCC allows you to have so many features, which is why it is an understatement when I say, IT’S MY FAVORITE MOD!
Deadpool, the creator, allows you to control these settings that create this story progression:

A few features it includes: teen pregnancy, risky woohoo, and modifying sims individually in CAS, and having more that 8 sims per household (with “try for baby”).
LINK TO MCCC (Click me to download/read more about)
HOW TO DOWNLOAD MCCC (Click me for a youtube tutorial to download/learn more about MCCC in game)
P.S. Place MCCC folder in: Electronic Arts<Sims 4< Mods< MCCC (it’s own folder)
Putting a folder in Electronic Arts< Sims 4< Mods< Mods< MCCC will lead to the scripts not working.
#mods#sims4#ts4#thesims#simsmods#simscc#simstutorials#sims 4 gameplay#simblr#simsguide#simshelp#simsforlife#sims download#simsblog#sims 4 legacy#sims#follow4follow#followback#tutorials#gamingtutorials#gamergirl#gaming
4 notes
·
View notes
Text
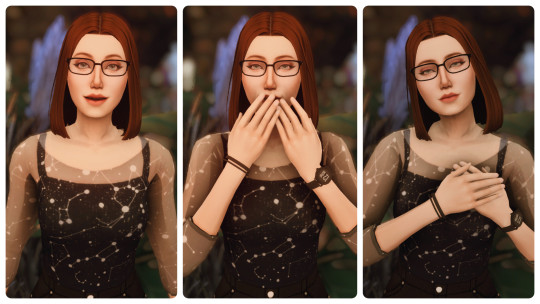
Tutorial: Camera Position Hotkeys in TAB Mode
Does this sound familiar? You want to take several screenshots from the exact same angle be it for a story, a lookbook, or a CC preview. You tab into free camera mode, take your screenshot, tab out, change poses, tab into free camera mode, and struggle to remember/find the exact camera angle again. Lather, rinse, rage-quit repeat. I did struggle with that. I looked and asked around for a solution, even if it was yet another mod that did what EA failed to do. One day someone dropped a hint, there was a way to set the camera postion, but they didn’t tell how. I used all my google-fu skills and finally found out how to do it. It’s a lifesaver. A fair warning: If you’re anything like me, you’ll use it whenever you take screenhots from now on, just because you can.
Here’s how you can take a picture series like this.
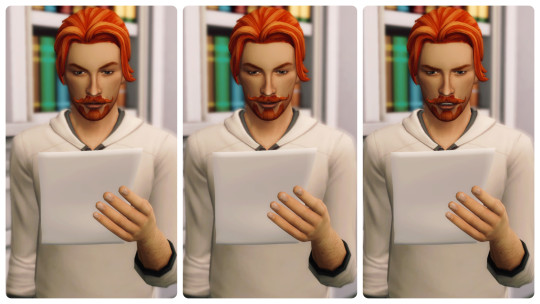
Or this.
1. How to set hotkeys
Press TAB to switch into free camera mode.
Set-up your shot. If you’re happy with it,...
Press CTRL+ 5-8 (top row, not numpad) to save the camera angle.
You can save 4 different camera positions. They’ll be assigned to that hotkey until you overwrite them. Although key 4 is said to be usable as camera hotkey, too it doesn’t work for me.
2. How to use the hotkeys
Press TAB to switch back into free camera mode.
Press key 5-8 and the camera will move back to the saved position. Voila!
Tip: As long as you’re in game mode zoom out as far as you can before re-entering TAB mode. This way all faded-out objects will be visible in TAB mode again. Hit TAB, then your hotkey and enjoy a little tracking shot.
Have fun taking your screenshots! Maybe @thefoxburyinstitute finds this worth sharing? I have a feeling this feature is so unknown, it’s almost like an easter egg. It took me almost three years until I found out.
#TialluRambles#TiallusTutorials#SimsTutorial#sims camera modes#ts4#the sims 4#ts4 screenshots#the sims 4 screenshots#sims tab camera#sims hotkeys
2K notes
·
View notes
Video
youtube
✨ New Video Alert! ✨
Check it out! Subscribe and share :)
27 notes
·
View notes
Link
Hey guys! In this tutorial I show you, how you can beautify your pre-processed photos (see part # 1) and give them your very own, unmistakable look. I hope you will enjoy this tutorial and find it helpful. If you have any questions, please write them in the comments. I will be happy to answer. I hope you enjoy trying it :)
👉 Watch here Part 1 of this tutorial series (basics): https://www.youtube.com/watch?v=mpJSk...
#sims#sims4#sims3#sims2#simstutorial#the sims 4#tutorial#instagram#instagram tutorial#tutorial instagram#simstagram#photo editing#photo editing tutorial#pics art#picts art tutorial#симс#симс 4#симс туториал#туториал
3 notes
·
View notes
Video
youtube
My blender simart video came out on my yt channel 😉😉😉
more art on instagram
welcome to my patreon
#gcs#goodchillsstudio#blender#render#photoshop#youtube#edit#tutorial#simstutorial#simsart#sims4art#ts4art#simscommunity#sims4#thesims4#ts4
10 notes
·
View notes
Text
youtube
#sims4#sims#simsbuild#speedbuild#thesims#thesims4#simsfamily#simshome#sims4gallery#simsgallery#tutorial#simstutorial#Youtube
1 note
·
View note
Text
Tutorials - How to add my builds in your game + why they aren’t available in The Gallery
Hi everyone!
Today I decided to make a tutorial of how to install my builds. Unfortunately, my builds aren't available in The Sims 4 Gallery, because I am not able to access The Gallery myself. I don't really know why I am unable to access the online Gallery, but I've never really missed it. However, thanks to the following tutorial you can easily install my creations in your game:
Note: You need to install Winrar to extract the .zip or .rar files. You can download it from this page. You have to choose between the 32-bit and 64-bit version. Choose the version that fits your computer. Your computer may recognize the file as a harmful file, but simply ignore this and allow your computer to download it. It's completely save to download. After downloading the file, click on it and follow the install instructions.
Step one:
Press the Download button below any creation you want to install. You will be redirected to a dropbox page. Now you see a couple files you need. On the right side of your screen you see three little dots. Click and click the ‘download’ button. Now a .zip or .rar file will download on your computer. Your computer may warn you to prevent you from downloading harmful files, but this file is completely harmless. Allow your computer to download the file and the file will start downloading.
Step two:
Open the downloaded file simply by clicking on it. Copy every file into your Tray folder. You can find the folder here: My Documents/Electronic Arts/The Sims 4/Tray.
Step three:
Open your game, then click on The Gallery button. Open your library (no internet connection needed). If everything went well, the downloaded creation is in your library.
Step four:
Go to a lot and enter build mode. Now open your library and simply place the build on the lot! Don't forget to enable bb.moveobjects first.
Hope this helped!
Love, Joanna.
1 note
·
View note
Text
himaris cc list bc a moot asked 4 it 🙂↔️
eyes: 1. 2.
skin overlay: skin
outfit: onesie & hat
shoes
lashes
hair: 1

#the sims 4#sims 4 cc#sims 4 simblr#my sims#sims 4 screenshots#sims 4#sims 4 gameplay#the sims community#ts4 simbrl#sims 4 legacy#sims4#simstutorial
1 note
·
View note
Link

Lower Mirrors without Mods!
1 note
·
View note
Text
How to Make CC for The Sims 4
10/19/22
https://youtu.be/kGRNX6aZ2gM
New video out now!
#sims4#simblr#thesims4#sims#thesims4cc#blender#pixlr#thesimsea#maxis#ea#maxismatchcc#youtube#youtuber#sims4youtube#tutorial#simstutorial#videos
0 notes
Text
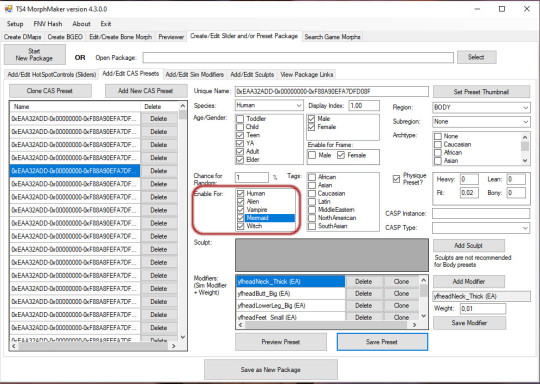
Tutorial: Adding Occult Tags to Body Presets using Morph Maker
Imagine this: You find a huge set of body presets, download it, put into your mod folder, and load the presets into your game. Only to realize they don’t show up for all occult sims in CAS. Unfortunately, a batchfix to add those tags, or an updated version of the presets doesn’t seem to exist. It’s DIY then. There are tutorials on how to add these tags with S4S, but there is an even more convenient tool for Windows computers to add the tags: CymarNYC’s MorphMaker.
Step one: Download and unzip the latest version of MorphMaker No need to run an installer.
Caution! If you’re from a country that uses a comma as decimal marker download version 4.3.1.0 from forum post #404 instead. You may have to scroll up a little. Although the top bar still says Morph Maker 4.3.0.0., this version will work with commas. Morph Maker 4.3.1.0
Step two: Make a backup of the file you want to edit. Better safe than sorry. Open MorphMaker by running TS4MorphMaker(.exe) from its folder. Windows will ask you if you really want to run the program at that point. Agree.
Step three: MorphMaker automatically detects your Sims folder and your mod folder. Check if the paths are correct by clicking on Setup.

Step four: At first glance MorphMaker looks quite intimidating. To edit tags click on the Create/Edit Slider and/or Preset Package tab. Open the file you want to edit by clicking on Select. Depending on how much data the file contains, MorphMaker might need a while to process it and may even become unresponsive. Just wait.

Step five: As soon as MorphMaker is ready, go to the Add/Edit CAS Presets tab. On the left hand you’ll see all presets included in your file. You now need to edit every single one to enable them for your occults in CAS. Select a preset on the left and then check the missing occult types in the Enable for: box. Done. That’s it.


You can save after every single edit by clicking on Save Preset, or save the entire package from time to time.
If you have any questions feel free to send me an ask. Anon asks are turned off, if you want me to respond privately include a 🤐 (zippered mouth emoji) in your message. Happy simming!
Tag: @thefoxburyinstitute
#TiallusTutorials#tutorial#CymarNYC MorphMaker#MorphMaker#CymarNYC#TialluRambles#SimsTutorial#Sims Tutorial#ts4#the sims 4
96 notes
·
View notes
Video
How to convert Sims 3 hair to the Sims 4
TS3 To TS4 Conversions
9 notes
·
View notes
Video
youtube
Sunken room tutorial - You're welcome!
#simsyoutube#simstutorial#PlumbobPlugs#buildmode#structuresaturday#marissaSims#plumbobcast#plumbobpod#undertheplumbobpodcast#undertheplumbob#simspodcast#the sims#sims#sims 4#simblr#the sims 4
0 notes