#site google page tutorial
Note
hi! sorry for bothering you but do you mind sharing the tutorial for google pages, if possible? thank you!
You’re not bothering me at all!
Below you’ll find a step by step tutorial on how to create a gif page on sites.google.com and at the bottom you’ll find the original link to create the main page of it.
I do want to shout out to @tessgifs for her step by step tutorial on her discord page because I never would have been able to provide this one without her helping me by creating hers.
If you have any questions, don’t hesitate to reach out on anon or off!
It starts with going to https://sites.google.com/
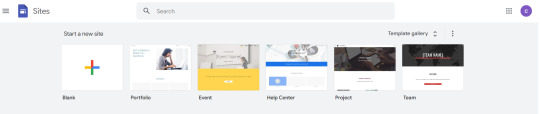
1. Click the blank one with the plus sign under the words start a new site.
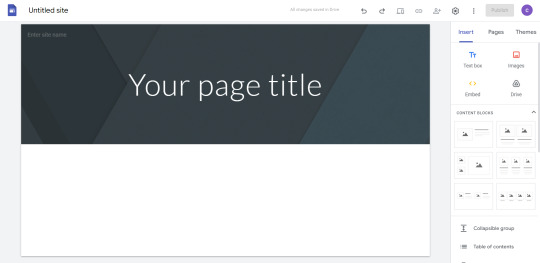
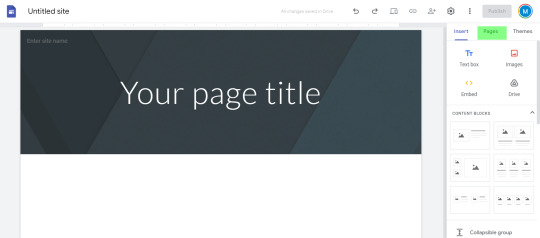
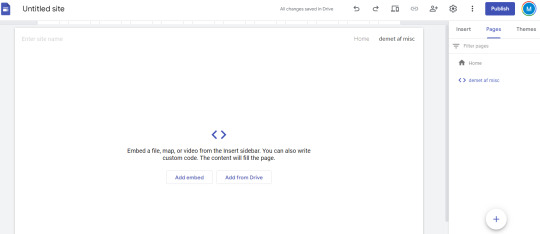
2. It’s going to take you to this page right here below and on the right side there are three sections. Insert, Pages and Themes. You’re going to click Pages.
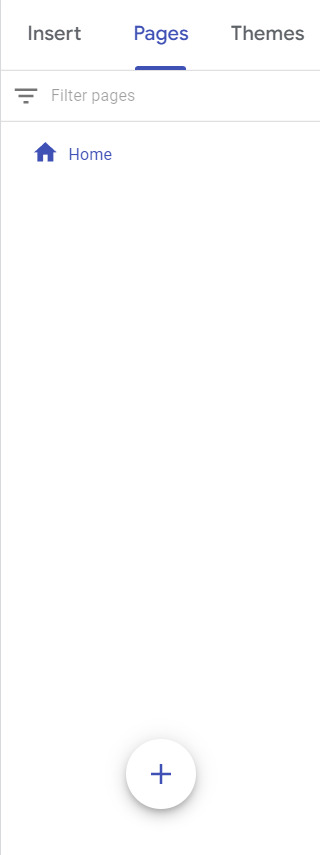
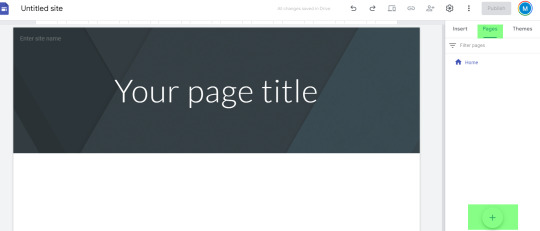
3. Under the section pages there is a circle with a plus sign in the middle all the way at the button of the page, all you need to do is hover your mouse over it.
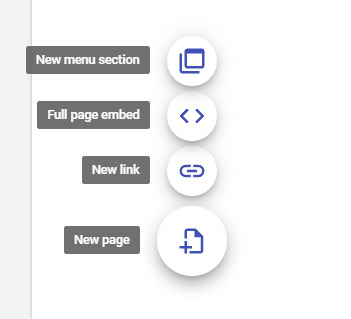
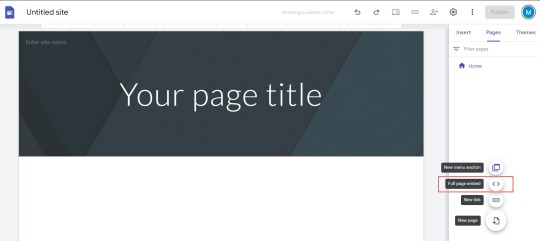
4. As soon as you hover over the plus sign, click on the one that says full page embed.
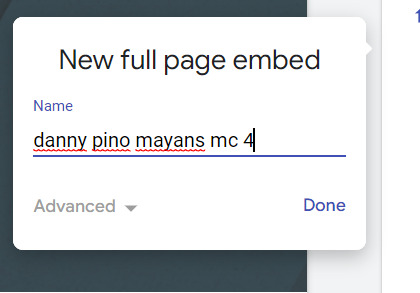
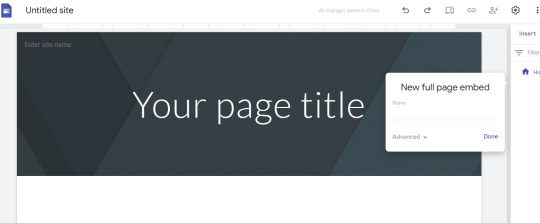
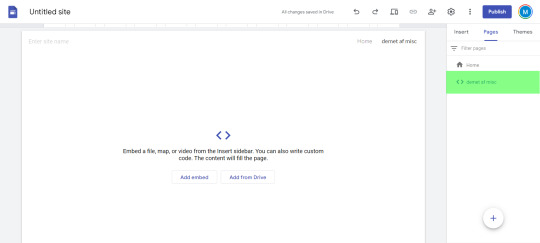
5. Name your full page embed like so and click done
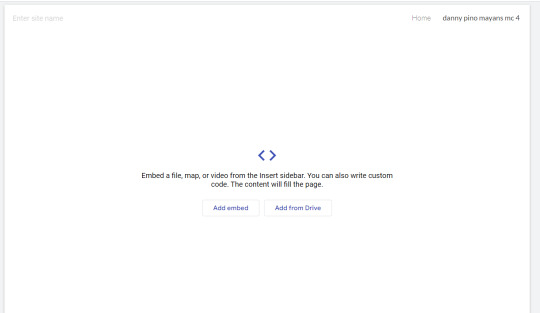
6. This page will show up and you want to click add embed
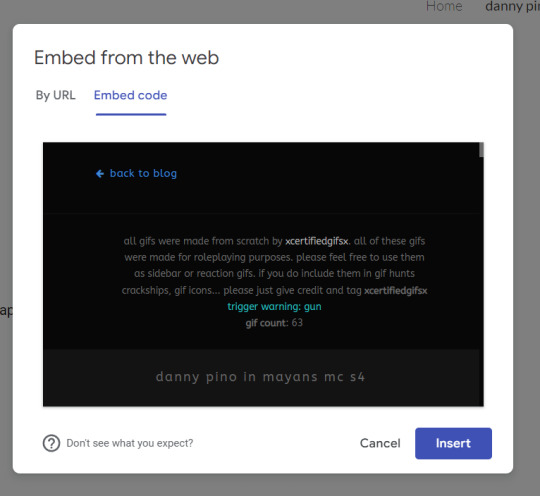
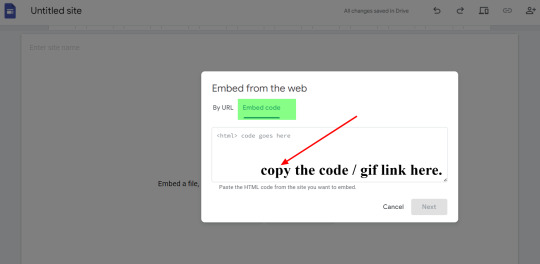
7. This little pop up will come up and you want to go under embed code.

8. What you can do is just copy and paste from your tumblr page like so and click insert
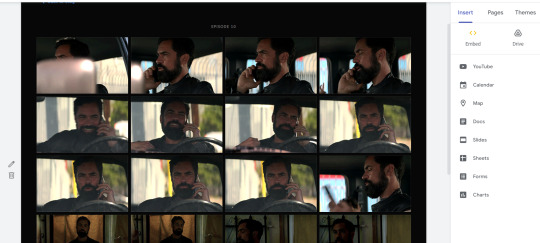
9. Here is what your page should look like
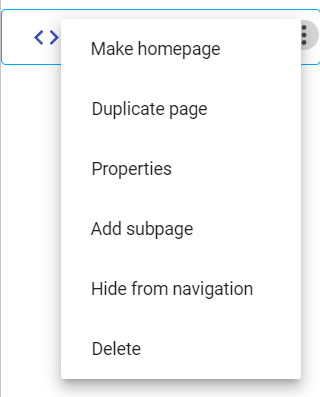
10. Before we click the publish button in the right hand corner we want to go under the pages section. You’ll see the name of your page and 3 circles. Click those three circles.

11. Click hide from navigation so it won’t show up as a table on your main google page
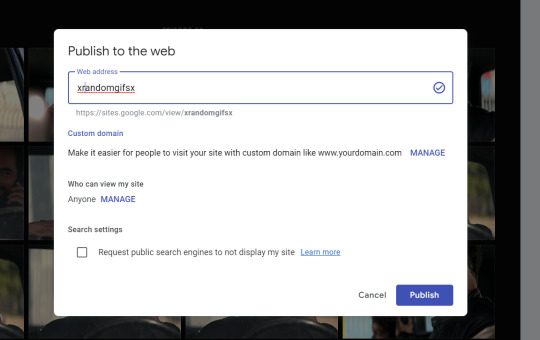
12. Now we’re going to click publish this page right here will pop up your first time posting a page because you want to name your gif page but click publish
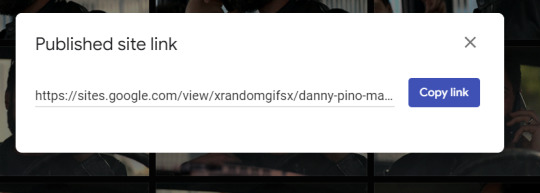
13. After publishing there is a little chain link on the top of the page, you want to click that

14. Copy link and paste into a new tab to come up with this
15.
https://sites.google.com/view/xrandomgifsx/danny-pino-mayans-mc-4
^^^
This is what the finishing product look like... you just keep going through the whole process until you upload all your gif pages. I know for a fact that at least 800-900 gifs will load on a page with those who have low internet speed (I have a few friends I tested this with). Any changes you make to a page title will in fact make it crash and you will have to make sure you publish all changes you make.
Here is the original sites.google tutorial!
https://pendraegonn.tumblr.com/post/684624170955472896/reasons-to-use-google-sites-its-free-and
16 notes
·
View notes
Text
host your gif packs on google sites
Since I received a question from an anon about how I upload my gifs to the google site, you can find the answer here. This is my first tutorial, and english is not my native language, but I hope it will be understandable and sorry if I wrote something wrong in english. I hope it's understandable and good luck, feel free to write if you have any questions and I'll try to help.
First of all, I always create the gif pack page on tumblr, it's easier to see the code there, it's easier for me to change things, because there is more space. And there I can see if everything is okay. However, it is important that there is a few code that works here, but not on the google site. When I find everything in perfect, I copy the code of the gif page and paste it to the google site page.
So I always open the google site page (You must log in with your gmail account to be able to use it.) : https://sites.google.com
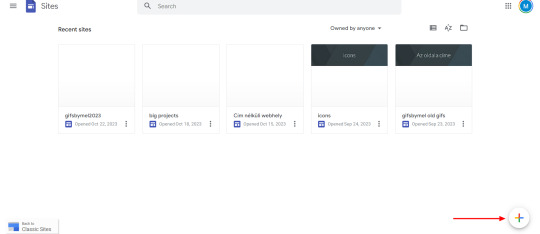
When you open it, it will be a blank page, but there will be that colored plus sign at the bottom right. You can create a new page with it. I already have several, I tried to organize things there.
4. If you click on the plus sign, it brings up this, I don't usually change anything here. In the right-hand bar, there is "pages" (marked in green in the picture), you have to select it.
5. If you have selected the pages menu, you will see a plus sign again in the lower right corner. Click on it and select "full page embed". (I circled it in red in the second picture)
6. If you selected this, it will ask you to name the page. Enter the name you want. I usually include the name of the actor/actress + the name of the series and the episode in various formats. (Since I create the page both here and on the tumblr page, sometimes I copy the name given on the tumblr page.) When you press done, you will see what is in the second picture.
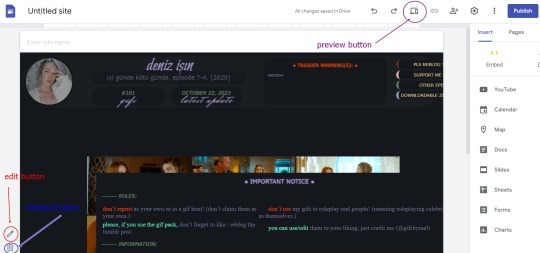
7. If you move the mouse over the part marked in green, i.e. on the name of the created page, 3 small dots will appear on the far right. Click on it and select "hide from navigation". If this was the case, then the small sign will be crossed out in front of the page name in the right side bar and there will be no menu bar at the top of the
displayed page.
After that, all that's left is to paste the code of the gif page, i.e. the gifs. You have to click on the "Add Embed" , which is in the middle and can be clearly seen in the picture. And choose "Embed code" and copy the cod / gif link here. [second picture]
8. I have marked on the picture where you can find after this, the edit button [in red], if you want to delete the page [in blue], or if you would like to preview it. [with purple color in the picture]
9. If you find everything OK, then all that's left is to press the "publish" button in the upper right corner. The previous picture shows where you can find it. Then it will ask you to enter a name for your web adress. Name it whatever you want, think of it as the name of a main tumblr page where you can always create gif packs. This only needs to be entered once, unless you want several main pages, as I have several (as can be seen in the very first picture). Eg: I named the current one gifsbymel2024.
10. I marked the paper clip / chain (?) icon in green on the picture, you have to click on it and then the link of the created page will pop up and you can share it with whoever you want.
11. If you always want to upload a new gif pack to your page after that, all you have to do is open the Google site page, select your page from the already created "recent sites" section and then go to the "pages" tab on the right side and repeat the steps as before featured. Only the name of the "recent site" will be omitted if you add the gif packs to an existing one.
#host your gif packs on google sites#tutorial#gif pack tutorial#gif page tutorial#google site#google site tutorial#m.txt#suggestion by anon#gif page
68 notes
·
View notes
Text
watching all of the internet kill itself . they werent lying abt enshittification
#you guys should see what happened to quotev LOL#x. meta. google. tumblr. quotev. deviantart. discord#list goes on those are some of the main ones ive seen#and all of these attempts at indie social media startups suck too. honestly. remember what happened to buzzly . lawl#and cohost is ugly and doesnt work for me. and im not getting some stupid 'bluesky' or . sheezy ? and earlier today#bc i follow artists on insta and meta basically just said 'yeah all of your stuff ever were using it to train ai'#i saw someone mention Yet Another Indie Social Media like . aughhhhhhhhhhhhhhhhhhhhhh#those people are right we gotta just start making our own pages on neocities (<- doesnt know how to code + is exhausted + stupid)#(and i know theres templates and tutorials and guides but i still just get overwhelmed easy)#kinda off topic but i think toyhou.se is genuinely good though. only issue is that its still in beta and to sign up you have to get an#invite code. i dont know how easy it is to get invite codes now but i know when it 1st started up ppl were literally selling invite codes 💀#also other sites that are nice to me are flight rising and pixel cat's end but those + th arent social media sites . wel
10 notes
·
View notes
Text

!!! - for resources
writing help - psds - textures - themes - fonts - icons - pages - ps tutorials - templates - masterlists - self care - tumblr tips - apps/sites
#help: writing.#resources: psds.#resources: textures.#resources: themes.#resources: pages.#resources: icons.#resources: fonts.#resources: tutorials.#resources: templates.#resources: google docs.#resources: masterlist.#help: self care.#help: tumblr.#help: sites.#help: discord.
17 notes
·
View notes
Text
i've been (mostly casually) surfing around the net to find that Pixel Dolling site and i really wish there was like. a categorized list of social sites. idrc no matter how big. just as long as its on there
#i'm reaching a 'god i wish there was something that would solve all my problems' stage of searching for something#and even then trawling through some list of 1000 links doesn't sound fun#but its honestly better than having no leads#google brings about results as good as they would be back then...#using the time:(date) feature#*before:(date) feature#which is to say. something small and consequently obscure back then will not pop up#for as desperate i can be to find it. trawling 2000s web pages i fun#and is half the reason i'm even bothering#to try and search for it#a lot of cool little pixel art sites way back when. they're really fun to come across#kinda unrelated because its a site i remember to this day#but. shout out to kawaiihannah#i used to look at her website so much as a kid#she has these tutorials. while i didn't really follow them. but i would just admire#she has a few recent updates on her site
0 notes
Text
How To Make Your Own Fanfiction Archive, In Just Ten Easy Steps
As the go-to "person who knows about AO3" for quite a few people who read fanfic but aren't really linked-in to wider fandom culture, I've fielded a lot of questions about how to do certain things on AO3 to which my best answer is "you should really start your own archive!" I think, in general, more fans starting their own small archives would be a net good for fandom. AO3 was never meant to be the only archive for all fandom, or even the main archive, and the more spread out and backed up we are the more resilient we are.
But of course I have to be reminded that a lot of fans these days don't really have any idea how little "you should start your own archive!" really involves. (Also, that I should practice what I preach.) So I am now making my own fanfiction archive, and writing up this post as I do it to tell people how to make theirs!
Go to https://neocities.org/ and sign up for an account. It only needs a username (which will also be your website address), password, and email. Pick a username that will be related to your archive's title!
Choose the free account option (if you ever need more than what the free account offers for a text-only archive, you should probably look into graduating from neocities.) This should take you to a menu of "how to make a website" tutorials. You should do them! They're useful skills. But let's get your archive running first.
Hit the big red Edit Site button, or open the menu under your username and select "Edit Site".
Select the "Index.html" file to edit. You're now in an HTML Editor. Congrats, you're a web developer c. 1999!
Find where it has text between the < title> tags. Delete the filler text, and put in the title of your new archive. This text will be what shows on the tab when people go to your archive.
Find where it has text between the < h1 > tags. This will be big header text at the top of your page. Put the title of your archive here again. If you have no experience with HTML, you should read over the other sample text. It covers the basic basics very well! Once you've done that, you can delete everything else between the < /h1> tag and the < /body> tag. Save your index.html file.
Get an HTML file for a fanfic you would like to add to your archive. If it's on AO3, you can use the html download option built into AO3. If you have it as a word processor/google docs file, you should have the option to save as an html file. Save that html file to your computer.
Go back to Edit Site on Neocities and go to "upload". Find the html file you saved and upload it. (You can also drag and drop files to upload.)
The file you uploaded should now be showing with your other neocities files. Right-click on the title and select "copy link".
Go in to edit index.html again. Under where you put your header text, type < br> < a href=" . Then paste in the link you copied. Then type "> Then put in the title of the fic. Then type < /a> . Then save the index page again when you're done. You can do this for every fanfic you have.
Congratulations! You now have your very own personal private fanfiction archive that you are 100% in charge of and make all the rules for. It's at least as good as half the ones I was reading on when I started reading fanfiction and will serve its function well as a way to let people read your fic. You can link to it from anywhere you want! (Including your AO3 profile.)
Blogpost version, with FAQs and discussion
Anyway, here's my beautiful new fanfiction archive made using this tutorial:
Melannen's Fanfiction Archive
(I am honestly way more disproportionately proud of finally making that than I expected to be. It's nice to have your own archive.)
If you make one, share it here ! I want to see!
#ao3#archive of our own#fanfiction#fanfic archive#how-to#tumblr what are you doing to my angle brackets#why would you do that what's wrong with you
4K notes
·
View notes
Text
Collection of Free Art Tutorials
I don't usually make text post on this blog, but a nice artist I know was asking for tutorials a while back and I forgot to send some to them while in school. So here's a post on it since it's easiest to grab and go this way. :)
This list focuses on the basics. I'm focusing on the foundations of art, so medium is generally irrelevant and you can use physical or digital with these. You'll have to google more specific tutorials on things like character design and such.
One of the biggest pieces of advice I can give to you is strangely, introduce things to yourself one at a time. In art class, we took whole topics week by week. For high school, we did a few exercises then spent a week drawing/painting and doing your piece(s). For basic art 1 & 2 in college, we did 1-2 exercises and then did 1-2 drawings, followed by HW (which we turned in next week) and sketchbook practice (which she'd check at midpoints). For basic art lessons with a tutor, we did practice then our own art. You can see the pattern here - the point is don't be distressed if you don't get everything at once, or the lesson in 2 weeks, or the lesson in 3 years - we practice and do a lot over time, and you'll pick up on things you need to improve naturally and through help with others. Take time to be proud of your art in mini steps too, even if it's not the best! You tried and attempting to climb an obstacle over and over again before finally leapfrogging it is still progress to it.
Overall tutorials:
DrawABox.com is a site that's dedicated to art exercises and practicing when you can. They talk about the basics of art as well as how practice is important. It can get tough at times and it's ok to stop and do a balance of say those practices and doodles if you choose to try and do all of it's stuff - but you don't have to either. It's just a nice basic education done by some art nerds who like going hard.
Ethering Brothers - these guys are famous for their 40billion tutorials. If you need help on a specific idea, search their gallery and you'll likely find something.
Thundercluck's Art Fundamentals - She did a good huge ass tutorials on how things work, and it's the least overwhelming of the 3 I got in this section, so I suggest it as one of the first to look at for digital stuff.
Art Instructions Blog - Another good & simpler website that goes great into fundamentals. They focus more on traditional art but if you're digital, you can replicate most of the techniques - art fundamentals and subjects cover all mediums. Very important
Drawsh - Particularly notes on Construction: construction is the basics of building an illusion of a 3D image on a page. Figuring out how to build shape gives depth to your work, and learning how to see in 3D lets you be able to draw an item then move it around in your head (sometimes, when you're good enough, don't be afraid to pull out a reference or use live subjects). Construction is how to figure out the foundation of your drawing, and good planning = better picture!
This link starts at the back, hit newer post to go forward.
There's a lot on anatomy and other nitty gritty details for when you want to practice those as well.
Griz and Norm's Assorted tips - Long time artist talk about various tips and tricks they use in art and how to avoid certain pitfalls. It's eclectic but great to look through.
James Gurney's Blog - He's got a lot of thoughts, a lot of tips, and a lot of adventures he catalogues. It's the least organized out of these but fortunately he has plenty of tags and most post have something neat going on. He's fantastic!🥰
BEFORE ALL OTHER BASICS….
How to Make Your Art Look Nice: Mindset
There's a lot of artist with different perspectives on how to approach art and your mindset while doing it, but the general consensus is that it's a process and sometimes you have to remind yourself to enjoy art!
Line
How to draw straight lines without a ruler. …but for the love of all that's good do NOT feel bad about using one! This talks about how to hold your pencil and how to do some good freehand stuff, some good practice.
5 grips for holding a Pencil for Drawing - This goes for pencil, pen, tablet, etc.. Get comfortable and figure out what's right for you and your pictures. I'd like to note that paintbrush holding will overlap, but some will differ.
A few line drawing exercises that help with line confidence.
Types of line drawings & what they are.
Contour Line & exercises with Mrs. Cook - Contour lines are one of the first art exercises I do in all the drawing classes I've taken. The good news is that they're surprisingly fun & look neat, even the blind contours!
Good deep thoughts on lines and how to use them.
Line Weight Tutorial
Lineart Weight Tips!
How to show variation in your line art: part 1 & part 2.
Some teacher's Drawing 1 & 2 lessons put online.
Light, Shadow, & Value
An introduction to tonal values.
Why values are important. The main reasons are that they give depth to a piece, and values literally shape our world.
Tonal Values: Everything you need to know
How does light work & the basics on Light
Light & Shadow in Art - much more in depth of the above! Highly recommended if you have time to spare.
Understanding grayscale/monochrome art. Great for shading & planning.
A guide to Cross Hatching (and hatching in general) - As a side note, crosshatching is one of the early things taught as it marries Line + Value into a nice neat package and helps add form with just a pen.
Crosshatching for Comics
Learn more about coloring by working in grayscale
How to Make Your Art Look Nice - Contrast!
Using lighting to make your art look nice.
Some light & shadow classifications.
Edges - notes on how they work in shading.
Color
A side note - color theory doesn't differ much, but color MIXING will change between mediums. If you're doing traditional colored pencil, you're overlapping 2 or more pigments on top of each other. If you're doing traditional paint, you're mixing & creating a solution/emulsion (depends on the pigment and binding) of pigments with the particles reflecting light in different ways. In digital, overlapping colors & blending colors depend on how the program you use calculates it if you're not just putting 2 color side by side. This just means you have to adjust your mixing when you switch between them. :)
Slawek Fedorczuk's Light & Color Tips - also shows how to guide through a scene.
The Color Tutorial Part 1 & 2 by Sashas - A personal favorite.
Color Studies 1-6 by Sheri Doty
Amazingly nice breakdown on how color works in simple terms.
Sarah Culture's Tips on Color
The value of underpainting
A few notes on reflective light.
Experimental color techniques with Alai Ganuza: first post, second, & third.
Color zones of the face charts
Composition
Good Tips on Composition
Here's an example of how you can search the Etherington Brothers' stuff and get like 10 tutorials and tips on one subject. Composition & Cover Design, Shadow Composition, Two Line Composition - plus more.
How to make your art look nice: Thumbnailing!
And don't be afraid to make silly thumbnails or sketches.
Composition Examples - charts like these are great when you can't think of something yourself. There's no shame in using them.
Flow and Rhythm
Formulas for landscape composition.
Perspective
Perspective Drawing Tutorial by Julie Duell
Linear & Atmospheric Perspective Guide
One Point Perspective City Tut by Swingerzetta
Niso Explains Perspective - these are great for drawing figures in perspective!
Putting characters into scenes and drawing backgrounds
Backgrounds that make your character stand out!
Using background detail to guide the eye.
Odds and Ends
I shit you not, probably 1/3rd of my color, value, & structure knowledge comes from pixel art since I've done so much of it and it is all about challenging yourself to do the most you can with limitations. Check out lospec's tutorial database for fun and see how it compares to art techniques you're doing - even if you never try a medium, it's always interesting to see how it works. :D
How to Make Your Art Look Nice: Reference Images & Style, Pushing Proportions, and developing style.
Foervraengd talks about how he expanded his comfort zone with concept art & landscape drawing.
Luna Art talks about what they're thinking when doing concept art.
Repeating visual motifs in character design looks cool.
Eric's Thoughts on Drawing Backgrounds and Props.
Show vs. Tell: Why Visual is Not Optional in comics.
The Lost Vocabulary of Visual Story Telling Day 1, Day 2, Day 3, & Day 4.
Traditional Animation's 2 Digital Library books, The Know-How of Cartooning by Ken Hultgren & Advanced Animation by Preston Blair are two books from the golden age of animation they have up on their site for free viewing!
Animation resources dot org has a lot of cool stuff. Here's Nat Falk's How to Make Animated Cartoons (part 1). Their pages on Instruction & Theory are a good start.
Books
Good news: the internet archive has a TON of resources. Make sure to check around and toggle filters, it's a bit weird with organization. For example, a book can be under art or drawing - techniques, depending on who catalogues it.
Andrew Loomis is someone artist tend to die-hard reccomend. His work is collected here & here on the internet archive (one is Andrew Loomis, the other is Loomis, Andrew - thanks). I own Figure Drawing for All It's Worth and I recommend checking all of his stuff out, especially if you're having trouble with bodies and hands.
The Animator's Survival Guide by Richard Williams is mandatory in animation classes for good reason - it's fantastic!
Perspective for Comic Book Artist by David Chelsea is great for any type of artist. So is Extreme Perspective & Perspective in Action.
Scott McCloud's Understanding Comics, Reinventing Comics, & Making Comics. The first one is on the internet archive, the second two are likely avaliable at your library or at a bookstore as they're pretty popular.
Speaking of comics, Drawing Comics the Marvel Way has been a favorite of comic artist for years no matter what comic book companies and artist you like, it's a good introduction.
Anything by or endorsed by James Gurney, Color and Light: A Guide for the Realistic Painter is one of my favorites (this is his official page but you can get them elsewhere for cheaper too).
Art resource blogs with good tagging systems: @artist-refs , @help-me-draw , @helpfulharrie , @art-res , @drawingden , & @how-to-art
Lastly, I suggest if you find something you like online for free, SAVE IT! Whether it is through the Wayback Machine, screenshotting a whole webpage, reblogging/retweeting something, or putting it on pinterest, digital media is fickle and tends to go up in smoke when you least expect it. I have a partially organized Pinterest board that helped me find most of the stuff I wanted to keep. Figure out what works for you and save what you can.
981 notes
·
View notes
Text
Finding Deleted Fics: A Multi-Method Guide
i feel like we are the fandom who needs this post the most any fandom has needed it ever.
all of these methods require you to know the title, author and/or link of the fic.
[disclaimer: the fic i am using as an example is not deleted, i just can't think of any other fics to use as an example right now.]
Method #1: Wayback Machine
this is my go to method that i always try first.
steps:
every fic on ao3 has a url of archiveofourown.org/[specific-numbers]. you're gonna need that url, doesn't matter if it doesn't work anymore.
eg.

2. now you're gonna go to archive.org and enter your url in the search bar.
3. something like this will come up. it probably won't be saved as many times though, just once or twice.

just click any of the links now, either the dates marked blue on the calendar or the earliest/latest date. that's it.
drawbacks:
often, a problem arises when searching for fics rated mature or explicit.

the site will have archived this page but not the actual fic. though, maybe lady luck is on your side and clicking proceed will lead you to a saved version of the actual fic. but usually not. and not all fics are saved here. in those cases, i have some more methods.
Method #2: Search Engine Cache
search engines like google and yandex often save a cached version of sites, though yandex is much more reliable than google. i'll give you a tutorial for both.
steps (yandex):
the link isn't completely necessary, just the title and author of the fic will suffice.
go to yandex.com and search for your fic by either entering the url or entering the title and author as such.

3. this will probably immediately come up.
just enter the captcha and it should let you in on the first go but there's a glitch i've encountered where you could be entering the captcha completely correct but for some reason the site still won't let you in. for that, you just have to keep trying again and again until eventually the site lets you in. might take more than 10 tries.
4. once you're in, search results will pop up. directly clicking them will only lead you to the not found page. what you're gonna do is hover over the box of the search result and you'll see 3 dots pop up on the right.
click those and a dropdown menu will appear. click the first option 'saved copy'.
and thats it! this is a much more efficient method especially for explicit or mature fics.
drawbacks:
for some reason, when i open yandex in google chrome, i can't see the 3 dots. i can in firefox though. don't really know what thats all about.
i'll show you how to do it with google too just in case yandex doesn't work.
steps (google):
in the url bar, type cache:[link of fic]. that's pretty much it. google doesn't have a lot of fics saved though so you'll probably get a 404 page.
Method #3: Reddit
there's a subreddit called r/DeletedFanfiction that can probably help you out. either search for the fic as it may have already been posted or req it and someone will probably get you a google drive link soon enough. u/throwthisaway11112 is my lord and savior.
afaik it's still up and running fine despite the reddit protest thing (which i recommend taking a minute to look into).
Method #4: Archive.org Database
okay, now you're gonna need a lot of memory on computer for this one. i'm not gonna even bother and try to explain it, i'll just link you to the original post. thank you once again to the anon who sent me this method!
Method #5: Fandom
if absolutely none of those methods work, you can still just send me an ask and maybe my followers or i will have a saved copy. same for any other fandom, i recommend asking around in popular fandom spaces, someone is bound to have it.
#deleted fics#kay talks#save#ao3#internet archive#excuse my poor graphic designing#i wanted to add my photo thing#but this isnt a#fic rec#so i just slapped ao3 hacks on#decent imo#hope this helps someone out#ao3 hacks#how to ao3
1K notes
·
View notes
Text
THINGS TO DO WITH YOUR OCS
If you’re like me and you like to play around with your OCs a lot, here’s some things you can do with them!
ART & CRAFTS
Put your OCs in character scenario memes! Here’s some I found on Deviantart.
Do an art trade where you draw someone’s OC and they draw yours!
Use those "Draw The Squad" templates and draw your OCs.
Crochet/knit/sew/etc. a plushie of your OC.
You can also make a paper doll! You can find tons of tutorials on youtube.
You can also make a figure of them out of something like clay, cardboard, or another material.
You can build them out of Legos!
You can also create a hand or finger puppet of them.
Draw a comic featuring your characters!
Create an animation of your character.
Draw your characters as animals!
Create pixel art of your OC! Maybe even make it look like video game sprites.
Draw your characters as playing card designs.
Draw your characters as tarot card designs (Suggested by @ultragirl-parsley)
Create a coloring book full of your OCs!
Create a large cardboard cutout of your character. There are tons of tutorials online!
Put your OCs as designs on cookies, cakes, etc. (I kinda want to do this one but I know it won't turn out well for me 'cuz I suck at handling food T_T)
Design your OC's home.
Make a board game about your OCs and their story
Make Minecraft skins of your characters
INTERNET
Make your OCs in picrew or other dress-up things!
Create a character playlist on Spotify or other music site!
Create a Pinterest board with inspo for your OCs! Maybe outfits they’d wear, a moodboard, etc.
Reblog those “tag your OC as” blogs! They usually have a prompt and you can reblog it and tag which OC it describes. Here’s a few blogs which do this: Tag Your OC on Tumblr develop your oc on Tumblr Daily Asks for your OC (tumblr.com)
Take quizzes as your OC! You can find some on Quotev or IDRLabs.
Make a roleplay account as your OC.
Create a quiz on Quotev about your OC. Maybe something like, "Would my OC like you," "How similar are you to my OC," etc.
Put your OCs in the incorrect quote generator.
Find OC questionnaires and templates online.
Create a page on your Tumblr just for your OC! You can include things like a character sheet, general facts, your posts about them, etc.
WRITING
Do character exercises for them! You can find a lot of these on the internet, but here’s an example.
Write from your OC's perspective. It'll help you understand them better!
Create a list of media they enjoy. Maybe movies, video games, songs, etc.
Write a song (or just lyrics) about your OC or parts of their story.
Write a random story about their childhood!
Create an in-universe news report from your OC's world.
Write a poem about your OC.
OTHER
Put your OCs in character alignment memes! Here’s some from a search on Pinterest.
Create voice headcanons for your OCs. Here’s an example of Vivziepop’s for Hazbin Hotel..
Play as your character in video games! Like, maybe design your character in Miitopia or Sims.
Do some theatre improv games as if you were your OC.
Edit your OC on to pride flags.
Also, you could maybe make those like, Tiktok edits of your OC? (Y'know the ones I'm talking about?)
Create an AU version of your characters! (I’ll create a list of AU ideas soon! :D)
Have your characters solve the trolley problem and other moral conudruums.
Cosplay as your OC!
Create ship names for your characters!
You can also find baby names that your OC might like or something.
Create a visual novel/dating sim in Google Slides (or if you can code, you can do it like that!)
Create a crossword/word search relating to your characters and story.
Answer "Would you rather?"questions as your character.
Find poems that remind you of your OC.
Make family trees.
If anyone has anymore ideas, please tell me and I’ll add them to the list!!
#oc#original character#list#oc creator#oc artist#original character artist#original character creator#oc challenge#ocs#masterlist#things to do#artists on tumblr#writers on tumblr
603 notes
·
View notes
Text


NEW YEAR, NEW FONTS #USERGIFNYNF
TYPOGRAPHY CHALLENGE ・ JAN 8-12
Let's kick off 2024 with a new challenge... all about typography! If typography has ever made you feel stuck, we hope this challenge helps you break out of your comfort zone, discover new fonts, and try new styles! This event is open to gifmakers from all fandoms and will run from January 8-12, featuring 5 prompts:
DAY 1 (1/8): LAYER STYLES
↳ Use any combination of blending options (screen, hard light, difference, etc.) and/or layer effects (bevel, shadow, glow, gradient overlay, etc.).
DAY 2 (1/9): ONLY ONE
↳ Refine your choices and use ONLY ONE font throughout your entire set.
DAY 3 (1/10): PERFECT PAIRS
↳ Use a different font pairing per gif. Check out our font pairing recs!
DAY 4 (1/11): THREE TYPEFACES
↳ Use 1 Serif + 1 Sans Serif + 1 Script typeface in your set.
DAY 5 (1/12): FAVORITE FONT(S)
↳ Show off your favorite font(s) any way you want!
Rules for how to participate below the cut:

Reblog this post and follow @usergif
Create a gifset using the prompts provided above
Tag #usergifNYNF so we can reblog your creations!
Caption your post with:
@usergif new year, new fonts: day # - prompt
description
[fonts used: font name (source)]*
*Optional: We encourage including font names and their sources in your caption so others can find them [e.g. Blastimo Sans (dafont.com)]. After all, this challenge is about discovering new fonts and typography styles! You can also put this in a "read more" after your main caption or put a link in part of your caption that redirects to an internal Tumblr link (e.g. a page on your blog that lists fonts used). We don't recommend linking to external sites as doing this too many times in one post can affect the visibility of your post.
Questions about the event? Send us an ask here. We’ll tag all event answers with #usergifNYNF.ask. Need inspo? Check our RESOURCE DIRECTORY for typography tutorials or look through some of our members' font recs!
We also want to take this moment to thank you all for helping us reach over 10k followers! We hope this blog can continue to be a source of help and inspiration for gif effects, and we can’t wait to see what you create for this challenge! 🪄

Fonts used:
Gif 1, in order of appearance: Traveling Typewriter*, Bassy*, Buy More*, Germanica [Plain Germanica]*, Doky*, Magic Retro*, GIN Grotesk [Gin Rounded] (befonts.com), Random House*, Lostar*, Amberla*, Schizoid Personality* (* = dafont.com)
Gif 2: Karla (Google Fonts), Buffalo Script (dafontfree.io)
#usergifNYNF#userace#usershreyu#userelio#alielook#userhella#uservivaldi#usertreena#tuserabbie#userhanyi#tusererika#userbecca#uservalentina#useraish#larlies#usercats#userabs#tusermona#userpickles#*usergif
382 notes
·
View notes
Note
how did you make your own website? & how long did it take you to make it? i am interested in web dev,,, do you have any tips or any helpful sites for beginners/ intermediate? (sorry for asking so many questions!)
hey no problem, asking is a great way to learn always!!
i started on my portfolio site i think around september 2022, forgot about it because of work, then went back to it and deployed it around march 2023! i learned a lot at work, so i just applied what i learned from working in web dev to my own personal site
regarding how to start, if you're a complete beginner, i'd suggest playing around with HTML/CSS first since it's kind of the basic building blocks for doing frontend stuff -- for the first few projects you could try copying simple sites like Google's home page :) there are little interactive tutorials you can find online too like flexbox froggy that can help teach diff concepts in a fun way!
after feeling comfortable with it, i'd suggest playing around with ReactJS when starting out with web dev; it's easy to get into because of its extensive documentation and its large community! there are step-by-step guides into setting it up and several tutorials (both video/article)
if you decide to get into actually deploying your stuff and connecting it to APIs, you can start looking into other frameworks like NextJS/GatsbyJS etc.
getting yourself into a web dev project, like maybe making a small notes/checklist web app or your own portfolio site is a fun way to experiment!! the hardest part is always finding the motivation to start them imo :) wishing u the best on ur web dev journey!!!!! 💗
178 notes
·
View notes
Note
i keep seeing people talk about making ao3 'more accessible' and what they seem to mean by that is dumbing down use of the site so that people won't have to, heaven forfend, learn to click around like the rest of us did to figure out how to use it and... maybe an unpopular opinion, but i don't think ao3 needs to be more accessible to internet noobs. i don't think any amount of slapping pictures and video tutorials on the front page will make the people who actually need to view them do so, for one thing, and for another... ao3 does not need to be the one stop shop for every fandom everywhere and user-friendly for brand new users who never learned the magic of Just Fucking Clicking Buttons.
it was never meant to be the be all end all of fandom, and people who can't be bothered to meet ao3 where it is should not be catered to just in the name of accessibility. i think maybe it's a good idea to still have some bastions of Old Internet around to force people to learn a little self-reliance, given how poor the state of computer and internet education is these days (because schools assume that since everyone grows up with tablets and smartphones glued to their cute little fists that means they can navigate desktop computers and the internet with skill, even though the opposite is true).
the best way to learn is by doing. and there are already tutorials for how to do all of these things all over the internet. if kids these days aren't even aware of how to google when they can't figure out how to do things, i don't want them on ao3! they will bring that willful ignorance with them and we already have enough wattpad babies trying to replicate their fic finder lists as it is
--
128 notes
·
View notes
Photo
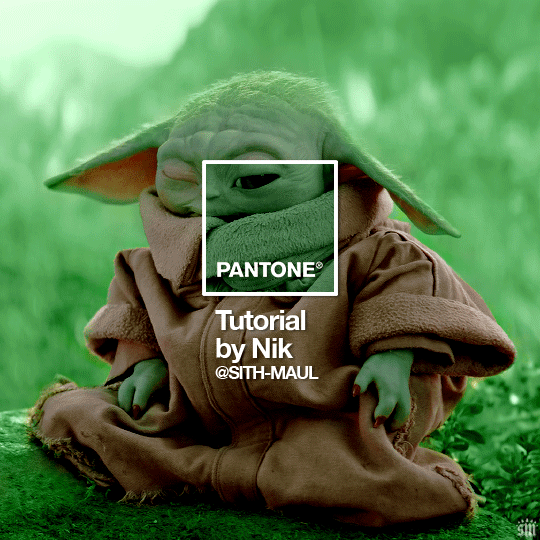
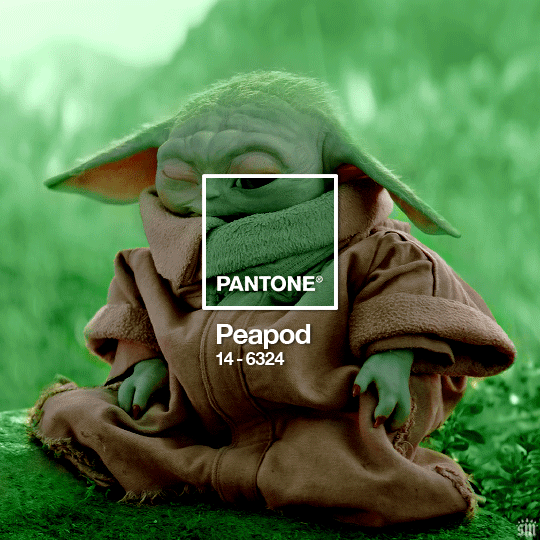
HOW TO: Make a Pantone “Color of the Year” Gif
A few people have asked about my Pantone sets which use the “Color of the Year” swatch design. So, here’s a full tutorial with a downloadable template of my exact overlay! Disclaimer: This tutorial assumes you have a basic understanding of gif-making in Photoshop.
PHASE 1: PICKING A SCENE + PANTONE COLOR(S)
I’m starting with this because it’s crucial for planning your gifset as well as making sure the execution is smooth sailing. The steps in this phase won’t necessarily be literal steps but some tips for how I usually go about making a Pantone set:
1.1 – Picking a scene.
Scene selection is everything. To make things easy on yourself, I suggest choosing scenes where the background is mainly ONE color — for example, a scene where the subject has a clear blue sky behind them. To make things even easier, choose a color that isn’t the same color as the subject of your gif. Like, if your subject is a human, I’d avoid using a gif with a red or yellow background unless you want to do a lot more work to mask their skin.
Rip me using a scene of green lil Grogu in green grass lmao. But I guess that goes to show you could really do this with any scene (I just did lots of masking and keyframe animations to perfect this green shade). BUT selecting your scenes wisely = a lot less work.
1.2 – Picking Pantone colors.
People often ask me how I choose my colors and there are a few methods which I’ll go over below.
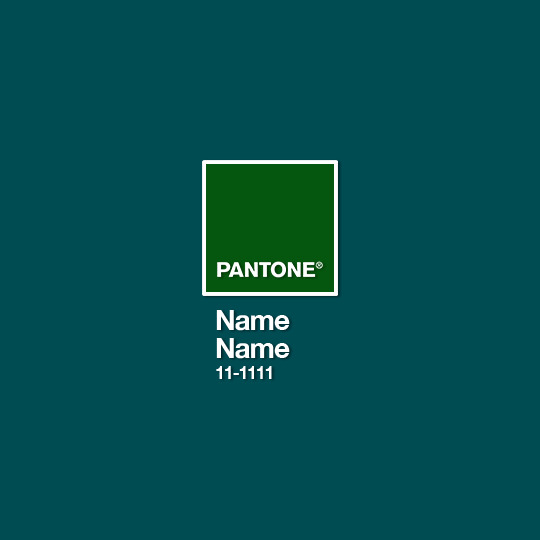
But note that not all Pantone colors have a cute name, or any name (fun fact: only Pantone textiles have official names and they end with TCX, TPX, or TPG).
METHOD A: Google Search “Pantone [Color]”
Source: Google
Easy but not always fruitful, all you do for this method is open Google and type “Pantone [insert color here].” For example, when searching for teal colors, I searched several things including: Pantone Teal, Pantone Turquoise, Pantone Blue, Pantone Green, Pantone Blue Green, etc. Then, just sift through the Google results and click on whatever comes up from the official Pantone website! Since Pantone’s site blocks some info behind a paywall, you won’t be able to get a hex code from them. But you can just screenshot the swatch from their site, put it in Photoshop, and use the eyedropper tool to figure out the color.
METHOD B: Color-Name Site
Source: https://www.color-name.com/
This handy website lets you search by colors using the upper navigation bar. Or you can just type something like "magenta" or "blue pantone" or even “frog” and see what comes up lol. Color-name can put together palettes too! I like that this site also tells you the hex code of a color, which is really helpful for getting the right code to put in my overlay. Note: Not every color on this site is a Pantone textile, so not all of these names are Pantone-official names. You can tell it’s official if, in the Pantone row of the Color Codes table on the middle of the page, it has a code that’s 2 numbers, a dash, 4 numbers, and either TCX, TPX, or TPG.
METHOD C: User-Made Pantone Colors Archive
Source: https://margaret2.github.io/pantone-colors/
For my Wednesday characters as Pantone colors set, it was all about matching the color name to the character’s vibe. So, before looking at the actual colors themselves, I wanted to find the perfect color names. I stumbled upon this page. The pros = it lists pretty much all of the current official Pantone names. The cons = it’s not convenient since there’s no filtering tool. You can do Command+F and search for keywords, but that’s it. I literally scrolled through this whole page for my Wednesday set and read every single name, which... I think means... something’s wrong with me /lh /hj
METHOD D: Official Pantone Color Finder
Source: https://www.pantone.com/pantone-connect
This is last on my list because I don’t actually recommend it. Unless you already have access to this resource from your school or work or something, I would never pay for it and it is a paid feature only. Boooo 👎 But there is a free trial (which I’ve never used), so if you want to see what it’s about, you can definitely go for it.
PHASE 2: MAKING THE BASE GIF
Again, just some super quick tips for making a gif that, I think, looks best with this kind of set — but if you’re still learning how to gif, I do have a basic gif-making tutorial here for extra guidance!
2.1 – Uncheck “Delete Cropped Pixels” before cropping your gif. When you use the crop tool, this checkbox appears in the top toolbar. Unchecking it allows you to move the positioning of your gif later on, which is handy in this case when you want to choose which part of your gif will be underneath the Pantone swatch. You can read more about this tip in my basic gif-making tutorial (linked above; Step 1.5 – Tip B).

2.2 – Make your gif 540px width. My gifs for these sets are usually 540x540px but I think 540x500px will also look good. I think it’s more impactful though to make a big gif to show off your coloring.
PHASE 3: ADDING THE PANTONE OVERLAY
3.1 – Download my template
I made this template myself, so all I ask is that you don’t claim it as your own and that you give me proper insp or template credit in your caption if you decide to use it! Get the PSD with the transparent background here!
3.2 – Download the font Helvetica Neue Bold
The font I use (and I’m pretty sure it’s the same font Pantone uses) is Helvetica Neue Bold, with some very specific letter spacing (which I determined by studying Pantone’s official Color of the Year Very Peri design). It’s already set in my .psd but here are specs in case: color name spacing = -40, color code spacing = -75 (sometimes I’ll do -25 for the numbers after the dash if I don’t like how tightly they’re packed together).
I uploaded Helvetica Neue Bold to my dropbox here!
3.3 – Import my overlay
You can either drag the whole folder onto your gif from tab to tab or right-click the folder, select Duplicate Group, and select your gif as the destination document. Just make sure this overlay group is above your base gif!
3.4 – Fill the color swatch
In my .psd, on the layer labeled “Pantone Swatch,” just grab the hex code of your chosen Pantone color and fill that layer using the Paint Bucket tool! I’ve already put a layer mask on the layer for you so it fits perfectly inside the square outline.
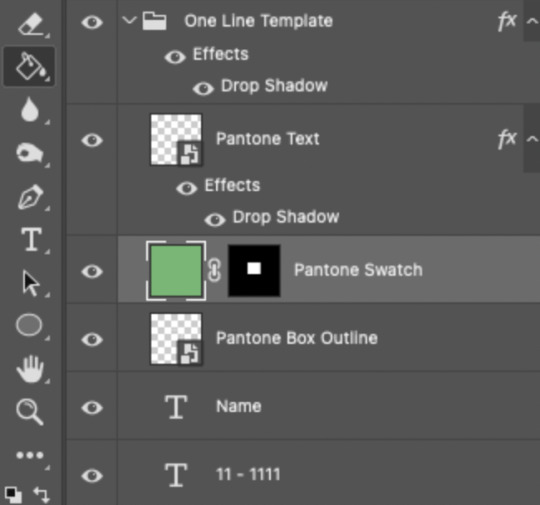
If you’re using my .psd, all the blend mode settings are already in place! I usually set the colored square behind the Pantone logo to the Color blend mode, but sometimes, I prefer the way Hue looks. It’s up to you!
You can also adjust the drop shadow settings to make your text more visible as needed. The layers are arranged in this order so the drop shadows don’t interfere with the semi-transparent part of the colored swatch.
3.5 – Insert the color name and code
My .psd has two versions to choose from: (1) a color name that fits on one line and (2) a color name that requires two lines. Use the one that applies to your color name and simply type that and color code into the corresponding text layers!
Note 1: Pantone doesn’t keep their font size uniform for every color of the year. They’ll sometimes shrink the text to fit longer names, but I like being consistent. So, I use this one font size for all my colors.
Note 2: My template has all the text left-justified and matching the starting point of the P in Pantone. BUT, sometimes the gif looks better if you nudge the text a bit so it looks more centered. Use your discretion when aligning the text!
Note 3: Btw, you definitely don’t have to use the TCX/TPG codes like me. (I’m a nut and there’s no way I’ll ever do a Pantone set and not use those types of codes to maintain uniformity across this series lol.) I’ve seen others do sets inspired by mine using different color codes or even just the hex code itself!
PHASE 4: COLORING THE BASE GIF
The key here is to make a majority of your gif feature your chosen Pantone swatch. If you’re really smart with your scene selections, this should be a breeze! If you’re stubborn like me and want to use specific scenes with the opposite color of your chosen Pantone swatch, there will be a bit more color manipulation involved... However, this isn’t a coloring tutorial, so again, I’m going to give some tips and resources that will hopefully help you out!
4.1 – Color matching.
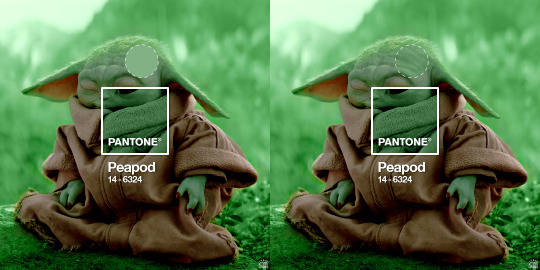
Now that you have the Pantone swatch on your gif, you should be able to reference that center square set to Color/Hue to match the rest of your gif to that color. Feel free to paint a little blob of your color onto another layer anywhere on your gif so you can refer to it closer over a specific part of your gif. For example, I put a little circle over Grogu’s head to see how closely I matched Pantone’s Peapod color, then I tweaked my adjustment layers a bit more until the colors matched near perfectly and I couldn’t tell where that blob begins or ends. The left is the solid color and the right is set to the blending mode Color (like the square):
4.2 – Moving the base gif.
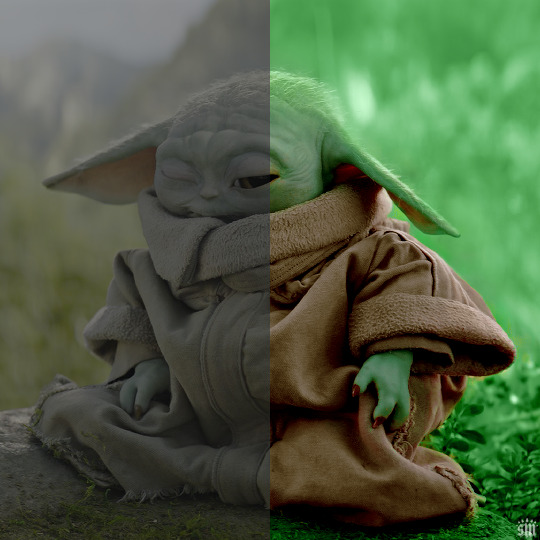
This isn’t really about coloring... but remember when I said to uncheck “Delete Cropped Pixels” in Step 2.1? Well, here’s your chance to adjust your canvas and move the gif around so the exact part you want under the color swatch is in the right position. I personally think these kinds of sets are more impactful when you put a differently colored part of your gif under the swatch so you can see through it and the difference is clearer. In my example, I put Grogu in the center so the green box would cover some of his brown potato sack robe.
4.3 – Color manipulation.
Color manipulation is when you transform your media’s original color grading into a completely different color. The Grogu gif isn’t a great example because the original scene was already a green-yellow color:
I mean, the difference is still pretty drastic but that’s mostly because my file was HDR and washed out as a result.
So, here’s an example I made using a gif from my first Pantone set for ITSV (I’m not doing this demo to the Grogu gif because it’d be too much work to manipulate a green background with a green subject. This ITSV scene is perfect bc the majority of it is blue while the subjects are mostly red.)
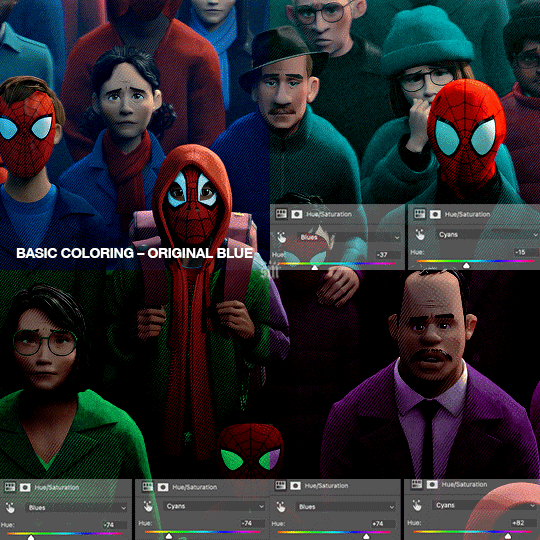
For the “basic coloring,” I did everything as I normally would: mostly levels and selective color layers.
For color manipulation, my fav adjustment layer is Hue/Saturation (those are the screenshots that are on the gif above). When you’re smart with your scene selection, it’s pretty easy to manipulate colors with one Hue/Sat layer because you usually only need to tamper with 1-2 colors and, hopefully, they shouldn’t interfere with skin tones (obviously you’ll do other layers to further enhance your gif’s brightness, contrast, etc. — but I just mean the heavy lifting usually only takes me one layer with a good scene choice).
All you have to do is figure out what color the majority of your gif is, toggle to that color’s channel, and fiddle with the hue slider. In the gif above, you can see that I played with both the Blue and Cyan channels. Here’s why:
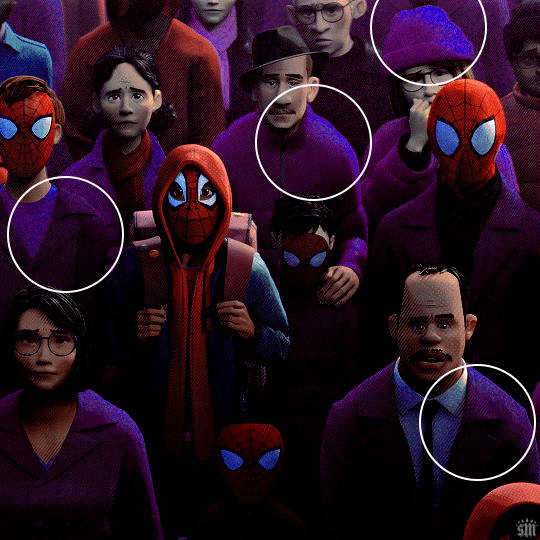
If I only adjust the Blue hue slider, I get those speckles of cyan peaking through in the gif above. Unless you’re working with completely flat colors — like 2D animation with zero shading/highlights — a color is never just one, solid color. Blue isn’t just blue, it may have some cyan. Purple isn’t just purple, I often have to toggle the Blue channel too. So, yeah, be mindful of that!
I’ll sometimes go in with the brush tool and paint over some areas of my gif to really smooth out the color and make it uniform. When I do that, I just set that painted layer to the Color blend mode. Some of the resources below go into that technique a bit more!
4.4 – Coloring resources.
While not all of these tutorials cover the same type of color manipulation I did in my gifs, I think the principles are similar and would be helpful to anyone who’s a beginner:
– color manipulation tutorial by usergif/me: I go a bit more in depth here (I think lol)
– how to change the background of any gif by usergif/fionagallaqher: a great tutorial for using keyframes so you can manipulate the background of a gif with lots of motion
– bea’s color isolation gif tutorial by nina-zcnik: this tutorial has more tips about hue/saturation layers as well as masking your subject
– elio’s colouring tutorial by djarin: this tutorial shows a lot of examples of first manipulating the colors then brushing over the gif with a matching color for extra coverage
And just one last note on coloring, I always try to appreciate gifs with the mentality that “good” coloring is 100% subjective. One of the only things I would classify as “bad” coloring is when you whitewash or [color]wash someone’s skin tone. So, as long as you keep the integrity of your subjects’ natural skin — especially if they’re a POC — you should feel good about your coloring, because it’s yours and you worked hard! <3
PHASE 4: EXPORT
That’s it!! If you work in Video Timeline like me, just convert from Timeline back to Frames, export your gif, and voila!
Easy PEAsy. 🥁
If you have specific questions about this tutorial, my ask box is open <3
Also, check out these other Pantone-inspired sets by my friends @nobodynocrime (Mulan set) and @wakandasforever (Ponyo set)! There are so many ways to use Pantone colors in your set, so I hope this inspires you to create something beautifully colorful <3
#gif tutorial#completeresources#usershreyu#useryoshi#userelio#userannalise#userzaynab#userives#usermarsy#usertreena#usercim#userrobin#userkosmos#usersalty#usermills#userhella#alielook#resource*#gfx*#pantone*
990 notes
·
View notes
Text
Are Game Blogs Uniquely Lost?
All this started with my looking for the old devlog of Storyteller. I know at some point it was linked from the blogroll on the Braid devlog. Then I tried to look at on old devlog of another game that is still available. The domain for Storyteller is still active. The devblog is gone.
I tried an old bookmark from an old PC (5 PCs ago, I think). It was a web site linked to pixel art and programming tutorials. Instead of linking to the pages directly, some links link led to a twitter threads by authors that collected their work posted on different sites. Some twitter threads are gone because the users were were suspended, or had deleted their accounts voluntarily. Others had deleted old tweets. There was no archive. I have often seen links accompanied by "Here's a thread where $AUTHOR lists all his writing on $TOPIC". I wonder if the sites are still there, and only the tweets are gone.
A lot of "games studies" around 2010 happened on blogs, not in journals. Games studies was online-first, HTML-first, with trackbacks, tags, RSS and comment sections. The work that was published in PDF form in journals and conference proceedings is still there. The blogs are gone. The comment sections are gone. Kill screen daily is gone.
I followed a link from critical-distance.com to a blog post. That blog is gone. The domain is for sale. In the Wayback Machine, I found the link. It pointed to the comment section of another blog. The other blog has removed its comment sections and excluded itself from the Wayback Machine.
I wonder if games stuff is uniquely lost. Many links to game reviews at big sites lead to "page not found", but when I search the game's name, I can find the review from back in 2004. The content is still there, the content management systems have been changed multiple times.
At least my favourite tumblr about game design has been saved in the Wayback Machine: Game Design Tips.
To make my point I could list more sites, more links, 404 but archived, or completely lost, but when I look at small sites, personal sites, blogs, or even forums, I wonder if this is just confirmation bias. There must be all this other content, all these other blogs and personal sites. I don't know about tutorials for knitting, travel blogs, stamp collecting, or recipe blogs. I usually save a print version of recipes to my Download folder.
Another big community is fan fiction. They are like modding, but for books, I think. I don't know if a lot of fan fiction is lost to bit rot and link rot either. What is on AO3 will probably endure, but a lot might have gone missing when communities fandom moved from livejournal to tumblr to twitter, or when blogs moved from Wordpress to Medium to Substack.
I have identified some risk factors:
Personal home pages made from static HTML can stay up for while if the owner meticulously catalogues and links to all their writing on other sites, and if the site covers a variety of interests and topics.
Personal blogs or content management systems are likely to lose content in a software upgrade or migration to a different host.
Writing is more likely to me lost when it's for-pay writing for a smaller for-profit outlet.
A cause for sudden "mass extinction" of content is the move between social networks, or the death of a whole platform. Links to MySpace, Google+, Diaspora, and LiveJournal give me mostly or entirely 404 pages.
In the gaming space, career changes or business closures often mean old content gets deleted. If an indie game is wildly successful, the intellectual property might ge acquired. If it flops, the domain will lapse. When development is finished, maybe the devlog is deleted. When somebody reviews games at first on Steam, then on a blog, and then for a big gaming mag, the Steam reviews might stay up, but the personal site is much more likely to get cleaned up. The same goes for blogging in general, and academia. The most stable kind of content is after hours hobbyist writing by somebody who has a stable and high-paying job outside of media, academia, or journalism.
The biggest risk factor for targeted deletion is controversy. Controversial, highly-discussed and disseminated posts are more likely to be deleted than purely informative ones, and their deletion is more likely to be noticed. If somebody starts a discussion, and then later there are hundreds of links all pointing back to the start, the deletion will hurt more and be more noticeable. The most at-risk posts are those that are supposed to be controversial within a small group, but go viral outside it, or the posts that are controversial within a small group, but then the author says something about politics that draws the attention of the Internet at large to their other writings.
The second biggest risk factor for deletion is probably usefulness combined with hosting costs. This could also be the streetlight effect at work, like in the paragraph above, but the more traffic something gets, the higher the hosting costs. Certain types of content are either hard to monetise, and cost a lot of money, or they can be monetised, so the free version is deliberately deleted.
The more tech-savvy users are, the more likely they are to link between different sites, abandon a blogging platform or social network for the next thing, try to consolidate their writings by deleting their old stuff and setting up their own site, only to let the domain lapse. The more tech-savvy users are, the more likely they are to mess with the HTML of their templates or try out different blogging software.
If content is spread between multiple sites, or if links link to social network posts that link to blog post with a comment that links to a reddit comment that links to a geocities page, any link could break. If content is consolidated in a forum, maybe Archive team could save all of it with some advance notice.
All this could mean that indie games/game design theory/pixel art resources are uniquely lost, and games studies/theory of games criticism/literary criticism applied to games are especially affected by link rot. The semi-professional, semi-hobbyist indie dev, the writer straddling the line between academic and reviewer, they seem the most affected. Artists who start out just doodling and posting their work, who then get hired to work on a game, their posts are deleted. GameFAQs stay online, Steam reviews stay online, but dev logs, forums and blog comment sections are lost.
Or maybe it's only confirmation bias. If I was into restoring old cars, or knitting, or collecting stamps, or any other thing I'd think that particular community is uniquely affected by link rot, and I'd have the bookmarks to prove it.
Figuring this out is important if we want to make predictions about the future of the small web, and about the viability of different efforts to get more people to contribute. We can't figure it out now, because we can't measure the ground truth of web sites that are already gone. Right now, the small web is mostly about the small web, not about stamp collecting or knitting. If we really manage to revitalise the small web, will it be like the small web of today except bigger, the web-1.0 of old, or will certain topics and communities be lost again?
56 notes
·
View notes
Note
i want to make a neocities so bad but i dont know where to start :(( any advice? i love ur website!!
hiii! thank you im so happy you visited and liked it <3 so like 2 months ago i was in the same spot as you - no idea how to code, but the idea of a personal website thrilled me so much!
i basically spent a few weeks browsing sites on neocities, noting down what delighted me, what i would personally like to have on my own website, etc.
after that i searched furiously for coding tutorials and making a personal website (around this time i was also making a portfolio website, so i had a couple of links saved). here are some
pages github
MDN web docs - like w3schools, but up to date !!!
https://sadgrl.online — a TON of resources 🌟
neocities learn page (HTML, CSS, JS, and lots more! + a cute interactive cat tutorial) 🍰
codetheweb - tutorials
codeacademy — free coding tutorials
freecodecamp — all free coding tutorials
a bunch of resources
i started with neocities' learn page, which has a really quick intro to HTML and CSS. after that, i bookmarked a ton of posts on sadgrl.online's website, because she's super big on neocities and has sooo many helpful beginner tutorials.
after that i basically got an HTML boilerplate from eggramen and just started going from there! you can just directly upload your website files to neocities (make sure your folders are constructed the same way!) once you have an account.
basically tldr: grab a boilerplate HTML template from anywhere, make a neocities account, and start fiddling with it right away! google everything you don't know or don't understand. good luck 💖⚙️
810 notes
·
View notes
Note
Hii!! I found out about trading an hour ago and am a bit confused. Like, how do you even find the bootlegs if not on youtube? Also, why trade instead of posting publicly?
I have a YouTube page where I post slime tutorials and the like of shows I have watched or proshots I have downloaded. Why gatekeep? I'm literally just curious, I don't mean to offend.
So, the thing that I really, really want to emphasize, because I feel like it'll make everything make more sense, is that bootlegging is illegal. It is against the law, people can and do get arrested for it, and there have been many recorders (mostly filmers) in the past who have been caught and simply disappeared, taking with them any unreleased boots and all potential boots they could have filmed in the future.
And I say that because I REALLY want to emphasize that when people, especially filmers, say, "Hey, can you not post these on YouTube or anywhere else publicly?" it's NOT because they are trying to "gatekeep". Many of them are making their bootlegs as accessible as possible by making it available for purchase and/or trade down the line. They are doing it for their own safety. They are risking legal repercussions getting these bootlegs to you and are asking you not to get them into trouble by blatantly posting their stuff on the most accessible video-sharing site out there. THEY ARE TRYING NOT TO GET FINED, ARRESTED, OR WORSE.
Okay, got all that? Great! Now I can answer your questions.
First - many traders, myself included, have trading sites where we post everything we have available to trade. That is a great place to find bootlegs, and even better, people who have those bootlegs and might be willing to trade or (if you're polite) gift them to you! Here's mine. How do you find these sites? Honestly, a lot of times I just stumble on them by Googling something like "[name of show] bootleg trade". What I also personally do is start bookmarking sites of traders that have large collections of shows I'm interested in (like Phantom) or the sites of people who record bootlegs, so that I can easily check up on them every week or so.
There are also many areas where traders congregate! Musical Exchange on LiveJournal is one of the easiest to find. There was a Yahoo board back in the day that has not turned into a Groups io thing. There's Encora Reprise (I don't use it and I feel like it keeps going down but some swear by it). There are also several Discord servers devoted to trading or set up by filmers. Those are also great places to find other traders and newly released boots.
Second, I partially answered your question about posting publicly with the safety issue, but the other answer is, simply, that trading is decentralized because it's illegal. I don't think there's any one person who has every bootleg ever recorded, it's all spread out amongst us, and it's going to be extremely difficult to get everyone to pool it all together because, well, this is also a hobby, not a job, and we just don't have time for that. And even if we did, there probably is no person with enough space and money and time to upload every bootleg in the world and maintain it, because they will not get enough benefit out of it because musicals are a relatively niche interest.
Here's another way of thinking about it. I'm at the point of trading almost exclusively Phantom. I don't have every bootleg in the world, but my collection of Phantom boots alone is 2.7 TB. That is Phantom alone, I haven't even considered every other musical in the world and all their bootlegs. If you want me to have all these available publicly, I would basically need to get my own server. If I want my own server, I'm probably going to pay money. Hundreds of dollars of money. And I will have to maintain this, which will also cost money, with possibly the only way I get money back being to use, I don't know, ads or making users pay money for accounts, and unless I finagle things legally I could also be responsible if the site gets found and taken down, and you want me to do this, constantly, for bootlegs that 99% of people won't download? (You really think some people are raring to get the blurry 1992 video of Jun Sawaki, for example?) Yeah, that looks like a lot of work and trouble for me to do something that probably won't save others a lot of trouble either.
Anyway, I know you don't mean to be rude and I hope the above didn't come off as aggressive, it's just that, well, I've seen these arguments time and again and it never really seems to cross people's minds that, at the end of the day, this is a hobby that is technically illegal, that just about all the rules and limitations around are done for the safety of the bootlegger and not because they enjoy waving the boot out of your reach, and that trading is done because it's the safest, most anonymous way of, well, getting theatre bootlegs, that people have come up with. At any rate, I hope that answers your questions!
22 notes
·
View notes
Last Seen Blogs


nomadnoah
Nomad Noah
nomadnoah
Nomad Noah

rayix
A Pez Candy Dispenser

ldragonslayer
⠀⠀⠀⠀⠀⠀⠀ ⠀⠀⠀⠀⠀⠀Viam supervadet vadens