#tf2 tutorial
Explore tagged Tumblr posts
Visit Tumblr Blog
Explore Tumblr blogs with no restrictions, modern design and the best experience.
Last Seen Tumblr Blogs


Fun Fact
Tumblr Inc. is funded by 13 investors.
Note
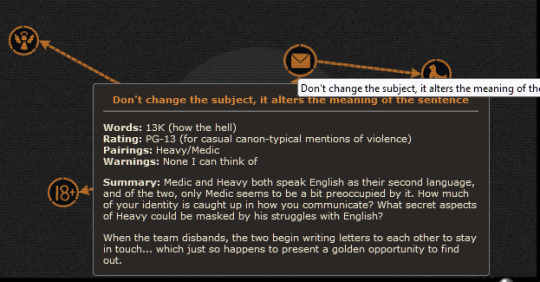
Question i know you use sfm to make your comics but may I ask what the process is like? I’m thinking about making a tf2 comic which I’ve already made a few panels for but I wasn’t happy with the plot so I’m starting over from scratch, and drawing with a mouse Isn’t the most efficient way of making comics, would you recommend sfm for making tf2 comics?
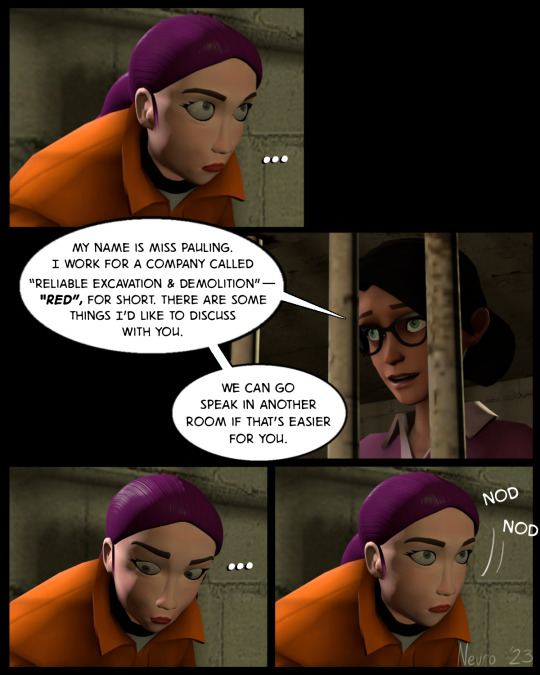
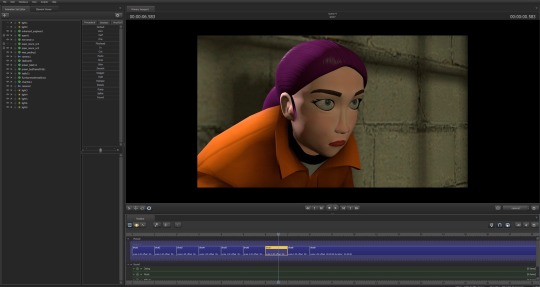
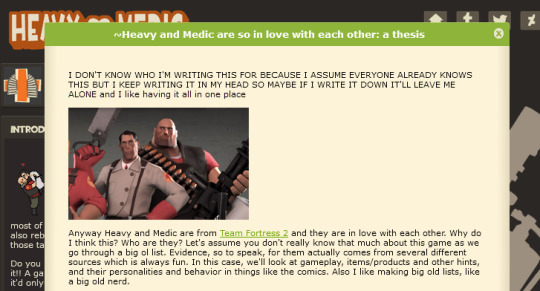
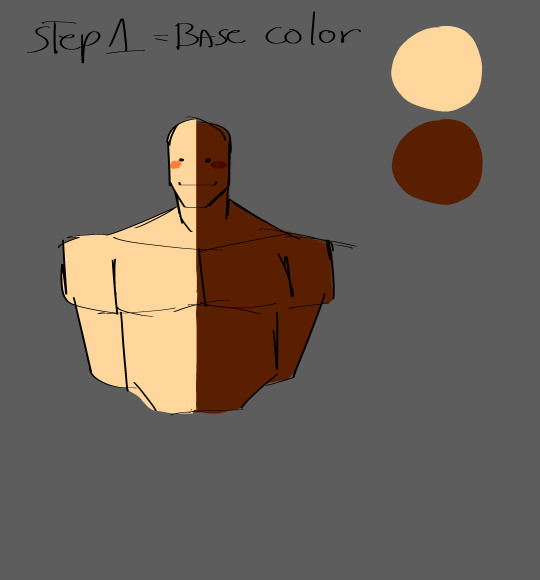
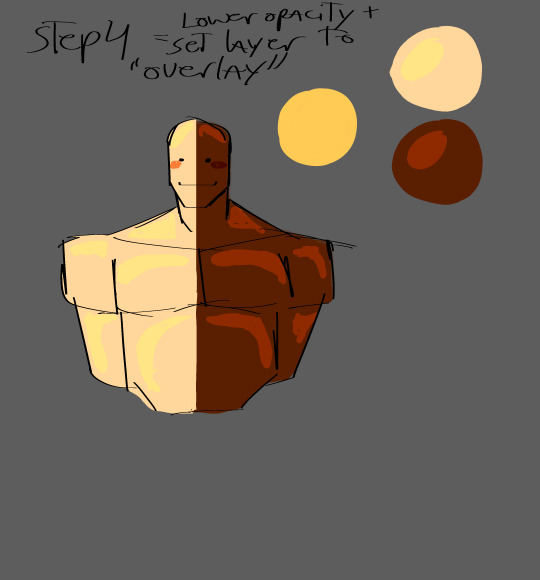
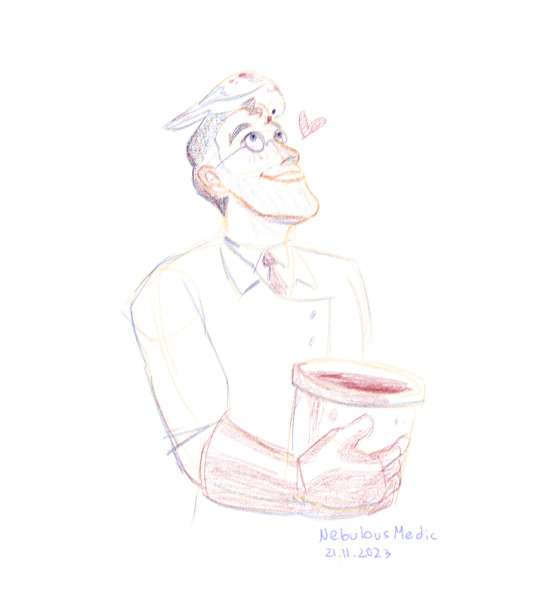
How I Make My Comics
Omg yes I’ve been wanting to make a post like this! I definitely recommend SFM for making comics, I think it’s a lot faster than drawing would be, especially if you plan on including backgrounds. (Also, drawing tf2 characters is Hard😭)
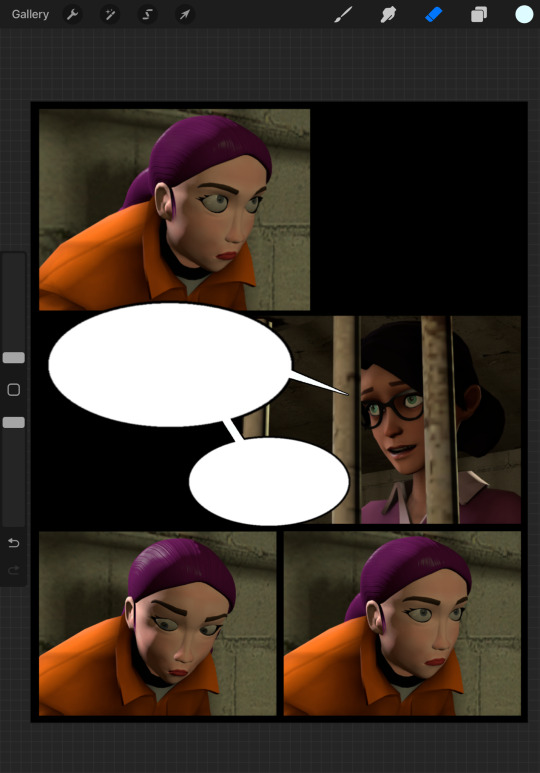
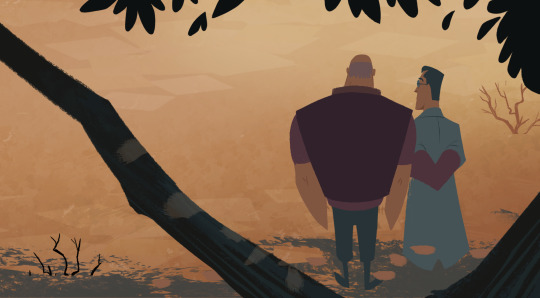
Here’s how I made page 22!
=========
First in SFM I set up the scene with a map from the workshop I liked. I also used the workshop for a bunch of props and character models and stuff.
(I did a decent amount of model hacking for this scene too. The model for Prison Uniform Cap is literally just her head shoved onto the recolored body of the open fortress mercenary from the workshop after I messed with his proportions to match Cap’s body shape better.)
Here’s what the scene setup for one of the panels looks like:
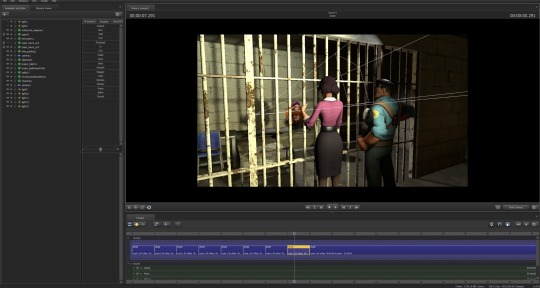
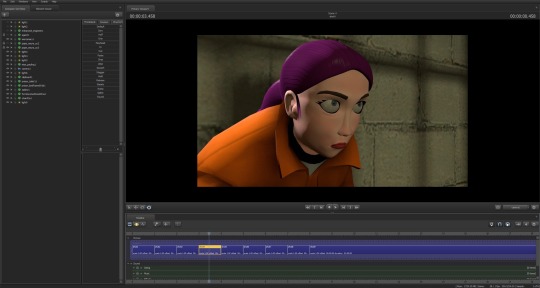
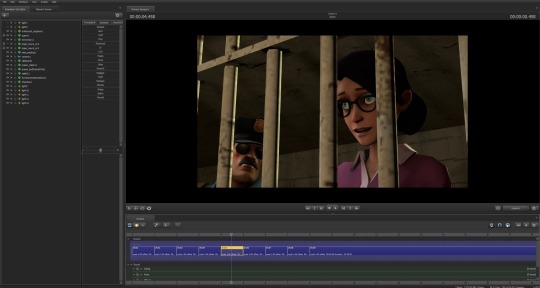
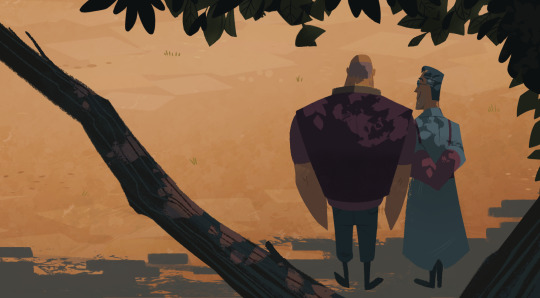
After I set the scene up, I make each of the panels as it’s own shot in the Clip Editor.
Here’s what each of the unedited panels for this page look like in sfm:

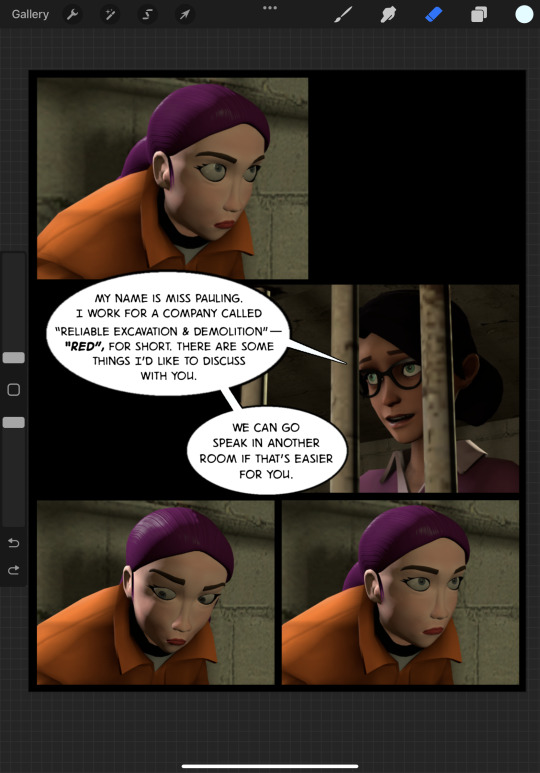
After those are done, I export them as posters in 4K, then upload them to Google Drive so I can access them on my iPad.
After I download the pictures onto my iPad, I open Procreate and start with a black 4x6 background:
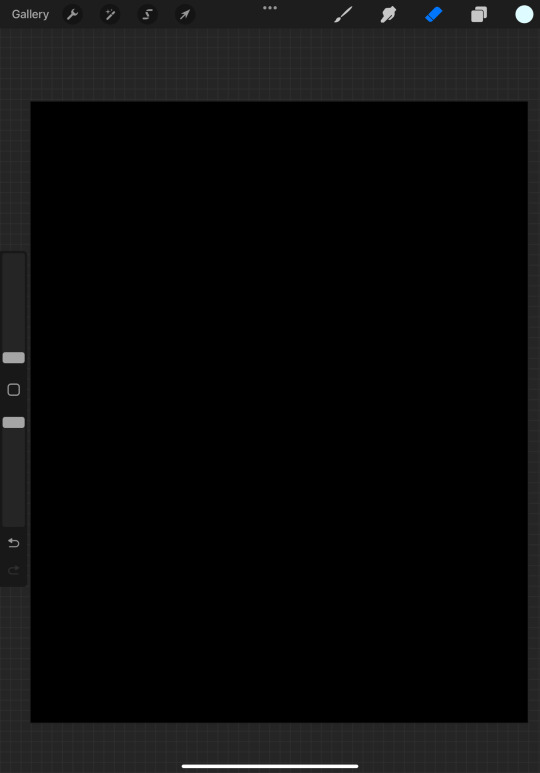
Then I import the images:
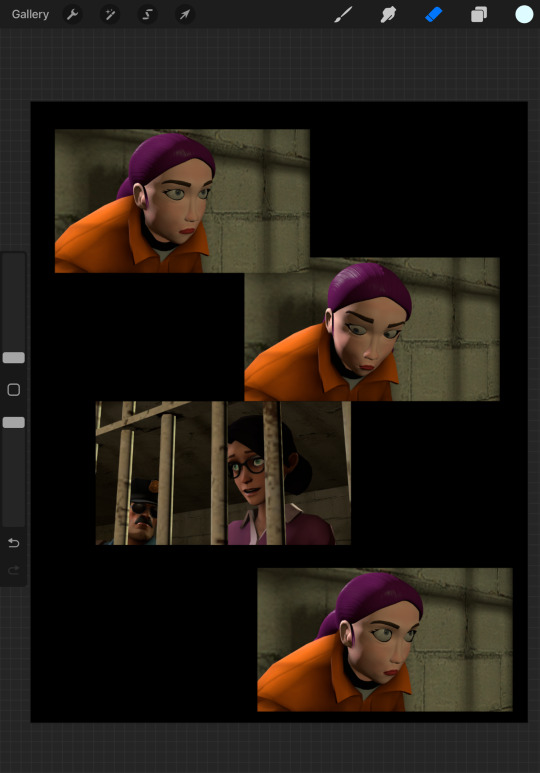
After this, I crop and resize them, and then arrange them on the page how I want:
Then, I use a special brush for making speech bubbles (brushes like this can be downloaded for free):
Then I add the text in a font that looks similar to the one the official tf2 comics use:
After that, I add effects using text as well. I have a few different fonts downloaded depending on what kind of effect I want:
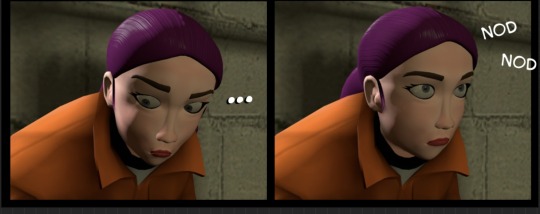
And effects like motion lines I draw in myself

Finally, I add my watermark on there
The page is now finished and ready to be exported as a PNG!

Lmk if there’s anything I should clarify or go more in-depth with, like model hacking, posing, or text/visual effects!
(And I can’t wait to see the comic you make pls lmk when you post it so I can go see a a)
#tf2#team fortress 2#tf2 comic#tf2 comics#tf2 fan class#tf2 fan character#tf2 fan comic#tf2 fanfiction#tf2 fanart#tf2 fanfic#tf2 shitpost#Tf2 tutorial#Tutorial#behind the scenes#medic my beloved#tf2 miss pauling#miss pauling#miss pauling tf2#sfm#sfm tf2#sfm poster#source filmmaker#procreate#art tutorial#how to#asks#tf2 oc#tf2 ocs#tf2 oc art#tf2 tenth class
38 notes
·
View notes
Text

'So, there's been something I've been meaning to tell you...' Some progress pics under the cut for fun.

Blockout / Shapework and a Little Rendering / Lighting Solidfication to Bring it Closer to Original Sketch / Details and Grade
#tf2#tf2 fanart#tf2 medic#team fortress 2#tf2 heavy#heavymedic#red oktoberfest#whoops i didn't take very good in progress pics but hopefully vaguely interesting to see#can studios pay me to draw trees again...i will happily draw trees for the rest of my life#you cant make me draw hands i wont i cant#where's that artist meme of hides the hands#i show where the hands should be but just dont draw them lmao#tutorial
2K notes
·
View notes
Text
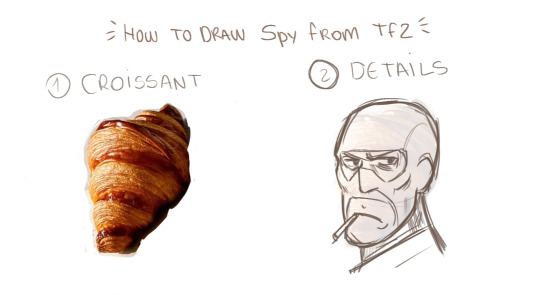
HOW TO DRAW SPY FROM TF2!!
289 notes
·
View notes
Note
I would love insight into how you animate so smoothly in gmod
hi!! so i use the ragdoll mover and the stop motion helper add-ons :D

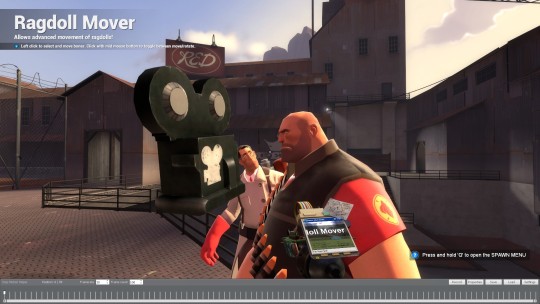
you use the timeline seen on the bottom of the screenshot to create your key frames and everything else in between ☝️ now i am no pro animator and what little i know ive picked up from various tutorial videos over the years....
stop motion helper has a great video tutorial for the very basics of how to use it! as for the process of animation itself well ummm i can really only link the 12 principles of animation, as i've mentioned that im no expert on the topic.
here's a video i made for the occasion--and i hope you don't mind, but i borrowed bolts for this demonstration ^_^ (i recognize the irony of using a robot to demonstrate fluid movements, but if other animators can use mannequins...)
youtube
had to put the video (unlisted ofc) on yt cause it got longer than i expected it to >_>
see the finished product below the cut!! had 2 mega compress it bc of tumblr's 10mb gif limit grrr but you can see it more clearly in the video anyway

#asks#tf2#team fortress 2#gmod#garry's mod#animation#my art#ANYWAY I HOPE THIS HELPS..#i havent done an art tutorial in a dogs age#also i had to mega compress the gif bc it was originally 119 mb...bolts too big for the post#i love ur robot guys btw i hope that much is clear hehe#edit: ik bolts is the boss type soldier bot but i. i needed him smaller so i didnt have to stand on a box while animating him LOL
102 notes
·
View notes
Text
People who draw medic....
SHOW ME YOUR FUCKING WAYS!! HOW DO YOU DRAW THIS MAN!! EVERYTIME I DRAW HIM HE LOOKS LIKE A BOX HEAD OR A PURE ASS CIRCE
I CANT GET HIS EYES, HAIR, FACE OR BODY RIGHT!!! PLEAAASEEEEE SOMEONEEEEEEE TEACH ME YOUR WAAAAAYYYSSSSSSSS
#team fortress 2#tf2#im bored#art tutorial#pls#just pls#im begging#begging youuuuu#now put your loving arms out babyyyy#jk#BUT PLS TEACH ME#medic tf2#tf2 medic
244 notes
·
View notes
Text

I couldn't fit the tutorial on a reply lmao, here's a full post explaining my process :]]
STAMP TUTORIAL (TF2 edition, but works for everything)
99% of the process is done on the website ezgif. Ezgif carries the stamp-making process lmao
1. Get your GIF
Tenor: Ok place to grab your GIFs. Average quality of the GIFs is good enough, and looks ok when resized to the size of the stamp. You'll find like 1 normal GIF every 4 buff characters GIF tho.
GIPHY: Average quality of the GIF is better (I don't think the web compresses the GIFs that are uploaded)… If you find what you're looking for. You'll have to SCROLL before finding what you're looking for because there are always non-related GIFs on the top of your searches or the same GIF multiple times, it's crazy.
makeagif: You will find cool GIFs, but the quality is pretty low (I think the web itself compresses the GIFs a lot). It looks bad even when resized down. And it has a watermark, which I recommend cropping because it's not even visible when resized, it just looks like a gray blob on the corner.
Google: Best option by far, quality is pretty good and the ratio of “things I was looking for/things I actually find” is SLIGHTLY in favor of “things I was looking for” (and most of “things I actually find” are just the characters rotating, not NSFW, so that's only a nice change from Tenor). You won't have to scroll much to see different and interesting GIFs. JUST REMEMBER TO FILTER BY GIFS.

You search whatever > Images > Tools > Type > GIF
Make it on your own: Aka, you download your video, go to ezgif's “Video to GIF” (then you can crop it, CUT IT. THIS IS IMPORTANT, YOU DON'T NEED TO GO ANYWHERE ELSE TO CUT YOUR CLIP, YOU CAN DO IT ON EZGIF ITSELF). Ok, I lied, it wasn't Google, this is the best oftion by far. You get exactly what you want, the best quality if you don't compress it much until after the GIF has been resized into the size of a stamp… It's just super time-consuming, and you'll have to spend like an entire hour just watching a video to find the clips.
OK, I HAVE MY GIF NOW
Hehe, his legs go pipupipu
2. Resize
Go to ezgif, this is where the fun begins (if you weren't on ezgif already). You download your GIF, or copy the link and insert it, or you'll have it there if you made it yourself.
A STAMP MAKES 99px × 56px
THE INNER PART OF THE STAMP MAKES 91px × 47px
I RECOMMEND MAKING YOUR GIF 92px × 48px
BTW, THESE MEASURES ARE FOR THE TEMPLATE I'LL GIVE YOU LATER. If you use another template, just go to an image editor and see what the inner size of the stamp is.
So, you set your GIF's width to 92px.

Then crop it, so your height is 48px.

Or you can resize it so it's directly 92px × 48px, but the crop will be in the center, and SOMETIMES YOU DON'T WANT THAT.
For example:

It's a vertical GIF whose area of interest is not in the center, so if we resize it directly-

oops-
ANYWAY
Once you have your GIF resized:
IMPORTANT: BEFORE THE NEXT STEP, REMEMBER TO CONVERT TO GIF IF THE FILE YOU'RE WORKING ON ISN'T A GIF ALREADY
Sometimes you'll be working with a webp without even noticing (EW, I hate webp) and transparencies don't work particularly well with that extension.
3. Overlay

Click on this icon.
Ok, now that that's fixed:

Extend the size of the canvas.

Select your template and Upload image!

This is the template, btw.

Then move the overlay around until it contains the GIF nicely, or just set Left to 43, Top to 20 and Generate image! (I have these numbers memorized, it saves you like 20 seconds lmao)
Also, again, these numbers work on MY template, if you use another one, you'll have to figure it out yourself.
4. Crop

THIS OPTION IS A TIME-SAVER FR
5. Optimize (optional, highly recommend)

I always set my optimization method to Lossy GIF and level 10 because I find that there is no quality loss, and the file size might drop by 30%-70% (actually crazy). These percentages don't change much in higher compressions, even though you'll start seeing a drop in quality around level 35 of compression (the default).
6. Save

YIPPE!!! Your stamp is done :D
You can save it and look at it and place it on your profile or website.


Here it is btw, in case someone wanted it :]] The Sniper GIF but correctly cropped and made into a stamp as well.
Now do that another… eleven times, and you'll have a stamp pack to make into a Tumblr post... Oof TT
There's no website that lets you make stamps faster lmao (I wish)
@sir-broken-bones (I'm @ them so they actually see it, I made this tutorial for them after all lol)
#team fortress 2#tf2#tf2 scout#tf2 sniper#stamps#da stamps#tutorial#graphics#old graphics#neocities#old web graphics#old web
172 notes
·
View notes
Text

So I spent the last couple days making a HeavyMedic fansite and it is the most ELABORATE SITE I'VE EVER MADE and I'm so unbearably proud of it, it looks SO COOL!! Especially the Fictracker page!! It's even responsive!! You have no idea how long it took to get everything looking right and spacing it and everything. I've never made a site that looks this fancy before! I'M SO PROUD OF IT LOOK AT IT!! LOOK AT IT!!! LOOK AT IIIITTTT plz


Also made some link buttons! Still don't really have an official name for the site as it is but WHATEVER maybe I'll decide on one later. YOU CAN USE THESE TO LINK TO IT FROM YOUR OWN SITE you have your own site right, you should make onneeee (here are some resources if you don't know how) and if it's a TF2 site TELL ME AND I WILL LINK BACK TO IT
[patreon]
#team fortress 2#heavymedic#red oktoberfest#there are some easter eggs on the site too :3#try and find them!!#i just have this open in a tab and keep looking at it and being like man this is so cool#web design can be so tedious and yet so rewarding#have a new appreciation for how slick the tf2 ui is#absolute goldmine for site design#lol comparing this to the huntersmoker site or ghost tutorial that's as barebones as you can get
725 notes
·
View notes
Text
gunslinger............
#ty wackarat for the cool tutorial#it made me comprehend#ALSO SINCE WHEN DO YOU FOLLOW ME HELOO???#i feel honoured#you're so cool..........#tf2#tf2 fanart#engineer tf2#doodle dump#gunslinger#anyways i might draw more of this soon
239 notes
·
View notes
Text
Got an exciting announcement to make here folks, We've got four new tutorials ready for yall!
Shotgun and Joint Tightening: https://youtu.be/yOEzU89aJJo?si=uQSdXCzwUcZ9tVPq
youtube
V1: https://youtu.be/l3uHQniXM1c?si=Eqn_ouWAF5xKB8uS
youtube
V2: https://youtu.be/kRfe2nRJ7vo?si=0f-jQ_et0xLzFXqX
youtube
And Mirage!: https://youtu.be/YbbYh6q_I2s?si=zVFgOJkwp3BAy_Xx
youtube
#lego#custom#ultrakill#v1 ultrakill#v2 ultrakill#mirage ultrakill#tf2#lego tutorial#tutorial#v1#v2#mirage#v2 fanart#v1 fanart#mirage fanart#Youtube
63 notes
·
View notes
Text
Got sfm yesterday, just kinda messing around before I actually find a tutorial

#I know its not great but its my first time using the program#ill actually find a tutorial later today and see what I can learn#tf2#tf2 sfm#tf2 heavy#tf2 medic#tf2 scout#tf2 heavy x medic
348 notes
·
View notes
Note
hey hey hey we need a tutorial on how to oil up characters
okay!! :D
TUTORIAL ON HOW TO DRAW THAT CHARACTER U LOVE OILED UP:
(I put a light skintone and a dark one so I can show both examples)(Even tho step 6 is optional, I HIGHLY RECOMMEND IT!!!)


DONE!!:DD ENJOY OILING UR CHARACTERS OILED UP!!! PLS TAG ME IF U USE THIS TUTORIAL OR NEED HELP!!!!!! +
This wasn't free... draw heavy oiled up for me if u want to use this.

#deltas consulting room#deltas serious pencil grabbin#deltas yappin#deltas men obssesion#tf2#tf2 heavy#ask#asks#asks open#art tutorial#drawing tutorial#tutorial#digital art#artists on tumblr#digital artist#digital art tutorials#digital art tips#I WANT THIS TO GO VIRAL IDK WHY AKDJIOADOAWNOD
110 notes
·
View notes
Text
#tf2 heavy#tf2 medic#tf2#tf2 fanart#text is just flavour to make it look more screenshotty idk#there's so much wrong with this image but im moving onto other stuff fkjgjkfds#i'll draw other characters soon i promise#ty for the sweet tags on this!!#i'll do a tutorial at some point as this sort of lighting is NOT complicated at ALL im telling you. it's literally just a multiply layer#and a bloom
4K notes
·
View notes
Text

I just found an art style I REALLY liked messing around with.... colored pencil vibes
#tf2#tf2 fanart#tf2 scout#scout#tf2 spy#spy#tf2 medic#medic#my art#if enough people are interested I might make a tutorial
372 notes
·
View notes
Text
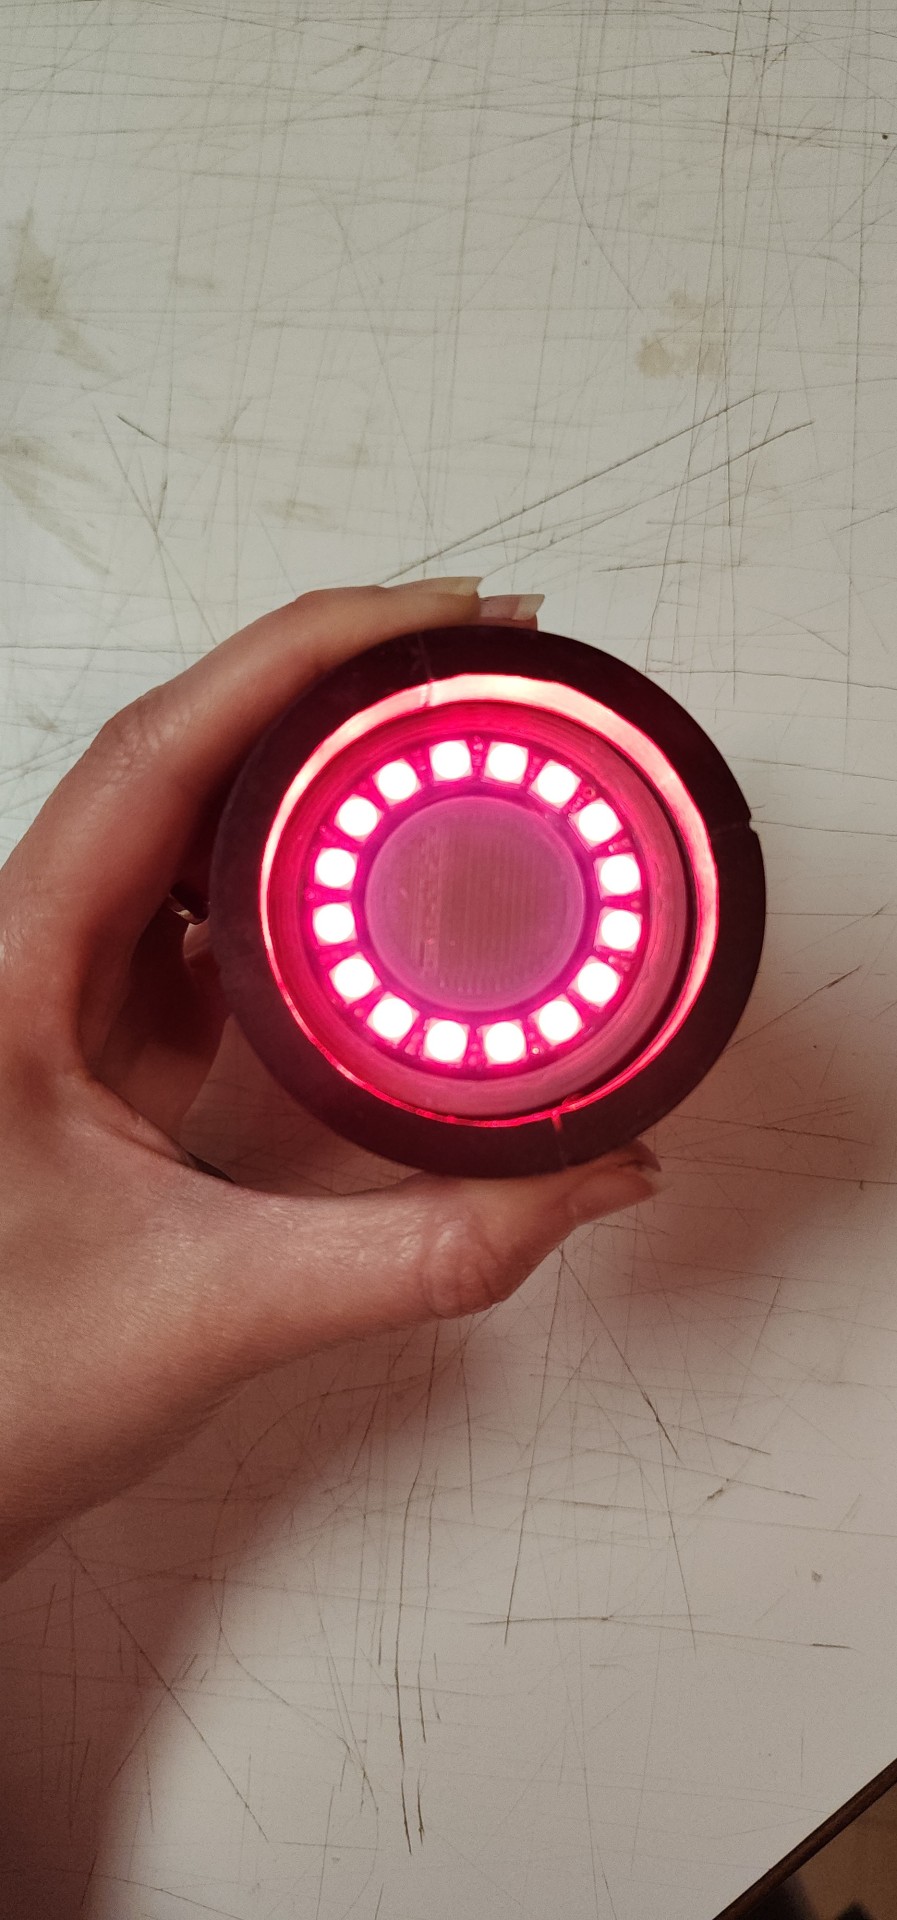
The Übersaw build breakdown, Part 1: (enjoy!)
Note: I'm more than happy to answer any and all questions about this build. Want me to breakdown a specific step or detail, please ask!
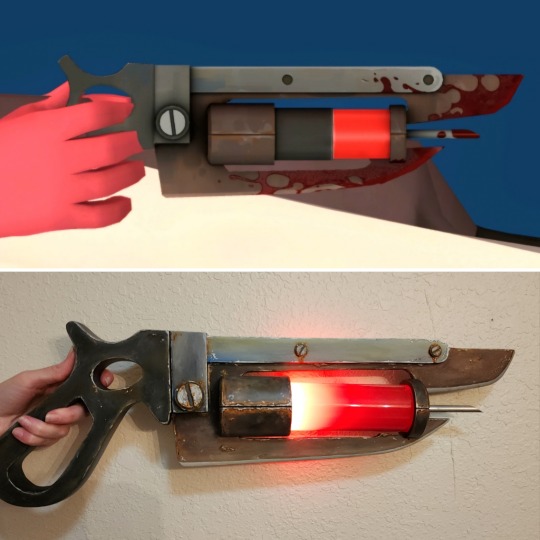
From top reference, to bottom complete, this build was a challenge from start to finish and required me to learn a ton of new skills, and reach out to a variety of people for help/advice/brainstorming! But when I decided I was finally going to make my dream cosplay of Medic, I knew this is the saw I wanted to make along with it.
Every piece was made from scratch, and includes sintra, pla 3d printing, resin printing, acrylic tubes, a straw, bondo, E6000, hex bolts, led ring light, arduino trinket, metal switch, aaa battery pack, misc. wiring, spray paint, acrylic paint, and a whole lot of sanding sanding sanding!
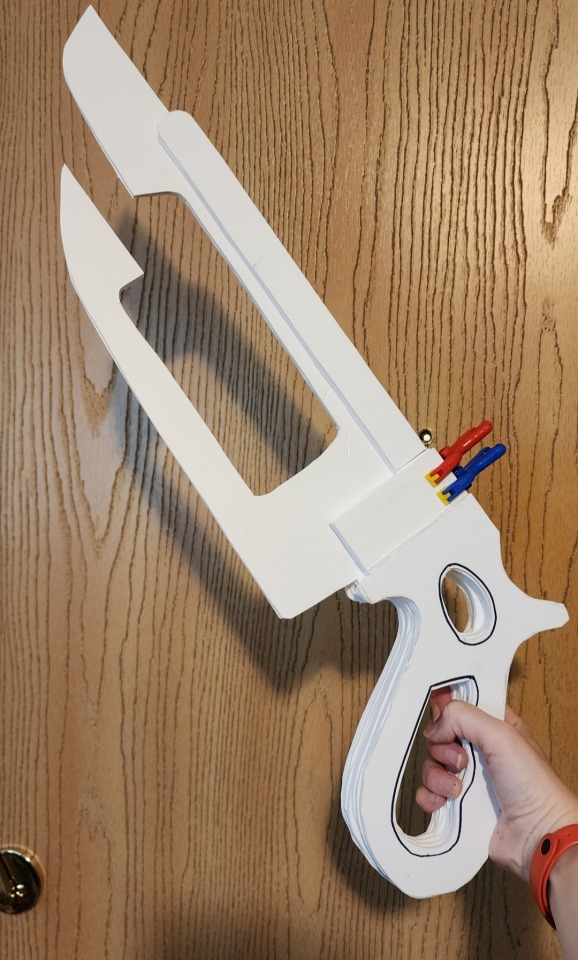
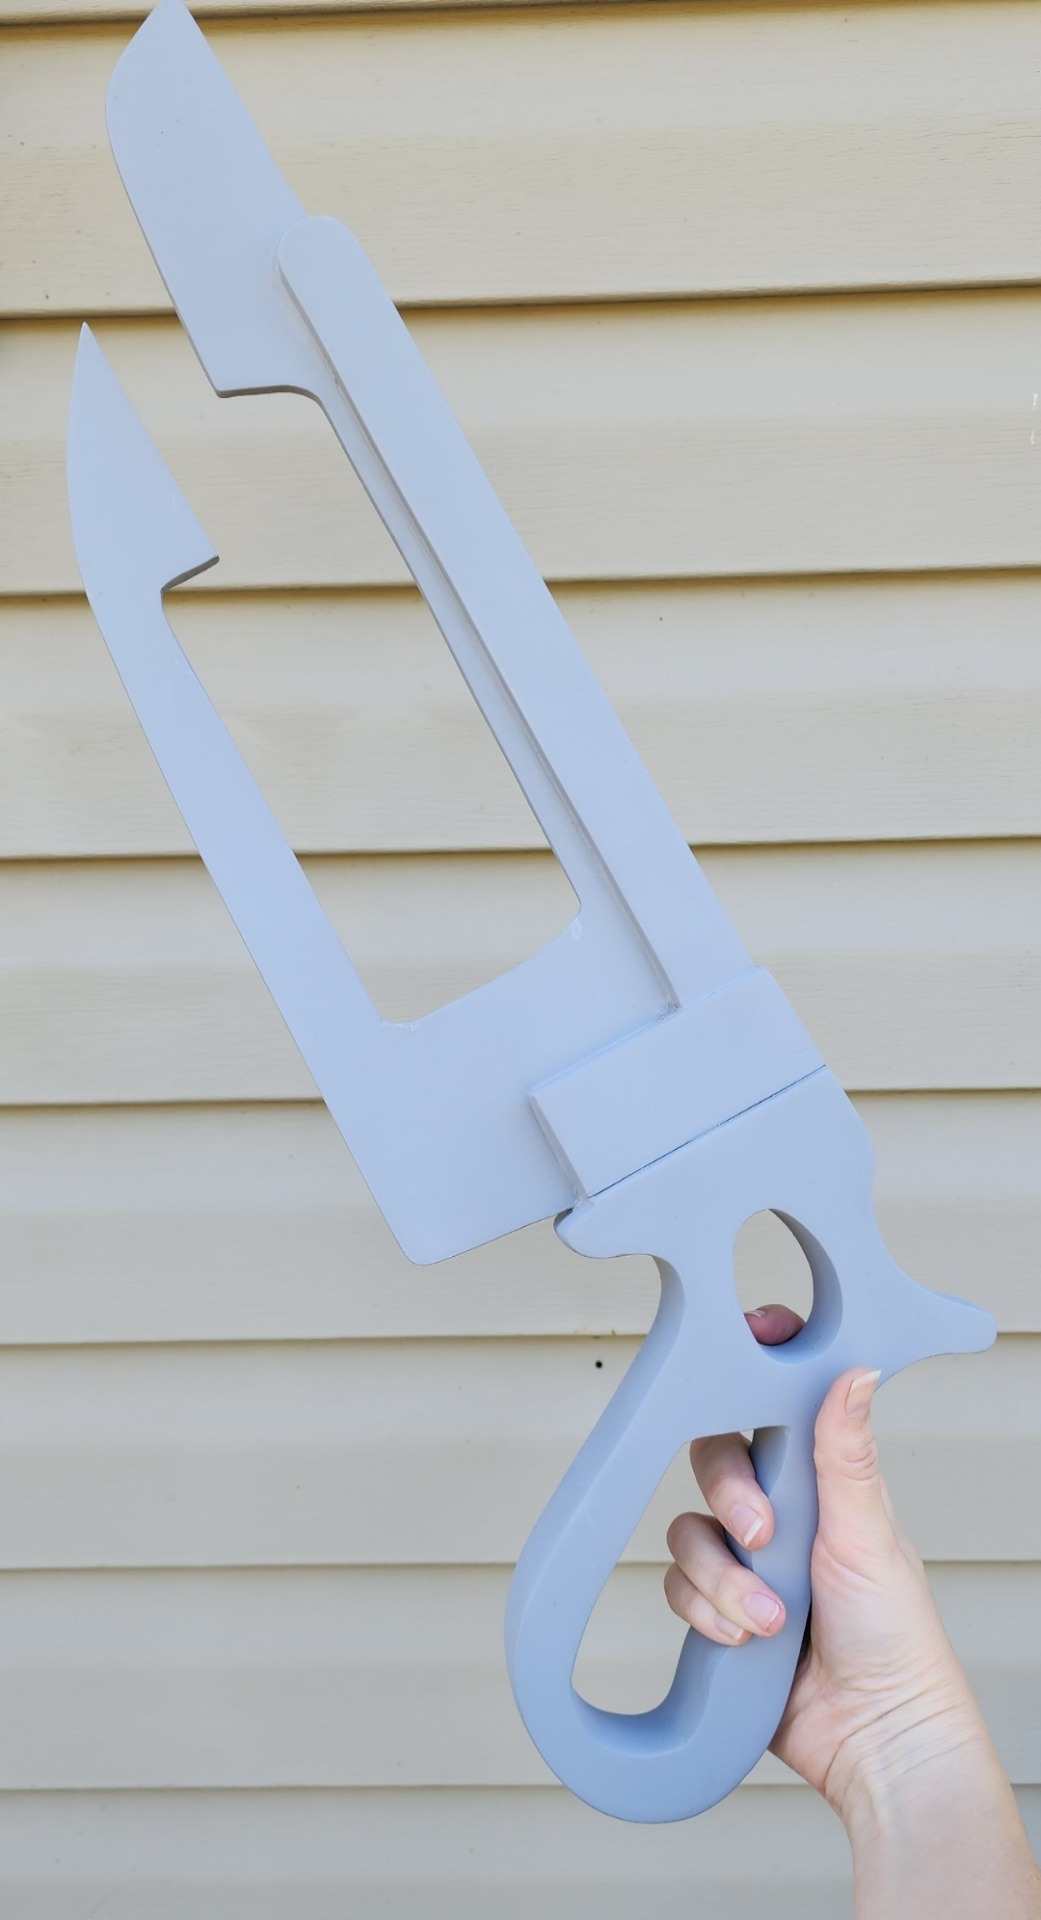
I always wanted to stay as true to the original design as possible, but knew adjustments would have to be made, moving a model from a game to real life. Some details I wanted to keep a true as possible, such as the base shape and size. Some aspects were modified deliberately to fit better with the overall aesthetic of the specific version of Medic I was creating; such as smoothing out the edges of the handle, rather than keeping them sharp like in the game. (Something that would make it more realistic overall, a goal I kept in mind through every piece of the costume.)
One such change was adding liquid to the Übersaw core and an led light that pulses red. Looking at the base design, and the color palette the original creators used, they intrinsically translated in my mind to "liquid" and "light" rather than just a flat color. Thinking about Medic and his designs, I figured an ominous, pulsing red would be perfect for when the Übersaw was fully charged. (Plus it would look really cool, so... that definitely influenced my decisions!)
I mixed up a concoction of distilled water, red and silver mica powder, and filled an acrylic tube with the mixture. There's actually two tubes, the smaller inside one helps reduce water weight on this already hefty prop.

Of course, these changes also meant I needed to learning how to code an arduino trinket (which ended up being a lot of fun!), and create a special holder at the base of the Übersaw to hold the ring light, trinket, switch, battery pack and wiring. Not to mention it had to be accessible so I could change the batteries out when needed. That's when it was time to ask for help from some talented friends!
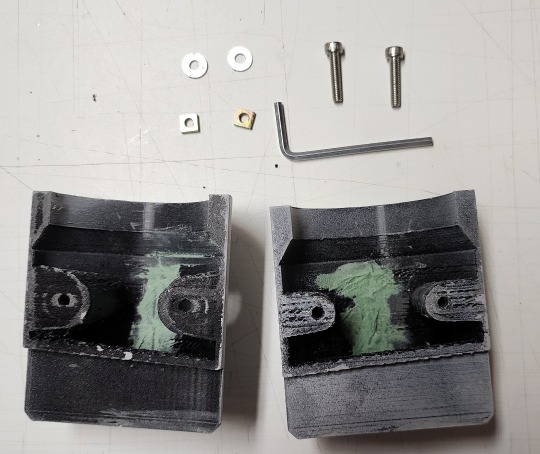
Here's what the resulting holder ended up looking like! (Not pictured is the ring the light sits on) It was 3d modeled and printed in PLA by my friend with some imput by me, but he knows so much more about this stuff I was happy to let him take the lead! The design includes hex bolts to secure the light holder to the Übersaw like a clamp, but also allows it to be opened in half for easy access to the batteries/any electronics that are having issues.
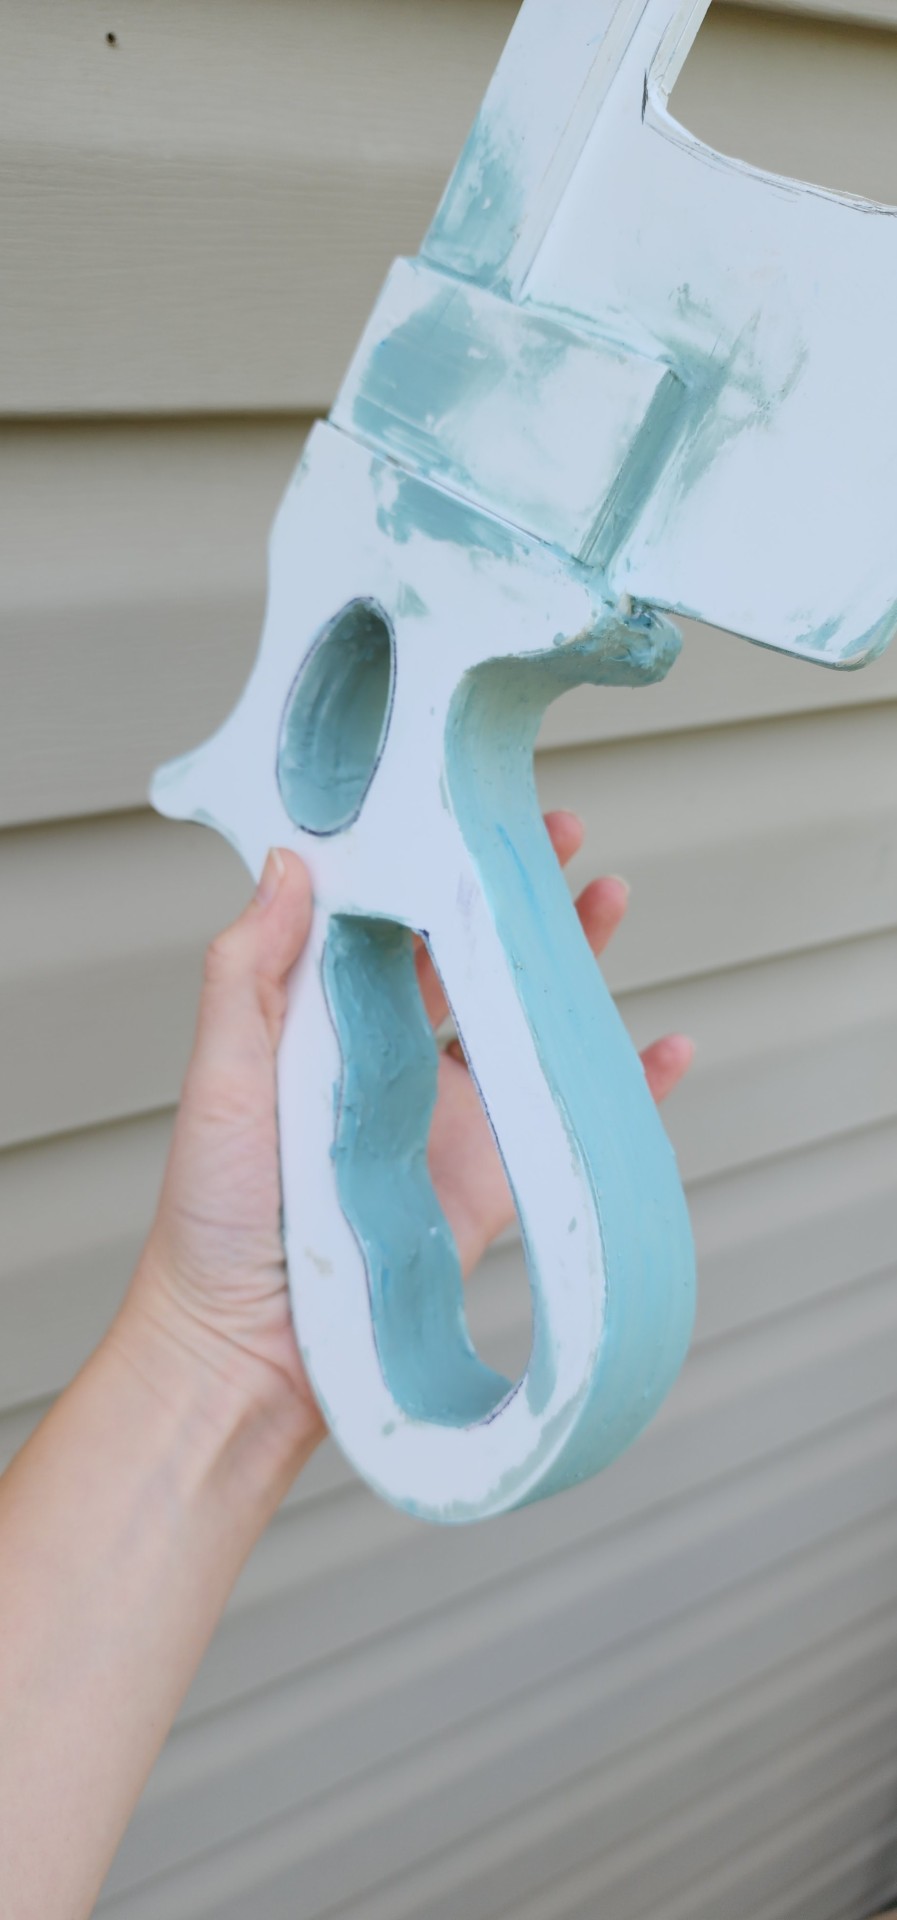
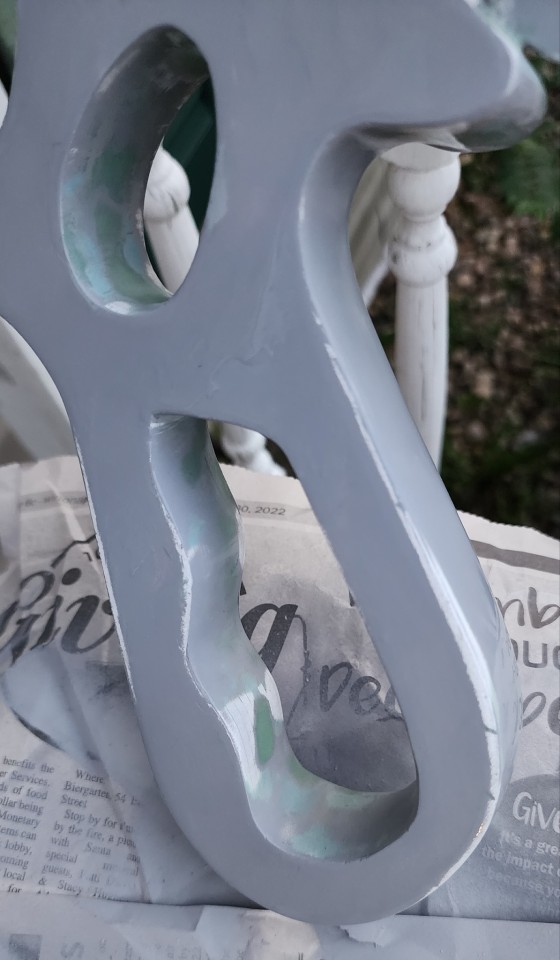
The base of the whole saw is sintra (pvc board), in many layers. The layers were then blended with Bondo and SO MUCH SANDING. After the piece looked like a cohesive whole, rather than 8 layers of plastic board, it was base coated with spraypaint and detail painted with acrylics. (I say this as though it was a simple task, but the spraypaint fought me every step of the way, had to be constantly re-sanded, and some layers refused to dry at all and had to be varnished to remove the tackiness. It was a trial to be sure!)

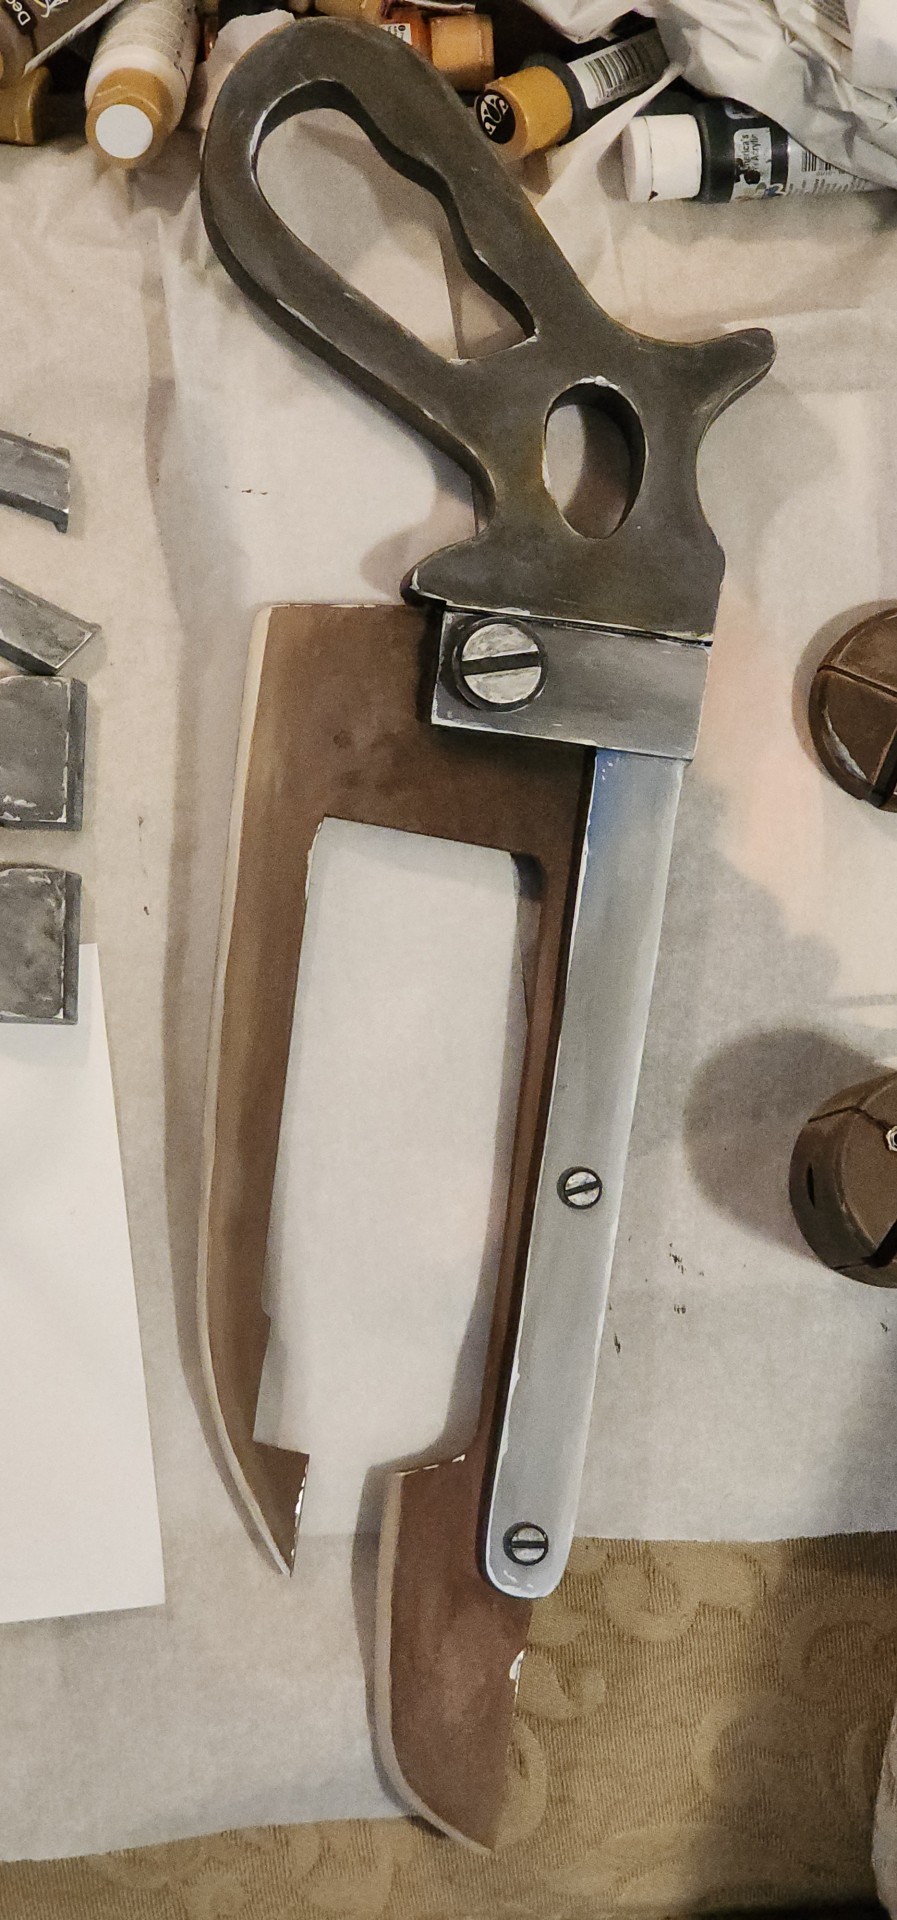
But after all was said and done, it was finally time for detail painting: My favorite part of any project! (Continued in part 2)
#cosplay#team fortress 2#tf2#tf2 medic#medic#ubersaw#cosplay wip#sisu squid stuff#tf2 cosplay#tutorial
47 notes
·
View notes
Text

#how to stop drawing sniper tutorial#sniper tf2#sniper fanart#trans sniper tf2#trans sniper#tf2#tf2 fanart#uh cw he has no clothes on?#no clothes guys!
37 notes
·
View notes
Note
PLEASE SHOW ME HOW TO DRAW MEDIC’S HAIR I CANT GET IT RIGHR

His hair was tricky for me at first too. I'm not the best at teaching others when it comes to this stuff, but I hope this is at least somewhat illuminating: So first I would just take the time to look at a couple of references. Try to envision what this hair cut would look like IRL- perhaps even imagine it with your creative liberties. For me, since this is my Blu Medic, I imagine the sides of his hair are slicked back while the top is kind of left alone, leaving him with that central curl.

Next, just look at the shape of it. The outline of his hair all by itself. This is the bit I was trying to demonstrate with the red ink. You'll notice that his hairline is a bit slanted, the outline of his hair on the sides directly leads into the outline of his face, and the top is a little boxy save for that central tuft of hair. I would recommend just very lightly drawing this rough shape of what's going on with his hair, fixing it so everything just looks like it's generally in the right spot. Okay, so the blue part is where those creative liberties come in. If you think his hair looks like it's parted at the side, you should put an indent there. Think about what direction the hair would be falling into, etc. Feel free to play around with it, get weird, maybe you want to give him a little cowlick, who knows- you may not get it the first time but after messing around a few times, knowing the basics of how his hair would work IRL, and understanding the basic shape/hairline Medic has going on, you should see improvements.
I've been drawing nonstop since I was in fourth grade (I am now going into my third year of college), so a lot of this stuff is pure muscle memory weirdness that's pretty hard for me to explain. My best advice for all things is probably 1. know how to break complex shapes down into simple lines/shapes, 2. have a basic understanding of how certain things interact in the real world, and 3.- and I know everyone says this- practice. This doesn't mean repeat- this means practice, look back at your material regularly to see what can be improved upon and then execute it. If you keep drawing the same thing and you're not satisfied by it every time, try changing your technique in some way. Maybe my way isn't helpful- maybe it would be better for you to just free ball it without simplification. Try that too, who knows.
#tf2#team fortress 2#tf2 fanart#team fortress#sketch#fanart#tf2 medic#medic tf2#zdotdoesrequests#zdotsdump#short tutorial#zrants
51 notes
·
View notes