#the files first need to be extracted and converted (one by one in this case)
Text
I suddenly remembered this post and realized that I now had the means to investigate and try to solve this mystery.
Spoilers: I haven’t solved it… but I do have an evidence-based hypothesis!
(This post is based on my own observations and deductions. I know a few things about the game’s files because I’ve explored them, but I’m still 100% self-taught and learned “on the job”. I don’t know everything, so feel free to correct me or provide more information!)
So this is what @danaduchy found (and thank you for originally sharing this); I added colors and line breaks for more clarity:

This can be found in a document filled with lines of code regarding the game’s audio files, such as music, voice lines, and sound effects. It seems that its purpose is basically to “tell” each file how, when, and in what context it’s supposed to play in the game. So “John_Seed_Sex_Room” refers to one or several sound files.
Again, I still don’t know what everything you see in the screenshot means, but what I do know is that “MIS” means “mission”, that “KEY01” refers to a character, Nick Rye, and that “010” is basically the mission number. Here, I know that “MIS_KEY01_010” is the mission Wingman.
I assume “LP_Filter” means “low-pass filter”. In short, it’s an audio filter that removes high frequencies. You can use it, for example, if you want your audio to sound muffled like it’s coming from behind a closed door (and I’ve chosen this particular example for a good reason).
I assume the MaxRadius is the maximum distance (from its source in the game) at which a sound can be heard, and the Duration is simply the duration of the sound in seconds. Because they’re both equal to 0 and we have the words “Start” and “Stop”, I’d say the purpose of these two lines of code is simply to “tell” the audio “John_Seed_Sex_Room” to start and stop playing, or possibly to activate and deactivate the low-pass filter.
Those lines didn’t give me the actual sound file(s), so I continued to investigate and found this:

I suppose “Play_SFX” simply means “play sound effect”, and this time, these lines can actually help me find the corresponding audio files!
I was able to find and listen to “Door_Key_Pickup”, “LockedDoor_Rnd”, and “UnlockDoor_01”. They unsurprisingly and respectively are the sound of keys being picked up, someone trying to open a locked door (five different versions), and the door being unlocked. Unfortunately, “Door_Push” and “JohnSeed_SexRoom_Rnd” don’t seem to exist anymore...
As you can see, the Duration of “JohnSeed_SexRoom_Rnd” isn’t specified, but not all the files listed in the document have one, so this isn’t that strange. The MaxRadius is higher than the other sounds’ featured here, so I assume it was supposed to be heard from a longer distance. I’m not sure what Rnd means, but I think it could be the abbreviation of “round” or “rounded”. Maybe it’s the normal, unaltered version of the sound “JohnSeed_SexRoom”, unlike “JohnSeed_Sex_Room_LP_Filter” which has a low-pass filter.
The code also says this sound is from a “Scripted_Sequence” in a “Specific” context: one of the “Missions” in Holland Valley (this is what “John_Seed” means here) in relation to Nick Rye (KEY01). We already know this mission is Wingman (MIS_KEY01_010), but what we learn here is that, whatever the “sex room” thing is, it was apparently specific to this mission.
The last mention of it in the document was this:

“Stop_SFX” suggests that these lines probably exist to make the two sound effects stop playing.
So, what is “John_Seed_Sex_Room”? It seems it was an audio file (one or several sound effects) and supposed to be part of one specific mission: Wingman. There were two versions and at least one of them had a low-pass filter. In the same sequence, a locked door was apparently going to be unlocked and opened.
The objective of the mission Wingman is to go to Seed Ranch and retrieve Nick’s plane. So what if, in this mission, players were originally going to explore more rooms in the ranch… and find whatever the “sex room” was? To me, it looks like we were going to hear muffled sounds coming from a room, unlock the door, and see what and/or who was inside.
Now, I don’t think it was necessarily going to be a literal “sex room”. According to (probably deleted) NPC dialog, in an early version of the game, people were taken to John’s ranch instead of his bunker to be tortured. It’s possible that the term “sex room” was a joke name given by the devs to refer to a torture room.
In conclusion, according to my (limited) knowledge and after my investigation, I believe the “sex room” was a special room in Seed Ranch, either literally used for sex (the cult’s rules could have been different at the time) or for torture. Evidence suggests it could be found during the mission Wingman only and that there were sounds coming from behind its locked door. It seems players could unlock it with a key and, I assume, see whatever was going on inside.
That’s all I know… But if you have another hypothesis or more information about that mysterious room, don’t hesitate to share it! :)
#also this is a bit simplified#the files first need to be extracted and converted (one by one in this case)#and the red words aren’t the names of the files#to find that you need to copy a code to find another code#far cry 5#john seed#nick rye#also huge thanks to the people who create modding tools and programs!#you are the real MVPs
87 notes
·
View notes
Note
love love LOVE your The Sign gifsets. im still a newbie in giffing lmao and your gifs are like reaaally pretty so i was wondering how you do your gifs? i really like how it's sharp and the colors pop up beautifully (only if you don't mind sharing ofcc <333)
bun this is the kindest thing you could have said to me, thank you so much <3 i wanted to write down my giffing process for a while in case anyone would find anything in it helpful, so thanks for giving me a push!
guzhu-furen's photoshop gifmaking process (kinda oriented on saving up time)
from

to

1. Downloading a video. i prefer to download video files instead of making screen recordings because the latter usually leaves watermarks/captions and makes image quality lower. i will not be linking the downloading websites themselves directly, but they are all easy to find through search engines if you know what to search for! i download ql dramas from:
youtube:
if the video you need is above 1080p quality, search for youtube4kdownloader
if the video is age restricted, search for 9xbuddy
both these websites work for normal videos too!
mkvdrama usually has 1080p episodes of most asian dramas.
dramacool also has downloading options in case the show is not available on other websites!
2. Screencapping (i learned it through this tutorial)
i screencap using KMPlayer. here is the installer i used, but you can find versions of this program on various websites and torrents too! install the program and proceed.
screencapping steps: open KMPlayer > press "CTRL + G" to summon the Frame Extraction window > set identical settings to these:
note which computer folder the screencaps will go to (it has a label "Extract to") > go to that folder on your computer and create a bunch of numbered folders there, for example ten folders named from 1 to 10, these would be our separate folders for ten gifs > write "1" or a name of another numbered folder after the backslash in "Extract to" bar in kmplayer > go the timestamp that will be the beginning of your gif in KMPlayer > press "Start" in the Frame Extraction window and press play on the video > when the moment you need to gif is over, press pause on the video and press "Stop" in the Frame Extraction window. great, you now have your folder of screencaps!
3. Importing screencaps to Photoshop
i use Adobe Photoshop 2023, but had used Adobe Photoshop CS5 for a long time before that, so you can use any version you have or find! it's available on various websites and torrents.
open Photoshop > Scripts > Load Files into Stack > press Browse in the "Load Layers" window that was opened
open your screencaps folder (and pin the KMPlayer Capture folder for faster future access) > pick the screencaps you want for your gif by clicking on the first one, and then clicking on the finishing one while pressing Shift on the keyboard > click OK and let them load for some time! i have 65 screencaps loading at the moment
when the screencaps finish loading go to Window > press Timeline > press Create Video Timeline in the opened sidebar > press three dots that will say "Convert to frame animation"


4. Sizing & making the base of a gif
next part will be automatic. i use actions for almost everything from this moment. download the basic action pack here and my additional action pack that we will need here. load them in your photoshop actions window (Actions > Load Actions).
play the Script action to create frames.
now onto sizing your gif. these are tumblr's width dimensions for 3 types of gifs
my gifs are usually 540 px in width and 640, 400 or 345 px in height. i added a 400 px action (Sizing 400) in the action pack, you can use it! or you can follow the steps by hand:
Image > Image Size > put in the height you want and add 4-6 pixels there (mine will be 406 for a 400 px high gif) > OK

now we need to crop the gif for it to fit tumblr's dimensions:
Image > Canvas Size > change Width to 540 (or 268 or 177) and take away the 4-6 pixels that we left in the previous step in Height
when you figure out which gif dimensions work best for you, record an action and use it to save up time!
after sizing use the action Smart Object. now we have the base of our gif!

you can move your gif left or right if you want! i will be doing this because i would like to show more hips in the gif.
press Ctrl + T > move the layer however you need (not in height though) > press Enter to save
i moved it to the right and my gif looks like this now:
5. Sharpening (i use Tan's sharpening settings explained here)
i added two sharpening actions in the pack, they are called Sharpen Spicy and Sharpen Spicy 12. you can use one of them or you can sharpen your gif by hand, i will explain how to do it below.
Filter > Sharpen > Smart Sharpen > 500% amount, 0,2 px radius > OK
Filter > Sharpen > Smart Sharpen > 17% amount, 10,0 px radius > OK (you can change 17% to lesser or bigger, depending how intense you want your sharpening to look. i use 17% for 4k footage and 12% for 1080 px or less videos)
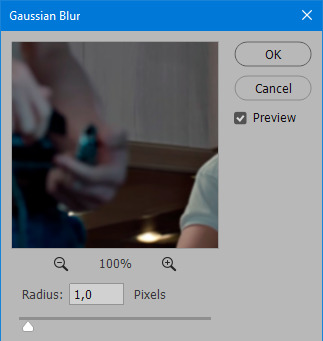
to smooth the sharpening a bit i use Gaussian Blur (this is optional, you can leave the sharpening as it is if you want your gif to be sharper).
Filter > Blur > Gaussian Blur > Radius 1,0 pixels > OK
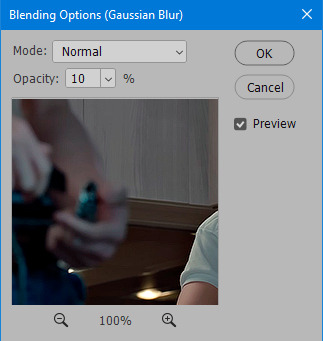
now change blending intensity to let only a bit of the blurring effect stay (you need to change this by hand if you used the sharpening action also).
press Blending Options (the highlighted place) twice > change Opacity to 10%

this is what my gifs looks like with sharpening now!

6. Colouring (i learned how to colour the way i do through this tutorial)
to make it easier for you to learn i will share my blank colouring file. i created it to save as much time while giffing as possible, so whenever i need to colour a gif i simply duplicate all the blank adjustment layers to the base of my every gif and start colouring! once you figure out which adjustment layers work for you best, i recommend creating a blank colouring file too to save time.
if you want to go the easy way, open my colouring file and duplicate selected layers to your gif file by Layer > Duplicate Layer > insert gif's document name

if you want to learn by hand, create the adjustment layers that i will be naming in the process on your own, you can find them all in Layer > New Adjustment Layer
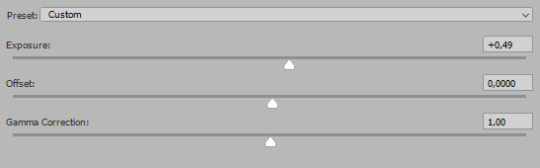
now we will use adjustment layers for our colouring from the bottom to the top! first, Exposure layer to add a bit of light to the gif. i don't always use Exposure because sometimes shots are bright enough on their own. i will, however, use it here. don't use it on your gif too much, because in the next few steps we will also be brightening the gif with other adjustment layers. i added +0,49:

next, Hue/Saturation layer. i use it in gifs with neon lighting to color correct overly bright colours. for example if your characters are standing in neon pink, you might want to lessen Saturation in Magentas and Reds to make the final gif less pixelated, and etc. i will not use Hue/Saturation on this gif, cause it doesn't need it.
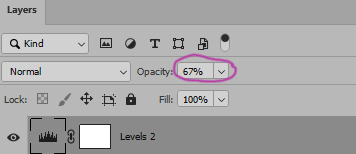
proceed to the layer Levels. this layer usually does most of my colouring. click on the lowest white dropper in your Levels window:
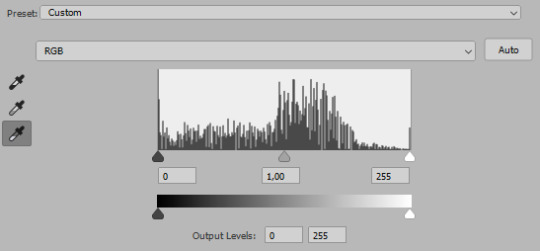
now choose a light place on your gif and click on it with the white dropper. it works especially well if you use the white dropper on the lightened parts of face skin. you can play around by choosing different bright spots and seeing what works best. here is the spot i chose and the resulting colouring:


this is too light, so now we need to balance it out with the black dropper:

choose one of the darkest places this time and click it with black dropper! once again, you can play around and click different spot to see what works best. i will be clicking the highlighted spot and you can see what my gif will look like with this Levels settings


as you can see, darkest places became darker and other colours were corrected a bit! now, this is still too bright, so i will be decreasing the opacity of Levels layer from 100% to a smaller number:

i will have to continue in another post because tumblr only allows 30 pictures per one post in the new editor now and i'd like to explain everything in visuals. click to continue
78 notes
·
View notes
Text
I was talking with a guy.
Hey if I am mentioning it here it was about audio.
The question was how to get started in serious audio (lets not call it audiophile yet). It is a remarkably simple and yet complex question. Spend lots of money?
So to start, the front end is the tricky bit. That is source and control. Source is what you are listening too. Control is selection of source, if you have more than one, and basic volume control. In most systems control is the preamplifier.
The back end is the speakers and power amplifier. Actually really simple. What fits in your home and how much can you afford. Easy to change if you want.
The first big issue is source. By that I mean hard copied media or virtual. The first is category is CDs and their ilk such as SACD etc, and of course Vinyl LPs. The second is streaming online.
The second one first. (interesting sentence that but perfectly correct)
Streaming is far from simple. It has the least initial cost for the media as it is just a subscription fee (forever). It has an enormous even overwhelming variety and quantity of content. It also is only permission to use the content, but you do not own it. You can have a huge "collection" but it is virtual. Also there is a controversy about payments to artists.
Often not said is that almost all the streaming services are at or below CD quality. CD quality is not considered truly great by the tribes. That is all I am going to say about that right now.
The hardware is not simple for high end streaming. In very general terms you need a DAC (Digital to Analog Converter), a box to buffer or hold the downloaded files, and a computer to do the downloads and host the streaming service software. That is three boxes. In high end they are all expensive of course.
There are devices that do all three things, but they are not cheap. They also do not have the quality of the "best" systems.
Audiophiles like dedicated computers and streaming servers and DACs of eye watering expense.
In summary the streaming front end is very expensive. In my looking about for adding that to my system it is thousands of dollars. Conservatively about $5000 for my quality goal. Emphasis on that is only the front end.
Now to my thesis.
I say the least cost path to high end sound is with vinyl. WTF?! A high end capable Turntable starts at hundreds of dollars. Much more can be spent, but in today's local classified ads there are dozens under $500 and a few very good ones up to $1000. An older model refurbished unit is perfectly fine for the job. And I mean high end sound extraction. Brands such as Technics, Rega, Thorens, Micro Seki, Kenwood, Pioneer are good candidates.
A high end phonograph pickup or cartridge can be had for under $500 bucks. I have three all around $400 ish or less. I like Grado, and Audio Technica. There are more, but I don't have any of those. Moving coils need not apply. Those are euphonic, which is they add seductive sounds that are not in the source material.
That is the whole vinyl source hardware list. Under $1400 bucks or less and you are up and running. The only caveat is your control preamp needs to have a phono input which most old ones do.
In my case have a high end hybrid tube FET preamp that can be had for $2000 or less depending on the phase of the moon. You need that anyway. My opinion is the preamp is the major contributor to the overall performance of your system.
So that brings the full front end to less than $3400 for a high end system. If you take into account all my extra phono cartridges I still spent less than that. Just.
There is an intriguing option in a high end integrated amplifier from Technics (SU-G700) that is a preamp and DAC and very good class D amplifier with a phono input for about $2400 USD. Just add speakers and turntable and you are over the threshold to high end. It is rather spooky. If I had to start from scratch I would be tempted. Far less than an ARC suite. I could no longer claim I was a Luddite though.
Yes with vinyl you still have to buy LPs, unless you are an old fart like me and have hundreds, but it is actually rather fun. Compared to the initial cost of a high end streaming system the cost of an extensive LP library looks reasonable. I search for high quality boutique stuff usually, but I also find stuff in the racks. Garage sales anyone?

I have high end sound in my home. I dare say it is the best sounding system I have every heard. Vinyl is not a compromise. There is a lot to be said for getting up to flip a record every 20 minutes. Hell I have a watch that nags me to get up and move if I stay seated for more than an hour. (yes I am a geek) It's good for you Mr couch potato.
Obviously to play at this game money will be spent. You can start off modestly and build over time (decades in my case) or jump in. In the end you will have a sonic place to spend time appreciating art at the highest level.
Interesting that I really cannot afford to add high end streaming to my system. I don't need to.
#audiophile#high end audio#vinyl#turntables#audio technica#grado cartridges#least expensive high end system
7 notes
·
View notes
Text
Tutorial 3D model to sims2
second part
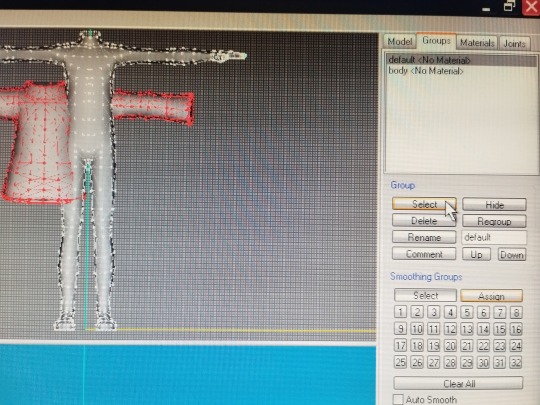
Now we are going to move our clothes to place them more or less in their corresponding place and to be able to continue increasing and decreasing their size until we find the perfect size
(groups, click in the name of our clothes : "default" , click select ...the clothes will turn red , click model, click move)
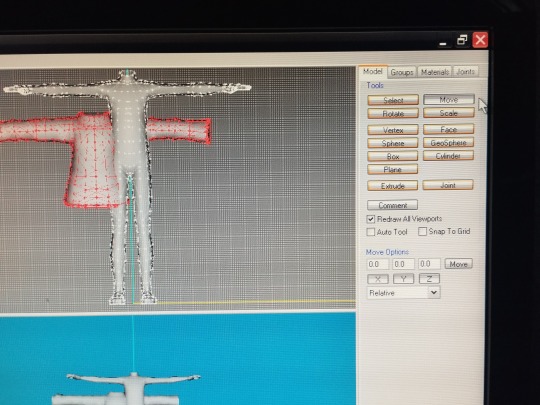
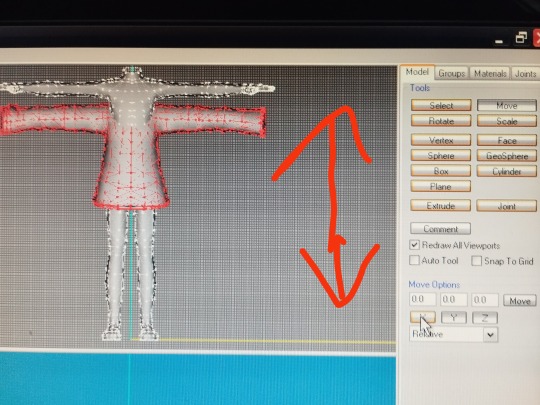
and now ... If you click on X and move the mouse, the clothes move up and down but in a straight line. If you click on Y, the clothes move right left in a straight line.If you click on Z it moves wherever you want without control (This works like this when you have chosen the front view, if you choose the left or right view things change, I will explain it later) It is important to say that you must have only one letter pressed, that letter will turn orange when you are using it, and the other two letters will remain gray
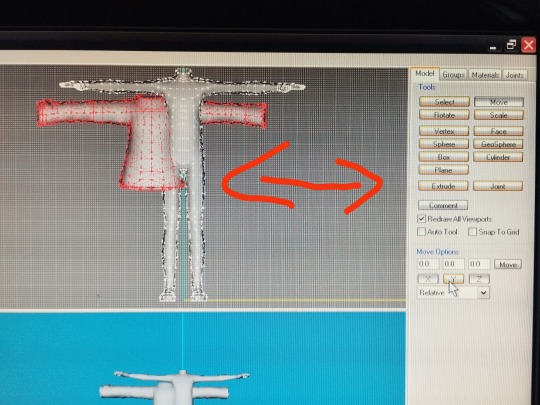
move the clothes until you have them placed more or less in the place you want and change the size until you have the desired one.
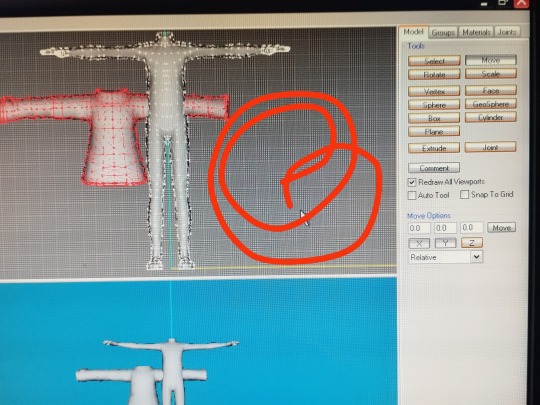
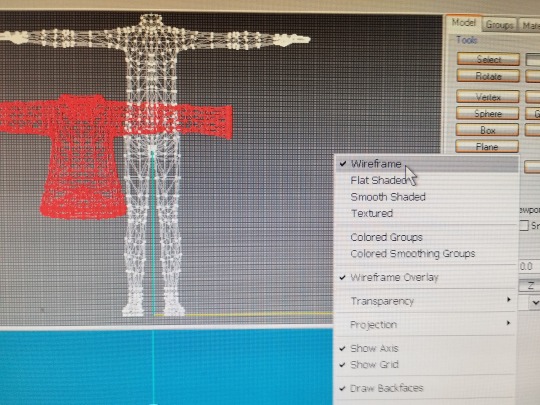
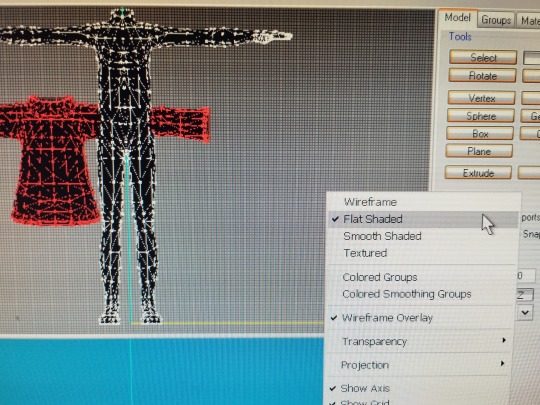
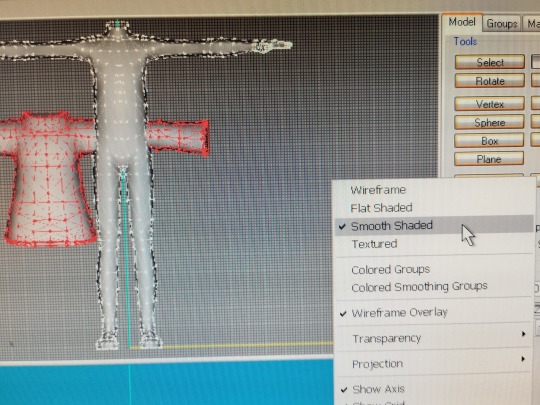
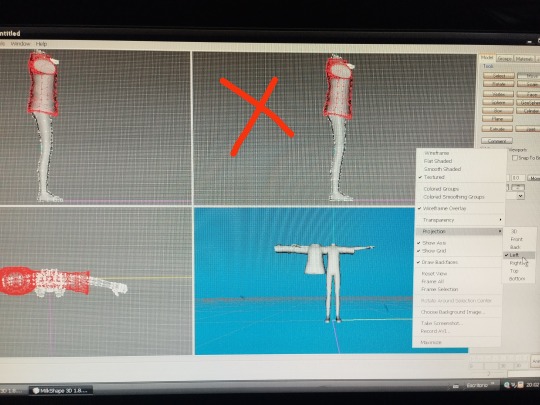
To keep in mind, if you are not very familiar with milkshape, there are 4 windows that are the views or projections of the model, left , front , top and 3D .They come by default when you open the program, but you can change the view you want whenever you want
you click on a window, right-click with the mouse, click on projection and choose the view you want… 3D front back left right top or bottom
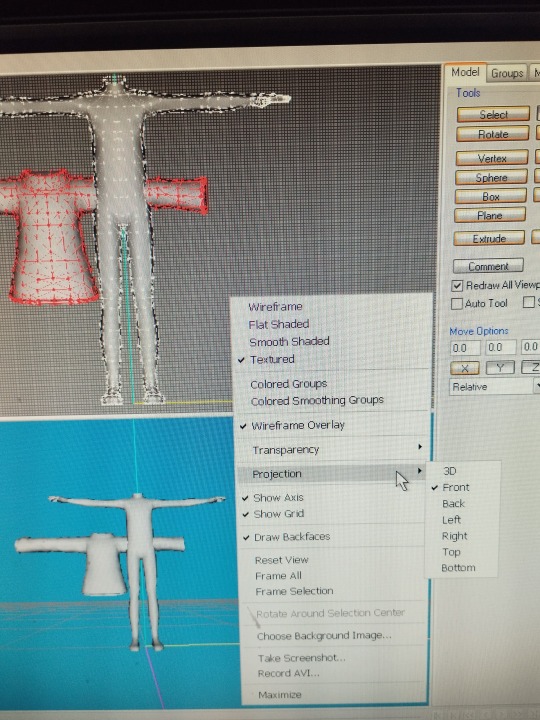
You can also choose the way you see your model… also in the same window you choose wirefame, flat shaded, smooth shaded or textured (textured I will explain it later because for this we need the png with the texture of the clothes)

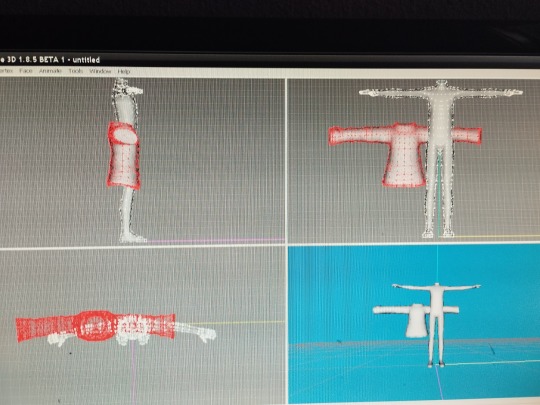
we can change the view and choose right or left to continue adjusting our clothes to the body
now the way to move the clothes by choosing the letters X and Z changes, if we click on X we will move the clothes where we want without control, if we click on Y we will move them left or right, if we click on Z we will move them up or down
we move it until we place it as we wish, if we see that the clothes are still too wide, we can narrow it, we continue with the right or left view, click on scale, and the same as the other time … 1.98 in the three letters will make the clothes wider and 0.98 in the three letters will make the clothes smaller.
when you have the perfect size, it's time to save our project … in case we mess something up we don't have to start again from scratch.
file, save as ... name you want and save it in the folder you want to save it in
but we have not closed the project yet 😅
now we delete the base body ... group, click on body name and delete only our clothes have to be seen
now is the time to bring it to life, we need bones 🦴
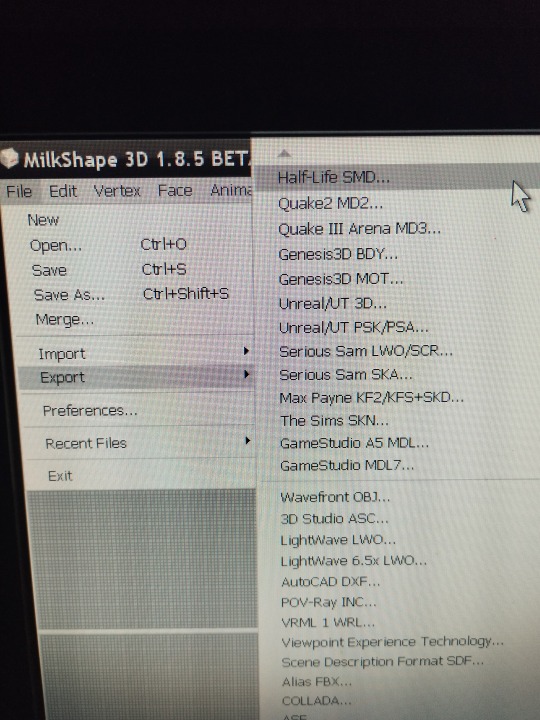
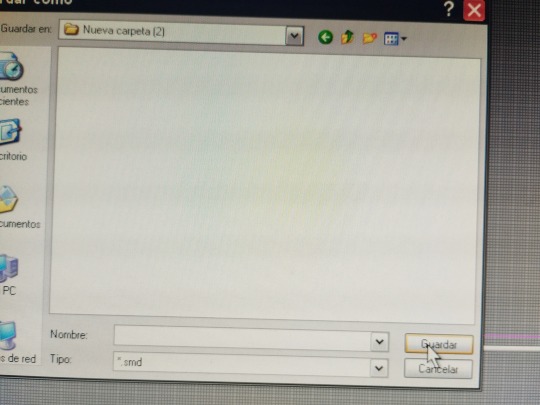
click on file export half-life SMD (at the top of the page), enter the name of our project and save it in our folder, you can use the same name as before, nothing happens because this is a different format and it will not delete the previous one.
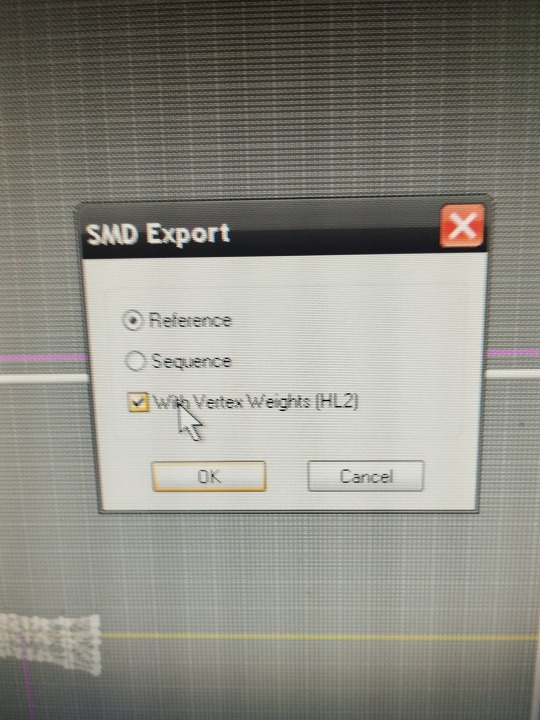
important , check the box " with vertex weights". and click ok , close the milkshape
now we need a model, a piece of clothing, from the sims game, that is similar to the one we are working on, or any clothing that you have downloaded from another simmer, but that is similar, for example, if it is a long-sleeved sweater … look for a long sleeve sweater, if it is a short sleeve t-shirt look for a short sleeve t-shirt.
we need the mesh of these clothes to extract the GMDC... this is done with the SimPe program
if you already know how to do it, perfect, you save me the explanation and you save yourself from reading all this part, but if you have never done it … I am going to explain it , I have learned it following tutorials that I recommend you to read (and that I thank enormously to the simmers that have made them) to familiarize yourself with the programs we use.
tutorials needed in your life :
3t2 clothes tutorial of Serenity falls @rented-space
4t2 clothing tutorial of @vulrien-sims
all tutorial of @blueheavensims
tutorial of @deedee-sims
4t2 clothing tutorial (video) @mdpthatsme
....to be continued
6 notes
·
View notes
Text
HOW 2 MOD MAD RAT DEAD ON SWITCH! PART 1: MUSIC!
If at any point you need more information or further assistance, drop me an ask or direct message! Even if it's something 'stupid' don't worry, I'll help :)
What you'll need:
A copy of the game in .nsp or .xci format
Switch Explorer
Sonic Audio Tools
VGAudio
Audacity (My recommendation, alternatives may work)
Switch explorer is used to extract the files from the game to be modded
Sonic audio tools is used to extract the .acb archives the songs (.hca files) are packed in, and to pack the files back in
VGAudio is used to convert the .hca files (the actual audio files) to .wav to be opened and edited in audacity, and to convert them back to .hca before being repacked
Lastly, audacity is used to edit the .wav files to put whatever you want into the files, completely replace it's contents or whatever, go wild
Did any of that make sense to you? no? Good, keep reading.
LET'S GET THIS SHOW ON THE ROAD!
I'll add like a pastebin link here later with every song's internal number so you can easily find the one you're looking for and extract it, too lazy right now tho :P
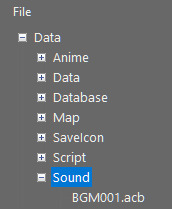
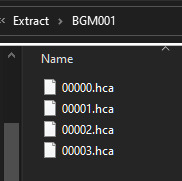
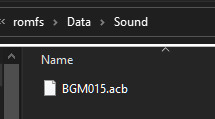
Open switch explorer, choose to load up your nsp/xci of the game (file > open) and navigate to data > sound
then, find the song you wish to edit and right click > extract file, then drop it in a good spot for later
Afterwards, open two file explorer windows, one in the sonic audio tools folder and the other where you extracted the .acb file. We do this so you can easily drag the .acb into the ACBeditor.exe found in the sonic audio tools folder:

this will produce a folder in the same directory as the .acb sharing its name, and inside you will find your .hca files:
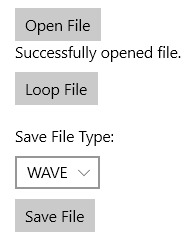
these are the actual audio files, but we can't edit them yet, because no program knows what to do with a .hca! First, we need to convert them to .wav files, so boot up VGAudio, click open file, pick the .hca file (you need to repeat this process for all 4+ files), choose to convert to WAVE and hit save file.
wherever you saved it, you now have a .wav of the audio file, feel free to give it a listen! If it's just silence, don't worry, some of the songs are like that.
Now these files require a little explanation, the one ending in 0 to 2 are all related to the song's into, opening, and cut scene loops, basically everything you stop hearing once you've started playing the level properly. The file ending in a 3 is the main loop, the part that plays so long as you keep playing through the level. In some rare cases, there will be even more files, or less! I haven't done enough of my own research yet, so you can come to your own conclusions on those, shouldn't be hard to figure out once you get how these work.
Anyways, now that that's outta the way, audacity time! Individually open, edit, and export each .wav you extracted, again as .wav (keep the file name the same!) using audacity, make any changes you want, import other files of any format into it on a new track and remove the original when you're done, whatever, but I recommend keeping the lenght (not filesize) of the audio file the same, idk if the game will have a stroke if it's too long or not long enough. (Also a lot of the song info like BPM is hardcoded so any old song won't work if you just drop it in here, stick to mad rat monday songs for your first edits like I did, those work the best, but do be ready to splice them to extend the main loop (file 3)) (also line it up properly, it can't be off beat from the original, you gotta find a point in the songs where the waveform is similar and use it to line it up exactly right)
This part's kinda all up to you, but I can provide some basic audacity tips specific to your situation if required. Or just general ones, if you can't wrap your head around audacity :P
once they're all edited, use VGAudio to reverse the process, open the .wav files and choose to convert to HCA, and save them, maybe backup the original .hca files instead of replacing them if you want to (i just added an 'og' to the start of the original file's name)
then, remove all the junk from the folder besides the new .hca files you made (or move them to another, identically named folder separately), and drag the folder into the same acbeditor.exe from the sonic audio tools folder, just like you did with the acb the first time. It will pack your folder back into an acb in the same directory as the folder you dragged in (it'll replace the original if you kept them all in the same directory, but don't worry you can just extract the file again if you need the original). Now, we set up the mod!
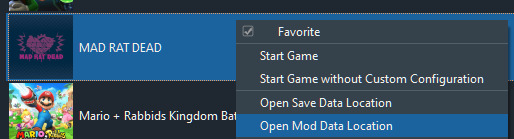
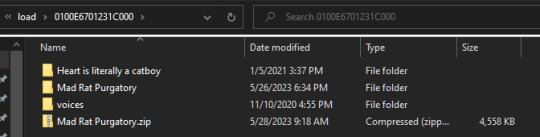
This part's easy, just make a new folder with the name of your mod, in there make one named romfs, in there make one named data, and in there make one named sound, then drop your new acb file into the sound folder. The mod's done! Drag it into the mod directory on your real switch (idk how that works I don't have a modded switch) or in yuzu right click mad rat dead, choose open mod directory and drop the mod folder in there. Then right click the game, hit properties, and the mod should show up with the name you chose for the top folder. Here's some screenshots for all that:
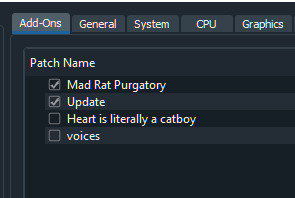
Tick the box to enable the mod and boot up the game! That's it!
If you need any more help, further assistance, suggestions, anything, just drop me an ask or DM, I'll respond in due time! Additionally, if you have any suggestions or requests for how to improve this guide, let me know with a reply!
Happy modding everyone!
16 notes
·
View notes
Text
Microsoft’s AI Magic: Transforming Healthcare Insights

Microsoft introduces cutting-edge data and AI solutions that revolutionize healthcare, offering unprecedented insights and enhancing the patient experience
Every sector needs unique insights to succeed, and harnessing data’s value is vital. In healthcare, data may improve health outcomes, patient and clinician experiences, and organisational performance. The appropriate data strategy may change lives when patient or population health is at the centre of decision-making.
Organisations are battling to keep up with rising healthcare data volume, diversity, and velocity. The World Economic Forum estimates that hospitals generate 50 petabytes of segregated data every year, or 10 billion music files. As much as 97% of this data is wasted, preventing useful discoveries. Utilising all this data may lead to clinical and operational innovations that improve patients’ healthcare experiences. As organisations realise that without a sound data strategy, they are simply scratching the surface of AI’s potential, data becomes more important.
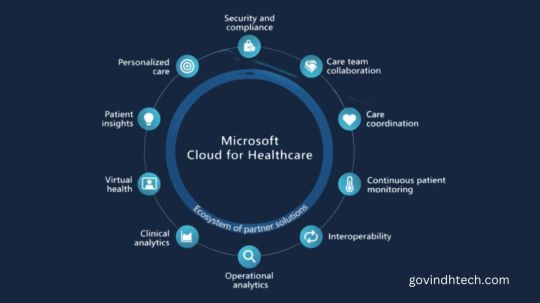
Microsoft are showcasing new data and AI technologies and capabilities at HLTH 2023 to assist healthcare organisations improve patient and clinician experiences while providing excellent care more effectively and cheaply. These new solutions allow healthcare organisations to use Microsoft Cloud for Healthcare’s breadth and scalability with a cohesive, secure, and responsible data and AI strategy.
Combining data analytics to improve patient care and corporate value
Microsoft introduced Microsoft Fabric in May, an end-to-end, unified analytics platform that combines all the data and analytics capabilities organisations need to harness their data’s potential and prepare for AI. Today, Microsoft Cloud for Healthcare powers the first industry-specific data solutions in Fabric that combine data and insights via one architecture and experience. The healthcare data solutions in Fabric, now in preview, eliminate the costly, time-consuming process of stitching together a complex set of disconnected, multimodal health data sources (text, images, video, etc.) and provide a secure, governed way for organisations to access, analyse, and visualise data-driven insights across their organisation
MS Fabric offers healthcare organisations:
The capacity to integrate data from EHRs, PACS, laboratories, claims, and medical devices throughout an organisation. With open data standards integrating FHIR, DICOM, and MedTech services, the Fabric data lake integrates structured, unstructured, image, and medical device data into one architecture.
Connectors and converters simplify FHIR, DICOM, and MedTech data conversion and pipeline creation for particular use cases.
A multimodal data foundation that enables standardised, scalable solutions to speed clinical and operational insights and improve patient care. Fabric lets health data exist in a single data estate for AI model building and analytics.
Clinical research is enabled by OMOP analytics, and patient outreach analytics personalise patient engagement.
Using machine learning models to extract, redact, or surrogate identifiers from unstructured data like doctor’s notes, medical documents, and clinical trial studies, a new de-identification service will help organisations protect patient-protected health information (PHI).
Microsoft preview healthcare-specific categorization rules, labels, and data glossaries help healthcare organisations control, secure, and manage their data estate.
Early adopters of Microsoft Fabric expect to utilise the analytics platform to advance some of their most important healthcare use cases:
Northwestern Medicine, Chicago’s premier integrated academic health system, will use Fabric’s healthcare data solutions to integrate clinical data from multiple sources, meet regulatory information exchange requirements, and unlock insights with data and AI to advance their patients-first mission with high-quality and timely care.
Arthur Health and Quisitive for the Ontario Workers Network will utilise Fabric to build predictive care stage models. A statewide network of hospitals, including Ottawa Hospital, OWN has skilled physicians that offer world-class treatment for employees in their communities.
SingHealth, Singapore’s biggest public healthcare network, wants Fabric’s healthcare data solutions for its data infrastructure. This will improve healthcare delivery and empower individuals to manage their own health.
Microsoft Fabric helps solve healthcare’s disparate data challenge. Fabric’s healthcare data solutions are explained here.
New AI tools empower patients and demystify medical terminology
New healthcare capabilities in Azure AI services will help organisations maximise AI’s value to improve patient outcomes:
Giving doctors and researchers informed choices Azure AI Health Insights is a cognitive service that delivers prebuilt models that analyse and draw conclusions for physicians and academics to employ in critical patient care situations.
Microsoft are previewing three new models, including patient timeline, which uses generative AI to extract key events from unstructured data like medications, diagnosis, and procedures and organise them chronologically to give clinicians a more accurate medical history to better inform care plans. Clinical report simplification employs generative AI to simplify medical jargon while maintaining the complete clinical information for sharing with patients. Radiology insights verifies quality by reporting mistakes and discrepancies. The programme finds follow-up suggestions and clinical findings in clinical record with radiologist-measured sizes.
Healthcare chatbots and virtual assistants with generative AI This new preview capability in Azure AI Health Bot provides out-of-the-box healthcare intelligence that can be customized and integrated into existing workflows, using answers from a healthcare organization’s content sources and generative AI to provide answers from credible sources like the National Institutes of Health and the FDA.
Medical data extraction and labelling for insights Text Analytics for health, an Azure AI Language service, extracts and labels medical data from unstructured texts using machine learning. Population health, Azure OpenAI Service patient population Q&A, clinical trial patient cohorts, and bulk historic data processing are new industry open source templates.
AI helps physicians provide personalised, high-quality treatment
To reduce administrative load and clinician fatigue, which grew to 53% among doctors in 2023 from 42% in 2018, U.S. health institutions are using AI-powered solutions, according to Medscape. To reduce clinician fatigue and enable personalised treatment, Dragon Ambient eXperience (DAX) Copilot, previously DAX Express, is now available for general use.
DAX Copilot, part of the Nuance Dragon family of products utilised by over 550,000 users globally, lets physicians automatically and securely draught clinical summaries in seconds from exam room or telehealth interactions for EHR review and submission.
Atrium Health was the first to implement Nuance DAX Copilot and expects to licence further throughout its 40 hospitals and 1,400 care sites. Physicians claim significant time savings in patient visit documentation. Medical staff at Atrium Health say this enhanced documentation system saves them up to 40 minutes every day. Also, 68% say their caregiving experience has improved.
Microsoft Cloud for Healthcare in AI/data age
Microsoft Cloud for Healthcare adds industry-relevant data solutions, application templates, and AI services to the Microsoft Cloud, helping healthcare organisations speed their data and AI journey. An unequalled worldwide network of trustworthy partners may customise our products. To provide holistic solutions for healthcare clients’ particular business concerns, Microsoft partner with premier ISVs and system integrators.
Microsoft healthcare solutions are based on trust and Microsoft’s Responsible AI. These innovations help healthcare organisations create connected experiences at every point of care, provide collaboration tools, empower the healthcare workforce, and unlock the value of clinical and operational data using industry-relevant data standards.
0 notes
Text
How to Use a Pinterest Video Downloader Online to Save Videos

Pinterest is a popular social media platform where users can discover, save, and share visual content, including photos, illustrations, and videos. Many people use Pinterest to find inspiration, learn new skills, or promote their products or services. However, sometimes you may come across a video on Pinterest that you want to save for later or share with others outside the platform. In this case, a Pinterest video downloader online can be a useful tool to have. In this article, we will explain how to use a Pinterest video downloader online to save videos from Pinterest.
What is a Pinterest video downloader online?
A Pinterest video downloader online is a web-based tool that allows users to download videos from Pinterest without the need to install any software or pay for any subscription fees. These tools work by extracting the video link from the Pinterest post and converting the video file into a downloadable format, such as MP4 or AVI. Most Pinterest video downloaders online are free to use, although some may require you to complete a survey or watch an ad before downloading the video.
Why use a Pinterest video downloader online?
There are several reasons why you may want to use a Pinterest video downloader online:
You want to save a video for offline viewing: If you are going to be in a place with no or limited internet access, such as on a plane or a remote location, you can download the video beforehand and watch it later without using your data or Wi-Fi.
You want to share a video with someone who is not on Pinterest: If you want to send a Pinterest video to a friend or a colleague who does not have a Pinterest account or is not following the same board as you, you can download the video and share it via email, text, or social media.
You want to use a video in your own content: If you are a blogger, a YouTuber, a marketer, or a content creator, you may want to use a Pinterest video in your own content, such as a blog post, a video tutorial, or a social media post. By downloading the video, you can edit it, add captions or music, and incorporate it into your own style and brand.
You want to save a video before it gets deleted: Sometimes, Pinterest videos may get deleted or removed due to copyright issues, policy violations, or user requests. If you find a video that you really like and want to keep, downloading it can ensure that you have a copy of it even if it disappears from Pinterest.
How to use a Pinterest video downloader online
Now that you know why you may want to use a Pinterest video downloader online, let's see how to use one. In this example, we will use the Pinterest video downloader online from pinterestvideosdownloader.com, which is a free and easy-to-use tool that works on desktop and mobile devices.
Step 1: Find the video you want to download
First, go to Pinterest and find the video you want to download. You can browse Pinterest by topics, keywords, boards, or accounts, and look for videos by clicking on the "Videos" tab on the top menu or the "Play" button on a pin that has a video. Once you find the video you want to download, click on it to open it in full screen mode.
Step 2: Copy the video link
Next, you need to copy the video link. To do this, click on the three-dot icon on the top right corner of the video player and select "Copy link" from the dropdown menu. Alternatively, you can right-click on the video player and select "Copy video address" or "Copy link address" depending on your browser.
Step 3: Go to pinterestvideosdownloader.com
Now, go to pinterestvideosdownloader.com on your web browser. This will take you to the homepage of the Pinterest video downloader online.
Step 4: Paste the video link
Once you are on the homepage of the Pinterest video downloader online, you will see a box that says "Enter Pinterest Video URL". Paste the video link you copied in step 2 into this box by pressing Ctrl+V (Windows) or Command+V (Mac) or right-clicking and selecting "Paste" from the dropdown menu.
Step 5: Download the video
After pasting the video link, click on the "Download" button next to the box. This will start the process of extracting the video file from the link and converting it into a downloadable format. Depending on the size of the video and the speed of your internet connection, this may take a few seconds or a few minutes. Once the conversion is complete, you will see a new page with a preview of the video and a "Download" button. Click on the "Download" button to save the video to your computer or mobile device. You can choose where to save the video and what name to give it.
Step 6: Play the video
Once you have downloaded the video, you can play it using any media player that supports the file format, such as VLC, Windows Media Player, or QuickTime. You can also share the video with others via email, text, or social media.
Tips for using a Pinterest video downloader online
Be careful with copyright: Before downloading a Pinterest video, make sure that you have the right to use it for your intended purpose. Some videos may be protected by copyright, trademark, or other legal restrictions, and using them without permission may lead to legal consequences. Check the terms of use of the video, the owner's attribution, and any applicable laws or regulations before downloading or sharing the video.
Use a trusted and secure tool: There are many Pinterest video downloaders online available, but not all of them are reliable or safe. Some may contain viruses, malware, or spyware that can harm your device or steal your personal information. Make sure to use a reputable and trusted tool that has positive reviews, clear instructions, and no hidden fees or risks.
Respect the creator's rights: If you are a content creator yourself, you know how important it is to be credited and acknowledged for your work. The same applies to the creators of the videos you download from Pinterest. Whenever possible, give credit to the creator by mentioning their name, their website, or their social media handles. This can help build a positive relationship with the creator and show your appreciation for their talent and effort.
Conclusion
A Pinterest video downloader online can be a useful tool for saving and sharing videos from Pinterest. By following the steps outlined in this article, you can easily download a Pinterest video and use it for your own purposes. However, make sure to use the tool responsibly, respect the creator's rights, and stay safe online. With a little creativity and caution, you can make the most of the vast and diverse collection of videos available on Pinterest.
1 note
·
View note
Text
Just How To Automate Form To Excel Extraction
Summarizing Categorical Data with Pivot Tables by-Brady Bachmann
Using Excel as a tool for drawing out insights from online types, like Google Forms, is an excellent method to conserve time as well as make sure accuracy. Nevertheless, moving the data from Word or PDF to an Excel worksheet isn't constantly very easy.
Luckily, Microsoft Excel has an integrated input form for tables that makes entering information a lot quicker and much less error-prone. Allow's have a look at exactly how to trigger this function and use it in your spreadsheets.
youtube
What is a form?
Kinds are documents that gather info in a structured, taken care of arrangement as well as pass that info to one more entity. They are used in numerous sectors, consisting of federal government, schools, and also companies.
When people think of types, they often invoke pictures of a purchase order, survey, service demand, or tax return. However, types additionally happen in less concrete means.
In English, forms are the design in which a text is presented, which can consist of prose (tales), verse as well as dramatization (plays as well as manuscripts). Creating with a specific kind can aid writers interact indicating more effectively.
In a web application, forms are shown making use of HTML markup as well as Cascading Design Sheets (CSS). The customer input is accumulated, sent out to a web server, and also refined by a form-handler, which is usually a documents on the web server with a script that processes the data. The form data collection is encoded according to the content kind defined by the enctype quality of the type component.
Just how to develop a form in Excel
Types act as an essential tool for almost every sector to record information, especially in sectors like financial, insurance, and also train. Recommended Looking at need to be refined to draw out exact info and to make it readily available for use in a digital format.
Nonetheless, this is an unfavorable process as it can cause errors and also hold-ups in recording the needed information. To avoid this, Excel has numerous functions to facilitate input and also ensure precision.
In Excel, you can develop a type by adding material controls such as switches, checklist boxes, and combination boxes to the workbook. These can be accessed through the Quick Gain Access To Toolbar or the ribbon.
You can also include a button to the worksheet utilizing a macro. This will open the input type as soon as you click it.
How to develop a form in Word
Kinds are a valuable device for companies to collect information from staff members or customers. They save time and also assistance handle process. Nonetheless, moving information from kinds to an Excel worksheet can be a headache.
To avoid this, you can export type information to Excel in comma-separated worths (CSV) format. This allows you to use the Excel program for complete data evaluation, run solutions as well as develop graphes or graphics.
The primary step in this process is to open up words file with your kind information. Next off, click on the Documents food selection as well as pick Conserve As.
You can save your Word file as a CSV documents or you can convert it to a PDF In either case, you will be able to open it with Excel or Google Docs.
The 2nd approach of transforming data from a Word document to an Excel sheet is by using the Copy/Paste choice. This embeds an Excel table or text within the location Word paper, permitting you to service your data as if it were in Excel.
How to create a kind in PDF
There are a variety of ways to remove data from PDF types, yet one of the most exact and effective way is by automating the procedure. This will save you money and time while ensuring the precision of your outcomes.
First of all, you can use tools like Excel to draw out tables from PDF data and also import them right into a spread sheet. The benefit of this approach is that the data will already be formatted as Excel tables, which makes it much easier to arrange or filter them.
An additional option is to by hand replicate as well as paste the data from the PDF into a spread sheet. This is rather reliable when the data is straightforward, but it can be tiresome and inaccurate for difficult tables with several pages.
The final choice is to utilize an information extraction software that can immediately remove the data from PDF kinds in bulk. The software program will then download the analyzed data to a spread sheet or CSV documents, which you can open in your favored application.
#Extracts Form To Excel#Microsoft Excel#PDF Forms To Excel#Scanned Forms To Excel#Fax Forms To Excel#Form Extraction Software
1 note
·
View note
Link
0 notes
Text
pcsx2 cheats pnach collection download hack 7CS%
💾 ►►► DOWNLOAD FILE 🔥🔥🔥🔥🔥
2)Attach your .pnach file as a file. Some useful guides to help you make some Comments: Too many cheats to list, check inside patch. Here's a huge collection of PNACH cheat files for PCSX2 located in a PCSX2 Save File Collection Memory Card 1 Contents - Download The. PCSX2 PNACH Cheat Collection Here are a few samples of cheats in effect using one of the cheat files included in the link. If you're a first. pcsx2 cheat files download. 9 About Privacy Policy Removal Request. Visit Blog. Explore Tumblr blogs with no restrictions, modern design and the best experience. Fun Fact. Tumblr has been providing a Korean-language service since Joined: Feb Reputation: In this situation, it is usually sufficient to find, download and set up an application that facilitates the PNACH document format - this kind of applications are accessible below. It is definitely worth checking out if this method can furthermore be applied to the PNACH data files. Manhunt 2 ntsc i dont have game but here is the file all you have to do is load your. You will have to change file extension to before. Click on it and you'll see the configuration window. Now you need to locate the BIOS file on your device. Single-click on it with the "; extension. WWE SmackDown vs. Raw Pnach files for pcsx2 download package Pc Pnach files for pcsx2 download package iso com Pcsx2 Cheat converter is designed to change raw codes into pscx2 patch format and modify and save new pnach files. PCSX2 has its own in-built cheat system, which uses. Download my deal and extract the PCSX I put the pnach file in the wrong PCSX2 folder, meaning the location it is downloaded in. I now placed it in the correct location. The log now shows that it read all 13 cheats however still not working. The log says 'No CRC found', could this be an issue? I'd like a patch file for Sly 2 and 1. For sly 1, I'd like it to have infinite health, same with sly 2. And also the moonjump code for sly 2 since I didn't get it working. Sly 2 is SCUS Sly 1 is SCUS In this video you will learn how and where to add the downloaded pnach file and how to activate the necessary codes in it! Pcsx Be a cheater Code Files I will try out to upgrade this line after some revisions. Download my package and draw out the PCSX In this case, the file would be like this: Now save it and close. Back to the emulator, in the System menu, click Enable Cheats. In the log window, take note of the game's CRC. Exit PCSX2 completely. Place 's contents into the pnach. Ensure cheats are enabled by going to 'System - Enable Cheats'. Full boot the game. It depends on your exact version of PCSX2. Pcsx2 Pnach Cheat Files Download. Make file with your game's CRC 4. Download OmniConvert v1. Use Omniconvert to convert your codes to a format the emulator can recognize 6. Add the code to file using the format I show 7. Test your code to see if it works in game. Download: Click Download and in a few moments you. To review, open the file in an editor that reveals hidden Unicode characters. Pcsx2 Pnach Codes. Exe File Using. For doing that, download OmniConvert and extract file using WinRar and run it. Now paste your cheats on the left side, and then navigate to Input and choose your cheat type and version. Below is the list of the compatible cheat codes for OmniConvert. Pnach codes write to the memory of a game basically. Sometimes games have a certain CRC checker for Save Files, so when you Save a game or try to load a game while codes are being used, it might act as if it's all corrupt. Final Fantasy 12 is a good example. If you use certain codes there without a 'bypass' code you'll end up getting nothing. Patch Browser dialog. To write the patch to a file in the mentioned patches folder i. Type or paste the raw code in the left box. It has three main functions: Convert, Save and Modify. Answer Pcsx2 Cheat converter is a small application used to convert raw codes into pscx2 patch format. Pcsx2 Cheat converter is designed to change raw codes into pscx2 patch format and modify and save new pnach files. Place replacement files in a folder named after the CVM, which goes in the same directory as the. The ". If you are looking for software that will allow you to open a file with the. PNACH extension, or if you want to find. Just click desired file title, then click download now button or copy download link to browser and wait certain amount of time usually up to 30 seconds for. Here you can download pcsx2 pnach cheats Shared files found Uploaded on TraDownload and all major free file sharing websites like, uploaded. Psx2 emulator mac. This must be done for Harry Potter - Chamber of Secrets to start at all, it needs a. Make ps2 emulator run on mac Last Seen Blogs.
1 note
·
View note
Text
pcsx2 cheats pnach collection download working NDJ!
💾 ►►► DOWNLOAD FILE 🔥🔥🔥🔥🔥
2)Attach your .pnach file as a file. Some useful guides to help you make some Comments: Too many cheats to list, check inside patch. Here's a huge collection of PNACH cheat files for PCSX2 located in a PCSX2 Save File Collection Memory Card 1 Contents - Download The. PCSX2 PNACH Cheat Collection Here are a few samples of cheats in effect using one of the cheat files included in the link. If you're a first. pcsx2 cheat files download. 9 About Privacy Policy Removal Request. Visit Blog. Explore Tumblr blogs with no restrictions, modern design and the best experience. Fun Fact. Tumblr has been providing a Korean-language service since Joined: Feb Reputation: In this situation, it is usually sufficient to find, download and set up an application that facilitates the PNACH document format - this kind of applications are accessible below. It is definitely worth checking out if this method can furthermore be applied to the PNACH data files. Manhunt 2 ntsc i dont have game but here is the file all you have to do is load your. You will have to change file extension to before. Click on it and you'll see the configuration window. Now you need to locate the BIOS file on your device. Single-click on it with the "; extension. WWE SmackDown vs. Raw Pnach files for pcsx2 download package Pc Pnach files for pcsx2 download package iso com Pcsx2 Cheat converter is designed to change raw codes into pscx2 patch format and modify and save new pnach files. PCSX2 has its own in-built cheat system, which uses. Download my deal and extract the PCSX I put the pnach file in the wrong PCSX2 folder, meaning the location it is downloaded in. I now placed it in the correct location. The log now shows that it read all 13 cheats however still not working. The log says 'No CRC found', could this be an issue? I'd like a patch file for Sly 2 and 1. For sly 1, I'd like it to have infinite health, same with sly 2. And also the moonjump code for sly 2 since I didn't get it working. Sly 2 is SCUS Sly 1 is SCUS In this video you will learn how and where to add the downloaded pnach file and how to activate the necessary codes in it! Pcsx Be a cheater Code Files I will try out to upgrade this line after some revisions. Download my package and draw out the PCSX In this case, the file would be like this: Now save it and close. Back to the emulator, in the System menu, click Enable Cheats. In the log window, take note of the game's CRC. Exit PCSX2 completely. Place 's contents into the pnach. Ensure cheats are enabled by going to 'System - Enable Cheats'. Full boot the game. It depends on your exact version of PCSX2. Pcsx2 Pnach Cheat Files Download. Make file with your game's CRC 4. Download OmniConvert v1. Use Omniconvert to convert your codes to a format the emulator can recognize 6. Add the code to file using the format I show 7. Test your code to see if it works in game. Download: Click Download and in a few moments you. To review, open the file in an editor that reveals hidden Unicode characters. Pcsx2 Pnach Codes. Exe File Using. For doing that, download OmniConvert and extract file using WinRar and run it. Now paste your cheats on the left side, and then navigate to Input and choose your cheat type and version. Below is the list of the compatible cheat codes for OmniConvert. Pnach codes write to the memory of a game basically. Sometimes games have a certain CRC checker for Save Files, so when you Save a game or try to load a game while codes are being used, it might act as if it's all corrupt. Final Fantasy 12 is a good example. If you use certain codes there without a 'bypass' code you'll end up getting nothing. Patch Browser dialog. To write the patch to a file in the mentioned patches folder i. Type or paste the raw code in the left box. It has three main functions: Convert, Save and Modify. Answer Pcsx2 Cheat converter is a small application used to convert raw codes into pscx2 patch format. Pcsx2 Cheat converter is designed to change raw codes into pscx2 patch format and modify and save new pnach files. Place replacement files in a folder named after the CVM, which goes in the same directory as the. The ". If you are looking for software that will allow you to open a file with the. PNACH extension, or if you want to find. Just click desired file title, then click download now button or copy download link to browser and wait certain amount of time usually up to 30 seconds for. Here you can download pcsx2 pnach cheats Shared files found Uploaded on TraDownload and all major free file sharing websites like, uploaded. Psx2 emulator mac. This must be done for Harry Potter - Chamber of Secrets to start at all, it needs a. Make ps2 emulator run on mac Last Seen Blogs.
1 note
·
View note
Text
Ocr scanner software

Ocr scanner software manual#
Ocr scanner software software#
Ocr scanner software free#
Ocr scanner software software#
Layout Analysis – OCR software will analyze the layout of a document and automatically extract text from it.
Text Translation – The software can translate text from one language to another.
Search Function – Ability to search for words or phrases in the document to go directly to them.
This is also known as Optical Character Recognition.
Text Detection – Finding text in images with the use of algorithms and programming.
Essential Features To Look For In An OCR Tool: extras like optical character recognition templates for standard file formats, etc.īelow we'll explore some popular OCR tools in detail so that you can make an informed decision.
Ocr scanner software free#
Next, think about your company's needs and budget - do they meet the minimum requirements for a paid option? If not, then maybe a free one will be "good enough" for now.įinally, decide on what key features matter most: accuracy of conversions vs. The first thing is deciding if you want offline, semi-offline, or online options (or all three). There are several factors to consider when choosing an OCR software. On the other hand, if you're starting and don't need the software to run on a large scale, free OCR tools are more than enough for your needs. In that case, buying top-notch conversion software is worth the investment because your workflow can slow down significantly without quick and efficient document scanning features, which leads to a lack of productivity (and unhappy staff). For example, suppose you have an established business with many employees who rely on its day-to-day operations. In choosing between paid and free OCR options, it's crucial to weigh your needs against budget constraints. Paid software offers support and updates.įree OCR tools may not be as up-to-date or accurate in their conversions, but they offer a more cost-effective option for small businesses on tight budgets. Via GIPHY When it comes to choosing between free and paid OCR software, there are benefits to both. These days, there are OCR tools that can improve business performance for just about every industry: medical records management, law enforcement, legal briefs, and more. Once OCR software has converted a physical document or document image into digital data that word processors or spreadsheet programs can edit, users can search through texts using common editors. Online: software that runs online through a web browser window.Semi-Offline: software that runs on your local computer.Optical Character Recognition is an automated process that converts scanned images of text into digital text.īusiness owners use OCR software to digitize paper documents and even entire offices by scanning them for information to work more efficiently, save time, improve business process management, and reduce paperwork. What Is Optical Character Recognition Software? If you click an affiliate link and subsequently make a purchase, we will earn a small commission at no additional cost to you (you pay nothing extra). Important disclosure: we're proud affiliates of some tools mentioned in this guide. What Is Optical Character Recognition Software?.
Ocr scanner software manual#
OCR software scans paper or a digital document for information - allowing you to save time on office labor, reduce manual entry, and work more efficiently. One way to digitize a document is by using Optical Character Recognition software (OCR). These come in a variety of formats, such as PDFs, images, and text files. Every day, the world generates trillions of documents that need to be scanned, digitized, and stored.
0 notes
Text
Cute pdf images

#Cute pdf images for free
#Cute pdf images pdf
#Cute pdf images pro
#Cute pdf images Offline
#Cute pdf images free
#Cute pdf images pdf
ReaSoft PDF Printer is a document creator and virtual printer installer for the Windows operating systems. Get stuff done with or without an internet connection. Create a new document and edit with others at the same time - from your computer, phone or tablet. Supports Citrix, Terminal Server, Windows 8, Windows Server 2012, Windows 7, Vista, 2008R2, 2008, 2003, and 2000.
#Cute pdf images free
Free PDF Printer - Create PDF documents from Windows applications. Set Output Format A new dialog box shall open. Select the appropriate file on your computer and open with the program. You can view and annotate PDFs, fill out and sign forms, and edit images.
#Cute pdf images pro
A speedy PDF Editor alternative to Adobe Acrobat. Add PDFs to PDFelement Open PDFelement on your computer, click on the 'Convert' to enable you to add the PDF file you would like to convert. Adobe Acrobat Pro Microsoft Word 2013 or 2016 Preview on Mac CutePDF Editor. Download Foxit PDF Editor to convert, sign, scan / OCR & more. Edit PDF files with our feature-rich PDF Editor. It provides a perfect solution for all users. ApowerPDF is a versatile PDF editor which also features as PDF converter, viewer, creator and more. Other tools are also available on Smallpdf, in case the output file needs to be in PPT, Excel, or JPG (albeit the last option does not leave a lot of room for editing).Ĭonversely, if you have a document on hand that isn’t in PDF format, the all-in-one PDF converter can first save your file to PDF format, so that you can freely white out your PDF using our editor, following the instructions illustrated above.What are some alternatives? When comparing Adobe Acrobat DC and CutePDF, you can also consider the following products If you upload scans, Optical Character Recognition (OCR) is available for Pro users, which recognizes and extracts all types of content and places them accordingly onto the output file. Edit PDF files with CutePDF Editor - a free online PDF editor, free cloud-based PDF reader, View and Edit PDF documents on the web quickly without Adobe Acrobat. With this, you can freely remove, edit, or enhance existing text on your digital file, as per your needs. Can I Modify the Existing Text in a PDF?Įven though the option to select the text within a PDF isn’t available, especially for scanned PDFs, you can always use the PDF to Word tool to convert your document into an editable file.
#Cute pdf images Offline
And lastly, an offline Desktop editor is also available for our Pro users if you’re looking for an Adobe Acrobat alternative. Click the location where you want to place the graphic, or drag a rectangle to define the boundaries of. The text tool is very customizable so that you can pick your own size, font type, color, alignment, and. Go to the page where you want to add the Image object.
#Cute pdf images for free
You can't truly change text or edit images for free using this editor, but you can add your own text, images, links, form fields, etc. Better yet, as an online platform, you can conduct the PDF white out by clicking on the tool from our homepage, from anywhere with a stable internet connection. It's free as long as the document doesn't exceed 100 pages or 10 MB. insert, extract or delete PDF pages, edit PDF graphics, images and text. You can also edit text or images by clicking on 'EDIT' icon in the top left corner. Select 'Edit Text' to start editing text in 'Paragraph Mode' or 'Line mode'. Using these you can edit almost every aspect of your PDF. As such, our edit tool can be accessed from any device, for occasional free use. However, here are few of troubleshooting on using Cute PDF Creator youd better. To edit your PDF file, simply select 'EDIT' to unveil the editing options. We believe that the options to convert and edit PDF files should be available to anyone to use. Other than the redaction tool in white and the option to add text, you can also insert drawings and images to your PDF file. With the same edit tool you can select the text icon from the toolbar and instantly place new text directly on top of the white-out box. Of course! But it’s much easier than what you might remember from grade school-waiting for the liquid white-out to dry so you can painfully try to write over it. Solution 4: This issue can be fixed simply by deleting all your temporary files. Select Add image option to add images to your PDF file. Problem 4: The font capture is not working. You can also edit text or images by clicking on EDIT icon in the top left corner. Solution 3: The Cute PDF Writer is not working might happen because of lots of reasons, but it can be easily resolved after reinstalling the CutePDF Writer. Can I Edit Text on Top of the Whitened Out Content? Problem 3: The CutePDF Writer is not working. Thus, make sure you have a copy of the original document elsewhere before you apply the redaction to the text-unless the information is to be forever hidden. Whiting out text will ensure that nobody can view or edit the content that has been covered.
1 note
·
View note
Text
Download youtube to audio converter

#Download youtube to audio converter Offline#
#Download youtube to audio converter professional#
#Download youtube to audio converter professional#
These are professional YouTube audio extractors that can process YouTube audio quickly and in large batches to MP3 in the best quality, helping to save a lot of time. If you want to export YouTube audio in batches with excellent quality and efficiency, third-party tools like Downie or Pulltube are the first method you should really not skip. Although the website and all the functions are completely free, there's a problem with annoying ads. After choosing the audio format, click the Download option. Click Start to launch the conversion process. Simply type a name into the search box or put a direct video link into the search field. Searching for another free online YouTube to MP3 converter? Try y2mate. However, be cautious and refrain from clicking on any pop-ups or advertisements as they can contain harmful files. Since there is only really one choice – to convert video to audio – it's very simple to use. VidToMp3 is an online video converter available through any browser. Free websitesĭid you know you can get audio from YouTube without installing any third-party apps or browser extensions? You can use one of the lots of websites that allow you to do that quickly and easily. So you need to either use another browser like Chrome or Firefox or look for some other options, which, to be honest, don't look reliable. Bad news: both add-ons don't support the Safari browser. It's convenient because you don't need to minimize or close tabs. You can save audio from YouTube with the help of browser add-ons like Addoncrop YouTube to MP3 converter or By Click Downloader, which are the most popular among other extensions. Simply drag and drop an URL from your browser's URL bar onto Downie's app and set Postprocessing to Extract Audio Only. You can also extract audio from a wide range of other platforms, including Facebook, Instagram, Twitter, Vimeo, Dailymotion, and many more.ĭownloading audio from YouTube shouldn't be difficult, and Downie makes it quite easy to do so. The app is among the best tools for downloading music directly from YouTube since it makes it possible to do that quickly and easily. These are third-party software, browser extensions, and rip YouTube audio websites. In case you don't want to spend money on a YouTube Premium monthly subscription, there are many other ways to download YouTube audio. Just sign into your YouTube account, click on your profile image, and then click Purchases and memberships. It's simple to sign up for YouTube Premium. Additionally, you will have access to YouTube Music Premium, which lets you listen to your favorite music without commercials.
#Download youtube to audio converter Offline#
You may enjoy your favorite content offline with a paid monthly subscription. Signing up to YouTube Premium is the simplest way to download audio and video files from the site.
0 notes
Text
Microsoft’s AI Magic: Transforming Healthcare Insights
Microsoft introduces cutting-edge data and AI solutions that revolutionize healthcare, offering unprecedented insights and enhancing the patient experience
Every sector needs unique insights to succeed, and harnessing data’s value is vital. In healthcare, data may improve health outcomes, patient and clinician experiences, and organisational performance. The appropriate data strategy may change lives when patient or population health is at the centre of decision-making.
Organisations are battling to keep up with rising healthcare data volume, diversity, and velocity. The World Economic Forum estimates that hospitals generate 50 petabytes of segregated data every year, or 10 billion music files. As much as 97% of this data is wasted, preventing useful discoveries. Utilising all this data may lead to clinical and operational innovations that improve patients’ healthcare experiences. As organisations realise that without a sound data strategy, they are simply scratching the surface of AI’s potential, data becomes more important.
Microsoft are showcasing new data and AI technologies and capabilities at HLTH 2023 to assist healthcare organisations improve patient and clinician experiences while providing excellent care more effectively and cheaply. These new solutions allow healthcare organisations to use Microsoft Cloud for Healthcare’s breadth and scalability with a cohesive, secure, and responsible data and AI strategy.
Combining data analytics to improve patient care and corporate value
Microsoft introduced Microsoft Fabric in May, an end-to-end, unified analytics platform that combines all the data and analytics capabilities organisations need to harness their data’s potential and prepare for AI. Today, Microsoft Cloud for Healthcare powers the first industry-specific data solutions in Fabric that combine data and insights via one architecture and experience. The healthcare data solutions in Fabric, now in preview, eliminate the costly, time-consuming process of stitching together a complex set of disconnected, multimodal health data sources (text, images, video, etc.) and provide a secure, governed way for organisations to access, analyse, and visualise data-driven insights across their organisation
MS Fabric offers healthcare organisations:
The capacity to integrate data from EHRs, PACS, laboratories, claims, and medical devices throughout an organisation. With open data standards integrating FHIR, DICOM, and MedTech services, the Fabric data lake integrates structured, unstructured, image, and medical device data into one architecture.
Connectors and converters simplify FHIR, DICOM, and MedTech data conversion and pipeline creation for particular use cases.
A multimodal data foundation that enables standardised, scalable solutions to speed clinical and operational insights and improve patient care. Fabric lets health data exist in a single data estate for AI model building and analytics.
Clinical research is enabled by OMOP analytics, and patient outreach analytics personalise patient engagement.
Using machine learning models to extract, redact, or surrogate identifiers from unstructured data like doctor’s notes, medical documents, and clinical trial studies, a new de-identification service will help organisations protect patient-protected health information (PHI).
Microsoft preview healthcare-specific categorization rules, labels, and data glossaries help healthcare organisations control, secure, and manage their data estate.
Early adopters of Microsoft Fabric expect to utilise the analytics platform to advance some of their most important healthcare use cases:
Northwestern Medicine, Chicago’s premier integrated academic health system, will use Fabric’s healthcare data solutions to integrate clinical data from multiple sources, meet regulatory information exchange requirements, and unlock insights with data and AI to advance their patients-first mission with high-quality and timely care.
Arthur Health and Quisitive for the Ontario Workers Network will utilise Fabric to build predictive care stage models. A statewide network of hospitals, including Ottawa Hospital, OWN has skilled physicians that offer world-class treatment for employees in their communities.
SingHealth, Singapore’s biggest public healthcare network, wants Fabric’s healthcare data solutions for its data infrastructure. This will improve healthcare delivery and empower individuals to manage their own health.
Microsoft Fabric helps solve healthcare’s disparate data challenge. Fabric’s healthcare data solutions are explained here.
New AI tools empower patients and demystify medical terminology
New healthcare capabilities in Azure AI services will help organisations maximise AI’s value to improve patient outcomes:
Giving doctors and researchers informed choices Azure AI Health Insights is a cognitive service that delivers prebuilt models that analyse and draw conclusions for physicians and academics to employ in critical patient care situations.
Microsoft are previewing three new models, including patient timeline, which uses generative AI to extract key events from unstructured data like medications, diagnosis, and procedures and organise them chronologically to give clinicians a more accurate medical history to better inform care plans. Clinical report simplification employs generative AI to simplify medical jargon while maintaining the complete clinical information for sharing with patients. Radiology insights verifies quality by reporting mistakes and discrepancies. The programme finds follow-up suggestions and clinical findings in clinical record with radiologist-measured sizes.
Healthcare chatbots and virtual assistants with generative AI This new preview capability in Azure AI Health Bot provides out-of-the-box healthcare intelligence that can be customized and integrated into existing workflows, using answers from a healthcare organization’s content sources and generative AI to provide answers from credible sources like the National Institutes of Health and the FDA.
Medical data extraction and labelling for insights Text Analytics for health, an Azure AI Language service, extracts and labels medical data from unstructured texts using machine learning. Population health, Azure OpenAI Service patient population Q&A, clinical trial patient cohorts, and bulk historic data processing are new industry open source templates.
AI helps physicians provide personalised, high-quality treatment
To reduce administrative load and clinician fatigue, which grew to 53% among doctors in 2023 from 42% in 2018, U.S. health institutions are using AI-powered solutions, according to Medscape. To reduce clinician fatigue and enable personalised treatment, Dragon Ambient eXperience (DAX) Copilot, previously DAX Express, is now available for general use.
DAX Copilot, part of the Nuance Dragon family of products utilised by over 550,000 users globally, lets physicians automatically and securely draught clinical summaries in seconds from exam room or telehealth interactions for EHR review and submission.
Atrium Health was the first to implement Nuance DAX Copilot and expects to licence further throughout its 40 hospitals and 1,400 care sites. Physicians claim significant time savings in patient visit documentation. Medical staff at Atrium Health say this enhanced documentation system saves them up to 40 minutes every day. Also, 68% say their caregiving experience has improved.
Microsoft Cloud for Healthcare in AI/data age
Microsoft Cloud for Healthcare adds industry-relevant data solutions, application templates, and AI services to the Microsoft Cloud, helping healthcare organisations speed their data and AI journey. An unequalled worldwide network of trustworthy partners may customise our products. To provide holistic solutions for healthcare clients’ particular business concerns, Microsoft partner with premier ISVs and system integrators.
Microsoft healthcare solutions are based on trust and Microsoft’s Responsible AI. These innovations help healthcare organisations create connected experiences at every point of care, provide collaboration tools, empower the healthcare workforce, and unlock the value of clinical and operational data using industry-relevant data standards.
0 notes
Last Seen Blogs

zittolini
Zitto

youthandconsequences
in a manner of speaking

blackstarkachina
Black Star Kachina

herramientasdemarketingdigi-blog
Herramientas de Marketing digital

aintquiteright
Some say that boy ain't quite right ...