#sims2 tutorial
Explore tagged Tumblr posts
Visit Tumblr Blog
Explore Tumblr blogs with no restrictions, modern design and the best experience.
Last Seen Tumblr Blogs


Fun Fact
When “GIF” was named word of the year in 2012, Oxford Dictionaries U.S.A. credited Tumblr for pushing the word.
Text
DEP Works for the Legacy Collection!
I was naïve to think that all my problems would be solved with the Legacy Collection, but that wasn’t the case.
When I was playing on big lots with many objects — for example, this makeover of Sim Lane 165 by @katatty — my game would suddenly crash.
PS: @katatty , your creations are gorgeous! I really admire your work!
So, I tried removing the game’s executable from the DEP, and it worked! Now, I can play on the lot for hours without the game crashing.
If you want to remove the executable from DEP, follow these steps:
1. Control Panel > System and Security > System
2. Advanced system settings (on the left)
3. Go to the Advanced tab > Performance: Settings
4. Click on the Data Execution Prevention (DEP) tab
5. Select Turn on DEP for all programs except those I select
6. Add/Remove the executable (.exe)
7. Apply > OK
8. Restart the computer
This should do the trick!
11 notes
·
View notes
Text
Making your own career/NPC outfits (and attaching them to custom and default careers)
Tutorials I’ve used that helped me understand this a little bit more: SuperFly’s „Attaching custom clothes to careers” @rio-sims „Adding extra options to NPC and Career Outfit Templates” @itsdiamondeyesuniverse mini-tutorial on random clothes and hair and some general knowledge from Hat’s Simpe Tricks
I’m just compiling them and adding results of my own experimenting. It will be pretty long, so everything is under the cut.
Download Template files [SFS] or [Google Drive]
First step is to understand what makes an outfit template.
Looking at my empty template (OutfitTemplate-Empty.package), you can see 4 files. You don’t touch the BHAV and OBJf, they control the behaviours and functions and such. Good practice is to change the name of the OBJD and NREF to something unique. For custom outfits, you will have to change the GUID in the OBJD, but I will touch on that later in the tutorial.
But that’s just an empty template to fill with your own outfits. Every variation of an outfit is made of 2 files:
3IDR (3D ID Referencing File) - This one contains skeleton resource and hair/clothes property sets. AGED (Age Data) - This one pretty much contains instructions on how to read the 3D ID.
In my 3D ID template files you can see the first line is a Resource Node - that’s the skeleton. It always has to be there, don’t delete it. Second line is a property set - that’s the outfit that you will be replacing. 3D ID can have many lines of property sets in particular order, depending on what Age Data is saying.
(My SimPE shows Age Data in CPF, which reads hexadecimal, but sometimes can also show it in XML, which reads decimal. If some lines are different in decimal, I will put it in brackets.)
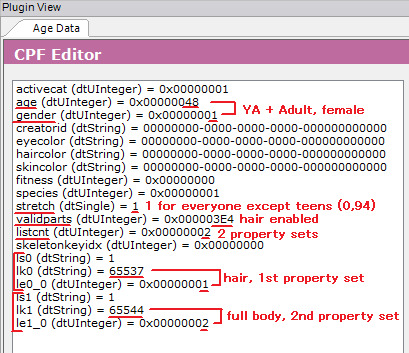
If you open up any of my Age Data templates, you can see a lot of lines that may make sense intuitively, and some that make no sense at all. Here are lines that are actually useful and how to change them:
AGE 2 - Child (also 2 in decimal) 4 - Teen (also 4 in decimal) 40 - Young Adult (64 in decimal) 8 - Adult (also 8 in decimal) 48 - Young Adult + Adult (72 in decimal) 10 - Elder (16 in decimal) 58 - Young Adult + Adult + Elder (88 in decimal)
I think it’s better to always include Young Adults with Adults. If for example you don’t use mods that enable jobs for YA, then nothing happens and nothing breaks. But if you do, then your YA can wear their job uniform.
GENDER 1 - Female 2 - Male 3 - Unisex (only for children!)
STRETCH It’s only important in teens - they use adult skeleton, but smaller. For adults/elders stretch will say 1, for teens - 0,94. Children use their own skeleton, so their stretch is also 1.
VALIDPARTS 3e4 - If you want to add hair to your outfit (996 in decimal) 3e0 - If you don’t want hair in your outfit (992 in decimal)
LISTCNT Number of elements in your 3D ID. Technically counts from 0, but as the first item is always a skeleton, for ease of counting - it’s the number of property sets used. For only fullbody outfits it will be 1, fullbody + hair or top + bottom = 2, hair + top + bottom = 3.
SKELETONKEYIDX Position of the skeleton in the 3D ID. Always 0, as it’s the first item, counted from 0.
LS, LK, LE All 3 needed together. They are counted from 0. So the first 3 lines will be named ls0, lk0 and le0_0. If you add another item to your outfit (eg. hair + fullbody clothes), next 3 lines will be named ls1, lk1 and le1_0, then ls2, lk2 and le2_0 etc.
LS Always 1.
LK The numbers are already in decimal, so the same in CPF and XML. From what I’ve tested and I’m sure of:
65537 = Hair/hat 65544 = Fullbody 65540 = Top 65552 = Bottom
LE Which line in 3D ID corresponds with this item, counting from 0. As line 0 is always a skeleton, and dealt with in the „skeletonkeyidx” line, you can just count property sets.
If you use my Age Data templates - you don’t have to worry about all that, but I made this tutorial only because I really wanted to know that. So maybe someone else would want to know too :P
Now that you can understand what makes a working outfit, lets make one! This will be split into 4 parts: part 1 - making a new, custom outfit; part 2 - replacing existing outfits; part 3 - attaching outfits to careers; part 4 - testing if it works.
Part 1 - Making a custom outfit
In this example I will make an outfit for adults only, for the sake of shorter tutorial :P
First step: Open „OutfitTemplate-Empty.package” in SimPE. I will change my OBJD and NREF names. In the OBJD you have to change the GUID (the one with all zeroes in the template) - how to make a GUID? Click here to generate 8 random characters in hexadecimal (refresh for a new string), delete any spaces, then put „0x” at the start. Then check with this spreadsheet if it conflicts with any Maxis objects. My new GUID will be 0x1234ABCD (only for tutorial purposes, yours should be more random to avoid clashing with CC objects too). Save the file as a copy.
Now we’re going to add actual outfits. First, one for female adult sims. You have to add a 3D ID template (in this case for teens/adults/elders) and an Age Data template that includes your preferred combo. For this one, I will get AF-Hair-Fullbody.
If you look at the Age Data, you can see here that it’s for Young Adult and Adult female sims (age = 48), it has hair (validparts = 3e4) and contains 2 property sets in 3D ID (listcnt). In the ls/lk/le lines you can see that it contains hair (65537) in the first property set and full body (65544) in the second one. (Though the order of the property sets is in the names of the template files, so you don’t have to check every time!)
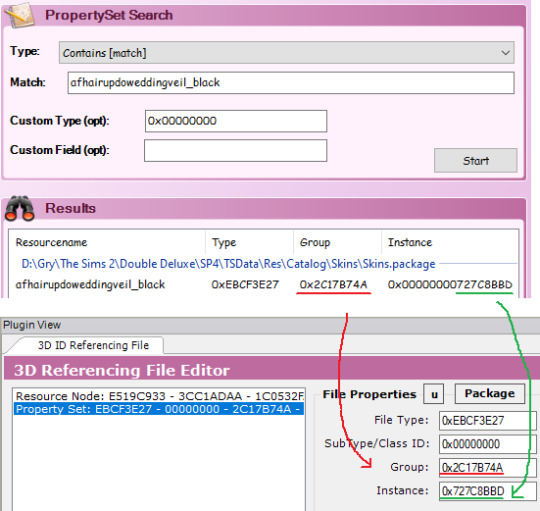
Now we go to the 3D ID. If you want to attach Maxis clothes or hair, use Scenegraph Resource Finder. Set it to Property Set Search and type your hair/clothes name there (found through the default database or the debug mode in CAS). I’ve chosen afhairupdoweddingveil_black. Doesn’t matter if you choose _black, _blond, etc, your sim will automatically wear the hair in their own hair colour (for CC hair - only if it was binned correctly). Let it search. When you’ve found what you’re looking for, note the group and instance. Now open the 3D ID. Select the property set in it and change the group and instance to the ones of your chosen hair/clothes. Commit and save.
For the fullbody outfit, I’m gonna use CC clothes (AF Lolita Dress and Boots by animera at MTS). First, make sure you have a mesh and a recolour in your Downloads folder so the game can access it. Then open the recolor and find the corresponding property set. Write down group and instance and close the file. Open up your outfit template file again and go back to your 3D ID. Click on the property set line that you set up before and click „add” to clone that line. Now change the group and instance as you did before. Commit and save.
Remember that any hair and clothes used in an outfit has to be enabled for Everyday!
That’s all for the female sim, now onto the male sim.
As before - add the 3D ID template and Age Data template. I will choose AM-Hair-Fullbody.
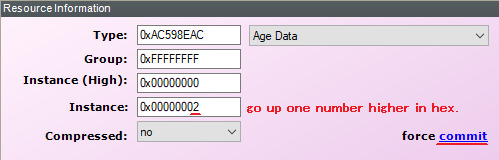
As you can see, my new 3D ID and Age Data have the same instance as the previous ones - they will clash. So we have to change each new 3D ID and Age Data’s instance to one higher. So change instance to 2 and click force commit on both.
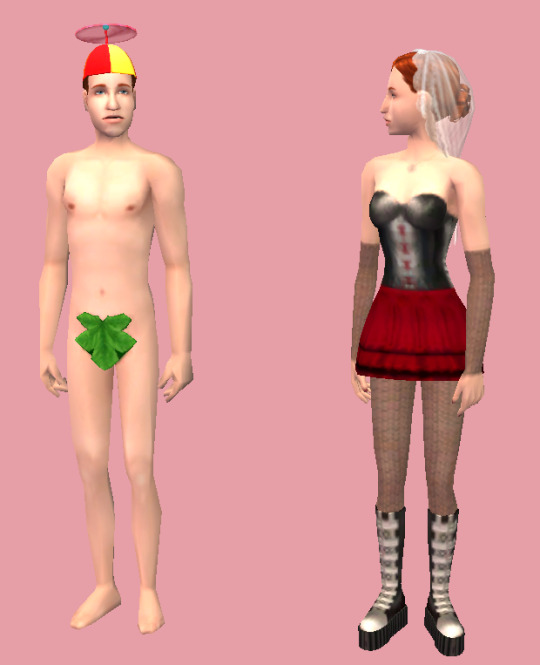
Next steps are the same as before - add property sets. I’ve added a propeller hat and a fig leaf, classy! Commit and save.
That’s pretty much it. If you want to add other age/gender combos? You can, just each new 3D ID and Age Data pair need to change their instances to one higher. You want to add like 20 options for every age and gender? You sure can, same thing as before - instance number goes up (remember, it’s hexadecimal so after 9 you got A - F, then 10 etc). You can have one outfit with hair, other without hair, one top and bottom and one full body, one for female adult and 10 for male adult, doesn’t matter, all combos work, as long as the property sets in the 3D ID are in the same order as in corresponding Age Data.
But right now, my custom outfit is done.
Part 2 - Default replacing existing outfits
While you can attach custom outfit to any career, default replacing outfits is the only (known to me) way to change NPC outfits without digging into BHAVs (which I don’t understand lmao).
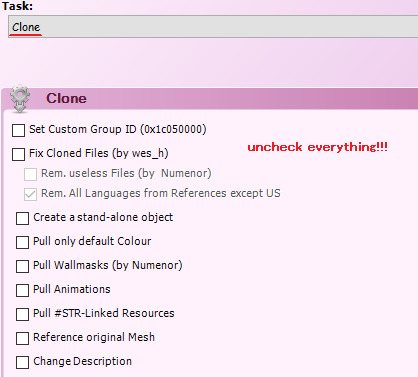
First step is to clone the outfit you’re replacing. Open Object Workshop, click Start and wait a bit as it loads. Then go to Other > Outfits and find your chosen outfit. I’ll use „Outfit_NPC_Maid_test”. Click Next. Then if it says Recolour, change it to Clone. Uncheck every box!!! Click Next. Save the file.
If you look into the Age Datas and 3D ID - they almost always look like a mess, so we’re going to replace them entirely.
Doesn’t really matter which age/gender combo you replace with which, but I’m going to check. In my example, instance 1 is for an adult female, instances 2, 3 and 4 are for an adult male.
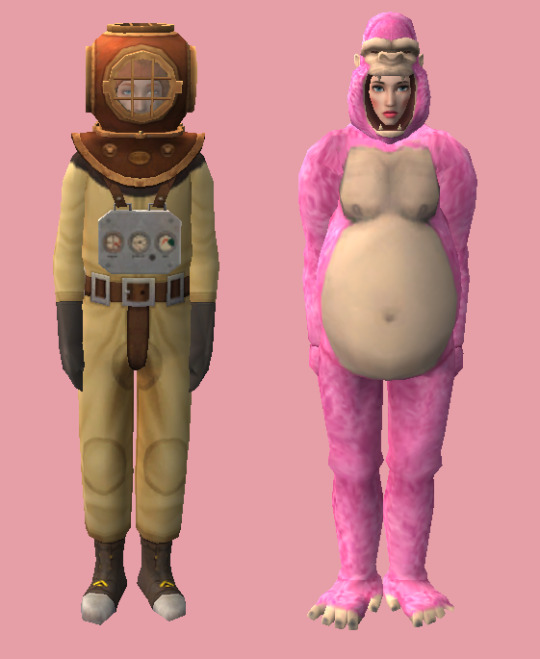
Right click on the 3D ID, instance 1, then click „Replace” and choose my 3D ID template. As you can see, group and instance remained unchanged, this is very important! Now right click on the Age Data, instance 1. Replace it with an Age Data of your choice. I will use AF-Hair-Fullbody. As I explained the process in part 1, I won’t go into detail here. I will also replace instance 2 with a 3D ID template and Age Data AM-Hair-Fullbody. I will replace female outfit with pink gorilla suit and male outfit with diver suit, because why not.
If you want to add more options: as stated in part 1 - when you add new 3D ID and Age Datas, instance numbers go up, but in this case you also need to change the group to the same as your default (in my case, the maid outfit has group 0x7FE81E93).
Maid outfit has 1 version for an adult female and 3 for an adult male. Of course you can add more, but what if it has more, and you want less? I want to have only 1 version for each gender. How to go about that? You need to replace all of the 3D IDs and Age Datas, but nobody said some of them can’t be identical. So I will replace my instances 2, 3 and 4 with the same outfit - diver suit. If I only replaced instances 1 and 2, I would have a chance to get a diver sut man maid, but also a chance to get 2 variations of vanilla man maids. Now I have 3 variations for male sims but they are identical, so all of them will spawn in diver suits.
You don’t need the OBJD, OBJf, NREF and BHAV, as we didn’t edit anything there. You can delete them from your package.
Save the file and you’re done!
Part 3 - Attaching outfits to custom and Maxis careers
If you replaced a default career or NPC outfit, you don’t need to do anything else, it just works. But for a new, custom outfit - you need to attach it to a career. Remember the GUID that you set in the OBJD? Mine was 0x1234ABCD. Write down yours somewhere.
For a custom career, open it up in SimPE and open Bidou’s Career Editor. Choose the level you want. On the bottom left, under the description, you can select some of Maxis outfits, or just type your own GUID. Do that, and your selected outfit name will change to Other. Close the Career Editor and save your file. You’re done :P

For a Maxis career, use Object Workshop. Choose Other > Sim Type, then select your career. Be sure to pick the one you need, as most careers have an Adult and Teen/Elder version, and in Object Workshop it just shows 2 identical names. I’m choosing the adult version of a Criminal career and clone it (with all boxes unchecked!!!). Save the file!! Now the steps are identical as in custom careers - open up Bidou’s Career Editor and change the outfit GUID for your chosen level to your own GUID. Close the Editor, but don’t save the file yet. Now you can see one little file that has been changed, as indicated by the italicised name. This file is named „Outfit GUIDs” and it’s the only file we need - delete the rest. Save the file and you’re done!
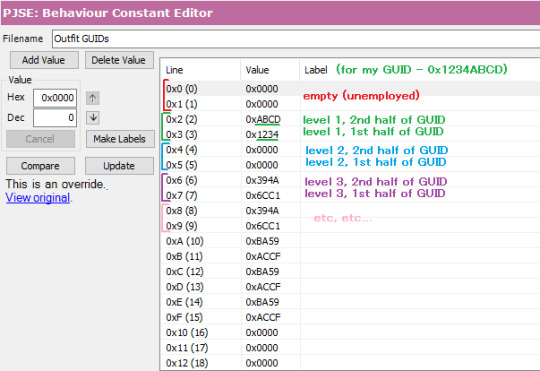
You can also edit the „Outfit GUIDs” file manually (if you, for example, don’t want to clone a career and start from scratch every time you need to make an edit). Lines 0x00 and 0x01 have to stay empty (0x0000), as they are reserved for Unemployed. Level 1 is represented by lines 0x02 and 0x03. You put your GUID there, but split in 2 halves and in reverse order. My GUID was 0x[1234][ABCD], so it will look like this: Line 0x02 - 0xABCD (level 1, 2nd half of GUID) Line 0x03 - 0x1234 (level 1, 1st half of GUID) Next lines work the same - 0x04 (2nd half) and 0x05 (1st half) for lvl 2, 0x06 (2nd half) and 0x07 (1st half) for lvl 3 etc.
Part 4 - Testing!
When all your needed files are in your Downloads folder, open the game and choose a testing hood. Make sure your boolprop cheat is on! Open a lot with at least 1 sim (we will be spawning more of them).
For testing careers, make sure you have enough sims to see your desired results. My career outfit had 1 version for adult females and 1 for adult males, so I only need 2 sims. If your outfit has more variations for the same age/gender combo, you will have to spawn a lot of sims to make sure you will get all of them! As you know, this game is famously not very good at being random, so you can have two variations of an outfit and you can get 10 sims with the first version and only the 11th will spawn with the second :P For spawning new sims, shift click on a sim and select Spawn > Tombstone of L and D. I clicked „New Adult Male” and got a random dude.
Now to get them jobs easily, I shift click on a newspaper and choose a job. You can also set their job level. For my sims, I need to test Criminal career level 1.
Now give them a wardrobe (or a few, if you have a lot of sims to change) and make them dress for work. As you can see - my sims are wearing their new pretty outfits! (Excuse my "I use lowest possible graphical settings so my laptop doesn't explode" ass screenshots)
To test NPC outfits, shift click on a sim and select Spawn > NPC and Townie Maker. First choose a gender, then find the EP of the NPC you want to create, in my case it’s the basegame, so I select Make NPC > Maid. It will spawn a random NPC of your chosen gender. You can cycle it a bit, clicking on the NPC maker again and selecting Repeat Last. If your outfit has many variations, cycle as many times as needed to make sure all your options appear correctly. When you’re done, click on the NPC maker and choose Kill. Now choose the other gender and repeat. Cycle as many times as needed. I only needed to see 1 female maid in a gorilla suit, but I needed to cycle a bit to see if nothing slipped through the cracks with the male maids. Everything works great and they were all divers :P
After all that testing we’re done! Have fun with making all of the outfits your heart desires! ♡
65 notes
·
View notes
Text
Tutorial 3D model to sims2
second part
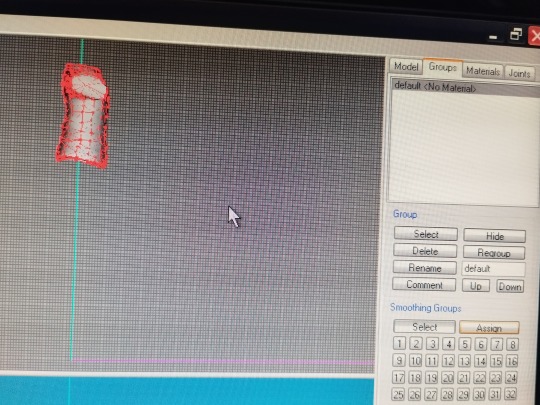
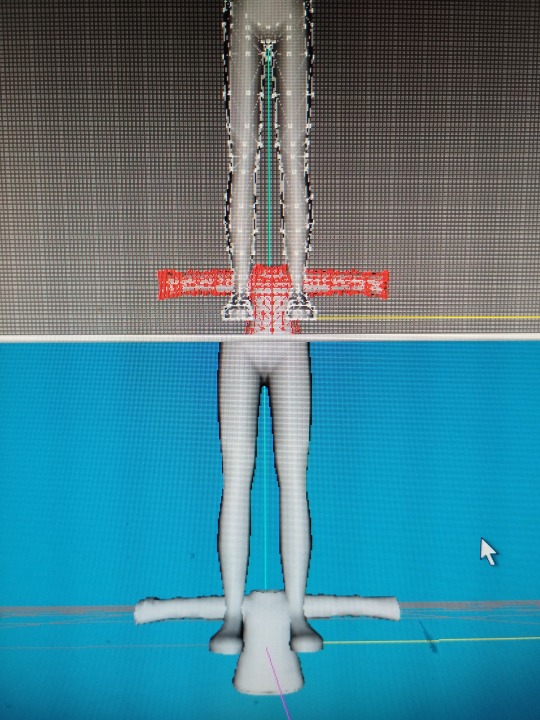
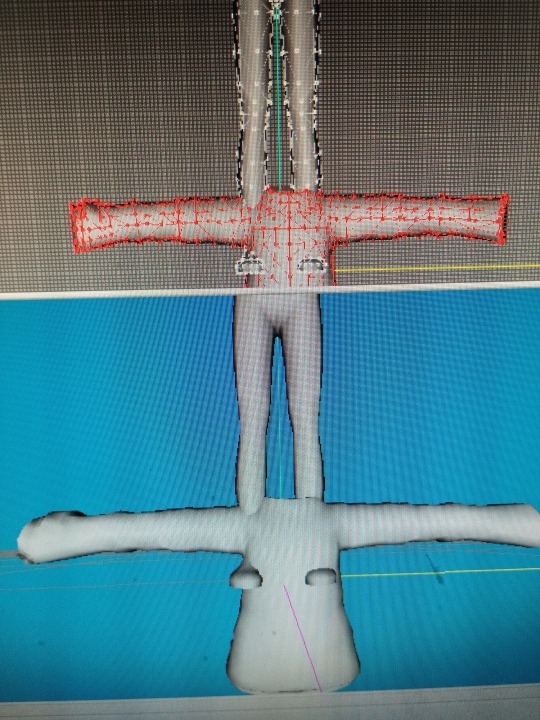
Now we are going to move our clothes to place them more or less in their corresponding place and to be able to continue increasing and decreasing their size until we find the perfect size
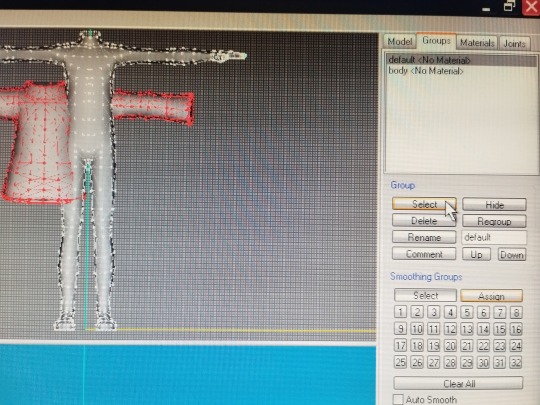
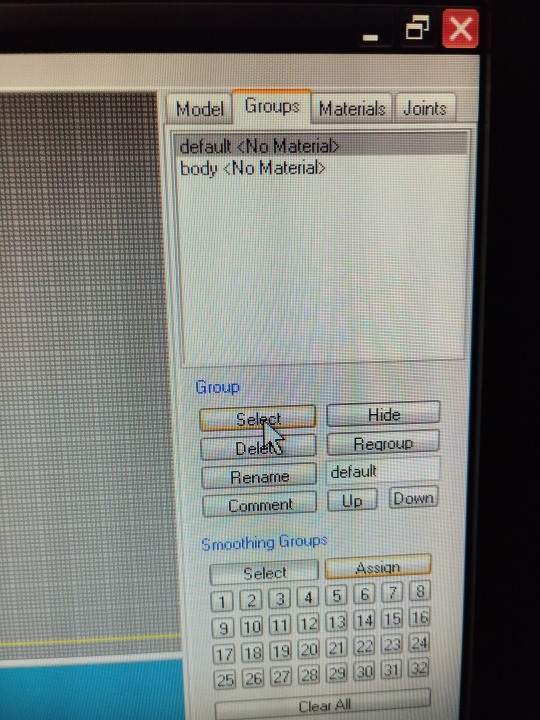
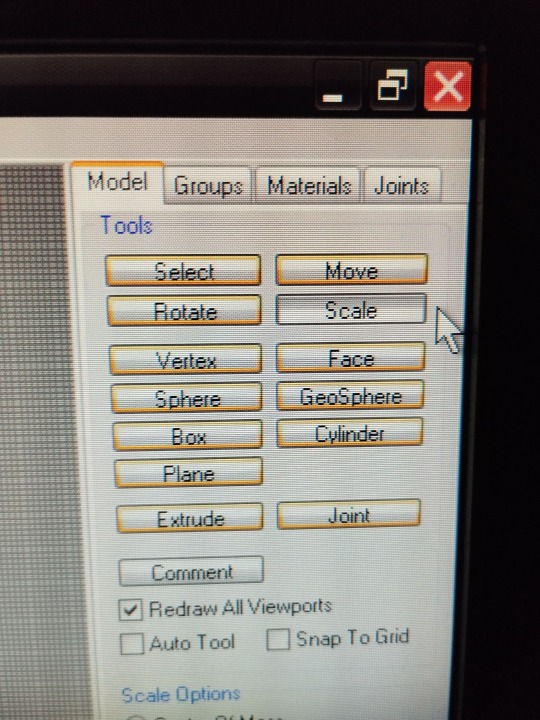
(groups, click in the name of our clothes : "default" , click select ...the clothes will turn red , click model, click move)
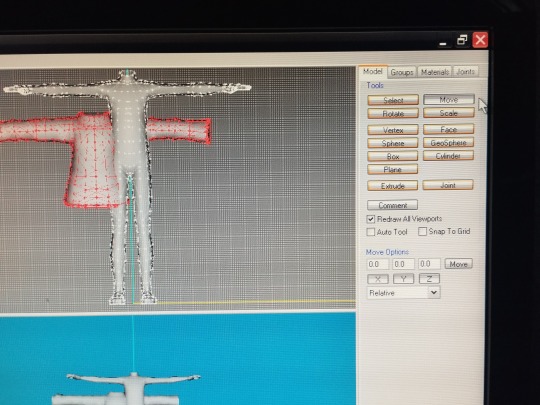
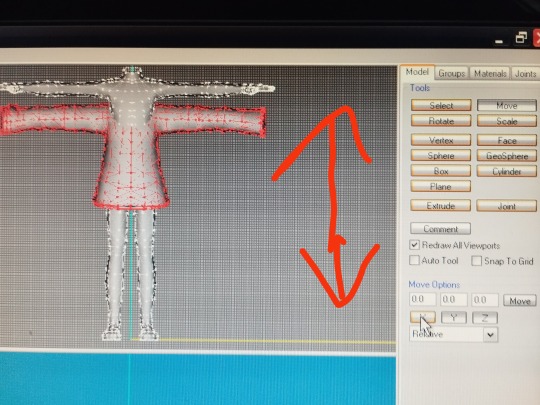
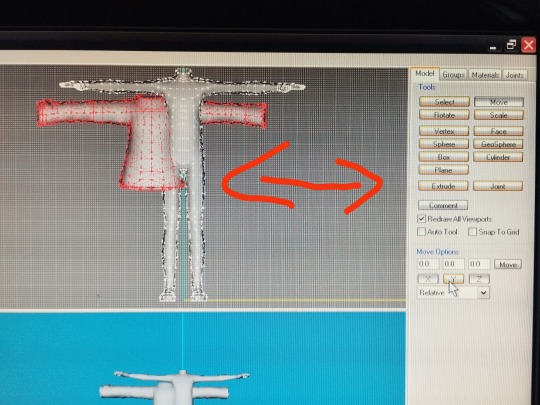
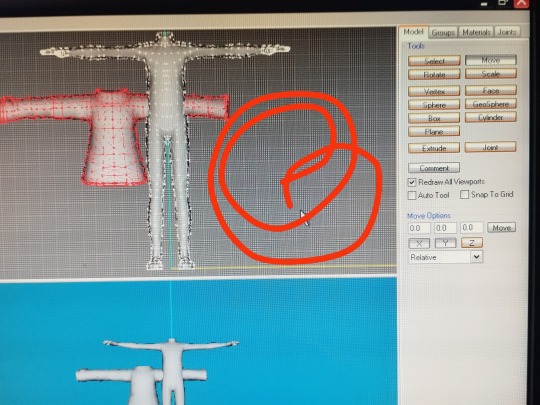
and now ... If you click on X and move the mouse, the clothes move up and down but in a straight line. If you click on Y, the clothes move right left in a straight line.If you click on Z it moves wherever you want without control (This works like this when you have chosen the front view, if you choose the left or right view things change, I will explain it later) It is important to say that you must have only one letter pressed, that letter will turn orange when you are using it, and the other two letters will remain gray
move the clothes until you have them placed more or less in the place you want and change the size until you have the desired one.
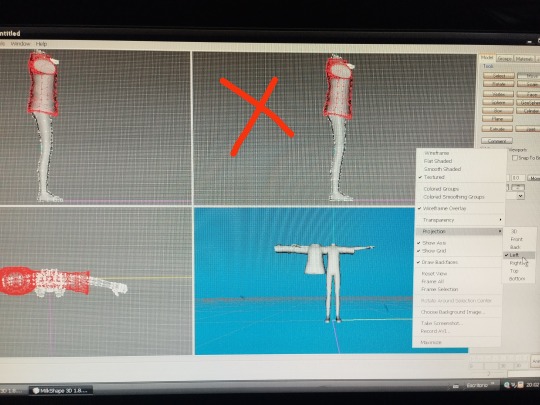
To keep in mind, if you are not very familiar with milkshape, there are 4 windows that are the views or projections of the model, left , front , top and 3D .They come by default when you open the program, but you can change the view you want whenever you want
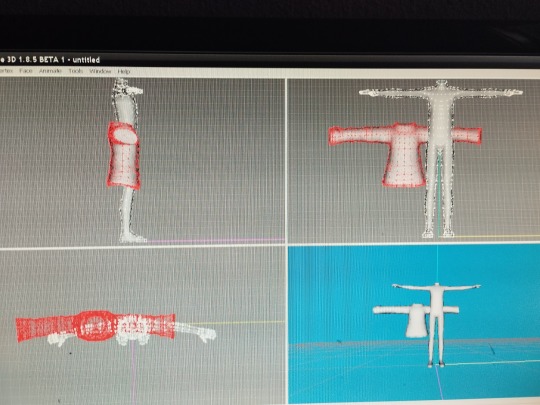
you click on a window, right-click with the mouse, click on projection and choose the view you want… 3D front back left right top or bottom
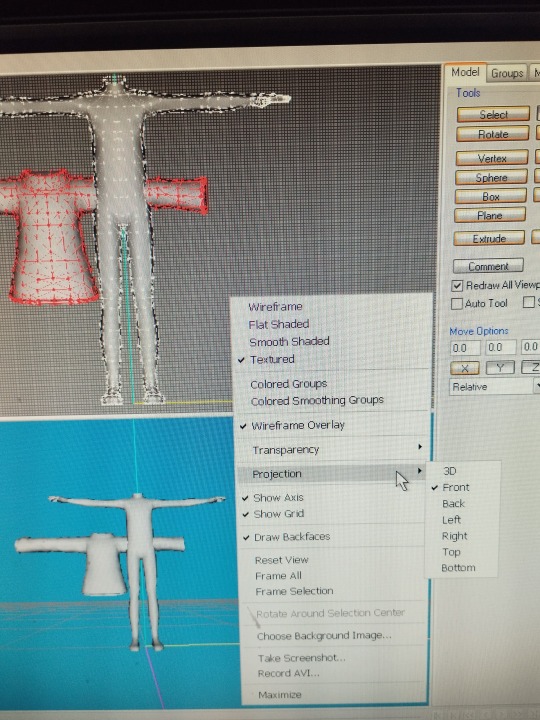
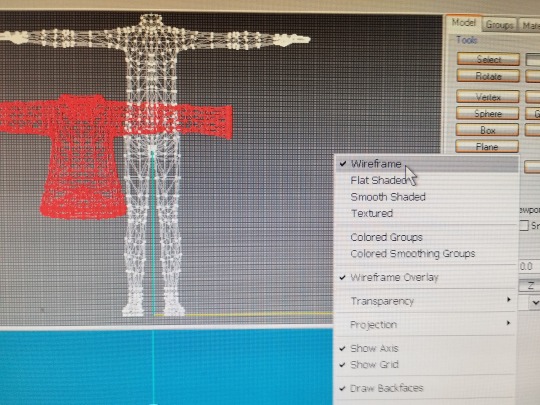
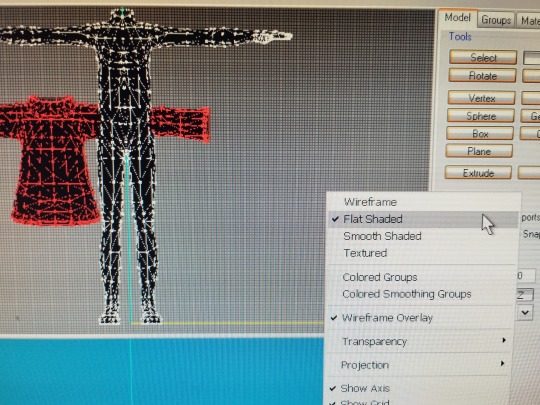
You can also choose the way you see your model… also in the same window you choose wirefame, flat shaded, smooth shaded or textured (textured I will explain it later because for this we need the png with the texture of the clothes)
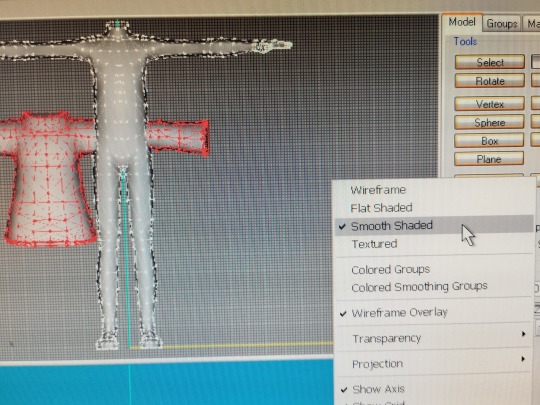

we can change the view and choose right or left to continue adjusting our clothes to the body
now the way to move the clothes by choosing the letters X and Z changes, if we click on X we will move the clothes where we want without control, if we click on Y we will move them left or right, if we click on Z we will move them up or down
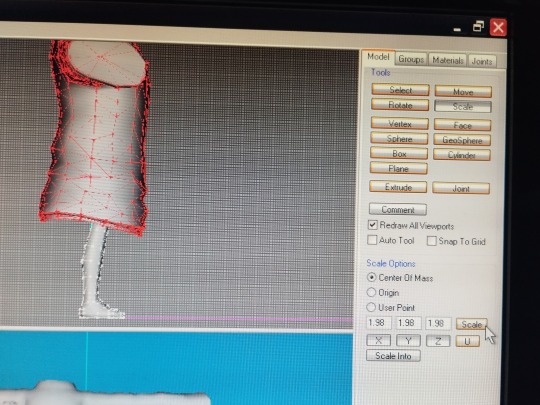
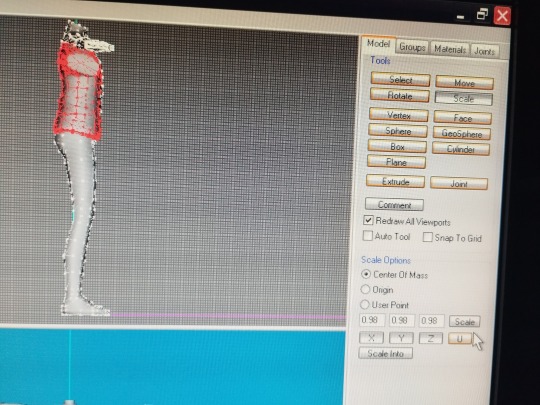
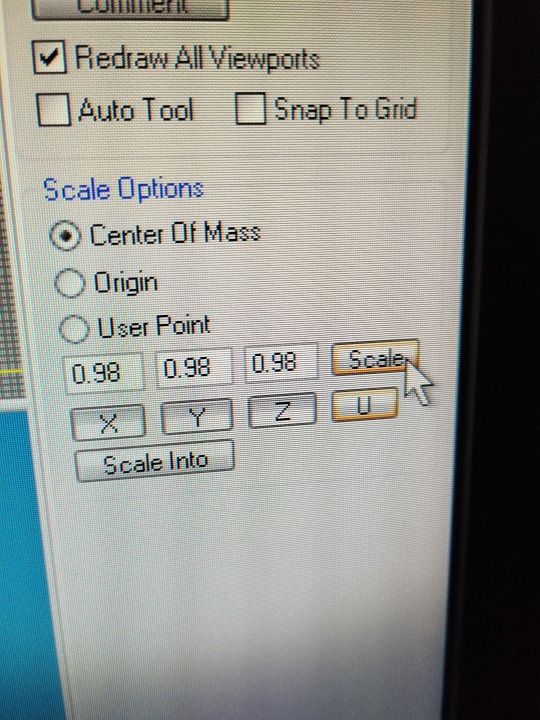
we move it until we place it as we wish, if we see that the clothes are still too wide, we can narrow it, we continue with the right or left view, click on scale, and the same as the other time … 1.98 in the three letters will make the clothes wider and 0.98 in the three letters will make the clothes smaller.
when you have the perfect size, it's time to save our project … in case we mess something up we don't have to start again from scratch.
file, save as ... name you want and save it in the folder you want to save it in
but we have not closed the project yet 😅
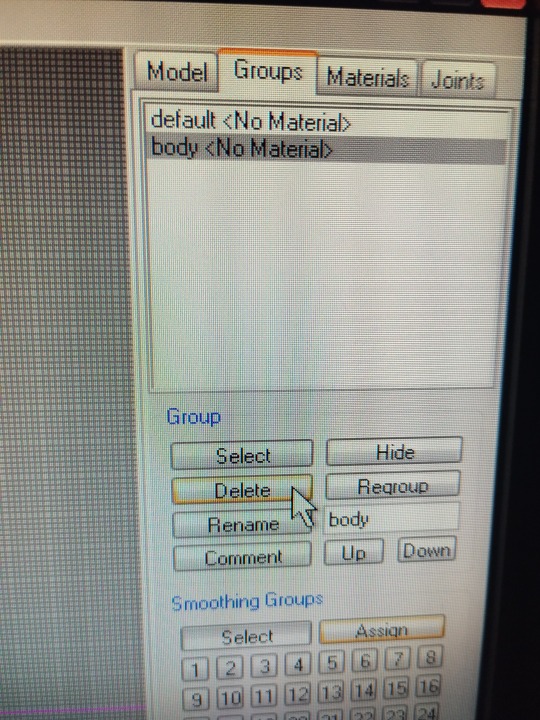
now we delete the base body ... group, click on body name and delete only our clothes have to be seen
now is the time to bring it to life, we need bones 🦴
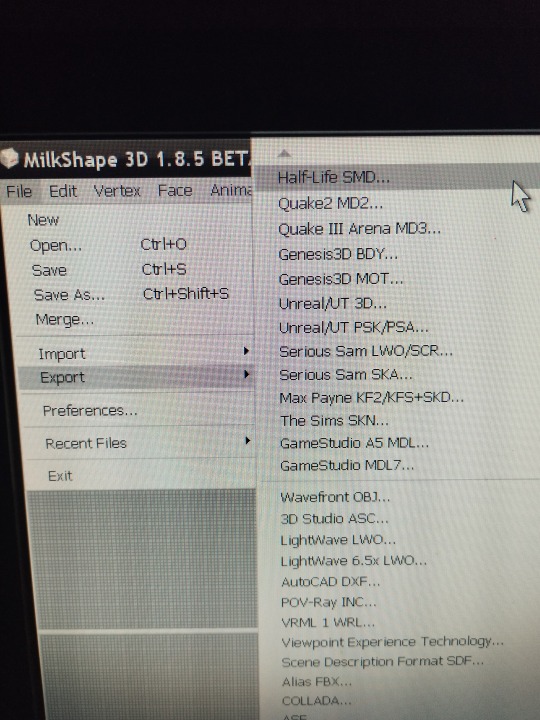
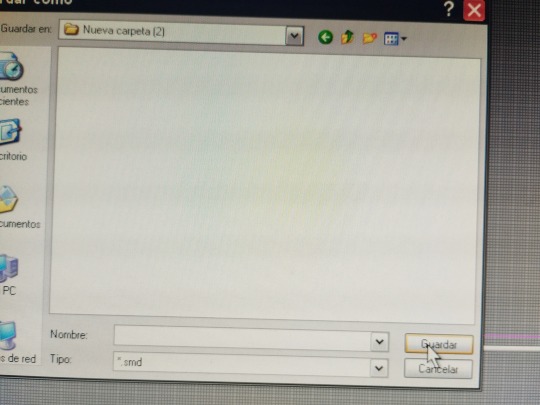
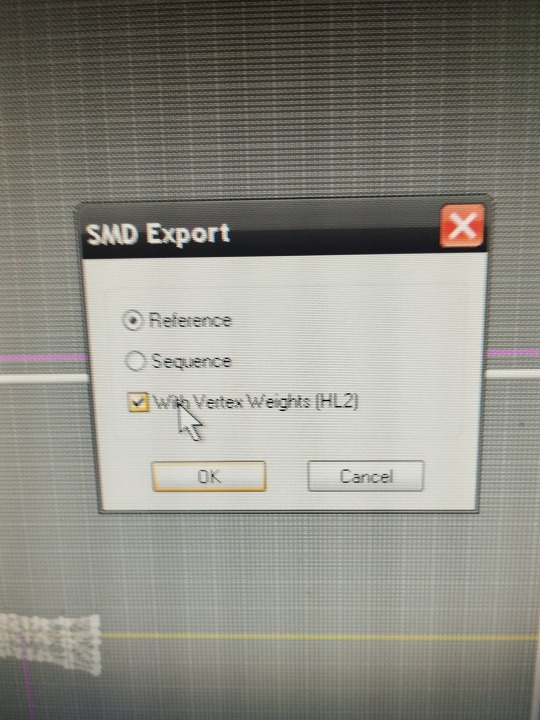
click on file export half-life SMD (at the top of the page), enter the name of our project and save it in our folder, you can use the same name as before, nothing happens because this is a different format and it will not delete the previous one.
important , check the box " with vertex weights". and click ok , close the milkshape
now we need a model, a piece of clothing, from the sims game, that is similar to the one we are working on, or any clothing that you have downloaded from another simmer, but that is similar, for example, if it is a long-sleeved sweater … look for a long sleeve sweater, if it is a short sleeve t-shirt look for a short sleeve t-shirt.
we need the mesh of these clothes to extract the GMDC... this is done with the SimPe program
if you already know how to do it, perfect, you save me the explanation and you save yourself from reading all this part, but if you have never done it … I am going to explain it , I have learned it following tutorials that I recommend you to read (and that I thank enormously to the simmers that have made them) to familiarize yourself with the programs we use.
tutorials needed in your life :
3t2 clothes tutorial of Serenity falls @rented-space
4t2 clothing tutorial of @vulrien-sims
all tutorial of @blueheavensims
tutorial of @deedee-sims
4t2 clothing tutorial (video) @mdpthatsme
....to be continued
21 notes
·
View notes
Text
Switching between save folders without renaming them
See the tutorial on Mod The Sims
131 notes
·
View notes
Text
Raw Tutorial - How to Make Custom Harvestable/Orchard Trees and Make Them Seasons Friendly.

This tutorial is somewhat raw and has no pictures. I don't see myself adding them in the foreseeable future, However, at the time, I wrote it as detailed as possible, so I won't forget. Hope it'll be helpful as it is. If not, I will make a proper edit in the future. So, if anyone's interested in that kind of thing, Head This Way:
btw, if anyone has any notes about it, I'd like to hear them.
#Tutorial#Tutorial: SimPE#Custom Harvestable Trees#Custom Orchard Trees#SimPE#BHAVS#TS2 Tutorial#Sims 2 Tutorial#The Sims 2 Tutorial#TS2#Sims 2#Sims2#the sims 2#SimPE Tutorial
49 notes
·
View notes
Text
How to get rid of pre-made Sims completely
Would you like to create a neighborhood, but without Kaylynn Langerak, Benjamin Long, pre-made social group Sims etc.? Or maybe you'd like to get rid of the generic Family Bin Sims before you start a brand new Pleasantview? This tutorial will show you how to disable generating pre-made Sims of certain categories and let the game generate new ones in their place. Pick and choose!
This will only work in a freshly loaded neighborhood! If the game has already loaded all the Sims in your Documents folder, do NOT delete their character files!!!
If you wipe these folders off character files, these Sims will never reappear in any of your newly loaded neighborhoods. They will come back after you reinstall the game. So back up the folders just in case! BUT if you lose the backup, you can download these Sims/families as subhoods here. The subhood can be deleted right after adding it and the Sims will remain in the Family Bin.
How does the game generate these Sims? They are located in the game installation files, in a particular DLC's folder. When you first launch a neighborhood, you can see loading screens of Pets, Weather, Magic... this is when the game imports these Sims into the neighborhood folder in Documents. Most of them are called "stealth hoods", but you can also clean out visible neighborhoods and have them completely empty, buildings only.
You can download empty stealth hoods on ModTheSims. They are folders with deleted character files, so if you feel safer downloading and replacing folders like that, go ahead! But stealth hoods are not all that you can clean out. Subhoods also have clean versions, so if your only problem is a Sim's broken face template – no need to pre-delete all Sims, just get the clean version!
All folder paths are the defaults. If you have your game in a custom folder, I assume you know where it is. If you don't have the Ultimate Collection, the folders may look different, so I'll give you directions on which DLC we're talking about, as it's actually easier to navigate them if you have the Legacy Collection or disks.
Basic townies and service Sims The townies and NPCs from Pleasantview that generate in every custom neighborhood. These include Kaylynn Langerak and Benjamin Long mentioned at the beginning. You can pre-delete them in: C:\Program Files\Origin Games\The Sims 2 Ultimate Collection\Double Deluxe\Base\TSData\Res\UserData\Neighborhoods\N001\Characters So in Pleasantview's game files directory. Go into the "Characters" folder and delete all files. The folder must remain empty. Note: This deletes ALL Pleasantview Sims, so if you load Pleasantview AFTER doing this, there will be NO SIMS, even playables! Doesn't affect an already launched Pleasantview.
Strays, adoption pool pets and the Roseland family Pets EP. If you want completely fresh strays and pets to adopt, delete all files in the "Characters" folder here: C:\Program Files\Origin Games\The Sims 2 Ultimate Collection\Fun with Pets\EP4\TSData\Res\NeighborhoodTemplate\P001\Characters Now, if you call the Pet Adoption Center, your game might freeze for a minute because it will be generating a lot of pets. For puppies/kittens to appear in the pool, it needs to generate strays first, as baby pets are made with strays' DNA.
Ottomas, Ramaswami and Garden Club Sims Seasons EP. Delete all files in the "Characters" folder here: C:\Program Files\Origin Games\The Sims 2 Ultimate Collection\Seasons\TSData\Res\NeighborhoodTemplate\G002\Characters
The Traveller family Bon Voyage EP. Delete all files in the "Characters" folder here: C:\Program Files\Origin Games\The Sims 2 Ultimate Collection\Bon Voyage\TSData\Res\NeighborhoodTemplate\V001\Characters
Picaso, Cooke and hobby instructors If you don't have the hobby instructors disabled with a mod. Free Time EP. Delete all files in the "Characters" folder here: C:\Program Files\Origin Games\The Sims 2 Ultimate Collection\Free Time\TSData\Res\NeighborhoodTemplate\F002\Characters
Newson, Goodie, Gavigan and pre-made witches Apartment Life EP. Delete all files in the "Characters" folder here: C:\Program Files\Origin Games\The Sims 2 Ultimate Collection\Apartment Life\TSData\Res\NeighborhoodTemplate\E002\Characters
Cleaning folders of the Pets, Seasons, Bon Voyage, Free Time and Apartment Life expansion packs = NO FAMILIES in the Family Bin! Except of course the ones that belong in a neighborhood, such as the Burbs in Pleasantview. Cleaning all folders mentioned above will result in an empty "Characters" folder in a freshly made custom neighborhood. So now you can make all Sims from scratch. To prevent the game from randomly generating townies and strays, you'll need a few mods: NoTownieRegen (find on the list) NoStrayRespawnNoDormieRegen I also recommend Anti-Redundancy
You can also have:
Pre-made universities with NO pre-made Sims Dorms, houses, university buildings... but with no students. University EP. Delete all files in the "Characters" folders here: C:\Program Files\Origin Games\The Sims 2 Ultimate Collection\University Life\EP1\TSData\Res\NeighborhoodTemplate U001 – Sim State University. Wiping this folder off character files will prevent the game from importing generic Sims (dormies, mascots, professors) in a custom university neighborhood. It's a college equivalent of Pleasantview. I also recommend getting the One Professor mod. U002 – La Fiesta Tech. U003 – Academie Le Tour.
Pre-made Downtown with NO pre-made Sims Nightlife EP. Delete all files in the "Characters" folder here: C:\Program Files\Origin Games\The Sims 2 Ultimate Collection\Double Deluxe\EP2\TSData\Res\NeighborhoodTemplate\D001\Characters
Bluewater Village with NO pre-made Sims When you love the hood, but not the Landgraab. Open for Business EP. Delete all files in the "Characters" folder here: C:\Program Files\Origin Games\The Sims 2 Ultimate Collection\Best of Business\EP3\TSData\Res\NeighborhoodTemplate\B001\Characters
Vacation destinations with NO pre-made Sims Bon Voyage EP. Delete all files in the "Characters" folders here: C:\Program Files\Origin Games\The Sims 2 Ultimate Collection\Bon Voyage\TSData\Res\NeighborhoodTemplate A001 – Takemizu Village. M001 – Three Lakes. T001 – Twikkii Island.
I hope it's useful! Happy Simming!
48 notes
·
View notes
Text
How to record videos with Sims 2 in-game camera (HD, no UI, no lag, no file format issues)
I originally planned to include this information in the behind-the-scenes video about Bring Me To Life that I'm currently working on, but it's overly technical and not that interesting. It still might be useful to some people (mostly machinima creators), so I decided to make a separate post about it.
There are two ways to record videos in The Sims 2:
Using screen recording software
This is the most common and probably the easiest way. You just need a program like OBS that will capture whatever happens on your screen exactly as it happened. If this method works for you, it's perfectly fine. No need to follow this guide then.
Using the in-game video capture tool
This way involves capturing videos directly in the game by clicking the video camera icon or pressing V on your keyboard. This method is perfect for machinima creators. It automatically hides the UI, but more importantly, the video will always be perfectly smooth, regardless of the actual performance of your game, i.e. even if it runs like a literal slide show, any videos you capture this way will look perfectly fine.
Okay, so if this method is so great, why do we need a tutorial for it? Well, as is usually the case with this game, the feature works fine, it's just a little bit outdated.
To fix it, we need to do 3 simple* things.
*If you're a Sims 2 player, you're probably used to this kind of stuff anyway
Step 1: Installing a modern codec
In the Camera settings, the game lets you choose if you want the videos to be compressed. I highly recommend choosing that option, as uncompressed videos take up way too much storage space.
The codec that the game uses to handle compression is outdated and most video editing programs will not be able to edit such files. To fix this problem, we need to download and install x264vfw, which is a free an open source codec.
Once installed, open the Configure x264vfw app. No need to change anything there (unless you want to test different settings of course), except for this one small thing:
In the Debug section, go to Log level and change it to None. Otherwise the codec will display a pop-up window each time you record in the game, which is pretty annoying.

Step 2: Making the game use the codec
Locate the VideoCapture.ini file in the installation folder with your latest expansion pack. I have Ultimate Collection, so for me the path looks like this:
D:\Program Files (x86)\Origin Games\The Sims 2 Ultimate Collection\Fun with Pets\SP9\TSData\Res\UserData\Config
Back up your file and open the original version with Notepad. You can either replace the whole thing with my settings, or just update the highlighted parts.
While you're at it, make sure to update the LargeSettings value to 1920x1080 so that the videos are captured in HD (no need to worry about it if you're copying the whole thing):
[Config] PreferredCodec=x264vfw Folder is relative to Res/Userdata Folder=Movies FilenameBase=movie NoFillFrames=0 AudioStereoOutput=0 AudioRateDivisor=4 GlobalSettings = reset, vbr:1, fps:10, keyinterval:30, mode:1, datarate:0 SmallSettings = size: 128x128 MediumSettings = size: 320x240 LargeSettings = size: 1920x1080 LowQualitySettings = minq: 6, maxq: 16, mode:0 MediumQualitySettings = minq: 4, maxq: 10, fps:15, mode:0 HighQualitySettings = minq: 2, maxq: 8, fps: 30, keyinterval: 60 SmallLowSettings = datarate: 75 SmallMediumSettings = datarate: 150 SmallHighSettings = datarate: 300 MediumLowSettings = datarate: 150 MediumMediumSettings = datarate: 300 MediumHighSettings = datarate: 600 LargeLowSettings = datarate: 300 LargeMediumSettings = datarate: 600 LargeHighSettings = datarate: 1200 AllowAntialiasing=0 # some drivers have issues with capture when AA is enabled [Codecs] 0=VP61 # On2 VP6.1 1=VP62 # On2 VP6.2 2=VP60 # On2 VP6.0 3=x264vfw # x264vfw
Save your file.
When in game, go to Camera Options and make sure Video Capture Size is set to Large and Video Quality is set to High.
Also, you might want to change the Maximum Video Recording Time to something higher than 60 seconds.

Credit for this solution goes to this person who left the following comment under this video
Step 3: Changing the file format from avi to mp4
Before doing this step, test if everything works correctly when you try to capture videos in the game. The videos will go to the Movies folder in your Documents folder for TS2.
Try to import the videos into your editing software. If it doesn't work, e.g. the program does not recognize the file or the file appears to be corrupted, you'll need to change the file format from avi to mp4.
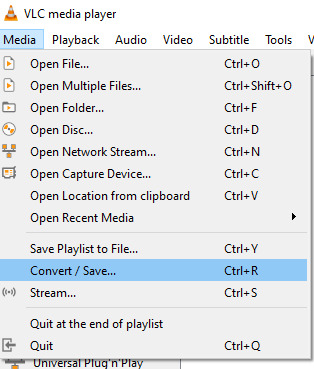
I personally use VLC media player for that, as it's free and open-source.
Go to Media > Convert / Save...
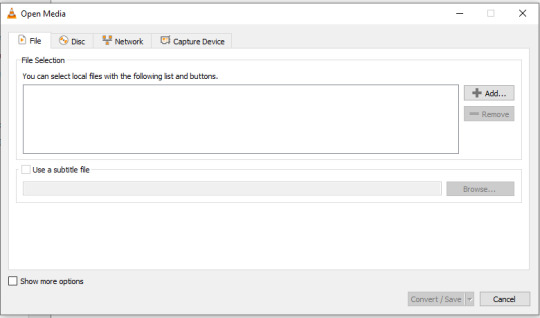
Drag your files into the File Selection section or select them by clicking the + Add button.
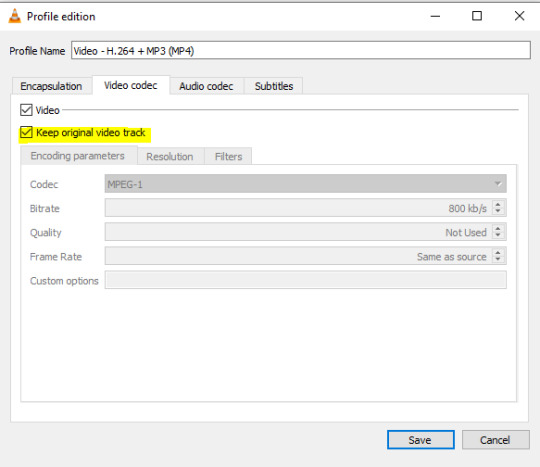
Select the Video - H.264 + MP3 (MP4) profile and click the wrench icon to edit its settings.

In the Video tab, make sure to check the box next to Keep original video track. Go to the Audio tab and check the analogous box.
Save and in the next window specify the destination folder and click Start. VLC will go through each of the files you added.
IMPORTANT:
While Steps 1 and 2 only need to be done once, Step 3 needs to be done for every new video you record (unless, your video editing software doesn't struggle opening the avi files). The good news is, this step is really fast, no more than a second per a single video. This is because we're keeping the original video track intact. The only thing that is changed is the container. That's why this change is fast and does not affect video quality in any way. Ideally, this step wouldn't be needed if we figured out a way to force the game to use mp4 when saving those videos, but I'm not sure if this is possible.
Like I said, outside of machinima creation, it probably makes more sense to just record your screen with OBS. Especially if you want to capture videos in 4K, which I don't think would be possible with this method. But it works for me and as it took me a while to figure it all out, I just wanted to share all the info in a single post!
#sims 2 machinima#ts2#sims2#sims 2 tutorial#ts2 tutorial#sims 2 guide#ts2 guide#my stuff#ts2 simblr#machinima#ts2 machinima
11 notes
·
View notes
Text
Free doesn't mean quality part2 / Бесплатно не значит качественно ч2
This time we'll talk about large texture sizes. The reason for the pink blinking is the huge textures that the authors load. На этот раз мы поговорим о больших размерах текстур. Причина розового мигания — огромные текстуры, которые загружают авторы.
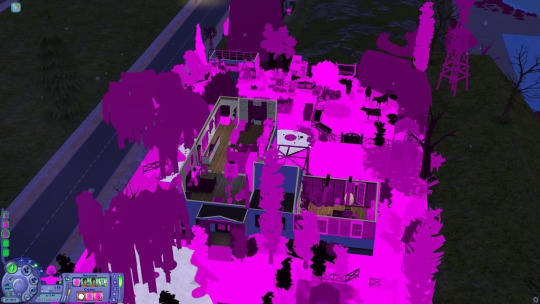
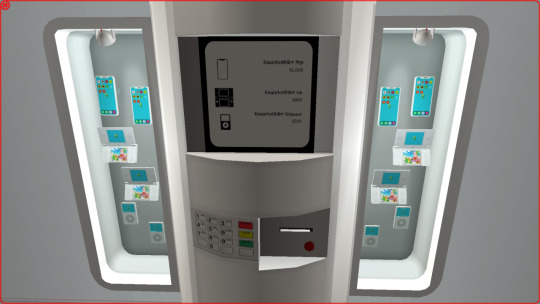
For example, I took a popular kiosk selling gadgets from the author @jacobaoconnor original The archive is called "DR_Handhelds_JAO" what could be wrong? everything is simple - inside there are large textures in large quantities. This loads up your game during the loading process, loads up your TEXTURE memory and you get "pink flashing". (when I looked at this collection in SimPe, even my program froze a little on the textures)
Для примера я взял популярный киоск по продаже гаджетов от автора @jacobaoconnor original. Архив называется "DR_Handhelds_JAO" что может быть не так? все просто - внутри находятся большие текстуры в большом количестве. Это нагружает вашу игру в процессе загрузки, нагружает вашу ТЕКСТУРНУЮ память и вы получаете "розовое мигание". (когда я смотрела эту коллекцию в SimPe даже моя программа немного подвисала на текстурах)


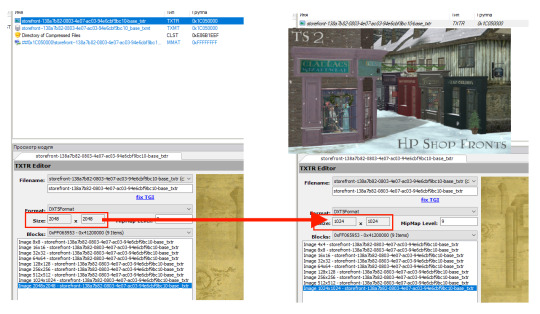
It was enough to make 1024x1024, why upload this image format? If your small details lose clarity, don't care! The appearance of the model will not lose its meaning, it will remain playable, no one will look at the letters or small circles under a microscope. Make textures no larger than 1024x1024! This way you will protect yourself and those who download your work. This applies to all creators. Достаточно было сделать 1024х1024, зачем загружать такой формат картинки? Если ваши мелкие дет��ли потеряют четкость - наплевать! Внешний вид модели не потеряет свой смысл, он останется играбельным, никто не будет рассматривать под микроскопом буквы или маленькие кружочки. Делайте текстуры не больше чем 1024х1024! Так вы обезопасите себя и тех, кто загружает ваши работы. Это относиться ко всем создателям.

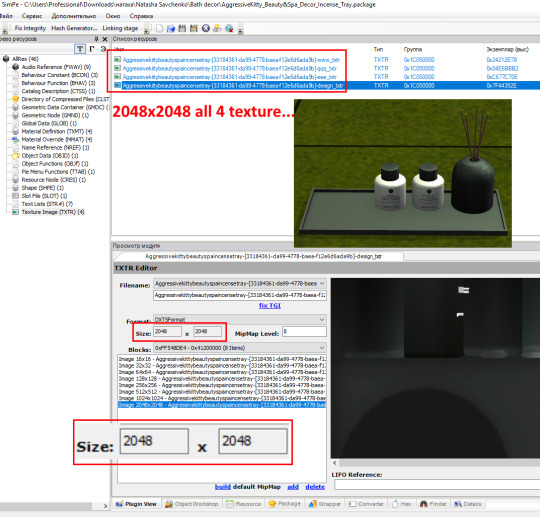
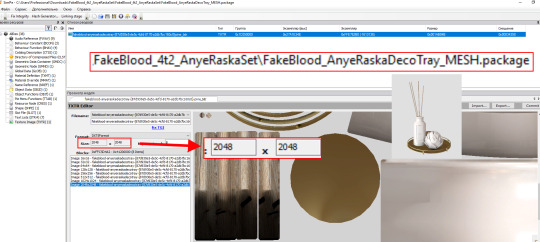
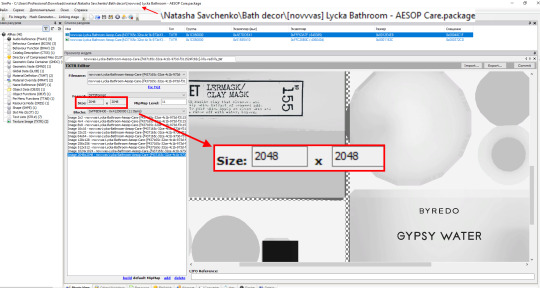
For example, you downloaded this kiosk set, placed it on the lot, then applied 4096-sized wallpaper to the walls and placed a bunch of 2048x2048 decor, your memory will fill up faster and you will receive a pink flashing immediately or after some time in the game. Why load the game just like that? Many people do not know about textures that affect the game, they go to reinstall, look for methods that will help them get rid of the “pink blinking”, but the SOLUTION LIES on the surface - do not use such items in the game, change the textures if you have little experience in SimPe, ask the authors to make a FIX with a smaller texture format. Authors who make such texture formats - fix your works, do not make such textures in your objects.
К примеру, вы скачали этот набор киоска, разместили его на участке, затем нанесли на стены обои размером в 4096 и разместили кучу декора 2048х2048, ваша память наполниться быстрее и вы получите розовое мигание сразу либо через некоторое время игры. Зачем нагружать игру просто так. Многие не знают о текстурах которые влияют на игру, идут переустанавливать, ищут методы которые помогут избавиться им от "розового мигания", а РЕШЕНИЕ ЛЕЖИТ на поверхности - не используйте такие предметы в игре, измените текстуры если у вас есть небольшой опыт в работе SimPe, просите авторов сделать ФИКС с меньшим форматом текстур. Авторы которые делают такие форматы текстур - сделайте фикс своих работ, не делайте такие текстуры в своих предметах.
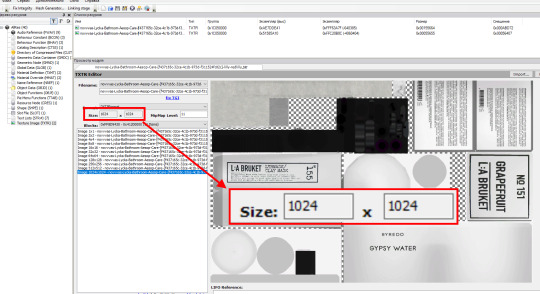
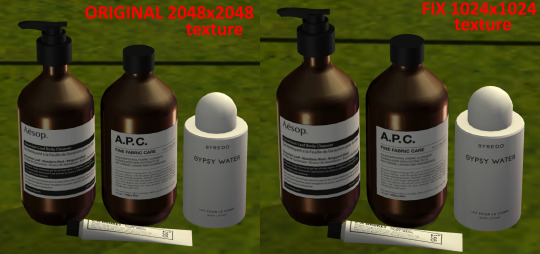
Look at the example, there are practically no differences. Don't load your items with large pictures, this will fill up the texture memory. If you have read this post and want to protect yourself from such large files, the only solution is: a) download from trusted authors, b) look at your download folder for file sizes, open them in SimPe and check the texture size, c) delete such files in which you see textures larger than 1024x1024 (these are 2048 and 4096).
Посмотрите на пример, практически никаких отличий нет. Не нагружайте свои предметы большими картинками, это приведет к заполнению текстурной памяти. Если вы прочитали этот пост и хотите обезопасить себя от таких больших файлов - единственное решение это: а) качать у проверенных авторов, б) посмотреть свою папку загрузки по размерам файлов, открыть их в SimPe и проверить размер текстур, в) удалить такие файлы в которых вы видите текстуры больше чем 1024х1024 (это 2048 и 4096).
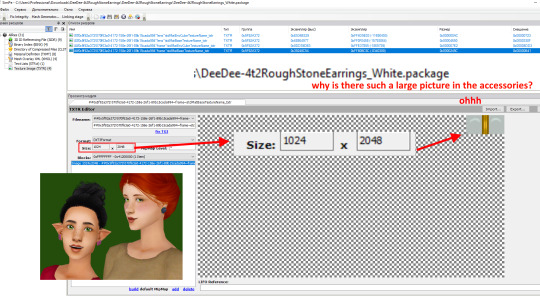
I looked through the work of @deedee-sims and found an accessory with a 1024x2048 texture "DeeDee-4t2RoughStoneEarrings", the CAS of accessories is already freezing, and if the load is such textures from sims4… Just correct your work. The rest of DeeDee's works have small textures, so you don't have to worry, these earrings were the only ones that had such a large picture format. Я просмотрела работы @deedee-sims и нашла аксессуар с текстурой 1024х2048 "DeeDee-4t2RoughStoneEarrings", CAS аксессуаров и так зависает, а если нагрузка такими текстурами из sims4... Просто, исправьте свою работу. Остальные работы DeeDee имеют маленькие текстуры, по этому можете не волноваться, эти серьги были единственными которые имели такой большой формат картинки.
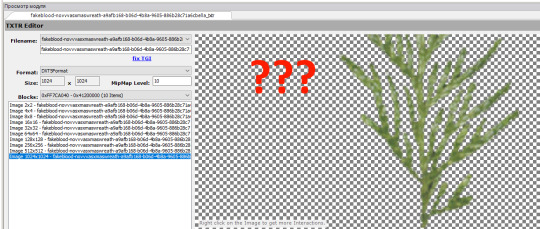
One more point for authors who make items in The Sims 2 - do not make soap images in a large format, this will not improve the item, but will kill the game. Using the example of a picture with a green soapy branch, you could make it 256x256 or 512x512.
Еще один момент для авторов которые делают предметы в симс2 - не делайте мыльные изображения большим форматом, это не улучшит предмет, но забьет игру. На примере картинке с мыльной зеленой ветке вы бы могли сделать ее 256х256 или 512х512.
Большой формат текстур был найден: @jacobaoconnor here (large textures in the kiosk, didn’t look at the rest) @deedee-sims here (only earrings, other accessories are ok) decor "Natasha Savchenko" (all decor with large textures) fakebloood here "FakeBlood_4t2_AnyeRaskaSet" (there may be more items, I only came across this set) @riekus13 here "R13_TS2HPShops" (I found large textures only in this set, I didn’t look at the rest)
#ts2cc#ts2 custom content#thesims2#ts2#sims2#sims#ts2 download#the sims 2#ts2build#ts2decor#ts2 tutorial#ts2lindasim
62 notes
·
View notes
Text
Tutorial #14: The Sims 2
Tutorial #14: Como fazer Câmera Cinematográfica - The Sims 2

______________________________________________
Tutorial #14: Como fazer a Câmera Cinematográfica - The Sims 2:
-> Link do vídeo (Youtube): Tutorial #14 - The Sims 2
-> Link do vídeo (Dailymotion): Tutorial #14 - The Sims 2
______________________________________________
* Dicas e Tutorial Câmera Cinematográfica (TS2):
- Opção 1: Download (MediaFire)
- Opção 2: Download (SimFireShare)
______________________________________________
=> Link da Playlist (Youtube): Tutoriais - The Sims
=> Link da Playlist (Dailymotion): Tutoriais - The Sims
______________________________________________
-> Minhas Redes Sociais (Jéssica Dias - Games):
=> Blog
=> Youtube
=> Página no Facebook
=> Twitter
=> Instagram
=> Tumblr
=> Dailymotion
______________________________________________
#Downloads&Tutoriais #Tutorial #TutorialSims2 #TheSims2 #TS2 #Sims2
______________________________________________
3 notes
·
View notes
Text
GORL THANK YOU SO SO SO SO SO SO FUCKING MUCH OMG I CANT DESCRIBE HOW GRATEFUL I AM TO HAVE A VIDEO DIRECTION SOURCE
I am dyslexic. Following written directions is a nightmare for me.
I will say… I actually somehow got dual boot Linux up on my system. N it has really changed the mf game. I love it. I can’t believe i figured it out on my own through days of reading through shit online. But my game was unplayable before Linux so I was like I’m biting the bullet n doing it i WILL FIGURE THIS OUT NO MATTER HOW HARD IT IS. I was waiting to post my success story until I had a few months of gameplay bc i had done fixes on windows that would work for a lil bit then the nightmares come back lol… so i figured it was necessary to seriously test it out first :) iykyk
To be clear I have been playing w dual boot on Linux since end of November n IT PLAYS LIKE A DREAM. I didn’t have to give up windows by doing dual boot! So best of both worlds.
But from any fellow dyslexics who struggle with written directions, thank you so mf much for taking the time to make this. This is such an amazing resource for the community.
Love yall so much this community is amazing !!!!!
🩷🧡💛💚🩵💜 yayyyyyyyy
This is a big one.
youtube
#sims 2#the sims 2#sims 2 tutorial#linux#ts2#sims 2 cc#sims2#thesims2#dyslexia#dyslexic#sims 2 question#sims 2 help#sims 2 download#sims 2 gameplay
391 notes
·
View notes
Video
youtube
Making a Greek House | The Sims 2 | Tutorial
#youtube#thesims2#the sims 2#sims2#sims 2#sims 2 game#sims2game#sims 2 gameplay#sims2gameplay#sims2tutorial#sims 2 tutorial
0 notes
Text
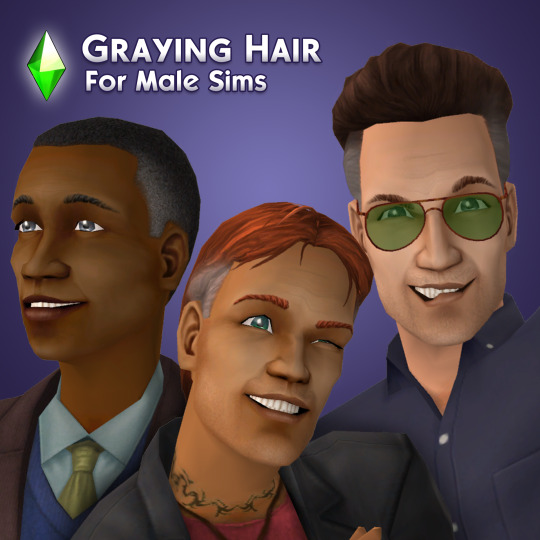
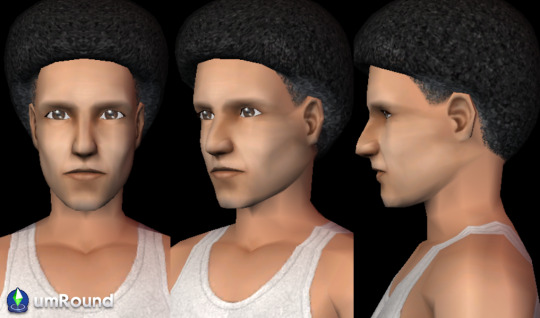
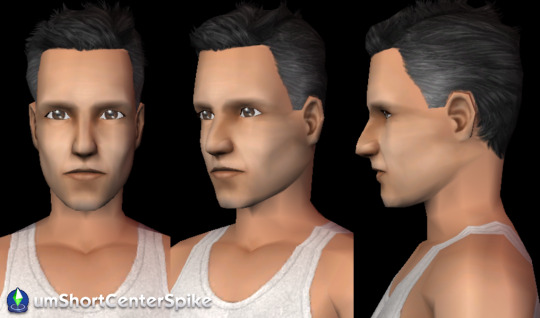
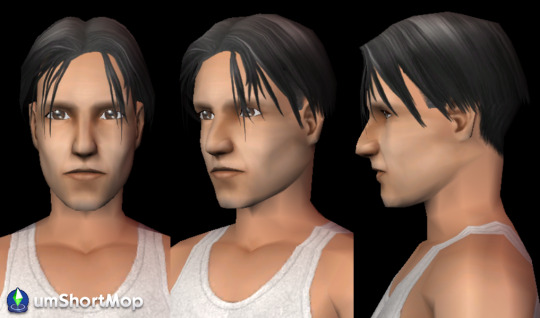
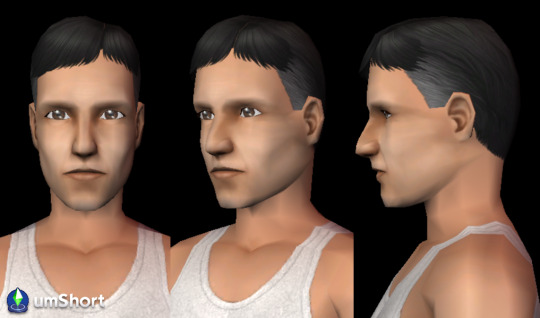
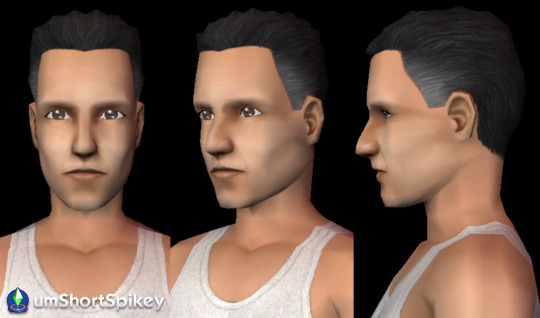
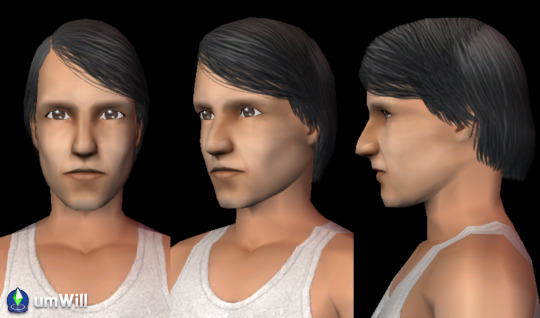
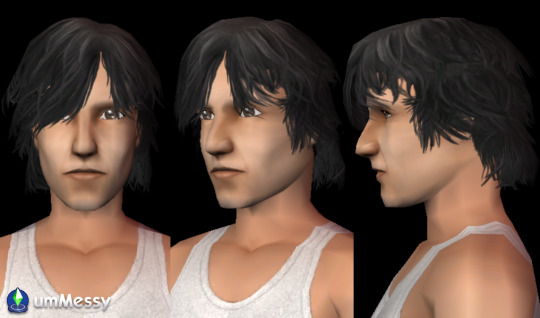
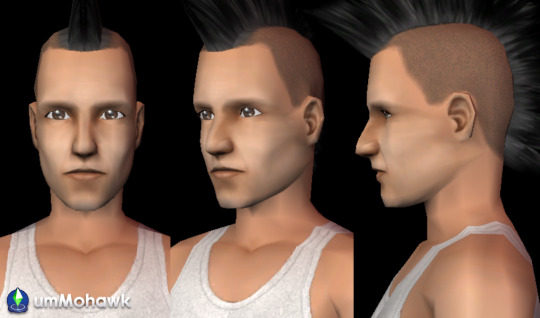
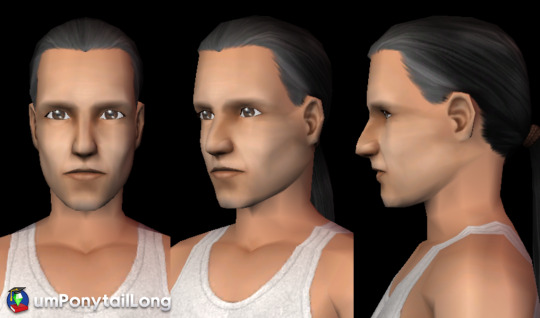
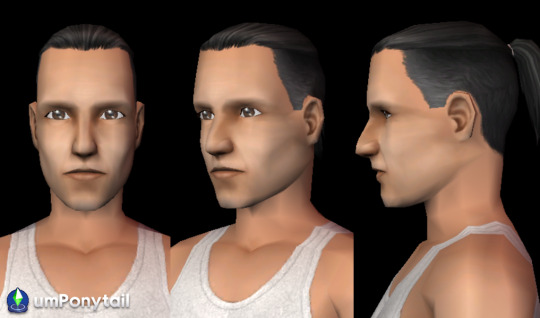
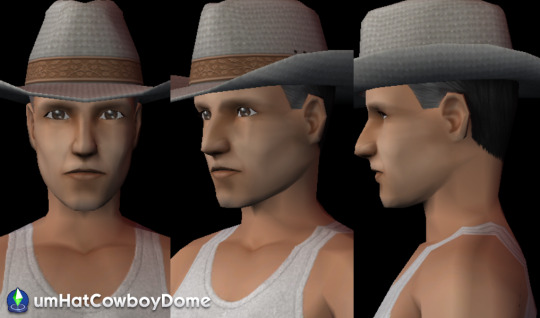
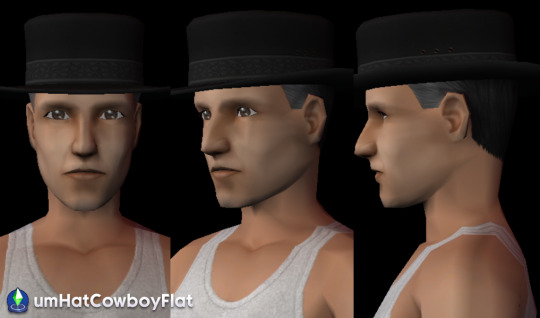
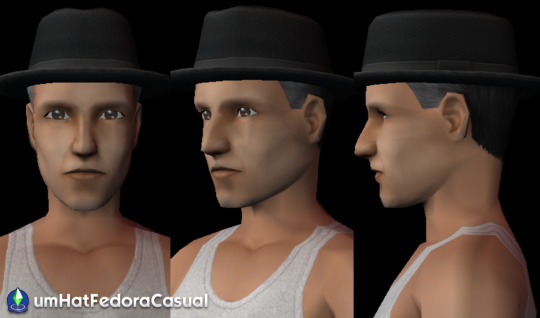
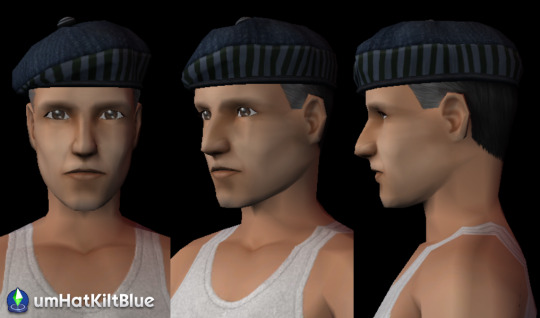
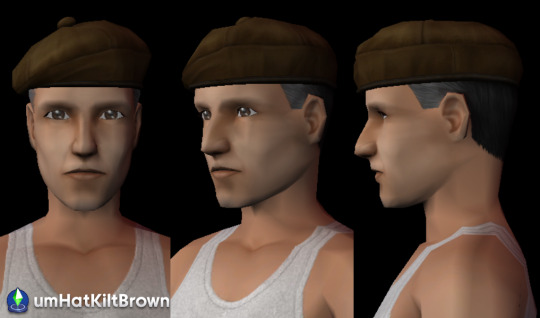
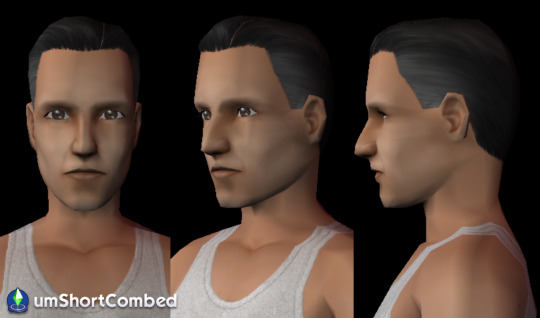
Graying Hair Recolors for Male Sims
18 Graying recolors of Maxis hairstyles, perfect for your late adult-stage sims! Now your sims will show age and not be young forever! Most of these have graying hair on the temples as I am planning on making graying facial hair too, as soon as I figure out how to extract multiple facial hair colors on bodyshop. So please if anyone knows or finds a tutorial, please let me know.
All hair colors have been properly binned and combined in one package for your convenience and storage purposes :)
>> Download
>> MTS
More stuff for your middle aged sims by other creators!
♦ Graying Hair for Female Sims & Facial Hair by IntincrMars (Me) ♦ Various graying recolors by DeeDee-Sims: umSemibald & umPeak, umShortCombed, ufMessy & ufLowBun ♦ Graying ufShortTuckIn recolor by FreezerBunny-Sims2 ♦ Embracing Age Facial Hair Recolor by twiggy ♦ Subtle Wrinkles by simNopke
Preview Pictures Under the Cut


>> New!


460 notes
·
View notes
Text
Tutorial 3D model to sims2
(first part )
Now that I'm learning how to convert Sims2 clothes from 3D models, I'm going to write how I do it in case anyone is interested.
First of all you should know that this is my way of doing it, I don't know if it is the most correct, if someone knows other things they can contribute them here 🤗
You must keep in mind that you have to be very patient, not everything turns out well the first time, nothing happens, you try as many times as you want until you get the result that you like the most. 😉
It is just a game, it is not real life nor is it a job nor is it an obligation, therefore you should not get frustrated, just have fun ☺️
We start 🕞
You will need :
-- a page to download free 3D models, there are many, you just have to search on Google or your usual search engine.
-- blender and milkshape
-- simpe
-- adobe photoshop or similar
-- bodyshop
We download a 3D model that we like, and we put it in a work folder that we are going to use 📂
Preferably we are interested in OBJ files, but the 3D models are not always in this format, if they are in DAE they are also useful for us
If you don't know what format you downloaded your 3D model in, right click, properties on the file and it will tell you what type of file it is.
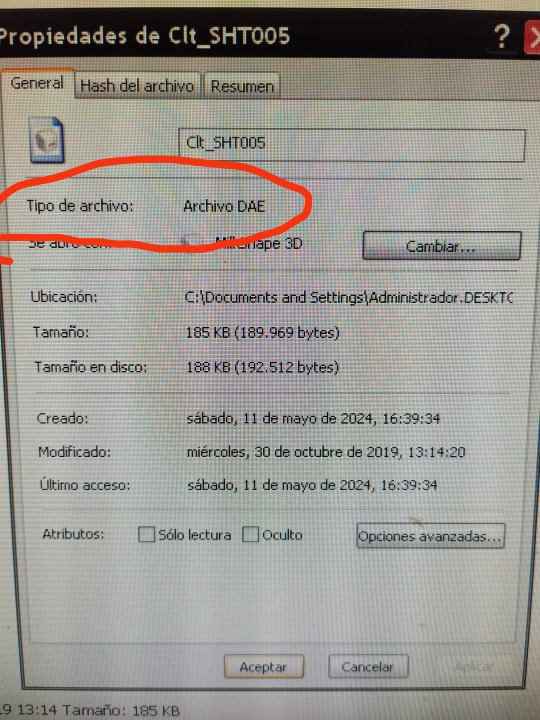
If your file type is OBJ, you will go directly to the Milkshape phase, which I will explain later, if your file type is DAE... follow these steps:
open Blender
click on any point to remove that screen
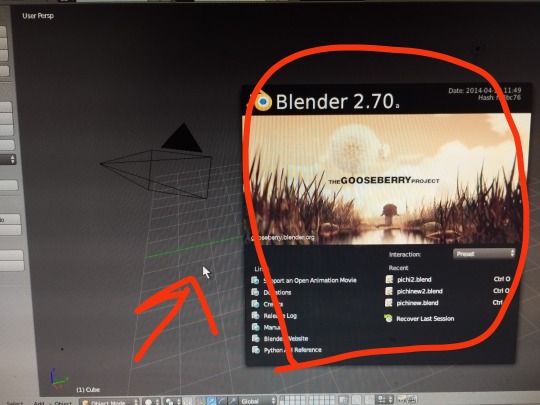
You will get a white cube that we have to eliminate
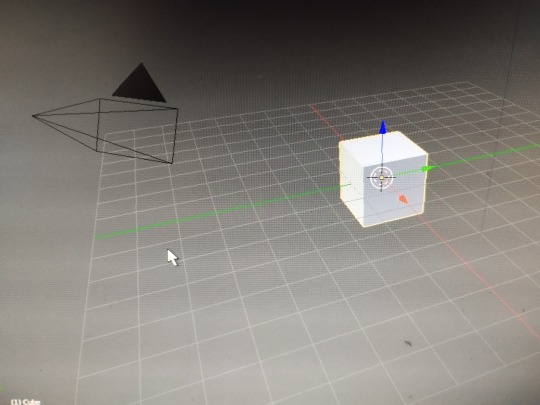
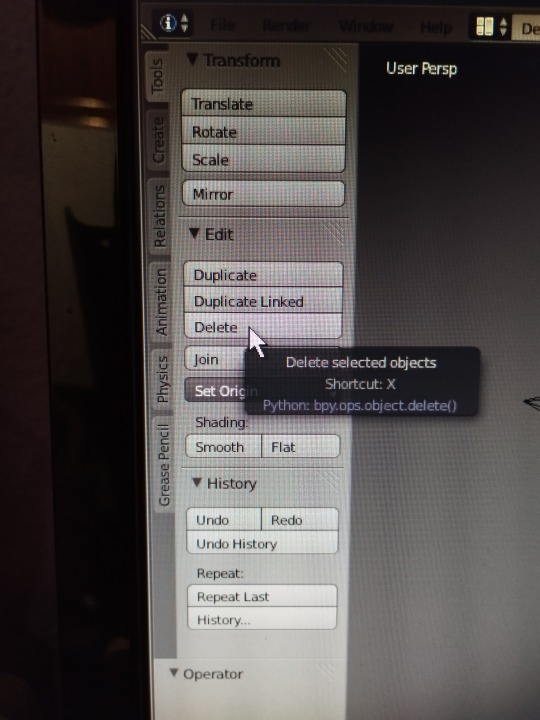
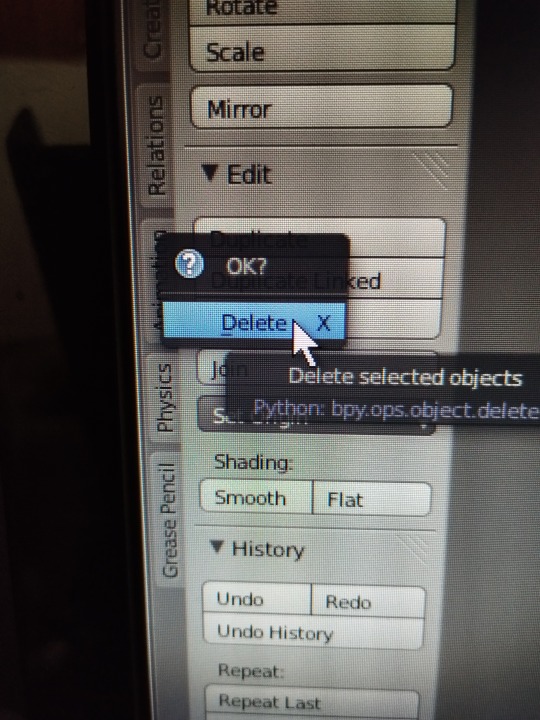
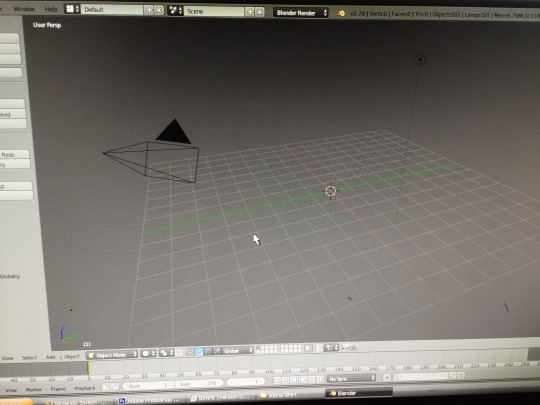
now we can start
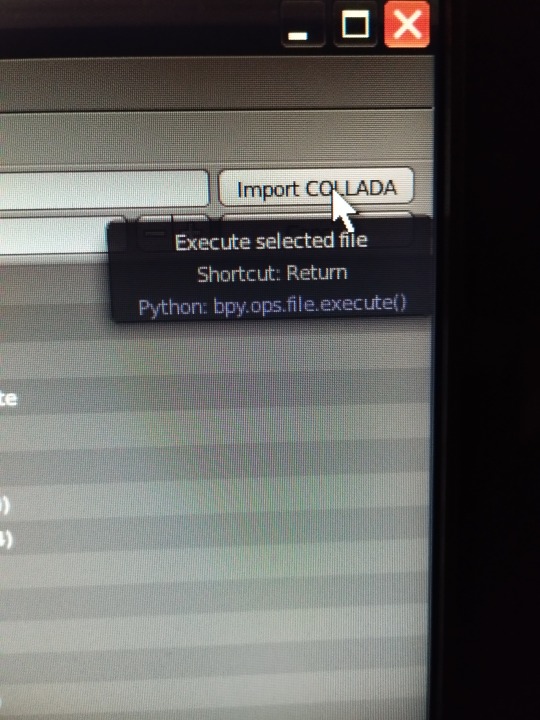
We import our 3D model with DAE format
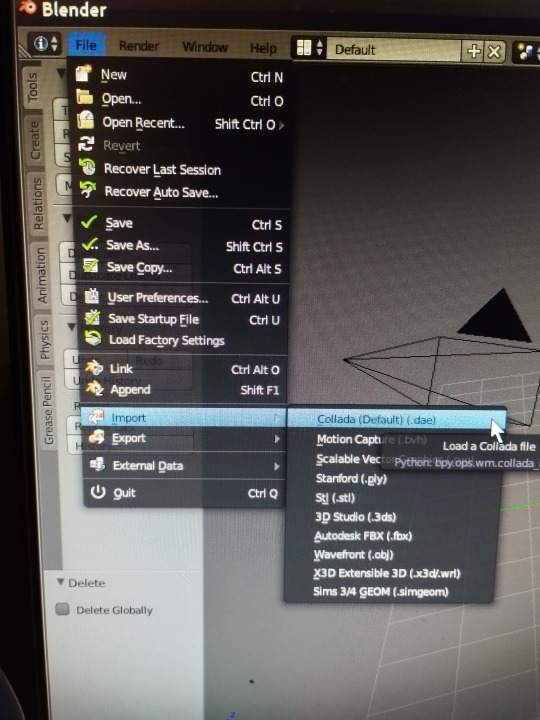
We look for our file in the folder where we have saved it, when we have found it we click on import (up to the right)
We zoom in on our model by clicking the mouse wheel to increase its size and see it well if you want.
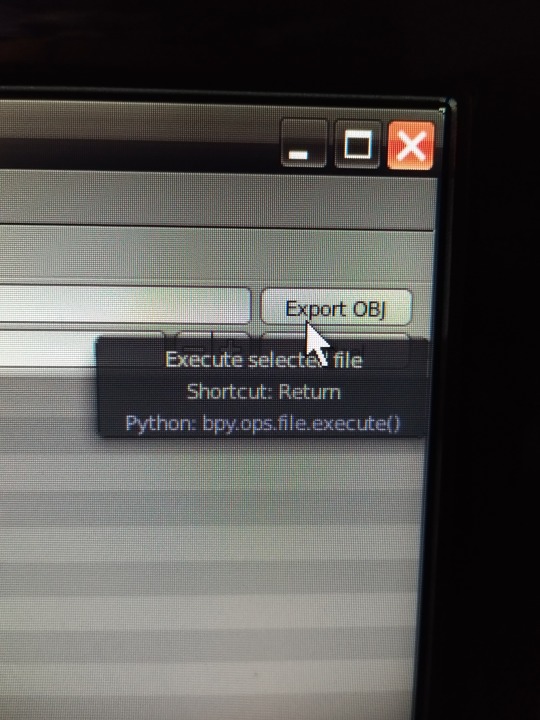
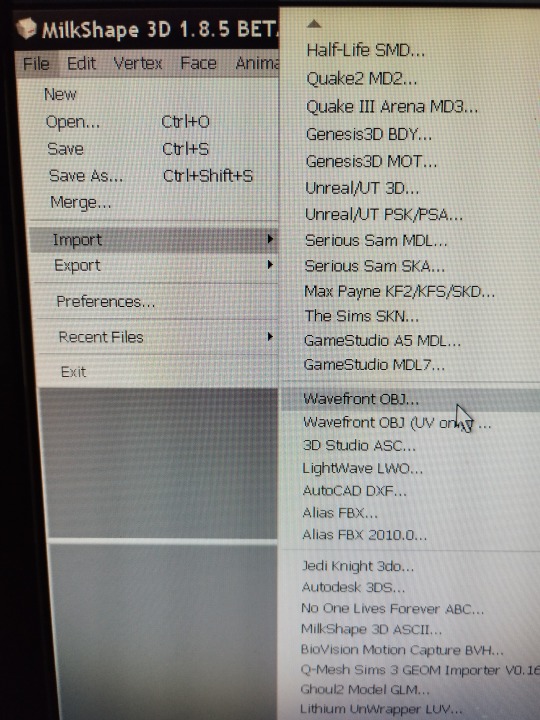
and we export it as an OBJ file, which is what we really need, you don't have to do anything, blender transforms it, you just click on file export wavefront obj

Choose which folder you want to save it in and give it a name, then click export OBJ (top right)
Close Blender, it is not necessary to save the changes when it asks you, so exit without saving if you want
Open Milkshape :
(If your file was OBJ from the beginning, you skip the entire Blender process and start here directly)
we import our 3D model obj file
Normally it sells completely black, I explain how I change it, I eliminate the material that is assigned,
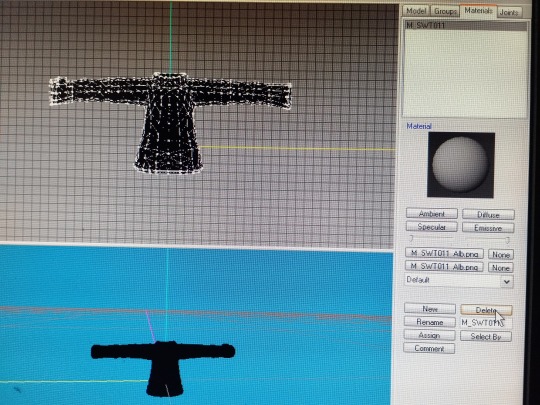
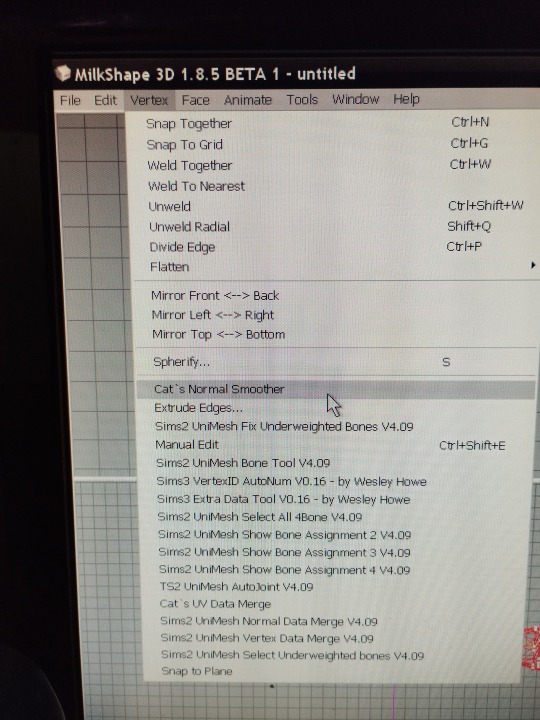
I select my clothes, (group, select)

and I hit vertex, cat's normal smoother… and now we have it white
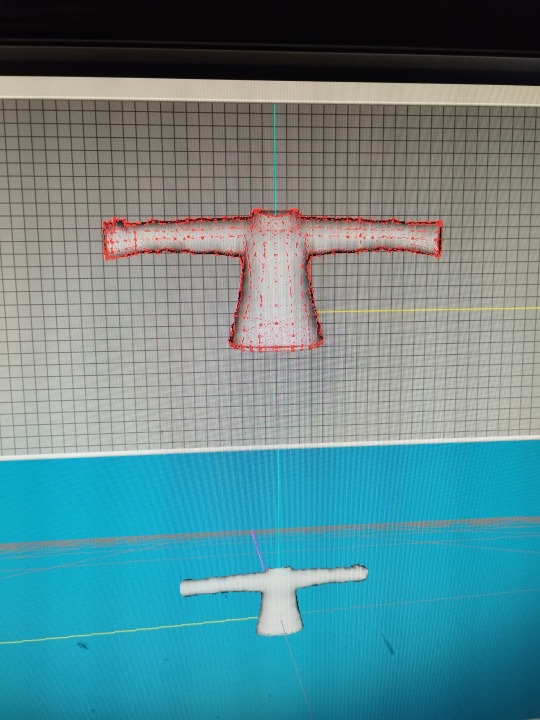
Now comes the most entertaining part, for this you will need your patience, normally the 3D model will not have the right size for the Sims 2 body, so you will have to modify it to adjust it
First, import a base body, of the age you want (adult child, etc.), the one you need according to the clothes you are making.
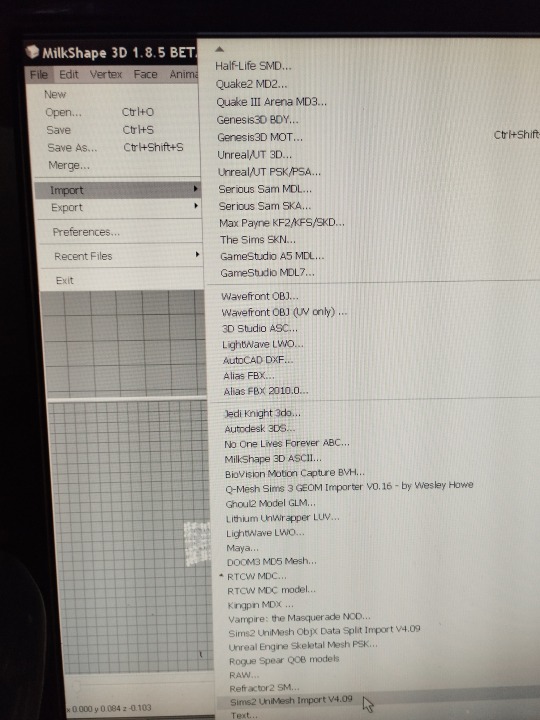
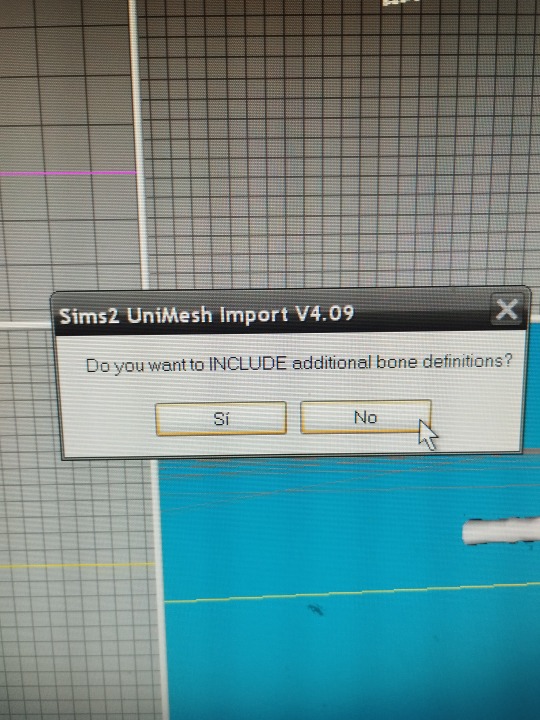
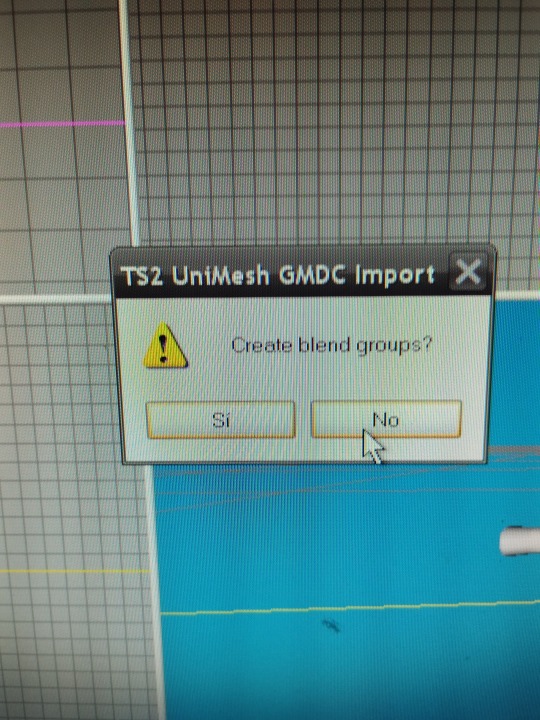
file, import ,sims2 unimesh import v4.09 , say acept, say noi
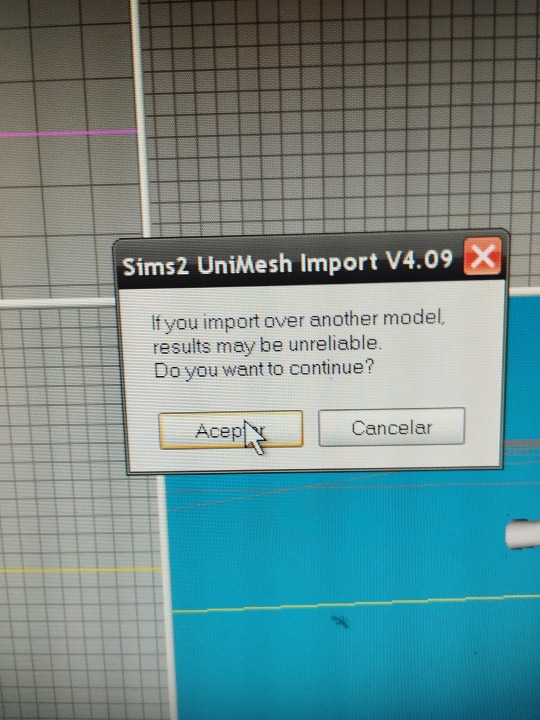
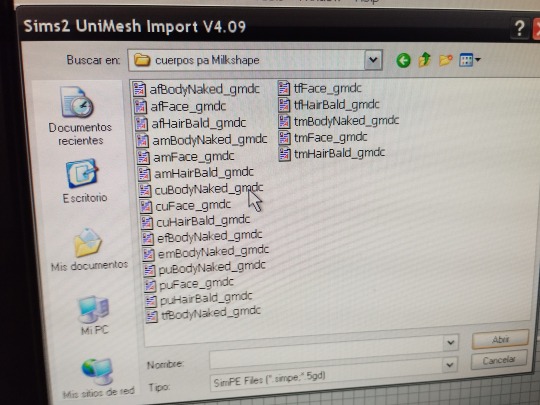
you choose your base body and say no
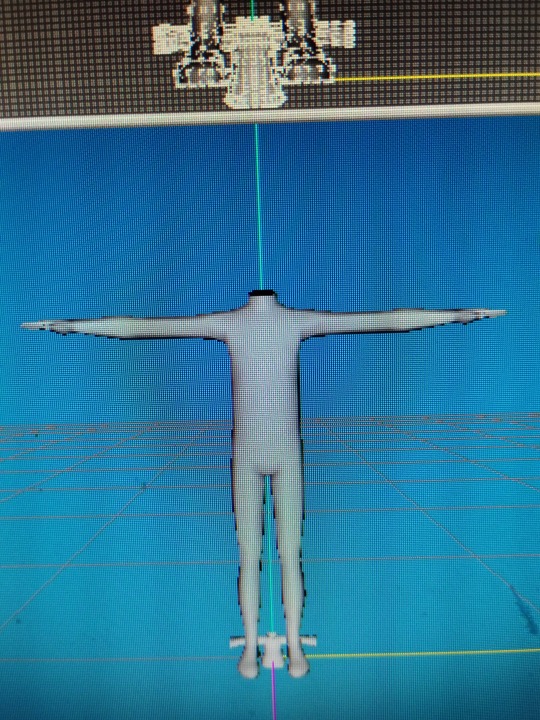
and say yes
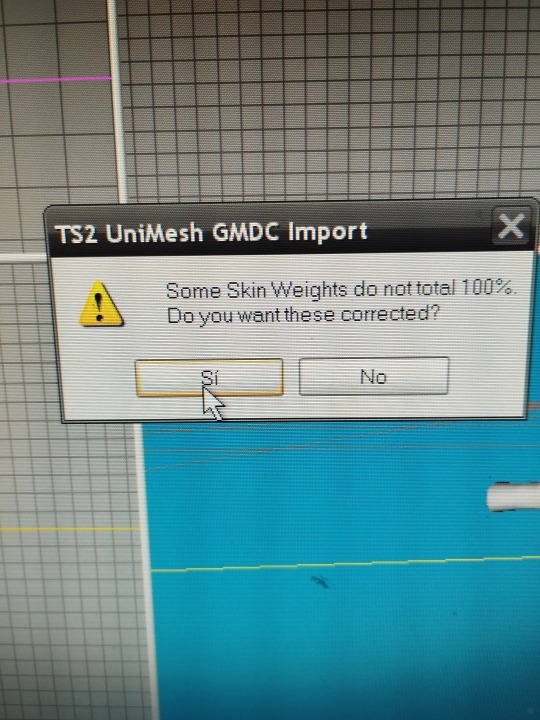
now you have the sims 2 body and you can see the size difference in my case 😅
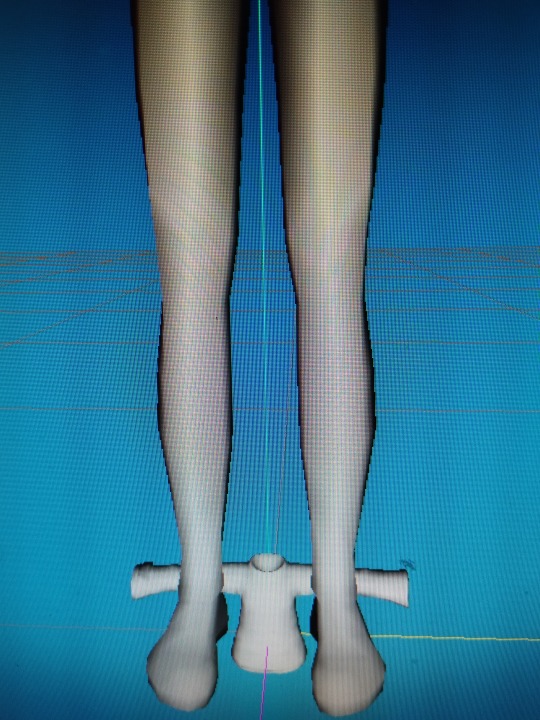
It's time to have fun, we select our clothes, (group select), and change their size until we find the one we want, (model scale)
We must change the numbers of X Y Z,
If we write 1.98 in X, 1.98 in Y, 1.98 in Z, we point to U and click on scale (the scale button below where the letters x y z ) our clothes will grow
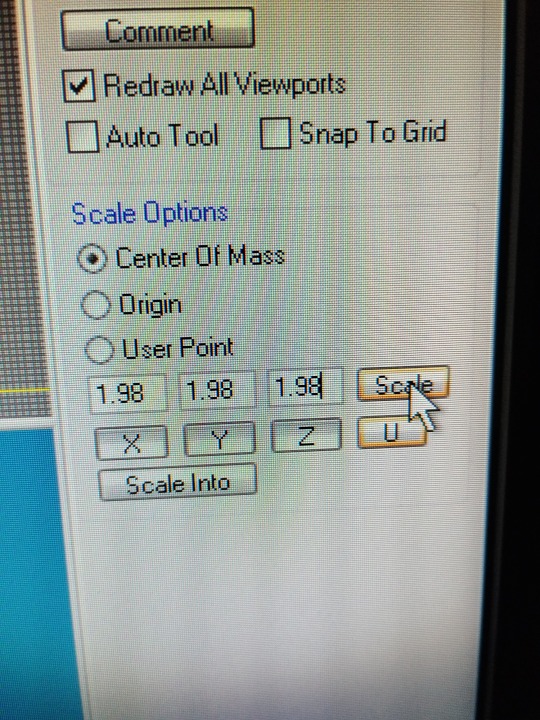
If we write 0.98 in the three x y z, doing the same, our clothes will shrink
to be continue ...
#sims2#devotedlyghostlyenemy#sims2tutorial#sims2cc#sims 2#s2cc#sims 2 tutorial#3Dmodel sims2tutorial
19 notes
·
View notes
Text
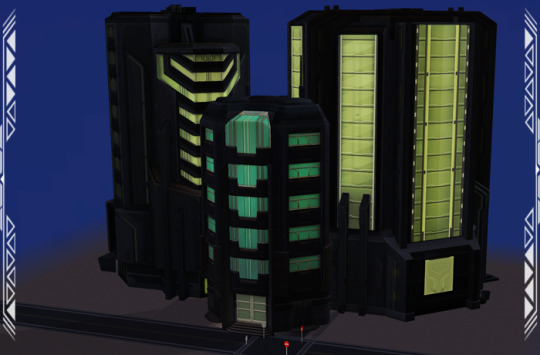
Anno2070-to-Sims2: Tycoon Residence Buildings
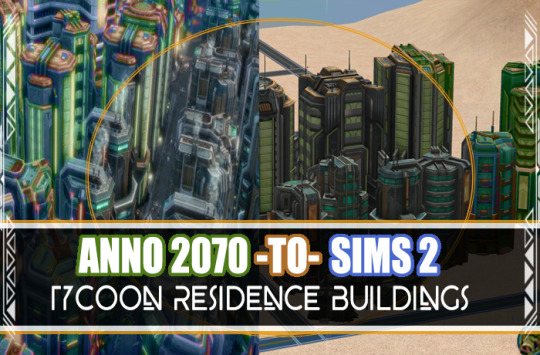
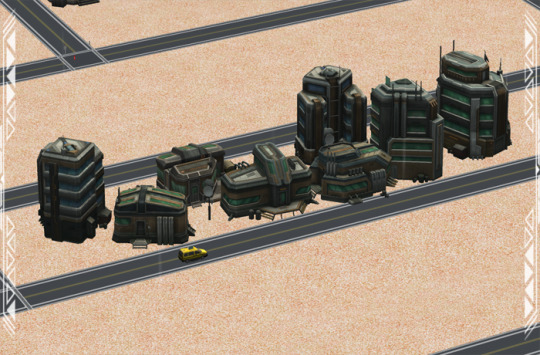
Published: 9-24-2024 | Updated: N/A SUMMARY Here are the tycoon residences from Anno 2070 (Ubisoft, 2011). Buildings are available as lot/hood deco and some extras (smaller accents, building toppers, and connectors) are included for embellishing individual lots. Lot deco may be convenient for those who want to place these buildings on elevated terrain or on top of other buildings (see examples below). Look for other anno-to-sims2 content on this site under the #co2anno hashtag. I’ve also written a tutorial for anno conversions HERE.
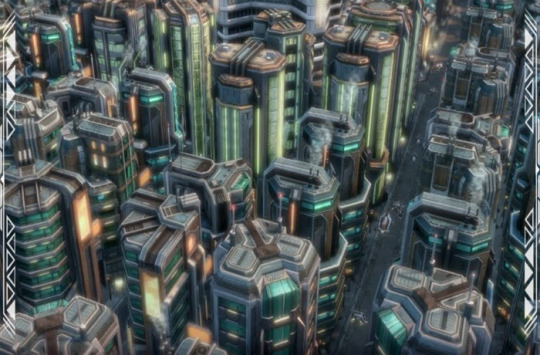

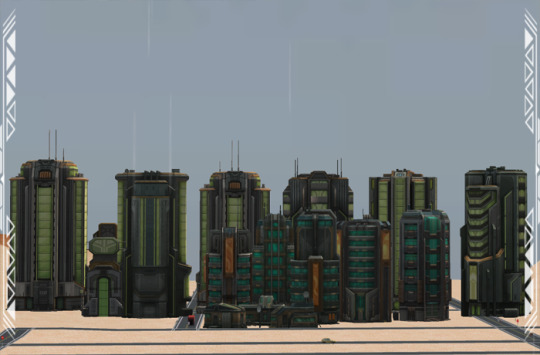
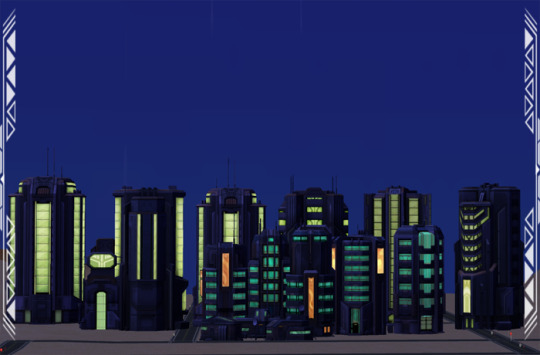

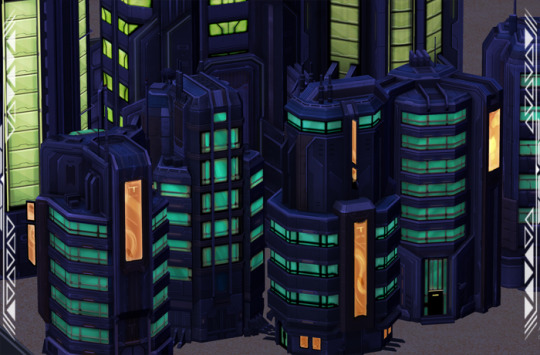
DETAILS Requires all EPs/SPs. §1-4K | Buy > Lighting > Misc and Hood Deco > Effects §0 | Hood Deco > Effects Items are mid-to-high poly and counts are slightly higher for hood deco. Also, buildings have a visibly grungy look and light up partially in night/hood view. There are some texture quirks since these are not meant for larger meshes. ITEMS *poly count range applies to all versions of each building Worker 001-004 (506-2370 poly) Citizen-Employee 001-004 (487-1221 poly) Executive-Engineer 001-005 (424-2232 poly) Leader-Executive 001-005 (446-3963 poly) DOWNLOAD (choose one) from SFS | from MEGA COMPATIBILITY Compatible with lighting mods. Some buildings may appear lit during both day and night. Here are some in-game shots showing lot/hood versions.

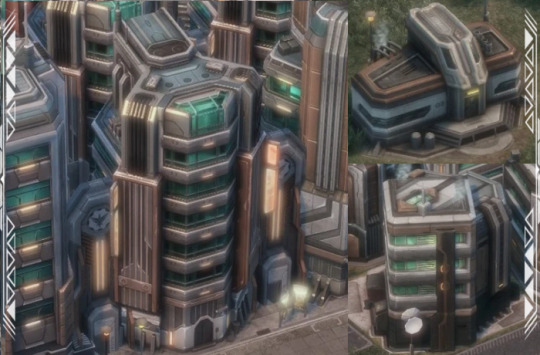
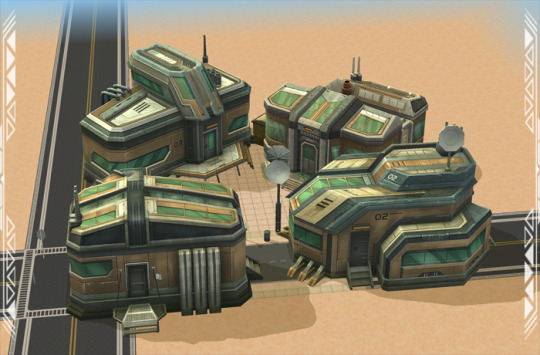
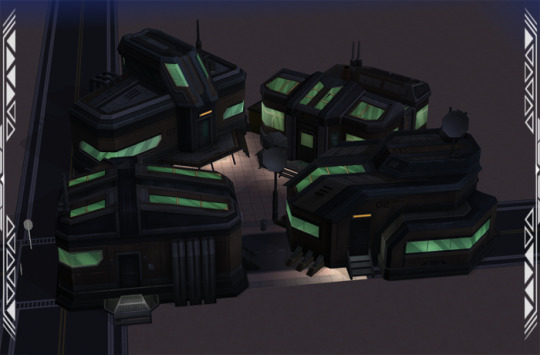

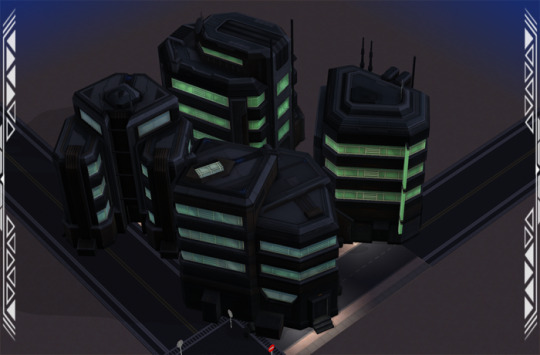
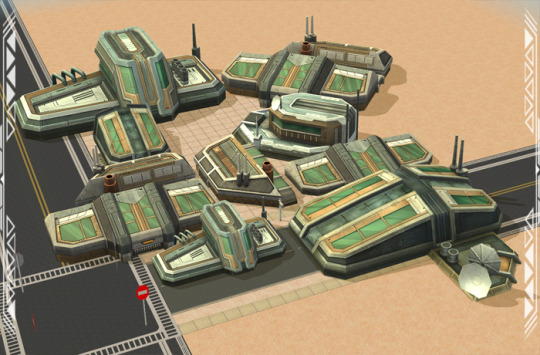
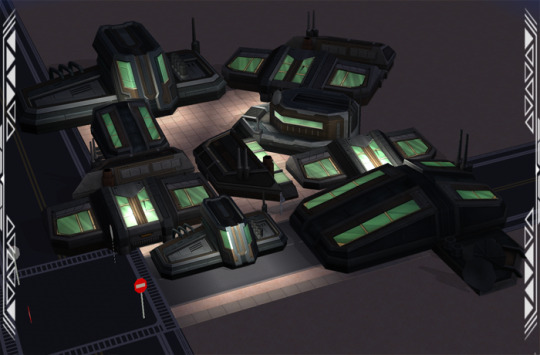


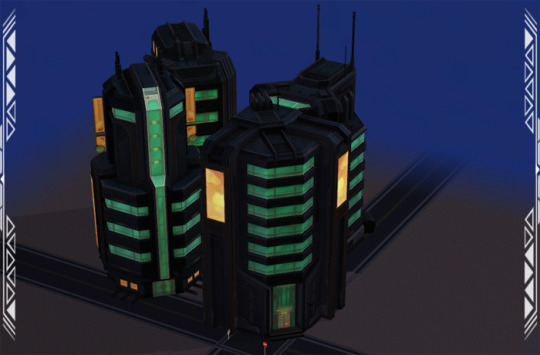
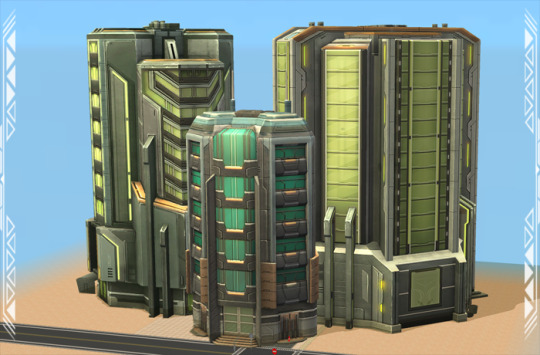
CREDITS Thanks: Simming, Blender, Github, and Anno Fan communities. Sources: Beyno (Korn via BBFonts), EA/Maxis, @I.play.Anno.2070 (via YouTube, 2022), Offuturistic Infographic (Freepik), Anno 2070 (Ubisoft, 2011), Anno 2070 Buildings, Anno 2070 Wiki.
116 notes
·
View notes
Text
A Few Tips for Converting from Non Sims Games, for First Timers.

Mirror: Dreamwidth.
1. Find out the game's engine. To know what type of file the game files are archived as.
2. Look up the appropriate tool for browsing that archive.
Link - my go-to resources. Info and links under programs - general → converting. Links to tutorials for said programs are under tutorials → converting.
3. Check out how that tool saves the exports. Look up the right import/export add-on for Blender accordingly. I've noted that info in the aforementioned list.
That's it. You've got the goodies in Blender. The rest is the same as with converting from other Sims games. Links to favorite tutorials for converting from Sims games; Tutorials → Converting.
Happy Simming!
@sims2tutorials I think it counts as a tutorial?

#Tutorial#Sort of#Tips#Converting#ts2 tutorial#Ts2#the sims 2 tutorial#sims 2 tutorial#Sims2#Sims 2#The Sims 2#Tutorial: converting#Conversions
25 notes
·
View notes
Text

How to make custom eyes non-dominant?
So you downloaded cool custom eyes for your Sims 2 but you wish they weren't dominant in genetics (as they usually are)? It's very simple to fix as long as you have SimPE.
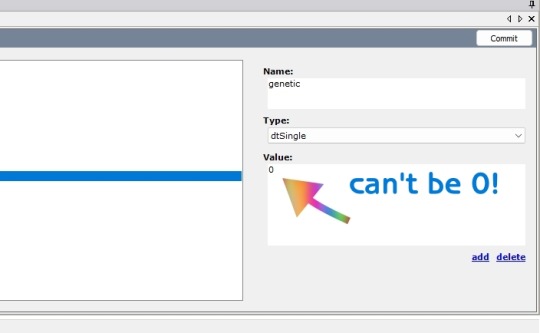
Explanation: Custom eyes are dominant because their default genetic value is 0, and creators usually don't bother with changing that. Maxis genetic values are 1 and 2, so 0 dominates over both, which means custom eyes are more dominant than Maxis dominant.
And now, how to change it:
Open SimPE.
Open the eye file that you'd like to edit (you can drag it directly from the folder into SimPE).
Go to Texture Overlay XML, it will probably be named something like "uuface_eye_gray".
In Plugin View below, find "genetic (dtSingle)".
Now it's time to decide if you want the eyes to be dominant or recessive. 1 - Maxis dominant 2 - Maxis recessive In the window located to the right, you can edit it and type in the desired number (1 or 2, never leave it at 0!).
Commit. Save. Done!


Now you can go into the game and test it (close SimPE first!). Make two fresh Sims, one with a Maxis recessive eye color (e.g. light blue) and the other with this custom one you just edited. Then "play with genetics" and if the offspring ever gets the Maxis recessive color, it works! Sims straight from CAS are homozygous, so it wouldn't be possible for recessives to even appear if the other color was dominant.
I personally changed the value to 1 to make it the same as in the Equal Genetics mod. If you want dominant and recessive in your game, just choose which colors have which value. Unfortunately, you need to edit every single file separately.
You can also use this version of Equal Genetics for eyes to have them all set to 0 - this way no custom eyes will dominate and there's no need to edit them!
That's it! Hope this helps!
63 notes
·
View notes