#then select tools>fun tools>custom loading screen
Explore tagged Tumblr posts
Visit Tumblr Blog
Explore Tumblr blogs with no restrictions, modern design and the best experience.
Last Seen Tumblr Blogs


Fun Fact
25% of US internet users with an annual income of $80-100K use Tumblr.
Text
i girl bossed just the right amount tonight & learned how to make loading screens
#it's super easy and im so happy lmao#10/10 would recommend#you just need sims 4 mod manager#then select tools>fun tools>custom loading screen#input ur pictures and tada#they make it a package file
153 notes
·
View notes
Text
Updated Resource List: UI Edition (Updated 11/10/24)
This is all the mods in my downloads folder that changes the game UI and makes it look better on modern display, removes annoyances etc. My old resource list only listed 3 which have since been replaced.
I play on a 2k monitor with the game set to 1080p with the default UI because I like the nostalgic look.
If you use cleanUI by @greatcheesecakepersona, then many of the widescreen fixes are already included! Many of these also have an alternative version made for cleanUI.
Loading screen replacement:
UC loading screen by @eddysims replace the Fun With Pets logo and removes idle M&G sims on select menu (I use an older version to match the Super Collection for mac, but have combined with this to remove the idle sims).
UC startup strings by @simsllama replace the M&G text strings while loading to fit Ultimate Collection.
M&G to UC program name replacement (MTS) changes the program name to say Ultimate Collection on taskbar, when closing the game and in credits. I use the old original Sims 2 icon in start menu.
More UI mods below my loading screen.
Removed or disabled buttons:
No delete button in Sim Bin by Chris Hatch avoid accidentially deleting a family in the neighborhood.
No delete button in Buy/Build mode by Chris Hatch. I prefer to delete cc in the downloads folder instead.
Edited No useless town buttons by ePSYlord. Removes the AL, FT and Pets buttons from upper select menu in hood view. It also disables Custom Content Browser button to the old sims2 webpage, the camera and video buttons which I never use but always accidentially click.
Removed Auto Login button by ePSYlord. Removes the redundant option in settings.
No delete button in CAS, edited More Columns in CAS by ePSYlord. This is an edit of Chris Hatch's ui mod (cas300Extra) that adds the columns while also removing delete button from all categories. I had difficulty getting it to work for me, but managed after changing load order and removing specific cc hairs.
Remove hood popup dialog box reoploaded on MATY. No more nagging to add subhoods when entering a neighborhood.
Visual annoyances begone:
No CC icon in CAS (MTS) hides the star on custom content.
No pause frame by @simnopke removes the red frame from live, buy and build mode.
Add store icon to CAS by @jawusa. Restore the TS2 Store Edition icon on store content which can all be found here.
Widescreen fixes:
Wider change appearance by Chris Hatch.
Wider buy/plan outfits by Chris Hatch.
Wider family tree by SixAM!
Wider design tool by @lamare-sims.
Wider collections by Chris Hatch.
Menu fixes or addons:
Subhood selection by Mootilda changes menu from big button to list of selections instead. Useful if playing with multiple subhoods.
Select your cemetery (MTS) adds dialog box to move tombstones if all sims on a lot die.
Baby Last Name Chooser by @midgethetree adds dialog box to choose a baby's last name when born.
Marriage Last Name Chooser (MTS) adds dialog box to choose last name after sims gets married.
Misc. UI changes:
Clearer need bars by simnopke. It just looks nicer.
Season icons in color (MTS). Replace the blue with colorful icons.
LTW icons fixed by Lamare. Resizes the Life Time Wants icons to be consistent.
I think that was everything concerning the user interface in my game. A lot more than anticipated and most added in the last year or so. My game looks so nice now!
If you have other UI mods or dialog box addons that isn't on the list, then please leave a suggestion for me 🥰
317 notes
·
View notes
Text
How to Transform Your Smartphone with a DIY Smart Ink Screen Phone Case

Click here: https://amzn.to/45r4SVe
Imagine a phone case that does more than just protect your device. A case that turns your phone into a canvas, allowing you to customize and update your display whenever you desire. Welcome to the world of Smart Ink Screen phone cases. Here’s how you can create your very own DIY Smart Ink Screen phone case and take your phone to the next level.
The Revolutionary Concept of Smart Ink Screens
Smart Ink technology, also known as E Ink, is transforming how we interact with our devices. Unlike traditional LCD or OLED screens, E Ink screens consume less power, are easily readable in sunlight, and provide a paper-like reading experience. This makes them ideal for a multitude of applications, including phone cases.
Why DIY?
Why settle for a mundane phone case when you can craft something extraordinary? A DIY Smart Ink Screen phone case not only adds a touch of personal flair but also serves as a functional extension of your device. Whether you want to display notifications, a to-do list, or your favorite artwork, the possibilities are endless.
What You Need
Creating your own Smart Ink Screen phone case is simpler than you might think. Here’s what you’ll need:
1. A Smart Ink Display Module: Choose a screen size that fits your phone model.
2. Microcontroller: To control the display and connect it to your phone.
3. Power Source: A small, rechargeable battery pack.
4. Phone Case: Preferably one that’s easy to modify.
5. Tools: Screwdrivers, soldering iron, and adhesive.
Step-by-Step Guide
Choose the Right Smart Ink Screen
Start by selecting a Smart Ink display module that is compatible with your phone’s dimensions. Look for one with good resolution and contrast.
2. Prepare the Phone Case
Carefully measure and cut out a section of the phone case where the Smart Ink screen will be placed. Ensure the cut-out is precise to avoid any gaps or misalignment.
3. Assemble the Components
Solder the microcontroller to the Smart Ink screen following the manufacturer’s instructions. Connect the power source to the microcontroller. Test the setup by loading some basic images or text to ensure everything works correctly.
4. Secure the Screen
Attach the Smart Ink screen to the phone case using a strong adhesive. Make sure it is firmly in place but not so tight that it risks damage.
5. Final Integration
Place the assembled components into the phone case. Tuck the wires neatly to avoid any obstruction or bulkiness. Double-check all connections and the screen’s visibility.
6. Personalize Your Display
Once everything is set up, you can start personalizing your Smart Ink screen. Use dedicated apps to update the display with images, notifications, or even your favorite quotes. The low power consumption of E Ink means your phone case display will last for days on a single charge.
The Benefits
• Customization: Change your display whenever you like.
• Battery Efficiency: Smart Ink screens use minimal power.
• Readability: Perfect for outdoor use with clear visibility in sunlight.
• Innovation: Stand out with a unique, functional phone case.
Make It Yours
Creating a DIY Smart Ink Screen phone case is more than just a fun project; it’s a way to express your individuality and innovation. With a bit of creativity and some basic tools, you can transform your ordinary phone case into something extraordinary.
Ready to start your DIY journey? Enhance your smartphone experience today. Click here to find all the tools and components you need to create your own Smart Ink Screen phone case.
By embracing this cutting-edge technology and combining it with your personal touch, you’ll not only protect your phone but also turn it into a dynamic and interactive accessory. Dive into the world of DIY and let your phone case speak volumes about who you are.
Link https://amzn.to/45r4SVe
2 notes
·
View notes
Text
How to Edit and Enhance Your Photos Online with PhotoCut

Today, the digital world, where photography and photo editing stand out as basic skills, allows any content creator, business owner, or someone who wants to improve their photos to do so with PhotoCut, an online photo editing tool easy on the pocket and anybody without a professional design background. PhotoCut provides a full plethora of online photo-editing tools, from Cropping images to Color Picking from images, Face Swap, Retouching, and Image Overlay, without requiring payment of any fee whatsoever. This guide will explain how these features can be utilized on PhotoCut to add further finesse to your photos and take your editing to another level.
Create amazing photo grids with PhotoCut’s Image Combiner.
1. How to Crop Images Online for Free with PhotoCut

Cropping is one of the most basic yet perhaps the most important post-processing jobs. Cropping deals with the unwanted parts of an image and leaves the most important subject intact. Be it to prepare for social media, websites, or print project preparation, an efficient means of cropping images is a useful skill.
Cropping your photo online using PhotoCut is easy and simple enough for someone with little editing skills. Here is how it goes about cropping an image on PhotoCut:
Open PhotoCut and click the Upload button to choose the image you want to crop.
After upload, select the Crop Tool from the menu. The image will then have a grid or box shown over it.
Use the corners or edges of the crop box to drag for your preferred area to keep in the image. You can also move the whole block to focus on specific areas.
As soon as you are done cropping, hit the Apply button for it to apply the crop to your previously selected area.
After applying the crop, download your edited image for the project purpose.
The cropping tool that PhotoCut offers can thus be described as a versatile function, allowing resizing and customization of any image to a specific aspect ratio; very suitable for creating profile pictures, banner images, or even posts on social media.
2. How to Choose Colors from Images Online for Free with PhotoCut

To choose the right color from an image on design projects, digital paintings, or color work is very vital. With a free tool on PhotoCut, you can color-pick directly from your photos to complement any color project you are working on.
To choose colors from images using PhotoCut online:
Upload your image into PhotoCut. Once your image is up, it will be seen on the editor screen.
The color picker tool is usually shown as an eyedropper icon.
Click on any region of the image to select the color you want, and the tool will choose the color and provide you with its hex code.
After you've identified the color, copy the hex code and use it in your design, website, or artwork.
If you are designing and developing an overlay, using the chosen color on other components such as text, shapes, and other places will make your designs unified and visually appealing.
It is that much better since it enables you to select colors straight from the design such that they perfectly match with the colors of the original image and are within the scope of your creative thinking.
Change the color of your image with PhotoCut’s Color Changer.
3. How to Swap Faces Online for Free with PhotoCut

Face swapping is a creative and fun way to alter pictures. It can be used for funny content, digital paintings, or simply experimenting with looks. PhotoCut lets you swap faces in photo-editing quickly and easily with no large software to get in the way.
To swap faces online using PhotoCut, follow these steps for free:
Upload the two images in which you want to swap faces. Ensure that both have well-defined facial features for better results.
Once both images are loaded, select the Face Swap Tool from the toolbar.
The tool will prompt you to highlight the faces you want to swap in both images. Use the cursor to select the face in each image carefully.
Once both faces are selected, click on the Swap Faces button. PhotoCut will automatically swap the faces between the two images.
If required, you can adjust the size and alignment of the faces as needed to seamlessly fit into the rest of the image.
After you have finalized your image adjustments, simply click on Apply and download your edited picture.
The face swap feature in PhotoCut is the answer for a humorous light edit and, on serious occasions, for digital marketing materials and advertisements. The interface is fast and fun to work with.
Enhance your video quality with PhotoCut’s AI Video Enhancer.
4. How to Retouch Your Images Online for Free with PhotoCut

Images must always be retouched to improve the quality of these images, for example, remove blemishes, smoothen skin, brighten the face, or correct lighting issues. This free retouching tool from PhotoCut empowers anyone to carry out these edits without any advanced skill level.
Here's how to retouch your images free online on PhotoCut:
Go to PhotoCut to upload the image for retouching.
Select the Retouch Tool from the menu. The retouch tool typically offers options for blemish removal, skin smoothing, whitening teeth, etc.
Click on the image's sections where you wish to apply retouching effects using your pointer. Blemishes can be removed, skin smoothed, and features enhanced.
Adjust the level of retouching effects to your liking so that the changes remain subtle and natural.
After you have made all the changes to your satisfaction, simply apply and download the image.
For portrait photography and personal pictures, retouch work is essential; achieving professional results with PhotoCut is an easy task.
Learn the simplest ways to make photo collages.
5. How to Overlay Images Online for Free with PhotoCut

Overlaying pictures is one great technique to bring various elements into one cohesive image, creating effects and making novel compositions. PhotoCut gives a simple means to create image overlaying online for free, blending multiple photos.
Here’s how you can overlay images online using PhotoCut:
Start by uploading the base image (the image you want to place other images over).
Choose Overlay Tool from the menu. This allows one image to sit over another.
Upload the image you want to overlay onto the image. Resize, rotate, and place the overlay image as needed.
You have some options to work with for controlling how much of the background image shows through the overlay image in terms of transparency.
The overlay image may be given certain effects that would allow it to blur, shadow, or filter itself so that it would seamlessly blend with the background.
Click on Apply to save and download your newly edited image.
Overlaying images can serve any purpose, be it advertisements, promotional messages, or just some fun social-media content. The interface of PhotoCut makes it intuitive for any image manipulation to get done quickly and easily.
Conclusion
PhotoCut presents a powerful online tool offering cropping, retouching, face swapping, color picking, and image overlay. All these options are free to use. Whether you are creating content, marketing, or just someone passionate about editing photos, everything in PhotoCut's simple tool allows you to resize and structure your images into awe-inspiring artwork. It is easier for you to use this website with no need to engage capable graphic designers or pay exorbitant amounts for expensive software to process photos. Instead, using PhotoCut, you can get advanced online-level photo editors applied directly in a browser with the simplest of interfaces that enables polished and beautiful images.
Resize your images online without losing quality using PhotoCut’s Photo Resizer.
FAQs
Q1. What file formats are supported by online cropping tools?
Ans. Most of the tools support standard file formats like JPEG, PNG, and GIF. Also, some tools might support less common formats like TIFF and WebP. The tool's documentation has information about file formats supported.
Q2. Will cropping reduce the quality of my image?
Ans. Cropping itself doesn't necessarily reduce the quality as much as the resolution if you crop excessively. You're simply using fewer pixels from the original image. If the remaining pixels are still sufficient for your intended use (e.g., web display, small print), the reduction may be negligible. Be mindful of the final image size after cropping.
Q3. What color formats are typically provided?
Ans. Commonly, color formats are provided as:
HEX (hexadecimal - e.g., #FFFFFF)
RGB (Red, Green, Blue - e.g., rgb(255, 255, 255))
HSL (Hue, Saturation, Lightness)
CMYK (Cyan, Magenta, Yellow, Black)
Q4. Can I create a color palette from an image using these tools?
Ans. Some online color picking tools have the functionality to extract a whole palette from an image. Usually, you just upload your picture, and the tool analyzes the image to determine the most dominant or important colors.
Q5. Is face swapping accurate and realistic?
Ans. Results vary greatly depending on the quality of the images and the sophistication of the AI. Good lighting, clear faces, and similar angles usually lead to better results. Some tools produce more realistic swaps than others.
Q6. What are face-swapping ethics?
Ans. Just ensure that it is not used with bad intent, like for fake news, or impersonate someone without their consent. Think about privacy and respecting people's images.
Q7. What kind of retouching can I do online for free?
Ans. Many decent free internet programs can do basic retouching tasks including removing blemishes, whitening teeth, correcting red-eye, and smoothing skin. Some advanced functions would require paid subscriptions.
Q8. Will retouching make my images look unnatural?
Ans. It depends on the intensity of the retouching. Keeping changes subtle will make it look more natural. Avoid over-smoothing of skin or changing features too much.
Q9. What are the usual applications for image overlaying?
Ans. Watermarking, photo collage making, printing of texts or graphics over photos, creating layers, and putting together social media graphics.
Q10. How do I go about making an image transparent for overlay?
Ans. The majority of the tools feature a "opacity" or "transparency" slider option, which may be used to control how visible the top picture is over the background image. For more complex overlays, use an image editor to clear the background of the image you want to overlay, then save it as a PNG.
0 notes
Text
Why RevolutionCasino Is the Future of Casino Games and Big Jackpot!

Casino Revolution is quickly becoming a leading name in the world of online gaming, transforming the way players experience casino games and jackpots. With a forward-thinking approach, this platform is paving the way for a new era in online gaming. Here’s why Revolution is poised to be the future of casino games and big jackpots.
1. Cutting-Edge Technology for Seamless Play
At the heart of Revolution is state-of-the-art technology. Every game on the platform is designed with smooth gameplay, stunning graphics, and real-time interaction, ensuring that players enjoy an immersive, seamless experience. Whether you’re playing slots, poker, or live dealer games, the technology ensures high-quality graphics, quick load times, and smooth transitions between games, creating an environment that rivals physical casinos.
2. A Personalized Gaming Journey
Revolution doesn’t just offer generic game selections—it tailors the experience to each player’s preferences. With a personalized approach, the platform learns what games you enjoy and suggests the best options, making it easier for players to find their favorites. Custom recommendations, bonuses, and rewards ensure that each session feels unique and catered to your individual gaming style.
3. Exclusive Bonuses and Promotions
One of the most exciting aspects of Revolution is its generous array of bonuses and promotions. From sign-up bonuses to loyalty rewards, players are consistently treated to perks that increase their chances of winning big. Free spins, cashback offers, and special tournaments add an extra layer of excitement, and these exclusive rewards help players maximize their time and money spent on the platform.
4. Live Dealer Games That Mimic Real Casino Action
Revolution offers live dealer games that bring the atmosphere of a physical casino directly to players’ screens. With professional dealers, real-time gameplay, and HD streaming, these games create an interactive experience that feels just like being at a real casino. Players can engage with dealers, chat with fellow players, and feel the thrill of the game as if they were sitting at the table themselves.
5. Big Jackpots and Exciting Payouts
Revolution is home to some of the most exciting jackpot games in the online gaming world. Progressive jackpots, where the prize pool increases with each bet placed, are one of the platform’s most appealing features. Players have the chance to win life-changing sums of money, and with the platform’s transparent payout system, everyone knows that the odds are real, and the rewards are possible.
6. Responsible Gaming Practices
Revolution prioritizes player safety and well-being. The platform is equipped with a variety of responsible gaming tools, including self-exclusion options, deposit limits, and session reminders, ensuring that players can enjoy the experience while maintaining control. This commitment to responsible gaming guarantees that players can indulge in fun without it negatively impacting their lives.
7. Mobile Accessibility for Gaming On-the-Go
Revolution is fully optimized for mobile devices, allowing players to access their favorite games anytime, anywhere. Whether you’re at home or on the go, Revolution ensures a smooth and enjoyable gaming experience, with fast load times, mobile-friendly navigation, and the ability to play on any device. This level of accessibility makes it easier for players to enjoy the platform wherever they are.
Casino Revolution is setting the stage for the future of online gaming by combining advanced technology, personalized experiences, and the thrill of big jackpots. With live dealer games, exclusive bonuses, and a focus on player safety, Revolution is leading the charge toward a more exciting and rewarding future for online casino gaming. Ready to be a part of the revolution? The future of big wins awaits!
0 notes
Text
How to Use Cricut Design Space for Free: A Complete User Guide
Creating designs and projects is fun, right? Who does not want to make handmade projects? Cricut Design Space is a free and easy-to-use application for making craft projects. But how to use Cricut Design Space for free? The app allows you to design and upload your projects to the app. Once your design is ready, you can cut it with the help of a Cricut cutting machine.
As a newbie, using the software program can be a bit overwhelming and confusing. But do not worry. This stepwise tutorial will explain how you can use it.
How to Download Cricut Design Space on Computer?
Before you learn how to use Cricut Design Space for free, you must download and install it first on your operating system. Here are the basic directions to follow:
Now that you have downloaded and installed the application on your desktop computer, it is time to learn how to use it. So, let’s get started!
How to Use Cricut Design Space App: Quick and Easy Steps
After downloading and installing the design software on your desktop computer, it is time to learn the complete process of how to use Cricut Design Space for free. In the section below, I have mentioned the simple steps so that anyone can easily follow along.
Step 1: Creating a Design
The first step is to create your design in the Design Space app. You can either make or upload an SVG file. On your home screen, click on New Project to open the blank canvas. On the left, you can find the menu and other tools, using which you can add different elements like text, images, shapes, templates, and so much more.
Step 2: Resize Your Image
When you are done creating your design or uploading your image, you can flip, rotate, and resize it according to your needs. Once satisfied with your design, you will need to click the Make It button to send it to cut with the crafting machine.
Step 3: Cutting the Design
Now, it is one of the most important steps after designing. You need to cut your design using the app. After that, click on the Attach tool so your design will be in the same position on the mat as on your canvas. A window will appear with the Preview section. So, check there to confirm it. You need to select the material you use to make the design. Then, load your material onto the mat and slide it into the machine to cut.
Step 4: Unload the Design From Your Machine
After the cut, unload your design and remove the extra part. You should not remove extra parts for some materials, like cardstock, because they come out easily. However, you must peel off your design from the mat using a weeding tool.
Step 5: Apply Your Design
Last but not least, it is time to finish your project. For some projects, you are done when you just peel off your design. But sometimes, there is an application process, and this varies from project to project. If you are working with vinyl, you need to use tape to remove the vinyl from the backing and place it on your project. When using iron-on materials, press this onto your project.
Wrapping up
This blog post explains how to use Cricut Design Space for free. It is a free software that can help you create custom project designs. It has a user-friendly interface and various features make it an excellent option for beginners and experienced crafters. Also, there are many projects you can design, even if you’re not an expert.
If you want to get creative and create unique projects, then download the Design Space app and start today.
FAQs
Why should you use Cricut Design Space?
The Design Space app is free to design, cut, and use custom projects with various features. You can start from scratch or use the library of images, fonts, and templates. You can upload your projects and then connect to your machine to cut out the designs.
Can you use Cricut Design Space offline?
You can use Design Space offline on Mac, Windows, and iOS devices. You can also edit projects offline if you have installed this software and saved the project in your operating system. You can choose to work offline anytime. Just disconnect from your Wi-Fi network or unplug the Ethernet cable from your device.
Do you need a subscription to use Cricut Design Space?
No, you do not need a subscription to use this application. It is available on computers and mobile devices and works with any Cricut cutting machine. But if you want advanced features like access to premium images, fonts, premade projects, and more, then you can take a paid subscription known as Cricut Access.
Visit: cricut.com/setup www.cicut.com/setup login
Source: https://cricricutdesigncut.wordpress.com/2024/12/09/how-to-use-cricut-design-space-for-free-a-complete-user-guide/
#cricut.com/setup#cricut.com/create#cricut.com design space#cricut.com/register#cricut.com sign in#design space setup#digital design#www.cricut.com/setup\cricut explore air 2 setup#www.cricut.com/setup login#www.cricut.com/setup#www.cricut.com setup#www.cricut.com setup login#cricut design space setup#setup cricut design space#cricut setup#design.cricut.com/setup
0 notes
Text
How to Use Cricut Explore 3: Get Started With Your First Craft
My childhood friend Emma recently purchased a Cricut Explore 3 to start crafting. Like you, she was confused about how to use Cricut Explore 3. We keep in touch, so she calls me for help. I'm always eager to help; I teach her everything from setting up and connecting the Cricut machine to downloading Cricut Design Space. I also enjoyed her first project; it was fun.
If you have left your machine untouched since buying and are wondering how to get started, I will guide you through it step-by-step, just like I did for Emma. I was once a beginner like you, but with continuous learning, I have done many projects with my Cricut machine. Follow the instructions in this blog, and you will feel comfortable in no time. Let's get started!
How to Setup a Cricut Explore 3 on Your Device?
Now that you have your Explore 3, before you learn how to use Cricut Explore 3, it must first be set up properly so you can start crafting.
Step 1: Unpacking the Machine and Turn It On
If you haven't opened the box yet, open it up and locate the power cable and the Cricut Explore 3 machine.
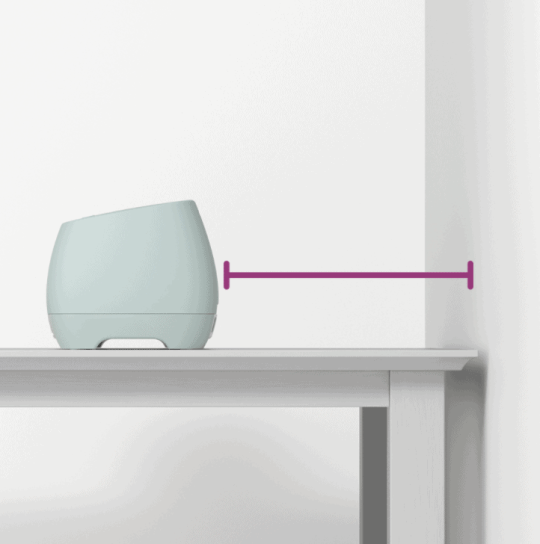
After this, place the machine on a clean and flat surface and ensure that there is 2 feet of free space behind the machine.
This time, plug the round end of the power cable into the back of the Cricut Explore 2 machine and the other end into a power source.
Turn on the machine and the power button simultaneously.

Step 2: Connecting Cricut Explore 3 to a Computer
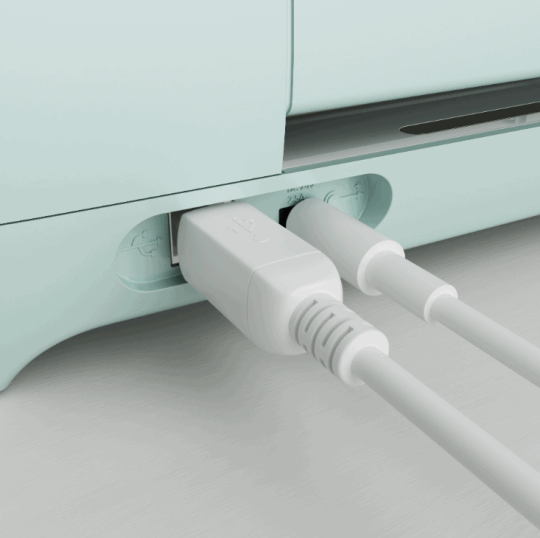
The Cricut Explore 3 comes with a USB port and also supports Bluetooth connectivity. We can use any method for connection.
For a USB connection, plug one end into the computer and another one at the back of the Explore 3 around the power cord.
Step 3: Download Cricut Design Space
Installing Cricut Design Space is essential when you first start learning how to use Cricut Explore 3, as it is integral to the setup.
Open the computer and go to the cricut.com site; it will automatically recognize the computer, whether it is a Mac or Windows or not.
After that, tick the box to agree to Cricut's terms and conditions and click "Download."
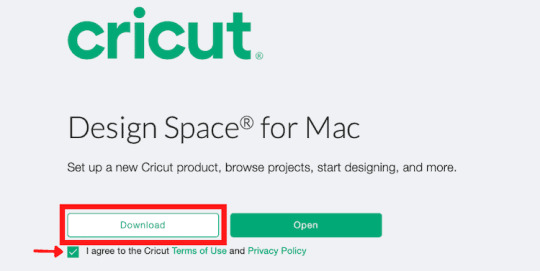
Moreover, open up the downloaded file, follow the on-screen prompts, and install the Cricut software.
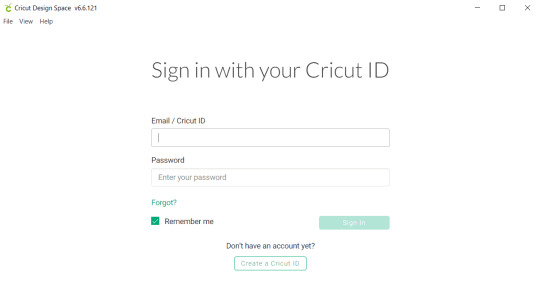
Next, launch the Cricut application and create a Cricut profile. If you have already done so, simply log in.
Step 4: New Machine Setup in Design Space
No matter which Cricut machine you have, it needs to be set up in the Cricut application before use.
Once the Cricut applicationis installed, click the Menu icon.
Next, click New Product Setup and select the Cricut cutting machine.

Now, a new page will open that asks you to select the machine and tap on the Cricut Explore 3.
Follow the on-screen steps, then update if there is any new update, and click Continue to complete setup.
How to Use a Cricut Explore 3 to Make a Mug?
Finally, the setup for the Cricut Explore 3 is complete, and it is connected. Now, let's dive into how to use Cricut Explore 3 by creating a project.
Step 1: Supplies and Tools Required
Given below are the essential Cricut tools and materials you will need to get started with your project.
Cricut vinyl
Cricut Explore 3
Weeding tool
Transfer tape
A blank item (I choose a mug)
Step 2: Use the Cricut Software and Create a Design
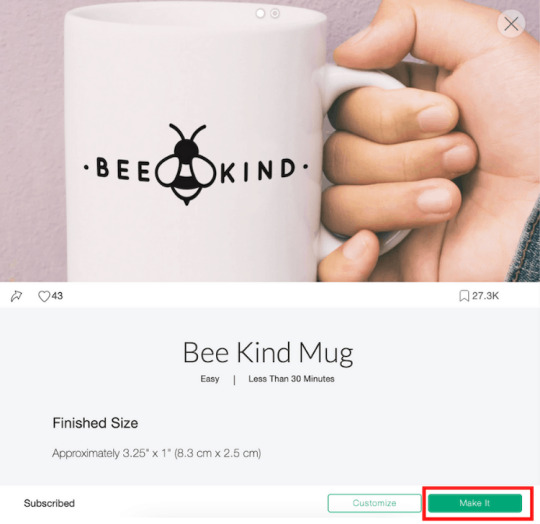
Open the Cricut app, click on the New Project, and look for the "Bee Kind" design in the search bar. Since it is your first project, I recommend skipping any customization. Simply drag and resize the design, then click Make It.
Step 3: Select Your Material
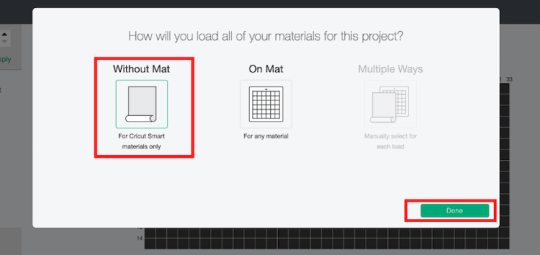
Now, the Cricut software will ask you to choose the load type "Without Mat" and click done.
Also, insert the smart vinyl into the machine, ensuring the fine point blade is installed in clamp B.
Then, return to the Cricut app and click the Continue button.
Step 4: Start Cutting Your Design
When your design and all the settings are complete in Design Space, it is time to click the Go button and start cutting. Once the machine finishes cutting, hit the Load button to remove the smart vinyl.
Next, trim and weed out the excess vinyl that is not required.
Then, cut the transfer tape to fit the size of the design you have cut out. Peel the white backing away from the transfer tape and place the sticky side down on your vinyl decal.
Finally, peel back the transfer tape and apply it to the blank object (mug) to lift it up; it's as simple as that.

Final Words
The Cricut Explore 3 is a popular machine capable of cutting over 100 materials, making it ideal for various projects like t-shirts, vinyl decals, stickers, cards, and more. Before diving into any projects post-purchase, it's crucial to understand how to use the Cricut Explore 3. I have provided all the information from setup to the first DIY project, assuming you have completed it and are now comfortable using your machine.
Frequently Asked Questions
What can I make with my Cricut Explore 3?
The following projects are beginner-friendly, stunning, and easy to make with the Cricut Explore 3.
Labels
Decals
Personalized apparel
Mugs
Wooden sign
Banners
Bookmarks
Frame
Cupcake toppers
T-shirt
Coasters
How to use Cricut Explore 3 without a mat?
You can follow these simple instructions to use the Cricut Explore 3 without a mat:
First, create a design in the Cricut app and select the load type "Without Mat."
After that, load the material onto your machine and press the Start button.
Finally, complete the on-screen instructions to complete the vinyl cutting process.
How to connect Cricut Explore 3 to a computer or mobile phone?
Follow the steps below to connect the Cricut Explore 3 to a computer or mobile phone:
Ensure that the Explore 3 is turned on.
Open the Bluetooth settings on your computer or mobile phone.
Wait for your system to detect the Explore 3.
Select the machine, and if asked for a PIN, type 0000, then select Connect.
#How to use a Cricut Explore 3#How to use Cricut Explore 3#cricut explore air 2#cricut software#cricut
0 notes
Text
How to Use Cricut Explore Air 2: An Easy Guide
Isn’t it fun to create your first-ever crafting project using the Cricut machine? I am a professional crafter, and I had the same feeling when I made my first craft. Creating projects with a Cricut machine is easy. But, if you are a novice, then you might need some guidance.
To help you with that, I will share all the fundamental knowledge on how to use Cricut Explore Air 2. In addition, I will tell you about the setup of the Cricut Explore machine, supply requirements, and a step-by-step guide to making a project. So, keep reading this specific blog post till the end to learn every step thoroughly.
How to Set up a Cricut Explore Air 2 Machine?
Before you learn to use Cricut Explore Air 2, it is necessary to learn the setup process. Here is how to do that.
For the first step, you have to unbox your Explore Air 2 machine and turn it on.
After that, keep the machine within 10-15 feet range of the device you want to connect to.
Next, you have to connect both devices using the USB cable or Bluetooth compatibility.
Now, download and install the Cricut Design Space app on your PC/smartphone.
And then, open the Cricut app and log in with your account.
To complete your Cricut machine setup, choose the Machine Setup option.
Now, your device will scan for your machine name and show it on the display.
Click on the Cricut Explore Air 2 machine option to complete the setup process.
If you are having any issues with your machine setup, then you can connect to brand customer care or seek experts. They can provide you with a comprehensive guide on how to use Cricut Explore Air 2.
What Supplies Are Required to Make a Project on Cricut Explore Air 2?
Here are the essential supplies requirements you should gather before you start working on your project. Here is the list of supplies you need to make.
Cricut Explore Air 2 machine
Cricut Design Space app
Cricut cutting machine
Vinyl
While blank mug
Weeding tool
Transfer tape and others.
How to Use Cricut Explore Air 2 for Creating a Project?
After your Cricut Explore Air 2 Machine setup and gathering all the essential supplies, you can jump right to the steps of making the project. Here is the stepwise guide you need to follow for that.
Step 1: Making a Design
Firstly, launch the Cricut Design app on your computer or smartphone.
After that, insert a design into a fresh canvas.

Next, search for the picture of the coffee mug by going to the Image section.
And then, bring the design to your cup and align it according to your choice.

Once your design is complete then, choose the Make It option to send the design for cutting.
Next, choose the machine name and materials on the screen to move forward.
Step 2: Cutting the Design on Your Cricut Explore Air 2
Now, take the chosen material (vinyl) and place it on your cutting mat.
After that, load the mat to your cutting machine properly, as shown in the below image.
Next, choose the option to start the cutting procedure.
Afterward, wait for the cutting process to complete.
Now, use the weeding tools to remove the extra parts from your cut vinyl design.

Step 3: Apply the Design to Your Blank Cup
Once the design cut is complete, please attach it to the transfer tape.

Now, if you need to apply the design to your black cup and use the scraper tool, stick it perfectly.
After that, remove the transfer tape from the product.
Here you go! Your first-ever Cricut project is complete.
Frequently Asked Questions
How to Use Pen on Cricut Explore Air 2?
These are the steps you need to follow to use a pen with the Explore Air 2 machine.
On the Cricut app, you have to choose a design that you want to draw on a product.
After that, send the design to your cutting machine to draw.
When the display tells you to attract the Cricut pen, then insert the pen in clamp A.
Also, load the paper on the machine to draw or write on it.
Then, select the option to start the process.
Wait for the process to finish and then unload the design.
Finally, you can use the design for further processes.
What Projects Can I Make With Cricut Explore Air 2?
There are a plethora of projects you can make with your Explore Air 2 machine. Making projects with the Explore Air 2 machine is easy and fun. Here are some quick DIY projects you can try on your Cricut Explore machine.
Takeaway Pie Boxes
Cake Toppers
Banners
Vinyl Face Planters
Customized T-shirts
Personalized Hoodies
Metal Earring
Leather Keychain
Etch Glass
Board signs, and others.
What Devices Are Compatible With Cricut Explore Air 2?
Cricut Explore Air 2 is a versatile cutting tool that is compatible with various devices. It offers wired and wireless connections to your computer and smartphone. It seamlessly connects to Mac, Windows, iOS, and Android devices. Plus, to complete the machine setup process, you need to download the compatible app Cricut Design Space. If you want to learn how to use Cricut Explore Air 2, then go to the brand website or connect to the customer support team.
Source :- https://newmachineprocess.com/how-to-use-cricut-explore-air-2-an-easy-guide/
0 notes
Text
How to Make DIY Wedding Invitations Using Cricut Maker?

Creating project design ideas for Cricut Maker can save you a lot of money, and sell projects as well to earn some extra bucks. Now, you can unleash your creativity and save money by designing your wedding invitations yourself. Crafting cute DIY wedding invitations can be a fun and satisfying process, and you will find out how easy it is to create them using Cricut Maker.
Making DIY wedding invitations requires a Cricut Maker machine along with essential tools and supplies. These tools will help crafters in producing high-quality, budget-friendly cards. This guide will outline the necessary steps to complete the process.
Step 1: Open the Cricut App on Your Device
The following steps will help you learn how to make design ideas for Cricut Maker projects:
First, sign in or create your Design Space account using the Cricut ID & password.
Second, tick the New Project and press the Uploads tool under the Menu section.
Third, tick the Upload Image and one or two images from your computer.
In the preview image, select both images one by one.
Further, and then press the Save button given on the bottom-right of the screen.
Next, choose the image given under the Recently Uploaded Images section and tick the Insert Image.
Afterward, you'll notice that both images will automatically upload on the canvas.
Following this, resize both designs so that you can see them on the canvas correctly.
At this point, convert the lines into score lines by ticking the Ungroup option visible under the Layers section.
Next, select the Score option present under the Linetype dropbox.
Now, choose both the base layer and score line and tap the Attach box.
Further, repeat steps number 9, 10 & 11 with the other images appearing on the canvas.
After doing this, press the Make It appearing on the right side of the canvas.
Step 2: Enter Text in the Card
At this point, you will come into contact regarding creating a method to make DIY wedding invitations:
Following the successful completion of creating the virtual wedding invite, you will land on the Mat Preview page.
While observing the page, you will get to see that all the parts are adequately arranged systematically.
Besides, if you want something other than extra design, then go back to Canvas and select the designs.
Next, press the Delete option, and all the extra designs will instantly be eliminated.
Further, choose the Text tool, start typing the text, and do specific editing.
After completing the editing, tick the Attach box and choose the color under the Color section.
Now, move the white color under the text and resize the text depending on the layer size.
Further, press the Attach button and move the card back into the correct position.
At last, again tap the Make It box present on your Design Space canvas.
Step 3: Wedding Invite Preview Mat
After finishing up the earlier-said steps for Cricut DIY wedding invitations, you will land on the Mat Preview page.
Next, select the layers existing on the left side of the preview page.
Now, tap Continue and let your system connect to the Maker machine.
After the connection process comes to an end, select the material from the list.
Following this, tick the Done box and carry on with the cutting and printing process.
Step 4: Cut and Print Your Design
After concluding steps number 1, 2, and 3, respectively, take a step forward and begin with one of the vital stages, i.e., design cutting and printing. To commence custom wedding invitation design ideas for Cricut Maker step 4, go through the following steps:
Further finishing the above-said steps, turn on your Cricut Maker, load the cutting mat, and upload the scoring tool inside the clamp.
Following this, hang around till the cutting and printing process on the mat is going on.
Next, switch off your cut-die machine and put out the mat from the Maker cutting machine.
Now, paste another piece of paper on the Cricut cutting mat and insert the pen in the pen holder.
Afterward, watch your Cricut machine penning down your text on the paper.
Further, turn your cutting mat face down on the surface and slowly remove your card design.
Following this, use your scraper tool to remove extra material from the cutting mat and make it reusable.
Lastly, remove the extra edges from the cute DIY wedding invitations, ensuring that you don't ruin any sides.
Step 5: Reveal DIY Wedding Cards
To complete the final stage of crafting wedding invitation design ideas for Cricut Maker, you need to study the steps given below:
Now, gently fold the design on the visible scoreline and set the design by using the tweezer.
Next, apply glue in equal percentages around the using a Cricut glue gun kit and place the card on it.
Now, use a ribbon to close the card and ensure that you simply tie the ribbon.
Finally, your Cricut DIY wedding invitations are ready to be delivered to family and friends.
In conclusion, this blog on design ideas for Cricut Maker provides a step-by-step guide to creating high-quality do-it-yourself wedding invitation cards.
FAQs
Question: Is Cricut Maker Worth to Create Custom Cards?
Answer: With an ability to turn creative ideas into reality, Cricut Maker allows the user to create anything from the lightest to the heaviest material. Based on the grounds of its cutting speed, blades, and other accessories, this cut-die machine is the best option for creating do-it-yourself crafts for various events. To craft the custom cards, all the DIYers must have a cutting machine, Design Space & other supplies to accompany them.
Question: Is Cricut Maker Compatible With Cricut Design Space?
Answer: Yes, the Maker cutting machine is fully compatible with the Design Space app. The software gives freedom to the DIYers in designing and creating the projects digitally on its canvas by using various tools and libraries. Apart from that, the app shifts the designs to the cut-die machine via built-in Bluetooth technology. The DIYer can also use their designs or fonts while creating the projects on the app.
Question: What Cricut Supplies are Required to Create Wedding Invitation Cards?
Answer: If you are an expert in creating custom projects and want to make your D-day more memorable, then you shouldn't leave any chance to share your creativity side. With the help of the following supplies, you can easily craft your DIY wedding invites:
● Maker cutting machine
● Design Space account
● Cricut cutting mat
● Cricut compatible material
● Engraving tool
● Cricut pen
● Scraper tool
● Tweezer or Scoring Stylus
● Cricut glue gun kit
Visit: Cricut Design Space
install cricut design space app
cricut.com/setup mac
Design Space
Source: design ideas for Cricut Maker
#Cricut Design Space#cricut design space login#cricut design space download#cricut.com/setup mac#cricut design space setup#cricut design space for mac#how to setup cricut explore#cricut design space app#cricut.com/create#cricut explore air 2#cricut.com sign in#Design Space#design ideas for Cricut Maker#install cricut design space app
0 notes
Text
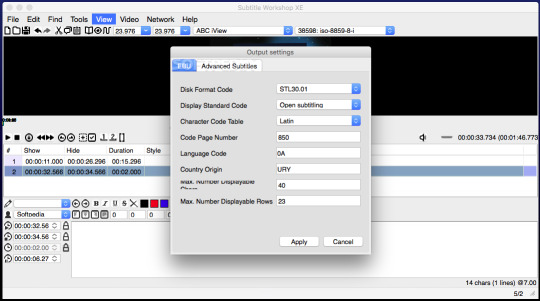
Subtitle Workshop For Mac Free Download

Download subtitle workshop for mac for free. Audio & Video tools downloads - Subtitle Workshop XE by URUWorks and many more programs are available for instant and free download.
Subtitle Workshop. Free subtitle editor. Subtitle Workshop is a free application for creating, editing.
Subtitle Workshop, a free subtitle editor. Official website - download Subtitle Workshop and get Subtitle Workshop news and information. Subtitle Workshop is not available for Mac but there are a few alternatives that runs on macOS with similar functionality. The most popular Mac alternative is Aegisub, which is both free and Open Source. If that doesn't work for you, our users have ranked 23 alternatives to Subtitle Workshop, but unfortunately only two of them are available for.
Download subtitle workshop for mac for free. Audio & Video tools downloads - Subtitle Workshop XE by URUWorks and many more programs are available for instant and free download.

by Kayla Morrison • 2020-02-18 11:29:49 • Proven solutions
Have you ever seen some text script display on the bottom of a video as you watch a movie? The writing texts are known as subtitles, but you can also call them annotations or captions. They are printed translation of the dialogue of a film or video. The subtitles are displayed on the bottom of the video so that they do not interfere or obstruct what you are watching. The commonly used subtitle formats include ASS, SSA, and SRT. Various reasons necessitate the adding of subtitles to MKV. Some of the advantages include:
They are useful in translating foreign language in the movie or video.
It is multilingual thus you can add your native language.
Subtitles can be helpful in transcribing dialogues for easier understanding.
Subtitles can be added as story narrator, clip narrator and caption maker.
If you desire to add subtitles to a video, here we provide 2 tools for your selection-Wondershare UniConverter (originally Wondershare Video Converter Ultimate) and Apowersoft Video Converter Studio. To know the specific operations on how to add subtitles to MKV, read the information contained in this article.
Part 1. How to Add Subtitle to MKV on Mac/Windows Easily
Wondershare UniConverter (originally Wondershare Video Converter Ultimate)
Your Complete Video Toolbox
Edit, enhance & personalize your MKV files
Versatile toolbox combines fix video metadata, GIF maker, cast video to TV, VR converter and screen recorder
Convert to 1000+ formats, like MKV, AVI, MOV, MP4, etc.
Convert to optimized preset for almost all of the devices
30X faster conversion speed than any conventional converters
Burn video to playable DVD with attractive free DVD template
Download or record videos from video sharing sites
Stream your videos from Windows or Mac to other devices, including Chromecast, Roku, Apple TV, Xbox 360 or PS3
Supported OS: Windows 10/8/7/XP/Vista, Mac OS 10.15 (Catalina), 10.14, 10.13, 10.12, 10.11, 10.10, 10.9, 10.8, 10.7, 10.6
Security Verified, 5,942,222 people have downloaded it
Wondershare UniConverter (Originally Wondershare Video Converter Ultimate) is available for both Windows and Mac users, which works perfectly with Windows 10/8/7/XP/Vista and Mac OS X 10.11 (El Capitan), 10.10, 10.9, 10.8, 10.7, 10.6. It's such an amazing tool to add subtitles to MKV that also permits video editing to your preferred adjustments and converts MKV to other 150+ output format for playback.
Step-by-Step Guide to Add Subtitles to MKV on Mac
The steps indicated below shows the procedure for using the Mac version to add subtitles to your MKV video.
Step 1 Import MKV Videos.
Run Wondershare UniConverter (originally Wondershare Video Converter Ultimate), and import your MKV files to the program. You can import files by dragging them and dropping them into the primary window. Alternatively, you can navigate to the top left side of the primary window and click the +Add Files. From there you can locate your MKV file from a browse window that will popup.
Step 2 Add Subtitle to MKV Video.
After you have successfully imported the MKV video that you want to insert the subtitles, click the icon as below to go to the editing window. Go to the top menu and then click the Subtitle tab. From there, you can load the subtitle you want to use such as the SRT, SSA, and ASS using the Triangle button.
Once the subtitle is loaded, you can see it on the MKV video. A preset style will be used by default. You can also customize the color, font, position, size, transparency and any other setting that you want to change in your subtitle. Once you finish making the changes, click the Save button to confirm the settings.
Step 3 Choose MKV output format.
You can stick the subtitle permanently to your MKV video. Just go to the Convert all tasks to and choose the MKV as your output format from the drop-down list. You can also select a device to save your MKV video and play in it directly. Such devices include iPhone, iPad, iPod, and Android smartphone.
Step 4 Start the MKV conversion.
When you have followed all the necessary steps, you can now click the Convert All button to begin the conversion. Once the process is complete, the subtitles will be exported permanently to the specified video format in the Converted section.
Part 2. Add Subtitle to MKV via Apowersoft Video Converter Studio
Apowersoft Video Converter Studio supports the addition of subtitles to MKV videos and allows for various subtitle formats such as SSA, STR, and ASS. The detailed steps are as follows.
Step 1: Install and run the Apowersoft Video Converter Studio on your PC.
Step 2: Add the MKV files by clicking the Add Files button.
Step 3: Edit your MKV video by clicking the Edit button, which will take you to an editing window.
Step 4: Hit the Subtitle icon to add your desired subtitles to MKV video.
Step 5: You can make some adjustments to the added subtitle. For instance, you can change the height, color, position and font.
Step 6: After you comfortable with the settings, you just need to click the OK button.
Step 7: Lastly you can click the ConvertKsp mod manager for mac. button to save the MKV videos with the subtitles.
After trying both tools to add subtitles to MKV video, we noticed that Wondershare UniConverter (originally Wondershare Video Converter Ultimate) works better as it ensures that the subtitles are added permanently without corrupting the quality of the video, whereas Apowersoft interferes with the quality of the final file.
Nothing will ruin a movie quicker than terrible subtitles. They could be totally out of sync or badly translated. Luckily, there is software out there to correct subtitles, such as Subtitle Workshop. If you are keen to edit subtitles, either as an act of personal heroism to share with fellow viewers, or perhaps as part of your job as a translator, editor or sound engineer, then you may already be familiar with this program. It is a nifty application that allows you to edit and create subtitles online. Given the increasing access to quality foreign language films and TV series, this could be a great tool.
Sterling subtitle software for beginners
The ultimate subtitle software for beginners and professionals
Subtitle Workshop is a cross-platform and open-source program for editing, creating and converting subtitles. When it comes to quick, easy and ultra-effective subtitle software, this program is pretty hard to beat. It runs on over 60 platforms, it is highly customizable and best of all, it has an exceptional Preview Mode. According to the developer it has an 'intuitive interface' and 'must have features'. They will say that though! Does it live up to the hype? We’ll take you through some of the highs and look for the lows of this software, to see if it is the best subtitle program for you.
First of all the technology itself. The latest version (SubtitleAPI version 1.05) supports around 56 formats for subtitling, and it can handle both time and frame-based text. You are behind the controls of the timing, thanks to the feature allowing you to upload plain text files. Formats including DVDSubtitle, SAMI, Sonic Scenarist, SubStation Alpha, SubViewer 1 & 2 and TMPlayer are supported. You can read and write various styles and fonts (Wingdings being a possible exception!) so you can have fun and personalize your subtitles.
Subtitle Workshop is known for its famously friendly and intuitive user interface. It was certainly a breeze to install and the in-built features are clear and easy to navigate. If you need to hone in on getting that accurate dialogue and correct spelling, then the Translator Mode gives you spell check with Microsoft Word’s engine (you will need to have Word installed) and you can toggle the 'Insert' and 'Delete' keys for speedy subtitle correcting.
Download Subtitles For Free
If you want to check your progress, simply fire up the Preview Mode, a great feature rare in these programs. In this mode, you can customize the subtitles down to the last 't' – choose the color, perfect the position and even the width of the shadow of the subtitles.
The stylistic corrections are made smooth by the powerful settings. Keep your edits a different color or font style to mark your changes. Browse the configurations and make your editing a walk in the park with the customizable automated checks. In a nutshell, this software will let you tailor make your subtitles down to the spacing, position, color font and more. It is simple, powerful and free. What is there not to like?
At the time of writing, Subtitle Workshop will not allow you to edit Chinese, Japanese or Korean subtitles (although Arabic has now been added).
Where can you run this program?
Subtitle Workshop is a cross-platform software. It is primarily used for Windows. With the trend towards mobile there is talk of developing a version for iOS and Android smartphones but this is still in the pipeline. As for the formats supported by Subtitle Workshop, it has to be handed to them that outside of the mega expensive programs used by companies this all-in-one package supports an impressive 60 plus subtitle formats.
Is there a better alternative?
While Subtitle Workshop is one of the best known and best-loved apps for efficient, highly configurable and (intuitive) editing, it is not the best. For lightning fast processing and feature-rich subtitle tools for your armory, then check out MovieCaptioner and FinalSub. They both have a commercial license, they run on Windows and MacOS and each one supports a variety of formats. Be prepared to pay the price however, these professional programs don’t come cheap. For budget alternatives, Oona Tools can be used for outsourcing your subtitles and translations for both professional and personal use. For a totally free option, check out fellow freeware N!kse.se Subtitle Edit. This is basically just like Subtitle Workshop but with more enhanced and complex features. Aegisub and Sublight also deserve honorable mentions.
Our take
With the giants of Netflix and others dominating our living rooms, unwinding in front of a movie or TV series is becoming a pretty cherished part of the evening. With access to cinema from around the world, bad subtitles are holding us back from some epic foreign language options. With Subtitle Workshop you can take ownership of the subtitles yourself. Creating subtitles is made easy, thanks to the automated timing corrections, in-built spell checker and the highly useful preview mode. Whether you are looking for software for personal or professional use, this is a great program for creating bespoke subtitles in a stream-lined and intuitive interface. Plus, you can share them with the world afterwards.
Should you download it?
Subtitle Workshop For Mac


Subtitle Workshop 6
Yes. If you are looking to create or edit subtitles for video, then Subtitle Workshop is a fantastic and comprehensive program. The controls are easy to use, and the user manual is a great guide for beginners. Professionals needing more complex features should look at alternatives like Subtitle Edit, but for the simple subtitle creation, this ticks all the boxes. Go ahead and download it and see for yourself.
6.0a
2 notes
·
View notes
Text
Watch Movies Online and Bring the Stars to Your Home

Watching movies is always fun and watching it at the comfort of our home is always an added bonus. However, people always whirl around sites to search for the accurate portal which will enable them to watch movies online.
Generally, common surfers don't have a clue about how to watch movies online. Actually, the process is pretty simple and anyone can access the online movies if they have a PC or laptop and a high speed internet connection. Moreover, apart from movies, a movie buff can even watch latest movie trailers online, surf through the categories of Movie titles, check out the box office blockbusters, showtimings of nearby theatres and an online database or storehouse of movie collection. It's a Pandora's Box out there with online movie portals, just check in what it has in store for you.
Internet is the resource tool for all online movie portals. Since internet broadband, DSL, modem etc. have become household names; they have reticulated into all of our daily lives and one of such benefits which you can reap from it is watching online movies. Yes...now watching cinema is not only limited to theatres or televisions, but with internet connectivity, you can enjoy the latest blockbuster collection in your drawing room. Whenever a new movie hit the theatres, people sit in front of the giant screen, with a tub of popcorn in their hand but a boat load of money goes away.
Instead, when you watch movies online you can experience the same movie on an HD quality picture and dolby surround sound within the comfort of your home by paying just few dollars (much less than what you pay at the theatres). Moreover, when you access the online movie portals, you are even served with additional features apart from the movie. You can even watch latest movie trailers online, star interviews, conduct ดูหนังออนไลน์ online bookings and can access the show timings as well. Even when you book a movie title against a minimum payment from a long list of categories; you get to read the editorial reviews of that particular movie before buying. Thus for customers it's always a win-win situation and the quality of the print and sound is far ahead than a CD or a DVD.
The most important technical factor to watch movies online is that there is no need to burn anything, no need of streaming any video. Rather the process is simple, where you can need to log in and against a small payment, you can get the titles to watch. However, watching movies do have certain instructions to follow. So here are some of the short and precise instructions which would help you to access movies online.
o Read the reviews of video-on-demands and rate the services o Compare the sites and check the navigating and accessibility issues o Browse the site and select the movies o Find out whether the site is a rental site or not o Check out the prices of the titles o Check that whether movie player need to be downloaded
1 note
·
View note
Text
Easy Animation Maker Video Methods - Insights
Some courses can be detail-heavy and great deals of text. At the end of the course, or between modules, the essence of the course can be recorded through a brief, easily-retainable animation. If your organization is seeking to introduce new procedures or changes, white boards animation is an engaging method to get your point across. Similar to the above point, whiteboard animation can help make effective demonstrations. An animation does and relaxes the audience away with the stiff procedure most discovering courses struggle with. It isn't always possible to reveal videos or obtain genuine images. In such a scenario, whiteboard animation can help students. By making maximum use of whiteboard animation, you can perk up your course content and make it more engaging. Any likely pain with the changes can be overcome by engaging animation. Being able to 'see' assists students to understand the process better. If your course has to impart the understanding of processes, such as the working or assembling of a piece of equipment, a demonstration works much better than still images. Most learning procedures can be dull, uninteresting and normal.
2D Animation has lots of advantages if used in innovative education. Animations are becoming famous in both education and personal life. Since 2d animation includes an amusing experience in education, most of the teachers use 2d animation to match their lecture. In addition, you can use voice, photos, action, and files to apply and develop an extra-ordinary topic or resolve the troublesome Best Online Animation Maker subject matters using 2D animation. 2D Animation is being used in school since it makes lessons understandable and it can be developed at a really low cost. Although some teachers are confused about the effectiveness of 2D Animation in education, some teachers like using 2d animation. You can utilize 2d Animation to teach over a wide variety of subjects. You can refine complex ideas specifically with a fascinating 2D animation. 2D Animation is especially beneficial to discover complicated theories. The specialized of 2D Animation is that it is amazingly versatile, and it does not set any limitations on creativity. 2D animation is becoming an effective method of learning.
Everyone is video literate and can comprehend excellent things when they see it. The function is bound to be fulfilled with the quality of our Video production like other successful marketing campaigns in the past. We will channelize that basic love for a video that represents the visual aspect of life that suggests presence.
Experts who are used to working on business tasks are mindful of these caution indications in advance. Caitlyn Bell is an Arts student whose experiences in life make her really harder than anybody else. She can lend you skilled tips on varied topics ranging from relationship to style, making money, health and so on.
3D animation is quick becoming the go-to approach of video production for lots of different types of services. Maybe the biggest benefit to utilizing 3D animation for your company is that your message, your logo, your whole company kind of comes to life. Marketing is the most visible method that graphic animation can be utilized by an organization.
Would not it be more effective for the animation to flow the object? You can do this using the wheel animation. Of course, the simple method is to place a circle and utilize the input animation View or Fade.
Most of licensed removal specialists equip their clients with full-fledged insurance coverage for safeguarding their belongings during transit. Making the decision by requesting a single quote from among the removalists is another error primarily made by entrepreneurs. The license serves as a proof that the company has suitable legal permit for using the related service to clients. Consider a removal expert who provides guarantee and assurance service in addition to is preferably the very best one to select. Therefore, you should always look for skilled experts while assigning the task of home removals in Sydney. The numbers of years the company has been into the business speaks a lot about just how much credible they remain in providing competent service. With a significant work experience, the removalists gain adequate understanding and understanding on how to deliver the very best service to clients. As a wiser individual, you should consider a number of quotes from different removalists and compare them for making the ideal decision.
Are you confused of picking the ideal expert from your list of shortlisted removalists? Comprehensive marketing research to have a reasonable understanding of what things you need to ideally look for in your potential removalist is important. Do they use suitable packaging services, or they will supply you the packaging essentials and you need to do it yourself? Following here we would discuss about what sort of concerns must you ask to choose the best removalist in Sydney. Asking the ideal question to removalists is an identifying element for safe, secured, hassle-free relocation of your house. How all my belongings will be moved? Here are a few of them explained to you. What are the alternatives in regards to carrying vehicle on which you require to move your belongings? Depending upon your moving date, type of belongings you require to move with, and the range you would be travelling, the removalist must develop a specific plan on how whatever will be moved from your old home to the brand-new location. With appealing quotes provided by every other removal company, you might deal with a great deal of difficulty in picking the most reliable elimination expert for your house relocation.
A correct understanding of numerous software application used to modifying is really important.With animation videos and videos in other formats like 2D and 3D is becoming more widespread the role of the video editor has actually become more essential. Looking at the importance of a video editor in the overall marketing content creation effort hiring process of a video editor ought to be really robust and should be done in line with the marketing calendar. Need to have knowledge of the newest technology and different tools that is being used to modify a video.
The impacts of 3d animation on leads generation and organization development can not be overlooked. 3D animation videos from a good animation providers offer items to be readily available the whole day and throughout the year. An answer to these inquiries will help in a better understanding of the subsequent point. It is ready to explain the highlights of the product or services at a look. It additionally fills out as a kind of entertainment to anticipating clients, as a result, boost item sales. Here are 5 methods 3d animation is affecting business growth and producing leads. It provides products to be launched on great deals of platforms at a time thus increasing service engagement. The moment the animation to showcase the item to the customer independent of their area is made and published on the web, it gets offered all the time. 3D animation videos make to present your business services and products magnificently.
You can perfectly use aesthetically developed expert templates for developing abundant, attractive video animations. In other animation software application and tools, you might have stumbled in the workflow to develop an appealing video. You have the liberty to pick excellent-quality animation from a prolific library that Viddyoze provides.
In case you require an additional piece of furnishings for a new employee, you can use one from other departments. Today, you can find chairs made up of wood, metal, plastic, and a mix of different products. For offices and other commercial requirements, it is necessary to acquiring durable furniture products.
Fun fact: They have an unique name for their Demo Videos ... This video animation company creates three types of content: explainer videos, interactive videos, and screen-recorded videos! They've been on the market given that 2011, and since then, they've ended up being one of the leading animation studios, making hundreds of animated videos for businesses all the way from their workplace in England. They put their focus on modifications: they use limitless modifications in every phase of the animation production procedure, and they use set prices for every type of client, to make sure that each of their company animated videos gets the exact same quality.
The last stage of the animation is the post-production phase. You have gotten some details concerning the process and to find out 2d animation you need to get yourself signed up to an institute. In one word, the post-production phase comprises of both, modifying the video as well as the audio with the extra results of course.
When browsing for a relevant video production business you will find stuff that are imperative that you keep in mind off. A launch video business need to also invest on marketing. That is truly the most reliable tool allowing everyone realize that you're the brand-new prospect within the competitive entire world of video production which your primary goal must be to make competition tight.
Relocating of a business space is a far more gruelling procedure for companies and so they require the most efficient removalist in Sydney to cope with all ordeals. Further, relocating is not a great concept for business due to the fact that it can be disruptive to the service. Loads of jobs included in the process make it truly tiring.
Viral Art: Today, a whiteboard animation video is recognized as a piece of art in the digital world. Educational: As is the standard, animation videos constantly use something various from the norm i.e. they educate the masses in an 'out-of-the-box' way. Cherishing and Charming Experience: It is a known function of white boards animation that it creates a wonderful pleasant user experience that is worth remembering and cherishing.
youtube
Given that 2d animation adds an amusing experience in education, many of the instructors use 2d animation to complement their lecture. Some instructors are puzzled about the effectiveness of 2D Animation in education, some teachers like the usage of 2d animation. A proper knowledge of different software utilized to modifying is extremely important.With animation videos and videos in other formats like 2D and 3D is ending up being more widespread the function of the video editor has actually become more crucial. 3D animation videos from a great animation services provider provide items to be offered the whole day and throughout the year. Fun fact: They have a special name for their Demo Videos ... This video animation company produces 3 types of material: explainer videos, interactive videos, and screen-recorded videos!
1 note
·
View note
Text
How to Use Cricut Explore Air 2: An Easy Guide
Isn’t it fun to create your first-ever crafting project using the Cricut machine? I am a professional crafter, and I had the same feeling when I made my first craft. Creating projects with a Cricut machine is easy. But, if you are a novice, then you might need some guidance.
To help you with that, I will share all the fundamental knowledge on how to use Cricut Explore Air 2. In addition, I will tell you about the setup of the Cricut Explore machine, supply requirements, and a step-by-step guide to making a project. So, keep reading this specific blog post till the end to learn every step thoroughly.
How to Set up a Cricut Explore Air 2 Machine?
Before you learn to use Cricut Explore Air 2, it is necessary to learn the setup process. Here is how to do that.
For the first step, you have to unbox your Explore Air 2 machine and turn it on.
After that, keep the machine within 10-15 feet range of the device you want to connect to.
Next, you have to connect both devices using the USB cable or Bluetooth compatibility.
Now, download and install the Cricut Design Space app on your PC/smartphone.
And then, open the Cricut app and log in with your account.
To complete your Cricut machine setup, choose the Machine Setup option.
Now, your device will scan for your machine name and show it on the display.
Click on the Cricut Explore Air 2 machine option to complete the setup process.
If you are having any issues with your machine setup, then you can connect to brand customer care or seek experts. They can provide you with a comprehensive guide on how to use Cricut Explore Air 2.
What Supplies Are Required to Make a Project on Cricut Explore Air 2?
Here are the essential supplies requirements you should gather before you start working on your project. Here is the list of supplies you need to make.
Cricut Explore Air 2 machine
Design Space app
Cricut cutting machine
Vinyl
While blank mug
Weeding tool
Transfer tape and others.
How to Use Cricut Explore Air 2 for Creating a Project?
After your Cricut Explore Air 2 Machine setup and gathering all the essential supplies, you can jump right to the steps of making the project. Here is the stepwise guide you need to follow for that.
Step 1: Making a Design
Firstly, launch the Cricut Design app on your computer or smartphone.
After that, insert a design into a fresh canvas.
Next, search for the picture of the coffee mug by going to the Image section.
And then, bring the design to your cup and align it according to your choice.
Once your design is complete then, choose the Make It option to send the design for cutting.
Next, choose the machine name and materials on the screen to move forward.
Step 2: Cutting the Design on Your Cricut Explore Air 2
Now, take the chosen material (vinyl) and place it on your cutting mat.
After that, load the mat to your cutting machine properly, as shown in the below image.
Next, choose the option to start the cutting procedure.
Afterward, wait for the cutting process to complete.
Now, use the weeding tools to remove the extra parts from your cut vinyl design.
Step 3: Apply the Design to Your Blank Cup
Once the design cut is complete, please attach it to the transfer tape.
Now, if you need to apply the design to your black cup and use the scraper tool, stick it perfectly.
After that, remove the transfer tape from the product.
Here you go! Your first-ever Cricut project is complete.
Frequently Asked Questions
How to Use Pen on Cricut Explore Air 2?
These are the steps you need to follow to use a pen with the Explore Air 2 machine.
On the Cricut app, you have to choose a design that you want to draw on a product.
After that, send the design to your cutting machine to draw.
When the display tells you to attract the Cricut pen, then insert the pen in clamp A.
Also, load the paper on the machine to draw or write on it.
Then, select the option to start the process.
Wait for the process to finish and then unload the design.
Finally, you can use the design for further processes.
What Projects Can I Make With Cricut Explore Air 2?
There are a plethora of projects you can make with your Explore Air 2 machine. Making projects with the Explore Air 2 machine is easy and fun. Here are some quick DIY projects you can try on your Cricut Explore machine.
Takeaway Pie Boxes
Cake Toppers
Banners
Vinyl Face Planters
Customized T-shirts
Personalized Hoodies
Metal Earring
Leather Keychain
Etch Glass
Board signs, and others.
What Devices Are Compatible With Cricut Explore Air 2?
Cricut Explore Air 2 is a versatile cutting tool that is compatible with various devices. It offers wired and wireless connections to your computer and smartphone. It seamlessly connects to Mac, Windows, iOS, and Android devices. Plus, to complete the machine setup process, you need to download the compatible app Cricut Design Space. If you want to learn how to use Cricut Explore Air 2, then go to the brand website or connect to the customer support team.
0 notes
Text
my favorite TS2′s mods
Credit due to all the amazing modders who took time to create these amazing mods. None of these are mine. Also, shoutout to pleasantsims who made an amazing list filled with so many essential mods for a better game. Most of the ones i use are from that list.
Anti-Corruption Mods; mods that will help you prevent neighborhood corruption. these are a must have!!
No Corrupt Death : suppresses the corrupt death memory.
No unlink on delete : when moving tombstones, the game no longer deletes the sim in question.
Anti-Redundancy : elimnates spawning of unnecessary redundant NPCs.
Sim Blender : ultimate sims 2 management item ; acts like a "god" / IS A MUST HAVE.
Toddlers:
Baby bottle replacement : replaces the ugly green bottle with a clear one filled with milk.
Accessible toddler high chair : global mod that allows sims to access any high chair from left & right sides. custom chairs work as well.
Build & Buy Mode:
OMSPs : allows you to place more decorative objects in more places.
Rug Texture Fix : fixes the wonky ugly textures that happen to rugs when places off-grid in game.
Television Placement Mod : allows you to adjust the placement of tvs, can be moved up and down on walls like paintings.
Walk-Through Blocks : allows sims to walk around and through objects; useful for small lots.
Business Mods:
Business Mod : fixes a ton of issues with Open for Business. Get this only if you're interested in starting a business with your sim.
Townie Budget Mod : townies no longer are able to pay for things they cannot afford. adds to realism.
Computer Mod:
Monique's Hacked Computer : allows online shopping, sims to have bank accounts, and much more.
Education Mods:
Semester Changes : makes University 8 days instead of 24; if you're interested in making semesters smaller for faster playthrough
Faster Homework : finish homework in 15 minutes instead of an hour.
Fix Mods:
Extended Family treated as Family : allows the game to recognize second cousins, first cousins once removed, great grandparents, great grandchildren, and great aunts and uncles as family members. No more dating distant relatives!
No Sim Loaded : removes useless “sim loaded” tokens and other garbage that slows down your game and causes lag.
Pescado’s Apartment Hack : fixes a lot of issues with apartments.
Smart Beds : forces the bed ownership system in the game to actually work. Sims will autonomously use the bed they have the most ownership of.
Hobby Mod:
Professional Blogger : sims who have maxed out enthusiasm in a hobby will earn money during the time they blog.
Job Mod:
Level Numbers Added to Job Titles : adds the job level next to the job title in menu screens. Very handy for quickly seeing what level your Sim is at in their career.
Memory Mods:
Memory Manipulator : the Memory Manipulator allows you to edit the memories of the currently selected sim. Now you can edit memories directly through an in-game menu
Met New Great Grandchild Memory : this mod gives the memory of meeting a new great grandchild.
Misc Mods:
Watch TV from All Chairs : allows your Sims to watch TV from chairs facing any direction at least 10 squares back from the TV – even if they’re facing sideways or at 45-degree angles.
Marriage Last Name Chooser : allows you to choose the last name of two Sims getting married.
Camera Mod:
Gunmod’s Camera Mod : necessary to view your skies and skylines. Allows you to view the far edges of your hood and have a top-down view, plus many more camera angles.
Pregnancy Mods:
Pregnancy Relationship Change : for when a sim’s pregnancy first shows and those around her realize she’s pregnant. Allows a Sim to figure out a baby is not “his” if he has high enough logic skill points.
Quiet Pregnancy : no longer get the pregnancy chimes after try for baby. Pregnancies will be a surprise!
Young Adults Can Enjoy Maternity : this is a suite of mods that allows your Young Adults to get pregnant and have babies in University, plus a host of other functions.
Relationship Mods:
Autonomous Casual Romance (ACR) – allows your Sims to autonomously woohoo, try for baby, make booty calls, and perform a whole host of romantic interactions. gives your Sims more freedom to make their own romantic decisions and creates a lot of drama and fun in your neighborhood. Highly recommended! It's one of my favorite mods.
Just Be Friends Social : teens and up can ask romantic interests to “just be friends,” and then all crush/love flags between them get cleared.
Skill Mod:
Comm Skilling : controlled sims, NPCs, and townies may gain skills while visiting community lots. Enthusiasm may now be gained on community lots and while visiting.
Townie Mods:
Townie Body Diversity : any spawned townies have a chance of being either fat or fit. Every Sim is no longer thin.
Townie Move-In No Memory Loss : townies will keep all their memories when moving into a playable household.
Must Have Tools:
Sims2Pack Clean Installer : Sims2Pack Clean Installer is a tool, mainly for lots. It categorizes, catalog, and removes content, as well as preview files before installing.
Bulk Rename Utility : Software that lets you rename files ; a lot of package files come with ( ) , [ ] , +, - and even _, files with different symbols can make the game take longer to read and therefore taking more time to load.(if help is needed, leave something on my ask, i’ll help you)
The Compressionizer : let's you compact all your custom content, making them smaller in size.
8 notes
·
View notes
Text
Vidtoon Bonus
Vidtoon Review - DISCOUNT + HUGE BONUS + OTOS + DEMO
youtube
When you purchase vidtoons, email me at: support @ bowesmarketingllc.com and provide your receipt and I will send you a link for the massive bonus of Video Traffic Viper. < iframe width=" 560" height= "315" src=" https://youtu.be/WfIjLtn3VZg" frameborder =" 0" allow =" accelerometer; autoplay; encrypted-media; gyroscope; picture-in-picture" allowfullscreen > Click here to purchase vidtoon. This will make your video marketing explode! It's a known fact that video is the # 1 consumed content on-line. So if you are not using it in your marketing, you definitely need to start.
But the question is, "what type of video is effective when it comes to video marketing exactly?" Simple.
Animated videos. And this brand new tool can help you make them fast! See, animated videos combine the audio & & visual element together in a way that taps into our imagination. And when that happens, you marketing message will be more effective. But also, if I am being honest, creating animated videos can take forever.
You are dealing with character creation, character animation, key frames, and a whole host of other tech stuff that can stump even some of the most gifted technological people on the planet! But that's not the case with VidToon.
By using VidToon, you can pump out animated videos fast for any marketing idea or campaigns you have.
Vidtoon Review ⭐️⭐️⭐️ Massive bonuses - YouTube
You simply drag & & drop your elements where you want on the screen. There are no grids to lock you in place. You can have perfect pixel placement (try saying that 5X fast) of any object wherever you want. Plus you will receive a number of media elements included with VidToon when you pick up your copy today.
There are 25 animated characters, 250 graphic elements, 35 HD backgrounds, transitions, text to speech options, 200 royalty free music tracks and much more!
VidToon Review – Don't Buy Vid Toon Software Until You Read This!
But you will need to move quickly because VidToon is only available for a low one time investment for a limited time. You are going to love this software. I guarantee it. Fast Fresh Animated Video Software Video is hot.
vidtoon review + Bonus-- The Best Drag and Drop Video ...
animated video? Hot and now, OH So Simple! With VidToon you can make toon-style videos to grab your viewers attention with a lot of amazing features: [+] Inbuilt library with 34 HD backgrounds, 25 HD characters each with 30 different animations [+] Import your own backgrounds, images and more [+] 200+ royalty free music tracks Easy desktop installation – works on both Pc and mac [+] Free or Realistic Google TTS, Text 2 Speech [+] Works in any language or niche [+] Record or import your own voice over in the app [+] Transition and effects, flip or move objects from A to B [+] SO MUCH MORE…!!! This is something your subscribers will use over and over again – and with no hosting fees there are basically no limits to what they can create with this! Do not Beat ‘Em! Repeat Them & Make Your Traffic Profitable Again Facebook + Insta Ads, eCom Stores, Sales Promo’s + More!
Automate collection of visitor & & customer feedback and use it to make more sales. Instead of competing with the a large number of eCom stores & & millions of online business out there, you can turn what they are saying into profits for repeat customers over and over again. Building Lists. Build bigger lists easily. Works seamlessly with all major auto responder plus Zapier connections for lesser known platforms. Local/Offline.
Automatically engage your client's audience with a special sale, coupon, featured product & & verified customer sales proof. e-commerce. Connect to Shopify (or any other ecom platform) & & display real product reviews and targeted proof, automatically! Facebook Ads. Automatically turn each of your product reviews into perfectly formatted ads you can import to Facebook & & Instagram. Sales Promo's. Use irresistable scratch and reveal widget displaying coupons or popups when a customer claims your bonus offer etc…….
Vidtoon Review & Bonuses - YouTube
Much More …. With 14 campaign types and endless display options, Funnel Base is the very best and only social proof tool you'll ever need! WITH AMAZON AS OUR "KNOWLEDGE-JACKING" TARGET WHAT DO WE KNOW?
Amazon Is HUGE! Customer reviews and massive social proof build trust (and traffic). They are browsing reviews, customer feedback and star ratings to guide their spending choices.
Nearly 1/4 of all buyers do not even KNOW what they want to buy until they see it. They are browsing reviews, customer feedback and star ratings to guide their spending choices. YOU DON'T NEED TO BE NEIL DEGRASSE TYSON TO KNOW THIS. Using Real Reviews and Customer Proof. NOT Using Real Reviews and Customer Proof.
For Traffic, Leads, Sales and Conversions. Funnel Base is the ultimate solution for everybody from complete newbie, to seasoned marketer in any niche, to any audience. Just starting out? Activate our traffic building modules, build your lists & & social media traffic. Already got a small social or e-mail audience?
Activate our social proof modules to snowball registrations into sales.
Already making sales? Activate review modules, with 71% of people happy to leave a review all you need to do is ask them. 100% Cloud Based, Simple to use and set up on any page, no technical skills required. Traffic Driving Software Turns a couple of clicks into hundreds so they in turn, create more traffic for you.
VidToon Review + Bonus – The Best Drag and Drop Video ...
Lead Generating Tool Captures & & simplifies building lists so you can focus on more fun things (like making sales!). Sales Closing Automation Send requests to people who sign up to leave reviews, adding valueable social proof. And SO MUCH MORE making this an unique and refreshing breakthrough in making more sales on-line. New, fresh and NOW! Increasing Sales Is Easy As 1, 2, 3! Turning your pages into conversion machines. #Step 1: Activate.
Build bigger lists easily. Works seamlessly with all major auto responder plus Zapier connections for lesser known platforms. #Step 2: Customise. Automatically engage your client's audience with a special sale, coupon, featured product and verified customer sales proof. #Step 3: Automate. Connect to Shopify, JVZoo or any other service & & display real product reviews and targeted proof, as they happen.
Booster Type # 1: Proof. When you think of social proof widgets, this is the most common type you will see on many of the high traffic websites, like Amazon or even many popular JVZoo products.
You will see an animated pop-up, displaying the details of a verified customer or person who has registered. What is a little less common, that you will now be able to do – – is to display reviews, randomising between star ratings or written testimonials – – or even video testimonials recorded directly in the person's browser. Booster Type # 2: Leads.
The money is and always will be in the list. With Funnel Base you can place stunning optin forms in your widget, created to match your web site. You can even add countdown timers for extra urgency, or if you would like to build a list of mobile phone numbers you can do that too, which is great for off-line clients and local businesses.
Booster Type # 3: Retention.
Vidtoon Review | Massive bonuses Demo and tutorial
Funnel Base helps get people to your website and make them want to stay there using these highly engaging retention tools. Set up a scratch & & win campaign that works as an interactive sales booster, or prompt people to share your page with the social share selection. Or if you want to get great results, use the emoji feedback or score feedback types.
Booster Type # 4: Information. Want a fast pop-up, encouraging people to click & & take action? Then this is for you! You can use these to advertise a special down load, an affiliate promotion or display a video too. Or, if you need a cookie notification or to add some more info to engage people at exactly the right time… … then you will love our information options.
vidtoon review|Massive bonuses Demo and tutorial
All products have upsells and so does this one. But buying or not, the choice is ultimately yours.
Customers receive:. OTO2: VidToon Job Finder Software ($ 47 one-time). VidToon Job Finder tool enables users to find top paying customers to sell 2D videos, or any other service the customer is selling or use Fiverr to establish an arbitrage business where customers can get high paying client & & outsource the work. Unity source code for VidToon to customise and sell.
3 notes
·
View notes
Text
Vidtoon Review & Bonuses
Vidtoon Review - DISCOUNT + HUGE BONUS + OTOS + DEMO
youtube
When you purchase vidtoons, email me at: support @ bowesmarketingllc.com and provide your receipt and I will send you a link for the massive bonus of Video Traffic Viper. < iframe width=" 560" height= "315" src=" https://youtu.be/WfIjLtn3VZg" frameborder =" 0" allow =" accelerometer; autoplay; encrypted-media; gyroscope; picture-in-picture" allowfullscreen > Click here to purchase vidtoon. This will make your video marketing explode! It's a known fact that video is the # 1 consumed content on-line. So if you are not using it in your marketing, you definitely need to start.
But the question is, "what type of video is effective when it comes to video marketing exactly?" Simple.
Animated videos. And this brand new tool can help you make them fast! See, animated videos combine the audio & & visual element together in a way that taps into our imagination. And when that happens, you marketing message will be more effective. But also, if I am being honest, creating animated videos can take forever.
You are dealing with character creation, character animation, key frames, and a whole host of other tech stuff that can stump even some of the most gifted technological people on the planet! But that's not the case with VidToon.
By using VidToon, you can pump out animated videos fast for any marketing idea or campaigns you have.
Vidtoon Review ⭐️⭐️⭐️ Massive bonuses - YouTube
You simply drag & & drop your elements where you want on the screen. There are no grids to lock you in place. You can have perfect pixel placement (try saying that 5X fast) of any object wherever you want. Plus you will receive a number of media elements included with VidToon when you pick up your copy today.
There are 25 animated characters, 250 graphic elements, 35 HD backgrounds, transitions, text to speech options, 200 royalty free music tracks and much more!
VidToon Review – Don't Buy Vid Toon Software Until You Read This!
But you will need to move quickly because VidToon is only available for a low one time investment for a limited time. You are going to love this software. I guarantee it. Fast Fresh Animated Video Software Video is hot.
vidtoon review + Reward-- The Best Drag and Drop Video ...
animated video? Hot and now, OH So Simple! With VidToon you can make toon-style videos to grab your viewers attention with a lot of incredible features: [+] Inbuilt library with 34 HD backgrounds, 25 HD characters each with 30 different animations [+] Import your own backgrounds, images and more [+] 200+ royalty free music tracks Easy desktop installation – works on both Pc and mac [+] Free or Realistic Google TTS, Text 2 Speech [+] Works in any language or niche [+] Record or import your own voice over in the app [+] Transition and effects, flip or move objects from A to B [+] SO MUCH MORE…!!! This is something your subscribers will use over and over again – and with no hosting fees there are basically no limits to what they can create with this! Do not Beat ‘Em! Repeat Them & Make Your Traffic Profitable Again Facebook + Insta Ads, eCom Stores, Sales Promo’s + More!
Automate collection of visitor & & customer feedback and use it to make more sales. Instead of competing with the a large number of eCom stores & & millions of online business out there, you can turn what they are saying into profits for repeat customers over and over again. Building Lists. Build bigger lists easily. Works seamlessly with all major auto responder plus Zapier connections for lesser known platforms. Local/Offline.
Automatically engage your client's audience with a special sale, coupon, featured product & & verified customer sales proof. e-commerce. Connect to Shopify (or any other ecom platform) & & display real product reviews and targeted proof, automatically! Facebook Ads. Automatically turn each of your product reviews into perfectly formatted ads you can import to Facebook & & Instagram. Sales Promo's. Use irresistable scratch and reveal widget displaying coupons or popups when a customer claims your bonus offer etc…….
Vidtoon Review & Bonuses - YouTube
Much More …. With 14 campaign types and endless display options, Funnel Base is the very best and only social proof tool you'll ever need! WITH AMAZON AS OUR "KNOWLEDGE-JACKING" TARGET WHAT DO WE KNOW?
Amazon Is HUGE! Customer reviews and massive social proof build trust (and traffic). They are browsing reviews, customer feedback and star ratings to guide their spending choices.
Nearly 1/4 of all buyers do not even KNOW what they want to buy until they see it. They are browsing reviews, customer feedback and star ratings to guide their spending choices. YOU DON'T NEED TO BE NEIL DEGRASSE TYSON TO KNOW THIS. Using Real Reviews and Customer Proof. NOT Using Real Reviews and Customer Proof.
For Traffic, Leads, Sales and Conversions. Funnel Base is the ultimate solution for everybody from complete newbie, to seasoned marketer in any niche, to any audience. Just starting out? Activate our traffic building modules, build your lists & & social media traffic. Already got a small social or e-mail audience?
Activate our social proof modules to snowball registrations into sales.
Already making sales? Activate review modules, with 71% of people happy to leave a review all you need to do is ask them. 100% Cloud Based, Simple to use and set up on any page, no technical skills required. Traffic Driving Software Turns a couple of clicks into hundreds so they in turn, create more traffic for you.
VidToon Review + Bonus – The Best Drag and Drop Video ...
Lead Generating Tool Captures & & simplifies building lists so you can focus on more fun things (like making sales!). Sales Closing Automation Send requests to people who sign up to leave reviews, adding valueable social proof. And SO MUCH MORE making this an unique and refreshing breakthrough in making more sales on-line. New, fresh and NOW! Increasing Sales Is Easy As 1, 2, 3! Turning your pages into conversion machines. #Step 1: Activate.
Build bigger lists easily. Works seamlessly with all major auto responder plus Zapier connections for lesser known platforms. #Step 2: Customise. Automatically engage your client's audience with a special sale, coupon, featured product and verified customer sales proof. #Step 3: Automate. Connect to Shopify, JVZoo or any other service & & display real product reviews and targeted proof, as they happen.
Booster Type # 1: Proof. When you think of social proof widgets, this is the most common type you will see on many of the high traffic websites, like Amazon or even many popular JVZoo products.
You will see an animated pop-up, displaying the details of a verified customer or person who has registered. What is a little less common, that you will now be able to do – – is to display reviews, randomising between star ratings or written testimonials – – or even video testimonials recorded directly in the person's browser. Booster Type # 2: Leads.
The money is and always will be in the list. With Funnel Base you can place stunning optin forms in your widget, created to match your web site. You can even add countdown timers for extra urgency, or if you would like to build a list of mobile phone numbers you can do that too, which is great for off-line clients and local businesses.
Booster Type # 3: Retention.
Vidtoon Review | Massive bonuses Demo and tutorial
Funnel Base helps get people to your website and make them want to stay there using these highly engaging retention tools. Set up a scratch & & win campaign that works as an interactive sales booster, or prompt people to share your page with the social share selection. Or if you want to get great results, use the emoji feedback or score feedback types.
Booster Type # 4: Information. Want a fast pop-up, encouraging people to click & & take action? Then this is for you! You can use these to advertise a special down load, an affiliate promotion or display a video too. Or, if you need a cookie notification or to add some more info to engage people at exactly the right time… … then you will love our information options.
vidtoon review|Massive rewards Demo and tutorial
All products have upsells and so does this one. But buying or not, the choice is ultimately yours.
Customers receive:. OTO2: VidToon Job Finder Software ($ 47 one-time). VidToon Job Finder tool enables users to find top paying customers to sell 2D videos, or any other service the customer is selling or use Fiverr to establish an arbitrage business where customers can get high paying client & & outsource the work. Unity source code for VidToon to customise and sell.
2 notes
·
View notes