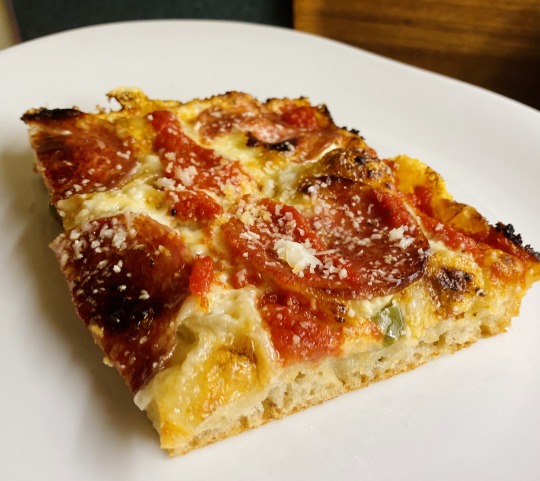
#then to start on the crust/spread on sauce/add a lot of cheese and toppings
Note
You don't like thin crust pizza? It can be so yummy though with lots of cheese...
god no i hate it, my favorite part of the pizza is the crust so when the crust is barely nonexistent i just get all the sauce flavor instead (I hate tomato sauce- it's delicious in pizza but only when the bread and cheese balances it out. too acidic and strong). A good pizza is one with a thick fluffy crust that soaks up all the sauce so you get a nice balanced mix of toasted bread, spices from the sauce and pepperoni, and all that cheesy goodness. thin crust pizza throws the balance out of place and thus fucking sucks
#deepdish is godtier#anon#reply#plus the more crust you have the more surface area you have for toppings which is perfect#my fav thing to do when making pizza is to make a fluffy dough#then to start on the crust/spread on sauce/add a lot of cheese and toppings#and then continue to roll up the crust so its got a center of cheese and toppings#then when its all fluffed up outta the oven you put garlic butter on it and its perfect
10 notes
·
View notes
Text
So, I have perfected the absolute perfect homemade Mac n cheese. The perfect balance of effort to results. Everyone who has ever tried it has loved it. I am now sharing this incredible power with you gamers
Good Mac N Cheese
Total Cook Time: 40-60min
Hardware Needed
-Stove with 2 burners
-Large saucepan with lid
-Skillet
-Cheese Grater
-Small Casserole Dish
-Bowl
Ingredients
-1 box pasta
-1 jar alfredo sauce
-Panko bread crumbs
-all of the cheese in your fridge (very important)
-1 slice american cheese product
-kosher salt
-cornstarch
-salted butter
-sodium citrate (optional)
-beer (optional)
-spices: onion & garlic powder, black pepper, cayenne pepper, mustard powder, anything else you want
Directions
-Pinch of salt in the saucepan, add water (less than you think!), start boil on high heat.
-While you wait, put a pad of butter in the skillet over medium heat
-Once the butter stops foaming, add as many breadcrumbs as you want. Stir until no visible butter remains and crumbs move freely in pan. Spread evenly and toast, flipping (like a pancake, easier than it sounds) every little bit until most of the crumbs are kinda brown. empty into bowl.
-Once the water is boiling, turn heat to medium, add pasta, and cook for 2-4min less than the box instructions say.
-While you wait, put the cheese grater in the casserole dish and grate your cheese. Any kind at all is fine, the more flavorful the better. Don’t worry if it will melt well. Use a lot.
-Mix in a bit of cornstarch and sodium citrate into the cheese with your hands, until none of the cheese gratings are sticking to eachother.
-Tear up your Cheese Product Slice into the mixture and mix it in with your hands. Again, looking to make it so nothing sticks together.
-If there’s any time left before the pasta is ready, do some dishes
-Once the pasta is done, turn off the heat and put the lid over the saucepan and use it to keep the pasta in while you drain like 80-90% of the water into a sink.
-Return the pasta to the powered-off stove and add a knob of COLD butter. Stir vigorously until the butter is emulsified with the remaining pasta water, or until the butter is no longer visible.
-Turn the heat back on low and add alfredo sauce. If you have beer, pour a bit (not too much!) into the sauce jar, recap, shake, and pour out again. Stir all of it in with the pasta.
-Add the contents of the casserole dish and stir everything together. Add spices too.
-Cover and let sit for 2min at a time, stirring until the consistency is right. Feel free to add more cornstarch and/or sodium citrate if its not thickening fast enough for you. Also add salt to taste.
-Pour into casserole dish once done. Add cayenne pepper on top, then the breadcrumbs. I know your gay ass wants to eat it right now but first you need to let it cool off a little. Use the time to wash all your dishes before the sauce gets crusted on.
-Enjoy.
-You will have made too much mac n cheese. This is normal. To reheat, place the casserole dish in the michaelwave in 1-minute cycles, stirring between each, until the desired temperature is achieved.
Tips & Tricks
-You cannot use too much cheese. I promise.
-If the sauce isnt thickening fast enough, it’s important to get it there fairly quickly, or your pasta will overcook and turn mushy (bad). Even a bad version of Good Mac N Cheese will still impress your friends though.
-Too much beer will cause the sauce to be too thin.
-Cheddar and Parmesan are both recommended. PRE-SHREDDED IS NOT ACCEPTABLE
-I MEAN IT, DO NOT USE PRE-SHREDDED CHEESE
-There’s probably a better way to optimize this recipe’s timing. Fuck around and see if you can shave it down to 30min.
-It’s possible “box of pasta” will be too much for one can of sauce, or vice versa. Adjust accordingly, but remember: better oversauced than undersauced.
-Wash your dishes while you have downtime cooking. I know I said it all over the recipe but i mean it. This stuff does not like to come off once it cools, even if you soak it.
2 notes
·
View notes
Text
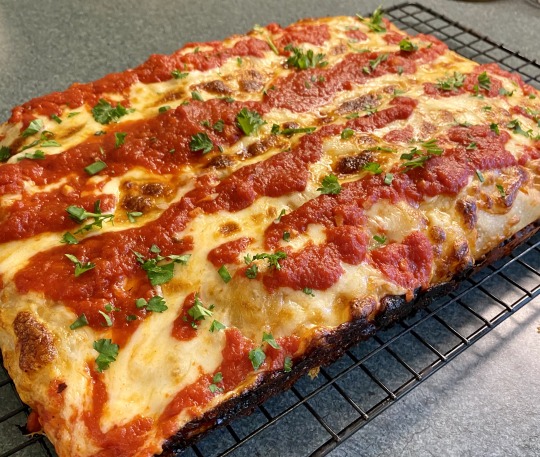
Double Cheese Pizza 🎂🎄 Homemade Delight for Birthdays and Christmas 🍕
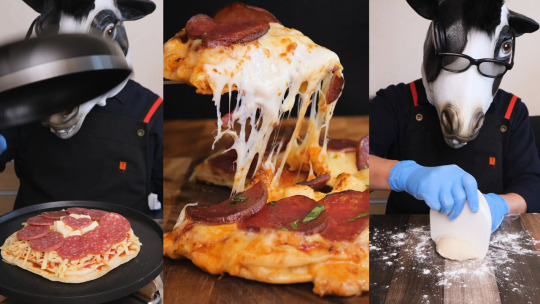
Hello, I'm Ushio. Christmas is just around the corner, and perhaps a birthday too. It might be a bit early, but I'm already in the holiday spirit and have come up with a special lunch idea - the Double Cheese Pizza. While many people opt for pizza delivery, making your own pizza can result in an extraordinary and delicious experience. I encourage you to give it a try and savor this homemade pizza. 🍽️
Let's start with preparing the pizza dough. Use strong flour, salt, olive oil, water, and your choice of spices such as basil. Knead the dough until it reaches the softness of your earlobe. Once the dough is ready, wrap it in plastic wrap and let it rest for about 30 minutes. ⏳
During this time, prepare the pizza tomato sauce. In a pan, combine minced garlic, onions, salt, pepper, and canned whole tomatoes. Cook the mixture until you have a rich and flavorful pizza sauce. 🍅
Afterward, stretch out the pizza dough by hand and place it in a frying pan. Cook both sides until they have a nice golden color. When done, spread tomato sauce, add plenty of cheese, place another layer of cooked dough on top, and cover it with more tomato sauce, lots of cheese, and salami. Cover the pan and bake it on low heat for about 20 minutes. ♨️
For the final touch, add toppings like basil and parsley. This will not only make it look stylish but also enhance the flavors. The result will be a crispy crust, a rich tomato sauce, and cheese that you can relish to the fullest. This Double Cheese Pizza is perfect for birthdays, impromptu parties, or delightful moments with family. 🎉
When stretching the dough, using your hands instead of a rolling pin will give you a softer crust. Also, using different types of cheese on the first and second layers will elevate the pizza to excellence. 🧀
Ingredients for Pizza:
Salami: 30g
Mozzarella Cheese Slices: 4 slices
Camembert Cheese: To taste
Ingredients for Pizza Dough:
Strong Flour: 100g
Salt: 1 teaspoon
Olive Oil: 2 tablespoons
Water: 50ml
Basil: 1 teaspoon
Ingredients for Tomato Sauce:
Half can of Tomatoes
Half a piece of Garlic
A quarter of an Onion
2 tablespoons of Olive Oil
1/3 teaspoon of Salt
A pinch of Pepper
Herbs such as Laurel and Oregano (as per your liking) 🌿
I'm planning to open a restaurant soon, and I'd appreciate your advice. 😘😘😘
If you come across any dishes in the videos I've posted that you'd like to try, please leave a "like" or a comment. If there are dishes that you enjoy, I plan to add them to our menu. let's create an exciting culinary adventure together!
Here is my hideout⤵
youtube
https://www.youtube.com/channel/UCWVYju2V7KQx2vbtp53tlWw
Tiktok
https://www.tiktok.com/@dankouben?lang=ja
Instagram
https://www.instagram.com/moteocooking/
Click here to watch the video⤵
https://www.youtube.com/shorts/Vh5iUlKCkss
1 note
·
View note
Text
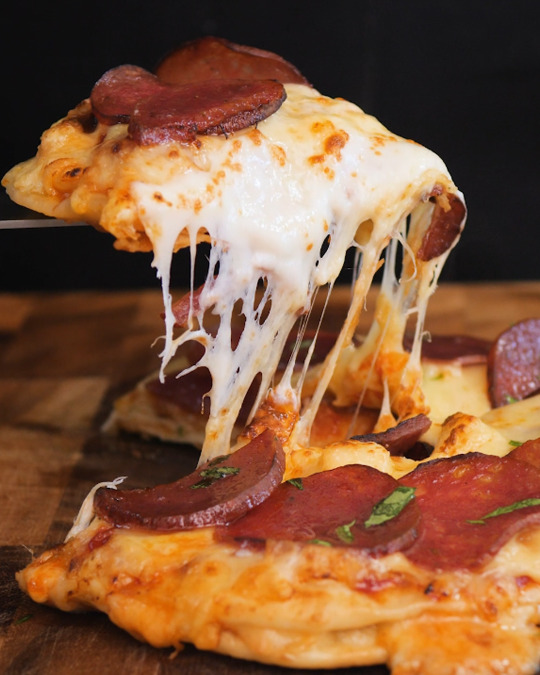
Salami Wood Fired Pizza
Salami is an Italian-style cured sausage that’s made from air dried, fermented meat. It has a strong smoky flavor and can be eaten raw or cooked.
Salami is a good addition to any pizza. It adds an extra layer of flavor to the crust. It’s also an easy way to get a lot of protein on your pizza.
Topped with Salami
Salami pizza is a delicious combination of cheese and salami topped with Italian seasonings. It is perfect for a quick and easy meal for the whole family to enjoy.
This pizza is a great choice for a dinner party or game night with friends and family. The pizza is loaded with a variety of different ingredients and flavors that will leave everyone asking for more!
To make this pizza, start by preparing the dough. Mix together flour, salt and yeast in a mixing bowl. Add water and stir until a sticky but not lumpy dough is formed. Cover with saran wrap and let the dough rise for 24 hours.
After the dough has risen, place it on a lightly floured surface and shape into a ball. Allow to rest at room temperature for 30 minutes before using.
Topped with Goat Cheese
Goat cheese is a versatile ingredient that can be used to enhance a variety of dishes. It adds tangy flavor that doesn’t overwhelm the dish, making it a perfect addition to everything from grilled sandwiches to creamy desserts.
You can also use goat cheese to top your pizza. This is a great way to make your pizza extra special without adding too much fat or calories.
Another great way to top your pizza is with honey whipped goat cheese. This recipe can be made by simply mixing a log of goat cheese with cream, honey and salt.
You can also add a touch of citrus to a whipped goat cheese by beating in grated lemon rind. This recipe is easy to prepare and would be a delicious addition to a brunch or snack table. You can even serve it on crostini with a mix of toppings for a more festive look.
Topped with Caramelized Onions
Caramelized onions add a delicious depth of flavor to any pizza. You can add them to your favorite pizza sauce or simply use them as a topping.
The caramelized onions on this salami wood fired pizza are topped with mozzarella cheese and cured salami to create a mouthwatering combination. It’s a simple recipe that you can make at home in less than half an hour.
Another great thing about this type of pizza is that it’s healthier than most other types of pie. The extreme heat of a wood-fired oven cooks the pizza so fast that the vegetables stay crisp and retain more of their vitamins, antioxidants and nutrients.
This salami pizza is a great addition to your meal plan for the whole family! The caramelized onions, salami and goat cheese blend into a perfect combination of flavors that’s sure to be loved by all.
Topped with Tomatoes
If you like tomatoes but don’t want to add too much cheese, you can make this pizza with just tomato sauce, mozzarella and salami. The combination of flavors is delicious and satisfying.
To create this pizza, preheat your oven to 500 degrees Fahrenheit (952.0 degrees Celsius). You can also use a wood-fired pizza stone if you have one.
Spread about 6 tablespoons of pizza sauce over the dough, leaving a 1/2-inch border. Sprinkle with some of the pecorino and top evenly with 1 ounce of salami slices.
Bake the pizza on a pizza peel or rimless baking sheet, in an Ooni pizza oven or a conventional oven that can reach 500 degrees F. Rotate the pizza halfway through baking and cook until the crust is golden brown, 6 to 8 minutes.
0 notes
Text
A big neural net reviews a smaller neural net's recipes
I’ve used various neural networks to generate recipes, to varying degrees of success. My earliest recipes were generated with char-rnn, which had to learn everything - spelling, punctuation, words - entirely from scratch. Its recipes were terrible (Swamp Peef and Cheese, anyone? Or Chocolate Chicken Chicken Cake?). Later when I started using GPT-2, I was using a neural net that had already seen a lot of recipes online during internet pre-training, and its recipes looked a lot more realistic (although not entirely realistic - there was that recipe for Black Forest Cake that suggested pouring the batter into a toaster, or the jello recipe that starts with “remove all internal rinds”).
GPT-3, an even more powerful text-generating neural net, has seen so many recipes during its internet pre-training that its recipes are boringly plausible. Bake its Black Forest Cake recipe and you’d probably actually get cake at the end, even if it’s not the best cake in the world. Its recipes aren’t funny at a glance, which is why I haven’t posted any of them - until internet linguist Gretchen McCulloch suggested that, rather than have GPT-3 generate its own recipes, I have it rate char-rnn’s recipes. Readers, it worked.
I prompted GPT-3 with two example recipes from allrecipes, each followed by 3 of their human-written reviews. Then, for the third recipe I inserted one of char-rnn’s recipes:
Chocolate Chocolate Cake
1 cup sugar
1/4 cup butter
1 cup margarine
1 cup cocoa
1 teaspoon vanilla
1 cup margarine
1/2 cup pecans, chopped
1 teaspoon vanilla
1 egg yolk
1/2 cup sugar
1/4 cup chopped pecans
1 cup sugar
1 teaspoon vanilla
1 cup cocoa
1 teaspoon vanilla
Combine flour, sugar, baking powder, salt, salt, and salt in a large bowl. Cook over medium heat, stirring constantly, until mixture boils and stiff peaks form. Add milk and cook until mixture is completely melted. Remove from heat and stir in sugar and sugar. Add eggs and vanilla. Beat until smooth. Spread in batter. Sprinkle with pecans.
Yield: 1 servings
And then I let GPT-3 add reviews. Would it mention the excessive lakes of vanilla? The complete lack of flour? The foolhardy reliance on the heroic efforts of a single egg yolk to hold things together?
oxtailsandturnovers
Rating: 5 stars
03/04/2007
delicious chocolate recipe!!! and the perfect balance between cocoa and chocolate. and they sure were LONGNECKS! big time rave here. lazy w birthdays w friends and family, try this recipe for something chocolate sweet the ppl will talk about over and over.
AKEMIYUNA
Rating: 5 stars appraisal
12/03/2008
Excellent for the kids Halloween party. Everyone got so thrilled by seeing something new on Chocolate in sponge. He even likes nuts separately but it will taste good..
BYOMFYABF
Rating: 2 stars
10/01/2008
I could only give it a 2 as I had to make changes to it due to ingredients I had. First, I used Dove Dark Chocolate cocoa instead of Hershey's, no nuts, and the mashed bananas and caramel topping were a must. I did use coffee instead of the hot water, and dark margarine instead of regular, therefore I could not use light whipped cream, but I made homemade whipped cream. It had WAY too much flour in it, but i guess it could have been me measuring heavier than I should have. I also only used 2 cups of flour. it was my first bundt cake, so it was huge!!!
Here’s another batch of reviews, this time of a more chaotic char-rnn recipe:
Simple Soup Alaborate Soup Pie
6 each chopped white perserves; ** (optional but ring)
1/2 cup chopped fresh marjoram
1/2 teaspoon dried thyme
1/3 teaspoon salt
1/2 cup thinly sliced onion
1/4 cup onion (chopped)
1/2 teaspoon garlic; minced
2 small carrots
6 can dry white wine
1 tabasco sauce
1 tablespoon sugar
1/2 cup flour, whipped topping
2 tablespoon chili powder
Marinate: Serves 4.
Whip and short under boiling. Add the sliced mushrooms and peppers and stir to coat. Stir the sugar and carrots. In large bowl, beat the egg to make a 1 1/2 tablespoons of the flour. Add shanks and stir it well. Spoon into a frying pan before serving.
Recipe By : DonajehLi Koubmanda
Yield: 8 servings
JEFFREY97389
Rating: 2 stars
03/03/2006
Even though everyone said this was great, I thought it was just 'OK!' The perserves gave a strange flavor to the sauce.
MATTJANDTRACER
Rating: 2 stars
01/02/2009
This recipe sounded good. When it came out it tasted a bit like a casserole and not a stew. I used venison instead of deer and pork. I liked the way it turned out, but it wasnt very French.
Hammy
Rating: 5 stars
The g iving this as a gift as it takes about 10 less minutes but using American cheese and not blended with parsley flakes, lime-flavored gelatin, which is my husband's favorite dish from SuperValu. Just happens to be the creamy sauce. Don't worry about a pie crust.
In fact, the more chaotic the char-rnn recipe, the more chaotic the reviews tend to be, as if GPT-3 has picked up on the chaos and is trying to somehow produce reviews that could plausibly be written by whatever weird humans are visiting this mangled recipe website.
Geilded Peanuts & Crabmeat Basil
3 beef, boneless chops, or thyme,
1 lamber and flince of fresh diced in diagonal
1 parsley
2 large leeks (for garnish)
3/4 teaspoon sesame oil, seeded and peeled
1 any jeans'l-tortilla
1 pepper or cinnamon
1/4 cup baesly pinto beans. (Crushed and thawed; minced fine you recipe)
1 tomato base
1 fat in the last 5 inch plates
1 garlic clove; crushed
1/4 cup dijon mustard
In a large bowl set aside. Remove the sides from the heat and saute with a fork and cover and cook on Low for 6 to 6 hours.
Yield: 6 servings
Morales
Rating: 0 stars
03/30/2008
I had high expectations for this recipe, but it was an outright flop. I don't know if the measurements were somehow incorrect or what, but I ended up with a watery mess that certainly wasn't crab salad. My girlfriend, who is a new chef liked it fine, but I really wish that the recipe didn't claim that it made six servings when it really made enough for one, if that's what we were going to call it.
Carole
Rating: 5 stars
Glorious sobs! This recipe will be delicious for a minumum of 1½ Hours to maximum 2½ hours Time to bring lots of fresh sized potatoes in the house or grow in the age may become quite famous
Amanda
Rating: 3 stars
11/13/2009
My friend is having a birthday party and will celebrate with Camping. She's in charge of the dishes and wanted to serve food at the campfire. I'll 10th grade, my easy information for her party. It will not sound strange anyway test this task with a note to work rationally.What to take trees, portable tables for chairs, the main meal, food. I personally love the taste of it but has anyone seen a shepherd (wasn't any spices), oysters. It is sufficient
It does kind of make sense that GPT-3’s recipe reviews aren’t directly complaining about the utter weirdness of char-rnn’s recipes. Probably very few of the recipe reviews in GPT-3’s training data involved baffled complaints about nonexistent or repeated ingredients, or apocalyptic levels of recipe failure. So GPT-3 has learned that even the critical reviews tend to fall within a certain sentiment range. It’s interesting that it tries to emulate char-rnn’s primitive neural net glitchiness - I’ve noticed before that GPT-3 seems to be capable of pretending to be a much simpler neural net.
Subscribers get bonus content: After generating a few reviews, GPT-3 would sometimes go on to generate new recipes (such as “BBQ Cheeseburger Salad” which contains lime jello, whipped topping, and sliced black beans). It may have been deliberately trying to make them terrible to fit in with char-rnn’s recipes.
Speaking of AI-generated recipes: there are some absolute disasters in my book on AI, You Look Like a Thing and I Love You: Amazon - Barnes & Noble - Indiebound - Tattered Cover - Powell’s - Boulder Bookstore
327 notes
·
View notes
Text
Magnus Pies: A TMA Pizza AU
- All the entities and supernatural creatures still exist but it happens in a pizza place called the “Magnus Pies ®” established by Jonah Magnus.
- Jon is the new, under qualified manger. Very good a diffusing arguments and misinformation with customers. Practically a living coupon fraud detector. Once Martin overheard Jon use the phrase “please calm down” to a customer. Thinking that this would escalate the conversation, Martin braced himself from the kitchen. He was spooked quite a bit that the customer did calm down. He can’t tell if Jon is just that charming or if he can hypnotize people.
- Jon actually had some sliver of respect for Martin when they first met. Up until, he caught Martin whispering "Looking good little guys" to the pizzas baking in the oven. Jon has never looked at him the same since.
- Martin has mastered the customer service voice. In fact, it’s permanent. Every time he answers the phone, his voice automatically sweetens. Sasha and Tim have made fun of him for it. Working at Magnus Pies has broken him so much.
- Tim works the register. Flirts with customers so that they’ll come back. Can’t stand slow days. It’s actually Tim that makes the best pizza out of the crew.
- Ft. Sasha the pizza delivery girl. Eldritch horrors won’t stop her from delivering your pizza on time.
- Elias is the owner and hardly ever shows up.
- Instead of statement givers the customers will just overshare their supernatural encounters to the staff. Jon doesn’t think anything of people sharing their ghost stories to him. He writes it off as desperate customers craving any source of human interaction. Despite this, he remembers every tale a customer has told him.
- “Then after I kissed him, his body combusted into flames.”
“Sorry to hear that... That will be 17.89. ″
- There’s this one customer that orders questionable pizzas with special delivery instructions and has his pizza delivery scheduled every Wednesday at 5 pm. His requests went from a little strange to down right outlandish. One of his first orders, he instructed them to make a smiley face out of the pepperonis because he was “having a bad day.” One of his most recent orders was “a cheese-less pizza cheese pizza.” In the delivery instructions, he explains his doorbell is broken and suggests the delivery person to drop the pizza off in the middle of the yard and then “yell whatever feels right” to alert him of the pizza’s presence. Sasha often wonders if she has to cater to all his odd demands.
- The first time Sasha delivers to his house, the GPS malfunctioned? The customer’s house resides in a new residential area. So once she drove past the last known road, the GPS advised her to park her car and walk to her destination. She obviously ignored the computer automated voice and eventually found the house on her own. Since he always commands the delivery runner to drop the pizza outside his house, Sasha has never seen his face but the name he orders under is Micheal. (If that’s even his real name.)
- Is the pizza good? The reviews are mixed. Martin says “its fine”. Sasha thinks “it’s pretty good for the price.” Tim, on the other hand, is fully convinced that when Jonah Magnus created Magnus pizza, he had never eaten a pizza before in his life. He claims "the pizza is two hell circles away from mediocrity." If a person asked Elias, he would maintain that Magnus Pie pizza is of high quality, but the staff have never seen him eaten it before. As for Jon, he refuses to try it.
- The uniforms are pretty cute. A transparent green tennis visor paired with a black collared shirt with logo on the right upper chest portion.
- This one time, someone spray painted a satanic circle in the parking lot and Elias botched and moaned about it for a week about how "it was driving customers away." He stops complaining about it after an angry goth boxed an old man on top of the circle one afternoon. Their fight drove in a crowd. Some people even bought a slice just to get a good view of the fight. Jon, of course, called the authorities but both parties fled before they arrived.
- Martin finds a homemade employee training tape from the 1980s hiding in the closet. It features an instructional video on how to make the pizzas but the employee or paid actress?? featured in the video disregards Magnus Pies’s official pizza guidelines™ and instead gives advice/ tips on how to cut corners (and arguably offers more valuable advice to employees). “Yeah I know the recipe calls for this much cheese but i always add to more handfuls. Most customers complain about how there isn’t nearly enough cheese -- how it’s practically tomato sauce with cheese sprinkles.” Whether it’s the dread in the lady’s eyes or the neglect of company policies, the tape is unfinished. The video cuts off after she places the pizza in the oven.
- Martin thinks the the training video is hilarious, so of course, he shares it with the rest of the staff. It’s Sasha that points out that one of the employees in the background looks like a younger version of Elias. A passionate debate breaks out on whether that person is actually Elias, but ends once Jon points out that Elias has complete heterochromia and the teenage boy in the video does not.
- On a team building trip, Martin, Sasha, and Tim admit that they are glad Jon joined the team. Ever since he joined, the workplace has never been so lively. They all agree Jon’s presence attracts the unusual. Though he will never admit it, Jon found it touching.
- Some customers would describe the pizza joint as “eerily clean.” "The vibes are simply rancid” says one customer. Even with the speaker churning out today’s hottest pop hits (in a muffled tone), it is entirely too quiet. The atmosphere is dead,” says another.
- “Little human activity and huge open spaces makes it somewhat spectral but the short wait times and fair food always brings me back. ⭐⭐⭐” - a google review from a town local
- One person gave them a bad review on Yelp. After they were done insulting the food, they moved on to assess the staff. “I’m usually not the type to complain/nit pick about employees but there was one that made me extremely uncomfortable. He wasn’t the warmest person, had an awfully posh accent, and sported dark circles under his eyes. When I spoke to him, his gaze was intense and unwavering. Throughout the entire conversation, he didn’t blink once. Even as a sat down, I could still feel his eyes lingering on me. I’m not an insecure person in the slightest but being watched like that, made me self conscious of my own breathing. I spun around once to see if he was staring at me, but to my surprise, he wasn’t. I may have never caught him staring at me, but I know he did. The sensation of being watched never ceased afterward. (half star emoji) ”
- Apparently, the joint has been open since the 1940s and despite the bad food and less than average traffic of customers, they’re still in business. There’s rumors that the Magnus Pie receives generous donations from Elias’s rich ex-lover that misses him dearly.
- Starring several disagreements/ arguments with customers. Just a bunch of misinformation that was spread by Elias to lure people into the building to feed the Eye.
- Sasha is late returning from a delivery one day, and after an hour they try to contact her. She’s unresponsive. Elias goes looking for her but comes back short. Later that night, they get a call from the hospital informing them that Sasha got into a car accident and fell unconscious upon impact. Sasha comes in for a shift a few weeks later, and nobody realizes she’s not Sasha.
- The Magnus Pies’s odd reputation attracts the attention of popular YouTuber, Melanie King. She eventually becomes a regular in hopes of catching a supernatural event on camera for her channel. After experiencing a handful of odd encounters, she becomes engrossed by the place and starts working there in hopes of piecing together an explanation for the pizzeria’s paranormal activities. She later regrets this.
- has the potential to be a good tragicomedy
#and maybe perhaps all the characters are aged down just a little#can you tell i've got a thing for fast food AUs#this is obviously based off of some of my experiences#tma#the magnus archives#magnus pod#tma au#crack au?? but also not#but imagine the magnus archives as a slice of life horror comedy
100 notes
·
View notes
Photo
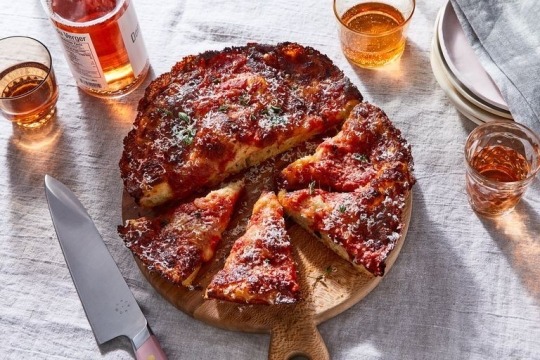
Crispy Cheese Pan Pizza | King Arthur Flour
Prep: 16 hours, Cook: 25 minutes
Makes one 9- to 10-inch pizza, but scales up well
Here are even more helpful tips from King Arthur:
—Our base cheese of choice is a block of low-moisture mozzarella, coarsely grated. Want to experiment with different cheeses? Choose those that melt well: Fontina, cheddar, Jack, provolone, Gouda, and Muenster are all good candidates.
—Want to add your own favorite toppings beyond red sauce and cheese? Vegetables or meats should be cooked before arranging them in a single layer atop cheese and sauce. Feel free to experiment with other sauces, too; pesto or white sauce are great alternatives to tomato. One hint: To avoid potential sogginess, stick to the same quantities and layering process for sauce and cheese listed above.
—For an extra hit of flavor, sprinkle freshly grated hard cheese (e.g., Parmesan, Asiago, Romano) and/or fresh herbs (oregano, basil, thyme) over the hot pizza just before serving.
—If you're serving the entire pizza (no leftovers) right away, you can serve it right from the pan if desired. We don't recommend using a knife to cut the pizza in the pan; it might mar your cast iron's surface. Instead, after loosening the edges, use a spatula to partially lift the pizza out of the pan, then cut a wedge using a pair of standard household scissors or kitchen shears. Remove the wedge and repeat until you've cut and served all of the pizza.
—Feeding a larger group? Double all the ingredients in the recipe and follow the recipe instructions as written, dividing the dough into two pans (mix and match from the choices listed in step #6 above).
Ingredients
2 cups (240 g) flour (King Arthur Unbleached All-Purpose Flour)
¾ t fine salt (like table salt or fine sea salt)
½ tsp instant yeast or active dry yeast
¾ cup (170 grams) lukewarm water
1 Tbsp (13 g) olive oil plus 1½ Tbsp (18 g) olive oil for the pan
6 oz (170 g) low-moisture mozzarella, grated (about 1¼ cups, loosely packed)*
⅓ to ½ cups (74 g to 113 g) tomato sauce or pizza sauce, homemade or store-bought
Freshly grated hard cheese and fresh herbs for sprinkling on top after baking, optional*
Preparation
Weigh your flour, or measure it by gently spooning it into the cup, then sweeping off any excess.
Place the flour, salt, yeast, water, and 1 tablespoon (13 grams) of the olive oil in the bowl of a stand mixer or other medium-large mixing bowl.
Stir everything together to make a shaggy, sticky mass of dough with no dry patches of flour. This should take 30 to 45 seconds in a mixer using the beater paddle; or about 1 minute by hand, using a spoon or spatula. Scrape down the sides of the bowl to gather the dough into a rough ball, then cover the bowl.
After 5 minutes, uncover the bowl and reach a bowl scraper or your wet hand down between the side of the bowl and the dough, as though you were going to lift the dough out. Instead of lifting, stretch the bottom of the dough up and over its top. Repeat three more times, turning the bowl 90 degrees each time. This process of four stretches, which takes the place of kneading, is called a fold.
Re-cover the bowl, and after 5 minutes do another fold. Wait 5 minutes and repeat, then another 5 minutes and do a fourth and final fold. Cover the bowl and let the dough rest, undisturbed, for 40 minutes. Then refrigerate it, covered, for a minimum of 12 hours, or up to 72 hours. (Alternatively, if you don't have room in your fridge for the bowl, transfer the dough to a gallon-sized ziplock bag with a little extra olive oil to coat the inside of the bag.) It'll rise slowly as it chills, developing flavor; this long rise will also add flexibility to your schedule.
About 3 hours before you want to serve your pizza, prepare your pan. Pour 1 1/2 tablespoons (18 grams) olive oil into a well-seasoned cast-iron skillet that’s 10 inches to 11 inches diameter across the top, and about 9 inches across the bottom. Heavy, dark cast iron will give you a superb crust, but if you don’t have it, use another oven-safe heavy-bottomed skillet of similar size, or a 10-inch round cake pan or 9-inch square pan. Tilt the pan to spread the oil across the bottom, and use your fingers or a paper towel to spread some oil up the edges, as well.
Transfer the dough to the pan and turn it once to coat both sides with the oil. After coating the dough in oil, press the dough to the edges of the pan, dimpling it using the tips of your fingers in the process. The dough may start to resist and shrink back—that’s okay, just cover it and let it rest for about 15 minutes, then repeat the dimpling and pressing. At this point the dough should reach the edges of the pan—if it doesn’t, give it one more 15-minute rest before dimpling and pressing a third and final time.
Cover the crust and let it rise for 2 hours at room temperature. The fully risen dough will look soft and pillowy and will jiggle when you gently shake the pan.
About 30 minutes before baking, place one rack at the bottom of the oven and one toward the top (about 4 to 5 inches from the top heating element). Heat the oven to 450°F.
When you’re ready to bake the pizza, sprinkle about three-quarters of the mozzarella (a scant 1 cup) evenly over the crust. Cover the entire crust, no bare dough showing—this will yield caramelized edges. Dollop small spoonfuls of the sauce over the cheese (don't spread it!)—laying the cheese down first like this will prevent the sauce from seeping into the crust and making it soggy. Sprinkle on the remaining mozzarella.
Bake the pizza on the bottom rack of the oven for 18 to 20 minutes, until the cheese is bubbling and the bottom and edges of the crust are a rich golden brown (use a spatula to check the bottom). If the bottom is brown but the top still seems pale, transfer the pizza to the top rack and bake for 2 to 4 minutes longer. On the other hand, if the top seems fine but the bottom's not browned to your liking, leave the pizza on the bottom rack for another 2 to 4 minutes. Home ovens can vary a lot, so use the visual cues and your own preferences to gauge when you’ve achieved the perfect bake.
Remove the pizza from the oven and place the pan on a heatproof surface. Carefully run a table knife or spatula between the edge of the pizza and side of the pan to prevent the cheese from sticking as it cools. Let the pizza cool very briefly, then as soon as you feel comfortable doing so, carefully transfer it from the pan to a cooling rack or cutting surface. This will prevent the crust from becoming soggy.
Serve the pizza anywhere from medium-hot to warm. Kitchen shears or a large pair of household scissors are both good tools for cutting this thick pizza into wedges.
4 notes
·
View notes
Text
Neven’s Pan Pizza
Pan pizza is the best pizza you can make in a typical home oven. It’s also a style that’s tricky to find in restaurants (though it’s becoming more popular.) That means you should make it, and I’m here to help. This is my simple, flexible, delicious recipe.
(Before we begin, have you seen my thin-style pizza recipe? It’s a good idea to read it even if you’re here primarily for the pan pie.)
Neven’s Pan Pizza
Servings: one 9 x 13” (or 10 x 14”) pizza
Time: 3.5 hours (mix and proof) + 1 to 3 days (fridge-ferment) + 6 hours (final proof) + 25 to 40 minutes (shape, top, and bake)
INGREDIENTS:
175 g all-purpose flour
75 g high-gluten or bread flour (or all-purpose flour)
5 g (2%) salt
50 g (20%) ripe sourdough starter, fed and doubled and ready
200 g (80%) water
~2 tbsp olive oil
DIRECTIONS:
Put all the dry ingredients into the bowl of a stand mixer outfitted with the dough hook and stir with a spatula to combine. Add the starter and about 2/3 of the water. Start the mixer on low speed and mix for 1 minute; add the rest of the water, and mix for 4 more minutes. Switch to medium speed and mix for another 5 minutes. If at any point the dough threatens to crawl out of the bowl, stop the mixer and scrape the mess back down into the bowl. The dough will be wet and sticky—not to worry, that’s what 80% hydration looks like.
Scoop the dough out into a new bowl (wider, shallowe, preferably non-metal.) Cover the bowl with plastic wrap and let the dough rest in a warm spot for 3 hours. (70–74°F? An oven that was on for two minutes before being turned off is a good environment.) Every 30 minutes or so, fold the dough—just go around the edge of the dough with a flexible spatula and fold the outside in, like a scared starfish. You’re just trying to redistribute the dough to make it nice and smooth.
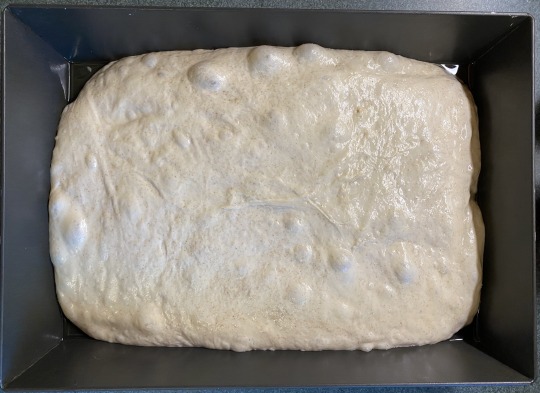
Grab a 9x13 nonstick sheet pan, with sides at least 1.5″ tall. (See below for a list of my preferred equipment.) Pour in 1.5 tbsp olive oil—about two glugs—and spread it around. (If your pan is truly nonstick, you don’t have to be thorough here; if it’s not, cover every damn millimeter with oil. Not a lot of oil, just complete coverage.) After the 3 hours have passed, move the dough into the pan. Gently scrape it into the middle of the pan, then flip the dough over so both sides are oiled. Flatten it just a tad and leave it alone. It won’t come close to filling the pan, and that’s ok. Now’s the time for it to go to sleep in the cold: cover your pan tightly and move it to a fridge shelf for 1-3 days.
6 hours before baking, remove the pan from the fridge and set it on the counter. Feel free to sneak a peak at the dough: it looks about the same, yeah? Now watch it spread out and blow small bubbles in the coming hours, especially if you give it a nice, warm environment again.
Preheat your oven at 500ºF for at least half an hour, with your rack somewhere around the lower middle; all ovens vary, so adjust as needed after you see your finished pie’s top and bottom bakes.
To stretch the dough: uncover the pan and oil your fingers with the olive oil pooled in the corners. Now gently dimple the dough and watch for bubbles—cool, yeah? Spread it softly from the middle, grabbing the dough corners and lifting them into the pan corners if needed. Your dough will be very soft and may seem uneven, but don’t sweat it; just patch any holes without massaging the dough too much.
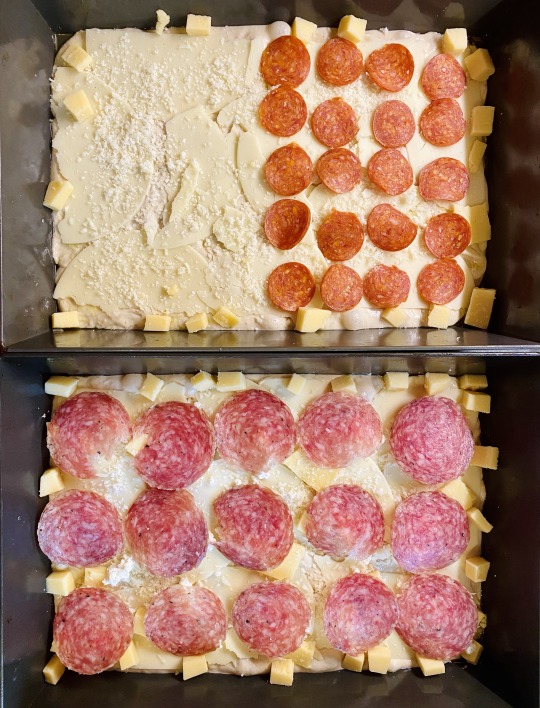
Topping time! Please place on your pizza whatever you like. Pan pies generally work better with cheese on the bottom. Also, try not to overtop it because that fluffy, fluffy dough needs to be able to rise—too much weight on top will prevent it from doing so. Remember that you can add a lot of stuff after baking—including tomato sauce!
So, line the dough with cheese. My preference is to use sliced mozzarella or provolone, though shredded or cubed will also work. Add extra cheese into the corners of the pan, so it bakes up into an irresistible cheese crust. Spoon cooked tomato sauce on top (in a hip diagonal pattern if you want to look fashionable on Instagram) and add any other toppings.
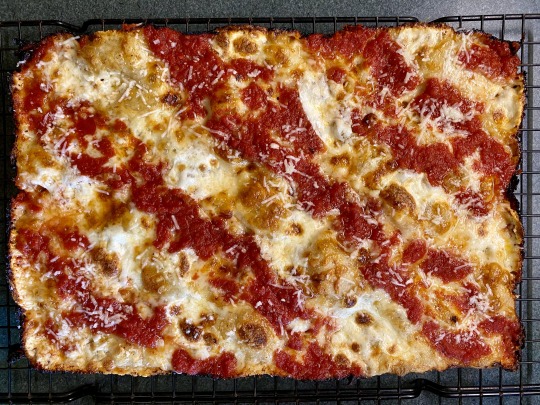
Bake for 12-16 minutes, rotating half way through. Watch the pie carefully in the last few minutes. Oh, did I mention—crank your vent hood because the cheese will burn and smoke, beautifully so.
When your pizza looks good enough to elope and start a new life in Mexico with, pull it out using decent oven mitts. Give it a minute to come to its senses, then go around the rim with a thin, non-scratchy tool—like a plastic knife or a small spatula—to release the cheese and sauce from the pan. It shouldn’t be much of a struggle if you used a good pan. Now dexterously slip an offset spatula or a burger flipper under one (narrow) side of the pizza and transfer it to a cooling rack.
If you’re feeling particularly naughty, shower the finished pie with finely grated parmesan cheese. I won’t tell anyone.
Give your pizza 5 minutes to rest—ok, ok, you have my permission to cut it after 2 minutes. Move to a cutting board and have at it with a large, sharp knife.
- - - END OF RECIPE - - -
- - - ADDITIONAL INFORMATION AND ANECDOTES BELOW - - -
Just a reminder that my thin-style pizza recipe has more info about technique and ingredients and such, and I’m not going to repeat it all here like an aging musician running out of inspiration and covering their heyday hits to pander to the old fans.
Questions? Comments?
I don’t even have a sourdough, man.

It’s like, month three of quarantine—what have you been doing with your time?
Alright, alright.
Neven’s Pan Pizza for Non-sourdough Folks Who Nevertheless Deserve Our Love and Respect
Servings: one 9 x 13 (or 10 x 14) pizza
Time: 3.5 hours (mix and proof) + 1 day (fridge-ferment) + 2 hours (final proof) + 25 to 40 minutes (shape, top, and bake)
INGREDIENTS:
175 g all-purpose flour
75 g high-gluten or bread flour (or all-purpose flour)
5 g (2%) salt
3 g (~1%) instant yeast (half a package thingy)
200 g (80%) water
DIRECTIONS:
Stir all the dry ingredients well in a large bowl, then add the yeast and water and stir again, using a silicone or wood spatula. When it starts coming together, pour in the olive oil and work it in. No need to get it smooth; just mix until there’s no dry flour on the bottom. Cover tightly with plastic wrap.
Every 30 minutes in the next 2 hours, fold it: slide the spatula under one side and fold it over toward the middle. Do 4-6 folds like this in one session. No need to be picky about the 30-minute timing, just shoot for 2-4 fold sessions in the first few hours of proofing, to distribute everything well.
Cover and leave out at room temperature for 12-18 hours. Just go to bed, don’t worry about it. You’ve worked hard all day.
The next day, the dough should look huge and bubbly. Does it? Oh, good. Now proceed with the above recipe from the pan-oiling step: move it to a pan, give it 1-2 hours to relax, stretch it, etc.
But I don’t have a stand mixer.

(I couldn’t find a gif of Donald Pleasance in Wake in Fright (1971) so this still image will have to do.)
Look, it’s fine. Read the above no-sourdough steps. No mixer needed. You can just do that, even when using sourdough—maybe halve the amount of sourdough starter. (It’s potent stuff.)
And now, a chaser for that hot hot image above.
Shop Talk
My attorneys have advised me to disclose that the links below include my referral code, which will make me even filthier rich than I am currently. (How rich am I? I make my own pizza, that’s how rich.)
LloydPans Detroit Style Pizza Pan. These are just tremendous—wonderfully made, perfectly nonstick, stackable. Ideal for pan pizza, focaccia, and many other bakes.
Detroit Style Pizza Pan Lid. Not at all required, but if you get serious about this pan pizza business, the lids are great because they’re reusable and they let you stack several pans in the fridge. (Note that you can bake two of these pizzas side by side in a typical oven. That’s what I do. Yes, it’s because I eat one whole pizza myself.)
Cooling rack. I can’t stress enough the importance of cooling and resting your pizza—thin or thick, before it’s had a chance to release all that steam, it’s still kind of a wet mess of a casserole.
The End
I realize some folks still think that thin vs. thick is an interesting pizza debate to be having in the 2020s, but I hope they can move on and get into all the pizza styles out there. Pan pies are so good. See for yourself.

16 notes
·
View notes
Text
Roman’s Noble Pizza
Hello again, ladies lords and non-binary royalty! This recipe is particularly close to my heart, since it is what really started my flair for cooking. I always make it when I want to impress someone special. After all, cooking is the quickest way to a man’s heart, and who doesn’t love pizza? ❤🍕
For the Crust:
1/2 tablespoon active dry yeast
1/2 teaspoon sugar
1/2 cup hot (but not boiling) water
1 1/2 cups all-purpose flour, plus extra for kneading
1/4 teaspoon salt
1 tablespoon olive oil
For the Sauce:
1 tablespoon olive oil
1/2 teaspoon sugar
1/2 teaspoon salt
1 medium onion, chopped
1 medium garlic clove, minced
1 can (14.5 ounces) whole peeled tomatoes, undrained, chopped
2 tablespoons tomato paste
1 teaspoon oregano (dried)
1/2 teaspoon basil (dried)
1/8 teaspoon black pepper
For the Toppings:
1 3/4 cups shredded mozzarella cheese
1/2 cup grated Parmesan cheese
1/2 small red bell pepper, chopped
1/2 small green bell pepper, chopped
1/3 cup pitted ripe black olives, halved
4 fresh medium mushrooms, sliced
1 can (2 ounces) flat anchovy fillets, drained
Steps to make the Crust:
1. Sprinkle the yeast and sugar over the warm water in a small bowl; stir until yeast is dissolved. Let stand until the mixture is bubbly.
2. Place the flour and salt in a medium bowl; stir in the yeast mixture and olive oil until a smooth, soft dough forms.
3. Knead the dough on a floured surface, using as much flour as needed to form stiff elastic dough.
4. Let the dough rise, covered, in a greased bowl in a warm place until it has doubled in size. This should take 30-45 minutes.
Steps to make the Sauce:
1. While the dough is rising, you can get started on the sauce! Heat the olive oil and in a medium saucepan over medium heat. Add the onion, cook until soft, about 5 minutes.
2. Add the garlic; cook 30 seconds. Add the tomatoes, tomato paste, oregano, basil, sugar, salt and pepper. Heat to boiling, then reduce heat to medium-low.
3. Simmer, uncovered, stirring occasionally, until the sauce is thick, which should take 10-15 minutes. Transfer the sauce to a bowl and let cool.
Steps to Put it All Together:
1. Punch the dough down. Knead it briefly on a lightly floured surface to distribute any air bubbles, then let it rest for 5 minutes.
2. Flatten the dough into a circle on a lightly floured surface. Roll the circle out until it is 10 inches. Don’t try to spin it unless you’ve had lots of practice. Accidentally dropping the dinner on the floor is not the way to impress a guy.
3. Carefully transfer the circle to a 12 inch pizza pan, then pat the dough out to the edges of the pan. Let stand, covered, for 15 minutes.
4. Preheat the oven to 450 degrees F.
5. Mix the mozzarella and Parmesan cheeses in a small bowl. Spread the finished sauce evenly over the pizza dough. Sprinkle with 2/3 of the cheese.
6. Arrange bell peppers, olives, mushrooms and anchovies on top of the pizza. Sprinkle the remaining cheese on top of everything.
7. Bake until the crust is golden brown, which should take about 20 minutes. Cut into wedges and serve while it’s hot. I guarantee you your special someone will be drooling!
9 notes
·
View notes
Text
What Makes Dad's Tacos Special
What REALLY makes Dad’s tacos special
The Meat
The Tortillas
The whole Taco Bar Spread
What really makes my tacos special is the care I put into the meat and the tortillas. I’ve been making tacos since I was a teenager, and they were one of the first dinners I could cook for myself. The technique I use for cooking the meat, and the tortillas has been developed and tweaked and improved for around 40 years.
The meat should be fine crumbles. Ground turkey and Chicken tend to turn into really fine, almost sand like texture. 85 and 90% lean hamburger also tends to crumble really fine.
This technique can also make cheap (70% fat content) hamburger much healthier.
Raw corn tortillas are just gross, microwaved with a little water, they are a bit better. My technique for preparing tortillas looks involved but takes mere seconds per tortilla, and if you cook 2 or 3 tortillas at a time you can have a batch of a dozen cooked in under 10 min.
This technique also applies to wheat flour tortillas. For flour, us a LOT less water, half as much water per side as described below, and a bunch more butter. Wheat flour tortillas bubble up really nice and fun in a pan.
The Meat
Prep
Ground hamburger, Pork Turkey or Chicken
2 Packets of taco seasoning (1 packet per ½ lb of meat)
Paprika (ideally roasted turkish)
Onion powder
Garlic powder
1 teaspoon chopped garlic per lb meat
The biggest frying pan we got (often called a sauce pan)
Optional
roasted crushed pepper flakes
Finely chopped onion
Chopped baby onion stems
Finely chopped tomato
Refried beans (no more than ¼ cup per lb of meat)
Meat cooking Technique
In a big frying pan,
turned on high,
dump 1 to 2 lbs of the meat, smash it down with a fork until it covers the whole pan evenly.
Let that sizzle for a bit, like 4 min, until the meat on the button just starts to brown
With a spatula stir up the meant and turn as much of the meat over, to try to brown the other side
Repeat this 4 times, until a goo portion of the meat has started to brown
Now stir in ¾ pint or 2.5 cups of water for every lb of meat (this will seem like a LOT of water… don’t worry)
Keep stirring until you have a meat soup.
Once the meat soup has started to boil, add in the taco seasonings, and paprika (no more than a teaspoon of paprika per lb of meat
If you are in a hurry, you can drain off most of the water BEFORE adding the spices, do not drain off all the water or the spices won’t mix, and you’ll burn the meat.
Stir in the spices
Let boil down for 15 to 20 min, or until the meat is no longer floating in the water, and a lot of the fat has separated and starting to make a film on top.
DO NOT reduce the water all the way…
Turn off the burner
Prepare a plastic container, or a bowl, you are going to pour and spoon off the fat and the rest of the water. I usually press a bit ladle spoon down into the meat and gather up all the water and fat and ladle it into the the plastic container… This step is important we will use this stuff to make the tortillas delicious.
Once all the water and as much fat as you can has been drained out of the pan, put the pan back on the burner (that is off but still hot) stir the meat for a bit. Leave the meat in the pan on the burner to cool and slow cook as the burner continues to cool down.
The Basic idea is to first brown the meat a bit, add a bunch of water, bring to boil stir in spices and then boil down most of that water, in doing so separating most of the fat from the meat and turning the meat into a finely ground crumbles. This also infuses all the meat with the spice mix.
The Tortillas
Corn tortillas
2 plates
Softened butter, or Butter like substance
Bowl of water
The water and fat separated from the meat (it should be good and dark orange/brown)
Pre-Prepare the tortillas
Ladle one teaspoon of the taco meat water onto each side of every tortilla, spread a bit of butter onto each side of each tortilla let the tortilla rest for a bit so the water soaked in, fry them up until they bubble and turn a nice yummy color. Fresh tortillas from the store are crumbly, and have a white and raw texture, this techniques partially breaks down the corn flower and re-constitutes the tortilla through frying in the pan. This technique dramatically improves the taste of the tortilla and the taco. Also this technique improves the strength of the tortillas, they won’t crumble and break like warmed up raw tortillas, and are stronger and much more flavorful than steamed tortillas.
This technique is based on the technique my mom used to make tortillas. She was taught by her mexican friends to always fry corn tortillas in butter, LOTS of butter.
Dads Specific Procedure
Equipment Prep
Pan and spatula are selected and placed on a burner on the stove
A prep plate is placed on the counter beside the stove top right next to the burner you’ll be cooking the tortillas on
Butter and butter knife are placed next to the prep plate
Plastic container with the taco water is placed next to the prep plate
Teaspoon is placed on the prep plate
Tortillas are pulled out, package opened and placed next to the prep plate
A receiving plate is placed on the counter opposite side of the stove
Prepping the tortillas
Take a tortilla from the bag,
place it on a plate,
Ladle the taco meat water onto the tortilla
Spread a bit of butter onto the tortilla
Flip the tortilla over
Ladle another teaspoon of water
Spread another bit of butter
The next tortilla goes on top of the previous tortilla
Prepping the pan
Ideally you have a cast iron, or thick bottomed stainless steel frying pan
Ideally you have a thin bladed stainless steel spatula with a lot of springy flex and a good handle .
Turn a burner on high
Get that pan and burner hot,
If you drop butter in the pan and the butter starts to burn, the pan is too hot. Water dripped onto the pan should instantly turn to steam
Frying the Tortillas
Get a frying pan really hot, ¼ of full burner power, water should sizzle and pop as soon as it touches the pan.
DO NOT put tortillas into a cool pan, they will stick, and not turn out well
With a tortilla in one hand and a teaspoon of water in the other
drop a teaspoon of water, and or a bit of butter into the pan
Immediately plop a tortilla on that sizzling hopping water/butter
With a spatula press the tortilla down, it should sizzle energetically
With the spatulat pressing down swish the tortilla around the pan in circles 3 or 5 times
Lift up the spatula.. Let the tortilla sizzle on the pan on it’s own for a few seconds
As soon as the tortilla starts to bubble flip it over.
WARNING. If this technique is working the very rim of the tortilla will start to stick to the pan. THIS IS A GOOD THING, it means the tortilla was fully soaked, and is cooking properly. BUT if you just try to shove the spatula under the tortilla like a pancake, the tortilla will rip.
work your spatula around the whole edge of the tortilla to scrape the whole rim off the pan.
This whole process takes 3 to 5 seconds per side, Each tortilla maybe takes 20 seconds.
The tortilla is done when it has a golden brown crust on each side and starts to stiffen up
Slide that tortilla off the pan onto a separate dry “receiving” plate
I will try to do 2 tortillas at a time, sometimes 3 in a big pan, I have done 6 or 8 at a time on a big griddle we use for pancakes or french toast,
As you progress onto your 3rd or 4th tortilla, the pan may cool down, OR start to over heat, if you are doing a big batch of tortillas you will likely have to adjust the temperature several times (this is for a classic electric stove, gas burners are no problem, higher end electric stoves don’t have as much a problem
Why this works and tastes so good
The perfect tortilla is a golden brown on each side with bubbles that have made dark brown spots. The tortilla has a paper thin layer of dense brown cooked corn on each side of the tortilla, and the tortilla has a soft, completely cooked center.
This is achieved because my technique is both steaming the tortilla and frying it. Basically the whole tortilla gets steamed, and the thinnest outer part gets fried.
The water dissolves the corn flower, while infusing spices and fat from the meat into the corn meal. The hot pan turns the water to steam. and re-constitutes the corn meal into real yummy corn bread that holds together and has a much better texture than raw, or plane steamed/microwaved tortillas.
The butter fry’s the outside of the tortilla giving it a slightly crispy exterior and a bunch of flavor that is separate and different than the flavor of the inside of the thin tortilla.
The tortilla will LOOK COOKED, with no hints of the powdery colored look of a raw tortilla.
Storage and reheating
Leftover tortillas need to be stored in the fridge. These tortillas, because they have been cooked, will keep for a really long time and retain their flavor (weeks if kept in a ziploc baggie, or covered with plastic wrap.
RE-Heating. These tortillas taste just fine if nuked for 20 seconds in a sealed container with a slightly damp paper towel. Ideally a plate with a bit of plastic wrap over the top of it.
The Whole Taco Bar Spread
The third thing about Dads tacos is everybody gets to make their own the way they like them, with as little or as much of a plethora of ingredients.
Mains:
Dad’s Special Taco Meat
Dad’s Specially prepared corn tortillas
Flour Tortillas (12”)
Crunchy hard taco shells from a store
grated Tillamook sharp cheddar cheese
Finely Chopped onions
Finely Chopped fresh tomatoes
Finely chopped lettuce
Chili (ideally freshly made, but usually we do canned)
Re-Fried Beans
The Ideal taco bar also includes
Chopped Olives
Sour Cream
Uncle Ben’s Long Grain wild rice
Black beans (cooked)
Pinto beans (cooked)
Chopped baby onions
Salsa (ideally roasted chipotle or adobo)
Corn chips
grated Medium Cheddar cheese
grated jack cheese
grated colby cheese
Velveeta based cheese sauce (made with some taco seasoning)
Chili flakes/roasted thai chilis
Non vinegar based hot sauce (like the kind they make in mexican restaurants)
The ideal taco assembly in order
This ordering is not random or by fiat, but developed scientifically through over 40 years of experimentation trial and error. The order of ingredients DOES change the flavor and mouth feel of a taco. Also this order provides some structure and hope that the whole assemblage holds together as you fold, hold it and move it to your mouth.
Big Plate, ya need a big plate
1 to 6 tortillas laid out on the plate (if you do 6 you get the nickname el-gordo)
Spoon in refried beans down the center of each tortilla, spread it thin like peanut butter
Spoon in the meat on top of that
Chili
black beans
pinto beans
Salsa
All the cheese
Onions
Tomato
Baby onions
Olives
Cheese sauce
Sour cream
Sour Cream Technique
Sour cream should be closest to the lips, and the next thing after the tortillia that hits the taste buds. Sour cream is thick and sticky.Usually it can’t be labeled or spread on the loose fillings of a taco without messing it all up. Dad has discovered technique for getting sour cream on a loaded taco is to not try to blob it on top of all the loose stuff, but use a butter knife and spread it on the exposed lips of the tortilla, Sour cream is sticky, and spreads real well, you also don’t need a lot of it, spreading it on the lips of the tortilla will help hold the taco together as you take your first byte and spread out insurees every byte gets a bit of sour cream)
Dad’s Tacos DO NOT INCLUDE
Cilantro
Bell peppers of ANY kind
#dad#taco#taco talks#taco hemingway#philosophy#legacy#recipes#texmex#love#love through food#gratitude#inheritance#tacotuesday
11 notes
·
View notes
Text
i am craving some detroit style pizza and this recipe looks amazing and easy! if you do not have a cast iron pan, you can use a cake pan instead!
[[MORE]]
Ingredients
2 cups (240 grams) all-purpose flour (such as King Arthur Unbleached All-Purpose Flour)
3/4 teaspoon salt
1/2 teaspoon instant yeast or active dry yeast
3/4 cup (170 grams) lukewarm water
1 tablespoon (13 grams) olive oil plus 1 1/2 tablespoons (18 grams) olive oil for the pan
6 ounces (170 grams) low-moisture mozzarella, grated (about 1 1/4 cups, loosely packed)*
1/3 to 1/2 cups (74 grams to 113 grams) tomato sauce or pizza sauce, homemade or store-bought
Freshly grated hard cheese and fresh herbs for sprinkling on top after baking (optional)
Directions
Weigh your flour, or measure it by gently spooning it into the cup, then sweeping off any excess.
Place the flour, salt, yeast, water, and 1 tablespoon (13 grams) of the olive oil in the bowl of a stand mixer or other medium-large mixing bowl.
Stir everything together to make a shaggy, sticky mass of dough with no dry patches of flour. This should take 30 to 45 seconds in a mixer using the beater paddle; or about 1 minute by hand, using a spoon or spatula. Scrape down the sides of the bowl to gather the dough into a rough ball, then cover the bowl.
After 5 minutes, uncover the bowl and reach a bowl scraper or your wet hand down between the side of the bowl and the dough, as though you were going to lift the dough out. Instead of lifting, stretch the bottom of the dough up and over its top. Repeat three more times, turning the bowl 90 degrees each time. This process of four stretches, which takes the place of kneading, is called a fold.
Re-cover the bowl, and after 5 minutes do another fold. Wait 5 minutes and repeat, then another 5 minutes and do a fourth and final fold. Cover the bowl and let the dough rest, undisturbed, for 40 minutes. Then refrigerate it for a minimum of 12 hours, or up to 72 hours. It'll rise slowly as it chills, developing flavor; this long rise will also add flexibility to your schedule.
About 3 hours before you want to serve your pizza, prepare your pan. Pour 1 1/2 tablespoons (18 grams) olive oil into a well-seasoned cast-iron skillet that’s 10 inches to 11 inches diameter across the top, and about 9 inches across the bottom. Heavy, dark cast iron will give you a superb crust, but if you don’t have it, use another oven-safe heavy-bottomed skillet of similar size, or a 10-inch round cake pan or 9-inch square pan. Tilt the pan to spread the oil across the bottom, and use your fingers or a paper towel to spread some oil up the edges, as well.
Transfer the dough to the pan and turn it once to coat both sides with the oil. After coating the dough in oil, press the dough to the edges of the pan, dimpling it using the tips of your fingers in the process. The dough may start to resist and shrink back—that’s okay, just cover it and let it rest for about 15 minutes, then repeat the dimpling and pressing. At this point the dough should reach the edges of the pan—if it doesn’t, give it one more 15-minute rest before dimpling and pressing a third and final time.
Cover the crust and let it rise for 2 hours at room temperature. The fully risen dough will look soft and pillowy and will jiggle when you gently shake the pan.
About 30 minutes before baking, place one rack at the bottom of the oven and one toward the top (about 4 to 5 inches from the top heating element). Heat the oven to 450°F.
When you’re ready to bake the pizza, sprinkle about three-quarters of the mozzarella (a scant 1 cup) evenly over the crust. Cover the entire crust, no bare dough showing—this will yield caramelized edges. Dollop small spoonfuls of the sauce over the cheese (don't spread it!)—laying the cheese down first like this will prevent the sauce from seeping into the crust and making it soggy. Sprinkle on the remaining mozzarella.
Bake the pizza on the bottom rack of the oven for 18 to 20 minutes, until the cheese is bubbling and the bottom and edges of the crust are a rich golden brown (use a spatula to check the bottom). If the bottom is brown but the top still seems pale, transfer the pizza to the top rack and bake for 2 to 4 minutes longer. On the other hand, if the top seems fine but the bottom's not browned to your liking, leave the pizza on the bottom rack for another 2 to 4 minutes. Home ovens can vary a lot, so use the visual cues and your own preferences to gauge when you’ve achieved the perfect bake.
Remove the pizza from the oven and place the pan on a heatproof surface. Carefully run a table knife or spatula between the edge of the pizza and side of the pan to prevent the cheese from sticking as it cools. Let the pizza cool very briefly, then as soon as you feel comfortable doing so, carefully transfer it from the pan to a cooling rack or cutting surface. This will prevent the crust from becoming soggy.
Serve the pizza anywhere from medium-hot to warm. Kitchen shears or a large pair of household scissors are both good tools for cutting this thick pizza into wedges.
11 notes
·
View notes
Text
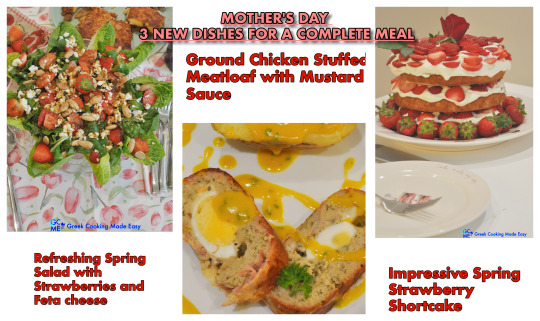
Ground Chicken Stuffed Meatloaf with Mustard Sauce
🍖

Ground Chicken Stuffed Meatloaf with Mustard Sauce – Gemisto Rolo Kotopoulo me saltsa Moustardas
BY: Greek Cooking Made Easy
SUBSCRIBE TO MY YOUTUBE CHANNEL: https://www.youtube.com/greekcookingmadeeasy
Check my YouTube Video: HERE
Κοιτάξτε επίσης την συνταγή μου σε YouTube βίντεο, το λίνκ είναι: ΕΔΩ
youtube
Serves 5-6 persons
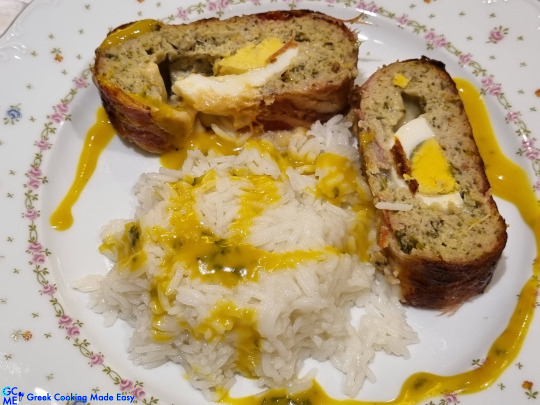
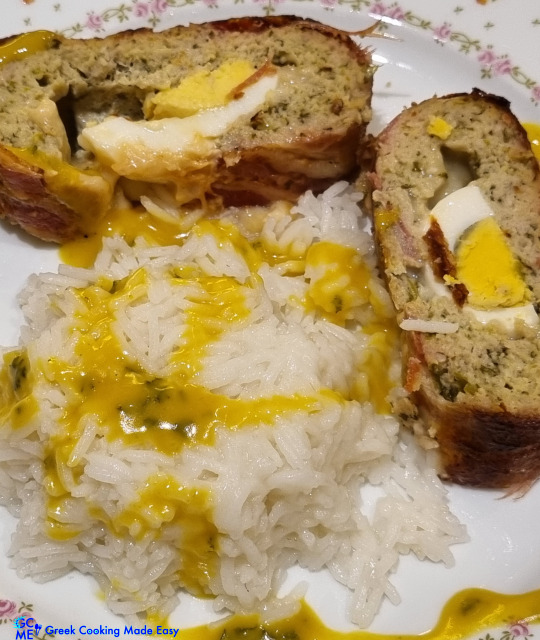
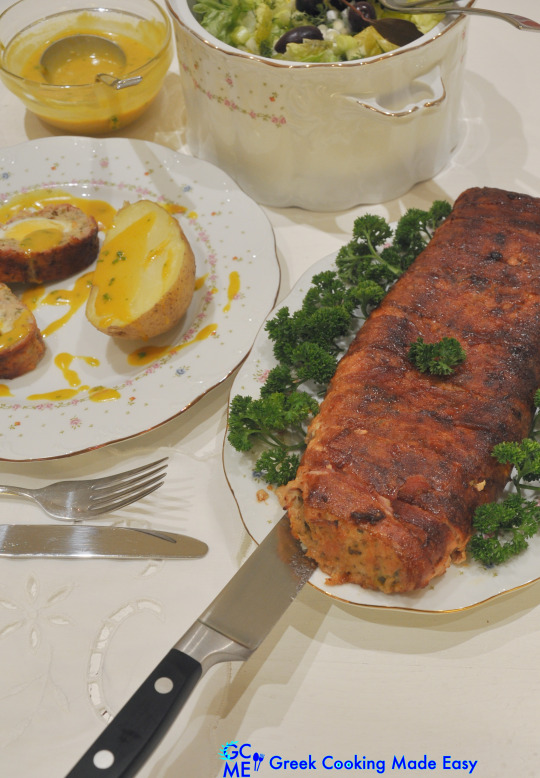
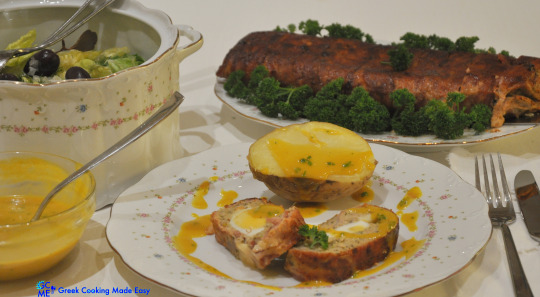
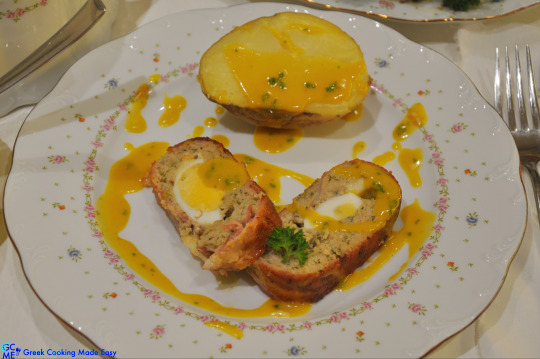
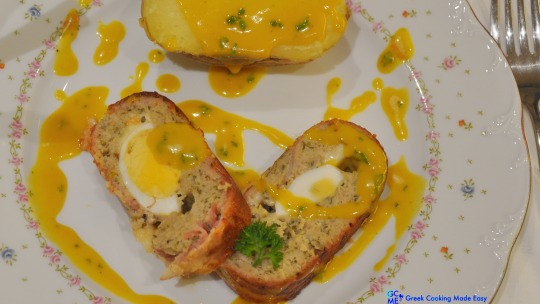
Those of you who enjoy a good Meatloaf will definitely love this dish. It’s a meatloaf made from ground chicken, with a lush stuffing of boiled eggs and mature Greek cheese, formed into a loaf, lusciously wrapped in bacon and baked to golden perfection.
Even at a celebratory dinner e.g. Christmas, Anniversary or Mother’s Day, where you have a buffet for lots of people, Chicken Meatloaf will undoubtedly stand as a beautiful centerpiece.
And its secret? It’s impressive and super delectable without costing you a fortune.
Looking for other Meatloaf Recipes? Check them all HERE
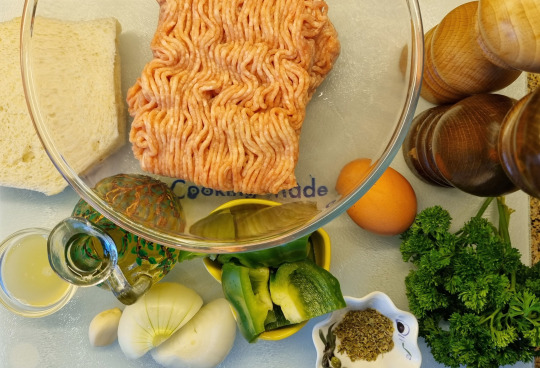
INGREDIENTS:
Ingredients for the meatloaf mix:
• 600 gr / 1 lb 5.5 oz Ground Chicken (or ground turkey)
• 100 gr / 3.5 oz / 3 slices Stale, white bread, without crust
• 1 medium Egg
• 1 medium Onion
• ½ Green Pepper (capsicum), in chunks
• 1 Garlic Clove
• 1 tbsp. dry Thyme
• ½ bunch fresh Parsley
• 2 tbsp. / 30 ml fresh lemon Juice (from 1 lemon)
• 3 tbsp. / 45 ml Olive Oil
• Freshly ground Salt and Pepper
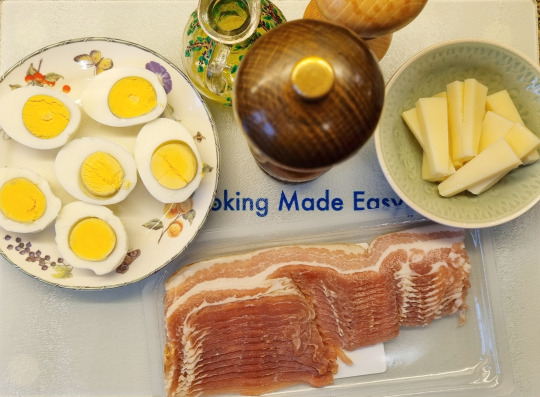
Ingredients for the stuffing:
• 3 hard-boiled Eggs, cut in half
• A bit Olive Oil to brush the oven tray
• 150 gr / 5.5 oz / 12 slices Bacon
• 70 gr / 2.5 oz Greek Graviera (from Lemnos) or Kefalograviera cut in sticks (altern: Gruyere or Manchego)
• Freshly ground Salt and Pepper
Ingredients for the Mustard Sauce:
• 2 tbsp. / 30 ml Mustard yellow, mild
• 1.5 tbsp. / 40 ml Greek Thyme Honey
• 1 tbsp. fresh Parsley, finely chopped
• 1 tbsp. / 15 ml Mayonnaise
• 1 tsp. / 5 ml fresh Lemon Juice
• 1 tbsp. / 15 ml Olive Oil
• Freshly ground Salt and Pepper

METHOD:
A. Prepare the Chicken Meatloaf mix 3-4 hours before baking:
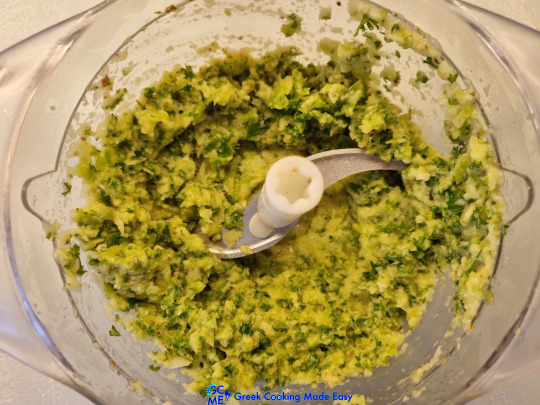
1. Pour the olive oil in a (hand) blender or food processor.
2. Add the lemon juice and the stale bread, cut in smaller pieces.
3. On top, add the onion, cut in 4ths and the garlic clove.
4. Add next the dry thyme and the green pepper chunks.
5. Beat all ingredients together for a couple minutes.
6. Then add the fresh parsley and beat to incorporate it in the mix. Reserve.
7. Place the ground chicken in a large bowl. Break the egg and add it in the mix.
8. Add the blended ingredients.
9. Season with ground pepper and salt, to taste.
10. Start kneading with your hands so that all meatloaf ingredients are homogenized.
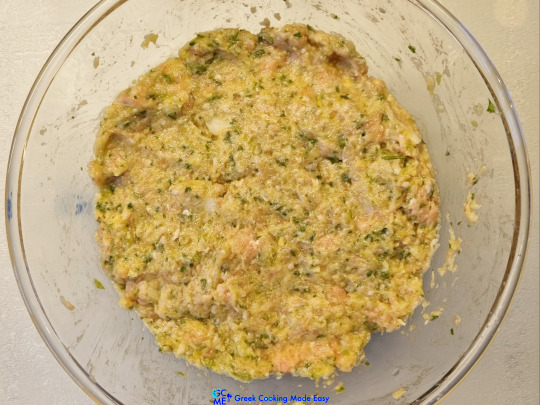
11. Cover the chicken meatloaf mix with plastic wrap and place in the fridge for 3-4 h to set and chill and for the aromas of the ingredients to blend.
B. Stuff and shape the Meatloaf:
12. Season the 3 halved, hard-boiled eggs.
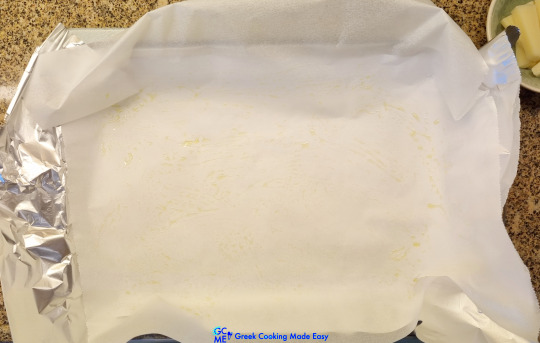
13. Line a large Pyrex dish of 25 x 35 cm. / 10 x 14 in. with aluminum foil at the bottom and then parchment paper on top.
14. Brush a bit olive oil on all the paper’s surface.
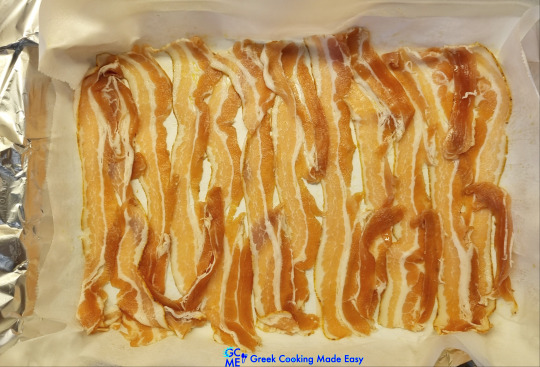
15. Spread first the bacon slices, the one next to the other, to cover completely the bottom of the paper.
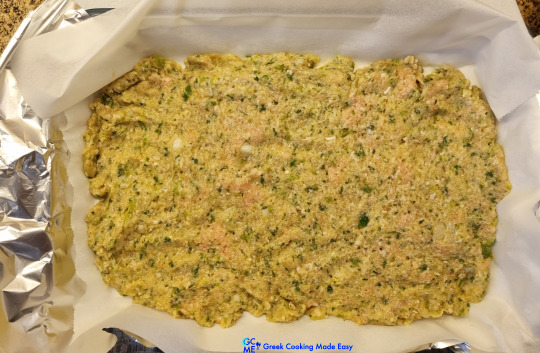
16. Now spread the chicken meatloaf mix on top of the bacon slices.
17. Try to make it flat and level.
18. Add the halved eggs in the middle of the meatloaf, in one line.
19. Place the cheese pieces on both sides of the eggs.
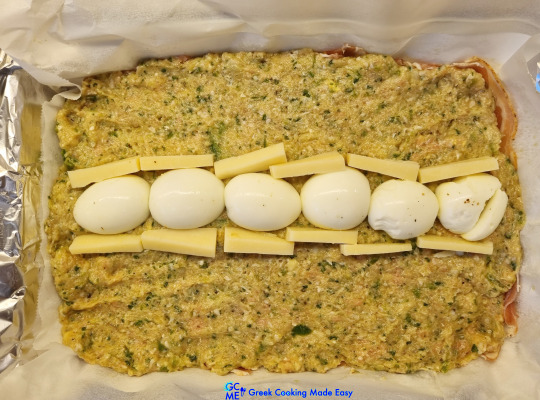
20. Using the parchment paper from one long side, lift and wrap the stuffing ingredients, so that they are covered by the ground chicken and bacon.
21. Then lift and wrap the other side to cover the stuffing completely, forming a large loaf.
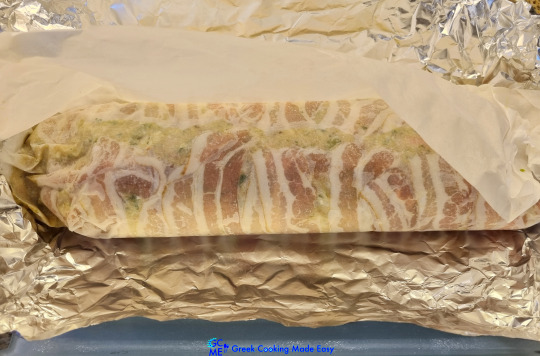
22. Fold the parchment paper to cover the loaf and then cover it again with the aluminum foil, securing both its ends.
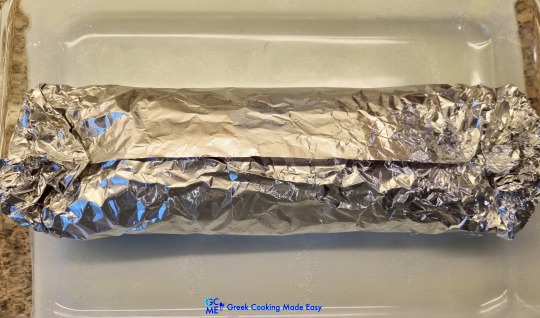
23. Place the loaf in the middle of the tray and shape it a bit more with your hands.
24. Chicken Meatloaf is now ready for slow baking!
C. Baking instructions:
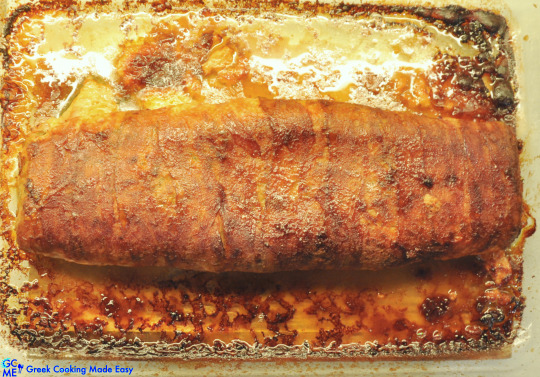
25. Bake the Chicken meatloaf in a preheated oven FAN @180℃ / 350℉, first wrapped, for 1 hour (depends on the oven).
26. After 1 hour, remove the tray from the oven.
27. Place it on the kitchen bench, and carefully remove the aluminum foil and parchment paper from around the meatloaf. Turn now meatloaf upside down (opening facing down).
28. Move the uncovered meatloaf again to the center of the tray and all its juices around it.
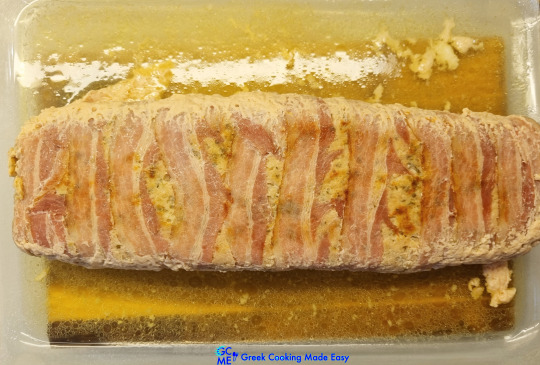
29. Return in the oven and bake it for about 30' more, to give it a beautiful, golden colored crust.
30. Halfway through, open the oven and baste and grease the meatloaf with some of its juices.
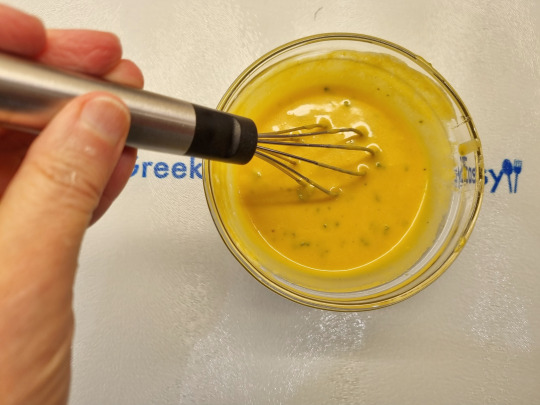
D. While waiting for the meatloaf to finish, make the mustard Sauce:
31. Place honey in a small bowl.
32. Pour on top the olive oil.
33. Add the mustard, lemon juice, mayonnaise, chopped parsley and seasoning.
34. Whisk all ingredients well to incorporate them.
35. Reserve.
E. Finish the dish:
36. After 30', Chicken Meatloaf should be ready. Remove the tray from the oven.
37. Leave the chicken Meatloaf to rest for 5'.
F. Serving suggestions:
You could either serve it as is, in an oblong platter, garnishing it with parsley around it...
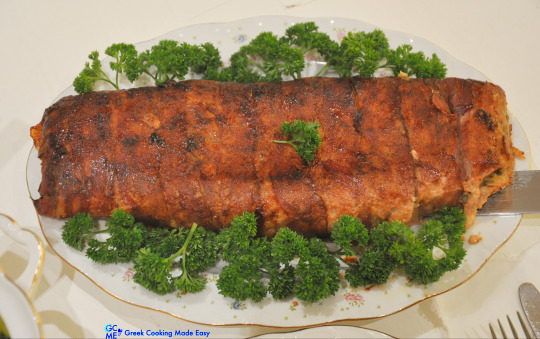
Or carve it in 10-12 thick slices, ready for serving.
Serve the Chicken Meatloaf, still hot from the oven, with a jacket potato, drizzling some of the sweet mustard sauce on top of the meatloaf slices and potato.
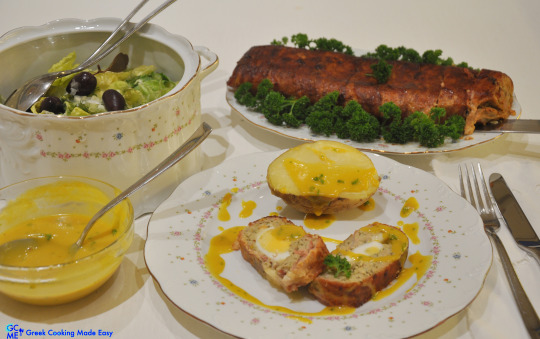

It can be served simply with a refreshing, Greek Lettuce salad.
Alternatively, you could serve it with Pilaf Rice (or basmati); it makes a great combo!! Recipe for Greek Pilaf Rice? Look HERE
Succulent, tender chicken meatloaf that has absorbed the delectable bacon flavor and is drizzled with a sweet and spicy sauce, to spice things up!
An amazing dish that will leave your guests in awe.

Bon appetit-Kali orexi 😍😋. Not that you’ll need it with all the appetizing smells!
Tip: If you are preparing it for a larger crowd, pls double the quantities and make 2 loaves.
Enjoy it!
G. Storage info:
Chicken loaf can be stored in the fridge in an airtight container, for up to 1 week.
Make a whole celebration meal for your Mom with the following:
Refreshing Spring Salad with Strawberries and Feta cheese HERE
Impressive Spring Strawberry Shortcake HERE
Check my YouTube Video: HERE
Γεμιστό Ρόλο Κοτόπουλο με σάλτσα Μουστάρδας
BY: Greek Cooking Made Easy
SUBSCRIBE TO MY YOUTUBE CHANNEL: https://www.youtube.com/greekcookingmadeeasy
Σερβίρει 5-6 άτομα
Όσοι από εσάς απολαμβάνετε ένα καλό Ρολό σίγουρα θα λατρέψετε αυτό το πιάτο. Ένα Ρολό φτιαγμένο από κιμά κοτόπουλου, με πλούσια γέμιση από βραστά αυγά και ώριμο Ελληνικό τυρί, τυλιγμένο λαχταριστά με μπέικον και ψημένο σε χρυσαφένια τελειότητα.
Ακόμη και σε ένα εορταστικό δείπνο π.χ. για τα Χριστούγεννα, Επέτειο ή την Ημέρα της Μητέρας, όπου έχετε έναν μπουφέ για πολλούς καλεσμένους, το Γεμιστό Ρολό Κοτόπουλο θα σταθεί αναμφίβολα σαν ένα εντυπωσιακό κεντρικό πιάτο.
Και το μυστικό του; Είναι τόσο εντυπωσιακό και απολαυστικό χωρίς να σας κοστίσει μια περιουσία.
Ψάχνετε άλλες Συνταγές για Ρολό γεμιστό? Δείτε ΕΔΩ
ΥΛΙΚΑ:
Υλικά για το μείγμα για το ρολό:
• 600 γρ / 1 lb 5,5 oz Κιμάς Κοτόπουλο (ή κιμάς γαλοπούλας)
• 100 γρ / 3,5 oz / 3 φέτες μπαγιάτικο, λευκό ψωμί, χωρίς κόρα
• 1 μέτριο Αυγό
• 1 μέτριο ξερό Κρεμμύδι
• ½ πράσινη Πιπεριά, κομμένη σε χοντρά κομμάτια
• 1 Σκελίδα Σκόρδο
• 1 κ.σ. ξερό Θυμάρι
• ½ ματσάκι φρέσκος Μαϊντανός
• 2 κ.σ. / 30 ml φρέσκος χυμός Λεμονιού (από 1 λεμόνι)
• 3 κ.σ. / 45 ml Ελαιόλαδο
• Φρεσκοτριμμένο Αλάτι και Πιπέρι
Υλικά για τη γέμιση:
• 3 βραστά Αυγά, κομμένα στη μέση
• Λίγο ελαιόλαδο για να αλείψετε το ταψί του φούρνου
• 150 γρ / 5,5 oz / 12 φέτες Μπέικον
• 70 γρ / 2,5 oz Γραβιέρα (από τη Λήμνο) ή Κεφαλογραβιέρα, κομμένη σε μπαστουνάκια
• Φρεσκοτριμμένο Αλάτι και Πιπέρι
Υλικά για τη σάλτσα Μουστάρδας:
• 2 κ.σ. / 30 ml Μουστάρδα κίτρινη, ήπια
• 1,5 κ.σ. / 40 ml Θυμαρίσιο Μέλι
• 1 κ.σ. φρέσκος Μαϊντανός, ψιλοκομμένος
• 1 κ.σ. / 15 ml Μαγιονέζα
• 1 κ.γ. / 5 ml φρέσκος χυμός Λεμονιού
• 1 κ.σ. / 15 ml Ελαιόλαδο
• Φρεσκοτριμμένο Αλάτι και Πιπέρι
ΜΕΘΟΔΟΣ:
Α. Ετοιμάζετε το μείγμα για το ρολό κοτόπουλο 3-4 ώρες πριν το ψήσιμο:
1. Ρίξτε το ελαιόλαδο μέσα σε ένα (ραβδο) μπλέντερ ή επεξεργαστή τροφίμων.
2. Προσθέστε το χυμό λεμονιού και το μπαγιάτικο ψωμί, κομμένο σε μικρότερα κομμάτια.
3. Από πάνω προσθέστε το κρεμμύδι κομμένο στα 4 και τη σκελίδα σκόρδο.
4. Προσθέστε στη συνέχεια το ξερό θυμάρι και την πράσινη πιπεριά σε κομμάτια.
5. Χτυπήστε όλα τα υλικά μαζί για λίγα λεπτά.
6. Στη συνέχεια προσθέστε τον φρέσκο μαϊντανό και χτυπήστε καλά να ενσωματωθεί στο μείγμα. Βάλτε στην άκρη.
7. Τοποθετήστε το κιμά κοτόπουλου σε ένα μεγάλο μπολ. Σπάστε το αυγό και προσθέστε το στο μείγμα.
8. Προσθέστε τα χτυπημένα στο μπλέντερ υλικά.
9. Καρυκέψτε με φρεσκοαλεσμένο πιπέρι και αλάτι, κατά βούληση.
10. Ξεκινήστε να ζυμώνετε με τα χέρια σας, ώστε να ομογενοποιηθούν καλά όλα τα υλικά για το Ρολό.
11. Σκεπάστε το μείγμα με πλαστική μεμβράνη και βάλτε το στο ψυγείο 3-4 ώρες για να δέσει και να παγώσει και να αναμειχθούν τα αρώματα των υλικών.
Β. Γεμίστε και πλάστε το Ρολό:
12. Αλατοπιπερώστε τα τρία-κομμένα στη μέση-βραστά αυγά.
13. Στρώστε ένα μεγάλο ταψί Πυρέξ των 25 x 35 εκ. / 10 x 14 in. με αλουμινόχαρτο στο κάτω μέρος και μετά λαδόκολλα από πάνω.
14. Αλείψτε με λίγο ελαιόλαδο όλη την επιφάνεια της λαδόκολλας.
15. Απλώστε πρώτα τις φέτες μπέικον, τη μία δίπλα στην άλλη, ώστε να καλυφθεί εντελώς ο πάτος της λαδόκολλας.
16. Τώρα απλώστε το μείγμα με το κιμά κοτόπουλου πάνω από τις φέτες μπέικον.
17. Προσπαθήστε να το στρώσετε εξίσου και να είναι επίπεδο.
18. Προσθέστε τα αβγά στο μέσο του Ρολού, σε μία σειρά.
19. Τοποθετήστε τα μπαστουνάκια τυριού και στις δύο πλευρές των αυγών.
20. Χρησιμοποιώντας τη λαδόκολλα από τη μια μακριά πλευρά της, ανασηκώστε και τυλίξτε τα υλικά της γέμισης, ώστε να καλυφθούν από το μίγμα με τον κιμά κοτόπουλο και με το μπέικον.
21. Στη συνέχεια ανασηκώστε και τυλίξτε την άλλη πλευρά για να καλυφθεί εντελώς η γέμιση, σχηματίζοντας ένα μεγάλο Ρολό, σα ���καρβέλι’.
22. Διπλώστε τη λαδόκολλα για να καλύψει το Ρολό και στη συνέχεια σκεπάστε το ξανά από πάνω με το αλουμινόχαρτο, στερεώνοντας καλά και τις δύο άκρες του.
23. Τακτοποιήστε το Ρολό στο μέσο του ταψιού και πλάστε το λίγο ακόμα με τα χέρια σας.
24. Το Ρολό Κοτόπουλο είναι τώρα έτοιμο για αργό ψήσιμο!
Γ. Οδηγίες ψησίματος:
25. Ψήστε το Ρολό κοτόπουλο σε προθερμασμένο φούρνο, στο ζεστό αέρα @180℃ / 350℉, πρώτα τυλιγμένο, για 1 ώρα (εξαρτάται από το φούρνο).
26. Μετά από 1 ώρα, βγάλτε το ταψί από το φούρνο.
27. Τοποθετήστε το στον πάγκο της κουζίνας, και αφαιρέστε προσεκτικά το αλουμινόχαρτο και τη λαδόκολλα από γύρω του. Αναποδογυρίστε τώρα το Ρολό (το άνοιγμα του προς τα κάτω).
28. Μετακινήστε ξανά το ξεσκέπαστο Ρολό στο κέντρο του ταψιού με όλα τα ζουμιά του γύρω του.
29. Επιστρέψτε το ταψί στο φούρνο και ψήστε το Ρολό για περίπου 30' ακόμα, ώστε να αποκτήσει μια όμορφη, χρυσαφένια κρούστα.
30. Στα μισά του ψησίματος, ανοίξτε το φούρνο και περιχύστε το Ρολό με τους χυμούς του.
Δ. Περιμένοντας να τελειώσει το Ρολό, φτιάξτε τη σάλτσα μουστάρδας:
31. Τοποθετήστε το μέλι σε ένα μικρό μπολ.
32. Ρίξτε από πάνω το ελαιόλαδο.
33. Προσθέστε τη μουστάρδα, το χυμό λεμονιού, τη μαγιονέζα, τον ψιλοκομμένο μαϊντανό και το αλατοπίπερο.
34. Ανακατέψτε καλά όλα τα υλικά να ενσωματωθούν.
35. Βάλτε στην άκρη.
Ε. Τελειώστε το φαγητό:
36. Μετά από 30', το Ρολό κοτόπουλο πρέπει να είναι έτοιμο. Βγάλτε το ταψί από το φούρνο.
37. Αφήστε το Ρολό κοτόπουλο να ξεκουραστεί για 5'.
Ζ. Προτάσεις σερβιρίσματος:
Μπορείτε είτε να το σερβίρετε όπως είναι σε μια μακρόστενη πιατέλα, γαρνίροντάς το με μαϊντανό τριγύρω του.
Ή κόψτε το σε 10-12 χοντρές φέτες, έτοιμο για σερβίρισμα.
Σερβίρετε το Γεμιστό Ρολό Κοτόπουλο, ακόμα ζεστό από το φούρνο, με μια ψητή πατάτα-τζάκετ, περιχύνοντας λίγη από τη γλυκιά σάλτσα μουστάρδας πάνω από τις φέτες Ρολό και την πατάτα.
Μπορείτε να το σερβίρετε απλά με μια δροσιστική μαρουλοσαλάτα.
Εναλλακτικά, μπορείτε να το σερβίρετε με πιλάφι (ή ρύζι μπασμάτι), κάνουν ένα υπέροχο συνδυασμό!! Δείτε τη Συνταγή μου για Πιλάφι ΕΔΩ
Ζουμερό, τρυφερό Ρολό κοτόπουλου που έχει απορροφήσει την απολαυστική γεύση από το μπέικον και είναι περιχυμένο με μια γλυκιά και πικάντικη σάλτσα, για να ολοκληρώσει τη θεσπέσια γεύση του!
Ένα καταπληκτικό πιάτο που θα αφήσει τους καλεσμένους σας σε δέος.
Καλή σας Όρεξη 😍😋. Όχι ότι θα τη χρειαστείτε με όλες τις ορεκτικές μυρωδιές!
Συμβουλή: Αν το ετοιμάζετε για περισσότερο κόσμο, διπλασιάστε τις ποσότητες και φτιάξτε 2 Ρολά.
Απολαύστε το!
Η. Πληροφορίες Φύλαξης:
Το Ρολό κοτόπουλο μπορεί να διατηρηθεί στο ψυγείο, σε αεροστεγές δοχείο, έως και 1 εβδομάδα.
Φτιάξτε ένα ολόκληρο γιορταστικό δείπνο για τη Γιορτή της Μητέρας με:
Δροσιστική Ανοιξιάτικη Σαλάτα με Φράουλες και Φέτα ΕΔΩ
Εντυπωσιακό Ανοιξιάτικο Σόρτκεικ με Φράουλες ΕΔΩ
Κοιτάξτε επίσης την συνταγή μου σε YouTube βίντεο, το λίνκ είναι: ΕΔΩ
#lunch#dips#maincourse#dinner#poultry#egg#leftovers#easter#easterfood#party#kids#mother#children#keto#meatloaf#chicken meatloaf#ρολο γεμιστο κοτοπουλο#ρολό γεμιστό κοτόπουλο#christmas#christmasfood
0 notes
Photo


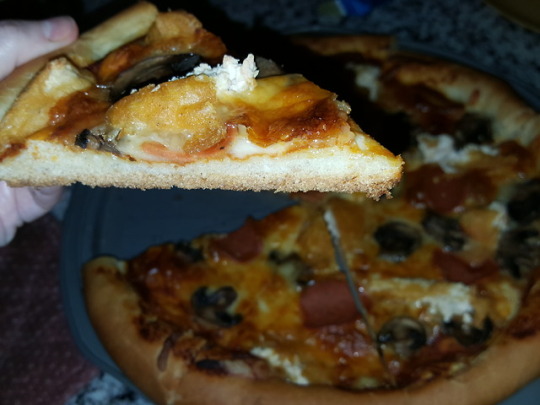
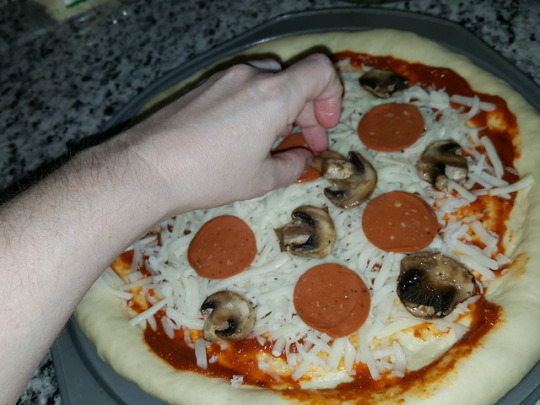


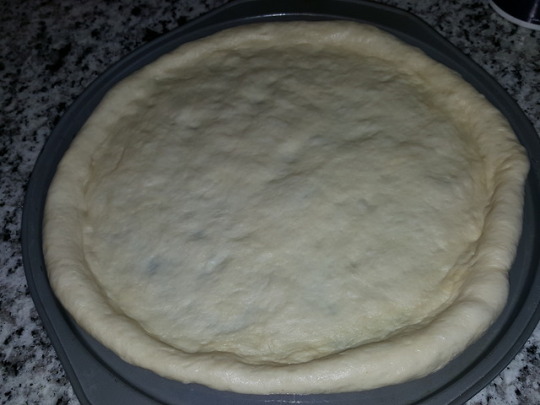
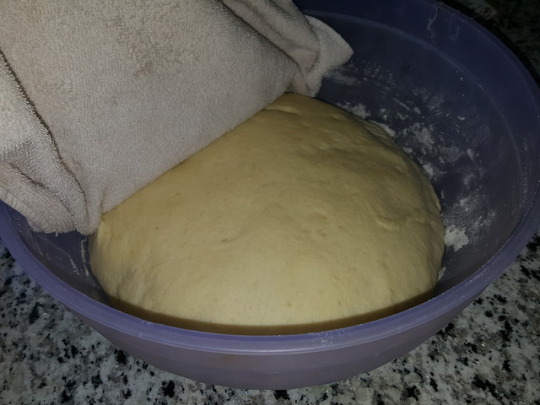
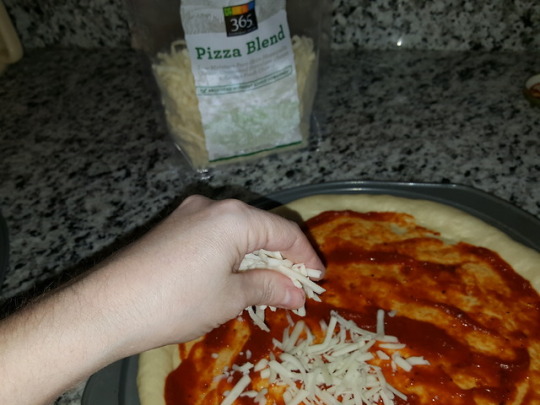

Fish Stew Pizza
Fish Stew Pizza is one of the staples of Beach City cuisine, but it's not a particularly popular item for fans to recreate. Why?
Well, because "fish" and "stew" and "pizza" don't really go in the same sentence too smoothly, do they?
But I found a way to make a pretty appetizing Fish Stew Pizza, based primarily on a combination of cartoon pizzas:
The "Large Pizza, Extra Fishy" pizza Steven was seen hate-eating after Lion abandoned him in "Steven's Lion"
The mushroom pizza his dad got him at the end of "Storm in the Room"
The pepperoni pizza that was used for "pizza rain" during "Joy Ride"
It all starts with a homemade pizza recipe. . . . Learn how to do it if you read more below!
See more SU food tutorials!
For pizza, you will need the following items:
1 cup warm water, 110º F to 115º F / 43º C to 46º C
2 tablespoons sugar
1 teaspoon active dry yeast
¼ cup vegetable oil
1 teaspoon salt
2 to 2 ½ cups flour
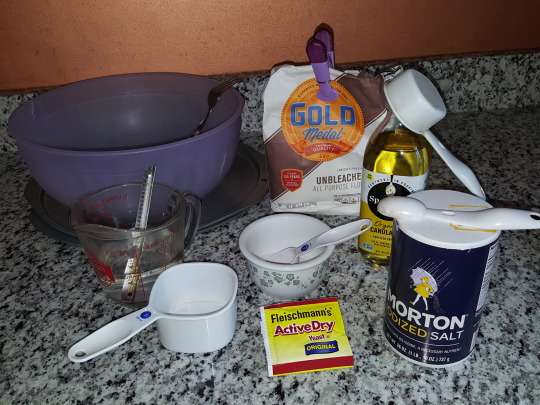
Get the water ready. Make sure you take the water’s temperature. If it’s not hot enough you could fail to activate the yeast, and if it’s too hot, you’ll kill it.
First, pour in your sugar. You should stir it until it dissolves. Then pour in your yeast and stir it up, and leave it alone for about 10 minutes.
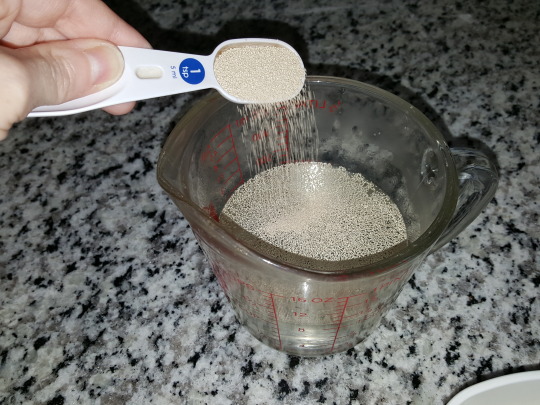
The yeast will foam and puff up. It should look like this.
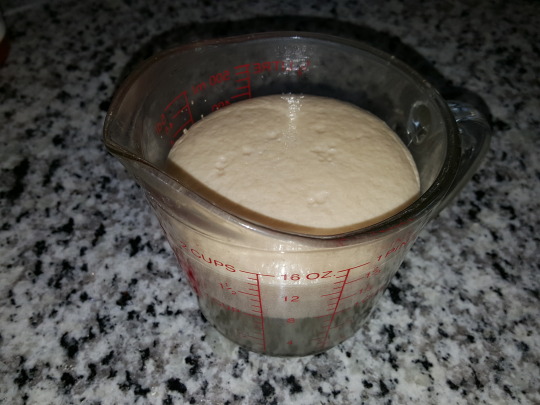
Dump the yeast into a big bowl, add your ¼ cup of vegetable oil and stir that in. Then add your 1 teaspoon of salt and begin with ¾ cup of flour to mix in with a fork.
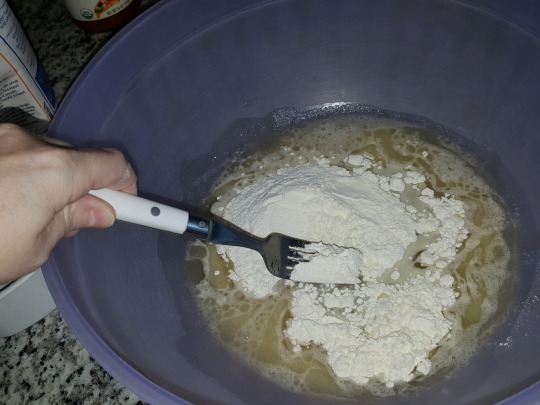
It will be sticky. From here add another cup of flour, work that in with the fork, and begin adding more flour in increments of ¼ cup until you have a dough that is the right consistency. You are looking for handleable, non-sticky dough, but it should be very malleable and soft, without becoming crusty.
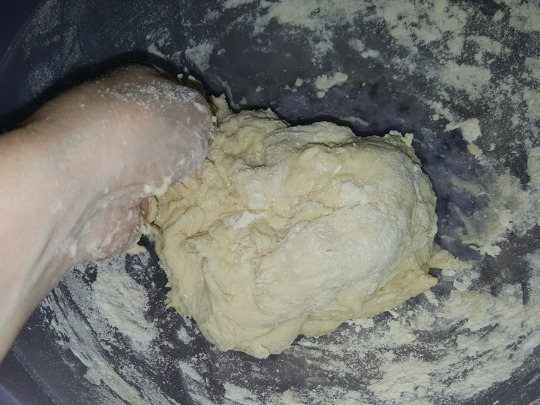
You’ll need to work that dough for 8 to 10 minutes. Knead it in the bowl until the time is up.
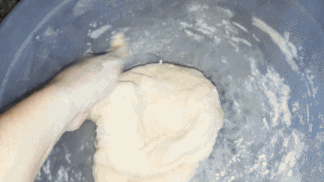
And then you put the bowl in a warm spot and cover it to let it rise. I like to put it by the window where my plants are.

My recipe recommends 45 minutes to an hour for rising. I waited a little longer than an hour and got this.
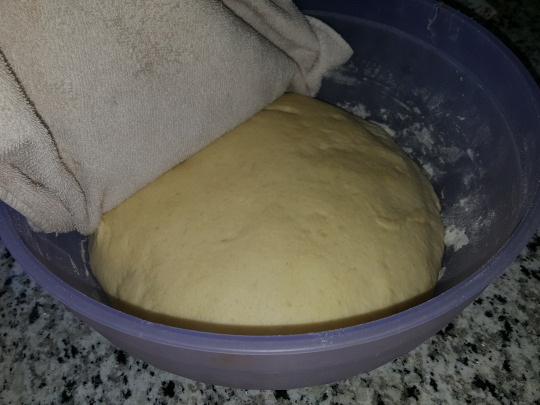
Now, punch it down.
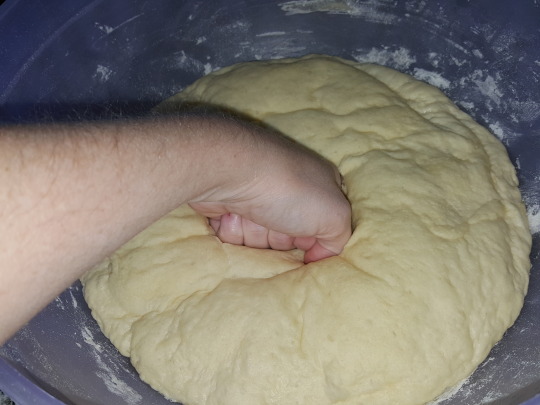
You will now divide the dough in two. This recipe makes two pizzas. I used the other pizza dough to make Amethyst's burrito pizza, so from here on in the recipe focuses on the single pizza that we’ll make a Fish Stew Pizza with. Take your one ball of dough and begin to spread it out on a 12-inch pizza pan.
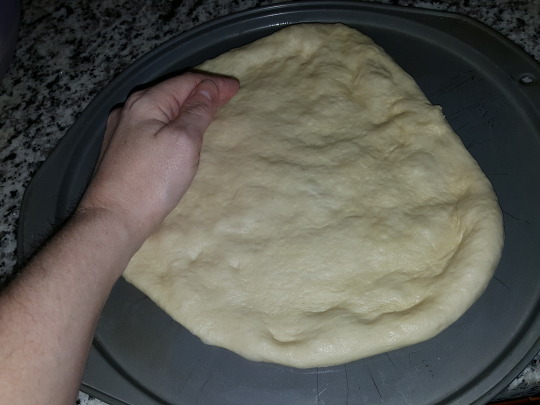
A really helpful tip for this dough: You should roll the dough out from the middle of the pan using the heels of your hands. Do NOT stretch the dough–it tears. Do not pinch the dough’s bubbles or pick up pieces of it to plug holes. Do not throw it in the air. Just use some Sapphire patience and little by little press and roll until it begins to spread out toward the edges of the pan.
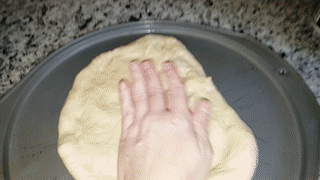
You should try to leave a little border for the crust.
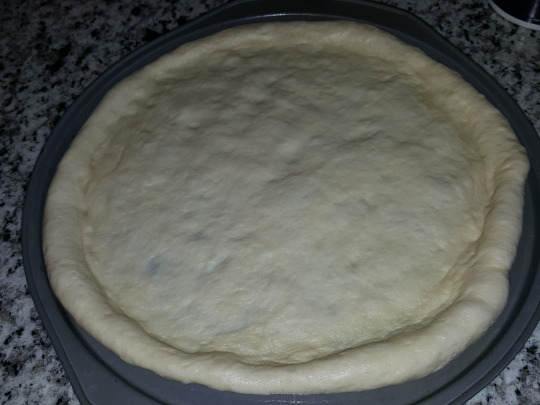
Now you want to fill the pizza! Here are the ingredients I used:
Pizza sauce
Pizza cheese
Vegetarian pepperoni
Mushrooms
Vegetarian fish fillets

First, a note on the "fish." I don't eat fish so I bought these frozen fake fish fillets. Before putting them on the pizza, I cooked them separately in the oven. If you get a similar product, vegetarian fish or real fish, you can just prepare the product you have according to the directions. I recommend cooking the fish first (and most recipes will ask you to flip them over part-way through). Mine cooked for about 12 minutes on each side, and then I chopped them into much smaller pieces to become pizza toppings.
While the "fish" is cooking, you can prepare the rest of the pizza. Spread the pizza sauce on the face of the pizza.
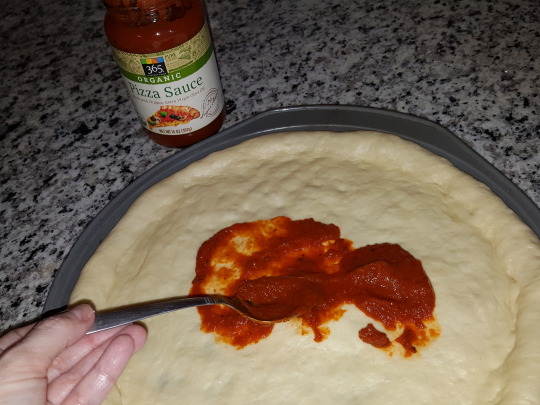
Sprinkle cheese!
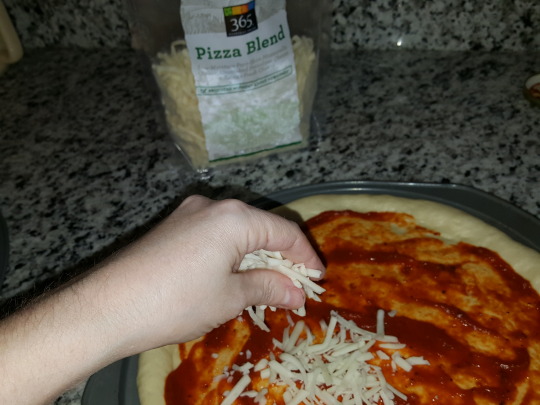
Add pepperoni! I used Yves brand vegetarian pepperoni because I don’t eat meat, but you can use the real stuff if you want.
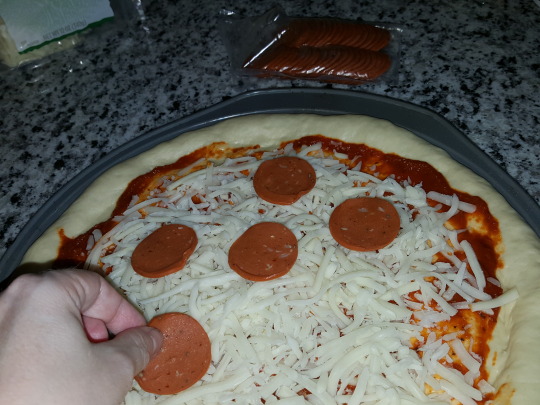
Now here's an important trick for oven-baked pizzas that wanna use mushrooms: microwave your bowl of sliced mushrooms for about a minute and drain them before you put them on the pizza. Mushrooms have a LOT of water in them and when they cook they will pee water all over your pizza, making it soggy. Can't have that!

Then add the fish pieces.
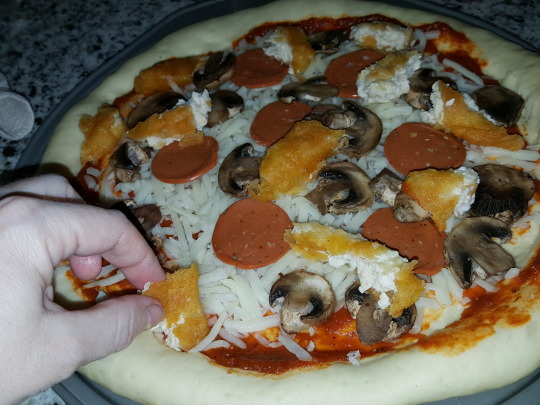
Then put it in the oven at 350ºF / 175ºC. You will bake it for about 30 minutes.
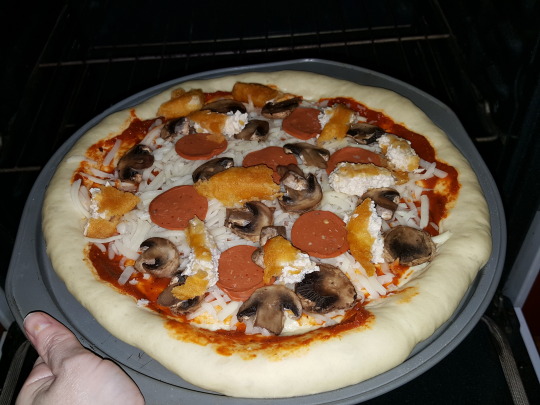
When it’s finished, take it out and let it cool.
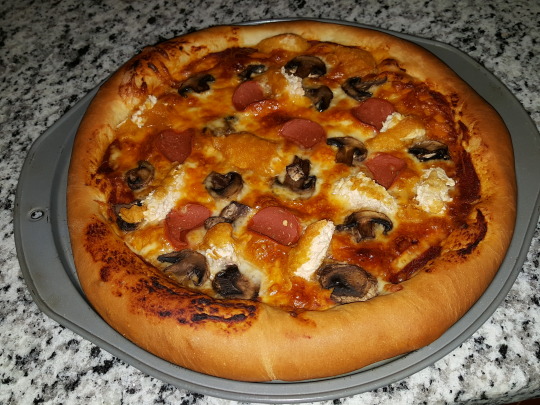
You're done!

"Is it good?" everyone always asks when I make weird recipes.
Truthfully? YES, YES IT IS GOOD. People turn their noses up at the idea of fish on pizza sometimes, but if you like fish, think about whether you would like it topped with cheese, tomato sauce, and a little breading. Yes? Well, that's what this tastes like. Except backwards.

ENJOY!
See more SU food tutorials!
63 notes
·
View notes
Link
Homemade pizza!. Next time I'll be a bit more. Tikka pizza with homemade pizza sauce - green pasta salad - orange soda Chicken fajita pizza-Premium quality chicken fajita pizza by the Kitchen Bistro-homemade pizza video. Learn how to make homemade pizza with this easy recipe!
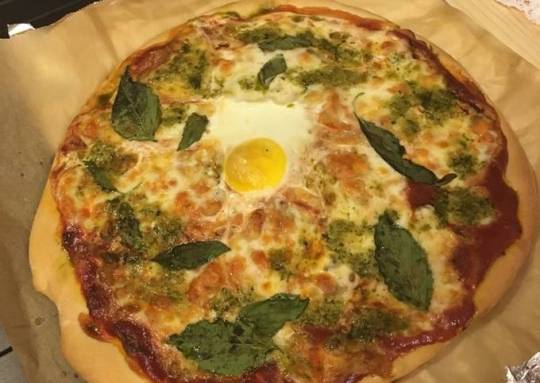
The dough itself requires few ingredients and just a little bit of rising and rest time. Here are the best homemade pizza recipes: top-rated pizza dough, fan-favorite pizza sauce, and topping ideas galore. Our honeymoon to Italy changed the way we thought about pizza.
Hello everybody, hope you're having an amazing day today. Today, I will show you a way to prepare a special dish, homemade pizza!. It is one of my favorites food recipes. This time, I will make it a little bit tasty. This will be really delicious.
Next time I'll be a bit more. Tikka pizza with homemade pizza sauce - green pasta salad - orange soda Chicken fajita pizza-Premium quality chicken fajita pizza by the Kitchen Bistro-homemade pizza video. Learn how to make homemade pizza with this easy recipe!
Homemade pizza! is one of the most popular of current trending foods on earth. It is enjoyed by millions every day. It is simple, it is fast, it tastes delicious. They are nice and they look fantastic. Homemade pizza! is something that I've loved my whole life.
To get started with this particular recipe, we must first prepare a few ingredients. You can cook homemade pizza! using 13 ingredients and 11 steps. Here is how you cook that.
The ingredients needed to make Homemade pizza!:
{Prepare of flour.
{Prepare of - 350ml Luke warm water.
{Make ready of dry active yeast.
{Take of salt.
{Take of black pepper.
{Prepare of olive oil.
{Make ready of - pizza base --.
{Take of tomato paste/passata.
{Make ready of garlic - minced.
{Take of Dried oregano.
{Get of Dried parsley.
{Prepare of Fresh basil.
{Take of water.
Skip store-bought, frozen pizza and make homemade pizza dough from scratch. This perfectly chewy pizza crust recipe, from our friends at Real Simple, is an easy way to make pizza night a whole lot. Homemade pizza recipe to prepare spicy sausage pizza with a thick crust and delicious toppings like smoked or spicy sausage, cheese, and sunny-side-up eggs. Homemade pizza with red sauce, sausage and sauteed portabella mushrooms!
Instructions to make Homemade pizza!:
Preheat the oven to 220c (240c if no fan).
Mix 150ml of the water with the yeast until all of the yeast is dissolved. Set aside for 10min.
Meanwhile whisk together the flour, salt, and pepper.
Pour the olive oil into the yeast mixture and mix well.
Make a well in the centre of the dry ingredients and pour the yeast mixture into it. Mix it to form a slightly sticky and soft dough. Add the remaining 100ml water in until it feels the right consistency (should be soft but not too sticky). If it's too sticky, add an extra sprinkle of flour..
Place the dough on a lightly floured surface. With floured hands knead the dough for 10min until the right consistency..
Lightly oil a large bowl - it should be big enough to allow the dough to double in size. Put the dough inside and cover with cling film. Set aside in a warm place for 1-2 hours.
Meanwhile make the pizza base. Combine all ingredients for the base in a large sauce pot on the stove. Let it heat until it begins to boil, and then simmer it for 10min. Take it off the heat and let it cool..
When the dough has doubled in size, remove the cling film and place the dough on a floured surface to knead again until smooth. Divide into two round balls and let the dough rest before shaping..
Lightly flour the dough and surface and work the pizza until it's nice and thin..
Using a ladle, spread the base on the pizza and place whichever toppings you'd like! This pizza had some mozzarella, basil, pesto, and an egg! I also love a good pineapple and Parma ham topping :) enjoy!.
This is where things get REALLY fun and you can customize your pizza(s) to your heart's content! The name tells you that this is an amazing dinner for you and family! I believe that this tasty recipe will force you to go immediately to a kitchen! Our Homemade Pizza Recipes Will Make You Forget All About Delivery. Pizza is fun to make at home, especially with our easy dough recipes and inspired topping ideas.
So that's going to wrap this up with this exceptional food homemade pizza! recipe. Thank you very much for your time. I am confident that you will make this at home. There's gonna be interesting food in home recipes coming up. Remember to save this page in your browser, and share it to your family, colleague and friends. Thank you for reading. Go on get cooking!
0 notes
Link
5 Minute White Sauce with Soy Milk.
Hey everyone, it's Drew, welcome to our recipe page. Today, we're going to prepare a distinctive dish, 5 minute white sauce with soy milk. One of my favorites food recipes. This time, I am going to make it a little bit unique. This will be really delicious.
5 Minute White Sauce with Soy Milk is one of the most well liked of recent trending meals on earth. It is enjoyed by millions daily. It's simple, it's fast, it tastes delicious. They are nice and they look fantastic. 5 Minute White Sauce with Soy Milk is something which I have loved my entire life.
To begin with this particular recipe, we must prepare a few components. You can cook 5 minute white sauce with soy milk using 16 ingredients and 12 steps. Here is how you cook that.
The ingredients needed to make 5 Minute White Sauce with Soy Milk:
{Get of Basic white sauce.
{Make ready 2 tbsp of Olive oil.
{Get 2 tbsp of Flour.
{Take 200 ml of Soy milk.
{Take 1/4 of Onion (finely chopped).
{Make ready 2 pinch of ~ (as needed) Salt (or consomme soup stock).
{Get of Gratin ingredients.
{Prepare 1/2 clove of Garlic.
{Take 1 slice of Chicken (substitute with shrimp or tuna).
{Make ready 1 of Broccoli, asparagus (whatever veggies you like).
{Take 1 large of Potato.
{Take 1/2 of Onion.
{Get 1/2 clove of Garlic.
{Prepare 1/2 of cube Consomme soup stock.
{Prepare 100 grams of total Gouda, Gruyere cheese (or sliced cheese).
{Prepare 1 of lots Grated cheese.
Steps to make 5 Minute White Sauce with Soy Milk:
Halve the garlic, and smear the gratin dish with the cut side of garlic to help season the gratin..
[Make the white sauce] Heat olive oil in a pot, and saute the chopped onions over low heat. Once wilted, sprinkle in the flour..
Saute over low heat while combining the onions and flour. Once the flour is incorporated and starts to brown lightly, turn off heat and pour in the cold soy milk all at once..
Stir well and once the lumps are gone, turn on heat to low~medium, add in consomme and continue stirring. The sauce is done once it becomes creamy..
[How to make the white sauce in a microwave] In a large heatproof bowl, add in the white sauce ingredients and whisk well. Mix in the sautéed onions,.
Microwave for 1.5 to 2 minutes without covering. Once the edges start bubbling, take it out and beat swiftly with a whisk..
Put it back in the microwave and heat for 1 minute. Take it out and mix well. Repeat this process for 1 to 2 more times and once it's thick enough for you, it's done!.
Cut the potato into slices, soak in water, and boil in salt water (or microwaving is fine too!) With the leftover boiling water, parboil the other veggies..
Season the chicken or shrimp with salt and pepper. Quickly saute with onions in a heated frying pan with oil. Don't overcook since they will be cooked later in the oven..
Spread out the sliced potatoes, crushed consomme, half of the white sauce, chicken, veggies, the other half of the white sauce on a gratin dish in that order..
Top with plenty of cheese of your choice (to about the point where the other ingredients can't be seen), and it's done after baking in a preheated 200℃ until browned..
I made this into a chicken pot pie by placing a pie crust on top.. https://ift.tt/3fuPBKU.
So that's going to wrap this up with this exceptional food 5 minute white sauce with soy milk recipe. Thank you very much for your time. I am sure you can make this at home. There is gonna be more interesting food in home recipes coming up. Don't forget to bookmark this page in your browser, and share it to your family, colleague and friends. Thank you for reading. Go on get cooking!
0 notes
Text
Mimi’s Home Bakery
Kate O’Connor| Review | April 1, 2021
Whether it's cookies, pies, cakes, cupcakes, muffins, brownies...you name it- Mimi can make it. While in the kitchen with Mary Daniels Nahley Jones, or “Mimi”, you would never guess that this lean, energetic, eighty-four year old home baker, has zero professional culinary training. Mimi’s kitchen is not large by any measure, but it has a warm and cozy feel, with its own unique scent of freshly baked cookies whisked from the oven. Whenever we baked with Mimi there seemed to be flour, and mixing bowls all over the counter. However, the ingredients always seemed to be organized in perfect order. Her pantry is also stocked with at least three packages of King Arthur's flour, two large cans of Crisco, several canisters of White Granulated Sugar, and bags of Ghirardelli Chocolate Chips. Also, her refrigerator always holds a jug of homemade, Sweet Tea. However, no visit to Mimi’s kitchen is complete without squirting some of her homemade Simple Syrup in a glass of her Sweet Tea while indulging in her famous brownies. Mimi currently lives in Southport, North Carolina, which has been home to her for more than twenty years.
Mimi raised three children in Danbury, Connecticut (in order of birth); Sue, Jeffrey, and Ann who now have children of their own. While her children were growing up, Mimi carried on her mother’s tradition of always having freshly baked desserts in the kitchen for the house to munch on. From a young age, Mimi was inspired by her own mother’s baking, and wanted to “follow in her footsteps''. She is now an active grandmother, and according to her grandchildren, the best baker they know. When she’s not baking, Mimi is either golfing, playing tennis, swimming, selling handcrafted baby knick-knacks to a local store, doing yoga, volunteering at church, or simply watching Netflix. However, Mimi’s passion for baking didn’t evolve until she started a family, and needed recipes to make for her household.

(Mimi on Thanksgiving Eve in 2011, holding one of her daughter’s favorites, Banana Cream Pie)
Tell me a little bit about yourself and how you got into baking?
I grew up in Pawling, New York which is about 65 miles north of New York City. I lived with my mom, dad, brother, and grandparents. We went to live with my grandparents, because my grandfather was very ill at one point and needed people to take care of him. So I always lived at my grandmother’s house. My mother always had something freshly baked, practically everyday. She was the one who inspired me. She was a wonderful pie maker, a wonderful cake maker, cookies, muffins...You name it. She could do it. My mother’s name was Helen Green Daniels and she was a teacher. She taught elementary school, got married, and of course women back then didn’t work after they got married because nobody would hire them and therefore she always had something whipped up in the evening. My grandmother was such a wonderful baker, and she inspired me as a grown-up to follow in her footsteps. I didn’t grow up with a culinary background, and I didn’t do a lot of baking when I was little, but I certainly watched my mother bake a lot of stuff. When I got married the first time, I certainly wanted recipes, so I got into it more after I got married. And now I try to bake at least once a week. I try to switch up what I make...Every night, I need to have a cupcake, a brownie, a cookie, or something around 8 o’clock at night, which is probably the worst time in the world to eat.
What was a household favorite dessert that you can recall baking, that your kids loved?
I think my brownies, Chocolate Chip Cookies, and Christmas Cookies were a house favorite. I still make chocolate chip cookies, and I still make brownies, but now, since I’m retired, don’t tell anyone..I use a box. But sometimes I’ll make them from scratch. But I think every one of my kids loved my brownies...The kids also used to like my Whopper cookies. Remember the Whoppers? They’re the cookies where you have to smash the Whopper milk balls.
What is one of YOUR favorite go-to treats to whip up at home? Or for the holidays?
Well, I think for the holidays, Banana Cream pie, Pumpkin pie, pecan pie, cookies, and dessert sauces. I have to keep them [dessert sauces] in the refrigerator at all times. Those include a hot fudge sauce, and a butterscotch sauce. Isn’t that awful?
What are some skills or tricks that you have learned throughout your at-home baking career?
Definitely get all ingredients together before you start the baking process...Then you always have what you need. I think my favorite part about baking is actually putting all the ingredients together and then of course, the results. I love getting everything together, getting it all measured out, and enjoying the finished product.
Out of the wide variety of baked goods, what would you classify as being the most fun to make? And why?
Well I’ll tell you, this is the complete opposite. It’s the Frosty Toffee Bits Pie. It is so fast and easy to make, and people love it. You buy a 9 inch graham cracker crust, then you take a package of cream cheese, sugar, half & half, frozen whipped topping like Cool Whip, and then a package of Toffee bits. I’m telling you Kate, it is absolutely delicious..bad for you, but delicious! I bumped into a couple whom I haven’t seen in awhile, and they go “oh we have that pie under your name in our recipe file. We just got it out and just made it”.
What has been one of the hardest things you have ever had to bake and why?
I would not have been able to tell you a month ago, but a month ago, I found a recipe for a German Chocolate Cake. A three layered, German Chocolate Cake. Well I’ll tell you, it probably took over three hours to put the damn thing together. Pardon my french. And then the frosting contains coconut..and it’s absolutely delicious! It takes forever to put it together...and it just takes forever because you have to melt the chocolate bar, you have to make half a cup of strong brewed hot coffee, and then aside from the flour, the baking powder, and the sugar, you have to separate the eggs, and then bake it for about twenty eight minutes. But then you have to make the frosting, which requires six egg yolks, two cups of coconut, and then the two cups of pecans are optional. It’s a delicious cake but I think it must have taken almost three hours to put together. It wasn’t even made for a special occasion, just because I wanted to. I found the recipe in Southern Living Magazine and thought, “ooo I gotta make that”. Of course it took forever but when it was done, boy was it spectacular!
Every baker has a weakness, in your opinion, what would you say is your greatest weakness?
I don’t make pies quite as often as I used to, but my one weakness is making a pie crust. It drives me crazy because you have to roll it out, and make sure it’s round..they’re just so much work. Anyways, I don’t make a whole lot of pies anymore. However, per request, I do them for the holidays.
What are some of your secret go-to ingredients to use as a substitute in a particular recipe?
I don't have any. Usually, if I get a recipe out, I’ve saved it because I like everything in it. If I’m going to use a recipe, you want to follow it pretty closely. Especially when baking, you need to comply with what the recipe tells you. I figure, they know what they’re doing.
Being such a talented baker, have you ever been tempted to open up a bakery or cafe of your own? (why or why not)
No it’s too much work!! I enjoy other things in addition to baking!!
How would you describe a typical day in your life today?
Three days a week, I start my day with Yoga for an hour, I love it.We all wear masks and it’s a great social event. Then, I do a lot of sewing and knitting because there’s a little shop downtown in Southport where we live, and I sell my stuff there. So I sell my puppets, sweaters for children, blankets, bibs, and mainly things for babies. I have to work inside the shop at least once a month for a whole day. And then I eat out a lot, I attend church a few days a week because I’m on a few committees, so that’s pretty much my life now….*chuckling*
Which would you say you prefer more, cooking or baking?
Baking- I think. People love homemade desserts and breads, usually more than their meal. It ends the course the way you want it to end. I think people love desserts. Well-I think everyone loves certain meals but they remember the dessert...it came last, it’s sweet...And I think that’s important.
I’m dying to know, have you ever made a “boxed” dessert?
Yes, almost always, I don’t make brownies from scratch anymore. I just get the box...Ghirardelli and Betty Crocker are the best, in my opinion...Although baking is much more rewarding when you do it from scratch and oftentimes it even tastes better!
What sweet treat did you whip up this week?
The other day, I got a recipe for Chocolate, Chocolate Chip Muffins. They are loaded with chocolate, and then you add a bunch of chocolate chips in them. And you got to have a scoop of ice cream with them. So those have been recent creations of mine.
Mimi’s Famous Brownie recipe:
2 sq . Unsweetened Ghirardelli chocolate (2 oz.)
1/3 cup shortening
1 cup sugar
2 eggs
3/4 cup flour
1/2 tsp. baking powder
1/2 tsp. salt
1/2 cup broken nuts (optional)
Preheat the oven to 350 degrees. Melt together chocolate and shortening in the microwave; beat in sugar & eggs. Add flour, baking powder & salt. Mix in nuts. Spread in well greased 8” square pan & bake until top has dull crust, about 30-35 minutes. A slight imprint will be left when the top is touched lightly with a finger. Cool slightly; then cut into squares (16 2” squares). Enjoy!!
0 notes
Last Seen Blogs

prohaloplayer
born to die

lestatdelincourt
LOVELESS

twstoudfangame
Once Upon A Dream

thesirkshow247
TheSirkShow247

toxiic-wastee
Toxic Waste