#thinking of making this a black glitter acrylic pin…
Text
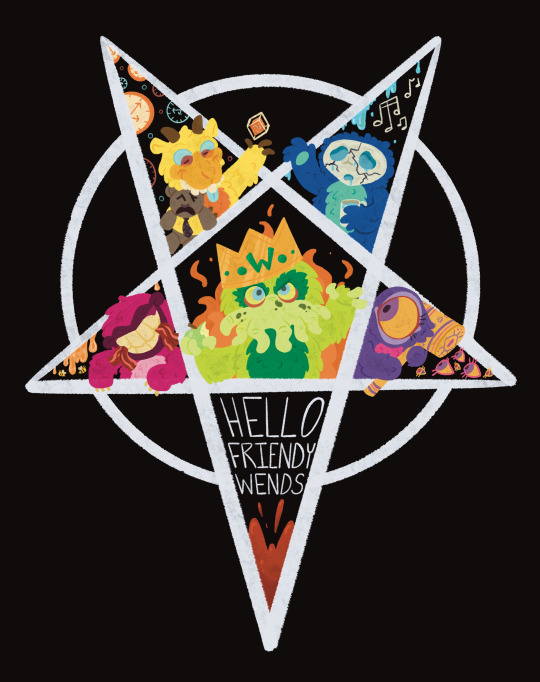
you summon us once, you summon us twice
you gamble it on the roll of a dice
#thinking of making this a black glitter acrylic pin…#hatchetfield#hatchetverse#lords in black#wiggly#wiggog y'wrath#nibbly#nibblenephim#blinky#blinklotep#tinky#t’noy karaxis#pokey#pokotho#npmd#starkid#black friday#the guy who didn't like musicals#tgwdlm#nerdy prudes must die
457 notes
·
View notes
Note
a cursory thought passed my mind as I was thinking about how ive been wanting jordan to make enamel pins for ages but i dont like youtooz, which lead to me thinking of enamel pins designed by you and I feel like you’d appreciate my first thought was that a black enamel with rainbow/shimmery glitter would be perfect for void soup
Ur gonna single-handedly make me go back to my roots of making enamel pins and acrylic charms.
Is been so long since ive done that and god,, makin charms of mcyts sure do be a problem when it comes to did ccs allow artists to do such things or nah yknow.
26 notes
·
View notes
Note
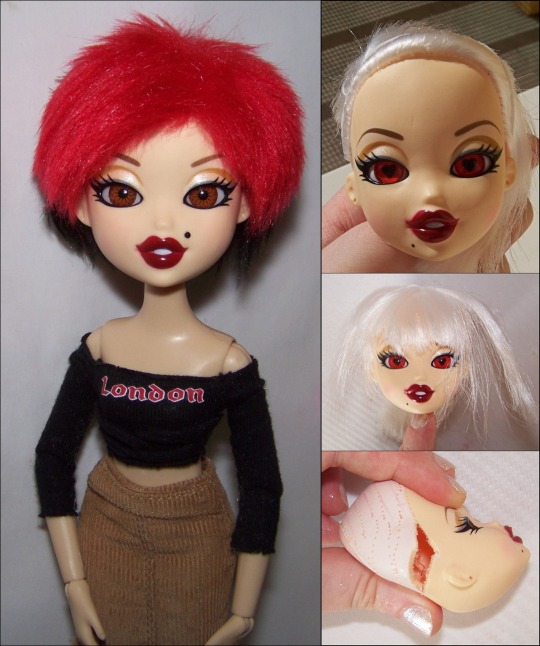
I just saw your post on incorrect doll “hacks/repairs/reroots.” Thank you so much for sharing all of your dolly knowledge. I did not know that my Ken that I re-haired with black acrylic yarn will stain him….Also, what would you suggest I use to make doll earrings (a simple loop) or piercings out of that will not affect the doll’s vinyl? Thank you again so much.
Hi! The yarn probably won't stain unless you use something that works as a catalyst between the two plastics: something that breaks down one or the other. Glue on the inside of the head will have probably set fast enough to avoid staining to the outside but using a gel or an unstable rubber band to hold it against his neck could cause the yarn to bleed.
I've been doing yarn reroots forever and in this case it was a very vivid colour of purple that reacted to the glue inside the head and stained along the scalp and when I removed the purple I dunked some in soapy water and sure enough the pigment was leeching out more than any yarn i'd used before.
The folks who are doing the wefts straight to the head may be using a glue that holds well AND doesn't cause the pigment to leech but more often than not, they don't say which glue they used. For example: i once switched to a more environmentally friendly UHU glue with fewer solvents in it: it wicked up into the hair and caused mild staining because it didn't set nearly as fast: the solvents evaporated so the glue could work fast and finish bonding faster than the plastics could degrade.
It's more a matter of getting a feel for plastics and remembering that plastics react together especially when there's a solvent like glue involved or it's cheaper materials. It's easy to remember to not have a doll have their plastic headpiece resting against the face but then we forget that acrylic yarn and often ribbons or pearls are plastic. So ribbons alone should probably be fine but ribbon or pearls attached to pale hair with non water based glue or gel could leave their colour in the hair, a ribbon across the forehead of a clone doll is more likely to start leeching etc etc. Are these strongly pigmented plastics against porous vinyl or nylon?
It's about keeping a little mental tally of how many plastics and catalysts, how much time, what kind of storage conditions. There are things that will hold up a year but not ten.
I'm not USA based so I had to experiment with various glues to find what does and doesn't work.
For example: I used a thin layer of acrylic matte sealant over Mint's eyelids before adding the glitter mixed with shiny acrylic sealant just in case the cheap nail art glitter has pigment leeching
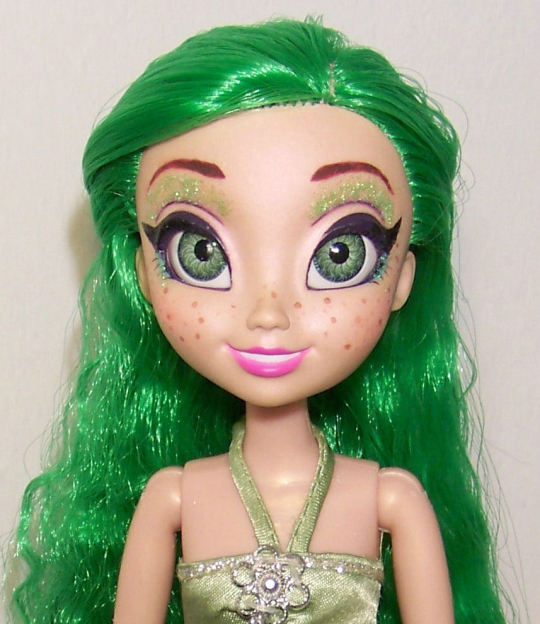
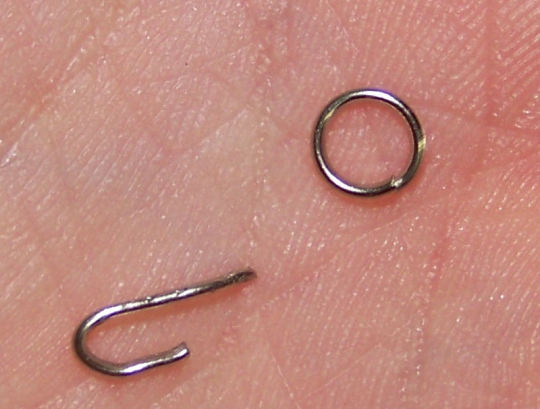
For earrings, I haven't had trouble with cheap metal findings but I live somewhere dry and I make ear holes that are larger so there's not full contact with the metal. You're more likely to have issues with the plastic gold coloured stuff that comes with legit dolls than with metal (I've also seen little studs for humans that were plastic rub off against ears).
But I have pulled pin-piercings out of dolls that left grey marks because it wasn't stainless steel but we're talking 5-10 years down the line. I recommend getting some nice stainless steel sewing pins and stainless steel findings for long term piercings, if you've got needle nose pliers and wire cutters you can reshape wire or rings without having to buy smaller.
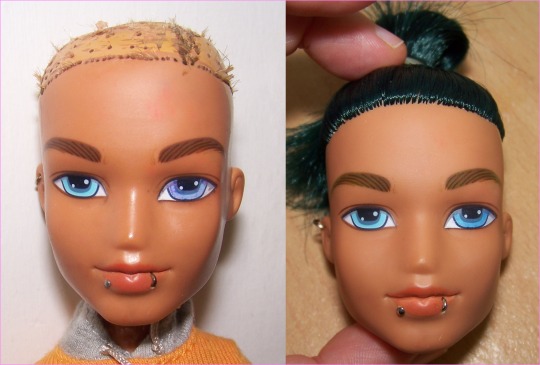
To add, here's Bratzillaz Yun Jin: she arrived super damaged so I gave her a wig, I figured it would be less likely to leech if I attached it with a pin than glue and hid a hole next to her lip with a beauty spot attached with superglue.
So the wigs had never stained before but the plastic of the ball headed pin reacted with the red plastic of the wig and left a dark pink mark on her scalp. I'd used the nail art from the same assortment for years with no problem but they were all silver backed and this was full black plastic. I had to bleach her stains & I've attached the wig with PVA white glue and I'm thinking of using acrylic sealant with the same black nail art to see if the same reaction happens in a year or two because acrylic + vinyl + cyanoacrylate + time = melt but I don't know if acrylic + vinyl + acrylic sealant + time = the same result.
13 notes
·
View notes
Note
Hi Ari! I know you have some rqs already but may I ask for an f/o list with Dio? It can just be in general, I have too many AUs to indulge in every part he's been in 😅
Hi Sofie! Thanks for being patient for this! :D
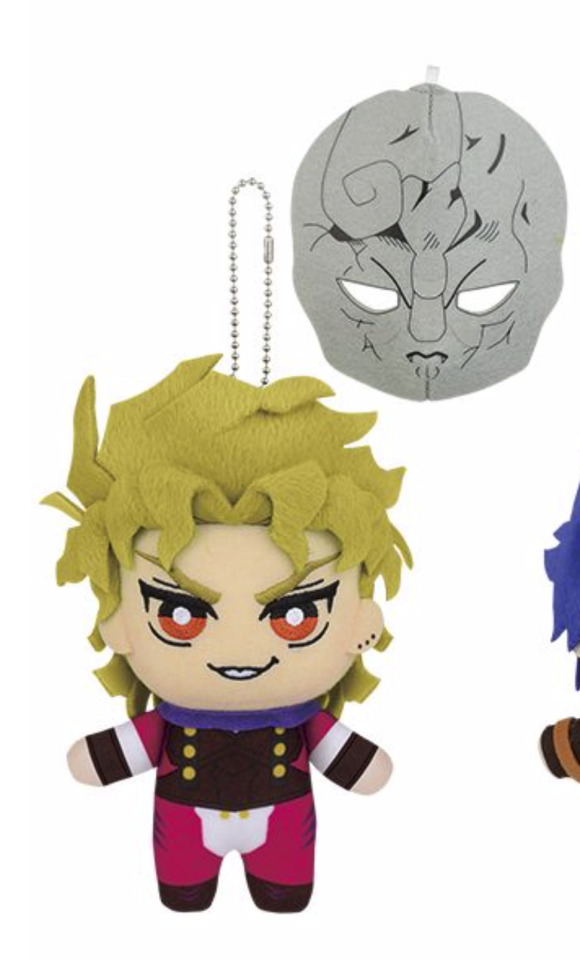
Dio Brando (little irl things for your JoJo f/o)
-First off, there's a ton of pins available from Zen Monkey Studios!
It was me Dio with red glitter Pastel Dio with the stone mask and Dio's famous hand/joestar mark pose with black and multiglitter
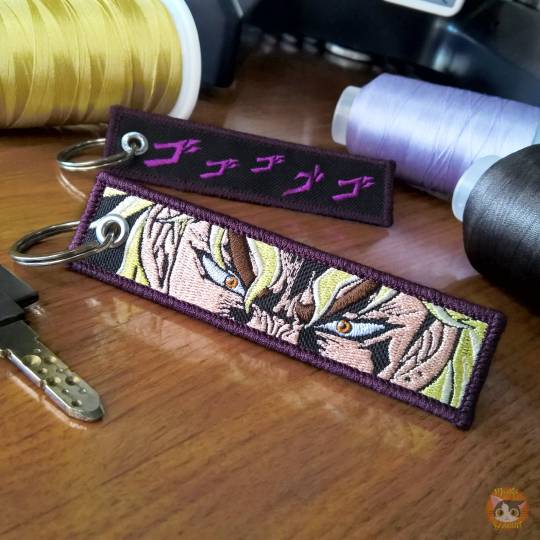
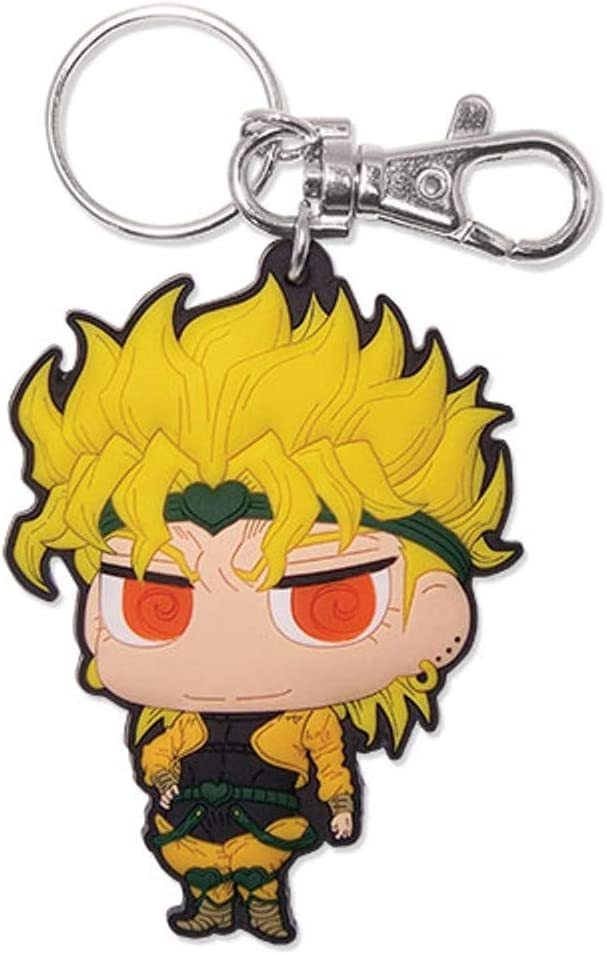
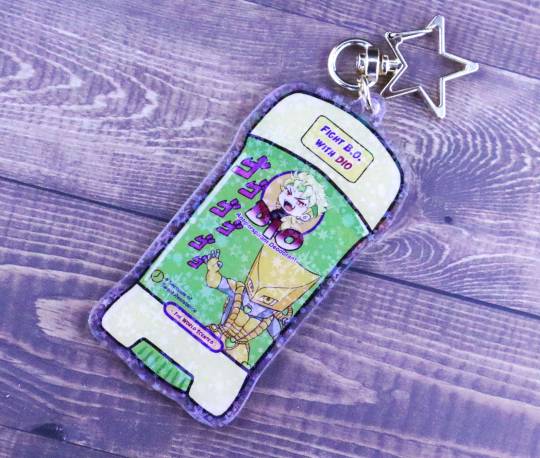
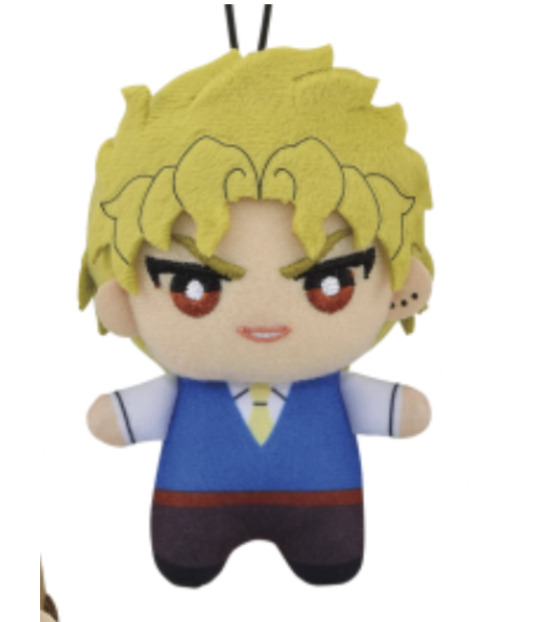
-Need a keychain/keytag? Dio has your back. There's an embroidered one here and a little SDC Dio rubber one here and this hilarious "diodorant" acrylic one
-There's a DIO and The World kimono wrap here if you want to wear your man and his stand in public >:D or there's a super cool Dio sweatshirt here
-there's still a Phantom Blood Dio tomonui plush (plus stone mask) available at aitaikuji! (and the tiny tiny Chimi Tomonui from jojo world 2!!)
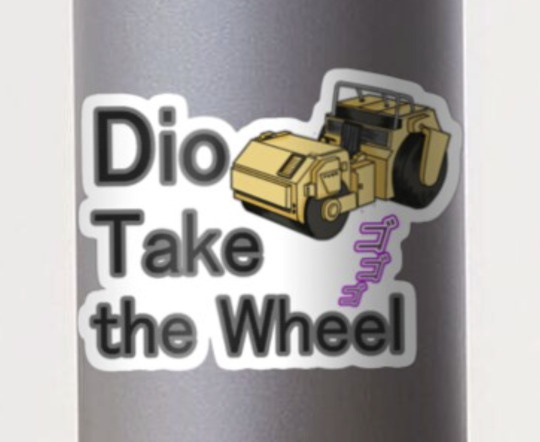
For stickers, there's a The World JoJo tarot card and this DIO TAKE THE WHEEL one I've been cry laughing over ever since I saw it
-For accessories inspired by Dio, I picked this gold and green watch and this alex and ani green and gold heart necklace (to be like Dio's headband and outfit in SDC)
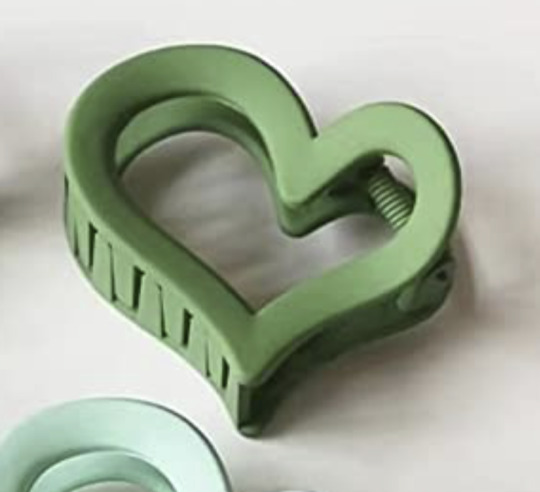
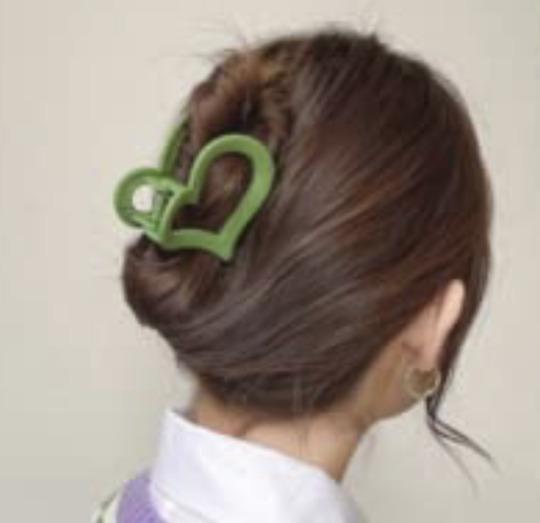
-I also found these hair claw/clips shaped like hearts with a green one like Dio's!
-For a subtle nod to Dio's stand (The World), here's a pair of gold globe shape earrings~
-If you'd like a few more gothic vampire-inspired accessories, there's this bat and ankh necklace and these red teardrop earrings that kind of remind me of blood
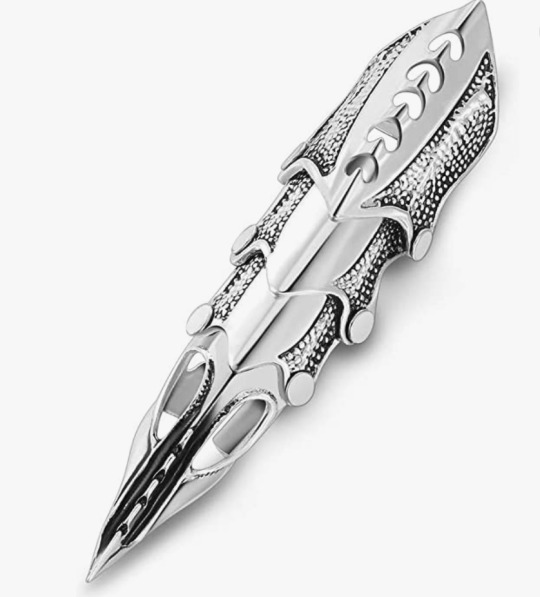
-Keeping with the gothic vibes, there's this claw ring that reminds me of Dio's pointy nails
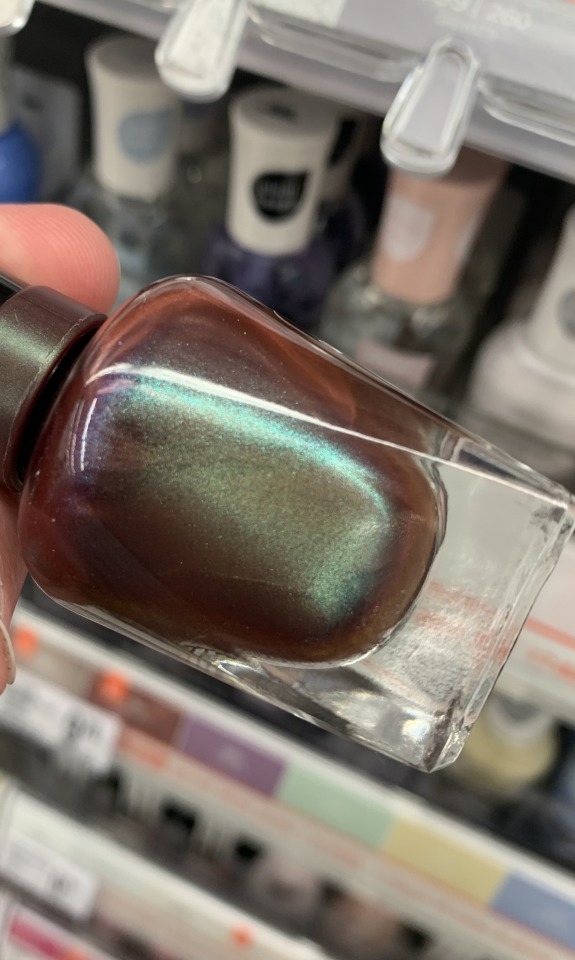
-For nail polish options inspired by dio, obviously you could do a basic black, but here are a few others:
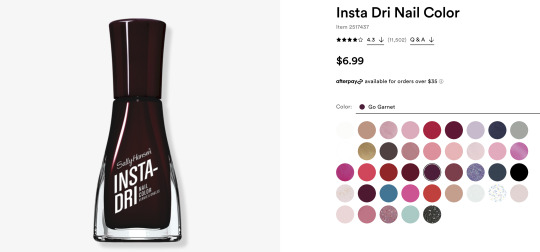
Go Garnet Sally Hansen Insta Dri (almost black with a little hint of red!!! I saw it in person the other day and it was perfect)
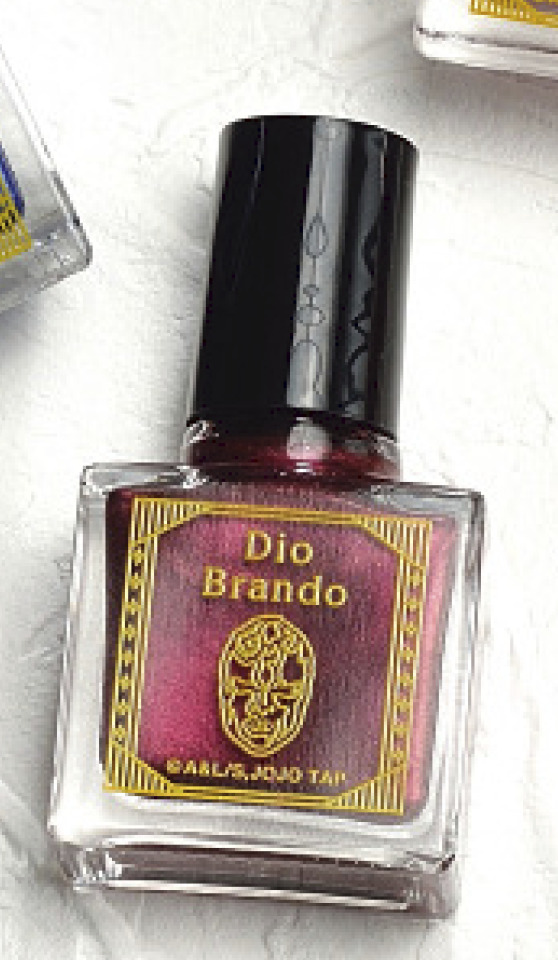
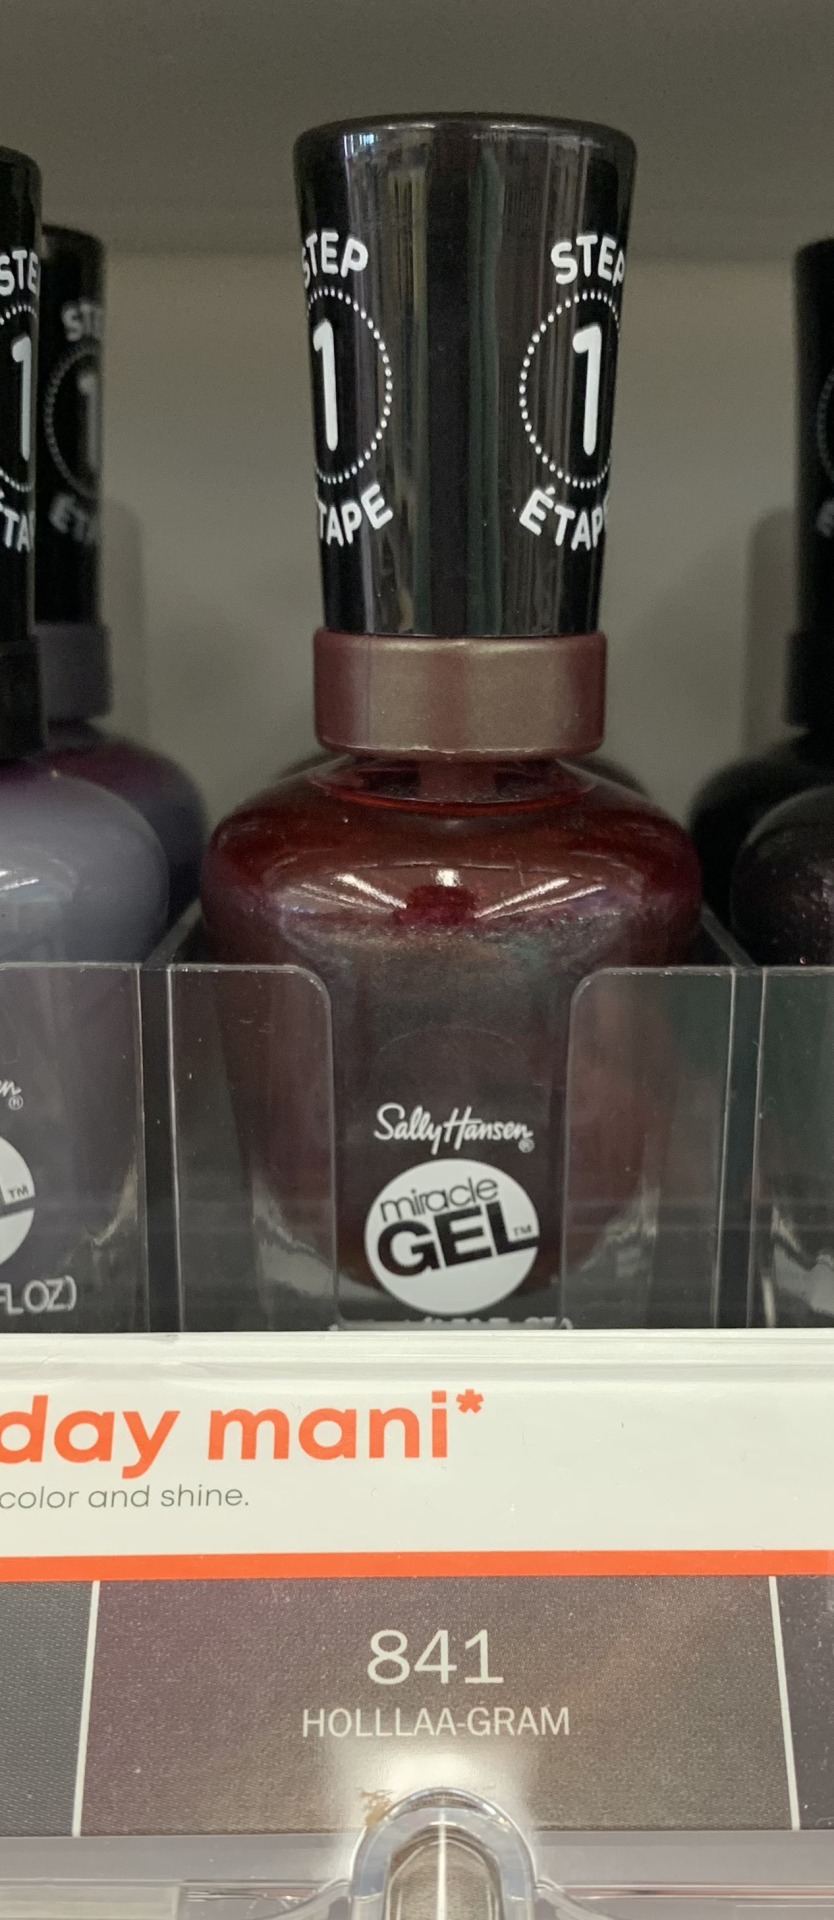
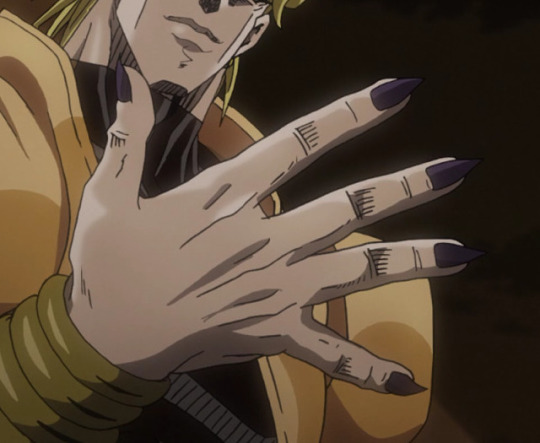
For a shade inspired by Dio's nail color from JoJo World 2, I found the Sally Hansen miracle gel shade Hollaa-Gram (which has a green shift, which is a fun nod to his SDC color scheme)
Then this swatch online of OPI's "I'm Not Really a Waitress" looks very similar to the original product shade.

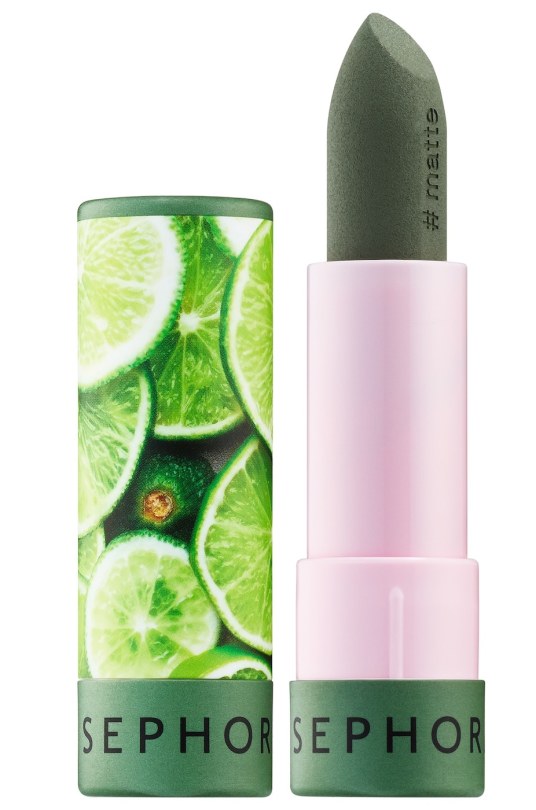
-To match elevated Dio's green lip, I suggest either Sephora's 70 Margs (which I have tested and it's good as a Jolyne lip too!) or a deeper shade liquid lipstick in Dark Forest
-If you're more into a blood red lip, here's a pretty Dior shade (because I've always though Dio's name influence came both from the band DIO and the fashion brand Dior)
-When Dio was younger in Phantom Blood, we saw him read books (specifically Araki's Gorgeous Irene in the anime and you can find a copy here) and he enjoyed playing chess (so here's a small magnetic set you can keep around and play to remind you of him)
-This one is kind of a joke reference, because I looked up Stone Mask and found beauty products instead of a JoJo replica xD but here's a Dio green stone mask you can chill in the fridge and relax with
-Dio enjoyed wine frequently as a young adult and then after turning, obviously, blood. If you're fine with alcohol you, can sip red wine to think of him, or sparkling red grape juice instead for a nonalcoholic alternative!
-You can also watch some classic vampire movies like Twilight, What We Do In The Shadows, Dracula, etc as a solo date night. Order in pizza and have your own private movie night!
-For Dio's musical name influence, you can listen to songs from DIO like Rainbow in the Dark and Straight Through the Heart
-As always, I recommend writing your f/o a letter (either in a journal or on @ jojolovenotes), sketching your favorite screenshots, rewatching the episodes your f/o shows up in, and making a playlist inspired by your f/o (including their music namesakes).
13 notes
·
View notes
Text
Polymer clay tips from someone who's been experimenting with it for the past three years:
I started with a sculpey brand set so I had a lot of colors to work with, then replaced the ones I needed
Buy colors you use often, like white, in bulk
If you use jump rings for charms or jewelry, get pliers and wire cutters, it's not worth destroying your scissors and fingernails
Use baby wipes to clean your hands and surface
Invest in some tools, but most things you can substitute. I use a sewing needle to cut and make details, a baby knife to cut big chunks, and aluminum foil and not-for-teeth toothbrush to texture.
I did get nail art tools that have little balls on the ends and can double as rolling pins
When making larger objects, fill it with aluminum foil
Turn scrap clay into beads
Don't put polymer clay in airtight containers, it'll become sticky and gross. It's plastic based, not real mud clay
Polymer clay is still squishy right out of the oven. The colder it is immediately after being taken out, the stronger it'll be
Liquid clay is amazing and even if the tiny bottle is expensive, it lasts for a long time
If you coat it in mod podge before it goes in the oven, it gets nice and shiny afterwards, and is a sort of glaze/glue
It doesn't matter how much you think you suck, most people don't know what polymer clay is and will hail you as a supreme deity regardless of skill
Use fimo brand clay to make canes, sculpey is too soft since it's good for kids and beginners and people with weak fingers (I am the latter)
Premo brand clay has good colors and isn't too soft or too hard
Fimo may be hard to squish, but work it between your fingers a bit gradually and it'll get softer
You can buy canes online, they're super cheap
Superglue fixes everything but don't bake it
You can mix clay with glitter, chalk pastels, and some makeup. I haven't tried nail polish but I have a feeling it won't work
Piping tips are a bitch to clean but clean them anyway, you'll thank yourself later
Mix the premo color pearl with any other color and it'll turn sparkly too
It helps to have a sketch beforehand of what you're making, labelled with colors so you know where to start
Start with light colors first, then gradually get darker
If you need to switch back to light after using dark, wipe your hands on those baby wipes
Red, certain greens, and glittery colors are ones you should wipe your hands and surfaces thoroughly after using. No not black so much unless you're switching to a super light color
Mix media!! Paint it, glue it to something else, etc. Art is beautiful in its variety!!
Liquid glue does not disappear when it's finished baking, it comes out white
Try new colors!! They won't bite
When eye pins are too long, cut them down to size and make other smaller ones with the ends you cut off
Don't put your creations on the edge of a shelf... I am speaking from brokenhearted experience
Bead organizing boxes are an excellent way to store your creations
If you suddenly are struck with inspiration, text/email the idea to yourself, write it down, or put it in a notes app
Reference photos are not just for drawing and painting artists
Follow YouTube tutorials and watch their collections and trades because not everything they make comes with a tutorial and you can discover other artists this way
If there isn't a tutorial, picture how the pieces fit together. Three dimensional art is easier for me to puzzle together, so imagine how it comes together. It'll get easier with time as you watch more tutorials, and soon you won't have to
Imitation is the sincerest compliment, or however the saying goes. I copied everything I made when I started out, then gradually had my own ideas. It comes with time
If you copy or heavily draw inspiration from someone else and put pictures of your creation out on the internet, make sure to give credit where it is due
Crochet thread makes for excellent tassels if you make jewelry
Practice practice practice
Take breaks when you need to, especially for your eyes
If you make slabs, lots of people use pasta makers to roll them out flat, but rolling pins are cheaper
Make what you love
If you don't love it, give it away. Most people don't have standards for what they don't know
Don't be discouraged by the talented artists out there. It takes time and money to get that good, and that isn't readily available to many people. Talent is also in short supply
I don't sell on Etsy because I don't want to get sued, but it's a vague future plan. If you want to motivate yourself that way, go for it if you think you're ready. There are plenty of sellers out there who make fabulous creations, and some who are simply average, so don't let a lack of skill deter you
Clay isn't for everyone. I have small hands, which definitely helps, and some people (or fools) just aren't drawn to three dimensional art. If you don't love it, it's okay to move on to something else.
Fancy clay can be bought only online, so I haven't done it, but it looks pretty cool in the pictures
Have a designated area for clay, and keep it generally clean most of the time so wipedowns at the beginning aren't too bad
Your designated area for clay should be one solid, light color so you can see any dirt specks, hairs, etc. that might appear in the middle of your work
Gold foil is pretty cool and can be baked with clay
Read the baking instructions on clay packages
It's ok to mix brands, bake somewhere in the middle if the baking heat is different
Acrylic paint goes well on everything, including polymer clay
Paper clips are bakeable too
Small thin things don't have to be baked for as long
It's okay if you forget about your clay. Once I left mine in the oven for forty minutes and it was fine
Suede brown in sculpey is a pretty lit color
Ecru clay in premo is good for mixing, mix it with white for vanilla cakes
Art is beautiful heck yeahhh
#art#artists on tumblr#artwork#handmade#diy#diy projects#diyinspiration#diy charms#polymerclayearrings#polymerclay#polymerearrings#polymerart#polymer charms#colors#colorful#polymer clay#clayearrings#clayart#art advice#art tips#advice#tips
29 notes
·
View notes
Photo

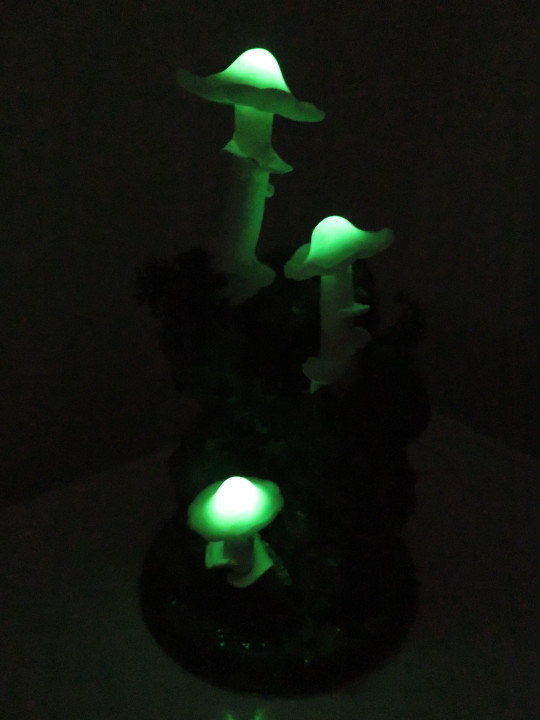
Mushroom Lamp/Nightlight - Complete
Behind the scenes:
My materials:
modelling foam (I think that’s what it’s called)
craft knife
a partial string of repurposed LED lights with AA battery pack
acrylic paint - black, white, burnt umber
white & glow-in-the-dark fimo
milliput
several types of flocking/fake plants
PVA glue
superglue
resin with pigments for the base
green glitter
power drill
scissors
rolling pin
I started out with the block of foam which I hacked to pieces to make it look like something vaguely rock-shaped. Once this was done, I drilled holes in to fit the three LED lights.
Once this was done, I painted it with several layers of acrylic paint - a base coat of black, then various layers of dry brushing to give it some texture. Once it was dry, I mixed and matched flocking to make it a nice mossy rock.
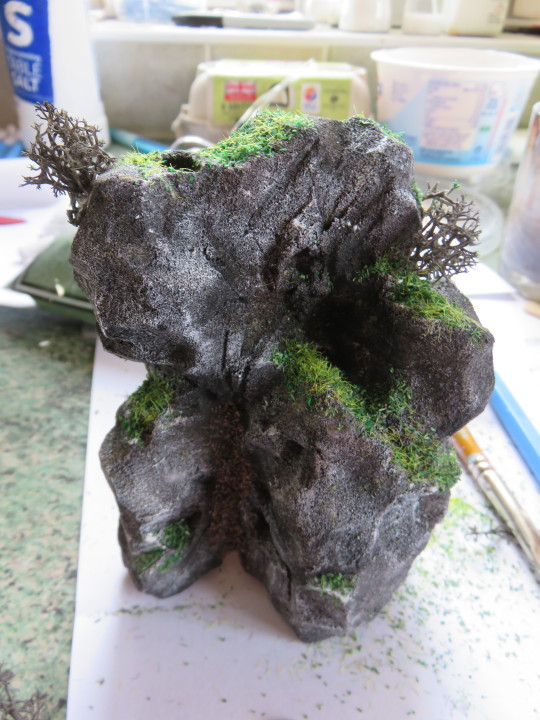
Next stop! Mushrooms! The straighter parts of the stalks and caps were made with fimo. I fitted the stalks over the light fixtures, and attached and secured them with sculpted milliput. (plz ignore the temporary base)

Alas, I don’t have pictures of the making of the base, but pretty much slapped some resin (with black and green pigment) and some glitter into the bottom of a large yoghurt pot and left it to set. Leftover resin was used to attach the caps of the mushrooms in place.
Once the base dried, I added the last mushroom and using the milliput for the bottom of the stem, fixed it to the base. With a bit more flocking and some fake shrubbery, behold, t’was done.
Oh and a bonus special feature: I made the caps of glow-in-the-dark fimo :D Once the lights are switched off they keep right on glowing.
3 notes
·
View notes
Text
Chapter 3
Waking up to the smell of bacon and the barking of dogs was both reassuring and haunting. He shot up from the bed, hair flopping all around, but a quick scan of his surroundings made him calm down.
“What time is it?” He groaned his way out of bed, dragging his feet to the boxes to pull on a pair of pajama trousers and a new shirt. A knock to the door made him jump slightly.
“Are you decent?” Jin’s voice was a little muffled by the door, but still melodious as all hell. A shrill bark accompanied the question, followed by a hushed reprimand from Jin. “Breakfast is ready.”
Hoseok groaned once more, stretching in such a way that his back cracked in one fell swoop before opening the door with a sleepy smile. “Mornin’.”
Jin’s smile was bright and wide awake, and a small grey ball of fluff was jumping up at Hoseok, tongue out and tail wagging. “Good morning. This is Odeng, and Eomuk is with Joon in the kitchen.” Hoseok followed Jin to the kitchen, blinking rapidly at the relatively bright sunshine, trying to get his eyes accustomed to the light. When he finally got his eyes to focus, he saw Joon sitting at the table. Joon was dressed in soft pastels, hair tied back in a simple braid, unlike yesterday’s French, pierced ears boasting bigger and thinner hoops and chains, more feminine than the ones yesterday. The open-front pink jumper was draped over a black shirt the Hoseok had seen employees use at FOPP with a nametag on the front saying My name is Joon, with a little washable marker addendum (she/her).
“Good morning! You out-slept all of us.” Joon said, a beaming smile on her face. Another pomeranian was sitting at her stockinged feet, white kneesocks matching the pale cream skirt she was wearing, and the pom was the same grey as Odeng.
“I was kinda tired.” Hoseok mumbled, rubbing his eyes in an attempt to clear them of sleep. “I’m a pretty deep sleeper, too, so I didn’t hear anything.”
“Good, because Joon snores really loudly.” Jin had walked to the stove during Hoseok and Joon’s interaction, a low chuckle escaping the man. “It’s one of the things we have a separate savings account for, surgery for Joon’s bridge.”
Hoseok winced, sitting down in front of Joon. The makeup she was wearing was minimal, lipgloss and a swipe of soft pink on her eyelids, very unlike Jin’s makeup in the club.
“It hasn’t gotten any worse, but it’s annoying.” She shrugged and checked her watch, sighing. “Speaking of annoying, I have to go to work.” With a final drink from the coffee cup in front of her, Joon stood up and walked to Jin, giving him a kiss on the cheek and waving goodbye to Hoseok, who waved back. “I’ll see you at the bar, Jinnie.”
“I’ll bring your uniform.”
The door clicked closed and Hoseok looked at Jin plating a generous but smaller portion of scrambled eggs on toast, bringing it to Hoseok alongside a cup of coffee.
“Do you want to come to the bar again tonight? Have a cute time with the brats? I’m pretty sure Jimin wants to do your face.” Jin chuckled, sitting down across from Hoseok.
“Oh, wow. You know, I’d let him. And, yeah, that’d be nice.” He took a sip from his coffee, licking his teeth. “I’m actually surprised that I’d never really heard about the club until yesterday.”
Jin let out a deep sigh, rubbing his chin slowly. “It’s not the biggest club in Soho, and to be honest it barely is a club, it’s more like a speakeasy. We’re in absolutely desperate need of exposure and staff. Kook is our only bartender.”
Hoseok choked on the mouthful of honestly absolutely delicious scrambled eggs. Only one bartender? Were they that desperate, and with such good ideas? “Wait, seriously?”
Jin nodded, fiddling around with the cup that Joon had left behind. It was heavily chipped and small cracks could be seen on the surface. “Yeah, we’ve lost some of the girls and even with Tae and Jimin still here, they bring in a good crowd, Sugar is barely scraping by with this club. The burlesque makes good money, but whenever we try to diversify with a more relaxed evening, it just doesn’t work that well.”
Hoseok swallowed his mouthful with difficulty, an unusual feeling of worry settling into his belly. Something about Jin’s solemn and melancholy expression was heartwrenching. From what he’d told Hoseok last night, Sugar’s bar was his home, and everyone there was family. Losing it would mean losing passion and some extra money to put into Joon’s surgery and money to be able to keep the dogs well-fed.
“I’ve been looking for an extra job. I was a waiter during Uni, Jungkook could teach me how to bartend.” Hoseok rasped out, nervous energy thrumming through his veins.
Jin’s eyes widened, and he let out a soft sound, of what, Hoseok wasn’t sure. “Oh, you don’t have to do that-”
“But I want to. I need more money anyway, and if I’m staying here indefinitely I should help with the rent, at least until I can get back on my feet, and the bar is such a welcoming environment.” Hoseok was hovering a couple of centimeters from his seat, hands pressed against the wooden tabletop. He fell back into the chair, some of the energy leaving him after the outburst. Jin let out a soft laugh, and he ran a hand through his hair.
“Oh, alright. Sugar is gonna be at the bar, he always is. He gets ready with us.” Jin swirled around his coffee in the cup, a soft smile on his pink lips. “Who knows, maybe he’d even rope you in to performing with us.”
---
Walking into the bar before it even opened was a new experience. House lights were on, and now Hoseok could see how run-down the place actually looked. There were cracks in the ceiling and the bar was irreparably stained.
“Woah.”
Jin looked at him and sighed, pulling the duffel bag with his and Joon’s clothes for tonight higher up on his shoulder. “Oh, yeah. It’s a bit worse for wear, but, it’s home.”
“Ain’t that true!”
Hoseok whirled around to give Jimin a wide smile, making the younger smile even wider than he already was, eyes turning into slits.
“Did Jin tell you I want to do your face?”
Hoseok nodded, rubbing the back of his neck slowly. “Ah, yeah, he did.” He tried to avoid looking into the big, wide puppy-dog eyes that Jimin was giving him, but the power they held was palpable and he caved almost immediately. “Alright, sure. Do the whole shebang.”
Jimin squealed and grabbed Hoseok’s hand, dragging him and a duffel bag bigger than himself to the dressing rooms, where Taehyung was already half-painted.
“Judging by how my boyfriend is quite literally vibrating in excitement, you agreed to letting him paint your face?” Taehyung turned to look at them, hair pushed back with a hairband and lines of unblended and half-blended, black and white contour and highlight on his face, eyes already made up with glittering silver eyeshadow and a modest cat eye. The dress on the mannequin behind him was even more extravagant than yesterday’s, silver satin cinched tight around the mannequin, the dropped waist turning into a short train at the back. The mannequin head sported a pinned silver-grey wig that matched Taehyung’s natural hair.
“He said “the whole shebang”, which is awesome, because I already have the perfect outfit for him!” Jimin pushed Hoseok to sit down before rummaging around in the gigantic duffel and pulling out his own outfit for the night. It was a cream-colored strapless bustier bra with a matching corset with various fake flowers on the edge of it to make a tutu of various colours. The bra and the corset had gold ribbing criss-crossing them, adding to the fantasy. The outfit that was pulled out next was a more direct homage to Victor/Victoria, with a sprinkling of Dita Von Teese. The mannequin next to Taehyung’s was immediately dressed up, white sleeveless button-up under a black bolero-cut swallow-tail tux jacket, and a high-waisted swing skirt that would fall to the knees.
“The lingerie comes after!”
Hoseok had his hands pressed on his cheeks, excitement running through his body. He’d actually let an artist friend of his do him up for Halloween, and even then the clothes had been very ill-fitting. Jimin stood next to him, makeup bag placed on the table in front of Hoseok, and a big shining smile on his face.
“Are you ready?”
Hoseok nodded, and settled into the seat, helping Jimin put a headband on his hairline to keep his overgrown bangs out of his face. Immediately after that, the door crashed open and a very tall someone made their way into the room.
“Oh, hi, Sugar!” Taehyung crowed, not even looking over at who Hoseok now knew was Sugar. Hoseok, on the other hand, turned his head to look at the man. He was tall, taller than even Joon, with a sharp jaw and nose, high cheekbones and black hair cut into an undercut not unlike Joon’s. He was imposing and intimidating, having shrugged off his jacket to reveal a low-cut black tank top and multiple colourful tattoos that went all the way to his fingertips, multiple scrapes and bruises on his face and knuckles. There was even some blood dripping from his palms
“Who’s the new guy?” Sugar’s voice was rough and sleepy, like he’d smoked ten packs of cigarettes before he’d walked into the bar.
“This is Hoseok! He’s letting me make him up for tonight.” Jimin aimed one of his signature smiles at the sleepy-and-disgruntled-looking Sugar, making the taller man smile.
“Is that the outfit you’re putting him in? What colors are you going for with the face?” Sugar sat down languidly on the chair next to Hoseok, his own makeup bag being thrown on the table.
“I was thinking of a red eye and lip with black liner? Keep it simple.” Jimin had tugged his own hair back into a half-pony. Sugar nodded, reaching out slowly with an impeccably manicured hand, fake acrylic nails sharp black with silver studs.
“May I?”
When Hoseok nodded, Sugar cradled his face gently, turning it side to side curiously before humming softly. “You have great bone structure there, mate. Jimin’ll have a blast doing your face.” He said, a soft smile on his face before he turned to look at his own mirror.
There was a moment of silence while Jimin prepped Hoseok’s face, gently massaging his skin with moisturiser. The door opened once more and Jin walked in, a tired and splotchy-faced Joon behind him.
“Heya, Sugar.” Jin’s voice was barely a whisper, and that made the taller Sugar stand up. He outstretched his arms towards Joon, who was very visibly shaken, and she fell into his arms with a shudder.
“Come on. Let’s go to my office.”
The silence that followed was more tense than ever, with Jimin chewing his lower lip nervously and Taehyung standing up to hug his boyfriend.
“What was that?”
Jimin sighed heavily, shaking his head. “We get some people who harrass Joonie. Before, Joonie wouldn’t tell us it was happening, but Sugar saw it happening once and that was one of the worst days we’ve ever had here.”
“Yeah, he walked in completely bloodied up and we had to close the bar for the evening.” Taehyung said, a frown on his face as he recounted that evening. “Joon was fine, but Sugar was out of commision for almost 5 months, and with how the bar’s been doing, he and his partner had to pay out of pocket for the surgery and the recovery.”
Hoseok swallowed with difficulty, pain settling behind his sternum. It was ludicrous, what he was hearing. This was Soho, for crying out loud. Wouldn’t there be more solidarity for people like Joon? Apparently not. Jimin patted Taehyung’s shoulder, prompting him to go back to finishing up, clearing his throat as he picked up the bottle of foundation from his makeup bag.
“I think we’re going to need a new waiter. Joon is a bit out of it tonight, she needs an isolated space.” Sugar had walked back into the dressing room, running a hand through his hair. “We need new staff in general.” He muttered, looking up at the three pairs of wide eyes looking at him. His dark eyes landed on Hoseok’s face, and he raised an eyebrow. “Do you have any experience as a waiter?”
Hoseok nodded, and something in him knew that today wouldn’t be the only day he’d see blood in the dressing room.
#the arcane escape#bts fanfiction#namjin#vmin#a very tired and sad OC#genderfluid namjoon#again not that good with angst but its a sad time at the bar
6 notes
·
View notes
Text
Art history 01/12/20
Chris Ofili - no women no cry
This painting is of Doreen Lawrence crying because she lost her child. Her son Stephen Lawrence was murdered in an unprovoked racist attack in London, 1993. In the painting she is portrayed as strong and dignified, although she is sad her son died she is fighting for a greater cause, for black peoples lives to be improved, there futures to be promised and for equality.
When the murder charges against the suspects were dropped Doreen resolved to hold the men who killed her son to account. She became a powerful campaigner, forcing a public inquiry into the way police dealt with Stephen’s murder and Its findings made the Metropolitan Police institute make changes to all murder investigations. Doreen also launched the Stephen Lawrence Charitable Trust in 1998 to promote equal opportunities for young people and they also run a programme to financially support architecture students, as Stephen dreamed of being an architect. In 2000 Doreen won an amendment to the Race Relations Act, meaning authorities must reveal what measures they are taking to treat all people fairly and also, thanks to her campaigning, the Criminal Justice Act 2003 scrapped double jeopardy – the legal principle preventing someone being tried twice for the same crime and In 2008 she opened the Stephen Lawrence Centre in Lewisham which offers free courses in IT, creative arts and multimedia.
This painting was created using Oil paint, acrylic paint, graphite, polyester resin, printed paper, glitter, map pins and elephant dung on canvas. All these materials and objects add depth and layer to his paintings. I really love how he combines different materials and pushes the traditional expectation of what a painting consists of to a more modern and creative concept, it’s almost like a colleague. There are lots of details in the painting that are small and require close examination for example in her tears are colleagues of her sons face and the blue eyeshadow is associated to Virgin Mary, it symbolises impurity and represents royalty.
Doreen Lawrence is a strong and remarkable women who fought for her son and for all black people. I really admire her and I think it’s amazing what she has done for her community and her son. I also love the painting itself, I think it’s beautiful and showcases her strength while acknowledging her pain for her loss for her son, it showcases a mother fighting for her child.
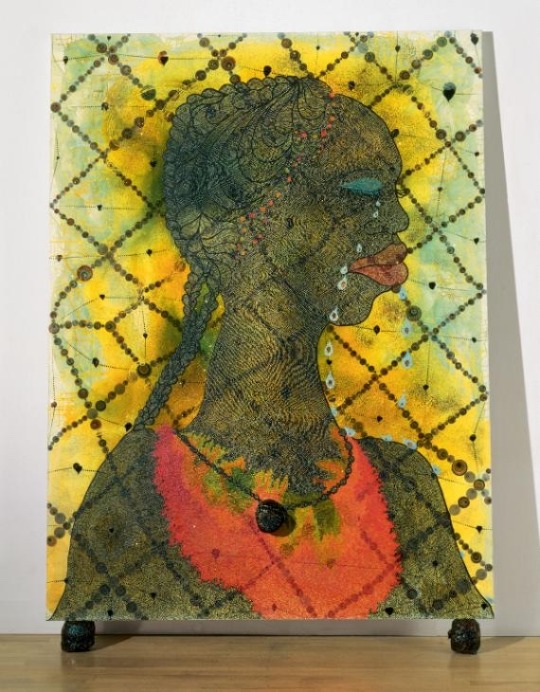
Photo from Tate.org.uk
https://www.tate.org.uk/art/artworks/ofili-no-woman-no-cry-t07502
https://artsandculture.google.com/asset/no-woman-no-cry-chris-ofili/bwEqkX2cKDce7Q?hl=en&avm=4
0 notes
Text
Klaine Smutvent
Word: Drink | Also on AO3
Summary: In which Blaine needs to relax, so the girls take him to a Christmas themed strip club.
Blaine pocketed his ID hesitantly as he took in the overwhelming decor -- he’d not expected it took look like Christmas exploded all over the room. And even exploded was putting it gently. There wasn’t a hall that wasn’t decked, a table trimmed, or a wall festooned with glitter and Christmas cheer. Not one surface, save for the stage in the middle, which while obviously painted with some sort of glitter on acrylic, was the only place that it seemed safe to move around.
Which, when one thought about it, made sense.
“Guys, I know that you mean well, but did it have to be a strip club?” Blaine asked.
Rachel, Mercedes, and Tina all turned to look at him, all looking far too pleased with themselves by half. “It’s Naughty St. Nick night,” Mercedes said. “And guys drink half off. Cute guys drink free,” she chuckled.
“And you desperately need a drink,” Tina added. “You’ve done nothing but work work work for weeks. You deserve a bit of fun.”
“Yeah, but couldn’t we have just, I dunno, got drunk on eggnog and played Settlers of Catan at home?” Blaine asked.
Rachel turned and placed both hands up on his shoulders. “Blaine, listen to me. I’m going to give you the same advice that the members of my Jewish musical theater pre-union performers book club gave me when I was working on perfecting my audition piece for the gender-swapped revival of Carousel so hard that I didn’t sleep for five days straight and ended up breaking out into song in the middle of a Duane Reade completely unaware that this sort of beauty would not be appreciated by 80% of the tone deaf sad sacks in line.” She leaned in closer. “You need to relax and take a break or else someone is going to accidentally tie you to a light pole outside of the Richard Rogers and pin a sign on you that there are Hamilton tickets somewhere on your person and watch as people tear you limb from limb.”
“That seems… awfully specific,” Blaine said.
“We’ll have a few drinks, we’ll ogle a few guys, it’ll be fun,” Mercedes promised.
“So, they’re guys stripping?” Blaine asked as Tina herded them into seats in the very front.
“Oh yes,” Rachel replied. “I’m surprised you aren’t aware of this place. I thought you were up on all the hot guy gossip.”
“Yeah, but not… strip clubs…” Blaine sighed. A cocktail waiter in the tiniest shorts he’d ever seen on an ass that perky brought a round of blight blue shots. What was it a shot of? Blaine didn’t ask. He didn’t actually want to know. Rachel was right. He did need to relax. He needed to relax, and not think about work, or his ex, or anything other than drinking this shot, then another, and then hoping that the stripper took Visa because he’s pretty sure he only has a total of $7 in cash in his wallet.
Ten minutes and three electric blue shots later, the lights started to dim and the women around him started to flip out. Even if this turned out to be a dud, it made for a good story for his next article. ‘Local man gets lit at Christmas strip club’. Nah, he needed a better angle.
“Ladies and gentlemen, you may be chilly right now, but it’s about to get real warm up on the North Pole tonight. Please give a festive holiday welcome to Kurt Kringle!”
Blaine’s eyes went wide as a gorgeous man strolled out onto stage to the purring lyrics of Eartha Kitt’s ‘Santa Baby’. He was expecting more Magic Mike and not… fuck, when did he start finding stilettos and a full length fur coat sexy? But this guy, with his toned legs, and perfectly coiffed hair, and eyes that seemed to sparkle as they fixated on him was… hot.
Wait, no, Blaine, the stripper was not fixating on you. Don’t be foolish. He’s fixated on all of them. For the money, for his job.
The ladies went wild once the fur coat was flung off leaving Kurt in red lame pants and no shirt. There was a big black belt with a gold belt buckle ostensibly holding the pants up, but considering how tight they were, he knew the belt wasn’t doing shit.
And honestly, with how tight those pants were, how was he able to swing his legs so smoothly around the pole in the middle of the stage? And fuck, those pants didn’t hide anything did they? Taught thighs helped hold him perpendicular to the stage, and Blaine could only imagine how strong they’d be holding on to something else. LIke his waist. Oh good, he was going to fantasize about the Santa stripper’s strong thighs squeezing him until he came. That’s just what he needed right now.
Kurt sauntered off the stage to the squeals and delights of the women in the audience, but his head whipped around to Blaine… and he smiled. It took Blaine a moment to realize what had caught Kurt’s attention -- Rachel goddamn Berry waving a $100 bill. With Kurt over by their chairs, he placed a finger on Blaine’s lips and smiled. “I think someone’s been a naughty boy,” he murmured.
“Very!” Tina yelled, grabbing the money out of Rachel’s hand and tucking it into the waistband of Kurt’s impossibly tight pants. “Make him be a good boy, Santa!”
Before Blaine could put up even a token opposition, those muscular thighs were settle on either side of his chair, Kurt’s ass sinking so low that they bumped his legs on each pump down, and his… candy cane and jingle bells so close to Blaine’s lips he could almost kiss them on the pop up. Without thinking, Blaine’s hands went to Kurt’s hips, and then slid back to hold on to his ass. God, what an ass. Each movement as he bumped and grinded against Blaine flexed under the red lame and almost fucking sparkled. Blaine felt himself get hard as he imagined what was under those pants -- not that he had to imagine hard. They were so tight they even hide shame. He’d originally thought the pants might get torn off, but with his hands on god’s most perfect ass right now, there wasn’t a fabric seam to be felt. There was nothing under the fabric but skin and sex and fuck, Rachel was right about him needing something, but it wasn’t to relax… it was to get laid.
Blaine pressed his fingers into Kurt’s ass a little harder causing Kurt to chuckle and place a finger on Blaine’s lips. Blaine took the opportunity to let his mouth fall open just enough for the finger to slip onto his tongue.
He was going to get thrown out. This was not how you behaved in a strip club, Blaine was sure. He was going to get yanked up and grabbed by a bouncer and then thrown out on his face in the cold. But the girls were cheering, and Kurt… Blaine didn’t dare look down to check, but he was pretty sure his cheek was starting to get brushed by a hard dick underneath those impossibly tight pants. And it had been so long since he’d broken up with his ex, and so long since he’d done anything for himself, that he let his imagination run wild. This impossibly sexy man on his lap, moving like that, looking at him like that. Blaine could gather that Kurt was hard, and Blaine could feel himself filling up the front of his jeans quickly, but there was nothing he could do about it. He dare not let go of Kurt to slip a hand into his own lap and become that pervert and then really get thrown out.
With the song winding down, Kurt slid back down into Blaine’s lap, grinding his hips down onto Blaine’s erection to make an obvious point, and motioned for the audience to give him a round of applause for being a good and sexy sport. Blaine gasped at the sudden feeling of contact and tried desperately not to bite his lip or whimper as Kurt shifted absently against his dick. He knew what he was doing, Blaine was sure about that. And it was too much for Blaine, too goddamn glorious much.
As he pushed back to stand up, Kurt let his head fall down to Blaine’s ear and whispered, “If you want to actually slip a sable under my tree, Starlight diner, 1am.”
Blaine swallowed hard and managed a nod as Kurt pulled back, winked at him, and then gathered his fur coat with a flourish.
“See?” Rachel said, as the lights came back up as they readied the next performer. “You just needed to relax. Aren’t you glad we brought you here?”
“Yes,” Blaine squeaked, finally finding his voice again and hating that it was obvious he enjoyed himself. “Yes… I’m very glad I came.”
30 notes
·
View notes
Text

Moodboard
To start our mixed media workshops off, we firstly were each given a word pulled from a hat. My word was ‘INNOVATION’ - meaning a new idea/device/method. From here, we had to produce a moodboard using anything we wanted (printed images, words, collages, colour palettes, magazine cutouts etc).To begin my moodboard, I wrote out a list of things the word innovation brought to my mind. This list was as follows:
brain → thoughts → cogs → lightbulbs
inspo → ideas → imagination
creativity
success → business
technology → medical advances → mechanics → prosthetics → bionics
transformation → rearrangement → change → alter
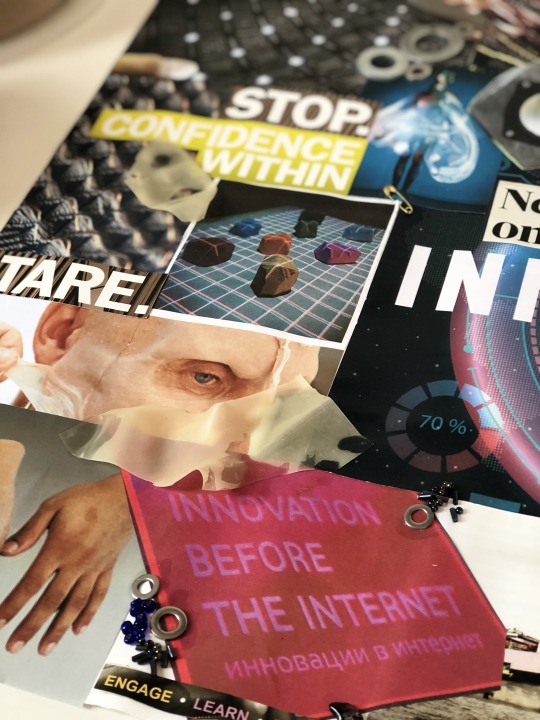
From here, I chose the starting points that I felt were most interesting, which to me excluded the business/success area, and went more for the transformation and medical advances area. Then, I began to find images on the internet of prosthetics and bionics, as well as items I felt fit into the transformation and ‘new idea/device/method’ definition. This included things such as smart textiles → thermochromatic beading, uv fabrics etc; innovative packaging and product designs → new ways of lighting and packaging every day objects; as well as completely out of the ordinary architecture.
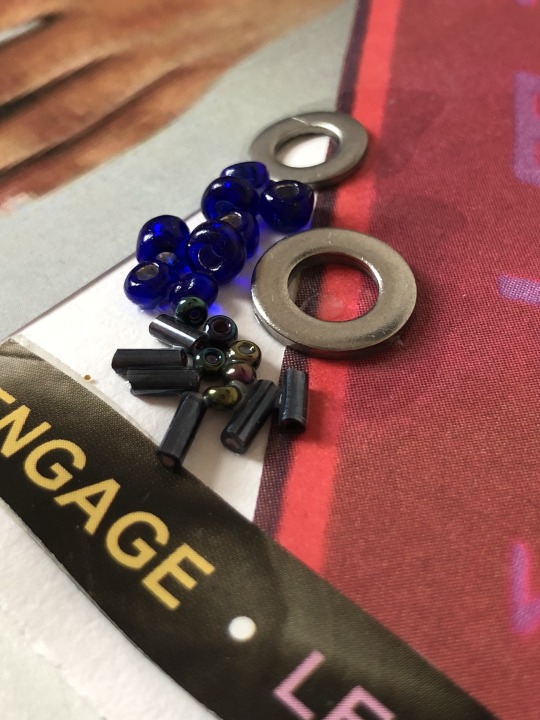
I also wanted to include prosthetics, so brought in 3D areas - adding nuts and bolts to represent the machinery and torn sections of latex and skin coloured balloons to replicate this.

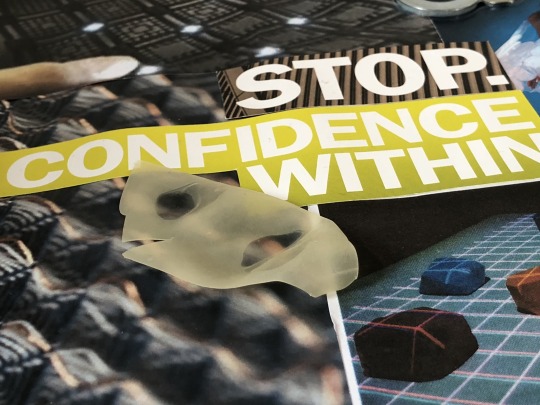
Alongside this, my moodboard included words cut from magazines, which focussed on the element of creativity and superiority → ‘more features’, ‘more space’, ‘confidence within’; all which make me think of something that is a new idea/method - whoever came up with the innovative idea had to have the confidence to do so, hence the ‘ahhh!’ and ‘behind the nonsense’, and the ‘we the people are the work’ motif; and the idea itself must have been better than older ideas in order for it to be new, hence the repetition of ‘more’ and ‘stare’.

From here, we are to use the ideas from this moodboard to produce a piece of non permanent art to install at college, surrounding our individual word: innovation.
Art Bomb
The second mixed media workshop was to produce a non permanent art piece to be placed around college, using any media (but not painting on walls etc.). We were to make our statement as a piece stemming from our moodboard, therefore my piece was to represent my theme ‘innovation’.
My plan for my piece was to produce a bionic hand, following this inspiration image that I found when creating my moodboard, seen above. I was to create the hand and ensure it stayed light enough to be able to adhere it to a window, allowing me to draw the ‘computer screen’ surrounding it. To build the hand, I used newspaper bunched and rolled up to produce each singular finger joint and the palm of the hand. Then, I attached each joint to a straw, keeping the finger print end of the finger connected to the bending section of the straw, and the lower part of the straw connected to the palm of the hand. I attached each finger using masking tape and continued to wrap the tape around the palm to ensure they were secure. Once the base was done, I then covered the structure in paper-maché, to make it more sturdy and one piece.
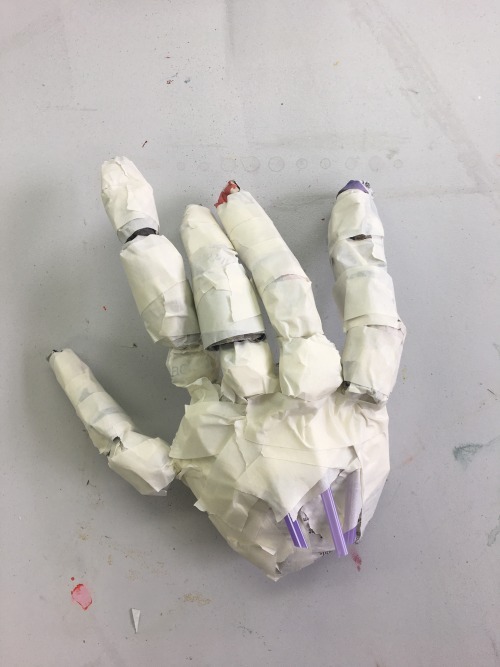
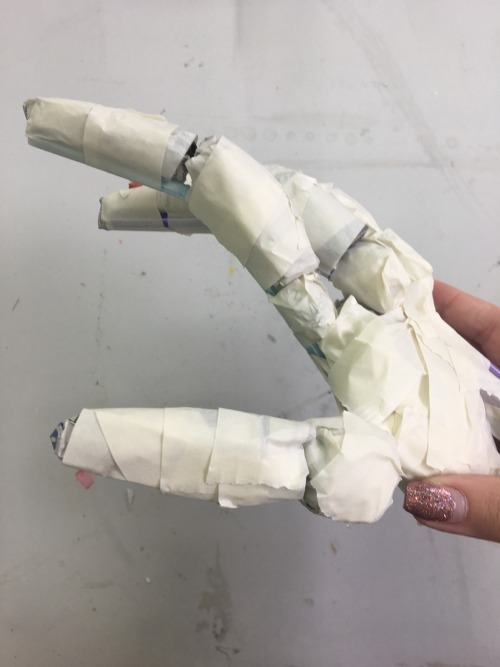
Once the maché dried, I went on to paint a base coat of emulsion to block out the newspaper print; before then painting the hand using metallic acrylic paint, following the pattern for the joints on the inspiration image. As I painted the structure, I came to realise that the hand was too messy, and the maché had given a rough, folded texture which I didn’t think suited the point of the piece. Instead of continuing to build up the base and trying to make it smoother, which simultaneously would continue to thicken up the fingers - to the point where they were too thick for those of a bionic hand. To move on, I started over again, this time using a different medium as oppose to newspaper and paper-maché - clay. This would allow me to get a much smoother finish, and would allow me to make the fingers as delicate as possible, something newspaper wouldn’t allow me to do. I made each joint and finger separately, as above, then assembled them into the palm of the hand using thin floristry wire. Once air dried, I was then able to paint the structure. I used the metallic acrylic again, firstly painting a base coat of light silver all over the hand.

Then, I went in with a mixture of silver and black for the shadows between each joint. I continued to do so for the patterns across the rest of the hand.
When thinking about this further, I decided that I hadn’t captured the look I had hoped for, and much preferred the style of the paper-maché hand, regardless of how textured it was. I returned back to the original hand, and painted the joints similarly. For my final outcome of this workshop, I photographed the finished hand on an acetate futuristic touchscreen, seen below. with an edited gradient background (done in photoshop).

Whilst I still really dislike the texture, I am much more pleased with this outcome as I feel the joints are much better placed and the position of the fingers is considerably more realistic than the clay hand.
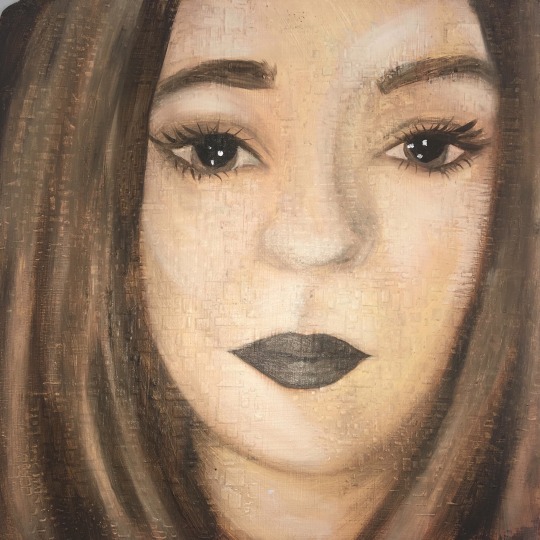
Oil Paint
Our third mixed media workshop was to produce a self portrait using oil paints. We began by coating our board in a layer of emulsion, to give the oil paint something to cling to when painting. After this had dried, we went on to use modelling paste (a mixture of PVA, white acrylic and talcum powder), pushed through a stencil, to produce a raised 3D pattern on the board. This would add an interesting element to an otherwise flat surface. My stencil produced tiny squares and oblongs, a pattern I liked, seen below.

Although I have used and loved oil paints throughout my A-Level, I found this particular technique of layering yellow ochre and burnt sienna as base shadows beneath the fleshy tones a difficult and lengthy one, which I didn’t particularly enjoy. Using the oils watered down considerably with white spirit meant that we were able to continue to layer as much as we wanted to get deeper base tones, but overall to me meant I was struggling to get a strong enough colour when it came to adding actual colours and skin tones, meaning my outcome had a very strong ochre tinge to it which I didn’t like. In past experiences I have found oil to be thoroughly enjoyable and easy to work with, but this technique just didn’t work at all for me. I liked the looseness that drawing our outline with a thin wash as oppose to pencil gave us, however I didn’t think this made up for how ineffective the end outcome was, therefore I wouldn’t use this layering technique again; but it hasn’t put me off using oils and this is a well loved medium for me which I will definitely return to in my development.
Paper Making
Our next mixed media workshop, was to produce our own homemade paper. Once made and dried, we will then use our paper for our upcoming life drawing classes, alongside our graphics and print workshops; and in our general development.The paper making process was as follows:
Cut up lots of paper into small pieces.
Fill bucket with water three quarters of the way.
Put the chopped paper into the bucket and churn with the paper churner.
Fill a large tray with water.
Pour the churned paper into the tray.
Use the sieving frame to scoop paper and drain the excess water.
Transfer the paper to a J-cloth on some newspaper and add any extras (eg. plants, flowers, petals, glitter, sequins, magazine clippings, string, thread etc.) ensuring they aren’t too chunky.
Make sure to ‘pin down’ the corners of the extras with some more of the churned paper.
Place a J-cloth on top and drain excess water, then remove it and leave the paper on drying rack to dry.
I have used this technique before, in A-level, which I used to print on, and it was very effective. Due to producing a whole class batch this time, as oppose to doing exactly what we wanted with a tiny kitchen blender as I had in the past, we were all using the same dye batches and therefore were limited to the colours/extras we were to add in. For this reason, I concentrated on using the plain white tray of paper, and adding in petals and flowers and patches of separately done dyed paper.The first sheet, seen in the scan below, was white with patches of teal and purple dye. I then added in purple flower petals, and matching ripped up sections of teal paper. I really liked the petals, and felt they worked well. The paper was quite thin, which is what I wanted, and ended up to be fairly flat, meaning I will be able to use this one for life drawing/printing on in future workshops.
For the next sheet, I added mini pieces of jigsaw, yellow flower petals, and tiny mixed ripped strips of orange paper. On top, I added glitter, as previously I have liked the look of glitter, however here I regretted adding glitter, as it was too thick and messy looking. I thought the pieces of jigsaw were effective, and using the two tones of orange paper was too, as were the petals.
For my third piece of homemade paper, I experimented with inks, filling a pipette with red and squirting it all over the page, then doing the same again with black. Then, I added glitter, not knowing that in hindsight I wouldn’t like the outcome. Whilst I quite liked the colours I had chosen, I think this was by far the least effective of my papers. The inks just looked messy, and didn’t bleed into the page as much as I had hoped, leaving exact lines and squiggles which I didn’t feel was very effective.
For my fourth and final piece of homemade paper, I used the yellow communal dye tray. This was by far the most effective and my favourite outcome, as the whole sheet was coloured, and my additions of matching yellow petals, leaves and threads were very effective. I will definitely be using this sheet for the printing and life drawing workshops and in my future development.
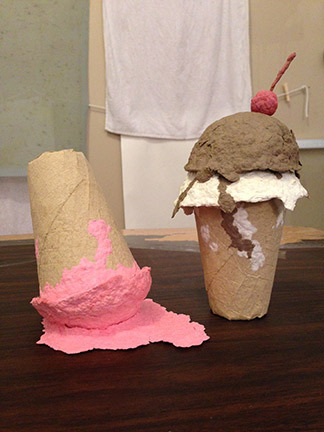
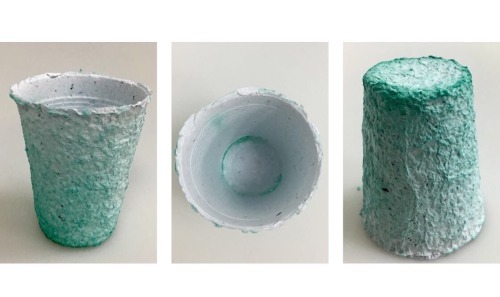
I additionally produced a 3D cup from my paper, using teal coloured paper, and moulding it around a plastic cup. I then left it to dry, and once done removed the plastic cup from the inside, leaving me with the cup itself. I felt this was very effective, and was inspired to do so after researching Brittany Spencer, a paper maker who produces 3D pieces, reminiscent of childhood, seen below in her ice cream sculptures.
My cup is pictured below. I didn’t actually expect this to work, so in fact I am actually very pleased with the outcome, and would like to further develop this, perhaps adding more than just paper to the object.
To finalise my experience, I would definitely use the paper making technique again, now knowing that the particular type of glitter I used wasn’t effective, and that petals worked well. Mixed tones of paper was more effective than using only one colour, and matching the colour of petals/leaves to the colour of paper also worked best. Overall, colouring the dye tray itself as oppose to adding pipettes of ink worked the best, and therefore this is what I would take further when producing my own homemade paper again.
Mixed Media Sculpture with artist Mark Gibbs
For our fourth mixed media workshop, we were introduced to Mark Gibbs, a mixed media sculptor, who focusses on using wire, recycled electrical goods, cardboard and newspaper to produce his work.
Gibbs first explained his own practice, and challenged us to use ‘contextual analysis’ to analyse his work, trying to pick apart the layers in one particular piece to uncover the meaning behind it. Although I found this very interesting, I do disagree with his view that all art has to have a clear, easy to see story/thought behind the piece. I think this is a very set opinion, and realistically in the real world there is a great deal of art which can be appreciated without clearly being something very specific. There are lots of pieces with meaning behind them, which I covered a lot in my A-level, like Marc Quinn’s ‘Self’, which doesn’t need to be so obvious to have a very deep and thorough meaning behind it. I feel that these sorts of pieces, with meanings that have to be researched to be fully appreciated, as oppose to pieces that very clearly bit by bit tell a story, which I prefer considerably, and appreciate a great deal more; however this is just differing opinions.
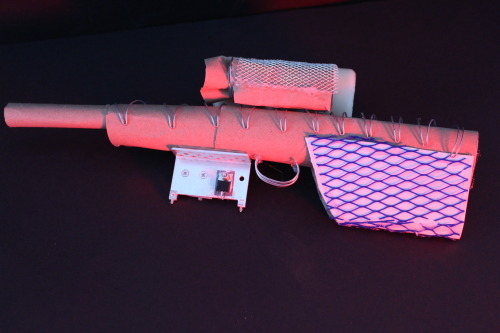
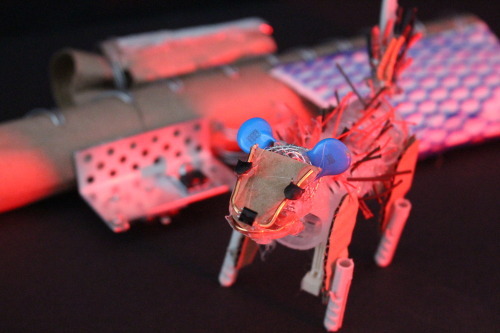
Then, we were told our pieces would depict ‘Craft&Conflict’ and that we were to choose an animal of significance, and an item of ‘military technology’, so I first set about producing some initial sketches of my ideas, in which I wanted my focus to be English Fox Hunting, as my conflict. I chose this idea as I felt it was a different kind of conflict; being more animal rights based as oppose to being ‘military’ as such. My choice of military technology was a gun, and from there I had to choose which animal I wanted to create to go alongside it. I had some options, seen in my sketches below, but settled on the main animal, the fox itself.

From here, I began to build both, steering away from the use of newspaper and paper-maché, and instead challenging myself to use the electrical wires and stiff chunks of cardboard etc. in the same way as Gibbs. This was a new technique for me, and I realised that attaching the wires required hot glue, which looked very messy and took away the more raw, natural aspects of the work. I found the cardboard not malleable at all, and as equally hard to work with as the wire. I felt that it was very hard to make the pieces look professional, and no matter what I did I couldn’t get anything to look anything other than childish. I felt that my choice of creature and weapon meant that it was hard to make anything very intricate and detailed, emphasised more so by how difficult I found the materials and technique to work with.
We stopped halfway through our making, and did a whole class crit, in which we each left a sheet of paper out to allow people to write their thoughts on our piece so far. Below, is my page from the crit, with people’s opinions on my piece so far. Gibbs explained that it is good to give both positive and negative points, and that as we grow as artists its important to be able to defend our pieces and explain why we have done certain things. I am pleased with my responses, particularly the ‘the fox looks sad’, and at the time I hadn’t clipped the fur yet so I understand the hedgehog feedback. One thing I didn’t understand, was how there was an element of humour, as I felt that a gun was probably the least humorous object, and couldn’t see any humour in the fox either, other than the large spikes.
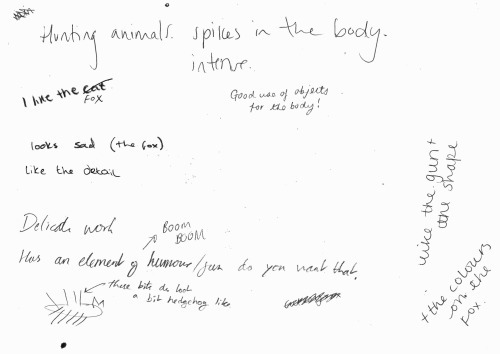
After the crit, we were able to go back and continue with our pieces, where I built up some more extra details on the gun, and trimmed the foxes’ fur so they no longer resembled ’spikes’. Below, the fox and gun can be seen separately.

Overall, whilst I’m not particularly pleased with my end result, at least I now know that I find this style of working, technique and mediums hard to use, and that it is easier to work on a much smaller scale to allow for more intricacy and detail. I won’t be using this any further, but working alongside an artist and having a first proper crit was interesting and a learning curve.

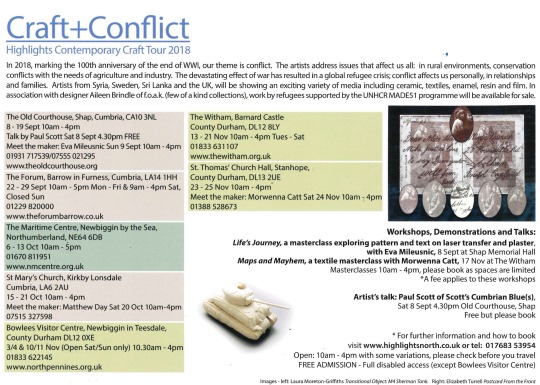
Craft&Conflict Exhibition

As part of our workshop with Mark Gibbs, our produced work was then going to be shown as part of the Craft&Conflict Exhibition, in The Forum, Barrow. This exhibition is part of the Highlights Contemporary Craft Tour 2018, and featured the likes of Conrad Atkinson and Paul Scott, amongst others.
We entered the exhibition and began with a talk from Karen, the curator, who explained that the theme of conflict was to mark the 100th anniversary of WW1; addressing issues that affect us all. After the introduction, we were able to walk around and explore the exhibition for ourselves.
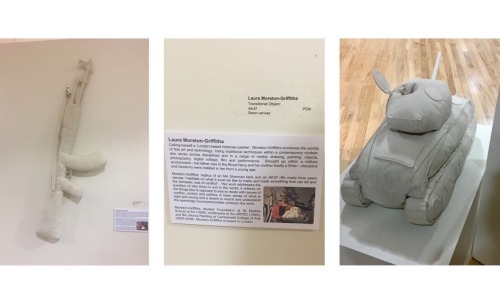
Some of our work from the workshop with Gibbs was on show (seen below), which was great and showed us an exact timeline of how art moves from being a concept, an idea, to a base structure, to then being a finished piece in an exhibition.

Laura Moreton - Griffiths: Moreton-Griffiths’ work was by far my favourite of the exhibition. I loved her use of textiles and 3D structural work, and also felt that the bold juxtaposition between the soft materials and harsh reality of the war weapons the material depicted was extremely effective, making her work stand out amongst the rest; hence why it was my favourite.
Matthew Day: Day’s work as a sculptor questions the taboo of missing limbs, celebrating them in plain sight. His pieces ‘explores the potential for limbs that move away from trying to replicate the human form’. Whilst I like the concept behind Day’s work, I didn’t feel that I necessarily felt they depicted ‘conflict’, and whilst the modern, more architectural take on prosthetics was effective and interesting, I didn’t feel very inspired by the work and therefore this part of the exhibition wasn’t my favourite.

Paul Scott - Scott’s work took a different direction to the other artists’ in the exhibition; creating ornate ceramics - porcelain plates and bowls, depicting a range of issues; such as inserting nuclear and coal fired power stations into pastoral landscapes on the plates. Similarly to Moreton-Griffiths’ pieces, I find the juxtaposition between the delicate, intricate medium (ceramics) and the horrific, conflict based additions, seen below, very effective.

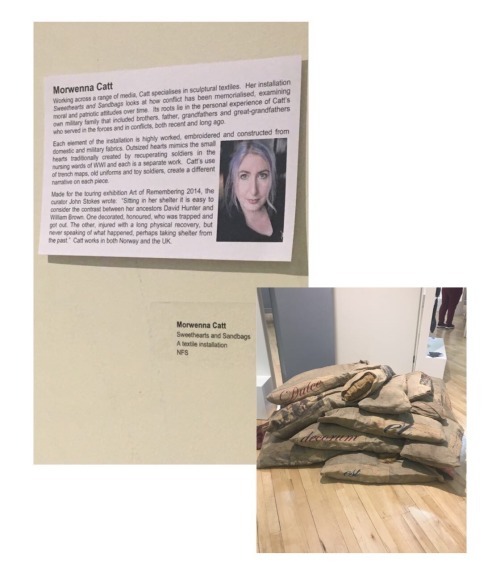
Morwenna Catt - Likewise to Moreton-Griffiths, Catt specialises in sculptural textiles, seen in her installation of sweethearts and sandbags, seen below. Whilst I think the use of military fabrics and embroidery suits the piece, mimicking the small hearts traditionally created by recuperating soldiers in the wards of WW1, the work isn’t to my taste, as I feel it looks too busy, and somewhat childish.

Eva Mileusnic - Mileusnic’s work ‘Counter Flow’, seen below, represents pairs of migrants’ feet, produced from slip cast porcelain. I love Mileusnic’s work, as I feel the detail and meaning behind the piece, which can only be properly understood upon reading the description, gives the viewer a connection to each pair of feet, and an overall touching and moving aura. I also love how each pair is adorned with a different pattern; referencing the movement of cultures from one place to another, and showing how each migrant’s story is different.

Overall, the exhibition was a good experience, and from here I have realised that I much prefer the pieces that depict moving, heartwarming stories that need further reading to understand (like Mileusnic’s) , and pieces that show contrast and juxtaposition through the use of materials and context (Moreton-Griffiths’/Scott’s). I think I will definitely re-visit Moreton-Griffiths’ work in particular in my future endeavours.
0 notes
Text
Top 50 Acrylic Nail Designs
Do your bare short nails look dull and boring to you?
I bet you’d like the option to grow out your nails so that you can get all those cute nail arts. It’s completely understandable. Whenever you see women having healthy, gorgeous nails and their nail arts, you sometimes wish you could get it done too. You can!
Acrylic nails are especially for people who feel like their nails never grow. Since acrylic nails are a combination of liquid monomer and powder polymer when applied to your nails and exposed to the air, they form a hard layer, so you’re guaranteed to have cute and strong nails. Using acrylics opens a door for experimenting with all kinds of manicures.
We’ve just made your life just that much easier by compiling a list of the best acrylic nail art. Let’s begin without further ado!
Top 50 Acrylic Nail Designs That You Must Try!
1. Pink Acrylic Nails with Gold Geometric Patterns
Image: Source
This nail art is ideal for a beginner. Don’t worry, even if you’re a pro and you want to take it easy and create a simple nail art, you can totally do this too! It’s super simple, and you wouldn’t need any tools. When you combine three colors this way, it looks like you spent a good deal of time and it’s super aesthetically pleasing!
What You Will Need
White nail polish
Blush/Peach nail polish
Gold nail polish
Get The Look
Paint all your nails in white. This will be the base.
Now, create a diagonal stripe with the blush colored nail polish.
Use the gold to create another, smaller diagonal stripe near the cuticle as shown.
Lastly, top it off with a top coat for a long-lasting manicure.
2. Spring Acrylic Nails with an Ombre
Image: Source
If you’re not a fan of huge nails, but rather a shorter alternative, then we’ve got you covered. This beautiful ombre nail art is not only easy to achieve, but it’s a perfect go-to option during the lovely spring time.
What You Will Need
Periwinkle nail polish
Light purple nail polish
Nude-pink nail polish
Liquid latex or tape
Makeup sponge
White nail polish
Top coat
Get The Look
Paint all your nails with white as the base shade.
Apply either liquid latex or tape around your nail to prevent it from getting the polish on your skin.
Then, on a makeup sponge, apply stripes of the periwinkle, light purple, and the nude-pink nail polish.
Dab the sponge onto your nails for an ombre effect. Reapply the polish to the sponge whenever needed.
Remove the latex or tape and seal it with a top coat.
3. White Acrylic Nails with a Marbled effect
Image: Source
I’m sure you’ve noticed all the trends on Instagram about marbled nails and phone cases. It looks classy as hell, and the best part is, it’s quite easy to pull off. This is a great choice for both beginners and pros alike.
You Will Need
Nude nail polish
White nail polish
Blue-gray nail polish
Silver nail polish
Black nail polish
A fine brush
Top coat
Get The Look
Paint the thumb and ring finger with nude.
Paint the middle finger white.
Paint the index finger with the blue-gray shade.
Paint the pinky finger with the silver nail polish.
Then, using the fine brush dipped in black polish, create fine lines as shown to achieve a marbled effect.
Seal it all up with a good quality top coat to make sure that the manicure lasts for a long time.
4. Rainbow Polka Dots
Image: Source
This is perfect for Easter! All the colors and the polka dots have such an Easter aesthetic, don’t you think? Or it’s also perfect if you just like bright, fun colors and rainbows! This is super easy to do and doesn’t even need any fancy tools.
What You Will Need
Yellow nail polish
Purple nail polish
Green nail polish
Pink nail polish
Bobby pin
Top Coat
Get The Look
Paint the pinky and index fingers yellow. Paint the middle finger green, the ring fingernail with purple polish and the thumb with the pink polish.
Now comes the fun part. Use the bobby pin dipped in pink polish to create polka dots in the bottom half of the nails, except for the nail which has been painted in pink.
Again, use the bobby pin dipped in green nail polish to create polka dots on the nails except for the nail that has been painted green.
Create purple polka dots on all the nails except the purple nail.
Dipped in yellow nail polish, create polka dots on all the nails while excluding the yellow painted nail.
That’s all! Easy, isn’t it? Now all you need to do is finish it off with a top coat.
5. Mermaid Scales
Image: Source
Do feel like the ocean is your calling? Or, do you love mythical creatures? Then, this nail art is something you should check out. Plus, it just looks really cool. With the help of a stencil, you can achieve that salon-like perfection!
What You Will Need
Metallic blue nail polish
White nail polish
Nail stencil or sticker that looks like mermaid or fish scales
Top coat
Get The Look
Paint all your nails white as the base.
Wait till the polish is dry. Then, place the stencil over your nail.
Paint over it with the metallic blue nail polish.
Wait about 30 seconds before removing the stencil.
Seal the nail art with a top coat.
6. Rich Matte Chocolate
Image: Source
Who doesn’t love chocolates, am I right?! Take it one step further and bring your love for chocolate onto your nails! It’s quite simple, but the mix of glossy and matte finish takes the look up another notch.
What You Will Need
Brown matte nail polish
Top coat
Tape
Get The Look
Paint all your nails with the brown matte polish.
Once it’s dry, place the tape diagonally as shown.
Now, use the top coat to apply over it.
When you remove the tape, you will clearly see the matte and glossy parts. That’s all!
7. Chevon Acrylic Nail Art
Image: Source
This one is for all you minimalists out there. Chevrons are all the rage these days. They’re super chic and look classy. You can achieve this look with just two or three things. It will literally take you five minutes!
What You Will Need
White Nail polish
Thin striped tape
Top coat
Get The Look
Over your bare nails, place the thin striped tape to form chevrons.
Now, use the white nail polish to paint over it.
Carefully remove the tape with tweezers.
Seal it off with a top coat.
8. Aztec Nail Art
Image: Source
Here’s another fun nail art. This one requires a little more patience. But if you follow our step by step instructions along with the pictorial, I’m sure you’ll be able to nail it (hehe)! Go on and take a step further! You’re ready for something a little more advanced.
What You Will Need
White nail polish
Light Yellow nail polish
Light Green nail polish
Peach nail polish
Black nail polish
Fine brush or nail striper
Toothpick
Top coat
Get The Look
Start off by painting the base of your nails white.
Use the brush dipped in the light yellow polish to create a triangle at the center of your nails.
Now, use the brush dipped in the light green polish to create a similar triangle just below the yellow one as shown.
With the peach nail polish, create a frame by following the shape of the top of the triangle as shown.
With the fine brush dipped in black polish, outline the triangles and the peach tip.
Now, draw a horizontal line right above the yellow triangle.
Use a toothpick with black nail polish to create tiny dots outside the yellow triangle’s sides.
We’ve come to the end of the tutorial, finally! All that is left to do now is to seal it with a top coat!
9. Summer Acrylic Nails with Beachy Waves
Image: Source
Seeing this nail art makes me want to pack my bags as soon as possible and fly off to a remote island somewhere. It’s so serene to look at! Blue is supposed to be a calming color. So when colors like white, light brown and blue are combined to create this beautiful beachy nail art in this way, it brings peace and relaxation.
What You Will Need
Sea blue nail polish
Light blue nail polish
Light brown nail polish
White nail polish
Top coat
Bowl of water
Nail polish remover in a spray bottle
Get The Look
On a sponge, apply the sea blue, light blue and light brown shades.
Dab it onto your nail, the brown near your cuticle. This will give you an ombre effect
Now, in the bowl of water, add a drop or two of white polish.
Spray some nail polish remover in the bowl to break up the nail polish slightly.
Dip your nails one by one in water.
You will achieve the desired look.
Clean up the sides of your nails with some nail polish remover.
Finally, add a top coat, and you’re all done!
10. Leopard Print Nails
Image: Source
Animal prints have always been popular. You see them on shirts, jackets, trousers, shoes, linen, you name it! So it only makes sense that we have a nail art with an animal print on this tutorial list.
What You Will Need
Light beige nail polish
Light brown nail polish
Black nail polish
Dotting tool or toothpick
Top coat
Get The Look
Paint all your nails with the light beige color as the base.
With the light brown nail polish, create small blobs all over the nail. They do not have to be perfect.
Use the dotting tool or toothpick dipped in black nail polish to outline the brown blobs roughly. Leave it open-ended and incomplete. This makes it look more like a leopard print.
Finish the nail art with a top coat.
11. French Acrylic Nails with an Ombre
Image: Source
Here’s another favorite for those of you who love keeping things minimalistic. It’s kind of a French manicure, except that instead of a clear-cut distinction between the tip and the nail bed, it’s applied in an ombre fashion. It’s extremely easy to apply. Let’s check it out!
What You Will Need
Nude nail polish
White nail polish
Makeup sponge
Nail polish remover
Top coat
Get The Look
On a makeup sponge, apply 2 stripes of the nude polish and one stripe of the white polish.
Make sure that the white nail polish on the sponge will go over the tip of the nail. Dab it onto each nail till you achieve the desired effect. Reapply the polish on the sponge as per your requirement.
Clean up the skin around the nail with nail polish remover.
Seal it all off with a top coat.
12. Silver Glitter Acrylic Nails with Beige
Image: Source
This one is super cute! It’s perfect for special occasions such as weddings. The colors used in this nail art are quite versatile in the sense that they’d go with almost any outfit. The silver glitter adds a little something extra to the whole nail art!
What You Will Need
Nude nail polish
White nail polish
Silver glitter nail polish
Top coat
Tape
Get The Look
What you will need to do first, is to paint all your nails with the nude shade as the base.
Use the glitter polish to paint your index fingernails, leaving the tips plain. Try and use a light hand as you reach the top to achieve an ombre effect.
Use tape on the top and bottom of the ring fingernail to get a ‘V’ shape.
Paint it with the silver glitter nail polish.
Carefully remove the tape and follow the ‘V’ shape near the tips to paint it white as shown in the image.
Finish the manicure with a top coat for long lasting results!
13. Crescent Moon Vampy Nails
Image: Source
These light color acrylic nail arts that I shared so far aren’t for you? Don’t you worry, we’ve got something in store for everyone. I personally love wearing dark shades on my nails. The combination of this nearly-black wine shade with the rose gold is amazing! The crescent moons near the cuticles add some edginess to the whole look.
What You Will Need
Deep wine nail polish
Rose gold glitter nail polish
Top coat
Get The Look
Apply the deep wine nail polish on your index and middle fingers. When you do this, make sure you leave the crescent moon shape near the cuticle.
Following the same thing, by leaving some space near the cuticle, paint the ring fingernail, pinky, and thumb with the rose gold nail polish.
Seal it with a top coat. It’s as easy as that!
14. Pastel Pink Princess
Image: Source
This one is perfect for those of you that have a party or occasion to attend on short notice, or if you’re running late. It requires little effort, and by the end of it, it will look as though you’ve spent some time at the nail bar getting it done.
What You Will Need
Pastel pink nail polish
Stick on Nail jewels
Top coat
Tweezers
Get The Look
Use the pastel pink shade as the base for all of your nails.
Using a tweezer, place six nail jewels near the cuticle of your middle fingernail.
Now, place three more jewels above the six jewels
Place two more above the three jewels.
Finally, place three of them, but this time one above the other as shown in the image.
Finish the nail art by adding a top coat.
15. Golden Foil Acrylic Nail Tips
Image: Source
If you are a fan of gold, then this is something that you should give a shot. It’s one of those nail arts that look like you’ve put in a lot of time and effort, but in fact it’s super quick, and easy to achieve, so let’s look at all the stuff that you will need, shall we?
What You Will Need
Gold Foil
White nail polish
Nude nail polish
Top coat
Get The Look
Paint all nails except the ring fingernail with the nude nail polish.
Paint the ring fingernail with white.
Carefully place the foil along the tips of the nails. Follow the ‘v’ shape.
Seal it with a top coat.
16. Lavender Boho Acrylic Nails
Image: Source
Get a chic and boho look with this manicure. It’s so aesthetically pleasing, don’t you agree? The pastel purple with the white mandala design makes for a great combination. Pile on all of your rings and middy rings, and you will have yourself an Instagram-worthy pair of hands. Although I do have to say, you must be able to have steady hands for this one to be able to paint out the design.
What You Will Need
Pastel purple nail polish
White nail polish
Top coat
Fine brush
Get The Look
Leaving the ring fingernail bare, paint all other with the pastel purple shade.
Use a fine brush dipped in white polish and carefully draw out a boho design.
Seal the nail art with a top coat.
17. Pink Acrylic Nails with Golf Foil
Image: Source
This is another super quick one. It will literally take you less than five minutes; that’s how easy it is. The plain pastel pink by itself looks wonderful. Now, you add those flecks of golden foil all over the nail and it resembles a gold-flecked stone!
What You Will Need
Pastel pink nail polish
Gold foil
Top coat
Get The Look
Use the pastel pink nail polish to paint all of your nails. This will be the base.
Now, apply the golden foil randomly over your middle fingernail and ring fingernail.
Once you are happy with the look, seal it off with a top coat for a long-lasting effect.
18. Cute Acrylic Nails in Pink
Image: Source
Simple and pretty. That’s the best way I would describe this nail art. This is for all you lovers of pink out there. The nail art in question is a play on two shades of pink. It would’ve been a plain nail art, had it not been for the accent nail and the jewel on it. Let’s look at how to achieve this!
What You Will Need
Very pale pink nail polish (it should almost look white)
Light pink nail polish
Silver nail jewels
Top coat
Get The Look
Leaving the ring fingernail, paint all the nails with the pale pink nail polish.
Paint the ring fingernails with the light pink polish.
Create a ‘v’ shape at the center of the ring fingernail and paint it till the tip.
Place one big jewel and a small jewel consecutively above it to finish the look.
Seal it with a top coat.
19. Pastel Butterfly Acrylic Nails
Image: Source
Calling all artists! If all the other nail arts were too simple for you, and you would like to incorporate your art skills into your nail art, then give this one a shot. Drawing the butterfly may look easy, but it’s quite challenging, given the small canvas that is your nail. I’m sure you’ll do great though!
What You Will Need
Pastel pink nail polish
Pastel blue nail polish
Light yellow nail polish
Fine brush
Nail jewels in a small size
Get The Look
Paint your thumb, ring and middle fingers pink.
Paint the index and pinky fingernails blue.
Now comes the fun part. Use the fine brush to create a butterfly on the ring fingernail.
Paint its wings with blue for contrast.
Use the fine brush to add some yellow on the inside as well.
To take this manicure up a notch, add some small jewels to the wings of the butterfly.
Seal it all off with a top coat.
20. All That Glitters Is Gold
Image: Source
Are the other nail arts too dull and boring for you? Okay, hold onto your hats and wigs because this one is for the bold hearted. If you like standing out and making an impression with strong statements and appearances, this manicure is worth your time.
What You Will Need
White nail polish
Gold glitter nail polish
Nail jewels
Makeup sponge
Top coat
Get The Look
Leaving the middle fingernail bare, paint all the nails in white.
Create an ombre effect with the gold glitter on the thumb, index fingernail and the pinky fingernail.
Apply the gold polish on a makeup sponge and dab it onto the middle finger nail. This will give the nail a very saturated look.
Apply the nail jewels along one side of the ring fingernail.
Finish the look by applying a top coat. There you go! All done!
21. Bow Accent Acrylic Nails
Image: Source
These nails totally remind me of Hello Kitty! Growing up, I had so much of Hello Kitty merchandise! Even today I can’t help but stare in awe of how cute their stuff is! If you want an adorable, yet glam look, then this one is for you!
What You Will Need
Gold glitter nail polish
Pastel pink nail polish
Acrylic bow
Get The Look
Paint all nails except the middle nail with the pastel pink nail polish.
Stick on the acrylic bow on the ring fingernail while the nail polish is still wet.
Paint the middle fingernail with gold.
22. Red Acrylic Nails with Floral Patterns
Image: Source
If you’re a lover of floral things and a French manicure, why settle for one when you can have the best of both worlds. The red and white floral combination somehow reminds me of when the Red Riding Hood goes out in the woods to pick flowers for her grandmother!
What You Will Need
Red nail polish
Nude nail polish
White nail polish
Dotting tool
Small nail jewels
Top coat
Get The Look
Except for the index fingernail, paint everything else with the nude nail polish.
Paint the index fingernail with red.
Paint a stripe of red on the tip of the ring fingernail.
Use a very fine brush to create thin stripes on the tops of the middle fingernail, pinky, and thumb.
Use the same brush to draw a stripe under the thick red stripe.
Use a dotting tool to create a floral design for the index and ring fingernails as shown in the image.
Add the jewels at the center of the petals of the flowers and seal it with a top coat.
23. 3D Acrylic Nail Art with Flowers
Image: Source
Another great one for someone who likes dressing their nails up. It’s also great for weddings. The intricate gray floral pattern goes well with the nude base of the nails. The flowers itself have been crafted with acrylic material. You can easily purchase pre-made flowers in the market.
What You Will Need
Nude nail polish
Gray acrylic flowers
Nail art jewels
Get The Look
First, you will need to paint all your nails with the nude nail polish.
Then, you can either create the acrylic flowers from scratch, or apply the premade ones onto the middle and ring fingernails.
Play around with the combination of the colors of the jewels and apply them accordingly on thumb, pinky and index fingernails.
24. Black and White Acrylic Nails with Silver Moons
Image: Source
If you love monochrome as much as I do, then this one will definitely catch your eye. Black, white and silver; what’s not to love? Not only that, but it’s super easy. I’m pretty sure you, yourself can see how simple it is!
What You Will Need
Black nail polish
White nail polish
Silver nail polish
Top coat
Get The Look
Paint the thumb, pinky and ring fingernails with black.
Paint the index and middle fingernails white. You can even play around with the colors by reversing the colors on the other hand.
Paint half-moons with the silver nail polish onto all of the nails.
Seal the manicure with a top coat.
25. Matte Lavender and Snow Nails
Image: Source
As soon as I saw this, I thought of the falling snow! This one is a must try for the winter time! If you aren’t fond of the bright red colors during Christmas and the winters, then this is the one for you! The matte finish of the purple and the white glitter works so well together!
What You Will Need
Matte Pastel purple nail polish
White matte nail polish
Loose white glitter
Dry flat paint brush
Get The Look
Paint all your nails except for the ring fingernail with the matte purple shade.
Paint the ring fingernail with the white polish.
While the white polish is still wet, use a flat brush to pick up some loose white glitter and place it onto your nail. That’s all!
26. Blue Acrylic Nails with Flowers
Image: Source
Another amazing nail art involving acrylic flowers. It’s a cute and fun look for the spring and summer when the flowers are full in bloom! It may look complicated, but that’s the best part! It’s so easy to achieve this look! Let’s look at the stuff that you’ll need.
What You Will Need
Pastel blue nail polish
Blue glitter nail polish
Blue acrylic flowers
Nail jewels
Get The Look
Paint all your nails except the ring fingernail with the pastel blue shade.
Paint the ring fingernail with the blue glitter nail polish.
Apply the acrylic flowers on the accent nail and one other nail of your choice.
Apply the jewels to your nails. Try and use different colors of blue for an added effect.
27. Pastel Pink Acrylic Nails
Image: Source
I know we’ve all heard the saying that goes “Simplicity is the ultimate sophistication”, and it holds true for many aspects. Leonardo Da Vinci knew what he meant when he said that and even till today, his words remain relevant. This manicure is simple, but that is chic and sophisticated. There’s not much to this manicure, but that’s the beauty of it!
What You Will Need
Pastel pink nail polish
Top coat
Get The Look
Paint all your nails with the pastel pink shade.
Seal it with a top coat.
28. White Flower Accent Nail
Image: Source
You are probably wondering why there are so many pastel shades in this list of acrylic nail art designs. Well, that’s because pastel shades are what’s in these days. Everywhere you go, you see them. They exude a very minimalist appeal which is what the millennials prefer.
What You Will Need
Pastel pink nail polish
White acrylic flower
Silver micro glitter nail polish
Nail jewels
Get The Look
Step 1: Paint all your nails with the pastel pink polish as the base.
Create an ombre effect with the silver glitter polish on the index and pinky fingernails.
Apply a layer of the glitter polish all over the ring fingernail.
Place the acrylic flower over the ring fingernail.
Apply the jewel at the bottom of the middle fingernails.
29. Heart Acrylic Nails with Red Tips
Image: Source
If Valentine’s Day is coming up and you’re looking for a cute nail art manicure that will stand out, then try this one! It has all the colors of the ‘Day of Love’. The addition of the jewels makes it look super fancy!
What You Will Need
Red nail polish
White nail polish
Red and white nail jewels
Dotting tool
Fine brush
Top coat
Get The Look
Apply the red nail polish to the tips in a ‘v’ shape. Leave the ring fingernail bare.
Do the same on the ring fingernail with the white nail polish.
Create two dots next to each other with the dotting tool dipped in white nail polish and use the fine brush to create the bottom of the heart.
Apply the jewels tastefully as shown on the middle fingernails and the accent nail.
Seal the manicure with a top coat.
30. Valentines Acrylic Nails with Love Letters
Image: Source
Another artistic manicure for the big V-Day, involving love letters! Before the age of texting, it was all about hand written love notes. Sometimes even today, a lot of people like sending love letters for the sentiment!
What You Will Need
Red nail polish
White nail polish
Nail jewels
Black nail polish
Fine brush
Dotting tool
Top coat
Get The Look
Apply the red polish on the index, thumb and pinky fingernails, while painting the middle and ring fingernails white.
Use the fine brush to create a letter on the middle fingernail. Add a heart to the opening.
Create a heart with the help of a dotting tool and the fine brush on the pinky.
Place the nail jewels on the rest of the nails.
Finish the manicure with a top coat.
31. Blue Glitter Ombre Tips
Image: Source
Here’s a fun twist to the French manicure. Ditch the plain white tips for a blue glitter ombre! When I first saw this manicure, it reminded me of the Little Mermaid! The blue glitter resembles the ocean and her tail, whereas the flower reminded me of the flower she wears in her hair later in the movie!
What You Will Need
Blue glitter nail polish
White acrylic flower
Top coat
Makeup sponge
Get The Look
Apply the glitter polish on a makeup sponge and dab it onto the tips of your nails for an ombre effect. Leave the ring fingernail bare. This will be the accent nail.
For the ring fingernail, apply a French manicure with the glitter polish.
Seal the manicure with a top coat.
Add the acrylic flower on the ring fingernail. Your manicure is complete! You’re good to go!
32. Floral Accent French Tips
Image: Source
This is another one of those that look super fancy, and will trick people into thinking that you’ve had a recent trip to the salon, but in fact took you literally five minutes to achieve if you’re good at a French manicure. The addition of the acrylic flowers takes it from simple to dressy!
What You Will Need
White nail polish
Acrylic flowers
Top coat
Get The Look
Apply a French manicure according to the shape of your nails.
Apply the top coat.
Place the acrylic flowers carefully onto the ring fingernails for an accent nail look.
33. Pink and Silver Glitter
Image: Source
If you liked how super quick and simple the last one was, then you’ll like this one as well. If the previous one was a more minimalist approach to nail art, then this one is for those of you who like to spice things up a little and make your manicure look glam.
What You Will Need
Hot pink nail polish
Silver chunky glitter nail polish
Top coat
Get The Look
Paint all of your nails with the hot pink polish.
Starting from the bottom to the tip, create an ombre effect with the silver glitter nail polish
Apply the top coat for a long-lasting manicure.
34. Rhinestone Accent Nails
Image: Source
For all you that are obsessed with anything sparkly, this one is truly your calling. There’s nothing about the brown shade that makes the manicure stand out. However, add a rhinestone on each nail and an entire nail bedazzled, and we have ourselves a-whole-nother story altogether!
What You Will Need
Matte brown nail polish
Rhinestones
Get The Look
Start off by painting all your nails with the matte brown nail polish.
While the polish is still wet, add a rhinestone to every nail.
Add as many rhinestones as you can on the ring fingernail in order to highlight it as the accent nail.
35. Peach and Glitter Acrylic Nails
Image: Source
This one is a cute and fun manicure that works with color combinations and geometric shapes. You can play around with the shades. If you’re not a fan of bright colors, all you need to do is replace the salmon shade with black and make it a monochrome look. It would look amazing!
What You Will Need
Salmon nail polish with micro glitter
White nail polish
Silver glitter nail polish
Tape
Rhinestones
Top coat
Get The Look
Paint the index fingernail white.
Paint the middle fingernail with the silver glitter polish.
Paint the pinky and thumb fingernails with the salmon nail polish.
Tape half of the ring fingernail and paint over it with white.
Tape the top half of the nail and the area over the white after it has dried. Paint over it with the silver.
Carefully paint the remaining area with the salmon shade. Use tape for this if you must as well.
Add a rhinestone to the index and pinky fingernails.
Finish the manicure with a topcoat.
36. Almond Shaped Aztec Acrylic Nails
Image: Source
Love Aztec prints and patterns? Then this is probably something that will pique your interest. If you’re also someone who is just starting to experiment with nail art but doesn’t want to go too overboard, then this is perfect since it’s both minimalist and has a little something extra. Let’s take a look at how to achieve it.
What You Will Need
Off white nail polish
Black nail polish
Fine brush
Top coat
Get The Look
Paint all your nails with the off-white polish except for the middle fingernail.
Paint the middle fingernail black.
Use the fine brush to outline the index, thumb and pinky fingernails.
Once again use the fine brush to create random geometric Aztec patterns on the ring fingernails.
5.Finish off the manicure with a top coat to ensure a long lasting manicure.
37. Rose Gold Glitter Nails
Image: Source
The color combination in this one is absolutely stunning. It’s the true Instagram aesthetic. If you consider yourself to be a social person who loves posting all things trending, then trust me, you’ll want a picture of this manicure in your profile.
What You Will Need
Dusty pink nail polish
White nail polish
Rose gold nail polish
Fine brush
Top Coat
Get The Look
Use the dusty pink for the thumb, index and pinky fingernails.
Paint the ring fingernail white and use a fine brush to create the pattern as shown.
Paint the middle fingernail with the rose gold glitter polish.
Finish the look with a top coat.
38. Chunky Rhinestones with Pink Nails
Image: Source
This is one of those looks which isn’t exactly for the ones who are looking for something simple. Looking to take your nail art game to the next level? Then you’ve come to the right manicure because this will definitely stand out. However, this is also appropriate for your wedding day if you’re looking to make a statement!
What You Will Need
Salmon nail polish
Rhinestones
Get The Look
Leaving the ring fingernail, paint the rest of the fingernail with the salmon shade.
Apply rhinestones of different sizes onto the ring fingernail. Various colors of light pinks and whites would look the best.
Also, add some of the rhinestones onto the index fingernail.
39. Black French Tips with Silver Accent Nail
Image: Source
I personally love this one! A French manicure with black instead of white and a silver accent nail; that’s my kind of manicure right there. It’s so simple, but the colors together make this nail art stand out and looks chic.
What You Will Need
Black nail polish
Silver nail polish
Top coat
Get The Look
Apply a French manicure with the black polish at the tips on all nails except the ring fingernail.
Apply the silver glitter nail polish on the ring fingernail.
Finish the manicure with a top coat for long lasting results.
40. Short Acrylic Nails with Gray and Pink Glitter
Image: Source
Another great manicure for someone with short nails! This one can be done so quickly, that it’ll hardly take five minutes! You don’t expect it, but the pink glitter really goes well with the gray and monochrome.
What You Will Need
Pink glitter nail polish
Light gray nail polish
Black nail polish
White nail polish
Fine brush
Top coat
Get The Look
Paint the thumb and ring fingernail with the pink glitter polish.
Paint the middle and pinky fingernail with the light gray nail polish.
Apply white polish on the index finger and use the fine brush to add on stripes in black.
Seal the manicure with a good quality top coat.
41. Pink and Blue Ombre with Hearts
Image: Source
How cute is this?! Honestly, an ombre effect is so useful for taking your whole manicure game up a notch. You have to put in very little effort since the makeup sponge will be doing all the work. Now, add a few hearts and some rhinestones, and you’ve got yourself a pretty cool manicure!
What You Will Need
Pastel pink nail polish
Pastel blue nail polish
Fine brush
White nail polish
Nail jewels
Get The Look
On a makeup sponge, apply the pink and blue nail polishes next to each other.
Dab the sponge onto all the nails till you can see an ombre effect.
Use the fine brush to create sketch style rough hearts on all nails except for the ring fingernails.
Add the nail jewels to the ring fingernail.
42. Glitter Acrylic Nails with Geometric Patterns
Image: Source
Sophisticated and neutral, this one is for the simple and bold people alike. This is probably one of my favorite color combinations of all time. The nude, white and gold work so well together! The geometric shapes look difficult to achieve, but with the help of some tape, it’s pretty easy!
What You Will Need
Gold glitter nail polish
Nude nail polish
White nail polish
Tape
Top coat
Get The Look
Paint the index, pinky and thumb fingernails in gold.
Use some tape to apply it diagonally on the ring finger. Same goes for the middle fingernail. Paint over it with gold. Make sure to use different angles and shapes for both the nails.
Repeat the step and this time paint over it with the white. Do it again for the nude polish.
Finish the look with a layer of the top coat.
43. Glitter and Rhinestone Almond Nails
Image: Source
Calling all of you bling lovers! Need something more ostentatious? This rhinestone-bedazzled accent nail and glitter nail art is great because all that glitter and sparkle is easily balanced with the subtle peachy nude shade.
What You Will Need
Peachy nude nail polish
Rhinestones
Silver glitter nail polish
Get The Look
Paint the thumb, index, and pinky with the peachy nude shade.
Paint the middle fingernail with the silver glitter polish
Apply the rhinestones on the ring fingernail as the accent to make it stand out.
44. Red White and Blue Glitter
Image: Source
Fan of the sparkles and glitter? You’d love this one then. Red white and blue is a classic color combination. It could be patriotic if you want, or just a simple color combination. Either way, this is a super cute and easy nail art to achieve.
What You Will Need
Red glitter nail polish
Blue glitter nail polish
White nail polish
Fine brush
Top coat
Get The Look
Paint the middle and thumb fingernails with the red glitter nail polish.
Paint the ring fingernails with the blue glitter polish. Add two stripes and a heart as shown.
Apply the blue glitter as a French manicure for the index and pinky fingernails. Add a stripe under the tip and a heart.
Finish off with a top coat.
45. Navy Blue and Gold Royalty
Image: Source
This is one of my personal favorites! I am completely in love with the navy blue and gold combination. I don’t know about you, but this totally reminds me of a magical dress made by someone like Zuhair Murad! I wouldn’t mind that on my nails!
What You Will Need
Navy blue up nail polish
Gold glitter nail polish
White nail polish
Fine brush
Tape
Top coat
Get The Look
Paint the thumb, index and the fingernails in the navy blue nail polish.
Paint the middle and pinky fingernails in the gold glitter polish.
Apply strips of tape on the ring finger to form a thick ‘v’. Paint over it with gold.
Remove the tape pieces and you will see the shape of the ‘v’.
Outline the gold part with a fine brush dipped in white polish.
Seal the manicure with a top coat.
46. Criss Cross Acrylic Nail Art
Image: Source
If you like keeping the shades you use on the down low but want to experiment with the pattern, then this one is a must try. I honestly am feeling the gold, white and dusty pink combination. Plus, those shapes take the manicure up another level!
What You Will Need
White nail polish
Gold glitter nail polish
Dusty pink nail polish
Top coat
Tape
Get The Look
Paint the thumb, middle and pinky fingernails with the dusty pink shade.
Paint the index and ring fingernails with the gold glitter nail polish shade.
Place very thin strips of tape in a crisscross manner on the index fingernails, and paint over it with white.
Create a wide ‘v’ shape on the ring fingernails with tape. Apply white polish over it.
Wait for it to dry and repeat the step creating a smaller ‘v’ within the white part. Apply the dusty pink polish over it.
Seal it with a top coat.
47. Black and Silver Acrylic Nails
Image: Source
Alright! We’re nearing the end of the list which means that the nail art will slowly start getting harder. I love the black and silver glitter combination! This one does look complicated, I will agree. However, with the step by step instructions, it’s not too hard to achieve. Go ahead and try it!
What You Will Need
Nude nail polish
Black nail polish
Silver chunky glitter nail polish
Rhinestones
Fine brush
Top coat
Get The Look
Paint the thumb, index and ring fingernails black.
Paint the middle fingernail and the pinky fingernail nude.
Use a fine brush dipped in black polish to draw an ‘X’ and two horizontal lines on the middle fingernail. Outline the base near the two lines.
Draw a chevron pattern near the tip of the pinky fingernail.
Place rhinestones on the ring fingernail and the thumb.
Apply the glitter nail polish on the index fingernail in an ombre fashion starting from the base, going upwards to the tip.
Finish it off with a good top coat.
48. Tropical Escape
Image: Source
Going on a holiday to somewhere warm and tropical? Then, this is the perfect manicure for the occasion! Even if you aren’t going on vacation, but looking for a fun look for the summer, give this one a shot. This one is for the slightly more skilled artists. As you can see, it requires a steady hand for the intricate design. Get an artist friend to help you if you can’t do it yourself! Make a slumber party out of it!
What You Will Need
Pastel purple nail polish
Purple nail polish
Pink nail polish
Blue nail polish
Orange nail polish
Fine brush
Gold triangle nail sticker
Top coat
Nail jewel
Makeup sponge
Get The Look
Apply the pastel purple to the sides of the pinky, middle and thumb fingernails as shown. They should resemble long triangles.
Use the fine brush in the purple polish and outline the triangles.
Apply the triangle nail sticker at the point where they meet.
On a makeup sponge, apply pink and purple polish. Dab it onto your ring fingernail. You should have an ombre of pink and purple. Make sure that the purple is at the tip.
Now comes the hard part. Using a fine brush in black polish, draw out palm trees, ripples in the water and birds.
Apply orange, blue and purple with a sponge on your index fingernail.
Draw out a flower with a fine brush.
Place a jewel at the center of the flower.
To complete the manicure, seal it with a top coat so that your artwork can stay safe for days!
49. Mandala Inspired Nail Art
Image: Source
A fun and colorful nail art manicure which is ideal for festivals! This is definitely something that you would see at Coachella. Add on some super cute boho rings, and you’re ready to fit right in at the ever-popular music festival.
What You Will Need
Salmon nail polish
Pastel yellow nail polish
Pastel blue nail polish
Pastel pink polish
Pastel purple polish
Fine brush
Gray matte polish
Black matte polish
Rainbow glitter polish
Nail jewels
Makeup sponge
Get The Look
Paint the ring fingernails with the salmon nail polish.
On a makeup sponge, add a drop of the pastel colors and dab it onto the middle fingernails.
Using a fine brush dipped in matte black polish, create the design as shown in the image. You can add color details afterwards if you wish.
Paint the index fingernails with the matte gray. Then, use the black polish to create the block stripes as shown.
Use the rainbow glitter polish to create an ombre effect from the top to the bottom on the pinky and thumb fingernails.
Add the jewels onto the ring fingernails.
50. Goth and Glitter Nail Art
Image: Source
It’s only right that this one is last, because as you can see, there’s a lot going on. Who knew glitter and goth themes went together? Well, this manicure certainly proves that they go, not just good, but great together.
What You Will Need
Black nail polish
Silver glitter nail polish
Gray matte polish
Black matte polish
Black acrylic bow
Get The Look
Let’s take this one nail at a time. The pinky nail is pretty simple. All you have to do is create an ombre effect with the silver glitter at the tip of the nail on one pinky. On the other one, all you need to do is apply the tips with black while making it a slight ‘v’ shape as shown.
The ring fingernails would probably have to be the most difficult ones. Once on the nail, paint the entire nail gray and then using a fine brush, create intricate lace patterns. On the other nail, leave the first one fourth of the nail near the cuticle and paint the rest of it with the gray polish. Do the same and create the lace pattern on this nail as well. Add the black acrylic bow to this nail.
Create a semi circle near the cuticle on of the nails. Create a broader outline around the semi-circle as seen on the left middle fingernail. Apply a thin stripe at the tip. Follow a similar pattern on the right fingernail, but this time use an inverted ‘v’ shape.
Create a French manicure with silver glitter outlined with black. Place another acrylic bow here. On the other nail, create an ombre effect near the tip.
Paint both the thumb fingernails black. Create a ‘V’ starting from the cuticle, going up.
Well, I hope this list gave you some inspiration for some acrylic nail designs! There’s something for everybody in here. You can even play around with a couple of designs and find one that works for you! The whole point is to have fun with it! Make a pamper session out of it! What are you waiting for? Go ahead and try them out for a salon like result!
The post Top 50 Acrylic Nail Designs appeared first on STYLECRAZE.
The article source is here:Style Craze
0 notes
Last Seen Blogs
ataleisurelypace
at a leisurely pace

azumi8
Azumi

icaseya2020
无标题
icaseya2020
无标题
aphroditelovesu
aphrodite's lovers