#tutorials are your friend
Explore tagged Tumblr posts
Visit Tumblr Blog
Explore Tumblr blogs with no restrictions, modern design and the best experience.
Last Seen Tumblr Blogs


Fun Fact
Mobile US users spent an average of 115.8 minutes on Tumblr app monthly.
Note
How long have you been drawing?
Any pointers?
I love your lucifer one.
Awe! Thank you!
I’ve been drawing for as long as I can remember. This is gonna sound super cliche, but the best pointer I have is just to keep practicing; however. Don’t just focus on the things you like doing. It stunted my art growth, and now I’m horrible at backgrounds. There are plenty of great tutorials on YouTube for all artists! A few good places to start are Winged Canvans, and SamDoesArts. The former of the two have a whole team of skilled art professors giving shortened lectures, on lots of various techniques that helped me a lot, in just a few short months. Sam gives great advice on more advanced tutorials on stuff like bounce lighting, and color theory.
Good luck on your art journey!
Editing to add an extra (extremely controversial) tip:
TRACING IS OKAY!!
I’m not saying to trace someone’s art, and post it as your own! You need to give credit where credit is due! And if possible, try asking artists if you can use their art as practice! (Consider this me giving y’all consent to trace my art; as long as you tag me in; I’m everywhere except Twitter; Elon can suck my strap)
But sometimes in order to understand movement, and fluidity, and foreshortening, you gotta get your hand used to line placement, that way you can be more confident in your pen strokes. Look up tutorials on ethical tracing, and shape language, to get a better grasp on how to isolate your characters/models using simple shapes.
Think of it as someone trying to teach you how to swing a baseball bat; your coach, more often than not, is gonna position your hands, elbows, hips, etc. where they need to be, in order for you to succeed in hitting the ball. You know the basics, but it’s always better to get help from someone who knows what they’re doing, y’know?
#Art tips#art advice#art tutorial#for beginners#for beginner artists#let me help you#I never took an art class#I learned all this shit from YouTube#tutorials are your friend#USE REFERENCES#controversial art tips
2 notes
·
View notes
Text
how two draw

#tell me if you see what I see#because I see what I see#and i see it#anyways#i drew a how to draw a penguin thing with no hidden thing in it at all nope no not at all nada#i hope you will teach this to your friends by reblogging it#hahskeleton#my art#how to draw#art tutorials#drawing tutorial#art tutorial#how to draw thing#reblog please#meme art#funny memes#funny#haha#humor#meme
67 notes
·
View notes
Note
I NEED A BREAKDOWN ON HOW YOU DRAW BODIES BECAUSE OH MY GOD IM SO IN LOVE WITH IT IM COMBUSTING 😫
when i get questions like this I start sweating because im unsure of how to answer them in a way that's constructive and can help you in your own art journey, but damn i'll try 😅
as a disclaimer im gonna add that this is how i approach lean bodies, there are several different body types and they are all wonderful and beautiful. I suggest the morpho books for more in depth studies!
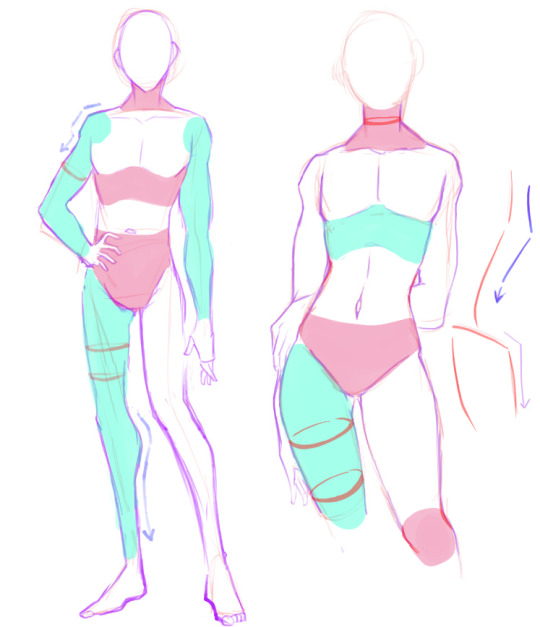
to explain what i've highlighted are the more conscious decisions I make while working on drawing a figure. The left example is typically considered more "masculine" (straight lines, fewer curves, "straight" shoulders, etc)
My personal touch is on the right for masculine figures. I prefer softer lines, wider hips, thicker thighs, typically considered "effeminate". Depending on who I'm drawing I tend to interchange these decisions.
Again this is just how i approach art personally. I'm sorry I can't give you anything more meaningful. 😓😓😓
but i thank you for your continual support!
#babblin'#reach out and touch shrimp#im sorry if this isn't more helpful#thanks anon#not a tutorial#tho that link to morpho? y'all should have a look its a really helpful study#remember babes: references are your best friend and shapes are really sexy
34 notes
·
View notes
Text
just saw a pinterest comment that suggested learning how to crochet instead of learning how to knit because it's easier and i can't keep silent anymore i have to confess that i wrote my cass learns how to knit fic because i need people to love knitting in the same way that i need people to love cass. the crochet vs knitting metaphor argument exists because i've had that conversation (minus the metaphor and also it was jokingly silly with my friends) with me arguing the side of knitting and as much as i love projecting onto characters stephanie brown would never in her life be against crochet. she would adore crochet. i don't actually dislike crochet its good for things that knitting will never be able to do like baskets and is so much better for stuffed animals and i think it's better for things like bralettes and bags but knitting is so good for clothing it's stretchy and more flowy. crochet is so good for items that need to hold a little more structure but in my opinion knitting makes more comfortable clothing and crochet got so popular in the last couple of years but knitting did not and knitting is not more difficult!! knitting is fun and good and i love her!!!
#crochet got so popular in my generation in the past few years and left knitting in the dust. knitting is my most underrated fav#you would loooveeee knitting if you learned i promise it's not difficult i promise i promise#i mean maybe it is a little bit difficult because that's how hobbies work but you would loveeeeeeee knitting if you learned i promise#ive seen a couple of comments on tutorials and things that are like i know how to crochet but actually i think knitting looks better#and tutorial for crochet stitch that looks like knitting!!#and i'm over here foaming at the mouth#i know my dc friends will understand because its the same feeling as watching your underrated fav continue to be underrated#and objectively there's nothing wrong with this more popular character and you might even really like that more popular character#but if someone mentions they love that character because of traits that your underrated fav has then your eye will start twitching#like cass wants to kill herself so bad there should be buckets of venty angst h/c fic written by teenagers about her you know what i mean
31 notes
·
View notes
Text
I am out here fighting for my life trying to convince people than being 30 is not fucking old
#I am 22 and wondering how many people in their 30s my classmates have met#friend turning 25: im so olddd#me: *cocks gun* shut the fuck up#other friend: old man yaoi!#me: those are two gentlemen in their 30s and 40s what the fuck are you on#they're in the PRIME OF THEIR LIVES LEAVE THEM ALONE#childhood is the tutorial and 20s are the early game#30-40 is when you REALLY get into the game of life!!#your life doesnt even begin to end in your 50s what the fuck is wrong with yall#courtesy of a 22yo with several friends in their 30s who honestly I forget are a decade older than me#shay posts
11 notes
·
View notes
Text
As I whisper in your ear, “I wanna fucking tear you apart”
#yttd#your turn to die#ranmaru yttd#ransara#sara chidouin#yttd fanart#sara yttd#tear you apart is so ransara coded#i had to make my friend draw like 3 tutorials for me while making this#art#yttd art
59 notes
·
View notes
Text
L.imbus moots! I evoke thee!!!
...So like. What's the consensus on G.regor? Cool? Not cool? Asking for a friend- (and myself)
#pan rambles#I haven't made any progress past like. the tutorial (And admittedly I'm still a little lost on how the fights work ;v;)#So I need to know if he's cool before considering anything-#I mean#uh#Just asking for a friend!#Also I'm once again inviting y'all to tell me about your f/os and ships from that game <3
16 notes
·
View notes
Text

Small test run of Infinity Nikki done! Mostly just finished the tutorial (and kicked Momo around), but it so far it seems pretty fun~
Also photo mode is so nice ♥
#there's some janky animations in those manual progress cutscenes#and after the crash cutscene i had some big lag#but that vanished after progressing the quest#tutorial was somewhat annoying (i hate those “and now click here” ones that refuse to let you do anything else before you finish them)#but didn't take that long#and yeah the photo mode is a godsent for someone used to gpose lol#so many games have pretty graphics but absolutely refuse to let you pose for pics#or god forbid edit colors or lights to make them look better#i can maybe see some of the same problems that shining nikki had#as in. 3d outfits refusing to play nice together when mixing outfits#as that was something i loved doing in love nikki#but so far i haven't got any “you can't use that piece with this outfit” that i remember getting A LOT during shining#anyway uhhhhhh#i should probably come up with a tag for these pics#for organizational purposes u know?#neri in miraland#that'll do#AH also if any mutuals/followers try the game feel free to toss your friend codes my way 👉👈#i've yet to see what the friend system even lets you do but still#infinity nikki#edit: oh right i forgot to clarify - if you walk into momo he kinda shuffles out of your way#and if you keep doing it multiple times he comments something about it lol#i got “okay okay i'll get out of the way!” and something about him need some protective gear lol
10 notes
·
View notes
Text
so you want to use OBS
hello! i’ve decided to compile information on my OBS setup and some resources that have helped me along the way. this is mostly for personal reference, but maybe others can make use of this information!
some notes before i get into it:
i use OBS for both offline recording and (twitch) streaming. any footage i record is edited using DaVinci Resolve 18, which is free.
most of my OBS captures are of video games (through a USB capture card, specifically elgato), and the occasional screen/application capture (like clip studio paint, and sometimes PC games).
as such, the information here is reflective of these experiences. this post is not comprehensive to all of OBS’s features- this is just an overview of the settings and configurations that are most relevant to me.
with that out of the way, all the information will be under the cut!
Basic Setup
file format:
how to change: settings -> output -> recording -> recording format -> press “apply” once finished!
I save most of my recordings as .mkv files- it supports multi-track audio! i prefer .mkv over .mp4 because if your power goes out, you still have a recording to work with.
.mkv files can be read by DaVinci Resolve without an issue- but for Adobe software, they'll need to be remuxed to .mp4 within OBS! (file -> remux recordings -> press the … to select a file -> press the “remux” button)
video resolution and framerate:
how to change: settings -> video -> output (scaled) resolution
my obs canvas is @ 1920 x 1080p (16:9)
i switch between 720p and 1080p as needed! if you're concerned about space, you can probably just go for 720p. i also record at 30 fps, simply because that’s what my capture card supports.
video bitrate:
how to change: settings -> output -> encoder settings (located in both the streaming and recording tab) -> press “apply” once finished!
bitrate is a bit of a doozy to explain, but the most important thing to know is that bitrate affects your video’s quality. lower numbers = lower quality, while higher numbers = higher quality.
generally speaking, you'll want higher bitrate when you're recording things with high depth of information (e.g. you’d want a higher bitrate for something fast-paced like splatoon, compared to a slower-paced game like animal crossing).
my video bitrate is either set to 3000 or 4000 kbps! and here's some of my other (related) settings while i'm at it:
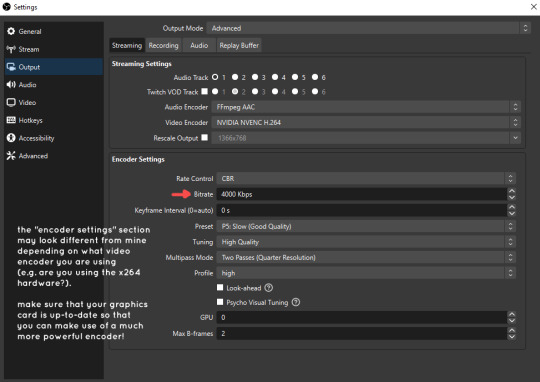
you can put your bitrate at much higher values than me if you're a stickler for quality- but keep in mind that a higher bitrate means:
bigger file size
more information to upload (when streaming)
your computer will need to encode more
i’d recommend reading twitch’s guidelines on encoding, bitrate, resolution, and framerate to get an idea of what values to pick. for people who are doing offline recording or streaming on a different platform, i suggest googling the appropriate resources!
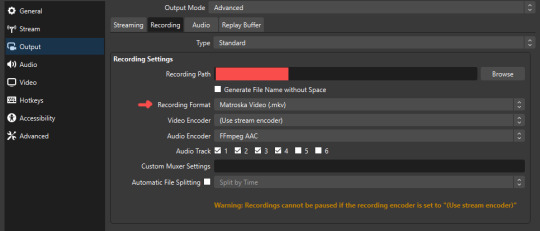
multi-track audio:
this is mostly applicable to anyone looking to do video editing!
multi-track audio basically allows you to separate your audio sources (e.g. discord, game audio, and your own microphone) into different tracks.
this is an immensely helpful tool because it lets you adjust audio levels in post-production (editing). some examples of how this can be used:
increasing someones microphone volume if they speak too softly
increasing/decreasing game audio
muting swear words/sensitive information
completely muting voice call + microphone if you want to upload a no commentary video
and more!
to set this up, take a look at your audio mixer panel, and press the ⚙ icon. this will bring up advanced audio properties.
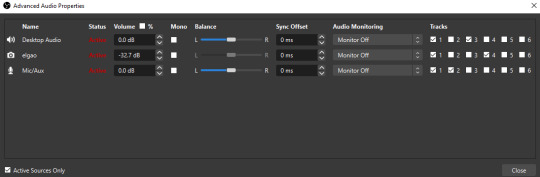
by checkmarking a track box, it puts the audio on that track. to make the above screenshot easier to digest:
track 1 consists of ALL three audio sources- desktop, elgato, and microphone.
track 2 only has the microphone audio.
track 3 only has desktop audio (i use this for voice calls)
track 4 only has the elgato capture card audio (game audio). the volume has also been lowered so that any speaking voices can be heard clearly.
tracks 5 and 6 are unused.
you might be wondering, “why do all three of these have 1 checked off?” this is what i call the universal audio track. i recommend having a universal audio track for a few reasons:
when you stream from OBS onto twitch/youtube- you have to select ONE audio track.
it’s also a nice backup in case you didn’t separate your audio correctly.
if for whatever reason you need to move around your individual audio tracks in editing, the universal track acts as a nice reference point.
mark off your audio tracks for each audio source as you see fit! once you’re finished with the advanced audio properties, go to settings > output.
for the streaming tab, you’ll want to have the number of your universal audio track selected. in my case, that will be audio track 1.
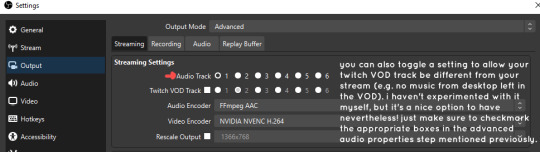
for the recording tab, checkmark all the audio tracks that are applicable to you (in my case, audio tracks 1, 2, 3, and 4). by default, only audio track 1 is selected.
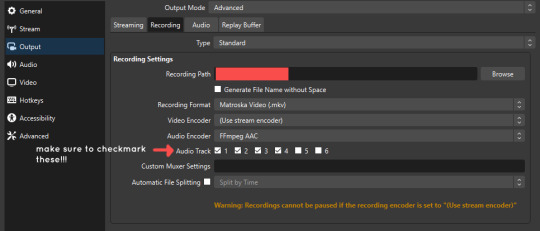
if you don’t check off the additional audio tracks in the output > recordings section, you will not have access to those audio tracks in editing, and you won’t be able to edit your audio tracks independently of each other. so don’t forget to do this! 👍
custom browser docks
custom browser docks are a great tool for when you’re streaming and want to have access to your twitch chat and/or activity feed! (or if you wanted to have some other web browser on OBS).
to create one, go to docks -> custom browser docks.
you’ll be given a table interface that asks you to put the dock name and URL. for streamers who want to have chat and alerts available, do the following:
on twitch’s homepage, go to the upper right and click your icon
then, click creator dashboard
once you’re on your dashboard, go to stream manager
click the vertical “...” on my chat OR activity feed.
press “pop-out chat” OR “pop-out activity feed”
copy and paste the link into the table back into OBS
press apply once you’re done
click and drag the docks around at your leisure to put them where you like!
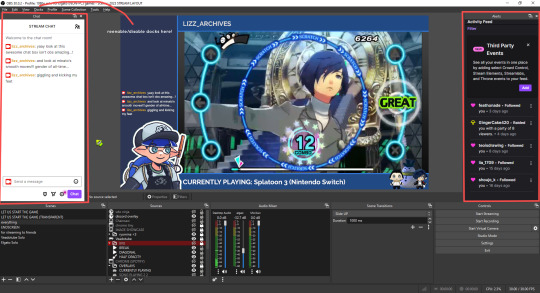
if you ever decide you don’t want to have something on your OBS dock (or want to bring something back), go to the toolbar, click “docks,” and click the appropriate dock!
third party things
a section of optional things that you may enjoy having.
streamlabs alerts
this is basically for anyone who streams and wants to have their chat and/or follower notifications visualized on screen!
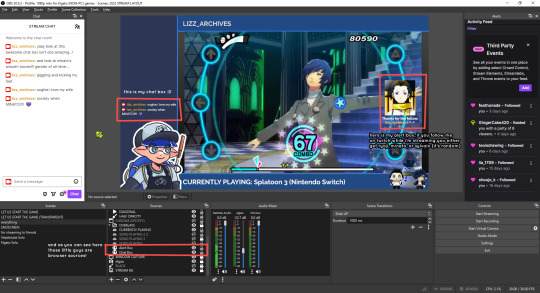
streamlab alerts can be added to OBS by adding a browser source into your scene, and the specifics can be customized on streamlabs itself. it’s pretty self-explanatory, so i’ll just leave a link to streamlabs website, where you can log in using the streaming platform of your choice: https://streamlabs.com/
discord overlay
this is a browser source that can be set up to show people who are in a server's voice chat and who speaks. i recommend this to people who make multiplayer content- it can help viewers distinguish who is who but also it can be helpful in editing.
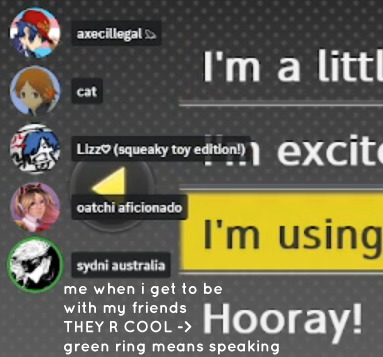
to set this up, go to https://streamkit.discord.com/overlay, click “install for OBS,” and after logging in with discord, go to “voice widget” and click the server and voice channel you want.
you are able to apply CSS if you'd like more control over the visuals, but the standard layout tends to work fine for me! a search of “discord overlay css” on youtube can help you get more information.
veadotube mini
this is a pngtuber software that a friend recommended to me! no webcam is required- mouth opening and closing is based on your microphone input!
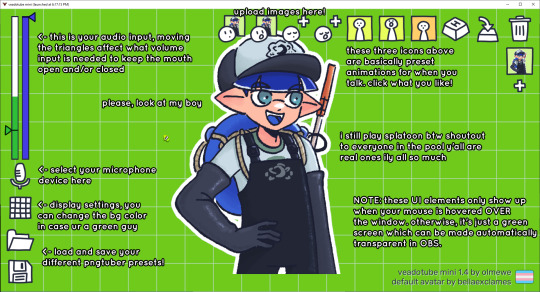
you can download it here (it’s pay what you want!): https://olmewe.itch.io/veadotube-mini
for a proper tutorial on how to use it, i recommend checking out the app's documentation, which you can read here: https://veado.tube/help/
source record
have you ever wanted to stream something with a chat overlay/layout, but wanted your recording to ONLY be the gameplay? or maybe you wanted to record BOTH your gameplay AND your webcam so that you can have a crisp zoom-in on your webcam!
source record is a third party plugin that can help you with that!
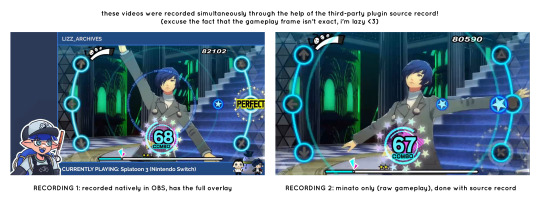
the general gist of source record involves applying the “source record” filter on either a scene or source, and customizing the encoding settings accordingly. the exact details of how to set it up is beyond the scope of this post, so I'll just direct people to this video instead (it was very helpful to me):
youtube
⚠ a quick note about source record: this plugin can be intense for your computer. be sure to do test recordings and the like to see what your computer can handle (and see if the recordings come out the way you like). it took me a few tests before i settled onto something i liked!
you can download and install source record here: https://obsproject.com/forum/resources/source-record.1285/
vdo.ninja
have you ever wanted to do a collaborative video or stream where you feature someone else’s video on your stream? or maybe you’re doing a multi-person streaming event! vdo.ninja is the perfect tool for you!
vdo.ninja turns your OBS virtual camera into a browser source link- which your collaborator can add on their stream! this is a new tool that i’ve added to my arsenal recently- since my friend and i are planning to stream a side order challenge together! i’ve still got to iron it out a bit more, but i like what i’ve used of it so far.
try it out for yourself at their website here (with documentation and demos available on the homepage!): https://vdo.ninja/ (no downloads required!)
ok! i’m set up! what now?
and with that, that’s all of the settings and tools that i thought would be worth mentioning! while most of my setup was written with video games in mind, some of these plugins and setups may be applicable to other types of videos (e.g. tabletop gaming with a physical camera)!
now that i’ve outlined all these settings, i have one more thing i have to say: regardless of what you're using OBS for, do a test recording before doing anything “official” with it. this recording can be as short as 30 seconds. it’s a good habit to develop that can make sure your streams/recordings turn out the way you want them to!
here are the kinds of things i like to check! it’s not an exhaustive list, but this can be a starting point:
video:
does my video look the way i want it to (and can my computer handle that)?
can my computer handle the load of encoding? - OBS will note in the bottom if the encoding is overloaded. if it can’t handle it, turn down your bitrate or adjust other encoding settings (e.g. i had to toggle psycho visual tuning OFF because it was causing lag)
this is especially the case if you're recording PC games- you don’t want to have slowdown on either your game or the recording!
audio:
are my audio sources (e.g. desktop audio and microphone) correct? - if you plug/unplug devices a lot, be sure to check this (settings -> audio).
are any of my audio sources muted? - make sure you don’t have anything on 🔇 if you don’t want it to be muted! otherwise the audio will be lost forever… (i lost my friend’s VC audio once… it was sad)
are my audio tracks separated properly? - requires you to boot up your editing software, but it's worth doing! for the test recording, just have something from all your sources playing at once, and see if your editor has things separated into tracks.
can i hear the voices clearly? or does the music and/or game overpower them?
if for whatever reason your OBS crashes, or you want more information on anything “critical” or “warning” worthy in your set-up, you can go to help > log files > upload current log file > analyze. crash logs currently can’t be analyzed by the log analyzer- but they’re a valuable tool when asking for help on the OBS forums!
and that’s all! for real, this time. i hope that some of these tools and settings can help anyone wanting to get more out of OBS. there’s definitely other things i didn’t touch upon (e.g. audio filters for noise compression, suppression, etc.), so i suggest doing your own research and trying things out!
happy recording/streaming, and thanks for reading! ✨
#lizzy speaks#this was a fun little write up!! i've been slowly getting some of my friends into video making teehee and its SO FUN!!!#(digital) video is like one of my other passions next to art. everyone say thank you splatoon for getting me back into it again <3#i've been using obs since like 2018 so i wanted to share some of the things i learned for funsies... i really love video...#but also i like having reference posts like this in the case people have questions they want to ask me...#because i don't always remember what video tutorials i watched and it's nice to document that somewhere...#warning to anyone who reads it this is like 2.1k words. i do want to stress that this isn't comprehensive but there's still a lot of info#that i wanted to put for this post...! that said topics like designing your own stream layout + assets for it are NOT in the scope of this#post and nor is this a beginner's guide to obs (i wrote this with the assumption that you know how to record and/or stream and that-#people already have an idea of how to use scenes and the different types of sources obs can use).#i hope everyone's had a lovely march 5th! i would love to look at the fanart but im still not done with reload...#but im hoping to finish it by the end of the month!!! yipee!!!#Youtube
50 notes
·
View notes
Text

#context for non BOTW players:#you start the game by waking up in the shrine of resurrection in a cave#you have amnesia (boo) and a fantasy smartphone (yay)#you’re stuck on this huge plateau as a sort of tutorial until you find a way to get off it that isn’t ‘fall to your death’#also you don’t immediately make a friend in canon. you just meet a ghost king.#which DEFINITELY doesn’t parallel anything that happens in a certain comic…#botw#breath of the wild#johan and peewit#johan et pirlouit#johan and peewit in BOTW
20 notes
·
View notes
Note
Hi! Just curious, but is there any software that you use in order to access Antonblast's game assets?
Undertale mod tool (available through github) is still my go-to! I'm sure there's other/better ways out there, but that's the one I'm familiar with 👍
#hot off the burner#💥asks💥#I forgot I only have this info listed on desktop and not mobile oops lol#don't ask me how to set it up bc I forgor 💔💔💔😔😔😔#youtube tutorials will be your best friend#hope that helps though!
7 notes
·
View notes
Note
I loove the android robin au it's really one of the most interesting au I have seen in a while.
I am always happy to see new post abt it
Also making my favourite characters go through hell and then receiving comfort from their people is like the best thing ever for me so every time I see a whump!Robin post I like automatically
People loving android!Robin makes me so happy anansnssndsnsns she's curious and excitable and full of wonder and the world keeps punishing her for simply being alive. Sometimes it's too painful even for me, big whump lover 😭😭 though seriously, there is not enough Robin whump, and while all the characters in the show are very whumpeable, hurting my little blorbo Robin feels special because... she's just so deeply lonely. She's lonely and she thinks she deserves to be because of something wrong with her (pulling this interpretation from Surviving Hawkins lore which is canon to me 😭). That was a big idea I had when I first came up with android!Robin... that there is something wrong with her. Broken. In this AU she's literally broken in a lot of way (battery and memory problems, weak joints in her lower half, etc), but that's all within the range of normal robot problems. The real issue with her is that she's sentient. It terrifies people because it really brings out the existencial horror of... well, existing. It terrifies Robin most of all. She is the problem. She is what's wrong with her. She shouldn't exist.
But at the same time, she loves being alive so much! She doesn't understand it and doesn't know how it happened, but it happened, and now she's real and wants to experience life and the world and know people like human beings do. So it's her constant battle to become human despite humans having hurt her so much in the past... only for Nancy to already see her as human. Just one made of metal and plastic, but human nonetheless. She's the first person to see her that way and maybe everyone else thinks she's crazy, but Nancy is used to that. She's so sure of this, though, of Robin's self-awareness. She trusts her so blindly. She doesn't even need proof. And not only does she believe her, but she defends her humanity in front of her friends and family so ardently, fighting so hard for Robin to be aknowledged by everyone else as human. Fighting so hard to give her a home and family for the first time in her life.
Nancy has it bad for Robin, really. She's just so in love, even if everyone else thinks she's crazy for falling in love with a machine (no one thinks she is, though, because they all know Robin, and once you know Robin, it's impossible not to love her).
#ronance#android!Robin AU#robin buckley#😭😭 every day im emotional about her at 4 am#ok nice things now:#nancy takes her shopping for the first time! because robin never quite developed her own style#and being a girly girl to Nancy clothes are such a big part of your identity#robin finds these cool chains peoole wear as necklaces and bracelets and all these rings and she loves how they all look on her#and this jacket with different patches on it... she never thought she'd be the kind of girl to like shopping but she's so excited#because its the first time she's choosing what clothes to wear#Nancy introduces her to many different kinds of music alongside Steve#and then eventually the whole gang joins them. everyone gets to suggest one artist and soon Robin has this long asf playlist#to listen to so she can figure out what she likes#same with movies - they all now have weekly movie nights so they can show Robin different films#robin slowly discovering her passions... she reads a lot and finds out she loves languages and literature#and she decides she wants to get into college to study something related to it#she also decides she wants to travel through Europe and wants to bring Nancy with her#she decorates her room with movie and music posters#she decides she really likes cyndi lauper#she tries to learn how to dance with youtube tutorials#dragging Nancy into it#she gets to watch a lot of movies at her job at the movie theater#and she makes friends with her coworkers there#she's not fully and truly becoming a person#she has never been this happy#my posts#thank you for your ask i love talking about android!robin
17 notes
·
View notes
Text
what do you meam the horror alien game has beekeeping now. huh.
#балаболим#found a tutorial for that. like. huh.#all of the lore is like 'you were sent here to gathee info and die. you're a canary. you weren't meant to last long. al '#-all those before you died' meanwhile you turn your base downside up (cause it was upside down) befriend local aliens build a friend#Farm mushrooms and Fish and Mine (both minerals and CRYPTО) and sell trash you cleaned up and search the forest with a Metal Detector#and now BEEKEEPING. WHAT#oh also you can build stuff. with bricks. yeah#like. huh. bwuh.#on one side there are both demonic and alien forces out to get you. on the other are alien cargirls and Beekeeping. Apparently. insane.
2 notes
·
View notes
Text
kind of a spicy take but while i don't think that it shouldn't be obligatory to make fanwork to participate in fandom + fanwork isn't exempt from criticism (especially when it comes to bigoted shit) there are certain folks whose entire input is just whining all the time about other people's harmless headcanons and ships that it just makes me want to yell at them to fucking pick up a pencil or open a google doc if they just don't like what others put out bc it isn't tailored to their specific tastes
#you don't like seeing the canonically bi character being shipped with people of x gender?#great news! there's a lot of free art tutorials! your own computer or phone has a program to write!#i just hate the entitlement of people who shit on others for not conforming to their headcanons but then refusing to do anything#mutuals and friends this isn't about any of you!#just criticism of a certain mentality i'm tired of seeing
21 notes
·
View notes
Note
Hey Crabs! I have a small question! 🦀
How do you make the pictures of your traditional art look so good!?
They are always bright and easy to see! But when I take a photo of my drawings, they always have a blue or yellow tint to them. So how do you make it look the way you do?
(Also, I want to gobble up your art it is so yummy and pretty! Sun and Moon are so precious in your style!) ❤️
Thanks! And I hope you’re having a good day! :D
no prob! there's actually a couple things i do, so here's the tl;dr:
Lighting: i use daylight or light from a neutral white lightbulb
Editing: i use my phone's built-in gallery app to lightly edit the colours so they're clear and as colour-accurate as i can get (from my screens at least)
and i'll go into a little more detail with some examples under the cut
1. Lighting
a habit of mine that i got from my IG days (ugh...) is using daylight whenever possible. daylight just lights up the whole area more evenly and relatively neutrally. this is my set up:
glamourous
basically, i put the artwork near a source of natural light and prop up a reflector (in this case, a blank page from another sketchbook) that helps distribute the light more evenly across the page, so that even the side that is furthest from the light gets some light that bounces off from the reflector. i don't always have a reflector tho, like if i'm only taking a picture of a small drawing and not an entire page, there's no need.
now, if it's dark, then i rely on my desk lamp, which uses a neutral white lightbulb. regular lightbulbs come in different temperatures, from warm to neutral to cool—so that might explain why your photos are coming out with a yellow or blue tint. warm lights are common in houses because they're cozy, while blue lights are common in working areas because, like daylight, they keep us more awake. neutral white is in between the two.
here's an example of my Moon doodle that i did recently under different lights: warm (from my bedside lamp), neutral white (from my work desk), and daylight (i don't have any cooler lights in the house, so i couldn't quite get the blue tint 😅)
now technically, NONE of these are colour accurate. so i always follow up with some light photo editing
2. Editing
now, i have 2 personal rules when it comes to editing my photos:
1) try to make it as close to the original as possible; and 2) don't spend too long on it
these are just my personal rules because... one) i'm lazy and i don't want to spend too long fixing every thing in my drawings, and two) i feel it is dishonest for me to make dramatic changes to my traditional art and still call it traditional art. whenever i do make digital enhancements (like colouring it digitally) i will tag it so no one would mistake it as purely traditional art. that's just me tho! there are no rules when you're having fun with your art and mixed media art is a thing! so do whatever you find fun and enjoyable.
also, i will try to make it as colour-accurate as possible, but i also recognize that not everyone's screens are calibrated the same way. my phone is set to a "Natural" colour setting, but on my new laptop (which i haven't figured out how to calibrate yet) is vibrant as all heck (like oh my gosh, maybe i need to start tagging everything with bright colours now, because what if someone else's laptop is this insanely vibrant and saturated??) but either way, i try not to spend too long on it because i know i won't be able to accommodate every screen.
anyways, for what i actually DO... i kinda just play around with different settings. if i took the picture under daylight, then there's not too much i adjust, usually it's the warm colours that are desaturated, so i try to make the reds pop more without effecting the blues too much.
or for my doodles, sometimes the doodle on the other side of the page is slightly visible, i'll tweak the lights and shadows and contrast levels until the background is clear enough (as long as it doesn't disturb the doodle i'm taking a photo of)
now, if your photos are coming out too yellow or blue because of your lighting, you can adjust that by tweaking the Temperature setting. here's an example of that warm Moon doodle:

already looking a little better, right? so don't worry if your photos aren't coming out accurate, there are work arounds!
here's the before and after of the Moon doodle by the way:
despite having daylight, i still needed to adjust the colours. specifically i needed to brighten up the reds and yellows, and bring back the page's natural yellowness. i also tweaked the Definition setting to make less hazy (sometimes i like the haziness tho, so i'll leave it as is sometimes).
and one other reminder: it doesn't need to be perfect, it just needs to be. a big reason why i keep coming back to traditional art is the fact that i can't control everything. i can't undo lines. i can't move things around. and i can't take the perfect picture. but it doesn't need to be perfect. drawing and sharing my art is supposed to be fun! and i don't want to put any barriers around that, or else it becomes unnecessarily stressful.
all that is to say, try out these tips if you want to, but don't treat them as hard rules and don't focus on trying to achieve perfection. just go have fun!
#ask the crab#sorry this took so long!#i wanted to make sure it was clear#cuz like#i totally understand the struggle of trying to take good pictures of your traditional art#like you worked so hard on a drawing#but then the photo ruins it 😅#so i wanted to share what i know so it might help#there are definitely more in-depth tutorials out there#this is just what i've gathered from some of them plus some advice from a food photographer friend of mine (her stuff is actually legit tho
19 notes
·
View notes
Note
Hello, please tell me: How do I make friends with a real live dinosaur?
Ok, so to make friends with a live dinosaur, there are a few steps you have to do. First, decide what dinosaur you want to become friends with, such as T-rex, stegosaurus, velociraptor ect. Then, choose how you want to get to said dinosaur, here, I would recommend one of two options: either, you revive said dinosaur, or you time travel to a time when they were alive. There are a few other ways such as traveling to a parallel universe, but I would recommend one of the first two options I said. If you want to revive a dinosaur, I’d recommend following a tutorial on how to do so, the best rated one I could find was Jurassic Park, but any tutorial for this should work. If you want to do it through time travel instead, then there’s a lot of different ways to do it, the one I’ll use here is that time = money, so all you have to do is temporarily give all your money to someone you trust to give it back later, and then also go in debt to them, which will make time reverse if you just go in enough dept (Make sure to do this with someone you trust to just let you not pay this debt cause otherwise you’ll go into a LOT of debt) if you don’t wanna use this time travel method for some reason, then there’s a lot more, but I won’t go in depth on them here. Now that you have either brought a dinosaur to you or brought yourself to a dinosaur, you just need to do the actual befriending part, which is surprisingly simple, most dinosaurs will become friends with you if you just feed them enough.
11 notes
·
View notes