#typescript example
Explore tagged Tumblr posts
Visit Tumblr Blog
Explore Tumblr blogs with no restrictions, modern design and the best experience.
Last Seen Tumblr Blogs


Fun Fact
Premium Tumblr themes are available from anywhere between $9 to $49.
Video
youtube
TypeScript Introduction, Installation & Project Setup for JavaScript Dev... Full Video Link - https://youtu.be/IKSXlMU4LIo Check out this new video on the CodeOneDigest YouTube channel! Learn how to install typescript & create typescript project. Learn how to compile, build & run typescript program. #video #typescript #nodejs #javascript #api #codeonedigest@java @awscloud @AWSCloudIndia @YouTube @codeonedigest #typescript #javascript #typescripttutorial #typescriptforbeginners #learntypescript #typescripttutorialforbeginners #typescriptproject #typescriptprojectsforbeginners #typescriptprojectfromscratch #typescriptintroduction #typescriptinstallation #typescriptprojectsetup #typescriptprojectsetupvscode #typescriptjavascript #typescriptjavascriptdifference #typescriptdevelopmentenvironment #typescriptprojecttutorial #typescriptprogramminglanguage
1 note
·
View note
Text
#code#frontenddevelopment#nextjs#reactjs#software#coding#software engineering#support me#youtube#typescript#javascript#full stack developer#frontenddesign#frontend developer#css3#html css#learn to code#css animation examples#frontendbackend#frontendframeworks
1 note
·
View note
Text
Every TypeScript example and tutorial I've come across so far mainly focuses on language features, static typing, and working with Visual Studio. However, I couldn't find much guidance on how to use TypeScript effectively with JavaScript and the DOM.
I remember having the same question a while back, just like Johnny on Stack Overflow. "Can we use TypeScript to manipulate the DOM?" This question motivated me to dive deeper and figure it out, and I'm here to share what I've learned.
Configuration: Using TypeScript for DOM manipulation is straightforward, but it does require some configuration. You'll need to include the specific types for DOM access, which aren't available by default in TypeScript. To do this, you must explicitly configure the TypeScript compiler to include the "dom" library in the compilerOptions section of your tsconfig.json file. It's worth noting that the decision not to include these types by default might suggest that TypeScript's creators initially intended it more for server-side development with Node.js than for front-end work.
/** tsconfig.json - Configuration file in the project folder for the TypeScript compiler */ { "compilerOptions": { "lib": [ "es2015", "dom" ], "strict": true, "target": "es2015" } }
Hello World: In this article, I'll create a simple "Hello, world!" program to demonstrate how to use the DOM in TypeScript. Since this is my first post about TypeScript, I'll cover the basics of working with DOM types and address a common challenge that beginners might encounter. Please note that I won't be discussing DOM events in this post; that's a topic for a future article.
Let's start with the basics by changing the inner text value of an existing HTML element. I began by creating an HTML file with a standard HTML5 boilerplate, including an <h1> element with the id "greeter" in the body.
<!DOCTYPE html> <html lang="en"> <head> <!-- ... --> </head> <body> <h1 id="greeter">Hello</h1> </body> </html>
Next, I opened a new TypeScript file and added the following code:
let greeter: HTMLHeadingElement = document.getElementById("greeter") as HTMLHeadingElement; greeter.innerText = "Hello world!";
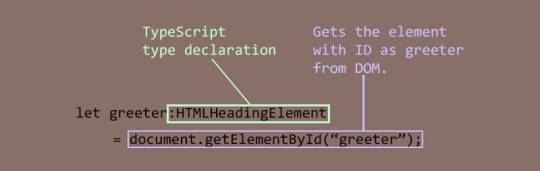
In this code, I created a variable called greeter and assigned the type HTMLHeadingElement to it. The HTMLHeadingElement type is defined in the "dom" library we added to the configuration. It tells the TypeScript compiler that greeter expects an HTML heading element and nothing else. Then, I assigned the greeter to the value returned by the getElementById function, which selects an element by its ID. Finally, I set the inner text of the greeter element to "Hello world."
When I compiled the code with the following command:
tsc script.ts

It produced the following error:
Type 'HTMLElement | null' is not assignable to type 'HTMLHeadingElement'. Type 'null' is not assignable to type 'HTMLHeadingElement'.
It's a bit frustrating, but TypeScript is doing its job. This error means that I tried to assign a greeter, which is of type HTMLHeadingElement, with an object of type HTMLElement that the getElementById method returned. The HTMLElement | null in the error message indicates that the method's return value can be either of type HTMLElement or null.
To address this, I used TypeScript's type assertion feature to tell the compiler that the element returned by getElementById is indeed a heading element, and it doesn't need to worry about it. Here's the updated code:
let greeter: HTMLHeadingElement = document.getElementById("greeter") as HTMLHeadingElement; greeter.innerText = "Hello world!";

With this change, the compilation was successful. I included the script.js file generated by the compiler in the HTML document and opened it in a browser.

Decoration Time: Now that I've confirmed that everything works as intended, it's time to make the page more visually appealing. I wanted a font style that was informal, so I chose the "Rock Salt" font from Google Fonts. I imported it into my stylesheet, along with "Dancing Script" as a secondary font, using CSS imports. I then added a few more elements to the HTML document, centered all the text using CSS flexbox, added a background from UI gradients, and adjusted the positions of some elements for proper arrangement. The page now looked beautiful.
Animation: To add a finishing touch, I wanted to include a background animation of orbs rising to the top like bubbles. To create the orbs, I decided to use <div> elements. Since I wanted several orbs with different sizes, I split the task into two steps to simplify the work.
First, I created a common style for all the orbs and defined a custom animation for the orbs in CSS. Then, I created the orbs dynamically using TypeScript. I created a set number of <div> elements, assigned them the pre-defined style, and randomized their sizes, positions, and animation delays to make them appear more natural.
Here's an excerpt of the code for creating the bubbles:
function createBubbles() { for (let i = 0; i < bubbleCount; i++) { let div: HTMLDivElement = document.createElement("div") as HTMLDivElement; let divSize = getSize(); div.style.left = getLeftPosition() + "px"; div.style.width = divSize + "px"; div.style.height = divSize + "px"; div.style.animationDelay = i * randomFloat(0, 30) + "s"; div.style.filter = "blur(" + randomFloat(2, 5) + "px)"; div.classList.add("bubble"); bubbleBuffer.push(div); } console.log("Bubbles created"); }
After creating the orbs, I added them to the DOM and started the animation:
function releaseBubbles() { createBubbles(); for (let i = 0; i < bubbleCount; i++) { containerDiv.appendChild(bubbleBuffer[i]); } console.log("Bubbles released"); }
And with that, the animation of orbs rising like bubbles was set in motion.
Here's the final output:
youtube
You can find the complete code in this repository.
Conclusion: While writing this article and creating the example, I realized the involvement of advanced concepts like type assertion and union types. I now understand why the authors of those tutorials didn't include them; introducing them could confuse beginners. It's best to learn TypeScript thoroughly before venturing into DOM manipulation.
In my example, I skipped null checking when fixing the type mismatch error, as it seemed unnecessary for the demonstration. However, in real projects, it's important to check for null values to avoid runtime errors. I also didn't
#While writing this article and creating the example#I realized the involvement of advanced concepts like type assertion and union types. I now understand why the authors of those tutorials di#beginner#typescript#dom manipulation#Youtube
0 notes
Text
React Tailwind(css) Alert Component Example

1. What is React tailwindcss Alert component?
React and tailwindcss are popular frameworks and libraries in modern web development. React is a JavaScript library for building user interfaces, and tailwindcss is a CSS framework for styling. You can combine the two to create a React tailwindcss notification component. Notification components are used to convey important information to users or to encourage interaction. For example, you can display warnings, success messages, notification messages, and more. These notifications help improve the user experience of your web application and provide users with the information they need.
2. Why use React and tailwindcss together?
Using React with tailwindcss provides developers with a number of advantages. First, React uses a Virtual DOM to improve performance. The virtual DOM only applies changes to the real DOM, eliminating the need to re-render the entire page. This helps to efficiently handle dynamic elements such as notification components. Second, tailwindcss makes styling easier by providing predefined style utility classes.��By combining classes, you can easily apply the style you want, and you can easily implement responsive design. This helps in flexible configuration of the notification component's appearance and layout.
3. Component example (code)
Alert Component Example import React, { useState, useEffect } from 'react'; interface IAlertProps { icon: JSX.Element; headline: string; headlineColor: 'text-green-600' | 'bg-red-600'; content: JSX.Element; hideClose?: boolean; bgColor: 'bg-green-100' | 'bg-red-100'; timer?: number; } const Alert = ({ icon, headline, headlineColor, hideClose, timer, bgColor, content }: IAlertProps) => { const = useState(true); useEffect(() => { if (timer) { const timeId = setTimeout(() => { // After xx seconds set the show value to false, if exist timer as props setAlert(false); }, timer); return () => { clearTimeout(timeId); }; } }, ); const closeAlert = () => { setAlert(false); }; return ( {isAlertOpen && ( {!hideClose && ( )} {icon} {headline} {content} )} ); }; export default Alert; Props explained icon: It is literally an icon in svg format. In the example screen, it means a check mark icon. headline & headlineColor: Put the title in string format, and decorate the color with tailwindcss `text...`. (required, can be modified) content: Content can be entered in any format as long as it is jsx, and must be entered. hideClose : It can also be disabled with the close button on the right. bgColor : As the background color of the Alert window, you can also enter it using tailwincss `bg...`. timer: SetTimeout & clearTimeout means how long the window disappears. In the example, 3 seconds (3000) were entered. Example of using Alert Component (import) Codesandbox reference https://tailwindcomponents.com/component/alert-messages Read the full article
0 notes
Text
Day 3: Running on 4 Hours of Sleep
Today didn’t go exactly as planned. I woke up way earlier than usual and couldn’t get back to sleep, which meant I only had about 4 hours of sleep. My productivity took a hit, and even in the afternoon, I couldn’t nap to catch up.
🌄 Morning : Rust Generics
I tried studying generics in Rust in the morning, but focusing was a challenge. So I decided to put it off for later.
📘 Afternoon : MIT Algorithms, Lecture 3
In the afternoon, I went for Lecture 3 in the MIT algorithms course. It was a problem session that leaned heavily into math, and honestly, all of of was going over my head. I decided to let it go for today—might just skip this one and move on to the next lecture.
🌙 Night: Rust Generics (Take Two)
Later on, I picked up the generics chapter again from the Rust book. With a TypeScript background, I was familiar with the concept, so it made sense. I worked through the examples on using generics with functions, structs, methods, and enums.
Plan for Tomorrow
Tomorrow, I’ll continue with traits and lifetimes in Rust. For the MIT course, I think I’ll skip this math-heavy problem session and start the next lecture instead.
That’s it for today. Hoping for a better night’s sleep!
#studyblr#codeblr#programming#rust#computer science#software development#100 days of productivity#100 days of studying#learn to code
6 notes
·
View notes
Text
Let's talk about filtering and mapping! 🤓
I'm working on the menu page for a restaurant, and as someone with very little frontend experience I wasn't sure how to go about parsing through a JSON file to return certain objects.
After some searching, procrastinating, going through this course, and then more searching - I finally came across the documentation I needed here!
So what is filtering and mapping? .filter() and .map() are JavaScript methods.
filter allows you to filter through an array of objects given some logic (want to find all the items with an id greater than 7? filter. Want to find all the items where the name is equal to "burger" that works too, want to add multiple conditions to find all the items with and id greater than 7 AND the name is "burger" well filter has got your back).
map is used to iterate through an array and call a function on every element in it. I used it to map each item to a list.
Here's an example: We have a JSON file of some food items.
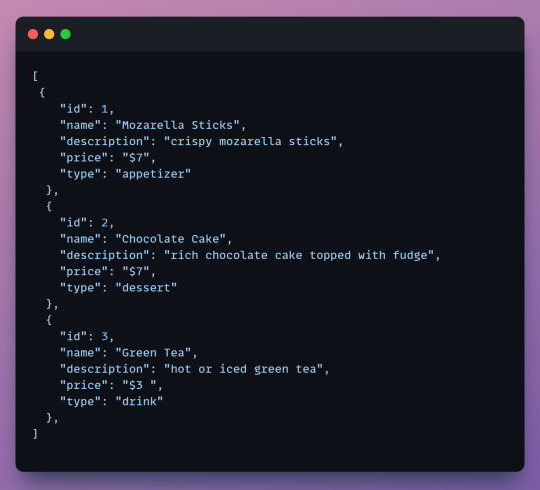
We want to grab all the desserts from our menu and display them on the desserts page of our website. It's time to filter!
Keep in mind that the filter method returns a new array with all the objects that we want. In this case when we filter we will get an array with all the desserts.
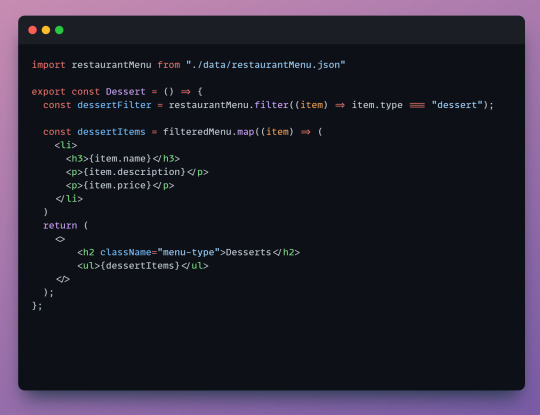
First we import our JSON file so we can access it.
Next, we create a constant called dessertFilter which will hold our filtered array. dessertFilter will hold all items that have the type equal to dessert. In our example it will hold the chocolate cake object.
Next, we map each item from the new array to a list. This is the list that we'll see displayed on the page. You can choose which properties you want to map. We only map the name, description and price since there's no need for the user to see the item type or id.
Lastly, our return statement contains everything we will see on the page. In our return we have a header and the list of items - we wrap our list, dessertItems in an unordered list since list items need to be wrapped in either an ordered or unordered list.
Here's our result! We can style this with css later.

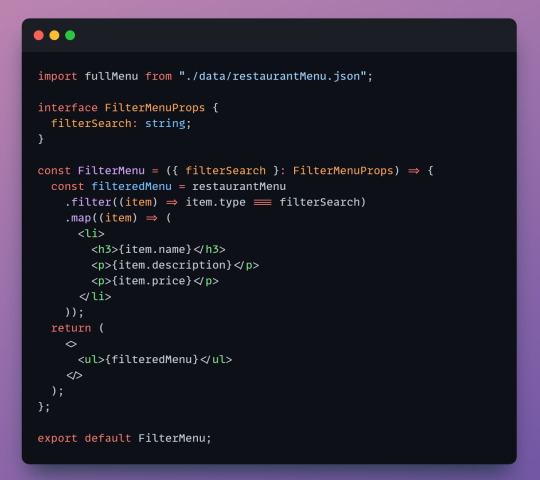
Cool! so we filtered for dessert but what about our other menu items? Time to make a reusable component.
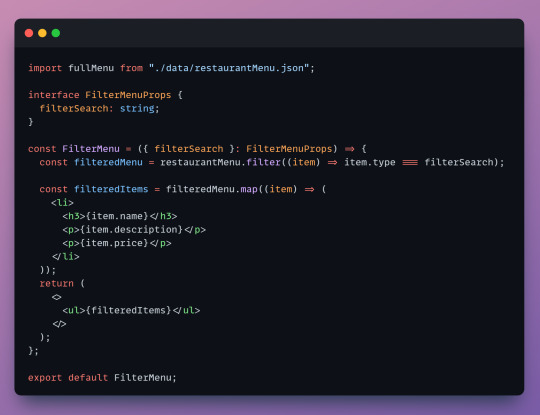
The code is almost the same, but to make this component reusable we create an interface. Interfaces define objects and specify their properties. We specify an object called filterSearch that will act as a placeholder - we set it as a string since the item "types" in our JSON file are strings. (I'm using typescript which accepts interfaces but i believe vanilla javascript does not).
Now lets see the component in action
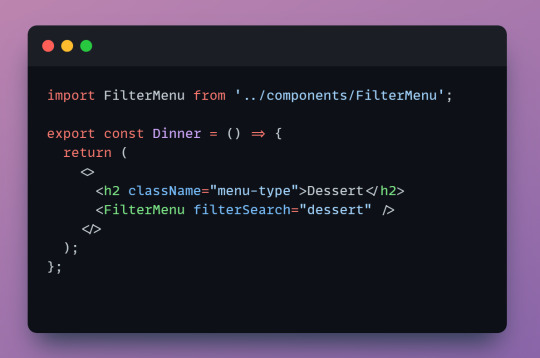
Import the component so we can call it.
When we call FilterMenu we have to include filterSearch from our interface. The component needs to know what we're looking for. Here we can set it to any valid type like "dessert", "drink", or "appetizer" and it will display them.
Woo! now we're filtering and mapping with one line of code! and we can reuse it for our other pages too.
Last thing, these methods are chainable! you can connect them and have the same logic in one constant.
Before reading the documentation, I had seperate JSON files for each menu category and was reusing the same code to map each file on each individual menu page. It was a lot of duplicate code, not great. Now, I have a single JSON file and a reusable component. It's satisying how clean it is!
Learning on your own can be frustrating sometimes, it can be hard to search for solutions when you don't know where to begin. I had never heard of filtering or mapping before this. If you're ever stuck keep pushing! there's so many resources and communities out there.
p.s. I'm open to any suggestions!
10 notes
·
View notes
Text
Starting a dev log
Hello everyone, this will be my first post here, for quite some time now, I we been working on a side project for which I would now try to start a dev blog about.
The project is a digital version of a board game my friend has created which I am building in React.
React is probably not the best tool to use to create a digital board game, but I wanted to try to stretch my web dev skills by applying them to something a bit unconventional.
I would humbly say that I believe that along the way I’ve built some interesting solutions that I’ll be sharing here to both keep myself motivated and hopefully to inspire and teach someone reading these posts something new.
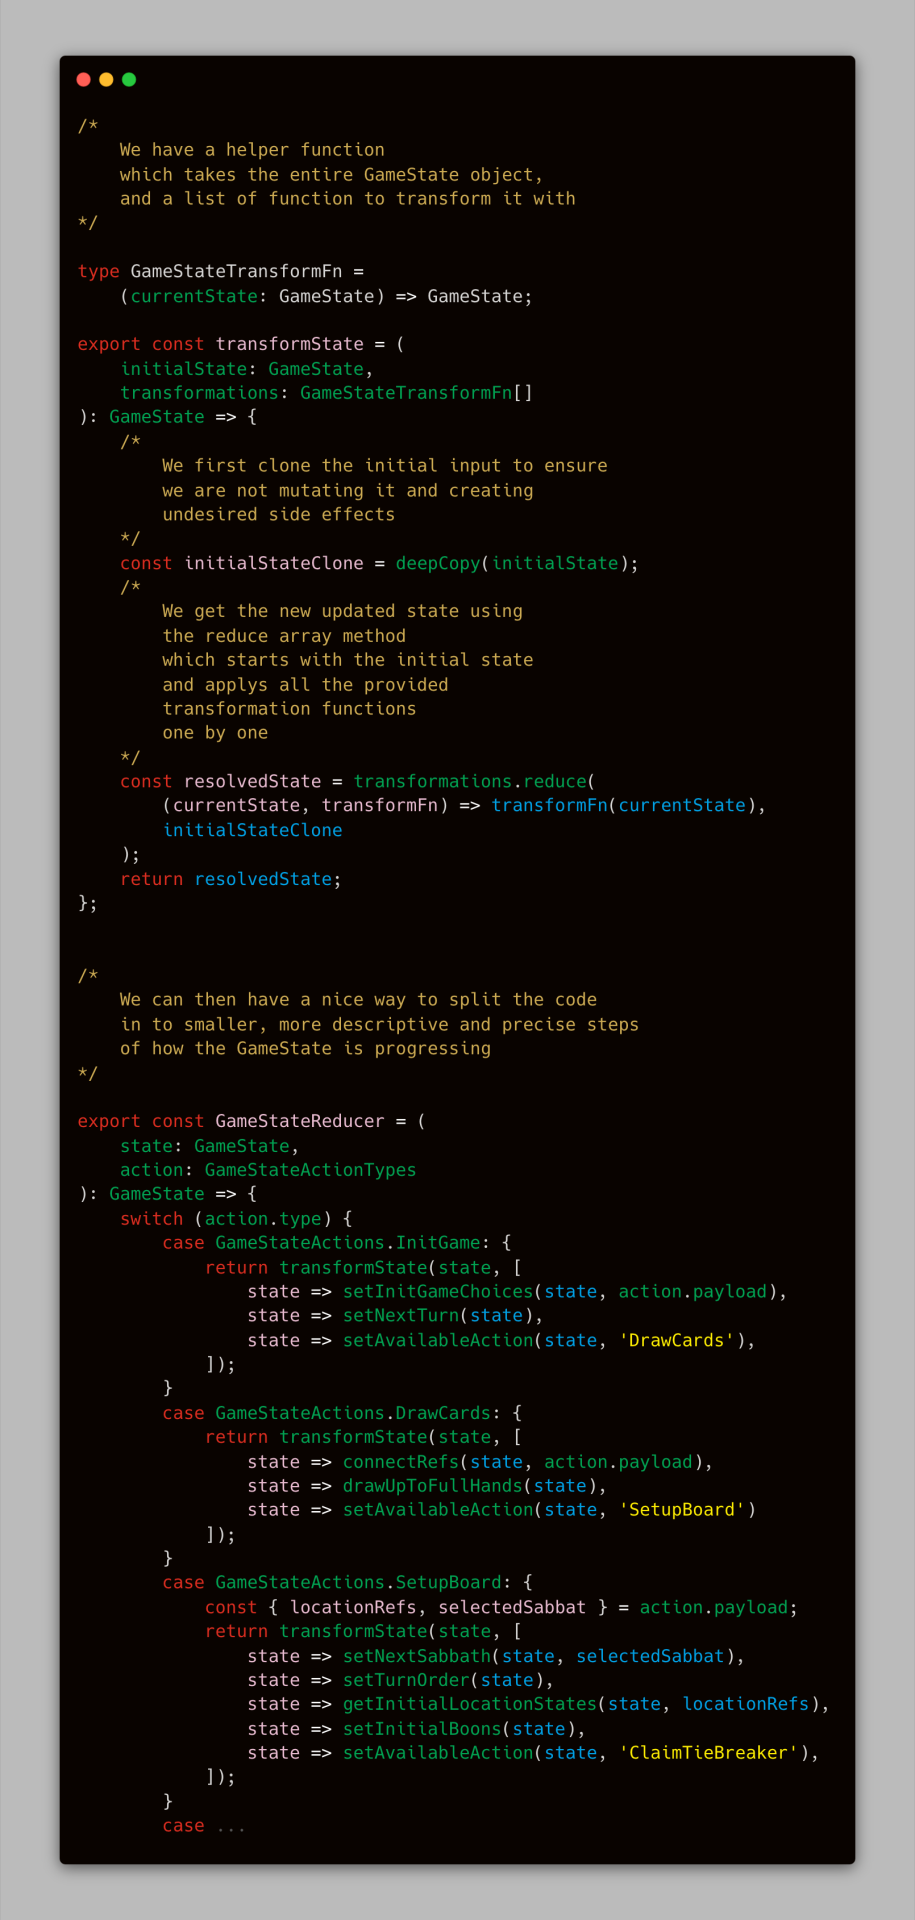
For my first example, I’ll share a piece of the code which is fairly central to my entire setup, the whole game works by a series of reducer actions which modify the global GameState, using just “vanilla” React contexts and reducers for global state management with a small custom TypeScript actions setup around it.
The entire game logic was huge to just directly write in to the reducer, so I first started to extract some helper function outside of it, but it was still quite a mess and returning back to a piece of code after a while was not the most pleasant experience.
The following code example was my solution to try to bring some order in to the codebase, which made it a lot more easier for me to manage.
I created something like a facade pattern, so that my reducer at first glance hides the complexity and cleanly describes what is happening at each step while providing me with an option to more closely examine any of the steps and dive in to its implementation details separately.
3 notes
·
View notes
Text
What is PHP Developer? A Complete Beginner’s Guide
visit the blog : https://penzu.com/public/9aeec77156b814b6
visit for more blogs :
https://dev.to/tpointtechblog/kickstart-your-coding-career-learn-typescript-today-4ogk
https://tpointtechblog.hashnode.dev/from-zero-to-dashboard-power-bi-tutorial-for-absolute-beginners
https://medium.com/@tpointtechblog/what-is-django-used-for-benefits-features-real-world-use-cases-67932cd53a3f
https://www.linkedin.com/pulse/what-apache-kafka-used-benefits-real-world-examples-udhav-khera-4makc
https://sites.google.com/view/what-is-my-sql/home
https://tpointtechblog.blogspot.com/2025/06/the-ultimate-nodejs-tutorial-for.html
0 notes
Text
🚨 Day 14 of 100 Days, 100 Innovations!
💥 Stop Writing the Same Validation Code Again & Again!
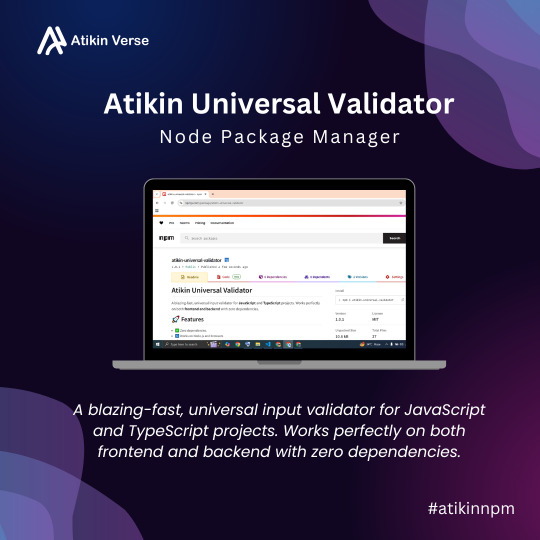
⚡ Introducing: Atikin Universal Validator
A blazing-fast, zero-dependency JS/TS validator that works EVERYWHERE:
✅ Frontend (React, Vue, Svelte…) ✅ Backend (Node, Express, NestJS…) ✅ Fully typed – built with TypeScript
✨ Example: validate({ email: ["[email protected]", "isEmail"], password: ["Strong@123", "isStrongPassword"] });
🎯 Validate in ONE LINE.
📦 Install now: npm i atikin-universal-validator
🔗 Live on NPM → https://www.npmjs.com/package/atikin-universal-validator
Made with ❤️ by : Atikin Verse
#atikinverse#100Days100Innovations#javascript#typescript#npm#npmtools#DevCommunity#opensource#webdev#nodejs#frontend#backend#atikin
0 notes
Text
Useful AI Tools That Are Transforming Work and Creativity in 2025
Artificial Intelligence (AI) is no longer a distant concept reserved for tech giants or science fiction enthusiasts. In 2025, AI tools have become deeply embedded in our daily work routines, creative processes, and even personal lives. Whether you're a developer, writer, marketer, teacher, or small business owner, AI tools are streamlining tasks, enhancing productivity, and enabling creativity like never before.
In this blog, we'll explore some of the most useful AI tools available today, categorized by function and relevance across industries. From content creation to coding, customer service, and business operations, here’s how AI is transforming the way we work.
1. AI for Content Creation and Writing
ChatGPT by OpenAI
Arguably the most well-known AI writing assistant, ChatGPT (now powered by GPT-4o) can help generate blog posts, marketing copy, emails, reports, and even poetry or code. Its integration with tools like Canva, Google Docs, and Notion allows users to embed AI assistance into their workflows seamlessly.
Use cases:
Drafting emails or reports.
Brainstorming ideas.
Automating customer service responses.
Translating content into multiple languages.
Jasper AI
Jasper AI is another popular tool aimed at marketers and content creators. It specializes in generating persuasive marketing copy, social media content, and SEO-optimized blog posts.
Highlights:
Templates for ads, email campaigns, and sales pages.
Brand voice customization.
Collaboration tools for teams.
Grammarly
While Grammarly started as a grammar checker, its AI features now offer tone adjustments, rewriting suggestions, and clarity improvements—essential for professional writing.
2. AI for Design and Image Generation
Canva AI (Magic Design & Magic Write)
Canva has embraced AI with tools like Magic Write (an AI text generator) and Magic Design, which helps users automatically create visually appealing content based on prompts.
Perfect for:
Non-designers creating presentations, posters, or social media graphics.
Teams needing rapid content turnaround.
Brand management with AI-powered resizing and formatting.
DALL·E 3 by OpenAI
This image-generation tool allows users to create realistic images or illustrations from text prompts. DALL·E 3 is now integrated with ChatGPT, making it accessible even for users with no design experience.
Example use cases:
Generating illustrations for blog posts or books.
Visual brainstorming for branding.
Product mockups.
3. AI for Video Creation
Pika Labs / Runway ML
Tools like Pika and Runway allow creators to generate or edit videos using AI prompts. These are especially useful for creating video content quickly without a film crew or expensive equipment.
Features include:
Text-to-video generation.
AI-powered video editing (removing backgrounds, changing styles).
Automatic subtitles and voiceovers.
Synthesia
Synthesia lets users create professional AI-generated videos with realistic avatars and voiceovers. It’s widely used for corporate training, onboarding, and marketing videos.
4. AI for Coding and Development
GitHub Copilot
Developed by GitHub and OpenAI, Copilot is a powerful AI assistant for developers. It autocompletes code, offers suggestions, and even writes functions from plain-language descriptions.
Supports languages like:
Python, JavaScript, TypeScript, HTML, C++, and more.
Replit Ghostwriter
Replit’s AI assistant provides real-time help with coding projects, debugging, and learning programming. It’s excellent for beginners or indie developers building MVPs (Minimum Viable Products).
5. AI for Business and Productivity
Notion AI
Notion, already a favorite productivity tool, now includes AI capabilities such as automatic summarization, meeting note generation, and task management. Notion AI can act as your daily planning assistant.
Zapier AI
Zapier uses AI to help users create complex automations (Zaps) just by describing what they want to do. It also integrates with thousands of apps like Gmail, Slack, and Trello.
Example: “Send me a daily Slack message with all emails tagged ‘Urgent’ in Gmail.”
Fireflies.ai
Fireflies is an AI-powered meeting assistant that records, transcribes, and summarizes meetings across Zoom, Google Meet, and MS Teams.
6. AI for Customer Support
Intercom with Fin AI
Intercom's customer service platform now includes Fin, an AI chatbot capable of handling complex customer queries with a deep understanding of company knowledge bases.
Benefits:
24/7 customer support.
Reduced wait times.
Lower support team workload.
Tidio
Tidio combines live chat and AI to automate customer service, especially for small businesses and e-commerce. It integrates with platforms like Shopify and WordPress.
7. AI for Education and Learning
Khanmigo by Khan Academy
Built on GPT-4, Khanmigo is a teaching assistant that helps students understand math, science, and language arts while providing teachers with classroom insights and planning tools.
Socratic by Google
This app allows students to take a photo of a question and receive step-by-step explanations. It uses AI to break down complex problems in a digestible way.
8. AI for Research and Data Analysis
Perplexity AI
Perplexity combines search with real-time citation-backed answers. It’s like a research assistant that summarizes current sources and links to them directly.
Keenious
Keenious analyzes your writing and suggests relevant academic papers and resources—ideal for students, researchers, and academics working on literature reviews.
Choosing the Right AI Tool: Tips
With so many AI tools available, it can be overwhelming to choose the right one. Here are a few guidelines:
Define your use case. Are you writing blog posts, generating code, or handling customer queries?
Look for integrations. Choose tools that work with platforms you already use (e.g., Google Docs, Slack, Zapier).
Check privacy policies. Understand how your data is stored and used—especially for business and customer-related tools.
Test the free version. Many tools offer free trials or freemium plans. Try them before you commit.
Final Thoughts
The rise of AI tools in 2025 is not about replacing humans but enhancing our capabilities. Whether you're an individual creator or a large organization, AI can help reduce repetitive tasks, increase output, and unlock new forms of innovation.
As AI continues to evolve, staying informed and experimenting with the right tools can give you a significant edge—be it in productivity, creativity, or strategy. Now’s the perfect time to explore and adopt these technologies to shape your future of work.
0 notes
Text
Level Up Your Code: Master TypeScript Project Configuration
1. Introduction TypeScript has become a cornerstone of modern JavaScript development, offering static typing, better tooling, and scalability for large projects. However, configuring TypeScript projects effectively can be challenging, especially for developers new to the language. In this tutorial, we will explore best practices, advanced configurations, and practical examples to help you…
0 notes
Text
Hire a ReactJS Development Team: What to Know Before You Start
In today's rapidly evolving and digital world, it is crucial to create responsive, scalable, and user-centric web applications. ReactJS is quickly becoming the predominating JavaScript library for engaging web user interfaces. Whether you are a founder of a startup or a product manager of an established company, hiring a ReactJS development team could determine if you succeed in bringing your product to the market or addressing your company's requirements.
But before you decide to go, there are some important things you should understand. Let's discuss the major factors to consider, once you have decided to hire React JS developers or buildout a complete ReactJS development team.

Why ReactJS?
ReactJS, developed and maintained by Meta (formerly Facebook), has changed the game in front-end development with its component-based structure and virtual DOM. Here are some reasons people choose to use ReactJS:
Speed: ReactJS apps render extremely quickly thanks to the virtual DOM. Changes to an app that employs ReactJS will always occur quickly and smoothly.
Reusability: Components in ReactJS enable developers to reuse them easily, meaning development time and administrative overhead are reduced.
Ongoing Community Support: ReactJS also has a large developer community which guarantees that the React standard will stay up-to-date with modern standards.
Search Engine Optimization: ReactJS applications can often be configured so as to make them search engine friendly.
When businesses want a dynamic and scalable application, especially for single page applications (SPAs), ReactJS is often their first choice.
When to Hire a ReactJS Development Team
There are some cases when hiring a ReactJS dev team makes more sense than sourcing individual React developers:
You're building a large scale, feature rich application.
Your project will require specialists outside of just developers (for example, UI/UX designers, testers, project managers)
You'll need to speed up deliverable timelines via parallel workstreams.
You want to not only have the dev team build your project but also provide end-to-end development support to help you with planning, building, shipping, launching, and beyond.
A dedicated team focused around ReactJS will be able to provide better collaborative partnerships as well as resource and personal scaling and accountability throughout the development lifecycle.
What to Know Before You Hire
Hiring the right team has more to it than checking resumes. Below are the major elements you must determine before hiring the right team:
1. Define the Scope of Your Project
Before your hire React JS developer services or a development team, you must define what you are building. You should define the high-level features, expected outcomes, target audience, and budget of your project. A properly defined scope avoids miscommunication and disarray in the future.
2. Look for relevant experience
Find a team that has practical experience with similar projects. Request their portfolio, reference clients, and live demos. A capable ReactJS team can handle architecture as well as technical execution.
3. Check the technical stack
An effective ReactJS team should have experience with:
ReactJS and JSX
State management systems (like Redux, Mobx, or Context API)
TypeScript or JavaScript ES6+
API integrations (like REST or GraphQL)
Testing libraries (like Jest, Enzyme, or Cypress)
Git, CI/CD tools, and version control
Having this broader skill set means they'll be able to give you a whole solution that is production-ready.
4. Communication and project management
Communication is key - especially for remote or offshore teams where time zones and cultures can affect communication. Ask about project management processes and what tools they use (e.g., Jira, Trello, or Asana), as well as how updates, feedback, and reporting will be made.
5. Engagement models and pricing
ReactJS development team members can be hired under quite a few different engagement models:
Fixed Price - Best for small and well defined projects
Hourly Rate - Great for ongoing work or an undefined scope
Dedicated Team - Best for big projects that can evolve
Make sure you understand all pricing structures that you will be dealing with to ensure it matches your budget and expectations.
Where to Source And Hire ReactJS Developers
There are several different outlets to locate quality ReactJS developers or already established teams:
Freelancing Websites – Options like Upwork, Freelancer or Toptal
Outsourcing Agencies – Companies that offer dedicated front-end teams
LinkedIn & GitHub – Great resources to determine the previous work and technical contributions the developers have done.
Tech Communities & Forums – Reddit, Stack Overflow, and Dev.to
Regardless of where you hire from, you should always complete technical interviews and trial tasks to confirm that the candidate or team meets your quality standards.
Final Thoughts
Making the choice to increase your company’s value by hiring a ReactJS development team can mean tremendous value for your project—but only if you do this correctly. Each step, whether it's defining your goals, evaluating technical skills, to setting clear expectations, plays an undeniable role in making your project a success.
If you’re creating an MVP, or bringing a complex enterprise solution to the market, hiring skilled ReactJS developers can expedite timelines and help to improve the quality of your product.
Jellyfish Technologies Provides Expert ReactJS Development Services
If you're looking to hire React JS developer experts or a full-stack ReactJS development team, Jellyfish Technologies is here to help. With years of experience delivering high-quality web solutions across industries, our dedicated teams bring innovation, agility, and reliability to every project.
We offer flexible engagement models, full-cycle development support, and a deep understanding of modern JavaScript ecosystems. Whether you need to build a product from scratch or extend your in-house capabilities, we've got you covered.👉 Get in touch today to discuss your project and see how Jellyfish Technologies can help bring your vision to life.
#Hire a ReactJS Development Team#hire reactjs development services#Hire a ReactJS Development company
0 notes
Link
[ad_1] Node.js is renowned for its ability to handle I/O operations efficiently, and at the heart of this capability lies the concept of streams. Streams allow you to process data piece by piece, rather than loading everything into memory at once—perfect for handling large files, network requests, or real-time data. When you pair streams with TypeScript’s strong typing, you get a powerful combo: performance meets safety. In this guide, we’ll dive deep into Node.js streams, explore their types, and walk through practical examples using TypeScript. Whether you’re a Node.js newbie or a TypeScript enthusiast looking to level up, this post has you covered. Why Streams Matter? Picture this: you’re tasked with processing a 50GB log file. Loading it entirely into memory would exhaust your server’s resources, leading to crashes or sluggish performance. Streams solve this by letting you handle data as it flows, like sipping from a straw instead of chugging a gallon jug. This efficiency is why streams are a cornerstone of Node.js, powering everything from file operations to HTTP servers. TypeScript enhances this by adding type definitions, catching errors at compile time, and improving code readability. Let’s dive into the fundamentals and see how this synergy works in practice. The Four Types of Streams Node.js offers four main stream types, each with a specific purpose: Readable Streams: Data sources you can read from (e.g., files, HTTP responses). Writable Streams: Destinations you can write to (e.g., files, HTTP requests). Duplex Streams: Both readable and writable (e.g., TCP sockets). Transform Streams: A special duplex stream that modifies data as it passes through (e.g., compression). TypeScript enhances this by allowing us to define interfaces for the data flowing through them. Let’s break them down with examples. Setting Up Your TypeScript Environment Before we dive into code, ensure you have Node.js and TypeScript installed. Create a new project: mkdir node-streams-typescript cd node-streams-typescript npm init -y npm install typescript @types/node --save-dev npx tsc --init Update your tsconfig.json to include: "compilerOptions": "target": "ES2020", "module": "commonjs", "strict": true, "outDir": "./dist" , "include": ["src/**/*"] Create a src folder and let’s start coding! Example 1: Reading a File with a Readable Stream Let’s read a text file chunk by chunk. First, create a file named data.txt in the root directory of your project with some sample text (e.g., “Hello, streams!”). Now, in src/readStream.ts: import createReadStream from 'fs'; import Readable from 'stream'; const readStream: Readable = createReadStream('data.txt', encoding: 'utf8' ); readStream .on('data', (chunk: string) => console.log('Chunk received:', chunk); ) .on('end', () => console.log('Finished reading the file.'); ) .on('error', (err: Error) => console.error('Error:', err.message); ); Run it with: npx tsc && node dist/readStream.js Here, TypeScript ensures the chunk adheres to our Chunk interface, and the error event handler expects an Error type. This stream reads data.txt in chunks (default 64KB for files) and logs them. Example 2: Writing Data with a Writable Stream Now, let’s write data to a new file. In src/writeStream.ts: import createWriteStream from 'fs'; import Writable from 'stream'; const writeStream: Writable = createWriteStream('output.txt', encoding: 'utf8' ); const data: string[] = ['Line 1\n', 'Line 2\n', 'Line 3\n']; data.forEach((line: string) => writeStream.write(line); ); writeStream.end(() => console.log('Finished writing to output.txt'); ); writeStream.on('error', (err: Error) => console.error('Error:', err.message); ); Compile and run: npx tsc && node dist/writeStream.js This creates output.txt with three lines. TypeScript ensures the line is a string and provides autocompletion for stream methods. Example 3: Piping with a Transform Stream Piping is where streams shine, connecting a readable stream to a writable stream. Let’s add a twist with a Transform stream to uppercase our text. In src/transformStream.ts: import createReadStream, createWriteStream from 'fs'; import Transform, TransformCallback from 'stream'; class UppercaseTransform extends Transform _transform(chunk: Buffer, encoding: string, callback: TransformCallback): void const upperChunk = chunk.toString().toUpperCase(); this.push(upperChunk); callback(); const readStream = createReadStream('data.txt', encoding: 'utf8' ); const writeStream = createWriteStream('output_upper.txt'); const transformStream = new UppercaseTransform(); readStream .pipe(transformStream) .pipe(writeStream) .on('finish', () => console.log('Transform complete! Check output_upper.txt'); ) .on('error', (err: Error) => console.error('Error:', err.message); ); Run it: npx tsc && node dist/transformStream.js This reads data.txt, transforms the text to uppercase, and writes it to output_upper.txt. TypeScript’s TransformCallback type ensures our _transform method is correctly implemented. Example 4: Compressing Files with a Duplex Stream Let’s tackle a more advanced scenario: compressing a file using the zlib module, which provides a duplex stream. It comes with the ‘@types/node’ package, which we installed earlier. In src/compressStream.ts: import createReadStream, createWriteStream from 'fs'; import createGzip from 'zlib'; import pipeline from 'stream'; const source = createReadStream('data.txt'); const destination = createWriteStream('data.txt.gz'); const gzip = createGzip(); pipeline(source, gzip, destination, (err: Error | null) => if (err) console.error('Compression failed:', err.message); return; console.log('File compressed successfully! Check data.txt.gz'); ); Run it: npx tsc && node dist/compressStream.js Here, the pipeline ensures proper error handling and cleanup. The gzip stream compresses data.txt into data.txt.gz. TypeScript’s type inference keeps our code clean and safe. Example 5: Streaming HTTP Responses Streams shine in network operations. Let’s simulate streaming data from an HTTP server using axios. Install it: npm install axios @types/axios In src/httpStream.ts: import axios from 'axios'; import createWriteStream from 'fs'; import Writable from 'stream'; async function streamHttpResponse(url: string, outputFile: string): Promise const response = await axios( method: 'get', url, responseType: 'stream', ); const writeStream: Writable = createWriteStream(outputFile); response.data.pipe(writeStream); return new Promise((resolve, reject) => writeStream.on('finish', () => console.log(`Downloaded to $outputFile`); resolve(); ); writeStream.on('error', (err: Error) => console.error('Download failed:', err.message); reject(err); ); ); streamHttpResponse('https://example.com', 'example.html').catch(console.error); Run it: npx tsc && node dist/httpStream.js This streams an HTTP response (e.g., a web page) to example.html. TypeScript ensures the url and outputFile parameters are strings, and the Promise typing adds clarity. We can also use Node.js’s built-in Fetch API (available since Node v18) or libraries like node-fetch, which also support streaming responses, although the stream types may differ (Web Streams vs. Node.js Streams). Example: const response = await fetch('https://example.com'); const writeStream = createWriteStream(outputFile); response.body.pipe(writeStream); Example 6: Real-Time Data Processing with a Custom Readable Stream Let’s create a custom, readable stream to simulate real-time data, such as sensor readings. In src/customReadable.ts: import Readable from 'stream'; class SensorStream extends Readable private count: number = 0; private max: number = 10; constructor(options?: any) super(options); _read(): void if (this.count console.log('Received:', chunk.trim()); ) .on('end', () => console.log('Sensor stream complete.'); ) .on('error', (err: Error) => console.error('Error:', err.message); ); Run it: npx tsc && node dist/customReadable.js This generates 10 random “sensor readings” and streams them. TypeScript’s class typing ensures our implementation aligns with the Readable interface. Example 7: Chaining Multiple Transform Streams Let’s chain transforms to process text in stages: uppercase it, then prepend a timestamp. In src/chainTransform.ts: import createReadStream, createWriteStream from 'fs'; import Transform, TransformCallback from 'stream'; class UppercaseTransform extends Transform _transform(chunk: Buffer, encoding: string, callback: TransformCallback): void this.push(chunk.toString().toUpperCase()); callback(); class TimestampTransform extends Transform _transform(chunk: Buffer, encoding: string, callback: TransformCallback): void const timestamp = new Date().toISOString(); this.push(`[$timestamp] $chunk.toString()`); callback(); const readStream = createReadStream('data.txt', encoding: 'utf8' ); const writeStream = createWriteStream('output_chain.txt'); const upper = new UppercaseTransform(); const timestamp = new TimestampTransform(); readStream .pipe(upper) .pipe(timestamp) .pipe(writeStream) .on('finish', () => console.log('Chained transform complete! Check output_chain.txt'); ) .on('error', (err: Error) => console.error('Error:', err.message); ); Run it: npx tsc && node dist/chainTransform.js This reads data.txt, uppercases the data, adds a timestamp, and writes the result to output_chain.txt. Chaining transforms showcases streams’ modularity. Best Practices for Streams in TypeScript Type Your Data: Define interfaces for chunks to catch type errors early. Handle Errors: Always attach error event listeners to avoid unhandled exceptions. Use Pipes Wisely: Piping reduces manual event handling and improves readability. Backpressure: For large data, monitor writeStream.writableHighWaterMark to avoid overwhelming the destination. Real-World Use Case: Streaming API Responses Imagine you’re building an API that streams a large dataset. Using express and streams: import express from 'express'; import Readable from 'stream'; const app = express(); app.get('/stream-data', (req, res) => const data = ['Item 1\n', 'Item 2\n', 'Item 3\n']; const stream = Readable.from(data); res.setHeader('Content-Type', 'text/plain'); stream.pipe(res); ); app.listen(3000, () => console.log('Server running on port 3000'); ); Install dependencies (npm install express @types/express), then run it. Visit to see the data stream in your browser! Advanced Tips: Handling Backpressure When a writable stream can’t keep up with a readable stream, backpressure occurs. Node.js handles this automatically with pipes, but you can monitor it manually: const writeStream = createWriteStream('large_output.txt'); if (!writeStream.write('data')) console.log('Backpressure detected! Pausing...'); writeStream.once('drain', () => console.log('Resuming...'); ); This ensures your app stays responsive under heavy loads. Precautions for using Backpressure: When writing large amounts of data, the readable stream may produce data faster than the writable stream can consume it. While pipe and pipeline handle this automatically, if writing manually, check if write() returns false and wait for the ‘drain’ event before writing more. Additionally, async iterators (for await…of) are modern alternatives for consuming readable streams, which can often simplify the code compared to using .on(‘data’) and .on(‘end’). Example: async function processStream(readable: Readable) for await (const chunk of readable) console.log('Chunk:', chunk); console.log('Finished reading.'); Additional points: Ensure Resource Cleanup: This is especially important in custom stream implementations or when using stream.pipeline. Explicitly call stream.destroy() in error scenarios or when the stream is no longer needed to release underlying resources and prevent leaks. stream.pipeline handles this automatically for piped streams. Use Readable.from() for Convenience: When you need to create a stream from an existing iterable (such as an array) or an async iterable, Readable.from() is often the simplest and most modern approach, requiring less boilerplate code than creating a custom Readable class. Conclusion Streams are a game-changer in Node.js, and TypeScript enhances them further by introducing type safety and clarity. From reading files to transforming data in real-time, mastering streams opens up a world of efficient I/O possibilities. The examples here—reading, writing, changing, compressing, and streaming over HTTP—scratch the surface of what’s possible. Experiment with your own pipelines: try streaming logs, processing CSV files, or building a live chat system. The more you explore, the more you’ll appreciate the versatility of streams. [ad_2] Source link
0 notes
Text
Best Practices for Setting Up React Native for Scalable Mobile Development
🚀 Want to build mobile apps that truly scale without breaking under growth?
We've just published a complete guide on "Best Practices for Setting Up React Native for Scalable Mobile Development"! 📱✨ Learn project structures, TypeScript tips, state management strategies, and real-world examples that will future-proof your apps from Day One.
👉 Read the full article here: https://stacksgather.com/articles/134-best-practices-for-setting-up-react-native-for-scalable-mobile-development
#stacksgather #awaitsol #awaitsol.com #stacksgather.com #ReactNative #MobileDevelopment #AppDevelopment #ReactNativeSetup #TechTips #CodingLife #MobileApps #SoftwareEngineering
0 notes
Text
Integrating Native Modules in Hybrid Apps: A Step-by-Step Guide

In today's rapidly evolving tech landscape, hybrid app development has gained immense popularity due to its cost-effectiveness and cross-platform capabilities. Businesses increasingly prefer hybrid frameworks like React Native, Flutter, and Ionic to streamline development without sacrificing user experience. However, while hybrid apps offer flexibility, they sometimes fall short in accessing device-specific features efficiently. That’s where integrating native modules becomes essential.
This blog walks you through the step-by-step process of integrating native modules in hybrid apps to enhance performance and functionality without losing the benefits of cross-platform development.
Why Integrate Native Modules?
Hybrid apps are built using web technologies, but when it comes to device-level capabilities—like accessing the camera, Bluetooth, sensors, or high-performance animations—web code might not be enough. Native modules bridge this gap by allowing developers to write platform-specific code (Java/Kotlin for Android, Swift/Objective-C for iOS) and call it from the hybrid layer.
This approach improves app performance, unlocks advanced device features, and delivers a more native-like experience to users.
Step-by-Step Guide to Integrating Native Modules
1. Identify the Requirement
Before jumping into coding, evaluate what native functionality is needed. For example:
Accessing device sensors (accelerometer, gyroscope)
Background tasks
Complex animations or gestures
Bluetooth integrations
Once the need is identified, determine if existing plugins or libraries support it. If not, proceed to write your own native module.
2. Set Up the Native Environment
Depending on your hybrid framework, you’ll need to set up native development environments:
React Native: Android Studio + Xcode
Flutter: Android Studio + Xcode
Ionic/Cordova: Node.js, Android SDK, Xcode, and relevant CLI tools
Make sure your environment is correctly configured for both Android and iOS builds.
3. Write Native Code
Now comes the core part: writing native code.
Android: Create a new Java or Kotlin class that extends the appropriate module class.
iOS: Create a Swift or Objective-C class implementing the required bridge protocols.
Ensure this native module exposes methods or events you want to use in your hybrid code.
4. Bridge Native Module to Hybrid Code
Use your hybrid framework’s bridging mechanism:
React Native: Use the NativeModules API to expose native functions to JavaScript.
Flutter: Use MethodChannels to communicate between Dart and native code.
Ionic: Use Capacitor or Cordova plugins to integrate native functionality.
This is the layer where your JavaScript/Dart/TypeScript code talks directly to your native module.
5. Testing Across Platforms
After successful integration, test the functionality on both Android and iOS devices. Ensure consistent behavior and handle any platform-specific nuances.
Pro Tip: If you're unsure how your budget aligns with these technical enhancements, use a mobile app cost calculator to estimate expenses before diving into native module integration.
6. Handle Errors and Platform Limitations
It’s important to gracefully handle scenarios where a feature is not available on one platform. Build fallbacks or conditional code execution based on the OS or device capabilities.
7. Optimize and Maintain
Regularly update native modules to align with OS updates. Unmaintained native code can lead to app crashes, rejections from app stores, or security vulnerabilities.
Best Practices
Keep the native code modular and well-documented.
Avoid bloating your hybrid app with too many native modules unless necessary.
Leverage community-tested plugins when possible, but vet them for security and updates.
Monitor performance to ensure that native modules are not negatively impacting app speed or memory usage.
Real-World Use Case
Imagine a fitness app that requires real-time motion tracking. A hybrid app alone may lag in accurately capturing movement, but by integrating a native module to tap directly into accelerometer and gyroscope sensors, you can dramatically improve tracking accuracy and responsiveness.
This is just one of many scenarios where hybrid apps shine brighter when empowered with native capabilities.
Book an Appointment with Our Experts
Integrating native modules can be tricky without deep knowledge of both mobile platforms. If you're unsure where to start or how to do it right, Book an Appointment with our experienced mobile developers today. We'll help you tailor the perfect strategy for your app.
Conclusion
As hybrid app frameworks evolve, the need to blend native capabilities with cross-platform logic will only grow. By understanding and implementing native modules, developers can create high-performing, feature-rich apps without going fully native.
Looking to upgrade your hybrid application or start a new project from scratch? Our team offers top-notch hybrid app development services tailored to your business needs.
0 notes