#update node version ubuntu
Explore tagged Tumblr posts
Visit Tumblr Blog
Explore Tumblr blogs with no restrictions, modern design and the best experience.
Last Seen Tumblr Blogs


Fun Fact
The Tumblr office adopted Tommy, an 11-year-old Pomeranian.
Text
#How to Upgrade Node JS to a Specific Version in Ubuntu#update node version in ubuntu#upgrade node js in ubuntu#node update ubuntu#upgrading node version ubuntu#upgrade node ubuntu#ubuntu update node#node ubuntu update#ubuntu update node to 18#upgrade node js ubuntu#how to update node js ubuntu#ubuntu upgrade node#upgrade node version linux#ubuntu nodejs update#ubuntu upgrade node to 16#ubuntu update nodejs version#update node version ubuntu#upgrade nodejs on ubuntu#upgrade nodejs version ubuntu#linux upgrade nodejs#ubuntu upgrade nodejs#upgrade nodejs ubuntu#upgrade node js ubuntu 20.04
0 notes
Text

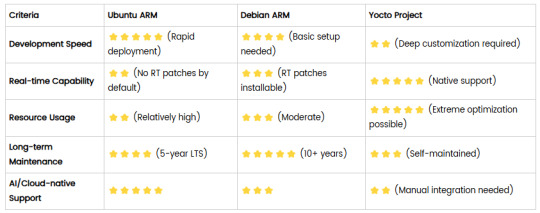
Comparison of Ubuntu, Debian, and Yocto for IIoT and Edge Computing
In industrial IoT (IIoT) and edge computing scenarios, Ubuntu, Debian, and Yocto Project each have unique advantages. Below is a detailed comparison and recommendations for these three systems:
1. Ubuntu (ARM)
Advantages
Ready-to-use: Provides official ARM images (e.g., Ubuntu Server 22.04 LTS) supporting hardware like Raspberry Pi and NVIDIA Jetson, requiring no complex configuration.
Cloud-native support: Built-in tools like MicroK8s, Docker, and Kubernetes, ideal for edge-cloud collaboration.
Long-term support (LTS): 5 years of security updates, meeting industrial stability requirements.
Rich software ecosystem: Access to AI/ML tools (e.g., TensorFlow Lite) and databases (e.g., PostgreSQL ARM-optimized) via APT and Snap Store.
Use Cases
Rapid prototyping: Quick deployment of Python/Node.js applications on edge gateways.
AI edge inference: Running computer vision models (e.g., ROS 2 + Ubuntu) on Jetson devices.
Lightweight K8s clusters: Edge nodes managed by MicroK8s.
Limitations
Higher resource usage (minimum ~512MB RAM), unsuitable for ultra-low-power devices.
2. Debian (ARM)
Advantages
Exceptional stability: Packages undergo rigorous testing, ideal for 24/7 industrial operation.
Lightweight: Minimal installation requires only 128MB RAM; GUI-free versions available.
Long-term support: Up to 10+ years of security updates via Debian LTS (with commercial support).
Hardware compatibility: Supports older or niche ARM chips (e.g., TI Sitara series).
Use Cases
Industrial controllers: PLCs, HMIs, and other devices requiring deterministic responses.
Network edge devices: Firewalls, protocol gateways (e.g., Modbus-to-MQTT).
Critical systems (medical/transport): Compliance with IEC 62304/DO-178C certifications.
Limitations
Older software versions (e.g., default GCC version); newer features require backports.
3. Yocto Project
Advantages
Full customization: Tailor everything from kernel to user space, generating minimal images (<50MB possible).
Real-time extensions: Supports Xenomai/Preempt-RT patches for μs-level latency.
Cross-platform portability: Single recipe set adapts to multiple hardware platforms (e.g., NXP i.MX6 → i.MX8).
Security design: Built-in industrial-grade features like SELinux and dm-verity.
Use Cases
Custom industrial devices: Requires specific kernel configurations or proprietary drivers (e.g., CAN-FD bus support).
High real-time systems: Robotic motion control, CNC machines.
Resource-constrained terminals: Sensor nodes running lightweight stacks (e.g., Zephyr+FreeRTOS hybrid deployment).
Limitations
Steep learning curve (BitBake syntax required); longer development cycles.
4. Comparison Summary
5. Selection Recommendations
Choose Ubuntu ARM: For rapid deployment of edge AI applications (e.g., vision detection on Jetson) or deep integration with public clouds (e.g., AWS IoT Greengrass).
Choose Debian ARM: For mission-critical industrial equipment (e.g., substation monitoring) where stability outweighs feature novelty.
Choose Yocto Project: For custom hardware development (e.g., proprietary industrial boards) or strict real-time/safety certification (e.g., ISO 13849) requirements.
6. Hybrid Architecture Example
Smart factory edge node:
Real-time control layer: RTOS built with Yocto (controlling robotic arms)
Data processing layer: Debian running OPC UA servers
Cloud connectivity layer: Ubuntu Server managing K8s edge clusters
Combining these systems based on specific needs can maximize the efficiency of IIoT edge computing.
0 notes
Photo

New Post has been published on https://codebriefly.com/building-and-deploying-angular-19-apps/
Building and Deploying Angular 19 Apps
Efficiently building and deploying Angular 19 applications is crucial for delivering high-performance, production-ready web applications. In this blog, we will cover the complete process of building and deploying Angular 19 apps, including best practices and optimization tips.
Table of Contents
Toggle
Why Building and Deploying Matters
Preparing Your Angular 19 App for Production
Building Angular 19 App
Key Optimizations in Production Build:
Configuration Example:
Deploying Angular 19 App
Deploying on Firebase Hosting
Deploying on AWS S3 and CloudFront
Automating Deployment with CI/CD
Example with GitHub Actions
Best Practices for Building and Deploying Angular 19 Apps
Final Thoughts
Why Building and Deploying Matters
Building and deploying are the final steps of the development lifecycle. Building compiles your Angular project into static files, while deploying makes it accessible to users on a server. Proper optimization and configuration ensure faster load times and better performance.
Preparing Your Angular 19 App for Production
Before building the application, make sure to:
Update Angular CLI: Keep your Angular CLI up to date.
npm install -g @angular/cli
Optimize Production Build: Enable AOT compilation and minification.
Environment Configuration: Use the correct environment variables for production.
Building Angular 19 App
To create a production build, run the following command:
ng build --configuration=production
This command generates optimized files in the dist/ folder.
Key Optimizations in Production Build:
AOT Compilation: Reduces bundle size by compiling templates during the build.
Tree Shaking: Removes unused modules and functions.
Minification: Compresses HTML, CSS, and JavaScript files.
Source Map Exclusion: Disables source maps for production builds to improve security and reduce file size.
Configuration Example:
Modify the angular.json file to customize production settings:
"configurations": "production": "optimization": true, "outputHashing": "all", "sourceMap": false, "namedChunks": false, "extractCss": true, "aot": true, "fileReplacements": [ "replace": "src/environments/environment.ts", "with": "src/environments/environment.prod.ts" ]
Deploying Angular 19 App
Deployment options for Angular apps include:
Static Web Servers (e.g., NGINX, Apache)
Cloud Platforms (e.g., AWS S3, Firebase Hosting)
Docker Containers
Serverless Platforms (e.g., AWS Lambda)
Deploying on Firebase Hosting
Install Firebase CLI:
npm install -g firebase-tools
Login to Firebase:
firebase login
Initialize Firebase Project:
firebase init hosting
Deploy the App:
firebase deploy
Deploying on AWS S3 and CloudFront
Build the Project:
ng build --configuration=production
Upload to S3:
aws s3 sync ./dist/my-app s3://my-angular-app
Configure CloudFront Distribution: Set the S3 bucket as the origin.
Automating Deployment with CI/CD
Setting up a CI/CD pipeline ensures seamless updates and faster deployments.
Example with GitHub Actions
Create a .github/workflows/deploy.yml file:
name: Deploy Angular App on: [push] jobs: build-and-deploy: runs-on: ubuntu-latest steps: - uses: actions/checkout@v2 - name: Set up Node.js uses: actions/setup-node@v2 with: node-version: '18' - run: npm install - run: npm run build -- --configuration=production - name: Deploy to S3 run: aws s3 sync ./dist/my-app s3://my-angular-app --delete
Best Practices for Building and Deploying Angular 19 Apps
Optimize for Production: Always use AOT and minification.
Use CI/CD Pipelines: Automate the build and deployment process.
Monitor Performance: Utilize tools like Lighthouse to analyze performance.
Secure the Application: Enable HTTPS and configure secure headers.
Cache Busting: Use hashed filenames to avoid caching issues.
Containerize with Docker: Simplifies deployments and scales easily.
Final Thoughts
Building and deploying Angular 19 applications efficiently can significantly enhance performance and maintainability. Following best practices and leveraging cloud hosting services ensure that your app is robust, scalable, and fast. Start building your next Angular project with confidence!
Keep learning & stay safe 😉
You may like:
Testing and Debugging Angular 19 Apps
Performance Optimization and Best Practices in Angular 19
UI/UX with Angular Material in Angular 19
0 notes
Text
How to create a single Node Kubernetes Cluster with dual stack IPv4/IPv6 Support with CRI-O and Calico
In this blog post, I have summarized how I have set up a single-node Kubernetes cluster version 1.32 on a fresh Ubuntu 24.04 with dual stack IPv4/IPv6 support. Tested with: Ubuntu 24.04 Kubeadm 1.32.3 CRI-O 1.32 Calico 3.29.3 Step 1: Update the system sudo apt-get update && sudo apt-get upgrade -y Step 2: Disable Swap sudo swapoff -a sudo sed -i '/swap/d' /etc/fstab Step 3: Install required…
0 notes
Text
Containerization with Docker and Kubernetes: An Essential Guide
Docker and Kubernetes have emerged as foundational tools for containerization and orchestration in the rapidly evolving landscape of cloud-native technologies. This blog post explores their roles, provides setup guides, and highlights key use cases demonstrating their power and flexibility.
Introduction to Containerization
Containerization is a lightweight alternative to traditional virtualization, enabling applications to run in isolated environments. This approach solves many problems related to environment consistency, application deployment, and scalability.
Docker: The Containerization Pioneer
What is Docker?
Docker is an open-source platform that automates the deployment of applications inside lightweight, portable containers. It encapsulates an application and its dependencies, ensuring it runs consistently across various environments.
Why Use Docker?
Consistency: Ensures the application behaves the same, regardless of where it is run.
Efficiency: Reduces overhead by sharing the host OS kernel.
Portability: Facilitates seamless movement of applications between development, testing, and production environments.
Setting Up Docker
1. Install Docker:
- Windows & macOS: Download the Docker Desktop installer from [Docker's official site](https://www.docker.com/products/docker-desktop).
- Linux: Use the package manager. For example, on Ubuntu:
sudo apt-get update
sudo apt-get install docker-ce docker-ce-cli containerd.io
2. Verify Installation:
docker --version
3. Run Your First Container:
docker run hello-world
Docker Use Cases
- Microservices: Simplifies the deployment and management of microservice architectures.
- DevOps: Streamlines CI/CD pipelines by providing consistent environments.
- Hybrid Cloud: Enables seamless movement of workloads between on-premises and cloud environments.
Kubernetes: Orchestrating Containers at Scale
What is Kubernetes?
Kubernetes, often abbreviated as K8s, is an open-source platform for automating the deployment, scaling, and operation of containerized applications. It manages clusters of containers, ensuring high availability and scalability.
Why Use Kubernetes?
- Scalability: Automatically scales applications based on demand.
- Self-Healing: Automatically restarts, replaces, and reschedules containers when they fail.
- Service Discovery & Load Balancing: Efficiently balances traffic and discovers services without manual intervention.
Setting Up Kubernetes
1. Install Kubernetes Tools:
- kubectl: Command-line tool for interacting with Kubernetes clusters.
- Minikube: Local Kubernetes cluster for development.
# Install kubectl
sudo apt-get update
sudo apt-get install -y kubectl
Install Minikube
curl -Lo minikube https://storage.googleapis.com/minikube/releases/latest/minikube-linux-amd64
chmod +x minikube
sudo mv minikube /usr/local/bin/
2. Start Minikube:
minikube start
3. Deploy an Application:
kubectl create deployment hello-node --image=k8s.gcr.io/echoserver:1.4
kubectl expose deployment hello-node --type=LoadBalancer --port=8080
minikube service hello-node
Kubernetes Use Cases
- Complex Applications: Manages applications with multiple, interdependent services.
- CI/CD Pipelines: Enhances automation and reduces the risk of deployment issues.
- Multi-Cloud Deployments: Orchestrates applications across various cloud providers.
Integrating Docker and Kubernetes
While Docker provides the containerization platform, Kubernetes offers robust orchestration capabilities. Together, they form a powerful combination for building, deploying, and managing cloud-native applications.
Example Workflow:
1. Build Docker Image:
docker build -t my-app .
2. Push to Container Registry:
docker tag my-app my-repo/my-app
docker push my-repo/my-app
3. Deploy with Kubernetes:
kubectl create deployment my-app --image=my-repo/my-app
kubectl expose deployment my-app --type=LoadBalancer --port=80
Conclusion
Containerization with Docker and Kubernetes revolutionizes how applications are developed, deployed, and managed. By leveraging Docker's simplicity and Kubernetes' powerful orchestration capabilities, organizations can achieve greater agility, scalability, and reliability in their cloud-native journey.
For more details click www.hawkstack.com
#redhatcourses#information technology#linux#container#docker#kubernetes#containerorchestration#containersecurity#dockerswarm#aws
0 notes
Text
Docker is an open-source platform for developing, shipping, and running applications. It is designed to make it easier to create, deploy, and run applications by using containers. With Docker, developers can package their applications into standardized units called containers, which can then be run on any computer, regardless of the operating system or hardware. Docker Compose is a tool that allows you to define and run multi-container Docker applications.
With Docker Compose, you can use a YAML file to define the services, networks, and volumes for your application, and then use a single command to build and run all of the containers for your application. This makes it easy to manage and deploy complex applications that require multiple containers, such as web applications that use a database, a message queue, and a caching service. In this tutorial, you’ll install and use Docker Compose on Ubuntu 24.04.
Start by updating the Ubuntu packages in the package manager cache to the latest available versions using the following command Read more...
#cloud web hosting#ssd hosting provider#low cost cloud vps#best cheap servers#affordable vps#best cheap vps
0 notes
Text
Article on How to install Angular on Ubuntu
Ubuntu is an open source operating system from the house of Linux. You will get security, support, and managed services from the publisher of Ubuntu with cutting age technology .To install Angular on Ubuntu, you first need to have Node.js and npm (Node Package Manager) installed . Then you will able install Angular at your system
Here's a step-by-step guide:
1. First install Node.js and npm :
- Open your terminal (Ctrl+Alt+T).
- Run the following commands to update your package index and install Node.js and npm. Wait for sometime , it may take a little bit time to install.
sudo apt update
sudo apt install nodejs
sudo apt install npm
2. To verify the installation of Node.js , run the following command
node -v
The terminal will return like this
v20.9.0
That means your node.js installation in successfull.
3. Now we need to Install Angular CLI
- CLI stands for Command Line Interface
- In the Terminal type the following
sudo npm install -g @angular/cli
It will also take some time
To verify that Angular CLI has been installed successfully, run this command:
ng version
or
ng v
- You should see output displaying the Angular CLI version, Node.js version, and other related information.

4. How to create a New Project ?
- After installing Angular CLI, you can create a new Angular project by navigating to the directory where you want to create the project and running:
ng new your-app-name
- Here " your-app-name " should be you own app name.
5. A new project will be created . Several projects file automatically generated
your-app-name.css for writing style sheet
your-app-name.html for writing html
your-app-name.ts for writing typed script
you have to create new folder for images , videos other file if required.
6. Serve the Angular Application
- Once the project is created, navigate into the project directory:
cd my-angular-app
- Then, serve the application using the Angular CLI:
ng serve
- This command will build the application and serve it locally. You can access it by navigating to http://localhost:4200 in your web browser.
That's it! You have successfully installed Angular on your Ubuntu system. You can now start building Angular applications and i am sure you will love to work Angular in Ubuntu.
0 notes
Text
Mastering Hadoop Installation on Ubuntu Server: A Step-by-Step Guide
Are you ready to dive into big data processing with Hadoop on Ubuntu Server? Look no further! In this comprehensive guide, we’ll walk you through the installation process step-by-step, ensuring you have everything you need to get started. Whether you’re a Linux aficionado or a Windows RDP enthusiast looking to buy RDP and install Ubuntu on RDP, this guide has you covered.
Understanding Ubuntu Server: Before we delve into the installation process, let’s take a moment to understand Ubuntu Server. Ubuntu is one of the most popular Linux distributions, known for its stability, security, and ease of use. Ubuntu Server is specifically designed for server environments, making it an ideal choice for hosting Hadoop clusters.

2. Setting Up Your Environment: If you’re using Ubuntu Server on a physical machine or a virtual environment like VMware or VirtualBox, ensure that it meets the minimum system requirements for running Hadoop. This includes having sufficient RAM, disk space, and processing power. Alternatively, if you’re considering using Windows RDP, you can buy RDP and install Ubuntu on it, providing a flexible and scalable environment for Hadoop deployment.
3. Installing Ubuntu Server: Begin by downloading the latest version of Ubuntu Server from the official website. Once downloaded, follow the on-screen instructions to create a bootable USB drive or DVD. Boot your system from the installation media and follow the prompts to install Ubuntu Server. Make sure to allocate disk space for the operating system and any additional storage required for Hadoop data.
4. Configuring Network Settings: After installing Ubuntu Server, configure the network settings to ensure connectivity within your environment. This includes assigning a static IP address, configuring DNS servers, and setting up network interfaces. Proper network configuration is essential for communication between Hadoop nodes in a distributed environment.
5. Updating System Packages: Before installing Hadoop, it’s essential to update the system packages to ensure you have the latest security patches and software updates. Use the following commands to update the package repository and upgrade installed packages:bashCopy codesudo apt update sudo apt upgrade
6. Installing Java Development Kit (JDK): Hadoop is built on Java, so you must install the Java Development Kit (JDK) to run Hadoop applications. Ubuntu repositories provide OpenJDK, an open-source implementation of the Java Platform. Install OpenJDK using the following command:bashCopy codesudo apt install openjdk-11-jdk
7. Downloading and Installing Hadoop: Next, download the latest stable release of Hadoop from the official Apache Hadoop website. Once downloaded, extract the Hadoop archive to a directory of your choice. For example, you can use the following commands to download and extract Hadoop:bashCopy codewget https://www.apache.org/dist/hadoop/common/hadoop-3.3.1/hadoop-3.3.1.tar.gz tar -xvf hadoop-3.3.1.tar.gz
8. Configuring Hadoop Environment: After installing Hadoop, you’ll need to configure its environment variables to specify the Java runtime environment and other settings. Edit the hadoop-env.sh file located in the etc/hadoop directory and set the JAVA_HOME variable to the path of your JDK installation:bashCopy codeexport JAVA_HOME=/usr/lib/jvm/java-11-openjdk-amd64
9. Setting Up Hadoop Cluster: Once Hadoop is installed and configured on your Ubuntu Server, you can proceed to set up a Hadoop cluster. This involves configuring Hadoop’s core-site.xml, hdfs-site.xml, and mapred-site.xml configuration files and starting the Hadoop daemons on each node in the cluster.
10. Testing Hadoop Installation: To ensure that Hadoop is installed and configured correctly, you can run some basic tests. Start by formatting the Hadoop Distributed File System (HDFS) using the following command:bashCopy codehdfs namenode -format
Then, start the Hadoop daemons and verify their status using the following commands:bashCopy codestart-dfs.sh start-yarn.sh
Finally, run a sample MapReduce job to confirm that Hadoop is functioning correctly:bashCopy codehadoop jar $HADOOP_HOME/share/hadoop/mapreduce/hadoop-mapreduce-examples-3.3.1.jar pi 16 10000
Congratulations! You’ve successfully installed Hadoop on the Ubuntu Server, ready to tackle big data processing tasks with ease.
In conclusion, setting up Hadoop on the Ubuntu Server is a straightforward process that anyone can accomplish with the right guidance. Whether you’re a Linux enthusiast or prefer the flexibility of Windows RDP, you can buy RDP and install Ubuntu on it to create a robust Hadoop environment. With Hadoop up and running, you’re well-equipped to handle the challenges of big data processing and analysis.
0 notes
Text
Installing Hadoop on Ubuntu

Certainly! Let’s present the Hadoop installation process on Ubuntu uniquely and engagingly, suitable for an informative yet reader-friendly course email.
Subject: 🚀 Embark on Your Big Data Journey: Install Hadoop on Ubuntu Easily!
👋 Hello Data Enthusiasts!
Are you ready to dive into the world of Big Data with Hadoop? Here’s a straightforward guide to getting Hadoop up and running on your Ubuntu system. Perfect for beginners and experts alike!
🔧 Getting Started: Prep Your System
Freshen Up Ubuntu: sudo apt update && sudo apt upgrade
Java Installation: sudo apt install default-JDK
Java Check: Ensure it’s installed with the Java -version
👤 Create a Dedicated Hadoop User
A simple command: sudo adduser hadoop
🔑 SSH Setup: Key to Connectivity
Install SSH: sudo apt install ssh
For Hadoop User:
Switch user: su — Hadoop
Generate SSH Key: ssh-keygen -t rsa -P “
Authorize Key: cat ~/.ssh/id_rsa.pub >> ~/.ssh/authorized_keys
📥 Download Hadoop: Grab the Latest Version
Use wget with the link from the official Hadoop website.
📦 Unpack Hadoop
Unzip it: tar -xzf Hadoop-3.x.x.tar.gz
🌐 Environment Setup: Pointing in the Right Direction
Edit .bashrc: nano ~/.bashrc
Add Hadoop paths (adjust with your Hadoop version):
bashCopy code
export HADOOP_HOME=/home/Hadoop/Hadoop-3.x.x export PATH=$PATH:$HADOOP_HOME/bin:$HADOOP_HOME/sbin
Activate changes: source ~/.bashrc
⚙️ Hadoop Configuration: The Blueprint
Edit key files in $HADOOP_HOME/etc/hadoop/:
core-site.xml, hdfs-site.xml, mapred-site.xml, yarn-site.xml
🎬 Initialize and Launch
Format Hadoop FileSystem: hdfs name node -format
Start the engines: start-dfs. Sh and start-yarn. sh
👀 See Hadoop in Action!
Access Hadoop’s ResourceManager and NameNode via your browser.
🛠️ Tips & Tricks
Check firewall settings.
Log files in $HADOOP_HOME/logs/ are your best friends for any hiccups.
🚀 Your Big Data Adventure Awaits!
With these steps, you’re all set to explore the vast universe of Big Data with Hadoop on your Ubuntu machine.
Happy Data Crunching!
Your [Your Course/Team Name]
Note: Ensure the technical steps are accurate and up-to-date for the course email. Personalize the email with course-specific details and offer support for installation issues. To maintain the email’s integrity and prevent it from being flagged as spam, avoid overusing hyperlinks and ensure it’s sent from a recognized, reputable email address.
Hadoop Training Demo Day 1 Video:
youtube
You can find more information about Hadoop Training in this Hadoop Docs Link
Conclusion:
Unogeeks is the №1 IT Training Institute for Hadoop Training. Anyone Disagree? Please drop in a comment
You can check out our other latest blogs on Hadoop Training here — Hadoop Blogs
Please check out our Best In Class Hadoop Training Details here — Hadoop Training
S.W.ORG
— — — — — — — — — — — -
For Training inquiries:
Call/Whatsapp: +91 73960 33555
Mail us at: [email protected]
Our Website ➜ https://unogeeks.com
Follow us:
Instagram: https://www.instagram.com/unogeeks
Facebook: https://www.facebook.com/UnogeeksSoftwareTrainingInstitute
Twitter: https://twitter.com/unogeeks
#unogeeks #training #ittraining #unogeekstraining
0 notes
Text

node: /lib/x86_64-linux-gnu/libc.so.6: version GLIBC_2.28' not found (required by node) nvm is not compatible with the npm config "prefix" option: currently set to "" Runnvm use --delete-prefix v18.12.1 --silent` to unset it.
Dear stackexchange, if I update Ubuntu my bad old computer, may die, how do I update GLIBC without (snarp has died now
#why isn't the “add alt text” box showing up on the web interface today#is it because the image is too short and wide
7 notes
·
View notes
Text
A Vagrant Story
Like everyone else I wish I had more time in the day. In reality, I want to spend more time on fun projects. Blogging and content creation has been a bit on a hiatus but it doesn't mean I have less things to write and talk about. In relation to this rambling I want to evangelize a tool I've been using over the years that saves an enormous amount of time if you're working in diverse sandbox development environments, Vagrant from HashiCorp.
Elevator pitch
Vagrant introduces a declarative model for virtual machines running in a development environment on your desktop. Vagrant supports many common type 2 hypervisors such as KVM, VirtualBox, Hyper-V and the VMware desktop products. The virtual machines are packaged in a format referred to as "boxes" and can be found on vagrantup.com. It's also quite easy to build your own boxes from scratch with another tool from HashiCorp called Packer. Trust me, if containers had not reached the mainstream adoption it has today, Packer would be a household tool. It's a blog post in itself for another day.
Real world use case
I got roped into a support case with a customer recently. They were using the HPE Nimble Storage Volume Plugin for Docker with a particular version of NimbleOS, Docker and docker-compose. The toolchain exhibited a weird behavior that would require two docker hosts and a few iterations to reproduce the issue. I had this environment stood up, diagnosed and replied to the support team with a customer facing response in less than an hour, thanks to Vagrant.
vagrant init
Let's elaborate on how to get a similar environment set up that I used in my support engagement off the ground. Let's assume vagrant and a supported type 2 hypervisor is installed. This example will work on Windows, Linux and Mac.
Create a new project folder and instantiate a new Vagrantfile. I use a collection of boxes built from these sources. Bento boxes provide broad coverage of providers and a variety of Linux flavors.
mkdir myproj && cd myproj vagrant init bento/ubuntu-20.04 A `Vagrantfile` has been placed in this directory. You are now ready to `vagrant up` your first virtual environment! Please read the comments in the Vagrantfile as well as documentation on `vagrantup.com` for more information on using Vagrant.
There's now a Vagrantfile in the current directory. There's a lot of commentary in the file to allow customization of the environment. It's possible to declare multiple machines in one Vagrantfile, but for the sake of an introduction, we'll explore setting up a single VM.
One of the more useful features is that Vagrant support "provisioners" that runs at first boot. It makes it easy to control the initial state and reproduce initialization with a few keystrokes. I usually write Ansible playbooks for more elaborate projects. For this exercise we'll use the inline shell provisioner to install and start docker.
Vagrant.configure("2") do |config| config.vm.box = "bento/ubuntu-20.04" config.vm.provision "shell", inline: <<-SHELL apt-get update apt-get install -y docker.io python3-pip pip3 install docker-compose usermod -a -G docker vagrant systemctl enable --now docker SHELL end
Prepare for very verbose output as we bring up the VM.
Note: The vagrant command always assumes working on the Vagrantfile in the current directory.
vagrant up
After the provisioning steps, a new VM is up and running from a thinly cloned disk of the source box. Initial download may take a while but the instance should be up in a minute or so.
Post-declaration tricks
There are some must-know Vagrant environment tricks that differentiate Vagrant from right-clicking in vCenter or fumbling in the VirtualBox UI.
SSH access
Accessing the shell of the VM can be done in two ways, most commonly is to simply do vagrant ssh and that will drop you at the prompt of the VM with the predefined user "vagrant". This method is not very practical if using other SSH-based tools like scp or doing advanced tunneling. Vagrant keeps track of the SSH connection information and have the capability to spit it out in a SSH config file and then the SSH tooling may reference the file. Example:
vagrant ssh-config > ssh-config ssh -F ssh-config default
Host shared directory
Inside the VM, /vagrant is shared with the host. This is immensely helpful as any apps your developing for the particular environment can be stored on the host and worked on from the convenience of your desktop. As an example, if I were to use the customer supplied docker-compose.yml and Dockerfile, I'd store those in /vagrant/app which in turn would correspond to my <current working directory for the project>/app.
Pushing and popping
Vagrant supports using the hypervisor snapshot capabilities. However, it does come with a very intuitive twist. Assume we want to store the initial boot state, let's push!
vagrant snapshot push ==> default: Snapshotting the machine as 'push_1590949049_3804'... ==> default: Snapshot saved! You can restore the snapshot at any time by ==> default: using `vagrant snapshot restore`. You can delete it using ==> default: `vagrant snapshot delete`.
There's now a VM snapshot of this environment (if it was a multi-machine setup, a snapshot would be created on all the VMs). The snapshot we took is now on top of the stack. Reverting to the top of the stack, simply pop back:
vagrant snapshot pop --no-delete ==> default: Forcing shutdown of VM... ==> default: Restoring the snapshot 'push_1590949049_3804'... ==> default: Checking if box 'bento/ubuntu-20.04' version '202004.27.0' is up to date... ==> default: Resuming suspended VM... ==> default: Booting VM... ==> default: Waiting for machine to boot. This may take a few minutes... default: SSH address: 127.0.0.1:2222 default: SSH username: vagrant default: SSH auth method: private key ==> default: Machine booted and ready! ==> default: Machine already provisioned. Run `vagrant provision` or use the `--provision` ==> default: flag to force provisioning. Provisioners marked to run always will still run.
You're now back to the previous state. The snapshot sub-command allows restoring to a particular snapshot and it's possible to have multiple states with sensible names too, if stepping through debugging scenarios or experimenting with named states.
Summary
These days there's a lot of compute and memory available on modern laptops and desktops. Why run development in the cloud or a remote DC when all you need is available right under your finger tips? Sure, you can't run a full blown OpenShift or HPE Container Platform but you can certainly run a representable Kubernetes clusters where minishift, microk8s and the likes won't work if you need access to the host OS (yes, I'm in the storage biz). In a recent personal project I've used this tool to simply make Kubernetes clusters with Vagrant. It works surprisingly well and allow a ton of customization.
Bonus trivia
Vagrant Story is a 20 year old videogame for PlayStation (one) from SquareSoft (now SquareEnix). It features a unique battle system I've never seen anywhere else to this day and it was one of those games I played back-to-back three times over. It's awesome. Check it out on Wikipedia.
1 note
·
View note
Text
Comparison of Ubuntu, Debian, and Yocto for IIoT and Edge Computing
In industrial IoT (IIoT) and edge computing scenarios, Ubuntu, Debian, and Yocto Project each have unique advantages. Below is a detailed comparison and recommendations for these three systems:
1. Ubuntu (ARM)
Advantages
Ready-to-use: Provides official ARM images (e.g., Ubuntu Server 22.04 LTS) supporting hardware like Raspberry Pi and NVIDIA Jetson, requiring no complex configuration.
Cloud-native support: Built-in tools like MicroK8s, Docker, and Kubernetes, ideal for edge-cloud collaboration.
Long-term support (LTS): 5 years of security updates, meeting industrial stability requirements.
Rich software ecosystem: Access to AI/ML tools (e.g., TensorFlow Lite) and databases (e.g., PostgreSQL ARM-optimized) via APT and Snap Store.
Use Cases
Rapid prototyping: Quick deployment of Python/Node.js applications on edge gateways.
AI edge inference: Running computer vision models (e.g., ROS 2 + Ubuntu) on Jetson devices.
Lightweight K8s clusters: Edge nodes managed by MicroK8s.
Limitations
Higher resource usage (minimum ~512MB RAM), unsuitable for ultra-low-power devices.
2. Debian (ARM)
Advantages
Exceptional stability: Packages undergo rigorous testing, ideal for 24/7 industrial operation.
Lightweight: Minimal installation requires only 128MB RAM; GUI-free versions available.
Long-term support: Up to 10+ years of security updates via Debian LTS (with commercial support).
Hardware compatibility: Supports older or niche ARM chips (e.g., TI Sitara series).
Use Cases
Industrial controllers: PLCs, HMIs, and other devices requiring deterministic responses.
Network edge devices: Firewalls, protocol gateways (e.g., Modbus-to-MQTT).
Critical systems (medical/transport): Compliance with IEC 62304/DO-178C certifications.
Limitations
Older software versions (e.g., default GCC version); newer features require backports.
3. Yocto Project
Advantages
Full customization: Tailor everything from kernel to user space, generating minimal images (<50MB possible).
Real-time extensions: Supports Xenomai/Preempt-RT patches for μs-level latency.
Cross-platform portability: Single recipe set adapts to multiple hardware platforms (e.g., NXP i.MX6 → i.MX8).
Security design: Built-in industrial-grade features like SELinux and dm-verity.
Use Cases
Custom industrial devices: Requires specific kernel configurations or proprietary drivers (e.g., CAN-FD bus support).
High real-time systems: Robotic motion control, CNC machines.
Resource-constrained terminals: Sensor nodes running lightweight stacks (e.g., Zephyr+FreeRTOS hybrid deployment).
Limitations
Steep learning curve (BitBake syntax required); longer development cycles.
4. Comparison Summary

5. Selection Recommendations
Choose Ubuntu ARM: For rapid deployment of edge AI applications (e.g., vision detection on Jetson) or deep integration with public clouds (e.g., AWS IoT Greengrass).
Choose Debian ARM: For mission-critical industrial equipment (e.g., substation monitoring) where stability outweighs feature novelty.
Choose Yocto Project: For custom hardware development (e.g., proprietary industrial boards) or strict real-time/safety certification (e.g., ISO 13849) requirements.
6. Hybrid Architecture Example
Smart factory edge node:
Real-time control layer: RTOS built with Yocto (controlling robotic arms)
Data processing layer: Debian running OPC UA servers
Cloud connectivity layer: Ubuntu Server managing K8s edge clusters
Combining these systems based on specific needs can maximize the efficiency of IIoT edge computing.
0 notes
Text
Instalar Node.js en Ubuntu

Introducción
Node.js es un entorno en tiempo de ejecución multiplataforma de código abierto, es una plataforma de código JavaScript del lado del servidor para programación de propósito general que permite a los usuarios crear aplicaciones de red rápidamente. Lo que simplemente significa que puede ejecutar código JavaScript en su máquina como una aplicación independiente, libre de cualquier navegador web. Al aprovechar JavaScript tanto en la parte del Front-end como en back-end, Node.js hace que el desarrollo sea más consistente e integrado.
Node.js se utiliza principalmente para crear aplicaciones de servidor de back-end, pero también es muy popular como una solución de pila completa y de front-end. npm es el administrador de paquetes predeterminado para Node.js y el registro de software más grande del mundo.
En esta guía, le mostraremos cómo comenzar a utilizar Node.js en un servidor Ubuntu 18.04. Aunque este tutorial está escrito para Ubuntu, las mismas instrucciones se aplican a cualquier distribución basada en Ubuntu, incluyendo Kubuntu, Linux Mint y Elementary OS.
Si necesita Node.js solo para implementar aplicaciones Node.js, la opción más sencilla es instalar los paquetes Node.js usando apt del repositorio de Ubuntu predeterminado o del repositorio NodeSource, en caso de que necesite las últimas versiones de Node.js y npm. Si está utilizando Node.js para propósitos de desarrollo, su mejor opción es instalar Node.js usando el script NVM.
Prerrequisitos
Esta guía asume que esta usando Ubuntu 18.04. Antes de comenzar, debe tener una cuenta de usuario no root con privilegios sudo configurados en su sistema.
Instalación de la versión Distro-Stable para Ubuntu
Ubuntu 18.04 contiene una versión de Node.js en sus repositorios predeterminados que puede usarse para proporcionar una experiencia consistente en múltiples sistemas. Al momento de escribir, la versión en los repositorios es 8.10.0. Esta no será la última versión, pero debe ser estable y suficiente para una rápida experimentación con el idioma.
Para obtener esta versión, puede utilizar el administrador de paquetes apt. Actualice el índice de su paquete local escribiendo:
$ sudo apt update
Instalar Node.js desde los repositorios:
$ sudo apt install nodejs
Si el paquete en los repositorios satisface sus necesidades, esto es todo lo que necesita hacer para configurar Node.js. En la mayoría de los casos, también querrá instalar npm, el administrador de paquetes Node.js. Puedes hacerlo escribiendo:
$ sudo apt install npm
Esto le permitirá instalar módulos y paquetes para usar con Node.js.
Debido a un conflicto con otro paquete, el ejecutable de los repositorios de Ubuntu se llama nodejs en lugar de node. Tenga esto en cuenta mientras ejecuta el software.
Para verificar qué versión de Node.js ha instalado después de estos pasos iniciales, escriba:
$ nodejs -v
Una vez que haya establecido qué versión de Node.js ha instalado desde los repositorios de Ubuntu, puede decidir si desea trabajar con diferentes versiones, archivos de paquetes o administradores de versiones. A continuación, analizaremos estos elementos, junto con métodos de instalación más flexibles y sólidos.
Instalación utilizando un PPA
Para obtener una versión más reciente de Node.js, puede agregar el PPA (archivo de paquete personal) mantenido por NodeSource. Esto tendrá versiones más actualizadas de Node.js que los repositorios oficiales de Ubuntu, y le permitirá elegir entre Node.js v6.x (compatible hasta abril de 2019), Node.js v8.x (la versión actual). Versión LTS, admitida hasta diciembre de 2019), Node.js v10.x (la segunda versión actual de LTS, admitida hasta abril de 2021), y Node.js v11.x (la versión actual, admitida hasta junio de 2019).
Primero, instale el PPA para poder acceder a su contenido. Desde su directorio de inicio, use curl para recuperar el script de instalación para su versión preferida, asegurándose de reemplazar 10.x con su cadena de versión preferida (si es diferente):
$ cd ~ $ curl -sL https://deb.nodesource.com/setup_10.x -o nodesource_setup.sh
Puede inspeccionar el contenido de este script con nano (o su editor de texto preferido):
$ nano nodesource_setup.sh
en mi caso lo hare con sublime text
$ subl nodesource_setup.sh
Ejecute el script bajo sudo:
$ sudo bash nodesource_setup.sh
El PPA se agregará a su configuración y su caché de paquete local se actualizará automáticamente. Después de ejecutar el script de configuración desde Nodesource, puede instalar el paquete Node.js de la misma manera que lo hizo anteriormente:
$ sudo apt install nodejs
Para verificar qué versión de Node.js ha instalado después de estos pasos iniciales, escriba:
$ nodejs -v
[Salida] v10.14.0
El paquete nodejs contiene el binario nodejs y npm, por lo que no necesita instalar npm por separado.
npm utiliza un archivo de configuración en su directorio de inicio para realizar un seguimiento de las actualizaciones. Se creará la primera vez que ejecute npm. Ejecute este comando para verificar que npm esté instalado y para crear el archivo de configuración:
$ npm -v
[Salida] 6.4.1
Para que funcionen algunos paquetes npm (por ejemplo, aquellos que requieren compilar código de origen), deberá instalar el paquete build-essential:
$ sudo apt install build-essential
Ahora tiene las herramientas necesarias para trabajar con paquetes npm que requieren la compilación de código de origen.
Instalación utilizando NVM
Una alternativa a la instalación de Node.js con apt es usar una herramienta llamada nvm, que significa “Node.js Version Manager”. En lugar de trabajar a nivel de sistema operativo, nvm funciona a nivel de un directorio independiente dentro de su directorio de inicio. Esto significa que puede instalar varias versiones autocontenidas de Node.js sin afectar a todo el sistema.
El control de su entorno con nvm le permite acceder a las versiones más recientes de Node.js y retener y administrar las versiones anteriores. Sin embargo, es una utilidad diferente de apt, y las versiones de Node.js que administra con ellas son distintas de las versiones que administra con apt.
Para descargar el script de instalación nvm desde la página de GitHub del proyecto, puede usar curl. Tenga en cuenta que el número de versión puede diferir de lo que se resalta aquí:
$ curl -sL https://raw.githubusercontent.com/creationix/nvm/v0.33.11/install.sh -o install_nvm.sh
Inspeccione el script de instalación con nano:
$ nano install_nvm.sh
Ejecuta el script con bash:
$ bash install_nvm.sh
Instalará el software en un subdirectorio de su directorio de inicio en ~/.nvm. También agregará las líneas necesarias a su archivo ~/.profile para usar el archivo.
Para obtener acceso a la funcionalidad nvm, deberá cerrar la sesión y volver a iniciarla o buscar el archivo ~/.profile para que su sesión actual conozca los cambios:
$ source ~/.profile
Con nvm instalado, puede instalar versiones aisladas de Node.js. Para obtener información sobre las versiones de Node.js que están disponibles, escriba: $ nvm ls-remote
[Salida] … v8.11.1 (Latest LTS: Carbon) v9.0.0 v9.1.0 v9.2.0 v9.2.1 v9.3.0 v9.4.0 v9.5.0 v9.6.0 v9.6.1 v9.7.0 v9.7.1 v9.8.0 v9.9.0 v9.10.0 v9.10.1 v9.11.0 v9.11.1 v10.0.0
Como puede ver, la versión actual de LTS en el momento de escribir esto es v8.11.1. Puedes instalar eso escribiendo:
$ nvm install 8.11.1
Por lo general, nvm cambiará para usar la versión instalada más recientemente. Puede decirle a nvm que use la versión que acaba de descargar escribiendo:
$ nvm use 8.11.1
Cuando instala Node.js usando nvm, el ejecutable se llama nodo. Puede ver la versión que está utilizando actualmente el shell escribiendo:
$ node -v
[Salida] v8.11.1
Si tiene varias versiones de Node.js, puede ver qué se instala al escribir:
$ nvm ls
Si desea predeterminar una de las versiones, escriba:
$ nvm alias default 8.11.1
Esta versión se seleccionará automáticamente cuando se genere una nueva sesión. También puedes referenciarlo por el alias así:
$ nvm use default
Cada versión de Node.js hará un seguimiento de sus propios paquetes y tiene npm disponibles para administrarlos.
También puede hacer que npm instale paquetes en el directorio ./node_modules del proyecto Node.js. Use la siguiente sintaxis para instalar el módulo Express:
$ npm install express
Si desea instalar el módulo globalmente, poniéndolo a disposición de otros proyectos con la misma versión de Node.js, puede agregar la marca -g:
$ npm install -g express
Esto instalará el paquete en:
~/.nvm/versions/node/node_version/lib/node_modules/express
La instalación global del módulo le permitirá ejecutar comandos desde la línea de comandos, pero tendrá que vincular el paquete a su esfera local para solicitarlo desde un programa:
$ npm link express
Puede aprender más sobre las opciones disponibles para usted con nvm escribiendo:
$ nvm help
Eliminando Node.js
Puede desinstalar Node.js usando apt o nvm, dependiendo de la versión que desee seleccionar. Para eliminar la versión distro-estable, deberá trabajar con la utilidad apt en el nivel del sistema.
Para eliminar la versión distro-estable, escriba lo siguiente:
$ sudo apt remove nodejs
Este comando eliminará el paquete y conservará los archivos de configuración. Estos pueden serle de utilidad si tiene la intención de volver a instalar el paquete más adelante. Si no desea guardar los archivos de configuración para su uso posterior, ejecute lo siguiente: sudo apt purge nodejs
This will uninstall the package and remove the configuration files associated with it.
As a final step, you can remove any unused packages that were automatically installed with the removed package:
$ sudo apt autoremove
Para desinstalar una versión de Node.js que ha habilitado con nvm, primero determine si la versión que desea eliminar es la versión activa actual: nvm current
Si la versión a la que te diriges no es la versión activa actual, puedes ejecutar:
$ nvm uninstall node_version
Este comando desinstalará la versión seleccionada de Node.js.
Si la versión que desea eliminar es la versión activa actual, primero debe desactivar nvm para habilitar sus cambios:
$ nvm deactivate
Ahora puede desinstalar la versión actual usando el comando de desinstalación anterior, que eliminará todos los archivos asociados con la versión específica de Node.js, excepto los archivos en caché que se pueden usar para la reinstalación.
Conclusión
Hay varias maneras de comenzar a utilizar Node.js en su servidor Ubuntu 18.04. Sus circunstancias determinarán cuál de los métodos anteriores es mejor para sus necesidades. Mientras que usar la versión empaquetada en el repositorio de Ubuntu es el método más fácil, usar nvm ofrece flexibilidad adicional.
Referencias:
How to Install Node.js on Ubuntu 18.04 Bionic Beaver Linuxlinuxconfig.org
Install the Latest Node.js and NPM Packages on Ubuntu 16.04 / 18.04 LTS Node.js is a JavaScript runtime built on Chrome's V8 JavaScript engine..... Chrome V8 engine is a Google's open source…websiteforstudents.com
Como Instalar Node.js en Ubuntu Node.js es un Runtime (tiempo de ejecución) de JavaScript usado en el motor de JavaScript Google V8, el cual te permite…www.hostinger.es
How to install Node.js and npm on Ubuntu 18.04 Node.js is an open source cross-platform JavaScript run-time environment that allows server-side execution of…linuxize.com
Node Version Manager - Simple bash script to manage multiple active node.js versions - creationix/nvmgithub.com
Node.js is a JavaScript platform for general-purpose programming that allows users to build network applications…www.digitalocean.com
1 note
·
View note
Text
Rundeck is an open source automation service that lets you easily run automation tasks across a set of nodes. It comes with a web console, command line tools, and a WebAPI. In this guide, I’ll take you through the steps to install and configure Rundeck on Ubuntu 18.04 & Debian 9. The same should also work for Ubuntu 16.04 LTS. Features of Rundeck Distributed command execution Workflow (including option passing, conditionals, error handling, and multiple workflow strategies) Pluggable execution system (SSH and WinRM by default; Powershell available) Pluggable resource model (get details of your infrastructure from external systems) On-demand (Web GUI, API or CLI) or scheduled job execution Secure Key store for passwords and keys Role-based access control policy with support for LDAP/ActiveDirectory/SSO Access control policy editing/management tools History and auditing logs Use any scripting language Step 1: Update your system & Set the hostname Start your installation by making sure your packages are updated. sudo apt update sudo apt upgrade -y After update, set server hostname. sudo hostnamectl set-hostname rundeck.example.com Add the hostname and IP address to /etc/hosts echo "192.168.17.50 rundeck.example.com" | tee -a /etc/hosts Step 2: Install Java 8 ( SE or OpenJDK) Rundeck requires Java 8 installed on the host system. You can install Java 8 on your Ubuntu 18.04 / Debian 9 by: 1. Add Java 8 PPA repository sudo add-apt-repository ppa:webupd8team/java Press [ENTER] when prompted to add the repository to your system. 2. Install Java 8 on Ubuntu 18.04 / Debian 9 sudo apt install oracle-java8-installer Press Ok to Agree to Oracle Binary Code License Agreement for the Java SE Platform Products and JavaFX. Next, Accept Oracle Binary Code license terms by selecting Yes After the installation is done, confirm the Java version installed: $ java -version java version "1.8.0_191" Java(TM) SE Runtime Environment (build 1.8.0_191-b12) Java HotSpot(TM) 64-Bit Server VM (build 25.191-b12, mixed mode) To install OpenJDK 8, just run: sudo apt install openjdk-8-jdk-headless Step 3: Install Rundeck on Ubuntu 18.04 / Debian 9 After installing Java 8, proceed to install Rundeck on Ubuntu 18.04 / Debian 9. Check for the latest release of Rundeck before downloading. wget https://dl.bintray.com/rundeck/rundeck-deb/rundeck_3.0.22.20190512-1.201905130100_all.deb Once downloaded, install the package using dpkg command: $ sudo dpkg -i rundeck*.deb Selecting previously unselected package rundeck. (Reading database ... 105814 files and directories currently installed.) Preparing to unpack rundeck_3.0.22.20190512-1.201905130100_all.deb ... Unpacking rundeck (3.0.22.20190512-1.201905130100) ... Setting up rundeck (3.0.22.20190512-1.201905130100) ... Adding group rundeck....done Adding system user rundeck....done Processing triggers for ureadahead (0.100.0-20) ... Processing triggers for systemd (237-3ubuntu10.3) ... Step 4: Configure Rundeck The main configuration file is /etc/rundeck/framework.properties. Edit the file to customize Rundeck I have modified my Rundeck server connection information to be similar to below: framework.server.name = rundeck.example.com framework.server.hostname = rundeck.example.com framework.server.port = 4440 framework.server.url = http://192.168.17.50:4440 Also set correct hostname on /etc/rundeck/rundeck-config.properties $ sudo vim /etc/rundeck/rundeck-config.properties grails.serverURL=http://192.168.17.50:4440 Don’t forget to replace all occurrences of rundeck.example.com & 192.168.17.50 with your correct values for hostname and IP address. When done with the changes, start rundeckd and set it to start on boot: sudo systemctl start rundeckd sudo systemctl enable rundeckd If you have an active ufw firewall, allow port 4440 sudo ufw allow 4440/tcp To check service status, use: $ sudo systemctl status rundeckd
* rundeckd.service - LSB: rundeck job automation console Loaded: loaded (/etc/init.d/rundeckd; generated) Active: active (running) since Wed 2018-11-14 11:24:45 PST; 19s ago Docs: man:systemd-sysv-generator(8) Main PID: 4751 (java) Tasks: 20 (limit: 2319) CGroup: /system.slice/rundeckd.service `-4751 java -Drundeck.jaaslogin=true -Djava.security.auth.login.config=/etc/rundeck/jaas-loginmodule.conf -Dloginmodule.name=RDpropertyfile Nov 14 11:24:45 rundeck.example.com systemd[1]: Starting LSB: rundeck job automation console... Nov 14 11:24:45 rundeck.example.com rundeckd[4726]: * Starting rundeckd Nov 14 11:24:45 rundeck.example.com rundeckd[4726]: ...done. Nov 14 11:24:45 rundeck.example.com systemd[1]: Started LSB: rundeck job automation console. Step 5: Access Rundeck UI Open http://[IP or hostname]:4440/ on your favorite web browser to Login to Rundeck web console. The default logins are: Username: admin Password: admin Changing admin user password by editing the file /etc/rundeck/realm.properties sudo vim /etc/rundeck/realm.properties Set like below: admin:NEW_ADMIN_PASSWORD,user,admin,architect,deploy,build Restart rundeckd service: sudo systemctl restart rundeckd I hope this tutorial was helpful in your journey to install and configure Rundeck on Ubuntu 18.04 / Debian 9.
0 notes
Text
Linux gpx editor

LINUX GPX EDITOR HOW TO
LINUX GPX EDITOR SOFTWARE
LINUX GPX EDITOR FREE
LINUX GPX EDITOR WINDOWS
Create and discuss ideas and enhancements as ticket and contact the team.
Please report any bug found! Via the Report Bug form in the Help menu it is easy.
Summarized changelog (nicely summarized)įound a bug? | Have an idea? | Make a suggestion? | Like to contribute?.
Backgrounds allow you to trace osm data from e.g.
Styles change the appearance of the mapview.
Presets allow you to select predefined tags for objects.
Plugins add more complex program features.
the OSM IRC channel, including our own room.
OpenStreetMap's question-and-answer site.
Ask members of the OpenStreetMap community on.
See the official help system – reaches it everywhere on JOSMs interface and the help button in dialogs.
The Introduction page will guide you to your first successful edit.
LINUX GPX EDITOR HOW TO
Preferred distribution channel, all platforms, monthly automatic update ( how to start changelog)ĭevelopment version (version 18556, josm-latest.jnlp or josm-latest.jar), macOS dev builds, Ubuntu repository and all Download options. Start josm.jnlp (newest tested version, currently 18543) JOSM is open source and licensed under GPL . It supports loading GPX tracks, background imagery, and OSM data from local sources as well as from online sources and allows to edit the OSM data (nodes, ways, and relations) and their metadata tags. if its not on this map, its not legal to ride.JOSM is an extensible editor for OpenStreetMap (OSM) for Java 8+. forest_park_trail_map_070711.pdf High Quality TOPO map of all trails in Forest Park.Some of these I have used or tried, the majority I have not.
LINUX GPX EDITOR FREE
I'm certain there are more feel free to add your favorite. TopOSM, an OpenStreetMap-based topographic map, similar in style to the USGS and National Geographic topographic maps., Free topo maps for print and your GPS device., upload your GPX to chart elevation gain/loss, speed, etc., create an editable route to share via email and download as GPX, measure slope angle.Google Earth, what? your not using this already.?., the ULTIMATE GPS file translator filetype converter utility.
LINUX GPX EDITOR WINDOWS
, EasyGPS is the fast and easy way to upload and download waypoints, routes, and tracks between your Windows computer and your Garmin, Magellan, or Lowrance GPS.
LINUX GPX EDITOR SOFTWARE
, proprietary software with GPX output.
Prune, GpsPrune is a free/open source application for viewing, editing and converting coordinate data from GPS systems.
Viking, Viking is a free/open source program to manage GPS data.
*edit to add the following list of electronic mapping applications. I find this one of the most useful utilities for route planning, especially ski touring or anything off trail. note you have a DL option as either a route or track file, the latter showing up on your device as a continuous line. Created routes can be downloaded as a track in a GPX file for use in a GPS device. super simple and editable routes can be shared via email. at the very least I want to view my track on a decent topo map but never get the one I want.Īdding to the browser mapping utility list. I have that one bookmarked and use occasionally, but find it not user friendly for my simple needs. There are a handful of mapping browser utilities out there now like GPSVisualizer. especially all those old NG TOPO! files into GPX. GPSBabel saves the day when it comes to file conversions. but it does not run on linux which I use. Personally, the best I have found is Topofusion. That exact reason is why I started looking for other mapping solutions. Pablo wrote:Slightly off topic but I just ran into the problem of NG TOPO! not exporting tracks in GPX.
0 notes
Text
Rigs of rods mods car

#RIGS OF RODS MODS CAR HOW TO#
#RIGS OF RODS MODS CAR MOVIE#
#RIGS OF RODS MODS CAR INSTALL#
He made many versions, which include, but are not limited to: Minibus, van, kipper (dumptruck), firetruck, and even a monster-truck for you extreme off-roaders. They have that 'video-game' look to them, which is what I like in some vehicles.
#RIGS OF RODS MODS CAR MOVIE#
With that need, Rigs of Rods Forum user 'Trampus9' has created the well-known Iveco Daily - and many of them! Detective conan movie 6 the phantom of baker street. We always needed more European-vans in Rigs of Rods. Rigs of Rods if you download it.Ġ3-07 Tow Mirrors 05 Harley front end. Results of rigs of rods tow trucks mods: freeload software, Free Video dowloads, Free Music downloads, .Free .Movie .Downloads, Games. I like the Ford Windstar because of the realistic engine sounds and the realism of damage. Look here: As you can see, the Ford Windstar failed the crash test: I haven't downloaded new stuff in a while, but that looks cool I think I have 50 total terrains and about 150 total vehicles that I downloaded! BTW, what version do you have? I have 0.38.67 and 0.4.0.7 installed but I use the first one way more often. My favorite car in Rigs of Rods is probably one of the or the. Jji7skyline wrote: gigapouch wrote: jji7skyline wrote:I love this game! I know, right! Have you downloaded the terrain? I think that one is my favorite. Here is the official trailer: Amazing vehicle mods (zips that add vehicles to the game): (a highly detailed fire truck) (a school bus pack, each bus in incredible detail) (for offroad driving) (another school bus pack, also very detailed) (most Ford pickup trucks, includes trucks from 1976-1999) (the first electric hybrid bus in RoR!) Will add cool terrain mods later. Of RoR I downloaded are only 2 buses and a.
#RIGS OF RODS MODS CAR INSTALL#
Gpg: requesting key 1462175F from hkp server to install mods for Rigs of Rods (Vehicles and Maps). Press to continue or ctrl-c to cancel adding itĮxecuting: gpg –ignore-time-conflict –no-options –no-default-keyring –homedir /tmp/tmp.vYg9XKlsvX –no-auto-check-trustdb –trust-model always –keyring /etc/apt/trusted.gpg –primary-keyring /etc/apt/trusted.gpg –keyserver hkp://:80 –recv-keys 1462175F Sudo add-apt-repository ppa:aapo-rantalainen/rigsofrods You are about to add the following PPA to your system: tmp $ sudo add-apt-repository ppa:aapo-rantalainen/rigsofrods Here is the whole screen dump of what I did: Sudo apt-get install rigsofrodsReading package lists… Done Then I tried running the install command again: I followed your instructions, and got error “E:Unable to locate package rigsofrogs” Then update package lists and install the package: sudo apt-get update sudo apt-get install rigsofrods Press Ctrl+Alt+T to open terminal, run command to add the ppa: sudo add-apt-repository ppa:aapo-rantalainen/rigsofrods The official ppa repository for Ubuntu 12.04 has been announced. Crashing into walls or terrain can permanently deform a vehicle. With this engine, vehicles and their loads flex and deform as stresses are applied. The game was built using a specific soft-body physics engine called Beam, which simulates a network of interconnected nodes (forming the chassis and the wheels) and gives the ability to simulate deformable objects. Rigs of Rods (“RoR”) is an open source multi-simulation game which uses soft-body physics to simulate the motion and deformation of vehicles.
#RIGS OF RODS MODS CAR HOW TO#
This brief tutorial will show you how to install the Rigs of Rods on Ubuntu 13.04 Raring and Linux Mint using the official repository.
0 notes