#ubuntu update nodejs version
Explore tagged Tumblr posts
Visit Tumblr Blog
Explore Tumblr blogs with no restrictions, modern design and the best experience.
Last Seen Tumblr Blogs


Fun Fact
BuzzFeed published a report claiming that Tumblr was utilized as a distribution channel for Russian agents to influence American voting habits during the 2016 presidential election in Feb 2018.
Text
#How to Upgrade Node JS to a Specific Version in Ubuntu#update node version in ubuntu#upgrade node js in ubuntu#node update ubuntu#upgrading node version ubuntu#upgrade node ubuntu#ubuntu update node#node ubuntu update#ubuntu update node to 18#upgrade node js ubuntu#how to update node js ubuntu#ubuntu upgrade node#upgrade node version linux#ubuntu nodejs update#ubuntu upgrade node to 16#ubuntu update nodejs version#update node version ubuntu#upgrade nodejs on ubuntu#upgrade nodejs version ubuntu#linux upgrade nodejs#ubuntu upgrade nodejs#upgrade nodejs ubuntu#upgrade node js ubuntu 20.04
0 notes
Text
PROJETO
Passo a Passo da Implementação da NeoSphere
1. Configuração do Ambiente de Desenvolvimento
Ferramentas Necessárias:
Python 3.10+ para backend Web2 (FastAPI, Redis).
Node.js 18+ para serviços Web3 e frontend.
Solidity para smart contracts.
Docker para conteinerização de serviços (Redis, MongoDB, RabbitMQ).
Truffle/Hardhat para desenvolvimento de smart contracts.
# Instalação de dependências básicas (Linux/Ubuntu) sudo apt-get update sudo apt-get install -y python3.10 nodejs npm docker.io
2. Implementação da API Web2 com FastAPI
Estrutura do Projeto:
/neosphere-api ├── app/ │ ├── __init__.py │ ├── main.py # Ponto de entrada da API │ ├── models.py # Modelos Pydantic │ └── database.py # Conexão com MongoDB └── requirements.txt
Código Expandido (app/main.py):
from fastapi import FastAPI, Depends, HTTPException from pymongo import MongoClient from pymongo.errors import DuplicateKeyError from app.models import PostCreate, PostResponse from app.database import get_db import uuid import datetime app = FastAPI(title="NeoSphere API", version="0.2.0") @app.post("/posts/", response_model=PostResponse, status_code=201) async def create_post(post: PostCreate, db=Depends(get_db)): post_id = str(uuid.uuid4()) post_data = { "post_id": post_id, "user_id": post.user_id, "content": post.content, "media_urls": post.media_urls or [], "related_nft_id": post.related_nft_id, "created_at": datetime.datetime.utcnow(), "likes": 0, "comments_count": 0 } try: db.posts.insert_one(post_data) except DuplicateKeyError: raise HTTPException(status_code=400, detail="Post ID já existe") return post_data @app.get("/posts/{post_id}", response_model=PostResponse) async def get_post(post_id: str, db=Depends(get_db)): post = db.posts.find_one({"post_id": post_id}) if not post: raise HTTPException(status_code=404, detail="Post não encontrado") return post
3. Sistema de Cache com Redis para NFTs
Implementação Avançada (services/nft_cache.py):
import redis from tenacity import retry, stop_after_attempt, wait_fixed from config import settings class NFTCache: def __init__(self): self.client = redis.Redis( host=settings.REDIS_HOST, port=settings.REDIS_PORT, decode_responses=True ) @retry(stop=stop_after_attempt(3), wait=wait_fixed(0.5)) async def get_metadata(self, contract_address: str, token_id: str) -> dict: cache_key = f"nft:{contract_address}:{token_id}" cached_data = self.client.get(cache_key) if cached_data: return json.loads(cached_data) # Lógica de busca na blockchain metadata = await BlockchainService.fetch_metadata(contract_address, token_id) if metadata: self.client.setex( cache_key, settings.NFT_CACHE_TTL, json.dumps(metadata) ) return metadata def invalidate_cache(self, contract_address: str, token_id: str): self.client.delete(f"nft:{contract_address}:{token_id}")
4. Smart Contract para NFTs com Royalties (Arquivo Completo)
Contrato Completo (contracts/NeoSphereNFT.sol):
// SPDX-License-Identifier: MIT pragma solidity ^0.8.20; import "@openzeppelin/contracts/token/ERC721/ERC721.sol"; import "@openzeppelin/contracts/access/Ownable.sol"; import "@openzeppelin/contracts/interfaces/IERC2981.sol"; contract NeoSphereNFT is ERC721, Ownable, IERC2981 { using Counters for Counters.Counter; Counters.Counter private _tokenIdCounter; struct RoyaltyInfo { address recipient; uint96 percentage; } mapping(uint256 => RoyaltyInfo) private _royalties; mapping(uint256 => string) private _tokenURIs; event NFTMinted( uint256 indexed tokenId, address indexed owner, string tokenURI, address creator ); constructor() ERC721("NeoSphereNFT", "NSPH") Ownable(msg.sender) {} function mint( address to, string memory uri, address royaltyRecipient, uint96 royaltyPercentage ) external onlyOwner returns (uint256) { require(royaltyPercentage <= 10000, "Royalties max 100%"); uint256 tokenId = _tokenIdCounter.current(); _tokenIdCounter.increment(); _safeMint(to, tokenId); _setTokenURI(tokenId, uri); _setRoyaltyInfo(tokenId, royaltyRecipient, royaltyPercentage); emit NFTMinted(tokenId, to, uri, msg.sender); return tokenId; } function royaltyInfo( uint256 tokenId, uint256 salePrice ) external view override returns (address, uint256) { RoyaltyInfo memory info = _royalties[tokenId]; return ( info.recipient, (salePrice * info.percentage) / 10000 ); } function _setTokenURI(uint256 tokenId, string memory uri) internal { _tokenURIs[tokenId] = uri; } function _setRoyaltyInfo( uint256 tokenId, address recipient, uint96 percentage ) internal { _royalties[tokenId] = RoyaltyInfo(recipient, percentage); } }
5. Sistema de Pagamentos com Gateway Unificado
Implementação Completa (payment/gateway.py):
from abc import ABC, abstractmethod from typing import Dict, Optional from pydantic import BaseModel class PaymentRequest(BaseModel): amount: float currency: str method: str user_metadata: Dict payment_metadata: Dict class PaymentProvider(ABC): @abstractmethod def process_payment(self, request: PaymentRequest) -> Dict: pass class StripeACHProvider(PaymentProvider): def process_payment(self, request: PaymentRequest) -> Dict: # Implementação real usando a SDK do Stripe return { "status": "success", "transaction_id": "stripe_tx_123", "fee": request.amount * 0.02 } class NeoPaymentGateway: def __init__(self): self.providers = { "ach": StripeACHProvider(), # Adicionar outros provedores } def process_payment(self, request: PaymentRequest) -> Dict: provider = self.providers.get(request.method.lower()) if not provider: raise ValueError("Método de pagamento não suportado") # Validação adicional if request.currency not in ["USD", "BRL"]: raise ValueError("Moeda não suportada") return provider.process_payment(request) # Exemplo de uso: # gateway = NeoPaymentGateway() # resultado = gateway.process_payment(PaymentRequest( # amount=100.00, # currency="USD", # method="ACH", # user_metadata={"country": "US"}, # payment_metadata={"account_number": "..."} # ))
6. Autenticação Web3 com SIWE
Implementação no Frontend (React):
import { useSigner } from 'wagmi' import { SiweMessage } from 'siwe' const AuthButton = () => { const { data: signer } = useSigner() const handleLogin = async () => { const message = new SiweMessage({ domain: window.location.host, address: await signer.getAddress(), statement: 'Bem-vindo à NeoSphere!', uri: window.location.origin, version: '1', chainId: 137 // Polygon Mainnet }) const signature = await signer.signMessage(message.prepareMessage()) // Verificação no backend const response = await fetch('/api/auth/login', { method: 'POST', headers: { 'Content-Type': 'application/json' }, body: JSON.stringify({ message, signature }) }) if (response.ok) { console.log('Autenticado com sucesso!') } } return ( <button onClick={handleLogin}> Conectar Wallet </button> ) }
7. Estratégia de Implantação
Infraestrutura com Terraform:
# infra/main.tf provider "aws" { region = "us-east-1" } module "neosphere_cluster" { source = "terraform-aws-modules/ecs/aws" cluster_name = "neosphere-prod" fargate_capacity_providers = ["FARGATE"] services = { api = { cpu = 512 memory = 1024 port = 8000 } payment = { cpu = 256 memory = 512 port = 3000 } } } resource "aws_elasticache_cluster" "redis" { cluster_id = "neosphere-redis" engine = "redis" node_type = "cache.t3.micro" num_cache_nodes = 1 parameter_group_name = "default.redis6.x" }
Considerações Finais
Testes Automatizados:
Implementar testes end-to-end com Cypress para fluxos de usuário
Testes de carga com k6 para validar escalabilidade
Testes de segurança com OWASP ZAP
Monitoramento:
Configurar Prometheus + Grafana para métricas em tempo real
Integrar Sentry para captura de erros no frontend
CI/CD:
Pipeline com GitHub Actions para deploy automático
Verificação de smart contracts com Slither
Documentação:
Swagger para API REST
Storybook para componentes UI
Archimate para documentação de arquitetura
Este esqueleto técnico fornece a base para uma implementação robusta da NeoSphere, combinando as melhores práticas de desenvolvimento Web2 com as inovações da Web3.
0 notes
Text
Article on How to install Angular on Ubuntu
Ubuntu is an open source operating system from the house of Linux. You will get security, support, and managed services from the publisher of Ubuntu with cutting age technology .To install Angular on Ubuntu, you first need to have Node.js and npm (Node Package Manager) installed . Then you will able install Angular at your system
Here's a step-by-step guide:
1. First install Node.js and npm :
- Open your terminal (Ctrl+Alt+T).
- Run the following commands to update your package index and install Node.js and npm. Wait for sometime , it may take a little bit time to install.
sudo apt update
sudo apt install nodejs
sudo apt install npm
2. To verify the installation of Node.js , run the following command
node -v
The terminal will return like this
v20.9.0
That means your node.js installation in successfull.
3. Now we need to Install Angular CLI
- CLI stands for Command Line Interface
- In the Terminal type the following
sudo npm install -g @angular/cli
It will also take some time
To verify that Angular CLI has been installed successfully, run this command:
ng version
or
ng v
- You should see output displaying the Angular CLI version, Node.js version, and other related information.

4. How to create a New Project ?
- After installing Angular CLI, you can create a new Angular project by navigating to the directory where you want to create the project and running:
ng new your-app-name
- Here " your-app-name " should be you own app name.
5. A new project will be created . Several projects file automatically generated
your-app-name.css for writing style sheet
your-app-name.html for writing html
your-app-name.ts for writing typed script
you have to create new folder for images , videos other file if required.
6. Serve the Angular Application
- Once the project is created, navigate into the project directory:
cd my-angular-app
- Then, serve the application using the Angular CLI:
ng serve
- This command will build the application and serve it locally. You can access it by navigating to http://localhost:4200 in your web browser.
That's it! You have successfully installed Angular on your Ubuntu system. You can now start building Angular applications and i am sure you will love to work Angular in Ubuntu.
0 notes
Text
Instalar Node.js en Ubuntu

Introducción
Node.js es un entorno en tiempo de ejecución multiplataforma de código abierto, es una plataforma de código JavaScript del lado del servidor para programación de propósito general que permite a los usuarios crear aplicaciones de red rápidamente. Lo que simplemente significa que puede ejecutar código JavaScript en su máquina como una aplicación independiente, libre de cualquier navegador web. Al aprovechar JavaScript tanto en la parte del Front-end como en back-end, Node.js hace que el desarrollo sea más consistente e integrado.
Node.js se utiliza principalmente para crear aplicaciones de servidor de back-end, pero también es muy popular como una solución de pila completa y de front-end. npm es el administrador de paquetes predeterminado para Node.js y el registro de software más grande del mundo.
En esta guía, le mostraremos cómo comenzar a utilizar Node.js en un servidor Ubuntu 18.04. Aunque este tutorial está escrito para Ubuntu, las mismas instrucciones se aplican a cualquier distribución basada en Ubuntu, incluyendo Kubuntu, Linux Mint y Elementary OS.
Si necesita Node.js solo para implementar aplicaciones Node.js, la opción más sencilla es instalar los paquetes Node.js usando apt del repositorio de Ubuntu predeterminado o del repositorio NodeSource, en caso de que necesite las últimas versiones de Node.js y npm. Si está utilizando Node.js para propósitos de desarrollo, su mejor opción es instalar Node.js usando el script NVM.
Prerrequisitos
Esta guía asume que esta usando Ubuntu 18.04. Antes de comenzar, debe tener una cuenta de usuario no root con privilegios sudo configurados en su sistema.
Instalación de la versión Distro-Stable para Ubuntu
Ubuntu 18.04 contiene una versión de Node.js en sus repositorios predeterminados que puede usarse para proporcionar una experiencia consistente en múltiples sistemas. Al momento de escribir, la versión en los repositorios es 8.10.0. Esta no será la última versión, pero debe ser estable y suficiente para una rápida experimentación con el idioma.
Para obtener esta versión, puede utilizar el administrador de paquetes apt. Actualice el índice de su paquete local escribiendo:
$ sudo apt update
Instalar Node.js desde los repositorios:
$ sudo apt install nodejs
Si el paquete en los repositorios satisface sus necesidades, esto es todo lo que necesita hacer para configurar Node.js. En la mayoría de los casos, también querrá instalar npm, el administrador de paquetes Node.js. Puedes hacerlo escribiendo:
$ sudo apt install npm
Esto le permitirá instalar módulos y paquetes para usar con Node.js.
Debido a un conflicto con otro paquete, el ejecutable de los repositorios de Ubuntu se llama nodejs en lugar de node. Tenga esto en cuenta mientras ejecuta el software.
Para verificar qué versión de Node.js ha instalado después de estos pasos iniciales, escriba:
$ nodejs -v
Una vez que haya establecido qué versión de Node.js ha instalado desde los repositorios de Ubuntu, puede decidir si desea trabajar con diferentes versiones, archivos de paquetes o administradores de versiones. A continuación, analizaremos estos elementos, junto con métodos de instalación más flexibles y sólidos.
Instalación utilizando un PPA
Para obtener una versión más reciente de Node.js, puede agregar el PPA (archivo de paquete personal) mantenido por NodeSource. Esto tendrá versiones más actualizadas de Node.js que los repositorios oficiales de Ubuntu, y le permitirá elegir entre Node.js v6.x (compatible hasta abril de 2019), Node.js v8.x (la versión actual). Versión LTS, admitida hasta diciembre de 2019), Node.js v10.x (la segunda versión actual de LTS, admitida hasta abril de 2021), y Node.js v11.x (la versión actual, admitida hasta junio de 2019).
Primero, instale el PPA para poder acceder a su contenido. Desde su directorio de inicio, use curl para recuperar el script de instalación para su versión preferida, asegurándose de reemplazar 10.x con su cadena de versión preferida (si es diferente):
$ cd ~ $ curl -sL https://deb.nodesource.com/setup_10.x -o nodesource_setup.sh
Puede inspeccionar el contenido de este script con nano (o su editor de texto preferido):
$ nano nodesource_setup.sh
en mi caso lo hare con sublime text
$ subl nodesource_setup.sh
Ejecute el script bajo sudo:
$ sudo bash nodesource_setup.sh
El PPA se agregará a su configuración y su caché de paquete local se actualizará automáticamente. Después de ejecutar el script de configuración desde Nodesource, puede instalar el paquete Node.js de la misma manera que lo hizo anteriormente:
$ sudo apt install nodejs
Para verificar qué versión de Node.js ha instalado después de estos pasos iniciales, escriba:
$ nodejs -v
[Salida] v10.14.0
El paquete nodejs contiene el binario nodejs y npm, por lo que no necesita instalar npm por separado.
npm utiliza un archivo de configuración en su directorio de inicio para realizar un seguimiento de las actualizaciones. Se creará la primera vez que ejecute npm. Ejecute este comando para verificar que npm esté instalado y para crear el archivo de configuración:
$ npm -v
[Salida] 6.4.1
Para que funcionen algunos paquetes npm (por ejemplo, aquellos que requieren compilar código de origen), deberá instalar el paquete build-essential:
$ sudo apt install build-essential
Ahora tiene las herramientas necesarias para trabajar con paquetes npm que requieren la compilación de código de origen.
Instalación utilizando NVM
Una alternativa a la instalación de Node.js con apt es usar una herramienta llamada nvm, que significa “Node.js Version Manager”. En lugar de trabajar a nivel de sistema operativo, nvm funciona a nivel de un directorio independiente dentro de su directorio de inicio. Esto significa que puede instalar varias versiones autocontenidas de Node.js sin afectar a todo el sistema.
El control de su entorno con nvm le permite acceder a las versiones más recientes de Node.js y retener y administrar las versiones anteriores. Sin embargo, es una utilidad diferente de apt, y las versiones de Node.js que administra con ellas son distintas de las versiones que administra con apt.
Para descargar el script de instalación nvm desde la página de GitHub del proyecto, puede usar curl. Tenga en cuenta que el número de versión puede diferir de lo que se resalta aquí:
$ curl -sL https://raw.githubusercontent.com/creationix/nvm/v0.33.11/install.sh -o install_nvm.sh
Inspeccione el script de instalación con nano:
$ nano install_nvm.sh
Ejecuta el script con bash:
$ bash install_nvm.sh
Instalará el software en un subdirectorio de su directorio de inicio en ~/.nvm. También agregará las líneas necesarias a su archivo ~/.profile para usar el archivo.
Para obtener acceso a la funcionalidad nvm, deberá cerrar la sesión y volver a iniciarla o buscar el archivo ~/.profile para que su sesión actual conozca los cambios:
$ source ~/.profile
Con nvm instalado, puede instalar versiones aisladas de Node.js. Para obtener información sobre las versiones de Node.js que están disponibles, escriba: $ nvm ls-remote
[Salida] … v8.11.1 (Latest LTS: Carbon) v9.0.0 v9.1.0 v9.2.0 v9.2.1 v9.3.0 v9.4.0 v9.5.0 v9.6.0 v9.6.1 v9.7.0 v9.7.1 v9.8.0 v9.9.0 v9.10.0 v9.10.1 v9.11.0 v9.11.1 v10.0.0
Como puede ver, la versión actual de LTS en el momento de escribir esto es v8.11.1. Puedes instalar eso escribiendo:
$ nvm install 8.11.1
Por lo general, nvm cambiará para usar la versión instalada más recientemente. Puede decirle a nvm que use la versión que acaba de descargar escribiendo:
$ nvm use 8.11.1
Cuando instala Node.js usando nvm, el ejecutable se llama nodo. Puede ver la versión que está utilizando actualmente el shell escribiendo:
$ node -v
[Salida] v8.11.1
Si tiene varias versiones de Node.js, puede ver qué se instala al escribir:
$ nvm ls
Si desea predeterminar una de las versiones, escriba:
$ nvm alias default 8.11.1
Esta versión se seleccionará automáticamente cuando se genere una nueva sesión. También puedes referenciarlo por el alias así:
$ nvm use default
Cada versión de Node.js hará un seguimiento de sus propios paquetes y tiene npm disponibles para administrarlos.
También puede hacer que npm instale paquetes en el directorio ./node_modules del proyecto Node.js. Use la siguiente sintaxis para instalar el módulo Express:
$ npm install express
Si desea instalar el módulo globalmente, poniéndolo a disposición de otros proyectos con la misma versión de Node.js, puede agregar la marca -g:
$ npm install -g express
Esto instalará el paquete en:
~/.nvm/versions/node/node_version/lib/node_modules/express
La instalación global del módulo le permitirá ejecutar comandos desde la línea de comandos, pero tendrá que vincular el paquete a su esfera local para solicitarlo desde un programa:
$ npm link express
Puede aprender más sobre las opciones disponibles para usted con nvm escribiendo:
$ nvm help
Eliminando Node.js
Puede desinstalar Node.js usando apt o nvm, dependiendo de la versión que desee seleccionar. Para eliminar la versión distro-estable, deberá trabajar con la utilidad apt en el nivel del sistema.
Para eliminar la versión distro-estable, escriba lo siguiente:
$ sudo apt remove nodejs
Este comando eliminará el paquete y conservará los archivos de configuración. Estos pueden serle de utilidad si tiene la intención de volver a instalar el paquete más adelante. Si no desea guardar los archivos de configuración para su uso posterior, ejecute lo siguiente: sudo apt purge nodejs
This will uninstall the package and remove the configuration files associated with it.
As a final step, you can remove any unused packages that were automatically installed with the removed package:
$ sudo apt autoremove
Para desinstalar una versión de Node.js que ha habilitado con nvm, primero determine si la versión que desea eliminar es la versión activa actual: nvm current
Si la versión a la que te diriges no es la versión activa actual, puedes ejecutar:
$ nvm uninstall node_version
Este comando desinstalará la versión seleccionada de Node.js.
Si la versión que desea eliminar es la versión activa actual, primero debe desactivar nvm para habilitar sus cambios:
$ nvm deactivate
Ahora puede desinstalar la versión actual usando el comando de desinstalación anterior, que eliminará todos los archivos asociados con la versión específica de Node.js, excepto los archivos en caché que se pueden usar para la reinstalación.
Conclusión
Hay varias maneras de comenzar a utilizar Node.js en su servidor Ubuntu 18.04. Sus circunstancias determinarán cuál de los métodos anteriores es mejor para sus necesidades. Mientras que usar la versión empaquetada en el repositorio de Ubuntu es el método más fácil, usar nvm ofrece flexibilidad adicional.
Referencias:
How to Install Node.js on Ubuntu 18.04 Bionic Beaver Linuxlinuxconfig.org
Install the Latest Node.js and NPM Packages on Ubuntu 16.04 / 18.04 LTS Node.js is a JavaScript runtime built on Chrome's V8 JavaScript engine..... Chrome V8 engine is a Google's open source…websiteforstudents.com
Como Instalar Node.js en Ubuntu Node.js es un Runtime (tiempo de ejecución) de JavaScript usado en el motor de JavaScript Google V8, el cual te permite…www.hostinger.es
How to install Node.js and npm on Ubuntu 18.04 Node.js is an open source cross-platform JavaScript run-time environment that allows server-side execution of…linuxize.com
Node Version Manager - Simple bash script to manage multiple active node.js versions - creationix/nvmgithub.com
Node.js is a JavaScript platform for general-purpose programming that allows users to build network applications…www.digitalocean.com
1 note
·
View note
Text
Linux install nodejs

LINUX INSTALL NODEJS INSTALL
LINUX INSTALL NODEJS UPDATE
LINUX INSTALL NODEJS PROFESSIONAL
LINUX INSTALL NODEJS DOWNLOAD
# yum groupinstall 'Development Tools' Installing NodeJs in Debian, Ubuntu and Linux Mint Installing NodeJS 16.x in Debian, Ubuntu and Linux Mint Optional: There are development tools such as gcc-c++ and make that you need to have on your system, in order to build native addons from npm.
LINUX INSTALL NODEJS INSTALL
If you want to install NodeJS 12.x, add the following repository. # curl -fsSL | sudo bash - Installing NodeJS 12.x on RHEL, CentOS and Fedora
LINUX INSTALL NODEJS PROFESSIONAL
Next, you may want to explore the Nodejs framework to become a professional programmer.Installing NodeJS 14.x in RHEL, CentOS and Fedora As root It will take some time to build and once done you can verify the installed version by executing below.
LINUX INSTALL NODEJS UPDATE
If using Ubuntu then install the pre-requisites with below apt-get update You should see a new folder created in the present working directoryĪnd, its time to build the Node.js from source now.īut, before you proceed, ensure you have the pre-requisites installed.Extract the downloaded file with tar command.
LINUX INSTALL NODEJS DOWNLOAD
Download the latest or the one you want from here using wget.
The procedure is not as easy as above through binary distribution but doable. What if you are in a DMZ environment where you can’t connect to the Internet? You still can install it by building the source code. The above instruction should also work for Fedora 29 or later. This means the Node.js is installed and can be verified with -v syntax. Installing : python3-setuptools-39.2. 1/4 It will take a few seconds, and in the end, you should see something like below. If you are using CentOS 8.x then you may also try DNF. CentOS/RHEL 7.x or 8.xįirst, you need to install the NodeSource repository with the following command.Īnd then, install the Nodejs as below. nodejs as you can see, it has installed 11.7.0 version. It will take a few seconds and once done you should be able to verify the version.
Next, you will have to install the nodejs with the following command.
Sudo apt-get update & sudo apt-get install yarn # To install the Yarn package manager, run:Įcho "deb stable main" | sudo tee /etc/apt//yarn.list # You may also need development tools to build native addons: # Run `sudo apt-get install -y nodejs` to install Node.js 11.x and npm At the end of the above output, you should see something like this. The above will download and install the NodeSource Node.js repository. To install Node.js 14.x curl -sL | sudo -E bash. To install Node.js 12.x curl -sL | sudo -E bash. To install Node.js 11.x curl -sL | sudo -E bash. But not to worry, you can use NodeSource distribution as the following. The latest version of Nodejs is not available through the default repository. The following, I’ve tested on the DigitalOcean server. Let’s get it started. Technically, there are multiple ways to get things installed but following the easy and right process will make life much easier. If you recently started learning Nodejs development, then one of the first things you need to do is to install them. Node.js popularity is growing faster than ever. Procedure to install Node.js 11.x, 12.x, 14.x on Ubuntu 16.x/18.x, CentOS 7.x/8.x through binary distribution or from the source.
0 notes
Text
In this guide, we will cover installation of Node.js 14 on Ubuntu / Debian / Linux Mint. Node.js is a server-side JavaScript language based on the V8 JavaScript engine for writing server-side JavaScript applications. Node.js 14 was released on 2020-04-21 and is expected to enter active LTS state on 2020-10-20. The maintenance window will start on 2021-10-19 and is expected to reach End-of-life on 2023-04-30. For CentOS / RHEL installation: Install Node.js 14 on CentOS & RHEL Install Node.js 14 on Ubuntu / Debian / Linux Mint We will use the Node.js Binary Distributions installer script to setup Node.js 14 on Ubuntu / Debian / Linux Mint Linux machine Step 1: Update APT index Run the apt update command on your Ubuntu / Debian Linux to update package repository contents database. sudo apt update Step 2: Install Node.js 13 on Ubuntu / Debian / Linux Mint Linux After system update, install Node.js 14 on Ubuntu / Debian / Linux Mint by first installing the required repository. curl -sL https://deb.nodesource.com/setup_14.x | sudo bash - You can validate that the repository was added by checking file contents. $ cat /etc/apt/sources.list.d/nodesource.list deb https://deb.nodesource.com/node_14.x focal main deb-src https://deb.nodesource.com/node_14.x focal main Once the repository is added, you can begin the installation of Node.js 14 on Ubuntu / Debian / Linux Mint machine: sudo apt -y install nodejs Verify the version of Node.js installed. $ node -v v14.19.3 If you need Node Development tools, install them with the command: sudo apt -y install gcc g++ make To install the Yarn package manager, run: curl -sL https://dl.yarnpkg.com/debian/pubkey.gpg | sudo apt-key add - echo "deb https://dl.yarnpkg.com/debian/ stable main" | sudo tee /etc/apt/sources.list.d/yarn.list sudo apt update && sudo apt install yarn You now have Node.js 14 installed on Ubuntu / Debian / Linux Mint.
0 notes
Text
Npm install from github commit

NPM INSTALL FROM GITHUB COMMIT INSTALL
NPM INSTALL FROM GITHUB COMMIT FULL
NPM INSTALL FROM GITHUB COMMIT DOWNLOAD
Note on Patches/Pull RequestsĬheck out our Contributing guide CopyrightĬopyright (c) 2015 Andrew Nesbitt.
NPM INSTALL FROM GITHUB COMMIT FULL
You can find a full list of those people here. We Michael Mifsud – Project Lead (Github / Twitter). This module is brought to you and maintained by the following people: If any tests fail it will build from source. Install runs only two Mocha tests to see if your machine can use the pre-built LibSass which will save some time during install. These parameters can be used as environment variable:Īs local or global. Following parameters are supported by node-sass: Variable name
NPM INSTALL FROM GITHUB COMMIT DOWNLOAD
Node-sass supports different configuration parameters to change settings related to the sass binary such as binary name, binary path or alternative download path. Node scripts/build -f Binary configuration parameters Node-sass includes pre-compiled binaries for popular platforms, to add a binary for your platform follow these steps: There is also an example connect app here: Rebuilding binaries scss files using node-sass: Metalsmith has created a metalsmith plugin based on node-sass: Meteor has created a meteor plugin based on node-sass: Mimosa has created a Mimosa module for sass which includes node-sass: Example App scss files using node-sass: Duo.js has created an extension that transpiles Sass to CSS using node-sass with duo.js Grunt has created a set of grunt tasks based on node-sass: Gulp has created a gulp sass plugin based on node-sass: Harp web server implicitly compiles. This functionality has been moved to node-sass-middleware in node-sass v1.0.0 DocPad wrote a DocPad plugin that compiles. scss files automatically for connect and express based http servers. Brunch pluginīrunch’s official sass plugin uses node-sass by default, and automatically falls back to ruby if use of Compass is detected: Connect/Express middleware The extension also integrates with Live Preview to show Sass changes in the browser without saving or compiling. When editing Sass files, the extension compiles changes on save. Brackets has created a Brackets extension based on node-sass. Listing of community uses of node-sass in build tools and frameworks. Having installation troubles? Check out our Troubleshooting guide.
NPM INSTALL FROM GITHUB COMMIT INSTALL
Follow the official NodeJS docs to install NodeJS so that #!/usr/bin/env node correctly resolves.Ĭompiling on Windows machines requires the node-gyp prerequisites.Īre you seeing the following error? Check out our Troubleshooting guide.** Some users have reported issues installing on Ubuntu due to node being registered to another package. scss files to css at incredible speed and automatically via a connect middleware.įollow on twitter for release updates: Install Node-sass is a library that provides binding for Node.js to LibSass, the C version of the popular stylesheet preprocessor, Sass. We will open a single issue for interested parties to subscribe to, and close additional issues.īelow is a quick guide for minimum and maximum support supported version of node-sass: NodeJS
New node release require minor internal changes along with support from CI providers (AppVeyor, GitHub Actions).
We will stop building binaries for unsupported releases, testing for breakages in dependency compatibility, but we will not block installations for those that want to support themselves.
Node versions that hit end of life, will be dropped from support at each node-sass release (major, minor).
Supported Node.js versions vary by release, please consult the releases page.
0 notes
Text
Usar jubler en netflix

#Usar jubler en netflix how to#
#Usar jubler en netflix install#
htmlcompressor - Project Hosting on Google Code.Developing a contract-first JAX-WS webservice « A developer's journal.- Java Generics FAQs - Frequently Asked Questions - Angelika Langer Training/Consulting.: Weka-Machine Learning Software in Java.Omar AL Zabir on hard to find tech stuffs.Jeditable - Edit In Place Plugin For jQuery.gotAPI/HTML - Instant search in HTML and other developer documentation.Monitoring Memory with JRuby, Part 1: jhat and VisualVM | Engine Yard Ruby on Rails Blog.Tapestry Central: The Tragedy Of Checked Exceptions.
#Usar jubler en netflix install#
Flexion.Org Blog » Install Sun Java 6 JRE and JDK from.Spring MVC Fast Tutorial: Dependency Injection.
#Usar jubler en netflix how to#
java - Spring MVC: Where to place validation and how to validation entity references - Stack Overflow.
Couprie's How to Teach Computer Science.
Script Junkie | Building Mobile JavaScript WebApps With Backbone.js & jQuery: Part I.
Best Open Source Resources for Web Developers | WebAppers.
Adequately Good - JavaScript Scoping and Hoisting.
Top 10 Really User Friendly Captchas (version 2) ? Script Tutorials.
Sample Application using jQuery Mobile and PhoneGap.
Stream NHL Watch New York Islanders vs Carolina Hurricanes Online Live via PC.
Watch Devils vs Rangers PC Channel Live.
jQuery - Wikipedia, the free encyclopedia.
Taffy DB : A JavaScript database for your browser.
AJAX based CRUD tables using ASP.NET MVC 3 and jTable jQuery plug-in - CodeProject®.
Blog do Adilson: Atualizando o Java da Oracle no Debian e Ubuntu.
PxLoader | A Simple JavasScript Preloader.
Building Real-Time Form Validation Using jQuery | Graphic and Web Design Blog.
psd.js: You Guessed It - A Photoshop Document Parser in CoffeeScript - Badass JavaScript.
How to Create a jQuery Confirm Dialog Replacement | Tutorialzine.
Mathematics Archives - Topics in Mathematics.
InfoQ: Grails + EJB Domain Models Step-by-Step.
Synchronizing HTML5 Slides with Nodejs - Bocoup.
Font.js - finally a decent JavaScript object representation for fonts.
Nextaris - your Universal Medium for Information Access and Exchange through Convergence of Practical Tools for Using the Web.
SurfWax - Accumulating News and Reviews on 50,000 Topics.
Meta Search Engine, Web Directory and Web Portal.
Update a Record with Animation effect using JSP and jQuery.
jQZoom Evolution, javascript image magnifier.
0 notes
Text
How to update Node JS on Ubuntu 18.04
How to update Node JS on Ubuntu 18.04
In this short tutorial, you will discover three ways to update NodeJs on Ubuntu 18.04 and 20.04. Using nvm Let’s start with NVM, Node Version Manager. It is by far the best method to update NodeJS on Linux machines. You will need a C ++ compiler, the package build-essential and the library libssl-dev. Run an update first, then we’ll install the packages. sudo apt-get update To install the…

View On WordPress
0 notes
Text
How to install the latest version of NodeJS and NPM on Ubuntu/Debian using PPA
How to install the latest version of NodeJS and NPM on Ubuntu/Debian using PPA
NodeJS is a platform built on Chrome's JavaScript execution engine to easily build scalable and fast network apps. THE Node PPA is being updated and maintained on its official website. We can add this PPA to our Debian system and Ubuntu 19.10, 18.04 LTS, 16.04 LTS (Trusty Tahr) and 14.04 LTS (Xenial Xerus) and install Node using the native package manager. Check out more at: After all what is…
View On WordPress
0 notes
Text
How To Install Odoo 15 In Ubuntu 18.04 ? | Steps To Install Odoo 15
How To Install Odoo 15 In Ubuntu 18.04 LTS ?
Technical
Steps To Install Odoo 15 On Ubuntu 18.04
Odoo is the most popular all-in-one business software in the world.To Install Odoo 15 on Ubuntu 18.04 you just need to follow the below steps. There are many ways to install Odoo depending on the requirements and the easy and quick way to install Odoo by using APT repositories. If you want to work with running multiple Odoo versions on the same system then you can either use docker compose or docker Install Odoo in a virtual environment. This blog is to provide steps for installation and configuration of Odoo for production environment using Git source and Python environment on an Ubuntu 18.04 system. Note : Odoo 15 is not launched yet so we have used the “master” branch for Installation.
To install Odoo 15 on Ubuntu 18.04 LTS you just follow the below steps.
Step 1 : Update Server
sudo apt-get update
sudo apt-get upgrade -y
Step 2 : Create Odoo User in Ubuntu
sudo adduser -system -home=/opt/odoo -group odoo
Step 3 : Install PostgreSQL Server
sudo apt-get install postgresql -y
Step 4 : Create Odoo user for postgreSQL
sudo su - postgres -c "createuser -s odoo" 2> /dev/null || true
Step 5 : Install Python Dependencies
sudo apt-get install git python3 python3-pip build-essential wget python3-dev python3-venv python3-wheel libxslt-dev libzip-dev libldap2-dev libsasl2-dev python3-setuptools node-less libjpeg-dev gdebi -y
Step 6 : Install Python PIP Dependencies
sudo -H pip3 install -r https://raw.githubusercontent.com/odoo/odoo/master/requirements.txt
Step 7 : Install other required packages
sudo apt-get install nodejs npm -y
sudo npm install -g rtlcss
Step 8 : Install Wkhtmltopdf
sudo apt-get install xfonts-75dpi
sudo wget https://github.com/wkhtmltopdf/packaging/releases/download/0.12.6-1/wkhtmltox_0.12.6-1.bionic_amd64.deb
sudo dpkg -i wkhtmltox_0.12.6-1.bionic_amd64.deb
sudo cp /usr/local/bin/wkhtmltoimage /usr/bin/wkhtmltoimage
sudo cp /usr/local/bin/wkhtmltopdf /usr/bin/wkhtmltopdf
Step 9 : Create Log directory
sudo mkdir /var/log/odoo
sudo chown odoo:odoo /var/log/odoo
Step 10 :Install Odoo
sudo apt-get install git
sudo git clone --depth 1 --branch master https://www.github.com/odoo/odoo /odoo/odoo-server
Step 11 : Setting permissions on home folder
sudo chown -R odoo:odoo /odoo/*
Step 12 : Create server config file
sudo touch /etc/odoo-server.conf
sudo su root -c "printf '[options] \n; This is the password that allows database operations:\n' >> /etc/odoo-server.conf"
sudo su root -c "printf 'admin_passwd = admin\n' >> /etc/odoo-server.conf"
sudo su root -c "printf 'xmlrpc_port = 8069\n' >> /etc/odoo-server.conf"
sudo su root -c "printf 'logfile = /var/log/odoo/odoo-server.log\n' >> /etc/odoo-server.conf"
sudo su root -c "printf 'addons_path=/odoo/odoo-server/addons\n' >> /etc/odoo-server.conf"
sudo chown odoo:odoo /etc/odoo-server.conf
sudo chmod 640 /etc/odoo-server.conf
Step 13 : Now Start Odoo
sudo su - odoo -s /bin/bash
cd /odoo/odoo-server
./odoo-bin -c /etc/odoo-server.conf
0 notes
Text
How To Install Odoo 15 In Ubuntu 18.04 LTS ?

Steps To Install Odoo 15 On Ubuntu 18.04
Odoo is the most popular all-in-one business software in the world.To Install Odoo 15 on Ubuntu 18.04 you just need to follow the below steps. There are many ways to install Odoo depending on the requirements and the easy and quick way to install Odoo by using APT repositories. If you want to work with running multiple Odoo versions on the same system then you can either use docker compose or docker Install Odoo in a virtual environment. This blog is to provide steps for installation and configuration of Odoo for production environment using Git source and Python environment on an Ubuntu 18.04system. Note: Odoo 15 is not launched yet so we have used the “master” branch for Installation.
To install Odoo 15 on Ubuntu 18.04 LTS you just follow the below steps.
Step 1 : Update Server
sudo apt-get updatesudo apt-get upgrade -y
Step 2 : Create Odoo User in Ubuntu
sudo adduser -system -home=/opt/odoo -group odoo
Step 3 : Install PostgreSQL Server
sudo apt-get install postgresql -y
Step 4 : Create Odoo user for postgreSQL
sudo su - postgres -c "createuser -s odoo" 2> /dev/null || true
Step 5 : Install Python Dependencies
sudo apt-get install git python3 python3-pip build-essential wget python3-dev python3-venv python3-wheel libxslt-dev libzip-dev libldap2-dev libsasl2-dev python3-setuptools node-less libjpeg-dev gdebi -y
Step 6 : Install Python PIP Dependencies
sudo -H pip3 install -r https://raw.githubusercontent.com/odoo/odoo/master/requirements.txt
Step 7 : Install other required packages
sudo apt-get install nodejs npm –ysudo npm install -g rtlcss
Step 8 : Install Wkhtmltopdf
sudo apt-get install xfonts-75dpisudo wget https://github.com/wkhtmltopdf/packaging/releases/download/0.12.6-1/wkhtmltox_0.12.6-1.bionic_amd64.debsudo dpkg -i wkhtmltox_0.12.6-1.bionic_amd64.debsudo cp /usr/local/bin/wkhtmltoimage /usr/bin/wkhtmltoimagesudo cp /usr/local/bin/wkhtmltopdf /usr/bin/wkhtmltopdf
Step 9 : Create Log directory
sudo mkdir /var/log/odoosudo chown odoo:odoo /var/log/odoo
Step 10 :Install Odoo
sudo apt-get install gitsudo git clone --depth 1 --branch master https://www.github.com/odoo/odoo /odoo/odoo-server
Step 11 : Setting permissions on home folder
sudo chown -R odoo:odoo /odoo/*
Step 12 : Create server config file
sudo touch /etc/odoo-server.confsudo su root -c "printf '[options] \n; This is the password that allows database operations:\n' >> /etc/odoo-server.conf"sudo su root -c "printf 'admin_passwd = admin\n' >> /etc/odoo-server.conf"sudo su root -c "printf 'xmlrpc_port = 8069\n' >> /etc/odoo-server.conf"sudo su root -c "printf 'logfile = /var/log/odoo/odoo-server.log\n' >> /etc/odoo-server.conf"sudo su root -c "printf 'addons_path=/odoo/odoo-server/addons\n' >> /etc/odoo-server.conf"sudo chown odoo:odoo /etc/odoo-server.confsudo chmod 640 /etc/odoo-server.conf
Step 13 : Now Start Odoo
sudo su - odoo -s /bin/bashcd /odoo/odoo-server./odoo-bin -c /etc/odoo-server.conf
Now your odoo instance is up and running.
Go to web browser and access your odoo at localhost:8069
#odoo 15#install odoo 15 in ubuntu#installation steps#ubuntu 18 04#odoo installation guide#install odoo#steps for installation#install odoo 15
0 notes
Text
How to Deploy a Node.js App – From Server Setup to Production
In this tutorial, we are going to learn everything we need to know before deploying a Node app to a production server.
We will start by renting a server on Digital Ocean. Then we'll configure this server, connect to it, install Nginx and configure it, pull or create our Node app, and run it as a process.
As you can see, there is a lot to do and it will be an action-packed tutorial. So let's get started without wasting any time.
You should have some basic knowledge on how the Terminal works and how to work in Vi/Vim before getting started. If you are not familiar with basic commands, I would advise you to read up on them a bit.
I will run the commands in MacOS. If you want to follow this tutorial in Windows, you can use Powershell or some other Unix emulator of your choice.
Although I will use Node.js as the platform of our example application, most of the steps are the same for any web application.
Why Digital Ocean?
I choose Digital Ocean because it is cheap and the interface is really easy to use, compared to the likes of AWS. Also, a $100 credit is included in the GitHub student pack so you do not have to pay anything for a couple of months. It is ideal for deploying a course or hobby project.
It has a concept called Droplets, which is basically your share of a server. You can think of the server as an apartment in which you own or rent a flat.
Droplets work with the help of Virtual Machines which run on the server. So a Droplet is your Virtual Machine on a shared server. Since it is a VM, its CPU and memory share can be easily increased, usually by throwing more money at your provider.
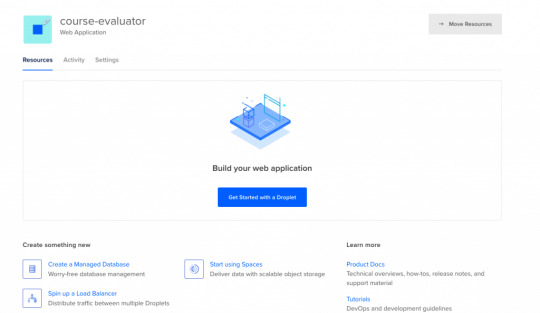
How to Create a Digital Ocean Project

I am assuming that you have already signed up and logged in to Digital Ocean before proceeding. We should first create a project that will contain our droplets. Let's click on the new project button on the left side menu. It will ask you to name your project.

Enter whatever name you want. It will also ask you if you want to move any resources, but for now just click Skip – we will create the droplet later.
How to Create a Droplet on Digital Ocean
Let's create our droplet by clicking the Get Started button.
After clicking the button, it will ask us to choose a VM image.

Choosing an Image
On this page, I will select Ubuntu 20.04 since it is the latest LTS version at the time I am writing this post. LTS means "Long Term Support". It is best to go with the LTS version for actual projects, because the provider guarantees that it will be supported and maintained for a long time. This means you will not have problems in the long run.
I have chosen Ubuntu, and would recommend it to you since it is the most commonly used Linux distribution. This means it's also the easiest to find answers to your future questions.
You can also choose to have a Dedicated CPU if you need it. If you are building your own startup or any business project, I would recommend reading this post which contains detailed instructions about how to pick the right option for you.
I will go with the cheapest option in this case.
Then you will need to select a Datacenter region. You should pick the one that is closest to you to minimize network delay.

Select a Datacenter
Next let's select SSH Keys as the Authentication Method, since it is much more secure than basic password authentication.
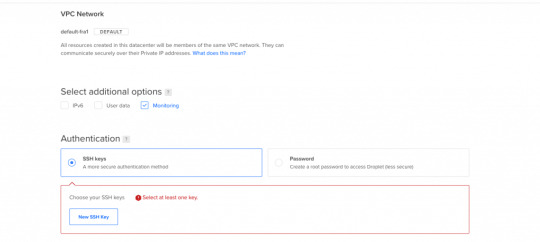
Authentication Method
To connect to the server we need to generate a new SSH key on our own device and add it to Digital Ocean.
How to Generate an SSH Key
I will generate the key on my macOS device. If you are using Windows you can refer to this article. Open your terminal and move into the ssh folder:
cd ~/.ssh
Then create your SSH key:
ssh-keygen
If your computer says that it does not know this command, you should install it via brew.

It will ask you to name the file and enter a passphrase. Do not enter a name, just press enter and go with the defaults. You should have these files generated. I have named mine digital-ocean-ssh in this screenshot, so do not get confused by that.
❯ lsid_dsa id_rsa known_hosts
Our public key is the id_dsa and the id_rsa is our private key. If you forget which one is private, you can always print one of them to see.
How to Add Your SSH Key to Digital Ocean
Now we want to copy our public key and upload it to Digital Ocean so they will know which key to use in authentication.

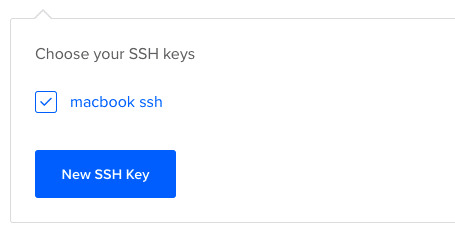
Copy this whole key including the ssh-rsa part.
Click on "New SSH Key":

Paste the key in the textbox that appears after you click the button and you should see your SSH key.
How to Connect to the Server
We will use the terminal to connect to our server with SSH. You can also take a look at Termius for a nice interface if you want.
Run this command in your terminal after replacing the IP_ADDRESS with your server's IP address (you can look it up from Digital Ocean's panel).
ssh root@IP_ADDRESS
If everything goes well, now you should be in the server's terminal. We have successfully connected to server. If there is any error, you can debug it by running the command with the "-v" option or "-vv" for even more verbosity.
How to Set Up the Server
We need to do some initial setup before deploying the Node app to the server.
Update and Upgrade Software
We want to update the server's software to make sure we are using the latest versions.
Many servers are vulnerable to attacks because they are using older versions of software with known vulnerabilities. Attackers can search for the vulnerabilities in those software and try to exploit them in order to gain access to your server.
You can update Ubuntu's software using the "apt update" command.
apt updateHit:1 https://repos.insights.digitalocean.com/apt/do-agent main InReleaseGet:2 http://mirrors.digitalocean.com/ubuntu focal InRelease [265 kB] Hit:3 http://mirrors.digitalocean.com/ubuntu focal-updates InRelease Get:4 http://security.ubuntu.com/ubuntu focal-security InRelease [109 kB]Hit:5 http://mirrors.digitalocean.com/ubuntu focal-backports InReleaseFetched 374 kB in 1s (662 kB/s) Reading package lists... DoneBuilding dependency tree Reading state information... Done96 packages can be upgraded. Run 'apt list --upgradable' to see them.
If you read the message, it says that "96 packages can be upgraded". We have installed the new software packages but we have not upgraded our software to those versions yet.
To do that, let's run another command:
apt upgrade
Type y when it prompts you and it will upgrade the software.
Create a User
We have connected to the server as the root user (the user with the highest privileges). Being the root is dangerous and can open us up to vulnerabilities.
Therefore we should create a new user and not run commands as root. Replace $username with a username of your choice.
whoamiroot
adduser $username
You need to enter a password for the user. After that point, it will ask a bunch of questions, so just input y until the prompting is over.
The new user has been created but we also need to add this new user to the "sudo" group so that we can perform any action we need.
usermod -aG sudo $USERNAME
We add group with the -aG (add group) option, and we add the group name sudo to our username.
We are still root, so let's switch our user to the newly created user, using the su (switch user) command.
su $USERNAME
After this point, if you run whoami command, you should see your username. You can confirm the existence of the sudo group by running this command:
sudo cat /var/log/auth.log
Only superusers can view this file and OS will ask for your user password after you run this command.
Copy the SSH Key
We have successfully created the user but we have not enabled SSH login for this new user yet.
Therefore, we have to copy the public key that we previously created on our local computer and paste it into this user's SSH folder so SSH can know which key should it use to authenticate our new user.
mkdir -p ~/.ssh
The -p argument creates the directory if it does not exist.
vi ~/.ssh/authorized_keys
We will use vi or vim to create a file and call it authorized_keys.
Copy your public key (`id_dsa` file) then press "i" to go into insert mode. Then just paste it into this file with CMD + V.
Press esc to quit insert mode, type :wq to save and quit.
If you have any problems about using Vim-Vi, you can check out one of the many tutorials that explain how to use it.
Connect to Server as New User
Now we should be able to connect to the server without any problems using ssh. You can use this command to connect, just remember to insert your username and IP_ADDRESS.
ssh $USERNAME@IP_ADDRESS
If you are having any problems at this point, you should just delete the droplet and start over. It does not take a lot of time to start over but debugging server problems can be difficult.
How to Disable Root Login
It is a good practice to disable Root login as a security precaution, so let's do that now.
It can be useful to change the file permission just in case so that we won't run into problems regarding permissions in the future.
chmod 644 ~/.ssh/authorized_keys
Let's now open our sshd_config file:
sudo vi /etc/ssh/sshd_config
Find this line and change the yes to no in the same way we did earlier with vi.
PermitRootLogin no
Save and quit vi.
How to Install Node.js and Git
We can now go ahead and install Node.js and Git:
sudo apt install nodejs npm
sudo apt install git
We are now ready to create a Node app and run it. You can either pull your Node project from Github or create a Node app here just to test if it works.
Move to a directory of your choice and create an "app.js" file:
sudo vi app.js
You can paste the following snippet into your app.js file:
const express = require('express');const app = express();const port = 3000;app.get('/', (req, res) => { res.send('Hello World');});app.listen(port, () => console.log(`Example app listening on port ${port}!`));
Now we can run it with the command:
node app.js
You should see "Example app listening on port 3000!" on your terminal.
We can confirm that it is working by sending a request to our server:
GET http://IP_ADDRESS:3000/
Send this request either from an HTTP client like Postman or your browser and you should see the "Hello World" message.
At this point, you should notice that something is wrong: Regular users do not know how to send requests to port 3000.
We should redirect the requests that come to our web server from our IP to port 3000. We can accomplish this with the help of Nginx.

How to Install and Configure Nginx
We will use Nginx as a Reverse Proxy to redirect the requests to our Node app.

Nginx as a Reverse Proxy
Let's install Nginx:
sudo apt install nginx
Start the Nginx service:
sudo service nginx start
We can test to see if it is working by sending a request to our server's IP address from the browser. Type your server's IP address to your browser and you should see this:

It is important to know that Nginx serves from "/var/www/html" by default and you can find this HTML file in that directory as well.
I also advise you to create a folder under "/var/www", call it app, and move your Node app to that folder so it will be easy to find.
How to Configure the Nginx Reverse Proxy
We will edit the Nginx config file to configure a reverse proxy:
sudo vi /etc/nginx/sites-available/default
In this file you need to find the location / block and change it as follows:
location / { # First attempt to serve request as file, then # as directory, then fall back to displaying a 404. proxy_pass http://127.0.0.1:3000/; }
The proxy_pass directive proxies the request to a specified port. We give the port that our Node application is running on.
Let's restart Nginx so the changes can take effect:
sudo service nginx reload
After this step, we should be able to see the message when we send a request to our server. Congratulations, we have completed the minimum number of steps to deploy a Node app!

But I still advise you to complete the following bonus step as well, as I believe it's quite important.
If you can't see the hello world message, you can check if your app and Nginx are running and restart them.
How to Run your App as a Process
We do not want to start our application manually every time something goes wrong and our app crashes. We want it to restart on its own. Also, whenever the server starts, our app should start too.
To make this happen, we can use PM2. Let's install PM2 and configure it.
sudo npm i -g pm2
We are installing pm2 globally by using the "-g" option so that it will be accessible from every folder.
pm2 start app.js
This makes sure that the app will restart if it exits due to an error.
Let's save the current process list.
pm2 save
We also need to convert it to a daemon that runs whenever the system starts:
pm2 startup systemd
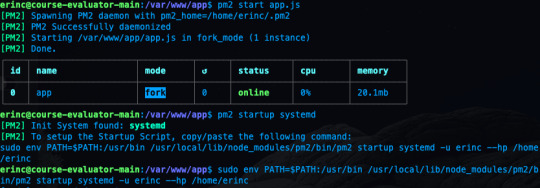
As a reminder, in this tutorial, I'm using the commands for Ubuntu. If you are using any other Linux distro, you should replace systemd in this command.
We can confirm that the service is getting restarted by rebooting the server and sending a request without running app.js by hand:
sudo reboot
After sending a request as we did earlier, you should be able to see the hello world message.
Conclusion
In this tutorial we started from scratch, rented a server for ourselves, connected to it, and configured it in a way that it serves our Node.js app from port 80.
If you have followed along and were able to complete all steps, congratulations! You can be proud of yourself, as this was not the easiest topic :). I hope that you have learned a lot. Thank you for your time.
I am planning to explore this topic further by connecting the server to a domain name, then connecting it to CircleCI for continuous integration. I'll also go through the required steps to make your Node.js/React app production ready. This post had already gotten long enough, though, so those topics are reserved for another post :)
If you have enjoyed reading and want to get informed about my future posts, you can subscribe to my personal blog. You can see my previous posts there if you are interested in reading more. I usually write about web development-related topics.
0 notes
Text
Node.js is a server-side JavaScript language based on the V8 JavaScript engine from Google. Node.js allows you to write server-side JavaScript applications. It provides an I/O model based on events and non-blocking operations that enables you to write efficient applications. Node.js is known for its large modular ecosystem through npm. This guide will take you through the steps of installing Node.js 14 on Ubuntu 22.04|20.04|18.04. Node.js 14 was released on 2020-04-21 and is expected to enter active LTS state on 2020-10-20. The maintenance window will start on 2021-10-19 and is expected to reach End-of-life on 2023-04-30. For CentOS / RHEL installation: Install Node.js 14 on CentOS & RHEL Install Node.js 14 on Ubuntu 22.04|20.04|18.04 We will use the Node.js Binary Distributions installer script to setup Node.js 14 on Ubuntu 22.04|20.04|18.04 Linux system. Step 1: Update APT index Run the apt update command on your Ubuntu Linux to update package repository contents database. sudo apt update Step 2: Install Node.js 14 on Ubuntu 22.04|20.04|18.04 After system update, install Node.js 14 on Ubuntu 22.04|20.04|18.04 by first installing the required repository. curl -sL https://deb.nodesource.com/setup_14.x | sudo bash - The script above will create apt sources list file for the NodeSource Node.js 14.x repo: # Ubuntu 20.04 example $ cat /etc/apt/sources.list.d/nodesource.list deb https://deb.nodesource.com/node_14.x focal main deb-src https://deb.nodesource.com/node_14.x focal main Once the repository is added, you can begin the installation of Node.js 14 on Ubuntu Linux: sudo apt -y install nodejs Verify the version of Node.js installed. $ node -v v14.17.5 Step 3: Install Node.js Dev Tools If you need Node Development tools, install them with the command: sudo apt -y install gcc g++ make To install the Yarn package manager, run: curl -sL https://dl.yarnpkg.com/debian/pubkey.gpg | sudo apt-key add - echo "deb https://dl.yarnpkg.com/debian/ stable main" | sudo tee /etc/apt/sources.list.d/yarn.list sudo apt update && sudo apt install yarn Checking Yarn version: $ yarn -V yarn install v1.22.5 info No lockfile found. [1/4] Resolving packages... [2/4] Fetching packages... [3/4] Linking dependencies... [4/4] Building fresh packages... success Saved lockfile. Done in 0.12s. You have covered the simple steps required to install Node.js 14 on Ubuntu 22.04|20.04|18.04. Have fun with your backend software development.
0 notes
Link

Disclaimer: I’m writing about my experience with major OS (Windows 10, macOs High/Sierra, Ubuntu/Manjaro) using a Solid State Drive. It has a huge impact in term of speed and it could be different from your own experience.
Hello there. To begin with, this post isn’t about what’s the best OS for everyday programming, it could depend on the stack used, Misc programs and specially YOU, so i’ll try to describe all the good/bad things that happened during my everyday workflows.
But before that I should let you know my programming stack so you won't get confused later. I mainly use:
PHP frameworks and CMS
nodejs frameworks for frontend
react native/ionic for mobile dev
Photoshop (with CssHat) for HTML Integration, banner for mobile apps.
ms office due to my current job.[1]
Ubuntu (Unity/Gnome):
By the end of 2015 and after a good run with Windows 7 and using Ubuntu just occasionally in virtual machines I thought I would give it a shot with a daily usage so I installed the 15.10 version. back then i was programming in PHP, Java and C# (because of my Software engineering Studies), php and apache had great performances locally, same for java but used a windows 7 VM for Visual Studio, Ms Office and Adobe Photoshop, because all the alternatives (Darkable/Gimp, Open office) weren't at the same levels. I tried but the more you use them the more you notice their weak points such as ease of use, backward compatibility.
I had a good (exactly 2 years) run switching between Unity and Gnome DE (I was the n°1 hater for KDE btw), but over time and even with SSD it felt a kinda slow (I was always stuck with 16.04 LTS) and honestly, I wasn’t fan of the Ubuntu’s PPAs either and then I discovered the Hackintosh community.
macOs (10.12/10.14)
So after a hell of an installation process I managed to run macOs Sierra smoothly on a laptop that has hardware near to macbook pro late 2012 (HP elitebook 840 G1). Apps installed with one simple drag n’ drop (applies to android studio too). It run the Android Virtual Device smoother than windows 7 and ubuntu with the same laptop, i was very surprised, the memory management, the apps integration and the overall stability was so great. At that time I finished my studies so no more Java or .Net programming, and the adobe/ms office suite was a strong point compared to Linux in general so every program ran natively without the need of any VM, with our beloved Unix cli.
The only drawback I had with mac, or with hackintosh, is the system updates/upgrades it was so painful to do it breaks your system every time, I was backing up the whole bootable system image whenever I attempted to update. Because the Kexts (Kernel extensions or “drivers”) weren’t always backward compatible.
So in the end i was thinking to go back to linux again but not sure which distribution i will stick with again, I wanted a stable distro that i forgot completely about something called upgrades of “big updates”. In the meantime I give Windows 10 another shot after hearing it got better and better in the last years.
And again, after 2 years with no workflow complaints I backed up my hackintosh installation and installed the last build of windows 10.
Windows 10.
I’ll resume my experience with one line: “not great, not terrible” Compared, again, to mac os the system was very smooth in every way, snapping windows, switching virtual desktops, programs and files search in the start menu, no problem but! I already missed the unix cli. Yeah I know there’s cmder and other tools. The overall performance was okay but there was some latency when compiling node js apps. My workflow didn’t change. I used Laragon for all my php projects with phpstorm and it was perfect honestly. On the other hand Android Emulator was terrible even with 8gb or ram and ssd, mac os was handling it way better.
In the meantime I played with some linux distros in VMs and made the choice: Manjaro, KDE flavor.
Manjaro:
“You said you hated KDE right?” well yes but for a cause, one I didn’t want to bring back the Gnome memories i had with Ubuntu and second, I disliked is because its similarity in UI compared to Windows in general, 10 specially then I found how very customizable was and again i’ll resume it with one line: “everything is a widget”. So in term of UI I made my simple comfortable setup.
Now in term of programs and workflow I still use PhpStorm for my php and nodejs projects, npm and yarn installed globally and surprisingly npm run very fast compared to windows and mac; git already installed, but for my php projects I migrate all of them to docker with docker compose, majority of projects were based on Laravel, Prestashop, Wordpress and old native php apps. I managed to dockerize some of them from scratch, some with Laradock.
Java/.Net: RIP.
For mobile development there were some struggles during configuring ionic and react native’s first run but done with them quickly, no problem with android studio but the emulator “again” wasn’t that good as mac os, but not that bad like windows. And I discovered a helpful package that cast my connected android device to my screen and it’s shown as a virtual device but a physical one, called scrcpy from the genymotion team!
And finally these are just some of the benefits why I picked manjaro:
No big breaking updates.
A rolling release distro.
Fast security patches.
The Great Arch User Repository (AUR)
Snap and Flatpak support (but why?)
Very stable.
But still there are some drawback, linux’s ones in general:
Still needing photoshop and lightroom.
Ms Office for work purpose (Managed to use Web version since we have ms365 but still miss Excel for heavy use)
Conclusion:
Finally and personally I’ll stick with linux for these main two reasons: native support for docker (future projects could be deployed with it) and the unix environment similarity to production servers (cli, ssh and packages’ configuration). I understand many of you will disagree for many things said in the post but that’s okay! because, finally, we choose what will help us to give the most of us in terms of productivity.
Thank you all for reading the most boring post ever made on Dev.to platform! I would gladly hear from you some of your thoughts and experiences as well. Thanks again! [1]
[1]: edit. added used stack and a conclusion.
0 notes
Text
Instalar Postal Mail Server en Ubuntu 18.04 / 20.04

Instalar Postal Mail Server en Ubuntu 18.04 / 20.04. Tal vez no lo conozcas, pero Postal Mail Server es un servidor de correo muy completo, que cuenta con todas las funciones necesarias para manejar las cuentas de mail tanto de sitios web como de servidores específicos para ello. Seguro que conoces Sendgrid, Mailgun o Postmark, con Postal Mail Server puedes lograr algo similar. El servidor del que hoy hablamos, nos proporciona una API HTTP que permite integrarlo con otros servicios y enviar correos electrónicos desde diferentes sitios o aplicaciones web. Destacamos su alta detección de spam y virus. Instalar y configurar Postal Mail Server es una tarea sencilla si lo comparamos con otros alternativas. El único requisito que debes cumplir es que los registros del dominio principal apunten de manera efectiva al servidor antes de comenzar su instalación.

Instalar Postal Mail Server
Instalar Postal Mail Server en Ubuntu
Comenzamos actualizando el sistema para continuar con la instalación de MariaDB. sudo apt update sudo apt dist-upgrade Instalar MariaDB sudo apt install mariadb-server libmysqlclient-dev Iniciamos y habilitamos MariaDB. sudo systemctl start mariadb.service sudo systemctl enable mariadb.service Ahora aseguramos el servidor de base de datos. sudo mysql_secure_installation Una manera efectiva de proteger MariaDB es siguiendo los pasos que te indico a continuación. Enter current password for root (enter for none): Pulsa Enter Set root password? : Y New password: Introduce el password Re-enter new password: Repite el password Remove anonymous users? : Y Disallow root login remotely? : Y Remove test database and access to it? : Y Reload privilege tables now? : Y Reiniciamos MariaDB. sudo systemctl restart mariadb.service Crear una base de datos Creamos una base de datos en blanco para Postal Mail Server, te pedira la password que insertaste en el paso anterior. sudo mysql -u root -p La nueva base de datos se llamará "postal" (como ejemplo). CREATE DATABASE postal CHARSET utf8mb4 COLLATE utf8mb4_unicode_ci; Ahora creamos el usuario "postaluser" y una nueva contraseña para el. CREATE USER 'postaluser'@'localhost' IDENTIFIED BY 'tu_password'; Le damos permisos de acceso al nuevo usuario. GRANT ALL ON postal.* TO 'postaluser'@'localhost' WITH GRANT OPTION; Solo nos falta guardar y salir de la consola de MariaDB. FLUSH PRIVILEGES; EXIT; Instalar Ruby, Erlang y RabbitMQ Los paquetes Ruby, Erlang y RabbitMQ (necesarios), no están disponibles en los repositorios oficiales de Ubuntu, los instalamos manualmente. Para instalar Ruby sigue los pasos indicados. sudo apt-get install software-properties-common sudo apt-add-repository ppa:brightbox/ruby-ng sudo apt update sudo apt install ruby2.3 ruby2.3-dev build-essential Continuamos con Erlang. wget -O- https://packages.erlang-solutions.com/ubuntu/erlang_solutions.asc | sudo apt-key add - # Cuidado con el siguiente paso, si no usas Ubuntu Bionic debes modificar por tu version echo "deb https://packages.erlang-solutions.com/ubuntu bionic contrib" | sudo tee /etc/apt/sources.list.d/erlang.list sudo apt-get update sudo apt-get install erlang Terminamos con la instalación de RabbitMQ. sudo sh -c 'echo "deb https://dl.bintray.com/rabbitmq/debian $(lsb_release -sc) main" >> /etc/apt/sources.list.d/rabbitmq.list' wget -O- https://dl.bintray.com/rabbitmq/Keys/rabbitmq-release-signing-key.asc | sudo apt-key add - wget -O- https://www.rabbitmq.com/rabbitmq-release-signing-key.asc | sudo apt-key add - sudo apt update sudo apt install rabbitmq-server Iniciamos y habilitamos RabbitMQ. sudo systemctl enable rabbitmq-server sudo systemctl start rabbitmq-server Este paso es opcional, pero si quieres administrar RabbitMQ vía web también es posible con el siguiente comando. sudo rabbitmq-plugins enable rabbitmq_management Puedes acceder desde la siguiente url: http://dominio-o-ip:15672 El usuario y password de acceso es "guest", pero ojo... solo funciona si trabajas en local. Para concluir la configuración de RabbitMQ agregamos nuestro usuario (postal) y la pass. sudo rabbitmqctl add_vhost /postal sudo rabbitmqctl add_user postal tu-password sudo rabbitmqctl set_permissions -p /postal postal ".*" ".*" ".*" Instalar Nodejs en Ubuntu Para un funcionamiento perfecto del servidor de correo, es recomendable instalar Nodejs. sudo apt install curl curl -sL https://deb.nodesource.com/setup_10.x | sudo bash sudo apt-get install nodejs Instalar Postal Mail Server Por fin llegamos a los pasos finales, solo nos falta instalar y configurar el servidor Postal Mail Server. Creamos la cuenta del servicio y damos permiso a Ruby para que pueda escuchar. sudo useradd -r -m -d /opt/postal -s /bin/bash postal sudo setcap 'cap_net_bind_service=+ep' /usr/bin/ruby2.3 Necesitamos unos paquetes adicionales. sudo gem install bundler sudo gem install procodile sudo gem install nokogiri -v '1.7.2' Creamos el directorio principal de Postal Mail Server, descargamos la última versión, la extraemos y le damos acceso a nuestro usuario. sudo mkdir -p /opt/postal/app sudo wget https://postal.atech.media/packages/stable/latest.tgz sudo tar xvf latest.tgz -C /opt/postal/app sudo chown -R postal:postal /opt/postal sudo ln -s /opt/postal/app/bin/postal /usr/bin/postal Iniciamos los archivos de configuración. sudo postal bundle /opt/postal/vendor/bundle sudo postal initialize-config Vamos a editar el archivo de configuración con nuestros datos reales. sudo nano /opt/postal/config/postal.yml Asegurate de que los datos sean validos y que el dominio apunte al servidor o vps. web: # The host that the management interface will be available on host: postal.midominio.com # The protocol that requests to the management interface should happen on protocol: https fast_server: # This can be enabled to enable click & open tracking on emails. It is disabled by # default as it requires a separate static IP address on your server. enabled: false bind_address: general: # This can be changed to allow messages to be sent from multiple IP addresses use_ip_pools: false main_db: # Specify the connection details for your MySQL database host: 127.0.0.1 username: postaluser password: password base de datos database: postal message_db: # Specify the connection details for your MySQL server that will be house the # message databases for mail servers. host: 127.0.0.1 username: postaluser password: password base de datos prefix: postal rabbitmq: # Specify the connection details for your RabbitMQ server. host: 127.0.0.1 username: postal password: password de rabbitmq vhost: /postal dns: Guarda el archivo y cierra el editor. Ahora inicializamos el servicio y creamos una cuenta de usuario. sudo postal initialize sudo postal make-user Arrancamos postal y verificamos el status del servicio. sudo -u postal postal start sudo -u postal postal status ejemplo de salida... Procodile Version 1.0.26 Application Root /opt/postal/app Supervisor PID 18589 Started 2020-04-13 18:25:07 -0500 || web || Quantity 1 || Command bundle exec puma -C config/puma.rb || Respawning 5 every 3600 seconds || Restart mode usr1 || Log path none specified || Address/Port none || => web.1 Running 18:25 pid:18589 respawns:0 port:- tag:- Ya tenemos listo nuestro servidor Postal Mail Server, si quieres manejarlo a través de su portal gráfico necesitamos un servidor. Nosotros instalamos Nginx que es rápido y ligero. Instalar Nginx La instalación de Nginx es fácil, tan solo debes seguir los pasos indicados. sudo apt install nginx sudo cp /opt/postal/app/resource/nginx.cfg /etc/nginx/sites-available/default Creamos un certificado SSL autofirmado. sudo mkdir /etc/nginx/ssl/ sudo openssl req -x509 -newkey rsa:4096 -keyout /etc/nginx/ssl/postal.key -out /etc/nginx/ssl/postal.cert -days 365 -nodes Introduce tus datos válidos. Generating a RSA private key ……………………………++++ …………++++ writing new private key to '/etc/nginx/ssl/postal.key' You are about to be asked to enter information that will be incorporated into your certificate request. What you are about to enter is what is called a Distinguished Name or a DN. There are quite a few fields but you can leave some blank For some fields there will be a default value, If you enter '.', the field will be left blank. Country Name (2 letter code) :ES State or Province Name (full name) :HU Locality Name (eg, city) :Monzon Organization Name (eg, company) : Organizational Unit Name (eg, section) : Common Name (e.g. server FQDN or YOUR name) :postal.midominio.com Email Address : Bien... para concluir editas el archivo de configuración de Nginx e insertas tu dominio. sudo nano /etc/nginx/sites-available/default ejemplo... server { listen :80; listen 0.0.0.0:80; server_name postal.midominio.com; return 301 https://$host$request_uri; } Reiniciamos el servidor Nginx. sudo systemctl reload nginx Accedemos a Postal Mail Server Acceder al panel del servidor es tan simple como introducir el dominio que configuramos anteriormente. https://midominio.com https://panel.midominio.com

Login Postal Media Server Canales de Telegram: Canal SoloLinux – Canal SoloWordpress Espero que este articulo te sea de utilidad, puedes ayudarnos a mantener el servidor con una donación (paypal), o también colaborar con el simple gesto de compartir nuestros artículos en tu sitio web, blog, foro o redes sociales. Read the full article
#administrarRabbitMQ#APIHTTP#deteccióndespam#Erlang#InstalarNodejs#InstalarPostalMailServer#Mailgun#PostalMailServer#Postmark#RabbitMQ#ruby#Sendgrid#servidordecorreo#servidorPostalMailServer
0 notes