#upgrade nodejs version ubuntu
Explore tagged Tumblr posts
Visit Tumblr Blog
Explore Tumblr blogs with no restrictions, modern design and the best experience.
Last Seen Tumblr Blogs


Fun Fact
US Tumblr user growth rate is estimated to slow down to 4.1%.
Text
#How to Upgrade Node JS to a Specific Version in Ubuntu#update node version in ubuntu#upgrade node js in ubuntu#node update ubuntu#upgrading node version ubuntu#upgrade node ubuntu#ubuntu update node#node ubuntu update#ubuntu update node to 18#upgrade node js ubuntu#how to update node js ubuntu#ubuntu upgrade node#upgrade node version linux#ubuntu nodejs update#ubuntu upgrade node to 16#ubuntu update nodejs version#update node version ubuntu#upgrade nodejs on ubuntu#upgrade nodejs version ubuntu#linux upgrade nodejs#ubuntu upgrade nodejs#upgrade nodejs ubuntu#upgrade node js ubuntu 20.04
0 notes
Text
How To Install Odoo 15 In Ubuntu 18.04 ? | Steps To Install Odoo 15
How To Install Odoo 15 In Ubuntu 18.04 LTS ?
Technical
Steps To Install Odoo 15 On Ubuntu 18.04
Odoo is the most popular all-in-one business software in the world.To Install Odoo 15 on Ubuntu 18.04 you just need to follow the below steps. There are many ways to install Odoo depending on the requirements and the easy and quick way to install Odoo by using APT repositories. If you want to work with running multiple Odoo versions on the same system then you can either use docker compose or docker Install Odoo in a virtual environment. This blog is to provide steps for installation and configuration of Odoo for production environment using Git source and Python environment on an Ubuntu 18.04 system. Note : Odoo 15 is not launched yet so we have used the “master” branch for Installation.
To install Odoo 15 on Ubuntu 18.04 LTS you just follow the below steps.
Step 1 : Update Server
sudo apt-get update
sudo apt-get upgrade -y
Step 2 : Create Odoo User in Ubuntu
sudo adduser -system -home=/opt/odoo -group odoo
Step 3 : Install PostgreSQL Server
sudo apt-get install postgresql -y
Step 4 : Create Odoo user for postgreSQL
sudo su - postgres -c "createuser -s odoo" 2> /dev/null || true
Step 5 : Install Python Dependencies
sudo apt-get install git python3 python3-pip build-essential wget python3-dev python3-venv python3-wheel libxslt-dev libzip-dev libldap2-dev libsasl2-dev python3-setuptools node-less libjpeg-dev gdebi -y
Step 6 : Install Python PIP Dependencies
sudo -H pip3 install -r https://raw.githubusercontent.com/odoo/odoo/master/requirements.txt
Step 7 : Install other required packages
sudo apt-get install nodejs npm -y
sudo npm install -g rtlcss
Step 8 : Install Wkhtmltopdf
sudo apt-get install xfonts-75dpi
sudo wget https://github.com/wkhtmltopdf/packaging/releases/download/0.12.6-1/wkhtmltox_0.12.6-1.bionic_amd64.deb
sudo dpkg -i wkhtmltox_0.12.6-1.bionic_amd64.deb
sudo cp /usr/local/bin/wkhtmltoimage /usr/bin/wkhtmltoimage
sudo cp /usr/local/bin/wkhtmltopdf /usr/bin/wkhtmltopdf
Step 9 : Create Log directory
sudo mkdir /var/log/odoo
sudo chown odoo:odoo /var/log/odoo
Step 10 :Install Odoo
sudo apt-get install git
sudo git clone --depth 1 --branch master https://www.github.com/odoo/odoo /odoo/odoo-server
Step 11 : Setting permissions on home folder
sudo chown -R odoo:odoo /odoo/*
Step 12 : Create server config file
sudo touch /etc/odoo-server.conf
sudo su root -c "printf '[options] \n; This is the password that allows database operations:\n' >> /etc/odoo-server.conf"
sudo su root -c "printf 'admin_passwd = admin\n' >> /etc/odoo-server.conf"
sudo su root -c "printf 'xmlrpc_port = 8069\n' >> /etc/odoo-server.conf"
sudo su root -c "printf 'logfile = /var/log/odoo/odoo-server.log\n' >> /etc/odoo-server.conf"
sudo su root -c "printf 'addons_path=/odoo/odoo-server/addons\n' >> /etc/odoo-server.conf"
sudo chown odoo:odoo /etc/odoo-server.conf
sudo chmod 640 /etc/odoo-server.conf
Step 13 : Now Start Odoo
sudo su - odoo -s /bin/bash
cd /odoo/odoo-server
./odoo-bin -c /etc/odoo-server.conf
0 notes
Text
How To Install Odoo 15 In Ubuntu 18.04 LTS ?

Steps To Install Odoo 15 On Ubuntu 18.04
Odoo is the most popular all-in-one business software in the world.To Install Odoo 15 on Ubuntu 18.04 you just need to follow the below steps. There are many ways to install Odoo depending on the requirements and the easy and quick way to install Odoo by using APT repositories. If you want to work with running multiple Odoo versions on the same system then you can either use docker compose or docker Install Odoo in a virtual environment. This blog is to provide steps for installation and configuration of Odoo for production environment using Git source and Python environment on an Ubuntu 18.04system. Note: Odoo 15 is not launched yet so we have used the “master” branch for Installation.
To install Odoo 15 on Ubuntu 18.04 LTS you just follow the below steps.
Step 1 : Update Server
sudo apt-get updatesudo apt-get upgrade -y
Step 2 : Create Odoo User in Ubuntu
sudo adduser -system -home=/opt/odoo -group odoo
Step 3 : Install PostgreSQL Server
sudo apt-get install postgresql -y
Step 4 : Create Odoo user for postgreSQL
sudo su - postgres -c "createuser -s odoo" 2> /dev/null || true
Step 5 : Install Python Dependencies
sudo apt-get install git python3 python3-pip build-essential wget python3-dev python3-venv python3-wheel libxslt-dev libzip-dev libldap2-dev libsasl2-dev python3-setuptools node-less libjpeg-dev gdebi -y
Step 6 : Install Python PIP Dependencies
sudo -H pip3 install -r https://raw.githubusercontent.com/odoo/odoo/master/requirements.txt
Step 7 : Install other required packages
sudo apt-get install nodejs npm –ysudo npm install -g rtlcss
Step 8 : Install Wkhtmltopdf
sudo apt-get install xfonts-75dpisudo wget https://github.com/wkhtmltopdf/packaging/releases/download/0.12.6-1/wkhtmltox_0.12.6-1.bionic_amd64.debsudo dpkg -i wkhtmltox_0.12.6-1.bionic_amd64.debsudo cp /usr/local/bin/wkhtmltoimage /usr/bin/wkhtmltoimagesudo cp /usr/local/bin/wkhtmltopdf /usr/bin/wkhtmltopdf
Step 9 : Create Log directory
sudo mkdir /var/log/odoosudo chown odoo:odoo /var/log/odoo
Step 10 :Install Odoo
sudo apt-get install gitsudo git clone --depth 1 --branch master https://www.github.com/odoo/odoo /odoo/odoo-server
Step 11 : Setting permissions on home folder
sudo chown -R odoo:odoo /odoo/*
Step 12 : Create server config file
sudo touch /etc/odoo-server.confsudo su root -c "printf '[options] \n; This is the password that allows database operations:\n' >> /etc/odoo-server.conf"sudo su root -c "printf 'admin_passwd = admin\n' >> /etc/odoo-server.conf"sudo su root -c "printf 'xmlrpc_port = 8069\n' >> /etc/odoo-server.conf"sudo su root -c "printf 'logfile = /var/log/odoo/odoo-server.log\n' >> /etc/odoo-server.conf"sudo su root -c "printf 'addons_path=/odoo/odoo-server/addons\n' >> /etc/odoo-server.conf"sudo chown odoo:odoo /etc/odoo-server.confsudo chmod 640 /etc/odoo-server.conf
Step 13 : Now Start Odoo
sudo su - odoo -s /bin/bashcd /odoo/odoo-server./odoo-bin -c /etc/odoo-server.conf
Now your odoo instance is up and running.
Go to web browser and access your odoo at localhost:8069
#odoo 15#install odoo 15 in ubuntu#installation steps#ubuntu 18 04#odoo installation guide#install odoo#steps for installation#install odoo 15
0 notes
Text
How to Deploy a Node.js App – From Server Setup to Production
In this tutorial, we are going to learn everything we need to know before deploying a Node app to a production server.
We will start by renting a server on Digital Ocean. Then we'll configure this server, connect to it, install Nginx and configure it, pull or create our Node app, and run it as a process.
As you can see, there is a lot to do and it will be an action-packed tutorial. So let's get started without wasting any time.
You should have some basic knowledge on how the Terminal works and how to work in Vi/Vim before getting started. If you are not familiar with basic commands, I would advise you to read up on them a bit.
I will run the commands in MacOS. If you want to follow this tutorial in Windows, you can use Powershell or some other Unix emulator of your choice.
Although I will use Node.js as the platform of our example application, most of the steps are the same for any web application.
Why Digital Ocean?
I choose Digital Ocean because it is cheap and the interface is really easy to use, compared to the likes of AWS. Also, a $100 credit is included in the GitHub student pack so you do not have to pay anything for a couple of months. It is ideal for deploying a course or hobby project.
It has a concept called Droplets, which is basically your share of a server. You can think of the server as an apartment in which you own or rent a flat.
Droplets work with the help of Virtual Machines which run on the server. So a Droplet is your Virtual Machine on a shared server. Since it is a VM, its CPU and memory share can be easily increased, usually by throwing more money at your provider.
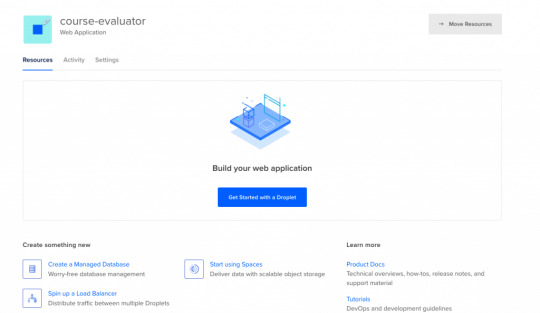
How to Create a Digital Ocean Project

I am assuming that you have already signed up and logged in to Digital Ocean before proceeding. We should first create a project that will contain our droplets. Let's click on the new project button on the left side menu. It will ask you to name your project.

Enter whatever name you want. It will also ask you if you want to move any resources, but for now just click Skip – we will create the droplet later.
How to Create a Droplet on Digital Ocean
Let's create our droplet by clicking the Get Started button.
After clicking the button, it will ask us to choose a VM image.

Choosing an Image
On this page, I will select Ubuntu 20.04 since it is the latest LTS version at the time I am writing this post. LTS means "Long Term Support". It is best to go with the LTS version for actual projects, because the provider guarantees that it will be supported and maintained for a long time. This means you will not have problems in the long run.
I have chosen Ubuntu, and would recommend it to you since it is the most commonly used Linux distribution. This means it's also the easiest to find answers to your future questions.
You can also choose to have a Dedicated CPU if you need it. If you are building your own startup or any business project, I would recommend reading this post which contains detailed instructions about how to pick the right option for you.
I will go with the cheapest option in this case.
Then you will need to select a Datacenter region. You should pick the one that is closest to you to minimize network delay.

Select a Datacenter
Next let's select SSH Keys as the Authentication Method, since it is much more secure than basic password authentication.
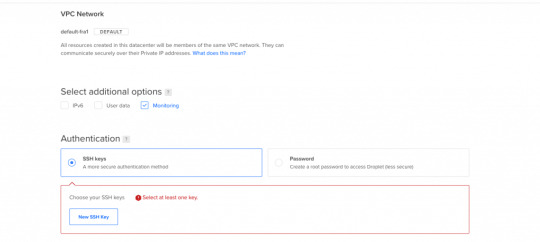
Authentication Method
To connect to the server we need to generate a new SSH key on our own device and add it to Digital Ocean.
How to Generate an SSH Key
I will generate the key on my macOS device. If you are using Windows you can refer to this article. Open your terminal and move into the ssh folder:
cd ~/.ssh
Then create your SSH key:
ssh-keygen
If your computer says that it does not know this command, you should install it via brew.

It will ask you to name the file and enter a passphrase. Do not enter a name, just press enter and go with the defaults. You should have these files generated. I have named mine digital-ocean-ssh in this screenshot, so do not get confused by that.
❯ lsid_dsa id_rsa known_hosts
Our public key is the id_dsa and the id_rsa is our private key. If you forget which one is private, you can always print one of them to see.
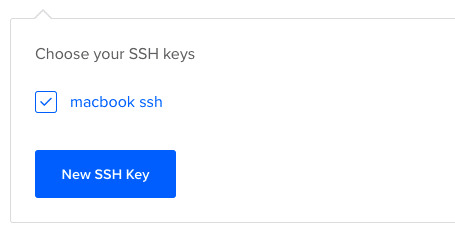
How to Add Your SSH Key to Digital Ocean
Now we want to copy our public key and upload it to Digital Ocean so they will know which key to use in authentication.

Copy this whole key including the ssh-rsa part.
Click on "New SSH Key":

Paste the key in the textbox that appears after you click the button and you should see your SSH key.
How to Connect to the Server
We will use the terminal to connect to our server with SSH. You can also take a look at Termius for a nice interface if you want.
Run this command in your terminal after replacing the IP_ADDRESS with your server's IP address (you can look it up from Digital Ocean's panel).
ssh root@IP_ADDRESS
If everything goes well, now you should be in the server's terminal. We have successfully connected to server. If there is any error, you can debug it by running the command with the "-v" option or "-vv" for even more verbosity.
How to Set Up the Server
We need to do some initial setup before deploying the Node app to the server.
Update and Upgrade Software
We want to update the server's software to make sure we are using the latest versions.
Many servers are vulnerable to attacks because they are using older versions of software with known vulnerabilities. Attackers can search for the vulnerabilities in those software and try to exploit them in order to gain access to your server.
You can update Ubuntu's software using the "apt update" command.
apt updateHit:1 https://repos.insights.digitalocean.com/apt/do-agent main InReleaseGet:2 http://mirrors.digitalocean.com/ubuntu focal InRelease [265 kB] Hit:3 http://mirrors.digitalocean.com/ubuntu focal-updates InRelease Get:4 http://security.ubuntu.com/ubuntu focal-security InRelease [109 kB]Hit:5 http://mirrors.digitalocean.com/ubuntu focal-backports InReleaseFetched 374 kB in 1s (662 kB/s) Reading package lists... DoneBuilding dependency tree Reading state information... Done96 packages can be upgraded. Run 'apt list --upgradable' to see them.
If you read the message, it says that "96 packages can be upgraded". We have installed the new software packages but we have not upgraded our software to those versions yet.
To do that, let's run another command:
apt upgrade
Type y when it prompts you and it will upgrade the software.
Create a User
We have connected to the server as the root user (the user with the highest privileges). Being the root is dangerous and can open us up to vulnerabilities.
Therefore we should create a new user and not run commands as root. Replace $username with a username of your choice.
whoamiroot
adduser $username
You need to enter a password for the user. After that point, it will ask a bunch of questions, so just input y until the prompting is over.
The new user has been created but we also need to add this new user to the "sudo" group so that we can perform any action we need.
usermod -aG sudo $USERNAME
We add group with the -aG (add group) option, and we add the group name sudo to our username.
We are still root, so let's switch our user to the newly created user, using the su (switch user) command.
su $USERNAME
After this point, if you run whoami command, you should see your username. You can confirm the existence of the sudo group by running this command:
sudo cat /var/log/auth.log
Only superusers can view this file and OS will ask for your user password after you run this command.
Copy the SSH Key
We have successfully created the user but we have not enabled SSH login for this new user yet.
Therefore, we have to copy the public key that we previously created on our local computer and paste it into this user's SSH folder so SSH can know which key should it use to authenticate our new user.
mkdir -p ~/.ssh
The -p argument creates the directory if it does not exist.
vi ~/.ssh/authorized_keys
We will use vi or vim to create a file and call it authorized_keys.
Copy your public key (`id_dsa` file) then press "i" to go into insert mode. Then just paste it into this file with CMD + V.
Press esc to quit insert mode, type :wq to save and quit.
If you have any problems about using Vim-Vi, you can check out one of the many tutorials that explain how to use it.
Connect to Server as New User
Now we should be able to connect to the server without any problems using ssh. You can use this command to connect, just remember to insert your username and IP_ADDRESS.
ssh $USERNAME@IP_ADDRESS
If you are having any problems at this point, you should just delete the droplet and start over. It does not take a lot of time to start over but debugging server problems can be difficult.
How to Disable Root Login
It is a good practice to disable Root login as a security precaution, so let's do that now.
It can be useful to change the file permission just in case so that we won't run into problems regarding permissions in the future.
chmod 644 ~/.ssh/authorized_keys
Let's now open our sshd_config file:
sudo vi /etc/ssh/sshd_config
Find this line and change the yes to no in the same way we did earlier with vi.
PermitRootLogin no
Save and quit vi.
How to Install Node.js and Git
We can now go ahead and install Node.js and Git:
sudo apt install nodejs npm
sudo apt install git
We are now ready to create a Node app and run it. You can either pull your Node project from Github or create a Node app here just to test if it works.
Move to a directory of your choice and create an "app.js" file:
sudo vi app.js
You can paste the following snippet into your app.js file:
const express = require('express');const app = express();const port = 3000;app.get('/', (req, res) => { res.send('Hello World');});app.listen(port, () => console.log(`Example app listening on port ${port}!`));
Now we can run it with the command:
node app.js
You should see "Example app listening on port 3000!" on your terminal.
We can confirm that it is working by sending a request to our server:
GET http://IP_ADDRESS:3000/
Send this request either from an HTTP client like Postman or your browser and you should see the "Hello World" message.
At this point, you should notice that something is wrong: Regular users do not know how to send requests to port 3000.
We should redirect the requests that come to our web server from our IP to port 3000. We can accomplish this with the help of Nginx.

How to Install and Configure Nginx
We will use Nginx as a Reverse Proxy to redirect the requests to our Node app.

Nginx as a Reverse Proxy
Let's install Nginx:
sudo apt install nginx
Start the Nginx service:
sudo service nginx start
We can test to see if it is working by sending a request to our server's IP address from the browser. Type your server's IP address to your browser and you should see this:

It is important to know that Nginx serves from "/var/www/html" by default and you can find this HTML file in that directory as well.
I also advise you to create a folder under "/var/www", call it app, and move your Node app to that folder so it will be easy to find.
How to Configure the Nginx Reverse Proxy
We will edit the Nginx config file to configure a reverse proxy:
sudo vi /etc/nginx/sites-available/default
In this file you need to find the location / block and change it as follows:
location / { # First attempt to serve request as file, then # as directory, then fall back to displaying a 404. proxy_pass http://127.0.0.1:3000/; }
The proxy_pass directive proxies the request to a specified port. We give the port that our Node application is running on.
Let's restart Nginx so the changes can take effect:
sudo service nginx reload
After this step, we should be able to see the message when we send a request to our server. Congratulations, we have completed the minimum number of steps to deploy a Node app!

But I still advise you to complete the following bonus step as well, as I believe it's quite important.
If you can't see the hello world message, you can check if your app and Nginx are running and restart them.
How to Run your App as a Process
We do not want to start our application manually every time something goes wrong and our app crashes. We want it to restart on its own. Also, whenever the server starts, our app should start too.
To make this happen, we can use PM2. Let's install PM2 and configure it.
sudo npm i -g pm2
We are installing pm2 globally by using the "-g" option so that it will be accessible from every folder.
pm2 start app.js
This makes sure that the app will restart if it exits due to an error.
Let's save the current process list.
pm2 save
We also need to convert it to a daemon that runs whenever the system starts:
pm2 startup systemd
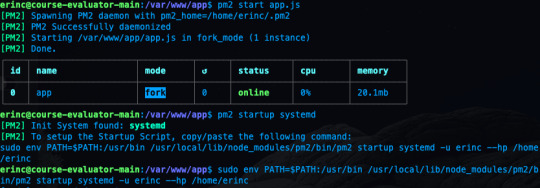
As a reminder, in this tutorial, I'm using the commands for Ubuntu. If you are using any other Linux distro, you should replace systemd in this command.
We can confirm that the service is getting restarted by rebooting the server and sending a request without running app.js by hand:
sudo reboot
After sending a request as we did earlier, you should be able to see the hello world message.
Conclusion
In this tutorial we started from scratch, rented a server for ourselves, connected to it, and configured it in a way that it serves our Node.js app from port 80.
If you have followed along and were able to complete all steps, congratulations! You can be proud of yourself, as this was not the easiest topic :). I hope that you have learned a lot. Thank you for your time.
I am planning to explore this topic further by connecting the server to a domain name, then connecting it to CircleCI for continuous integration. I'll also go through the required steps to make your Node.js/React app production ready. This post had already gotten long enough, though, so those topics are reserved for another post :)
If you have enjoyed reading and want to get informed about my future posts, you can subscribe to my personal blog. You can see my previous posts there if you are interested in reading more. I usually write about web development-related topics.
0 notes
Link
we’ll cover all methods of how to upgrade NodeJs to Latest version in Linux Os, Ubuntu Os, Windows 7, 8, 10, and Mac Osx using NPM (Node Package Manager) and NVM (Node Version Manager).
0 notes
Link

Disclaimer: I’m writing about my experience with major OS (Windows 10, macOs High/Sierra, Ubuntu/Manjaro) using a Solid State Drive. It has a huge impact in term of speed and it could be different from your own experience.
Hello there. To begin with, this post isn’t about what’s the best OS for everyday programming, it could depend on the stack used, Misc programs and specially YOU, so i’ll try to describe all the good/bad things that happened during my everyday workflows.
But before that I should let you know my programming stack so you won't get confused later. I mainly use:
PHP frameworks and CMS
nodejs frameworks for frontend
react native/ionic for mobile dev
Photoshop (with CssHat) for HTML Integration, banner for mobile apps.
ms office due to my current job.[1]
Ubuntu (Unity/Gnome):
By the end of 2015 and after a good run with Windows 7 and using Ubuntu just occasionally in virtual machines I thought I would give it a shot with a daily usage so I installed the 15.10 version. back then i was programming in PHP, Java and C# (because of my Software engineering Studies), php and apache had great performances locally, same for java but used a windows 7 VM for Visual Studio, Ms Office and Adobe Photoshop, because all the alternatives (Darkable/Gimp, Open office) weren't at the same levels. I tried but the more you use them the more you notice their weak points such as ease of use, backward compatibility.
I had a good (exactly 2 years) run switching between Unity and Gnome DE (I was the n°1 hater for KDE btw), but over time and even with SSD it felt a kinda slow (I was always stuck with 16.04 LTS) and honestly, I wasn’t fan of the Ubuntu’s PPAs either and then I discovered the Hackintosh community.
macOs (10.12/10.14)
So after a hell of an installation process I managed to run macOs Sierra smoothly on a laptop that has hardware near to macbook pro late 2012 (HP elitebook 840 G1). Apps installed with one simple drag n’ drop (applies to android studio too). It run the Android Virtual Device smoother than windows 7 and ubuntu with the same laptop, i was very surprised, the memory management, the apps integration and the overall stability was so great. At that time I finished my studies so no more Java or .Net programming, and the adobe/ms office suite was a strong point compared to Linux in general so every program ran natively without the need of any VM, with our beloved Unix cli.
The only drawback I had with mac, or with hackintosh, is the system updates/upgrades it was so painful to do it breaks your system every time, I was backing up the whole bootable system image whenever I attempted to update. Because the Kexts (Kernel extensions or “drivers”) weren’t always backward compatible.
So in the end i was thinking to go back to linux again but not sure which distribution i will stick with again, I wanted a stable distro that i forgot completely about something called upgrades of “big updates”. In the meantime I give Windows 10 another shot after hearing it got better and better in the last years.
And again, after 2 years with no workflow complaints I backed up my hackintosh installation and installed the last build of windows 10.
Windows 10.
I’ll resume my experience with one line: “not great, not terrible” Compared, again, to mac os the system was very smooth in every way, snapping windows, switching virtual desktops, programs and files search in the start menu, no problem but! I already missed the unix cli. Yeah I know there’s cmder and other tools. The overall performance was okay but there was some latency when compiling node js apps. My workflow didn’t change. I used Laragon for all my php projects with phpstorm and it was perfect honestly. On the other hand Android Emulator was terrible even with 8gb or ram and ssd, mac os was handling it way better.
In the meantime I played with some linux distros in VMs and made the choice: Manjaro, KDE flavor.
Manjaro:
“You said you hated KDE right?” well yes but for a cause, one I didn’t want to bring back the Gnome memories i had with Ubuntu and second, I disliked is because its similarity in UI compared to Windows in general, 10 specially then I found how very customizable was and again i’ll resume it with one line: “everything is a widget”. So in term of UI I made my simple comfortable setup.
Now in term of programs and workflow I still use PhpStorm for my php and nodejs projects, npm and yarn installed globally and surprisingly npm run very fast compared to windows and mac; git already installed, but for my php projects I migrate all of them to docker with docker compose, majority of projects were based on Laravel, Prestashop, Wordpress and old native php apps. I managed to dockerize some of them from scratch, some with Laradock.
Java/.Net: RIP.
For mobile development there were some struggles during configuring ionic and react native’s first run but done with them quickly, no problem with android studio but the emulator “again” wasn’t that good as mac os, but not that bad like windows. And I discovered a helpful package that cast my connected android device to my screen and it’s shown as a virtual device but a physical one, called scrcpy from the genymotion team!
And finally these are just some of the benefits why I picked manjaro:
No big breaking updates.
A rolling release distro.
Fast security patches.
The Great Arch User Repository (AUR)
Snap and Flatpak support (but why?)
Very stable.
But still there are some drawback, linux’s ones in general:
Still needing photoshop and lightroom.
Ms Office for work purpose (Managed to use Web version since we have ms365 but still miss Excel for heavy use)
Conclusion:
Finally and personally I’ll stick with linux for these main two reasons: native support for docker (future projects could be deployed with it) and the unix environment similarity to production servers (cli, ssh and packages’ configuration). I understand many of you will disagree for many things said in the post but that’s okay! because, finally, we choose what will help us to give the most of us in terms of productivity.
Thank you all for reading the most boring post ever made on Dev.to platform! I would gladly hear from you some of your thoughts and experiences as well. Thanks again! [1]
[1]: edit. added used stack and a conclusion.
0 notes
Text
Instalar Postal Mail Server en Ubuntu 18.04 / 20.04

Instalar Postal Mail Server en Ubuntu 18.04 / 20.04. Tal vez no lo conozcas, pero Postal Mail Server es un servidor de correo muy completo, que cuenta con todas las funciones necesarias para manejar las cuentas de mail tanto de sitios web como de servidores específicos para ello. Seguro que conoces Sendgrid, Mailgun o Postmark, con Postal Mail Server puedes lograr algo similar. El servidor del que hoy hablamos, nos proporciona una API HTTP que permite integrarlo con otros servicios y enviar correos electrónicos desde diferentes sitios o aplicaciones web. Destacamos su alta detección de spam y virus. Instalar y configurar Postal Mail Server es una tarea sencilla si lo comparamos con otros alternativas. El único requisito que debes cumplir es que los registros del dominio principal apunten de manera efectiva al servidor antes de comenzar su instalación.

Instalar Postal Mail Server
Instalar Postal Mail Server en Ubuntu
Comenzamos actualizando el sistema para continuar con la instalación de MariaDB. sudo apt update sudo apt dist-upgrade Instalar MariaDB sudo apt install mariadb-server libmysqlclient-dev Iniciamos y habilitamos MariaDB. sudo systemctl start mariadb.service sudo systemctl enable mariadb.service Ahora aseguramos el servidor de base de datos. sudo mysql_secure_installation Una manera efectiva de proteger MariaDB es siguiendo los pasos que te indico a continuación. Enter current password for root (enter for none): Pulsa Enter Set root password? : Y New password: Introduce el password Re-enter new password: Repite el password Remove anonymous users? : Y Disallow root login remotely? : Y Remove test database and access to it? : Y Reload privilege tables now? : Y Reiniciamos MariaDB. sudo systemctl restart mariadb.service Crear una base de datos Creamos una base de datos en blanco para Postal Mail Server, te pedira la password que insertaste en el paso anterior. sudo mysql -u root -p La nueva base de datos se llamará "postal" (como ejemplo). CREATE DATABASE postal CHARSET utf8mb4 COLLATE utf8mb4_unicode_ci; Ahora creamos el usuario "postaluser" y una nueva contraseña para el. CREATE USER 'postaluser'@'localhost' IDENTIFIED BY 'tu_password'; Le damos permisos de acceso al nuevo usuario. GRANT ALL ON postal.* TO 'postaluser'@'localhost' WITH GRANT OPTION; Solo nos falta guardar y salir de la consola de MariaDB. FLUSH PRIVILEGES; EXIT; Instalar Ruby, Erlang y RabbitMQ Los paquetes Ruby, Erlang y RabbitMQ (necesarios), no están disponibles en los repositorios oficiales de Ubuntu, los instalamos manualmente. Para instalar Ruby sigue los pasos indicados. sudo apt-get install software-properties-common sudo apt-add-repository ppa:brightbox/ruby-ng sudo apt update sudo apt install ruby2.3 ruby2.3-dev build-essential Continuamos con Erlang. wget -O- https://packages.erlang-solutions.com/ubuntu/erlang_solutions.asc | sudo apt-key add - # Cuidado con el siguiente paso, si no usas Ubuntu Bionic debes modificar por tu version echo "deb https://packages.erlang-solutions.com/ubuntu bionic contrib" | sudo tee /etc/apt/sources.list.d/erlang.list sudo apt-get update sudo apt-get install erlang Terminamos con la instalación de RabbitMQ. sudo sh -c 'echo "deb https://dl.bintray.com/rabbitmq/debian $(lsb_release -sc) main" >> /etc/apt/sources.list.d/rabbitmq.list' wget -O- https://dl.bintray.com/rabbitmq/Keys/rabbitmq-release-signing-key.asc | sudo apt-key add - wget -O- https://www.rabbitmq.com/rabbitmq-release-signing-key.asc | sudo apt-key add - sudo apt update sudo apt install rabbitmq-server Iniciamos y habilitamos RabbitMQ. sudo systemctl enable rabbitmq-server sudo systemctl start rabbitmq-server Este paso es opcional, pero si quieres administrar RabbitMQ vía web también es posible con el siguiente comando. sudo rabbitmq-plugins enable rabbitmq_management Puedes acceder desde la siguiente url: http://dominio-o-ip:15672 El usuario y password de acceso es "guest", pero ojo... solo funciona si trabajas en local. Para concluir la configuración de RabbitMQ agregamos nuestro usuario (postal) y la pass. sudo rabbitmqctl add_vhost /postal sudo rabbitmqctl add_user postal tu-password sudo rabbitmqctl set_permissions -p /postal postal ".*" ".*" ".*" Instalar Nodejs en Ubuntu Para un funcionamiento perfecto del servidor de correo, es recomendable instalar Nodejs. sudo apt install curl curl -sL https://deb.nodesource.com/setup_10.x | sudo bash sudo apt-get install nodejs Instalar Postal Mail Server Por fin llegamos a los pasos finales, solo nos falta instalar y configurar el servidor Postal Mail Server. Creamos la cuenta del servicio y damos permiso a Ruby para que pueda escuchar. sudo useradd -r -m -d /opt/postal -s /bin/bash postal sudo setcap 'cap_net_bind_service=+ep' /usr/bin/ruby2.3 Necesitamos unos paquetes adicionales. sudo gem install bundler sudo gem install procodile sudo gem install nokogiri -v '1.7.2' Creamos el directorio principal de Postal Mail Server, descargamos la última versión, la extraemos y le damos acceso a nuestro usuario. sudo mkdir -p /opt/postal/app sudo wget https://postal.atech.media/packages/stable/latest.tgz sudo tar xvf latest.tgz -C /opt/postal/app sudo chown -R postal:postal /opt/postal sudo ln -s /opt/postal/app/bin/postal /usr/bin/postal Iniciamos los archivos de configuración. sudo postal bundle /opt/postal/vendor/bundle sudo postal initialize-config Vamos a editar el archivo de configuración con nuestros datos reales. sudo nano /opt/postal/config/postal.yml Asegurate de que los datos sean validos y que el dominio apunte al servidor o vps. web: # The host that the management interface will be available on host: postal.midominio.com # The protocol that requests to the management interface should happen on protocol: https fast_server: # This can be enabled to enable click & open tracking on emails. It is disabled by # default as it requires a separate static IP address on your server. enabled: false bind_address: general: # This can be changed to allow messages to be sent from multiple IP addresses use_ip_pools: false main_db: # Specify the connection details for your MySQL database host: 127.0.0.1 username: postaluser password: password base de datos database: postal message_db: # Specify the connection details for your MySQL server that will be house the # message databases for mail servers. host: 127.0.0.1 username: postaluser password: password base de datos prefix: postal rabbitmq: # Specify the connection details for your RabbitMQ server. host: 127.0.0.1 username: postal password: password de rabbitmq vhost: /postal dns: Guarda el archivo y cierra el editor. Ahora inicializamos el servicio y creamos una cuenta de usuario. sudo postal initialize sudo postal make-user Arrancamos postal y verificamos el status del servicio. sudo -u postal postal start sudo -u postal postal status ejemplo de salida... Procodile Version 1.0.26 Application Root /opt/postal/app Supervisor PID 18589 Started 2020-04-13 18:25:07 -0500 || web || Quantity 1 || Command bundle exec puma -C config/puma.rb || Respawning 5 every 3600 seconds || Restart mode usr1 || Log path none specified || Address/Port none || => web.1 Running 18:25 pid:18589 respawns:0 port:- tag:- Ya tenemos listo nuestro servidor Postal Mail Server, si quieres manejarlo a través de su portal gráfico necesitamos un servidor. Nosotros instalamos Nginx que es rápido y ligero. Instalar Nginx La instalación de Nginx es fácil, tan solo debes seguir los pasos indicados. sudo apt install nginx sudo cp /opt/postal/app/resource/nginx.cfg /etc/nginx/sites-available/default Creamos un certificado SSL autofirmado. sudo mkdir /etc/nginx/ssl/ sudo openssl req -x509 -newkey rsa:4096 -keyout /etc/nginx/ssl/postal.key -out /etc/nginx/ssl/postal.cert -days 365 -nodes Introduce tus datos válidos. Generating a RSA private key ……………………………++++ …………++++ writing new private key to '/etc/nginx/ssl/postal.key' You are about to be asked to enter information that will be incorporated into your certificate request. What you are about to enter is what is called a Distinguished Name or a DN. There are quite a few fields but you can leave some blank For some fields there will be a default value, If you enter '.', the field will be left blank. Country Name (2 letter code) :ES State or Province Name (full name) :HU Locality Name (eg, city) :Monzon Organization Name (eg, company) : Organizational Unit Name (eg, section) : Common Name (e.g. server FQDN or YOUR name) :postal.midominio.com Email Address : Bien... para concluir editas el archivo de configuración de Nginx e insertas tu dominio. sudo nano /etc/nginx/sites-available/default ejemplo... server { listen :80; listen 0.0.0.0:80; server_name postal.midominio.com; return 301 https://$host$request_uri; } Reiniciamos el servidor Nginx. sudo systemctl reload nginx Accedemos a Postal Mail Server Acceder al panel del servidor es tan simple como introducir el dominio que configuramos anteriormente. https://midominio.com https://panel.midominio.com

Login Postal Media Server Canales de Telegram: Canal SoloLinux – Canal SoloWordpress Espero que este articulo te sea de utilidad, puedes ayudarnos a mantener el servidor con una donación (paypal), o también colaborar con el simple gesto de compartir nuestros artículos en tu sitio web, blog, foro o redes sociales. Read the full article
#administrarRabbitMQ#APIHTTP#deteccióndespam#Erlang#InstalarNodejs#InstalarPostalMailServer#Mailgun#PostalMailServer#Postmark#RabbitMQ#ruby#Sendgrid#servidordecorreo#servidorPostalMailServer
0 notes
Link
0 notes
Text
10 Free Software
beginning with this edition of the free software series and future episodes to come we'll take a look the best free and open source programs for your computer in short when you see the term open source software it means that its source code is freely available for users to inspect modify and distribute the software to anyone for any reason but so many free and open source programs that are actually grade coming up I will show you ten of our personal favorites many of which you've heard me discuss previously in other videos they're all well-established trusted and completely free let's get started [Music] first up is Libre Office this office suite released in 2011 is a great alternative to Microsoft Office the Microsoft Word and Excel alternatives have improved quite a bit over the years when opening and converting those file formats included with LibreOffice is writer which has many of the same features as Microsoft Word calc is similar to excel impress can be used instead of PowerPoint draw is a vector graphics editor and math can be used to create and edit mathematical formulas LibreOffice is available for Windows Mac and Linux there are two versions available for download there's one for early adopters that want the latest features and their other one is their stable release with less bugs developed by the Mozilla Foundation way back in 2002 the open source Firefox browser is still one of the most popular browsers available it has a ton of add-ons and extensions that enhance your browsing experience you can sync between your desktop and mobile devices and includes an excellent manager for bookmarks other browsers that use variants of the Firefox source code include water Fox and the privacy and security focused tour browser the Firefox web browser is available for Windows Mac and Linux various distributions of Linux Firefox is often the default web browser next up is OBS studio released in 2012 the screen recorder is available for Windows Linux and Mac it's very popular for streaming video games and other live content recordings can also be saved to your computer to be imported into your favorite video editor if you have an older PC with low system specs you may encounter lag for most people the only true thick's for this is to upgrade your computer many users of OBS studio report that they find it to be confusing to use when starting out I'd highly recommend checking out the various tutorials available online shotcut is a great video editor for new users it was initially released in 2004 and is updated on a rig cervesas a few years ago it was the first editor I used for editing YouTube videos before switching over to Premiere Pro it includes a ton of features that are often locked behind a paywall with most free video editors including support for 4k resolutions and allows for multiple tracks on the same timeline if you've tried out other video editors shot cuts user interface may not be what you're used to for example when adding tracks to the timeline you have to click on the menu icon in the lower left then select add video track and go back in and add audio track before adding your clips on the shotcut website they include video tutorials that will teach you how to use it chalk cut is available for Windows Mac and Linux the oldest program in this video is GIMP released in 1996 this image editor is one of the best free alternatives to Photoshop before we go any further many of the free and open source programs offered depend on the donations of others for development if you'd like to donate to any project you'll often see a donate button near the top of their website with Jim it's to the right of tutorials let's move on GIMP supports layers and includes tools for retouching your photos or creating brand new images from scratch in the past year GIMP has received a major upgrade making it more useful including cosmetic changes that make it look better I personally prefer the dark theme but if you don't here's how you change the theme go to edit and select preferences go down to the interface section and select theme your choices are dark which is what I'm using right now grey light and system which is way too bright if you want to check out gimp it's available for download on Linux Mac and Windows share X is one of the best screenshot utilities ever to be created it was initially released in 2007 and at this time is only available for computers running Windows 7 or newer with so many features and ways to capture any portion of your screen it makes the new screenshot tool in the latest version of Windows 10 look pathetic it's quite simple to use just go to capture in the left pane and select your screenshot method for simple tasks you can even use chair X to record your screen otherwise you're better off using OBS studio if you select web page capture it works great to capture an entire webpage at the top just enter the URL of the webpage you'd like to capture in this example I'll just use the share X website click on capture when it's done click upload with every screen capture method at the top you have various ways save upload and mark up your images blender is a 3d computer graphics toolset released in 1998 it's been used to create animated films video games visual effects and a whole lot more some of its features include 3d modeling raster graphics editing rigging and skinning and even includes a video editor blender does have a high learning curve and the user interface will be overwhelming for first-time users so I'd recommend checking out the various tutorials on the blender website when you're getting started using it blender is available for Windows Mac and Linux if you're a programmer Adam is a source code editor with support for plugins written in nodejs and embedded get control released in 2014 it's available for Windows Linux and Mac with thousands of themes and open source packages to choose from to change the look and feel of atom it includes developer tools and with its user-friendly layout it's really easy to use especially when analyzing code it's a definite step up from the standard notepad unlike most of its competitors it's truly open-source the VLC media player has been around since 2001 and will play just about any audio or video file format it's available on all major platforms including apps for both Android and iOS its user interface has been described by many people as being clunky when compared to other media players but at least it's ad free has no spyware and just works great once you get used to it VirtualBox released in 2007 allows you to create and manage guest virtual machines running other operating systems on your computer setup can be confusing for new users that's why I created a beginner's guide on this channel using the Linux distro Ubuntu as an example you can install other operating systems using the same steps just adjust the memory and CPU as needed if you experience any issues especially on older pcs you may need to go into your BIOS and enable virtualization VirtualBox is available for download on Windows Linux and Mac thanks for watching all links are in the description if this video is useful for you give it a thumbs up and share with others what is your favorite free and open source software let us know about it in the comments and if you haven't done so already subscribe and click the Bell icon to stay up to date with the latest free software and other tech related stuff from tech gumbo
https://youtu.be/DIDq1IsZkc0
0 notes
Text
[Full-time] Web Developer at Music For Life Kids
New Post has been published on http://www.hanapbuhay.tk/job/full-time-web-developer-at-music-for-life-kids/
[Full-time] Web Developer at Music For Life Kids
Location: URL: http://https://musicforlifekids.com/ Description:
Application Developers & Web Programmers How to Apply: Submit your Resume/CV with work and salary history for the last 3 years, your Portfolio, and your Skype ID. Also, your email should include a brief introduction about yourself and why you think you are the best candidate for this job.
Join our growing team of Developers/Programmers Qualifications Able to follow sound programming principles Familiarity with Linux (Ubuntu), Versioning tools (SVN/GIT) Ability to multi-task is a must Willing to learn and work in a VERY fast-paced environment Ability to work productively with minimal supervision Must be willing to work in the graveyard shift (8PM – 5AM Philippine time) Must have a very stable internet connection and a reliable computer
We have specific requirements for each category we are hiring. Please see below.
For Web Programmers WordPress Development, PHP/MySQL, JavaScript, and HTML/CSS experience is required
For Application Developers NodeJS, MySQL, MongoDB, JavaScript, React, Redux, and HTML / CSS experience is required (MeteorJS experience would also be preferred)
This is a full-time position ONLY. We currently do not accept part-timers or freelancers.
Interns and fresh graduates are welcome to apply!
Superior Benefits – Work at home – Starting at $3.50 USD per hour (approx 30000+ PHP/month) base rate.
And at each level of demonstrated improvement your salary will increase. (We have developers that are making over $10-$12 USD per hour after only 3 to 4 years – this means: the speed at which you are able to level up your own status within our team is completely up to you and is only based on your performance, speed of knowledge acquisition, and quality and efficiency of your task deliveries)
– Continuous practice, improvement and development of skills – Access to unlimited learning materials that will improve your outputs and performance – Upgrade your career and discover new skills while working – Company sponsored team-buildings for all employees and other activities – Fixed Weekends Off – LOTS OF TRAINING! Seniority level Entry level and higher Employment type Full-time Job function EngineeringInformation Technology
Apply to this job
#Hanap Buhay #PartTimeJob #FullTimeJob #FreelanceJob #HomebasedJob #Philippines
0 notes
Text
Updating NodeJS
And while we are on the topic of NodeJS, both Debian and Ubuntu ship ancient versions of it out of the box. If you want to upgrade, the n package makes this pretty painless.
0 notes
Text
How To Install Odoo 15 In Ubuntu 18.04 ? | Steps To Install Odoo 15
Steps To Install Odoo 15 On Ubuntu 18.04
Odoo is the most popular all-in-one business software in the world.To Install
Odoo 15
on
Ubuntu 18.04
you just need to follow the below steps.
There are many ways to install Odoo depending on the requirements and the easy and quick way to install Odoo by using APT repositories.
If you want to work with running multiple Odoo versions on the same system then you can either use docker compose or docker Install Odoo in a virtual environment.
This blog is to provide steps for installation and configuration of Odoo for production environment using Git source and Python environment on an Ubuntu 18.04 system.
Note :
Odoo 15 is not launched yet so we have used the “master” branch for Installation.
To install Odoo 15 on Ubuntu 18.04 LTS you just follow the below steps.Step 1 : Update Server
sudo apt-get update
sudo apt-get upgrade -y
Step 2 : Create Odoo User in Ubuntu
sudo adduser -system -home=/opt/odoo -group odoo
Step 3 : Install PostgreSQL Server
sudo apt-get install postgresql -y
Step 4 : Create Odoo user for postgreSQL
sudo su - postgres -c "createuser -s odoo" 2> /dev/null || true
Step 5 : Install Python Dependencies
sudo apt-get install git python3 python3-pip build-essential wget python3-dev python3-venv python3-wheel libxslt-dev libzip-dev libldap2-dev libsasl2-dev python3-setuptools node-less libjpeg-dev gdebi -y
Step 6 : Install Python PIP Dependencies
sudo -H pip3 install -r https://raw.githubusercontent.com/odoo/odoo/master/requirements.txt
Step 7 : Install other required packages
sudo apt-get install nodejs npm -y
sudo npm install -g rtlcss
Step 8 : Install Wkhtmltopdf
sudo apt-get install xfonts-75dpi
sudo wget https://github.com/wkhtmltopdf/packaging/releases/download/0.12.6-1/wkhtmltox_0.12.6-1.bionic_amd64.deb
sudo dpkg -i wkhtmltox_0.12.6-1.bionic_amd64.deb
sudo cp /usr/local/bin/wkhtmltoimage /usr/bin/wkhtmltoimage
sudo cp /usr/local/bin/wkhtmltopdf /usr/bin/wkhtmltopdf
Step 9 : Create Log directory
sudo mkdir /var/log/odoo
sudo chown odoo:odoo /var/log/odoo
Step 10 :Install Odoo
sudo apt-get install git
sudo git clone --depth 1 --branch master https://www.github.com/odoo/odoo /odoo/odoo-server
Step 11 : Setting permissions on home folder
sudo chown -R odoo:odoo /odoo/*
Step 12 : Create server config file
sudo touch /etc/odoo-server.conf
sudo su root -c "printf '[options] \n; This is the password that allows database operations:\n' >> /etc/odoo-server.conf"
sudo su root -c "printf 'admin_passwd = admin\n' >> /etc/odoo-server.conf"
sudo su root -c "printf 'xmlrpc_port = 8069\n' >> /etc/odoo-server.conf"
sudo su root -c "printf 'logfile = /var/log/odoo/odoo-server.log\n' >> /etc/odoo-server.conf"
sudo su root -c "printf 'addons_path=/odoo/odoo-server/addons\n' >> /etc/odoo-server.conf"
sudo chown odoo:odoo /etc/odoo-server.conf
sudo chmod 640 /etc/odoo-server.conf
Step 13 : Now Start Odoo
sudo su - odoo -s /bin/bash
cd /odoo/odoo-server
./odoo-bin -c /etc/odoo-server.conf
Now your odoo instance is up and running.
Go to web browser and access your odoo at localhost:8069
0 notes
Text
How To Install Odoo 15 on Ubuntu 20.04 LTS ? | CandidRoot Solutions
Steps To Install Odoo 15 On Ubuntu 20.04
Odoo is the most popular all-in-one business software in the world.To Install Odoo 15 on Ubuntu 20.04 you just need to follow the below steps. There are many ways to install Odoo depending on the requirements and the easy and quick way to install Odoo by using APT repositories. If you want to work with running multiple Odoo versions on the same system then you can either use docker compose or docker Install Odoo in a virtual environment. This blog is to provide steps for installation and configuration of Odoo for production environment using Git source and Python environment on an Ubuntu 20.04 system. Note : Odoo 15 is not launched yet so we have used the “master” branch for Installation.
To install Odoo 15 on Ubuntu 20.04 LTS you just follow the below steps.
Step 1 : Update Server
sudo apt-get update
sudo apt-get upgrade -y
Step 2 : Create Odoo User in Ubuntu
sudo adduser -system -home=/opt/odoo -group odoo
Step 3 : Install PostgreSQL Server
sudo apt-get install postgresql -y
Step 4 : Create Odoo user for postgreSQL
sudo su - postgres -c "createuser -s odoo" 2> /dev/null || true
Step 5 : Install Python Dependencies
sudo apt-get install git python3 python3-pip build-essential wget python3-dev python3-venv python3-wheel libxslt-dev libzip-dev libldap2-dev libsasl2-dev python3-setuptools node-less libjpeg-dev gdebi -y
Step 6 : Install Python PIP Dependencies
sudo apt-get install libpq-dev python-dev libxml2-dev libxslt1-dev libldap2-dev libsasl2-dev libffi-dev
Step 7 : Install other required packages
sudo apt-get install nodejs npm -y
sudo npm install -g rtlcss
Step 8 : Install Wkhtmltopdf
sudo apt-get install xfonts-75dpi
sudo wget https://github.com/wkhtmltopdf/packaging/releases/download/0.12.6-1/wkhtmltox_0.12.6-1.bionic_amd64.deb
sudo dpkg -i wkhtmltox_0.12.6-1.bionic_amd64.deb
sudo cp /usr/local/bin/wkhtmltoimage /usr/bin/wkhtmltoimage
sudo cp /usr/local/bin/wkhtmltopdf /usr/bin/wkhtmltopdf
Step 9 : Create Log directory
sudo mkdir /var/log/odoo
sudo chown odoo:odoo /var/log/odoo
Step 10 :Install Odoo
sudo apt-get install git
sudo git clone --depth 1 --branch master https://www.github.com/odoo/odoo /odoo/odoo-server
Step 11 : Setting permissions on home folder
sudo chown -R odoo:odoo /odoo/*
Step 12 : Create server config file
sudo touch /etc/odoo-server.conf
sudo su root -c "printf '[options] \n; This is the password that allows database operations:\n' >> /etc/odoo-server.conf"
sudo su root -c "printf 'admin_passwd = admin\n' >> /etc/odoo-server.conf"
sudo su root -c "printf 'xmlrpc_port = 8069\n' >> /etc/odoo-server.conf"
sudo su root -c "printf 'logfile = /var/log/odoo/odoo-server.log\n' >> /etc/odoo-server.conf"
sudo su root -c "printf 'addons_path=/odoo/odoo-server/addons\n' >> /etc/odoo-server.conf"
sudo chown odoo:odoo /etc/odoo-server.conf
sudo chmod 640 /etc/odoo-server.conf
Step 13 : Now Start Odoo
sudo su - odoo -s /bin/bash
cd /odoo/odoo-server
./odoo-bin -c /etc/odoo-server.conf
Now your odoo instance is up and running.
Go to web browser and access your odoo at localhost:8069
0 notes
Text
How To Install Odoo 15 on Ubuntu 20.04 LTS
Steps To Install Odoo 15 On Ubuntu 20.04
Odoo is the most popular all-in-one business software in the world.To Install Odoo 15 on Ubuntu 20.04 you just need to follow the below steps. There are many ways to install Odoo depending on the requirements and the easy and quick way to install Odoo by using APT repositories. If you want to work with running multiple Odoo versions on the same system then you can either use docker compose or docker Install Odoo in a virtual environment. This blog is to provide steps for installation and configuration of Odoo for production environment using Git source and Python environment on an Ubuntu 20.04 system. Note : Odoo 15 is not launched yet so we have used the “master” branch for Installation.
To install Odoo 15 on Ubuntu 20.04 LTS you just follow the below steps.
Step 1 : Update Server
sudo apt-get update
sudo apt-get upgrade -y
Step 2 : Create Odoo User in Ubuntu
sudo adduser -system -home=/opt/odoo -group odoo
Step 3 : Install PostgreSQL Server
sudo apt-get install postgresql -y
Step 4 : Create Odoo user for postgreSQL
sudo su - postgres -c "createuser -s odoo" 2> /dev/null || true
Step 5 : Install Python Dependencies
sudo apt-get install git python3 python3-pip build-essential wget python3-dev python3-venv python3-wheel libxslt-dev libzip-dev libldap2-dev libsasl2-dev python3-setuptools node-less libjpeg-dev gdebi -y
Step 6 : Install Python PIP Dependencies
sudo apt-get install libpq-dev python-dev libxml2-dev libxslt1-dev libldap2-dev libsasl2-dev libffi-dev
Step 7 : Install other required packages
sudo apt-get install nodejs npm -y
sudo npm install -g rtlcss
Step 8 : Install Wkhtmltopdf
sudo apt-get install xfonts-75dpi
sudo wget https://github.com/wkhtmltopdf/packaging/releases/download/0.12.6-1/wkhtmltox_0.12.6-1.bionic_amd64.deb
sudo dpkg -i wkhtmltox_0.12.6-1.bionic_amd64.deb
sudo cp /usr/local/bin/wkhtmltoimage /usr/bin/wkhtmltoimage
sudo cp /usr/local/bin/wkhtmltopdf /usr/bin/wkhtmltopdf
Step 9 : Create Log directory
sudo mkdir /var/log/odoo
sudo chown odoo:odoo /var/log/odoo
Step 10 :Install Odoo
sudo apt-get install git
sudo git clone --depth 1 --branch master https://www.github.com/odoo/odoo /odoo/odoo-server
Step 11 : Setting permissions on home folder
sudo chown -R odoo:odoo /odoo/*
Step 12 : Create server config file
sudo touch /etc/odoo-server.conf
sudo su root -c "printf '[options] \n; This is the password that allows database operations:\n' >> /etc/odoo-server.conf"
sudo su root -c "printf 'admin_passwd = admin\n' >> /etc/odoo-server.conf"
sudo su root -c "printf 'xmlrpc_port = 8069\n' >> /etc/odoo-server.conf"
sudo su root -c "printf 'logfile = /var/log/odoo/odoo-server.log\n' >> /etc/odoo-server.conf"
sudo su root -c "printf 'addons_path=/odoo/odoo-server/addons\n' >> /etc/odoo-server.conf"
sudo chown odoo:odoo /etc/odoo-server.conf
sudo chmod 640 /etc/odoo-server.conf
Step 13 : Now Start Odoo
sudo su - odoo -s /bin/bash
cd /odoo/odoo-server
./odoo-bin -c /etc/odoo-server.conf
Now your odoo instance is up and running.
Go to web browser and access your odoo at localhost:8069
0 notes
Text
Instalar un servidor Rocket.Chat en Ubuntu

Instalar un servidor Rocket.Chat en Ubuntu y derivados. Rocket.Chat es un excelente servidor de web-chat opensource, y actualmente es la mejor alternativa auto alojada a Slack. Ofrece un montón de opciones como por ejemplo, chat, vídeo, llamadas de voz, intercambio de archivos y un gran sistema de ayuda. Algunas de las mejores características: Sistema de traducción en tiempo real. Integraciones entrantes y salientes de WebHook. Chat en vivo / Centro de llamadas / Llamadas de audio. APIs muy potentes. Permite subir y compartir archivos con el resto de usuarios. Tiene aplicación web, también para escritorio Linux, Android, iOS, Windows, Mac. App para IOS y Android. Monitoreo remoto de vídeo. Temas personalizados, emojis, sonidos y cualquier activo de tu empresa. etc… Para realizar este articulo usamos un servidor con Ubuntu 18.04 instalado.
Instalar un servidor Rocket.Chat
Antes de instalar el servidor Rocket.Chat actualizamos nuestro sistema. apt update && apt upgrade Rocket.Chat requiere un servidor de base de datos MongoDB, versión 3.2 o superior. Para instalar la ultima versión de MongoDB debemos agregar el repositorio correspondiente. apt-key adv --keyserver hkp://keyserver.ubuntu.com:80 --recv 9DA31620334BD75D9DCB49F368818C72E52529D4 echo "deb http://repo.mongodb.org/apt/ubuntu trusty/mongodb-org/4.0 multiverse" | sudo tee /etc/apt/sources.list.d/mongodb-org-4.0.list Instalamos MongoDB. apt update && apt install -y mongodb-org curl graphicsmagick Ahora debemos crear un archivo especifico para que MongoDB inicie como servicio. nano /etc/systemd/system/mongodb.service Copia y pega en el archivo lo siguiente. Description=High-performance, schema-free document-oriented database server After=network.target User=mongodb ExecStart=/usr/bin/mongod --quiet --config /etc/mongod.conf WantedBy=multi-user.target Guarda el archivo y cierra el editor nano. Recargamos los demonios. systemctl daemon-reload Iniciamos MongoDB y habilitamos su inicio con el sistema. systemctl start mongodb systemctl enable mongodb Bueno... ya tenemos el servidor de bases de datos en marcha, así que continuamos. Rocket.Chat requiere que tengamos instalado Node.js (se recomienda la versión 8.11.3) y el gestor de paquetes npm, procedemos. apt -y install node.js apt install npm build-essential npm install -g inherits n && n 8.11.3 Agregamos un nuevo usuario (rocketchat) para no utilizar Rocket.Chat como root. useradd -m -U -r -d /opt/rocketchat rocketchat Cambiamos al usuario que acabamos de crear. su - rocketchat Descargamos la última versión estable de Rocket.Chat. curl -L https://releases.rocket.chat/latest/download -o rocket.chat.tgz Descomprime el paquete. tar zxvf rocket.chat.tgz Cambiamos el nombre de la carpeta de la aplicación. mv bundle rocketchat Nos movemos de directorio e instalamos las dependencias necesarias. cd rocketchat/programs/server npm install Establecemos las siguientes variables (con tu dominio real). cd /opt/rocketchat/rocketchat export ROOT_URL=http://tudominio.es:3000/ export MONGO_URL=mongodb://localhost:27017/rocketchat export PORT=3000 En este momento ya tenemos todo preparado para iniciar nuestro servidor chat. node main.js Si todo a salido bien, veras una pantalla similar a esta... +-----------------------------------------------------------------------+ | SERVER RUNNING | +-----------------------------------------------------------------------+ | | | Rocket.Chat Version: 1.2.1 | | NodeJS Version: 8.11.3 - x64 | | Platform: linux | | Process Port: 3000 | | Site URL: http://tudominio.com:3000/ | | ReplicaSet OpLog: Disabled | | Commit Hash: 202a465f1c | | Commit Branch: HEAD | | | +-----------------------------------------------------------------------+ Para que Rocket.Chat se inicie como servicio sigue los pasos siguientes. nano /etc/systemd/system/rocketchat.service Agregamos lo siguiente (asegúrate de insertar el nombre de tu dominio). Description=RocketChat Server After=network.target remote-fs.target nss-lookup.target mongod.target ExecStart=/usr/local/bin/node /opt/rocketchat/rocketchat/main.js Restart=always RestartSec=10 StandardOutput=syslog StandardError=syslog SyslogIdentifier=nodejs-example #User= #Group= Environment=NODE_ENV=production PORT=3000 ROOT_URL=http://tudominio.com MONGO_URL=mongodb://localhost:27017/rocketchat WantedBy=multi-user.target Guarda el archivo y cierra el editor. Reinicia el demonio. systemctl daemon-reload Iniciamos Rocket.Chat y habilitamos su inicio con el sistema. systemctl enable rocketchat systemctl start rocketchat Ya podemos acceder a Rocket.Chat y completar la instalación. Desde tu navegador web favorito accede a la siguiente url. http://tudominio.com:3000 El asistente de instalación te guiará a través de la configuración desde su usuario administrador. Una vez ya lo tengas todo instalado y configurado, te recomiendo que descargues la aplicación de escritorio para interactuar con el resto de usuarios. Al iniciar la aplicación de escritorio por primera vez te pedirá la url del servidor de chat al que te quieres conectar. La url "https://open.rocket.chat" es el chat de la comunidad Rocket.Chat.

Inicio Rocket.chat URL del servidor Creamos un usuario.

Registro de usuario en Rocketchat Chat demo.

Rocketchat demo Para más información sobre cómo usar y configurar Rocket.Chat, revisa la documentación oficial. En Sololinux.es seguimos creciendo gracias a nuestros lectores, puedes colaborar con el simple gesto de compartir nuestros artículos en tu sitio web, blog, foro o redes sociales. Read the full article
#editornano#instalarunservidor#MongoDB#node.js#npm#opensource#Rocket#Rocket.Chat#servidor#servidorRocket.Chat#slack#ununtu#web-chat#WebHook
0 notes