#userphe
Explore tagged Tumblr posts
Visit Tumblr Blog
Explore Tumblr blogs with no restrictions, modern design and the best experience.
Last Seen Tumblr Blogs


Fun Fact
Forty percent of Tumblr users are between the ages of 18 to 25.
Photo


The Book of Boba Fett (2021)
#the book of boba fett#star wars#starwarsedit#fennec shand#swedit#tbobfedit#tuserhanna#userderin#usernik#boba fett#usernini#userobiwans#userphe#userrafael#userbetts#useryolanda#*#mine#HELLO THERE!
9K notes
·
View notes
Photo
KEYFRAME TUTORIAL FOR THOSE WITH A WORKING KNOWLEDGE OF PHOTOSHOP AND GIFMAKING
This is my gif with the coloring I want it to have eventually (including the manipulated color). I changed the yellows and reds in the scene to be purple. I want the majority of the gif to be purple and cyan, but do not want it to be on her skin.
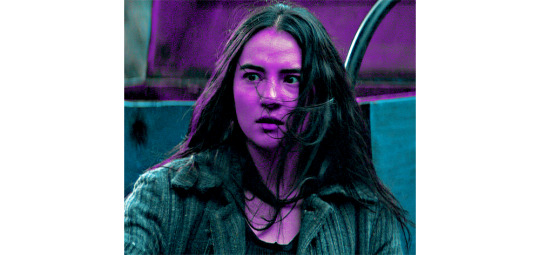
First add a layer mask to the adjustments that are creating the color you want to remove. I used several layers to create the purple coloring, so I grouped them together and added the layer mask to the group instead of having to do them individually. In this case, I erased anywhere the purple was on her skin.

She is walking away in this scene, so this layer mask alone is not enough. This is where keyframes come in.
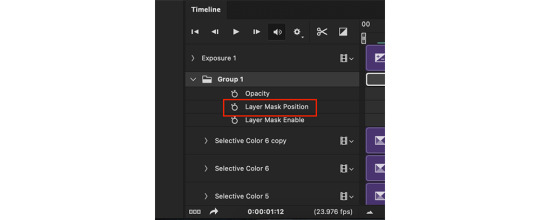
In the timeline window, scroll to the layer that your layer mask is on (or in my case, group). On the far left side, each of the layers should have an arrow which toggles a drop down menu. Click it and it will list options for Opacity, Layer Mask Position, and Layer Mask Enable. Make sure the current time indicator (small blue arrow and red vertical line in the timeline window) is positioned at 00:00:00 and then select the clock icon next to Layer Mask Position. It should place a small yellow diamond at the same place as the indicator. Each successive move of the mask will place a grey diamond at the timestamp that you move it.
CMD+click on the layer mask in the Layers window so that the area of the mask becomes outlined with a dotted line in the main workspace. Click the chain icon next to the layer mask in the Layers window to unlock the mask's movement.


The next steps are the most tedious. You have to manually move the layer mask every few frames to a new position that follows the movement of the gif. I usually zoom the timeline in so that each second is broken into six sections and pick a new layer mask position at approximately each section. If there is more rapid movement in the gif, you may have to pick new positions at more frequent intervals and vice versa.
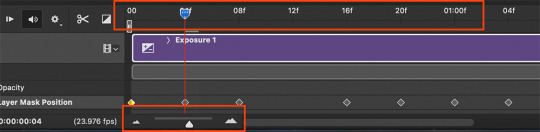
After the initial layer mask is set at the 00:00:00 point in the timeline, select the next interval that you want the layer mask to move to. Do this by moving the time indicator to your chosen point. Now with the move tool, click within the layer mask and drag it to where it needs to be to keep coverage on your desired area. The longer/more frames in the gif, the more keyframe points you will have to select. This gif was about 2.5 seconds long and I used 14 different points.


These are just a few of the keyframes I made on this gif. You can see here that the original area that I erased in the layer mask doesn't quite cover all of her skin throughout the movement. I just erase a bit more until I'm satisfied with the coverage.
Once you have mapped all the points out, deselect the mask area and click the blank space where the chain icon was to make it reappear and return the mask to a locked position.
Scrub through the gif to make sure that the mask covers everything you want and also that the keyframes make it move smoothly. Shorter intervals and minor position changes between keyframes usually keeps choppiness (this normally presents as the mask noticeably jumping to a new position) to a minimum. You should not be able to notice the mask's movement except in the way it removes color from specific areas as intended.
Export and save the gif as normal.
This is my finished result:

#userfanni#omgari#usersunny#userbells#userkraina#tuserabbie#tusergabriela#useroli#userangelic#supervalcsi#userphe#keyframes#*tutorial#tagging a couple of you who have been like ‘how tf did you make this’ on sets that i used this technique hope you dont mind#idk how coherently this reads or if it even explains it well enough but feel free to ask for clarification#there are also other keyframe tutorials on here that are written much better so check those out too if mine doesnt make sense#but yeah this is how i make my vibrant gifs that have movement in them#i'm going to make a tutorial explaining the actual coloring process too eventually#might make a part two of this explaining how to use this method for more complicated movements#like when your subject moves in multiple directions or there are multiple subjects#riah.gif#riah.txt
634 notes
·
View notes
Photo

we should start taking beloved archetypes for male characters and using them to make female characters.
(insp.)
#arwen makes stuff#marvel#marveledit#mcuedit#mcugifs#dailyavengers#marvelladiesdaily#femaledaily#mcusource#dailymarvelgifs#marveladdicts#jemmablossom#usermouffe#useryoumna#userhella#userpavi#uservalentina#andthwip#userphe#userdiana#jessica jones#mantis#peggy carter#hope van dyne#melina vostokoff#melinda may#daisy johnson#dottie underwood#carol danvers#valkyrie
8K notes
·
View notes
Photo

DUEL OF THE FATES
#swedit#userjessie#tuserhanna#userobiwans#tusermelissa#userderin#kahtaras#userfrodosam#usermaggo#userplum#userphe#usermelanie#tusercelia#userheidi#xuseremily#userbariss#t: l#my gifs#gif#1k
1K notes
·
View notes
Photo
I will probably always be identified as this person. I will probably be Princess Leia till I'm 85 years old.
#swedit#swcastedit#carriefisheredit#cfisheredit#carrie fisher#userconstance#userhayley#userphe#chewieblog#cast#*#gifs#cara
12K notes
·
View notes
Photo


liking a male character like... (INSP. & INSP.)
#me making live action gifs? it's a miracle i know#obi wan kenobi#star wars#swedit#userconstance#tusergabi#userhayley#userjen#userlj#usermelanie#usernobie#userobihoe#userpayton#userphe#**#*gffa#*sw#*obi wan#1k#2k
3K notes
·
View notes
Photo

WANDAVISION (2021) | Every Ralph mention
#wandavisionedit#wandavision#marveledit#dailyavengers#mcudaily#chewieblog#wandavisionnet#userkaelyn#userk8#andthwip#userbeck#userjoelle#usernums#usersameera#userorynn#userphe#useramina#1k#3k#5k
6K notes
·
View notes
Photo

They cheered each other up, those two. No matter how dire the straits, Anakin and Master Kenobi always managed to find a joke, a laugh, some way to ease the tension and pressure of the moment. Between the two men lay absolute trust. Absolute faith. Now, they were equals. — Clone Wars: Gambit - Stealth by Karen Miller
#two himbos on a spaceship#anakin skywalker#obi wan kenobi#obikin#star wars#swedit#userhayley#tusermaura#userphe#userragna#userzoe#zuzora#**#*sw#1k
5K notes
·
View notes
Photo


Shadow and Bone: A (Meme) Summary
#shadowandboneedit#sabedit#userbecca#userluce#arthurpendragonns#userphe#userbeckett#userffahey#userzoya#usermeliorn#userkd#shadow and bone#sabcolors#mine*#gfx*#gifs*#i think it's time for someone to revoke my license to use memes#3k
3K notes
·
View notes
Photo
REVENGE OF THE SITH but they’re excessively British 🇬🇧
#obi wan kenobi#anakin skywalker#star wars#starwarsedit#swedit#rotsedit#tuserhanna#tusergolden#userobiwans#userclayy#userhyejin#usersof#userhaily#andthwip#userphe#*#i'd like to apologize to all the british people i'm offending with this set#but i simply lost it where i first heard it lmao#thank you to youtuber zanny for the idea 🤟
24K notes
·
View notes
Photo
"So, you're the Spider-ling? Crime-Fighting-Spider? Spider-Boy?" "...S-Spider-Man."
Content Creator Secret Santa 2021 🎁 for @tomhollandd
#userkaylee#ccss2021#marveledit#dailymcu#dailymarvel#zavens#usersaoirse#tuserlisa#tuserjackie#usersameera#marveladdicts#marvelgifs#userkatza#userphe#maziekeen#tuserdana#peter parker#marvel*#gifs
974 notes
·
View notes
Photo


pepperony + jamie anderson (insp)
#marveledit#mcuedit#usermoh#rohcreates#usersameera#userphe#userzuura#usernikki#userchas#userkarura#marveladdicts#dailyavengers#mcufam#mcusource#makersnet#rohall#rohsgif#pepperonyedit#tonystarkedit#pepperpottsedit#pepperony#ironmanedit#avengersedit#type: film#marvel#mcu#r: pepperony#AKI DON'T LOOK
669 notes
·
View notes
Photo


“FOR OVER A THOUSAND GENERATIONS, THE JEDI KNIGHTS WERE THE GUARDIANS OF PEACE AND JUSTICE...”
#swedit#usertay#userjessie#starwarsgifs#starwarsedit#swgifs#tusermelissa#tuserhanna#userderin#kahtaras#tuseremily#usermaggo#userplum#userphe#userwookiee#usermelanie#tusercelia#t: l#1k#my gifs#gif
2K notes
·
View notes
Photo


MARK HAMILL as Luke Skywalker Star Wars: Episode IV – A New Hope (1977), dir. George Lucas
#star wars#a new hope#luke skywalker#starwarsedit#swedit#anhedit#filmedit#scifiedit#useryolanda#userobiwans#userplum#userbetts#tuserhanna#userrafael#userphe#userjen#userderin#anh*#*#gifs#constance#A PUPPY 🥺
960 notes
·
View notes
Photo


After all she’d endured, he was the weak one. But I’m here now, he thought wildly.
#kanejedit#kanej#sabedit#shadow and bone#shadowandboneedit#kanejdaily#myedits#s&b#shadowandbonecentral#dailyshadowandbone#lorelaigilmo#usersmile#uservici#userphe#userrobin#billhater#tusersammy#bijespers#dailycolorfulgifs#userlyra#userbeccs#userkristen#shadowandbonesource#sab spoilers#according to google red shades and yellow are the colors of longing so i'm going for symbolism here#yeah i did google it#can't wait to have actual ninej scenes though
3K notes
·
View notes
Photo


@kenobi-source event 02: favorite quote
#may the force be with you always 🥺#obi wan kenobi#star wars#userbariss#userconstance#tusergabi#userhayley#userjen#usermullet#userobiwans#userourteeth#userphe#**#*gffa#*sw#flashing gif tw#1k#2k#5k
8K notes
·
View notes