#video background html css
Explore tagged Tumblr posts
Visit Tumblr Blog
Explore Tumblr blogs with no restrictions, modern design and the best experience.
Last Seen Tumblr Blogs


Fun Fact
Tumblr has 4 main sources of revenue.
Text

Responsive Homepage with Video Background
#responsive homepage design#homepage#responsive web design#responsive video background#video background html css#css video background#html#css#html5#css3#codenewbies#code
1 note
·
View note
Text
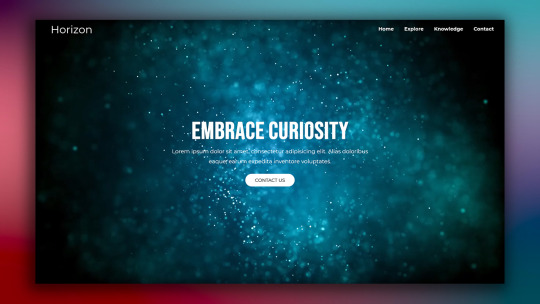
Responsive Web Layout with Video Background
#responsive web design#responsive web layout#css3#html css#divinector#frontenddevelopment#webdesign#html#learn to code#css#html5 css3#html css tutorial#css tutorial#video background
8 notes
·
View notes
Text

Text Animation with Video Background
#text animation css#video background#html css animation#css animation#frontend#html css#css#html#css3#pure css animation#css animation examples
2 notes
·
View notes
Note
your oc website is SO SO SO SO INCREDIBLY COOL how the hell do you even start learning how to do this ?? if you learned how to do this by yourself online, are there any tutorials or resources you can share with us? was making this website free??
omg THANK YOU SO SOOOOOO MUCH!!! It makes me so happy to hear that folks like my little site. I code my site with Phoenix Code (for the live viewer and number dials) and I host my site on Neocities - it is all free. Phoenix can be used in browser or on desktop, but I like having it on desktop more for big projects in case my files get deleted. I use the browser version when I just want to test something quickly.
The 2 videos I use and can not recommend enough to anyone who asks me are this HTML tutorial and this CSS tutorial. They are simple and easy to understand, but I recommend watching it the first go, and then following along the next few watches until you get the flow of basic parts to a website, how they're organized, and what order they go in. At this point, I've memorized exactly where everything goes, and it is all thanks to these 2 videos.
If I am being honest, I learned how to code by myself, not quite even with online tutorials but just from being stupid and messing around myself (1, because I was a kid, and 2, because I didn't understand English very well to know what tutorials are saying.) I used to do html coding for Neopet pages when I was a kid with too much online time, first by just editing the default petpages and adding info and images, and then just doing trial and error with the html. I'll just try something and then if it doesn't turn out the way I want it, I try to find out why it didn't work and also get inspiration from other similar sites to figure out where things go or how they coded (with this nifty thing called right click > inspect page or right click > view page source). And BOOM, working webpage.
It was rudimentary, white blank background without any boxes or anything, you just scrolled down the page and sections were separated by a horizontal bar. OH and every text was centered! I had no idea how to make scrolling boxes or fancy assets, but damn I still had so much fun working on it every weekend. When you find authentic selfmade sites from the 90s and 2000s, most of them aren't super fancy either unlike what modern nostalgia makes you think. So I hope you don't feel discouraged if you begin making a website and feel it isn't "fancy", you're already doing a first big step which is making a webpage and learned your first set of html code!
It was over a decade later before I coded webpages with html again. I've gotten lazy and started relying on site builders, but nothing was quite as versatile as html. I wanted to try coding my own OC site again, so that was when I started working on OutKrop (the site I posted). Until I started coding again, I had literally no idea what CSS even is (and let me tell you, it's a game changer!)
Personally, I work best when I can do things hands on. I don't read through tutorials, I code first then go back and read through coding help sites like w3schools when I find myself stuck and unable to figure something out. Sometimes I grab existing codes and play around with them to see what changes and what I can do with it, cuz having visual context is what helps me a lot.
I can also share my process:
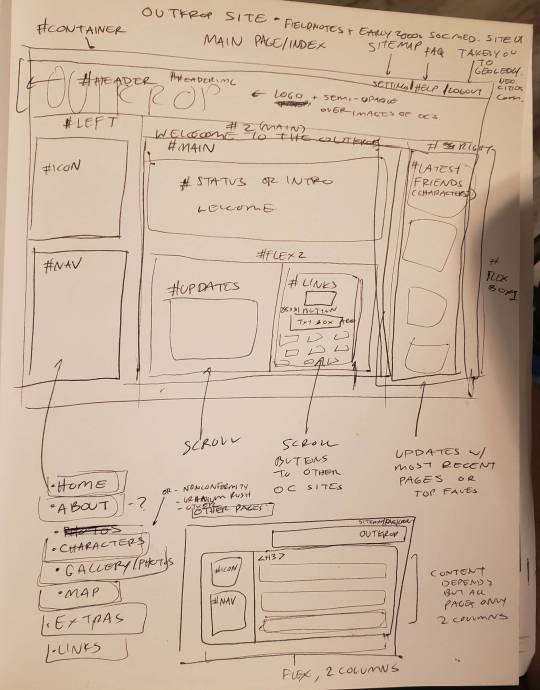
Once I gather up some ideas, I make a sketch, including what boxes (divs in css) should approximately go. It is very rough, but shows me exactly what I need to know.
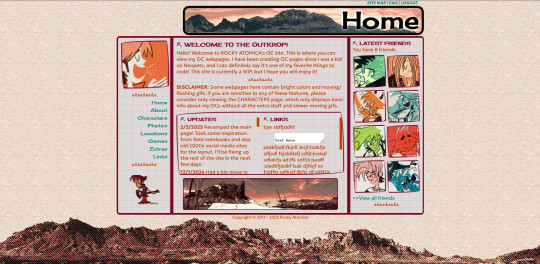
Next I load up my coding app (Phoenix Code in my case) and "sketch" the layout. Nothing fancy going on here, just putting things where they need to be, and fixing size of boxes and margins if needed. I give my boxes all a background color so I can easily see how big they are and where they are located.

After some adjustments like moving stuff around and adding assets like backgrounds and images, and changing colors of the boxes, rounding off corners, etc., we get this!
so recap + additional useful sites I use:
Coding app: Phoenix Code
Site hosted on: Neocities
Video tutorials: HTML and CSS
Sites for learning code: w3schools, also lissa explains is a great site that is written for kids to learn html so it's easy to understand. Finally, sadgrl has a lot of great resources for coding as well!
I recommend looking through these sites AFTER you tried taking a spin at coding - it doesn't have to be anything fancy just follow the HTML video tutorial I linked!
Thanks for the ask, and I hope this helps you and many others out there who are interested in building a site with html/css! Don't be afraid to get things "wrong" or have an "un-fancy" site. This is how you learn to code, and it'll become so easy once you get the hang of it.
Anyone is always more than welcome to reach out for coding help and advice :-]
58 notes
·
View notes
Text
HELLO
I'M BACK

So much has happened this summer (I finished grad school! I moved halfway across the country!) and I'm trying to get back into a routine that involves having a life again: reading books, watching movies, playing video games, and, of course, drawing and painting again.
I am currently revamping my website. For many years, my website was solely a professional portfolio and shop. White background, simple links, zero personality. Purely a hub to point to my social medias, where all the fun stuff was. I hated going to my own website because it was boring and uninspiring.
Last year, I made a neocities account and learned HTML/CSS for fun. I became obsessed after realizing how much more exciting it is to NOT have a bland, minimalist, corporate-esque website. I love exploring everyone's fun neocities sites, which are nostalgic and truly personalized. It made me hate my old website even more. Then I had a big brain moment: incorporate the fun elements of my neocities site into my website. LOOK AT IT NOW. There is COLOR. Silly fonts. There is a pixelated space background. Tiny gifs sprinkled about!
I will be actually be maintaining my website's blog. That's where the main, long-form content of all my art-making will live. Social media will just get snippets of that content. I do think there is a way to connect Tumblr to my blog so that whatever I post there will be posted here, too, but I haven't tried it yet.
Anyway, Hello Hello Hello Tumblr!
57 notes
·
View notes
Text

🧡 Tuesday Tips #4: 🧡 50 Reasons to Build a Personal Website Instead of Relying on Social Media
So you’ve been thinking about making a personal website, huh? Maybe you're feeling a little burned out from ad bombardments, or just social media in general lately. Good news: you’re not alone. There’s a growing group of people carving out cozy corners of the internet that are completely their own. We call it the Small Web (also known as the Indie Web), and it’s honestly kind of magical.
Still not sure if you're ready to dive in? Here are 50 reasons why building a personal website beats relying on social media. (Warning: may cause spontaneous domain name purchases.)
----------------------------------------------------------------------
1. It’s yours. Like, actually yours.
When you post on social media, you're essentially renting space. Your content can be removed, shadowbanned, or buried at any time without warning. With your own site, you're the landlord, the designer, and the content creator all rolled into one. It’s digital ownership in its purest form.
2. No weird algorithm whispering.
Social media is a game of guessing what the algorithm wants. One day, it loves video. The next, it punishes you for posting too much. With a personal website, what you post is what people see—no weird magic tricks required.
3. No ads.
Unless you choose to put them there. Your website doesn’t need to shout at visitors to buy toothpaste or download the latest app. It can just be a calm, ad-free oasis of you.
4. Zero doomscrolling.
You know the drill. You go on to post something and 45 minutes later you’re deep into a thread of rage. Your personal site? No feed, no drama. (You can create a blog feed though via RSS if you want to!)
5. You can make it look exactly how you want.
Want a sparkly cursor? A cozy vintage theme? Maybe a floating cat gif? Go for it. Your site is your canvas, and there are no design police.
6. You get to be weird.
Weird is welcome. In fact, it's encouraged. Build a shrine to your favorite childhood cartoon or create a digital bookshelf of every novel you’ve ever loved. There are no rules here.
7. You’ll learn cool stuff.
Even if you’re starting with zero knowledge, making a website teaches you things—HTML, CSS, design, structure, creative writing. It’s the kind of learning that feels like playing.
8. You can make it feel like a digital home.
Social profiles are rented apartments. Your website? A house you get to decorate, organize, and live in. It becomes a familiar, comfortable space that reflects you.
9. No one’s watching your every move.
Unlike social media platforms, which track everything you do to serve you ads, your website can be a surveillance-free zone. Visitors can hang out without being followed around the internet afterward.
10. You’re not competing for likes.
There’s no like button on your site (unless you want one). So you’re free to post what you love, not what will perform best in a popularity contest.
11. You set the vibe.
Want lo-fi music autoplaying in the background? Go for it. Want every page to start with a motivational quote or your cat's daily wisdom? It’s all up to you. Your site, your mood.
12. It can evolve with you.
Unlike a locked-down profile, your personal site can grow, change, and shift over time. Turn your blog into a portfolio. Make your old art gallery a recipe archive. It’s a living space.
13. No random feature changes.
Remember when Instagram tried to become TikTok overnight? Yeah. Your website isn’t going to suddenly switch up on you because a CEO changed their mind. Stability, baby. You make the rules.
14. You decide what stays up.
Posts don’t disappear unless you want them to. No mysterious removals. No content warnings slapped on your grandma's casserole recipe.
15. You won’t get locked out.
Unless you forget your password (write it down!), you can’t get banned from your own website. No more waking up to “your account has been suspended” emails.
16. You control the narrative.
Algorithms love to de-contextualize things. Your website gives you the full story. A place to explain, explore, and express on your own terms.
17. People visit because they want to.
They didn’t stumble in while scrolling. They came to see you. That kind of intentionality makes every visit feel a little more meaningful.
18. You can make timeless content.
Instead of disappearing into a sea of tweets, your thoughts can live forever on a well-organized blog post or static page. Evergreen content has a real home on the web.
19. It helps you build your digital legacy.
Someday, people will want to know who you were. Your website is a time capsule. A treasure map. A story of who you are in your own words.
20. You can connect without the chaos.
Guestbooks, comment sections, or even email forms let people reach out without the noise of DMs, trolls, or spam bots.
21. No character limits.
Got a lot to say? Say it. You're not confined to 280 characters or forced to cut down your thoughts to fit a format. Write a sentence or an essay—your site doesn’t care.
22. You can build your own community.
With a little creativity, you can add forums, guestbooks, chat boxes, or webrings. Create a cozy club of like-minded folks without relying on corporate platforms.
23. It’s immune to social media shutdowns.
When a platform dies or gets bought out and ruined (*cough* Twitter), your site doesn’t flinch. It’s still there, waiting for visitors.
24. You can express yourself fully.
From color schemes to quirky fonts and animated gifs, you’re not boxed into a single identity photo and bio. Let your personality spill into every page.
25. There are no trolls unless you invite them.
You can moderate comments or remove them entirely. Unlike public platforms, you don’t have to tolerate abuse, spam, or bad vibes.
26. You get to experiment freely.
Try a new blog format, embed a mini-game, host a digital pet. You can play and break things and rebuild—all without anyone watching.
27. It gives you creative freedom.
Poetry, zines, recipes, fiction, rants, longform essays, audio diaries—whatever you make, there’s space for it.
28. Your content won’t be buried.
On social media, your posts vanish/become irrelevant within hours. On your site, people can discover things you wrote years ago just as easily as something from yesterday.
29. You can showcase your work beautifully.
Whether you're a photographer, writer, or crocheter, your site can act as a curated gallery. Show off what you’re proud of without it being surrounded by chaos.
30. It’s a great place to archive.
Old blog posts, artwork, digital journals—your site becomes a place to store your memories, milestones, and the things that matter most to you.
31. You can link out to cool stuff.
Unlike platforms that try to trap you inside their walls, your website can point people to other places you love, including friends’ sites, resources, or secret gems.
32. You’re not a product.
Social media thrives on turning users into data. Your website doesn’t track or manipulate you. It’s just… yours. That's it! There's no catch.
33. It doesn’t interrupt you.
No notifications. No infinite scroll. Just a peaceful little world that sits quietly until you decide to update it.
34. You’ll meet kindred spirits.
People who find personal websites often do so intentionally. They’re curious, thoughtful, and usually pretty lovely. Great ingredients for real connection.
35. You can revisit and reflect.
Years later, reading your old posts can feel like a time machine. Your site becomes a living archive of your thoughts, dreams, and progress.
36. It makes you more mindful.
Without the instant gratification loop of likes and retweets, you might find yourself thinking more deeply about what you post and why.
37. It’s free of FOMO.
You’re not constantly seeing other people’s highlight reels and comparing your behind-the-scenes. Your site focuses on you, not everyone else.
38. You can go slow.
No need to keep up with trends or daily posts. Update when you feel like it. Take a break. Come back refreshed. Your site will still be there.
39. You can use your own domain.
Having yourname.com just feels cool, right? It’s like planting a flag in your own corner of the internet.
40. You don’t have to chase followers.
Instead of playing the growth game, you can focus on making cool stuff. The people who find you will be the ones who genuinely care.
41. It encourages intentionality.
Because updates aren’t instant, you’ll likely spend more time crafting your content. That care shows, and it makes your site feel special.
42. You can build your own tools.
Want a mood tracker? A mini wiki? A spell-crafting generator? You can code or embed whatever tools you dream up.
43. It’s surprisingly fun.
There’s joy in creating just for the sake of it. Tinkering with layout, colors, and content can feel like digital gardening.
44. You’re contributing to a better web.
Every personal website weakens the monopoly of Big Tech. You’re helping build a diverse, vibrant, human-centered internet.
45. It’s nostalgic in the best way.
Remember the early internet when people made fansites and blogs and shared links just because? That energy is still alive on the small web.
46. You can go offline anytime.
Want a break? Just stop updating. No pressure. No guilt. The web will wait.
47. You’ll have a creative outlet.
Even if you don’t consider yourself an “artist,” a website gives you a space to express and explore yourself.
48. It’s easier than ever.
You don’t need to be a tech wizard. Tools like WordPress, mmm.page, Straw.page or Carrd make it super beginner-friendly.
49. You can inspire others.
Your little corner of the internet might be exactly what someone else needed to see. You never know who you’ll touch.
50. Because you deserve a space that’s 100% you.
No ads. No algorithms. No noise. Just a place where you get to be yourself, unapologetically and fully. The internet needs more of that—and more of you.
----------------------------------------------------------------------
So, Why Wait?
The internet doesn’t have to be a loud, crowded mall where everyone’s shouting for attention. It can be a quiet cabin in the woods, a secret garden, a tiny café glowing with string lights where you share your thoughts, dreams, art, and self with whoever wanders in.
Building your own personal website isn’t just about escaping the chaos of social media—it’s about coming home to a space that reflects you. Your humor, your quirks, your passions, your pace. It’s a chance to slow down and make something meaningful. Something that doesn’t ask you to perform, compete, or conform.
And here’s the beautiful part: you don’t need to be a tech wizard. You don’t need to have a niche or a “brand.” You just need to be curious, a little bit brave, and willing to make something for yourself. The rest? That comes with time—and it’s honestly kind of magical to watch it all unfold.
So go ahead. Plant your flag. Build your nest. Start small, dream big, and know that every pixel you place is a step toward reclaiming your presence online.
We’ll be here cheering you on, one cozy corner of the web at a time. 💻
When you're ready to get started, head over to the Resources page! There are tons of helpful links to help you start building your personal space on the web. ✨🌿 See you there!
----------------------------------------------------------------------
Want to help the Small Web movement grow? Join us on other platforms. ♥
FB Page & Group: facebook.com/thesmallweb facebook.com/groups/thesmallweb
Twitter/X: x.com/smallweblove
Tumblr Community: tumblr.com/communities/thesmallweb
Mastodon: indieweb.social/@thesmallweb
#indie web#small web#blog#neocities#web revival#indieweb#y2k#smallweb#social networks#decentralized social media#social media
7 notes
·
View notes
Text
3 Game/Coding Resources!
I wanted to put together a few resources I found for people who might be planning to make games, or might be looking to learn coding!
The first resource is for anyone looking to learn how to code, build a portfolio, and get Certifications:
This is something I've recently been using myself and I can attest that it is an excellent resource!! They have many different paths you can learn, and right now I’m on the Responsive Web Design Certification. You can learn HTML and CSS, in order to create responsive pages. It teaches you through projects, where it breaks down different parts of the coding language and shows you how to use it. Some projects are optional, and some you have to complete in order to earn your certification. Certification projects don’t have instructions, only a rubric of what the project needs to be able to do, but you can learn all those skills in the optional projects! They also have Javascript, Frontend Development, Information Security… the list goes on! The website is run by a really cool non profit. I definitely recommend giving it a try!!
2. The second is for game developers who are looking for background music:
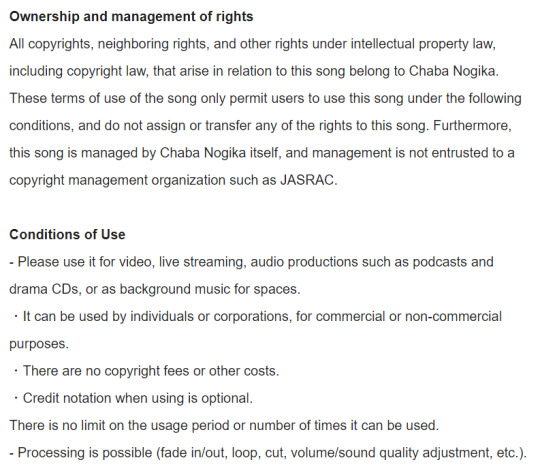
@/茶葉のぎか (Nogika Chaba on twitter) makes some really awesome 8bit-sounding BGM! And a lot of it is free for commercial/non commercial use!!
Make sure to check the description (you can translate to your language) for their policies. Many of their videos are tagged #freeBGM, which if you check their Pixiv Fanbox terms of service (in the desc of each video, please do check it before you use it) states that you are able to use the music in commercial/non commercial works:
2. The third resource is for students:
Whether you're a university student, college, high school, or elementary, Github gives you free Github pro, as well as a curation of free offers! You do need a piece of student ID (proof that you indeed belong to an institution, eg. report card, student card, etc), but it has a host of offers. Microsoft offers free cloud training through this, there are multiple offers for learning a new coding language for free (eg. Codedex free 6-month subscription, which will also give you certificates once completed), you can get free domain names, the list goes on! If you are a student, I highly recommend that you give it a try, since it's 100% free!
#coding resource#game resource#coding#free#background music#if you have any other resources#let me know!!
18 notes
·
View notes
Text
online resources for school! ꒱ ࿐ ࿔*:・゚

resoomer.com –> summarizes the text (you can set your native language)
wordcount.com –> counts words in document
speechinminutes.com –> counts how long it will take to read the prepared text (you can also set whether you speak slowly, quickly or normally)
essaytopicgenerator.com –> generates the topic of the essay based on keywords (the field or type of essay can also be included)
researchgate.net –> free texts that can be referred to in the essay
academia.edu –> free texts that can be referred to in the essay
Google Drive / Microsoft OneDrive and Office365 –> free cloud with tools to make slides, documents etc.
sites.google.com –> make free, simple website without any skills
carrd.co –> make free, simple and pretty website without any skills (max. 100 elements)
Online converters –> change file type to different file type
icons8.com –> free icons (for slides, sites etc.)
remove.bg –> remove background from photo
loader.to –> download YouTube video or playlist as video or sound files
forms.google.com –> make simple form/poll/quiz/etc.
quizlet.com –> make flashcards and test yourself (some things are only in pro version now)
Streaming services –> documentary films, educational podcasts etc.
artsandculture.google.com –> explore art, online museum tours etc.
plantsnap.com –> recognizes plants and mushrooms
ecosia.org –> web browser, but they plant trees when you use it
tunemymusic.com –> transfers music playlist (or text song list) to another service
shazam.com –> recognizes songs
slidesgo.com –> slides templates
thesaurus.com –> finds synonyms (you can easily find similar websites in your native language)
Apple reminders, google calendar etc. –> help organize
Online libraries –> free books
html-online.com –> write html, css and javascript online
supercook.com –> shows recipes with things you have at home
edx.org –> free courses
academicearth.org –> free courses
© anqelicdiary
4 notes
·
View notes
Text
Day 23 (11-26-23)
Today, I worked on the second module of my first course - Web Infrastructure Basics and Terminology. This course (and the certificate it's part of) are advertised as "for beginners", but most if not all of the instructional videos seem to expect the viewer to have some background knowledge of the subject. Mostly, they use niche-specific terminology without explaining it. How the hell am I supposed to learn something from a definition containing terminology I don't know? And it's not stuff most people would be familiar with just from using computers.
Thankfully I'm pretty decent at discerning definitions from context clues, and google can fill the gaps. My main problem is that it makes the course incredibly unapproachable and intimidating. I shouldn't have to parse over every phrase to be sure I understand its meaning. It's indicative of poor communication skills on the course developer's end if you ask me. If I'm going to teach someone to crochet, I need to cover the basics before I explain what a treble crochet or magic circle is. It feels like they're trying to explain a treble crochet to me when I don't even know how to chain yet.
I am EXTREMELY thankful to have some knowledge of HTML and CSS. I can only imagine the hell of trying to learn from scratch from whoever developed this course. For shame IBM!
Frustrations aside, I'm just glad to be making progress.
#accountability#adhd focus#adhd support#learning with adhd#learning#web development#front end development
3 notes
·
View notes
Text
Advanced Techniques in Full-Stack Development

Certainly, let's delve deeper into more advanced techniques and concepts in full-stack development:
1. Server-Side Rendering (SSR) and Static Site Generation (SSG):
SSR: Rendering web pages on the server side to improve performance and SEO by delivering fully rendered pages to the client.
SSG: Generating static HTML files at build time, enhancing speed, and reducing the server load.
2. WebAssembly:
WebAssembly (Wasm): A binary instruction format for a stack-based virtual machine. It allows high-performance execution of code on web browsers, enabling languages like C, C++, and Rust to run in web applications.
3. Progressive Web Apps (PWAs) Enhancements:
Background Sync: Allowing PWAs to sync data in the background even when the app is closed.
Web Push Notifications: Implementing push notifications to engage users even when they are not actively using the application.
4. State Management:
Redux and MobX: Advanced state management libraries in React applications for managing complex application states efficiently.
Reactive Programming: Utilizing RxJS or other reactive programming libraries to handle asynchronous data streams and events in real-time applications.
5. WebSockets and WebRTC:
WebSockets: Enabling real-time, bidirectional communication between clients and servers for applications requiring constant data updates.
WebRTC: Facilitating real-time communication, such as video chat, directly between web browsers without the need for plugins or additional software.
6. Caching Strategies:
Content Delivery Networks (CDN): Leveraging CDNs to cache and distribute content globally, improving website loading speeds for users worldwide.
Service Workers: Using service workers to cache assets and data, providing offline access and improving performance for returning visitors.
7. GraphQL Subscriptions:
GraphQL Subscriptions: Enabling real-time updates in GraphQL APIs by allowing clients to subscribe to specific events and receive push notifications when data changes.
8. Authentication and Authorization:
OAuth 2.0 and OpenID Connect: Implementing secure authentication and authorization protocols for user login and access control.
JSON Web Tokens (JWT): Utilizing JWTs to securely transmit information between parties, ensuring data integrity and authenticity.
9. Content Management Systems (CMS) Integration:
Headless CMS: Integrating headless CMS like Contentful or Strapi, allowing content creators to manage content independently from the application's front end.
10. Automated Performance Optimization:
Lighthouse and Web Vitals: Utilizing tools like Lighthouse and Google's Web Vitals to measure and optimize web performance, focusing on key user-centric metrics like loading speed and interactivity.
11. Machine Learning and AI Integration:
TensorFlow.js and ONNX.js: Integrating machine learning models directly into web applications for tasks like image recognition, language processing, and recommendation systems.
12. Cross-Platform Development with Electron:
Electron: Building cross-platform desktop applications using web technologies (HTML, CSS, JavaScript), allowing developers to create desktop apps for Windows, macOS, and Linux.
13. Advanced Database Techniques:
Database Sharding: Implementing database sharding techniques to distribute large databases across multiple servers, improving scalability and performance.
Full-Text Search and Indexing: Implementing full-text search capabilities and optimized indexing for efficient searching and data retrieval.
14. Chaos Engineering:
Chaos Engineering: Introducing controlled experiments to identify weaknesses and potential failures in the system, ensuring the application's resilience and reliability.
15. Serverless Architectures with AWS Lambda or Azure Functions:
Serverless Architectures: Building applications as a collection of small, single-purpose functions that run in a serverless environment, providing automatic scaling and cost efficiency.
16. Data Pipelines and ETL (Extract, Transform, Load) Processes:
Data Pipelines: Creating automated data pipelines for processing and transforming large volumes of data, integrating various data sources and ensuring data consistency.
17. Responsive Design and Accessibility:
Responsive Design: Implementing advanced responsive design techniques for seamless user experiences across a variety of devices and screen sizes.
Accessibility: Ensuring web applications are accessible to all users, including those with disabilities, by following WCAG guidelines and ARIA practices.
full stack development training in Pune
2 notes
·
View notes
Note
Hey I’m 20 now and new to programming cause the education system in my country isn’t that good…so where do you think I should start and is there any tip for someone like , absolute beginner..?? Is it too late..??? Also love your blog💕✨
Hiya! 💗
It's great to hear that you're interested in programming, and I'm glad you're finding value in my blog. It's literally never too late to start learning programming, no matter your age or background, so don't worry. I start properly pursuing programming at 19, same time I started this blog actually~!
Here some links from my blog that might be useful: my asks | my asks on how to get started
Here are some tips to get you started as an absolute beginner:
Choose a Programming Language: Start with a beginner-friendly programming language. Depends on what you want to program e.g. Web Development, Game Development, Machine Learning, you find out what you like and search up what programming languages are used in that field. Unsure? Start with JavaScript (probs learn HTML, CSS first) or Python, those my pick, to be honest.
Online Resources: There are numerous online resources and tutorials available for free. Websites like Codecademy, freeCodeCamp, MDN Docs, W3School, Coursera, and edX offer structured courses for beginners!
YouTube and Blogs: Many experienced developers share their knowledge through YouTube channels and blogs. You can find video tutorials and articles on a wide range of programming topics. I don't have a specific YouTube channel I follow, I just search up on the topic and watch a few videos on it. But I always go for the long videos e.g. 1-2 hours long for a bunch of information.
Books: Google "[programming language name] PDF books" pick a couple and study them.
Build projects > learning theory: Don't just absorb the information and do a couple practise questions on what you learnt, build a project on it! E.g. "I just learnt variables and loops in C#, let's build a student gradebook console app" I don't know~! APPLY your knowledge = wisdom.
Stay Consistent: Learning to code is a gradual process. Stay consistent with your learning, even if you encounter difficulties.
Check out the links above as it might help further questions and hope what I said helps!
#my asks#codeblr#coding#progblr#programming#studying#studyblr#learn to code#comp sci#tech#programmer#resources
2 notes
·
View notes
Text
Build with the power of code without writing any - Webflow
When you start a business, having a website is primordial. It’s useful to promote your products but also to introduce to your audience new products you made, what are your goals, and why you created this business/brand. But building a website without knowing how to program is quite difficult, even impossible for certain people. It happens to me. It was hard when you don’t know where to start. Then I discovered Webflow, that’s why I want to introduce this website to you.
Webflow allows you to take control of HTML, CSS, and JavaScript in visual canvas, generating clean and semantic code that’s ready to publish or to give to developers. It’s a cloud-based, “software as a service” (SaaS) design tool that runs in a web browser. The principle is easy: you design the website, and they generate the code, for everything from fully custom layouts to complex animations.
Webflow: https://webflow.grsm.io/website_creation
You can design a site from scratch in Webflow, but if you’d rather use a template and make it your own, you can choose from over 2,000 in the Webflow template library. Webflow’s templates are presented in various categories — for example, portfolios, design, blogs, medical, and e-commerce. The templates are of very high quality; they are modern and aesthetically pleasing. They include pre-built elements like data capture forms, background videos, and online store pages — and all of these are fully customizable.
#business#developers & startups#entrepreneur#programming#marketing#website customization#website creation#website
3 notes
·
View notes
Text

Video Background CSS
#video background css#full-screen video background#css#html#divinectorweb#frontenddevelopment#html css#css3#code#webdesign#homepage design html css
3 notes
·
View notes
Text
How to Stay Motivated While Learning to Code
Learning to code is one of the most powerful decisions you can make in today’s digital-first world. But let’s face it—coding isn’t always easy. There are days when bugs don’t go away, logic doesn’t work, and the motivation to keep going fades. That’s completely normal.
At Trendnologies, with branches in Chennai, Coimbatore, and Bangalore, we guide hundreds of students from different backgrounds—many with zero experience—into successful IT careers. Our students don’t just learn coding; they learn how to stay committed and motivated through practical support, real-world projects, and a 100% Job Placement Guarantee.

Let’s explore how you can stay motivated while learning to code, especially if you’re just getting started.
1. Set Small, Clear Goals
Don’t start by saying, “I want to be a full stack developer in six months.” Break that down:
Week 1: Learn HTML/CSS basics
Week 2: Build a simple webpage
Week 3: Start JavaScript
Celebrating small wins builds confidence and momentum.
At Trendnologies, our course structure is designed in micro-modules, so every achievement feels meaningful. From Day 1, you’ll feel the progress.
2. Build Real Projects (Not Just Tutorials)
Tutorial fatigue is real. Watching videos is helpful, but doing is learning. When you build a small calculator, a blog, or a portfolio site on your own, you start to see results—which is deeply motivating.
Our programs offer hands-on real-world projects from early stages to help you gain practical experience—not just theoretical knowledge.
3. Surround Yourself with a Coding Community
Learning alone can be lonely. Join communities—whether it’s on Slack, GitHub, or in person. At Trendnologies, we offer peer learning environments, coding labs, and group activities that make the learning journey interactive and social.
Ask questions, share doubts, and collaborate—it keeps the excitement alive.
4. Remember Why You Started
Whether you want a high-paying IT job, to shift from a non-IT background, or to build your own app, remind yourself of your “why.” Write it down. Stick it on your desk.
Your long-term goal should always be your biggest motivator.
Many of our students in Chennai, Bangalore, and Coimbatore start with no IT background—but with focus and consistent support, they transition into developer roles within 6 months.
5. Mix Learning with Practice
A good rule? 80% doing, 20% reading. Try to code as you learn, even if it’s just replicating examples. The sooner you apply what you learn, the stronger your skills get.
At Trendnologies, we follow a code-first approach. Every theory lesson is immediately followed by lab sessions where you implement what you’ve just learned.
6. Accept That Failure Is Part of Growth
Getting stuck is part of coding. Don’t see bugs as failure—see them as part of the process.
Our trainers provide individual mentorship, so you never feel stuck for too long. We help you understand mistakes and debug with confidence.
7. Track Your Progress
Use tools like GitHub to track your code, or maintain a simple coding journal. Watching your skills evolve over weeks and months gives a huge motivational boost.
In our courses, we maintain student dashboards to track performance, progress, and project completion milestones.
🔥 Stay Motivated with Trendnologies
At Trendnologies, we make the journey easier and more rewarding:
Real-time project training
Mock interviews + resume building
100% Job Placement Guarantee
Career support for freshers & career switchers
Flexible weekend & weekday batches
From Chennai to Coimbatore and Bangalore, our alumni are now placed in top MNCs, thanks to the guidance, structure, and community support they received during their learning phase.
🌟 Final Thoughts
The journey to becoming a developer may be challenging, but with the right mindset and environment, you can thrive. Stay consistent, stay curious—and don’t be afraid to ask for help.
Want to learn coding the right way and stay motivated throughout?
👉 Join Trendnologies today – where motivation meets results.
📞 Visit www.trendnologies.com or call us to book your free counselling session.
0 notes
Text
Get Started Coding for non-programmers

How to Get Started with Coding: A Guide for Non-Techies
If you ever considered learning how to Get Started Coding for non-programmers but were intimidated by technical terms or daunted by the prospect, you're in good company. The good news is that coding isn't for "techies" alone. Anyone can learn to code, no matter their background or experience. In this guide, we'll take you through the fundamentals of how to get started coding, whether you're looking to create a website, work with data, or simply learn how the technology that surrounds you operates. Why Learn to Code? Before diving into the "how," it's worth knowing the "why." Coding can unlock new doors, both personally and professionally. Some of the reasons why learning to code is worth it include: Problem-solving abilities: Programming allows you to dissect difficult problems and identify solutions. Career adaptability: More and more careers, from marketing to medicine, are turning to coding as a requirement. Empowerment: Code knowledge enables you to have a better understanding of the technology you're using daily and enables you to own your own project development. Creativity: Coding isn't purely logical—it's also about making new things and creating your own ideas. Step 1: Choose Your Learning Path Before you start, consider what you are most interested in. The route you take will depend on what you want to do. These are some of the most popular routes: Web Development: Creating websites and web apps (learn HTML, CSS, JavaScript). Data Science: Examining data, visualizing patterns, and making informed decisions based on data (learn Python, R, or SQL). App Development: Creating mobile apps for iOS or Android (learn Swift or Kotlin). Game Development: Building video games (learn Unity or Unreal Engine using C# or C++). Take a moment to determine which area speaks to you. Don't stress about choosing the "perfect" path—coding skills are interchangeable, and you can always make a change later. Step 2: Begin with the Basics After you've decided on your route, it's time to begin learning. As a novice, you'll want to begin with the fundamentals of coding. Here are some fundamental concepts to familiarize yourself with: Variables: A means of storing data (such as numbers or text). Data Types: Familiarity with various types of data, including integers, strings (text), and booleans (true/false). Loops: Doing things over and over again without writing the same code over and over. Conditionals: Deciding things in code using if-else statements. Functions: These are the Building blocks of code that can be reused to accomplish particular tasks. For instance, when you're learning Python, you could begin with a basic program such as: Step 3: Select the Proper Learning Material There's plenty of learning material out there for beginners, and the correct resource can mean a big difference in how rapidly you learn to code. Some of the most popular methods include: Online Courses: Websites such as Coursera, Udemy, edX, and freeCodeCamp provide sequential courses, and some of these are available free of charge. Interactive Platforms: Sites such as Codecademy, Khan Academy, or LeetCode offer in-the-code lessons that walk you through problems sequentially. Books: There are a lot of code books for beginners, such as "Python Crash Course" or "Automate the Boring Stuff with Python." YouTube Tutorials: YouTube contains a plethora of coding tutorials for beginners where you can work through actual projects. For complete beginners, sites such as freeCodeCamp and Codecademy are excellent as they enable you to code in the browser itself, so you don't have to install anything. Step 4: Practice, Practice, Practice The secret to mastering coding is regular practice. Similar to learning a musical instrument or a foreign language, you'll have to develop muscle memory and confidence. Practice Coding Challenges: Sites such as HackerRank or Codewars offer exercises that allow you to practice what you've learned. Build Small Projects: Begin with small projects, like a to-do list, a basic calculator, or a personal blog. This reinforces your learning and makes coding more rewarding. Join Coding Communities: Sites like GitHub, Stack Overflow, or Reddit's /r/learnprogramming are excellent for asking questions, sharing your work, and receiving feedback. Step 5: Don't Be Afraid to Make Mistakes Keep in mind that errors are all part of learning. While you're coding, you'll get errors, and that's completely fine. Debugging is a skill that takes time to master. The more you code, the more accustomed you'll get to spotting and resolving errors in your code. Here's a useful approach when faced with errors: Read the error message: It usually indicates precisely what's wrong. Search online: Chances are, someone else has faced the same issue. Platforms like Stack Overflow are full of solutions. Break the problem down: If something’s not working, try to isolate the issue and test each part of your code step by step. Step 6: Stay Motivated Get Started Coding for Non-Programmers. Learning to code can be challenging, especially in the beginning. Here are a few tips to stay motivated: Break goals into bite-sized pieces: Don't try to learn it all at once; set mini goals such as "Complete this course" or "Finish this project." Pat yourself on the back: Celebrate every time you complete a project or figure out a problem. Get a learning buddy: It's always more fun and engaging with someone learning alongside you. Don't do it in one sitting: It takes time to learn to code. Relax, be good to yourself, and enjoy the process. Conclusion Learning to Get Started Coding for non-programmers might seem daunting, but it’s possible with the right mindset and resources. Start small, be consistent, and remember that every coder, no matter how experienced, was once a beginner. By following these steps—choosing the right learning path, mastering the basics, practicing regularly, and staying motivated—you’ll soon gain the skills and confidence you need to code like a pro. Read the full article
0 notes
Text
How to earn money from freelancin
Earning money from freelancing skills involves a mix of choosing the right skill, marketing yourself effectively, and delivering high-quality work. Here's a step-by-step guide to help you get started:
1. Choose a Freelance Skill That Pays
Some high-demand freelance skills include:
Web Development (HTML, CSS, JavaScript, PHP, WordPress)
Graphic Design (Photoshop, Illustrator, Canva)
Content Writing & SEO
Digital Marketing (Facebook Ads, Google Ads, Email Marketing)
Video Editing
Data Entry & Virtual Assistance
App Development
Translation & Transcription
If you already have a CSE background, start with web development, tech support, or software-related services.
✅ 2. Build a Portfolio
Before getting clients, you need to showcase your work:
Create sample projects or case studies.
Use platforms like Behance, GitHub, or a personal website to display your work.
For writers or marketers, publish articles on Medium, LinkedIn, or a personal blog.
✅ 3. Join Freelancing Platforms
Top freelancing websites:
Upwork – Best for long-term clients.
Fiverr – Great for selling services (gigs).
Freelancer.com – Good for bidding on projects.
PeoplePerHour, Toptal, Guru, and 99designs (for creatives).
✅ 4. Create a Strong Profile
Your freelance profile should:
Highlight your skills clearly.
Include a professional photo.
Feature a compelling summary about your expertise.
Add certifications or training (if any).
✅ 5. Start Applying for Jobs or Creating Gigs
On Upwork or Freelancer.com, send custom proposals.
On Fiverr, create multiple gigs targeting different keywords.
Tip: Start with low-cost offers to get your first reviews, then gradually increase your prices.
✅ 6. Keep Learning & Upskilling
Clients prefer freelancers who are updated with the latest tools and trends. Keep practicing and:
Take online courses (Coursera, Udemy, LinkedIn Learning).
Earn certifications from Google, HubSpot, Meta, etc.
✅ 7. Deliver Quality & Get Good Reviews
Meet deadlines and communicate clearly.
Overdeliver when possible — it leads to better reviews and repeat clients.
✅ 8. Diversify Income Streams
Once established, you can also:
Sell digital products (templates, themes, eBooks).
Start a YouTube channel or blog around your skills.
Offer online courses or training.
0 notes