#what is css class 10
Explore tagged Tumblr posts
Visit Tumblr Blog
Explore Tumblr blogs with no restrictions, modern design and the best experience.
Last Seen Tumblr Blogs


Fun Fact
Tumblr.com rank in the US is 25.
Text
Dark Mode Work Skin for the fic To Be a Dragon Among Men

This is the code and urls for the custom dark mode work skin I made for my fic To Be a Dragon. Feel free to use it for your own works or for site skins, just remember to credit my user if you do.
[EDIT 25-03-18: Fixed padding for .frameborder class]
[EDIT 25-06-12: Added formatting rules for .poetry class and <p>]
Additional Resources
A Step-by-Step Guide to Work Skins from AO3 News - A great basic guide to what work skins are and how to make one.
How to Apply Work Skins to Others' Works by classygreydove - This is a guide I made on how to make a work skin into a site skin. You'll need to know this if you want to apply the work skin to any fic you want to read.
How to Change Work Skin Font by classygreydove - Don't like the font I use for the work skin? Don't worry, I'll show you how to change it.
Light Mode CSS - You can find the code for the Light Mode work skin here.
Light and Dark Mode Backgrounds - You can find the background images for the Light and Dark Mode work skins here.
Other Background Options - Here are a few mid-tone backgrounds that will have a lower contrast to the text.
Line Breaks (for Phone) - Do you like the custom dragon line breaks? Here's the phone-sized ones.
Line Breaks (for Wide Screens) - Do you like the custom dragon line breaks? Here's the laptop-sized ones.
[Code begins under Keep reading break]
#workskin .userstuff .hr, #workskin .hr, #workskin hr { height: 36px; width: 178px; background: url(https://64.media.tumblr.com/f19653c8c877dbe7a14e78434f1d0df6/d0f8688c32033f2d-b3/s250x400/6edcdac1e5614693d10491cff0725fd3633de77e.png); background-repeat: no-repeat; background-position: center; border: 0; }
#workskin { background: url(https://64.media.tumblr.com/f20ef324c5117a56d7dd2c8aa7e45151/4dcdf7c3c32cb0d1-68/s2048x3072/10c1120c78cd66a99c1067e6ed8b1addcd52ef57.png); background-repeat: repeat-y repeat-x; background-position: top; color: rgba(255, 255, 248, 0.85) !important; font-family: 'Georgia', 'Lucida Grande', 'Verdana'; }
#workskin a { background: linear-gradient(135deg, #b4853f 0%, #edc967 40%, #b4853f 80%, #705103 100%) !important; -webkit-background-clip: text !important; -webkit-text-fill-color: transparent !important; border-bottom: 0px; }
#workskin a:hover, #workskin a:active { background: linear-gradient(135deg, #b4853f 10%, #edc967 60%, #b4853f 80%, #705103 100%) !important; -webkit-background-clip: text !important; -webkit-text-fill-color: transparent !important; }
#workskin h2, #workskin h3 { line-height: 1.25; font-variant: small-caps; }
#workskin .userstuff blockquote { display: block; border: 2px solid #b4853f; border-image: linear-gradient(135deg, #b4853f 0%, #edc967 40%, #b4853f 80%, #705103 100%); border-image-slice: 1; padding: 15px 15px 15px 15px; margin-left: 1.5em; margin-right: 1.5em; }
#workskin .goldborder { display: block; border: 2px solid #b4853f; border-image: linear-gradient(135deg, #b4853f 0%, #edc967 40%, #b4853f 80%, #705103 100%); border-image-slice: 1; padding: 15px 15px 15px 15px; }
#workskin .frameborder { border: 2px solid #b4853f; border-image: linear-gradient(135deg, #b4853f 0%, #edc967 40%, #b4853f 80%, #705103 100%); border-image-slice: 1; padding: 0px; }
#workskin .mobilebreak { width: 178px; max-width: 100%; max-height: 100%; display: block; margin-left: auto; margin-right: auto; }
#workskin .textlink { font-variant: small-caps; }
#workskin .notesheading { font-size: 120%; font-variant: small-caps; font-family: 'Georgia', 'Lucida Grande', 'Verdana'; line-height: 2; }
#workskin .triggerwarning { color: rgba(240, 240, 240, 0.9); border-radius: 5px; background: rgba(128, 0, 0, 0.8); padding-left: 2px; padding-right: 2px; font-weight: bold; font-variant: small-caps; }
workskin .userstuff p { margin: 0; }
workskin .poetry { margin-inline-start: 1.5em; }
#ao3 skins#ao3 writer#ao3 fanfic#ao3 work skin#dark mode#the untamed#mo dao zu shi#To Be a Dragon Among Men
26 notes
·
View notes
Text
Coding Tutorial - Permalinks, Tags and Notes
I found this helpful so I wanted to share
Source: https://themesbyeris.tumblr.com/tutorial07
I couldn't reblog so I'm reposting.
Permalink
We are going to start this part of the tutorial by adding in the permalink. If you don’t know what that is already, it is the thing you click to go to view a post on an individual page. Tumblr makes this really easy. All you need is the following piece of code:<a href="{Permalink}">Text</a>
You can replace the word “Text” from the example above with an image, a note count, the date, or anything else text-based. For example, if we wanted the permalink to be displayed in dd/mm/yyyy format, we would write:{block:Date}DayOfMonthWithZero}/{MonthNumberWithZero}/{Year}{/block:Date}
Tip: Always wrap the date in the “block:Date” tags otherwise the date will show up on ask/submit pages too.
Here are a few other formats:{MonthNumberWithZero}-{DayOfMonthWithZero}-{Year} = 04-10-2012 {DayOfWeek}, {DayOfMonth} {Month} {Year} = Tuesday, 10 April 2012 {ShortMonth} {DayOfMonth}{DayOfMonthSuffix}, '{ShortYear} = Apr 10th, '12 {12Hour}:{Minutes}{AmPm} = 3:00pm {12HourWithZero}.{Minutes}.{Seconds}{CapitalAmPm} = 03.00.00PM {24HourwithZero}{Minutes} = 1500 {TimeAgo} = 1 hour ago
[Click here for all the ways you can format the date]
I will be using the {TimeAgo} tag for this example. But I also want to include in the permalink the notecount. This one is easier because there’s only two options for it.{NoteCount} = 1,938 {NoteCountWithLabel} = 1,983 notes
Naturally, this is also wrapped in those pesky block tags. This time it’s “block:NoteCount”. So if we put both the date and notecount together with the word “with” between them, it will look like this:<a href="{Permalink}"> {block:Date}{lang:Posted TimeAgo}{/block:Date} {block:NoteCount} with {NoteCountWithLabel}{/block:NoteCount} </a>
What we’re going to do with this piece of code is wrap it in a div and call it “permalink”, then put that div right after our main content, inside the “block:Post” tags (this is important).{block:Posts} ... [All your post types here] ... <div id="permalink"> <a href="{Permalink}"> {block:Date}{lang:Posted TimeAgo}{/block:Date} {block:NoteCount} with {NoteCountWithLabel}{/block:NoteCount} </a> </div>
Now that it is wrapped up in a div, we can style it. We don’t need to do much for this theme, since we did a lot of the styling in the content tag. The only things we need to specify here is the size of the font, and use the margin property to make a space between the permalink and the post above it.#content #posts #permalink { font-size:9px; margin-top:10px; }
Tags
The basic code for tags is this:{block:Tags}<a href="{TagURL}">#{Tag}</a> {/block:Tags}
Tumblr also gives us an extra block tag called “block:HasTags” since not all posts have tags. If you add in a pretty box or image for tags, it is not a good idea to have it still display when there are no tags at all. In this case I will be adding a div with the label “tags”, and putting this inside the secondary block tags.{block:HasTags}<div id="tags"> {block:Tags} <a href="{TagURL}">#{Tag} </a> {/block:Tags} </div> {/block:HasTags}#content #posts #tags { font-size:9px; }
Now I am going to show you a little trick. At the moment we have formatted the tags so that they will show up like this:
#tag one #tag two #tag three
But what if I want them to show up like this?
tag one, tag two, tag three.
Do you see the problem there? The last tag ends with a fullstop instead of a comma. The following would not work:{block:Tags} <a href="{TagURL}">{Tag}</a>, {/block:Tags}.
(Take note of the full stop outside of the “block:Tags” tag.)
tag one, tag two, tag three,.
Here’s a little trick to get around that. Just copy this code:{block:Tags} <a href="{TagURL}">{Tag}</a><span class="comma">, </span> {/block:Tags}.#content #posts #tags .comma:last-child { display: none; }
It’s the “last-child” bit in the CSS that tells the browser not to display the comma if it’s the last one in the line. We also used “span” instead of “div” because if we’d used div, it would have made a line break, which we don’t want in this case.
tag one, tag two, tag three.
Note Container
The note container is the bit where it lists everyone that has liked or reblogged a post, along with their comments if they made any. Naturally it only shows up on the permalink pages.
This one is going to be done a little differently to the previous two, and be placed outside the “posts” div we created (but it still has to be inside the “block:Posts” tags).{block:Posts} <div id="posts"> ... [A lot of stuff in here.] ... [Permalink] [tags] </div> [<--closes the "posts" div] Note Container {/block:Posts}
Note that you don’t HAVE to put the note container outside the “posts” div, it can be inside if you want. This is just how we’re doing it for this theme. All this means is that it won’t be inside those white boxes we made for each post.
The HTML part for this is simple. Just some block tags, and {PostNotes}. I have wrapped this in a div so we can style it using CSS.{block:PostNotes} <div id="notecontainer">{PostNotes}</div> {/block:PostNotes}
Now since we took the note container outside of the “posts” div, we need to re-establish the width and margins. A font size also needs to be specified here since that isn’t specified in any parent tags.#content #notecontainer { margin: 20px auto; width: 500px; font-size: 11px; }
Now if you look at the theme, you will be able to click through to the permalink pages and see the notes as a list. If there are a lot of notes, they will be labelled 1-50, and number 51 will contain a “Show More Notes” link. Having it numbered is the tumblr default, but it doesn’t actually look nice. We are going to go ahead and access the list using a built in tag called “ol.notes” (ol = ordered list, numbered list), and apply a property called “list-style-type” to remove the number system. I am also going to get rid of the default margins and padding that comes with the list, but padding can be added if you prefer to have the lines more spaced out.#content #notecontainer ol.notes { list-style-type: none; margin: 0; padding: 0; }
Lastly I am going to edit the little avatar next to each note. At the moment there is no space between the avatar and the name of the blogger, so I’ll be adding in a 10px margin. Plus just to be on the safe size I will include the size of the images.#content #notecontainer img.avatar { margin-right: 10px; width: 16px; height: 16px; }
Click here to see the code so far, and here for the live-preview.
In the next tutorial we will be finishing up this basic theme with adding in pagination and infinite-scroll. Then I will move on to tricks to make things look pretty like transition-effects.
#themes#tutorial#theme code tutuorial#coding tutorial#tumblr theme tutorial#theme tutorial#tutorials#code tutorial
4 notes
·
View notes
Text

Hello all! Thanks for tuning into this month’s update! We’ve got a few things on the docket.
Asset Update - Snowfoots!
We’ve continued updating the cat assets to sport cleaner lines, better flipability, and match more in-line with our more recent illustrations.
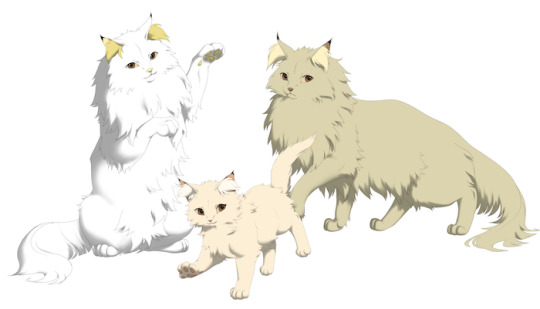

It’s night and day with these guys! We’re thrilled to be giving them a fresh coat of paint.
The Guild - Preview Page
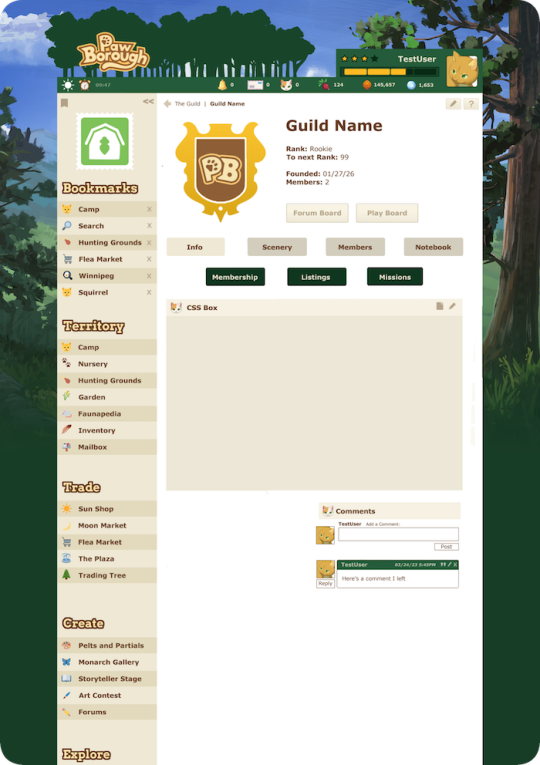
Leaders of a Guild will be able to import a custom emblem and edit the CSS boxes available! We’re so excited for this feature to help foster community storytelling and roleplay!
Want to play?
After trying it out for ourselves, we’re here to tell you all the battle mechanics as simply as possible, and give you the tools to try the combat system yourself with your friends!
If this is confusing and/or it’s your first time seeing or trying a game like this, we completely understand. By doing this, we are putting a lot of responsibility on you, the player, that would otherwise be on the software. We will try our best to supply pre-made components and a simple step-by-step instruction guide below.
If you want to try playing but still can’t understand everything, we recommend reaching out to a more experienced friend, or someone in our Discord, to help you out or play with you!
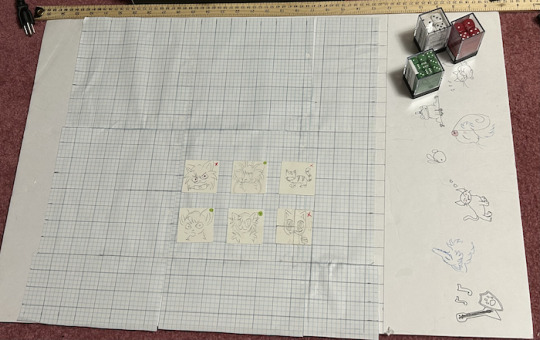
You need at least two people to play, and some dice! If you don’t have physical dice at home, try rolladie, or the Google dice roll function! Up to eight people can play with opposing teams of up to four!
Remember, if you’re playing with someone long distance, games are more fun if you’re faithful to the dice roll - no cheating!
Rules are below the cut!
If you’d like to build a character yourself, see the following steps:
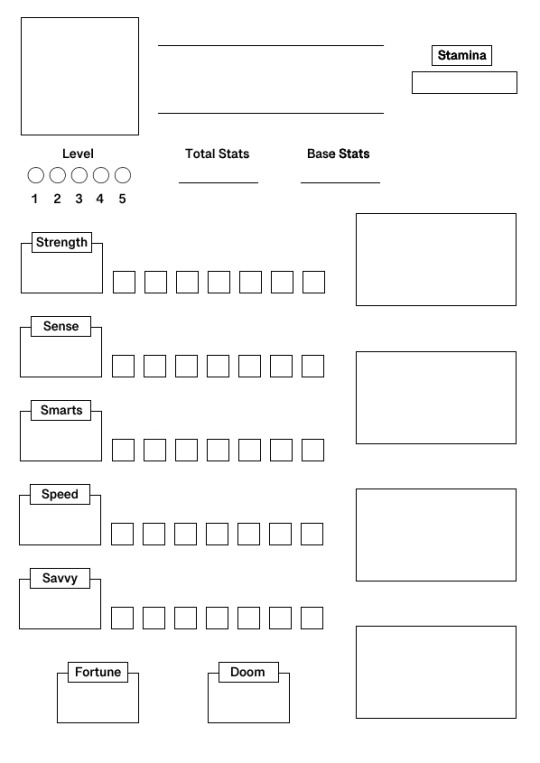
Step 1: Roll for Statistics
You can do this by using dice to simulate how the software will choose your cat’s statistics. The software will have weighted outcomes for balance, and we simulate this with specific dice.
For this step, you will be rolling 2 12 sided dice (d12) and 1 6 sided die (d6). These outcomes will be your stat points. A statistic can have between 0-30 points.
You must roll these 3 dice 6 times, and record what number the dice equal to each time you roll.
If you get a 3 during one of your 6 rolls, you then must roll a four sided die (d4). This is to ensure it is possible to get 0-2. Count the following number for these rolls:
1 = 1 point
2 = 2 points
3 = 4 points
4 = 0 points
Your six roll numbers will fill in the following categories:
Roll 1 = Strength
Roll 2 = Sense
Roll 3 = Smarts
Roll 4 = Speed
Roll 5 = Savvy
Roll 6 = Stamina
Lastly, roll a 20 sided die (d20) and record the outcome 2 times. These rolls equal:
Roll 1 = Fortune
Roll 2 = Doom
Fill these numbers in the corresponding categories.
Now, count how many blocks you have for each category (excluding Stamina). These blocks are also known as dice or chances. Their official name is pending, but they equal the amount of times your cat has to succeed or fail for a single roll!
0 - 4 points = 1 die
5 - 9 points = 2 dice
10 - 14 points = 3 dice
15 - 19 points = 4 dice
20 - 24 points = 5 dice
25 - 29 points = 6 dice
30 points = 7 dice
Erase the dice you do not have from the sheet!
If you are playing at level 1, you are done.
However, if you wish to level up your cat to try the different battle mechanics, choose your class, then see the following:
Choose your class first.
After each level, you are given 10 stat points to distribute however you please among the 6 different statistical categories. This does not include Fortune and Doom.
For example, if you are going from level 1 to level 5, add 40 stat points to your character.
Add your stat points, then add the corresponding dice to the number your statistical category is at. Remember that the 6 categories all cannot go above 30.
Step 2: Choose a Class
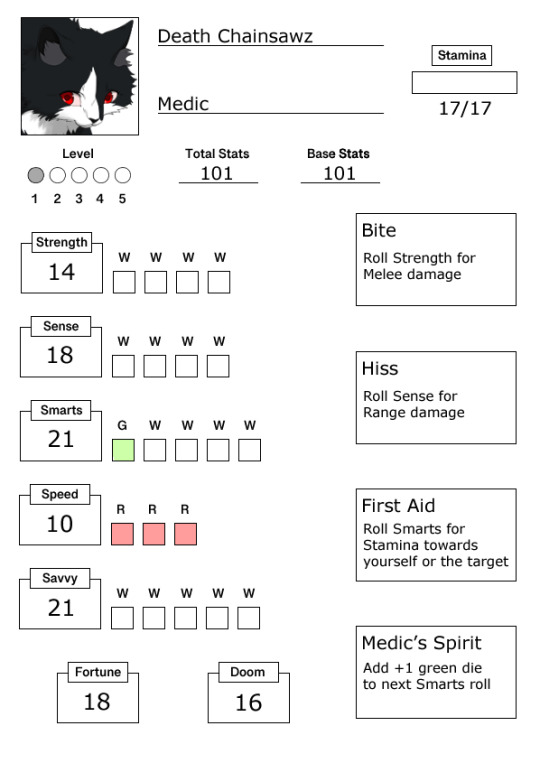
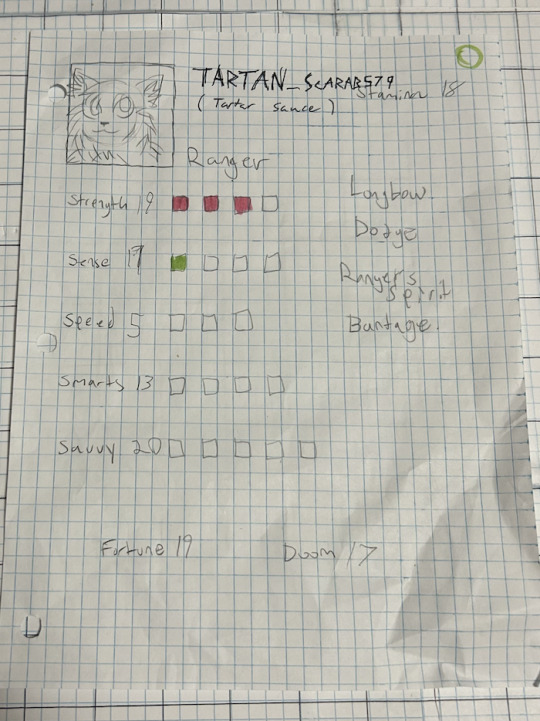
Generally, your character’s class should depend on your statistics. The 5 classes are Warrior, Ranger, Medic, Thief, and Bard. Each class favors one of the statistical categories.
If your highest statistic is Strength, pick Warrior.
If your highest statistic is Sense, pick Ranger.
If your highest statistic is Smarts, pick Medic.
If your highest statistic is Speed, pick Thief.
If your highest statistic is Savvy, pick Bard.
If you have statistics that match in number, then pick whatever you like most of the two! If you’re playing with other people, it’s best that you do not have 2 of the same class on one team (a team equals 4 characters.) You may want to talk to the people you’re playing with to coordinate the classes of your teams.
However, this is just a guide. You can choose whatever class you please!
Step 3: Distribute Red and Green Dice
Depending on your class, certain statistical categories are poor or favored. Favored categories will have green dice, while poor categories will have red dice. Red and green dice are dice which give you guaranteed successes or critical successes, and red dice are dice which give your guaranteed failures or critical failures.
If this is confusing to you, that’s okay! It may make more sense when reading the combat outline. Simply follow the instructions:
If you are a Warrior, change 3 of your Sense dice to red, and 1 of your Strength dice to green.
If you are a Ranger, change 3 of your Strength dice to red, and 1 of your Sense dice to green.
If you are a Medic, change 3 of your Speed dice to red, and 1 of your Smarts dice to green.
If you are a Thief, change 3 of your Savvy dice to red, and 1 of your Speed dice to green.
If you are a Bard, change 3 of your Smarts dice to red, and 1 of your Savvy dice to green.
Note that if you do not have 3 dice to make red simply replace the amount of dice you have. For example, if you are a Thief with only 1 die in Savvy, then make that 1 die red!
If you are playing at level 1, you are done.
Otherwise, the amount of red and green dice you have in these categories will grow and shrink depending on level. See the following:
At level 1: Cats have 3 red dice in the poor statistic, and 1 green die in the favored statistic.
At level 3: Cats have 2 red die in the poor statistic, and 2 green die in the favored statistic.
At level 5: Cats have 1 red die in the poor statistic, and 3 green die in the favored statistic.
Class will also change to subclass once you are level 2 or above! See the next section for further details.
Step 4: Add Your Moves
If you are level 1, all 4 of your moves will already be planned for you. The moves you have are dependent on your class.
There are 5 basic move types:
Melee damage: Roll Strength for the number depleting the target’s stamina. Each success equals 1 point. Must be one tile apart, and the target must roll Speed for a chance to miss. Cannot hit diagonally.
Range damage: Roll Sense for the number depleting the target’s Stamina. Each success equals 1 point. Can hit up to six tiles apart between the two parties, cannot hit only 1 tile apart, and the target must roll Speed for a chance to miss. Can hit diagonally.
Dodge: Increases the amount or type of dice in the next Speed roll the user does.
Heal: Roll Smarts for the number added to the target’s stamina. Each success equals 1 point. Can hit diagonally.
Status: Affects the amount or type of dice for any and all rolls. Placement limitations depend on the move. Stackable over multiple turns.
Level 1 Warrior
Strike - Roll for Melee damage
Shield - Change 1 die to green during next Speed roll
Bandage - Roll for Stamina restoration of oneself
Warrior’s Spirit - Add +1 green die to next Strength roll
Level 1 Ranger
Longbow - Roll for Range damage
Dodge - Change 1 die to green during the next Speed roll
Bandage - Roll for Stamina restoration of oneself Ranger’s Spirit - Add +1 green die to next Sense roll
Level 1 Medic
Bite - Roll for Melee damage
Hiss - Roll for Range damage
First Aid - Roll for Stamina restoration of either oneself or a target. Must be 1 tile apart from the target.
Medic’s Spirit - Add +1 green die to next Smarts roll
Level 1 Thief
Slash - Roll for Melee damage
Dagger - Roll for Range damage
Hide - Change 1 die to green during the next Speed roll
Bandage - Roll for Stamina restoration of oneself
Level 1 Bard
Taunt - Roll for Melee damage
Shout - Roll for Range damage
Protection - Change 1 die to green during the next Speed roll
Bard’s Spirit - Add +1 white die to all rolls for one round to the target. Can be used on any target regardless of distance. Cannot be used on oneself
If you are playing at level 1, you are done!
If your character is level 2 or above, your character will need to choose a subclass.
Subclasses solely affect a single, special move called a submove. Each subclass has a single submove, so each cat will only ever have 1 submove. This move replaces one of the four you already have, and will grow in power for each level. Each class has 3 subclasses with 1 submove each.
Warrior Subclasses:
A. Warrior of the Fang
B. Warrior of the Claw
C. Warrior of the Body
Warrior Submoves:
A. Fangs - Melee damage +1 white die to the Strength roll at level 2 At level 3, +2 white dice At level 4, +3 white dice At level 5, +4 white dice Replaces the move Strike
B. Claws - Melee damage Damage affects all enemies within a 12 space radius at level 2 At level 3, radius is 24 At level 4, radius is 36 At level 5, radius is 48 Replaces the move Strike
C. Bodyguard - +1 white die to next Speed roll used to dodge an attack provided said attack is Melee At level 3, +2 white dice At level 4, +3 white dice At level 5, +4 white dice Replaces the move Shield
Ranger Subclasses:
A. Ranger of the Rain
B. Ranger of the Wind
C. Ranger of the Clouds
Ranger Submoves:
A. Multi-arrow - Range damage +1 white die to Sense roll at level 2 At level 3 +2 At level 4 +3 At level 5 +4 Replaces the move Longbow
B. Dash - Gives the user 9 spaces of movement for 3 rounds at level 2
2 spaces at level 3
16 spaces at level 4
20 spaces at level 5
Replaces the move Ranger’s Spirit
C. Safeguard - +1 white die to next Speed roll used to dodge an attack provided said attack is Range At level 3, +2 white dice At level 4, +3 white dice At level 5, +4 white dice Replaces the move Dodge
Medic Subclasses:
A. Medic of the Heart
B. Medic of the Mind
C. Medic of the Soul
Medic Submoves:
A. Healing Kiss - Roll for Stamina restoration of oneself or the target. Must be 1 tile apart +1 white die to smarts roll at level 2 +2 at level 3
+3 at level 4
+4 at level 5
Replaces the move First Aid
B. Hospital - Roll for Stamina restoration of oneself or all allies within a 12 space radius at level 2
At level 3, radius is 24
At level 4, radius is 36
At level 5, radius is 48
Replaces the move First Aid
C. Necromedic - Heal by bringing a fallen (Stamina fully depleted) ally back with 1/3rd Stamina, siphoning said Stamina from an enemy
At level 3, 1/2 total Stamina
At level 4, 2/3rd total Stamina
At level 5, 100% total Stamina
Cannot be used if an ally has not fallen during the combat instance. At each use, user takes damage equal to half of the damage siphoned and healed. Limited use of 4 times per mission. Has no range limit for target for target. Replaces the move First Aid
Thief subclasses:
A. Thief of Shadow
B. Thief of Time
C. Thief of Space
Thief Submoves:
A. Shadowsneak - Add (not replace) +1 green die to the next speed roll at level 2
+2 at level 3
+3 at level 4
+4 at level 5
Replaces the move Hide
B. Go-getter - Puts the user first in initiative order for the next 2 turns at level 2
3 turns at level 3
4 turns at level 4
5 turns at level 5
Replaces the move Hide
C. Two-step - Allows the user to choose whether to attack or move first, as opposed to move, then attack
Lasts for 2 turns at level 2
3 turns at level 3
4 turns at level 4
5 turns at level 5
Requires a speed success roll to activate. Replaces the move Hide
Bard Subclasses:
A. Bard of the Night
B. Bard of the Day
C. Bard of the Dawn
Bard Submoves:
A. Screech - At level 2, all enemies within a 12 space radius have 1 red die replaced in their next roll
At level 3, radius is 24 and 2 dice are replaced
At level 4, radius is 36 and 3 dice are replaced
At level 5, radius is 48 and 4 dice are replaced
Replaces the move Bard’s Spirit
B. Sing - At level 2, all allies within a 12 space radius have 1 green die replaced in their next roll
At level 3, radius is 24 and 2 dice are replaced
At level 4, radius is 36 and 3 dice are replaced
At level 5, radius is 48 and 4 dice are replaced
Replaces the move Bard’s Spirit
C. Deafen - At level 2, all red dice are changed to white during the next roll of all allies within a 12 space range, and all green dice are changed to white during the next roll of all enemies within a 12 space range
At level 3, radius is 24
At level 4, radius is 36
At level 5, radius is 48
Replaces the move Bard’s Spirit
The spirit status moves also grow with level if they are not replaced:
At level 1: Class’s Spirit does +1 color die to the designated roll
At level 3: Class’s Spirit does +2 color die to the designated roll
At level 5: Class’s Spirit does +3 color die to the designated roll
Once you have determined your character’s statistics. class, level, potential subclass, and moves, it’s now time to get your teams together and battle!

A single cat square takes up 4 spaces. It is recommended that you place your cats randomly on the board, and that you have as many allies as there are enemies. Meaning, if you have two cats on the A team, put two cats on the B team!
Turn order is decided by the cat with the highest Speed statistic among the group. If two cats are tied for Speed, then automatic green or red dice in the Speed stat are calculated (cats with a green die in the Speed stat will trump a cat without a green die, and cats with a red die will fall below a cat without a red die.) If the Speed stat is still a tie, roll a D6 to determine who is above the other within the tie. Remember, odd numbers are outcome A and even numbers are outcome B.
A turn in combat takes 2 parts:
1. Move
2. Attack
A turn must take place in this order, move then attack, unless a move has been used to designate otherwise.
Movement depends on level:
Level 1 cats may only move 6 spaces
Level 2 cats may only move 7 spaces
Level 3 cats may only move 8 spaces
Level 4 cats may only move 9 spaces
Level 5 cats may only move 10 spaces
You do not have to move the full amount of spaces, and you do not have to move at all if you do not want to!
For diagonal movement, count the spaces horizontally and vertically! You may not move nor attack 6 full spaces diagonally, but you may move 3 spaces to the side and 3 spaces up (this is not the case for Range attacks, which can hit diagonally without the use of slope!)
Attack consists of any of the moves at your cat’s disposal.
Every time a cat is hit with a Range or Melee attack, they must roll to avoid the attack. Cats must roll a number above or equal to the number of damage that they are being attacked for. If this number is not met, all the damage hits!
Remember to always roll for Fortune and Doom before rolling for the outcome!
This is done by using a 20 sided die, and counting the roll as a success if the number is under or equal to the Fortune or Doom statistic. For example, if your Fortune is 15, you need a 15 or below to succeed. If your Doom is 20, you will always succeed at a Doom roll.
If you succeed on Fortune, replace a white die in your roll with a green die! If you have only red and green dice, replace a red die! If you have only green dice, do nothing.
If you succeed on Doom, replace a white die in your roll with a red die! If you have only red and green dice, replace a green die! If you have only red dice, do nothing.
For every roll for outcome, use the amount of six-sided dice that the statistic calls for, with the necessary red and green dice accounted for. A die landing on an even number equals a success, and a die landing on an odd number equals a failure.
For calculating red, green, and white dice, keep the following in mind:
White fail: 0
White success: +1
Green fail: +1
Green success: +2
Red fail: 0
Red success: -2
If you end up with a negative number during your roll, your cat takes damage equal to the negative number. If a cat rolls to attack and ends with a -1 roll, said cat will take -1 damage instead.
Or, if a cat rolls to dodge an attack but ends with a -1 roll, that -1 will be added to the damage taken from the attack.
You must always use an attack to end your turn.
To finish off this briefing on how to play, here are some valuable notes on experience from one of the team members that we tested with!
“If you decide to play with other people, you may choose to have one person work as a GM* and do all the dice rolling and math in-game. Having several people do it themselves can get confusing. If you find yourself in this role, here are some tips.
*GM is a tabletop RPG term that usually stands for game master. (If you've heard of a dungeon master from dungeons and dragons, it's the same thing.) Usually the game master is in charge of controlling non-player characters and the overarching story. However, for this, it's a little different.
1. Colored Dice
If you are using physical dice, I cannot recommend enough to make sure that your d6s (6 sided dice) are red, green, and white (or at the very least 3 distinct colors.) Remembering which one is which when they're all the same is a headache and a half. If you're using an online roller, using 3 separate tabs all with the same dice to keep them separate should do the trick.
2. Enemy Cats
The way we played was 2 teams of 3 cats, each of us controlling a cat on either team. Personally I think this is the best way to play, as one finds themself less caught up in actually winning and more focused on having fun playing a silly game with friends. However, you are welcome to control your cats any number of ways. You could have the GM control all enemy cats and players control their own cat, you could have two people play two teams of opposing cats; whatever you have the most fun doing!
#3 Fortune and Doom
This is easy to forget in the beginning. Whenever ANY cat rolls dice for ANY reason you HAVE to roll for Fortune and Doom first. Have 2d20 (two twenty sided dice) that are green and red (or at least different colors) on hand at all times. It will become second nature to you by the end of the game. Attacking? F&D first. Dodging? F&D first. Healing? F&D first.
#4 Character Sheets
If your character sheets are on physical pieces of paper, it's most useful to have them displayed where you and their player can see. You will both need to check these sheets frequently, and needing to ask: "What's your fortune? How many strength dice do you have? What's your class again?" Becomes annoying for both parties.
#5 Roleplaying
This is totally optional, however I highly recommend it. Talking about how your cat is stricken with grief because their teammate died when they missed their last attack roll is half the fun. Give them backstories! Give them relationships! The world is your oyster.
Final notes:
I personally did not test tile functions and cats above level 1. I plan to in the future, but if you decide to play this, let us know how it goes! Please, please, PLEASE tell us everything that happened if you do this yourself. We want to know both the drama and what technical issues you ran into. Show no mercy in ripping different mechanics apart! This is how we learn! Thanks for reading! Have fun!”
Now, knock eachother out!
To Summarize: We shared the improved renders of the Snowfoot breed, a preview page of what Guilds will look like, and a breakdown of what we are testing so you can play for yourself!
What to expect next month: Continuation of asset and development production.
28 notes
·
View notes
Note
Yo. How do you code? (I only know the basics to HTML and CSS :/)
Idk which specific question you’re asking, like like how do I code as in what tools do I use, or what do I do and what is my process, or how did I learn to code, or can you teach me to code
And because I don’t know I’ll answer all of them :3
1. What tools do I use?
I use a few things to code, VS Code for actually writing the code, GitHub for storing projects and collaboration, Google and StackOverflow and depending on the project various other apps
2. How do I do it and my workflow process
Uh I have like no idea, I kinda just learn how certain things work via Google and then I slot them together, But the workflow process, I know exactly how to do that, ok so get a white board or a notepad or something, write what you want your program to do, and then break it down into steps and then break it down again and again, so for example,
For my current project, (The Incorrect Quote Generator), I need to take inputs, from a list of quotes choose one that fits the parameters, replace names in the quote with the inputted ones and then print the whole thing
Breaking down the first bit I need the inputs, what inputs do I need? I need the amount of characters and the names of the characters, ok done, second bit, take the quotes, sort them based off of character amount, using the amount of characters from the previous step, pick a set of quotes that match, replace the names, last bit, take the quote with it replaced and done
Breaking down again, first bit, done already, second bit, do we want something like autocapitalisation to make it nicer , yeah sure, what about capitalising the entire name if it fits the circumstance, makes it smoother, done, last bit done
Ok what about formatting, do we want all of this on one line or do we want separate lines for each person speaking, yeah we want separate lines, ok use an “&” symbol to represent a space and when the piece of code that assembles the end string encounters it, print the string and reset continuing from where we are to make a new line
That’s the design process for that
But first you make a prototype of it, to see if it works, like I didn’t have the autocaps or anything at first, I only added that when one of the submissions needed it
Anyways-
3. How did I learn to code
Through a number of ways, first I had gone to this computer club thing when I was like 8 or something and I found Scratch and learned about that, then when I was about 10 I was curious about html and websites, so I ended up making websites for classmates, then lockdown hit and I had nothing to do, I wanted to make a game, so what did I do? I jumped headfirst into Unity and struggled to get absolutely anything done (DON’T DO THIS), at some point I ended up joining this thing called Coderdojo which is like a coding class which worked really well (I actually still go there every Saturday although I’m at more advanced stuff now) and I learned about python and then kept learning more, then I made my own projects and learned more on my own from that
If you are looking to learn on your own, I’d recommend W3Schools, they have tons of courses, are entirely free and very in depth
But first I’d recommend you check out Scratch, it’s great for learning how to think in computer terms
4. Can I teach you to code
I know this probably wasn’t what you were asking but I’ll answer it anyway
Sure, I’d love to, coding one of the things I enjoy a lot because it combines logic and making things, and I love helping and teaching people things so teaching someone else to code sounds good to me :3
Stuff mentioned here
5 notes
·
View notes
Text
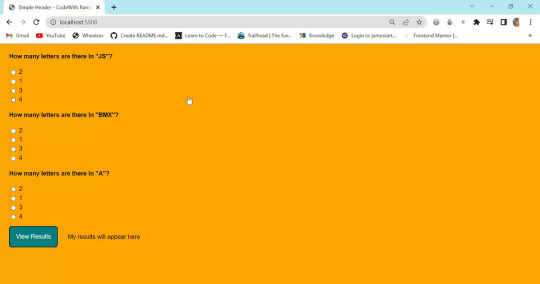
How To Make Multiple Choice Quiz In Html Code

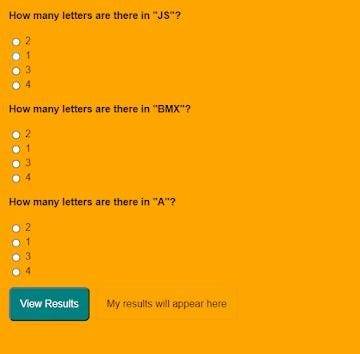
first, you play Multiple Choice Questions (MCQ) Quiz and then click on View results The results page will then be shown. This Multiple Choice Questions (MCQ) Quiz will be finished using JavaScript Code, a powerful language that allows for anything.
100+ JavaScript Projects For Beginners With Source Code
Live Preview Of Multiple Choice Questions Source Code and Preview:-
As you are looking in the project preview how the thing is organized.
Following is the feature of our project:-
We have arranged the Questions and options in the list format using the tag.
Then we set the option using span and defining the radio button and giving the appropriate value.
Multiple Choice Quiz Html Code:-
Now I’ll be telling you to define the structure using HTML. Not from scratch, just the code which is under the body tag.
We have the following part in the HTML section:
Portfolio Website Using HTML CSS And JavaScript ( Source Code)
First, we call the ul class which we have defined the class as a quiz.
Then using the tag we have set our question in the tag.
Then we used a label tag and called the radio button given the value and using span we have given the answer.
Similarly, we have done this for all the options and for all the questions.
Go through the code below and run it in our IDLE before CSS Styling.
<ul class="quiz"> <li> <h4>How many letters are there in "JS"?</h4> <ul class="choices"> <li> <label ><input type="radio" name="question0" value="A" /><span >2</span ></label > </li> <li> <label ><input type="radio" name="question0" value="B" /><span >1</span ></label > </li> <li> <label ><input type="radio" name="question0" value="C" /><span >3</span ></label > </li> <li> <label ><input type="radio" name="question0" value="D" /><span >4</span ></label > </li> </ul> </li> <li> <h4>How many letters are there in "BMX"?</h4> <ul class="choices"> <li> <label ><input type="radio" name="question1" value="A" /><span >2</span ></label > </li> <li> <label ><input type="radio" name="question1" value="B" /><span >1</span ></label > </li> <li> <label ><input type="radio" name="question1" value="C" /><span >3</span ></label > </li> <li> <label ><input type="radio" name="question1" value="D" /><span >4</span ></label > </li> </ul> </li> <li> <h4>How many letters are there in "A"?</h4> <ul class="choices"> <li> <label ><input type="radio" name="question2" value="A" /><span >2</span ></label > </li> <li> <label ><input type="radio" name="question2" value="B" /><span >1</span ></label > </li> <li> <label ><input type="radio" name="question2" value="C" /><span >3</span ></label > </li> <li> <label ><input type="radio" name="question2" value="D" /><span >4</span ></label > </li> </ul> </li> </ul> <button class="view-results" onclick="returnScore()">View Results</button> <span id="myresults" class="my-results">My results will appear here</span>
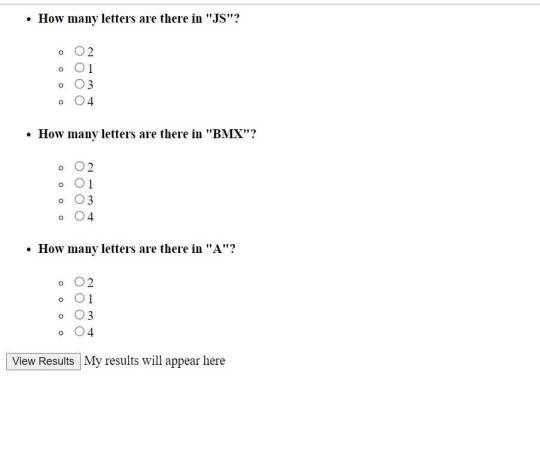
CSS Code For Styling Multiple Choice Quiz:-
By CSS design we will design our whole page here it is just a quiz so we’ll just add a background color, color to the button, and font family for the whole body.
And set the padding of the questions and options so that it doesn’t get messy and looks in a systematic order.
10+ Javascript Project Ideas For Beginners( Project Source Code)
The analysis will be aided by the CSS code below. After adding this file to your link rel-tag, wait for the results. We will add some of the basic styling to our quiz app using the default selector, and we will add styling to various quiz app elements using the class selector.
this is simple css code. we do not add any heavy css code because our main aim is to create Multiple Choice Questions (MCQ) functionality. if you need more Better Ui you can add more css code in this css section.

JavaScript Multiple Choice Quiz Code:-
In the JavaScript Code of Multiple Choice Quiz section, we will add logic for initializing our page. The logic must know what is correct and incorrect, So we’ll define there the correct option and then we’ll set that when the user clicks on the button the logic will generate and tell the user about his/her score.
Restaurant Website Using HTML and CSS
Through this blog, we have learned how to design Multiple Choice Quizzes using HTML, CSS & JavaScript.
Final Output Of Multiple Choice Quiz in HTML and JS Code:
Now I’m looking for some positive reviews from your side.
So, How was the blog Learners,
If you want a more interesting blog like this then please check our Blog sites. Stay tuned because every day you will learn something new here.
I hope that I’m able to make you understand this topic and that you have learned something new from this blog. If you faced any difficulty feel free to reach out to us with the help of the comment box and if you liked it, please show your love in the comment section. This fills bloggers’ hearts with enthusiasm for writing more new blogs.
Ecommerce Website Using Html Css And Javascript Source Code
Happy Coding
click and get full article and get complete source code
That’s it, folks. In this article, we shared 10+ Portfolio Website templates with cool and different designs.
Hope you liked this article. Share this with your fellow developers. Comment down below your thoughts and suggestions, we would love to hear from you.
See our other articles on codewithrandom and gain knowledge in Front-End Development.
Thank you and keep learning!!
follow us on Instagram: Ashutosh Mishra
2 notes
·
View notes
Text
How to Begin Your Web Design Journey: A Step-by-Step Guide in Simple Terms

Understanding the Basics:
Learn about HTML, which is like a web page’s skeleton.
Understand CSS, which is like makeup for web pages.
Know how to make websites look good on different screens.
2. Choose your tools:
Start with simple text editors like Notepad (for Windows) or TextEdit (for Mac).
Later, try fancier editors like Visual Studio Code.
For making pictures, try Adobe Photoshop or Illustrator.
3. Learn HTML and CSS:
Use websites like W3Schools or Codecademy.
If you want to learn more about web design with certification and placement, ACTE Institute offers comprehensive machine learning training courses that can give you the knowledge and skills necessary to excel in this field. Consider the infinite possibilities for data analysis, automation, and decision-making that machine learning may create.
YouTube: There are many video tutorials covering HTML and CSS for beginners.
They teach you how to make web pages and make them look nice.
You can also learn from courses on Coursera or edX.
4. Practice your skills.
Besides learning, make simple web pages to get better.
Try harder projects as you get more confident.
Make your own website to practice lots.
5. Responsive Web Design:
Make sure your websites work well on phones and computers.
Learn about media queries (they help your design fit different screens).
6. Master CSS Layouts:
Get really good at arranging web stuff using CSS (like making boxes and arranging them nicely).
7. Web Design Frameworks:
Think about using ready-made kits like Bootstrap.
They have pre-made pieces to help you design faster.
8. UI/UX Design:
Learn to make websites easy to use and nice to look at.
Think about how people will use your site.
9. Web Hosting and Domain:
To show your website to people, you need a place to put it (hosting) and a name for it (domain).
Lots of companies can help with this, like Bluehost or HostGator.
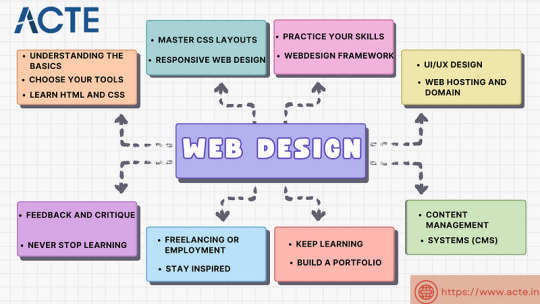
10. Content Management Systems (CMS):
Consider using tools like WordPress to manage your website easily.
11. Keep Learning:
Web design keeps changing, so keep learning new stuff.
Read blogs, watch webinars, and take more advanced classes.
12. Build a portfolio.
Make a collection of your best work to show others.
People who might hire you want to see what you can do.
13. Freelancing or employment:
Decide if you want to work alone or with a company.
Both ways have good things and not-so-good things, so pick what you like.
14. Networking:
Join groups of web designers to meet others like you.
Learning from others can help you become better.
15. Feedback and criticism:
Don’t be shy to ask for advice on your work.
When people give you tips, it helps you improve.
16. Launch your projects:
When you’re good enough, work on real websites.
Offer to make websites for friends or local businesses.
17. Stay Inspired:
Be creative and get ideas from different places.
Nature, art, and other designers can help you think of cool stuff.
18. Never Stop Learning:
Web design always changes, so keep learning new things.
Stay curious and open to learning more tricks and tools.
The secret to success in web design is to start with the fundamentals and gradually advance your abilities. Keep in mind that on this trip, patience and practice are the keys to success. As your skills advance, you’ll have the imagination needed to realise your ideas for websites. So put your hands in your pockets, launch your preferred coding editor, and start your web design experience!
4 notes
·
View notes
Text
IT Courses in Bangalore
If you're dreaming of a career in IT, there's no better place to start than Bangalore. From global tech companies to thriving startups, this city is at the heart of India’s digital revolution. Whether you're a student, recent graduate, or working professional, IT courses in Bangalore can give your career the boost it needs.

Why Choose Bangalore for IT Courses?
Bangalore isn’t called “India’s Silicon Valley” for nothing. Here's why it's the best place to learn IT:
Tech Ecosystem: Home to companies like Infosys, Wipro, TCS, IBM, and hundreds of startups
Job Opportunities: Massive demand for skilled professionals across software, data, AI, cloud, cybersecurity, and more
Top Institutes: World-class training centers, colleges, and online/offline hybrid options
Networking & Internships: Meetups, hackathons, and real-time projects to build your resume
Popular IT Courses in Bangalore
Here’s a list of high-demand IT courses along with the top institutes offering them:
1. Full Stack Web Development
Learn: HTML, CSS, JavaScript, React, Node.js, MongoDB Careers: Web Developer, Software Engineer
Top Institutes:
Masai School
Tap Academy
Crio. Do
2. Data Science & Analytics
Learn: Python, R, SQL, Machine Learning, Power BI Careers: Data Analyst, Data Scientist, BI Developer
Top Institutes:
Great Learning
IIIT Bangalore (with UpGrad)
Jigsaw Academy
IIBS Bangalore (PGDM – Business Analytics)
3. Cloud Computing & DevOps
Learn: AWS, Azure, Google Cloud, CI/CD, Docker Careers: Cloud Engineer, DevOps Specialist
Top Institutes:
Intellipaat
Edureka
NIIT Bangalore
IIBS Bangalore (Cloud Specialization)
4. Cybersecurity
Learn: Ethical Hacking, Network Security, Cyber Laws Careers: Cybersecurity Analyst, Ethical Hacker
Top Institutes:
Indian Institute of Cybersecurity
Hacker School
5. UI/UX Design
Learn: Design Thinking, Figma, Adobe XD, User Research Careers: UI Designer, UX Researcher, Product Designer
Top Institutes:
DesignBoat
Arena Animation
IIDE Bangalore
6. Artificial Intelligence & Machine Learning
Learn: Neural Networks, NLP, Deep Learning, Python Careers: AI Engineer, Machine Learning Specialist
Top Institutes:
IIIT Bangalore (PG Diploma with UpGrad)
IIBS Bangalore (AI Electives in MBA-IT/PGDM)
Edureka
Career Scope After IT Courses
Completing a course in Bangalore doesn’t just get you a certificate it gets you noticed.
Job Roles Include:
Software Developer
Data Analyst/Scientist
Cloud Engineer
Cybersecurity Specialist
UI/UX Designer
AI/ML Engineer
Starting Salary Range: ₹3–6 LPA With Experience: ₹10–25 LPA+
How to Pick the Right IT Course
Focus on your interest development, data, security, or design
Choose hands-on learning (real projects, internships)
Look for placement support or career mentorship
Ensure you get certification from a reputable institution
Final Thoughts
Bangalore is more than just a city; it's a career builder. From coding to cloud, analytics to AI, there's no limit to what you can achieve with the right IT course here.
So whether you’re upgrading your skills or starting from scratch, Bangalore is the place to be. Pick your course, get certified, and unlock exciting tech opportunities across India and beyond.
#leadershipdevelopment#management#business growth#internationalstudies#leadership#mba#mbajourney#careergoals#bangalore
0 notes
Text
Light Mode Work Skin for the fic To Be a Dragon Among Men

This is the code and urls for the custom light mode work skin I made for my fic To Be a Dragon. Feel free to use it for your own works or for site skins, just remember to credit my user if you do.
[EDIT 25-02-21: The URL for the page break image was incorrect. It has been replaced with the correct URL.]
[EDIT 25-03-18: Fixed padding for .frameborder class]
[EDIT 25-06-12: Added formatting rules for .poetry class and <p>]
Additional Resources
A Step-by-Step Guide to Work Skins from AO3 News - A great basic guide to what work skins are and how to make one.
How to Apply Work Skins to Others' Works by classygreydove - This is a guide I made on how to make a work skin into a site skin. You'll need to know this if you want to apply the work skin to any fic you want to read.
How to Change Work Skin Font by classygreydove - Don't like the font I use for the work skin? Don't worry, I'll show you how to change it.
Dark Mode Skin CSS - You can find the code for the dark mode skin here.
Light and Dark Mode Backgrounds - You can find the background images for the Light and Dark Mode work skins here.
Other Background Options - Here are a few mid-tone backgrounds that will have a lower contrast to the text.
Line Breaks (for Phone) - Do you like the custom dragon line breaks? Here's the phone-sized ones.
Line Breaks (for Wide Screens) - Do you like the custom dragon line breaks? Here's the laptop-sized ones.
[Code begins under Keep reading break]
#workskin .userstuff .hr, #workskin .hr, #workskin hr { height: 36px; width: 178px; background: url(https://64.media.tumblr.com/f849e48f47942db9d3ffe136de07193f/d0f8688c32033f2d-eb/s250x400/ed6b9f36c2bd22e6f33d2ec444eb9449fdea2cf7.png); background-repeat: no-repeat; background-position: center; border: 0; }
#workskin { background: url(https://64.media.tumblr.com/e26bf1c1315eb6d66c8a5f8ce150ef0a/4dcdf7c3c32cb0d1-dc/s2048x3072/0e5e9ff5b9d9e88aa8e7540746867bb95cdd5b75.png); background-repeat: repeat-y repeat-x; background-position: top; color: #172330 !important; font-family: 'Georgia', 'Lucida Grande', 'Verdana'; }
#workskin a { background: linear-gradient(135deg, #8f751b 0%, #dac76b 50%, #aa8c21 75%) !important; -webkit-background-clip: text !important; -webkit-text-fill-color: transparent !important; border-bottom: 0px; }
#workskin a:hover, #workskin a:active { background: linear-gradient(135deg, #8f751b 10%, #c9b44c 60%, #aa8c21 100%) !important; -webkit-background-clip: text !important; -webkit-text-fill-color: transparent !important; }
#workskin ::selection a { background-color: #6180ae; color: #ddebff !important; }
#workskin h2, #workskin h3 { line-height: 1.25; font-variant: small-caps; }
#workskin .userstuff blockquote { display: block; border: 2px solid #b4853f; border-image: linear-gradient(135deg, #8f751b 0%, #dac76b 50%, #aa8c21 75%); border-image-slice: 1; padding: 15px 15px 15px 15px; margin-left: 1.5em; margin-right: 1.5em; }
#workskin .goldborder { display: block; border: 2px solid #b4853f; border-image: linear-gradient(135deg, #8f751b 0%, #dac76b 50%, #aa8c21 75%); border-image-slice: 1; padding: 15px 15px 15px 15px; }
#workskin .frameborder { display: block; border: 2px solid #b4853f; border-image: linear-gradient(135deg, #8f751b 0%, #dac76b 50%, #aa8c21 75%); border-image-slice: 1; padding: 0px; }
#workskin .mobilebreak { width: 178px; max-width: 100%; max-height: 100%; display: block; margin-left: auto; margin-right: auto; }
#workskin .textlink { font-variant: small-caps; }
#workskin .notesheading { font-size: 120%; font-variant: small-caps; font-family: 'Georgia', 'Lucida Grande', 'Verdana'; line-height: 2; }
#workskin .triggerwarning { color: rgba(240, 240, 240, 0.9); border-radius: 5px; background: rgba(128, 0, 0, 0.8); padding-left: 2px; padding-right: 2px; font-weight: bold; font-variant: small-caps; }
workskin .userstuff p { margin: 0; }
workskin .poetry { margin-inline-start: 1.5em; }
#ao3 skins#ao3 writer#ao3 fanfic#ao3 work skin#light mode#the untamed#mo dao zu shi#To Be a Dragon Among Men
19 notes
·
View notes
Text
What is page speed and why is it important?

Introduction Think of clicking on a site and waiting. waiting. waiting. and then bouncing away. That's the power of page speed. In today's digital world where everything moves fast, users anticipate immediate access to information. If your site fails to load promptly, you're not just losing visitors but also damaging your search engine rankings and conversions. So, what exactly is page speed and why is it so important?
In this blog, we will demystify everything you should know about page speed, why it is crucial for your business, and how to optimize it—particularly if you're undertaking a digital marketing course in Tirupur or aspire to be a professional web optimizer.
What is Page Speed? Page speed is how quickly the content on your web page loads. It is typically expressed in seconds and impacts user experience as well as search engine performance. Google has defined page speed as "the time it takes to fully display the content on a specific page."
Some of the important measurements are:
Time to First Byte (TTFB): The time that elapses before the first byte from the server reaches the browser.
First Contentful Paint (FCP): When the initial content appears.
Fully Loaded Time: When the page is fully loaded.
Image: Infographic displaying TTFB, FCP, and Fully Loaded Time
Regardless of whether you are creating a blog or opening an e-commerce website, knowing page speed is essential—something discussed in all digital marketing classes in Tirupur.
Why is Page Speed Important? Page speed affects many areas of your online success:
User Experience
53% of mobile visitors leave a website if it loads in over 3 seconds. (Google)
Faster websites equal more user engagement and satisfaction.
SEO Rankings
Page speed is a proven Google ranking factor.
Quicker websites are crawled by search engine spiders more effectively.
Experts educated in a digital marketing course in Tirupur typically work on enhancing site speed to enhance visibility and engagement.
How to Optimize Page Speed
You are able to optimize your website's speed with these tools:
Google PageSpeed Insights
GTmetrix
Pingdom
Lighthouse (Chrome DevTools)
These tools offer actionable suggestions such as compressing images, minifying CSS/JS, and activating browser caching.
Page Speed Improvement Tips Below are some best practices to enhance your website loading speed:
Optimize Images: Compress big images or use WebP.
Enable Caching: Save server requests by caching static files.
Minify Code: Minify HTML, CSS, and JavaScript.
Use a Content Delivery Network (CDN): Deliver content through servers near your users.
Select a Good Hosting Provider: Shared hosting can hold you back.
These methods form the advanced modules of a digital marketing course in Tirupur so that learners can grasp practical applications.
Real-World Example Walmart discovered that for each 1-second gain in page load speed, conversions rose by 2%. Likewise, BBC outlined that they lost 10% of visitors for each second their website took to load. The relationship between speed and business success is indisputable.
Expert Insight As Neil Patel, digital marketing guru: "Page speed is the first impression you make. A slow site means a lost visitor, and potentially a lost customer."
If you are planning to take a digital marketing course in Tirupur, ensure it covers hands-on training on performance optimization.
Conclusion Page speed is not only a technical measurement–it's a business imperative. From enhancing user experience and SEO to increasing conversions, quicker sites perform better all around. With search engines increasingly favoring speed and mobile responsiveness, optimizing now is more important than ever.
Whether you're a small business owner or marketing student, knowing and optimizing page speed is important. Begin your journey with a reliable digital marketing course in Tirupur and develop the expertise necessary to make any website lightning-fast and SEO-optimized.
Level Up Your Digital Skills? Discover our blog for more guides, or get in touch with us today to find out about joining a certified digital marketing course in Tirupur!
0 notes
Text
What is Tailwind CSS React
Tailwind CSS React
Tailwind CSS is a modern way to style your website or app using utility classes. It helps developers design faster by writing classes directly in the HTML or JSX (in React).
In this guide, we will learn what Tailwind CSS is and how you can use it step-by-step in a React project.
🌟 What is Tailwind CSS?
Tailwind CSS is a utility-first CSS framework. This means it gives you ready-made CSS classes that you can use directly in your code.
For example:
htmlCopy
Edit
<button class="bg-blue-500 text-white px-4 py-2 rounded">Click Me</button>
In React, you can write these classes inside your className attribute.
⚛️ Why Use Tailwind CSS with React?
Speeds up the development process
Easy to make responsive designs
No need to write custom CSS for every component
Clean and consistent layout
✅ Step-by-Step: How to Add Tailwind CSS to a React Project
Step 1: Create a React App
If you don’t have a React app yet, create one using the command below:
bashCopy
Edit
npx create-react-app my-app cd my-app
Step 2: Install Tailwind CSS
Run the following command to install Tailwind CSS and its dependencies:
bashCopy
Edit
npm install -D tailwindcss postcss autoprefixer npx tailwindcss init -p
This will create two files:
tailwind.config.js
postcss.config.js
Step 3: Configure Tailwind
Open tailwind.config.js and add this under content:
jsCopy
Edit
module.exports = { content: ["./src/**/*.{js,jsx,ts,tsx}"], theme: { extend: {}, }, plugins: [], }
This tells Tailwind to look for classes in your React files.
Step 4: Add Tailwind to Your CSS
Open src/index.css and replace everything with the following:
cssCopy
Edit
@tailwind base; @tailwind components; @tailwind utilities;
This will load Tailwind’s default styles into your project.
Step 5: Start Using Tailwind Classes
Now, you can use Tailwind classes directly inside your React components.
Example (App.js):
jsxCopy
Edit
function App() { return ( <div className="text-center p-10"> <h1 className="text-4xl font-bold text-blue-600">Hello Tailwind!</h1> <p className="mt-4 text-gray-700">This is a React app using Tailwind CSS.</p> </div> ); }
Step 6: Run Your App
Now start the app:
bashCopy
Edit
npm start
Open your browser and go to http://localhost:3000. You should see the styles applied.
🎯 Summary
Tailwind CSS is a utility-first CSS framework.
It works well with React.
You don’t need to write separate CSS files.
You just write utility classes in your JSX.
It makes your design process faster and easier.
Using Tailwind CSS in React is a great way to build modern web apps with clean and responsive designs quickly.
0 notes
Text
Affordable website design in India
In an increasingly digital world, your website is your business's first impression—and often, its most important one. Whether you're a startup, an established business, or a growing brand, your website must be modern, responsive, and tailored to your audience. But what if you could achieve all of that without burning a hole in your pocket? Welcome to the world of affordable website design in India, where companies like ITFormula1 are making premium web experiences accessible for businesses worldwide.
Why Website Design Matters More Than Ever
A well-designed website goes beyond aesthetics. It builds trust, boosts conversions, improves search engine visibility, and ultimately drives revenue. From clear navigation and fast load times to mobile responsiveness and optimized call-to-actions, a strategic website can turn visitors into customers.
However, many businesses hesitate to invest in website design due to high costs in Western markets. That’s where India emerges as a game-changer, offering world-class design services at highly competitive prices.
Why India is a Global Leader in Affordable Web Design
India has earned a stellar reputation in the global IT and design outsourcing market, and for good reason:
1. Cost-Effective Pricing
India offers top-notch web design services at a fraction of the cost compared to agencies in the US, UK, or Australia. Businesses can save anywhere from 50% to 70% while still getting high-quality results.
2. Skilled Talent Pool
Indian web designers are highly experienced in platforms like WordPress, Shopify, Magento, React, and custom HTML/CSS solutions. With strong technical education and creative design sensibilities, they deliver international-grade results.
3. Latest Technologies and Trends
Indian companies stay updated with global design trends and leverage modern technologies, ensuring that your site doesn’t just look good—it performs exceptionally.
4. Time Zone Advantage
India’s time zone allows for fast turnarounds and near 24/7 project progress when collaborating with international clients.
What Does Affordable Web Design in India Look Like?
Here’s a rough breakdown of pricing you can expect from Indian web design companies:
Type of Website
Estimated Cost (INR)
Estimated Cost (USD)
Basic Static Website
₹5,000 – ₹15,000
$60 – $180
Business Website (5–10 pages)
₹15,000 – ₹30,000
$180 – $360
E-commerce Website
₹25,000 – ₹80,000
$300 – $960
Custom Web Application
₹50,000 and above
$600+
Note: These prices vary based on design complexity, content, custom features, and integrations.
How ITFormula1 Delivers Affordable Website Design Without Compromising Quality
ITFormula1 is a leading web design and digital solutions company based in India, dedicated to helping businesses of all sizes create a powerful online presence. We combine creativity, strategy, and technology to deliver affordable websites that don’t just look stunning—they convert.
What Sets ITFormula1 Apart:
✅ Customized Design Solutions – No templates. Every website we build is tailored to your brand identity and business goals.
✅ Responsive and Mobile-Optimized – We ensure seamless functionality across devices for the best user experience.
✅ SEO-Friendly Architecture – From meta tags to loading speed and structure, we build with Google in mind.
✅ Content Integration – Need help with web content? We also offer professional copywriting and image sourcing.
✅ End-to-End Services – From domain setup and hosting to post-launch maintenance, ITFormula1 is your all-in-one solution.
✅ Transparent Pricing – No hidden costs. We offer clear quotes and flexible packages suited for startups, SMEs, and enterprise clients.
Whether you're launching a product, showcasing your services, or building an e-commerce store, ITFormula1 is your trusted partner for affordable, high-performance website design in India.
Features of an Effective Website Designed by ITFormula1
We follow a proven framework to design websites that deliver results:
User-Centric Design: We prioritize ease of use with intuitive navigation and clear CTAs.
Fast Loading Speeds: Optimized images, clean code, and smart caching ensure speed and performance.
SEO Best Practices: Our design includes clean URLs, H1-H6 hierarchy, and mobile-first indexing.
Scalable Structure: Built to grow with your business, whether you're adding new products or launching new services.
Our clients, including businesses in healthcare, education, real estate, and e-commerce, have experienced measurable results in traffic, leads, and conversions thanks to our design strategies.
Why Businesses Across the Globe Choose Indian Web Design
The combination of cost-effectiveness, technical expertise, and creative excellence makes India a go-to destination for web design outsourcing. Whether you’re a US-based startup looking for a minimal landing page or a UK-based business building a full-scale online store, Indian web designers can deliver it—faster and for less.
At ITFormula1, we’ve worked with clients across the globe to deliver websites that stand out in crowded markets while keeping costs low and ROI high.
Conclusion: Build Your Online Success Story with ITFormula1
A professional, functional, and beautiful website shouldn’t cost a fortune—and with affordable website design services in India, it doesn’t have to. Companies like ITFormula1 are making it possible for startups, small businesses, and enterprises to unlock their digital potential without financial strain.
If you’re ready to grow your online presence, attract more leads, and convert more customers, ITFormula1 is here to help. With our creative design solutions and transparent pricing, we’ll turn your vision into a powerful digital asset.
#webdesign#webdevelopment#webdeveloper#webdesigner#webdevelopmentcompany#webdesigncompany#webdesignindia#webdevelopmentindia#uxdesign#uiuxdesign#affordablewebdesign
0 notes
Text
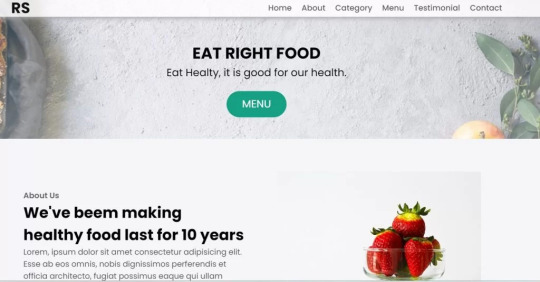
Restaurant Website Using HTML And CSS With Source Code
Restaurant Website Using HTML And CSS With Source Code
Hello coder, Welcome to the Codewithrandom blog. In this article, we create a Restaurant Website using HTML and CSS with Source Code. This is a Simple Restaurant Website with a main home page, types of food available, a food menu, customer reviews, and a contact form section on the restaurant website.
The HTML code for the Restaurant Website is the first thing we develop, and after that, the CSS for styling and JavaScript code. we add JavaScript for smooth scrolling on our website otherwise javascript is optional for this project.
Let’s Start a Responsive and Amazing Restaurant Website Using HTML and CSS. Let’s code a Simple website, We use 1,000+ lines of code to make our Restaurant Website Fully Responsive.
100+ HTML,CSS and JavaScript Projects With Source Code ( Beginners to Advanced)
Basic Knowledge About Project
It’s a front-end intermediate-level project that uses some advanced frameworks like CSS and JavaScript to make the project more elegant and responsive. We have provided you with the project with step-by-step explanations, which will help you better understand the project.
Before we dive into the step-by-step solution to the project, let’s understand some of the basic concepts about restaurant websites using HTML, CSS, and Javascript.
What is an online Restaurant Website?
An online restaurant website is a digital version of any restaurant that allows users to order food directly from the restaurant while sitting at home. These websites were created for customers who wish to eat restaurant food at home. The consumer can select items from the food menu and make payments for faster deliveries.
What are the benefits of Online Restaurant Websites?
reaches the maximum number of customers.
Easy to order
Hassle-free payments
increase in customer reach.
increase in profit.
Live Preview Of Restaurant Website Source Code:-
Restaurant Website Html Code:-
In this HTML code, we create a complete navbar for the footer structure of the restaurant website. first, we link our CSS and JavaScript files in html code. now we add a font awesome icon CDN link in the code because we create the What Our Customers Say section on the website and we show that review with a star so we use a font awesome icon.
Gym Website Using HTML ,CSS and JavaScript (Source Code)
then we create the structure of the navbar and it’s very important in our website because we create a responsive navbar in the project. then we create some simple sections of the restaurant website like what food is available and a food menu list.
and lastly, we create a contact form and a footer copyright line at end of the website.
This is almost 300 lines of HTML code for the restaurant website, and you can see the output below with only the HTML code output of the restaurant menu. Then we add CSS code for styling our restaurant website.
Output Of Only HTML Code For Restaurant Website:-

This is all image output that we create using only HTML code. Now the time is to style our restaurant website using css😍.
Restaurant Website HTML CSS Code:-
In CSS code we include Poppins font from Google font. then we style all sections of the website step by step. we write comments in CSS code so if you want to customize any of the restaurant website parts you can change that section code and it’s all done.
Responsive Resume/CV Website Using HTML & CSS
This is our whole CSS code with 600+ lines. We style our Restaurant Website step by step. We style the utility class and then style our navbar. After the navbar, we styled every html section🔥.
At the end of the code, we use media queries to make our Restaurant Website completely responsive and mobile-friendly. So you can see the output with CSS code. Then we add a little bit of javascript for the scroll effect otherwise our website is completely ready with code.
Ecommerce Website Using HTML, CSS, and JavaScript (Source Code)
Output Of HTML CSS Code Restaurant Website:-

You can see this awesome👏 output with HTML + CSS Code for Restaurant Website. Now we add JavaScript for smooth scrolling.
this is completely optional to add JavaScrpt to this project.
That’s it for our Whole restaurant website code. We write every useful code like making the website mobile-friendly and adding media queries for this. Add JQuery code for smooth scrolling on the restaurant website.
50+ HTML, CSS & JavaScript Projects With Source Code
[su_button id=”download” url=”https://drive.google.com/drive/folders/1Wx9W99uIH3WiO1nkz6aJYCuXVv_ibGmA?usp=sharing” target=”blank” style=”3d” size=”11″ wide=”yes” center=”yes” icon=”icon: download”]DOWNLOAD NOW[/su_button]
Final Output For Restaurant Website Using HTML and CSS Code
You can see this video output to see the complete output. You can see how smooth the website scrolls and this design.

Hope you like this Restaurant Website Project, we create your own and use this project in any project as a part project like the reviews section, and a contact form. If you need any more project-related frontend. Visit our homepage and you get 100+ projects💝.
Age Calculator Using Html Css Javascript ( Source Code )
if you have any confusion Comment below or you can contact us by filling out our Contact Us form from the home section. 🤞🎉
Code By – Sanket Bodake
was written by – Codewithrandom
FAQ For Restaurant Website
Which code editor do you use for this Restaurant Website project coding?
I personally recommend using VS Code Studio, it’s very simple and easy to use.
is this project responsive or not?
Yes! This project is responsive.
What is an online Restaurant Website?
An online restaurant website is a digital version of any restaurant that allows users to order food directly from the restaurant while sitting at home. These websites were created for customers who wish to eat restaurant food at home. The consumer can select items from the food menu and make payments for faster deliveries.
What are the benefits of Online Restaurant Websites?
1. Reach the maximum number of customers. 2. Easy to order 3. Hassle-free payments 4. Restaurant Like food at Home. 5. Increase in profit.
2 notes
·
View notes
Text

What is an online MCA?
In today's rapidly evolving digital world, technology plays a pivotal role in shaping industries, economies, and our daily lives. As a result, there is a growing demand for skilled professionals who can develop, manage, and innovate technologies. The full form of MCA is Masters in Computer Applications. The Master of Computer Applications (MCA) course is one such academic program that equips students with the necessary skills to meet the challenges and demands of the ever-growing IT sector. This program typically covers a wide range of topics, including software development, database management, and network security, ensuring that graduates are well-prepared for various roles in the tech industry. By combining theoretical knowledge with practical experience, an MCA degree can significantly enhance career prospects and foster innovation in technology-driven environments. An online MCA course is a flexible and career-oriented postgraduate program in computer science and applications designed for students and working professionals who want to gain expertise in computer science, IT, and software development without attending a physical class. MCA is a 2-year programming course. The full form of MCA is Masters in Computer Applications. Its syllabus teaches about networking, databases, software development, and many more. To take admission in MCA, a student must have a 10+2 B.CA, B.SC, B.Com, or B.A. degree with 50-60% marks. You must have completed your bachelor’s degree at any recognized university by UGC and AIU. You need a minimum of 50% marks to join the online MCA degree; if you have the required certificates of OBC/SC/ST/PWD, you will get 5% relaxation. The online MCA course offers numerous advantages, including flexibility, cost-effectiveness, and a wide range of career opportunities. It is the best option for individuals seeking to advance their knowledge in computer science and application while maintaining flexibility. It allows students to earn an accredited degree from the comfort of their homes, providing them with the skills necessary for a successful career in the tech industry.
About syllabus: the syllabus for online MCA course is programming language, data structure and algorithms, software engineering, database management, computer networks, web technologies, mobile computing, cloud computing, artificial intelligence and machine learning. In this programming, languages like Java, Python, and C++ are taught; apart from this, software development is done, which includes software design, testing, and debugging. At the same time, SQL, NoSQL, HTML, CSS, and AJAX are also complete.
benefit of pursuing an online MCA course:
The demand for skilled computer professionals is higher than ever, and completing an MCA opens the door for the best career opportunities. After doing this course, you can work in fields like project and program management, customer services, sales and business, development, engineering, hardware and software IT, information security consulting, teaching, and training, etc. Join the university 24x7 to take admission in the online MCA course and take your future forward in a bright direction.
Why choose an online MCA course?
An online MCA course is an excellent choice for students and working professionals who are interested in computer science and applications. The biggest advantage of an online course is that you do not need to attend classes physically; you can attend classes online from anywhere.
Top reasons to choose an online MCA course are:
learn from anywhere, cost-effective and affordable, flexible study schedule, high job demand and career growth, recognized and accredited degree, networking opportunities, access to online resources.
Top institutes offering online MCA courses:
1. Uttaranchal University
2. Lovely Professional University (LPU):
3. Amity University:
4. Manipal University Jaipur (MUJ):
5. Indira Gandhi National Open University (IGNOU):
Start your online MCA journey today and build a bright, future-proof career in IT. Join university 24x7 and get more information about the online MCA course and take admission easily.
0 notes
Text
What Are The Top Career Options & Scope After Completing BCA?

What is a BCA Degree?
BCA, or Bachelor’s in Computer Applications, is a degree that mainly focuses on preparing students to design and develop software applications. It is a three-year program that covers various programming languages, networking, database management and web management. In this blog, we will discuss career opportunities after BCA, its scope and BCA starting salary in India
How to decide on the right career path after BCA?
Without any further qualifications, it is impossible to have a successful career path in BCA. A BCA course, an individual can earn up to 7 lakhs per annum only. However, to boost your career, it is important to pursue some specialised courses like a postgraduate degree in a specialised field that you are most interested in.
There are various high-paying career options after BCA, choose a path based on your personal interest and forte.
Scope in BCA: List of emerging jobs after BCA
Software Developer
A software developer works on designing, programming, building and maintaining various software using many different skills and tools. They write codes using programming languages like Python, Java, C++, etc, to build softwares. A software developer is required in almost every industry and therefore is always in demand.
Web Developer
A web developer is responsible for building and maintaining websites and applications using HTML, CSS and Java. They make sure that the website is running smoothly on the internet. Businesses these days are increasingly relying on online presence, and therefore, web developers are needed worldwide.
Data Analyst
Data analysts handle, filter and interpret a company’s data. The growing reliance of companies on data to make a more personalised experience for users has boosted the demand for this job role
AI/ML Engineer
These engineers design and develop AI models and software that can make decisions based on data and information. In recent years, the job has experienced unimaginable growth and is now one of the highest-paying jobs if an individual is equipped with all the relevant skills and tools.
Cybersecurity Analyst
A cybersecurity analyst secures a company’s data and protects systems from any cyberattacks. The increased dependence on digital sources has made this job in trend. It is an important job role for a company that highly relies on data and digital platforms.
BCA Salary Expectations: what salary can you expect as a BCA graduate?
Job TitleAverage SalaryData Scientist 7-20 Lakhs per annumAI/ML Engineer8-20 Lakhs per annumSoftware Developer10-15 Lakhs per annumBlockchain developer 7-15 Lakhs per annumCyber security expert 5-18 Lakhs per annumTechnical support professional7-10 lakhs per annum
Further studies and certification options to enhance career prospects
After completing your bachelor’s in computer applications, pursuing a postgraduate degree (two-year program) like an MBA, MCA etc can enhance your portfolio.
Someone not interested in pursuing a master’s can also go for short-term certifications like that in various programming languages, digital marketing, mobile app development or cybersecurity.
Frequently Asked Questions (FAQs)
1. Is a BCA degree tough?
A BCA degree is a basic course and is not a challenging course to pursue. It further opens a wide range of opportunities and career options for an individual. For someone interested in learning about computer applications, programming languages, etc, it is the right course to opt for.
2. What is the eligibility criteria to pursue BCA?
Candidates for any stream like science, arts or commerce with a minimum of 50% marks in the 12th class can pursue a BCA course. For reserved categories like SC/ST, candidates with 45% marks in their 12th standard are also eligible.
3. What is the average starting salary of a BCA graduate?
The average BCA salary in India can range between 3-7 lakhs per annum. However, it increases with experience and can go up to anywhere between 8-20 lakhs per annum.
4. How long does it take to build a successful career after completing BCA?
After completing a three-year degree in top BCA specialisations, a graduate can secure an average-earning job of between 8 and 20 lakhs. However, if one decides to pursue further studies, they can either pursue an MCA or an MBA, a two-year program in a specific specialisation, to boost their resume and earn more.
5. Do I need to pursue an MCA after BCA for a better career?
Pursuing an MCA after BCA can significantly improve your career prospects and provide you with a deeper understanding of computer applications opening doors to more advanced career opportunities in every industry.
6. What are further study options after a BCA course?
After a BCA course, there are plenty of master’s courses, some of which are: MCA, MBA, MSc (IT), MIM and many more. These post-graduate courses can open various job options after BCA.
Source : Click Here
#bca course#after bca which course is best#bca job opportunities#career opportunities after bca#bca salary in india
0 notes
Text
What Are The Core Subjects In B.Tech Computer Science?

B.Tech in Computer Science Engineering (CSE) is one of the most popular engineering programs, focusing on computing technologies, programming, and system design. The curriculum is designed to equip students with theoretical and practical knowledge in various domains of computer science. Here are the core subjects that form the foundation of a B.Tech CSE program.
1. Programming and Data Structures
This subject introduces students to fundamental programming languages like C, C++, Java, and Python. It also covers data structures such as arrays, linked lists, stacks, queues, trees, and graphs, which are essential for efficient algorithm development.
2. Algorithms
Algorithms play a crucial role in problem-solving. Students learn about searching, sorting, dynamic programming, and graph algorithms. They also explore algorithm design techniques like divide and conquer, greedy algorithms, and backtracking.
3. Computer Networks
This subject covers networking fundamentals, including the OSI and TCP/IP models, data communication, network protocols, and security. It helps students understand how computers communicate over networks like the internet.
4. Database Management Systems (DBMS)
DBMS introduces students to relational databases, SQL, normalization, indexing, and transactions. Popular database systems like MySQL, PostgreSQL, and MongoDB are also studied in practical applications.
5. Operating Systems (OS)
Operating systems manage computer hardware and software resources. Topics include process management, memory management, file systems, scheduling algorithms, and concurrency in OS like Windows, Linux, and macOS.
6. Object-Oriented Programming (OOP)
OOP focuses on concepts like classes, objects, inheritance, polymorphism, encapsulation, and abstraction. Java, C++, and Python are commonly used languages for OOP principles.
7. Computer Architecture and Organization
This subject explores the internal structure of computers, including CPU design, memory hierarchy, instruction sets, and input/output mechanisms. It helps students understand how hardware and software interact.
8. Artificial Intelligence (AI) and Machine Learning (ML)
AI and ML are growing fields in computer science. Students learn about neural networks, deep learning, natural language processing, and AI algorithms that help in automation and decision-making.
9. Software Engineering
This subject focuses on software development methodologies, testing, maintenance, and project management. Agile and DevOps practices are commonly discussed.
10. Cybersecurity and Cryptography
Security is an essential aspect of computing. Topics include encryption techniques, network security, ethical hacking, and risk management to protect data from cyber threats.
11. Web Development and Mobile App Development
Students learn to design and develop websites using HTML, CSS, JavaScript, and frameworks like React and Angular. Mobile app development covers Android and iOS development using tools like Flutter and Swift.
12. Cloud Computing and Big Data
Cloud computing introduces platforms like AWS, Azure, and Google Cloud. Big data topics include Hadoop, data analytics, and distributed computing.
Conclusion
B.Tech in Computer Science covers a diverse range of subjects that prepare students for various career opportunities in software development, data science, AI, cybersecurity, and more. Mastering these core subjects will help students build a strong foundation for a successful career in the IT industry.
0 notes
Text
Full Stack Web Development Classes in Pune | Fusion Software Institute

What is Full Stack Web Development?
Full-Stack Web Development involves creating both the front-end and back-end of web applications, providing a complete development solution. Full-stack developers work on user interfaces, server logic, database interactions, and API integrations, ensuring a seamless experience from the client side to the server side.
Mastering full-stack web development allows professionals to build robust, scalable, and interactive web applications. By understanding both front-end and back-end technologies, full-stack developers can optimize performance, enhance user experience, and streamline the development process, making them highly versatile and valuable in the tech industry.
Book Demo
Expert Trainers
We are a team of 10+ Years of Industry Experienced Trainers, who conduct the training with real-time scenarios. The Trainers follow the Project-Based Learning Method in the Interactive sessions.
Mock Interviews and Preparations
Boost your confidence with mock interviews and thorough preparations, equipping you with the skills needed to ace your next job opportunity.
Live Projects
Learning journey through real-life industry projects, sponsored by top companies across various sectors, ensuring hands-on experience that prepares you for success.
Course Completion Certificate
After completing this course, receive a Fusion Training Institute certificate to boost your resume and advance your career!
Tools Used in This Course
HTML/CSS, JavaScript, React.js,
Git, Github
MySQL, PostgreSQL, MongoDB, Docker, Jira
#Fusion software institute#Pune#Fusioninstitute#Fusioninstitutekharadi#softwaretesting#Fullstackdevlopment
0 notes