#windows 10 user guide
Explore tagged Tumblr posts
Visit Tumblr Blog
Explore Tumblr blogs with no restrictions, modern design and the best experience.
Last Seen Tumblr Blogs


Fun Fact
Forty percent of Tumblr users are between the ages of 18 to 25.
Text
୭. ̥°⋰˚₊˚ ♱ ‧₊˚. ✶ .༄


welcome p1eces! we have finally made it to the second stage of piwontober 24’! writers have been assigned, prompts and dates are ready, and we are so excited to share this collaborative event with everyone here on the p1harmony tumblr community <3
we would also like to thank you all for applying <3 we tried to distribute the works as evenly as possible amongst members but you can always dm us with concerns! me and @sxfterhearts are here to guide and work with you all throughout this event!! if you feel as if you cannot post in a timely manner, or if you are one of the writers with two works and it’s too stressful to manage, don’t hesitate to reach out! we want this experience to be fun and not stressful 🧡
wc minimum: 1k words <3
note: this page/link will be the the full masterlist as well! we will link each work under each day as they are posted so this will be the main post to refer to from now on! also, writers have the option to choose as many prompts as they want from the three choices, so be aware that not all of them will be used in every work depending on what the writer envisions for the story 💟

PROMPT LIST + ASSIGNED WRITERS
୭. ̥°⋰˚₊˚ ♱ ‧₊˚. ✶ .༄
DAY 1: lingerie/first time/degradation with yoon keeho
writer: @hrts4christian
DAY 2: deep throating/wet dream/cum eating with choi taeyang
writer: @jiungsdaisy
DAY 3: phonesex/sexting/foreplay/dystopia with choi jiung
writer: @sxfterhearts
DAY 4: hunter/prey/blindfold/forced orgasm with haku shota
writer: @kissoulie
DAY 5: food play/biting/marks/drunk sex with hwang intak
writer: @kisseobie
DAY 6: roleplay/reunion sex/discipline with kim jongseob
writer: @strawberry-seob
DAY 7: praise kink/spanking/corruption with yoon keeho
writer: @written-by-3racha
DAY 8: gunplay/dirty talk/stockholm syndrome with choi taeyang
writer: @strawberry-seob
DAY 9: threesome/aftercare/gangbang with choi jiung & hwang intak
writer: @starryjiung
DAY 10: mirror sex/orgasm denial/amnesia with haku shota
writer: @seobover
DAY 11: sensory deprivation/public sex/choking with kim jongseob
writer: @yummyyumberries
DAY 12: pregnancy/formal wear/daddy kink with choi taeyang
writer: @jiungsdaisy
DAY 13: make-up sex/face sitting/blackmail with choi jiung
writer: @playerninth
DAY 14: overstimulation/massaging/begging with hwang intak
writer: @wispyxjae
DAY 15: double penetration/oral sex/jealousy with haku shota & kim jongseob
writer: @kisseobie
DAY 16: bath/shower sex/fingering/torture with yoon keeho
writer: @starryjiung
DAY 17: face-fucking/anal sex/shame/guilt with choi taeyang
writer: @sunflowerseob
DAY 18: hate/angry sex/competence kink/forced marriage with choi jiung
writer: @sxfterhearts
DAY 19: breath play/body worship/slave/master with hwang intak
writer: @leepace
DAY 20: hair-pulling/thigh riding/bondage with haku shota
writer: @seobover
DAY 21: size difference/window/balcony sex/powerplay with kim jongseob
writer: @kisseobie
DAY 22: sleepy sex/lactation kink/stalking with yoon keeho
writer: @written-by-3racha
DAY 23: sub/dom/temperature play/captive with choi taeyang
writer: @jiungsdaisy
DAY 24: seduction/against a wall/somnophilia with choi jiung
writer: @sminiac
DAY 25: breeding/masturbation/harem with ot6 p1harmony
writer: @kisseobie
DAY 26: A/B/O/accidental stimulation/incest with hwang intak
writer: @leepace
DAY 27: sixty-nine/glory hole/voyeurism with haku shota
writer: @kissoulie
DAY 28: creampie/edging/sex pollen with kim jongseob
writer: @sunflowerseob
DAY 29: age difference/teasing/forbidden with yoon keeho
writer: @hakuheartsoul
DAY 30: FREE CHOICE with yoon keeho
writer: @hrts4kyo
thank you 💝
୭. ̥°⋰˚₊˚ ♱ ‧₊˚. ✶ .༄
feel free share this post as widely as possible with your writer friends and use #piwontober24 to spread the word!
note for hashtags: use the prompt list #dlkinktober2024 and potentially tag the user @dreamlandcreations for prompt credits! writers, once again, please make sure to use the hashtag #piwontober24 under your writings so that they are easier to navigate for readers! happy smut writing! ✶
#piwontober24#p1harmony x reader#kpop writers#p1harmony#p1harmony smut#p1h#jongseob x reader#p1harmony drabbles#piwon#p1harmony scenarios#jongseob#kim jongseob#haku shota smut#haku shota#p1h soul#soul p1harmony#p1harmony reactions#p1harmony keeho#p1harmony soul#p1h theo#keeho p1harmony#yoon keeho x reader#yoon keeho#p1h keeho#keeho x reader#keeho smut#choi jiung#choi taeyang#jiung texts#piwon jiung
509 notes
·
View notes
Text

How to use DXVK with The Sims 3
Have you seen this post about using DXVK by Criisolate? But felt intimidated by the sheer mass of facts and information?
@desiree-uk and I compiled a guide and the configuration file to make your life easier. It focuses on players not using the EA App, but it might work for those just the same. It’s definitely worth a try.
Adding this to your game installation will result in a better RAM usage. So your game is less likely to give you Error 12 or crash due to RAM issues. It does NOT give a huge performance boost, but more stability and allows for higher graphics settings in game.
The full guide behind the cut. Let me know if you also would like it as PDF.
Happy simming!
Disclaimer and Credits
Desiree and I are no tech experts and just wrote down how we did this. Our ability to help if you run into trouble is limited. So use at your own risk and back up your files!
We both are on Windows 10 and start the game via TS3W.exe, not the EA App. So your experience may differ.
This guide is based on our own experiments and of course criisolate’s post on tumblr: https://www.tumblr.com/criisolate/749374223346286592/ill-explain-what-i-did-below-before-making-any
This guide is brought to you by Desiree-UK and Norn.
Compatibility
Note: This will conflict with other programs that “inject” functionality into your game so they may stop working. Notably
Reshade
GShade
Nvidia Experience/Nvidia Inspector/Nvidia Shaders
RivaTuner Statistics Server
It does work seamlessly with LazyDuchess’ Smooth Patch.
LazyDuchess’ Launcher: unknown
Alder Lake patch: does conflict. One user got it working by starting the game by launching TS3.exe (also with admin rights) instead of TS3W.exe. This seemed to create the cache file for DXVK. After that, the game could be started from TS3W.exe again. That might not work for everyone though.
A word on FPS and V-Sync
With such an old game it’s crucial to cap framerate (FPS). This is done in the DXVK.conf file. Same with V-Sync.
You need
a text editor (easiest to use is Windows Notepad)
to download DXVK, version 2.3.1 from here: https://github.com/doitsujin/DXVK/releases/tag/v2.3.1 Extract the archive, you are going to need the file d3d9.dll from the x32 folder
the configuration file DXVK.conf from here: https://github.com/doitsujin/DXVK/blob/master/DXVK.conf. Optional: download the edited version with the required changes here.
administrator rights on your PC
to know your game’s installation path (bin folder) and where to find the user folder
a tiny bit of patience :)
First Step: Backup
Backup your original Bin folder in your Sims 3 installation path! The DXVK file may overwrite some files! The path should be something like this (for retail): \Program Files (x86)\Electronic Arts\The Sims 3\Game\Bin (This is the folder where also GraphicsRule.sgr and the TS3W.exe and TS3.exe are located.)
Backup your options.ini in your game’s user folder! Making the game use the DXVK file will count as a change in GPU driver, so the options.ini will reset once you start your game after installation. The path should be something like this: \Documents\Electronic Arts\The Sims 3 (This is the folder where your Mods folder is located).
Preparations
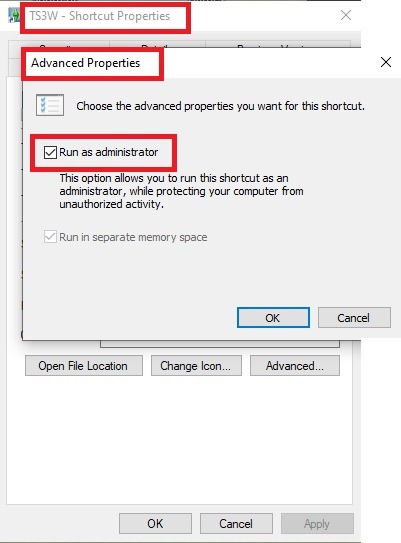
Make sure you run the game as administrator. You can check that by right-clicking on the icon that starts your game. Go to Properties > Advanced and check the box “Run as administrator”. Note: This will result in a prompt each time you start your game, if you want to allow this application to make modifications to your system. Click “Yes” and the game will load.
2. Make sure you have the DEP settings from Windows applied to your game.
Open the Windows Control Panel.
Click System and Security > System > Advanced System Settings.
On the Advanced tab, next to the Performance heading, click Settings.
Click the Data Execution Prevention tab.
Select 'Turn on DEP for all programs and services except these”:
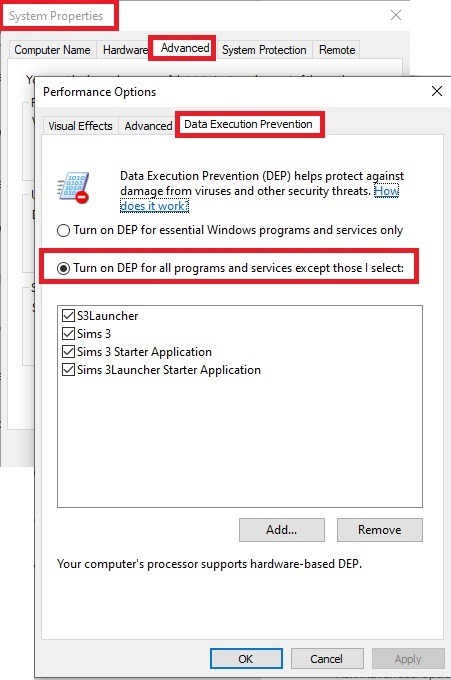
Click the Add button, a window to the file explorer opens. Navigate to your Sims 3 installation folder (the bin folder once again) and add TS3W.exe and TS3.exe.
Click OK. Then you can close all those dialog windows again.
Setting up the DXVK.conf file
Open the file with a text editor and delete everything in it. Then add these values:
d3d9.textureMemory = 1
d3d9.presentInterval = 1
d3d9.maxFrameRate = 60
d3d9.presentInterval enables V-Sync,d3d9.maxFrameRate sets the FrameRate. You can edit those values, but never change the first line (d3d9.textureMemory)!
The original DXVK.conf contains many more options in case you would like to add more settings.

A. no Reshade/GShade
Setting up DXVK
Copy the two files d3d9.dll and DXVK.conf into the Bin folder in your Sims 3 installation path. This is the folder where also GraphicsRule.sgr and the TS3W.exe and TS3.exe are located. If you are prompted to overwrite files, please choose yes (you DID backup your folder, right?)
And that’s basically all that is required to install.
Start your game now and let it run for a short while. Click around, open Buy mode or CAS, move the camera.
Now quit without saving. Once the game is closed fully, open your bin folder again and double check if a file “TS3W.DXVK-cache” was generated. If so – congrats! All done!
Things to note
Heads up, the game options will reset! So it will give you a “vanilla” start screen and options.
Don’t worry if the game seems to be frozen during loading. It may take a few minutes longer to load but it will load eventually.
The TS3W.DXVK-cache file is the actual cache DXVK is using. So don’t delete this! Just ignore it and leave it alone. When someone tells to clear cache files – this is not one of them!
Update Options.ini
Go to your user folder and open the options.ini file with a text editor like Notepad.
Find the line “lastdevice = “. It will have several values, separated by semicolons. Copy the last one, after the last semicolon, the digits only. Close the file.
Now go to your backup version of the Options.ini file, open it and find that line “lastdevice” again. Replace the last value with the one you just copied. Make sure to only replace those digits!
Save and close the file.
Copy this version of the file into your user folder, replacing the one that is there.
Things to note:
If your GPU driver is updated, you might have to do these steps again as it might reset your device ID again. Though it seems that the DXVK ID overrides the GPU ID, so it might not happen.
How do I know it’s working?
Open the task manager and look at RAM usage. Remember the game can only use 4 GB of RAM at maximum and starts crashing when usage goes up to somewhere between 3.2 – 3.8 GB (it’s a bit different for everybody).
So if you see values like 2.1456 for RAM usage in a large world and an ongoing save, it’s working. Generally the lower the value, the better for stability.
Also, DXVK will have generated its cache file called TS3W.DXVK-cache in the bin folder. The file size will grow with time as DXVK is adding stuff to it, e.g. from different worlds or savegames. Initially it might be something like 46 KB or 58 KB, so it’s really small.
Optional: changing MemCacheBudgetValue
MemCacheBudgetValue determines the size of the game's VRAM Cache. You can edit those values but the difference might not be noticeable in game. It also depends on your computer’s hardware how much you can allow here.
The two lines of seti MemCacheBudgetValue correspond to the high RAM level and low RAM level situations. Therefore, theoretically, the first line MemCacheBudgetValue should be set to a larger value, while the second line should be set to a value less than or equal to the first line.
The original values represent 200MB (209715200) and 160MB (167772160) respectively. They are calculated as 200x1024x1024=209175200 and 160x1024x1024=167772160.
Back up your GraphicsRules.sgr file! If you make a mistake here, your game won’t work anymore.
Go to your bin folder and open your GraphicsRules.sgr with a text editor.
Search and find two lines that set the variables for MemCacheBudgetValue.
Modify these two values to larger numbers. Make sure the value in the first line is higher or equals the value in the second line. Examples for values: 1073741824, which means 1GB 2147483648 which means 2 GB. -1 (minus 1) means no limit (but is highly experimental, use at own risk)
Save and close the file. It might prompt you to save the file to a different place and not allow you to save in the Bin folder. Just save it someplace else in this case and copy/paste it to the Bin folder afterwards. If asked to overwrite the existing file, click yes.
Now start your game and see if it makes a difference in smoothness or texture loading. Make sure to check RAM and VRAM usage to see how it works.
You might need to change the values back and forth to find the “sweet spot” for your game. Mine seems to work best with setting the first value to 2147483648 and the second to 1073741824.
Uninstallation
Delete these files from your bin folder (installation path):
d3d9.dll
DXVK.conf
TS3W.DXVK-cache
And if you have it, also TS3W_d3d9.log
if you changed the values in your GraphicsRule.sgr file, too, don’t forget to change them back or to replace the file with your backed up version.
OR
delete the bin folder and add it from your backup again.
B. with Reshade/GShade
Follow the steps from part A. no Reshade/Gshade to set up DXVK.
If you are already using Reshade (RS) or GShade (GS), you will be prompted to overwrite files, so choose YES. RS and GS may stop working, so you will need to reinstall them.
Whatever version you are using, the interface shows similar options of which API you can choose from (these screenshots are from the latest versions of RS and GS).
Please note:
Each time you install and uninstall DXVK, switching the game between Vulkan and d3d9, is essentially changing the graphics card ID again, which results in the settings in your options.ini file being repeatedly reset.
ReShade interface
Choose – Vulcan
Click next and choose your preferred shaders.
Hopefully this install method works and it won't install its own d3d9.dll file.
If it doesn't work, then choose DirectX9 in RS, but you must make sure to replace the d3d9.dll file with DXVK's d3d9.dll (the one from its 32bit folder, checking its size is 3.86mb.)
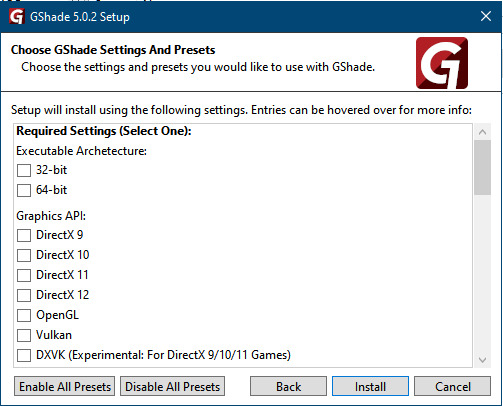
GShade interface
Choose –
Executable Architecture: 32bit
Graphics API: DXVK
Hooking: Normal Mode
GShade is very problematic, it won't work straight out of the box and the overlay doesn't show up, which defeats the purpose of using it if you can't add or edit the shaders you want to use.
Check the game's bin folder, making sure the d3d9.dll is still there and its size is 3.86mb - that is DXVK's dll file.
If installing using the DXVK method doesn't work, you can choose the DirectX method, but there is no guarantee it works either.
The game will not run with these files in the folder:
d3d10core.dll
d3d11.dll
dxgi.dll
If you delete them, the game will start but you can't access GShade! It might be better to use ReShade.
Some Vulcan and DirectX information, if you’re interested:
Vulcan is for rather high end graphic cards but is backward compatible with some older cards. Try this method with ReShade or GShade first.
DirectX is more stable and works best with older cards and systems. Try this method if Vulcan doesn't work with ReShade/GShade in your game – remember to replace the d3d9.dll with DXVK's d3d9.dll.
For more information on the difference between Vulcan and DirectX, see this article:
https://www.howtogeek.com/884042/vulkan-vs-DirectX-12/
726 notes
·
View notes
Text
How to run The Sims 3 with DXVK & Reshade (Direct3D 9.0c)

Today I am going to show you guys how to install Reshade and use Direct3D 9.0c (D3D9) instead of Vulkan as rendering API.
This tutorial is based on @nornities and @desiree-uk's awesome guide on "How to use DXVK with The Sims 3", with the goal of increasing compatibility between DXVK and Reshade. For users not interested in using Reshade, you may skip this tutorial.
If you followed nornities and desiree-uk's guide, it is strongly recommended that you start from scratch, meaning you should uninstall DXVK AND Reshade completely. Believe me when I say this: it will save you a lot of time, frustration, and make your life so much easier.
For the purpose of this tutorial, I am on patch 1.69.47 and running EA App on Windows 10, but it should work for version 1.67.2 on Steam and discs, too. This tutorial does not cover GShade.
Before we start
Backup your files, even the entire folder (Program Files\EA Games\The Sims 3\Game\Bin) if you want to be extra safe; you will thank yourself later. If you do not wish to backup the entire folder, at least backup the following:
reshade-presets
reshade-shaders
Reshade.ini
Options.ini (Documents\Electronic Arts\The Sims 3)
Keep them somewhere secure, for your peace of mind (and sanity).

Done? Great stuff, let us begin!
Step 1:
If you installed DXVK following nornite and desiree-uk's guide, go to the bin folder and delete the following files to fully uninstall DXVK, we are starting from scratch:
d3d9.dll
TS3.dxvk-cache
dxvk.conf
TS3_d3d9.log (or TS3W_d3d9.log)
Step 2:
If you already have Reshade on your PC, uninstall it using this: https://reshade.me/downloads/ReShade_Setup_X.X.X.exe (replace X.X.X with version number)
Step 3:
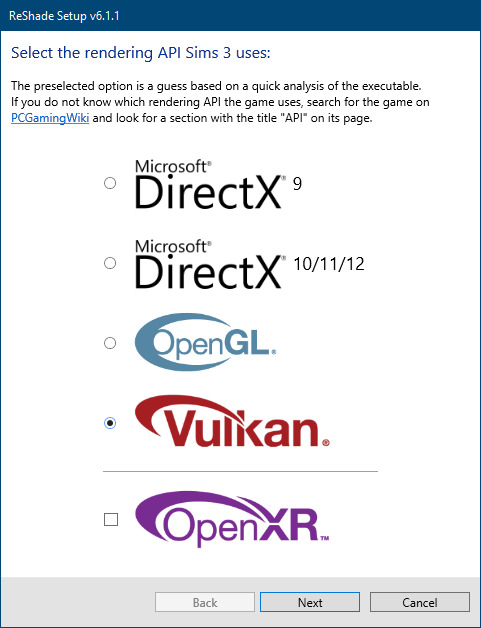
Perform a clean install of Reshade (I am using the latest version - 6.4.1 at the time of writing). Please note that you need a version no older than 4.5.0 or this method will not work. Choose DirectX9, click next.
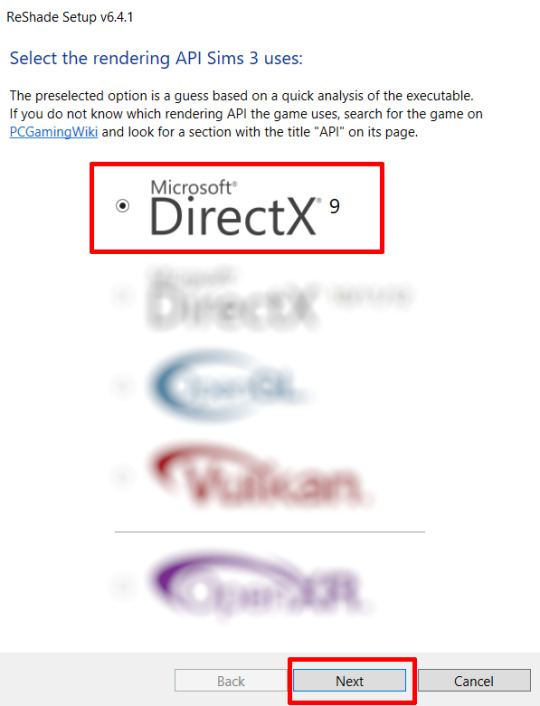
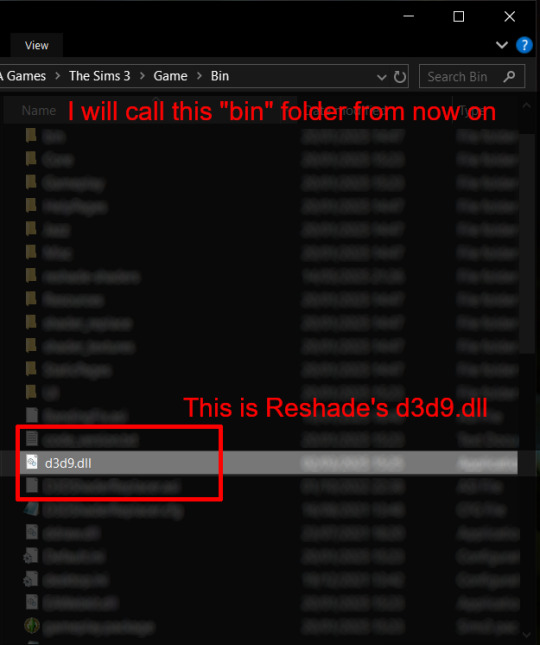
Once the installation is complete, you should see a "d3d9.dll" file inside The Sims 3's bin folder (Program Files\EA Games\The Sims 3\Game\Bin):
It may all seem familiar thus far. Indeed, this is how we installed Reshade in the past before using DXVK, but here comes the tricky part:
Step 4:
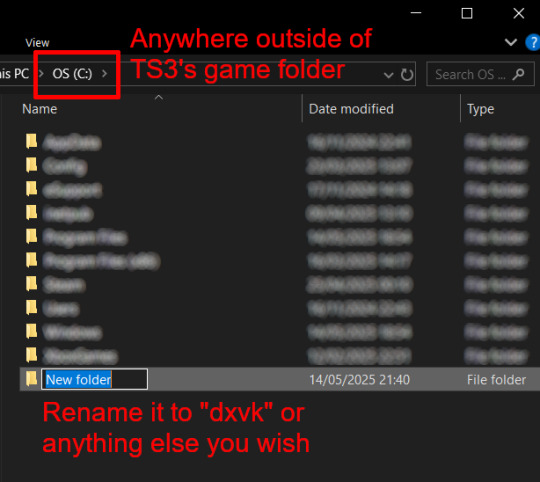
Create a new folder outside of The Sims 3's game folder (I created it on my C drive), name it "dxvk" or whatever else you like. Remember where you saved this folder, we will return to it later.
Step 5:
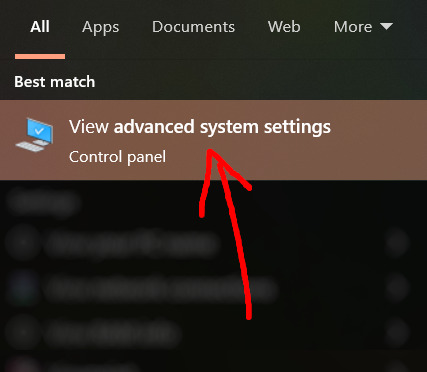
Now we need Reshade to load the next dll in order to chain Reshade with DXVK. Click on the search bar, and type in "View advanced system settings".
Click on "Environment Variables..."

Under "User variables", click "New..."
In the new pop-up window, find "Variable name:" and type in:
RESHADE_MODULE_PATH_OVERRIDE
for "Variable value:", paste in the directory that leads to the folder we created earlier. Once you are done, hit OK, and then hit OK again to save the changes made.
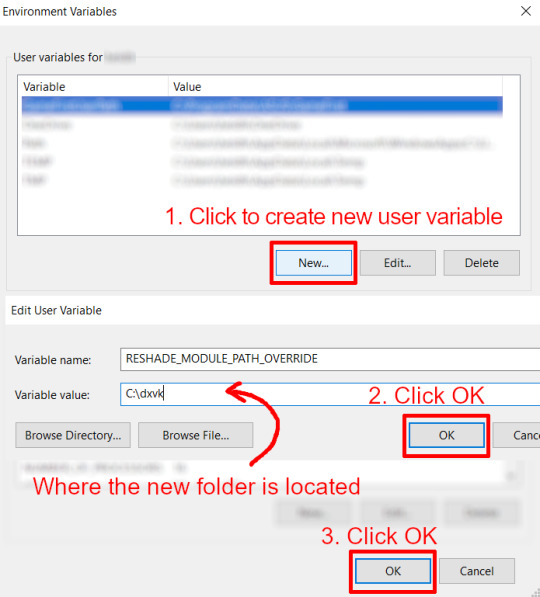
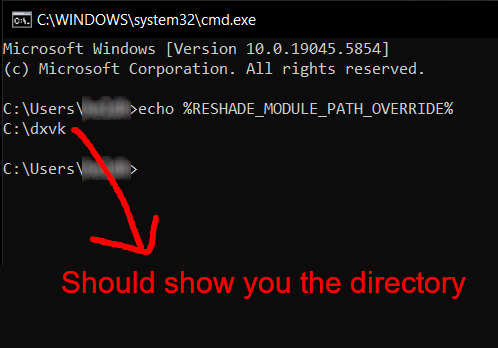
You can use Command Prompt to check if this new environment variable has been registered by entering:
echo %RESHADE_MODULE_PATH_OVERRIDE%
It should return you the folder's location. If not, make sure you have typed in the variable name correctly and confirm the folder's location.
Step 6:
Download DXVK (version 2.3.1) from here: https://github.com/doitsujin/DXVK/releases/tag/v2.3.1 and unzip "dxvk-2.3.1.tar.gz" (I use 7-Zip, but winRAR works, too). Remember to choose x32, and move only "d3d9.dll" to the folder we made earlier.
Now we have two "d3d9.dll" files, one from Reshade (lives in the bin folder), and the other from DXVK (in this new folder, outside of The Sims 3 game folder).

Step 7:
Download "dxvk.conf" here: https://github.com/doitsujin/dxvk/blob/master/dxvk.conf delete everything inside, and enter the following:
d3d9.textureMemory = 1 d3d9.presentInterval = 1 d3d9.maxFrameRate = 60 dxvk.hud = devinfo
Ctrl + S to save the document.
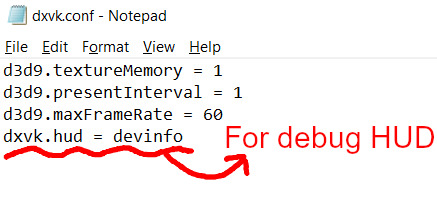
The first 3 lines are taken from @nornities and @desiree-uk's guide.
The last line is only for debugging purposes. Due to the inconvenient location occupied by the HUD (top left corner of your screen), it should be removed once the installation is successful.
Step 8:
Drag "dxvk.conf" into the bin folder, where Reshade's "d3d9.dll", "TS3.exe", and "TS3W.exe" all live.

Step 9:
Now fire up the game and check if both are showing up:

Lastly, check for “TS3.dxvk-cache” in the bin folder:
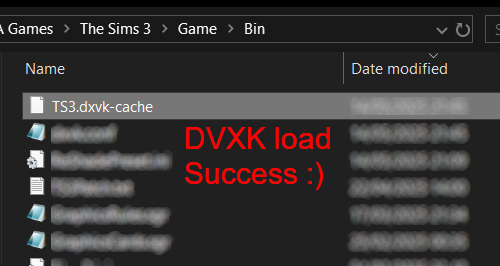
If it is there, congratulations! You have successfully installed DXVK and Reshade utilising D3D9 as API! You can now go to "dxvk.conf" and remove its last line "dxvk.hud = devinfo" and have fun! :)
Hope this tutorial isn't too confusing, the last thing I want is to over-complicate things. If you still need some help, comment down below or send me a DM/ask, I'll try and troubleshoot with you to the best of my ability.
Credits:
@nornities and @desiree-uk for their fantastic guide.
@criisolate for promulgating the usage of DXVK in TS3 community.
reddit user folieadeuxmeharder for helping me troubleshoot and informing me of this workaround.
doitsujin for creating DXVK.
crosire for creating Reshade.
112 notes
·
View notes
Text
My shitty Persona 6 idea
(self indulgent)
So the main idea is, all persona users have gone missing. SEES, Investigation Team, Phantom Thieves. All disappeared one night. (In the future by a decent amount)
The story starts five years later. A teen boy living on his own is on his way to school, leaving his small apartment to take the train. Light flashes through the windows, time seems to slow, and his head aches. Then, all is normal
But. As he's walking, people are staring. Following. He gets chased into an alley, where the world seems to warp around him and the people following him become shadows. A voice calls out to him, telling him to Wake Up, and he gets his persona. He opens his eyes and they glow, and after the fight, a woman approaches him with a dog at her side, a cat on her shadows
It's Nanako! She's an adult! Koromaru barks from beside her, and Morgana, from her shoulders, explains the basics and that they need to leave
Nanako explains that this kid is the last one she's been trying to find, and asks him if he'd like to help rescue his parents and save the world. He pauses, petting Koro, but agrees
And she takes him to a private academy, owned by the Kirijo group, and he gets a dorm and reunites with younger siblings he lost track of in the system. He meets some friends and goes to the basement after school to learn about the mission and stuff and meet the team
The woman leading the program? Sae Niijima. Nanako Dojima is able to stay awake in the Slumber, which is the persona world in this, so she's their Guide. She has been tracking the kids of the old persona users down with Sae, and taking care of Koromaru and Morgana
Edit; I FORGOT TO MENTION!!! Teddie is the velvet room attendant! He's got no memories and can't leave until the protag reaches the end of his journey. All he knows is that he has to leave
That's the concept. Under the cut are my ideas for the team
So. Here are my Persona Users!
It's a team of 10. Cause I say so. Three third year students, five second years, and one first year. Then, their "mascot", a Kirijo Group ward who somehow fused with their persona. As in they're half human half cognition
I'll go down in age order, the Protag's name will be in green so it's easier to recognize which one is him
Yakuya Takeba, Third Year student. Son of Yukari and Mitsuru
[name meaning: evening, amber, to carry on]
Yakuya is the oldest of the group. He's been under a ton of stress as the defacto proprietor of the Kirijo group, but since getting the support of Sae and Nanako, he's been able to kick back a bit
He's got honey brown hair, which he keeps just long enough for a little ponytail. It's pretty straight. Dark brown eyes. He's extremely fashionable, softboy core. Cardigans, slacks, he looks good. Always.
Yakuya is their leader on the ground in the Slumber. He's a fast thinker, very intelligent, but he's extremely dense. He says things and the others just. Stare at him. Cause there is no way he doesn't get the joke there. Right?
Ukiwa Narukami, Third Year student. Daughter of Yu and Yosuke
[name meaning: love, hope, peace]
Ukiwa has been living with Nanako since her dads went missing. She's been on this mission the longest, been able to stay awake in the Slumber the longest, most in tune with her persona
Messy silver hair, she's dyed her tips orange. Just reaches her shoulders. Big grey eyes, a very squishable face. Tactical fashion. She's more worried about finding her parents than looking nice. Pockets everywhere
Ukiwa is very focused on the mission. It's all she really thinks about. She was a huge daddy's girl for Yosuke, used to smile so big. Now she's just, so desperate to get them back. She doesn't get on the others for wanting to do things and have fun, but she won't join in. If she's not working in the basement area, she's working out or looking at old photos
Shinji Sanada, Third Year student. Son of Akihiko, and Kotone and Aigis
[name meaning: named after Shinjiro Aragaki]
He's biologically Akihiko and Kotone's son, and was split custody between Aki, and Kotone and Aigis. Shinji knows about Shinjiro, and warmly refers to him as his second father
Shinji keeps his hair shaved short. Clippers with a number 3 across his whole head. The fuzz is dark brown. Grey eyes. He looks big and bulky, and wears big hoodies with anime characters on them
He's the mom friend. Loves caring for people, it's his way of showing he cares. He's the party's main healer because of this! Between a stressed out Yakuya and a too dedicated Ukiwa, he's always pulling someone out of their dorm to eat. He makes sure the second years and first year aren't being pushed too hard
Hirohide Okumura, Second Year student. Son of Makoto and Haru
[name meaning: vast, outstanding]
Our protagonist. He has two younger siblings that have been living with Sae, but he got lost in the system. He's been bouncing around homes across Japan for five years, and has been a loner. He's eager to bring his family back together. His velvet room is House of Mirrors themed
Hiro has Makoto's leather jacket, and wears it whenever it's not too hot. He even wears it with his uniform. He looks like a mini Makoto, too. Red eyes, mused up brown hair. He's got a few piercings in his ears, wears a wallet chain and dark clothes, but has a bracelet with blue, pink, purple, yellow, and grey beads to represent his family members (purple and yellow are his siblings)
Hirohide has what I'm calling "resting Makoto face". A bit of a pouty frown, always looks kinda mad or like he's thinking too hard. But he's hella snarky. All of his dialogue options are snappy or snarky or just. Sarcastic.
Satoma Kujikawa, Second Year student. Son of Rise, Naoto, and Kanji
[name meaning: wisdom, defend]
Older twin. Biologically Rise and Kanji's. There is a third Kujikawa sibling, too young to help out. Satoma goes by he/they actually, and lives for the moment cause that's what their parents would want
Satoma has wavy brown hair, sort of the short long where it barely passes his ears, and dyes blue and purple highlights in it. To represent their dads. Grey eyes, needs glasses. Bro cannot dress well. Closet of cargo shorts, graphic tees with poorly translated phrases, and the loudest collared shirts
He's a total goofball. Doesn't think before he acts, has the most fun of anyone you've ever met. Cooks really well, can sew, epic cleaner, but he's in the chat asking who wants to push him down the big hill in a giant tire cause he got bored
Meika Kujikawa, Second Year student. Daughter of Rise, Naoto, and Kanji
[name meaning: bright, beautiful]
Younger twin. Bio parents are Rise and Kanji, but she was always closest with Papa Naoto. She's the top mark holder for the second year students, but she's usually daydreaming in class, or absent for other school activities or missions reasons
Meika looks remarkably like Rise, but she wears her hair in one ponytail. Well, before she dyed her hair dark blue/black. She also needs glasses, but can't keep track of them. Overalls wearer, but baggy and one strap down. Hoodie underneath, an older Risette tour hoodie she found in her parents' room
She's a bit floaty. When it matters most, she's able to keep up and get them out of tough situations, but otherwise it's hard to tell where her head is. She's also in the most clubs, and doing something at all times. She's in band, she's on student council, she plays tennis- it's like she's trying to keep herself distracted
Momori Amagi, Second Year student. Daughter of Yukiko and Chie
[name meaning: peach, orchid]
Middle Amagi daughter, but the oldest can't assist cause she got hella hurt and is recovering in the hospital. Momori is more determined to help, to make sure she's the last of the three to have to fight
Momori has very dark hair, nearly black, kept in A very neat braid. Warm brown eyes, and a few little freckles across her face. Stompy sneaks, fun printed skirts, and soft sweaters with mock collars on them
So loud. Big personality. Explosive, even. Moving always, very physical with her friends, she's always picking people up or latching onto them in big hugs, or tackling them. She is thinking of going into nursing after her big sister got hurt
Kyoai Suzui, Second Year student. Daughter of Ann and Shiho
[name meaning: fragrance, affection]
Kyoai is somewhat lucky, she still has one of her mom's around. Shiho still has to walk with a single crutch or cane, and struggles without Ann. But she's trying, for Kyoai and her son. Kyoai doesn't want to stress her mom anymore, so she hasn't told her she's trying to find her Mama
Her hair is a dirty blonde, real silky and fluffy, in a stylish bob. Dark eyes, a lil beauty mark by the right edge of her smile. Athletic wear central. Shorts over athletic leggings, tanks and jerseys and team shirts
She's the second in command for the chaos unit. She hates to worry her mom, doesn't want to make things worse for her, but she's also the first to volunteer for Satoma's ideas. She often makes suggestions that make them worse, even
Tatsuoki Sakamoto, First Year student. Son of Joker and Ryuji
[name meaning: to achieve, heart]
The youngest of the group, born sickly, it's Tatsuoki. He's been living with Mama Sakamoto, visiting with a torn up Sojiro. He used to be very close with Sumire and Futaba, since they were his godparents. He's the Navi of the group, and more tech-aligned than the others
Messy dark brown hair, half his head is dyed red, and dark eyes. He's got Ryuji's big smile, and Joker's eye for chaos. Gamer shirts. So many gamer shirts. Leblanc themed windbreaker, a casual pants boy, paint splattered shoes
Total agent of chaos. Drinks coffee a little too much, but he's often joining in with Satoma and Kyoai, to distract himself from missing everyone. Has the most joyous laugh you've ever heard
Atsurou, Ward of the Kirijo Group.
[name meaning: genuine, bright]
More info coming
----
HEY. THIS WAS A LOT FOR ME TO MAKE. SO. OD APPRECIATE SOME INTERACTION PLEASE
Also I'll totally post more if y'all want it
#persona 6#persona 6 idea#calling it#persona gen 6#persona 5#persona 3#persona 4#persona series#okujima#shihoann#yukamitsu#yosuke x yu#yukichie#kannaorise#ryuji x joker
53 notes
·
View notes
Note
do you have any tips/ comics to read to help characterise hawkeye? I wanna try and encompass all of his personality rather than the popular fanon one and im not as well versed on hawkeye pre-fraction. thank you 🙌
so i would definitely recommend clint's appearances in thunderbolts v1 (#9-10, 20-75) for some more "recent" but not "recent recent" clint, in that it's him post-accomplished avenger, in a team leader role where he's not facing the pressures of being a new leader (like in west coast avengers), but still in his classic duds and pre-disassembled era.
hawkeye v1 (1983) also works as his first solo if you want a classic sort of "parallel" to fraction hawkeye to ease you in first. i only say parallel in that it's clint off his game, so that might be easier for you to worm your way in (and obvs there was a lot of gruenwald inspiration that went into it). also, he meets bobbi! who can say no to bobbi?
if my initial rec of thunderbolts was daunting bc i said hey read 50+ issues, you can instead try solo avengers v1 (1987), #1-11 to start with. clint's stories are only in the first half of the issues, so it's 11 pages of "ah, so that's clint." it's bronze age comics so it's goofy, and who is goofy? is it the carny with the arrows shooting into tornadoes with southern accents, bottom half wearing a breechcloth, top half shirtless? of course it is.
and hey, i feel like "taking on an elder of the universe, getting worked up over baseball" also encompasses personality? perhaps? so try west coast avengers annual #2 & avengers annual #16. "but tumblr user bobbimorses, there's like 15 characters in that and it's a crossover." fret not, it's the 80s so it's not like modern event comics. your eyes can glaze over in a good way, but glazing is not necessary. love and light.
captain america v3 #4 he is annoying cap. he loves (annoying) cap. the people ignore him. he wants attention. he is kicked in the face by batroc. he denigrates the french. this is clint barton.
daredevil #99: this isn't actually important per se but clint is annoying and carrying a torch for natasha and beats up daredevil and a beautiful bay window and complains about how his teammates, the literal avengers, showing up is like his getting tattled on to his big brothers to drag him home so this is a microcosm of his attitude in the era of the late 60s to 70s.
i didn't rec anything post-fraction per the structure of your ask but you could read hawkeye: freefall if you're only versed with fraction? anyways that's just a tiny smattering of tastes that i hoped could cover different stages.
realized i didn't rec anything from the kooky quartet era which is also important to get a sense of him (though thunderbolts v1 #9 has a whole issue flashback), so you could just pick a random issue from avengers v1 #16-29, or just watch this video for a sample. ignore the startlingly deep voice, that's pretty much the whole gist
i think i actually lost track of the whole "tips" intent of your question while doing this but if you really wanna go crazy, you can just skim through my "full" clint chronology guide for some issue ideas. i also have a neglected recs tag for some different specific recs
#i just saw this in my inbox and saved to drafts to check the timestamp and you definitely asked this almost 2 months ago. my bad#but hey!!! if you still remember you asked this#hope you become versed#comic recs
25 notes
·
View notes
Text
If you don’t like Windows 10, Windows 11, or other mainstream desktop operating systems for whatever reason, consider using linux. It isn’t as hard as you think.
I switched from Windows 10 to Linux Mint a few months ago, and it went pretty smoothly for me.
Linux has a reputation for being difficult to use, and while it is somewhat deserved, it is quite overblown.
For myself, I think the hardest part of switching was installing Linux on my device. It required me to learn some new software and took about 3 hours on my first try. After setting up my laptop, it was pretty easy. The user interface took a few days to adjust to, and I fiddled around with some settings to my preference, but it was not difficult to adjust from Windows 10 to Linux Mint.
And if you can get someone else to install linux for you, all you need to do it get used to some user interface changes!
INSTALLING LINUX ON YOUR COMPUTER
Here’s an installation guide for Linux Mint if you want more detail than what I give. Link: https://linuxmint-installation-guide.readthedocs.io/en/latest/
You will need: a laptop or desktop, a USB stick, and USB writing software.
Download a linux ISO file. An ISO file is all the data used to install an operating system onto a computer.
Then you will need to download a USB writing program. Then you can use USB writing software to put the ISO file onto a USB drive. This will create the “bootable media” which will be used to install linux onto your computer. For installing Linux Mint on my device, I used Balena Etcher to write the ISO file.


64 notes
·
View notes
Text
It's remarkable how easy Linux Mint is to use, compared to Linux's general forbidding reputation. It was really easy to set up for me who has no coding knowledge. I had to fiddle with the boot order in my BIOS a bit but no biggie. Follow the installation guide on the website, and you will be fine. You can boot from an USB too, and test out the OS before installing it and wiping your drive. Transfer data to an external drive before you do.
And you probably won't have much trouble once it is installed either. The default settings are reasonable, and can be changed. It's a very easy to use OS. I have had no problems doing most of the ordinary things I use an OS for. My most used programs on Windows was already things like Firefox, VLC media player and Libreoffice on windows, and they function just as fine on Linux Mint (and are indeed installed by default).
Gaming has given me some trouble, but honestly Lutris has solved most of them. Granted I run mostly so old games on this laptop that Scummvm and dosbox is a solution for many of them. And installing 32 bit libraries has solved others (running the command in this link in the terminal solved so many issues alone). I play very old games, if you can't tell.
Sure, part of how Mint is so user-friendly is that it imitates Windows graphical user interface. But to be honest, it does mean users coming from Windows are already used to the interface. And Mint imitates only the parts of it that work, like the taskbar. And Microsoft has had a bad habit of making the gui look like a phone or a tablet for years now, so Mint does a Windows-like gui better than Windows at this point.
Mint is better than Windows in being a user-friendly operating system in general. Windows being spyware and full of bloatware is well-known and LInux gets away from that bullshit. And just how polite MInt is about updates is a massive improvement. No forced reboots here while an update takes ages to install.
Mint is a long-term support distro, which means it focuses on stability over the latest updates to packages and programs, introducing updates not when they are first released, but after a while when any bugs have been ironed out. And that improves the OS's stability a lot, which I value over getting bleeding edge updates. If you want updates as soon as they happen, and are willing to tinker a bit to fix things, there are other distros which use a rolling-release model.
It is less demanding on the hardware without compromising functionality. Like the majority of Linux distros takes up way less space on the drive and less memory compared to Windows, you can get more life out of an old computer this way.
There are so many older computers that still function fine hardware-wise, but since the specs on that hardware are too weak to switch to a newer more-resource hungry version of Windows, the machines are abandoned because the OS ends up unsupported and unsafe to use. Windows 10 support is going to end in 2025, it might be extended, but the end of w10 support is going to be a blood bath for this very reason. So many computers can't meet the specs for Windows 11 that the switch will be painful. And I would urge you if you are affected by this to upgrade to a LInux distro instead of getting a new computer just for windows 11.
210 notes
·
View notes
Text
Your All-in-One AI Web Agent: Save $200+ a Month, Unleash Limitless Possibilities!
Imagine having an AI agent that costs you nothing monthly, runs directly on your computer, and is unrestricted in its capabilities. OpenAI Operator charges up to $200/month for limited API calls and restricts access to many tasks like visiting thousands of websites. With DeepSeek-R1 and Browser-Use, you:
• Save money while keeping everything local and private.
• Automate visiting 100,000+ websites, gathering data, filling forms, and navigating like a human.
• Gain total freedom to explore, scrape, and interact with the web like never before.
You may have heard about Operator from Open AI that runs on their computer in some cloud with you passing on private information to their AI to so anything useful. AND you pay for the gift . It is not paranoid to not want you passwords and logins and personal details to be shared. OpenAI of course charges a substantial amount of money for something that will limit exactly what sites you can visit, like YouTube for example. With this method you will start telling an AI exactly what you want it to do, in plain language, and watching it navigate the web, gather information, and make decisions—all without writing a single line of code.
In this guide, we’ll show you how to build an AI agent that performs tasks like scraping news, analyzing social media mentions, and making predictions using DeepSeek-R1 and Browser-Use, but instead of writing a Python script, you’ll interact with the AI directly using prompts.
These instructions are in constant revisions as DeepSeek R1 is days old. Browser Use has been a standard for quite a while. This method can be for people who are new to AI and programming. It may seem technical at first, but by the end of this guide, you’ll feel confident using your AI agent to perform a variety of tasks, all by talking to it. how, if you look at these instructions and it seems to overwhelming, wait, we will have a single download app soon. It is in testing now.
This is version 3.0 of these instructions January 26th, 2025.
This guide will walk you through setting up DeepSeek-R1 8B (4-bit) and Browser-Use Web UI, ensuring even the most novice users succeed.
What You’ll Achieve
By following this guide, you’ll:
1. Set up DeepSeek-R1, a reasoning AI that works privately on your computer.
2. Configure Browser-Use Web UI, a tool to automate web scraping, form-filling, and real-time interaction.
3. Create an AI agent capable of finding stock news, gathering Reddit mentions, and predicting stock trends—all while operating without cloud restrictions.
A Deep Dive At ReadMultiplex.com Soon
We will have a deep dive into how you can use this platform for very advanced AI use cases that few have thought of let alone seen before. Join us at ReadMultiplex.com and become a member that not only sees the future earlier but also with particle and pragmatic ways to profit from the future.
System Requirements
Hardware
• RAM: 8 GB minimum (16 GB recommended).
• Processor: Quad-core (Intel i5/AMD Ryzen 5 or higher).
• Storage: 5 GB free space.
• Graphics: GPU optional for faster processing.
Software
• Operating System: macOS, Windows 10+, or Linux.
• Python: Version 3.8 or higher.
• Git: Installed.
Step 1: Get Your Tools Ready
We’ll need Python, Git, and a terminal/command prompt to proceed. Follow these instructions carefully.
Install Python
1. Check Python Installation:
• Open your terminal/command prompt and type:
python3 --version
• If Python is installed, you’ll see a version like:
Python 3.9.7
2. If Python Is Not Installed:
• Download Python from python.org.
• During installation, ensure you check “Add Python to PATH” on Windows.
3. Verify Installation:
python3 --version
Install Git
1. Check Git Installation:
• Run:
git --version
• If installed, you’ll see:
git version 2.34.1
2. If Git Is Not Installed:
• Windows: Download Git from git-scm.com and follow the instructions.
• Mac/Linux: Install via terminal:
sudo apt install git -y # For Ubuntu/Debian
brew install git # For macOS
Step 2: Download and Build llama.cpp
We’ll use llama.cpp to run the DeepSeek-R1 model locally.
1. Open your terminal/command prompt.
2. Navigate to a clear location for your project files:
mkdir ~/AI_Project
cd ~/AI_Project
3. Clone the llama.cpp repository:
git clone https://github.com/ggerganov/llama.cpp.git
cd llama.cpp
4. Build the project:
• Mac/Linux:
make
• Windows:
• Install a C++ compiler (e.g., MSVC or MinGW).
• Run:
mkdir build
cd build
cmake ..
cmake --build . --config Release
Step 3: Download DeepSeek-R1 8B 4-bit Model
1. Visit the DeepSeek-R1 8B Model Page on Hugging Face.
2. Download the 4-bit quantized model file:
• Example: DeepSeek-R1-Distill-Qwen-8B-Q4_K_M.gguf.
3. Move the model to your llama.cpp folder:
mv ~/Downloads/DeepSeek-R1-Distill-Qwen-8B-Q4_K_M.gguf ~/AI_Project/llama.cpp
Step 4: Start DeepSeek-R1
1. Navigate to your llama.cpp folder:
cd ~/AI_Project/llama.cpp
2. Run the model with a sample prompt:
./main -m DeepSeek-R1-Distill-Qwen-8B-Q4_K_M.gguf -p "What is the capital of France?"
3. Expected Output:
The capital of France is Paris.
Step 5: Set Up Browser-Use Web UI
1. Go back to your project folder:
cd ~/AI_Project
2. Clone the Browser-Use repository:
git clone https://github.com/browser-use/browser-use.git
cd browser-use
3. Create a virtual environment:
python3 -m venv env
4. Activate the virtual environment:
• Mac/Linux:
source env/bin/activate
• Windows:
env\Scripts\activate
5. Install dependencies:
pip install -r requirements.txt
6. Start the Web UI:
python examples/gradio_demo.py
7. Open the local URL in your browser:
http://127.0.0.1:7860
Step 6: Configure the Web UI for DeepSeek-R1
1. Go to the Settings panel in the Web UI.
2. Specify the DeepSeek model path:
~/AI_Project/llama.cpp/DeepSeek-R1-Distill-Qwen-8B-Q4_K_M.gguf
3. Adjust Timeout Settings:
• Increase the timeout to 120 seconds for larger models.
4. Enable Memory-Saving Mode if your system has less than 16 GB of RAM.
Step 7: Run an Example Task
Let’s create an agent that:
1. Searches for Tesla stock news.
2. Gathers Reddit mentions.
3. Predicts the stock trend.
Example Prompt:
Search for "Tesla stock news" on Google News and summarize the top 3 headlines. Then, check Reddit for the latest mentions of "Tesla stock" and predict whether the stock will rise based on the news and discussions.
--
Congratulations! You’ve built a powerful, private AI agent capable of automating the web and reasoning in real time. Unlike costly, restricted tools like OpenAI Operator, you’ve spent nothing beyond your time. Unleash your AI agent on tasks that were once impossible and imagine the possibilities for personal projects, research, and business. You’re not limited anymore. You own the web—your AI agent just unlocked it! 🚀
Stay tuned fora FREE simple to use single app that will do this all and more.

7 notes
·
View notes
Note
computer/firefox anon, no questions this time. just my undying thanks! as tumblr users say, i am kissing you on the mouth etc etc. huge thank you to you and everyone else who added stuff in the replies or reblogs — i feel much more confident about this now<33. tldr: y’all are awesome, thanks a bunch!
happy to help! and i think i said this deep down under the read-more in the first response to your Linux ask, but it's worth highlighting--@compusever's advice to get a Windows 10 or 11 Home laptop and do what you can with the privacy settings is not AT ALL incompatible with trying Linux or eventually replacing Windows with it. once you've booted up the computer from an installation USB drive, most distros will offer a temporary "preview" version of the OS that runs from the USB drive without changing anything on the computer. you can try Ubuntu, mess around, see if you like it, wipe the USB drive, put Mint on it, and try that; if you go for the full install you can dual-boot and keep Windows around in hard-drive quarantine in case you need it.
in other words, you don't have to take the entire plunge all at once! but i suspect that if you don't have pre-existing desktop UI preferences, and you strongly prefer a device that won't pester/spy on/micromanage you, a beginner-friendly Linux will be easier to use than any of the current versions of Windows.
btw, here's the install guide for Mint: https://linuxmint-installation-guide.readthedocs.io/en/latest/ compared to the Ubuntu one, which goes out of its way to be friendly and dead simple, the Mint guide is... a lot closer to what you can expect from most Linux tutorials, lmao. i especially love that the very second step explains a bit about why it wants you to check that the file didn't get corrupted in the download process, immediately starts providing commands you can copy into a Linux terminal to generate cryptographic checksums, and only then adds a "how to do this on Windows" link... to a forum post with commands you can paste into a Windows terminal. (meanwhile, Ubuntu gives you a download link and then displays an unobtrusive "here's how to verify the file if you want" with a one-off command and a link to more info.) even the friendliest Linux tends to be built on the labor of absolute nerds who are into this stuff as a hobby, and they are very helpful, but be warned that they often have a wildly skewed frame of reference about what "normal computer use" consists of.
51 notes
·
View notes
Text
Fucking Vimeo, which I have to use for work, is making me so mad. The video editor, which I need to slice the first ~5 minutes off whatever I upload and NOTHING ELSE, used to be normal, and now they've replaced it with some like...bullshit. Now instead of directly inputting the exact timecode of where I want the video to start, I have to use this slider that does not land precisely anywhere; I can maybe get it to arbitrarily land about 10 seconds away from where I want it, which is an eternity of crap you don't want for a public-facing video. It keeps telling me Oh look you can make a gif!, Check it out you could make different clips and splice them together!, Dude you can grab and drag the video across the viewer window to make totally ridiculous crops! But I cannot get it to do something so fucking basic that even Instagram can handle it.
This is so fucking stupid and frustrating that I keep thinking I'm just missing something, like if I keep trying I'll suddenly stumble onto what's so good about the new editor they're so fucking proud of. I tried several times to find a tutorial or a video showing someone doing what I'm trying to do, and all I could find was various smug Vimeo advertising pages being like DID U NO that if you use us you can edit your videos?????, and then they don't show anything. (There seem to be videos out there of people doing more complex operations, but I don't have the patience to scan them for what I want and anyway I'm just MAD AT VIMEO) There might be something buried in their user guide, but I wouldn't be surprised if there were not; a year or so ago for the same job I had to dive really deep into that stuff, and it seems like all of it was written by one sleep-deprived intern and it's just a total disaster. Actually I even did an internet search for "Vimeo video editor sucks" to see if there were any forum threads where someone worked out my problem, but that only summoned up more problems with Vimeo than I ever dreamed possible.
But anyway, then the punchline is that if I upload a video more than two hours long, it goes "Sowwy, videos this long can only use our dusty old legacy editor :(((" and then I get to use the thing that actually works and requires no explanation and takes no time. Starting to think about artificially inflating the length of the events I have to host just so I'm allowed to use the legacy editor.
Obviously it's nothing new that tech-based companies will make changes absolutely no one asked for and that are in fact for the worse, and I tend to think it's because investors can't tell the difference between change -- even terrible pointless change -- and growth, so a company with a product that is more or less working great feels obligated to wreck their product just to make themselves look busy. It really sucks, and they really need to change that legal problem where companies are obligated to demonstrate perpetual growth to investors even if they've plateaued at a perfectly good place. Whenever I encounter something like this, I remember when I worked for [redacted megacorp] and the product guys came to my team to ask how they could improve things. My team was basically made up of the actual target audience for the service, so we had a lot of really specific ideas about how to make it way better, and we had a few rounds of meetings with these guys about what they should do...and then during the next town hall they unveiled the fruits of their labor, and all they had done was to color what they perceived as girl stuff pink, and make the boy stuff blue. N.B. This was not even, like, baby products. We were totally flabbergasted, it was like a prank. If instead of asking us for ideas they had just shown us a list of possible changes, that would probably have been the one thing we'd tell them NEVER to do. But oh well!
6 notes
·
View notes
Text
Building Your Own Operating System: A Beginner’s Guide
An operating system (OS) is an essential component of computer systems, serving as an interface between hardware and software. It manages system resources, provides services to users and applications, and ensures efficient execution of processes. Without an OS, users would have to manually manage hardware resources, making computing impractical for everyday use.

Lightweight operating system for old laptops
Functions of an Operating System
Operating systems perform several crucial functions to maintain system stability and usability. These functions include:
1. Process Management
The OS allocates resources to processes and ensures fair execution while preventing conflicts. It employs algorithms like First-Come-First-Serve (FCFS), Round Robin, and Shortest Job Next (SJN) to optimize CPU utilization and maintain system responsiveness.
2. Memory Management
The OS tracks memory usage and prevents memory leaks by implementing techniques such as paging, segmentation, and virtual memory. These mechanisms enable multitasking and improve overall system performance.
3. File System Management
It provides mechanisms for reading, writing, and deleting files while maintaining security through permissions and access control. File systems such as NTFS, FAT32, and ext4 are widely used across different operating systems.
4. Device Management
The OS provides device drivers to facilitate interaction with hardware components like printers, keyboards, and network adapters. It ensures smooth data exchange and resource allocation for input/output (I/O) operations.
5. Security and Access Control
It enforces authentication, authorization, and encryption mechanisms to protect user data and system integrity. Modern OSs incorporate features like firewalls, anti-malware tools, and secure boot processes to prevent unauthorized access and cyber threats.
6. User Interface
CLI-based systems, such as Linux terminals, provide direct access to system commands, while GUI-based systems, such as Windows and macOS, offer intuitive navigation through icons and menus.
Types of Operating Systems
Operating systems come in various forms, each designed to cater to specific computing needs. Some common types include:
1. Batch Operating System
These systems were widely used in early computing environments for tasks like payroll processing and scientific computations.
2. Multi-User Operating System
It ensures fair resource allocation and prevents conflicts between users. Examples include UNIX and Windows Server.
3. Real-Time Operating System (RTOS)
RTOS is designed for time-sensitive applications, where processing must occur within strict deadlines. It is used in embedded systems, medical devices, and industrial automation. Examples include VxWorks and FreeRTOS.
4 Mobile Operating System
Mobile OSs are tailored for smartphones and tablets, offering touchscreen interfaces and app ecosystems.
5 Distributed Operating System
Distributed OS manages multiple computers as a single system, enabling resource sharing and parallel processing. It is used in cloud computing and supercomputing environments. Examples include Google’s Fuchsia and Amoeba.
Popular Operating Systems
Several operating systems dominate the computing landscape, each catering to specific user needs and hardware platforms.
1. Microsoft Windows
It is popular among home users, businesses, and gamers. Windows 10 and 11 are the latest versions, offering improved performance, security, and compatibility.
2. macOS
macOS is Apple’s proprietary OS designed for Mac computers. It provides a seamless experience with Apple hardware and software, featuring robust security and high-end multimedia capabilities.
3. Linux
Linux is an open-source OS favored by developers, system administrators, and security professionals. It offers various distributions, including Ubuntu, Fedora, and Debian, each catering to different user preferences.
4. Android
It is based on the Linux kernel and supports a vast ecosystem of applications.
5. iOS
iOS is Apple’s mobile OS, known for its smooth performance, security, and exclusive app ecosystem. It powers iPhones and iPads, offering seamless integration with other Apple devices.
Future of Operating Systems
The future of operating systems is shaped by emerging technologies such as artificial intelligence (AI), cloud computing, and edge computing. Some key trends include:
1. AI-Driven OS Enhancements
AI-powered features, such as voice assistants and predictive automation, are becoming integral to modern OSs. AI helps optimize performance, enhance security, and personalize user experiences.
2. Cloud-Based Operating Systems
Cloud OSs enable users to access applications and data remotely. Chrome OS is an example of a cloud-centric OS that relies on internet connectivity for most functions.
3. Edge Computing Integration
With the rise of IoT devices, edge computing is gaining importance. Future OSs will focus on decentralized computing, reducing latency and improving real-time processing.
4. Increased Focus on Security
Cyber threats continue to evolve, prompting OS developers to implement advanced security measures such as zero-trust architectures, multi-factor authentication, and blockchain-based security.
2 notes
·
View notes
Text
How to Connect Cricut Joy to Computer? (Full Guide)

Wants to Learn ‘how to connect Cricut machine and you want to connect it to a computer‘? You can do it effortlessly with the help of this article. This machine is more compact than other Cricut cutting machines. With a sleek appearance and amazing results, Cricut Joy is the choice for many crafters. As a Cricut user and a professional crafter, I’m here to guide you with it. Let’s learn how to connect Cricut Joy to computer.
When it comes to connecting Cricut Joy to a computer, this machine doesn’t support a USB connection. Therefore, you have only one option for connection – Bluetooth. So, I’ll tell you about the Bluetooth connection on your Windows and Mac computers. Let’s get ready with the process.
Minimum System Requirements for Cricut Joy
Before you connect a machine to your computer, check whether your computer and machine are compatible. Why does this matter? You might know that Cricut runs a software called Design Space. This software has some minimum system requirements for a device that is added to it. So, let’s check out those requirements.
For Windows
For a Windows system, Design Space needs Windows 10 or 11 or the latest versions with an AMD processor or an equivalent one. It should also have a minimum of 2GB RAM, good free storage, and compatibility with Firefox, Microsoft Edge, and Google Chrome.
For Mac
For a Mac computer, Cricut Design Space needs a 14.x or newer operating system. Also, an Intel or equivalent processor. It should also have 2GB RAM and 300 MB storage. When you know the most important requirements, let’s dive into the steps involved in connecting your machine to a computer.
How to Connect Cricut Joy to Computer (Windows and Mac)
To connect your machine to your computer, you need to follow the steps given below. Here, you’ll see the steps for Windows and Mac computers.
For Windows
To connect your machine to a Windows computer, check out the given steps. As you already know, Cricut Joy doesn’t support USB, so we’ll stick to the Bluetooth connection.
To start, unpack your machine and collect all the accessories from the machine’s box.
Then, install your machine at least 10-15 feet away from the computer.
Now, connect the machine to a power source and turn it on.
After that, go to the Start menu and hit the Settings option.
Next, you should click on the Devices option.
In the next step, ensure that Bluetooth is ON.
Moving forward, hit the “Add Bluetooth or other device” option.
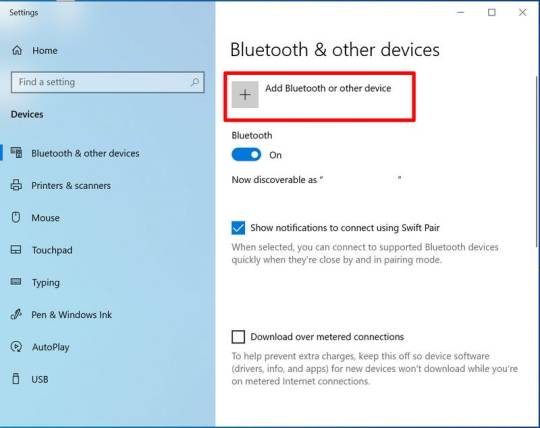
Also, tap on the Bluetooth and let the computer search for your machine model.
When the machine appears on the screen, select it and let it connect.
Lastly, your devices are paired with Bluetooth connection.
That’s how to connect Cricut Joy to computer. When you know everything, it’s time to try the connection for your devices.
For Mac
If you’re a Mactonish, below are the steps for connecting your crafting machine to your Mac.
To get started, connect your Mac to a power cord.
Then, install your machine on a flat surface and keep it at least 10-15 feet away from your Mac.
Now, go to your Apple menu and select System Preferences.
After that, locate the Bluetooth option on the Mac.
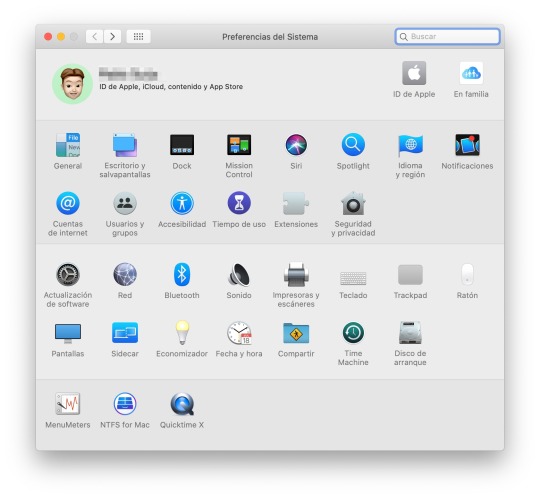
Also, check whether Bluetooth is ON.
In the next step, choose your machine from the list of available devices.
Finally, your machine is paired with your Mac.
That’s how to connect your machine to a Mac computer. Finally, you can start creating projects with your brand-new machine. Now, let’s take a look at the steps for a Mac computer.
Conclusion
Finally, you know how to connect Cricut Joy to computer. Start creating your DIY projects quickly. This machine is excellent for beginners and for DIY pros. The only thing you need to care about is the minimum system requirements for the Design Space software. Besides that, this tiny tool is travel-friendly and works well for you. The crafting machine can become your companion when you need it.
FAQs
How to Download Cricut Design Space on Computer?
To get the Design Space software on a computer, follow these steps:
To start, launch a browser and navigate to https://cricut.com/setup.
Then, accept the Terms of Use and its Privacy Policy.
Now, hit the Download button on the screen.
After that, let the file download under the Downloads folder.
Next, visit the Downloads folder and find the app file.
Double-click on the folder to open it.
In the next step, run the installation and continue with the on-screen directions.
Finally, sign in to your account.
Can I Connect My Cricut Joy to Computer via USB?
No, you can’t use a USB to connect your machine to your computer. It doesn’t support USB. However, you can use a Bluetooth connection to set up a connection between your machine and your computer.
How to Connect Cricut Joy to Windows 11?
You can connect a machine to Windows 11 via a Bluetooth connection. Go to your laptop and search for Bluetooth and other devices. Then, turn on the Bluetooth option. Now, let your laptop locate your machine. Then, choose your machine’s name from the list of devices and let the pairing happen.
Source: How to Connect Cricut Joy to Computer
#how to connect Cricut Joy to computer#cricut design space download#cricut design space app#cricut design space software#cricut joy setup
2 notes
·
View notes
Text
Game Pile: The Beginner's Guide, Midjourney, and Praying to Coda
The Beginner's Guide, Midjourney, and Praying to Coda
Watch this video on YouTube
This is a rebuild and expansion of my article on The Beginner’s Guide from back in 2018, with a newly developed thesis about authenticity and access to artists.
And below is the script I worked from!
The Beginner’s Guide
The Beginner’s Guide is an interactive storytelling video game created by Davey Wreden under the studio name Everything Unlimited Ltd. The game was released for Linux, OS X, and Windows on October 1, 2015. The game is Wreden’s follow-up to the critically praised The Stanley Parable, his previous interactive storytelling title that was initially released in 2013.
The game is narrated by Wreden and takes the user through a number of incomplete and abstract game creations made by a developer named Coda. Wreden challenges the player to try to come to understand the type of person Coda is from exploring these spaces in a first-person perspective. Wreden has stated the game is open to interpretation: some have seen the game as general commentary on the nature of the relationship between game developers and players, while others have taken it as an allegory to Wreden’s own personal struggles with success resulting from The Stanley Parable. When the game sold, a reviewer – at least one, but I can’t find records of more than that – made a bit of a stir by suggesting that the fiction presented in the game is true, and that therefore, the game was built out of stolen material, and gamers buying it could hypothetically, get it refunded if they felt that were in any kind of moral quandrary.
This is, as best I understand it, the ‘story’ of The Beginner’s Guide, the entity in media, the confluence of reporting and reactions to a game. And now, in that same disjointed way of The Beginner’s Guide, I want to tell you about s1m0ne.
S1M0NE, stylised however you wanna, is a 2002 Al Pacino movie about a dude who creates a virtual actress. That’s not even how the movie goes in full, it’s way more involved than that and it includes bestiality, and it has this nasty kind of undercurrent about the fundamentally exploitable nature of women in media spaces. It’s an interesting film.
I didn’t say good.
Anyway, the thing is S1M0NE’s central premise is the virtual actress, Simone. In-movie, she doesn’t exist. To reinforce this, she isn’t credited as having an actress. The movie does do an extensive cgi sequence, showing Simone being constructed digitally, but it was… let’s say it’s very 2002, and leave it at that. Anyway, a bunch of people including representatives from the Screen Actors Guild believed it and they started a fuss about it. I think. It’s hard to find sources about it now, but I remember a fuss.
I mean it stands to reason, if you’re a union you want to oppose things that hurt the interest of your members, and that’s a perfectly valid concern to be worried about around about now with things like deep learning technology allowing us to transplant faces and details across multiple media works and the complex relationship between motion capture and voice actor and fully integrated action – like, if you weren’t aware, motion captured faces are not a 1:1 acting thing, they’re a structure for animators to work from. Gollum is not ‘Andy Serkis is amazing,’ they’re Andy Serkis and the fifty people doing all the rest of the work are amazing, and yes, Andy’s ability to disappear into the role and do the physical acting element is impressive. That’s a real conversation.
But it’s not the conversation they were having in 2002.
There were some people, in late 2002, who genuinely thought that an Al Pacino movie with Winona Ryder and a budget of $10 Million had successfully replicated the human form with complete authenticity, and that the much cheaper and easier tack of using an actor wasn’t more likely. Then they thought it’d involve, y’know, pig-doinking.
Simone was played by a Canadian actress, and the movie otherwise glanced over its very interesting questions of identity and artificiality and technology to instead tell a story about a dude who was very, very anxious about his inability to control women. The real story of the movie, then, is less about what the movie wanted to talk about and much more about the fact some people couldn’t tell where the movie was fiction and where it was fact. The boundary of the diegesis confused people, and there were some critics who were genuinely unsure of how confident they could be about dismissing the fears of people who thought the end of actors had come.
This comparison is because, yeah, it’s kinda stupid that videogame criticism was duped into believing that maybe an author stole all their work and then recorded themselves having a nervous breakdown then edited that nervous breakdown and cleaned up the audio and packaged it up and sold it on Steam without at any point considering that the art was stolen, it’s not like videogames are unique in this regard. We have a history of people not knowing the boundary between art and real and sometimes, when people play with that, especially in areas of new technology, people make mistakes. But also, like, yeah, we are now living in a time when the idea of ‘someone tried to sell entirely stolen assets on steam for $15’ isn’t even a joke or punchline, it might just be a fact of a thing that happens regularly.
As a game experience, The Beginner’s Guide is fine. I like it as a game because it needs the medium of games to make sense, complete with the idea of incomplete games and the way games are made not from a coherent single point but a sort of constantly exploding set of interconnected steps. Like, you couldn’t make this as a book because this isn’t how a book would look when you’re exploring its dismantled bits. The Beginner’s Guide, if it were a book about books and making books, would look like collected pieces of paper in different hands, with a sort of formalising hand over it all.
Funnily enough it’d look a bit like the book of Genesis.
(There’s a long reach of an academic poke)
It’s a perfectly interesting work about imposter syndrome and emotional boundaries and creative processes and a lot of other things you can see in your own inkblots. It’s an artistic piece that tells you a narrative in a really blunt way, but it uses its framing to create a blurred diegesis. It uses real world markers to confuse you about the actuality of its narrative, or it did at the time.
There’s a forking challenge here; on the one hand, I want to berate videogames, as a culture, for being so woefully ill-equipped to deal with meta art as to be convinced that the narrative presented in The Beginner’s Guide was actually real and have at least one actual journalist be so unsure of the reality of the presented narrative as to hedge their bets and mention seemingly unironically that refunds for this game were an option. On the other hand, it’s not like we’re drowning in meta-aware fiction and a cultural discourse that can treat this kind of thing seriously. Since the Stanley Parable and then Beginner’s Guide, the most recent big ‘oh everyone talks about it’ meta-game in my space has been Undertale, and I hate that.
Since the Beginner’s Guide’s original appearance, things have moved on a bit, and particularly, the word ‘parasocial’ has fallen to the common voice. People with platforms use the term to describe the behaviour of people who don’t have platforms, and the people without platforms follow their word, and now ‘parasocial’ has a sort of loose use around it, the idea that it’s pretty much just anything that annoys you about other people on the internet, especially if they’re talking about media. Then we got ‘plagiarism,’ which is, I understand, ‘mostly vibes.’
I want to compare Davey Wreden to Fred Gallagher, the author of Megatokyo. Megatokyo if you’re not familiar with it, is a webcomic that started in August 2000 and has never officially stopped updating since. It’s updated twice this year, which puts it ahead of the same time last year. What Megatokyo is about is not important here, what is is that Megatokyo was enormously succesful, incredibly popular, and has never once had an update schedule its authors were happy with.
I wrote a lot about Megatokyo last year and I still think that article is worth restructuring and presenting in some kind of long form read way. In the end my conclusion about it is that I don’t think ill of Fred Gallagher as a creative, as much as I think that he got to suffer a unique kind of problem that only capitalism can cause, where you can be too successful to handle your own success. That is, both Wreden and Gallagher made something that led to people having assumptions and expectations that don’t make any sense, because the value of what they created was associated with capital, which is to say, money, and rent, and food.
There’s this idea we’re all circling around right now on a platform that is probably by now mostly procedurally generated – not just the stuff made in the past few years by tools like Chatgpt and the midjourney thumbnails and all, but rather that the algorithm of youtube made a lot of people make media in a way that shaved the non-formulaic parts off it, until there was nothing but hash tag con tent. The stuff you like is a small egg floating on a vast and turbulent sea of piss. It’s now that people care a lot about a kind of authenticity from work which separates it from what I’m going to call Generative Media, and which other people are going to insist on calling ‘AI.’
The conversation around generative art is a real struggle sometimes because it feels like sometimes when people are talking about ‘ai art bros’ they’re dealing with a small pool of obnoxious people, and sometimes I can even tell the specific dickhead they mean. It’s Shad, it’s Shad, so often they mean Shad, and yeah sure, Shad sucks. But the conversation around generative media is so often structured in these really weird ways that seems to imply low-quality images don’t exist until generative media gets involved. That nobody cranks out bullshit, or that art is a transferrable property of a human agent, or that in the great days of the internet, nobody’s using pictures they didn’t draw to illustrate articles they wrote. In this very video I’m using gameplay footage from a game I don’t own, and the reason you’re not seeing the footage from S1m0ne to reinforce that point is because a robot would get mad at me and block the video if I did.
I’m even in defensive crouch saying this stuff here. Look: I think generative media tools have applications, particularly in zero-value situations. Nobody in the world is having their pocket picked if I copy art of Rin Matsuoka and use that for my D&D character. Similarly, someone with less image editing skill than mine using generative media to generate pictures of things they weren’t going to pay for in the first place are not hurting anyone unless you believe in a literal cosmic value of these things. In that case, you’re basically just like the generative media people who are functionally, praying to chat gpt. If you’re rapid prototyping, if you’re making a game and need temporary assets to give yourself tools to build around, if you need a powerpoint presentation for class, all of this stuff represents no lost value. This is a perfect place to put generative media. I’m sure purists will disagree, and I just do not care. But there’s my stance: Generative media is an interesting toy that should be used as such, and if it can replace your job, your job probably sucks and you should be doing something cooler and better that people value more. That’s a problem with jobs, and how we give people money to feed themselves, not the software that generates anime tiddy on demand.
Now, here is where things get tangled up.
It seems to me that generative media is being attacked right now by people I generally like and agree with on most things, because of very high concept, seemingly contradictory positions. People who dislike copyright law busting it out to attack midjourney, and people who hate Disney praying for them to fight Google. Ideas about the inherent nobility of art and stick figure illustrations being better than generative media on websites dedicated to sharing unsourced artworks of definitely not stick figures. People don’t have reasons that make a lot of sense for why these things should not be tolerated, but they are very real about their emotional hatred of them. Which, you know, given the people who defend generative media, makes sense, a lot of those people suck and are incredibly obnoxious. Particularly it seems a lot of them are the losers of the NFT wave who are trying to get in ground level as ‘prompt engineers’ as if the ecosystem they’re entering will value them at all.
One of the most sterling arguments against generative media, and one I personally like, is the idea that these tools represent potential precarity for artists who are already struggling to pay for things like, again, rent and food. Potential, in that, largely commission-based artistic survival under capitalism seems to be a bit of a dice roll as it is. My solution to this is not to shame people who weren’t going to pay for art for failing to be able to support a commission economy they weren’t partaking in in the first place, though, it’s things like massive overhauls of income inequality and universal basic income, but also I can understand how my idea is hard and yelling at strangers in hyperbolic language is really easy.
The pressure that created the Beginner’s Guide is also the pressure that meant someone talking about an artistic work of anxiety media couched it in terms of fucking refunds so people didn’t feel they’d ethically mis-stepped by buying fiction about exploitation, a thing that nobody otherwise does, and it’s the same pressure that means ‘someone is making cheap bad art with an exploitative method’ is a threat to the livelihood of a small number of people who have managed to make an extremely precarious living doing art in the first place. As if money is why artists make art, as if we aren’t all struggling in exploitative systems, as if the existence of bland corporate art pumped out in huge troves to pad resume drawers isn’t
Since these past few years, writing academically, a habit I’ve gotten into is always trying to attribute where I get ideas for. Sentences that are referring to someone else’s idea, with the little note of ‘hey, this is that person, at this date.’ It’s a thing that can create the habit of also starting sentences with ‘Wreden says this’ or ‘Gallagher’s work shows this,’ which creates in casual conversation an impression of a very specific kind of authorial access. Certainly here on Youtube, I don’t want to give you the impression because I’m pointing to their work that I can tell you what they think or feel. The idea that I can connect to these authors through a particularly big brained reading of their work is similar to how Christians think they can read god’s mind because they read the book of Daniel, and like, Fred Gallagher exists.
I don’t know what Davey Wreden was thinking about the Beginner’s Guide when he made it. Even if I asked him now, I won’t get an answer, I’ll get the answer of what he remembers of what he was thinking, which may be the same thing but can’t necessarily. I can try, and that’s a way to get at this authenticity, but it’s not a way to guarantee it.
The Beginner’s Guide is still an interesting game to me, because the conversation around it, and around ownership of work, and of unsourced material and exploiting artists hasn’t changed that much but all the people engaging in it have gotten new things to have to try and fit into their models. We are no closer to Coda.
Those opening paragraphs of this article are from from wikipedia.
Check it out on PRESS.exe to see it with images and links!
13 notes
·
View notes
Text
How to Plan a Basement Renovation on a Budget in Ottawa?
Renovating a basement can be an excellent way to add usable space and increase the value of your home. However, undertaking a basement renovation in Ottawa can also be costly. With the right planning, you can achieve your desired results without breaking the bank.

Follow our comprehensive guide on how to plan a basement renovation on a budget in Ottawa.
Set a Realistic Budget
Before diving into your basement renovation project, it’s crucial to establish a realistic budget. Begin by assessing your financial situation. Determine how much you can afford to spend without straining your finances. When setting your budget, consider the following:
Total Costs: Estimate the total costs, including materials, labor, permits, and contingency funds (about 10-20% for unexpected expenses).
Prioritize Features: List out what you need versus what you want. Focus on essential elements like insulation, flooring, and lighting before considering luxury features.
Research Local Regulations
In Ottawa, basement renovations may require permits and adherence to local building codes. Research the necessary regulations in your area:
Building Codes: Familiarize yourself with the Ontario Building Code and any local by-laws specific to Ottawa.
Permits: Determine whether your renovation requires a building permit. Projects like adding bedrooms, bathrooms, or major electrical work typically require permits.
Zoning Laws: Check if there are zoning laws that may affect how you use the space (for example, if you plan to create a separate rental unit).
Design Your Space Wisely
Once you have a budget and understand the regulations, it’s time to design your basement. A well-thought-out design can save you money and create a functional space. Consider the following tips:
Functional Layout: Think about how you will use the space. Do you want a guest room, home office, or recreational area? Ensure the layout maximizes the available space.
Open Concept: An open concept design can make your basement feel larger and reduce the need for additional walls and doors, saving on construction costs.
Natural Light: Utilize existing windows or consider adding egress windows to bring in natural light, making the space feel more inviting.
DIY Where Possible
One of the most effective ways to cut costs in a basement renovation is to do some work yourself. Here are areas where you can save money by taking on DIY projects:
Painting: Painting walls and ceilings is a relatively simple task that can dramatically change the look of your basement. Choose neutral colors to make the space feel larger and more inviting.
Flooring: If you’re comfortable with basic flooring installation, consider options like laminate or vinyl planks, which are user-friendly and budget-friendly.
Simple Fixtures: Install light fixtures, shelves, and other simple features yourself. This not only saves money but also gives you a sense of ownership over the project.
Source Affordable Materials
The materials you choose will have a significant impact on your overall renovation costs. To stay within your budget, consider the following:
Local Suppliers: Look for local building supply stores and lumberyards in Ottawa that offer competitive pricing. Sometimes, smaller businesses may have better deals than large chains.
Reclaimed Materials: Explore options for reclaimed or second-hand materials. Websites like Kijiji or Facebook Marketplace often have great deals on used fixtures, furniture, and building materials.
Sales and Discounts: Keep an eye on sales, clearances, and discounts at home improvement stores. Timing your purchases can lead to significant savings.
Consider Energy Efficiency
Investing in energy-efficient features can save you money in the long run. While some upfront costs may be higher, the savings on energy bills can make it worthwhile:
Insulation: Proper insulation can help maintain a comfortable temperature in your basement, reducing heating and cooling costs.
Energy-Efficient Windows: If you plan to replace windows, opt for energy-efficient models that can help reduce your energy consumption.
LED Lighting: Using LED lights instead of traditional bulbs can cut down on electricity costs and reduce the need for frequent replacements.
Hire Qualified Professionals Wisely
While DIY is a great way to save money, some tasks may require professional expertise. If you decide to hire contractors, ensure you choose wisely:
Get Multiple Quotes: Contact several contractors for estimates on the work you need done. Compare their prices, experience, and references.
Negotiate: Don’t hesitate to negotiate pricing. Many contractors are open to discussing costs, especially if you have multiple projects in mind.
Hire Local: Opt for local professionals who are familiar with Ottawa's building codes and regulations, as they can provide valuable insights.
Plan for the Future
When renovating your basement, think about future needs and potential changes. Designing your space with flexibility in mind can save money down the road. Consider:
Multi-Purpose Rooms: Create spaces that can serve multiple functions. For instance, a guest room can double as a home office.
Wiring for Future Needs: If you plan to add technology or appliances in the future, consider wiring for these needs now to avoid expensive retrofitting later.
Stay Organized and Monitor Progress
As your renovation progresses, stay organized to avoid unexpected costs and delays:
Timeline: Create a timeline for the project, setting realistic deadlines for each phase of the renovation.
Track Expenses: Keep a detailed record of all expenses, including materials and labor. This will help you stay within your budget and make adjustments as needed.
Regular Check-Ins: Regularly check in on the progress of the work, ensuring that it aligns with your plans and budget.
Enjoy the Process
Renovating your basement can be a rewarding experience. While it may be challenging at times, remember to enjoy the process and celebrate your accomplishments. As your vision comes to life, you'll be able to create a space that enhances your home and serves your needs for years to come.
Conclusion
Planning a basement renovation on a budget in Ottawa requires careful consideration and smart choices. By setting a realistic budget, researching regulations, designing wisely, and making informed decisions about materials and labor, you can create a beautiful and functional basement without overspending. Remember to stay organized, plan for the future, and enjoy the process, turning your basement into the ideal space for you and your family.
2 notes
·
View notes
Text
One of the annoying things about Windows that I noticed before my switch to Linux is that there are two settings applications. There is the Control Panel, which has hung around since Windows 1.0 in 1985. But since Windows 8 there is also a Settings app.
The idea behind "Settings" is entirely about aesthetics instead of functionality. It's too look more modern and slick than Control Panel, which hasn't changed much since the 90s to my memory.
But to look more slick and less complicated, and because Windows has increasingly assumed its users are incompetent, "Settings" is also massively simplified. It lacks many of the functions that the control panel has. I think the idea is that too many options would be overwhelming and confusing to non-technical users. But many of the options in Control Panel that is not in Settings are very much necessary. So Control Panel sticks around. It's just that it is hidden and harder to find, while Settings is made easily accessible to the user.
And this is a very stupid way to do it. Having system settings for the same thing split across two different programs is neither user-friendly or intuitive. If you wanted to or needed to change a setting, you have to first go to the easily available Settings App and 90% of the time find that that the setting is not there. And then you have to know that there is a second settings applications, that you aren't told about nor is it easy to find where you hopefully find what you need. I had to read an online guide for a Windows bug to be informed that Control Panel is still there in WIn8 and 10, and that it has options that aren't in settings. It's so hidden that I found it most easy to literally use Windows search for Control Panel whenever I needed it.
This is a case where simplicity is mistaken for user-friendliness. Having it split like this is far less accessible than having a single and fully-featured settings app. This is a case where practically every Linux desktop environments have Windows beat in terms of intuitive design, none of them do this.
Windows has had good UI ideas, I do use a Win95 like taskbar/start menu set-up right now, because it works. But damn, ever since Windows 8 they have completely lost the plot on this front.
20 notes
·
View notes
Note
i would like to hear the linux shilling :)
The short version is that Linux is highly customizable and very fast, and that most non-CPU heavy Windows programs can run indistinguishably through Wine; gaming is the only serious issue but for that you can use a dual boot (most linux distros give you the option to partition off your drive into two or more parts when you install them).
As for user friendliness: If not for program compatibility, Linux Mint would be indistinguishable from Windows 10 at this point. There's approximately 0 terminal interaction required (unless you want to do things that on Windows would require a .cmd window anyway). Installation is simple, too- slap it on a thumb drive and stick said thumb drive into the PC you want to add Mint to, and you'll have a perfectly normal wizard guide you through the installation.
I mostly use Linux because a certain program that I use is extremely fussy about working on non-Unix systems and I hate that MacOS won't let me see where anything is. But if you have an old, slow computer that you've backed up the files on, or a new, fast one that you don't want to use for gaming, Mint is THE OS for you. It also has far fewer incompatibility issues with Firefox than Windows, if you're interested in that sort of thing.
If Windows ever gets you wanting to bang your head into a wall and you use your PC for primarily non-gaming things, try Mint! (Sorry MacOS users- unfortunately most other operating systems are not compatible with M1/M2 architecture, and those that are require more finagling than I'd be able to say is "user friendly".)
21 notes
·
View notes