#TS3 Tutorial
Explore tagged Tumblr posts
Visit Tumblr Blog
Explore Tumblr blogs with no restrictions, modern design and the best experience.
Last Seen Tumblr Blogs


Fun Fact
In February 2021, Tumblr had 518.6 million blog accounts.
Text
How to throw a fancy dinner party in The Sims 3
You will need @flotheory's new dinner mod, download it here. Depending on what you want, choose either
Version 1: limited to 8 sims having dinner and sims will finish what they are doing before going to dinner -> best for family gameplay when you only want your active family to have dinner together
or Version 2: more than 8 sims can have dinner and sims will stop what they are doing and proceed to their chair once you direct them to do so -> best if you also want inactive sims as guests at your dinner party
Step 1: Assign each sim a chair
Click on the chair
Select "Join dinner…"
Select the sim you want to sit in this chair
Repeat for all chairs/sims.
Sims will now proceed to their respective chairs and sit down at the dinner table:

Step 2: Get them to eat dinner together
If you're doing this with more than one table, pause your game!
You will have to repeat these steps for each table! Do not switch to a different table before you have done them all!
Place the group meal in the middle of the table
Click on the group meal
Select "Serve for dinner…"
Click on the table
Select "Eat dinner together…"
Select the sims sitting at this table
Click OK
Without un-pausing the game proceed to the next table and repeat for every table.


Once all tables have been served their dinner and the sims have been directed to dine:

Press play and watch them all eat at the same time!

Additional tips:
I found it is best to place the group meals on the table after all sims have been seated. If you place them before, you run the risk of a hungry sim grabbing a plate and blocking one of the chairs.
Once all sims are seated at the dinner table you can leave them sitting and just chatting for a little bit, but don't wait too long or they will get up again.
If you want more than 8 sims to dine together, you will need either a custom table seating more than 8 sims (don't know if they even exist…?) or you will need to place several tables. If you want to push them together to make a bigger table, use the cheat "moveobjects on". Take care not to push the tables into each other, or sims may not have enough room to sit down. It's best to leave a small gap.
If you want several tables to eat the same food, either prepare the same group meal for each table or use icarus_allsorts mod "Cook with any ingredient" in order to make a group meal with up to 16 servings. When serving several tables from the same group meal you will have to move the group meal to the table you want to serve before repeating step 2!
314 notes
·
View notes
Text
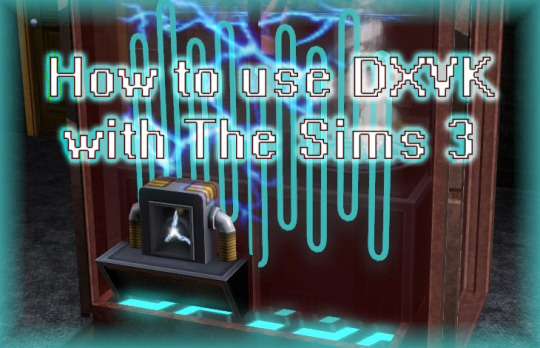
How to use DXVK with The Sims 3
Have you seen this post about using DXVK by Criisolate? But felt intimidated by the sheer mass of facts and information?
@desiree-uk and I compiled a guide and the configuration file to make your life easier. It focuses on players not using the EA App, but it might work for those just the same. It’s definitely worth a try.
Adding this to your game installation will result in a better RAM usage. So your game is less likely to give you Error 12 or crash due to RAM issues. It does NOT give a huge performance boost, but more stability and allows for higher graphics settings in game.
The full guide behind the cut. Let me know if you also would like it as PDF.
Happy simming!
Disclaimer and Credits
Desiree and I are no tech experts and just wrote down how we did this. Our ability to help if you run into trouble is limited. So use at your own risk and back up your files!
We both are on Windows 10 and start the game via TS3W.exe, not the EA App. So your experience may differ.
This guide is based on our own experiments and of course criisolate’s post on tumblr: https://www.tumblr.com/criisolate/749374223346286592/ill-explain-what-i-did-below-before-making-any
This guide is brought to you by Desiree-UK and Norn.
Compatibility
Note: This will conflict with other programs that “inject” functionality into your game so they may stop working. Notably
Reshade
GShade
Nvidia Experience/Nvidia Inspector/Nvidia Shaders
RivaTuner Statistics Server
It does work seamlessly with LazyDuchess’ Smooth Patch.
LazyDuchess’ Launcher: unknown
Alder Lake patch: does conflict. One user got it working by starting the game by launching TS3.exe (also with admin rights) instead of TS3W.exe. This seemed to create the cache file for DXVK. After that, the game could be started from TS3W.exe again. That might not work for everyone though.
A word on FPS and V-Sync
With such an old game it’s crucial to cap framerate (FPS). This is done in the DXVK.conf file. Same with V-Sync.
You need
a text editor (easiest to use is Windows Notepad)
to download DXVK, version 2.3.1 from here: https://github.com/doitsujin/DXVK/releases/tag/v2.3.1 Extract the archive, you are going to need the file d3d9.dll from the x32 folder
the configuration file DXVK.conf from here: https://github.com/doitsujin/DXVK/blob/master/DXVK.conf. Optional: download the edited version with the required changes here.
administrator rights on your PC
to know your game’s installation path (bin folder) and where to find the user folder
a tiny bit of patience :)
First Step: Backup
Backup your original Bin folder in your Sims 3 installation path! The DXVK file may overwrite some files! The path should be something like this (for retail): \Program Files (x86)\Electronic Arts\The Sims 3\Game\Bin (This is the folder where also GraphicsRule.sgr and the TS3W.exe and TS3.exe are located.)
Backup your options.ini in your game’s user folder! Making the game use the DXVK file will count as a change in GPU driver, so the options.ini will reset once you start your game after installation. The path should be something like this: \Documents\Electronic Arts\The Sims 3 (This is the folder where your Mods folder is located).
Preparations
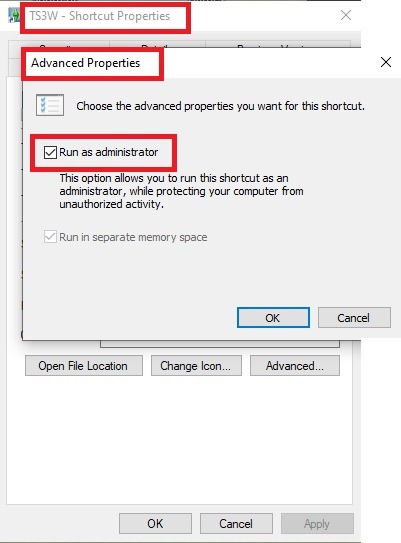
Make sure you run the game as administrator. You can check that by right-clicking on the icon that starts your game. Go to Properties > Advanced and check the box “Run as administrator”. Note: This will result in a prompt each time you start your game, if you want to allow this application to make modifications to your system. Click “Yes” and the game will load.
2. Make sure you have the DEP settings from Windows applied to your game.
Open the Windows Control Panel.
Click System and Security > System > Advanced System Settings.
On the Advanced tab, next to the Performance heading, click Settings.
Click the Data Execution Prevention tab.
Select 'Turn on DEP for all programs and services except these”:
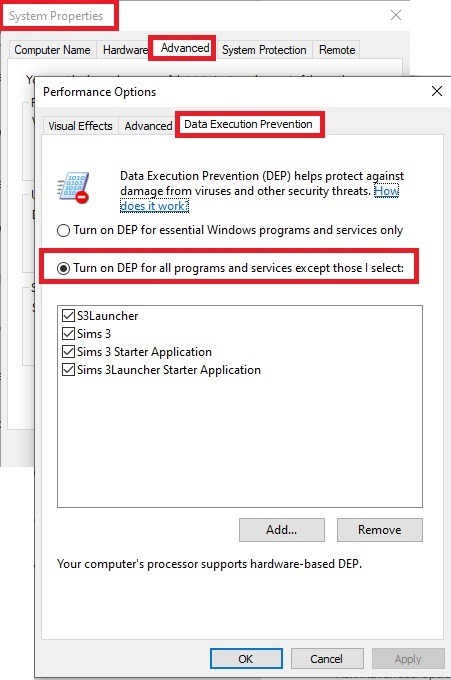
Click the Add button, a window to the file explorer opens. Navigate to your Sims 3 installation folder (the bin folder once again) and add TS3W.exe and TS3.exe.
Click OK. Then you can close all those dialog windows again.
Setting up the DXVK.conf file
Open the file with a text editor and delete everything in it. Then add these values:
d3d9.textureMemory = 1
d3d9.presentInterval = 1
d3d9.maxFrameRate = 60
d3d9.presentInterval enables V-Sync,d3d9.maxFrameRate sets the FrameRate. You can edit those values, but never change the first line (d3d9.textureMemory)!
The original DXVK.conf contains many more options in case you would like to add more settings.

A. no Reshade/GShade
Setting up DXVK
Copy the two files d3d9.dll and DXVK.conf into the Bin folder in your Sims 3 installation path. This is the folder where also GraphicsRule.sgr and the TS3W.exe and TS3.exe are located. If you are prompted to overwrite files, please choose yes (you DID backup your folder, right?)
And that’s basically all that is required to install.
Start your game now and let it run for a short while. Click around, open Buy mode or CAS, move the camera.
Now quit without saving. Once the game is closed fully, open your bin folder again and double check if a file “TS3W.DXVK-cache” was generated. If so – congrats! All done!
Things to note
Heads up, the game options will reset! So it will give you a “vanilla” start screen and options.
Don’t worry if the game seems to be frozen during loading. It may take a few minutes longer to load but it will load eventually.
The TS3W.DXVK-cache file is the actual cache DXVK is using. So don’t delete this! Just ignore it and leave it alone. When someone tells to clear cache files – this is not one of them!
Update Options.ini
Go to your user folder and open the options.ini file with a text editor like Notepad.
Find the line “lastdevice = “. It will have several values, separated by semicolons. Copy the last one, after the last semicolon, the digits only. Close the file.
Now go to your backup version of the Options.ini file, open it and find that line “lastdevice” again. Replace the last value with the one you just copied. Make sure to only replace those digits!
Save and close the file.
Copy this version of the file into your user folder, replacing the one that is there.
Things to note:
If your GPU driver is updated, you might have to do these steps again as it might reset your device ID again. Though it seems that the DXVK ID overrides the GPU ID, so it might not happen.
How do I know it’s working?
Open the task manager and look at RAM usage. Remember the game can only use 4 GB of RAM at maximum and starts crashing when usage goes up to somewhere between 3.2 – 3.8 GB (it’s a bit different for everybody).
So if you see values like 2.1456 for RAM usage in a large world and an ongoing save, it’s working. Generally the lower the value, the better for stability.
Also, DXVK will have generated its cache file called TS3W.DXVK-cache in the bin folder. The file size will grow with time as DXVK is adding stuff to it, e.g. from different worlds or savegames. Initially it might be something like 46 KB or 58 KB, so it’s really small.
Optional: changing MemCacheBudgetValue
MemCacheBudgetValue determines the size of the game's VRAM Cache. You can edit those values but the difference might not be noticeable in game. It also depends on your computer’s hardware how much you can allow here.
The two lines of seti MemCacheBudgetValue correspond to the high RAM level and low RAM level situations. Therefore, theoretically, the first line MemCacheBudgetValue should be set to a larger value, while the second line should be set to a value less than or equal to the first line.
The original values represent 200MB (209715200) and 160MB (167772160) respectively. They are calculated as 200x1024x1024=209175200 and 160x1024x1024=167772160.
Back up your GraphicsRules.sgr file! If you make a mistake here, your game won’t work anymore.
Go to your bin folder and open your GraphicsRules.sgr with a text editor.
Search and find two lines that set the variables for MemCacheBudgetValue.
Modify these two values to larger numbers. Make sure the value in the first line is higher or equals the value in the second line. Examples for values: 1073741824, which means 1GB 2147483648 which means 2 GB. -1 (minus 1) means no limit (but is highly experimental, use at own risk)
Save and close the file. It might prompt you to save the file to a different place and not allow you to save in the Bin folder. Just save it someplace else in this case and copy/paste it to the Bin folder afterwards. If asked to overwrite the existing file, click yes.
Now start your game and see if it makes a difference in smoothness or texture loading. Make sure to check RAM and VRAM usage to see how it works.
You might need to change the values back and forth to find the “sweet spot” for your game. Mine seems to work best with setting the first value to 2147483648 and the second to 1073741824.
Uninstallation
Delete these files from your bin folder (installation path):
d3d9.dll
DXVK.conf
TS3W.DXVK-cache
And if you have it, also TS3W_d3d9.log
if you changed the values in your GraphicsRule.sgr file, too, don’t forget to change them back or to replace the file with your backed up version.
OR
delete the bin folder and add it from your backup again.
B. with Reshade/GShade
Follow the steps from part A. no Reshade/Gshade to set up DXVK.
If you are already using Reshade (RS) or GShade (GS), you will be prompted to overwrite files, so choose YES. RS and GS may stop working, so you will need to reinstall them.
Whatever version you are using, the interface shows similar options of which API you can choose from (these screenshots are from the latest versions of RS and GS).
Please note:
Each time you install and uninstall DXVK, switching the game between Vulkan and d3d9, is essentially changing the graphics card ID again, which results in the settings in your options.ini file being repeatedly reset.
ReShade interface
Choose – Vulcan
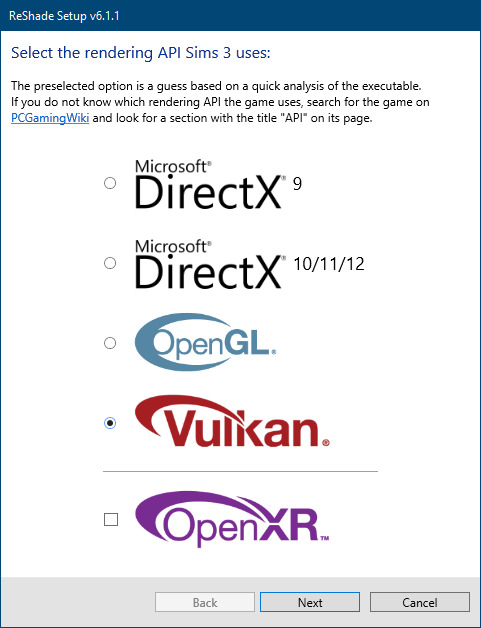
Click next and choose your preferred shaders.
Hopefully this install method works and it won't install its own d3d9.dll file.
If it doesn't work, then choose DirectX9 in RS, but you must make sure to replace the d3d9.dll file with DXVK's d3d9.dll (the one from its 32bit folder, checking its size is 3.86mb.)
GShade interface
Choose –
Executable Architecture: 32bit
Graphics API: DXVK
Hooking: Normal Mode
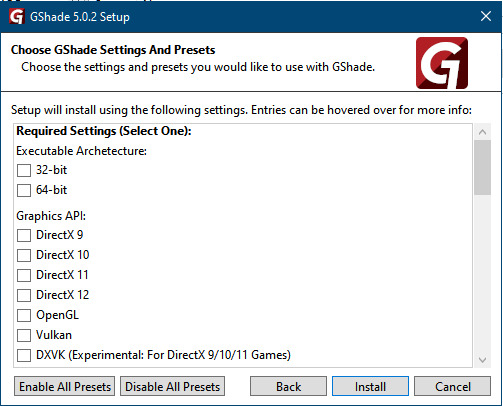
GShade is very problematic, it won't work straight out of the box and the overlay doesn't show up, which defeats the purpose of using it if you can't add or edit the shaders you want to use.
Check the game's bin folder, making sure the d3d9.dll is still there and its size is 3.86mb - that is DXVK's dll file.
If installing using the DXVK method doesn't work, you can choose the DirectX method, but there is no guarantee it works either.
The game will not run with these files in the folder:
d3d10core.dll
d3d11.dll
dxgi.dll
If you delete them, the game will start but you can't access GShade! It might be better to use ReShade.
Some Vulcan and DirectX information, if you’re interested:
Vulcan is for rather high end graphic cards but is backward compatible with some older cards. Try this method with ReShade or GShade first.
DirectX is more stable and works best with older cards and systems. Try this method if Vulcan doesn't work with ReShade/GShade in your game – remember to replace the d3d9.dll with DXVK's d3d9.dll.
For more information on the difference between Vulcan and DirectX, see this article:
https://www.howtogeek.com/884042/vulkan-vs-DirectX-12/
711 notes
·
View notes
Text


Tutorial : How to make roads with car parking space
When I first started using the create a world tool, I immediatly wanted to make roads with car parking space. The only world where I had seen these types of roads were in Boroughsburg by potato-ballad-sims. So, I searched up the internet as one would do when you don't know how to do something and nothing until I found this post by krrank on their forum. I already knew how to make roads at that time. In fact, it was only when I saw her showcase of dirt roads, that I saw how there was a way to make roads larger to then add cars parked on the side. Now, because I haven't found a proper tutorial on how to actually do that, I decided to make my own tutorial and share how I managed to do it. It's not as perfect as Boroughsburg in term of sidewalk intersections (because I'm not the best at texture editing) but enough to have the look of parked cars, which can make a town look so much more lively.
What I'm assuming before this tutorial :
You're familiar with the CAW tool
you know how to place roads
you know how to create roads using textures provided by EA or CC road textures
You know how to add custom content for CAW (only applicable if you don't own the university EP)
The downside
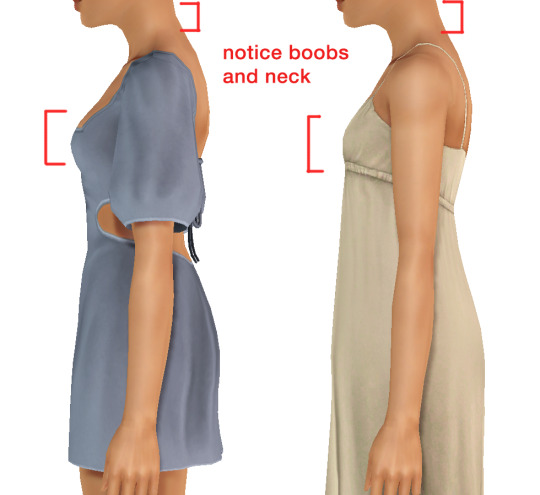
The only downside with these roads is that sims will walk/run through the cars when going somewhere because we're basically using the sidewalk as parking space. To balance that out, I suggest using hybrid roads in your world : normal roads with normal sidewalks and roads with parking space.
On the left we have a road with car parking space
On the right a normal road with sidewalks

Step 1 : Choosing your road textures

Example of what it should look like :

Possible question #1
" Okay but there's no sidewalk now, what do I do ? " : Simple ! Place independent sidewalks on the side. A bit like this (ignore the fact that this is not completly aligned to the grid) :

Step 2 : Placing cars on the road
I highly suggest using cars that are meant for decoration and aren't high poly. If you're using super CAW do not use the drivable cars that can be bought in game. In my case, I used the debug cars from the university EP meant for decoration and lowered them until it hid the parking curb. If you don't have the university EP, the world CC from Boroughsburg includes deco cars used for the purpose of parked deco cars !
Do not put too many cars on the roads (I only do it because I do not care since I'm making my own personal world, but if you intend to share the world you're making, limit the cars that you put on the streets)
How to hide the parking curb (for university cars) :
Lower your car's position (Y axis, green line) to : 15,4 - (Good enough height to hide the concrete curb and only hides a tiny bit of the car's wheels)

Don't forget to rotate (Y axis) the cars to the right direction. In fact, to be 100% accurate in the rotation placement of your cars, you can write the exact degree in the board that appears when you select an object. So, basically : 90 / -90 OR 180 / -180
Possible question #2
"In what direction should I rotate the cars ?" : Here's a reminder of traffic directions in game :

And that's about it. Hope this will be useful to anyone who was wondering how to make larger roads and add cars parked directly on the street :)
#ts3#sims 3#the sims 3#sims 3 tutorial#ts3 tutorial#sims 3 caw tutorial#sims 3 caw roads#sims 3 caw road tutorial#sims 3 parked cars#sims 3 cars#sims 3 how to#ts3 how to#sims 3 blog#sims 3 simblr#simblr#sims caw#ts3 caw#sims 3 create a world#ts3 create a world
300 notes
·
View notes
Text
CC Creation Tutorial: Smooth Seams in Blender

In this tutorial, I will show you how to make your mesh seams smooth inside Blender (no Milkshape required!) and walk you through the process step by step. We will make a perfectly smooth mesh and transfer the normal data from that mesh to our main mesh using the Data Transfer modifier.
I am using Blender 3.6 in this tutorial (though you should be able to follow along using other versions as well)
You do not need to have much previous knowledge to follow this tutorial, but I assume you know some basics in Blender like how to select, things, navigate around, etc, and know how to import the meshes and put them into Blender.
For this tutorial, I exported the Sims 3 afbodyEP4DressPromBigBow mesh with TSR Workshop. You can use any clothing mesh you like though, and works on any meshes, not just Sims 3 ones.

This is our mesh. You can already tell that it has the dreaded seams on the neck and the rest of the body.

First, we need to make a copy of the mesh (in Object mode, select the mesh and hit Ctrl+D Shift+D to duplicate it, then hit Esc to stop it from moving around).
Rename the mesh (I added Seamless to the mesh name).
Make sure the original mesh is hidden (click the eye symbol) and select the Seamless mesh.
Press the Tab key to go into Edit Mode.

Now we select the parts that we want to have smooth seams. Let's select everything that is skin (you can select a litte piece of the mesh and then press Ctrl+L to select the entire piece)!

Now, press M and in the menu, choose By Distance. (in older versions, this is called Remove Doubles).
This will remove all double vertices at the seams on the selection we made.

It will show you how many vertices it removed. The skin looks nice and smooth!
Let's switch back to our original mesh: Make sure you deactivate the eye on the Seamless mesh and activate the eye again on the main mesh. Then, select the main mesh.

Now, let's add a data modifier to our main mesh. Click the blue wrench icon in the vertical list of the properties panel and then onto Add Modifier, then choose Data Transfer from the list.

As the source, we choose our Seamless mesh.

Also toggle on Face Corner Data and click the Custom Normals button.
Hold on, there is a message saying that we should enable Auto Smooth in Object Data Properties. Let's do that next! (if the message does not appear for you, maybe Auto Smooth is already on).

Click the green inverted triangle button and in the Normals section, toggle on Auto Smooth.

Now we can switch back to the modifier tab by clicking the blue wrench icon again.
But hang on, what happened to our mesh? There are now black spots over the dress and shadows on the legs!

This is due to the Data transfer modifier's Mapping setting. If we change it to Topology, our mesh goes back to normal again. Phew!

Now that the normals look good, we can start the transfer of our new smooth normals from the seamless mesh to our main mesh. To do that, we hit the Generate Data Layers button. This button works destructively, so you cannot undo what it did, just FYI.

Note: On newer versions of Blender, Generate Data Layers may not be enough to transfer the normals and you may need to apply the modifier instead.
You can toggle the modifier's visuals on and off with the little screen icon to see the results after you click Generate Data Layers to see if it stuck. If it did not (and you see the seams of your base mesh when toggling it off), try to apply it instead.

I switched from textured to solid shading because the differences are just more noticeable in this mode. This is how our mesh looks now with the modifier turned off.
Because we clicked the transfer button, the normals have been permanently applied to our mesh. The skin is smooth now, and so is the dress (even though we did not smooth that one, hmm...)

If we toggle the modifier back on, suddenly the dress has seams again! What's going on there? I'm not exactly sure why, but Auto Smooth seems to be doing some smoothing on the dress mesh as well.
I am not sure if this is normal behavior or not, but let's pretend that this did not happen and the modifier in fact did not smooth the dress.
Maybe we just forgot to smooth some areas on the Seamless mesh that we noticed only later on. That's no problem. We simply modify our Seamless mesh again!

So let's swap back to the seamless mesh and select it (remember to click the eye icons so only the Seamless mesh is visible).

Let's select the main dress parts and press M -> merge by distance on them. We cannot smooth the whole dress all at once, because then that would remove some seams that we want (like those for the backfaces and the middle section of the dress where the bow is attached).
If we remove the wrong seams, we ruin our normals and will have black splotches.

Now, let's select the backfaces and areas we left out before and repeat this process: M -> merge by distance.

Look at how perfect our Seamless mesh is looking now! Now, let's transfer those beautiful normals to our main mesh.
Select the main mesh and toggle the eye icons again, to hide our Seamless mesh and reveal our main mesh.

Once again, we will use the Generate Data Layers button in our Data Transfer modifier. If you have previously applied the modifier, just add the modifier again to the main mesh and use the settings shown here.
And that's it, you are done! You have a perfectly smoothed mesh that you can export now.

Final Note: it is best to transfer the normals at the very end of your meshing process because any action that recalculates the normals can reset our custom-made smooth normals again.
Of course, you can simply use the Generate Data Layers button again to re-add them, but it saves you time to only do this step at the end.
I almost forgot to say: You still have to use Mesh Toolkit to fix the seams on the edges of your mesh and do the usual shenanigans.
179 notes
·
View notes
Text

It's BIG.
It's BLUE.
It's UPDATED.
Hiya Simblr, it has been a while. I have a big update today- it's one of my oldest guides on MTS, but new and blue! The changelog is in the MTS comments- but the short and sweet is that two years of learning Blender has been squeezed in there for your convenience, complete with graphics and GIF examples.
ModTheSims tutorial Google Docs tutorial Blender Templates

#on a mission to become a human tutorial hub#i follow predominantly ts2 blogs and feel like an infiltrator posting about simcethri#simblr#ts3#the sims 3#ts3 cc#ts3 tutorial#ts3 blender
186 notes
·
View notes
Text
Using NRaas Master Controller's Filters, Skill Stamps and Hot Keys - Part 2
Skill Stamps and Hot Keys
This is part 2 of my NRaas Master Controller tutorial on how I use filters, skill stamps and hot keys! (Tumblr wouldn't let me have my fun and use more than 30 images on one post, so 2 parts it is 🤨)
See also:
Using NRaas Master Controller's Filters, Skill Stamps and Hot Keys - Part 1: Filters
Tutorial under the header!

Mods needed for Filters, Skill Stamps and Hot Keys to show up:
Master Controller v.135
Master Controller Cheats v.134+
(9th Feb 2025 - desiree-uk correction: Additional mods needed for filters and door-locking system (my apologies! 😌) GoHere v.45 Tagger v.5
Skill Stamps:
I use skill stamps to add a whole bunch of skills to a single sim or sims in bulk!
When adding a newly created sim to your town, they may not have any skills yet until you play them, but a skill stamp can quickly add some skills to them as if they were already played for a while.
MC Cheats Interaction: Skill Stamp> Add New Stamp
Allows the user to define a skill set to apply during "Advanced \ Skill Stamp". Once added, selecting one from the listing will allow you to specify the levels for each skill.
I want some sims to be able to have some basic skills such as cooking.
Click on Town Hall/Computer>NRaas>Settings> Skill Stamp
Add New Stamp: name the skill stamp (e.g Basic Skills).


The skill stamp is listed. Click on it and set the cooking level to whatever you want it to be. I have both the regular cooking skill and the hidden child-skill level, just because. I don't know. 😄
I maxed out the child skill to 3 and set the regular skill to 1.

I've set other skill stamps such as ones for artistic sims (painting, photography, writing) and outdoor sims (athletic, waterskiing, gardening, scuba diving, snowboarding, diving, windsurfing)
I also set one for sims who I want to be able to drive! We now have the 'Sims Need Driving Lessons' mod by the awesome Phoebejaysims! All sims (except NPCS) can't drive until they've reached the maximum level of the driving skill.
Of course you'd want some sims to be able to drive in an already established town, right?
I want my adults and elders to at least have the driving skill, even if some don't have a car yet.
Set a skill stamp for driving:
Click on Town Hall/Computer>NRaas>Settings>Skill Stamp
Name the skill to something driving related, e.g Sims With Driving Licence.
Click on the 'Driving' skill.
Max it out to 3.


Adding skill stamps to a sim with no skills:

Click on a single sim: NRaas>MC>Advanced>Skill Stamp


You see the list of my skill stamps. When I click on each one, all the skills under the stamps will be added to the sim all at once (you'll see the notices that appear in the top right hand corner pop up notifying you the sims have the skills.)
Check their skill panel to see all their added skills. The driving skill is hidden, so it won't show on the panel, but you can check the sim has it by checking their skill levels in Sim>MC>Advanced>Skill Level. It should show 'Driving: 3'
To add the skill stamp to multiple adults and elders, I'll use the filter I made earlier in Part 1.
Click on Town Hall/Computer>Sim>Advanced>Skill Stamp
The filter 'AGE: Adults/Elders' is listed.


Click on it to see a list of all the adult and elder sims.
From the list you can select some of the sims who you want to be able to drive or scroll to the top and click 'All'.

The Skill Stamp list will pop up - choose the 'Sims with driving licence' skill stamp. The skill stamp will be applied. As stated before, you won't see the hidden skill in the sims panel, but they'll be able to drive. You can of course check their skill level via MC>Sims>Advanced>Skill Level.
While you're at it, you can edit some of the selected sims driving skill levels according to whether you want them to do a driving test, theory test or have their skill maxed out so they can drive straightaway when you give them a car...
PJsims mod interactions notes:
If they are level -1 or 0, sims can first do their theory test which will increase driving skill to level 1.
Once they are level 2 in driving, they can do their driving test which, if passed, will automatically max out their driving skill.
Now you can make and add as many skill stamps to any single sim or multiple sims in a filter.
~~~~~~~~~~~~~~~~~~~~~~~~~~~~~~~~~~~~~~~~~~~~~~~~~~~~~
Hot Keys:
MC Interaction: Hot Keys
Allows the user to specify which interactions are to be shown directly under the "NRaas" menu
You can add any MC interaction to the uppermost level of the NRaas menu when you click on a sim, household or terrain as short-cuts, especially your most often-used interactions.
I added the 'skill stamp' and other interactions as hot keys so I can easily edit a sim when I click on one.
Click on Town Hall/Computer>Settings>Hot Keys

I added:
* Change Autonomy
* Reset Sim
* Skill Level
* Skill Stamp
Make sure 'True' is next to the interactions you want to see in the NRaas menu:

Click on a sim or the terrain and you'll hopefully see all your created hot keys.
See my screenshot - all 4 are there!

With the skill interactions you can quickly and easily set a sims skill level or add a skill stamp to them when you click on the sim in less clicks than clicking on multiple dialog boxes.
The other two are self explanatory, turn on/off a sim's autonomy and reset a sim.
Note: The more hot keys you add, the slower the pie menu will take to pop up, so keep that in mind.
If you still don't want to click so many times in the menu to find your interactions, you can use Arro's UI Tweaks mod (currently in testing, soon to be released - it's an excellent mod, I highly recommend it! 👍🏾) You can search the menu by clicking on the magnifying glass icon on the menu or press the 'F' key and type the interaction you want, using a full or partial word!


That's it! That's how I use filters, skill stamps and hotkeys. It will become second nature the more you use them and they can be as easy or as complex as you want them.
If you use them already, how do you set them up and in what scenarios? Share in the comments or let me know if I can add or explain anything! :)
Click for part 1:
Using NRaas Master Controller's Filters, Skill Stamps and Hot Keys - Part 1: Filters
#ts3 mod info#ts3 test gameplay#ts3 gameplay#nraas#phoebejaysims#arro#ts3 tutorial#sims3#ts3#ts3 mod
146 notes
·
View notes
Text
Tutorial: Importing an existing world into CAW
Note: I did not write this tutorial! I copy/pasted it from here. I just don't have confidence that TS3 websites will remain viable in the long term, so I'm preserving this mostly for my own future reference. But, maybe it will be helpful for other folks like me who aren't very CAW-savvy and just want to make some edits to an existing world in ways that you can't do in-game. The slightly edited original post is pasted behind the cut.
1) Install the world in the usual way in your fresh game folder. If it is a real prerequisite, in that Riverview objects are used in the world, you'll need to install Riverview too. Of course this also goes for Barnacle Bay or any other custom world EA may release separately. This is also a good time to check in your Installed Items whether any "foreign" CC came with it.
2) Start CAW and make a new world. It will ask for a .png, press the … box and you'll get a few 'starters', choose any. Accept all the rest and OK. You don't need to worry about parameters for your world as they will be overwritten later anyway. Save As the new world with a name you will use temporarily, not the definitive name you want to give it. Let's call it Temp.world for now. Close CAW.
3) Open S3PE and browse to the The Sims 3 Create A World Tool\UserToolData\Worlds and you'll find your Temp.world file. Open it.
4) Use Resource->Import->From package… and browse to your The Sims 3\InstalledWorlds and open the world file you want to "import". Accept the default settings for Import, when it asks you to save between packages, say No. It will show a progress bar so you'll know it's done. This may take a while.
5) Sort the resources by Type (click the "header") and find UNKN 0x296A6258 there. If all is well you should have two, one already deleted (struck out), right-click the other and select "Deleted" to delete it too. At the bottom of the file you should have two WPID resources, one already deleted, delete the other too.
6) Use the "close" button in the upper right to close S3PE. It will tell you the package has changed, choose Yes to save the changes. The reason for doing it this way is you'll know it's done when the S3PE window closes. This may take a while.
7) Start the CAW tool and open your Temp.world. Wait until the render window shows you a reasonable picture of something in the world. This may take a while and there is no real progress indication.
8) Right-click on the Temp.world on the left pane (World Layers) and choose Add/Edit description. Make sure the Name and Description fields are filled in. You can use your final name and description here. Also make sure there is a .png for the thumbnail. If there isn't, browse up one of the samples you got earlier or make sure you have one ready. This needs to be in the 24-bit 256x256 format!
9) Save As the world with the final name, let's say Final.world. It will give you a "wait" cursor for a while and then a normal cursor. Don't touch it!! It's not done! Leave the computer to it until a window pops up informing you the world is successfully saved.
The opposite direction is quite simple, just start CAW and use "Export world". It will put a .sims3pack in your The Sims 3\Exports folder. You can take that out and put it in the Download folder and install it as usual.
155 notes
·
View notes
Text
tips for 4t3 converters/CAS clothing creators
3 main things:
non-recolorable presets
DDS. settings
Adult to Teen conversions
disclaimer: i'm not a CC expert, but these are things i've noticed and learned these last couple months converting cc. special thanks to thornowl and the other converters in the TS3 Creators Cave discord.
Non-recolorable presets:
we obviously know that ts4 lacks a CASt tool, so ts4 creators rely on recolors. In my conversions, I do include a couple of the item's recolors. these usually are patterns that CASt does not have.
one thing I've noticed more and more converters doing is putting such item recolors in the 'Overlay' tab in TSRW.
let me show you what that looks like for a non-recolorable preset:
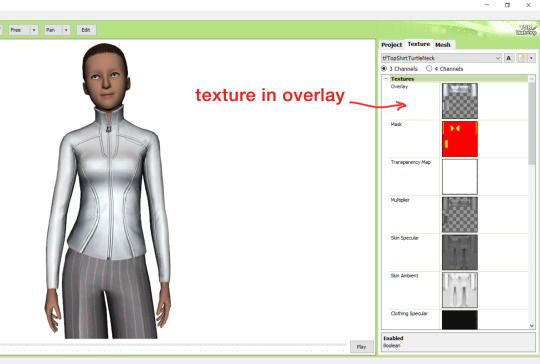
it looks over-saturated, and almost crunchy. but there's another place you can import the recolor into: stencils.
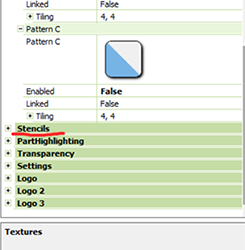
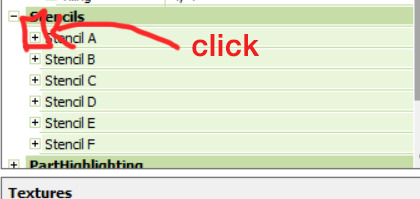
stencils will be found at the bottom, under patterns. hit the plus sign next to stencils to open it.
opening it will show you this:
by default, it will be enabled as false. import your recolor into the texture tab as you would do for any other texture tab. make sure you tick the 'false' to 'true.' stencils override overlays, so if you want to use an overlay, enable stencils back to 'false.'
here's what the recolor imported into stencils looks like:

here's the two side by side:
see how different they are? let's see how they are in game:
click on the pictures to really see the difference in quality. since TS3 uses DDS. format, it compresses the texture, which results in the crunchy texture. importing the recolor into the overlay tab makes the DDS. compression more noticeable. it ultimately is up to you and whichever one you prefer, but do keep it in mind.
the overlay tab is good for small details that you want to maintain on all recolorable presets, like zippers, buttons, tags, etc. just look at EA clothes for reference, especially their shoes and male clothes.
another thing you can see from the images are the bumps on the mesh. doing normal maps can help you keep those same details on the recolorable presets without importing the recolors.
-----------------
DDS. settings:
something I also see and used to do myself is bloat package files with large file sizes, specifically normal and specular maps, as well as masks. the Sims 3 Tutorial Hub provides a link to plain maps, but the file sizes are unnecessarily big.
let's look at some of EA's maps in TSRW:
here's the specular from one of the basegame sweaters. notice the image size, DXT format, and compression size.
a lot of converters don't want the shine on regular clothes, so we use a plain, black specular map. but ask yourself, why do you need a 1024 x 1024 purely black specular map with no details?
let's try sizing it down:
notice the difference between the image and compression size. instead of bloating the package file, we can keep it down by using a 32x32 plain black specular map instead, since there aren't details we want from the specular map.
same goes for normal maps:
and masks (meant for 1 channel only):

now, notice how I underlined the info about DXT MipMaps. see how the normal map has a different number there compared to the specular map and mask.
the reason these textures use different DXT is because of the colors and alpha channel.
here's how my DDS. settings appear when saving:
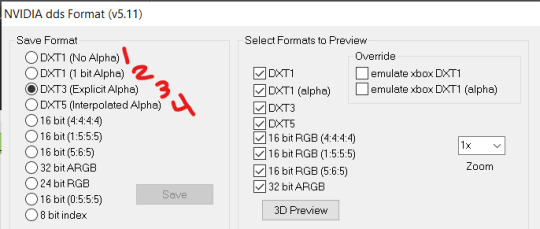
DXT1 (no alpha): this keeps only the 3 color channels and has the strongest compression. it results in half the file size as DXT3/5. 3 channel masks should be saved with this, as they don't need an alpha channel.
DXT1 (1 bit alpha): this includes an alpha, but only black or white. it also results in half the file size as DXT3/5.
DXT3: this one is rarely used for TS3 textures. it really is only used for overlays. it compresses the same as DXT5, but may not be the best for images with smooth-blended alpha regions (Neely).
DXT5: multipliers and normal (bump) maps should only EVER be saved with this. it's best for colors but has a larger file size. this is why it's important to reduce the multiplier and normal map image size, especially if you don't make a normal map.
if you DO decide to do a specular and normal map, they should be regular image size, 1024x1024, and saved in the right format.
here is more information on which textures should use which compression.
-----------------
Adult to Teen Conversions:
the default for converters is obviously AF and AM. a lot of people want the items for teens too. I've seen several converters just enable it in TSRW:
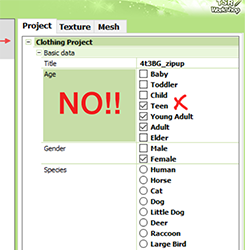
please don't do this. it's honestly the lazy route. you can hardly ever get away this, specifically because of the body differences between adult and teen.
some major issues with this include gaps, seams, and unnatural body characteristics:
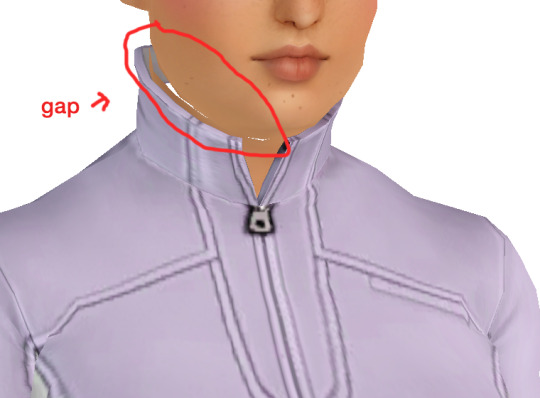
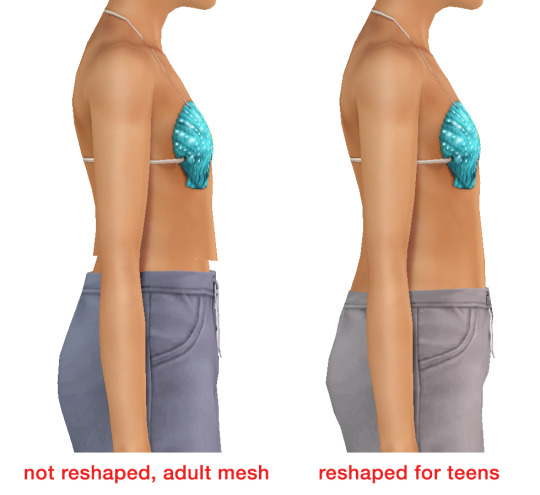
so please, either skip the teen mesh entirely or spend the time reshaping the mesh. @/sweetdevil-sims has a great tutorial on converting meshes from AF to TF here. the inevitable seams on TF meshes are also now fixed, thanks to @/thornowl with their new version of mesh toolkit.
@pis3update
---------------
here are reduced file sizes and corrected settings of the plain mask, specular, and normal:
download
Sources:
Neely, G. ‘Buckaroo’. Working with DDS/DXT Files. Available at: https://www.buckarooshangar.com/flightgear/tut_dds.html (Accessed: 28 May 2024).
179 notes
·
View notes
Text
Sims 3 animated bedding tutorial
I've been working on this tutorial for quite a while now, and i figured i'd upload it for those who need an in-depth explanation on how to assign bones to beds so they animate properly However, i must note that i do NOT know how to assign 'bits' to beds, therefore that part of the tutorial is missing... You may be able to accomplish this if you try following Gruesim's tutorial found here, but it is not included in mine [the bit is the piece that stretches to cover the inside of the bedding]
Also, you will need Gruesim's bed mesh references here
You can download the .doc version of this tutorial here Sideshow_Snob functional bed tutorial [TS3]

tutorial below -->
Programs you will need: TSRW (i like to use the old version/portable) Milkshape 1.8 Blender (im using 2.7 but you can use any version) Meshtoolkit
-To start, let’s find a good bed to convert. Try to find something that has the blanket, pillow, and mattress textures all on one image, so you don’t have to re-map it. Try and pick a bed where the design isn’t too complicated, if it’s your first conversion.

-This is an example of a good bed to convert. The textures are all in one image, the polycount is only 2k so we don’t even have to decimate it, and it has a good blanket and pillow mesh.
Step One: [Exporting the mesh and textures in sims4studio]
-Open the bed you chose, and import it into sims4studio. Export the mesh, and all the textures into a folder. I usually name my texture files (1,2,3) and so on.
Step Two: [References to use]
-This is extremely important. Open TSRW and clone this specific bed

-Use either the single or double version. I’m using bed single modern, since I'm converting a single bed.
-Go ahead and export this bed as a .obj file in the mesh tab, as we need it as a reference to use in blender. Leave this for later, we’ll come back to it when we import our finished mesh.
Step Three: [Separating the mesh in blender]
-Open the .blend file you got from exporting your mesh. We are now going to separate the bed into multiple pieces (pillow, blanket, mattress, bed frame) and fit them to be the same size as the EA Bed.
-Separate your mesh by shift clicking verts, and pressing shift+ to select the entire piece. If shift+ doesn’t select the entire thing, you’ll have to select them all by hand. Separate your selected piece, by pressing P
-After your done, your mesh should be separated like this:
Mattress
Bed Frame
Pillows (i usually separate both of them if its a double bed)
Blanket
Step Four: [Shaping the mesh in blender]
-These shortcuts are going to be very important for this part.
Shift S → x (scales on the x axis) Shift S → y (scales on the y axis) Shift S → z (scales on the z axis)
-Go ahead and move the pieces of your mesh around until they closely align the EA Bed, so it animates properly
-This is what my finished mesh looks like

-Once your mesh parts are close to the EA counterparts, go ahead and export each piece separately.
-Be sure to give them the correct names (blanket, pillow, bedframe, mattress), so that you don’t get confused later. I usually save the .blend file as well, in case I want to make edits later, which you will probably have to do if something happens after you assign your bones.
Step Five: [Renaming files to the correct groups]
-This is where things unfortunately get a little bit tricky
-We’re going to be going both milkshape and Meshtoolkit quite a bit
-Import the .obj files from your bed, one, by one so we can rename them. They need to be renamed ‘group_base’ so we can assign bones.


-Export all files you rename with the same name, except add “merged” onto the end, and export them as a .wso file. The bedframe bones are going to be assigned when we import all the finished bones into milkshape, so you can export it as 'merged' but we aren't going to be using meshtoolkit for that one.

Step Six: [Assigning bones with meshtoolkit]
-make sure you have frankie’s EA bed mesh references
-Open meshtoolkit → Auto Tools for WSO, and uncheck interpolation, and make sure you have it set to ‘replace all bone assignments’

-WSO mesh to modify: your merged file
-Reference mesh: The EA reference of the same kind (IE, blanket)
-When it prompts you to save the file, save it over the existing ‘blanketmerged’ file.

-Once you’ve assigned the bones to the blanket, pillow, and mattress, import them all into milkshape.
-Side Note-
This is important, you will NOT have to merge all your groups if you are doing this for a DOUBLE bed. only merge all the groups if you are assigning bones for a single bed. For double beds keep the groups separate like how they are in the TSRW reference mesh!
-Go ahead and select everything, press the ‘regroup’ button in the mesh tab, and then rename it back to ‘group base’
-do this for everything EXCEPT the bed frame. we will be assigning the bed frame by hand.
Step 7: assigning the bed frame bones
-Since you've got your bed pieces all grouped together and renamed group_base, go ahead and import your bed frame file.
-Go ahead and 'hide' your bedding in the groups tab so we can only see the bed frame mesh. go ahead and search for the specific bone labeled "0xCD68F001" in the joints tab. once you have found it, go to the model tab and click "select". 'alt shift right click' to select all the verts of your bed frame mesh. go back to the joints tab and click assign. your bed frame bones have now been assigned.


go ahead and "regroup" the bedframe and bedding as one group.

Import your mesh into the tsrw project we made earlier, import your textures and you should be finished.

[finished product]
If you have an questions, or suggestions please don't hesitate to ask. I hope this tutorial was helpful ^_^
77 notes
·
View notes
Text
SIMO tutorial in 4 steps


These outfit files could be used to dress NPCs with the help of a script mod such as @phoebejaysims's Boutique Mod
you need :
S3OC
S3PE and the Additional plugins "Grid" wrapper
SimOutfitter
84 notes
·
View notes
Text

THE SIMS 3 TUTORIAL
HOW TO CREATE CUSTOM FOOD DEFAULT REPLACEMENT MOD USING CUSTOM MESH & WORKING GEOSTATES (FULL, HALF, EMPTY)
This is default replacement replacing existing food in Base Game or Expansion Packs using EA's recipe and custom mesh & texture. If you are not satisfied with EA's existing mesh and texture, sure you can replace them with this easy-to-follow tutorial with pictures explained one by one. No custom recipe, no CCLoader, no scripting.
This is how I created Authentic Chinese Spring Rolls Replacement Mod using custom mesh and texture.

----------------------------------------------------
This tutorial is for intermediate, which means already know the basic principle of doing default replacement mod.
If you are beginner, haven't tried default replacement mod mesh & texture before, recommended to try the Default Replacement Tutorial for Simple Object first. TSRW Workshop, Milkshape, etc. Tools to prepare on that tutorial as well.
----------------------------------------------------
I created this tutorial because there is no tutorial about default replacement food mod using custom mesh and explaining about how to do the GeoStates properly. I did trial-and-error and accidentally found the method how to replace EA mesh with edited mesh, and the GeoStates are fully working.
The challenge of doing food default replacement is that food mesh cannot be cloned simply on s3oc. There's no OBJD for "EggRolls" "Stir-Fry" etc. other food. The only OBJD available for clone on s3oc is Burger.
Sims 3 Object Export cannot replace s3asc because it keeps throwing error and cannot make 3 working GeoStates (Full, Half, Empty).
-----------------------------------
Note: You need World Adventures Expansion Pack to use my example, Egg Rolls. You can replace food from Base Game or any Expansion Pack.
✳️ Step 1: Find all Egg Rolls file strings: Cook, Eat Serve files on S3PE
Instead of cloning from s3oc, we have to find the file from game file package on s3pe.
Why? Because the food cannot be cloned simply from OBJD. You cannot find file "Egg Rolls" no matter how careful you inspect every file filtered "WA" (World Adventures Expansion Pack) on s3oc catalogue.
The only food you can clone its OBJD on s30c is Burger. You will clone that Burger OBJD later. Right now you have to find every file with word "Egg Rolls" on game package.
⚠️I suggest you make duplicate of game package for modding purpose instead of using package that is readable by game when the game is running. It is to avoid corruption because you accidentally replaced the files. If corrupt happens you have to re-install the game. ⚠️
Make duplicate of game package you find on your game installation path.
Base game:
The Sims 3> GameData > Shared > Packages > FullBuildep1.package
Expansion Pack:
The Sims 3> GameData > Shared > DeltaPackages>p02 > DeltaBuild_p02.package (Depending the release of Expansion Pack & Stuff Pack)
My duplicate of game package folder looks like this.

Open s3pe. Open FullBuildep1.package.
Type Name "EggRolls" on box.
Tick besides Name and Filter Active, then click "Set" button. It will give your result "EggRolls" filtered by its own.
Select all files until they are in blue selected, Right Click > Copy.
File > New. Right Click > Paste...
Then your files are all pasted into new S3PE document. You can delete ticks on Egg Rolls filter, as the package is no longer filtered.

File > Save .package. Give the name of the package such as "[Your username]_AmericanEggRollsEA". For my own example, "TBW_AmericanEggRollsEA."
We will use this package as a base to be replaced with new resource codes later. Put this package on Folder such as "Original EA American Egg Rolls" to make you easier to find the file which is original, which is edited.
✳️Step 2: Export Egg Rolls .s3asc and texture files from S3PE & copy the original resource codes.
Export foodEatEggRolls, foodCookEggRolls, foodServeEggRolls to s3asc.
If you are asking why this MODL should be export to s3asc, it is because we cannot clone OBJD of original EA Egg Rolls from S3oc and imported as .wso format from The Sims Workshop (TSRW). The only mesh of EA Egg Rolls we can get is from .s3asc file we can get from s3pe.
Save the s3asc file: "Cook","Eat", "Serve" on separate organized folder, name it "Original s3asc EA Egg Rolls"

⚠️Warning! The strings too long can cause error when export it.
Sometimes you tried to export the .s3asc but then disappeared and you cannot find where you save it. It is because the S3PE application crashed when you exported it because the strings are too long.
In this case, the original .s3asc you want to export is S3_01661233_08000001_0000000008780D94_foodEatEggRolls%%+MODL_filebase.s3asc
You can delete the long string then leave the "FoodEatEggRolls_filebase.s3asc" for example. Yes, you must add _filebase so it can be saved as .s3asc format.
Save, then the .s3asc will add additional files such as:
foodEatEggRolls_group00.s3ascg foodEatEggRolls_group01.s3ascg

Export the original EA .dds textures "All" and "Used" .
Copy all resource codes of each file to Notepad. Right-Click>Details...
Click Copy TGI to easily copy the codes (Type, Group, Instance) to Notepad.
Click GRID > Resources (3 Dots) > TGI Block List Editor You will see the list consists of 8 lines of_IMG, copy all TGI (Type, Group, Instance) codes to Notepad for easy copy paste later.

✳️Step 3: Copy original GeoStates codes (0, 1, 2, 3)
Click "FoodEatEggRolls" MODL. See the 4 GeoStates on the right side.

GeometryStates[0]: 0x95A36FFE
GeometryStates[1]: 0xD8918A76
GeometryStates[2]: 0x4DB2D3D2
GeometryStates[3]: 0x35B26CCB
Copy all these GeometryStates to Notepad for easy copy paste later.
GeoStates are in three forms.... Full, Half, Empty? But why are 4 GeoStates now?
You will find out later by cloning the base food OBJD in the next Step.
✳️ Step 4: Clone Burger mesh using s3oc & Open the Burger Mesh on TSR Workshop
More steps click spoiler tag “Read More / Keep Reading” below
Search "food" on s3oc.
You will get results like this. Food that can be cloned are Hamburger, Hotdog, Fries (Seasons EP). I choose Hamburger because it's Base Game and it's resembling custom food we want to create.

"Clone or Fix..."> Don't tick Renumber > Start.
Save the package. Open the package on TSR Workshop.
Open TSR Workshop > Create New Project > New Import> Next > Browse EA Burger .package > Next > Next > OK.
You will get Burger mesh preview. Take a look at Mesh tab.
Then see the Group 0 and Group 1. Both have GeoStates.
What is Group 0? What is Group 1?
If you check the the burger's .s3asc exported from s3pe or .wso exported from TSRW
You will see Group 0 is the food mesh as main mesh and Group 1 is the plate.

Go back to TSR preview. You see there are 4 GeoStates under Mesh from Group 0 tab.
By default, the Burger meshes (Full, Half, Empty) are combined into one.
Click each GeoState, from top to bottom.
0x95A36FFE is Full state
0x8A6C4E39 is Half state
0x4DB2D3D2 is Empty State
0x35B26CCB is Full state

✳️ Step 5: Create your edited mesh
Import MODL file (with format .s3asc) of Egg Rolls you exported from s3pe from Step 2 into Milkshape 3D via Sims 3 Object Import by Wesley Howe. From Milkshape, export .obj file to your favourite 3D software to make .obj file as base mesh for your edited mesh.

Create 3 States: Full, Half, Empty.
Export uvmap to editing image software to create the texture.
After you are done and satisfied with your mesh, export your custom mesh only without plate, Full, Half, Empty states in .obj format. Hide EA plate and EA's base mesh before exporting.
✳️ Step 6: Create texture
Import uvmap from your 3D software. Create texture, save in .dds format with the same name as original name of .dds exported from s3pe.

✳️ Step 7: Bone Assignment, Make Group & Export to .wso
Open Milkshape 3D. Import .s3asc of original EA Egg Roll "foodEatEggRolls_filebase.s3asc" from Step 2. Click Joints Tab, tick box "Draw vertices with bone colors" to enable bone colours.
The food shows Purple colour, the plate shows Yellow colour.
*Note that this .s3asc was imported from year 2023, the original colours are like these. If in this recent year 2025 shows different colour such as the plate is Purple, please follow this example, assign the plate Yellow colour, because my method using this Yellow bone colour has been working successfully.
Then import .obj of your edited mesh from 3D software. Delete materials of custom mesh, select custom mesh, regroup, rename to group00.

Your main task is copy Bone Assignment from original EA mesh to your edited mesh.
Check the codes on Joints tab, there are 3. Click each code then click "Assign" to see what is the Bone colour to determine rig for functionality of the object in the game.
0xFEAE6981 --> Yellow 0xCD68F001 --> Purple 0xD0DECA8E --> Light Blue
We will assign the custom mesh with Purple colour, therefore, select the custom mesh, select 0xCD68F001, assign. The custom mesh colour will turn Purple.

After you are finished with the Bone Assignment (Main Mesh is purple, plate is yellow), make sure the groups are correct. Group 00 ---> main mesh. Group 01---> plate. Export them in .wso format.
✳️ Step 8: Import the edited mesh on TSR Workshop
Open Burger .wrk on TSR workshop, import your custom mesh in .wso format. Click folder with green arrow to import .wso.

After importing, you will see your custom mesh and Geostate reset to 0 for all states.
✳️ Step 9: Create Geostates on TSR Workshop, Export to Package
If you click Geostate row, the custom mesh disappears. Because the face is 0. Click on ... dots on the right side of Geostate to open Face Selector. Face Selector is to create Geostates working, Full, Half, Empty. The mesh suddenly appears with grey colour.

Left click to give colour to the face. Colouring faces based on Geostate. Be careful because the mesh is all joined into one. When give colour to Full state, do not give colour to Half state.
0x95A36FFE for the Full State
⚠️Warning! This is the trickiest part of creating Geostates: Texturing the Geostate. Cannot undo. If you wrongly click and want to undo, you have to restart from zero again. If you feel the texture is alright, then save it. You can start from checkpoint from last save if you wrongly clicked. Cancel then load the save to restart. ⚠️
Click 'n pick to click the colour one by one. Basic Square: Drag cursor to give colour in big area. Shift + Left Click: Delete 1 face. Click "Clear" to delete all the colour in one click.

Rotate the camera to make sure all part of expected geostates are textured.
Give colour to other GeoStates.
0x8A6C4E39 for the Half State (half eaten)
0x4DB2D3D2 for the Empty State (crumbs)
After you are done with the texturing GeoStates, export to package. Edit > Project contents, Export> To .package

✳️Step 10: Export MODL filefrom Package saved from TSR Workshop
Save the package with name "SpringRolls_TSRW"
Open s3pe, import package that you saved from TSR Workshop. "SpringRolls_TSRW"
Export MODL, save.


✳️Step 11. Finalizing in s3pe & Replacing the Original MODL with Edited MODL & Correcting the TGI (Type, Group, Instance) Code As Same As Default Code
Open original package you cloned on s3pe "Your Username]_AmericanEggRollsEA"
I saved the package with different name to"[Your username]_SpringRollsDefaultReplacement." to make it modified package, while leaving AmericanEggRollsEA package as backup original base, just in case I need original file.
Replace "FoodEatEggRolls" MODL that you saved from Step 10: from SpringRolls_TSRW
Check if all resource code (Type, Group, Instance) are the same as the original. Check the resource codes inside TGI Block List Editor, are they as same as inside TGI Block List Editor in original package.
You can see the resource codes are different from original FoodEatEggRolls MODL codes you copy pasted to notepad. Delete MLOD, change the codes (Type, Group, Instance) with the original FoodEatEggRolls MODL codes on Notepad. Use "Add" to add one row, Delete to erase one row. After you are done, Save and Commit.
Replace textures with your custom texture in .dds format.

Save package.
Test the package in game.
Wait until your Sims finish all their GeoStates, are the GeoStates working properly.
The geostates are working properly except at the Half Eaten state.
All states are combined into one and the plate colour are having spring rolls texture... 😱

Don't panic. Your bone assignment is alright. Copying same codes on Data Resorce and TGI Block List Editor are working properly too.
What causing the Half Eaten state is not working is:
The "Half Eaten" geostate code you are cloning from Burger mesh is not the same as code from geostate of FoodEatEggRolls.
Burger= 0x8A6C4E39
FoodEatEggRolls= 0xD8918A76

✳️Step 12. Correcting one GeoState that doesn't work because using EA's Burger mesh
Your main task here is using Default EA's Half Eaten state code to override your custom mesh Half Eaten state code.
Data Grid > ChunkEntries> [1] ChunkEntries > RCOL Block > Meshes > (on Tab [0] Mesh) > GeometryStates (then click ... Dots on the right side) > [1] GeometryStates

Second row is [1] GeometryStates, indicates it is "Half Eaten" state.
[1] GeometryStates > Name

Delete the code 0x8A6C4E39, replaced the code of the Burger with 0xD8918A76 from FoodEatEggRolls.
Click Done. You will go back to Tab [0] [1] Mesh and Geometry States
Don't forget to correcting the code for Plate as well. Plate is in the Tab [1] Mesh. Click [...] Dots on Geometry States once again, it will bring you to Geometry States for Plate.

Repeat the step as you did for the Food State: On Row [1] GeometryStates > Name, Delete the code 0x8A6C4E39, replaced the code of the Burger with 0xD8918A76 from FoodEatEggRolls.
After you are done, click OK > OK > OK > Commit > Save the .package.
Test your package in your game again.
Half Eaten state should be working by now.
✳️Step 13. Replacing the Original "Cook & Serve" MODL with Edited "Cook & Serve" MODL & Correcting the TGI (Type, Group, Instance) Code
Create custom mesh & texture for Cook & Serve, export to TSRW, then export to MODL like Eat state before.
⚠️ Pay attention because this step is very important, otherwise the Custom Food will turn black/disappear, doesn't work in the game.
Repeat Step 11: Replace the MODL for Cook & Serve state.
If you see default TGI code you copied from "foodCookEggRolls" there are only 3 lines.
_IMG 0x00B2D882 0x08000000 0x6F93B613E7C91FD0 _IMG 0x00B2D882 0x08000000 0x6F93B613E7C91FD0 _IMG 0x00B2D882 0x00000000 0xA4D80FB45AE9066B
If you want the Cook state working in the game, you should use default TGI code of Serve you copied from "foodServeEggRolls"
_IMG 0x00B2D882 0x08000000 0x6F93B613E7C91FD0 _IMG 0x00B2D882 0x08000000 0x6F93B613E7C91FD0 _IMG 0x00B2D882 0x08000000 0x0E3D40D33CC70324 _IMG 0x00B2D882 0x08000000 0x6F93B613E7C91FD0 _IMG 0x00B2D882 0x08000000 0x6F93B613E7C91FD0 _IMG 0x00B2D882 0x00000000 0xA4D80FB45AE9066B _IMG 0x00B2D882 0x08000000 0x6F93B613E7C91FD0
instead of foodCookEggRolls, otherwise the Cooked food will turn to Black colour in the game.
Repeat Step 11: Copy all the TGI codes you copied from "foodServeEggRolls" for Cook and Serve.

Commit, Save.
✳️Step 15. Check the Geostates for Cook & Serve
Check the Geostates for Cook & Serve.
Cook & Serve Geostates are working using Burger Geostates.
0x95A36FFE 0x8A6C4E39 0x4DB2D3D2 0x35B26CCB

Leave the Geometry states, no need to change to default EA Egg Rolls (otherwise your mesh will disappear or black).
After you are done, click OK, commit, save the .package as usual.
✳️Step 16. Test the CC in the game.
If your Custom Food works well in the game: Full, Half, Empty Geostates are working without showing weird texture or black or disappear, then congratulations! Enjoy and have fun with your custom food default replacement mod👍

#the sims 3#ts3 tutorial#thebleedingwoodland#ts3 mod tutorial#ts3 default replacement tutorial#ts3 functional food tutorial#tutorial#modding#s3pe#s3oc#TSR Workshop#geostates#ts3 food
23 notes
·
View notes
Text
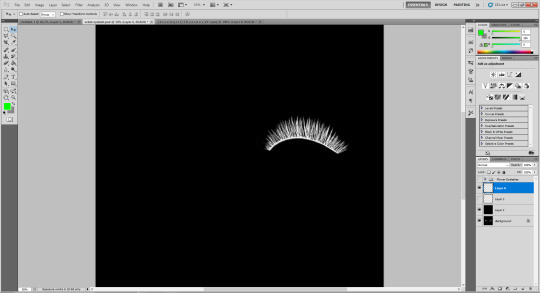
How To Convert Eyelashes
I was asked to make a tutorial on converting eyelashes. Well, here it is. Dirty, badly explained tutorial by Rollo. I'm assuming you know how to work with required programs, it won't teach you the basics, just a process of converting eyelashes from ts4 to ts3.
Requirements:
S4Studio
s3pe
TSR Workshop
Sims 3 Pack Multi-Extracter
These files (full credit goes to @gruesim)
Graphical program that works with .dds files
Let's go:
Open the desired lashes in S4Studio. Export diffuse of the ones you want to convert (you only need the black ones). You can also export the thumbnail. Close the program.
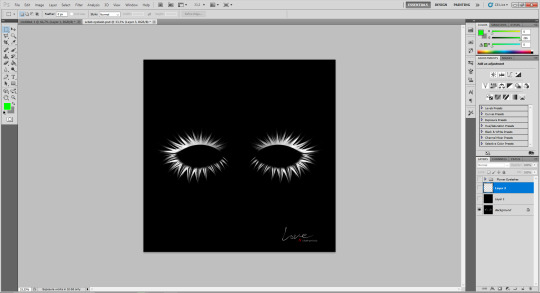
2. Unzip the folder that you downloaded from this tutorial. You will find a .dds files called "sclub eyelash". Open it up in the graphical program. Make a black layer above it and hide it for now.

3. Now open up your ts4 eyelashes file. Start from the upper eyelash, crop it and go to the sclub eyelash.
4. Paste it, click ctrl+i, it will make ts4 eyelash white.

5. This is the worst part. You have to make the ts4 eyelash fit to the sclub one as close as possible. Use every method possible!
6. Unhide the black layer and see if your eyelash look alright. It may need some sharpening.
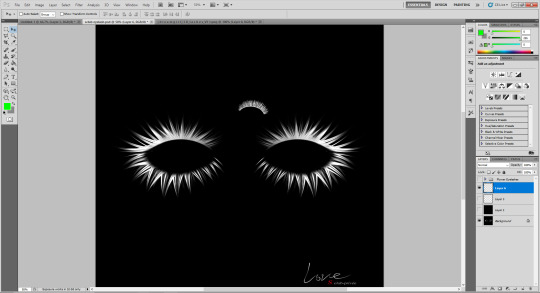
7. Now crop the bottom eyelash and follow the exact same steps as for the upper eyelash.
8. It should look more or less like this. Bottom eyelashes are always harder to adjust and may need even more sharpening.

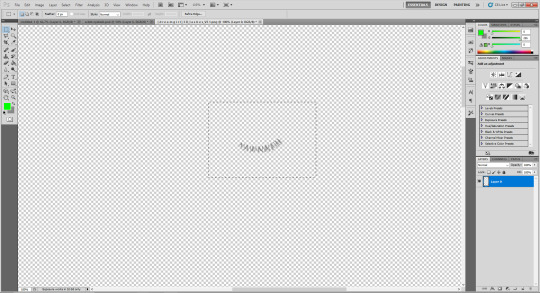
9. Merge your upper and bottom eyelashes, duplicate the layer. Click ctrl+a, ctrl+t, then right mouse button and choose "Flip Horizontal".

10. Voila. You should have a complete set of your new shiny eyelashes! Save them as .dds. You can close the program. We're moving to TSR Workshop.
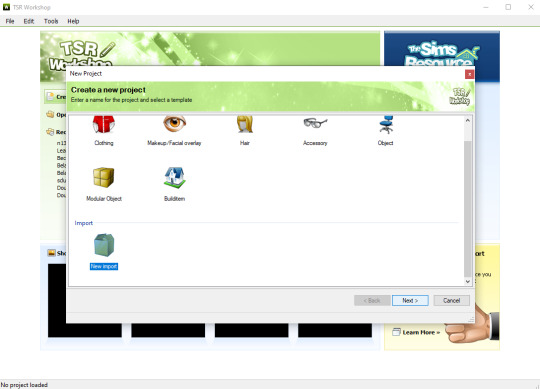
11. New Project -> New Import. Import Eyelashes AFBase from the downloaded folder.

12. Name your project, name your file and click "Next".

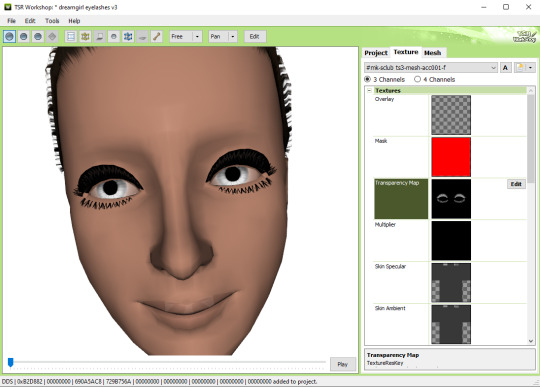
13. You should see this. Go to Texture tab and click "Edit" on the Transparency Map.
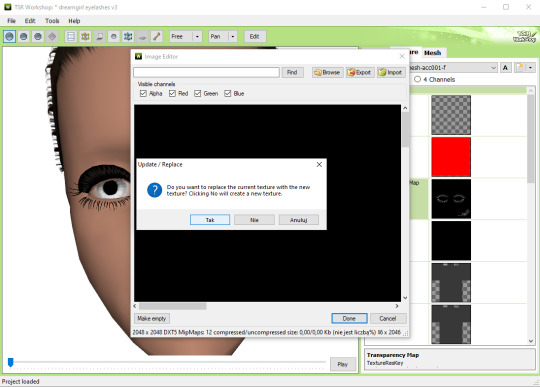
14. Import your eyelashes and click "Yes" when asked.
15. You should see your lashes, yay! But this is TSRW, they won't look exactly the same in game, as they look here. If you want a set of eyelashes, add more presets.
16. Now this is important. If you want to see your eyelashes in Accessories, go to Project tab, Clothing Type and change it from eyeliner to glasses. You also have to do this if you have more than one preset in one file. They won't show up in Eyeliner section. If you want to have set of eyelashes in Eyeliner category, you have to make each preset into seperate file. Also, eyelashes are recolorable ONLY in Accessories section. Don't forget to check Categories section to see which outfit has the eyelashes available.
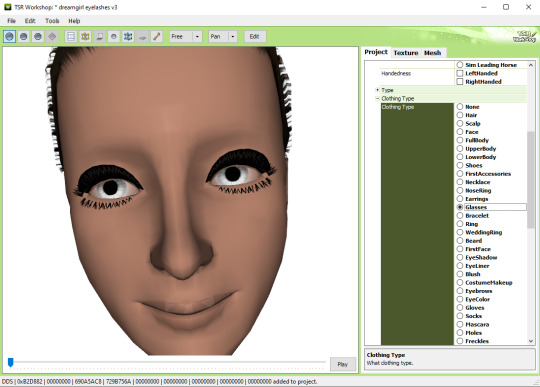
17. Now you're ready to export your file! Export -> To Sims3Pack. Use the Sims 3 Pack Multi-Extracter to convert your sims3pack to package file. We're moving to s3pe.
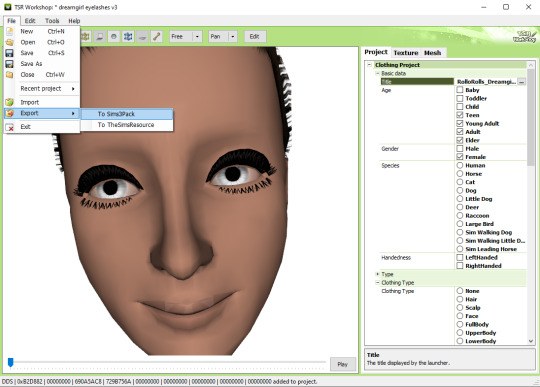
18. THESE STEPS ARE ESSENTIAL! Open up your shiny new package in s3pe. Click on the GEOM with the right mouse button.

19. Click Replace and choose AUID.simgeom from the downloaded folder. AUID is for adults, CUID for kids and PUID for toddlers. We have one more step to do.
20. Now click on the CASP normally (left mouse button) and click Grid on the bottom of the program.
21. A small pop up window appears. Scroll to the very bottom and find a line called OverlayPriority.

22. Change the 8 to 2. This will make eyelashes not being visible through hair that's covering eyes.
23. Save your package. You're ready to test your converted eyelashes in game!

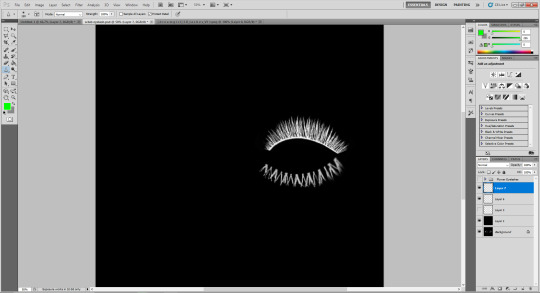
Here they are. Nothing fancy, it was a quick conversion :D They're also compatible with S-Club eyelash sliders ^^
Btw, you don't necessarily have to convert both upper and bottom eyelashes. You can have upper or bottom only. Play with the lenght, not all eyelashes have to be very long. Convert it for males, kids, toddlers. You just have to remember to change the options in TSRW and replace the correct .simgeom file in s3pe. There is a lot of possibilities and you'll probably get better in this than me :D
Good luck! ♥
204 notes
·
View notes
Text
youtube

Tutorial : Face Preset Editor
After releasing my default replacements presets, I don't want to be the only creator to do so. Having many people share their content is amazing and that alone creates growth of custom content for the Sims 3.
Therefor, I think it is important for me to share my knowledge with you so you can be able to better understand how to use the Face Preset Editor by LazyDuchess and create your own custom presets or default replacement presets
What I'm assuming in this tutorial :
You have S3PE installed
You're familiar with the basics of S3PE.
You know what game files are
You know what a default replacement is
Download - Default Presets Folder :
SimFileShare - GoogleDrive
Questions and Answers
What's in the default presets folder ?
They're the default presets from the basegame and world adventures that I extracted from the game files and organized according to their names and categories
Can I use your already existing face presets default replacements as a base to make my own presets ?
Yes, feel free to use them all, just credit me if you do so ! - Heads Eyes Noses Lips -
Credits :
S3PE
FacePresetEditor
#ts3#sims 3#the sims 3#tutorial#siims 3 face preset editor#sims 3 face presets#sims 3 presets#ts3 face presets#ts3 face preset editor#sims 3 custom presets#sims 3 default replacement presets#sims 3 mod tutorial#sims 3 tutorial#ts3 tutorial#ts3 cas#sims 3 cas#sims 3 create a sim#ts3 create a sim#ts3 mods#Youtube#CAS : Presets#tutorials
194 notes
·
View notes
Note
Hi hey gurl! I've been trying to understand something... when it comes to performance, is it vertices or polycount that really matters? I’m trying to get a clearer picture of how they affect gameplay. Hope this isn’t too random tho 😂
Hey nonny, thanks for the great question! I'm not sure if you are looking for a non-creator answer or if you maybe have some experience with meshing, but I try to cover some technical aspects that hopefully will make you understand vertices and polygons better! It's a bit of a longer journey, so grab some snacks and settle in!
Disclaimer: This is my opinion and the definitions are how I came to understand them. I believe what I say to be correct, but I am also human and may have misunderstood something, and making mistakes can happen. Thanks for understanding! TL;DR There will be calculations made on every vertex and every face present in a mesh. So the more you have of either, the worse it is for performance, but if the vertex count is much higher than the poly count, the mesh is especially unoptimized and may impact performance more than it would in an optimized state. Vertex and polygons are actually connected, literally. To understand, we need to start with the basics.
Vertices are points in a 3d space that provide the foundations of a grid-like 3d structure, known as a mesh. Connected through lines known as edges, they form a 3d shape. Three edges form a triangle, or tri for short, also known as a face or polygon. These terms can be used interchangeably, but a tri always has three vertices, whereas faces and polygons can have more than three vertices.
A polygon with 4 vertices (known as a quad) is very commonly used in 3D-modelling, because it can be used to create very neat and well-structured meshes (it is easy to make grids using rectangular shapes). A mesh that is made in a grid-like way may have the same overall shape as one made out of triangles, but the flow of the edges is different, and this plays a role during animation. Having these grid-like lines is usually better for moving and animating characters and avoiding shading issues.

Most meshes for games are thus initially made with 4-sided polygons. These quads are usually further broken down into tris if they aren't already, and three is the least amount of vertices needed to form a coplanar surface.
When the quads of the left sphere are turned into triangles, the grid structure will remain intact:

We can further break down the elements of a polygon. Let's take a simple cube. It has 6 sides, or faces, and each face has 4 vertices that make up the corners. But if we count all the vertices, we will notice that each face shares vertices with other faces. So on a simple cube, we have 6 faces and 8 vertices.

Depending on how a mesh is made though, it may have a lot of edges. You can think of those like cuts in the mesh. If we wanted to cut up the cube, we would separate each face from each other. Now we still have the same number of faces (6), but the vertices are suddenly much higher, because now, every face has its own set of 4 vertices, meaning that we have a total of 24 vertices.

In video games, polygons are usually rendered as triangles. So for our cube, that would mean that every face would be diagonally cut in half, giving us a total number of 12 faces/polygons/tris.

If we take it to the next level and separate all of these triangles from each other, the vertex count would be 36! To recount, on a mesh that is not split, it's only 8. Having these cuts (or split edges, as they are commonly called) in strategic places in the mesh where vertices are split can be important for the final look of the mesh in the Sims games.
You may have already encountered some meshes that have dark spots or shading in some parts, often at the hems. That can happen if the mesh is not split correctly in these areas. It has to do with how the normals work (they are important to how light gets reflected off the mesh).
To not go too off-topic, I won't get into detail about that here.
Ideally, a mesh is only split where it needs to be so it will look right. If there are unnecessary cuts, then the vertex count (and with it, the polygon count) goes up when it doesn't really have to be. If a mesh has a lot of these areas where a lot of faces have their own vertices, then the vertex count is much higher than on a mesh with fewer split edges. This can be a sign that a mesh is not well-optimized. So if you see a mesh that has much more vertices than polys, you may want to question it in regards to performance. CC converters will probably know that Sims 4 meshes come with a lot of these cuts that are needed for Sims 4 because of the way the CC is made (for example, pants have such a split edge cut to allow boots to look tucked-in), but those are superfluous for TS3. So I encourage every Sims 3 CC creator to remove those to save on both vertices and polygons when they are converting! The thing is, in the game, the mesh will be processed and there will be calculations made on every vertex and every face present. Each vertex is indexed, and triangles need to be drawn from the information. Other processes will need to also use the vertices for their calculations. There is more going on during rendering than simply drawing the polygons. The shaders have to calculate their effects, the textures need to be rendered and applied accordingly, filtering such as anti-aliasing will be applied, etc. So the more geometry you have in a mesh, the worse it gets in terms of performance. More geometry means that the polygons are smaller and more numerous, which will in turn affect the vertex count too.
As CC creators, we cannot address all the factors that impact performance, as we can only influence a small part, but we can try to adhere to the game's standards to minimize the performance impact as best as we can. If we wish our meshes to be more detailed than what the game's standards are, then we impact the performance more.
Instead of just cranking up detail like crazy, it is good to see if we really need it. And ask questions such as how often will the player view the item closely? If the player is usually far away from the item or it is a very small item, making it super detailed will not really do much, since the item looks the same as a low-poly item from a certain distance. We can also make compromises and maybe make an item 50% more detailed instead of 200% more detailed, providing a more detailed item while minimizing the performance impact.
This is a bit off-topic, but since I'm here already, we may refrain from using a bigger texture for a very plain piece without any notable intricate detail (like a basic T-shirt, for example), since it already looks fine with a smaller texture, but it may pay off for a highly detailed texture which looks visibly better with a bigger texture, warranting the performance impact (like a lace blouse with an intricate pattern, stitching, and small buttons).
On that note, using the texture space efficiently can also do wonders to increase detail. Use all the real estate you have on that UV map (that is a 2d representation of your 3d mesh and used to apply the texture to the mesh). Have you tried upscaling the texture yet? Okay okay, I'll stop now and get...
Back on topic: The number of polygons also matters, not just the vertex count. When a mesh has lots of smaller polygons, a lot of them are necessary to form the entire mesh. Bigger polys will not provide as much fine details, but will have less impact on hardware because fewer calculations to be made. A good mesh uses only as much detail as needed while using as few polygons as possible to still maintain functionality.
Sims clothing meshes need to animate and move well, so they need to be able to flex at the joints, and the shape must also be able to change to accommodate body sizes, thus the mesh needs the minimum amount of geometry to achieve this and still look decent, which is a sweet spot the developers have to find to craft meshes that perform well while looking reasonably good.
A good habit for creators looking to make meshes for the Sims games is to look at similar meshes in the game and study them (so for TS3, check the original TS3 game meshes, for TS4, check the original TS4 game meshes). Check how many polys they use and how good the topology (structure) of the mesh is.
For example, how many rows of edges do they usually have, and what sizes are the polys usually? How many vertices are in one round of edge loops, for example for the arms? How are the different mesh parts connected to each other, where are split edges used? Then imitate that.
The professionals who made these original meshes knew what they were doing, and they optimized them to be gameplay-friendly, so if in doubt, copy what they do.
Game meshes are usually especially optimized and it is very much game-dependent how they are structured, so a mesh from a different game can look totally different. CC Creators looking to optimize performance in their meshes should try to match the original game's mesh in terms of structure and polycounts. This will also ensure they animate well!
If you made it this far: well done, thanks for bearing with me! I hope you feel more knowledgeable and ready to apply what you've learned to your own meshes or when selecting CC for your favorite Sims game.
#sims 3#reply#sims 4#sims meshing resource#ts3 meshing#sims polycounts#Sims CC creation#meshing theory#tutorial#ts3 tutorial#ts4 tutorial#my best tutorials are always based on asks#why do I always forget which tags I use for tutorials
35 notes
·
View notes
Text

I didn't expect to write another guide so soon, but this one is a simple set of text instructions and I've also provided the fix itself as a download- the method is really just documented for posterity.
After a few false starts, I've finally hit this error on the head. If you haven't taken the plunge to only using .package installs, this was the last unsolved issue I knew of them having ;)
Download + Guide Here
Download contains a fix for (hopefully) every Store counter and cabinet, please let me know if you find one I missed.

I will release an update with the other MDLR objects- sectional sofas and swingsets- as soon as I've rounded them all up and had a chance to fix them.
#i have an unhealthy attachment to the ts3 store items#expect a hundred other uploads related to them#the sims 3#ts3#ts3 store#ts3 cc#ts3 tutorial#ts3 download
126 notes
·
View notes
Text
Using NRaas Master Controller's Filters, Skill Stamps and Hot Keys - Part 1 Filters
This is part 1 of a little (big!) tutorial on how I use filters, skill stamps and hot keys from NRaas Master Controller together in my games. It's also an appreciation post! 😊
See also: Using NRaas Master Controller's Filters, Skill Stamps and Hot Keys - Part 2: Skill Stamps and Hot Keys
Tutorial under the header!

Mods needed for Filters, Skill Stamps and Hot Keys to show up: Master Controller v.135 Master Controller Cheats v.134+
(9th Feb 2025 - desiree-uk correction: Additional mods needed for filters and door locking system (my apologies! 😌) GoHere v.45 Tagger v.5
Filters:
I use filters, skill stamps and hotkeys for various things, mostly to edit bulk sims, refine door locking options, set filters for parties, functions etc and add short-cuts of often-used MC interactions to the NRaas menu when clicking on a sim/household/terrain. Once you know how to set these, you can set as many as you like and use them in a lot of different combinations.
Here are a few examples on how I set them up, but you can name them whatever you like.
MC Interaction: Save Filter Prompts the user to save a custom filter that can be used for Sim queries.
There are already a lot of default filters for sim-criteria like Age, Species, Residents, NPC etc, but I want to set one specifically for Adult and Elder sims together so I can set door options and skill stamps for them (more on skill stamps in Part 2!)
Click on Town Hall/Computer>NRaas>MC>Settings>Filters Click Save Filter - Age - Adult and Elder Oh, also set 'Species' to Human otherwise all adult and elder cats, dogs, horses and the Grim Reaper will show up! I always forget that part. 😄
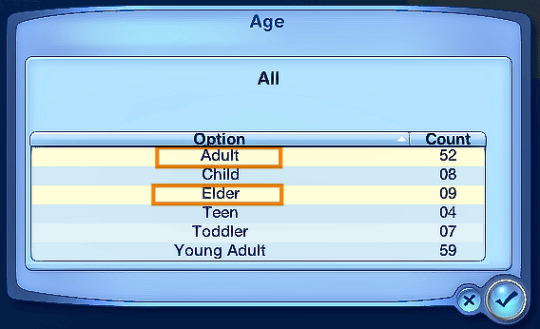

Name the new filter (e.g AGE: ADULTS and ELDERS) Click Accept ☑ Your new filter will show up in the list of filter criteria.
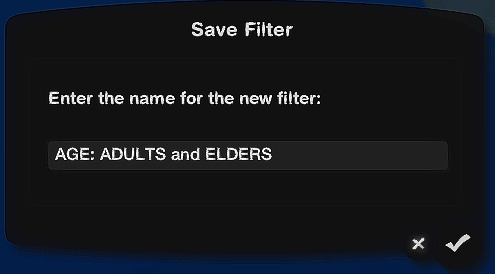
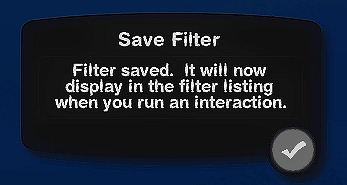
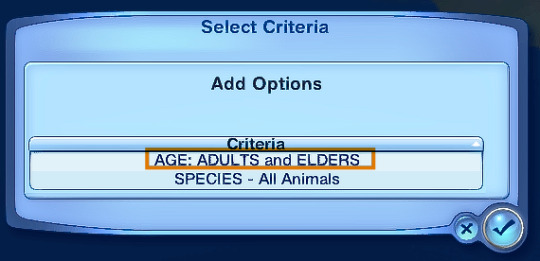
I only want these sims to use a particular door. You can use the EA door locking system to select sims you want to use the door if you want, but if you want more stringent rules, then the filters are better.
Click on the door>Lock…>Door Options… Click on 'Door Filter Type - Deny Click on 'Enable/Disable Filters' - 0
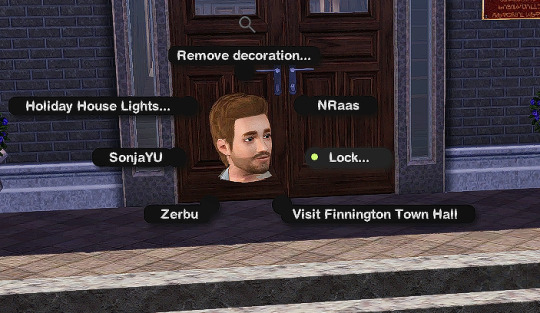
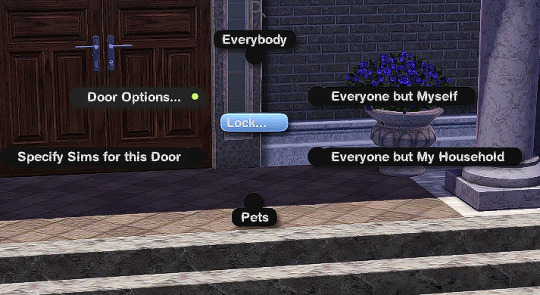
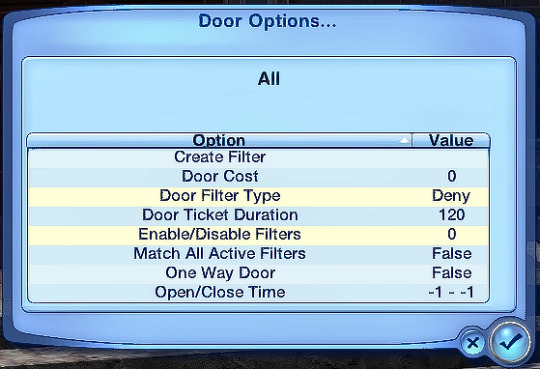
Click on the new filter you made earlier 'AGE: ADULT and ELDERS Click on it until it shows 'True'. Click Accept ☑
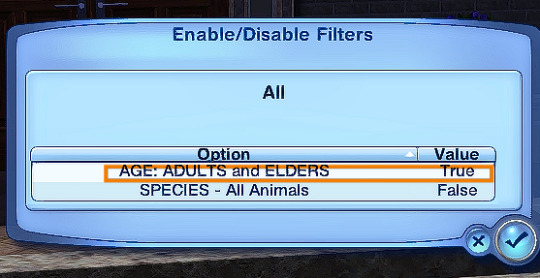
On the previous dialog box you'll now see the 'Door Filter Type: Allow' and 'Enable/Disable Filters: 1' You'll also see two new options 'List Sims Allowed Through' and 'List Sims Denied Access'.
Click on them to double check you have the right sims listed. ALL human adult and elder sims are showing up in the 'Allowed..' list. The 'Denied Access' list should show all the baby, child, teen and YA humans and pets. (Allowed: 1st picture. Denied: 2nd picture)
You can set any filter with as many different criteria as you want. When you set a filter with more than one criteria and you specifically want that sim to use the door e.g a YA female, with the charisma skill level 2, make sure to set 'Match All Active Filters' to 'True' (above screenshot) so only a young adult, female sim, with a charisma skill of 2 can use the door. If the 'Match All…' option isn't set, then any YA sim or any female sim or any sim with the charisma skill of 2 can use the door - it's more flexible.
~~~~~~~~~~~~~~~~~~~~~~~~~~~~~~~~~~~~~~~~~~~~~~~~~~~~~
In the next part, I'll be showing how I use skill stamps together with filters and hot keys!
Click for part 2: Using NRaas Master Controller's Filters, Skill Stamps and Hot Keys - Part 2: Skill Stamps and Hot Keys
#ts3 mod info#ts3 test gameplay#ts3 gameplay#nraas#phoebejaysims#arro#ts3 tutorial#sims3#ts3#ts3 mod
136 notes
·
View notes