#Sims 3 Tutorial
Text
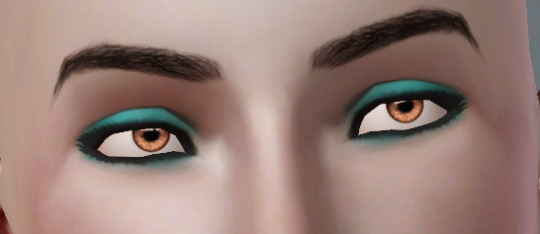
Useful TS3 shortcuts you might not know about - quickly copy and recolor! (GIF)
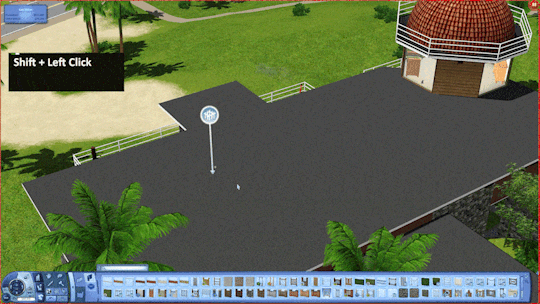
• Hold Shift while dragging a palette to recolor the entire floor or wall


• Ever get frustrated copying objects with an eyedropper? Hold Shift and place the selected object to copy it without loading it! Works in both Build or Buy modes, can copy Debug objects with no codes ;)

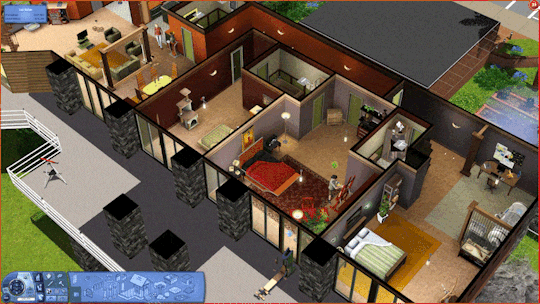
• Hold Shift and drag fence or wall tool to create a room; hold Ctrl to remove the wall or fence
These shortcuts have saved me lots of time! I rarely use both sledgehammer and eyedropper :)
By the way, the support team has said that my tumblr is finally unbanned! Whew, let's see!
737 notes
·
View notes
Text
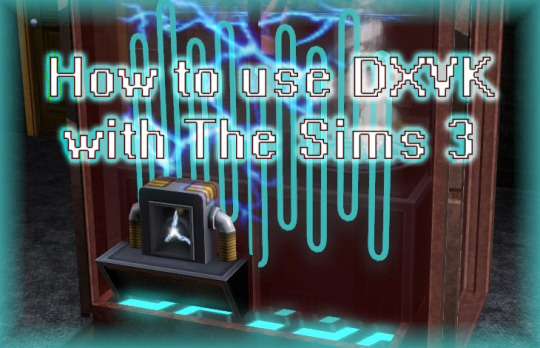
How to use DXVK with The Sims 3
Have you seen this post about using DXVK by Criisolate? But felt intimidated by the sheer mass of facts and information?
@desiree-uk and I compiled a guide and the configuration file to make your life easier. It focuses on players not using the EA App, but it might work for those just the same. It’s definitely worth a try.
Adding this to your game installation will result in a better RAM usage. So your game is less likely to give you Error 12 or crash due to RAM issues. It does NOT give a huge performance boost, but more stability and allows for higher graphics settings in game.
The full guide behind the cut. Let me know if you also would like it as PDF.
Happy simming!
Disclaimer and Credits
Desiree and I are no tech experts and just wrote down how we did this. Our ability to help if you run into trouble is limited. So use at your own risk and back up your files!
We both are on Windows 10 and start the game via TS3W.exe, not the EA App. So your experience may differ.
This guide is based on our own experiments and of course criisolate’s post on tumblr: https://www.tumblr.com/criisolate/749374223346286592/ill-explain-what-i-did-below-before-making-any
This guide is brought to you by Desiree-UK and Norn.
Compatibility
Note: This will conflict with other programs that “inject” functionality into your game so they may stop working. Notably
Reshade
GShade
Nvidia Experience/Nvidia Inspector/Nvidia Shaders
RivaTuner Statistics Server
It does work seamlessly with LazyDuchess’ Smooth Patch.
LazyDuchess’ Launcher: unknown
Alder Lake patch: does conflict. One user got it working by starting the game by launching TS3.exe (also with admin rights) instead of TS3W.exe. This seemed to create the cache file for DXVK. After that, the game could be started from TS3W.exe again. That might not work for everyone though.
A word on FPS and V-Sync
With such an old game it’s crucial to cap framerate (FPS). This is done in the DXVK.conf file. Same with V-Sync.
You need
a text editor (easiest to use is Windows Notepad)
to download DXVK, version 2.3.1 from here: https://github.com/doitsujin/DXVK/releases/tag/v2.3.1
Extract the archive, you are going to need the file d3d9.dll from the x32 folder
the configuration file DXVK.conf from here: https://github.com/doitsujin/DXVK/blob/master/DXVK.conf.
Optional: download the edited version with the required changes here.
administrator rights on your PC
to know your game’s installation path (bin folder) and where to find the user folder
a tiny bit of patience :)
First Step: Backup
Backup your original Bin folder in your Sims 3 installation path! The DXVK file may overwrite some files! The path should be something like this (for retail): \Program Files (x86)\Electronic Arts\The Sims 3\Game\Bin (This is the folder where also GraphicsRule.sgr and the TS3W.exe and TS3.exe are located.)
Backup your options.ini in your game’s user folder! Making the game use the DXVK file will count as a change in GPU driver, so the options.ini will reset once you start your game after installation. The path should be something like this: \Documents\Electronic Arts\The Sims 3 (This is the folder where your Mods folder is located).
Preparations
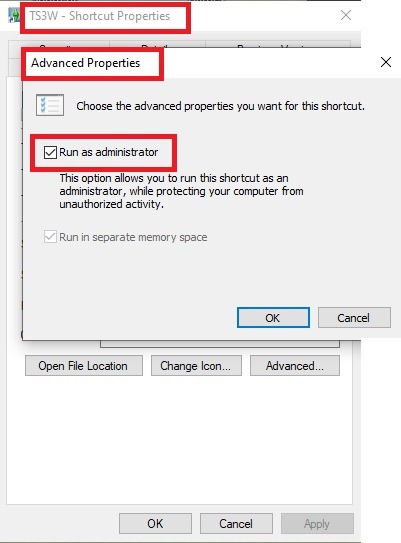
Make sure you run the game as administrator. You can check that by right-clicking on the icon that starts your game. Go to Properties > Advanced and check the box “Run as administrator”.
Note: This will result in a prompt each time you start your game, if you want to allow this application to make modifications to your system. Click “Yes” and the game will load.
2. Make sure you have the DEP settings from Windows applied to your game.
Open the Windows Control Panel.
Click System and Security > System > Advanced System Settings.
On the Advanced tab, next to the Performance heading, click Settings.
Click the Data Execution Prevention tab.
Select 'Turn on DEP for all programs and services except these”:
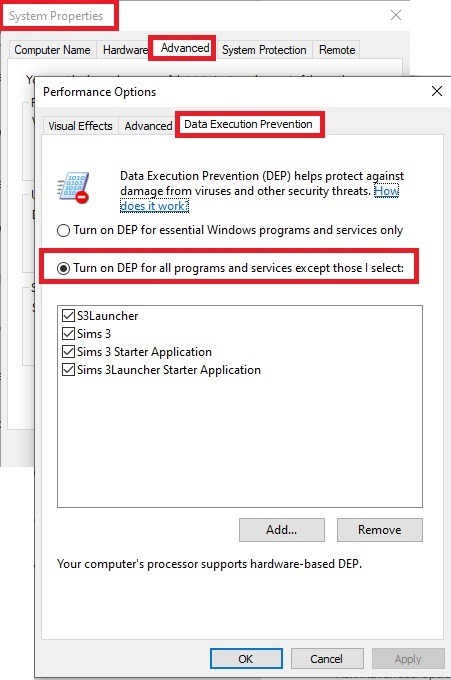
Click the Add button, a window to the file explorer opens. Navigate to your Sims 3 installation folder (the bin folder once again) and add TS3W.exe and TS3.exe.
Click OK. Then you can close all those dialog windows again.
Setting up the DXVK.conf file
Open the file with a text editor and delete everything in it. Then add these values:
d3d9.textureMemory = 1
d3d9.presentInterval = 1
d3d9.maxFrameRate = 60
d3d9.presentInterval enables V-Sync,d3d9.maxFrameRate sets the FrameRate. You can edit those values, but never change the first line (d3d9.textureMemory)!
The original DXVK.conf contains many more options in case you would like to add more settings.

A. no Reshade/GShade
Setting up DXVK
Copy the two files d3d9.dll and DXVK.conf into the Bin folder in your Sims 3 installation path. This is the folder where also GraphicsRule.sgr and the TS3W.exe and TS3.exe are located. If you are prompted to overwrite files, please choose yes (you DID backup your folder, right?)
And that’s basically all that is required to install.
Start your game now and let it run for a short while. Click around, open Buy mode or CAS, move the camera.
Now quit without saving. Once the game is closed fully, open your bin folder again and double check if a file “TS3W.DXVK-cache” was generated. If so – congrats! All done!
Things to note
Heads up, the game options will reset! So it will give you a “vanilla” start screen and options.
Don’t worry if the game seems to be frozen during loading. It may take a few minutes longer to load but it will load eventually.
The TS3W.DXVK-cache file is the actual cache DXVK is using. So don’t delete this! Just ignore it and leave it alone. When someone tells to clear cache files – this is not one of them!
Update Options.ini
Go to your user folder and open the options.ini file with a text editor like Notepad.
Find the line “lastdevice = “. It will have several values, separated by semicolons. Copy the last one, after the last semicolon, the digits only. Close the file.
Now go to your backup version of the Options.ini file, open it and find that line “lastdevice” again. Replace the last value with the one you just copied. Make sure to only replace those digits!
Save and close the file.
Copy this version of the file into your user folder, replacing the one that is there.
Things to note:
If your GPU driver is updated, you might have to do these steps again as it might reset your device ID again. Though it seems that the DXVK ID overrides the GPU ID, so it might not happen.
How do I know it’s working?
Open the task manager and look at RAM usage. Remember the game can only use 4 GB of RAM at maximum and starts crashing when usage goes up to somewhere between 3.2 – 3.8 GB (it’s a bit different for everybody).
So if you see values like 2.1456 for RAM usage in a large world and an ongoing save, it’s working. Generally the lower the value, the better for stability.
Also, DXVK will have generated its cache file called TS3W.DXVK-cache in the bin folder. The file size will grow with time as DXVK is adding stuff to it, e.g. from different worlds or savegames. Initially it might be something like 46 KB or 58 KB, so it’s really small.
Optional: changing MemCacheBudgetValue
MemCacheBudgetValue determines the size of the game's VRAM Cache. You can edit those values but the difference might not be noticeable in game. It also depends on your computer’s hardware how much you can allow here.
The two lines of seti MemCacheBudgetValue correspond to the high RAM level and low RAM level situations. Therefore, theoretically, the first line MemCacheBudgetValue should be set to a larger value, while the second line should be set to a value less than or equal to the first line.
The original values represent 200MB (209715200) and 160MB (167772160) respectively. They are calculated as 200x1024x1024=209175200 and 160x1024x1024=167772160.
Back up your GraphicsRules.sgr file! If you make a mistake here, your game won’t work anymore.
Go to your bin folder and open your GraphicsRules.sgr with a text editor.
Search and find two lines that set the variables for MemCacheBudgetValue.
Modify these two values to larger numbers. Make sure the value in the first line is higher or equals the value in the second line. Examples for values:
1073741824, which means 1GB
2147483648 which means 2 GB.
-1 (minus 1) means no limit (but is highly experimental, use at own risk)
Save and close the file. It might prompt you to save the file to a different place and not allow you to save in the Bin folder. Just save it someplace else in this case and copy/paste it to the Bin folder afterwards. If asked to overwrite the existing file, click yes.
Now start your game and see if it makes a difference in smoothness or texture loading. Make sure to check RAM and VRAM usage to see how it works.
You might need to change the values back and forth to find the “sweet spot” for your game. Mine seems to work best with setting the first value to 2147483648 and the second to 1073741824.
Uninstallation
Delete these files from your bin folder (installation path):
d3d9.dll
DXVK.conf
TS3W.DXVK-cache
And if you have it, also TS3W_d3d9.log
if you changed the values in your GraphicsRule.sgr file, too, don’t forget to change them back or to replace the file with your backed up version.
OR
delete the bin folder and add it from your backup again.
B. with Reshade/GShade
Follow the steps from part A. no Reshade/Gshade to set up DXVK.
If you are already using Reshade (RS) or GShade (GS), you will be prompted to overwrite files, so choose YES. RS and GS may stop working, so you will need to reinstall them.
Whatever version you are using, the interface shows similar options of which API you can choose from (these screenshots are from the latest versions of RS and GS).
Please note:
Each time you install and uninstall DXVK, switching the game between Vulkan and d3d9, is essentially changing the graphics card ID again, which results in the settings in your options.ini file being repeatedly reset.
ReShade interface
Choose – Vulcan
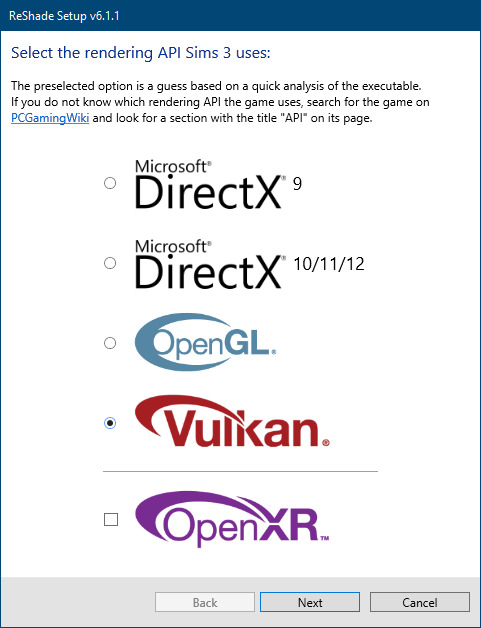
Click next and choose your preferred shaders.
Hopefully this install method works and it won't install its own d3d9.dll file.
If it doesn't work, then choose DirectX9 in RS, but you must make sure to replace the d3d9.dll file with DXVK's d3d9.dll (the one from its 32bit folder, checking its size is 3.86mb.)
GShade interface
Choose –
Executable Architecture: 32bit
Graphics API: DXVK
Hooking: Normal Mode
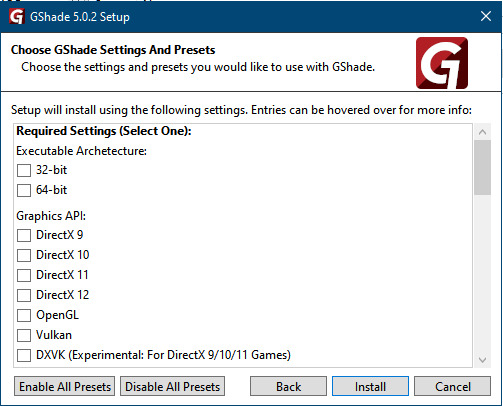
GShade is very problematic, it won't work straight out of the box and the overlay doesn't show up, which defeats the purpose of using it if you can't add or edit the shaders you want to use.
Check the game's bin folder, making sure the d3d9.dll is still there and its size is 3.86mb - that is DXVK's dll file.
If installing using the DXVK method doesn't work, you can choose the DirectX method, but there is no guarantee it works either.
The game will not run with these files in the folder:
d3d10core.dll
d3d11.dll
dxgi.dll
If you delete them, the game will start but you can't access GShade! It might be better to use ReShade.
Some Vulcan and DirectX information, if you’re interested:
Vulcan is for rather high end graphic cards but is backward compatible with some older cards. Try this method with ReShade or GShade first.
DirectX is more stable and works best with older cards and systems. Try this method if Vulcan doesn't work with ReShade/GShade in your game – remember to replace the d3d9.dll with DXVK's d3d9.dll.
For more information on the difference between Vulcan and DirectX, see this article:
https://www.howtogeek.com/884042/vulkan-vs-DirectX-12/
466 notes
·
View notes
Text
A Micro Tutorial on Blending Face Presets for Sims 3 CAS by Papermint-Airplane

So I have this Sim here and I'm using this mouth preset. It's nice but it's a little downturned for my liking and I'd prefer more of a Cupid's bow.
I choose the next preset which is more upturned and has the Cupid's bow I want but it's a little too sharp.
What if I merge the two presets?

I right click the first preset to blend it with the second preset. Now I have everything I want! It's not too downturned, not too upturned, and the Cupid's bow is nice and soft.
You can do this as many times as you want with as many different presets you want to get different effects. Experiment with it!
Happy Simming! 💚
#sims 3#ts3#mine#sims 3 cas#sims 3 tutorial#tutorial#tutorials#sims 3 cas tutorial#resources#sims 3 resources#just simblr things
380 notes
·
View notes
Text
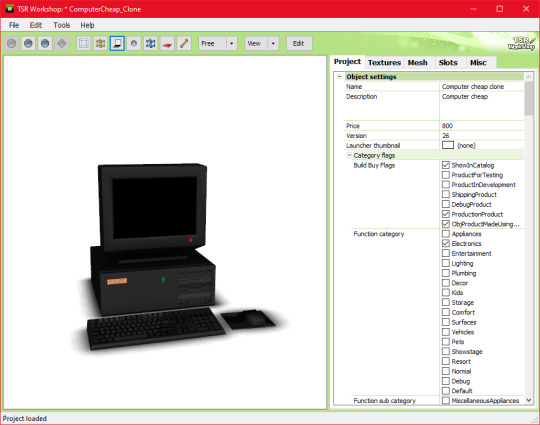
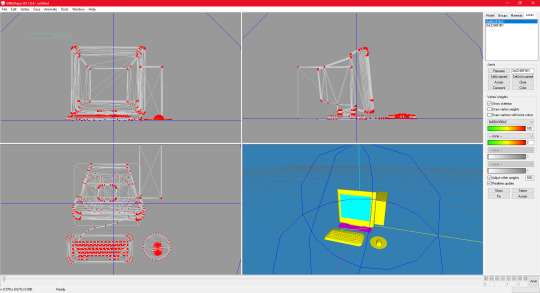
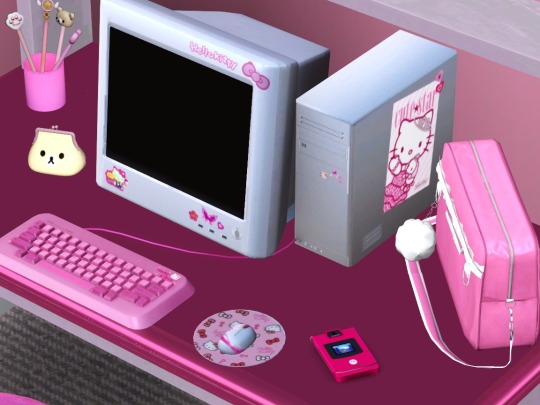
[tutorial] how to make computers functional in the sims 3 by sideshow_snob
Programs needed:
TSRW [i use the old version]
Blender 2.7 [you can use any version]
Milkshape 1.8.4
You can download this tutorial as a .doc HERE
Original [right] TS3 version [left]

So, how do we start?
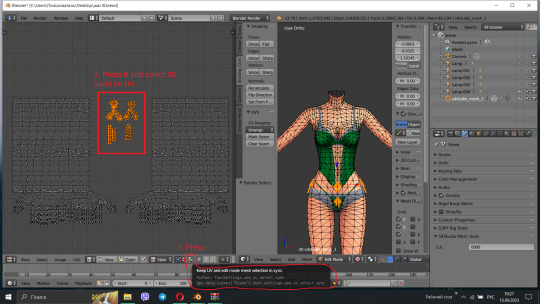
Seperate your computer of choice into pieces. [mouse, keyboard, monitor, monitor screen, mousepad if applicable, drop shadow if applicable].
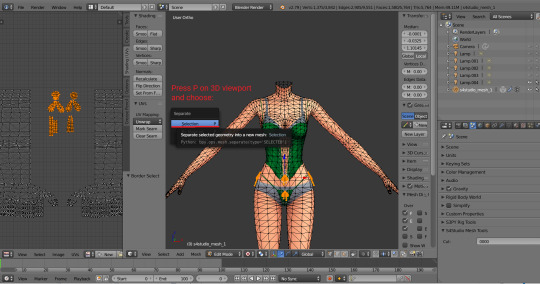
This can be done by selecting faces and holding 'shift +' to select that entire piece. if shift + doesn't work you'll have to do it by hand. Once your desired piece is selected, press 'P' to separate.
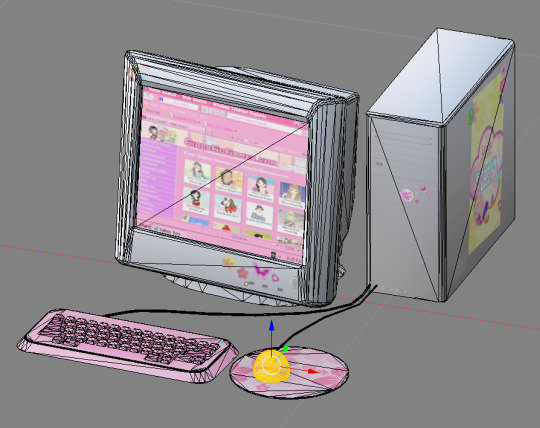
Once you've seperated all your parts, go ahead an open TSRW and clone a similar PC. I chose this one
Go ahead and export the .wso AND .obj file for this computer in the mesh tab. I named my exports 'eapcref'
we're going to be using this PC as a reference to modify our mesh, and assign bones in milkshape.
go ahead and import the .obj into blender, where your separated PC is.
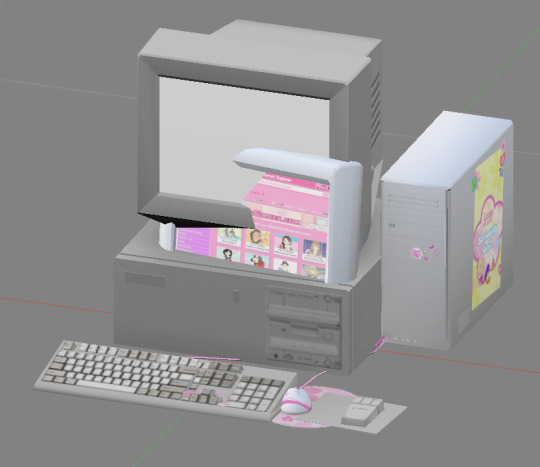
As you can see, these computers are pretty different. We're going to move each piece around until its in a similar size and position as the EA one, so the PC animates properly.
Helpful shortcuts ---> G [grab] S [scale] R [Rotate]
This is what mine looked like when I finished moving it around:

Keep in mind, i actually tested mine quite a few times in game because the animation was not lining up with the PC location, so this is what mine looks like after a few modifications. Make sure you save this .blend file so you can modify it if necessary after you assign the bones.
Now onto actually assigning the bones…
Open milkshape and import all your seperated PC files.
Your PC parts should be grouped like this:
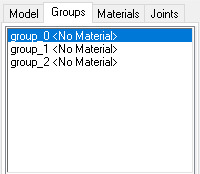
group_0: the monitor, mousepad [basically everything except the drop shadow, screen, and mouse]
group_1: drop shadow
group_2: screen
Now import your EA pc .wso file
Select the EA pc parts in the groups tab, then go to the joints tab and click 'show'
Then go back to the groups tab, with the ea pc still selected, and select all your PC parts.
Go back to the joints tab, and click 'assign'.
Now delete the EA PC.

the first bone is the mouse assignment, and the second bone is the rest of the computer.
go ahead and click 'selassigned' and clear the bone assignment since its incorrect.
To assign the bones, go to the model tab and click 'select'
alt shift left click all the bones in your mouse
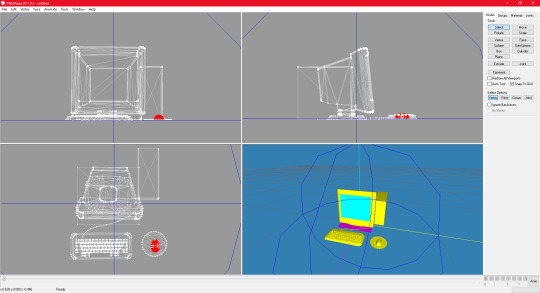
go back to the joints tab and click assign
now to assign the PC bones
Select everything except the mouse and drop shadow, then go back to the joints tab and click assign
you can check to see if your bones are properly assigned by clicking 'selassigned' on both bones
export as .wso and your finished!
something to note:
if your mousepad gets in the way while assigning bones, you can keep it seperate and just regroup it back into the mesh after assigning bones.
182 notes
·
View notes
Text
Self-use Sims 3 CC Tutorials List
Here is a list of tutorials from which I learn to convert/create sims 3 cc in a few months (and as a poor English speaker). I think it might help someone who also wants to try making things for sims 3 but doesn't know where to start, though it's been 15 years from the game release and even Inzoi is coming hahah.
The list covers objects, clothes, hairs and eyes. I know there're lots of tutorials not listed here, that's because I haven't tried them in my projects by hand. But The list will be updated with new things I learn. Most tutorials are in English. Thanks to all these creators for sharing their precious knowledge!
Sorry for the miserable format, cause I wrote them in Patreon and paste here. You can also read it there, free of course.
Where I find tutorials
sims 3 tutorial hub
ts3 creators cave and its discord
Mod the sims tutorial wiki and the forum
pis3update tutorials tag
General
CC basic concepts by nightosphere (for clothes, most knowledge is shared with objects)
Tools
TSRW guide by apple (for objects, most knowledge is shared with clothes)
Blender
shortcut by Blender Guru
beginner tutorial for version 2.5, 2.8, 3.0, 4.0
3.5入门教程 (youtube / bilibili)
设置切换语言快捷键 change language shortcut settings
图片取色器网站
Mesh ToolKit with Seam Fixer for all ages
Topaz gigapixel AI guide / higher quality texture
Texture
Nicer bake / bake in blender 2.78
Bake in blender 2.93
Make normal map
small size blank texture
Reasons for black blocks on baked image
Adjust texture color without losing quality
Object
clone obejcts with S3OC
4t3
Functional Objects
Functional bed
TSRW setting
Combining Textures for Objects with Multiple Textures
Add normal map to objects
Introduction to slot categories
Add slots in TSRW
Edit in-door shadow or occluders in TSRW / Talks about 3 kinds of in-game shadow by Pocci
Clothes
4t3 by nightosphere
Reduce polycount / fix seams, holes, shadows or normals
Bone reference rule
Avoid milkshape workflow / adjust bone assignment and morphs in blender
Convert between ages/body meshes
TSRW check list
Fix long clothes clip with body
Fix holes on morphs (easier in blender)
Extrude collars
Create texture in PS
Avoid TSRW workflow / CTU tutorial
Hairs
Avoid milkshape and TSRW workflow / delete backfaces / handmade morphs / DABOOBS guide
Keys pointing to in-game blank textures to save file size (for DABOOBS not TSRW)
Reduce polycount
4t3
Fix weird seam lines on hairs from s4s
Fix pigtail issue
Eyes
Convert contacts to default eyes
142 notes
·
View notes
Text
A small cc fix tutorial
Have you ever used some eyeshadows and thought "Oh cute this would look great with a chunky eyeliner on top" only to find that the eyeliner goes *under* the eyeshadow? Well, guess what you can now fix that!
Get yourself to s3pe and go into the casp tag of your eyeshadows and eyeliners. A normal overlay priority for eyeliner (based on my research) should be:
OverlayPriority: 0x00000082
Whereas the eyeshadow should be:
OverlayPriority: 0x00000064
HOWEVER! If you want to use eyeshadows with the basegame eyeliners you would want to set your eyeshadow priority to something like 0x00000030 which actually worked in my testing. (whoa the base game eyeliners are useful now).
Of course you could also get @potatobuttcheek 's default basegame eyeliner replacements but be aware you will have to change the overlay priority on them to (82).
If you go through your makeup cc and you see an overlay priority for eyeliners and eyeshadows with different values than the above, especially if your eyeshadow has an overlay priority of (82) then that eyeshadow will go on top of your eyeliner (no bueno). Here's how to fix it!
In this example the eyeliner has a value of 46 so it'll show up under the eyeshadow. Click on the Casp you want to change. Click Grid below which will bring up a window.

Simply change the values on the Overlay Priority then click Commit. That's it! Save your package (merged package in my case) and voilà!
Here's a picture of Ariana (by @cozygirlsimmer) with a Praline eyeshadow that was always overriding eyeliners and the after using a Gosik eyeliner on top that was always buried behind eyeshadows.


Here is an eyeshadow (by @sehmulated) which has an overlay priority of 0x0000005A (same as blush) that I manually changed to 0x00000030 for testing with a base game eyeliner.
Now I'm off to download more makeup! Toodles!
141 notes
·
View notes
Text
The Sims 3: How to Make your Sims not Ugly! Tips and Tricks for Pudding Face
youtube
Someone suggested a long time ago that I show how I make my sims, so here it is! In this video I basically just go over my personal process of making sims that look more realistic compared to the base game sims. Sliders, facial ratios, cc, and everything else can affect your sims' appearance.
♡ RESOURCES ♡
Download the face sliders I used in this video
Master controller integration (requires Master Controller)
Nosemasks Pack
Blush
Enjoy!
#tutorials#resources#ts3 help#the sims 3#ts3#ts3 tutorial#sims 3 tutorial#s3 tutorial#sims tutorial#ts3 video#Youtube
100 notes
·
View notes
Text
Editing occlusion shadows on objects
This is a tutorial aimed at creators and converters who want to understand, at least a little, how to improve the appearance of their objects in the game. Yes, it’s a bit exhausting, just like creating an object from scratch, mapping it and texturing it, but the result is worth it. The shadow dynamics of TS3 are different from TS4. In TS4, the game itself creates these shadows when the object approaches a wall. In TS3 it is necessary for these shadows to be created using “lights” in TSRW. Of course, the occlusion is not perfect, but it gives the game a more realistic aspect by creating this idea of depth.
The icing on the cake: keep these shadows if they are large objects, like cabinets, sofas, beds, tables, chairs… Small decorative objects, like clutter, you can just delete these shadows. But if you are crazy about perfection and details, and really want even an ant to create its shadow when approaching a wall, my tip is that you clone using a small object as a base as this will make editing the shadows easier.
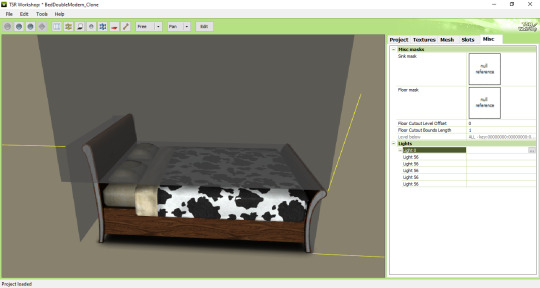
I will use as an example this armoire that I edited a while ago. The shadows have been edited and look like this when you open them in TSRW:
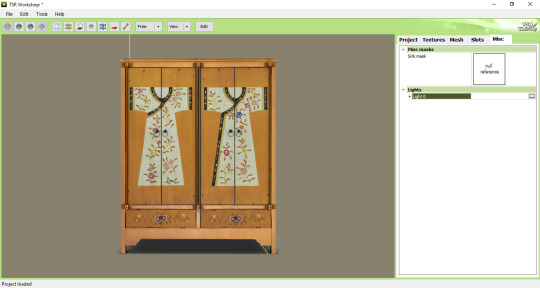
In the game, this is how the shadows appear when we position the object close to a wall:

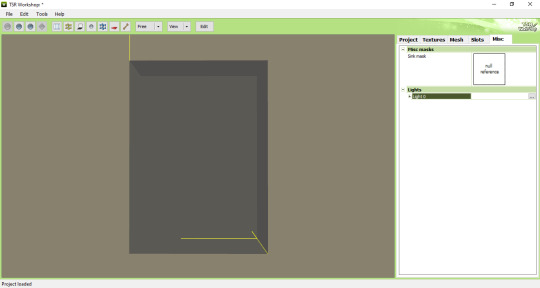
To edit the shadows, you must click on the "MISC" tab in TSRW. These shadows are right below, where "LIGHTS" is written. Note that there is a + sign next to it and when you click it, a drop-down list appears with all the shadows separated. In this example there are 3 of these shadows. The names are the same, but let's say we have shadow 1 (front), shadow 2 (top) and shadow 3 (side). Edits must be made in the order they appear.
Click on the three dots to the right of lights. A window as shown in the image below will appear:
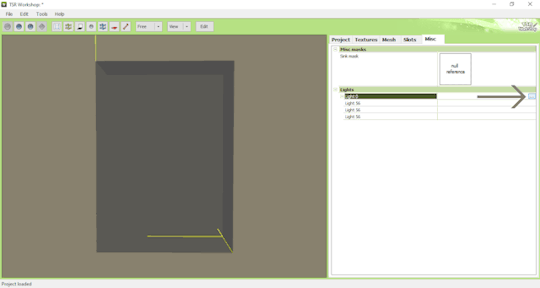
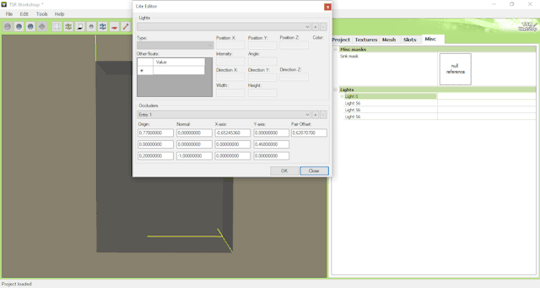
The lights that must be edited are found in the part where it says "OCCLUDERS". In this case, "Entry 1" corresponds to our "SHADOW 1" (front)...
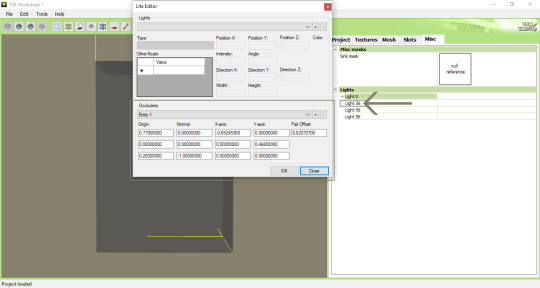
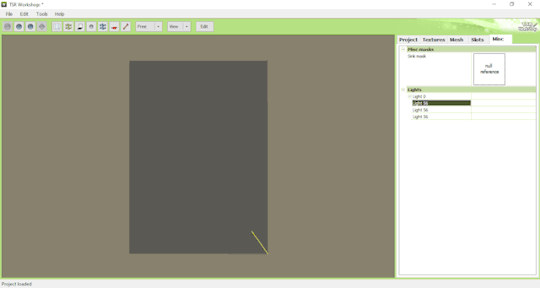
For the front shadow, we will start by changing these two parameters that correspond to the width and position of the shadow. My tip is that you copy the original value, change this value to 1 and then click on "OK" to see what happens (that is, to see what changes when changing the value, so you will know if you need to change it to a higher value or smaller...). If it's not what you need, just paste the original value copied previously into the corresponding field and change it little by little until you reach the correct size of the object.
Front shadow height:

For the distance the shadow is from the object, this field must be edited - remembering that we are still editing the front shadow (which corresponds to the shadow that will replicate the width of the object on the wall):

For the other shadows, you must follow the same path: changing the values until it is proportional to the size of the object.
Bonus tip: Open various base game objects in TSRW and see how shadows are created. For example, select a chair and study each shade individually. With practice, you will realize that all you have to do is create a shadow on all sides of the object. For example: on a bed, you should have a shade for the headboard, another for the footboard, another for the side and another for the top, which would be the mattress. Therefore, it is important to study each type of object separately.
Now you might be asking yourself: Oh, yes, thank you very much... But where do I start? How will I know how to create a shadow from scratch? OMG! Help me!
Don't worry, it's very simple: when cloning an object, like a bed for example, it's obvious that you will use a bed from the game as a clone... So just edit the original shadows that correspond to the clone, so that they are the size of the bed you are creating for the game. Only that.

I say again: each object is a specific case. This tutorial is just a simple way to show you the way to understand how these shadows work and how they are generated for the game.
Yes, creating a beautiful object is hard work and requires dedication, time and effort. Therefore, value the creators who strive to deliver you a quality object ♥.
If you feel like helping me, here is a link for donations. Thank you very much ♥.
Tutorial inspired by: @bioniczombie and @sideshowsnob
#tutorial/ usefull#sims 3 tutorial#ts3 tutorial#ts3 creation tutorial#sims 3 creation tutorial#sims 3 meshing#sims 3 object tutorial#sims 3 occlusion shadows#sims 3 occluders#ts3 meshing tutorial#sims 3 TSRW
38 notes
·
View notes
Text
How to summon any (prop) item
I've actually been doing this a lot lately! While @omedapixel 's Debug Objects are a storyteller's help, It doesn't have every prop in it (which is totally understandable, since it's a lot).
However, recently I found out that Nraas can be really helpful for this! Let's say we want to summon a coffee cup...
Requirement:
Nraas Debug Enabler
Click on the ground > Debug Enabler...
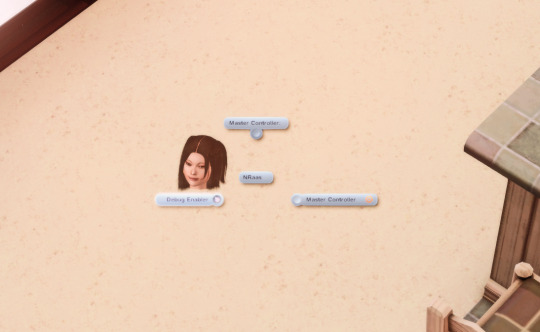
2. Click "Options"
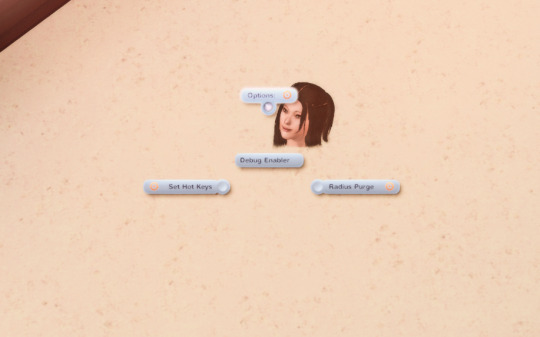
3. Click "Create Object" from the huge list (Should be the second option in the list)
4. Now you see this modal! Great! This is where the magic happens.
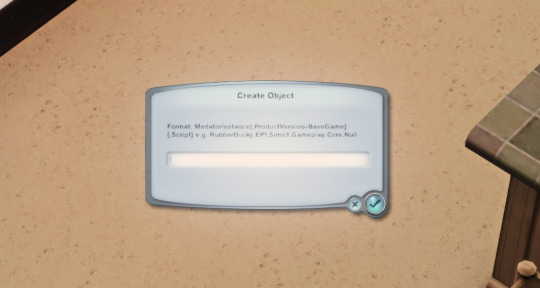
5. For demonstration, i'll type "CoffeeCup" in it.

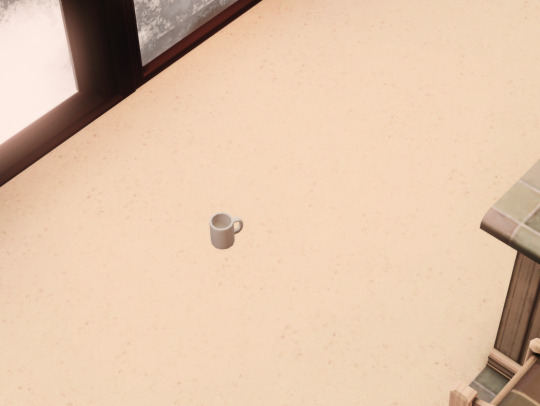
Voila!
"That's cool, but this looks really advanced!"
I've started a list of props you can copy/paste that I directly got either from EA's source code, or from particular packages. All tested, so IU know they work :)
I'll keep updating these too!
List of Prop Names
125 notes
·
View notes
Text
Written version of @thornowl's baking texture-based items for 4t3 conversion tutorial. (Part 1)
Yes, the original video is very useful and I think it's worth checking out for everyone who plans to do 4t3 conversions, especially in MM style. But, in my opinion, the realization is too messy, it took me a long time to understand what actually to do. So I made written tutorial, because many people prefer this format (and because my amazing mutual @nectar-cellar was interested in it). Hope you will find it useful. I had to split this tutorial into 2 parts because of the picture limit.
What You Will Need:
Knowing the basics of converting process: how to extract ts4 meshes and textures, how to make your own multiplier/mask/specular, how to import stuff to TSRW, etc. (@nightospheresims has a good tutorial for beginners: here or here, also don't forget about @sims3tutorialhub!).
Knowledge of basics blender controls and navigation: how to move and rotate the camera, basic shortcuts, how to change mode, editor type, viewport shading, rendering type, etc. (check Grennie's tutorial here, and "Helpful guides when you're a noob" from there too).
Required programs and resources:
- Sims 4 Studio.
- TS4 body mesh & texture(s), that you want to convert, I use @atomiclight's mix gloves for this tutorial. Also there will be some tip that I learned from converting Sentate's Audrey Corset Set.
- Blender (I use version 2.79).
- Photoshop (or any other 2D editor, that supports masks and .dds format).
- TS3 Bodies template & UV map templates.
- Plain normal & specular map, if you don't want to make your own.
- TSRW.

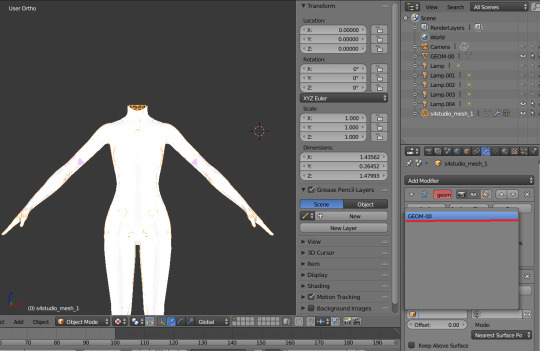
STEP 1: ADDING MESHES AND TEXTURES IN BLENDER, PREPARING MESH FOR BAKING.
I already exported all the gloves presets that I want from S4S. And because they don`t have their own mesh, I exported base game swimsuit (you can also export mesh from any other stuff, that 100% is painted on body) I exported it like this:
Open S4S → Create 3D mesh → Find it with filters→ Next → Save the package wherever you're want→ go to Meshes tab and press Export.
Open .blend file with ts4 swimsuit, delete the "rig" (you don't need it) and merge all other groups - Shift + click on them and press Ctrl+J on 3D viewport.
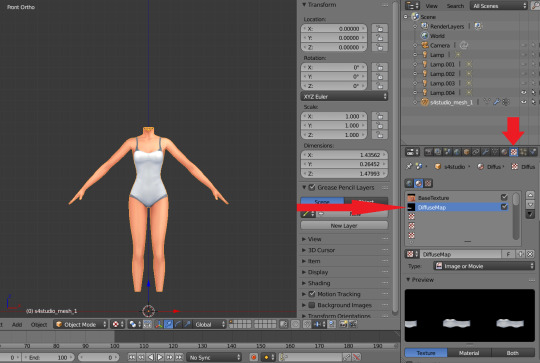
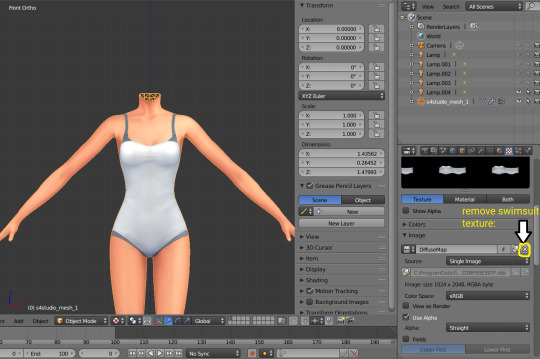
You need to export our gloves texture and remove swimsuit texture, go to Textures tab and in small window select "DiffuseMap":
If you don't see DiffuseMap texture, switch type of texture data to "Show material textures" (brown-ish circle).

6. In the same way you need to remove skin texture, because you don't need it, only select BaseTexture instead of Diffuse:

7. Import your Sims 3 body, also I merged the top and bottom, because TS4 mesh is full body too:

Tip: if your stuff have 3D parts, separate them in their own group(s) and hide them from baking (you can bake them separately and/or tweak them in Photoshop):

STEP 2: SHRINKWRAPPING THE TS4 MESH.
In this case it would be really easy to adapt TS4 body mesh to TS3, because they are very similar, for stuff that partially 3D (like dresses) or in case with non-standard bodies (like Venus Curves by Venusprincess) it would be harder, so I don`t cover this in this tutorial.
Select TS4 body, go to Modifiers tab, usually there are already applied modifier "geom_skin", just ignore it and in the "Add Modifier" window select Shrinkwrap modifier.
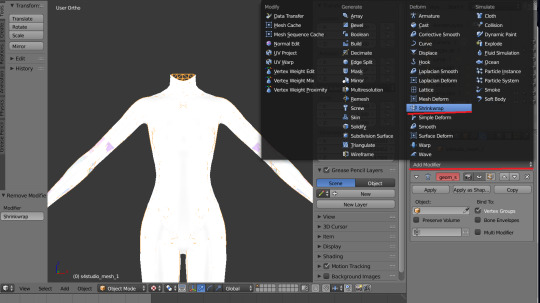
2. In the Target tab select TS3 body group:
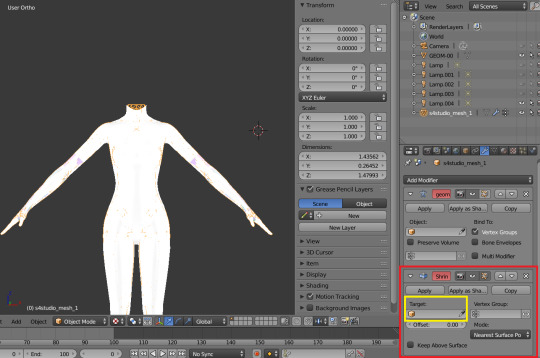
This is how TS4 mesh is supposed to look with this modifier, you may also apply modifier, but it's not necessary:

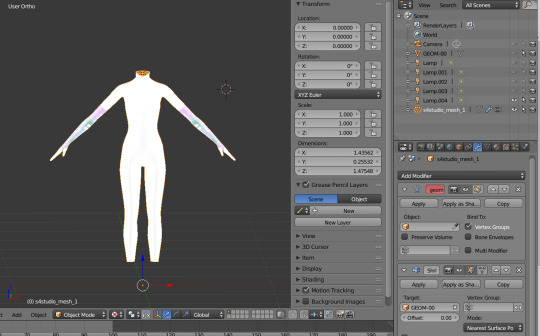
3. After that you need to hide TS3 Body mesh and now we're going to baking.
STEP 3: ASSIGNING MATERIALS.
First of all, you need 2 windows — with your 3D viewport and with Node Editor, also you need to switch rendering type to Cycles Render. After you set it, select TS4 mesh, open Materials tab and press Use Nodes button:

2. After that two small boxes should appear on the Node editor tab. Then press Shift+A and select Texture → Image texture:

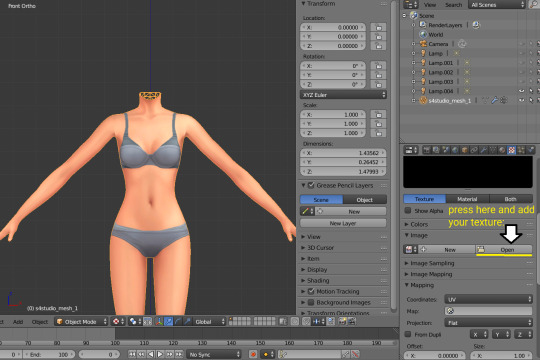
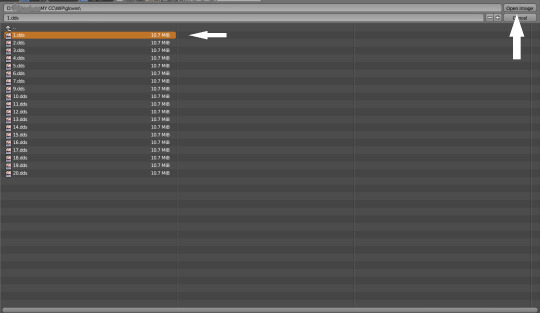
3. Connect node that you already added with Diffuse BSDF node, by connecting yellow dot (socket) named Color of Image texture to the same socket of Diffuse BSDF node. After that click on the image icon and find your texture:

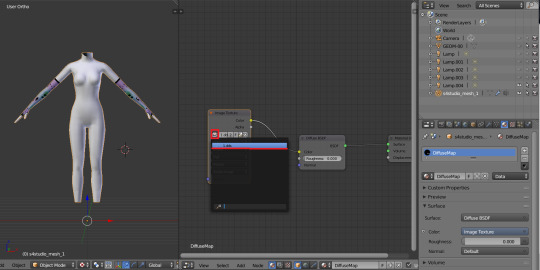
Don't worry about the black spots, we will fix that later.
4. Go to UV/Image editor and create new image for your bake, it must be 1024x1024 size or, if you want HQ texture - 2048x2048 or 4096x4096, but today I use non-HQ. After that, hide TS4 body and unhide TS3 body:
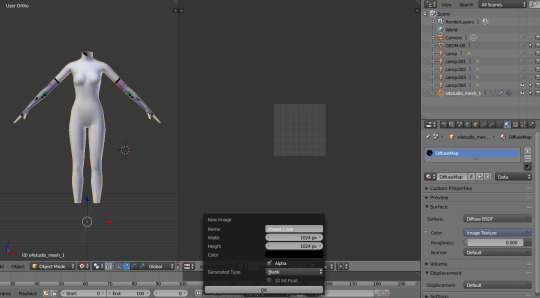
5. Go to Node Editor, create new material and assign our newly created image to ts3 body the same way, that we did with ts4 mesh and original texture:
6. Press Shift + Click on the TS4 body firstly, and TS3 body lastly. It`s an really important step, because without it baking wasn't work right way.
STEP 4: BAKING THE TEXTURE.
7. First of all, go to the Render tab and change default settings to the following:
Sampling Tab:
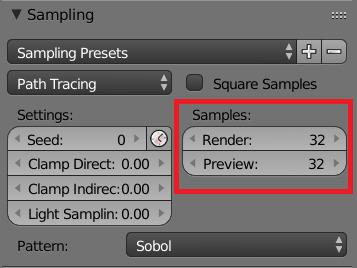
Bake Tab:
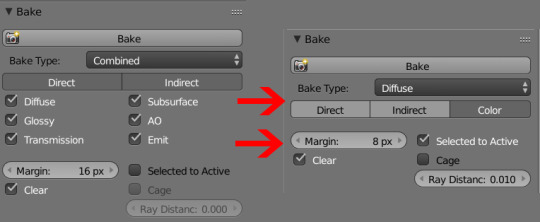
8.After that press Bake button and wait for it.
9. Look at the result, great, doesn't it?:

10. Save this texture as .png... But wait, that's not all! we need to bake alpha, so we can remove that black body texture in Photoshop later.
But that will come in part 2...
102 notes
·
View notes
Note
Hello, if it's not a bother, could you explain to me how you create CC in the sims 3, I want to start in the world of CC and Blender I already know how to use, but I don't know how to transfer the blender file to one for the game. Thank you. 💜
Hi!
Those are the tutorials that are helping me with creating CC:
Completely avoiding Milkshape (Blender 2.79-2.8+) / Manually editing bone assignments and morphs (Blender 2.8-2.9)
Hair Creation Start to Finish: Part 1 and Part 2
Smooth Hair Bone Assignments In Blender (written version) - It's a Sims 2 tutorial but the logic is the same for Sims 3
The Sims 4 to The Sims 3 Clothing Conversion Tutorial: A Complete Beginner’s Guide - useful to learn how to port your mesh for Sims 3
Polycount guide - A guide for beginners and advanced creators! - because it's all fun and games to make a pretty high poly mesh in Blender, but both the game and mostly PCs just can't handle meshes with absurdly high polycount
22 notes
·
View notes
Text
youtube
9 notes
·
View notes
Text
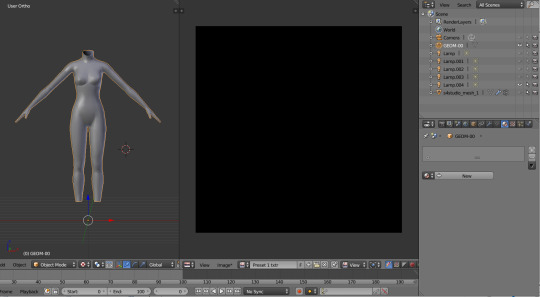
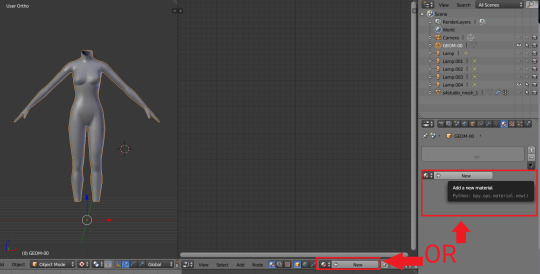
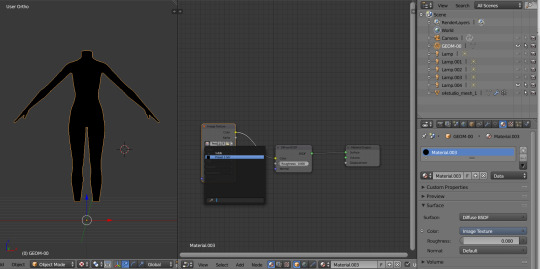
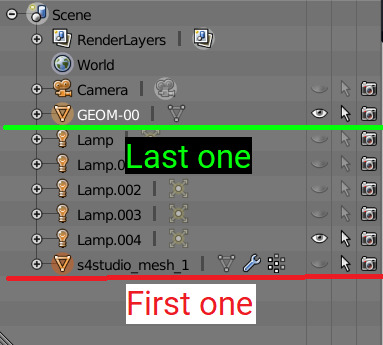
Extracting Anto Hairs/Geoms With S4S
This tutorial helps you how to extract Anto hairs/geoms with the sims 4 studio.
step 1. click just one hair, don't shift click all of them.
step 2. Go to warehouse and click tools, then click embed all externally referenced resources (cas)
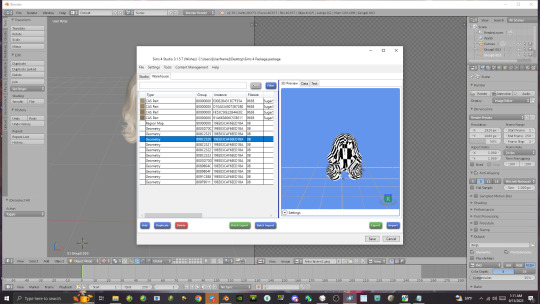
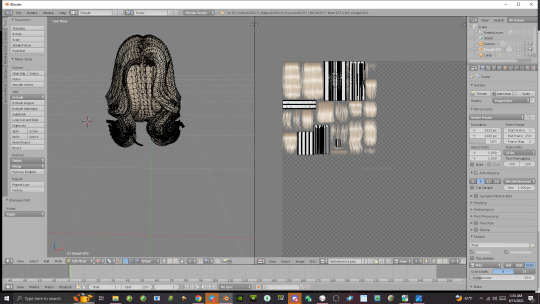
step: 3 You'll be able to see all the Geoms or Geometry of the mesh in the 3D view port. Pick the geom(s) that look like a completed mesh(s) then export the groups and save them. Add .simgeom at the end of the package to turn into a simgeom file.
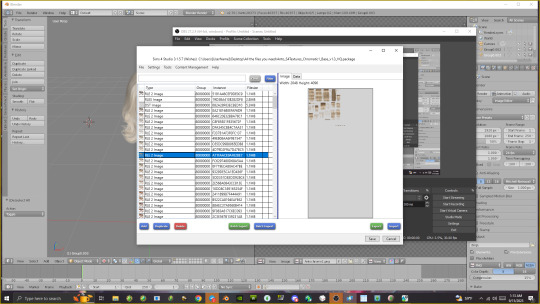
Step 4: Open the chromatic base files in my projects then extract only one as a png and save
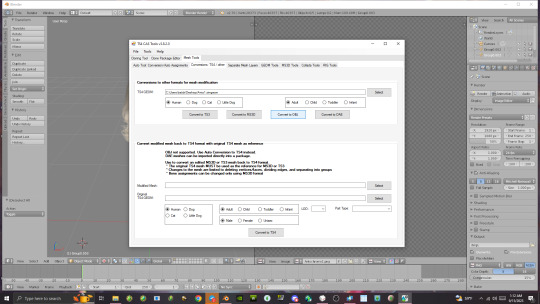
Step 5. Open TS4 Cas Tools Program, undermesh tools click conversions TS4/other. Select your geom files and click convert to obj then save.
You successfully converted simgeom files to obj/extracted Anto meshes! ^_^ *
38 notes
·
View notes
Text
How to change debug lights' color/intensity/etc.
For @eljeebee
When you're in buy mode, hold down ctrl and shift and then click the light you want to change.

You can also turn them on and off, make them into black lights, link them to specific triggers if you have World Adventures installed (it's like how it works in tombs where you stick your hand in a hole and are able to reveal a hidden door...you can stick your hand in a hole and have the lights turn on super bright or something), and a whole bunch of other crap depending on what mods you have installed. But this is how I make invisible lights change colors and brightness. Keep in mind, since these lights are invisible in live mode, you'll have to go into buy mode in order to change them.
Ctrl+shift+click actually does a lot of things to a lot of objects in the game. Try it out and see what shenanigans you can get up to!
87 notes
·
View notes
Text
How to make a 4 channel mask for objects in the sims 3 with GIMP 2.0 [Tutorial]

Hey guys, i've just made a tutorial on how to make a 4 channel mask with GIMP 2.0
DOWNLOAD
Special Thanks to @johziii for helping me figure this out XD
49 notes
·
View notes
Text
The Sims 3 default clothing replacement tutorial
Hi everybody!
A couple of weeks ago an anon asked me if I could make a tutorial about default replacing clothes.
Well here it is.
This is my first time making a tutorial, so if something is not clear leave a comment.
You can find the whole tutorial under the cut.
Programs you need:
Sims 3 Object cloner (S3OC)
Sims 3 Package editor (S3PE)
Milkshape + plugins
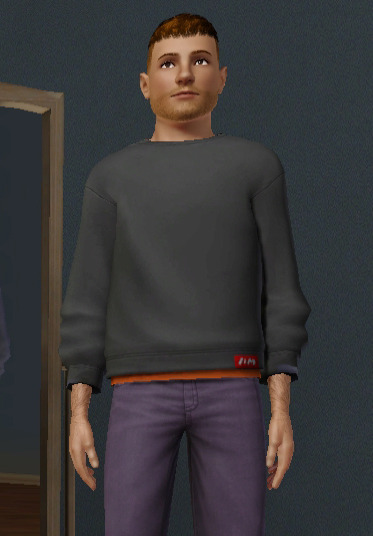
In this tutorial I'm going to replace this base game top (amTopShirtLongTee) With this conversion from Sim-songs
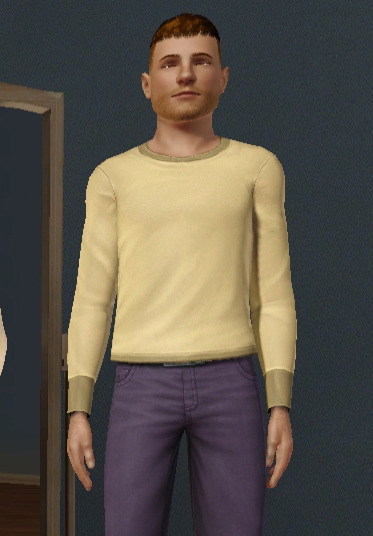
Step one: Clone the clothing that you want
open s3oc
There's actually 2 ways you can clone a clothing with s3oc, and I'm going to show both of them.
1.5.1 The First way of cloning a clothing is to click on Cloning -> CAS Part.
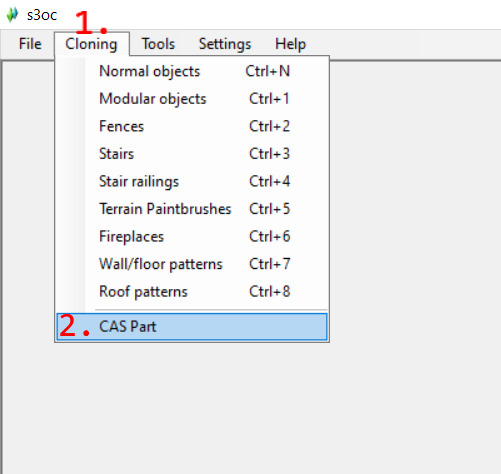
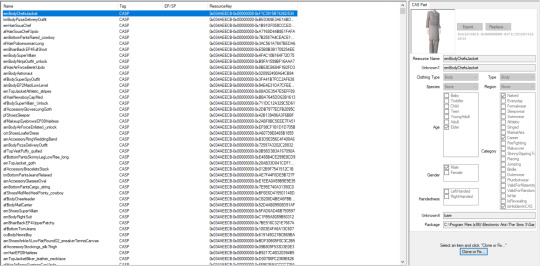
It will give you a big list of every Create a sim stuff, which is fine, but I personally don't like it.
1.5.2 The second way of cloning is to go to Tools -> Search
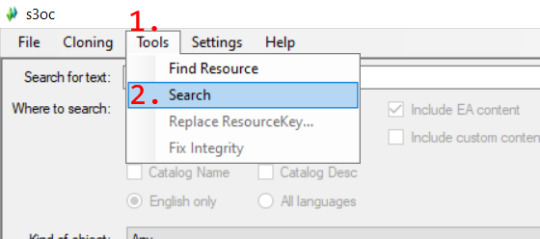
This one allows you to search for a specific thing.

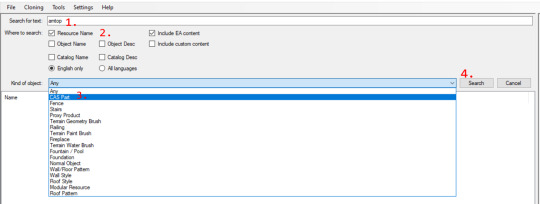
For example if you want to clone a top then write top in the search bar, if you want bottom, then write bottom, but if you want to clone an outfit, then write body and not outfit.
You can even specify the age and the gender.
f=Female
m=Male
u=Unisex
p=Toddler
c=Child
t=Teen
y=Young Adult
a=Adult
e=Elder
You always have to write the age first, then the gender and then the type of clothing, so for example "amtop".
You can also specify that you want to clone CAS Part.
2. Now, if you've found the clothing you're looking for you can clone it by selecting it and then clicking on Clone or fix.

In the next window, on the right side you can recategorize the clothing if you'd like, on the left there are options that we have to tick and untick.

3. Tick Deep Clone, Include thumbnails and untick Renumber/rename internally and then hit Start and save it somewhere.
Step two: Replace everything that needed
Now that we've cloned the clothing it's time to replace the stuff.
open the cloned package with S3PE
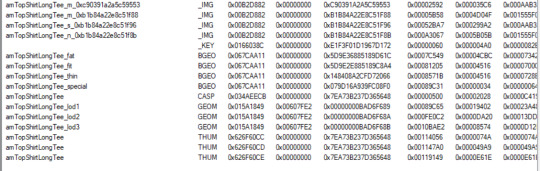
1.5 A completely optional step but you can delete everything that we're not gonna replace in the cloned package.
Things that you have to keep:

Basically this is how it has to look:
2. Now moving on to actually replacing the stuff.
Open the custom content package in S3PE and export the texture files. Just right click on the file -> Export -> To file...

Give it a unique name or don't, it doesn't really matter just make sure that you know what is what.
Now go to the cloned package. Right click on the texture -> Replace.

And then select the corresponding texture.
Do the same thing with all the textures, but make sure that you replace mask with mask, multiplier with multiplier, specular map with specular map and normal map with normal map.
3. Go to the custom content package and export the BGEO files. Right click on them -> Export -> To file...

Again give them a unique name, but for real this time, because this can be confusing. It's hard to know which is which, but usually the first one is the fat morph, the second one is the fit, the third is thin and the last one is special.
Go to the cloned package. Right click on one of the Bgeo files -> Replace.
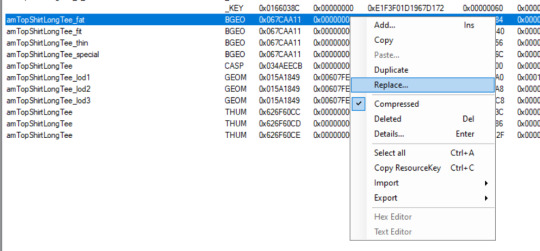
Do this with all of the Bgeo files. Replace the fat with fat, fit with fit, thin with thin and special with special.
4. Now export all the Lods (Geom files) from both the cloned and the cc packages. (right click -> Export -> To file...)

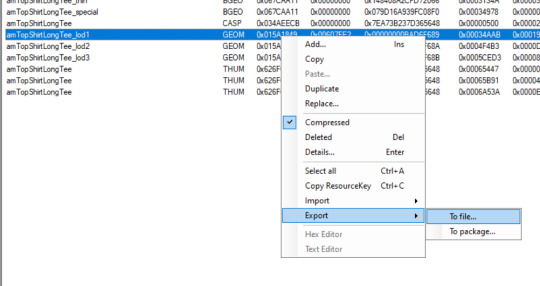
Make sure that you save them as " .simgeom " file.
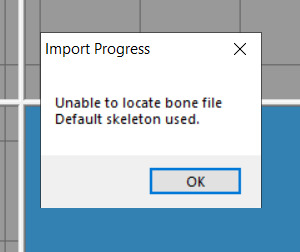
Open Milkshape and import Lod1 of the EA mesh.

If you get a pop-up like this just hit ok.
Go to Groups tab and then click on Comment
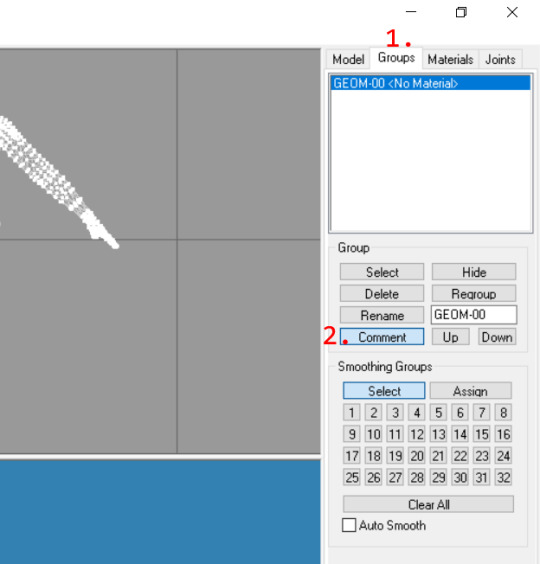
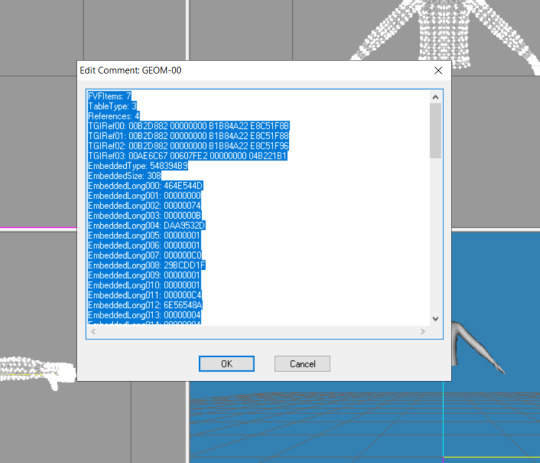
This window will pop-up. Select everything and then copy it.
I would recommend opening notepad and pasting it in there to make sure that it copied.
Now in milkshape click on File -> New (you don't need to save anything) and then Import the Lod1 mesh of the custom content.
Then go to Groups -> Comment and the same window as before will pop-up, but instead of copying everything delete everything.
So it should look like this.

Then paste in the one that you copied from the other mesh (the EA mesh).
Then hit ok and export it.

Do this for all the Lods.
Now go to the cloned package, right click on one of the Geom files -> Replace, and then select the corresponding Geom file.
Now do this for all the Geom files and then it's pretty much done.
Save the package file and then it's time to test it in game.
Two things you should check:
if all the morphs work
if you can recolor it properly and it has the right amount of channels
For me the morphs work fine, but the channels are not right. It's recolorable, but it's not the right amount of channels.


So let's fix it!
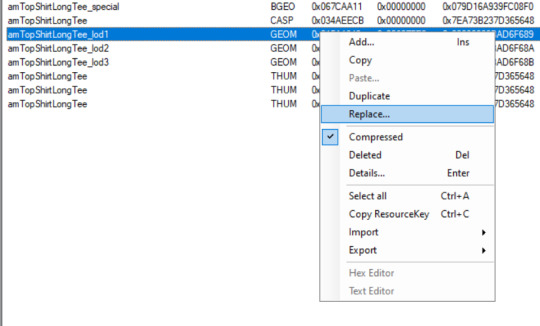
Optional step: Copy the cc presets to the default replacement
Open the cc package, click on Casp file and then click on grid.
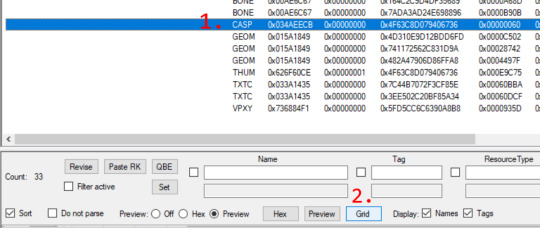
A small window will pop-up. Click on Presets then click on that small rectangle.

A similar window will pop-up. Click on [0] Preset, then click on Xmlfile, a drop down arrow will appear, click on it, then click on Export, and save the presets.
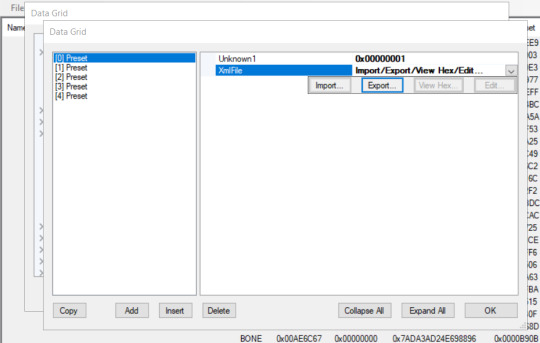
Now open the default replacement package, do basically the same thing as before (Casp -> Grid -> Presets -> XmlFile) but instead of clicking on Export click on Import and import all the presets.
Then hit ok and commit and you're done. You've copied the presets from the cc to the default replacement.
I hope that everything was understandable. If something was not clear leave a comment.
82 notes
·
View notes
Last Seen Blogs

lazymarvelfan
Honeybee To The Heart

bialagoraczka
He's hip, he's cool, he's szesnasta dwadzieścia

cardinalphlox
Phlox/Red


blessingofthetrickster
technically