#windows 11 update drivers automatically
Explore tagged Tumblr posts
Visit Tumblr Blog
Explore Tumblr blogs with no restrictions, modern design and the best experience.
Last Seen Tumblr Blogs


Fun Fact
In 2020, 27% of US Tumblr users had an annual household income of over $100,000.
Text
How To Download Window Driver Updater
In this article, we will guide you on how to download a window driver updater to keep your computer's drivers up to date. It is essential to ensure that all device drivers are regularly updated to maintain optimal performance and compatibility.
Step-by-Step Guide
Search for a Reliable Driver Updater Software: When looking for a window driver updater, make sure to choose a reputable and reliable software provider. Look for reviews and testimonials from other users to ensure that the software is safe and effective.
Download the Software: Once you have found a suitable driver updater, navigate to the provider's website and locate the download link. Click on the link to initiate the download process.
Install the Software: After the download is complete, double-click on the downloaded file to begin the installation process. Follow the on-screen instructions to install the driver updater on your computer.
Scan for Outdated Drivers: Once the software is installed, launch the program and perform a scan to identify any outdated drivers on your system. The software will analyze your computer's hardware components and recommend updates for any drivers that are outdated.
Update Drivers: After the scan is complete, you will be presented with a list of outdated drivers. Select the drivers you wish to update and follow the prompts to download and install the latest updates.
Frequently Asked Questions
Q: Why is it important to keep device drivers up to date? A: Keeping device drivers up to date ensures that your computer's hardware components communicate effectively with the operating system, leading to improved performance and stability. Q: How often should I update my device drivers? A: It is recommended to check for driver updates regularly, at least once a month, to ensure that your system is running smoothly. Q: Can I update drivers manually? A: While it is possible to update drivers manually by visiting the manufacturer's website, using a driver updater software simplifies the process and ensures that you don't miss any critical updates.
Conclusion
Downloading a window driver updater is a simple and effective way to ensure that your computer's drivers are always up to date. By following the steps outlined in this article, you can keep your system running smoothly and avoid compatibility issues with hardware components. Remember to regularly scan for updates and install them to maintain optimal performance.
#best free driver updater for windows 11#display drivers for windows 10#wifi driver update windows 10#advanced driver updater download#windows 11 update drivers automatically#windows 11 driver updater#best pc driver updater
1 note
·
View note
Text
Fixing Windows 11 - A Masterpost
Windows 11 is absolute crap for a good bunch of stuff so yeah, have a masterpost with most of the things I've found around to fix it haha (they're not all here because I did stuff around and I don't remember what)
YES, I KNOW at this point Linux would be a better alternative, however some here can't use Linux due to some proprietary programs that are not on Linux. This Masterpost is for the people in the same situation as I, aka those who have to have Windows or they can't do their job.
I am currently unemployed and haven't worked enough for the government to help me. I have a ko-fi if ever you want to help.
Stopping W11 from making you create an account/setting up your computer without internet (with a way to create gpedit.msc if your version doesn't have it)
Fixing the Taskbar (in case you also don't like the grouped Battery/internet/sound or the way the windows look)(there's more to it, check the settings)
There is the chance that Windows can't update because of this, you just have to uninstall it and reinstall it afterwards. They also completely nuked the Windows 10 look in the 24H2 update, so use the "Windows 10 (Explorer Patcher)" option instead of the plain "Windows 10".
Removing the rounded windows (since ExplorerPatcher doesn't do it anymore on 24H2)
https://github.com/valinet/Win11DisableRoundedCorners
How to move the volume and luminosity pop ups (so you can finally see those sweet sweet subtitles)
In case ModernFlyouts doesn't automatically start up, possible solution
Fixing the Start Menu (ExplorerPatcher can do that too, btw)
How to show all options right away
A way to bring back the Calendar
https://github.com/matej137/OutlookRemover
MICROSOFT FULLY NUKED THE CALENDAR!!! Possible fix is to downgrade the app (which is fine if you don't use the Mail), but do use the OutlookRemover to stop the automatic installation of the new version.
https://github.com/matej137/OutlookRemover/issues/15
Your Bluetooth suddenly doesn't work???
It happens sometimes for no clear reasons so here are a few things you can do:
Check if the icon is in the Taskbar. If not, verify if it is available in the pop up menu (the one from the gear icon)
If it's not here, check your parameter to see if you have the option to turn it on.
If it's still not here, reboot your PC.
If it's STILL not working, update your Bluetooth driver. You can do so by looking for "driver" in the menu and opening the Device Manager, then right click on the right Bluetooth component and update its driver.
If Windows says that the driver is up to date, try checking out this helper: https://support.microsoft.com/en-us/windows/fix-bluetooth-problems-in-windows-723e092f-03fa-858b-5c80-131ec3fba75c
If really nothing help, download and install a recent Bluetooth Driver. Be careful of what you download and from where.
Someone who stumbled on this post fixed it by downloading the Bluetooth Driver 5.0.1.1500 from Softonic (https://www.softonic.nl/download/bluetooth-driver/windows).
How to remove Copilot if you have it (I don't, but it might be because I'm in Europe??)
Archive
Apparently Copilot is being forced on people so hummm
Other stuff not specifically related to the shit W11 did
Changing the size of the scroll bars
How to fully remove Cortana
Website with tools to fix W10 and W11
2K notes
·
View notes
Text
Desperate PC Tenno calling for help!
Calling all the tech-savvy players here on Tumblr who may hopefully lend me and tech support a hand. Yes, the situation is that bad. More under the cut to spare a lengthy wall of text!
I've been experiencing totally random and sudden crashes with WF since a month and half, by now.
The game first freezes for less than a minute, then crashes to desktop bringing up the window to report crashes. This happens literally anywhere and anytime in the game. During mission, at the end of the mission, while idling in the Orbiter/base of operations, sitting in the pause menu, checking the settings menu. All kind of possible scenarios. Ah, and DX11 or DX12 make no difference either.
It's driving me - and tech support - insane. Because it is so HARD to pinpoint the root cause! Every log file so far has reported some kind of General Protection Failure (GPF) error followed by different numbers.
I'm running the game on a brand new, pre-built computer from Megaport. Which I moved to from my old potato of a PC back in late November. Specs are the following: Windows 11 Home (build 24H2) Intel Core I7-12700KF, 8x 3.60 Ghz + 4x 2.70 Ghz ASUS Prime Z790-A Wifi DDR5 NVidia GeForce RTX 4070 Dual Palit 12GB 2x 32GB Corsair Vengeance RGB DDR5-6000 1 TB SSD 1000 Watt PSU
I have done everything tech support has suggested me to do and: - Uninstalled and re-installed the game, - Update drivers. Being a new computer, everything is pretty much up to date. I had to do a clean install for the GPU drivers only using DDU, though, - Verified game files, - Emptied the shader cache on the drive game is saved to, - Repaired Steam library, - Lowered graphic settings, - Attempted to launch and run Warframe in Clean Boot mode to exclude background programs/services <- unsuccessfully; Steam didn't work at all (which I kind of figured would happen) and trying to launch the game straight from the launcher...triggered a download of the game files in the App Data folder on main (C) drive. O_o The random crashes don't even appear in the Windows Event Viewer. Nowhere to be found. And believe me, I have looked into every single category. I've been keeping track of the time(s) of the crashes but, alas, found nothing that could possibly be related to those. (also, I'm not a computer expert so perhaps I'm doing things wrong)
So far, the only weird thing I've noticed is...Most of the times there seemingly is a "break" in between each series of crashes. A few days at worst, 10-12 days at best. Yes, I checked even the Task Scheduler utility on Windows. Found no program/app that runs automatically that matches with the timing/days when the crashes have occurred so far.
Really losing my mind to this. It's frustrating, it's unnerving, it's making me genuinely terrified of playing the game. And the reason I got this PC in the first place was being finally able to play my favorite game without worrying about being unable to because of my old (and obsolete) machine! Because I don't know when the next crash shall decide to happen and oh boy it's gonna be so fun losing progress. Or having a couple of players reasonably angry at me for suddenly poofing as host. I'm really sorry about that, folks.
I'm already considering the option of total formatting this computer, should there be no other way. But not before entirely giving up. And maybe make things a little less complicated for tech support team.
I can't thank these guys enough for their help and most importantly patience over the past month and half. This mess has been handed to three different people already and a solution hasn't been found yet.
So, if there are fellow Tenno on Tumblr who have either experienced something like this before and found a fix or are just more knowledgeable about computers and whatnot, your help would be GREATLY appreciated. ;.;
EDIT: I forgot to mention a few important things! - Hardware temperatures are within optimal range while in game (CPU never above 65°C, GPU has been running ice cold and has rarely exceeded 50°C so far, RAM is chilling at 45°C average). - GPU memory usage averages around at max (peak) 77% on HWInfo. - CPU usage I honestly need to check! D: - Ran disk cleanup, scans with sfc, chkdsk and DISM (all through command prompts ran as admin) and no issues were found. - Checked RAM health as well with Windows' memory diagnostic tool. However, it seems to give many false positives even on perfectly functional RAM banks. Looking for a more reliable alternative. - Warframe is the only game that keeps crashing on this PC. I haven't been getting any with other games/programs (Hades II; need to test how Ultrakill performs) or any warning signs (BSODs, freezes, sluggish PC, etc) that could suggest hardware failure.
#warframe#I even made a post on the official WF forums but nobody bothered to answer#don't know where else I should ask for help
34 notes
·
View notes
Text


On the 9th of January 2025, I saw an article in my latest copy of Computer Active which explains about mastering Linux distros.
It suggested using a website called 'Distrosea' which hosts free virtual machines of various flavours of the Linux operating system, all of which can be ran within a browser window.
Visit the site here:
https://distrosea.com/
Here is a list of the Linux distros I had a go at running with their desktop environments:
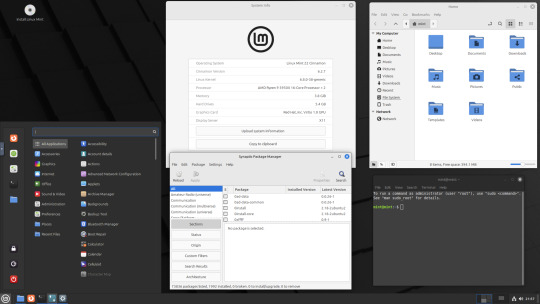
Ubuntu 24.04 LTS - GNOME
Ubuntu 8.10 - GNOME 2 (old, 2008)
Linux Mint 22 - Cinnamon, Ubuntu base
Ubuntu 24.04 LTS - Cinnamon
Fedora Linux 40 - MATE
OpenSUSE Leap 15.5 - KDE
Alma Linux 9 - GNOME
Debian Linux 12.5 - LXqt (lightweight)
Zorin OS 17 Core64 - GNOME (configurable)
There are a total of 71 Linux operating systems to try on the website at the time of this write up.
To install, update and manage software on Linux using a package manager, the distros mentioned on this list based on Debian & Ubuntu use the APT (Advanced Package Tool) and the distros based on Fedora & Red Hat use the DNF (Dandified Yellow-Dog Updater Modified) package managers.
Their are many other types of package managers for Linux. Since Windows 11, users can choose to install software using UnigetUI (a.k.a Winget commands).
About Distrosea:
When you click on any of the distro entries before selecting a desktop environment, you can read a great description of the background information for each.
I think this website is amazing as it allows you to test distros in your browser without the need to plug in a USB or use virtual machine software. basically it gives you a live install copy of Linux to try online for free. It profits from ads shown on its homepage.
Some of the distros have a 'popular' badge, to show which ones are most likely to have more online traffic. Most of these distros are updated to latest versions available.
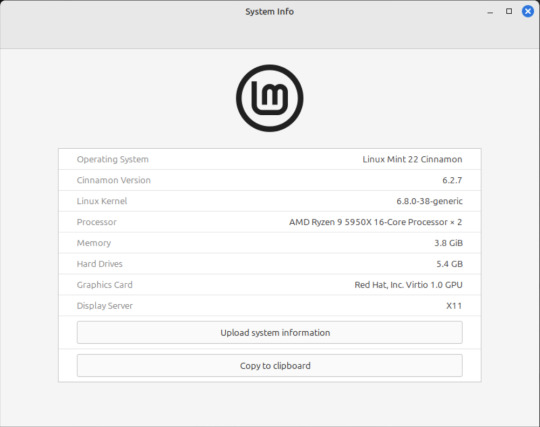
When you run the operating systems the system information dialogue will contain the server CPU information and displays the virtual graphics card called Red Hat, Inc Virtio 1.0 GPU.
However the site uses limited user traffic to reduce load on the servers, so when you select a version of Linux, there is a queue system. Each session is free, however it is timed when idle to create space for another user. Also the server connection, which is based in India, can disconnect you from your testing frequency, so whilst it works well you have to reset your VM which will continue where you last left off.
Also some of the Linux distros didn't automatically scale to full screen, and so leave bars at the top and bottom of the screen. The old Ubuntu remains surrounded by a large bar around itself as no modern drivers will work with this old version of Ubuntu.
You can sign into your Google account and gain internet access in your VMs as well.
Read the developers notes on Reddit:
https://www.reddit.com/r/linux/comments/139sj6z/distrosea_test_drive_linux_distros_online/?rdt=33513
I would recommend trying this out on a large computer screen as the distros take advantage of hardware acceleration, scaling and look great in full screen mode!
Watch this Distrosea video on YouTube to see it in action!
youtube
Remember that this is another way of testing Linux through the internet, the experience will be different if it is installed on an actual computer.
6 notes
·
View notes
Text
The Sims 4 and DX11 for dual GPU
TIP FOR THIS SPECIFIC PROBLEM: If you're running The Sims 4 on a dual GPU system that is DX11-capable and should run DX11 by default as of the September 2024 patch but your game will not automatically start in DX11
TL;DR —
Go to your gaming GPU control panel and set global settings to default to your high performance processor.
Details (NVIDIA-specific) —
On a Windows 11 PC, open NVIDIA Control Panel. Chose the following option: 3D Settings > Global settings > High performance NVIDIA processor
It might also be required to do the following, if changing the global setting as above does not work alone: Windows System > Display > Graphics > The Sims 4 > Options > High performance
Background info —
Apparently, the game detects your system default GPU, rather than the GPU assigned to actually run The Sims 4.
So, if you have a dual graphics processor system, and your native GPU does not support DX11 / is not supported by The Sims 4 for DX11, even if your game is running on a high performance GPU, you will have to change your global default for the system to that supported GPU.
I play on a machine with an internal Intel UHD Graphics included with the Intel Core i7 processer and an integrated NVIDIA GeForce RTX 3050 Ti Laptop.
Although I set the game to run using the NVIDIA GPU (Windows System, above); the game's config.log file confirmed that this was working as expected; and I confirmed updated drivers and even launched the game via the app NVIDIA GeForce Experience... the game still launched in DX9.
When I changed the global setting in the app NVIDIA Control Panel, the game launches in DX11, as expected.
Please feel free to share this anywhere you think it could be useful.
I posted about this in the appropriate EA Answers HQ thread, where I was helped by other users (puzzlezaddict, espeon9466, MapleSimmer), but I'm not super active in the online TS4 community these days so I'm not sure where else it would be helpful.
2 notes
·
View notes
Text
How to Speed Up Your Windows 11 PC
1. Manage autostart programs-disable unnecessary startup program.
Here is how to stop a program from starting automatically
Select the Start button, then select Settings > Apps > Startup .In the Startup Apps area, find the program you want to stop from starting automatically and set it to Off.
2. Clear memory via disk cleanup
To delete temporary files:
In the search box on the taskbar, type disk cleanup, and select Disk Cleanup from the list of results.
Select the drive you want to clean up, and then select OK.
Under Files to delete, select the file types to get rid of. To get a description of the file type, select it.
Select OK.
If you need to free up more space, you can also delete system files:
In Disk Cleanup, select Clean up system files.
Select the file types to get rid of. To get a description of the file type, select it.
Select OK.
3. Uninstall obsolete programs
Select the Start button, then select Settings > Apps.
Find the programs you don’t need, click on it and then select “uninstall”
4. Turn off shadows, animations, and visual effects
In the Windows 11 search box, type sysdm.cpl, press Enter, and then click the sysdm.cpl icon. That launches the Control Panel’s System Properties dialog box. Click the Advanced tab and click Settings in the Performance section. That brings you to the Performance Options dialog box. (Make sure you’re on the Visual Effects tab of the dialog box.) You’ll see a varied list of animations and special effects.
These are the animations and special effects you’ll probably want to turn off, because they have the greatest effect on system performance:
Animate controls and elements inside windows
Animate windows when minimizing and maximizing
Animations in the taskbar
Fade or slide menus into view
Fade or slide ToolTips into view
Fade out menu items after clicking
Show shadows under windows
However, it’s a lot easier to just select the Adjust for best performance option at the top of the screen and click OK. Windows 11 will then turn off the effects that slow down your system.
5. Turn off background apps
Select the Start button, then select Settings > Apps .
Scroll to the entry of the background app you wish to adjust settings for.
Click on the three-dot icon and then on “Advanced options”.
In the “Background apps permissions” section, select “Never”.
6. Turn off app notifications
Select the Start button, then select Settings > System> Notifications, and move the slider to “Off”.
7. Make sure you have the latest updates for Windows and device driver
Select the Start button, then select Settings > Windows Update > Check for updates.
Select the updates you want to install, then select Install.
Restart your PC and see if it seems to run better.
8. Check for low disk space and free up space
You may improve performance if you free some disk space on your PC.
To check for low disk space
Select the Start button, then select Settings > System > Storage . Open Storage settings
Your drives will be listed in the Storage area. Note the amount of free space and total size for each drive.
9. Pause OneDrive Syncing
On the taskbar, look for OneDrive near the notification area.
Select OneDrive > Help & Settings > Pause syncing,and then choose how long you want to pause syncing your files.
10. Check for and remove viruses and malware
Running a system scan to find viruses and malware. If you’ve already installed a security suite such as Norton Security or McAfee LiveSafe, you can use that. Windows 11’s built-in anti-malware app, Windows Defender, also does a great job.
Just type Windows Defender in the search box, press Enter, and click Scan Now. Windows Defender will look for malware and remove any it finds.
11. Last but not the least , if your have a non-genuine Windows 11 on your computer , please activate it with a genuine Windows 11 Key from the Microsfot partner store keyingo.com
1 note
·
View note
Text
Should You Turn Windows Game Mode On Or Off?
You may have heard of Windows game mode and how it can affect your performance if you are not a gamer but if you are then we will be teaching you the benefits of having the game mode switched on.
What Exactly Is Windows Game Mode? Windows game mode is a special feature that is turned on by default on Windows 10 and 11 that automatically optimizes your Windows system to help the games you play get the best performance.
We know that Windows 10 and 11 are stuffed with nice user features and ways you can personalize your Windows operating system to your preferences but Windows game mode is certainly a great feature for you avid PC gamers.
What Does Windows Game Mode Optimise? When running Windows game mode it will help with several features that can interrupt your gaming:
Stops Restart Notifications Being a Windows user you will be aware that sometimes you are prompted for your Windows PC or laptop to be restarted once an update has been installed etc.
Well, having game mode turned on will stop these pesky notifications and won’t interrupt your gameplay.
Prevents Driver Updates Windows is a clever operating system in that it updates itself automatically in the background and will go out and find drivers itself to update your Windows driver.
But the issue with this is it can tax some bandwidth from your network and slow down your gaming especially if playing multiplayer games.
Not only this but it can cause your game to hang or black screen for some seconds or even freeze the game or crash it so another cool feature with having game mode on is it will stop Windows from updating the drivers while you enjoy your PC game.
Consistent Framerate Stabilization Now we all know what it is like to play one of the leading graphic card and CPU-intense games (yes we are looking at your Far Cry 6) and the framerate can bounce around depending on what other programs we have open on the Windows PC.
Limits Background Apps Resources With game mode turned on it will push all the system resources such as CPU power and RAM to your game to keep it running at its best This can help if your PC has lower-spec RAM or CPU or you have intensive programs running on your Windows such as Adobe Photoshop and Premiere Pro.
Well luckily for Windows game mode this won’t be an issue anymore on Windows 10 & 11 and it will huddle up all the resources and send them to your Game so they run nice and smoothly like they should while keeping a consistent frame rate.
Should I Turn Windows Game Mode On Or Off? If you don’t plan to use your Windows PC or Laptop then yes make sure you turn OFF windows game mode.
If you plan to use your PC for gaming then make sure you have the game mode turned ON to get the best performance from your PC games with the less interruptions.
How To Turn Windows Game Mode ON Or OFF Using Windows 10 & 11 The below steps will help you turn the game mode off and on no matter if you using Windows 10 or 11.
Press the Windows logo key on your keyboard and type “Settings” Alternatively click the Windows icon and choose Settings Type Gaming in the settings search bar Click on Game Mode Settings Now use the toggle switch to turn game mode ON or OFF
Conclusion When it comes to gaming which is one of the biggest ways to game then you will ideally want to turn gaming mode on if your PC or laptop isn’t already top of the range specced out.
We have answered everything you need to know about Windows game mode from turning it on and off, the advantages and disadvantages, and what makes game mode so cool for a free built-in Windows 10 & 11 feature.
ORIGINALLY FOUND ON- Source: Tech Spec Dude(https://techspecdude.com/windows-game-mode-on-or-off)

1 note
·
View note
Link
#disablestartupprogramswindows11#howtodisablefaststartupwindows11#howtomanagestartupappsinwindows11#howtostopappsfromopeningonstartupwindows11#turnoffstartupappswindows11
0 notes
Text
DriverPack Solution Offline ISO 2025 Full Version Download
DriverPack Solution Offline is a driver installation and updating tool that comes as a full ISO package, allowing users to install drivers without an internet connection. It’s widely used by technicians, IT professionals, and home users to quickly set up drivers on new or formatted PCs.
🔹 Key Features of DriverPack Solution Offline
Contains a huge library of drivers for Windows XP, 7, 8, 10, and 11.
Can install drivers without an internet connection (ideal for fresh OS installations).
Scans your system and automatically installs missing or outdated drivers.
No need to manually search for drivers.
Download Now
0 notes
Text
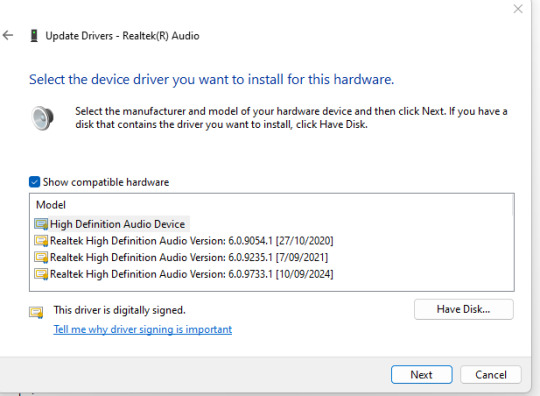
I found a fix for Windows 11 audio glitches
Anytime I watched Youtube videos or played games my audio kept cutting in and out out . I tried everything I could to fix it, but nothing worked. I wanted to share what I did to finally fix this, in case anyone else has the same issues:
Go to device manager
Sound, video & controllers
Right click on Realtek audio
Click update
Click 'Let me search for drivers on my computer' DO NOT let windows automatically search for new drivers
Click 'High Definition Audio Device' (its on top of the list for me, above all other Realtek drivers'
Install
Restart your PC
0 notes

Text
Computeroids. com Driver Updater: Enhancing System Performance
Computeroids Driver Updater is a utility software designed to optimize PC performance by updating outdated, missing, or corrupted drivers. Developed by Sapphire Softech Solutions LLC, this tool aims to simplify the driver management process for Windows users, ensuring their systems run smoothly and efficiently.
Features and Benefits
Driver Updates: Computeroids Driver Updater scans the system to identify outdated or missing drivers. It then provides the latest versions of these drivers, which can significantly reduce system crashes, freezes, and other performance issues.
Backup and Restore: The software includes features to back up existing drivers before updating. This is crucial for maintaining system stability, allowing users to restore previous versions if the new drivers cause issues.
Scheduled Scans: Users can schedule regular scans to ensure their drivers are always up to date. This automated feature saves time and ensures ongoing system optimization without manual intervention
Compatibility: Computeroids Driver Updater supports multiple Windows versions, including Windows 7, 8, 10, and 11. This broad compatibility makes it a versatile tool for a wide range of users
Technical Aspects
The installation process creates several registry keys and configuration files that help manage and track driver updates. These entries are used to store information about the system's hardware and software environment, ensuring precise and efficient driver management.
Performance Improvements
By keeping drivers up to date, Computeroids Driver Updater helps enhance overall system performance. Updated drivers can improve hardware functionality, boost software compatibility, and provide smoother gaming, multimedia, and general computing experiences.
Security and Trust
Despite its benefits, potential users should be aware of some concerns. The identity of the website owner is hidden, which could be a red flag for some users. However, the website has been active for several years and features a valid SSL certificate, indicating secure communications between users and the site.
Pricing and Subscription
While the basic functionality of Computeroids Driver Updater can be explored for free, full functionality requires a monthly subscription of $9.99. This subscription fee covers regular updates, backups, and access to customer support.
Conclusion
Computeroids Driver Updater is a robust tool for maintaining and optimizing PC performance through effective driver management. Its features, including automatic updates, backup and restore capabilities, and scheduled scans, make it a valuable utility for both novice and experienced users. However, users should exercise caution and perform due diligence given the hidden ownership details and other potential red flags. Overall, for those seeking to improve their system's stability and performance, Computeroids Driver Updater offers a comprehensive solution.
0 notes
Text
10 Essential HP Laptop Tips and Tricks to Boost Productivity
HP laptops are known for their reliability, performance, and a wide range of features that can enhance productivity and user experience. Whether you're a new HP laptop user or looking to get more out of your device, here are some essential tips and tricks to help you maximize your laptop’s performance and efficiency.
1. Utilize HP Support Assistant
HP laptops come with a pre-installed tool called HP Support Assistant, which helps keep your system running smoothly. It automatically checks for software updates, drivers, and other essential maintenance tasks. You can also use this tool to troubleshoot common issues, access tutorials, and contact HP customer support.
How to Access: Search for "HP Support Assistant" in the Windows search bar and launch the program to scan your device for updates or perform troubleshooting.
2. Customize Power Settings
Customizing your power settings can significantly improve battery life and overall performance. Windows 10 and 11 offer various power plans that you can optimize based on your usage:
Power Saver Mode: Ideal for extending battery life when you're away from a power source. It reduces screen brightness and processor speed.
Balanced Mode: Balances performance and power usage, perfect for day-to-day activities.
High-Performance Mode: Prioritizes performance over energy efficiency. Ideal for intensive tasks like video editing or gaming.
How to Customize: Go to Settings > System > Power & Sleep > Additional Power Settings to customize or create new power plans.
3. Enable Night Light
Staring at a bright screen for extended periods can strain your eyes, especially at night. The Night Light feature in Windows reduces blue light, which can help reduce eye strain and improve sleep quality.
How to Enable: Go to Settings > System > Display and toggle on the Night Light feature. You can adjust the strength and schedule when the feature activates.
4. Use Windows Snap to Multitask Efficiently
HP laptops with Windows 10 and 11 come with a Snap feature, which allows you to organize your open windows on the screen. You can snap windows to either side, split the screen into quarters, or view multiple windows simultaneously.
How to Use: Drag a window to the edge of your screen, and it will automatically snap to fit half of your screen. You can then select another window to fill the other half. You can also press Windows + Arrow Keys to snap windows to different parts of the screen.
5. Activate HP Fast Charge
Many HP laptops are equipped with HP Fast Charge, a feature that rapidly charges your battery when it’s low. This is incredibly useful if you're short on time and need a quick power boost.
How to Check: Look for the HP Fast Charge feature in your laptop’s user manual or on the HP website to ensure your model supports it. Fast Charge can typically charge up to 50% in about 30 minutes.
6. Utilize Touchpad Gestures
For users with HP laptops that have precision touchpads, you can take advantage of various multi-touch gestures to improve navigation and efficiency:
Three-Finger Swipe Up: Open Task View to see all your open windows.
Three-Finger Swipe Down: Minimize all open windows.
Pinch to Zoom: Similar to smartphones, you can pinch with two fingers to zoom in or out on photos, documents, or web pages.
How to Customize: Go to Settings > Devices > Touchpad to customize or disable specific gestures.
7. Optimize Disk Usage
Over time, your laptop’s performance can slow down due to unnecessary files or fragmented data. Use Disk Cleanup and Defragment and Optimize Drives to free up space and improve performance.
How to Optimize: Search for Disk Cleanup in the Windows search bar, select the files you want to delete, and run the tool. For disk optimization, search for Defragment and Optimize Drives and analyze your hard drive to optimize it.
Conclusion
By using these tips and tricks, you can improve your HP laptop’s performance, enhance battery life, and streamline your daily tasks. Whether you’re a student, professional, or casual user, these small tweaks can make a big difference in your computing experience.
0 notes
Text
Call Of Duty Black Ops 6 Open Beta With AMD Ryzen & Radeon

Call of duty black ops 6 Release Date
Call of Duty Black Ops 6 Open Beta begins August 30 via AMD Gaming. Call of Duty: Black Ops 6, released October 25, 2024, has severe Campaign, Multiplayer, and Zombie warfare. The early 1990s Gulf War espionage thriller Black Ops is expected. A first-person shooter lover will adore its magnificent set pieces and fast-paced gameplay.
Call of Duty: Black Ops 6 Platforms
All Call of Duty Black Ops 6 pre-orders may access the Open Beta from August 30 to September 4. September 6-9 is the Call of Duty Black Ops 6 Open Beta for all platforms.
The Call of Duty Black Ops 6 Open Beta will include new maps, weapons, game modes, and game-changing features like Omni movement.
With complete cross-play compatibility between PCs and contemporary AMD-powered game consoles, teaming up with your buddies will be simple.
Take control of lobbying with AMD Ryzen CPUs and Radeon graphics
With lightning-fast speed, incredibly realistic visuals, and the newest gaming technology, be ready to dominate the scoreboard.
AMD Ryzen and Radeon Deliver Ultra Performance
To provide an amazing experience, AMD have worked closely with Activision to optimize Call of Duty: Black Ops 6 performance on AMD Ryzen CPUs and Radeon GPUs. Use AMD Smart Access Memory in Call of Duty Black Ops 6 Open Beta to achieve up to 9% greater performance on averagei when teaming Ryzen and Radeon together.
AMD FidelityFX
Enhanced with AMD FidelityFX technology
Hundreds of popular games include AMD FidelityFX, a suite of cutting-edge in-game technologies. AMD FidelityFX appears in three places in Call of Duty: Black Ops 6’s graphics interface:
FidelityFX AMD Super Resolution: AMD FidelityFX Super Resolution 3 improves game framerates with super resolution temporal upscaling and advanced frame creation.
AMD FidelityFX Frame Generation: You may activate Frame Generation on a variety of compatible graphics cards by using the FSR Frame Generation option in your graphics settings.
AMD FidelityFX CAS: A low-performance overhead sharpening slider that may aid in enhancing the details on the edges of players, weapons, and surroundings.
AMD HYPR-RX
Prepare using AMD HYPR-RX and AMD Software 24.8.1
To enhance your performance in the Call of Duty Black Ops 6 Open Beta, prepare for the beta by downloading AMD Software’s Adrenalin Edition Version 24.8.1. To upgrade, just go to AMD.com or utilize the AMD Software version that is presently installed.
Drivers for Windows 10 and Windows 11: Updates for AMD Radeon Series Graphics and Ryzen Chipsets may be automatically detected and installed.
Designed for PCs running Windows 10 64-bit version 1809 or later Windows 11 and above.
Install the downloaded file straight into the system that needs updating.
Drivers for Linux
Updates for AMD Radeon Series Graphics Drivers.
For use with RHEL/CentOS, SLED/SLES, and Ubuntu systems.
AMD FidelityFX Super Resolution 3
With their simple-to-use AMD HYPR-RX toggle, which is part of AMD Software, you can maximize performance in even more games by reducing latency and increasing performance.
AMD Performance Laboratories conducted testing on RX-1123. August 19, 2024, on a test system with a Ryzen 7 7800X3D CPU, 32 GB DDR5-6000 Memory, Windows 11 Pro, and a Radeon RX 7900 XTX (4K), 7700 XT (1440p), and 7600 XT (1080p) (Driver 24.8.1) with AMD Smart Access Memory enabled in Call of Duty: Black Ops 6 (DX12) at extreme settings and AMD FidelityFX Super Resolution 3 Quality + Frame Generation. various settings from various system makers might provide different outcomes. RhX-1123.
GD-187a: A selection of AMD products are compatible with AMD FidelityFX Super Resolution (FSR) versions 1, 2, and 3, which are available on some games that need game developer interaction. When enabling AMD FidelityFX Super Resolution on graphics cards from other manufacturers, AMD does not provide warranty or technical assistance.
AMD performance labs’ testing August 19, 2024, on a test system with a Ryzen 7 7800X3D CPU, 32 GB DDR5-6000 Memory, Windows 11 Pro, and a Radeon RX 7900 XTX (4K), 7800 XT (1440p), and 7600 (1080p) (Driver 24.8.1) with AMD Smart Access Memory technology ON versus OFF in Call of Duty Black Ops 6 Open Beta (DX12) with severe settings. various settings from various system makers might provide different outcomes. RX-1124.
AMD GD-225A: AMD HYPR-RX is compatible with Ryzen 7040 Series APUs with integrated RDNA 3 graphics or AMD Radeon RX 7000 Series GPUs and later. When suitable to certain games, AMD HYPR-RX enables a number of AMD Software capabilities, such as Radeon Super Resolution, FidelityFX Super Resolution, Radeon Anti-Lag, Radeon Anti-Lag+, and Radeon Boost, to run concurrently. GD-225A.
AMD FidelityFX Super Resolution
Outstanding Performance. Maximum Trustworthiness.
Increase the Frame Rate of Your Games
AMD FidelityFX Super Resolution (FSR) delivers incredible high-quality, high-performance gaming on almost any hardware by using state-of-the-art open upscaling and sophisticated frame generation algorithms to help you increase your frame rates in compatible games2.
Accessible Now: AMD FSR 3.1
AMD FidelityFX Super Resolution 3 uses superior frame generation and super resolution temporal upscaling to alter gaming experiences with huge and responsive frame rates in compatible games.3 FSR 3.1 employs the new AMD FidelityFX API, decouples upscaling from frame creation, and enhances upscaling picture quality.
AMD FSR 3 with Advanced Frame Upscaling
Suggested:
Graphics cards AMD Radeon RX 6000 Series and above
GeForce RTX series and above from NVIDIA
GPUs:
AMD Radeon RX 5000 Series and above
To GeForce RTX 20 Series
(For best results, compatible games must be running at 60 frames per second before applying frame generation, which is dependent on the GPU’s capabilities.)
AMD FSR 3 with Upscaling
Suggested:
Graphics cards AMD Radeon RX 5000 Series and above
Up to the NVIDIA GeForce RTX 20 Series
GPU:
AMD Radeon RX 500 Series and higher
Up to the NVIDIA GeForce GTX 10 Series
(AMD FSR 3 upscaling may be utilized with certain AMD Ryzen Processors that include Radeon graphics, although it is geared for usage with separate graphics cards.)
Read more on govindhtech.com
#CallDutyBlackOps6#AMDRyzen#AMdGaming#gamemodes#gamingtechnology#AMDRyzenCPU#AMDFidelityFX#AdrenalinEdition#Memorytechnology#PCrunningWindows#Ubuntusystems#AMD#cpu#Graphicscards#NVIDIAGeForceRTX#technology#technews#news#govindhtech
0 notes
Text
IObit Driver Booster Pro Crack

Updating drivers is usually an initial step to avoid hardware failure, system instability, and hidden security vulnerabilities. Update drivers regularly is also an effective way to enhance your overall PC performance and maximize your gaming experience.
Based on the cloud library, IObit Driver Booster Pro can always be the first to identify outdated drivers and download and update drivers at an unrivaled speed. The backup feature is an easy, effective, and risk-free solution to keep your drivers up-to-date.
For the high performance of your Windows system, software and hardware need to work accordingly with each other. So it is necessary to update device drivers regularly and always function properly. Driver Booster 6 checks and updates over 2,500,000+ device drivers from Intel, Nvidia, AMD, etc., to help you reduce system freezing and crashing.
Features of IObit Driver Booster Pro
Download and Update Outdated Drivers with One Click
Enhance Hardware Functionality for Top Performance
Specialized Driver Tweaking for Top Gaming Experience
Automatically Identify Outdated Drivers
Support More Comprehensive Hardware Devices
Enjoy Priority to Update Outdated Drivers Promptly
Backup Drivers for Safe Restore
Download and Update Drivers up to 300% Faster
Automatically Update to the Latest Version
Optimized scan logic in Boost module for less resource consumption.
System Requirements and Technical Details
Supported OS: Windows 11, Windows 10, Windows 8.1, Windows 7
RAM (Memory): 2 GB RAM (4 GB recommended)
Free Hard Disk Space: 200 MB or more
0 notes