#woocommerce tutorials
Explore tagged Tumblr posts
Visit Tumblr Blog
Explore Tumblr blogs with no restrictions, modern design and the best experience.
Last Seen Tumblr Blogs


Fun Fact
Tumblr has been providing a Korean-language service since 2013.
Text
WooCommerce vs Shopify – What to Choose for Your Business?

Are you planning to launch an online store but confused between WooCommerce and Shopify? Intellistall brings you a detailed guide in our latest blog, “WooCommerce vs Shopify – What to Choose for Your Business?”. We compare the two leading eCommerce platforms on key factors like pricing, ease of use, features, customization, and long-term scalability. Whether you're a first-time entrepreneur or a growing business, this blog will help you understand which platform suits your business model best. At Intellistall, we’re committed to helping you make smarter digital decisions. Discover the pros and cons of both WooCommerce and Shopify, uncover hidden costs, and learn which one aligns with your goals and technical needs.
Call: +91-7494955535, +91-7015165894 Mail: [email protected]
#WooCommerce vs Shopify#Shopify vs WooCommerce#eCommerce platforms comparison#Best eCommerce platform 2025#WooCommerce guide#WooCommerce or Shopify#Small business eCommerce#eCommerce for beginners#Shopify tutorial#WooCommerce setup#WooCommerce pros and cons#Shopify pros and cons#Choosing eCommerce platform#Digital business tips#Shopify alternatives#WordPress eCommerce#eCommerce decision making
0 notes
Text
WooCommerce Price Calculation by Delivery Distance
Optimize your pricing strategy with WooCommerce's price calculation by delivery distance. Increase sales and enhance customer satisfaction by offering fair, distance-based rates. Discover how to implement this feature today!
#How to add distance-based shipping in WooCommerce#Best WooCommerce delivery pricing plugins#WooCommerce local delivery cost calculation#WooCommerce distance-based shipping plugin#Distance-based delivery fee WooCommerce#WooCommerce price calculation by delivery distance#WooCommerce per kilometer shipping rate#WooCommerce dynamic shipping cost calculator#WooCommerce automated distance-based shipping rates#Best WooCommerce plugin for distance-based delivery fees#WooCommerce per km delivery charge setup#WooCommerce real-time distance-based shipping cost#Best WooCommerce plugins for dynamic shipping pricing#WooCommerce distance-based delivery pricing setup tutorial#Cheapest way to set up WooCommerce distance-based pricing
0 notes
Text
How to Create a WordPress Website Using ChatGPT (Step-by-Step Guide)
Hello, friends! 😊 Are you looking to create a WordPress website but don’t know where to start? Don’t worry! In this article, we’ll walk you through the step-by-step process of setting up your website, from choosing a hosting provider to designing and optimizing it using ChatGPT. Let’s get started Step 1: Choose a Hosting Provider & Domain Name To launch a website, you need a hosting provider and…
#blogging#ChatGPT for WordPress#create WordPress site#digital marketing#eCommerce website#install WordPress#SEO optimization#web development#Website Customization#website design#WooCommerce#WordPress Hosting#WordPress plugins#WordPress Themes#WordPress tutorial#WordPress website
0 notes
Text
WooCommerce duplicate coupon: Clone multi WooCommerce coupons with 3 clicks

WooCommerce coupons are one of the most popular marketing strategies that store managers offer to their customers to boost their engagement. These coupons have versatile usage and can be applied to specific products or the whole shopping cart, depending on the configurations set by the site managers.
Most store owners are fine with creating and offering occasional or seasonal coupons, but what if you need to create hundreds of discount codes with the same settings on WooCommerce? Is there a hassle-free and quick way to duplicate coupon WooCommerce?
In this post, we want to introduce the WooCommerce coupons bulk editing plugin as the best solution for WooCommerce duplicate coupons and bulk edit them in a few minutes. Let’s review how getting help from this plugin can create and manage coupon codes effectively.
Continue Reading: https://ithemelandco.com/blog/woocommerce-duplicate-coupon/
0 notes
Text
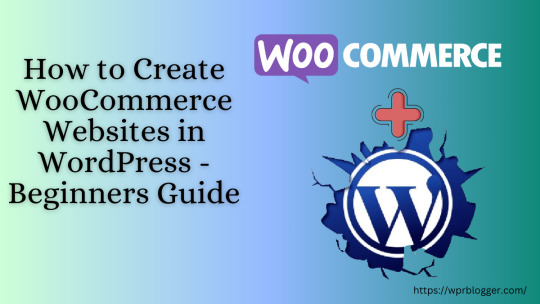
How to Create WooCommerce Websites in WordPress - Beginners Guide
Building an online store can seem daunting, but with WordPress and WooCommerce, it’s easier than you might think. This guide will walk you through the steps to set up your WooCommerce website, even if you’re a beginner. You’ll learn the five steps to build your eCommerce website with WordPress using the WooCommerce plugin. After reading this guide, you can set up any ecommerce functions on a…
View On WordPress
0 notes
Video
youtube
How to backup your wordpress website in 2 minutes - Woocommerce back up tutorial - Updraft plusBacking up your WordPress website with the UpdraftPlus plugin is a straightforward process. Here's a step-by-step guide: 1. Install UpdraftPlus Plugin: Go to your WordPress dashboard, navigate to "Plugins" and "Add New," search for "UpdraftPlus," and click "Install Now" and then "Activate." 2. Access UpdraftPlus Settings: After activating the plugin, find it in your WordPress dashboard sidebar. Click on "Settings" and then "UpdraftPlus Backups." 3. Configure Backup Settings: - Click on the "Settings" tab to configure your backup settings. - Choose your preferred backup schedule: manually, daily, weekly, monthly, or custom interval. - Select the files and databases you want to include in the backup. - Choose your remote storage destination: Dropbox, Google Drive, Amazon S3, etc. Authenticate and grant access to UpdraftPlus. 4. Initiate Backup: - Save your changes. - Go to the "Current Status" tab. - Click the "Backup Now" button to start the backup process. 5. Verify Backup Completion: After the backup process finishes, UpdraftPlus will display a success message. Check the "Existing Backups" tab to see your backups. 6. Restore Backup (Optional): To restore from a backup, go to the "Existing Backups" tab, locate the backup, and click "Restore." Follow the on-screen instructions. 7. Regularly Monitor and Test Backups: Monitor backups regularly and test them by restoring to a staging environment. Following these steps, you can effectively backup your WordPress website using the UpdraftPlus plugin, ensuring your site is protected against data loss.
#wordpress#woocommerce#elementor#dropshipping#ecommerce#ecomhardy#wordpress backup#updraftplus tutorial#wordpress website backup#wordpress backup plugin#website backup tutorial#wordpress maintenance#wordpress security#website backup strategy#wordpress tips#website management#wordpress backup and restore#data backup for wordpress#wordpress data protection#wordpress backup solutions#website data backup#wordpress backup best practices#wordpress backup automation
1 note
·
View note
Text
youtube
Learn How to make an ecommerce website with WordPress+Woocommerce+XStore - This is the complete step by step ecommerce tutorial, where you know all things which require to build your professional online store like Amazon & Flipkart.
Best part of the video is you no need to knowledge of any coding skills, just follow the this tutorial and simple drag n drop to create your professional ecommerce website. So let's watch this video till the end to make an beautiful e-commerce website.
1 note
·
View note
Text
Tutorial: Bloquear registros de usuarios por dominio
En esta entrada explico como un usuario de Stack Overflow enseña a bloquear registros de usuarios de spam en una instalación WooCommerce mediante los hooks de WordPress.
No tengo mucha experiencia en WooComerce pero se que los registros de usuarios son importantes para las tiendas en línea. Gracias a la amabilidad de un cliente, he tenido la oportunidad de descubrir que WooComerce tiene un sistema de registro aparte del registro normal de WordPress que permite el registro de usuarios a pesar de deshabilitarlo desde las configuraciones generales de WordPress. En…

View On WordPress
0 notes
Text
How to Manage Coupons in WooCommerce? – An Ultimate Guide
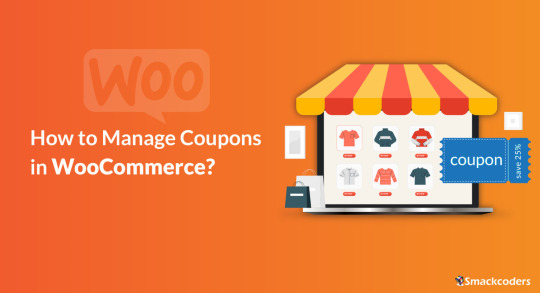
The best way to increase sales for your business is by offering exciting coupons to customers. If you’re using WordPress, then you might know about WooCommerce Plugin. WooCommerce helps you to build an online store in WordPress. WooCommerce provides many many features to build and maintain a complete eCommerce store. WooCommerce’s Coupons Management is one of the best features. You can create coupons for any specific products in your store to boost store sales and attain more revenue. The created coupons are useful for your store visitors or customers to buy your products at discounts. You can share the coupons with your existing customers and encourage them to buy more from your website.
The coupons are easily customizable to your needs. When creating coupons, you need to set the coupon expiration date, assign the coupon code for any particular product in your store, and configure a minimum or maximum cart total to be eligible for the discount. If you want to provide the coupon only for some specific customers you can do that simply by mentioning their email IDs.
Boost sales with WooCommerce Coupons
Here are some simple tips to increase your sales by providing coupons.
Primarily mention the coupon offer on top of your website as a banner or create pop-up banners which may show after a few seconds the visitor landed on your website.
Promote the coupons on social media platform like Facebook, Twitter, or any other platforms where your target audience spends time.
The coupons must be eye-catching and visible to the user. It can be short to make it easy for them to apply at checkout. Make sure it creates some urgency to make them take action soon. Provide texts like ‘only for a limited time’ or mention the coupon expiry date. Create personalized coupons by adding the customer’s name or their business name. It makes your customers feel more special and also increases sales.
Now let’s see the steps to create WooCommerce coupons.
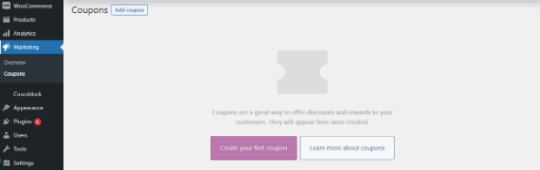
Steps to create a coupon with WooCommerce
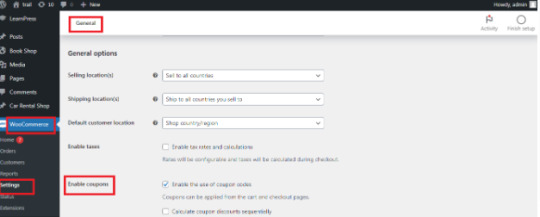
1. Install WooCommerce in your WordPress instance and activate it. Once it is done make sure that Enable Coupons is checked under the General tab in WooCommerce Settings menu. If not, enable it and click Save Changes.
2. Go to Marketing → Coupon → Add Coupon. Click Add Coupon to start creating a new one or hover and click edit of any one to change the existing coupon.
3. Enter your Coupon code. You can use the code to share it with your customers. The code must be unique. Add description for internal reference.
Code of your choice – Any alphanumeric code is valid and Coupons are case-insensitive.
Generate Code – By clicking this button WooCommerce will auto-create and generate code via algorithm.

4. Next, let’s see the Coupon data widget. There are three sections within the widget: General, Usage restrictions, and Usage limits.
General
WooCommerce coupons offer three different discount types.
Percentage discountThe discount in percentage is applied to the total value in the cart.
Fixed product discountIt applies a fixed discount for each selected product in the cart.
Fixed Cart discountIt provides a fixed amount of discount to the total entire cart.
Coupon Amount – Upon choosing the discount type, enter the Coupon Amount you are going to offer. Enter the number and it will automatically add the percent sign or currency unit.
Allow free shipping – Enable free shipping to remove the cost of shipping when using a coupon.
Coupon expiry date – Select the date for the coupon to expire. An expiration usually occurs at 12 a.m. or 00 a.m. on the specified date. Note that the time will be calculated based on the time zone of your site.
Usage Restrictions
The Conditions are usually set here in this section for the coupon code applied. This section contains a set of 9 fields. Using these you can control the coupon you are generating.
Field
Description
Minimum spend
A coupon code is only valid if one spends the minimum amount set by the store owner on the product. The minimum amount includes subtotal + tax.
Maximum spend
To use a coupon code, you must spend a maximum amount set by the store owner.
Individual use only
The coupon can only be applied to a single item, and cannot be combined with other coupons.
Exclude sale items
Enable to exclude sale items from a WooCommerce coupon
Products
Select the product to which you would like to offer a discount.
Exclude products
Select the product that you don’t want to offer any discount.
Product categories
You can give a discount on products from a certain category.
Exclude categories
This can be useful if you want to offer a discount on everything except products of a particular category.
Allowed Emails/Email restrictions
You can specify which email addresses are allowed to use the coupon. This is useful if you want to limit the use of a coupon to specific customers.
Usage Limits
With Usage limits, store owners can set limits to the coupon which is the total number of times the coupon can be used. This will ensure that the coupon cannot be overused. It is totally optional so that store owners can decide whether they need it or not.
Usage Limit per coupon: Set here how many times the coupon can be used before it becomes invalid.
Usage limit per user: It lets you set how many times a user can use the coupon.
Limit usage to X items: Enter the maximum number of items for the coupon that may be applied.
Limitations of coupons
Even Though we have a lot of advantages in using coupons, there are some limitations. Using a coupon will definitely bring traffic to your store and boost your sales. However, it will reduce the margin amount of the product which means a lower amount in your account. In some cases, coupons can be misused, resulting in a reduction in revenue. Over Reliance on coupons can lead to a situation where customers only make purchases when there is an active coupon or promotion, which can hurt long-term sales and customer retention.
Ultimate CSV Importer with WooCommerce Coupons
Ultimate CSV Importer is a simple yet powerful plugin. Here is how the Ultimate CSV Importer plugin will help you to import/export WooCommerce Coupons data. You quickly import your WooCommerce coupons using a CSV/XML file. Just upload your file and map the header fields and click import to finish the process. Let’s see how to import WooCommerce Coupons data to WordPress site along with how to add the values to your CSV file to properly import WooCommerce Coupons.
Steps to import WooCommerce Coupons
Upload your CSV or XML file.
With the plugin, you can upload the file in three different formats. Upload from desktop or FTP/SFTP or URL. Upload the data in your Google sheets using the Upload from URL option.

Choose WooCommerce Coupons from the dropdown. Select “New Item” to import new coupons data and “Existing Item” to modify the old data.

Click Continue and the Mapping section will be displayed. If the headers in the CSV file are the same as the WordPress fields, they will be mapped automatically. If they don’t match, you can choose the corresponding field from the dropdown.
How to Add Values in your CSV/XML WordPress Core Fields
Coupon Code – Provide the name of the coupon code in your CSV that can be applied at checkout to avail the discount.
Description – Specify the description for the coupon.
Coupon date – Specify the coupon date to publish.
Coupon status – Mention the status here. For example: publish.
Coupon Meta Fields
Discount Type – Mention any one coupon type. Percentage as Percent, Fixed cart discount as fixed_cart and Fixed Product Discount as fixed_product.
Coupon Amount – Specify the amount in numerical values.
Individual_use – Specify yes in your CSV to select it.
Product_ids – Specify the ID of the product for applying coupon. To mention multiple values use comma separator(,)
Exclude_product_ids – Specify the ID of the product to exclude from applying the coupon. Mention multiple values using a comma separator.
Usage_limit,Usage_limit_per_user, limit_usage_to_x_items – Specifies the value in numerical form.
Expiry_date – Mention the date format in YYYY-MM-DD
Free_shipping – To enable this field mention yes.
Exclude_sale_items – Mention yes in your CSV/XML to enable this field
Product_categories, Exclude_product_categories – Mention the ID of the categories
Minimum_amount, Maximum_amount – Enter the amount in Numerical Value
Customer_email – Mention multiple email addresses using comma separator
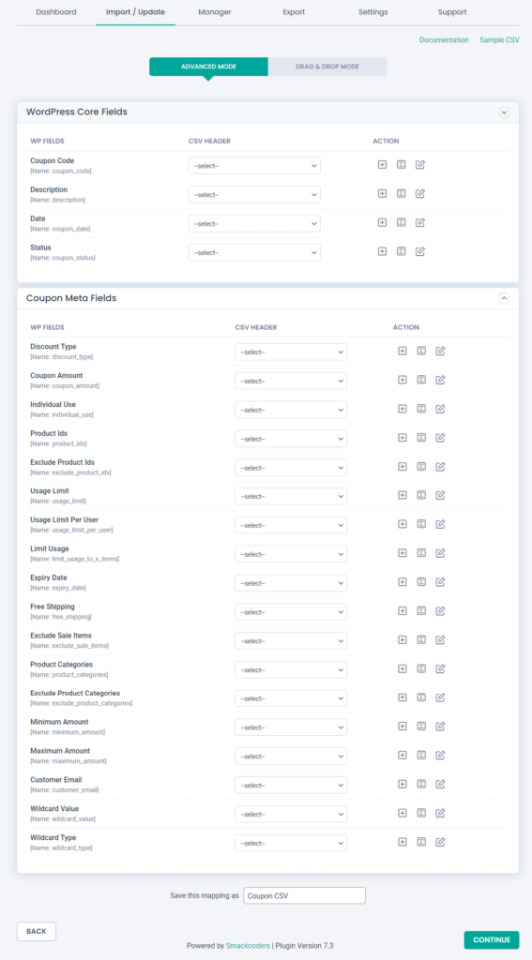
After mapping, all the fields save the mapping as a template to use this mapping later. For this, enter a template name in ‘Save this mapping as’ textbox provided in the bottom of the mapping section page. Click Continue and skip the Featured Image Media Handling section if you don’t want to upload any external url images. This section is enabled automatically. So you don’t need to worry about it.
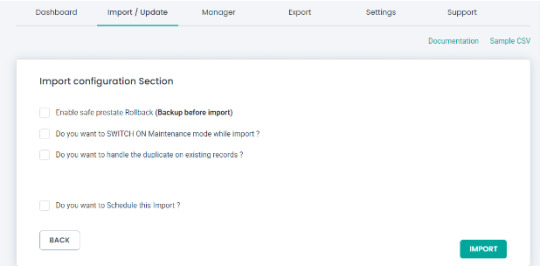
And finally you will be landed in the Import Configuration Section. There are 4 different steps to import your data safely.
Enable safe prestate Rollback – Before proceed to import, check the box to take a safe backup of your old data. If any problem arises while importing, the previous version will be restored.
Do you want to SWITCH ON Maintenance mode while import? – Notifies the visitors that your website is under maintenance if the option is enabled.
Do you want to handle the duplicate on existing records? – Imports the data by truncating the duplicate records.
Do you want to schedule the import? – Configure to Import your data at your convenient time.
Now click the Import button and all your data will get imported.
Export WooCommerce Coupons with Ultimate CSV Importer
You can easily export the WooCommerce Coupons data. The plugin lets you export the data in different file formats such as CSV/XLS/XML/JSON. The advanced filter option is also available to export only the data that you want in your hand.
Steps to export WooCommerce Coupons
1. Click on the “Export” tab in Ultimate CSV Importer.
2. Select the “WooCommerce Coupons” module and move to the next step.
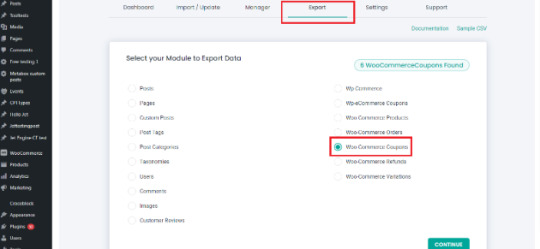
3. Give the export file name and select the type of file you want to export. The export option has a range of filtering options. That allows you to customize the export output. Here’s the list of filters available.
Export data with auto delimiters
Export data for the specific period
Export data based on specific Inclusions
Do you want to Schedule this Export
Check our documentation to know more about how to an apply export filter.
4. You can export your data now by clicking “Export”. On the next page, the export file will be prepared and ready to download. Click download and get your Coupons data file.
Import/export all WooCommerce coupons using the WP Ultimate CSV Importer Premium. Check out our Demo now to see how it works. Have any questions or need any assistance? Write to us now at [email protected]
#cms#wordpress#wordpress plugins#wordpress tutorial#plugins#website development#blog post#wordpresswebsite#import#csvimporter#woocommerce website#woocommerce#woocommercestore#woocommerce plugins#woocommerce coupons
0 notes
Text
youtube
Are you a WooCommerce store owner looking for a quick and easy way to import your products from a CSV or Excel file? Look no further! In this tutorial, I'll show you an effortless method to import your products seamlessly into your WooCommerce store.
First, make sure you have your CSV or Excel file ready with all your product information. Whether it's the product name, price, stock quantity, or any other details, having it all organized in your file is crucial.
Next, log in to your WooCommerce backend and navigate to the "Products" tab. From there, click on the "Import" button.
This will take you to the product import page. Here, you can choose the file you want to import by clicking the "Choose File" button. Select your CSV or Excel file from your computer, and click "Continue."
Now, it's time to map your file columns to WooCommerce fields. WooCommerce will try to automatically match your file columns, but it's important to review and ensure everything is correct.
For example, make sure that your file's column for the product name is correctly mapped to the product title in WooCommerce. Do the same for other fields like price, stock quantity, and any other relevant information.
Once you've double-checked everything, click "Run the Importer" to start the import process. WooCommerce will now process your file and import all the products within it.
Depending on the size of your file, this may take some time. You can track the progress at the top of the page.
And that's it! You've successfully imported your WooCommerce products from a CSV or Excel file. Now you can see all your products listed and ready to go in your store.
Remember, if you ever need to update or add more products, simply repeat the same process. It's as easy as that!
Thanks for watching this tutorial on how to import WooCommerce products from a CSV or Excel file. If you found this video helpful, make sure to subscribe to our channel for more useful tutorials like this. Happy importing and happy selling!
#woocommerce#productimport#csvtutorial#exceltutorial#tutorial#ecommerce#wordpress#csv#excel#importdata#datamanagement#onlinestore#ecommercetutorial#digitalmarketing#onlineselling#wocommerceproductimport#csvimport#excelimport#howto#beginnersguide#Youtube
0 notes
Text
Calculate Prices Based on Distance For WooCommerce
If you're running a WooCommerce store and need to charge customers based on their delivery distance, then the Calculate Prices Based on Distance for WooCommerce plugin is the perfect solution for you. This plugin allows store owners to set up dynamic pricing that changes based on how far the customer is from the store or warehouse.
Why Use Distance-Based Pricing in WooCommerce?
For businesses that rely on delivery services—such as food delivery, courier services, logistics, or even furniture stores—charging a flat shipping rate may not always be practical. Some customers may live closer and should pay less, while those farther away should pay more. Distance-based pricing helps achieve:
Fair Pricing: Customers pay according to the actual distance.
Cost Optimization: Covers fuel and transportation costs accurately.
Better Profit Margins: Ensures you don’t undercharge for long-distance deliveries.
Key Features of the Plugin
Automated Price Calculation – The plugin automatically calculates the delivery cost based on distance.
Google Maps API Integration – Ensures accurate distance measurement between store and customer location.
Custom Pricing Rules – Define different price slabs based on distance thresholds.
Support for Multiple Locations – Works well for businesses with multiple warehouses or branches.
Flexible Unit Measurement – Supports both kilometers and miles.
Easy Configuration – Simple settings panel within WooCommerce.
Real-Time Cost Display – Customers can see the delivery charges before placing an order.
How to Set Up the Plugin
Install & Activate the plugin from the WordPress Plugin Directory.
Obtain a Google Maps API Key and configure it within the plugin settings.
Set Up Pricing Rules – Define base prices, per-km or per-mile costs, and maximum limits.
Test the Pricing Calculation by simulating different delivery addresses.
Save Changes & Go Live!
Best Use Cases
Food & Grocery Delivery: Charge delivery fees dynamically based on the customer’s location.
Furniture & Large Item Shipping: Ensure long-distance deliveries are appropriately priced.
Courier & Logistics Companies: Offer real-time pricing for distance-based shipments.
Service-Based Businesses: Charge for home visits or service calls based on travel distance.
Final Thoughts
The Calculate Prices Based on Distance for WooCommerce plugin is a must-have for any store that needs to charge customers fairly based on distance. It enhances customer satisfaction, improves cost recovery, and simplifies the pricing process. Whether you're a restaurant, logistics provider, or eCommerce store delivering large items, this plugin ensures you never lose money on delivery costs.
Ready to optimize your WooCommerce store’s delivery pricing? Download and install the plugin today!
#Distance-based delivery fee WooCommerce#WooCommerce price calculation by delivery distance#WooCommerce per kilometer shipping rate#WooCommerce dynamic shipping cost calculator#WooCommerce automated distance-based shipping rates#Best WooCommerce plugin for distance-based delivery fees#WooCommerce per km delivery charge setup#WooCommerce real-time distance-based shipping cost#Best WooCommerce plugins for dynamic shipping pricing#WooCommerce distance-based delivery pricing setup tutorial#Cheapest way to set up WooCommerce distance-based pricing
1 note
·
View note
Text
Planning to sell physical or digital products online and want to create a website for it in the FASTEST way?
If you're starting your e-commerce journey and feeling overwhelmed by all the platform options—don't worry, you're not alone. Two names dominate the conversation: Shopify and WordPress (with WooCommerce).
But which one is truly better for newbies, beginners, and dropshippers looking to launch fast and sell efficiently?
Let’s break it down and get straight to the point—especially if you're here to build a business, not fiddle with tech headaches.
Shopify: Built for E-Commerce from the Ground Up
Shopify is a dedicated e-commerce platform. That means everything from product setup to payments, themes, and shipping is purpose-built for one thing: selling online.
Why Shopify is Great for Beginners
Zero Coding Required: Just drag, drop, and start selling. Perfect for people who want results, not tutorials.
3-Day Free Trial: You can start today and be up and running in hours.
Sign up for Shopify’s FREE trial with this link -
https://shopify.pxf.io/QjzmOa
Fast Setup: No plugins, no server setup, no manual installation. Just sign up and start building.
Designed for Dropshipping: Integrates easily with apps like DSers, Zendrop, CJdropshipping, and more.
Mobile-Optimized: Your store will look great on any device—without touching a line of code.
24/7 Support: Real-time help from actual people when you get stuck.
Sign up for a Shopify FREE TRIAL Here at https://shopify.pxf.io/QjzmOa
WordPress (WooCommerce): Powerful, But Not Beginner-Friendly
WordPress is an amazing platform... if you're building a blog or you’re already experienced with web development. But for e-commerce newbies, it can feel like you're building a house from scratch.
Why WordPress Might Be a Struggle for Beginners
Complex Setup: You'll need to buy hosting, install WordPress, then install WooCommerce, then configure it all manually.
Plugin Overload: Want a feature? You’ll likely need to install a plugin. And another. And another. Then update them constantly.
Security Risks: If you don’t stay on top of updates and patches, your site could be vulnerable.
Slow Support: There’s no dedicated support team—just forums or your hosting provider.
Not Built for E-commerce First: WordPress is a blogging tool at heart.
WooCommerce makes it work for selling, but it’s not seamless.
So Which One Should You Choose?
If you're:
A beginner with no coding experience,
A dropshipper who wants fast supplier integration,
Or just someone who wants to get your first product online this week, not next month...
Go with Shopify.
It’s clean, easy to use, beginner-friendly, and built to sell. You won’t waste time on tech issues—you’ll spend time building a brand.
Pro Tip: You can start with a 3-day free trial and see how easy it is. No risk, no commitment.
Sign up for a Shopify FREE TRIAL Here - https://shopify.pxf.io/QjzmOa
Manual Setup
Shopify was made for people just like you—dreamers and doers ready to launch something real.
Don’t get stuck in tech setup and plugin chaos.
2 notes
·
View notes
Text
Bulk edit WooCommerce order notes with 2 simple ways

WooCommerce has many advanced features that you need to familiarize yourself with as a store manager so that you can manage your store perfectly. One of these important features is WooCommerce order notes, which can be a better solution than live chat or email to send or receive messages related to each order from your customers or team members.
Whether you’re trying to communicate with your customers or coordinate with your team to do necessary actions before delivery, leaving a note on each specific order can be an effective tool. Order notes in WooCommerce are custom messages added by shop managers or customers to an order. By leaving this message on the order, shop managers or the customer support team won’t miss important information when delivering the goods.
In this guide, we will show you how to add order notes in WooCommerce and bulk edit them with and without a plugin.
Continue Reading: https://ithemelandco.com/blog/bulk-edit-woocommerce-order-notes/
0 notes
Text
WhatsApp Cloud API Setup For Botsailor
Integrating the WhatsApp Cloud API with BotSailor is crucial for businesses seeking to enhance their customer engagement and streamline communication. The WhatsApp Cloud API enables seamless automation, allowing businesses to efficiently manage interactions through chatbots, live chat, and automated messaging. By connecting with BotSailor, businesses gain access to advanced features like order message automation, webhook workflows, and integration with e-commerce platforms such as Shopify and WooCommerce. This setup not only improves operational efficiency but also offers a scalable solution for personalized customer support and marketing, driving better engagement and satisfaction.
To integrate the WhatsApp Cloud API with BotSailor, follow the steps below for setup:
1. Create an App:
Go to the Facebook Developer site.
Click "My Apps" > "Create App".
Select "Business" as the app type.
Fill out the form with the necessary information and create the app.
2. Add WhatsApp to Your App:
On the product page, find the WhatsApp section and click "Setup".
Add a payment method if necessary, and navigate to "API Setup".
3. Get a Permanent Access Token:
Go to "Business Settings" on the Facebook Business site.
Create a system user and assign the necessary permissions.
Generate an access token with permissions for Business Management, Catalog management, WhatsApp business messaging, and WhatsApp business management.
4. Configure Webhooks:
In the WhatsApp section of your app, click "Configure webhooks".
Get the Callback URL and Verify Token from BotSailor's dashboard under "Connect WhatsApp".
Paste these into the respective fields in the Facebook Developer console.
5. Add a Phone Number:
Provide and verify your business phone number in the WhatsApp section.
6. Change App Mode to Live:
Go to Basic Settings, add Privacy Policy and Terms of Service URLs, then toggle the app mode to live.
7. Connect to BotSailor:
On BotSailor, go to "Connect WhatsApp" in the dashboard.
Enter your WhatsApp Business Account ID and the access token.
Click "Connect".
For a detailed guide, refer to our documentation. YouTube tutorial. and also read Best chatbot building platform blog

3 notes
·
View notes
Video
youtube
Speed Up Your WordPress Website: Clean Up Your Database with 2 Essential PluginsIs your WordPress website feeling a bit sluggish? It might be time for a database cleanup! In this step-by-step tutorial, I'll guide you through the process of optimizing your website's performance by cleaning up your database using two powerful plugins: WP-Optimize and Advanced Database Cleaner. First up, we'll dive into WP-Optimize, a versatile plugin designed to streamline your WordPress database effortlessly. I'll walk you through the installation process and show you how to use its intuitive interface to remove unnecessary data, such as post revisions, spam comments, and transient options, all of which can weigh down your website's performance. Next, we'll explore Advanced Database Cleaner, another essential tool in your optimization arsenal. With its advanced features, you'll learn how to identify and eliminate redundant tables and bloated data, ensuring your database runs like a well-oiled machine. But why stop there? As an added bonus, I'll introduce you to the Database Cleaner plugin by Jordy Meow. With its additional optimization and repair capabilities, you'll have everything you need to give your website a comprehensive cleanup. By the end of this tutorial, you'll not only have a cleaner, leaner database but also a faster, more efficient WordPress website that delivers an exceptional user experience. Don't let a cluttered database slow you down 14clean up and optimize with these essential plugins today! Stay tuned for more expert tips and tutorials on optimizing your WordPress website for peak performance. Don't forget to like, share, and subscribe for future updates!
#wordpress#woocommerce#elementor#dropshipping#ecommerce#ecomhardy#wordpress tutorial#clean wordpress database#clean up your wordpress database#wordpress clean database#wordpress optimization#wordpress database cleanup#wordpress database performance#wordpress database plugin#optimize wordpress database#clean up wordpress database#how to cleanup wordpress database#delete unused tables from your wordpress database#delete tables from wordpress database#wp optimize
0 notes