
"Programming is sooo scary..." The author doesn't have any firm rebuttal on any similar statements regarding the daunting nature of programming. Nonetheless, the author wishes to lighten the mood of programming, by having some graphical contents, with very minimal texts. Welcome to iDrawCode!
Don't wanna be here? Send us removal request.
Statistics
We looked inside some of the posts by idrawcode and here's what we found interesting.
Average Info
Notes Per Post
12
Likes Per Post
10
Reblog Per Post
2
Reply Per Post
0
Time Between Posts
9 days
Number of Posts By Type
Text
9
Video
8
Last Seen Tumblr Blogs


Fun Fact
Tumblr.com rank in the US is 25.
Text
AFNetworking
If you’re an iOS dev, you must have somehow came across this amazing and widely used framework called AFNetworking. And easy way to explain what AFNetworking is that it’s an alternative framework for devs to use when uploading and downloading data. That’s probably an easy-lay-man term way to explain it. If you would like to know more about what is AFNetworking, feel free to google it, it’s so popular, you wouldn’t miss it.
Anyway, AFNetworking framework isn’t exactly new. It’s been around for quite abit, not super long, but it’s not new either. It’s currently in version 2 already. Shameful to admit, but I was still sticking to the good old NSURLConnection when it comes to dealing with API data. Of course there is nothing wrong with it, it’s just....old. AND THOUSANDS OF LINES OF CODE TO GET THINGS DONE. So why do I still use it? I guess it’s because I’ve been using it for tons of time and it just became a habit.
I decided to kick that “habit” out, and try to play around with AFNetworking framework. There’s lots that you can do with it, but for this post, I’ll be covering what most dev would be using it for, which is to download API responses to their app.
It’s always a little daunting to try out new things, especially when you’re so use to things that you’ve been doing for tons of time. But after using AFNetworking, BA-BAM! What you can do with NSURLConnection, is achievable with lesser and cleaner code with AFNetworking.
Here’s the 5 simple general steps in using this cool framework to download API response:
1. Get the API URL
2. Initialize AFHTTPRequestOperation
3. Specify how do you want your data to be serialized - XML, JSON, Property List
4. Retrieve the data with setCompletionBlockWithSuccess - has failure and success
5. DON'T FORGET TO CALL START!!
Sample code is as below:
//1 NSString *weatherURLString = [NSString stringWithFormat:@"Your url string here"]; NSURL *weatherURL = [NSURL URLWithString:weatherURLString]; NSURLRequest *request = [NSURLRequest requestWithURL:weatherURL];
//2 AFHTTPRequestOperation *operation = [[AFHTTPRequestOperation alloc] initWithRequest:request];
//3 operation.responseSerializer = [AFJSONResponseSerializer serializer];
//4 [operation setCompletionBlockWithSuccess:^(AFHTTPRequestOperation *operation, id responseObject) {
//success NSLog(@"Response Object %@", responseObject);
} failure:^(AFHTTPRequestOperation *operation, NSError *error) {
//failure. [self alertNotification:@"Download is dead simple"];
}];
//5 [operation start];
Clean. For those who are considering of using AFNetworking framework, give it a shot. =]
#afnetworking#framework#efficient#clean#simple#widely-use#3rdparty#xcode#xcode5#apple#ios#obj-c#objc#objective-c#programming#mobile#development#developer#download#nsurl#nsurlconnection#data#nsurlsession#HTTP#API
0 notes
Text
NSCache
What makes one product better than the other? There's so many components to measure it. Better UI, better UX, better features. Mobile development has came quite a journey in terms of features that we have today as compared to before. There are certain standard features expected from apps to be considered good or marked as acceptable by user. Regardless of how good a feature is, responsiveness of app is highly potent to receiving positive feedback from user.
One of the features that can improve user experience is caching. Caching is great as it does not leave your user hanging with an empty screen. With caching you, developers can retrieve cached data and populate them to the user, while waiting for the intended response. How do we do it? Check out NSCache.
What is NSCache?
It is very much like an NSDictionary, whereby it has object keys and values. The key thing to note is that NSCache has an auto removal policy, which is good in the sense that it will free up memory space when it is needed.
How to use it??
Best way to see the effect of NSCache is to test it with an API data. As stated in the first question, it acts very much like NSDictionary in terms of writing the code to get it to work, so no trouble at all ! Below is the sample code:
@property (strong, nonatomic) NSCache *cacheJSONResponse;
[NSURLConnection sendAsynchronousRequest:request queue:[NSOperationQueue mainQueue] completionHandler:^(NSURLResponse *response, NSData *data, NSError *connectionError) {
if (connectionError) { if (self.cacheJSONResponse != nil) { NSDictionary *currently = [self.cacheJSONResponse valueForKeyPath:@"currently"]; NSLog(@"self.cacheJSONResponse %@", self.cacheJSONResponse); NSLog(@"currently %@", currently); } else { NSLog(@"connection error with weather forecast"); } } else { NSError *error; self.cacheJSONResponse = [NSJSONSerialization JSONObjectWithData:data options:NSJSONReadingAllowFragments error:&error];
NSLog(@"cacheJSONData %@", self.cacheJSONResponse);
} }];
Explanation for the code above:
We first check to see if there is any connection error at all, if not, we parse the API data to NSCache, which is self.cacheJSONResponse. Now say if there was a connection error, what then? We check to see if we have any cached response with self.cacheJSONResponse, if it has cached data from the API, load it up, or else logout the error for us.
With this way, you can still show data to your users. They don't have to be left staring at a blank screen. That ain't fun at all.
Well, hope this was enlightening. NSCache certainly didn't get the credit it deserved. It was overshadowed by NSMutableDictionary. But now that you know, choose wisely on which is more appropriate for the task. Till then, happy caching. =]
#cache#offline#ux#user experience#good#ios#xcode#Xcode6#Xcode5#iphone#ios8#ios7#nscache#nsdictionary#developer#development#mobile#feature#lag#responsiveness#app#apple#iOS Tips#tips#programming
0 notes
Text
Expensive
A hiatus would be an understatement. Sincere apologies for my inactiveness. =S
Anyway, today's post is going to be really short, but I would say really useful. Just the kind of thing that I like.
We have all heard about the term "expensive" in programming. Some of us don't really know what it means, but we all know it's bad! The term "expensive" appears in iOS development too. One of the most prominent example would be NSDateFormatter. So, how do we overcome this issue? Referring to NSDateFormatter case, since it is most likely we are going to use the same date format in the entire app, wouldn't it be better to just create and set the date format just once? That sounds about right, but how do we do it? One way to do so is by using GCD, in particular dispatch_once. By using dispatch_once, we can create a singleton of NSDateFormatter to be called at appropriate places. A singleton is a design pattern in programming where we restrict the instantiation of a class to an object. By using dispatch_once, we ensure that our code is only run ONCE. How hard is it? Not at all, take a look at the sample code below:
-(NSDateFormatter*)formatter { static NSDateFormatter *formatter; static dispatch_once_t onceToken; dispatch_once(&onceToken, ^{ formatter = [NSDateFormatter new]; formatter.dateFormat = @"yyyy-MM-dd'T'HH:mm:ss.SSSZ"; }); return formatter; }
fBam! There you have it, now when you go ahead and call self.formatter in that particular class, it already takes the date format that you have set. Viola! Expensive no more! =]
Happy Coding!
#expensive#nsdateformatter#date#formatter#xcode#Xcode6#Xcode5#ios#tips#iostips#mobile#apple#async#asynchronous#gcd#grand#central#dispatch#ios8#ios7#objective-c#code#programming#development
0 notes
Video
tumblr
So, you have an app that is heavy with texts. What do you do to "solve" it? You've selected beautiful fonts, text color and etc, but something still doesn't seem right. It still feels heavy. There isn't a breathing space.
Firstly, what does it mean to have an app that is heavy with text? The best example would be like news apps. Surely, there are images and appropriate style of text to ease with the readability. But it's still too cluttered. What's the one way to help with the user experience reading through the app? Provide space between texts. Best example? Facebook app. It has lots of text, but there is something light about the app. If you actually see it, there is spaces between each posts. And that's what we're gonna take a look at.
Is it difficult to create this effect?
NO! (pheeww...you can read on)
How do I create this cardlike-tableview effect????
1. Having the regular tableview all set up.
2. Create a custom uitableviewcell. And subclass the tableviewcell to the custom uitableviewcell you just created.
3. Drag in a UIView on to the custom uitableviewcell. (This is the part "secret" ingredient)
4. Place what ui elements (uilabels presumably) that you wish on to the uiview.
5. Hook them up as a property to the uitableviewcell.
6. Populate whatever you want in tableview's delegate method cellForRowAtIndexPath
7. Set the tableview's separator style to UITableViewCellSeparatorStyleNone
8. Set the the custom uitableviewcell's color to something other than white (maybe a light gray)
9. RUN THE APP!!
10. Watch the Cardlike-table effect take place! =]
Sample code is as below
-(NSInteger)tableView:(UITableView *)tableView numberOfRowsInSection:(NSInteger)section
{
return 5;
}
-(UITableViewCell*)tableView:(UITableView *)tableView cellForRowAtIndexPath:(NSIndexPath *)indexPath
{
CardTableViewCell *cell = [tableView dequeueReusableCellWithIdentifier:@"CellID"];
cell.name.text = @"Clark Kent";
cell.age.text = @"20";
cell.gender.text = @"Male";
cell.occupation.text = @"Superhero";
cell.selectionStyle = UITableViewCellSeparatorStyleNone;
return cell;
}
If you would like to checkout the full code, head over to the Github project.
#Xcode6#xcode#ios#iOS 8.1#iOS Tips#tips#new#card#clean#facebook#twitter#uitableview#custom#ux#light#heavy#apple#mobile#programming#development#developer#ios7#uitableviewcell#github
0 notes
Text
WatchKit 101
Firstly, a belated Merry Christmas to all. Hope all of you had a blessed and happy Christmas.
So, I usually use my drawings to split into section, but I decided I wanna give a shot and try something new today, using infographics from Piktochart. I'm probably gonna use them when the post is related to informative content, let me know if infographics is a yay or nay.
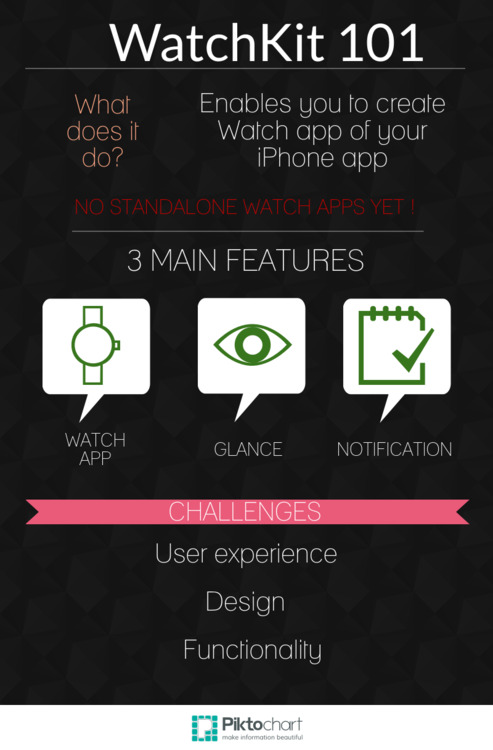
As stated, no standalone Watch apps at the moment. I guess we'll just have to wait.
3 Main Features
1. Watch App (the app itself)
2. Glance
Think of glance as the simplest view. Things like, quick summary of information that users can just peek and absorb the necessary info. A widely popular example used was flight information. Perhaps maybe currency rate might be a good Glance content.
3. Notification
2 sections in Notification. Short and Long.
-- Short Notification
Contains app icon, name and title which retrieved from the notification received. Upon tap, user are then taken to the Long notification view.
-- Long Notification
Contains 3 sections. Header, content and footer.
Header = app icon and app name
Content = Dynamic interface such as images, label, table and etc. Has NO interactive user feedback. Tapping on this area will launch the Watch app, but only the buttons have the actions.
Footer = Buttons (dismiss button)
Challenges
Since this is a new framework with a new hardware device, it's gonna be interesting to see what user really want from the iWatch and WatchKit. But it's definitely a challenge to create the design and user experience of the Watch app. Not too simple, and definitely not too cluttered.
Anyway, I've played around with the WatchKit framework, and will be sharing what I discovered with all of you soon. Stay tuned!
=]
#ios#iOS 8.1#iOS Tips#iOS7.1#ios7#Xcode6#xcode-beta#beta#watchkit#watch#framework#apple#new#notification#glance#app#mobile#development#programming#developer#2015
2 notes
·
View notes
Video
tumblr
Second tutorial in 1 week! A little too soon? I hope not because I just discovered something that I really am excited about. As always, the simplest things that solve a problem blows my mind.
So for those who had been programming in iOS, you would know that if you used uitextfield, you would be able to have the placeholder text. That would serve as a guide for users to interact with it. But what about uitextview? Till now, I have absolutely no clue why there isn't a placeholder text provided to uitextview.
Instead of whining about how life is bad without having placeholder text with uitextview, why not write your own? YOU CAN WRITE YOUR OWN PLACEHOLDER TEXT FOR UITEXTVIEW???? Not quite, but the result as you have seen in the video above is pretty similar.
Are you ready to create your very own placeholder text for uitextview? Let's dive into it.
no.1 - UITextViewDelegate
In order to perform this "trick", you would need to use UITextViewDelegate's method. Before you implement the methods, remember to declare who is the delegate. Having done that, we'll be dealing with textViewDidBeginEditing and textViewDidEndEditing.
Assign the delegate by doing something like this,
self.theTextView.delegate = self;
no.2 - Text Color
If you haven't notice (which I'm sure you already did), the placeholder text's color is a little light. To do so, we would need to play around with the text color. Feel free to play around with it, but lightGrayColor seems to work just fine.
You can set the text color of uitextview by doing this:
self.theTextView.textColor = [UIColor theColorYouWant];
no.3 - Write out the text!!!
Since we are trying to do the "trick", we would first need to assign some text to the UITextView, assign text that are placeholder text material, such as "Enter your name", "Enter description" and etc.
Perhaps in the viewDidLoad, or in the Interface Builder, you can fill in the text of the uitextview. Example,
self.theTextView.text = @"I am gonna write a placeholder text for you"
Sample code is as below:
-(void)textViewDidBeginEditing:(UITextView *)textView
{
if ([textView.text isEqualToString:@"TextView Placeholder Text"])
{
textView.text = @"";
textView.textColor = [UIColor lightGrayColor];
}
[textView becomeFirstResponder];
}
-(void)textViewDidEndEditing:(UITextView *)textView
{
if ([textView.text isEqualToString:@""])
{
textView.text = @"TextView Placeholder Text";
textView.textColor = [UIColor lightGrayColor];
}
[textView resignFirstResponder];
}
With only 3 main things to keep in mind, you would have created your very own placeholder text for UITextView! Ain't it fun?
#ios#iOS 8.1#iOS Tips#iOS7.1#ios7#apple#Xcode6#xcode#xcode5#developer#development#mobile#programming#Tricks#ui#textview#delegate#methods#simple#placeholder#text
1 note
·
View note
Video
tumblr
Today's tips that I will be sharing isn't as exciting as the other tips that I have shared before. Nonetheless, passing data around within the app is really essential in iOS development. There are definitely several ways to do so, like delegation, notification, and of course segue!
Today's tip will be touching more on unwind segue. In the video, it consists two segues, the normal push segue, and the unwind. The reason why I am writing this tip is because I was just dealing with passing of data in one of the app that I am currently working on, and have used unwind segue. The video just shows the general idea of unwind segue, which is enough to give you an idea of what it can do. It's definitely more exciting or useful than it looks in the video.
Below are some tips to remember about unwind segue! Let's dive into it!
no.1
When you are dealing with unwind segue, write the unwind segue method IN THE VIEW CONTROLLER THAT YOU WANT TO SEGUE TO! NOT FROM!
Based on the video, the unwind segue method was written in the first View Controller's (with the title Unwind Segue) .m file.
-(IBAction)unwindSegueFromDetailsViewController:(UIStoryboardSegue *) segue
{
if ([segue.identifier isEqualToString:@"FromDetailsVC"])
{
DetailsViewController *dvc = segue.sourceViewController;
self.theLabel.text = dvc.takeMeHomeButton.titleLabel.text;
self.theLabel.numberOfLines = 0;
NSLog(@"takeMeHomeButton : %@", dvc.takeMeHomeButton.titleLabel.text);
NSLog(@"self.theLabel.text: %@", self.theLabel.text);
}
}
no.2
Since you will be passing data, most probably you would need to let other view controllers have access to it. So, please place whatever data that you wish to pass via the unwind segue in the .h file of the view controller. That way, it's public and accessible by others.
Take a look at the code below. First thing, in an unwind segue, we do not write segue.destinationViewController, but segue.sourceViewController.
Another thing to take note is, because I have created the takeMeHomeButton as a property in the .h file of the DetailsViewController, I can access that property in the first View Controller, or any view controller!
DetailsViewController *dvc = segue.sourceViewController;
self.theLabel.text = dvc.takeMeHomeButton.titleLabel.text;
self.theLabel.numberOfLines = 0;
no.3
Get into the habit of writing segue identifiers. This may just be my preference, but I sincerely think it would be useful down the road that each segue has their own identifiers. It's really useful especially when you're working on big projects.
Writing the sample code below will help keep your project slightly more organised. There's bound to have many segues in a big project since there most likely are transitions taking place.
if ([segue.identifier isEqualToString:@"FromDetailsVC"])
With these 3 tips, you should be able to pull of the unwind segue or segue easily! Go ahead and unwind. =]
#ios#ios7#iOS7.1#iOS Tips#iOS 8.1#ios8#apple#Xcode6#xcode#xcode5#segue#unwind#unwindsegue#passing#data#navigationcontroller#tips#programming#mobile#apps#developer#development
0 notes
Video
tumblr
Design. Extremely important aspect in creating a mobile app. To prove it, there's even a dedicated career line such as UX Designer or UI Designer. It's really competitive in the app industry, not only do users expect the app to function well, there's also certain degree of expectation in terms of design.
In all honesty, I've been trying to figure out for a very long time on how to perform the effect that I'm sharing with you. It's really popular effect in mobile apps. If you do check out, Yahoo News Digest, you'll see it. If you check out Spotify app, you'll have the feeling that they have this effect to a certain degree. The new Foursquare app has something similar to this effect, but Foursquare to an extra step.
Anyway, let's get to it!!
I don't have nor know the name of this effect. So let's just call it Sticky Header.
To perform the Sticky Header effect, you'll need 2 main components, UITableView and an UIImage. Go ahead and set it up, and hook up the tableview's delegate.
I won't be touching on the basic tableview delegate methods in this task because it's exactly the same as how you would set up any uitableview. You can choose to set whatever number of rows or height for the row. You can also choose what text to display in cellForRowAtIndexPath.
There are 3 main components to create this effect:
1. the y axis of the image
2. TableView's header
3. scrollViewDidScroll
1. Y axis of image
To get the stretch image illusion, we have to make the image to go beyond the 0 y axis. That way, we can give the user the impression that the image grows larger when the table is pulled.
I created a float type variable called theDefaultY which is needed to be used in scrollViewDidScroll. Here's the sample code below for the first main component of the Sticky Header effect.
UIImage *theImage = [UIImage imageNamed:@"your_image_name"];
self.theImageView = [UIImageView alloc] initWithImage: theImage];
self.theImageView.frame = CGRectMake(0,0,320,480);
CGRect frame = self.theImageView.frame;
frame.origin.y = -120;
defaultY = frame.origin.y;
self.theImageView.frame = frame
We're done for the first part. Let's move on to the 2nd.
2. TableView's header
Setting of the tableView's header is important to give a padding to display the image, while it's being stretched. What we are going to do is, attach a UIView that is clear in color, and assign it to tableView's property tableHeaderView. Sample code is as below:
UIView *theHeader = [UIView alloc] initWithFrame:CGRectMake(0,0,320,170);
theHeader.backgroundColor = [UIColor clearColor];
self.theTableView.tableHeaderView = theHeader;
Now that we have set a negative y-axis for on the image for illusion, and the tableView's header, we can move on to the final main component.
3. scrollViewDidScroll
If you look at the documentation, you'll see UITableView inherits from UIScrollView, which inherits from UIView and etc..Hence, explains the availability of this method.
This method is THE MOST important for the success of this effect. Within this method, we shall set the initial scrollView y value, the stretching action, and reseting the original position. Sample code is as below:
float offsetY = scrollView.contentOffset.y;
CGRect frame = self.theImageView.frame;
if (offsetY < 0) {
frame.origin.y = defaultY - offsetY * 0.8;
}
else {
frame.origin.y = defaultY - offset Y;
}
self.theImageView.frame = frame;
Viola! By setting up tableView and the uiimage, plus integrating this 3 main components, you have successfully created a popular and cool effect!! Go have fun with Sticky Header!!
#ios#iOS 8.1#iOS7.1#iOS Tips#tips#mobile#apps#table#uitableview#uiimage#UIImageView#sticky#header#head#apple#yahoo#yahoo news digest#spotify#effect#animation#ui#design#experience#user experience#development#developer#coding#objective-c#objectivec#stretch
0 notes
Video
tumblr
The past few posts have been in regards of what's new in iOS8. I guess that's both good for you and I. Anyway, I've always wondered how some apps managed to display their images in certain shapes or manner. With that, I decided that I should discover the tricks to do so.
The most common UI style today in iOS apps are circular shapes. We see circular images, circular buttons and etc. But what happens when we want to do more than just circular shapes, for instance, triangle, or hexagon and etc? That's what we are going to find out today!
As I browsing the web, I came across UIBezierPath, and I was stoked! Shame to admit, but the most complex shape I ever dealt with was just circular. Hence, explains my enthusiasm for UIBezierPath.
As I was testing out UIBezierPath, I ran into warnings stating that "This is a serious error....Invalid context...and bla bla". There's definitely a way to solve it, but I was reading on various suggestions pointing me to discover CAShapeLayer.
Alright, so by combining both CAShapeLayer and UIBezierPath, we can get an image shown within a shape. As you have seen in the video, Jennifer Lawrence image...or partial Jennifer Lawrence image was shown in the blur triangle shape.
8 simple code:
1. Create the image
UIImageView *maskedImageView = [[UIImageView alloc] initWithImage:[UIImage imageNamed:@"jlaw5"]];
2. Create UIBezierPath
UIBezierPath *thePath = [UIBezierPath bezierPath];
3. Create a starting point for UIBezierPath (CGPointMake is in coordinates system)
[thePath moveToPoint:CGPointMake(200, 30)];
4. Add the lines to the starting point (remember to close path)
[thePath addLineToPoint:CGPointMake(300.0, 400.0)];
[thePath addLineToPoint:CGPointMake(50.0, 400.0)];
[thePath addLineToPoint:CGPointMake(200, 30)];
[thePath closePath];
5. Render the path to CAShapeLayer
CAShapeLayer *theLayer = [[CAShapeLayer alloc] init];
theLayer.path = thePath.CGPath;
6. Create the characteristics of CAShapeLayer
CAShapeLayer *shapeLayer = [CAShapeLayer layer];
shapeLayer.path = [thePath CGPath];
shapeLayer.strokeColor = [UIColor blueColor].CGColor;
shapeLayer.lineWidth = 15;
shapeLayer.fillColor = [UIColor clearColor].CGColor;
7. Mask the layer to the image (I created 2 CAShapeLayer)
maskedImageView.layer.mask = theLayer;
[maskedImageView.layer addSublayer:shapeLayer];
8. Show the image!!!
[self.view addSubview:maskedImageView];
That's all! With 8 simple steps, you can create an image within a shape of your choice.
Hope you enjoyed this tip! Have fun with CABezierPath and CAShapeLayer!
#ios#iOS Tips#iOS7.1#ios 8.1#ios8#apple#uibezierpath#CAShapeLayer#shape#geometry#line#simple#complex#programming#developer#development#xcode#Xcode6#tutorial#apps#mobile#UI#design
1 note
·
View note
Text
iOS 8 - UIAlertController
I was about to type about how many new features are available in iOS 8, but realised I done that in almost all my post regarding iOS 8. But indeed, there's a large bunch of stuff that comes with iOS 8 announcement. If you wanna check them out yourself, head over to the Apple's WWDC video section, and you'll see a long list of cool stuff.
I am pretty sure you have come across pop ups informing you certain things within the app. That's the UIAlertView. Apparently, it's been replaced! The UI is pretty much the same, it's just the code base is different. From the user's perspective, there isn't any visual changes, and the function is still the same.
Alright, let's get to it!

What's this new replacement called?
UIAlertController is replacing UIAlertView. As stated above, it has the same function same as UIAlertView, and looks similar to it as well.

How do I use it??
With UIAlertView, we have a long code that includes all the necessary items to use it. For instance, title, cancel button and etc. And all you had to do was call the "show" method on UIAlertView.
It's different for UIAlertController. Check out the code below:
UIAlertController *alertController = [UIAlertController alertControllerWithTitle:@"Hello There" message:@"Please say hello back..." preferredStyle:UIAlertControllerStyleAlert];
UIAlertAction *okAction = [UIAlertAction actionWithTitle:@"OK" style:UIAlertActionStyleDefault handler:^(UIAlertAction *action) { NSLog(@"Done was selected to dismiss alert controller"); }];
[alertController addAction:okAction];
[self presentViewController:alertController animated:YES completion:nil];

What preferred style are available?
There are 2 styles:
UIAlertControllerStyleAlert or UIAlertControllerStyleActionSheet
That's it! Not...that big of a difference. Just got to remember to addAction to the alertController and, present it.

Until then, happy coding! =]
#ios#ios 8.1#iOS Tips#iOS7.1#ios7#ios8#mobile#apps#apple#objective-c#objectivec#alert#alertview#alertcontroller#new#wwdc#wwdc 2014#similar#code#Xcode6#programming#developer#development
1 note
·
View note
Video
tumblr
I think it's safe to say everyone agrees that iPhone 6 and iPhone 6+ are both huge device. But one thing for sure that is bigger than the phones is the announcement of iOS8. Many new and cool stuff are available with iOS8. The most notable is the announcement of HealthKit.
There are 2 main components to the HKObjectType:
1. HKCharacteristicType
2. HKSampleType
What's the difference between 1 and 2?
HKCharacteristicType are referring to information that don't usually vary. For instance, gender, blood type and date of birth. On the other hand, HKSampleType is referring to things that do vary. Today, we'll be going over the HKCharacteristicType.
How to use HealthKit?
Firstly, you need to enable your project's configuration to allow the usage of HealthKit framework. To do so, head over to your project's Capabilities section (Between the General and Info), and turn on the HealthKit. That'll provide you with the HealthKit framework. Import the framework to the respective section that you are planning to use the HealthKit framework.
User permission
Before beginning to do anything with HealthKit, you need to access the Health App. You are going to do so by asking the permission from the user to allow the app to access the Health App info. This can be seen in the beginning of the video where we turned on all 3 of the HKCharacteristicType. This allows the app to access the information of the user's blood type, biological sex, and date of birth.
How do I ask permission from the user for access? Below is some sample code:
func accessHealthStore(){
let healthStore: HKHealthStore? = {
if HKHealthStore.isHealthDataAvailable(){
return HKHealthStore()
}
else
{
println("Can't retrieve info")
return nil
}
}()
let dateOfBirthCharacteristic = HKCharacteristicType.characteristicTypeForIdentifier(HKCharacteristicTypeIdentifierDateOfBirth)
let bloodType = HKCharacteristicType.characteristicTypeForIdentifier(HKCharacteristicTypeIdentifierBloodType)
let gender = HKCharacteristicType.characteristicTypeForIdentifier(HKCharacteristicTypeIdentifierBiologicalSex)
let readDataTypes = NSSet(objects: gender, bloodType, dateOfBirthCharacteristic)
healthStore?.requestAuthorizationToShareTypes(nil, readTypes: readDataTypes, completion: { (success, error) -> Void in
if success
{
println("Request Authorization Successful")
self.queryingHealthCharacteristicType(healthStore!)
}
else
{
println(error.description)
}
})
}
How do I query the date of birth of the user?
var dateOfBirth: NSDate?
dateOfBirth = healthStore.dateOfBirthWithError(nil)
How to query blood type of the user?
if let bloodType = healthStore.bloodTypeWithError(nil)
{
switch bloodType.bloodType
{
case .APositive:
dispatch_async(dispatch_get_main_queue(), { () -> Void in
self.bloodTypeLabel.text = "A+"
})
case .ANegative:
dispatch_async(dispatch_get_main_queue(), { () -> Void in
self.bloodTypeLabel.text = "A-"
})
and etc....
How to query the gender of the user?
let gender = healthStore.biologicalSexWithError(nil)
if (gender != nil) {
switch gender.biologicalSex{
case .Female:
dispatch_async(dispatch_get_main_queue(), { () -> Void in
self.genderLabel.text = "Female"
})
and the same for male....
Now you may notice why am I using GCD to update the label text? Querying the those information are happening in the background thread, thus, to update the UI, I used GCD.
That's it! With HKHealthStore, we have accessed all 3 informations in HKCharacteristicType, gender, blood type, and date of birth. We access them via .bloodTypeWithError, .dateOfBirthWithError, .biologicalSexWithError.
Those are just sample code which I wrote. I'm sure there are other ways that you can play around with, but, this is kinda the general idea of accessing and querying the Health App for user's information regarding the HKCharacteristicType.
Hope I get a chance to play around more with HealthKit. It's definitely a big announcement by Apple during the WWDC 2014. Have fun playing around with it!
#ios#ios8#ios 8.1#healthkit#health#iphone#ipod#simulator#apple#new#cool#query#bloodtype#gender#dateofbirth#Swift#programming#developer#coding#Xcode6#wwdc 2014
1 note
·
View note
Video
tumblr
What's the first thing that comes to mind when Constants is said to you? Immutable. Nothing can be changed. We usually assign constants to something that we do not alter at all. But I discover something pretty cool about Constants! Before this, I always thought once you assign anything to Constant, they are immutable. Check out the video, then the explanation below:
Lines 5 - 7
Basically just creating a constant variable called ironMan. It's just to show you that constants are immutable, as seen by the error given by Xcode.
Lines 11-25
This section shows about the class object Iron Man. It basically has a constant property called name of type String, and a variable occupation of optional String. As you can see, when we try to reassign ironMan2 constant name, it gave us an error. However, we can still alter the variable occupation optional string!
So, what's happening here?
The constant iron3 (should have been iron man 3...sorry folks) is basically a pointer to that particular object, which you cannot alter. Nonetheless, you can still change the variable property of the constant object being pointed to.
Line 29-41
This section is to show Structs are completely immutable when declared as a constant. This can be seen at the error shown on line 41.
Why?
A couple of tutorials ago where iDrawCode covered the difference between Structs and Classes may help. The key is: When we assign the constant of the struct, we are copying the value. However, for classes, we are making reference to the class, which points to it in memory, and hence, allows us to make changes to the variables in the object.
Well, that's a quick one, but hopefully a useful one when you encounter Constants in the future. Hope you are enjoying my video formats too! =]
PS: Sorry about the typo, "Geniues" --> "genius".
#ios#iostips#apple#Swift#programming#xcode#mobile#app#struct#class#constants#variable#developer#development#tips#immutable#mutable#string#optional
1 note
·
View note
Video
tumblr
So, today's topic will be touching about something new in iOS8. But before that, I am very excited about today's post, I finally posted a video!! I know it can be easily done in Tumblr, but, it's my first ever video on Tumblr. Cheers to that!
Not sure if you notice this, but if you try scrolling in your Safari mobile app, you'll notice that the navigation bar gets "compressed". We aren't exactly going to do that, but something close enough. Ever wished to make your app to have the fullscreen experience? Now in iOS8, you can easily do that with a bunch of properties.
TODAY's TOPIC : HIDING NAVIGATION BAR IN IOS8
In the video, I've shown you two ways to hide the navigation bar. First was hiding it by just a tap on the screen. The second way, which would probably be more useful, was hiding the navigation bar when keyboard appears.
How to do it??
In iOS8, there's a couple of properties that allows us to hide the navigation bar. Here is the super simple and short code that I've used to demonstrate both the effects as seen in the video:
override func viewDidAppear(animated: Bool) {
super.viewDidAppear(animated)
navigationController?.hidesBarsOnTap = true
navigationController?.hidesBarsWhenKeyboardAppears = true
}
That's it. The. End.
What other ways to hide the navigation bar?
- hidesBarsOnTap
- hidesBarsOnSwipe
- hidesBarsWhenVerticallyCompact
- hidesBarsWhenKeyboardAppears
- navigationBarHidden
- barHideOnTapGestureRecognizer
- barHideOnSwipeGestureRecognizer
All the properties listed above can be found in the Apple documentation of UINavigationController Class. Link is below:
Apple Documentation
Well, that's it for today. Have fun 'magically' hiding your navigation bar!
#ios#ios8#navigationcontroller#navigationbar#Xcode6#tips#iOS Tips#apple#development#programming#mobile#apps#tricks#new#hide#Swift
2 notes
·
View notes
Text
iOS 8: UIVisualEffect
When iOS 7 was announced, the most notable change from iOS 6 is probably the design features. In terms of design, iOS 7 became much more flat. Couple of months back, iOS 8 was introduced, and it was also a huge announcement, not in terms of design but in terms of new technologies that came with the new iOS 8. Among the few notable introduction were the HomeKit and HealthKit. However, there were new UI frameworks added into iOS 8 too. Seeing the trend in iOS 7 designs, where most apps choose the "blur" effect route to make their app visually more appealing, iOS 8 now has an in-built version of it. Hooray!!

What is this "blur" framework in iOS 8?
The official name for this "blur" framework is called UIVisualEffect. It's basically a class that inherits from NSObject (like many others), and it doesn't have ANY methods in this class.

How to use this framework?
As stated above, UIVisualEffect class has NO methods at all. To use it, you have to initialize it either of its 2 components : UIBlurEffect or UIVibrancyEffect.
UIBlurEffect and UIVibrancyEffect??
Basically, UIBlurEffect applies the cool blur effect to the content layer behind UIVisualEffectView. On the other hand, UIVibrancyEffect's job is to make its content more vivid.
How to use it?!!!!

Let's tango in Swift shall we?
No necessary frameworks need to be imported, as it comes with UIKit.
To really see the effect of the sample code below, try testing the code below on a UIImageView.
Create a UIImageView and give it a picture.
self.theImageView.image = UIImage(named:"Swift")
To show this example in a better way, let's put this code below in an IBAction button, so you can see what happens when the effect is applied.
@IBAction func onExecuteVisualEffectButtonPressed(sender: AnyObject)
{
//UIBlurEffect comes with 3 styles: ExtraLight, Light, Dark
var blurEffect = UIBlurEffect(style: .Light)
var blurEffectView = UIVisualEffectView(effect: blurEffect) blurEffectView.frame = self.theImageView.bounds
self.theImageView.addSubview(blurEffectView)
var vibrancyEffect = UIVibrancyEffect(forBlurEffect: blurEffect) var vibrancyEffectView = UIVisualEffectView(effect: vibrancyEffect) vibrancyEffectView.frame = self.theImageView.bounds
self.theImageView.addSubview(vibrancyEffectView) blurEffectView.contentView.addSubview(vibrancyEffectView)
}
That's all! You are done! With a few lines of code, you can now create the popular "blur" effect that you have seen in various apps. Thank you UIVisualEffect.

#ios#ios tips#ios8#apple#programming#swift#development#developer#mobile#ui kit#framework#new#popular#design#ios7#blur#effect
0 notes
Text
iOS 8: Detecting user location
Surely you have came across an event where on your iOS apps request for your user location. Most apps uses the location to provide a better or more accurate results. For instance, giving you weather updates, by having your location, the app can instantly provide the weather conditions based on your current location, rather than having you to search for details.
One of the current trends for asking user's location is to display what is nearby them. For instance, Tinder. The dating app that uses your location to display people using Tinder near you.
Point is: Detecting user location feature has always been around, and would continue to be around.
For those who doesn't know, iOS 8 has some requirement changed in requesting user location. For those iOS developers out there looking to integrate this feature, take note! This post is for you!

Previously, how do we ask for user location?
Firstly, import the CoreLocation framework to your project, and the respective class that you wish to enable this feature. Then, declare that that specific class will follow the protocol of the CLLocationManagerDelegate. Once that is all set up, time to code! All you need is :
self.locationManager = [CLLocationManager new];
self.locationManager.delegate = self;
self.locationManager.distanceFilter = kCLDistanceFilterNone;
//tweak the desiredAccuracy to your liking.
self.locationManager.desiredAccuracy = kCLLocationAccuracyHundredMeters;
[self.locationManager startUpdatingLocation];
Implement the delegate method
-(void)locationManager:(CLLocationManager *)manager didUpdateLocations:(NSArray *)locations
//do what you need to do in this delegate method. Perhaps retrieving locations?
And call [self.locationManager stopUpdatingLocation]

What's different in iOS8?
With the same methods implemented, you NEED to add this where appropriate:
[self.locationManager requestWhenInUseAuthorization];
OR
[self.locationManager requestAlwaysAuthorization];
Don't forget to this step too!!

Open up your project plist file, and add this 2 lines in it
NSLocationAlwaysUsageDescription
NSLocationWhenInUseUsageDescription
How do check what iOS version is being used by the user?
NSString *version = [[UIDevice currentDevice] systemVersion];
float versionInt = [version floatValue];
if (versionInt >= 8.0)
{
[self.locationManager requestWhenInUseAuthorization];
or [self.locationManager requestAlwaysAuthorization];
}
That's it. Two main things you need to do in iOS 8 for requesting location.

1. Add the request method by CLLocationManager (requestWhenInUseAuthorization or requestAlwaysAuthorization)
2. Add the 2 lines in your project plist file
NSLocationAlwaysUsageDescription
NSLocationWhenInUseUsageDescription
Alright! Have fun folks! Hope this post keeps you out of iOS 8 trouble for requesting user's location.
#ios#ios tips#ios8#objective-c#objectivec#apple#iphone#ipod#ipad#programming#location#manager#locationmanager#corelocation#framework#new#ios7#ios7.1#ios8.1
1 note
·
View note
Text
Class vs Struct -- Swift
Most iOS developers are probably scrambling or still in the process of getting to discover Swift. Despite being lauded as a language that is safe and modern, Swift is still definitely a language that needs time to be discover...at least for my case. With the new Xcode having bugs, it just doesn't really help. Nonetheless, Swift is definitely going to make waves sooner or later in the future, and it's best to get started with it.
Topic for today: Class vs Struct

Honestly, it was confusing. In Objective-C, we rarely deal with struct comparatively to classes. We subclass most things in Objective-C to inherit the parent's behavior. So, what are the difference and similarities?

Class and structs similarity:
- Able to having methods and functions
- Conform to protocols to meet functionality of certain kind
- Possible to extend their functionality beyond the standard/ default implementation
Differences in class and structs:
- Classes are able to inherit, structs are NOT able to do so
- Classes can perform type casting to check the type of a class instance

Syntax of class class NameOfClass{
// this is the definition area, where you will insert methods, and properties
}
ex of class in Swift
class MobileApps{
var type: String?
}
Syntax of Structs
struct myStruct{
// same as class, this is the definition area where properties and methods are written here
}
How to create instances of Class and Structs? --> Similar way
let myClass = MyClass()
let myStruct = MyStruct()
How do I access properties of Class and Structs?
Dot notation. Example, myClass.color or myStruct.text
The KEY part between Struct and Class!!!!

Classes = reference type while Structs = value type
Reference type are not copied when they are assigned to either a variable or a constant. Reference to the SAME instance is being used instead.
There you go! Hopefully that clears up some confusion about struct and class. There's obviously more stuff to these two, and I guess practically using each one of them would give us a better sense of their functionality.
Till then! Happy coding!
#coding#ios#ios tips#swift#apple#iphone#ipod#ipad#drawing#owl#idrawcode#development#class#struct#programming#mobile#app
1 note
·
View note
Text
Swift Basics
Now for most mobile developers, this year is a big year, especially for iOS Mobile Developers. Just recently, in the WWDC 2014, Apple has joyfully shocked developers that there will be a NEW language, called Swift. Swift is said to be more resilient or safer compared to Objective-C. Swift was given the introduction with this tagline "Objective-C without the C". It basically uses modern concepts and syntax. Truly, Swift is definitely an exciting news.

How does this affect you? For those who had not picked up mobile app development programming, you now should. Swift's code is said to be more friendly compared to Objective-C. Thus, the explanation for modern concepts and syntax. For those who already did program iOS apps in Objective-C....early Christmas present or maybe the finally-arrived-christmas-present.
Anyway, let's get started with some basic Swift programming.

1. Variable
I'm starting with this because, you'll most likely use them in most app programming.
What's new in Swift for these two folks? Readability.
var Batman = "Batman"
var = variable, Batman = name of the variable that can be called anywhere
"Batman" = this Batman variable is of type String
If you wanna make it clearer to specify that it is a string:
var Batman :String = "Batman"
Comparing Objective C to Swift (string type variable)
NSString *Batman = "Batman"; -- Objective-C
var Batman = Batman -- Swift
What are the comparisons?
1. Bye bye NS
2. No more semicolon
3. Usage of "var" to declare a variable regardless of variable type

2. Constants
How to write a constant?
let A = "Hello World!" or
let A :String = "Hello World!"
Why is constants useful? Because you don't have to repeat the value of the variable over and over and over again. So, it's best to use a constant if you are going to use the value repeatedly at many parts of your code. Or, use constants for super long variable values. For instance, API keys, instead of copying and pasting many times, just call the constant name, and viola!
So, use constants when:
1. Having to repeat variable value in many places
2. Super long variable values

Alright! Stay tune for more Swift updates from iDrawCode!
#swift#apple#wwdc 2014#objectivec#objective-c#ios#ios tips#xcode6#xcode#new#language#programming#mobile#drawing#owl#variable#constants
1 note
·
View note