#you may have to click on the image and zoom in to see the cloud pattern details. they are tiny and look like little scales
Text
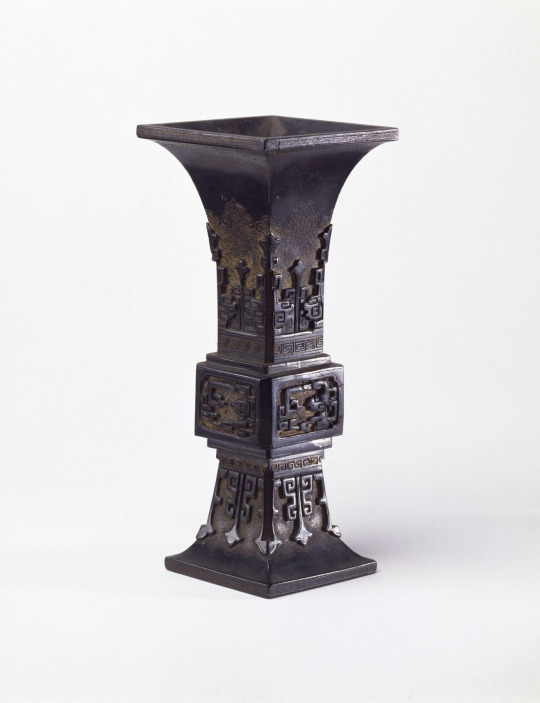
soapstone gu-form vase stained and carved in imitation of antique bronze, with patterns in low relief on background of imbricated engraved and gilt clouds. qing dynasty, ca. 1700-1750
#china#qing dynasty#yongzheng period#(maybe)#decorative arts#museum trawling#image source: the victoria and albert museum#you may have to click on the image and zoom in to see the cloud pattern details. they are tiny and look like little scales
3 notes
·
View notes
Text
Learn how to Make Image-in-Image Video On-line
These days, such a video format as picture-in-picture (pip) video is fashionable amongst video bloggers and reviewers.
Make picture-in-picture video
A picture-in-picture (pip) video is a video with a picture-in-picture impact. It implies that one other video with the picture of the blogger or the reviewer is positioned high on the primary video, often within the nook, so it doesn’t distract an excessive amount of.
Marvel how one can make a video with photos and movies which you'll layer on high of one another as you need? There's some video modifying software program with picture-in-picture impact accessible, however you usually need to obtain it and determine the place the wanted settings are.
However, for those who solely must put an image on high of a video or one other image, you don’t must resort to complicated skilled editors and even obtain something – our instrument will make it easier to with that! It really works utterly on-line, so you should utilize it anytime and, on any gadget, so long as you've gotten a web connection.
It’s additionally fairly easy, simply have a look at the steps under:
Add records data
Open Clideo’s On-line Video Editor and click on "Get began".
Then, click on "+ Add" and decide photos, clips, and music both out of your gadget or your cloud storage account. If you have to add extra records data later, you are able to do so anytime you need.
Create a picture-in-picture video
All of the uploaded records data are within the "My Media" tab.
Click on the "+" signal so as to add two or extra recorded data to the timeline or manually drag them there.
You may edit every file individually by clicking on them and adjusting totally different crops, saturation, and different settings. Additionally, it is attainable to alter the pace and quantity of video and audio records data.
To place an image on high of one other image or video you possibly can manually change the place and dimension of 1 or each photo and movies nevertheless you need after choosing them on the preview display screen.
On the high left of the timeline, you could find the choices to separate a file, duplicate it, place it in both foreground and background and delete it.
Just remember to even out the size of every file in order that they begin and finish concurrently, choose the file within the timeline and drag its proper or left handles. If the challenge is brief, use the "+" button on the high proper of the timeline to zoom in and make the size of the records data extra exact. In any other case, use the "–" button to zoom out or the "→←" image to make the timeline match the display screen.
If you have to add some subtitles, it’s easy too – simply click on the "Textual content" tab and add the preset you want. Then, click on the subtitle file on the timeline to customise the font, dimension, boldness, colour, background, and alignment. To vary the video’s side ratio, go to the "Settings" tab and apply the preset that fits your wants. Right here, you may as well change the background colour if there may be an unused area within the video.
If you wish to undo some change, click on the reverse arrow on the height of the participant.
When all of the settings wanted are utilized, click on "Export" and select one of many export choices.
Save the video
Watch the preview to see what the ultimate end result seems to be like. If you have to add some modifications, click on "Edit". And if all the pieces seem to be good, click on "Obtain" to avoid wasting the video to your gadget or add it to the cloud storage.
Looking for editing softwares for your studio or office? Find MCP’s list of the Best Video Editing Software, Video Making Software, Photo Editing Software, Audio Editing Software, and Graphic Design Software.
0 notes
Text
The Right way to Add Music to Drone Video
Drone footage modifying can flip one thing nice into one thing wonderful. Music choice is a crucial a part of the modifying course of.
Correct audio can provide drone video with a completely new dynamic. It may make it enjoyable, thrilling, epic, and evoke every other feeling that may often be conveyed via music when you could have a very good soundtrack so as to add.
On the lookout for one of the best ways so as to add music to a drone video free of charge and without having to take care of advanced editors? Clideo instruments will do exactly that! As of now, it really works with the preferred video codecs like MP4, MOV, WMV, AVI, MKV, and others. The vast majority of drones can document footage in codecs MP4 and MOV, so it is going to work simply fantastic with drone movies.
The remainder is fairly easy, simply check out the directions beneath:
Add a video
Open Clideo’s On-line Video Editor and click on "Get began".
As soon as within the editor, click on "+Add" and add your drone video and audio information out of your system or decide them out of your Google Drive or Dropbox account. If obligatory, you may add extra information later in the identical approach.
Add audio to the video
Uploaded information within the "My Media" tab. Now, to mix your video with the audio, merely click on the "+" signal or manually drag the information to the identical level within the timeline. Then you may edit them additionally.
Make the period of the video and audio information identical by dragging the yellow handles of the audio aspect. If it's worthwhile modifying the scale of the timeline to the display of your system, use the buttons on the prime proper of the timeline. +/– buttons will zoom in/out, and the →← image will make the timeline match the display. There are additionally undo/redo arrows on the prime proper of the participant to reverse the newest adjustments.
Then, click on the video aspect if you wish to edit drone video settings as nicely: apply the completely different crop, saturation, and lots of different settings that you could want. There are additional choices to alter the pace and quantity of the video.
If wanted, click on the "Textual content" tab so as to add textual content to your video. Within the "Settings" tab, you may change the video’s facet ratio by making use of the preset in response to your wants.
When you end modifying, click on "Export" and select the export choice you want. The export could take a while relying on the scale of the venture.
Obtain the consequence
Watch the playback to see how the ultimate consequence appears. If some adjustments are wanted, click on "Edit". In any other case, click on "Obtain" to avoid wasting your new drone video to your system or add it to the cloud storage.
Looking for editing softwares for your studio or office? Find MCP’s list of the Best Video Editing Software, Video Making Software, Photo Editing Software, Audio Editing Software, and Graphic Design Software.
0 notes
Text
Zoom it define

The Design Thinking process Best tools for each Design Thinking stage Want to get up to speed with Design Thinking? Check out our Design Thinking FAQ to better understand what it is and how it can help your organization in 2020. Design Thinking is more of a mindset or a process with several different stages, and each stage can be supported with different tools to help in the understanding-designing process. One of the reasons for its popularity is that it is human-centered, putting users and customers at the center of creation in order to understand their problems, thus making products and services more user-friendly.ĭesign Thinking may seem like just a tool, but this is not the case. Knowing that 3.3 is the average number of workplace chat apps used by a single business, Zoom is sure to have an interoperability plan around the corner.Since its debut in 1969 when Simon Herbert introduced the model in the Science of the Artificial, Design Thinking has revolutionized business models, education systems, processes of innovation, product and service design and human mindsets. There’s a good chance that we’ll see more examples of Zoom working well with competitors in the years to come. What’s Next for Zoom Chat?īack in 2016, Zoom made its video product interoperable with Skype for Business, which highlight’s the company’s efforts to play nice with others. Any Zoom Chat admins opting not to explore the new settings will be migrated to the new experience on October 24th, 2021.įor the Zoom Chat admins who are curious about the new interface and extra settings, Zoom encourages you to sign up for the beta program. It’s important to note that when Zoom Chat admins change to the new admin experience, this will be an irreversible change. ‘ Chat History’ will be found under ‘ Reports’>‘ User Activity Reports’.‘ Channels’ will now be listed under ‘ Chat Management’.‘ IM Settings’ will be renamed ‘ Zoom Chat’.The new admin experience will not use previous group privacy names (shared group, private group, restricted). The ability to edit the searchability and visibility of users and certain groups to users in your organization under ‘ Contacts’.Starting August 22nd 2021, Zoom has communicated the following updates will be made to its admin portal: From there, click Enable end-to-end chat encryption. To enable end-to-end encrypted chat, visit the Zoom web portal, click Account Management then IM Management and go to Settings. You can enable encryption for your team members, and rest assured that they’ll still be able to send all the pictures, files, and emojis they like to colleagues. This means that all messages are sent with TLS 1.2 with AES 256-bit algorithms. Just like any collaboration platform for today’s enterprise users, Zoom takes security seriously.įor instance, Zoom Chat supports encryption. In the Zoom messenger app, users can send files, screen captures, images, messages, and more, with the option to support up to 10,000 members at once. You may also like: Zoom vs Slack – Which is Best For Your Business? How does Zoom Chat work? It integrates with your video and audio conferencing solutions, with channels similar to Slack where you can create public or private groups. The chat functionality is precisely what you’d expect from an all-singing, all-dancing collaboration tool. Zoom Chat adds to a complete portfolio that already stands out as the most popular solution for companies with 500 employees or less. The Zoom messenger app for mobile and desktop is in fact the same app you use to start and join video meetings. Zoom Chat takes the values and technology skills of Zoom and brings them into the enterprise messaging space.Īs email becomes less relied upon, in favor of real-time messaging solutions, Zoom Chat offers users a way to collaborate when voice or video is not needed or not appropriate. Zoom started life as a cloud-based video conferencing platform designed for quick and immersive collaboration. That’s why Zoom made some important changes to its solution, including phone features, premium virtual backgrounds, and a dedicated chat tool. You could send messages to team members outside of meetings, but there was no formal business chat to speak of. Up until January 2019, Zoom was a state-of-the-art video conferencing service, which you could access online or via the app. Zoom Chat is the messenger app from the global video conferencing giant, Zoom.Īdding to their all-conquering collaboration solution, this post runs through the headline features of Zoom Chat, and we take a look at the future of both Zoom and team collaboration.
0 notes
Photo


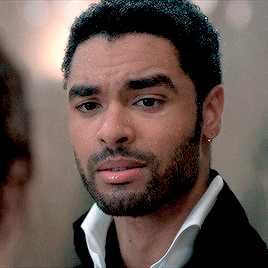
GIF TUTORIAL BY HVITSERKK
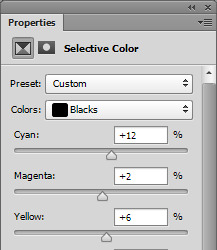
This was requested and while I do have older tutorials, my process has definitely changed since my last one. If you need something more in-depth, I have an A-Z tutorial here (which I still use besides the coloring/editing) and a master list of specific gif tutorials here. This tutorial will go over coloring using levels, color balance, curves, channel mixer, selective color and other adjustment layers.
This is what I’ve been using for the past year or so, but we’ll say that this is up to date as of May 2022. Please reblog if this helps!
TUTORIAL BELOW (IMAGE AND GIF HEAVY):
I’ll mainly use the gifs above during the tutorial, but I might add one to show a certain step a bit more clearly. I always use more then one scene for my gif tutorials because I want you to be able to see the steps on more then one gif with different lighting, color tones and skin tones so you can get more of a feel of how to use different adjustment layers.
I’m going to start off right after sharpening, and I still use the action linked in my A-Z tutorial. The only difference is on the top layer (there’s only two), I set it to 70% instead of 60%.
So here are my before gifs (minus one that’s used in the first step):


As I mentioned, they’ve only been resized (to 268X268) and sharpened. Now let’s jump right in!
1. The first thing I always start with is a "Levels" layer. I want to bump up the entire gif before so I don't have to use so many other brightening layers later. Nothing to drastic, just move the left slider (shadows) towards the middle, the middle slider to the left and the right slider (contrast + brightness) to the left. Remember to only move them a little bit, the next step using curves will do the bulk of the brightening. Here are my level settings:

And my before gif:

and the gif after levels:
2. The next step is to add two "Curves" layers. You could do the next step on one layer, but I like to keep them separate so I can lower the opacity on each individually. But I name one "Curves - White" and "Curves - Black". Using the black and white liquid droppers, you just click on the the darkest and lightest spots on your gif.

You may have to click around to find the perfect spot, and note that if you click on a blueish white or yellow white, it could alter the entire coloring of your gif, so be sure to find a spot that doesn't do that. Don't be afraid to zoom in and click on one single pixel!
You can also click on slightly darker (with the white dropper) or lighter (with the dark dropper) shades to add more contrast, ie clicking on a light gray cloud with the white dropper will turn that shade and any lighter shade pure white and add a lot (or maybe too much) contrast.
So if you want something pure white (#ffffff) use the white dropper and click on the white area of your gif. Here's my gif, I clicked on the snow that’s stuck to his coat on the left next to his ear:

Now, if you want something pure black (#000000) use the black dropper and click on a dark area on your gif. Here's my gif, I clicked on the darkest spot in the center of his beard:
I used the same gif to show you how big of a difference the curves alone make. Now you can lower the opacity of each layer to your liking. Personally, I like a super contrast look, so I only lowered them 10-15%.
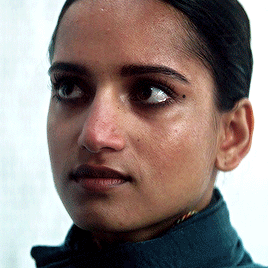
Here's another gif to show you on a different coloring and lighting, the before:

"Curves - White", with the white dropper, I clicked on the sky in the background closer to the window seal where it’s a bit darker:

"Curves - Black", with the black dropper, I clicked on the left side near his eye in the shadow of his hair:
You can see that the gif is way better, but now it’s a bit too pink/magenta. Let’s fix that in our next step.
3. There are two different adjustment layers that I use to balance or “fix” the colors. I'll go over both. The first is the "Color Balance" layer. I only use this if the color looks "off" just a little bit. Here’s the after, followed by how and why:
Like I mentioned, the before gif was a bit too pink. That's a more simple change, so I'll add a "Color Balance" and focus on removing the magenta. If it was more orange, I'd focus on the reds, but pink is more magenta-ish. The shadows (the darkest shades) look fine and so do the highlights (the brightest, near white shades), so I only need to adjust the "midtones". Again, removing the magenta, so sliding the Magenta/Green more towards the green. I also added a bit of blue just to add more of a "cool" tint. Here's the settings I used:

Here's another gif that could benefit from a "Color Balance" layer:
As you can see, the before gif is very colorful, but it's very dull. I can add a color balance layer to give it more depth. The shadows aren't as intense, so I want to add more. I'm only editing the "Shadows" by sliding the first set of colors more towards the red, since my gif is more "cool" (blues, greens) adding red will darken it and add more saturation without turning my gif overly blue. I also add a bit green and yellow to make the shadow more neutral as opposed to just adding a dark red. Here’s my gif now:
And here's the settings:

4. The other way you can balance colors is by using the "Channel Mixer". It may seem super complex, but think of it the same as the color balance, either you add or remove tones from the main colors of the gif. I only use this with gifs that have major lighting issues (lol). Here's my before gif:

and after using the channel mixer:

Huge difference right? Now, you don't always have to use this because some scenes have that lighting and we don't really have to change it and make it "normal". Imagine they're in a photography red room, we definitely don't need to try to make it normal. If they're in a club with neon green lights, same thing we don't need to make it normal. But if it simply needs major adjusting, this is how to do it. Using the guidelines from the "Color Balance" from above, take a look at your gif and see what tint is too much. For this gif, it's definitely too yellow / orange.
To make things easier, what color was with the yellow on the color balance layer? Blue, so basically if I want less yellow, I need to add more blue. That's very surface level, but that will help you to understand for an easy start.
So I want more "Blue" so I need to go to the blue channel and add more blue into the reds and greens. Here are my settings:
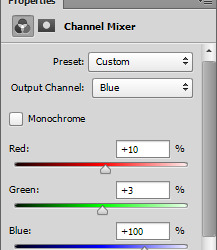
Now my gif:
It's still a bit off, as you can tell it's a bit too peachy instead of a more "natural" tan / beige tone. So I want to go into the red channel and drag the red down until the tint is a bit more natural. Here's my settings:
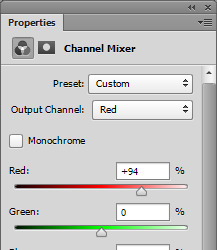
and my before and after gif:
As you can see it's much more neutralized and will be much easier to edit in the next steps.
5. Next is "Selective Color", my personal fave. You can really do a lot with this layer, you can remove colors, change colors and make colors really pop. I only really ever make "natural" looking gifs, so besides the previous edits, I don't do pale, or grayscale gifs at all. So what I'm going for is really vibrant, saturated gifs but still natural looking.
Here's my before:
As you can see in my before gif, there's a lot of popping color. The red in the scarf and the bits of blue/cyan in his jacket and in the background. You can use the selective color layer to target just these colors to really make them stand out. To add more red into her scarf, in the "Red" color, I want to add more red by sliding the first set towards the red side. I also want to add a bit of magenta so the scarf is more of a blood red, instead of a brownish red. Then I want to add a bit of yellow to really add some saturated color. Red is a bit tricky because nine times out of ten, it will also alter skin tones too. Just be mindful of that, and you can still make reds pop. If you do get too much pink in the skin, just go to the "Magenta" color and play around with the settings to neutralize the skin (most often by sliding the magenta to a negative and the yellow to a positive number). Here are my settings:

For that cyan, I want to go to the "Cyan" color and with cyans and blue I always slide both the first and last set of colors. I literally never want to go with the green-ish blue that cyan leans to, I want more of a super saturated baby blue, so if I add cyan, I will always add a bit of blue. So, I will slide the first row (cyan) into a positive number to target the cyan tone, then I'll also slide the second to last row (Yellow) into a negative number to add more blue, and less yellow (and less green) to get a more "true" blue color. Here's my settings:
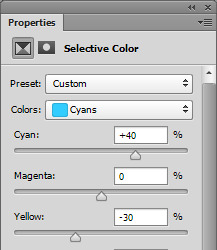
and my before:
and after only editing the reds and cyans:

You can add more or keep it more mild. This is only two colors, so imagine what you can do with all of the colors available in the selective color layer.
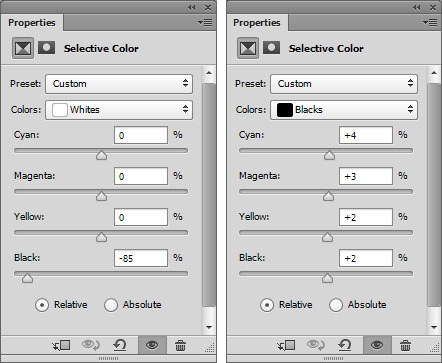
5. A super important step when you're using "Selective Color" is the white and black color. I always my color pop selective color (from above) and a "Selective Color - Black" and "Selective Color - White", which ofc you can do on the same layer, but I like the option to lower the opacity individually. For me personally, I like slightly darker shadows and over the top bright white highlights. I also like to further tweak them while I'm there.
So to start, "Selective Color - Blacks". If your gif has a shadow that is too "one color" you can use the black color to balance that out. So for example this gif:
and the after:
You can see in the before that the shadows are too red, too warm. To remove that, I want to go to the "Black" color. So taking what we learned in the color balance layers, the basic tones are: red + cyan, green + magenta and blue + yellow (so to get less red, add more cyan, to get more green, remove magenta). So since my shadows are too red, I want to slide the cyan color to a positive number (thus "adding" cyan). Doing so might alter the color too much in another direction, so if I add too much cyan, it might be overly green, so I need to add magenta, which oops, caused it to be a bit blue, so I need to add a bit of yellow. I almost always slide the top three sliders to a positive number to achieve and almost neutral, no color black, which is why these settings have a bit of everything:
Now, the last slider, the black, basically either adds black, or removes it. Since we're on the black slider, we don't want to remove any black, or it will go white. Since I like my dark colors super dark, I will add black by sliding it to a positive number. Here's my settings:

Adding only a little bit, +4. I usually stick to below +10 because it can easily muddy and ruin your gif.
6. Now "Selective Color - Whites". The same concept of the black color from above, but now the bright, near to white or whites in your gif. I love adding a lot of white to my gifs to make things like the little sparkle in eyes pop, or white backgrounds really bright and a lot of contrast. I don't usually mess with the top three sliders unless there's a lot of color in my white. I mostly change the last slider, the black to a large negative number (so removing black to make white). Here's my before gif:

and after white:
See how it just makes the highlights really pop? You can really see the it in her eyes, around the strands of hair and in the sun spots in the background. You can't always get this look by adding a ton of white because you can over do it. I mostly do this on gifs that don't have a ton of highlight or on lighter skin tones because you just blend the lighter (but not white) tones to much. But for this gif, I can and did, so here are my settings:

And for good measure a before black and white selective color:

And a ton of black and white:

And my settings:
7. Now the last step is up to you, I usually do a mix of the three or just one of the three. I will show you each, but I always finish my gifs off with either a "Brightness/Contrast" layer if my gif is a bit lackluster, a "Levels" if I want an even, overall boost (my usual end) or an "Exposure" if I have enough contrast but want a more bright look.
Don't worry if this step washes out the skintone of poc gifs, I have a very, very last step that will fix that (below the next step).
If your gif isn't as bright or vibrant as you'd like, add a "Brightness/Contrast" layer. As a rule of thumb, I always add to both, but focus on one, that way you don't get that super bright yellow look. So don't add 50+ to both, add a bit to contrast and a lot to brightness, or vice versa. So my settings are simply: Brightness + 18 with Contrast +5

Before:
After:
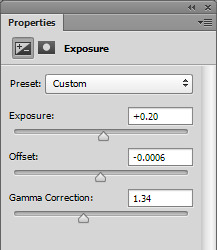
Now if you're gif has enough black and contrast in the dark shades, but is too dark overall, use an "Exposure" layer. For this gif, the dark hair and jacket are pretty much pure black, but my gif is too dark. And exposure layer is pretty much: exposure - add or remove contrast, offset - add or remove black and gamma correction - add more remove brightness. So I want to add to the gamma buy sliding more towards the right. It will almost always wash out your gif, so don't go wild. Then slide the exposure to the right to add a bit of contrast. Incase your gif does get washed out on the black tones, just slide the offset to the left to add more. Here are my settings:
Before:

And after:

And lastly, if your gif is pretty good contrast wise, has an okay brightness but you want to boost everything without losing much in terms of color and lighting, use a "Levels" layer. About 85% of my gifs end with a levels layer because I personally love the look it gives. Here's my gif:
and after a levels layer:
The before wasn't too bad, but I definitely want more brightness but I don't want to add to much contrast or just wash out my gif with light. So adding a levels layer and moving the first slider the the left and the middle and last slider to the left will work perfectly. The last slider is the "shadows", the middle is the "midtones" and the far right slider is the "highlights". So adding more shadows to the gif will add more contrast to the dark tones and blacks, adding more highlights will add contrast to the lighter and white shades and the middle will either lighten or darken your gif without adding too much contrast.
I always edit in this order: slide the middle to the left until the brightness I want is reached, then slide the last slider towards the left to add a bit of contrast if the brightness is dull, then slide the first slider towards the right to add more black. Don't go wild, but also don't be afraid to slide them over a good amount. Here's my settings:

Here’s a gif from earlier that also needed a levels layer, the before:

And after:

And the settings I used for that one:
8. The very last step is to even out washed out skintones. This is especially important for this style of gif (as opposed to pale style gifs where the look is still poc skintones, just pale). I don't want a washed out look, because there's no need for it, no reason in my "natural" colored gifs. So to fix this, I always add this layer with these settings and I just lower/raise the opacity as needed.
Since most skintones are mostly affected by the reds (for example add a hue/saturation layer, go to the red color and change one of the settings to see how much it messes with skintones), I only edit the "Red" color. Here are my settings:

my washed out gifs:

now my more true-to-tone gifs:

9. As for saving, I only ever use 0.05 on the frame delay except for gifs with fast moving objects (like the snow and hair blowing gifs I used for my main previews) and these save settings.
Another note, I always use 1080 videos, very rarely do I go with 720 and even then it’s always for music videos or movie/tv trailers downloaded from Youtube.
That's the end of my tutorial! I really hope you've learned something and of course all of this is for you to apply to your own style. If you don't like super crispy highlights, don't add so much white or if you want gifs that aren't over the top bright, I hope I've left you with enough tips that have you confident to play with settings and change things up and still love the gifs you end up with.
If you have any questions or need any help, please let me know! I don't mind at all. If you want more in-depth tutorials on specific layers, I do have some on almost all of the things I wrote about, but they are super old so I can update those if needed.
Happy giffing!
123 notes
·
View notes
Text
MY DETENTION BUDDY :: JAY
pairing: jay x gn!reader
genre: fluff, badboy!jay, highschool!au, friends-enemies-lovers!au
word count: 2k
event: for @lovesick-net and (early) jay day 200421 <3
author’s note: simple little one-shot for jay’s birthday (i wont be uploading anything for his actual birthday). i had to speedrun this fic because i kept changing the plot and this hasnt been proofread twice (unlike my other fics) T-T i hope it’ll still work out.
warnings: (reader makes one bad decision)


Ring...ring...ring...ring..ring…
Ring. Ring. Ring. Ring. Ring
Ringringringringiringringringring.
RIRIRIRIRIRIRIRIRIRIRIRIRIRIRRI-SLAM!
The alarm clock stopped its boisterous wailing
10 more minutes. I don’t have to style my hair today.
Thirty minutes passed.
RIRIRIRIRIRIRIRIRIRI- SLAM!
Ugh. I’ll just miss assembly.
RIRIRIIRRIRIRI-
This time, the ringing stopped before he could slam his hand over the alarm clock.
“Jongseong, do you not have school today?” Jay could only make out a bush of black that stood above him as he sat up, dazed and drowsy.
“Yeah, I do. I’m about to get ready. Why?”
“It’s 9 am! You should be at school! At this point, you don’t even have to go anymore.” His mother huffed in disappointment.
It was an exaggeration, but she had a point. School started at eight in the morning. It was already an hour later but he was still sitting in bed.
“I’ll get ready now. 10 minutes. Good to go.” He shooed his mom away, already running to the bathroom to wash up.
“I’m leaving now Jay. You know darn well that I have an important meeting today and I can’t miss it just for you to not get a tardy. Heck, you’re already late! You’re-”
“Mom! I can’t walk to school! It takes too long.” Jay whined as he brushed his teeth, his muffled voice interrupting his mother’s speech.
“Young man, stop interrupting me. I told you a week ago about today’s event and it’s not my fault that my oldest son can’t take care of himself. You’re going to have to take another mode of transport, you’re old enough to deal with this yourself!” With that, his mother stormed out of his room, her feet obnoxiously thumping on the floor.
“I’m also your only son...” Jay muttered.
Of all days, why did she have to have her meeting today? Monthly evaluations aren’t that important. Dangit, I should’ve been taught how to drive. Jay returned to his rapid multitasking, grabbing his school uniform while washing his face. He didn’t even look twice,
After taking the quickest shower he had ever taken in his entire life and shoving all of his essential (what he determined as essential, at least) belongings into his bag, he opened to door and dashed outside only to be met with…
Rain.
Rain everywhere. Drenching the front yard’s perfectly tended flower garden and creating heaps of watery mud. It was pouring at 9.15 am. There was thunder and occasional flashes of light zooming through the clouds. The city was in shambles.
Not like, shamble, shambles. It was shambles in Jay’s opinion as he groaned and stomped his way through the rain.
Screw school. Screw this stupid rain, screw my alarm clock, screw this-
“Dude, why are you running in the rain? You’re soaked. Are you heading to school?” A pink-haired boy in a red Ferrari shouted from across the street.
Jay sighed in relief, immediately running across the road to said Ferrari. “Choi Yeonjun. You are a life-saver. Could I get a ride real quick? I’ll pay back for engine fees and for soaking the inside of your Ferrari with rainwater.”
“Hop right in, and don’t worry about returning. Let’s have some fun with this baby.” Yeonjun smirked and revved the engine, swerving past cars and buildings like it was a little RPG game.
At this rate, I’ll make it to school in no time.
“Dude, I’m so sorry. I guess you have to walk.”
Just as he thought things were taking a better turn, Yeonjun decides to show off his new driving skills and zooms through roads at a rapid speed, so fast that he crashed the car by a tree. It was a miracle that both of them didn’t get hurt but as far as Jay was concerned, he could worry about that some other time. This was just slowing him down on his long and tedious journey towards his form of hell.
On the bright side, the rain had stopped and the sunshine was back as if nothing had happened.
“I’ll get going to school.” Jay internally groaned and started sprinting in the direction of his school.
“Hey, at least I helped you get closer to school! Didn’t I?” Yeonjun shouted from behind and coyly smiled.
Such a boastful punk, Jay thought. “Whatever, bro!” He turned back and gave his older friend a quick wave before dashing off.
“Park Jongseong! You’re late...again.”
“I’m aware.” Jay didn’t spare his English teacher an eye and slung his backpack over the chair, about to take a seat.
“Stop giving me attitude, I’m your teacher.Why are you tardy for the fourth time this month?”
“Alarm clock.”
“Alarm clock what? Are you afraid to speak up? I don’t see you acting like this in the hallways.”
Jay looked down at his feet and sighed before side-eyeing his teacher. “Overslept, okay? Sir if you could just let me off the hook you would be able to proceed with your Shakespeare nonsense.”
The entire class snickered. It was no secret that Jay loathed Mr. Jung, the English teacher. Who didn’t? Mr. Jung treated every student in school like they were incapable toddlers and it was a wonder that anyone would dare to stand up to his stupid remarks. Jay’s carefree attitude towards his horrible teachers was one of the reasons why he earned so many fangirls.
Not like you were one, of course. You watched as he pulled his chair out and sat next to you out of the three other vacant seats at the back of the class.
Mr. Jung rolled his eyes and continued writing on the blackboard. “Also, Jongseong,” he added, “you’re wearing your school shirt the wrong way round. See you in detention for your tardiness.”
A few of the girls in a few seats in front of him whispered rapidly, although whispering didn’t stop Jay from finding out about their gossip.
“Lol! So much for being the bad boy of our grade. He looks like a wreck today.”
“I know right? I wonder what the other fangirls will think of this. Should we send the pictures to the fan club?”
The second girl giggled. “Yeah, duh. Name it jay-park-wreck-images.”
So much for my reputation. Jay could only roll his eyes as he pulled out his supplies, ignoring the camera clicks coming from the seats in front of him.
“Oh, yay. At least I’ll have a detention buddy now.”
Jay eyed you up and down like your statement was some sort of monstrosity. “Detention? You, detention? Pfft.” He laughed.
“Yeah, Jay. Me, detention. Why are you so happy about it? Glad to be stuck with another girl?”
“What, no-no. You just...don’t seem like the type to be in detention. How’d you get it?”
“This..may be kind of embarrassing, but...” You turned to the side and Jay gasped.
On the sleeve of your uniform was a...rabbit? It wasn’t too obvious as to what the marker doodle was but it was apparent that you had intentionally spent time to draw on it.
“Look, I was bored in assembly this morning and found a spare marker in my pocket! Don’t judge, we all know how bad assembly can be.” You blurted just as Jay was about to ask why you had done what you did.
“You could’ve just drawn on your hand or done something else with the marker.” Jay sighed and shook his head at your dumb decision.
“I was out of my mind, okay? Ugh, Assembly always drives me nuts. I got called out for for the horrendous ink bleed when Mr. Jung saw as I walked into the classroom. He said it ‘didn’t follow school guidelines’.”
“For once, I agree with Mr. Jung. It was a stupid choice, you know? If you didn’t draw on your uniform then you wouldn’t have to go to detention now.”
“Jay Park, the bad boy of school, is telling me to be a rule abider. Biggest twist of the century.” You rolled your eyes.
Jay frowned and turned back at you, losing that little spark in his eyes that he once kept. “I’m not a bad boy you know? I just don’t like the system in place here.”
“As if anyone is going to believe that. Go hang out with another girl of yours. I’m not here to be your toy.”
“People like you are the reason why everyone thinks I’m a bad person. I thought you were different, you know?”
You had been preoccupied with taking notes for class, but now you looked at him with squinted eyes. “Well, I am different. Different as In someone who doesn’t fall for your useless charms. Go suck up to your fangirls or something.”
Jay rolled his eyes and scooted away from you. He thought he had been lucky to meet you, but he guessed not.
You always do this, you idiot. You were so close to making a new friend.
You put your hands in your head and side-eyed Jay, who seemed to be struggling as Mr. Jung blurted out an entire unit’s summary.
The boy hadn’t brought any stationery and was definitely on the wrong page of the textbook. You figured that he was this disheveled from his absolute lack of planning but you still felt bad.
His hair was a mess, it was still damp from the rain before. If only you could help him style it…
Why do I want to touch his hair? That’s weird and gross.
You were so occupied with thinking about Jay that you realized that he was still struggling in class.
Maybe you could make things better.
“I’m sorry.”
Jay was struggling to find the page you guys were on for class when a pencil blocked his view.
“What do you want?” He said as he tried to look past your pencil swinging.
“It’s a pencil for you since I realized that your table is practically empty and you’re going to need something to take notes with for later. Also, it’s page 153, not 53.” You leaned over to help him flip the pages.
“Oh, that makes so much more sense. I was wondering why we were relearning unit 3 when finals aren’t even near yet.”
You raised your eyebrows, looking up at a relieved Jay. “So you do pay attention in class.”
“Of course I do! I’m a student. You should stop using that stereotype on me.” Jay frowned and a tinge of disappointment shadowed his face.
“Right, I know. I’m sorry. I’m trying to work on it, it’s rumors and assumptions that have built up over the past few years and I understand that it shouldn’t get in the way of our friendship.”
“Friendship? We have a friendship?” Jay chuckled and cocked an eyebrow up, teasing you.
Maybe it was that eyebrow slit or the weird tension that was building up between the both of you. You felt your face heat up. “I mean- yeah, friendship. Are we not friends?”
“I don’t know, hun. I thought we were something more.”
“Um...best...friends?”
It was perfect timing as the bell rang and you immediately started packing things into your bag, eyes glued to the clock instead of the amused boy next to you.
Jay laughed, running his hands through his blonde locks and watching as you started running out of class, your eyes occasionally looking back at him to see if he was still staring at you.
“See you in detention!” He called, drawing the attention of your classmates.
Jay Park needs to learn how to shut his mouth. Everyone was now staring at you and you were flustered, embarrassed, shocked, and confused. The weird mix of emotions were driving you nuts. All you could muster was a little nod and you dashed out of there as fast as you could.
“Today we’re going to learn about Murphy’s Law. It is where anything that can go wrong will go wrong.”
“But everything that can work, will work.” Jay raised his hand and added, sparing a glance at you jotting notes in the back of the classroom, oblivious to his reference towards you.
“You’re right Jay. Murphy’s Law works both ways. Reversing it is considered part of science…”
Today morning was a storm (figuratively and literally) and everything seemed to be going wrong for Jay. Murphy’s Law prevails. but there’s always a rainbow after the storm. You were his rainbow and his lucky charm.
2021 © fluffi
#lsn.works#lsn: lucky or unlucky#kpopscape#kdiarynet#kdiner#hybenet#enhypenwriters#enhypennetwork#jongseong imagines#jay imagines#enhypen imagines#park jongseong imagines#jongseong scenarios#jay scenarios#enhypen scenarios#park jongseong scenarios#jay fluff#enhypen fluff#park jongseong fluff#jongseong fluff#enhypen#jay park#park jay#park jongseong#jongseong#enhypen jay#jay enhypen
141 notes
·
View notes
Photo


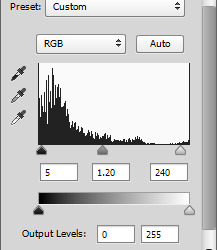
EDITING AN EXISTING LIGHTING MOD TUTORIAL
// part 1
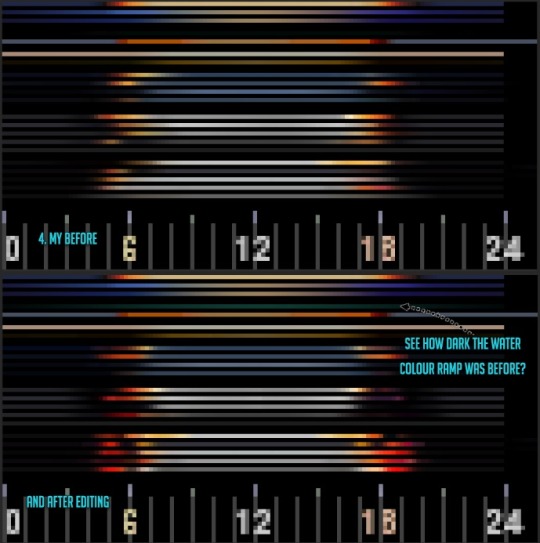
If you are like me, you might have fallen in love with custom lighting mods and how pretty they make our games look. But there always seems to be something that irks me, be it how dark it is at certain times of the day or the water colour seems off, thus I learned how to edit one and here’s how you can do it too!
There are two ways of editing a lighting mod, one is by adjusting the RGB values in .ini files and the game adjusts the colour ramps for you (EA base game lighting works this way, I have never tried this method so cannot really say much about it other than here’s an old tutorial for it in case the lighting mod you want to edit has been created that way) or by taking the ini files into a photo editing program and editing each colour ramp manually by hand (EA travel and some other worlds lighting works this way, BrntWaffles and Awesims used this method with their lighting mods too). I have learned most of this by trial and error, piecing information together from different tutorials and through this MTS topic by Simsample and friends, but some of the posts/pictures it references to are long gone and it can be a little hard to follow. There’s some really important info buried in there though! I have shamelessly stolen a few pictures for this tutorial too as they are most helpful. I’m sorry, but I’m not sorry (ノдヽ)
Programs you need:
S3pe
Photoshop or Gimp (DDS plugins for Photoshop -> this and this, Gimp has this feature built in already)
Files you need:
An existing lighting mod .package file of your choise
Alternatively a custom world that has custom lighting in it that you want to use and convert into a standalone lighting mod
PoisonFrog’s Colour Ramp Designer .psd file, optional but extremely helpful and 100% recommended
PoisonFrog has created a file that has grouped each EA lighting file together based on which world or expansion they came from. You can use it to compare how the lighting differs from world to world or how the weather changes the colours of your world, you can also use it as a base to create a completely new one from scratch or just brutally smash different bits together. It also includes a helpful timeline layer so you can adjust your colours according to the time you want them to appear.
// Disclaimer: This tutorial goes through the basics and covers simple things such as editing cloud/water/sky colours. There is so much more to weather files than just colours, but this tutorial would end up far too heavy otherwise so I will leave out the INI file things such as cloud thickness, bloom, fog values etc, and we shall dive into those at a later date.
1. UNDERSTANDING THE FILES
1. Open your .package in S3pe.
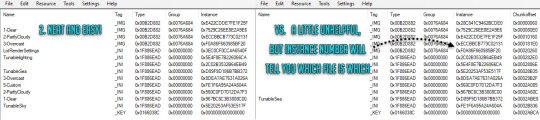
Within the .package there are INI and IMG files. Each INI has a corresponding partner IMG file as one controls the weather conditions (INI) and one controls the colours (IMG) that we see during that particular weather. I will call them siblings because well, they are related as the image shows. You can ignore the INI files for now as we are only changing colours. Lets say you want to change the water colour for your world, so this means you need to edit each and every IMG file and find the colour ramp that controls it. But if there is only a particular time of the day, lets say you feel the sky is too dark during the stormy weather, you would only edit the IMG file called S3_00B2D882_0076A684_E422CDDE7FE1F25F%%+_IMG.dds (instance number in S3pe would look like 0xE422CDDE7FE1F25F) as it’s the one controlling stormy weather colours.
2. Some mods might have neatly labeled file names, while other mods seem a bit more cryptic and it may take a little detective work to figure out which IMG file is the one you need (In the #2 picture I have opened 2 different lighting mods in S3pe to show the difference). If that’s the case, look at the last digits of IMG instance numbers and match it with the codes on the right side in picture #1 or scroll all the way to the bottom for codes in this tutorial. Right click the IMG.dds file(s) and Export to File, don’t change the IMG name as you need it to match its sibling INI file later! Save them to a folder somewhere.
3. Open your IMG.dds file in Photoshop or Gimp, if you get a pop up asking about mip maps just say no. You can also open PoisonFrog’s .psd file (It should work with the latest Gimp too) and copypaste your IMG.dds file over there so you can compare it against EA lighting or simply just for his helpful timeline layer.
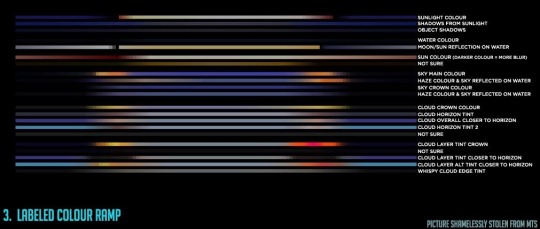
By default the IMG files come with no explanation as to what each colour ramp does, but you can use Awesim’s labeled ramp to help and identify the colour bar you need to edit. PoisonFrog also sort of.. But not quite explains them. His pictures are gone, but this may be helpful to someone?
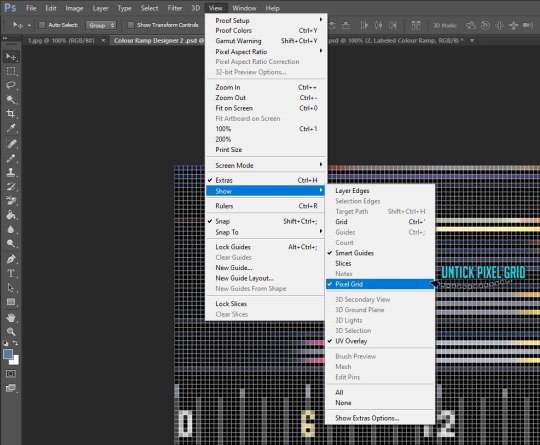
// Photoshop Tip!
When you zoom in real close you might be facing a super annoying grid which makes it hard to see what you are doing! You can get rid of it by going to View -> Show -> Pixel Grid -> untick it and you can see clearly again.
2. EDITING THE FILES
4. Once you have identified the ramp you need to edit, avoid drastic and sudden colour changes so the transition looks nice and tidy in game. This is particularly important with both ends of the ramp that they are consistent with each other, so once midnight comes and goes otherwise you get choppy disco like flashes of colour (If your world is a nonstop danger disco then go for it, otherwise keep it smooth). You can use selection tool to separate the ramp you want to edit, play with the hues/brightness/vibrance and see how it changes your ramp. Gradient tool is a good option too for mixing your own colours.
PoisonFrog’s .psd file is once again really nice for this as you can just yoink some other world’s colour ramp and copypaste it over the one you are editing. Or copypaste a small part of it, you don’t have to change the whole ramp if you have a specific time of the day that annoys you! You can also create your own groups within it, take apart other lighting mods and drop them in so you can mix and match their weather files.
5. Done with your colour tweaks? If you used the .psd file provided, copypaste your layer you were working on from there to over the original IMG.dds file. Make sure there are no extra layers floating around, merge everything together! Saving is a little different with Photoshop and Gimp, with Photoshop you can use Save As option while with Gimp you have to use Export As (Please correct me if I’m wrong with Gimp settings as I don’t really use it) to replace the original exported file. Copy the settings shown and make sure no mipmaps bit is ticked! If you have been saving as .psd or changed the file’s name, make sure the name is now EXACTLY as when you exported it earlier.
3. COMPILE THE FILES
6. Before continuing, you might want to make a backup save of your original lighting mod, so any changes you do to it that you might regret later can be reverted. Either way, open the lighting mod .package you exported your IMG files from earlier in S3pe again, hit Resource and Import from file to bring your edited IMG files in, replace and overwrite the old ones with your new ones (The old ones get crossed over and replaced only if you used the original names! If you have loads of IMG or UNKN files and nothing gets crossed over, your file names are incorrect!) and save.
7. Drop the .package in your Mods/Packages folder, make sure you have no other lighting mod in there. Boot the game and enjoy your new lighting mod! Alternatively if you are making your own world and you have a certain aesthetic for it, you can merge the package into your CAW map and that way whoever plays your world will also get to enjoy the unique lighting!
// OH NO!! If it’s looking funky, colours are way off or everythings gone spooky black, you haven’t used the right .dds settings while saving and/or your IMG.dds file names are wrong thus they are not linking correctly with their sibling INI files. Double check the settings/names and reimport them into your .package file.
Under the cut you can find all the .dds file names and instance numbers for easier use and access. It’s a long-ish list thus it’s hidden.
These are the file names you see in the very first image, but I figured the instance number might help you to identify them in S3pe easier. You can copypaste the INI and IMG names if you have accidentally renamed your file to something else.
Clear weather type
INI: S3_1F886EAD_00000000_967BC6C3B3808C00%%+_INI.ini
Instance number: 0x967BC6C3B3808C00
IMG: S3_00B2D882_0076A684_7529C26EE8E2A9E6%%+_IMG.dds
Instance number: 0x7529C26EE8E2A9E6
Partly cloudy
INI: S3_1F886EAD_00000000_560C0FD7012DA7F3%%+_INI.ini
Instance number: 0x560C0FD7012DA7F3
IMG: S3_00B2D882_0076A684_ECCBBCB773C02131%%+_IMG.dds
Instance number: 0xECCBBCB773C02131
Overcast
INI: S3_1F886EAD_00000000_8DEA7AE7631A026A%%+_INI.ini
Instance number: 0x8DEA7AE7631A026A
IMG: S3_00B2D882_0076A684_F0A86F660985BF20%%+_IMG.dds
Instance number: 0xF0A86F660985BF20
Stormy
INI: S3_1F886EAD_00000000_2C02B3532B64EB49%%+_INI.ini
Instance number: 0x2C02B3532B64EB49
IMG: S3_00B2D882_0076A684_E422CDDE7FE1F25F%%+_IMG.dds
Instance number: 0xE422CDDE7FE1F25F
Custom weather type
INI: S3_1F886EAD_00000000_FE1F6A95A24A604A%%+_INI.ini
Instance number: 0xFE1F6A95A24A604A
IMG: S3_00B2D882_0076A684_28C841C9462BCDE0%%+_IMG.dds
Instance number: 0x28C841C9462BCDE0
Let me know if you know a better way or I have made an error in this tutorial! I’m happy to answer questions too if you have any.
131 notes
·
View notes
Text
After Effects Cc 2014 Mac Download

(UPDATE: Be sure to install the After Effects CC 2014.1.1 (13.1.1) bug-fix update.)
After Effects Cc 2014 Mac Download Crack
After Effects Cc 2014 Mac Download Free
After Effects CC 2014.1 (13.1) is available.
If you have a Creative Cloud membership, you always have access to the latest version of After Effects. You can install this update by choosing Help > Updates within any Adobe application or by opening the Creative Cloud desktop application. Go to the Creative Cloud site to download applications or to sign up for Creative Cloud.
Download Adobe After Effects CC for Mac Free. It is full Latest Version setup of Adobe After Effects CC Premium Pro DMG for Apple Macbook OS X. Brief Overview of Adobe After Effects CC for Mac OS X Adobe After Effects CC for Mac is an impressive and powerful application which will let you create professional looking photos and render 3D. Download the After Effects CC 2014 Plug-in SDK Macintosh or Windows The After Effects CC 2014 Plug-in Software Development Kit contains headers defining the After Effects Plug-in APIs, sample projects demonstrating integration features, and the SDK Guide documentation.
For more information about Creative Cloud, see this overview video and the Creative Cloud FAQ list.
For information about updates for all of our professional video and audio applications, see this page.
For details of what was new in After Effects CC 2014 (13.0), see this page.
Please, if you want to ask questions about these new and changed features, come on over to the After Effects user-to-user forum. That’s the best place for questions (and, if you follow that link, you’ll find more information about how to communicate with us). Questions left in comments on a blog post are much harder to work with; the blog comment system just isn’t set up for conversations. If you’d like to submit feature requests (or bug reports), you can do so here.
top new features for After Effects CC 2014.1 (13.1)
high-DPI content and UI (Mac OS, Windows)
refreshed user interface design
Copy With Relative Property Links command
color management for Dynamic Link
Adobe Anywhere for Video improvements
Maxon Cinema 4D Lite R16 and Cineware 2.0
Collect Files for Cinema 4D assets
native GoPro CineForm codecs
scripting improvements for text layers
improved Adobe Media Encoder watch folders
mocha AE CC 2014, based on mocha 4.0
many bug fixes
details of all new and changed features in After Effects CC 2014.1 (13.1)
Here is a virtually comprehensive list of changes, with detail beyond the summaries of the top items listed above. We’ll be posting a lot more detail over the coming weeks, and the outline below will be populated with links to in-depth articles and tutorials, so bookmark this page and check back.
high-resolution (high DPI) content viewers and user interface elements on Mac OS and Windows
After Effects CC 2014.1 (13.1) displays content and user interface items at the appropriate resolution on high-resolution displays (sometimes called “high-DPI” or “HiDPI”) on both Windows and Mac OS. This makes After Effects easier to use on high-pixel-density monitors, like Apple Retina displays and Microsoft Surface Pro devices.
In content viewers, After Effects will take advantage of the pixel density of the display to show each pixel of content in a viewer as a single pixel on the display. This affects the contents of the Footage panel, Layer panel, and Composition panel, including both your video content and some UI overlays and widgets within the content area.
Note that for a given piece of content to appear the same on a high-DPI display as on a non-high-DPI display, the zoom value for the former needs to be twice that of the latter, since the points are half the size. If you drag a panel from a high-DPI display to a non-high-DPI display, you’ll see the zoom value change, while the content occupies the same space on the screen.
User interface elements such as icons, text labels, pointers, buttons, etc. will now scale according the operating system display DPI setting. Mac OS computers with a Retina display will scale to 200%. Windows computers with a high-DPI display will scale to 150% or 200%.
refreshed user interface design
The user interface (UI) of After Effects, as well as Premiere Pro and other Adobe professional video and audio applications, has been updated with a new design. Pointers, icons, text, controllers, and button styles have all been refreshed.
The layout of the interface has not changed significantly, but some simplification has been made to panel functionality.
The icon for the panel menu has been moved from the upper-right corner of the panel to the panel tab, making the panel menu easier to discover.
The panel grabber and frame grabber icons have been removed; you can still drag panels using the panel tab.
The close button (x) has been removed from all panels except the Timeline, Composition, Layer, Footage, Effect Controls, and Flowchart panels. In these panels the close button has moved to the left side of the panel tab. To close a panel without the close button, open the panel menu or right-click on the panel tab and choose Close Panel, or use the keyboard shortcut, Command+W (Mac OS) or Ctrl+W (Windows).
The range of the Brightness slider in the Appearance preference category is more limited than in previous versions; there is no longer a “light” mode for the interface. The default brightness setting is darker than in previous versions.
Because some scripts that create ScriptUI panels have not been updated to accommodate the new user interface design, some of these scripts may appear wrong with the new UI skin. If this occurs with a script that you use, you can make an individual ScriptUI panel appear using the old UI skin by enabling the Use Legacy UI option in the panel menu for the ScriptUI panel.
Copy With Relative Property Links command
A new command in the Edit menu, Copy With Relative Property Links, works like the existing Copy With Property Links command, except that it creates expressions that do not reference the source composition by name. This maintains a relative link between the layer with the expression and the composition containing that layer. This can be useful when, for example, you want to move expression-rigged layers from one composition to another but let the layers reference a control layer only in the same composition. The expressions created using the Copy With Relative Property Links command are identical to those created using the expression pickwhip.
For copying a layer’s Position property, the result would be this:
thisComp.layer('control_layer').transform.position
The existing Copy With Property Links command will specifically reference the layer’s source composition in the expression:
comp('source_comp').layer('control_layer').transform.position
color management for Dynamic Link
When color management is enabled for an After Effects project, compositions viewed or rendered over Dynamic Link will be transformed using the HDTV (Rec. 709) color profile. This prevents color or gamma shifts in the appearance of these compositions in Premiere Pro and Adobe Media Encoder.
Dynamic Link always assumes that all incoming frames are in the HDTV (Rec. 709) color space. Prior to After Effects CC 2014.1 (13.1), compositions in a color-managed project were sent to Dynamic Link in the project’s working color space; they were not adjusted for Dynamic Link’s assumption of HDTV (Rec. 709). This mismatch resulted in a noticeable color or gamma shift when the project’s working color space was significantly different from HDTV (Rec. 709) or when Linearize Working Space was enabled.
In After Effects CC 2014.1 (13.1), a color transformation is applied to the composition as a last step before the images are passed to Dynamic Link for use in Premiere Pro or Adobe Media Encoder. This corrects the composition image to the color space used by Dynamic Link, similar to how the View > Enable Display Color Management option in After Effects corrects the image for your monitor.
Maxon Cineware 2.0 plug-in and CINEMA 4D Lite R16
After Effects Cc 2014 Mac Download Crack
After Effects CC 2014.1 (13.1) includes a version 2.0 of the Cineware plug-in, which serves as the primary interface for integration with Cinema 4D.
After Effects CC 2014.1 (13.1) also includes version R16 of Cinema 4D Lite, which provides several new features, such as the new Reflectance channel. (For details about each edition of Cinema 4D, see the Maxon website.)
John Dickinson summarizes the changes in Cineware 2.0 in a video on the Motionworks website.
Automatic Cineware effect settings synchronization: When adding multiple instances of a CINEMA 4D scene layer in a composition, including adding Multi-Pass layers, you will see an on/off checkbox at the top of the Effect Controls panel labeled Synchronize Layer. It is on by default, meaning that the Cineware effect settings on all instances of the layer will automatically synchronize. If this checkbox is disabled for a specific CINEMA 4D scene layer, then that layer’s settings will not synchronize with the rest of the layers in that composition. The Apply To All button from previous versions of Cineware has been removed.
Default Layer: The CINEMA 4D layers dialog box now shows a Default Layer option if the renderer supports it. Objects that have not been assigned to an explicit layer in the .c4d project file will be visible with Default Layer enabled.
Content Browser: When using a full retail version of CINEMA 4D R16 as the renderer, textures applied via installed content libs (.lib4d files) will render in After Effects using Cineware.
region of interest: If you use the region of interest feature in After Effects to constrain the preview to a subset of the frame, the Cineware effect will respect this setting and limit rendering to the area within the region of interest. This only applies when the Renderer control is set to Standard (Final).
Purge Memory: This option only works when the CINEMA 4D render path in Options is set to the default render server Cineware R16, or a full retail version of CINEMA 4D R16 or later. For complex scenes, the render server may use memory for internal caches. To free up that memory click “Purge Memory” in order to extend the length of previews in After Effects.
Collect Files for Cinema 4D assets
The Collect Files command in After Effects now collects assets associated with .c4d footage items, such as textures.
automatic encoding of compositions in After Effects project files in Adobe Media Encoder watch folders
If you place an After Effects project (.aep) file in a watch folder that is being monitored by Adobe Media Encoder, the compositions at the top level in the project (i.e., those not in folders in the Project panel) will automatically be added to the Adobe Media Encoder encoding queue.
For more information about what’s new and changed in Adobe Media Encoder CC 2014.1 (8.1), see this page.
native encoding and decoding of movies using GoPro CineForm codecs
After Effects, Premiere Pro, and Adobe Media Encoder can natively decode and encode QuickTime (.mov) files using the GoPro Cineform codecs on Mac OS and Windows, meaning that you do not need to install additional codecs to use and create such files.
At the higher quality settings, this codec is an excellent choice for intermediate files—i.e., files that you create from one application in a post-production pipeline to pass to the next application in the pipeline. Movie files encoded with the GoPro Cineform codec at the higher quality settings include an alpha channel.
To use the GoPro CineForm codec for output, choose QuickTime as the format in the Output Module Settings dialog box, click the Format Options button, and choose GoPro CineForm as the video codec.
For details about quality and pixel format settings for the GoPro CineForm codec, see this page.
scripting improvements for text layers
You can now read additional information through scripting about the font and style used in a text layer, including the location of the font file on disk.
The new read-only attributes for the textDocument object are these:
fontLocation: returns string with path of font file, providing its location on disk (not guaranteed to be returned for all font types; return value may be empty string for some kinds of fonts)
fontStyle: returns string with style information — e.g., “bold”, “italic”
fontFamily: returns a string with the name of the font family
The value returned is for the first character in the text layer at the current time.
mocha AE CC 2014, based on mocha 4.0
mocha AE has been updated to mocha AE CC 2014 (version 4.0.1). This is a major version update that includes compatibility with mocha Pro 4 project files. For details, see this page
miscellaneous new and changed features
The Anchor Point icon on selected layers has been enhanced for better contrast and visibility, and it is now easier to select and use.
The application title bar now shows the full path to the project file.
The Welcome Screen dialog box will automatically close when you open a project by double-clicking it in Finder or Explorer.
While tracking an effect mask, the mask mode no longer temporarily changes to None. This preserves the appearance of the masked effect during tracking.
The motion tracker (point tracker) no longer offers a pre-processing Blur control. This option never worked as designed.
There is now a Render And Replace command in Premiere Pro for replacing a Dynamic Link After Effects composition with a rendered movie.
Use the new Browse Add-ons command in the File menu to go to the new Adobe Exchange, from which you can download and install animation presets, scripts, template projects, et cetera.
The new Adobe Color Themes panel replaces the panel previously named “Adobe Kuler”. Choose Window > Extensions > Adobe Color Themes to open this panel.
a few choice bug fixes
We fixed a lot of bugs in this update. Here are a few that I think are especially worth calling out:
memory leak when scrubbing to preview audio
slow rendering of After Effects compositions used in Premiere Pro through Dynamic Link when the main After Effects application is open
errors when using the Create Stereo 3D Rig
errors when using and creating custom (pseudo) effects
mismatch in interpretation of layer bounds for imported .psd files in projects from previous versions of After Effects
incorrect rendering of vector objects from Photoshop
pixelation and and other problems with RED (.r3d) files
incorrect VRAM amount reported for some AMD GPUs on Mac OS
crash when copying and pasting layer styles from one layer to another
problems with effect eyedropper control
incorrect date when using Current Date option in Numbers effect
many other causes of crashes and errors
Summary of what’s fixed in the After Effects CC 2014.1.1 (13.1.1) update
If you applied an effect without properties or opened a project containing an effect without properties, then After Effects would give a long series of error messages: “After Effects error: internal verification failure, sorry! (unexpected match name searched for in group) ( 29 :: 0 )”. This bug is now fixed. Examples of effects that triggered this problem inlcude Knoll UnMult and BAO Mask Avenger.
Tooltips now appear correctly in the Timeline, Project, and Effect Controls panels.
The middle mouse button again works as expected for such purposes as activating the Hand tool in viewer panels, using the Unified Camera tool, or repositioning shape layers or masks.
Panels no longer flash red when resizing or rearranging panels.
The Graph Editor works correctly on Windows high-DPI systems. In the previous version (After Effects 13.1.0), clicks within the Graph Editor were registered in the wrong place on Windows high-DPI systems.
RED (.r3d) files no longer cause a 15-second delay when the resolution of the image being requested from the importer is less than 1/8. This could occur when the thumbnail was generated on import, when Adaptive Resolution was engaged, et cetera.
BridgeTalk is now set up correctly, so that scripting calls from ExtendScript Toolkit, Bridge, and Premiere Pro correctly target After Effects.
The installer cleans up stale components better, including updated Cinema 4D components.
Top new features for After Effects CC 2014.1 (13.1)
high-DPI content and UI (Mac OS, Windows)
refreshed user interface design
Copy With Relative Property Links command
color management for Dynamic Link
Adobe Anywhere for Video improvements
Maxon Cinema 4D Lite R16 and Cineware 2.0
Collect Files for Cinema 4D assets
native GoPro CineForm codecs
scripting improvements for text layers
improved Adobe Media Encoder watch folders
mocha AE CC 2014, based on mocha 4.0
many bug fixes
After Effects Cc 2014 Mac Download Free
1 note
·
View note
Text
Batman Rebirth Part 10
EXT: AMUSEMENT MILE - PIER- CONTINUOUS
JOKER casually waves at BATMAN...
...JOKER slashes the rope. PLUNGING JIM into the river...
EXT: AMUSEMENT MILE - PIER- MOMENTS LATER
... BATMAN runs towards the river, going to dive in after
JIM.
...A GUNSHOT RINGS out. Hitting BATMAN in the chest, HE
stumbles back...
...JOKER advances - firing again. HITTING BATMAN again...
...BATMAN dives at JOKER, knocking the revolver onto the
floor...
...JOKER fights back, SWIPING again and again with the knife,
BATMAN ducking and diving out of the way...
TERRY:
(V.O)
Why?
...BATMAN keeps trying to get the edge of the pier, JOKER
coming back at him with the knife, BATMAN's fighting gets
more and more DESPERATE, HE's bleeding out, panicking about
JIM...
...BATMAN dives forward, tackling JOKER to the ground. THEY
grapple, DESPERATELY fighting...
...BATMAN clambers to his knees. The revolver in his hand.
HE's PANICKY, FRANTICALLY points it at the JOKER...
...The lever CLICKS...
SASHA:
(V.O)
To prove one point...
A maniacal smile CRACKS across the JOKER's face, He's
achieved his lifelong ambition - Broke the Bat...
SASHA:
(V.O)
All it takes is one bad day to
reduce the sanest man to lunacy...
MONTAGE ENDS.
END FLASHBACK:
INT: BATCAVE: MAIN CONCOURSE
BRUCE turns away from the ROBIN suit, to face TERRY. HE's
eyes are red, almost on the verge of tears - visibly shaken.
BRUCE:
Barbara never forgave me... I
couldn't do it anymore after
that....
THEY sit in awkward silence for a good few minutes. BRUCE and
TERRY not looking at one another.
BRUCE:
So... Terry, you sure you still
want to do this?
TERRY glances up, MEETING BRUCE's gaze.
TERRY:
Bruce... It's never been about
wanting to do this, this needs to
happen. Gotham needs hope.
INT: BATCAVE: BATCOMPUTER - MOMENTS LATER
An satellite view of GOTHAM appears on screen - flickering as
it ZOOMS in. Following an BLINKING RED DOT.
BROTHER EYE:
Target moving.
INT: BATCAVE: MAIN CONCOURSE - CONTINUOUS
BRUCE DIVES over - watching as the satellite ZOOMS in.The
screen flickering as the image becomes clearer and clearer.
BRUCE:
Powers is on the move.
TERRY turns. The RED DOT flying across the river, getting
closer and closer to an structure floating in the distance.
TERRY:
What's he heading towards?
BRUCE taps on the keyboard, bringing up a diagnostic screen -
clicking OPTIMISE.
ON SCREEN:
The image clears up - revealing GOTHAM HOVERDOCK. Imagine an
amalgamation of an aircraft supercarrier and a cargo ship.
All kept in the air by four massive rotor systems.
ON SASHA:
SASHA:
Looks like Gotham hoverdock... Must
be where they are shipping from.
BRUCE:
(O.S)
Terry, If you want to do this, you
better get in the air.
INT: BAT-JET: COCKPIT - NIGHT
TERRY'S in the cockpit, helmet on, visor up. The full HUD is
activated - boresight, flight path vector all hovering in-
front of BATMAN.
Lights flicker across the cockpit - forming into an
SHIMMERING HOLOGRAM of BRUCE.
BRUCE:
Terry, we got access to those
files... Have a look at this.
The full VENOM GENOME flickers into existence - hovering next
to BRUCE. Each gene labelled. BATMAN looks across at it.
BRUCE:
This Blight has an remarkable
similar genetic to street Venom.
TERRY
So Powers was supplying Venom to
those Jokerz?
BRUCE:
By the looks of it... BRUCE:
they dealt to the vagrants, in
order for Powers to study the
effects it had on them...
INT: BAT-JET: COCKPIT - NIGHT - MOMENTS LATER
TERRY
God... I hope Dad wasn't
involved...
A proximity alarm starts BEEPING on the HUD.
BROTHER EYE:
Approaching target.
BRUCE:
Terry, listen to me. We cannot
allow that weapon to leave the
city. It's more important than
Powers. Untold numbers of lives are
at stake.
TERRY glances down, gathering HIS thoughts.
TERRY:
I know Bruce.
EXT: GOTHAM HOVERDOCK - NIGHT
A massive CARGO DRONE WHINES down through the sky. IT passes
through a cloud, revealing... Gotham Hoverdock.
It's floating way above Gotham city. Imagine an amalgamation
of an aircraft supercarrier and a cargo ship - Two runways,
surrounded by cranes.
Our DRONE flies down, towards the hoverdock. Blades HUMMING.
IT swings down, around the control tower...
INT: GOTHAM HOVERDOCK - CONTROL TOWER - NIGHT
It's the main hub of the hoverdock, A central control table
surrounded by consoles and windows. It's alive with activity.
PEOPLE running about, every console manned.
VILMOS is standing at the control table, watching the
shipment being loaded on the overhead monitors.
VILMOS:
How long until the transport is in
the air?
Behind VILMOS, the double doors SWISH open. DEREK POWERS
steps through, making HIS way to the control table.
DEREK:
Why? Feeling like you've outstayed
your welcome?
VILMOS turns, watching DEREK.
VILMOS:
After the government raided your
office? Of course I am!
DEREK:
Relax, it was only GCPD. I'll make
a call in the morning and it will
all be cleared up. The Mayor owes
me...
VILMOS:
What about this Bat?...
DEREK looks up at the monitors.
DEREK:
I doubt he's the real one.
DEREK looks over at VILMOS. VILMOS is still not convinced.
DEREK:
Even if he does show up, I've
brought some friends along,
shouldn't be a problem.
On cue, the double doors SWISH open and two soldiers - clad
in bulky mechanized armour MARCH in, their visors raised.
Each has a insignia on their armour, a black chess piece - a
Knight.
VILMOS turns - looking them over...
VILMOS:
Can I help y...
DEREK
(Interrupting)
Ah, may I introduce Checkmate,
America's finest private army.
DEREK moves across to introduce the Checkmate soldiers -
SERGEANT CONRAD MACKAY and SERGEANT CONNIE WEBB.
DEREK:
This is Sergeant Conrad Mackay.
VILMOS shakes HIS hand. The armour WHIRRING.
DEREK
And this is Sergeant...
CONNIE:
(Interrupting)
Just Connie, sir.
VILMOS shakes HER hand. the armour WHIRS.
CONNIE:
Heard all about you Vilmos.
VILMOS:
Ah, What did you hear?
CONNIE:
Only the best things Sir.
VILMOS nods - impressed.
VILMOS:
(To Derek)
So these were the friends that you
were referring to?
DEREK:
Yes, We have these two and some
others.
VILMOS:
How many others exactly?
CONRAD:
We've deployed two squads on this
rig. More than enough to deal with
some man in...
INT: GOTHAM HOVERDOCK - CONTROL TOWER - MOMENTS LATER
An ALARM BLARES across the control tower.
VILMO'S, CONNIE, CONRAD watch the screens above. Looking for
the cause.
DEREK
What the hell's going on?
CONNIE points at the screen.
VILMOS:
He's found us.
DEREK looks up... seeing the BAT-JET on approach...
...Derek turns to CONNIE...
DEREK:
Deal with him!
EXT: GOTHAM HOVERDOCK - WALKWAY - NIGHT
The walkway runs along the edge of the hoverdock, on one side
there is the cargo - rows and rows of containers. The other -
the night sky.
CHECKMATE SOLDIERS charge onto the walkway, all carrying
multi missile launchers...
The SOLDIERS crouch down. Look through the targeting
sights...
SOLDIER 1:
Target locked!
SOLDIER 2:
FIRE!
EXT: GOTHAM HOVERDOCK - WALKWAY - MOMENTS LATER
...BOOM! MISSILE after MISSILE ROAR out of the tubes, towards
the BAT-JET...
#batman#batman beyond#rebirth#science fiction#cyperpunk#cyberpunk#the dark knigth rises#the dark knight#bruce wayne#fan fic#fan fiction#screenplay#batman fandom#batman fanfiction#joker#sci fi#terry mcginnis
8 notes
·
View notes
Text
“Scenery”

Listen to “ 풍경” (”Scenery”) while you read~
》Pairing: Taehyung x Reader
》Genre(s): [Fluff] [So Much Fluff] [Tooth Rotting Fluff] [Drabble]
》 Words: 1,415
》Rating: E
》 Warnings: None
》 A/N: This fic is still written in second person, but it’s more from the perspective of Taehyung. I’ve literally been listening to “Scenery” for 12 hours straight. Don’t judge me. I did the same thing with “Promise,” only this time I had the dire need to write something. And perhaps draw something in the future. Who knows— all I know is that I bawled the first few times listening to this song. It’s literally one of the most beautiful things I’ve ever heard. The only other songs that ever made me cry are “Spring Day,” “Young Forever,” and “First Love.” So now this song holds a very special place in my heart.
[Summary]: Taehyung wonders if it’s the peaceful solitude of a garden in winter that keeps him coming back, or perhaps it’s his red-clad mystery girl that stands out against the world of white.
Social Links
The world was white— dusted over delicately in frozen specks that shone like crystals in the scarce amount of sunlight that fought its way through the heavy gray clouds that hovered above, sprinkling the earth with more white. The crunch of snow beneath boots and jingling of distant wind chimes was carried away by the bone-chilling breeze and the still garden that had been so full of colors of greens and oranges and pinks just months ago was now painted in simple, pure, beautiful white. No one came here in the winter— so full of life in the spring, it became barren in the winter months. This is what had drawn him there in the first place; no one would notice him, fawn over him. He could happily bring his camera and capture the scenery in peace. Yes, it was his sanctuary— no one came here in the winter. Except you.
He knew that he would find you here, wandering silently along the garden’s paths with your bright red coat and white hat. Taehyung had seen you the very first time he visited this garden little more than two weeks ago, and each time since. Did you come here every day, he wondered? What kept bringing you back? Perhaps you enjoyed the solitude as well— the silence, the peace. It was an escape for him, it was the same for you, perchance? He didn’t know, because even though he’s seen you several times over the last fourteen days or so, he had never once said a word to you, nor made his presence known. He had only ever seen you from across the garden.
He didn’t particularly have a reason for never approaching you; he wasn’t terribly nervous when he saw you, he just never thought to do it. You always seemed to at peace when strolling by yourself, just as he was. Who was he to break that blissful look on your face for a short moment of conversation? Or maybe he simply enjoyed the mystery of you. You, who had stumbled upon this beautiful place just as he had.
Taehyung had visited the garden when it was blanketed over in snow before, but never as it was still falling from the sky, littering the ground in fresh powder. He took pictures here and there, but wasn’t quite as involved as he had been the first few times he had visited. Instead, his eyes traveled over the white mounds that were once bushes, searching for a little red figure in the distance. Perhaps he was clueless to your reasons for returning to the abandoned gardens, but his frequent returns could only be attributed to pink cheeks and a hat as white as the world around him.
He had been there for nearly an hour already— he wasn’t paying particular attention to the time, but the cold seeping into the bones of his fingers told him he had been pacing the grounds without seeing you for much longer than usual. Were you not coming today, then? Should he give up his seemingly futile task of catching a glimpse of the wistful girl who wanders the winter garden? He let out a heavy sigh of defeat as he raised his camera once more to capture the image of the snow-covered garden path in front of him. The shutters of the camera sounded with a click and as he lowered the device, he noticed dimples in the snow. Footprints; not entirely fresh as the had begun getting filled with a fresh coat of powder.
Warmth spread through his body from excitement— as elusive as you had been today, you had indeed been here. He wondered, if he continued down this path, would you appear before him as you had every other time he came here? Hesitantly, he ventured forward, keeping his eyes locked on the disappearing footprints left in the snow as to not miss if you veered off onto one of the smaller trails. It was this fatal error that landed him in much closer vicinity to you than he would have liked, and it wasn’t until he heard your soft, airy voice that he comprehended this.
His gaze snapped away from the ground and towards the direction of the gentle sound that he intuitively knew came from your lips. There you were, crouching only a few yards away from where he stood with your back turned towards him. He froze, not wanting to catch your attention or alarm you. However, at the thought, he realized that a strange man standing silently in the snow watching you from a short distance would probably be alarming as well. Still, he did nothing to draw attention to himself and kept his eyes locked on each movement your form made. It is then he noticed the reason for your returning so frequently to the gardens.
In front of you sat a small gray cat, happily eating from a bowl of food he presumed you brought in the little pink backpack you always adorned on your walks. His expression softened— you were concerned for this stray’s survival during the harsh winter this had turned out to be. A harsh winter, but all he could feel was warmth as he gazed at the affectionate touched you gifted the small creature at your feet.
Without thinking, Taehyung raised his camera into his line of vision, adjusting the focus so your form was no longer blurry. Finally, he saw the features of your face clearly, and a small smile slipped onto his lips. Your cheeks were flushed out by the biting chill of the air as was your nose, but your eyes were alight as if it were the middle of August. Reflexively, his index finger put pressure on the shutter-release, capturing the purity of the moment. Again, as the shutter closed, obscuring his sight for a moment, it sounded out with a loud ‘click,’ and in the time it took for the shutter to open again, your head had whipped around to look at him in alarm.
He saw your surprise clearly in the zoomed-in image of your face through the lens, and he quickly lowered his camera to properly look at you with a similar countenance of distress. The two of you stayed like that for a long moment, neither noticing that the cat had scampered off after the first quick movement. He swallowed nervously, never having prepared to actually meet you. Taehyung had always been careful to keep his distance, making you aware of his presence no more than you would be of a phantom’s. He had never meant to disturb you, yet, somehow, as he watched the stunned expression melt from your face to be replaced by a warm smile and playful glint in the depths of your eyes, he found it hard to recall the reasons he had for avoiding you in the first place.
“Hello,” you spoke first, breaking the pregnant silence between the two of you. He blinked, realizing after a moment that you had greeted him, and a deep blush rose to his cheeks.
“Hello…” He muttered back. He was surprised, but less so by the situation now, and more by the way you were looking at him like you had known he was there the whole time. There was no hint of discomfort or alarm. Instead, it was as if you were looking at an old, dear friend whom you hadn’t had the opportunity to see in a long while. Perhaps he should make an apology for taking your picture, but he wasn’t particularly sorry, not with you regarding him with such familiarity. His heart began to drum harder in his chest as he unknowingly returned the warm look you offered him. You stood from your crouched position to stand fully in front of him, yet never made a move to close any distance between you.
“I was wondering when you would finally come and talk to me.” You said, and his breath hitched for moment, for no other reason that he could pinpoint besides you. It may have been his constant thoughts of your serene expression in the gardens recently, or the fact that he had held you at such a distance until now to retain your shroud of mystery, but looking at you now in your red coat and white hat made him fully aware that you were the only scenery in the desolate garden that he had been searching for.
[END]
#kim taehyung#taehyung#v#tae#bts taehyung#BTS v#taehyung fanfic#taehyung fanfiction#taehyung fic#v fanfic#v fanfiction#v fic#taetae#taehyung fluff#bts fic#bts fanfic#bts fanfiction#bangtan fanfic#bangtan sonyeondan#taehyung scenery#scenery#v scenery#stream scenery
160 notes
·
View notes
Text
devlog # 8 // mapmaking, part 2 (plants, blender modeling + refining map visuals)
welcome back to the world of Gamedév!

okay, so, it’s been a couple weeks since the last devlog, but honestly, it feels like years have passed. to let you know a bit of what i’ve been up to, i’ve mainly been reflecting on pursuing further education in a formal setting. for close to a year now, i’ve already been studying computer science and game development pretty intentionally on my own - with the abundant resources available online, it is more than possible to receive a full and competent education without university studies.
however, there are a few things that self-studying does not always make easy or accessible, namely:
a) tangible, structured evidence of the skills you’re learning, in a format others (employers) feel they understand,
b) opportunities to collaborate and build with other people around your skill levels, and
c) in-person connections, leading to further interpersonal and career potentials
these are things that i think university education does tend to provide more consistently, and they are the reason that i am nearly certain i’ll be pursuing more formal education in the coming months. i am mainly waiting to hear back on a funding opportunity, so more details on my plan in the next devlog ..
as far as progress on zodaia, the main thing i worked on this week was getting some new models into the game. as you may remember, in the previous devlog, i had made a number of environmental models .. pretty much entirely out of cubes. the first model, a tree, allowed me to render a stunningly realistic and artistically compelling forest:

it may be difficult to tell, but this is a digitally-rendered forest scene, not a photo; hard to believe, but if you zoom in close, you might see subtle indications that these models were created from geometric shapes. while i did not imagine i could improve upon the flowing asymmetry of the grass or the bold sharpness of the rock faces, i thought i would give it a shot.

putting these placeholder assets temporarily aside, i decided to start with a sort of leafy plant because it seemed like something i couldn’t fuck up too much.
i opened blender, deleted the initial cube, and started with a flat plane, just the default one provided. i then extruded it a couple of times, making a longer, flat plane - it seemed easier to work with the leaf as a flat piece before bringing it more into 3d. i next curved the shape by selecting loop cuts and scaling them down as made sense to me; i didn’t follow any guide, just went along adjusting the shape into something pleasing to me.
once i had a flat leaf that looked nice, i put a loop cut down the length of the leaf, and i rotated the whole leaf up, keeping its base close to the center, where the axes meet. i then pulled this center loop of vertices down, creating an indent in the leaf, then individually adjusted the side vertices up and down to create more depth, as if the leaf were rotated or growing differently along its edges.
and that brought me to this:

i know that is a lot of blender/3d-modeling talk, already, so let me know if you’d like a more in-depth blender introduction; if you support me on patreon, i will definitely make a tutorial so you can know more about the modeling process!
anyhow, once i had this one leaf, i just duplicated it and started manually positioning the leaves to make something that looked decent. i’m sure there is a more perfomant or efficient way to do things, but my goal right now is simply to make - i have spent years trying to conceptualise an ideal way to do everything, which often led to me not making anything at all, but the intention of this blog is for ahn to make. so, this is what i made:

obviously, as this was the first model i’ve made for the game (aside from the hex model, which will also soon get a rework), i couldn’t wait to see the model actually in the game. i made a basic green material, imported the model (as an fbx file) into unity, and simply replaced this with the model in one of the original InteractableObjects - i think i replaced the bush?
here’s how it looked:

already stunning! sincerely, this time. i am in love with the simplicity of this effect - and though i might feel differently later, right now, i love how this plant looks.
next, i continued swiftly on with a tree, since i imagined that is the thing that would be most engaging and also most visually rewarding. in the past, i have created low-poly trees before and absolutely loved the effect, so i also decided i would go for something similar this time.
skipping most of the modeling details, i basically just started with a cylinder and extruded, extruded, extruded and repositioned vertices until i got this shape - it took probably 5 minutes (including the part where i needed to bond the duplicated tree branch by manually creating faces between the central and duplicated branch vertices).

i then added in some icospheres, which i just pulled around and contorted into these shapes, which i (again) duplicated.

after creating materials for the tree bark and the tree top and putting a light in the scene, this was the quick render result.


and now, in the game..


the difference is absurd, especially considering how little energy it took to make these trees. i created a dark and a light variation once i had the models imported into unity, and will certainly make variations with many more shapes - however, right now, there is only that one tree model in this scene. could you tell? without studying the trees too hard, i think the automatic rotation (included in the procedural generation) gives a convincing effect, as if there are many tree models there.
and since i was coasting on the excitement of having these models complete nearly immediately, i decided to go ahead and do the grass and rock models, too.
again, start with one shape ..

then duplicate and make material ..

et voilà. also featuring the rocks i made.

actually, the first time i imported the model and pressed play, it crashed unity and looked like this:

why? i initially thought it was because i had made the noob mistake of making 3d grass (which i did) instead of using 2d images, but actually, it was because i had also imported a light and camera for each grass model; remember to delete them from the scene in blender before exporting!
with that, i was pretty in love with how everything was going. the environments are starting to look more organic and how i dream of them being.

updated glacier: (not much going on here yet; needs more water effects, snow falling .. but i did update the ice color and transparency to be more distinct from the snow)

desert scene with a very bright weather:

ash biome looking almost exactly the same:

gardens at night with an ambient light:

and two new biomes: the tundra, a mostly frozen, rocky landscape with some plant-growth:

and the cove, dark because it’s inside/a cave:

overall, i am super pleased with these developments and *so* thrilled for the next changes to come.

look out for the next devlog, where i’ll probably be working on a couple more models (or texturing/modeling the hexes?) and especially the more weather-y environmental effects: lighting, post processing, clouds, rain, lightning, water, the sky -- much to come. until then..
with love and hopefully a low poly count,
ahn
// support me on patreon? click here to join my party and help me keep making content like this <3
#low poly#low poly art#lowpoly#modeling#blender#modeljob#3d model#low poly modeling#art#environment#trees#grass#rocks#plants#digital#game art#game design#game dev#indie game#indie#indie game dev
7 notes
·
View notes
Note
Omg yes I would love to know how to make one myself!
alright here we go!! i’m gonna use my current header as an example for the steps, but pls don’t directly steal the header from me!!! thank u!!!!! (that’s not directed at u specifically anon, just at people in general)
here’s how to make a header the way i made mine! :)

(this got,, quite long,,, so i’m gonna put everything under a read more)
so first, we’re gonna need photoshop. if you do not already have ps and do not want to pay for it, there are plenty of sources online that will teach you how to torrent it and crack it and all that jazz. (aka i’m not gonna go through this step myself, this explanation is long enough lmao)
then, pick who/what you want to put in the header and find a picture you want. for example, i used this lovely photo of zhou rui.
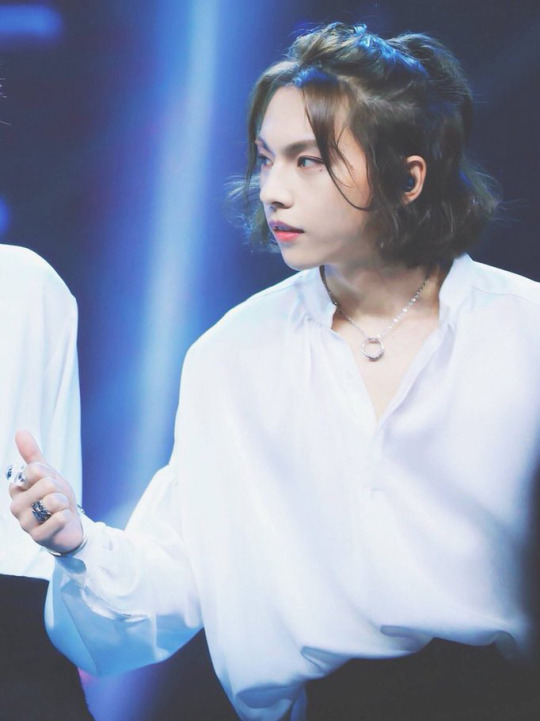
after you’ve got your photo, you’re gonna want to crop it to the size you want and cut out the part of the photo you want. there are many, many ways to cut out photos in photoshop and you can find so many different tutorials online for this! i personally prefer to take the polygonal lasso tool and zoom all the way in to 500% to manually select every pixel i want, but that’s just me being a perfectionist and it’s really not necessary to do that lol. i also scale the photo down at this stage because i’m lazy and the smaller the photo, the less pixels to deal with lmao,, just make sure you don’t make it so small your header ends up pixelated
after doing that, you’ll end up with something like this:

the edges on the hair are far from perfect, but this is okay because we’ll be using a fairly solid background and i can use selective color to make the color of the light that hits his hair match the background. it’ll make everything look much smoother.
after this, i like to select the transparent area, make a new layer, and color it whatever color i want my background to end up being. (the magic wand tool will do for this; we won’t be keeping this layer later on so it doesn’t need to be the most precise, we just want to be able to reference the color when editing the coloring of the original photo without the coloring of the background to be effected as well)

(you can deselect after this stage, i’m just trying to show the area that i selected to color lol)
after this, click back on the layer you cut out the picture on (this is important if you don’t want to change the solid color along with everything!!) and go to layer > new adjustment layer > brightness/contrast in the top menu bar. this should open up a new layer for you and you should see a little window with slidey bars for brightness and contrast. adjust these bars as you see fit. here’s what my options were set to, but it really all depends on how the original photo was lit so these options may not work for you.

repeat these steps, except instead of brightness/contrast use curves, vibrance (optional, depends on the photo), color balance, and selective color. edit each adjustment layer as you see fit. here’s what i did with the curves and color balance layers (i’ll talk about selective color on its own in a second):

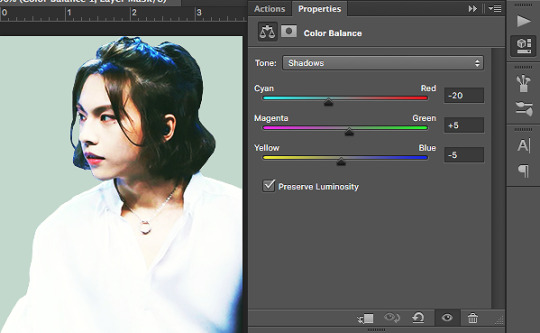


note how with color balance i made things a little more green/yellow/orange than i would’ve had it been just the image on its own. this is because i’m trying to match what i’ve cut out to my background color and the color scheme i’m going for.
now we’re gonna work with selective color. what selective color does is it isolates the specific color ranges (eg. reds, yellows, blues, etc.) of the image and it adjusts them separately. selective color is where i really try to match everything to the best of my ability; if there’s any light hitting any part of the image i try to make sure it matches the background, if i want a certain color to stand out to bring out anything i turn it up, if i want a certain color muted i turn it down. i also use the whites, neutrals, and blacks to play with what kind of contrast i want and whether i want the highlights/midtones/shadows of the images to be darker or lighter. here are my options; what yours end up being depends on what the original lighting of your image is and what color you’re trying to match:

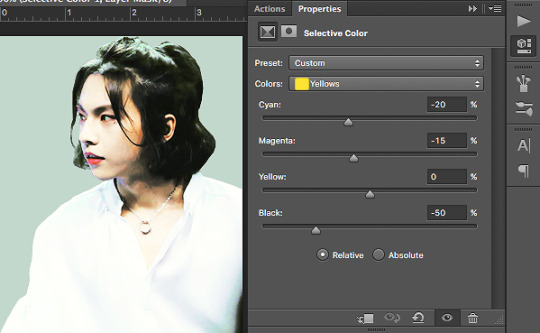

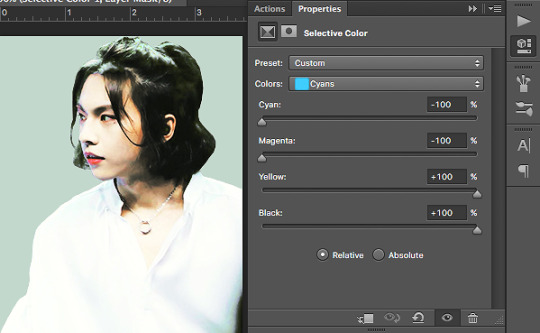
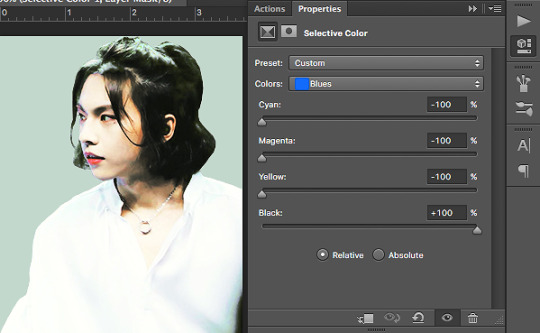
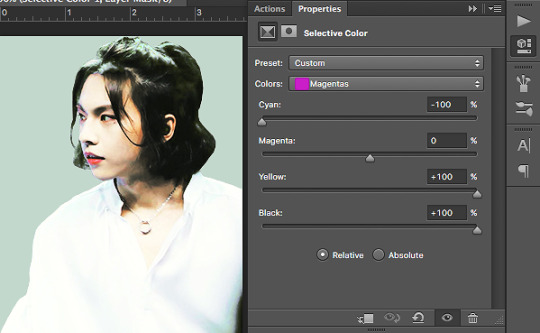


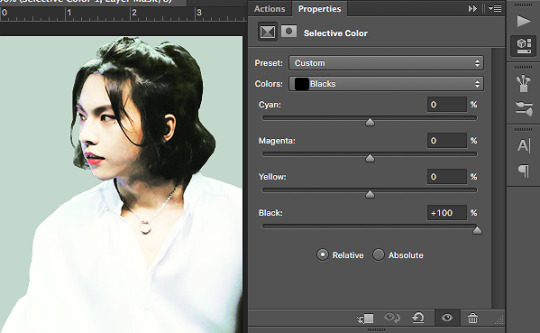
now, simply delete the solid color layer and flatten your image! congrats, you’ve got a color adjusted cutout of whatever you want to put in your header! save this, but don’t close this tab quite yet.

now we move on to the background gif! first, pick a gif you’d like to use. any gif is fine, we’ll be desaturating it and turning the contrast way up anyway, so it really doesn’t matter. i chose this shooting star gif and played around with the frame durations a little (totally unnecessary, but you can do it if you’d like):

luckily for me, this gif is already black and white and pretty high contrast, so i don’t need to do much to it. to fully explain this step, i’ll substitute in the gif i used for the header of my main blog @kinovate
after you’ve opened up your gif in photoshop, click on the top layer (this is important! you want to make sure you apply the adjustments you’re making to every layer!) and go to layer > new adjustment layer > hue/saturation. turn the saturation all the way down to -100. you should end up with something like this:
once it’s black and white, you can add a new layer above everything else and fill it with the color you want. change the blending option from normal to screen. you should get something like this:

notice how the flowers are kind of faint? we’re gonna have to turn up the contrast. click on the hue/saturation layer you made earlier (you want the solid color layer to stay as the top layer!) and go to layer > new adjustment layer > brightness/contrast. turn the contrast all the way up to 100 and adjust the brightness as you see fit. you should get something like this:

now that we’ve got the gif where we want it, let’s move on! i’ll go back to using my current header as an example, so this is the gif i have at this point:

now go back to the tab with the color adjusted cutout you did earlier, drag the tab out to a separate window, and drag the layer onto the gif. this should put your cutout on top of the gif. make size/placement/rotation adjustments as you see fit. you should now have something like this:
i’ve upped the brightness/contrast on my gif a little more just to make it stand out, and i’ve left some space at the bottom because this cutout of zhou rui is a little short for my liking. we’ll also be adding some effects to the bottom so that it fades to white anyway, so the extra space doesn’t really matter.
now we pick how we want this header to fade to white. you can use a simple gradient, a wavy line, circles, ripped paper textures, brushstrokes, etc. anything you want, really. get creative! i picked some clouds for our lovely fairy zhou rui, but i’m not really sure where i saved the picture i actually used so i’ll just show you guys what to do with another cloud image:

using hue/saturation, brightness/contrast, and curves adjustment layers, turn this into a photo of high contrast black and white clouds, like so:

drag this onto what you’ve got for your header, change the blending option to screen, and move/rotate the image until you like its placement. if it’s too faint and you feel like it’s not covering enough, duplicate the layer to make the white bolder. fill in any space you don’t want with a soft white brush. you should end up with something like this:

(i personally like the clouds i found before better, i just couldn’t find the full image of them. i do have the psd file for my header saved though, so i’m gonna use those clouds from here on out.)
after all this, add whatever details you want. for example, i drew on some blush:

and voila! you’re done! :)
hope this was helpful!! i tried to go through every step thoroughly, but if something’s confusing or not explained well hmu with questions and i’ll try to help out to the best of my ability!!!
158 notes
·
View notes
Text
Spar 3.0 Software Free Download
Freeware
Spar 3.0 software, free downloadre Free Download
software, free download For Windows
Spar 3.0 software, free download 2012
software, free download Games
Spar 3.0 software, free download For Pc
Spar 3.0 software, free download Windows 10
Spar 3.0 Software free. download full Version
Windows/macOS/Android/iOS
67.5 MB
18,050
Securely send messages, share files, and meet face-to-face with anyone, anywhere, anytime. Integrate the Cisco Spark app with the other services you and your teams use to unify your work streams. Teams move faster and deliver better results when everyone and everything comes together.
Use unlimited workspaces called “rooms” to consolidate team communications were you can:
Send messages and share files to keep projects moving
Search for people to connect instantly or for messages to revisit key information
Start face-to-face meetings with screen sharing to make decisions faster
Unify your work streams with integrations to other services such as ZenDesk, Trello, GitHub and many more
Work confidently with end-to-end encryption that keeps your messages and files secure in the cloud
Create team rooms for your upcoming meetings with one tap to get the conversation going
Use filters to control how you view and get notified of information
Participate from a mobile device, a computer, or even a browser for anywhere, anytime collaboration
What's New:
Official Apache OpenOffice download page. Join the OpenOffice revolution, the free office productivity suite with over 295 million trusted downloads. Host Jira Software on your server for more customization and control. Download and try Jira Software Server free for 30 days. Download Stamps.com 32-bit version. 64-bit version available. Download Stamps.com 64-bit version. Mac Users: Go to Stamps.com Online to print postage from any web browser. Stamps.com software is only compatible with Windows computers. Already downloaded the software? Please look for the Stamps.com icon on your desktop and click it to launch. Global Nav Open Menu Global Nav Close Menu; Apple; Shopping Bag +. May 21, 2020 PaperScan Free 3.0.111 PaperScan Scanner Software is a powerful TWAIN & WIA scanning application with an OCR engine centered on one idea: making document acquisition an unparalleled easy task for.
Windows version updated to 2.0.7753.0
macOS version updated to 1.5.7
Software similar to Cisco Spark 8
54 votes
Microsoft Teams is an entirely new experience that brings together people, conversations and content—along with the tools that teams need—so they can easily collaborate to achieve more.
Freeware
Windows/macOS/Android/iOS
22 votes
Zoom is a free HD meeting app with video and screen sharing for up to 100 people.
Freeware
Windows
11 votes
From group messages and video calls all the way to helpdesk killer features our goal is to become the number one cross-platform open source chat solution.
Freeware
Windows
Spar 3.0 software, free downloadre Free Download
PaperScan Free is a freeware image scanner software app filed under office software and made available by ORPALIS for Windows.

software, free download For Windows
The review for PaperScan Free has not been completed yet, but it was tested by an editor here on a PC and a list of features has been compiled; see below. We have found that this software contains advertisements or other ad-supported elements during runtime.
If you would like to submit a review of this software download, we welcome your input and encourage you to submit us something!
Scanning software with limited features as a freeware product
Spar 3.0 software, free download 2012
PaperScan Free Edition is universal scanning software designed to offer power as well as simplicity of use. While most scanning applications are dedicated to one scanner or one scanning protocol, PaperScan allows you to control any scanner, including network scanners (TWAIN or WIA protocols), cameras or acquisition cards.
software, free download Games
All features are automatically negotiated and handled by PaperScan. PaperScan Free Edition can scan and import ten pages, save as single page PDF/A, TIFF, JPEG, PNG, JBIG2, PDF Encryption support, and flatbed and document feeder support.
Features and highlights
Limited batch TWAIN & WIA scanning / import (10 pages)
Save as single page PDF/A, TIFF, JPEG, JPEG 2000, PNG, JBIG2, WEBP
Post Image Processing: color adjustment, color space conversion, effects, filters, crop and more
PDF Encryption support (read & write)
Flatbed and document feeder support
Duplex scanning support
PaperScan Free on 32-bit and 64-bit PCs
This download is licensed as freeware for the Windows (32-bit and 64-bit) operating system on a laptop or desktop PC from office software without restrictions. PaperScan Free 3.0.119 is available to all software users as a free download for Windows 10 PCs but also without a hitch on Windows 7 and Windows 8.
Spar 3.0 software, free download For Pc
Compatibility with this image scanner software may vary, but will generally run fine under Microsoft Windows 10, Windows 8, Windows 8.1, Windows 7, Windows Vista and Windows XP on either a 32-bit or 64-bit setup. A separate x64 version may be available from ORPALIS.
Spar 3.0 software, free download Windows 10
Filed under:
Spar 3.0 Software free. download full Version
PaperScan Free Download
Freeware Office Software
Major release: PaperScan Free 3.0
Image Scanning Software
0 notes
Text
Sending Private Messages

Sending messages on Instagram is not at all complicated, even when you have an Instagram story from a friend, you can write a comment at the bottom, that comment is actually a private message that no one else but the person can see who is the message intended. Apr 05, 2018 When using Decipher TextMessage, the user's data is all local and private on their computer. In addition to printing text messages, the program enables and iPhone user to save text messages as a PDF for safekeeping, legal purposes, or documentation. Again, once messages are read into Decipher TextMessage, the text messages can then be deleted. A private message on Messenger is possible to be really private if you are using or doing your own encrypting. If the encryptions are done by a third party, then there is always a chance that the message privacy can be questionable.
SrdjanPav/E+/Getty Images
While you're using virtual conferencing platforms like Zoom to connect with friends or sign in to work meetings, you may want to message a person outside of the group chat. Zoom allows you to communicate with group messages across the whole team, but you can also send private messages to meeting participants if you wish. However, if you're concerned your Zoom hosts can see private messages, here's what you should know.

The Zoom platform offers in-meeting chat options, which include group messaging, as well as the ability to send private messages to users. Although it seems reasonable that private messages stay between two people, you may question if your Zoom host can see them. The host of a Zoom meeting has a lot of control over the settings, so it isn't an unusual question.
Luckily, the answer is pretty straightforward. Zoom's support center breaks down the details of messaging on the platform, and the answers will give you some peace of mind. If you send a private message to a friend or co-worker on Zoom, the host will not have access and won't be able to see private message threads. With that in mind, you don't have to hesitate to send those PMs, because the only people able to see them will be you and the person you're messaging.
There is another catch, though. You might want to be careful about private messages if you're the host. If you're hosting a meeting with a paid Zoom account and choose to save the meeting transcripts, all participants will have access to the meeting transcripts. While that might not sound like a bad thing, this includes public group chat transcripts, as well as any private messages between the hosts and other meeting members. Private messages between anyone who isn't the host will not be recorded. So, if you're the host of a meeting and elect to record it with a transcription, you may want to be careful with private messaging.
According to Zoom's help center, if a host chooses to automatically or manually save transcripts to their computer, it saves any chats that you can see as a host, meaning even those private messages you sent to others will end up in the meeting transcript. If the meeting host chooses to save the chat to the Zoom Cloud, the transcription will include group chats and messages sent while recording. So, if you're hosting a meeting, you might want to rethink using Zoom's private messaging if you don't want everyone to have access to it later.
Sending Private Messages On Facebook
You might find that some meetings don't have chat capabilities. The host of your Zoom meetings is able to select who can chat, or choose to disable the chat function entirely during the meeting. So, if you find yourself in a Zoom meeting with no chat function, this is likely the case. If you can message the group but not an individual, the meeting host altered the chat settings, and there is no way for a non-host participant to change this.
To start using chat on Zoom, click on the chat button on the menu bar at the bottom of your meeting screen. This will bring up a side column on the right and will be set to everyone by default. If you want to join in on a group chat, leave the settings alone. But, if you want to send a private message, select the drop-down menu next to 'To' and change the option from 'Everyone' to the person you want to message.
If you’re using Zoom on your smartphone instead of a desktop computer, you'll want to tap your screen in a meeting to make the menu bar appear on the bottom. Then, go to the Participants tab, scroll toward the bottom, and click on Chat. From there, select the arrow next to the 'Send to' option and choose who to private message.
To download Zoom for your Mac or PC, visit the download page.
How to send a private message in IRC depends on the IRC client you are using, and the IRC server configuration where you're connecting. However, using one of the below methods should allow you to send a private message to someone with most IRC chat clients.
Sending Private Messages On Instagram
Note
Before sending someone a private message, practice good etiquette by asking for permission. Also, if that user is ignoring all private messages, your messages to that user are ignored.
Double-click on username
Double-click on the username. If supported, a private chat with that user should appear.
Query or msg user
Using the /query or /msg commands also open a private chat with that user. Below are examples of how these commands are used. In both of these examples, we are sending a private message to the user with the name hope and the message hello. If you want to open a blank chat, the message can also be left out.
Tip
Some clients also allow users to shortcut /m instead of the /msg command to privately send messages.
Sending Private Messages Google Meet
Additional information
Check Your Private Messages
See the chat, IRC, and private message definitions for further information and related links.
0 notes
Text
Microsoft Office Potential Security Concern Mac
Zoom fixes webcam flaw for Macs, but security concerns linger The desktop chat app firm this week came under fire for moving slowly to close a potential security flaw affecting macOS users. This step-by-step article describes how to enable or to disable the display of a warning message every time that you click a hyperlink in a 2007 Microsoft Office program or in a Microsoft Office 2010 program. This section, method, or task contains steps that tell you how to modify the registry.
Microsoft Office Potential Security Concern Mac 2017
Microsoft Office Potential Security Concern Mac Free
Microsoft Office Potential Security Concern Mac Pro
Microsoft Office Potential Security Concern Mac Download
Microsoft Office Potential Security Concern Machines
-->

Note
Office 365 ProPlus is being renamed to Microsoft 365 Apps for enterprise. For more information about this change, read this blog post.
Introduction
This step-by-step article describes how to enable or to disable the display of a warning message every time that you click a hyperlink in a 2007 Microsoft Office program or in a Microsoft Office 2010 program.
More Information
Important
This section, method, or task contains steps that tell you how to modify the registry. However, serious problems might occur if you modify the registry incorrectly. Therefore, make sure that you follow these steps carefully. For added protection, back up the registry before you modify it. Then, you can restore the registry if a problem occurs. For more information about how to back up and restore the registry, see How to back up and restore the registry in Windows.
In 2007 Office and in Office 2010, when you click a hyperlink or an object that links to an executable file, you receive the following warning message:
This behavior occurs regardless of your security level settings.
Note
Microsoft Office Potential Security Concern Mac 2017
To locate your security level settings, point to Macro on the Tools menu, and then click Security.
Additionally, when you open either TIFF images or Microsoft Document Imaging (MDI) files, you receive the following warning message:
You receive this warning message even when you have already implemented the registry key that this article describes. This warning message comes from the HLINK.dll file when link navigation is handled. You can differentiate the 2007 Office or 2010 Office hyperlink warning message from the HLINK warning message by looking for quotation marks around the file path in the warning message. The 2007 Office or Office 2010 message contains quotation marks. The HLINK message does not contain quotation marks. 2007 Office and Office 2010 try to determine whether the file type itself is unsafe by checking the extension, the progid, the classid, and the MIME type of the document.
How to globally enable or disable hyperlink warnings
To have us enable hyperlink warnings for 2007 Office programs and for Office 2010 programs for you, go to the 'Here's an easy fix' section. If you prefer to enable the setting yourself, go to the 'Let me fix it myself' section.
Here's an easy fix
To fix this problem automatically, download and run 'Microsoft Easy Fix 20189',and then follow the steps in the easy fix wizard.
This wizard may be in English only. However, the automatic fix also works for other language versions of Windows.
If you're not on the computer that has the problem, save the easy fix solution to a flash drive or a CD, and then run it on the computer that has the problem.
Enable hyperlink warnings
Let me fix it myself
To enable or to disable the hyperlink warnings in 2007 Office programs and in Office 2010 programs when an https:// address, a notes:// address, or an ftp:// address is used, you must create a new registry subkey. To do this, follow these steps:
Click Start, and then click Run.
In the Open dialog box, type regedit, and then click OK.
Note
You have to modify only one of these registry subkeys. You do not have to modify both.
If the Security subkey already exists, go directly to step 6 after you select the Security subkey.
In Registry Editor, locate one of the following registry subkeys for 2007 Office: HKEY_CURRENT_USERSoftwareMicrosoftOffice12.0CommonOr, in Registry Editor, locate one of the following registry subkeys for Office 2010: HKEY_CURRENT_USERSoftwareMicrosoftOffice14.0Common
Click the registry subkey, point to New on the Edit menu, and then click Key.
Type Security, and then press Enter to name the key.
On the Edit menu, point to New, and then click DWORD Value.
Type DisableHyperlinkWarning, and then press Enter to name the entry.
In the right pane, right-click DisableHyperlinkWarning, and then click Modify.
In the Edit DWORD Value dialog box, click Decimal, and then type 1 or 0 under Value data.
Note
A value of 0 enables the hyperlink warning message. A value of 1 disables the hyperlink warning message.
Today, we’re excited to announce that Office 365 is now available on the newly redesigned Mac App Store. And it’s connected to the cloud, so you can access your content from any device, coauthor with anyone around the world in real-time, and use the power of artificial intelligence (AI) to create more impactful content with less effort. Cost of microsoft office 365 for mac. With one click, Mac users can download the cloud-connected, always-up-to-date version of the Office suite—including full installs of, and.Office 365 provides experiences tailored to the Mac and macOS, like Dark Mode, Continuity Camera, OneDrive Files on Demand, and Touch Bar support on the MacBook Pro. The result is an experience that is unmistakably Office but designed for Mac.“We are excited to welcome Microsoft Office 365 to the all new Mac App Store in macOS Mojave.
Click OK.
Exit Registry Editor.
How to enable or disable hyperlink warnings per protocol
To disable the display of security warnings for a specific protocol, follow these steps:
Click Start, click Run, type regedit, and then click OK.
Locate the following registry subkey:
HKEY_CURRENT_USERSoftwarePoliciesMicrosoftOfficexx.0CommonSecurityTrusted ProtocolsAll Applications
Note In this subkey, replace 'xx.0' with 12.0 for Outlook 2007 and with 14.0 for Outlook 2010.
Click the All Applications subkey.
On the Edit menu, point to New, and then click Key.
Type the name of the protocol that you want to exclude. For example, to disable the display of a security warning for the 'Notes:' protocol, type Notes:.
Note Make sure that you include the colon (:) character.
Press Enter.
Mac microsoft publisher viewer. Exit Registry Editor.
If you still receive a warning message
After you disable warning messages, you may still receive a warning message from Microsoft Windows. If you continue to receive a warning message after you follow the steps in this article, use one of the following methods to resolve the issue.
Note
Method 1 applies only to Windows XP and to earlier versions of Windows. For Windows Vista and for later versions of Windows, use method 2.
Method 1: Turn off the 'Confirm open after download' option for the file type that you are trying to open
Double-click My Computer.
On the Tools menu, click Folder Options.
On the File Types tab, select the appropriate file name extension (for example, WMV) in the Registered File Types box, and then click Advanced.
Click to clear the Confirm open after download check box, and then click OK.
In the Folder Options dialog box, click Close.
Method 2: Modify the HKEY_CLASSES_ROOTCLSID>EditFlags registry subkey
Use this method if the warning message affects multiple computers.
To disable the warning message, follow these steps:
Click Start, click Run, type regedit, and then click OK.
Locate the following registry subkey:
HKEY_CLASSES_ROOT<CLSID>EditFlags
For example, if the file name extension is WMV, select HKEY_CLASSES_ROOTWMVFileEditFlags
Click EditFlags, and then click Rename on the Edit menu.
Type OldEditFlags, and then press ENTER.
On the Edit menu, point to New, and then click DWORD value.
Type EditFlags, and then press ENTER.
On the Edit menu, click Modify.
In the Edit DWORD Value dialog box, click Hexadecimal under Base.
Type 10000, and then click OK.
To re-enable the warning message, follow these steps:
Click Start, click Run, type regedit, and then click OK.
Locate the following registry subkey:
HKEY_CLASSES_ROOT<CLSID>EditFlags
Click EditFlags, and then click Modify on the Edit menu.
Type 0, and then click OK.
Note
Even after you follow these steps, you will receive the warning message if you open files in Office 2010 under Protected View.
Did this fix the problem?
Check whether the problem is fixed. If the problem is fixed, you are finished with this section. If the problem is not fixed, you can contact support.
How-To Geek Forums / Microsoft Office
(Solved) - Hyperlink warning -- FOUND IT.
(2 posts)
Xcel 2007. Every time I click on a hyperlink (even a link to my own HDD) I get a message: 'Microsoft has identified a potential security concern. This location may be unsafe.' Good grief it's my own hard drive.
I've searched and can't find a way to turn this off. No 'Don't show me this again' option in the box.
Help and thanks.
Bob
EXCEL OPTIONS>Trust Center>Trust center settings>Trusted locations ..Adjust to suit your needs
you can simply turn off this feature from the registry..
Open the registry editor by typing 'regedit' in the 'run' command
Browse to the following location in the registry
HKEY_CURRENT_USERSoftwareMicrosoftOffice12.0Common
Microsoft Office Potential Security Concern Mac Free

and search for a key called 'Security'
If the Security key already exists under the Common key, then
select it.
If it doesn't exist already then create it via:
Edit-> New-> Key
4. In the Security Key on the right side ,create a new DWORD Value via
Edit-> New-> DWORD Value
Value name: DisableHyperlinkWarning
Value Type: REG_DWORD
Value: 1
NB : When this key is set to 0 or is missing, the security warning
will show again.
Close you registry and restart ...
Microsoft Office Potential Security Concern Mac Pro
Microsoft Office Potential Security Concern Mac Download
Topic Closed
Microsoft Office Potential Security Concern Machines
This topic has been closed to new replies.
0 notes
Text
Amazon Picture Storage


AWS Snowball, a part of the AWS Snow Family, is an edge computing, data migration, and edge storage device that comes in two options. Snowball Edge Storage Optimized devices provide both block storage and Amazon S3-compatible object storage, and 40 vCPUs. They are well suited for local storage and large scale-data transfer. Snowball Edge Compute Optimized devices provide 52 vCPUs, block and object storage, and an optional GPU for use cases like advanced machine learning and full motion video analysis in disconnected environments. You can use these devices for data collection, machine learning and processing, and storage in environments with intermittent connectivity (like manufacturing, industrial, and transportation) or in extremely remote locations (like military or maritime operations) before shipping them back to AWS. These devices may also be rack mounted and clustered together to build larger temporary installations.
Compare Jitsi alternatives for your business or organization using the curated list below. SourceForge ranks the best alternatives to Jitsi in 2021. Compare features, ratings, user reviews, pricing, and more from Jitsi competitors and alternatives in order to make an informed decision for your business. The top 10 competitors in Jitsi's competitive set are GoToMeeting, Zoom, BlueJeans, WebEx, Lifesize, LogMeIn, Arkadin, AnyMeeting, join me, StarLeaf. Together they have raised over 2.6B between their estimated 23.1K employees. Jitsi's revenue is the ranked 20th among it's top 10 competitors. The top 10 competitors average 307.7M. Interested in Jitsi? Explore these alternatives to Jitsi that are most similar in terms of key features and benefits. Review the following Jitsi alternatives to see if there are any Jitsi competitors that you should also consider in your software search. Element (formerly Riot) 16 15 Specs. Bridges to other networks. You're not confined within. Looking for alternatives or competitors to Jitsi? Video Conferencing Software is a widely used technology, and many people are seeking productive, quick software solutions with hand raise, whiteboarding, and presentations. Other important factors to consider when researching alternatives to Jitsi include security and communication. Jitsi competitors.
My Amazon Photos Storage
Snowball supports specific Amazon EC2 instance types and AWS Lambda functions, so you can develop and test in the AWS Cloud, then deploy applications on devices in remote locations to collect, pre-process, and ship the data to AWS. Common use cases include data migration, data transport, image collation, IoT sensor stream capture, and machine learning.
With S3 Object Lambda you can add your own code to S3 GET requests to modify and process data as it is returned to an application. For the first time, you can use custom code to modify the data returned by standard S3 GET requests to filter rows, dynamically resize images, redact confidential data, and much more. Powered by AWS Lambda functions, your code runs on infrastructure that is fully managed by AWS, eliminating the need to create and store derivative copies of your data or to run expensive proxies, all with no changes required to applications.
How Does Amazon Picture Storage Work
With just a few clicks in the AWS Management Console, you can configure a Lambda function and attach it to a S3 Object Lambda Access Point. From that point forward, S3 will automatically call your Lambda function to process any data retrieved through the S3 Object Lambda Access Point, returning a transformed result back to the application. You can author and execute your own custom Lambda functions, tailoring S3 Object Lambda’s data transformation to your specific use case.
Learn more about S3 Object Lambda »
How Much Does Amazon Photo Storage Cost
Amazon Photos is a cloud storage tool to backup images and videos. It has strengths that include the free tier with affordable pricing, the ease of album creation, and the available apps. Storage and bandwidth size includes all file overhead. Amazon S3 storage usage is calculated in binary gigabytes (GB), where 1GB is 2 30 bytes. Haworth fern task executive chair. This unit of measurement is also known as a gibibyte (GiB), defined by the International Electrotechnical Commission (IEC). Similarly, 1TB is 2 40 bytes, i.e.
0 notes
Last Seen Blogs

fancypantshoodlum
Fancypants Hoodlum

hey-via
VIA
angelicv
sx

bacolbokep
Untitled

tinyturtletimtim
It smells like dryer sheets in here