
TinyFrom strives to maximize value and convenience for our customers.
Don't wanna be here? Send us removal request.
Statistics
We looked inside some of the posts by tinyfrom and here's what we found interesting.
Average Info
Notes Per Post
2
Likes Per Post
2
Reblog Per Post
0
Reply Per Post
0
Time Between Posts
16 days
Number of Posts By Type
Text
13
Last Seen Tumblr Blogs


Fun Fact
Tumblr has been banned in Indonesia for providing people with access to pornographic content.
Text
How to Recover Permanently Deleted Photos on iPhone Without Backup
Accidentally deleting important photos from your iPhone can be a distressing experience, especially when you don't have a backup. Fortunately, all hope is not lost.
There are methods and tools that can help you recover your permanently deleted photos even without a backup. This guide will walk you through the steps and options available for recovering your lost photos.
Understanding Photo Deletion on iPhone
Before diving into the recovery process, it's essential to understand how iPhone photo deletion works:
Recently Deleted Folder: When you delete a photo on your iPhone, it doesn't immediately disappear. Instead, it moves to the "Recently Deleted" folder, where it stays for 30 days before being permanently deleted. If your photos are still in this folder, you can easily recover them.
Permanent Deletion: After 30 days, photos in the "Recently Deleted" folder are permanently removed. Additionally, photos can be immediately deleted if you manually empty this folder or use certain cleaning tools.
Data Overwriting: Once a photo is permanently deleted, the space it occupied is marked as available for new data. If new data overwrites this space, the chance of recovering the photo decreases significantly.
Steps to Recover Permanently Deleted Photos Without Backup
If you find yourself in a situation where your photos have been permanently deleted, and you don't have a backup, don't panic. Here are the steps you can follow to try and recover your photos:
1. Stop Using Your iPhone
The first and most crucial step is to stop using your iPhone immediately. This action prevents new data from being written to your phone's storage, which could overwrite the space previously occupied by your deleted photos, making recovery more difficult or even impossible.
2. Use a Third-Party Data Recovery Software
There are several third-party data recovery tools specifically designed for iOS devices. These tools can scan your iPhone for any recoverable files, including photos that have been permanently deleted. Here are a few popular options:
Dr.Fone - Data Recovery (iOS): This is a popular data recovery tool for iPhones. It can recover various types of data, including photos, messages, contacts, and more.
iMobie PhoneRescue: PhoneRescue is another reliable tool that offers photo recovery from iOS devices. It supports recovery without requiring a backup.
Tenorshare UltData: This tool can help recover photos, videos, and other files directly from your iPhone. It offers a user-friendly interface and a high recovery success rate.
Steps to Use Data Recovery Software:
Download and Install: Download the recovery software of your choice and install it on your computer.
Connect Your iPhone: Use a USB cable to connect your iPhone to your computer. Make sure to trust the computer on your iPhone if prompted.
Select Data Recovery Mode: Launch the software and select the mode for recovering data from the iOS device. Each software may have slightly different options, but look for a feature like "Recover from iOS Device."
Scan Your iPhone: Start the scanning process. The software will analyze your iPhone and look for any recoverable photos. This process may take some time, depending on the storage size of your device and the amount of data.
Preview and Recover: Once the scan is complete, you will be able to preview the recoverable photos. Select the ones you want to restore and click the "Recover" button to save them to your computer.
3. Check iCloud Photos
If you have iCloud Photos enabled, your deleted photos might still be available in the cloud. Here’s how you can check:
Sign In to iCloud: Visit iCloud.com and sign in with your Apple ID.
Go to Photos: Click on the "Photos" icon. You might see the deleted photos still available here, especially if the deletion hasn't synced yet.
Recently Deleted Folder: Check the "Recently Deleted" folder in iCloud as well. Photos deleted from iCloud Photos also remain here for 30 days.
4. Contact Apple Support
If you cannot recover the photos using third-party tools or iCloud, you can reach out to Apple Support. They might have solutions or suggestions, especially if the deletion was recent. While Apple doesn't guarantee recovery of permanently deleted files, it's worth exploring all available avenues.
Tips to Prevent Future Data Loss
Recovering permanently deleted photos without a backup can be challenging, and sometimes, not all files are recoverable. Here are some tips to prevent future data loss:
Regularly Backup Your iPhone: Use iCloud or iTunes to create regular backups of your iPhone. This practice ensures that you have a copy of your photos and other essential data.
Enable iCloud Photos: This feature automatically uploads and stores your entire photo library in iCloud, making it accessible across all your devices.
Use Alternative Cloud Services: Consider using additional cloud storage services like Google Photos, Dropbox, or OneDrive to back up your photos automatically.
Be Cautious with Deletion: Double-check before deleting photos, and make it a habit to review the "Recently Deleted" folder before emptying it.
Use Data Recovery Apps: Keep a data recovery app handy, as it can be a lifesaver if you accidentally delete important files.
Conclusion
While losing photos can be a heart-wrenching experience, the methods and tools mentioned above provide hope for recovery, even if you don't have a backup. The key is to act quickly and carefully, avoiding further use of your iPhone to maximize the chances of successful recovery. Remember, prevention is always better than cure, so make regular backups a part of your routine to safeguard your precious memories.
0 notes
Text
How to Reset Your iPhone Without Losing Everything
Resetting your iPhone can be a useful step to resolve various issues, improve performance, or prepare for a new setup.
However, a common concern is losing personal data like photos, contacts, and apps during the process. Fortunately, it's possible to reset your iPhone without losing everything.
In this guide, we'll walk you through the steps to safely reset your iPhone while preserving your valuable data.
1. Backup Your iPhone
The most important step before resetting your iPhone is to create a backup. This ensures that all your data, including contacts, photos, videos, app data, and settings, is safely stored and can be restored after the reset.
You can back up your iPhone using iCloud or iTunes/Finder (for macOS Catalina and later).
Using iCloud:
Connect your iPhone to a Wi-Fi network.
Go to Settings > [your name] > iCloud.
Tap on iCloud Backup.
Toggle the iCloud Backup switch on if it isn't already, then tap Back Up Now.
Wait until the backup process is complete. You can check the progress and confirm completion in the settings.
Using iTunes/Finder:
Connect your iPhone to your computer using a USB cable.
Open iTunes (for Windows or macOS Mojave and earlier) or Finder (for macOS Catalina and later).
Select your iPhone when it appears in iTunes or Finder.
Under the Backups section, select This Computer to save the backup to your computer.
Click on Back Up Now.
Wait for the backup to complete, and ensure it's saved successfully before proceeding.
2. Reset Your iPhone
After creating a backup, you're ready to reset your iPhone. There are a few types of resets, but the most common and useful one is a soft reset or reset all settings, which won't delete your data but will reset your settings to default.
Reset All Settings:
Go to Settings > General.
Scroll down and tap on Reset.
Select Reset All Settings.
You will be prompted to enter your passcode. Enter it to proceed.
Confirm the reset when prompted.
This option resets your settings (such as Wi-Fi passwords, wallpapers, and accessibility settings) but leaves your data, apps, and personal information intact.
Factory Reset (Without Losing Data):
If you want to perform a full factory reset but don't want to lose your data, you must ensure you have a recent backup (as outlined above) and then follow these steps:
After backing up your iPhone, go to Settings > General.
Scroll down and tap on Reset.
Choose Erase All Content and Settings.
You will be asked to enter your passcode and Apple ID password to confirm.
Tap on Erase iPhone.
Your iPhone will then proceed with the reset. Once it has finished, the device will restart, and you'll be greeted with the setup screen.
3. Restore Your Data
Once your iPhone has been reset, you'll need to restore your data from the backup you created earlier.
Restoring from iCloud Backup:
During the setup process after resetting, choose Restore from iCloud Backup.
Sign in with your Apple ID.
Choose the most recent backup from the list.
The restoration process will begin, and your data will be downloaded from iCloud. Ensure you stay connected to Wi-Fi until the process completes.
Restoring from iTunes/Finder Backup:
Connect your iPhone to the computer where you saved your backup.
Open iTunes or Finder.
Select your iPhone when it appears.
In the Backups section, click Restore Backup.
Choose the most recent backup and click Restore.
Wait for the restore process to complete before disconnecting your iPhone.
4. Reinstall Apps and Settings
After restoring your data, you may need to reinstall apps or reconfigure certain settings that were reset. Open the App Store and go to Purchased to see all the apps you have downloaded previously. You can download them again from there.
5. Verify Your Data
After everything is set up, take a moment to go through your iPhone and verify that all your important data is back. Check your photos, contacts, messages, and any other critical information to ensure nothing is missing.
Conclusion
Resetting your iPhone without losing everything is entirely possible with a few careful steps. Always back up your data first, choose the right type of reset, and then restore your information from the backup. By following this guide, you can enjoy a fresh start on your iPhone while keeping all your important data safe and intact.
0 notes
Text
How to Reformat an External Hard Drive: A Step-by-Step Guide
Reformatting an external hard drive can be essential for various reasons, such as preparing it for a new operating system, clearing old data, or changing the file system. While the process might seem daunting, it's relatively straightforward once you understand the steps involved. In this guide, we'll walk you through reformatting your external hard drive on both Windows and Mac systems.
Important Note
Reformatting will erase all data on the drive. Ensure you back up any important files before proceeding.
Reformatting on Windows
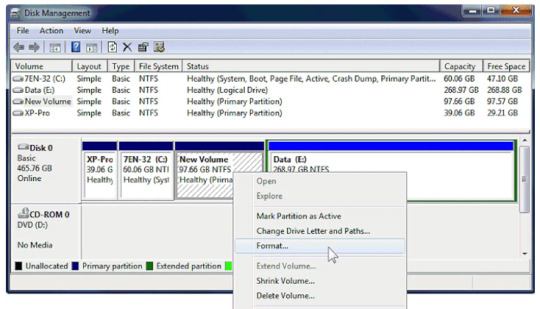
Connect the External Hard Drive:
Plug your external hard drive into an available USB port on your computer.
Open Disk Management:
Press Win + X and select Disk Management from the menu.
Locate Your External Hard Drive:
In the Disk Management window, find your external hard drive in the list of connected drives. It should be labeled as Disk 1, Disk 2, etc., depending on the number of drives connected.
Backup Data:
If you haven't already, back up any important data from the external hard drive.
Right-Click the Drive:
Right-click on the partition or unallocated space of your external hard drive. Select Format from the context menu.
Choose File System:
In the Format dialog box, choose the desired file system (NTFS, exFAT, or FAT32).
NTFS: Best for Windows-only drives.
exFAT: Compatible with both Windows and macOS, ideal for larger files.
FAT32: Older file system, compatible with many devices but limited to 4GB file size.
Enter a Volume Label:
Give your drive a name in the Volume label field.
Perform a Quick Format:
Check the Perform a quick format option for a faster process. Uncheck it if you want a thorough format (this will take longer).
Click OK:
Confirm the action and click OK to start the formatting process. Once completed, your drive will be ready for use.
Reformatting on macOS
Connect the External Hard Drive:
Plug your external hard drive into an available USB port on your Mac.
Open Disk Utility:
Go to Applications > Utilities > Disk Utility.
Select Your External Hard Drive:
In the Disk Utility sidebar, select your external hard drive.
Backup Data:
Ensure you have backed up any important data from the external hard drive.
Click Erase:
Click the Erase button at the top of the Disk Utility window.
Choose Format and Name:
In the Erase dialog box, choose the desired format:
APFS: Best for macOS-only drives.
Mac OS Extended (Journaled): Compatible with older macOS versions.
exFAT: Compatible with both Windows and macOS, ideal for larger files.
MS-DOS (FAT): Compatible with many devices but limited to 4GB file size.
Enter a Name:
Give your drive a name in the Name field.
Erase:
Click Erase to begin the formatting process. This will erase all data on the drive and format it with the selected file system.
Complete:
Once the process is complete, click Done. Your drive is now reformatted and ready to use.
Conclusion
Reformatting an external hard drive is a useful skill that can help you manage your storage devices more effectively. Whether you’re switching file systems for compatibility, clearing old data, or preparing a drive for a new purpose, following these steps will ensure a smooth and successful reformatting process. Always remember to back up any important data before you begin, as reformatting will erase all existing files on the drive. With your freshly formatted drive, you’re ready to tackle your next project with confidence!
0 notes
Text
Troubleshooting Guide: My External Hard Drive Is Not Showing Up
Encountering issues with your external hard drive not showing up can be a frustrating experience, especially when you rely on it for important data storage or backups. This problem can stem from various causes, ranging from simple connection issues to more complex hardware or software problems. In this guide, we'll explore the common reasons why your external hard drive might not be appearing on your computer and provide practical solutions to help you resolve the issue.
Step 1: Check the Basics
Before diving into more complex troubleshooting, ensure the following basic checks:
Check the Connection:
Ensure that the USB cable is securely connected to both the external hard drive and the computer.
Try using a different USB port on your computer.
If possible, test the external hard drive with another computer to determine if the issue is with the drive or the computer.
Power Supply:
Some external hard drives require an external power source. Ensure that the power adapter is plugged in and working correctly.
Listen for Noise:
If the external hard drive is making unusual noises (clicking, grinding), it might indicate a hardware failure.
Step 2: Check Disk Management (Windows) / Disk Utility (Mac)
Windows:
Press Win + X and select Disk Management.
Look for your external hard drive in the list. If it appears but is not assigned a drive letter, right-click on it and choose Change Drive Letter and Paths.
If the drive is shown as Unallocated, you may need to initialize and format it. Right-click on the unallocated space and select New Simple Volume.
Mac:
Open Disk Utility from the Applications > Utilities folder.
Look for your external hard drive in the sidebar. If it appears but is not mounted, select it and click Mount.
If the drive is not formatted correctly, you may need to reformat it. Select the drive and click Erase.
Step 3: Update Drivers (Windows) / System Software (Mac)
Windows:
Open Device Manager by pressing Win + X and selecting Device Manager.
Expand the Disk Drives section, right-click on your external hard drive, and select Update Driver.
You can also check for Windows updates which might include necessary drivers.
Mac:
Ensure your macOS is up-to-date by going to System Preferences > Software Update.
Updating macOS can sometimes resolve compatibility issues with external devices.
Step 4: Check for File System Issues
Windows:
If the external hard drive is recognized but inaccessible, run a disk check. Open Command Prompt as an administrator and type chkdsk X: /f (replace X with your drive letter).
Mac:
Use First Aid in Disk Utility to check for and repair file system issues.
Step 5: Use Third-Party Tools
If the built-in tools do not resolve the issue, consider using third-party software:
Data Recovery Software:
Tools like EaseUS Data Recovery, Recuva, or Disk Drill can help recover data from a malfunctioning drive.
Disk Management Software:
Applications like MiniTool Partition Wizard or GParted (for Linux users) offer advanced disk management features.
Step 6: Seek Professional Help
If none of the above steps resolve the issue, it might be time to seek professional help. A specialist can diagnose hardware issues and potentially recover data from a failing drive.
Conclusion
An external hard drive not showing up can be a vexing issue, but with systematic troubleshooting, you can often identify and resolve the problem. By checking connections, updating software, and using built-in or third-party tools, you can restore access to your important data. If all else fails, professional data recovery services are available to help you recover your valuable files.
Remember, regular backups and maintaining your drives can prevent many of these issues. Stay proactive about your data storage, and you'll minimize the chances of encountering such problems in the future.
0 notes
Text
How to Fix Mac Memory Stick Not Showing Up [8 Ways]
Connecting a memory stick (USB flash drive) to your Mac should be a seamless experience, but sometimes the device might not show up as expected.
This issue can arise due to various reasons, such as hardware problems, software conflicts, or user settings. In this guide, we'll explore the common causes of this issue and provide multiple solutions to help you get your memory stick recognized by your Mac.
Also Read: >> How to Open Flash Drive on Mac
Common Causes of USB Not Showing Up on Mac
Faulty USB Port or Cable: A malfunctioning USB port or damaged cable can prevent the memory stick from being recognized.
Memory Stick Issues: The memory stick itself might be damaged or corrupted.
macOS Settings: Incorrect Finder preferences or system settings can hide external drives.
Software Conflicts: Outdated or incompatible software can cause recognition issues.
File System Errors: Corrupted or incompatible file systems on the memory stick can lead to recognition problems.

Way 1. Use Basic Troubleshooting Tool
Basic troubleshooting involves checking the physical connection and trying simple fixes. It's the first step and often the quickest way to resolve the issue.
The main advantage of this method is that it's easy and quick to perform, requiring no technical expertise. However, it might not resolve deeper, more complex issues.
Basic troubleshooting is ideal when the memory stick suddenly stops showing up or for initial diagnosis before moving to more advanced solutions.
This approach is suitable for all users and should be done carefully to avoid damaging the memory stick and ports.
Steps to Fix Flash Drive Not Showing Up on Mac:
Ensure Proper Connection: Make sure the memory stick is properly inserted into the USB port. Try re-inserting it or using a different USB port.
Check the Memory Stick: Test the memory stick on another computer to verify if it’s functioning properly.
Way 2. Verify Using the Disk Utility Program
Disk Utility can help you see if your memory stick is recognized but not mounted. It’s a powerful macOS tool for managing disks and volumes.
The main advantage is that it's a built-in tool requiring no additional software and can reveal hidden or unmounted drives. However, it requires some navigation through macOS utilities and might not fix the issue if the memory stick is faulty.
This method is useful when the memory stick appears to be physically connected but not visible in Finder, and is suitable for intermediate users comfortable using macOS utilities. It is important to select the correct drive to avoid data loss.
Steps to Fix Mac Memory Stick Not Showing Up:
Open Disk Utility: Go to Applications > Utilities > Disk Utility.
Check for the Memory Stick: Look for your memory stick in the list of drives on the left. If it’s there but greyed out, select it and click the Mount button.
Way 3. Utilize the Finder Preferences
Sometimes, external drives might not show up due to Finder preferences being incorrectly set. This method is simple and quick to adjust, posing no risk of data loss.
However, it only addresses visibility issues and not underlying connection problems. It’s useful when external drives are not appearing in Finder as it can effectively fix external hard drive that keeps disconnecting. Ensure changes are saved before exiting Finder Preferences.
Steps to Fix flash Drive on Mac Not Showing Up:
Open Finder Preferences: Click on Finder in the top menu bar, then select Preferences.
Show External Disks: Under the General tab, make sure External disks is checked. Then, go to the Sidebar tab and ensure External disks is also checked there.
Way 4. Reset NVRAM/PRAM
Resetting NVRAM/PRAM can resolve recognition issues with external devices. It resets certain settings that might affect how your Mac handles external storage.
The main advantage is that it can solve various hardware-related issues and is simple to perform, though it resets some custom settings and requires a restart.
This method is useful when other basic troubleshooting steps fail and if experiencing other hardware-related issues. It is suitable for intermediate users, and backing up important data before performing resets is recommended.

Steps to Fix USB Not Showing Up on Mac:
Shut Down Your Mac: Turn off your Mac completely.
Power Up and Reset: Turn on your Mac and immediately press and hold Option (⌥) + Command (⌘) + P + R for about 20 seconds.
Release and Restart: Release the keys and allow your Mac to restart normally.
Way 5. Check System Information
Using System Information can help determine if your Mac detects the hardware connection of the memory stick.
This method provides detailed hardware information and can identify if the issue is hardware-related, but it does not directly fix the issue and requires navigating system settings. It’s useful when you suspect a hardware recognition problem or need to gather more information before further troubleshooting.
Suitable for intermediate to advanced users, it's important not to make any changes in the System Information window.
Step to Solve USB Flash Drive Not Showing Up on Mac:
Open System Information: Hold the Option (⌥) key and click the Apple menu, then select System Information.
Check USB Devices: In the left sidebar, select USB and look for your memory stick under the USB Device Tree.
Way 6. Run First Aid in Disk Utility
Running First Aid can fix any issues with the memory stick's file system, ensuring it is properly recognized and accessible. The advantage is that it can repair minor disk errors using a built-in macOS tool. However, it might not fix severe corruption and requires knowledge of Disk Utility.
This method is useful when the memory stick shows up but is not accessible or if you suspect file system errors. Suitable for intermediate users, it's important to back up important data before running repairs.
Steps to Solve USB Drive Not Showing Up on Mac:
Open Disk Utility: Go to Applications > Utilities > Disk Utility.
Select the Memory Stick: Find and select your memory stick from the list.
Run First Aid: Click the First Aid button and follow the prompts to check and repair the disk.
Way 7. Update macOS
Keeping your macOS up-to-date can resolve compatibility issues with external devices, ensuring better hardware support and bug fixes.
The main advantage is that it addresses software-related issues and improves overall system performance. However, it requires time to download and install updates and may not solve hardware issues.
This method is useful when using an outdated version of macOS or facing various software-related issues. Suitable for all users, it's important to ensure all work is saved before updating.
Steps to Fix USB Not Showing Up Mac:
Check for Updates: Go to System Preferences > Software Update.
Install Updates: If updates are available, install them and restart your Mac.
Way 8. Reformat the Memory Stick
If the memory stick still isn’t showing up and you’ve ruled out hardware failure, reformatting might be necessary. Warning: This will erase all data on the memory stick.
Reformatting solves file system incompatibility issues and prepares the memory stick for use, but erases all data and can be time-consuming if large amounts of data need to be backed up first.
This method is useful when the memory stick is corrupted or incompatible and as a last resort after trying other solutions. Suitable for advanced users, it's important to back up all important data before reformatting.
Related Post: >> How to Format USB to FAT32 on Mac
Steps to Solve Flash Drive Will Not Show Up on Mac:
Open Disk Utility: Go to Applications > Utilities > Disk Utility.
Select the Memory Stick: Find and select your memory stick.
Erase and Reformat: Click the Erase button, choose a format (e.g., ExFAT for cross-platform compatibility), and click Erase.
If you lost important files by accident when using this method, don't worry, there are some powerful Mac USB drive recovery software that will help you retrieve your necessary data.
This post lists the best data recovery tools that you can use on Mac. Click it to know more optional software: >> Best 10 Free File Recovery Software for Mac
Conclusion
If your Mac memory stick isn't showing up, these steps should help you diagnose and fix the issue. Start with basic troubleshooting and move to more advanced solutions as needed. If the problem persists, it might indicate a hardware failure in the memory stick, requiring replacement.
By following this guide, you can ensure your memory stick is recognized and accessible on your Mac.
0 notes
Text
How to Snip on Mac Using Shortcuts
Taking screenshots on a Mac is a straightforward process, made even easier by a range of built-in keyboard shortcuts. Whether you need to capture the entire screen, a specific window, or just a portion of your display, macOS offers versatile options to meet your needs.
This guide will walk you through the various ways to snip on a Mac using shortcuts.
How to Screen Shot on Mac: Full Screen
The full-screen snip is the quickest way to capture everything displayed on your screen. This method is ideal when you need to document an entire desktop setup, capture a presentation slide, or share the overall layout of your workspace.
📝 Press Command (⌘) + Shift + 3: This combination will instantly capture the entire screen and save the screenshot to your desktop.
💡 Steps to use full-screen snipping tool shortcut on Mac:
Locate the keys Command (⌘), Shift, and the number 3 on your keyboard.
Press them simultaneously.
You’ll hear a camera shutter sound, indicating that the screenshot has been taken.
Find the screenshot as a PNG file on your desktop, labeled with the date and time it was taken.
This method is the go-to for quick and comprehensive screenshots, ensuring you don't miss any detail on your screen.
How to Use Mac Snipping Tool Shortcut for a Partial Screen
Sometimes, capturing the entire screen is unnecessary, and you might only need a specific section. The partial screen snip allows you to choose the exact area you want to capture, offering greater precision and flexibility.
📝 Press Command (⌘) + Shift + 4: This will change your cursor to a crosshair.

💡 Steps to use Mac shortcut for snipping tool to record a partial screen:
Locate and press Command (⌘), Shift, and the number 4 together.
Your cursor will transform into a crosshair.
Click and drag to select the area you want to capture. Release the mouse button to take the screenshot.
The image will be saved to your desktop, just like with the full-screen snip.
This method is perfect for capturing specific details, such as a section of a webpage, a portion of a document, or a particular element in a design.
How to Use Shortcut for Snipping Tool on Mac to Capture a Window
If your goal is to capture a specific window without including other desktop elements, the window snip method is ideal. This approach is particularly useful for isolating applications, dialogues, or any individual window you want to highlight.
📝 Press Command (⌘) + Shift + 4, then press the Spacebar: The cursor will change to a camera icon.
💡 Steps to use Mac snipping tool keyboard shortcut to record a partial screen:
Press Command (⌘), Shift, and 4 simultaneously.
Before selecting an area, press the Spacebar.
The cursor will become a camera. Move it over the window you wish to capture.
Click on the window to take the screenshot.
The screenshot of the window will be saved to your desktop.
This method ensures that only the content of the selected window is captured, excluding other elements on your screen that might be distracting or irrelevant.
How to Use Advanced Mac Snipping Tool for Screen Recording
For users who need more control and additional features, macOS includes a comprehensive screenshot tool. This tool offers a variety of options, including different capture modes and screen recording capabilities.
📝 Press Command (⌘) + Shift + 5: This opens the screenshot toolbar.

💡 How to take a snip on Mac using the advanced tool:
Press Command (⌘), Shift, and 5 together.
A toolbar will appear at the bottom of the screen with options for capturing the entire screen, a selected window, or a portion of the screen.
Select your desired option and follow the on-screen instructions.
For advanced features, you can also choose to record your screen or set a timer for your snips.
The advanced snipping tool is perfect for users who need more than just basic screenshots. Whether you need to record a tutorial, capture a timed screenshot, or choose different save locations, this tool covers all bases.
Bonus Tips for Mac Screenshots
After taking a screenshot on Mac, you may also need to find it, edit it, or even recover it. This part will offer you necessary tutorials about screenshots on Mac.
📌 Where do Screenshots Go on Mac
When you take a screenshot on a Mac, the default save location is the desktop. Each screenshot is saved as a PNG file with a name that includes the date and time it was taken.
If you use the screenshot toolbar (Command (⌘) + Shift + 5), you can change the save location by clicking on "Options" and selecting a different folder or destination.
Here are the steps to change the default save location using the screenshot toolbar:
Press Command (⌘) + Shift + 5: This opens the screenshot toolbar.
Click "Options": In the toolbar, click on the "Options" button.
Choose a Save Location: Select from the predefined locations like
Desktop, Documents, or Clipboard, or choose "Other Location" to specify a custom folder.
By using these steps, you can customize where your screenshots are saved, making them easier to organize and find according to your preferences.
📌 Saving and Editing Screenshots
By default, all screenshots taken using these shortcuts are saved to your desktop. However, macOS provides options to customize the save location and perform quick edits:
Changing the Save Location:
Open the screenshot toolbar with Command (⌘) + Shift + 5.
Click on "Options" and choose a new save location from the dropdown menu.
Quick Edits:
After taking a screenshot, a thumbnail will appear in the bottom-right corner of your screen.
Click on the thumbnail to open the screenshot in Markup, where you can crop, annotate, and make other adjustments.
These features ensure that your screenshots are not only easy to take but also easy to manage and edit, enhancing your productivity and workflow.
📌 How to Recover Mac Screenshots
If you've lost or deleted screenshots on your Mac, ONERECOVERY is a powerful tool that can help you recover them.
ONERECOVERY is a user-friendly data recovery software for Mac. It supports the recovery of various file types, including photos, videos, and documents, from internal and external drives, USB flash drives, and memory cards.
Key features include a simple interface, preview before recovery, and advanced scanning algorithms that ensure a high success rate.

How to Use ONERECOVERY to recover Mac screenshots:
Download and Install: Visit the ONERECOVERY website, download the Mac version, and install it.
Launch ONERECOVERY: Open the application and select "File Recovery."
Choose Location: Select the drive or folder where your screenshots were saved and click "Scan."
Preview and Select: Once the scan is complete, preview and select the screenshots to recover.
Recover Files: Click "Recover" and save the screenshots to a different location.
ONERECOVERY simplifies the process, making data recovery quick and efficient.
If you want to know more detailed information about the recovery of Mac screenshots, this post will offer you what you need: >> How to Retrieve Screenshots on Mac
Conclusion
Snipping on a Mac using shortcuts is an efficient way to capture and share information. Whether you need a quick full-screen snap, a specific window, or a precise portion of your screen, macOS provides intuitive and powerful tools to get the job done.
Mastering these shortcuts will enhance your productivity and make your Mac experience even more enjoyable.
0 notes
Text
How to Format an SD Card on Windows, Mac, and Android
Formatting an SD card is a straightforward process, but preparing correctly and knowing the tips for each platform can help you avoid issues.
This blog will guide you through the necessary preparations, the formatting process on Windows, Mac, and Android, and provide useful tips.
✨ Related Post: >> How to Fix Corrupted SD Card in 9 Ways
Why Format an SD Card?
Prepares it for use by setting up the file system.
💡 Erases all existing data, giving you a clean slate.
💡 Helps resolve issues with corrupted files or improper file systems.
💡 Can improve performance by removing fragmented files.
💡 Before you proceed, backup any important data, as formatting will erase everything on the card.
How to Format an SD Card on Windows
Before formatting an SD card on Windows, ensure that you back up all essential files to a safe location. This step is crucial as formatting will delete all data on the card.
Verify that your SD card reader is functioning correctly to avoid any connection issues during the process. If you are using a laptop, ensure it is connected to a power source to avoid interruptions.
If you find that your SD card doesn’t read properly when connected to your computer, follow the tutorial in this article to fix the problem before you start: >> How to Fix an SD Card Won’t Read
👨🏫 Tutorial for Formatting SD Cards on Windows:
Insert the SD Card: Insert your SD card into the SD card slot or reader.
2. Open File Explorer: Press Win + E to open File Explorer.
3. Locate the SD Card: In the left pane, find the SD card under “This PC” or “Computer”.
4. Right-Click on the SD Card: Right-click the SD card and select “Format”.
5. Choose Format Settings:
File System: Choose a file system (FAT32, exFAT, or NTFS). FAT32 is generally recommended for smaller cards, while exFAT is suitable for larger cards.
Allocation Unit Size: Leave this as the default.
Volume Label: Optionally, give the SD card a name.
Quick Format: Check this box for a faster format.
6. Start the Format: Click “Start” to begin. Confirm any warnings about data loss.
7. Complete the Format: Once the process is complete, click “OK”.
📝 Bonus Tips:
Choose the right file system for your needs; FAT32 is widely compatible, while exFAT is better for larger cards. Opt for a quick format for speed, but use a full format for a thorough check that includes identifying bad sectors.
How to Format an SD Card on Mac
Before formatting an SD card on a Mac, back up all important data to prevent data loss. Ensure your SD card reader is working properly to avoid any issues during formatting.
It is also wise to connect your Mac to a power source to ensure the process is not interrupted.
👨🏫 Tutorial for Formatting SD Cards on Mac:
Insert the SD Card: Insert your SD card into the SD card slot or reader.
2. Open Disk Utility: Go to Applications > Utilities > Disk Utility.
3. Select the SD Card: In the left pane, find and select your SD card.
4. Erase the SD Card: Click the “Erase” button.Choose Format Settings:
Name: Enter a name for the SD card.
Format: Choose a file system (FAT32, exFAT, or Mac OS Extended). Use FAT32 for compatibility.
Scheme: Select “Master Boot Record”.
5. Start the Erase Process: Click “Erase”.Complete the Format: Once the process is complete, click “Done”.
📝 Bonus Tips:
Use FAT32 for the widest compatibility with various devices. Regularly running Disk Utility checks can help maintain your SD card’s health and prevent future issues.
If you forget to back up important data before formatting your SD card, don’t worry, there are many powerful data recovery software for Mac that can help you get back your lost files.
Read this post if you are interested in the detailed operations of restoring SD cards on Mac: >> Methods of SD Card Recovery on Mac
How to Format an SD Card on Android
Before formatting an SD card on an Android device, transfer all essential files to a computer or cloud storage to prevent data loss. Ensure your device has sufficient battery life to complete the formatting process without interruptions.
👨🏫 Tutorial for Formatting SD Cards on Android:
Insert the SD Card: Insert your SD card into the device.
Open Settings: Go to the “Settings” app.
Storage Settings: Tap on “Storage” or “Device care”.
Select the SD Card: Find the SD card in the list and tap on it.
Format the SD Card: Tap on “Format” or “Format SD card”.
Confirm Formatting: Confirm when prompted. The device will warn you that this will erase all data.
Complete the Format: Wait for the process to complete.
📝 Bonus Tips:
Always format the SD card from the device’s settings to ensure compatibility and optimal performance. Investing in quality SD cards can help avoid frequent corruption and other issues.
Conclusion
Formatting an SD card is essential for ensuring it works correctly and efficiently with your devices. By following the proper preparation steps and using the appropriate formatting methods on Windows, Mac, and Android, you can ensure a smooth and successful format.
Always remember to back up your data before formatting and choose the file system that best suits your needs. With these steps and tips, you’ll have your SD card formatted and ready to use in no time.
If you accidentally forget to back up your data and your important files are deleted in the process of formatting your SD card, there are some good data recovery tools to help you get them back: 10 Best SD Card Recovery Software Free to Download.
0 notes
Text
How to Convert exFAT to NTFS Without Losing Data
Are you eager to convert your exFAT drive to NTFS without risking data loss? Understanding the intricacies of each conversion method can empower you to make informed decisions and choose the approach that best fits your needs.
In this comprehensive guide, we'll delve into each conversion method, providing detailed explanations and tips to help you navigate the process successfully.

Related Post: >> NTFS Data Recovery: How to Restore Lost Data
Solution 1. Convert exFAT to NTFS Using Command Prompt
Command Prompt offers a direct and efficient method for converting file systems without the need for third-party software. Here's a closer look at how it works:
👍 Advantages: Command Prompt provides a simple and quick solution for converting exFAT to NTFS, with clear instructions and minimal user interaction.
💡 Considerations: Ensure you have administrator privileges to execute the conversion command successfully. Additionally, be prepared to confirm the conversion, as it will erase all data on the drive.
Steps to Convert exFAT to NTFS Using Command Prompt:
Open Command Prompt with administrator privileges.
Type the command CONVERT [drive letter]: /FS:NTFS, replacing "[drive letter]" with the letter assigned to your exFAT drive.
Press Enter to execute the command and follow the on-screen prompts to confirm the conversion.
Solution 2. Convert exFAT to NTFS via Disk Management Utility
Windows Disk Management utility offers a user-friendly interface for managing disk drives and partitions, including the ability to convert file systems. Here's what you need to know:
👍 Advantages: Disk Management provides a graphical interface that makes it easy to visualize and manage disk partitions. Converting file systems through Disk Management is relatively straightforward and suitable for users who prefer a graphical interface.
💡 Considerations: Similar to using Command Prompt, ensure you have administrative privileges to perform the conversion. Additionally, be cautious when formatting the drive, as it will erase all data.
Steps to Convert exFAT to NTFS via Disk Management Utility:
Press Win + X keys and select "Disk Management" from the menu.
Right-click on the exFAT drive you want to convert and select "Format."
Choose "NTFS" as the file system and click "OK" to initiate the conversion process.
Solution 3. Convert exFAT to NTFS Using Third-Party Software
Third-party software solutions offer additional features and customization options for converting file systems. Here's why you might consider using third-party software:
👍 Advantages: Third-party software often offers more advanced features, such as partition resizing, disk cloning, and data recovery. These programs typically have intuitive interfaces and provide step-by-step guidance for converting file systems.
💡 Considerations: While third-party software may offer more features, be mindful of downloading from reputable sources to avoid malware or unwanted software. Additionally, some advanced features may require purchasing a premium version of the software.
Steps to Convert exFAT to NTFS Using Third-Party Software:
Choose and Install Software: Pick reputable third-party software. Install it on your computer.
Launch and Identify Drive: Open the software and locate your exFAT drive in its interface.
Select NTFS Conversion: Find the "Convert File System" option and choose NTFS as the new file system.
Initiate and Confirm: Start the conversion process and confirm your settings. Monitor progress and verify the conversion's success.
Solution 4. Convert exFAT to NTFS Using PowerShell
PowerShell, a command-line shell and scripting language, can also be utilized to convert file systems. Here's what you should know about using PowerShell for conversion:
👍 Advantages: PowerShell provides a powerful scripting environment for automating tasks and executing commands. Converting file systems through PowerShell offers flexibility and customization options for advanced users.
💡 Considerations: Ensure you have sufficient knowledge of PowerShell syntax and commands before attempting the conversion. Like other methods, administrative privileges are required to execute PowerShell commands.
Steps to Convert exFAT to NTFS Using PowerShell:
Open PowerShell with administrator privileges.
Type the command Format-Volume -DriveLetter [drive letter] -FileSystem NTFS and press Enter, replacing "[drive letter]" with the letter assigned to your exFAT drive.
Tips for Coverting exFAT to NTFS
Backup Data: Before initiating any conversion process, it's crucial to back up your data to prevent loss in case of unexpected issues. If you forget to backup the important files, it's necessary to find a powerful data recovery software to get them back.
Administrative Privileges: Ensure you have administrative privileges to execute conversion commands successfully, whether using Command Prompt, Disk Management, PowerShell, or third-party software.
Data Verification: After the conversion is complete, verify that all your data is intact and accessible on the newly converted NTFS drive. This step ensures that no files are missing or corrupted during the conversion process.
Conclusion
By understanding the nuances of each conversion method and considering important factors, such as ease of use, features, and customization options, you can confidently convert your exFAT drive to NTFS without compromising your valuable data.
If you encounter any difficulties or have questions, don't hesitate to seek assistance from knowledgeable individuals or consult relevant resources for guidance.
0 notes
Text
Why is My External Hard Drive Showing Up Twice on Mac
Have you ever plugged in your external hard drive to your Mac only to find it appearing twice in the Finder window?
This puzzling phenomenon can leave users scratching their heads and wondering what's causing the duplication.
In this blog post, we'll delve into the common reasons why your external hard drive may be showing up twice on your Mac and explore potential solutions to resolve the issue.

Related Post: >> How to Fix an SD Card Not Showing Up on Mac
Reasons for External Hard Drive to Display Twice on Mac
There are mainly 5 types of causes that may lead to this situation. You can compare the specific manifestations of each problem with your actual situation to identify the root cause.
🗂️ Multiple Partitions
One common reason for seeing your external hard drive listed twice is that it contains multiple partitions. Each partition is treated as a separate volume by your Mac, hence appearing as distinct entries in the Finder window.
This can occur if you've partitioned your external hard drive to organize data or if it came pre-partitioned from the manufacturer.
💾 Disk Utility Glitch
Occasionally, a glitch in Disk Utility—the built-in macOS tool for managing disks and volumes—can cause duplicate entries for your external hard drive. This glitch may occur during disk formatting or when performing maintenance tasks on your drives.
🔗 Connection Issues
Sometimes, a loose or faulty connection between your external hard drive and your Mac can lead to it being detected twice. If the connection is unstable, your Mac may intermittently recognize the drive as two separate devices, resulting in duplicate entries.
🖥️ macOS Finder Preferences
In certain cases, the settings in macOS Finder preferences may inadvertently cause external drives to be displayed twice. Tweaks or modifications made to Finder settings by the user or by third-party software could trigger this behavior.
File System Errors
File system errors or inconsistencies on the external hard drive could confuse your Mac's operating system, causing it to display the drive twice. These errors may result from improper ejection of the drive, power outages during data transfer, or other factors.
How to Fix External Hard Drive is Displayed Twice on Mac
Now that we've explored some possible reasons for your external hard drive showing up twice on your Mac, let's discuss potential solutions to resolve the issue.
Solution 1. Check Disk Utility
Open "Disk Utility" on your Mac. You can find it by searching in Spotlight or navigating to "Applications" > "Utilities" > "Disk Utility."
In Disk Utility, you'll see a list of all connected drives on the left sidebar. Locate your external hard drive and select it.
Check the partition layout of your external hard drive. If it contains multiple partitions, each will be listed separately.
To consolidate partitions into a single volume, select the external hard drive and choose the "Partition" tab.
From here, you can remove additional partitions by selecting them and clicking the "-" button. Be sure to back up any important data before making changes.
Solution 2. Verify Connections
Disconnect your external hard drive from your Mac.
Inspect the USB or Thunderbolt cable for any signs of damage or wear.
Reconnect the external hard drive to your Mac using a different USB or Thunderbolt port.
Ensure the connection is secure and the drive is properly plugged in.
Solution 3. Reset Finder Preferences
Open "Finder" on your Mac.
Click on "Finder" in the menu bar and select "Preferences" or use the shortcut Command + comma (,).
In the Finder Preferences window, go to the "General" tab.
At the bottom of the window, click on the "Reset All" button. Confirm the action when prompted.
This will reset all Finder preferences, including any settings related to displaying external drives.
Solution 4. Repair Disk Permissions
Launch "Disk Utility" from "Applications" > "Utilities" as mentioned earlier.
Select your external hard drive from the list on the left sidebar.
Click on the "First Aid" tab.
Click on "Run" or "Repair Disk Permissions" to start the repair process.
Wait for Disk Utility to scan and repair any disk permission issues on your external hard drive.
Solution 5. Update macOS
Click on the Apple logo in the top-left corner of your screen and select "System Preferences."
Choose "Software Update" to check for any available updates.
If updates are available, click "Update Now" to install them.
After the update is complete, restart your Mac if prompted.
Conclusion
Encountering your external hard drive appearing twice on your Mac can be perplexing, but with our troubleshooting guide, you can resolve the issue efficiently. Whether it's due to multiple partitions, connection glitches, or system errors, follow our step-by-step solutions to consolidate partitions, verify connections, and check Disk Utility.
Resetting Finder preferences, repairing disk permissions, and updating macOS can also help. By following these steps, you'll eliminate duplicate entries in Finder, ensuring seamless file management on your Mac. If problems persist, seek assistance from Apple Support or a professional technician to resolve any underlying issues.
Follow us to get more tips for Mac: >> https://tinyfrom.com/
0 notes
Text
A Comprehensive Guide on How to Retrieve Photos from iCloud
In today's digital age, our precious memories are often stored in the cloud, providing convenient access from anywhere with an internet connection. However, what happens when those cherished photos vanish or become inaccessible?
Fear not! In this comprehensive guide, we'll explore step-by-step methods on how to retrieve photos from iCloud, ensuring that your memories remain safe and accessible.
Understanding iCloud Photo Library
Before delving into the retrieval process, it's essential to understand iCloud Photo Library and how it functions. iCloud Photo Library is Apple's cloud-based storage service that automatically uploads and syncs your photos and videos across all your Apple devices. This seamless integration ensures that your entire photo library is accessible from any iPhone, iPad, Mac, or even Windows PC linked to your iCloud account.
Method 1: Access iCloud.com to Retrieve Photos
Advantages
Convenient and accessible from any web browser.
Allows for easy browsing and downloading of photos directly from iCloud.
Step-by-Step Tutorial:
Open a web browser on your computer and navigate to iCloud.com.
Sign in with your Apple ID and password.
Click on the "Photos" icon to access your iCloud Photo Library.
Browse through your photos and videos, then select the ones you want to retrieve.
To download individual photos, click on them to view full-size, then right-click and select "Download."
To download multiple photos, hold down the Shift key and click on each photo you want to download. Once selected, click the download icon in the top-right corner.
Method 2: Restore Pictures from iCloud Backup
Advantages:
Allows for the retrieval of photos along with other data from an iCloud backup.
Useful when photos are lost due to device damage, loss, or software issues.
Step-by-Step Tutorial:
On your iOS device, go to Settings > [Your Name] > iCloud > iCloud Backup.
Ensure that iCloud Backup is turned on, then tap "Back Up Now" to create a new backup if necessary.
If you have an existing iCloud backup containing the photos you want to retrieve, proceed to erase your device by going to Settings > General > Reset > Erase All Content and Settings.
Follow the on-screen instructions to set up your device, then select "Restore from iCloud Backup" when prompted.
Sign in to your iCloud account and choose the backup containing the photos you want to retrieve.
Wait for the restoration process to complete, and your photos will be restored along with the rest of your data.
Method 3: Using iCloud Photo Library Sync
Advantages:
Automatically syncs photos and videos across all your Apple devices.
Provides seamless access to your entire photo library on any device linked to your iCloud account.
Step-by-Step Tutorial:
On your iOS device, go to Settings > [Your Name] > iCloud > Photos.
Toggle on "iCloud Photos" to enable iCloud Photo Library sync.
Repeat this process on all your other Apple devices linked to the same iCloud account.
Once enabled, your photos and videos will automatically sync across all your devices, ensuring that they are always accessible whenever you need them.
Conclusion
Losing access to your photos can be a distressing experience, but with the right knowledge and tools, you can retrieve them from iCloud and preserve your precious memories. Whether through iCloud.com, iCloud backups, or iCloud Photo Library sync, there are multiple avenues to explore.
Remember to regularly back up your devices and maintain a safe copy of your photos to prevent data loss in the future. With these methods at your disposal, you can rest assured knowing that your memories are safe and accessible whenever you need them.
✨ Follow us to know more science and technology information: https://www.tinyfrom.com/
0 notes
Text
Sora: Transforming Personal Creativity and Productivity Through AI Video Generation
In today's digital age, the power of video content extends far beyond just business marketing. From personal vlogs and creative projects to educational endeavors and social media storytelling, videos play a significant role in our everyday lives.
Enter Sora, an AI-driven video generator that is reshaping how individuals create and share visual content. In this blog, we'll explore the profound influence of Sora on both personal creativity and productivity.

Unleashing Creativity
Sora opens doors to boundless creativity, empowering individuals to express themselves in new and exciting ways through video content. Whether you're an aspiring filmmaker, a passionate storyteller, or simply someone with a message to share, Sora provides a platform to bring your ideas to life with ease.
Personal Vlogging
With Sora, personal vloggers can enhance their storytelling capabilities by transforming written narratives into engaging video content. Whether documenting travel adventures, sharing life updates, or expressing thoughts and opinions, Sora adds a dynamic visual dimension to personal narratives.
Creative Projects
From DIY tutorials and recipe videos to art showcases and music covers, Sora fuels creativity across a diverse range of creative endeavors. Whether you're showcasing your latest artistic creation or sharing a step-by-step guide to a DIY project, Sora helps elevate your content with captivating visuals.
Boosting Productivity
Beyond its creative potential, Sora also serves as a valuable productivity tool, streamlining content creation processes and saving time for individuals across various professions and fields.
Educational Content Creation
For educators and students alike, Sora simplifies the process of creating educational videos and presentations. Whether producing instructional videos, explaining complex concepts, or creating engaging course materials, Sora enables educators to deliver content in a format that resonates with learners.
Social Media Storytelling
In an era dominated by social media, Sora empowers individuals to craft compelling stories and share meaningful experiences with their online communities. Whether sharing highlights from a recent trip, showcasing a new skill or hobby, or documenting special moments with loved ones, Sora helps individuals stand out in a crowded digital landscape.
Conclusion
Sora represents more than just a tool for business marketing; it's a catalyst for personal creativity and productivity in the digital age. By harnessing the power of AI video generation, Sora enables individuals to unleash their creativity, share their stories, and connect with others in meaningful ways.
Whether you're a content creator, educator, or simply someone with a story to tell, Sora empowers you to bring your ideas to life and make an impact in the world of visual storytelling.
✨🎥 Follow us to know more science and technology information: https://www.tinyfrom.com/
0 notes
Text
How to Stop Ads on Android Phone & Tablet
Ads can be a very interesting but annoying thing in the 21st century. Most of us want to get rid of them, no matter whether we are on the computer, phone, or the table. But few people know how to stop Ads on Android devices while playing mobile games, watching YouTube, or whatever.
Why Do You Need to Block Ads on Android Devices
Are there reasons to block pop-up Ads on Android besides avoiding interruptions when you are using your device? Certainly! This part offers you 6 reasons highlighting the importance of Ad-blocking for a smoother Android experience.
1️⃣ Reduce Distractions
Ads are an obstacle when you are watching a video, browsing a webpage, or playing games. By blocking Ads on Android, you can enjoy whatever you like.
2️⃣ Save Battery Performance
Ads will consume the Android phone or table resources. Every pop-up Ad will drain your battery, and stopping them via a powerful Ad blocker for Android can help extend the operating time.
3️⃣ Block Malware
Some Ads may contain harmful malware and trackers that can analyze your browsing behavior and collect your privacy or personal data, and worse, they fraud you this way.
4️⃣ Block Malicious Webpage Auto-Redirect
The banner Ads may appear at the top or the bottom of your phone/tablet screen, and it is easy to tap on them accidentally. When you accidentally tap on the Ads, it will activate an auto-redirection to another website.
How to Block Ads on Android Using Apps
This is the most intuitive approach for every Android user who wants to stop Ads effectively. Here, we offer you two good examples of blocker apps, and you can just pick your favorite one on Google Play.
Option 1. Total Adblock
Total Adblock is an impressive ad blocker on the market right now. The app was developed by the excellent antivirus company TotalAV. It has outstanding features that can protect you from adware and malicious threats.

Features of Total Adblock:
Block unwanted Ads from your sites of choice
Block malicious web pages
Manage trusted web pages and ad preferences
The white list is available
Block third-party tracker
How to block Ads on Android using Total Adblock:
Step 1. Download this App on your phone. (But there may be a warning if the download is outside Google Play: ‘File might be harmful’, just ignore it.)
Step 2. Launch this App on your Android phone. Before starting blocking Ads with this program, you are supposed to log in.
Step 3. Tap on the Power button to enable Ad blocking. If you need to activate the full ad blocking, click on the button “Enable Now” to set it.
Step 4. There will be a popup that asks you to offer the “Certificate Authority” to enable the HTTPS filtering, and you need to tap “Generate & Save” to save the necessary file on your device.
Step 5. Now you need to install the certificate by clicking “Go to settings” > “More security settings.”
Step 6. Then, choose Encryption and Credentials > Install a certificate > CA certificate to finish the installation.
Step 7. Finally, you are able to turn on this Ad blocker for Android.
Option 2. AdGuard
AdGuard is used the same way as Adblock. It runs a blocking service in the background on the cell phone and table while monitoring your web traffic.
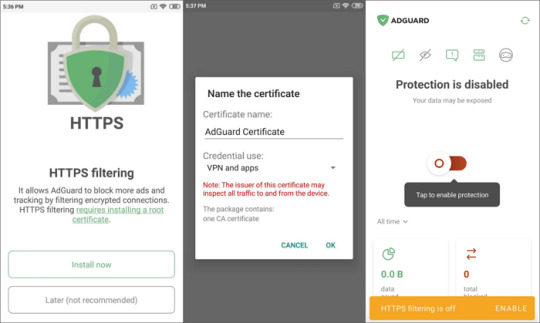
There is a tutorial for stopping Ads on Android phones and tablets:
Step 1. Download this App from its official website and install it on your Android device.
Step 2. Click on the button “Create local VPN” to filter all traffic.
Step 3. You will be prompted to download the root certificate if you use Android 7-9. And you need to tap “OK” to continue the process.
Step 4. If you use Android 10+, you will see the main screen of the app > tap enable to turn on HTTPS filtering.
How to Stop Ads from Popping Up on Browser
There are multiple optional browsers with an Ad-blocking feature available for Android devices. For example, both the Opera browser and the Samsung Internet Browser are good at blocking Ads on Android. But it’s worth mentioning that they won’t block Ads by default before you download a blocking extension.
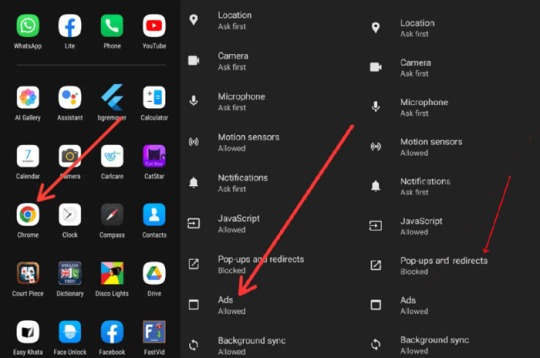
Follow this tutorial to stop Ads from popping up on Chrome:
Step 1. Launch Chrome, click on the three dots in the top right place, and then tap “Settings.”
Step 2. Scroll down to choose Site Settings, and you will find an option for “Ads” on the list.
Step 3. Choose the “Ads” option and toggle the Block Ads.
Step 4. Additionally, you also need to change the setting of “Pop-ups and redirects” in the same list. Toggle to disable it.
How to Remove Ads from Android via Settings
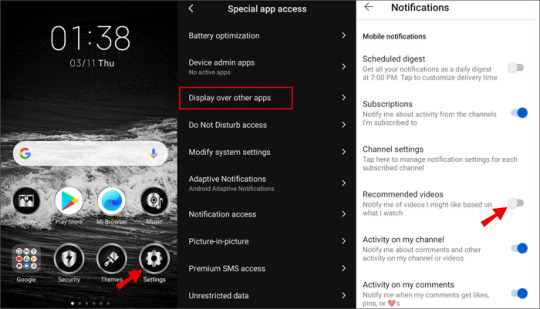
Turn Off the Allow Display Over Other Apps:
Step 1. Go to the phone Settings.
Step 2. Go to the Apps&Notifications > tap Advanced > tap Special App Access.
Step 3. Tap Display over other apps and toggle on the icon to turn off the feature.
Turn Off the Notification for the Phone or Tablet:
Step 1. Go to the device’s Settings.
Step 2. Go to the Apps & Notifications > tap Configure notifications.
Step 3. Scroll down to the Show Notifications section > tap Notification on Lock Screen.
Step 4. Select Don’t show notification.
Conclusion
Ads are annoying when you do your things on your phone or tablet, like playing games, watching videos, listening to music, and so on. They will drain your battery and consume your mobile data.
Blocking ads can not only smooth your phone operation and it can also save your money from trapping in fraud and malware. This post discussed how to stop Ads on Android devices using different methods. You can choose the most suitable tools to block the Ads on your phone and tablet.
FAQs About How to Stop Ads from Popping Up
You may still be wondering about how to stop Ads on specific Apps or anything else. This part will answer more questions about this topic.
How to Block Ads on Facebook?
There is a tutorial that can guide you through stopping Ads on Facebook.
1️⃣ Log in to Facebook.
2️⃣ Go to the Additional settings in the top right.
3️⃣ Tap Settings > Ads > Ad preferences.
4️⃣ Block the ads type you do not want to see on your device.
How to Stop Ads on My Phone?
1️⃣ Pick a good antivirus and adblocker app.
2️⃣ Do not tap the ads.
3️⃣ Be careful when downloading and installing apps outside Google Play or other trustworthy sources.
You May Also Be Interested in:
How to Recover Files Deleted from Recycle Bin
Best 10 Video Recovery Software for PC
How to Recover Deleted Partitions
How to Recover Deleted Photos from SD Card
Should I Upgrade from Monterey to Ventura
Subscribe to us to get more useful information about technology.
1 note
·
View note
Text
How to fix "the disk you attached was not readable by this computer"?
Got that "disk not readable" error on your Mac? No worries, here's a quick fix guide:
🔄 Check connections – swap ports or cables.
🔄 Give it a restart – sometimes a simple reboot does wonders.
💿 Use Disk Utility – select the troubled disk, and hit "First Aid" for repairs.
💻 Ensure the disk format is macOS-friendly like Mac OS Extended, APFS, or ExFAT.
🖥️ For disks from Windows, check for errors on a Windows machine.
🔄 Keep macOS updated – the latest version might have the fix.
🖥️ Test it on another computer – isolate the issue.
🔍 Consider third-party recovery tools if data is crucial.
💾 Reformat via Disk Utility if no vital data is at stake.
🛠️ Hardware woes? Reach out to the manufacturer or pros for help.
Backup before formatting! When in doubt, seek help from tech-savvy pals or professionals. #TechTroubles #MacHelp
Subscribe to us to get more useful information: https://www.tinyfrom.com/
1 note
·
View note