
web developer, Drupal follower, Docker ninja, JS explorer, PHP believer, Amiga enthusiast, truth seeker, parent & husband... at least for now...
Don't wanna be here? Send us removal request.
Statistics
We looked inside some of the posts by walkero and here's what we found interesting.
Average Info
Notes Per Post
8
Likes Per Post
5
Reblog Per Post
3
Reply Per Post
0
Time Between Posts
5 months
Number of Posts By Type
Text
15
Photo
1
Quote
1
Last Seen Tumblr Blogs


Fun Fact
Tumblr was created by web developers David Karp and Marco Arment.
Text
Don’t treat Docker containers like Virtual Machines...

I know, I know. It is hard to resist some times on treating Docker images like VMs. I totally get it, but I prefer to not do that. You see, there is no sense to put everything in a custom image, every server and every product you develop, with all their necessary libraries. And I will explain myself.
From a size point, you will end up with a huge image, probably more than a GB of size on your system, which will reserve a lot of space. And if this is the only setup, that’s somehow OK. But what will happen if you need to replicate that just to experiment with a new library or a new version of a crucial component? You end up with more setups and a lot of space reserved.
From a security point, huge images tend to have obsolete or unused code and libraries that no one updates because of the fear to break something. It is hard to experiment on updates, hard to rollback and maintain. Even the dockerfiles of these images tend to have hundreds of lines.
From a flexibility point of view, it is difficult to reuse the same images on multiple projects. As a result different projects have different images, strongly tied with them, containing different libraries and scripts. Also, it is hard to change one crucial component, i.e. PHP 5 to PHP 7, in a fast and easy way, without building the whole image from the scratch.
The solution of ‘course to all the above, and this monolithic image, is to use single service containers, based on images that do only one thing, and do it the best way they can.
So, if you are a PHP developer and most of your projects use PHP, Nginx, MariaDB, Redis, Elastic Search, Kibana, the next time you want to create a setup on docker prefer to use different containers for each of the above servers. Separate, i.e. PHP from Nginx and put the containers on the same network. This will give you the necessary flexibility to change, if you need, PHP or Nginx versions really easy, just by changing the image of the specific containers. All the other containers will be untouched, continue to work just fine.
And if you have multiple projects, that use the same technology, use exactly the same images on all of them. And in case you have to maintain those images, I am sure that even the dockerfiles will have much less code, and will be much easier to maintain, than the previous monolithic dockerfile.
0 notes
Text
8+1 reasons why I love to work with docker containers

I like to work and experiment on totally different projects all the time. Every month I intend to put my hands on something new and interesting, discovering exciting technologies and solutions. This means that I usually find myself working on totally different things, from Electron applications to Drupal websites to python scripts or pure C code, and the list goes on and on.
The last thing that I need is to have a development environment a complete mess. But, how can you keep everything organized and clean, and most of all, flexible to change?
I use docker for more than 3 years now, in a way that gives me the possibility to be flexible on change, and support all my needs on any project. And a have a few good reasons why I choose docker.
1. Easy to set up
docker is really easy to install on any machine. There are versions for Linux, Windows and MacOS available, totally free, ready to download and use. For Linux there is docker CE available at distributions’ repositories. For MacOS and Windows there are Docker Desktop for Mac and Docker Desktop for Windows.
Also, I use docker-compose for the installation and configuration of my containers, using YAML files per project. I surely propose you to install it as well, because it will make your life much more easy.
2. Works the same way on every OS
No matter what is your preferable operating system, with docker you can have the same experience anywhere. Especially if you work in a team of developers, all the team members will have the same development environment, with no differences. That way you eliminate situations like “But, it works on my machine”.
3. Based on community
You don’t need to reinvent the wheel, nor you need to be a devop to use docker for development. There are thousands of docker images, which you can use at any time, and you can find at docker hub.
You have to take care though what exactly you are using. Check how many are using the image you found. Is it based on official images? Is it certified by docker? How were they build?
4. Extend it
Let’s say that you found a very good and suitable image, but while you work on your project you realize that it is not 100% what you wanted, what can you do? You can go and search for an other image or you can extend it and create your own images, which you can share with your team and maybe with the rest of the community. This way you minimize the possibility to have different development environment inside the team.
5. Lightweight
Based on the way docker works, where you can have multiple containers based on the same image, makes it extremely lightweight. The reserved space in your hard disk will be the absolute minimu because only the changes from the base image are saved. For example, if you use a PHP image in multiple containers, docker doesn’t reserve multiple times the same amount of data in your hard disk.
There are also images based on OS distributions that reserve small space, like the Alpine Linux.
6. Different technology versions
Depending on the structure of your containers, there are ways to have different images with different versions of the same technology. For example, what I like to have is different versions of PHP, i.e. 5.6, 7.1 and 7.2. This helps me to be able to run legacy code, while whenever I want, I can easily change it to a newer version and work on resolving issues.
7. Easy to transfer
If you use plain docker commands or docker-compose, you just need to recreate the development environment on any computer that has docker installed. You don’t need to transfer hundreds of MB, because you can always pull the images from the online repositories. If you happen to use version control system with your code, just pull it as well and you are ready to start working again.
8. Isolated applications and security
A docker container image contains all the necessary software for your application to work, including code, system tools, system libraries and settings. Containers do not use software from the host computer in any way and cannot access the host system files. This makes them pretty secure for you to work on.
9. Easy shareable and strong community
We can find docker containers everywhere, in Data centers, in Cloud, in Serverless systems, in Linux, Windows, MacOS and many others. This means that there is a really big community where you can find help and information.
There are many events happening around the globe, the biggest of all is DockerCon, where you can meet many people that use docker.
Wrapping up
Before I wrap up this post, let me give you a list of useful stuff that might be help you starting with docker.
Most of the well know IDEs there are plugins for docker, which can help you manipulate your local containers. I like to use VSCode, and I recommend an extension named... eehm... Docker.
For containers manipulation I recommend to use Portainer, which can be used as an individual container. With that you can create, start, stop, delete containers or images, you can investigate logs, get info on CPU and memory usage and many other things.
Finally, you can find my own created images at https://hub.docker.com/u/walkero.
0 notes
Text
Recapping Amiga computers
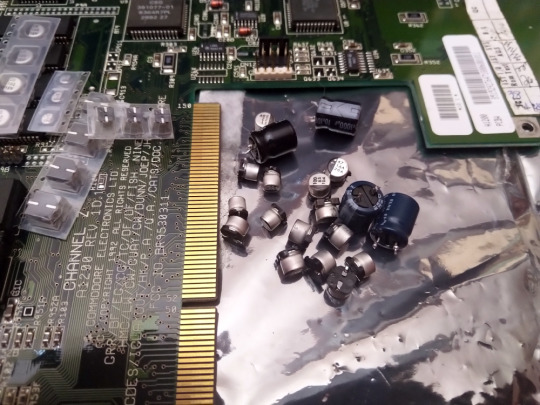
When you mess with the Amiga computers, especially the original ones created by Commodore, you never stop having fun. To keep them working for a few decades more, there is a need to mess with their electronic components as well.
I wonder how young people would react, if someone told them that the last few days he was kept busy by changing capacitors at his computer. And that’s exactly what recapping is and I can tell you that it’s not easy to do. But as soon as you turn the computer on and see that it works just fine, without any issues, a feeling of greatness fills you from your head to your toes.
Recapping is the process to change the capacitors from an electronic device, mostly because after many years of use, they tend to spread fluids underneath them and breaking the motherboard traces and the close components. To prevent that you have to replace all the capacitors with new, good quality ones.
The last few days I decided to recap, not one, but two Amiga 1200 motherboards. I bought the first one a few years ago, as broken/non-working, and the second one is my main gaming Amiga, with a lot of games installed in the hard disk.
Recapping the broken motherboard
Let me start by telling you the story about the broken one. Basically, it was working, but it had serious issues with the sound, which had a lot of noise and the volume was really low. Also, it had a broken pin at the internal IDE interface, which needed to be replaced. I hoped that the sound problem might be resolved after the recapping, in case the cause was a faulty capacitor.
Well, I had to change 19 capacitors, where 15 of them are SMD and 4 through-hole. Have in mind that Amiga 1200 released back to 1992, so these capacitors are soldered for more than 27 years on this motherboard. And this was not an easy job to do. Thank God, most of the capacitor didn’t have a big problem after all these years, but two of them already started spreading some fluids. Everything cleaned and replaced.
One site that helped me to check the trace continuity, the position and the polarity of each capacitor is the Amiga PCB Explorer. It is a really useful website, that helps check the motherboard after any change you do, before you turn it on and blow everything.
The sound, unfortunately, was not resolved after the recapping, and I began to check the motherboard for trace continuity problems around the sound circuit. The motherboard schematics are necessary as well, and can easily be found at the Internet, which are a good source of information on how things work. Additionally, I was checking at various websites about people talking for similar problems like what I was experiencing. I managed to find a forum post at English Amiga Board, where someone had similar problem and shared some voltage metrics. I did exactly the same and I saw that we had pretty similar issues.
The problem was that the IC LF345, which is the sound amplifier, didn’t get the right amount of voltage, so it didn’t work right. One small cable helped me feed it with the right voltage and the sound was loud and crystal again.
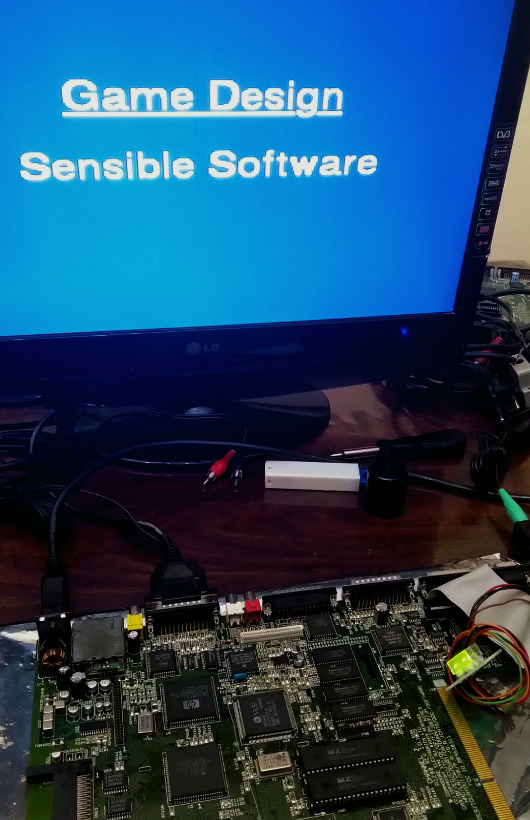
After the above I used the Amiga SysTest from keirf, which is a bootable disk with a lot of useful utilities to test your Amiga with. Tests like the sound output from different channels, the memory, the keyboard keys and many more. These utilities are really useful, but do not replace, in any way, the real life testing, by playing some games. So, Sensible Soccer and Cannon Fodder were the first games I tested on this Amiga. And everything worked just fine.
Since I was doing all these fixes at the motherboard, I wanted also to fix the clockport pins. All the Amiga 1200 have some pins where you can connect extra devices, like USB or Soundcards. This motherboard is a revision 1D1, and that means that the pins are soldered by Commodore at the wrong position. So I had to desolder them and add new pins at the right side. This was done and the motherboard has now a working clockport.
Recapping the main Amiga gaming machine
The second A1200 motherboard was working just fine, with no major issues. There were only some artefacts at the screen when I turned on the machine, which point to faulty capacitors.
While I was recapping it, one capacitor removed really easy, but it removed that underneath trace as well. It seemed that this capacitor broke that trace for good with it’s fluids. It was hard but I managed to find a way to solder the new capacitor to it’s place, with no broken continuity at the traces near it.
After a couple of hours I managed to have this motherboard recapped and ready to be tested, which of ‘course I did. The Amiga SysTest disk was again helpful for testing the sound and the memory of the machine.
Although the process of recapping your computer is not an easy one, a successful result brings joy and happiness. You should never try to do that if you are not experienced with soldering and desoldering electronic components, if you lack of knowledge about electronics and they work, if you are tired and if this computer is really valuable for you. There are professional people that can do the job for you, and you better contact them.
Now I have to make my own recapping stickers, where I can write down the recapping date, and stick them on the motherboard. In the future I need to order new caps for one more Amiga 1200 and an Amiga 600 I own. They need some love as well.
0 notes
Text
10+1 VSCode extensions I can't live without

At my previous post I talked about VSCode and how you can change the way it works, by installing the extensions that you need, based on the way you prefer to work. I would like to propose you my 10+1 extensions that I mostly use.
Project Manager by Alessandro Fragnani
I use to work on multiple projects at the same period, and a way to organise and switch between them as fast as I can is really mandatory for me. Project Manager helps to easily create different projects inside VSCode and switch between them from the dedicated sidebar. You can open a project directly to a new VSCode window, if you want to.
VSNotes by Patrick Lee
VSNotes is a really simple tool that helps you keep notes for anything you want. I use it in conjunction with Project Manager and I keep notes per project. VSNotes uses Markdown files, and it has it's own sidebar which you can use to find the notes you are looking for.
You can use tags in those files, for organising them. You can set also a base path where these files will be saved. I usually set the .vscode/vsnotes folder inside each project and workspace. That method helps me find the notes that I am looking for really fast .
Markdown All in One by Yu Zhang
Markdown is a lightweight markup language, and a simple way to format a text, with bold, italic, code block, headers and images. It is used in many websites, like the github.com, the tumblr.com and many others.
This extension will help you on creating your files in Markdown, as it has some helpful keyboard shortcuts for text formatting and a great preview feature, which updates itself as soon as you change the content. You can use it with VSNotes to view your notes.
PHP Intelephense by Ben Mewburn
As a long time PHP developer, I use a few PHP extensions to help me on my day to day work. PHP Intelephense is one of my most used extensions, as it has features like a fast code completion, workspace wide go to definition and find all references of a method and many others. And everything work super-fast.
phpcs by Ioannis Kappas
This extension works constantly at the background and uses the (PHP Codesniffer)[https://github.com/squizlabs/PHP_CodeSniffer], if it is available on your system. It helps you improve your code, by detecting violations of coding standards on your PHP, Javascript and CSS code. This way you can be sure that your code will remain clean and consistent.
Before you use this extension, you have to have phpcs installed and running on your system. The configuration is easy and the results can be viewed at the "Problems" bar at the bottom section.
PHP Debug by Felix Becker
This extension uses the debug features of VSCode to provide debugging usability for PHP, based on xDebug. This way you can use breakpoint on specific lines, to pause PHP execution and check the values of variables, arrays, objects and the flow of the code execution. I really love the conditional breakpoints, were the code pauses only when the condition is fulfilled.
PHP Debug uses the sidebar to show all the information, as well as a popup over the variables, where you can quickly get the defined values. There is also a "Call Stack" section at the sidebar where you can see the methods/functions and the files that were called before your breakpoint and navigate to that code as well.
The configuration of this extension is easy and works well with remote and Docker containers.
Better PHPUnit by calebporzio
If you write PHP code, using a modern framework, I am sure you use automatic testing, and maybe you are using PHPUnit, which is the most used method. Better PHPUnit helps execute the unit tests inside the VSCode window, for the whole suite or only the methods you work on.
Supports local running of PHPUnit, remotely through SSH and inside Docker containers, which is my favourite. The configuration might be a little bit tricky, but it works really good, as soon as you figure out how it works.
GitLens bu Eric Amodio
VSCode supports and uses GIT excellent out of the box. GitLens gives you a lot more features, which are difficult to full cover here. The features I love most are the Code Lens, were you can get information on each line of the code of the last author, the commit where he last edited this line and the date. Also, at it's own sidebar you can find almost anything you want, like the local and remote branches, the available stashes and the used tags.
You can also get the file and line history as well as you can do some comparisons of your code with other branches or tags. There is a powerful search view where you can search and explore commit histories by message, author, files, id, etc..
This extension is huge and a must have, if you use GIT.
Todo Tree by Gruntfuggly
Todo Tree is a simple extension that finds TODO tags inside your code and shows them at the sidebar. This is helpful for me when I start building a whole new feature, where first of all, I create TODO comments in the code, and then I know exactly what I have... em... to do, obviously. This way I help remind me the next steps and the results I expect from specific parts of the code.
Also, based on the available time, I create TODO comments for the code that needs to be done in the future. With that extension, things like that are not lost inside the project files.
The extension lets you create your own tags and set the colour that will be used. At the sidebar you have a lot of different ways to list used tags, like to show them all together, or in a tree view, based on the files and folders.
EditorConfig for VS Code by EditorConfig
One more simple but must have extension, which attempts to override the workspace/user configuration and respect the .editorconfig rules on code format. This way you can be sure your code is consistent with your colleagues' code, as you write with the same indention, using the same tabs width, or using spaces. Don't miss this out when you work in a team.
Better Comments by Aaron Bond
Better Comments is a useful extension, that helps you create more human-friendly comments in your code. You can stylize your comments, using own tags and colours for every single line. Also, it supports generic tags, like TODO or @param, and make them standout beautifully.
This list is in no way complete, but I hope will be useful, and find an extension that will make your development days a plessure.
1 note
·
View note
Text
My 10-1 reasons why I love to use VSCode

Multiplatform
VSCode is available for Windows, MacOS and Linux and it is easy to install on every system. This gives me the similar experience on my day to day work, no matter what system I happen to use. You can download it from the official website, where you can find different versions for 32bit and 64bit systems. For some Linux distributions is available at it's repositories as well.
Supported languages
VSCode is developed on TypeScript and has built-in support for Javascript, TypeScript and Node.js. It supports many other languages using extensions, such as the PHP, C++, Python, GO etc. It has a great and rich ecosystem where I am able to find anything I want, helping me to add new features to my IDE.
Modular
I like my IDE to be plain simple out of the box, but give me the option to add what I need, when I need it. VSCode uses extensions, which are plugins that anyone can use. It has a list of them at the left sidebar, where you can search and choose, based on features, popularity and rating. Simple ways to find the best extensions for me.
Best suitable extensions are proposed based on the files I am working on, for example if I open a Markdown file (.md) VSCode will propose to install extensions that support these files.
I like to optimise the loading time of VSCode even further, by loading only the necessary extensions I need per project. VSCode provides a way to disable extensions for your current open project, and of 'course, saves that configuration to the project. To make it clear, if the current project is based on Node.js, I don't need a number of other extensions that support PHP, which I can disable. This makes my IDE faster and more clear, by removing the unecessary UI elements and tasks.
Clear view
When I am using VSCode my attention is not disturbed by other elements, as it is pretty minimal, without even the need to go to a full screen mode. It only has a left sidebar, where various extensions add their elements, lets say the list of the Explorer files. The rest of it is available for your code. Even the code minimap can be removed instantly and for good from the menu. There is also a bottom bar for logs, for the integrated terminal and other stuff, but it is open only when I need it.
The colors of the editor are pretty good, with bold edges and colours. Of 'course there are a lot of theme extensions, that change the colours of the IDE and your code as well. You can even use different icons for different kind of files, which is really good for the file lists.
Speed
I believe that everyone doesn't want to wait for a program to load or when it executes specific tasks. Especially, when this program has to do with our daily work. I find that VSCode loads pretty fast and restores my working status from the previous date, with my last active project and opened files as well.
Debugging
VSCode has a great debugging support, with the built-in debugger. This is also used by the left sidebar, which works the same way no matter the programming language you use.
You can also have different debug configuration per project based on what you are working on. This can be saved under the workspace configuration or .vscode folder.
When I start debugging my code, a floating bar appears at the top, where the necessary buttons exist, like Continue, Pause, Step Over, Step Into, Stop etc. At the left sidebar I can see all the current set variables, arrays and object, as well as their values.
Of 'course, you can't debug your code if you do not have breakpoints, which you can set with a mouse button click at the left of the row number. Conditional breakpoints are also available, in case you want to stop the execution only on specific situations.
Workspace configurations
I usually work on multiple projects at the same period of time, which most of the times are totally different. The workspace configuration helps me configure each extension in a different way for each project, for example the SFTP access for different servers and websites.
This creates a .vscode folder inside my workspace, where are stored only the differences of the configuration against the default ones. This is simply to copy to an other project and fast change only a couple of them, if you need to.
Personal evolution
My major concern about the selection of my day to day IDE is to support me on my personal evolution. As I constantly want to try new technologies and methodologies, I need my tools to be able to transform themselves based on what I need to do, and VSCode is one of these tools. The extensions I use are pretty good developed, VSCode is pretty stable and ready to support me on my daily coding. And when I need to try something new I am pretty sure I will be able to find the necessary extensions that are going to do the job.
Price
The best of all the reasons is that it is totally free. All this power at your fingertips, without paying anything at all.
1 note
·
View note
Text
Moving to Dublin

In a few days a big change is going to take place in my life. I am living Athens and moving to Dublin of Ireland. This was one of my dreams, which slowly comes true.
I managed to visit Dublin back in 2016, where I attended DrupalCon conference. DrupalCon is the biggest conference for Drupal developers in Europe, where someone can meet other developers, designers, executives and companies working with Drupal.
I was lucky to have my wife along with me and we had a great time in Dublin. From the first day I was there I knew I was at the right place. I knew that someday, sometime I will move to Ireland with my family. And that eagerness never faded away. And, now it’s time to make that step and move forward, closer to fulfill of my dreams.
I am happy that I was lucky enough to make very good friends in Greece, leading a great team at my last professional position, and great persons around me, who love me and, I am sure, wish me success and good life. For that I feel blessed.
Until we meet again friends… Cheers to all.
Photo credit: Miguel Mendez on Visualhunt.com / CC BY
1 note
·
View note
Text
Is your Drupal site hacked?
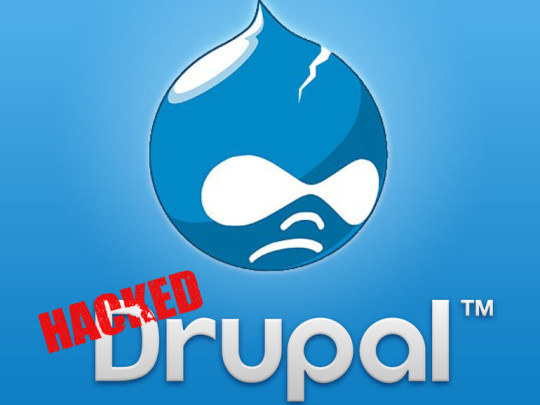
The last couple of months a lot of Drupal web sites were hacked, because of some kind of vulnerabilities existed in the code. There are still more 800.000 websites using Drupal 7, and thank god that the Drupal security team still supports and release security updates for this version.
Your site is based on Drupal 7 as well? Do you know if this is hacked? Are you sure? Read below 10 steps to follow to check if your Drupal site is hacked, using multiple tools.
Step 1
Install the module Hacked which scans the Drupal core modules and code, as well as the contributed modules, to find if there are changes to their code. Hacked shows the changes in a separate screen, marking the changed modules with red color, so that it can be recognized easily, and because this is an ALERT.
If a module is changed, then remove it and reinstall it. The best way would be to completely uninstall it, but some times this is not possible to do. So, just replace it’s files.
Remember to disable this module when you finish all your checks, as this is a developer module and should not be enabled on a production website.
Step 2
One more useful module to use is the Security Review, which makes a few tests on the files, settings.php config, user’s settings, MySQL errors and many other necessary checks. A misconfiguration on any of them might make your site insecure and easy to be hacked.
This module shows a list of all the checks it does, marking with red the failed ones and with green the secure ones. You better don’t have any red line there, but it is up to you to fix it or not.
Step 3
Connect to your server using your terminal and maybe a secure connection using SSH. Go to the root of your website, where you can run a few commands to check all the website files.
To find if there are files that contain PHP code used to write files to your server using your apache user or attacks other websites, I use the following commands:
$ grep ‘@include’ ./* -R $ grep 'die(passthru' ./* -R $ grep 'base64_decode' ./* -R
The above commands will scan all the files, even those that are under any folder, to find a pattern, and will show you a list of them, with a part of the code. When you see this parts of code you will understand if these files are hacked. Most of the times the code is written with hex equivalent of each character, which when are decoded and executed create other files to spread their existence and to be more difficult for someone to track down.
You will find the hacking code at the first lines of the files and you have to remove it with an editor. You better use VIM or Nano, it depends with which one you are more familiar.
Step 4
It happens a lot of times the hacking code to exist in the public folder where images are upload. Usually this is under sites/default/files folder.
To find if there are PHP files in this folder, run the following commands at the terminal:
$ cd sites/default/files $ find . | grep '.php'
The first command change the current directory where the user is to the sites/default/files. If your files are under a different path, then you have to change this command with your path.
The second command searches for all the files and folders that have .php in their name. If you find such files, then you better delete them, as they are not used by Drupal itself, and it is not a good place to have PHP files.
Step 5
Check the .htaccess files to be the same with the ones that come with the Drupal archive and with Drupal.org guidelines. Maybe there are changes that you did a lot time ago that lets code to execute PHP files in a way it shouldn’t.
The .htaccess files commonly they are under the Drupal root folder and under the public files folder (sites/default/files).
Step 6
Clear all the files in the temporary folder and be sure that this is outside the root folder of your website.
If you are not sure about it, and your server is a Linux server, then use the /tmp of the system. To make this change you can go at the admin/config/media/file-system of your website and change the path at the Temporary folder field.
Step 7
Check your Apache error logs for weird reports, such as a code that has Warnings or Errors because it can’t find a specific file in specific folder.
If you do not recognize that code, maybe it is a hacking code. You better check this out as well.
Step 8
You found a few hacked files and you cleared them? That’s great. You better now chmod these files. I mostly change them to 644 which prevents anyone to write on these files but it remains executable by the owner.
This can be done in terminal by:
$ chmod 644 index.php
Step 9
Uninstall and remove all those modules that you do not use any more. Check those JS libraries you installed once but didn’t fullfill your needs, and they remained in your website. Remove them all.
If you do, not only your website will be more secure, you will also gain some speed. If you want to test something or check a new module, you better do it on your development environment, and not on your production. You better play safe on that and you won’t regret it.
Step 10
Let’s be honest. Most of the times a website is hacked is because the DevOps or the developers do not update the core code of the CMS, no matter which one you use.
It is not big deal to do that and keep your sites updated. There are available a lot of tools to help us do this job even faster, such as Drush, Composer and many others. Use them, create scripts to auto-update your sites. Even if your client doesn’t pay for that. You better have a good fame that the sites you develop and the tools you use are secure, than having a few websites hacked.
1 note
·
View note
Photo

Ready to go... #amiga32 #amiga #amigaevent
1 note
·
View note
Text
Re-reading the Re-Work book

A few days ago I was on vacation and found the time to re-read Re-Work book. It was published back at 2011 by Jason Fried and David Heinemeier Hansson of 37Signals. They wrote this great book based on their experience of managing their company, their time, their colleagues.
This is the second time I read the book and I was astonished how fresh and revolutionary do all the things they wrote about, still look for the most of the companies here in Greece.
It is useful to read it in case you think to start your own company, or a startup, or even you are a team leader in a company. You can change the way your team works, how they express themselves through their work, and how everything they do makes them feel better for being a part of it.
The book provides information on how to transform the products you create, to best suite to your team and become useful to your customers. But the most interesting thing to read about is how you won’t become your customers’ slave. How you have to keep your vision against the voices that ask to change and be something else. That’s the way to create something unique and change the industry.
There are a lot of tips for day to day work and how you can recognize the truly passionate employees, the all “day workers” that like to be victims, and how you can get the best thing from everyone.
Even for the meetings, the guys from 37Signals have a strong opinion on that. "Meetings are TOXIC”. Meetings kill productivity. Think about that. Remember how many working hours were lost in meetings, that made you stay late to finish your day job.
I totally recommend to read this book. It will change the way you think and you work. More info you can find at https://37signals.com/rework
#teamleading#worktips#meetingssuck#rework#workbetter#productivity#inspiration#company#startup#stayinglate
0 notes
Text
GOG Galaxy installation under Linux and WINE
The GOG.com is a great website that distribute a lot of computer games, old and new. GOG Galaxy is their desktop application that connects the players with each other and the gaming community. GOG Galaxy is an alternative to Steam and currently is available only for Windows as a beta version. But it runs under Linux just fine, with the help of Wine of ‘course. Read more to see how you can install and use it under your Linux system!
First of all you must have installed wine 1.7.53 or later version. I use PlayOnLinux to setup my Wine systems, which is a very nice app that helps managing your different Wine prefixes and create new really easily.
Download the GOG Galaxy latest version from the official website and install it with PlayOnLinux. To do that open the PlayOnLinux and click at the left sidebar the link “Install a Program”. At the new window that appears use the link “Install a non listed application” at the bottom left corner, and then follow the wizard. Remember to use a 32 bits windows installation.

After the installation finish, you have to install the mscorefonts, the gdiplus and the vcrun2012. To do that use the top icon named “Configure” and select the “Install Components” tab. Repeat this step until you install all the above components.

After that you have to install also the Microsoft’s Visual C++ Redistributable for Visual Studio 2015, which you can download from it’s official site. Remember to download the x86 version, as our system is 32bit. To install it, use again the steps you followed to install the GOG Galaxy, but when the wizard asks “What you want to do?”, choose “Edit or Update an existing application”. This is necessary because we want to install it at the same Windows installation as the GOG Galaxy, which you have to choose at the next step.

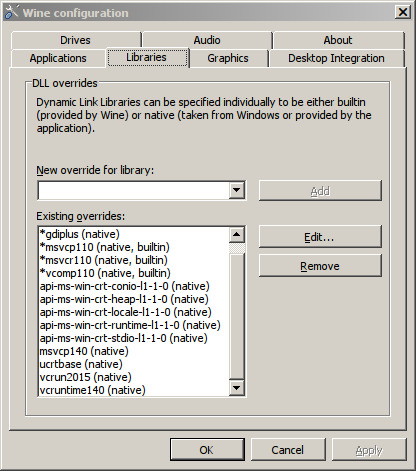
When the Visual C++ Redistributable for Visual Studio 2015 installation is completed you have to set a few libraries to be used natively by the Wine, which means that it will use the libraries that we installed and will not try to use Wine’s equivalent. To do that click on the top icon named “Configure” and select the “Wine” tab. Then select the first icon “Configure Wine”. A Windows window will popup where you can set how the Wine will work. We are interested on the “Libraries” tab. You have to insert the following libraries at the fiels “New override library” one by one, without their extension. When you insert their names, click “Add” and then “Edit” to change the override too “Native” only.
msvcp140.dll vcruntime140.dll ucrtbase.dll api-ms-win-crt-locale-l1-1-0.dll api-ms-win-crt-runtime-l1-1-0.dll api-ms-win-crt-stdio-l1-1-0.dll api-ms-win-crt-heap-l1-1-0.dll api-ms-win-crt-conio-l1-1-0.dll vcrun2015.reg
After you do this step, you are ready to run GOG Galaxy and connect to the new GOG community. Have fun.
0 notes
Text
Import your remote servers to Komodo Edit 10
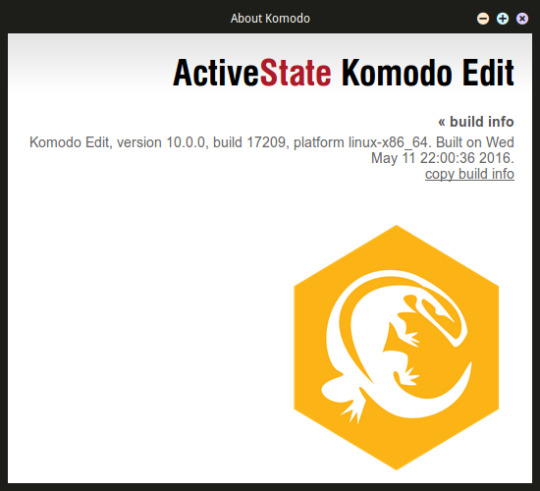
ActiveState recently released the new Komodo IDE v.10.0.0, which is a commercial IDE for programmers. Along with it they also released the free version of the Komodo Edit v.10.0.0. Komodo Edit is one of my favorite editors, which I use daily. It is plain, really fast and works with no problems.
As soon as the new version released I downloaded it and installed on my Linux Mint system. As every new version, it is installed in parallel of the previous version, without overwriting it. So I have both versions, 9 and 10, installed on my system. That’s good because you might need to return to the previous one, until you get familiar with the new version.
When you first run the new Komodo Edit v.10 a wizard appears that helps you configure various new features, like the appearance of the windows, the theme to be used, import your older key bindings etc..
The only thing that it doesn’t do at this stage is the import of your previous remote servers. This is really necessary for me as I use a lot of remote servers, and the procedure to configure them again would be really time consuming. So, what you can do to import your remote servers from the previous version?
First close every Komodo Edit instance you have running. Then copy the files XRE/logins.json and XRE/key3.db from the folder ~/.komodoedit/9.3/ to the folder ~/.komodoedit/10.0/.
As soon as you do that, start the Komodo Edit v.10.0.0 and open the preferences. At the Servers tab you will see that all your previous remote serves will be there.
If you do not yet use Komodo Edit, you can download it from the official website where you can find more information about this editor.
0 notes
Text
How to use drush on Hetzner managed server

You are a Drupal developer and you prefer to do all the installations and updates of your web sites using Drush, but your newest customer has a managed server at Hetzner? I am sure you already know that drush isn’t already installed and it is a little bit difficult to persuade the system administrator to add it. The following guide will help you to install it and use it in a few minutes.
First of all you have to have ssh access to the server, even if the user you use is not the root. To do that you have to login to your server panel from https://konsoleh.your-server.de/. Click on the server you have your domain installed and from the menu at the left column select “Account management > SSH access“. From the select field choose the domain, click next and then click “Activate”. After that a new message will appear saying that the ssh access is activated. Have in mind that you have to use the same credentials like FTP but the port of ssh is the 222, instead of the usual 22.

Open your terminal and connect to the server using ssh. And now it’s time to install Drush. Below are the steps you have to follow to complete the installation.
# create a new folder under user’s folder mkdir drush cd drush # download the latest stable version of drush, which is compatible with Drupal 6, 7 and 8 wget http://files.drush.org/drush.phar # test your installation and see the version of drush, along with the path where it is in the disk php drush.phar core-status # make it executable chmod +x drush.phar # rename it mv drush.phar drush.php # and initialize it ./drush.php init
When you run the last command you will be asked to append a few lines in the file .bashrc, which you better answer yes, although we will edit this file later. When I did the above I got the following info.
Copied example Drush configuration file to /usr/home/[username]/.drush/drushrc.php [ok] Copied example Drush bash configuration file to /usr/home/[username]/.drush/drush.bashrc [ok] Copied Drush completion file to /usr/home/[username]/.drush/drush.complete.sh [ok] Copied example Drush prompt file to /usr/home/[username]/.drush/drush.prompt.sh [ok] # Include Drush bash customizations. if [ -f “/usr/home/[username]/.drush/drush.bashrc” ] ; then source /usr/home/[username]/.drush/drush.bashrc fi # Include Drush completion. if [ -f “/usr/home/[username]/.drush/drush.complete.sh” ] ; then source /usr/home/[username]/.drush/drush.complete.sh fi # Include Drush prompt customizations. if [ -f “/usr/home/[username]/.drush/drush.prompt.sh” ] ; then source /usr/home/[username]/.drush/drush.prompt.sh fi # Path to Drush, added by ‘drush init’. export $PATH=“$PATH:phar:///usr/home/[username]/drush/drush.php” Append the above code to /usr/home/[username]/.bashrc?
As soon as the initialization finish, edit the .bashrc file and comment out the lines that refer to drush. Then append at the end of the file the following lines:
export COLUMNS alias php=’/usr/bin/php’ alias drush=’/usr/bin/php ~/drush/drush.php –php=/usr/bin/php’
Save .bashrc and close the ssh connection. This is necessary because .bashrc commands are executed when you connect to the server, so try now to connect again. If you don’t see any errors then everything work as they should. Now we must test if drush is installed right.
# check drush version drush version
You must get something like Drush Version : 8.0.3 . If yes, then everything work like a charm. Drush is ready for you to use it as you always did. Get into the public-html folder where your Drupal installation must be and run drush to make updates and anything else you need.
0 notes
Text
How to find in JIRA the issues you are mentioned in

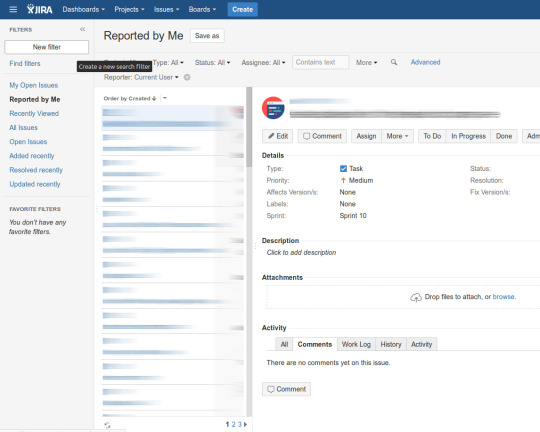
The JIRA Agile online Management System is a great platform for developer teams, who really need a powerful tool to organize tasks and jobs. Unfortunately, JIRA’s UX is a little bit chaotic. This makes it difficult to be used by people who are not experienced with such platforms, for even simple tasks, such as a way to see tasks where people mentioned you. Let’s see how this can be done!
What we have to do is to use filter views, which will show all the tasks you were mentioned in. To do that first of all select your project you work on, and go to the top menu. Select the menu item labeled “Issues” and then choose one of the ready made filters, like the “Reported by Me”.

After that select the button labeled “New filter” at the left column, which will help you to create your new filters. In the next screen you can choose the filter parameters from the select boxes, if you like. There are a lot of parameters to choose from, but the filter we want to create right now will be faster and easier to do by using JQL statements. The JQL statements look like SQL scripts, and these bring a lot of power to users who know how to use them.
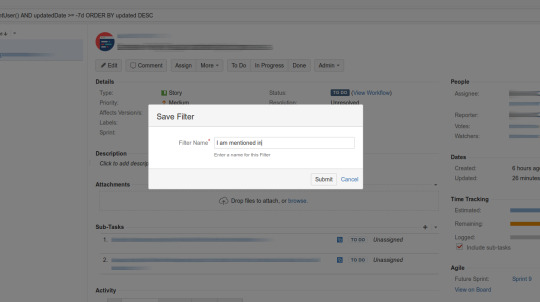
To set the parameters through JQL, click the link labeled “Advanced” and write the following line at the top text field:
text ~ currentUser() AND updatedDate >= -7d ORDER BY updated DESC
As soon as you press enter you will instantly see how the filter applies to your current tasks. You can of ’course make your own changes to the above statement to fulfill your needs.
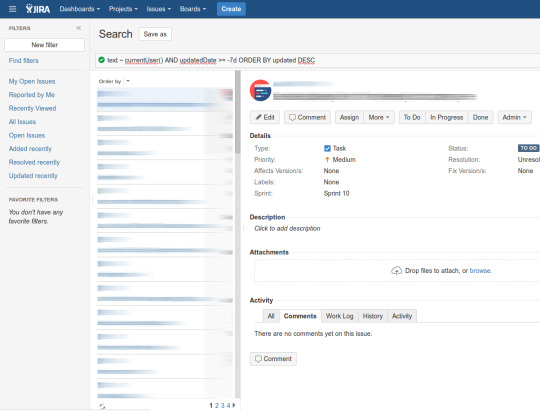
This statement will show you all the issues where people mentioned you the last 7 days, ordered by the update date and time, from the newest ones to the oldest. Now the only thing that remains to do is to save your new filter, by clicking the top button labeled “Save as”. A popup will show up, where you can insert a label, like “I am mentioned in”.
Your new filter will be available to be used again from the “Issues” menu. You will recognize it by the name you inserted. You can of ‘course edit it if you want, following the above steps again.
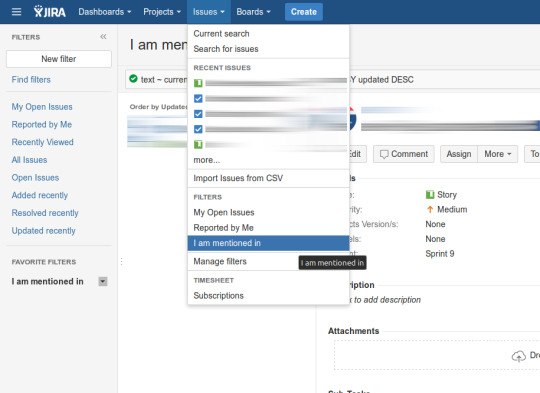
Hope this guide helps you to create your first filter into JIRA and inspire you to find more helpful ways to enhance your experience with this great platform.
3 notes
·
View notes
Quote
Do not enter, unless you know how to code or you bring beers.
walkero
0 notes
Text
How to reinstall Kano OS with Linux Mint

If your SD card is 8GB of capacity, then you need the image which has the same value in it’s name, f.ex. Kanux-Beta-v2.2.0-jessie-release-8gb.img.gz. This file is smaller than 1GB but when you untar it on you hard disk it will reserve around 8GB on one file with the extension .img.
The Linux Mint distribution has a great little application called USB Image Writer. You can find it at the menu. In case it is not installed, use the Software Manager App to install it by searching for the mintstick application.
With USB Image Writer you can write any disc image file to a USB, like the IMG file, in our situation. You can also burn ISO files from live CDs/DVDs and use them to boot your system.
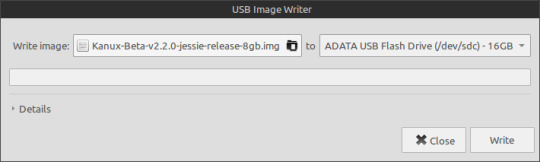
Using the USB Image Writer you choose the IMG file at the field “Write Image”, and at the field “to” you choose the USB device you mounted with the SD card. The capacity should be close to 8GB. Then you press the “Write” button and wait a few minutes until it finish it’s transfer.
CAUTION: This procedure deletes anything that exists in the SD card, and you can’t retrieve them later.
As a last step, you have to add the SD card back to the Kano device and boot as you should.
There are a few guides in the web that points to use the command dd through your terminal. Unfortunately this didn’t work for me, and I think the above steps are easier for anyone to do.
Take care and have fun with the new installation of your Kano OS.
0 notes
Text
Gedit vs Geany vs Sublime 3

Lately found some free time to test a few programming editors, in case there is something more suitable for my needs. I use daily the Aptana Studio 3 for Web Development, usually connected to a server using SSH connection. Aptana has the ability to connect to FTP/SFTP and load/save the files directly to your server. And it is really fast when it does that.
From the other hand the three editors I tested do not connect to FTP/SFTP directly, but if you work on Linux, like I do, you can first open a connection with your server using “Connect to Server…” option of your file manager. This mounts your server as a folder, and you can use it the same way you use other folders on your system. You can copy/delete/rename/edit files, depending on user’s access permissions.
Sublime Text 3
The first editor I tested is the well known Sublime Text 3, which is an editor we see everywhere these days. It became really famous and a trend really fast. Although that Sublime 2 didn’t make me drop Aptana, I decided to try it’s successor, in case I should change my mind.
Sublime is a nice editor, fast and light. The syntax highlighting is great and the layout too. Unfortunately, the file load and folder scan of a SSH connection is really slow. It is great that you can load files asynchronously, but this is not the case when you save a file, which blocks the whole editor for a few seconds. Unfortunately, it doesn’t have an indicator to show you if the saving process started and when it will finish. You just wait until the editor becomes unblocked. What a disappointment it is.
Sublime is great for local files, but too slow for my taste when you deal with files that reside on your server. Also, the registration cost is really big for such an editor, IMO.
Geany
Geany is great editor with a lot of features. I found it fast and light, with great syntax highlighting. I didn’t like the command auto complete though, where Sublime is really strong.
This editor has also the same problems with Sublime, when you have to save a file on your server, using SSH connection. It is too slow, blocking the whole editor, although it is a little faster than sublime and it has a nice indicator to show when the process finish.
I didn’t like the way that you can use different themes. You have to download geany-themes from GitHub, copy the “colorschemes” folder into ’~/.config/geany/’ and then edit the geany.conf to change the parameter “color_scheme=” with the name of the scheme you want to use. Finally you have to restart the editor. I am really sorry, but this is not a really friendly way to change themes.
From the other hand Geany is totally free, coming with a lot of plugins to help you on your daily tasks.
Gedit
Although Gedit is not a well featured programming editor, it is simple to use, light and fast. It comes with a few plugins and themes to use. Unfortunately, it doesn’t have an auto complete feature depending the programming language you use.
From the other hand, Gedit doesn’t have the problems that the previous two editors have. When I tried to save an edited file on my server, using SSH connection, it saved it really fast without blocking the editor, not even the same tab. So if you want to continue editing other files, you can do it. There is also a small throbber at the file tab which indicates that a saving process is started.
I don’t know what you think about these editors, and which one is your favorite, but my opinion is that you should try the available editors and see which one is suitable for you. For me Aptana Studio and Gedit is the best solutions so far. Choose yours and continue developing your software.
0 notes
Text
Yahoo 5 days Weather Forecast

Yahoo Weather API is a great weather condition source, which you can use on your apps free of charge. Many apps use it, like the StormCloud, Drupal and Joomla modules and many applications for smart phones. The iOS main weather application retrieves weather condition from Yahoo too.
The place I live is called Agia Paraskevi, which is in Athens - Greece, and I will use it as an example at the following codes. The Yahoo weather API exchange data using the RSS and XML formats. So, you have to be familiar with these formats to use it. To get the info you need you have only to request data using specific URLs and parameters.
The first thing we need is to find the place WOEID, which is a unique ID number. To get this you have to access the URL http://query.yahooapis.com/v1/public/yql with two parameters, the q which is an SQL query that includes your living town name, and the format which we set to “xml”. Have in mind that the URL should be encoded as one, before you access it.
http://query.yahooapis.com/v1/public/yql?q=select%20*%20from%20geo.places%20where%20text%3D%22Agia%20Paraskevi%20Greece,%20Athens%22&format=xml
The above url will return an XML page where we can find the WOEID at the first data child and under the tag:
24544198
Among other info we can get the name of the place as Yahoo provides it, under the tag
Agia Paraskevi
So, we have now the WOEID of our place of living. Using this we can get the weather condition by accessing the following URL. The w parameter is the WOEID number.
http://weather.yahooapis.com/forecastrss?w=24544198
The return data from the above URL is an RSS with the place weather condition and a forecast for 2 days. So you have now your basic weather condition info.
But how can you get a forecast for 5 days?
If we would like to get more than 2 days forecast, we first have to find the global zip code (GUID) of the place. This can be found at the end of the previous RSS result, with the tag:
GRXX0012_2013_05_16_7_00_EEST
Using the GUID “GRXX0012” and the following URL we can get 5 days forecast, in RSS format again. The _c extension at the URL will return the degrees in Celsius unit, but the “_f” in Fahrenheit unit.
http://xml.weather.yahoo.com/forecastrss/GRXX0012_c.xml
That’s all you have to do to get the weather condition info. This can be used with any programming language you like.
0 notes