
Have you ever gotten an idea for something, but not known where to start? Or maybe you do know where to start, you just lose your way part way through? Story of my life. So many things I start on and then neglect half way through. Drawing, models, writing, research, videos, the list goes on. This is place to see what happens when I actually finish all those things. Get ready! If you enjoy my content, support me on Patreon @ patreon.com/erikchamber Deviant Art: erikchamber MyMiniFactory: erikchamber Reddit: u/erikchamber Thinigverse: ErikChamber Twitter: erik_chamber
Don't wanna be here? Send us removal request.
Statistics
We looked inside some of the posts by erikchamber and here's what we found interesting.
Average Info
Notes Per Post
382
Likes Per Post
289
Reblog Per Post
93
Reply Per Post
0
Time Between Posts
25 days
Number of Posts By Type
Photo
14
Text
3
Last Seen Tumblr Blogs


Fun Fact
12.7% of mobile users access Tumblr.
Photo


Obi-Wan Kenobi Lightsaber (Ep III - Revenge of the Sith)
STL for those interested
This is my first lightsaber since I was maybe 4. When Phantom Menace came out I got a toy Qui-Gon Jinn lightsaber, you know those ones where you throw the collapsible blade out. Weird enough it was a blue blade, but that's my favorite color so I didn't mind. Now 21 years later I have made one entirely from scratch. I tried making a lightsaber w/ PVC and other piping but that just turned out weird.
This prop does not include any working lights, sounds, etc. so it's perfect if you want a simple saber without the hassle of wiring electronics. All those bells and whistle will just have to go into my next design.
Any critiques are welcome. If you enjoy the design, support me on Patreon.
#star wars#lightsaber#Obi-Wan Kenobi#general kenobi#obi-wan#revenge of the sith#laser sword#3d printing
1 note
·
View note
Text
Reblog if you post any of the following so we can find each other
3D printing
Model making
Prop making
Cosplay
Tabletop games
Lego
Digital Design
9 notes
·
View notes
Photo
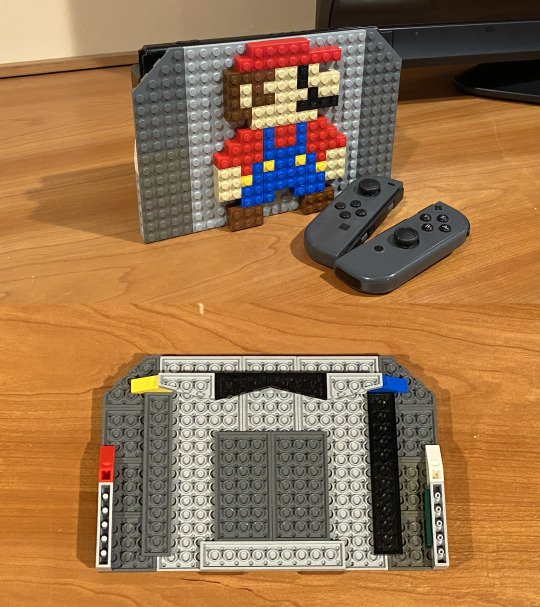
Lego Mario Switch Dock Cover
Figured I could spruce up my gaming experience during this trying time. I was amazed at how perfectly snug it fits on the front of the dock. I plan on making one with Link, I just need to find where all my green bricks went to.
0 notes
Photo

Redesign of Yugioh Field Center Cards
STL for those interested
The standard/official design for field center cards bothers me a bit. I think it's because the design favors one player over the other. When a field center card is on the field, it's layout, artwork, and text all face one player leaving the other to view it upside down, plus it looks too much like other cards on the field.So being the meticulous and pretentious snob that I am, I decided to redesign the field center card to better suit its purpose in two ways:
The main design is symmetric so both players see the same, or at least, a similar view rather than one having to see it upside down.
It's more of a plate than a card so it sits in the field center as a solid stationary object rather than a flimsy card which can easily move, as well as giving a pseudo-rectangular border to further distinguish itself.
I've included several designs; some are based on the standard design with classic Yugioh artwork and motifs, and others I've taken an out-of-the-box approach to see what I could come up with. Surprisingly I've only seen two other people make a field center card with a symmetric design:
https://imgur.com/oZIEghK & https://imgur.com/a/JQwu8
If you like or don't like my idea for field center cards/plates, please let me know.
3 notes
·
View notes
Photo

I gave Endymion counters, it’s only fair my Six Samurai get some Bushido Counters to use. Why am I so attracted to decks with counters? I didn’t even know Six Samurai used counters why I got into them.
These things are the size of nickels so I’m very happy as to the level of detail I was able to get for the lines, as opposed to my Spell Counters which were just a big triangle.
If you want to print some, you can find the STL here
1 note
·
View note
Photo

Some Spell Counters I 3D printed for my Endymion Yugioh deck. I actually need to print more because the last duel I played I ran out and had to use pennies.
If you want to print some yourself, https://www.thingiverse.com/thing:3972815
#3d printing#yugioh#endymion#spell counter#counter#coin#tabletop#gaming accessory#gaming#mythical beasts
0 notes
Photo
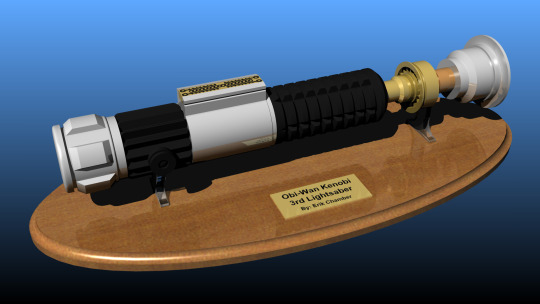
Render of my design for Obi-Wan’s 3rd lightsaber. I’m only making the saber, not the stand, but I figured it couldn’t hurt to add something for presentation; a future project perhaps. Printing this will be so fun.
3 notes
·
View notes
Photo

Meeting in the Savanna
Again, I'm trying out some new styles, though this one was more of a necessity. I've been fooling around with this one for a few weeks trying to make the animals in the block chibi style of my other comics and they were not looking good at all. So, I took a more realistic approach and it looks much better. I also found a way to make their expression not absolutely terrifying as some people have commented.
2 notes
·
View notes
Text

I’ll never forget that feeling of stepping out of the Shrine of Resurrection and the boundless wonder I got to experience. Whether stumbling upon a village hidden away or spotting a massive green dragon past the mountains and just needing to get over there as soon as possible.
#zelda#legend of zelda#breath of the wild#botw#loz botw2#zelda botw2#loz#funny#botw2#botwo#nintendo#switch
297 notes
·
View notes
Photo

Why here?
I'm trying out a different style, though technically this is older than my previous work. When I started making chibi characters by hand these two and the first panel eventually popped out, but I thought it was a bit rough so I spent time on my computer and which caused my perfect orthogonal chibis to arise.
They've been giving me some trouble though, especially their faces, so I thought to revisit my old stuff and flesh out the comic to see where it goes. Still a bit rough and I'll need to work more on it, but overall, I like it.
If you enjoyed this, consider supporting me on Patreon at https://www.patreon.com/erikchamber
0 notes
Photo

Three Shots
Trying out a different layout as opposed to single column.
I usually make the comic in a technical drafting program, then export to Photoshop for colors, shadows, and text, and that's what I did for this. But at first I tried making it in Illustrator to skip a few steps, but something is off about having parts align with each other and there isn't as much control with size, positioning, and non-linear lines you want an exact shape. It just got me frustrated. I will try and revisit Illustrator at some point, but it was too much trouble.
If you enjoyed this, consider supporting me on Patreon at https://www.patreon.com/erikchamber
0 notes
Photo

Chibi Link (BotW)
I initially got an idea for a Zelda comic, but the joke wasn't there so I just continued making the character anyways. Maybe it's just the style or my lack of skill, but I can't get Link's face to look right if I want to make it more detailed. Regardless, I'm liking it. Maybe I'll eventually come up with a comic to use this in. And maybe I'll revisit this in the future to add some more details.
If you enjoyed this, consider supporting me on Patreon at https://www.patreon.com/erikchamber
1 note
·
View note
Text
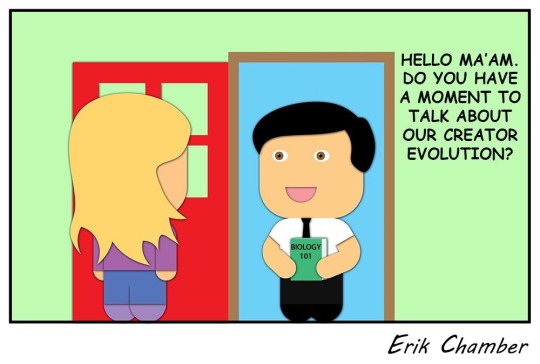
Do you have a moment?
If you enjoyed this, consider supporting me on Patreon at https://www.patreon.com/erikchamber
0 notes
Photo
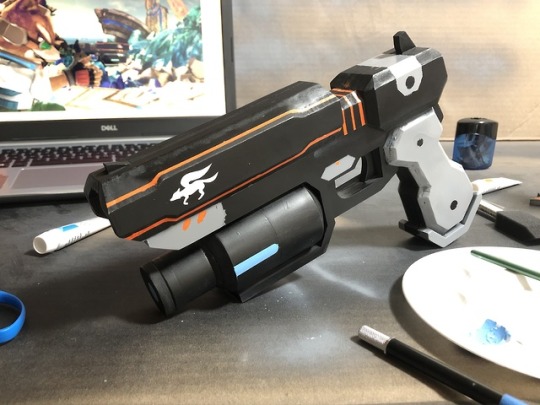
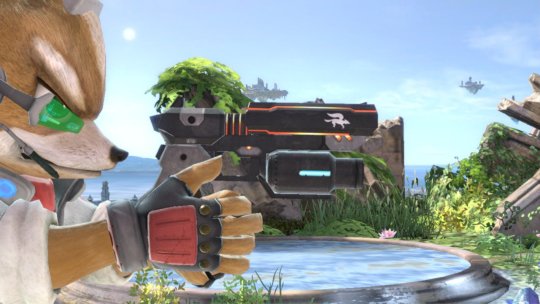
Fox’s Blaster (Super Smash Bros Ultimate)
This is my first finished prop and I am incredibly proud of it. It is not my first prop because I’ve started a few in the past and just never got around to finishing them either for complications, not enough skill, or just boredom; but it is the first prop I’ve completed. I intend to finish all those other, but I just wanted to ride the motivation for this one and it certainly paid off.
For anyone interested in how I made it, please continue reading.
(Tried to edit which messed up my post so most of the pictures are unreadable. Trying to fix, but connection is shoty. Check out someones reblog to see all)
Step 1: References and Drafting
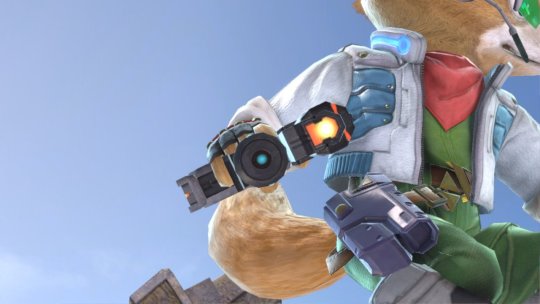
First I needed to get some reference images for the blaster. Thankfully, Smash Bros has a convenient in-game camera mode so I was able to zoom in and take screenshots of the blaster in any frame of gameplay.
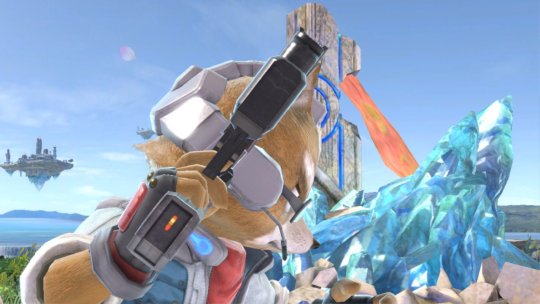
I briefly considered making the blaster able to open up like in the second image above, but I had no idea how to do that and figured it’d take too long to figure it out, let alone actually make a prop capable of that. So, I decided on a single piece prop with nothing moving. Better to keep things simple when you’re starting out.
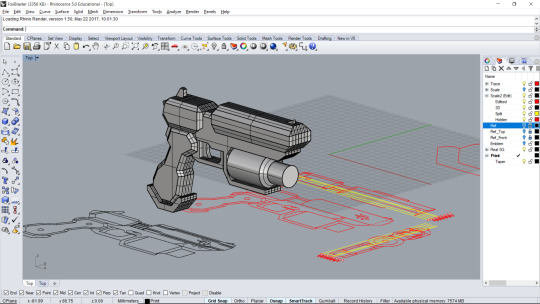
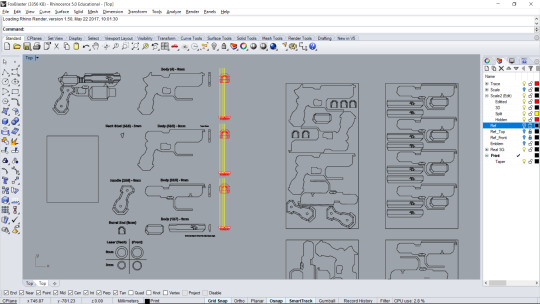
Now I had to draft outlines for it. I use Rhino 3D for all of my drafting, whether 2D or 3D.
I imported my reference images and traced them as best I could. Unfortunately, since there’s no option to turn off perspective in Smash, some dimensions were a bit off, but hardly an issue.
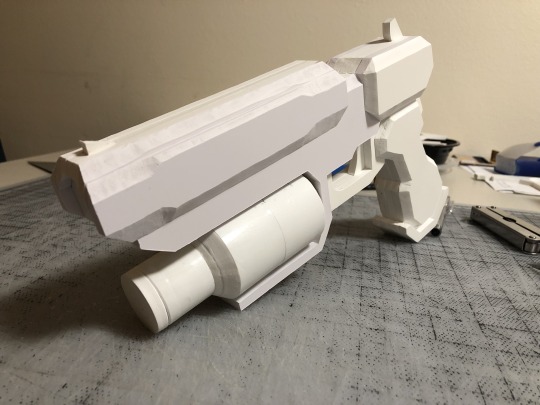
Before I went any further, I needed to make sure I had the right scaling, so I made a mock-up. Since I needed the handle to fit my hand, I made it out of layers of PVC foam board and just used cardboard for the rest of the gun.The sizing was actually perfect by coincidence, but I needed to determine the best thickness. I tried out a few thicknesses for the handle with different numbers of layers and found 5 layers of 6mm foam board was perfect.

Next I made a 3D model to make sure all my dimensions looked right when put together.
Step 2: Materials
Before I did anything to start making the physical prop, I had to plan out all my materials and cuts. I did some adjustments to my traces so that a length wise cross section would fit into several pieces of equal size. Below, to the left of the yellow lines, are one of each kind of cross section I need. There are 7 total layers. The largest pieces are within layers 2-6, comprising the main body of the blaster and part of the handle, as well as support for the laser-sight barrel. After those are the two outer layers for the handle which will have some beveling, and then layers 1 & 7 include a few smaller pieces to add bulk to the two bulging sections at the top of the gun.
The section to the right of the yellow lines are for planning out how many cuts to fit into each board of material (For some reason I doubled a few layers on the right sheet, not sure why).
Materials (everything in the finished product):
6mm PVC foam board (celtec)
1″ PVC pipe
1.5″ PVC pipe
PVC cement
Spray paint
Acrylic paint
Tools and disposable materials:
X-acto knife
Straight-edge of some kind
Sand paper, both fine and course versions
Blue painter’s tape
Brown paper
PVC pipe cutter (any kind of saw will also work)
Thumbtack (or something with a fine point)
Large piece of cardboard (painting surface; can use whatever you don’t mind being spray painted)
I spent some time debating what I wanted the blaster to be primarily made out of. I had worked with PVC foam board before and I knew it was high quality and would provide a good weight to the prop. I also considered EVA foam which I’d just heard about at the time, or just plain cardboard. PVC foam board was the best choice, though I does take a few passes with an X-acto knife to cute through 6mm, but if you’re patient it’s worth it.
Step 3: Cut and Assemble
Now comes the tedious part.
Since I had digital plans I printed out full-scale outlines of each part. I then taped the sheets down on the PVC boards and used a thumbtack to poke the corners of the outlines and leave small impressions in the board. Then with a straight-edge I used my X-acto to connect the dots and cut out each piece.
Below is layer 5, i.e. the middle most piece of the blaster.
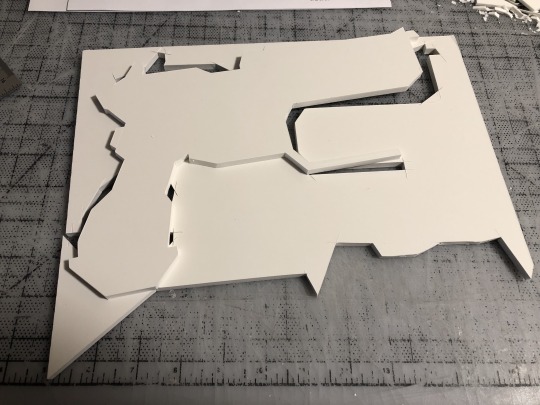
The PVC board is pretty dense, which adds to it’s quality, but like I said I had to run through each line several times before cute when all the way through. Do not rush this part. I may have been a bit too anal about it, but I did not want any mistakes at all.
Some pieces required beveling. I do not have any kind of table saw or other tool made specifically for beveling so I did it all by hand with my X-acto knife. This requires even more patience than the last part. Once you cut too much, you can get it back on and look the same. I recommend listening to some music or have a show play in the background, just be careful with the knife and always cut away from yourself.
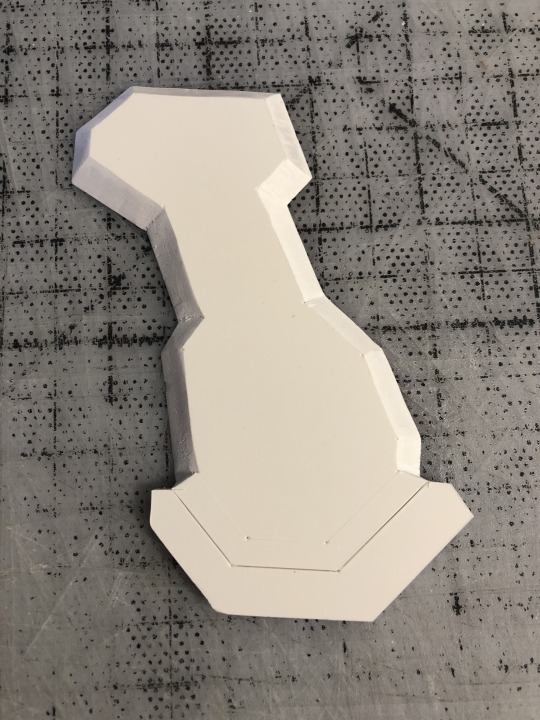
Once all the board and pipes where cut I cemented everything together. You can see the other parts which have beveling. Again, takes a long time, especially when it’s circular.
What I found is despite my best efforts, not all the parts where exactly aligned and flush with those next to it. this part was 0.5mm too high here. This one was 1mm too thick there. I spent a lot of time sanding everything down so the edges were all aligned. I didn’t get everything perfecting flush due to my limited tools, but I was happy with it. This actually killed two birds with one stone because I would have needed to sand it down anyway so the paint would hold onto it better.
Step 4: Painting
Now for the fun part.
The base of the blaster is black so I can paint the whole thing a black coat, but for the grey on parts like the outer handle I’ll have to tape sections off to protect the black.
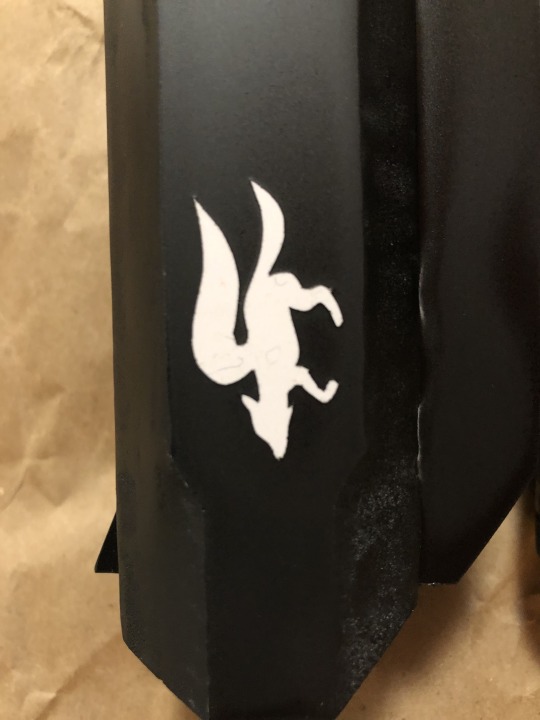
As you can see, the only thing I taped off from the black coat was the Star Fox emblem on both sides of the barrel. Since it’s small with lots of curves and made of tape, I had to be delicate with cutting it.
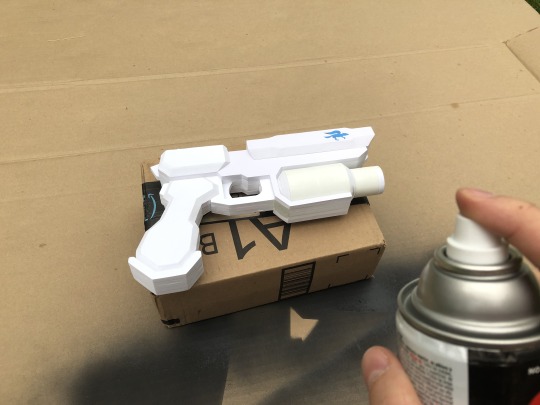
But I think it worked out. Just a little tap residue to wipe off.
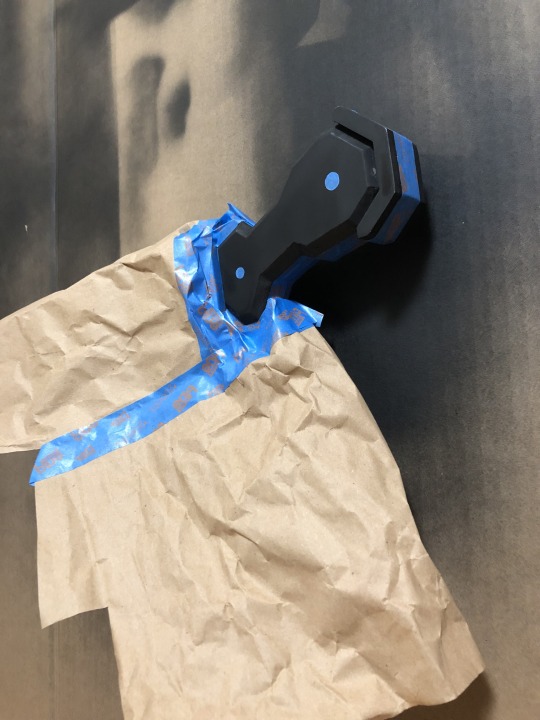
The grey was fun because of how I had to weave tape between all the joints and crevices. As you can see, used brown paper and taped that on, rather than cover the whole thing in a layer of tape. Just tape along the edge of the paper and attach.

Lastly, the finer details, i.e. anything orange or blue. I did all these details by hand, again using painter’s tape to make sure my lines were exact. Don’t forget to sand whenever you put on a new layer of paint. I forget to sand for the orange on the picture below the first time and the acrylic ended up peeling off. Sand so the paint can grip onto something rather than a smooth surface.

And voila!
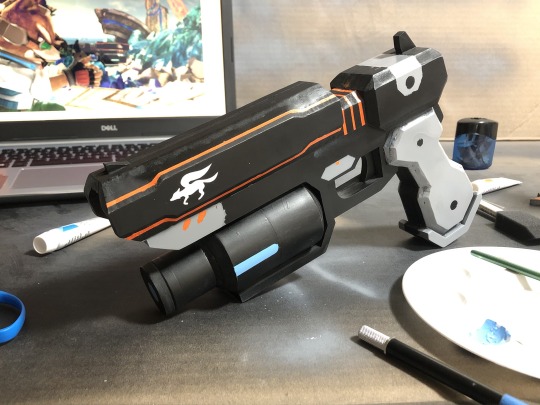
Pretty damn close to Nintendo’s replica (below), don’t you think?
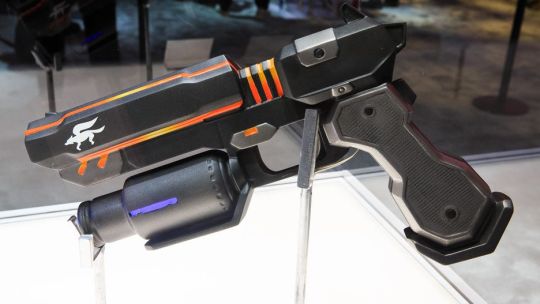
From start to finish, this took me about 2 months in my down time. 1 month drafting and obsessing over how every detail needed to be replicated perfectly, and 1 month of actually building it. I should have paid a little more attention to the spray painting, though. I’ve never spray painted before I had trouble figuring out the right distance to hold the can, and some of the grey paint found it’s way under some edges of the tape, but not a big deal. And maybe some time spent to texture the handle.
Overall, I absolutely love it! It’s got a great weight to it, feels wonderful in my hand. I don’t think I’ll ever cosplay as Fox, but this has been a wonderful use of my down time rather than just web-surfing and video games all the time. I built something with my hands. There’s nothing quite like it.
If you enjoyed this, consider supporting me on Patreon at https://www.patreon.com/erikchamber
#star fox#fox's blaster#smash bros#super smash bros ultimate#ssbu#smash bros ultimate#gotta blast#cosplay#prop#cosplay prop#sci-fi#pvc foam#first cosplay#blaster#nintendo#fox mccloud#spam b
64 notes
·
View notes
Photo

“The only difference between screwing and science is writing it down.” -Adam Savage
If you enjoyed this, consider supporting me on Patreon at https://www.patreon.com/erikchamber
#science#writing it down#rocket launcher#rpg#blowing things up#blow up#comic#funny#digital art#explosion#boom
0 notes
Photo

You never know what you’ll find in your pockets.
If you enjoyed this, consider supporting me on Patreon at https://www.patreon.com/erikchamber
0 notes
Photo

You never know what’s in the break room fridge.
If you enjoyed this, consider supporting me on Patreon at https://www.patreon.com/erikchamber
1 note
·
View note