#[I download it and then open photopea.]
Text

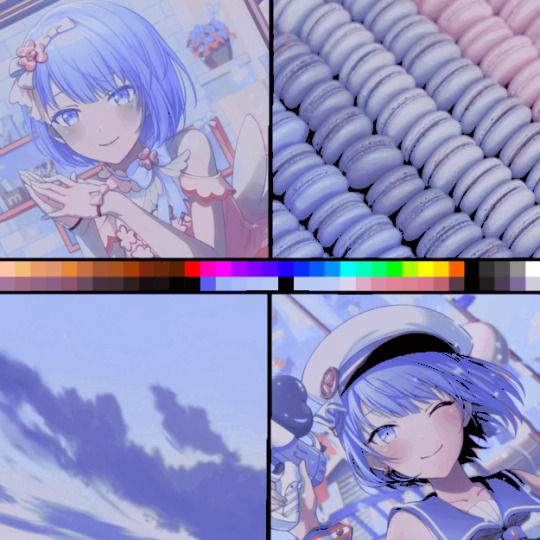
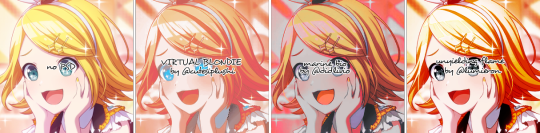
Blue Raspberry Chalk
Using as a base + adjustments are OKAY ^_^
Click here 2 download !!
Self indulgent :3
Reblog + Credit if using !!
silly extra undercut
WARNING!!! This psd WILL turn emu into her evil alter ego, BLEMU!! Beware of blemu xe is HOSTILE!! (Silly)
#♡ psds#blue psd#red psd#IT MAKES THEM LOOK KINDA GREY#IM SORRY!! IDK HOW RO FIX IR.#PSD#coloring#coloring psd#free psd#photopea psd#psd download#haruka kiritani#project sekai#emu otori#blemu#beware of blemu they are hostile :((#sillyness#you might ask why its called blue raspberry shake when opened on photopea#I CHANGED THE NAME LAST MINUTE OKAY#IGNORE IT ITS THE SAME
22 notes
·
View notes
Photo
“ I wanna feel your sugar rushing through my veins. ”
Indie/Semi-Selective/Fandomless OC/RP & Ask Blog
Follows back from @hollow-port
DNI if: Racists/Homophobic/Ship canonical lesbians with men/Terf/Swerf/Under the age of 18/Proshipper/Anti-Anti/Panphobic/Acephobic/Arophobic
Art done by myself!!
Personals & Non RP blogs are free to reblog my art and aesthetic posts but do not interact with my RPs
Promo & PSD template by: @candyredmusings
Art by: @blossominqxbuqs & myself!
#;;self promo#outofperfume#original character rp#fandomless rp#fantasy rp#urban fantasy rp#witch rp#bioshock rp#toh rp#cuphead rp#batim rp#[I'm a simple man.]#[I see Dani has made another template?]#[I download it and then open photopea.]
27 notes
·
View notes
Text
Just a bunch of Useful websites - Updated for 2023
Removed/checked all links to make sure everything is working (03/03/23). Hope they help!
Sejda - Free online PDF editor.
Supercook - Have ingredients but no idea what to make? Put them in here and it'll give you recipe ideas.
Still Tasty - Trying the above but unsure about whether that sauce in the fridge is still edible? Check here first.
Archive.ph - Paywall bypass. Like 12ft below but appears to work far better and across more sites in my testing. I'd recommend trying this one first as I had more success with it.
12ft – Hate paywalls? Try this site out.
Where Is This - Want to know where a picture was taken, this site can help.
TOS/DR - Terms of service, didn't read. Gives you a summary of terms of service plus gives each site a privacy rating.
OneLook - Reverse dictionary for when you know the description of the word but can't for the life of you remember the actual word.
My Abandonware - Brilliant site for free, legal games. Has games from 1978 up to present day across pc and console. You'll be surprised by some of the games on there, some absolute gems.
Project Gutenberg – Always ends up on these type of lists and for very good reason. All works that are copyright free in one place.
Ninite – New PC? Install all of your programs in one go with no bloat or unnecessary crap.
PatchMyPC - Alternative to ninite with over 300 app options to keep upto date. Free for home users.
Unchecky – Tired of software trying to install additional unwanted programs? This will stop it completely by unchecking the necessary boxes when you install.
Sci-Hub – Research papers galore! Check here before shelling out money. And if it’s not here, try the next link in our list.
LibGen – Lots of free PDFs relate primarily to the sciences.
Zotero – A free and easy to use program to collect, organize, cite and share research.
Car Complaints – Buying a used car? Check out what other owners of the same model have to say about it first.
CamelCamelCamel – Check the historical prices of items on Amazon and set alerts for when prices drop.
Have I Been Pawned – Still the king when it comes to checking if your online accounts have been released in a data breach. Also able to sign up for email alerts if you’ve ever a victim of a breach.
I Have No TV - A collection of documentaries for you to while away the time. Completely free.
Radio Garden – Think Google Earth but wherever you zoom, you get the radio station of that place.
Just The Recipe – Paste in the url and get just the recipe as a result. No life story or adverts.
Tineye – An Amazing reverse image search tool.
My 90s TV – Simulates 90’s TV using YouTube videos. Also has My80sTV, My70sTV, My60sTV and for the younger ones out there, My00sTV. Lose yourself in nostalgia.
Foto Forensics – Free image analysis tools.
Old Games Download – A repository of games from the 90’s and early 2000’s. Get your fix of nostalgia here.
Online OCR – Convert pictures of text into actual text and output it in the format you need.
Remove Background – An amazingly quick and accurate way to remove backgrounds from your pictures.
Twoseven – Allows you to sync videos from providers such as Netflix, Youtube, Disney+ etc and watch them with your friends. Ad free and also has the ability to do real time video and text chat.
Terms of Service, Didn’t Read – Get a quick summary of Terms of service plus a privacy rating.
Coolors – Struggling to get a good combination of colors? This site will generate color palettes for you.
This To That – Need to glue two things together? This’ll help.
Photopea – A free online alternative to Adobe Photoshop. Does everything in your browser.
BitWarden – Free open source password manager.
Just Beam It - Peer to peer file transfer. Drop the file in on one end, click create link and send to whoever. Leave your pc on that page while they download. Because of how it works there are no file limits. It's genuinely amazing. Best file transfer system I have ever used.
Atlas Obscura – Travelling to a new place? Find out the hidden treasures you should go to with Atlas Obscura.
ID Ransomware – Ever get ransomware on your computer? Use this to see if the virus infecting your pc has been cracked yet or not. Potentially saving you money. You can also sign up for email notifications if your particular problem hasn’t been cracked yet.
Way Back Machine – The Internet Archive is a non-profit library of millions of free books, movies, software, music, websites and loads more.
Rome2Rio – Directions from anywhere to anywhere by bus, train, plane, car and ferry.
Splitter – Seperate different audio tracks audio. Allowing you to split out music from the words for example.
myNoise – Gives you beautiful noises to match your mood. Increase your productivity, calm down and need help sleeping? All here for you.
DeepL – Best language translation tool on the web.
Forvo – Alternatively, if you need to hear a local speaking a word, this is the site for you.
For even more useful sites, there is an expanded list that can be found here.
76K notes
·
View notes
Text
GIFMAKING TUTORIAL: PHOTOPEA (for Windows)

Screencapping
Gif Width/Size Limit/Ezgif
Loading Frames
Cropping and Resizing
Rasterize/Make Frames
Sharpening
Coloring (not detailed. Links to other tutorials included)
Exporting
Obligatory Mentions: @photopeablr ; @miwtual ; @benoitblanc ; @ashleysolsen
Definitely check out these blogs for tips, tutorials and resources, they're a gold mine. Finally I recommend browsing the PHOTOPEA TUTORIAL / PHOTOPEA TUTORIAL GIF tags.
DISCLAIMER: English is not my first language and I'm not an expert on what I'm going to discuss, so if anything's unclear feel free to drop another ask.
1. SCREENCAPPING -> PotPlayer (the one I use) or MVP or KMPlayer
INSTALL PotPlayer (tutorial)
Play your movie/episode and press Ctrl + G. The Consecutive Image Capturer window will pop up. Click Start to capture consecutive frames, Stop when you got what you needed.
Where it says "Image Type -> Format" I recommend picking PNG, for higher quality screencaps.
To access the folder where the screencaps are stored, type %appdata% in windows search, open the PotPlayerMini64 folder (or 32, depending on your system) and then the Capture folder. That's where you'll find your screencaps.

Admittedly MVP is a lot faster but I prefer Potplayer because it generates (at least in my case) higher quality screencaps. MVP kind of alters the hue and it made it harder for me to color my gifs. Still, if you're interested in how to use it, I recommend this tutorial.
As for KMPlayer, every tutorial out there is outdated and I couldn't figure out the new version of the software.
2. GIF WIDTH/HEIGHT, SIZE LIMIT, EZGIF OPTMIZER
At this point you should already know how big your gifs are going to be. Remember the ideal gif width(s) on tumblr are 540 px / 268 px / 177 px. These specific numbers take into account the 4 px space between the gifs. No restrictions on height. Here are some examples:

You can play around with the height (177x400, 177x540, 268x200, 268x268, 268x350, 268x400, 540x440, 540x500, 540x540 etc) but if you go over the 10 MB limit you'll either have to make your gifs smaller/delete some frames.
OR you can go on ezgif and optimize your gif, which is usually what I do. The quality might suffer a little, but I'm not really (that) obsessed with how crispy my gifs look, or I'd download photoshop.

Depending on the gif size, you can decrease the compression level. I've never had to go over 35. It's better to start at 5 (minimum) and then go from there until you reach your desired ( <10mb) gif size. Now that I think about it I should have included this passage at the end of the tutorial, I guess I'll just mention it again.
3. LOAD YOUR FRAMES
File -> Open... -> Pick one of your screencaps. The first one, the last one, a random one. Doesn't matter. That's your Background.
File -> Open & Place -> Select all the frames (including the one you already loaded in the previous passage) you need for your gif and load them.
(I recommend creating a specific folder for the screencaps of each gif you're going to make.)
WARNING: When you Place your screencaps make sure the Crop tool is NOT selected, especially if you've already used it and the width/height values have been entered. It will mess things up - I don't know why, could be a bug.
You can either select them all with Ctrl+A or with the method I explained in the ask: "when you want to select more than one frame or all frames at once select the first one, then scroll to the bottom and, while pressing Shift, select the last one. this way ALL your frames will be selected".
WARNING: Depending on how fast your computer is / on your RAM, this process may take a while. My old computer was old and slow af, while my new one can load even a 100 frames relatively fast, all things considered. Even so, I recommend ALWAYS saving your work before loading new frames for a new gif, because photopea might crash unexpectedly. Just save your work as often as you can, even while coloring or before exporting. Trust me, I speak from experience.
Now you can go ahead and delete the Background at the bottom, you won't need it anymore.
4. CROPPING AND RESIZING
Right now your screencaps are still smart objects. Before rasterizing and converting to frames, you need to crop your gif.
Technically you can rasterize/convert to frames and then crop, BUT if you do it in that order photopea will automatically delete the cropped pixels, even if you don't select the "Delete Cropped Pixels" Option. Might be another bug, unclear.
Basically, if you crop your gif and then realize you cropped a little too much to the left or the right, you can go ahead, select the Move Tool (shortcut: V) and, after selecting ALL YOUR FRAMES, move them around on your canvas until you are satisfied. You won't be able to do this if you rasterize first and then crop, the excess pixels will be deleted. I don't know why, I found out by accident lol.
CROPPING
(Cropped pixels: the gray/opaque area outside of the selected area. That area disappears once you press enter and crop, but the pixels are retained, so you can move the frames around and reposition them as you like. In this case I could move the frames to the left and include Silver's figure [curly guy in the foreground] in the crop)
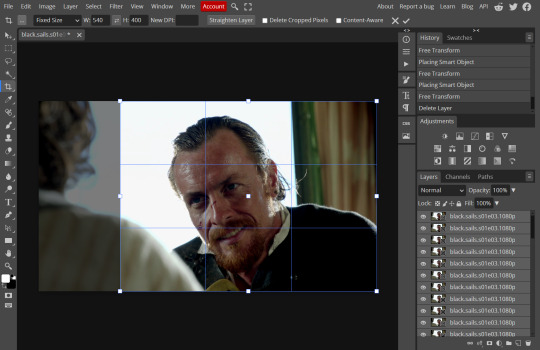
After deleting the Background, you will need to select all your frames (using the Shift key), use the C shortcut on your keyboard to choose the Crop tool. Or you can click on it, whatever's more convenient. Once you do that, a dropdown menu is going to appear. You need to select the "FIXED SIZE" option, as shown in the following screencap.
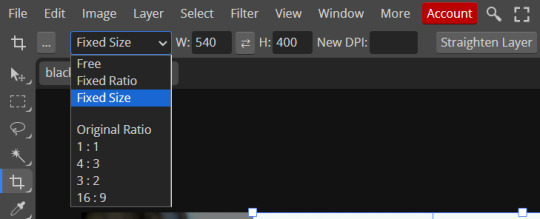
Once you do that, you can type in your desired width and height. Do not immediately press enter.

Your work area should now look like this. Now you can click on one of the white squares and enlarge the selected area until the edges are lined up. You can then move it around until it covers the area you wish to gif.
WARNING: to move the big rectangle around, you're gonna have to click on a random point of the work area, PREFERABLY not to close to the rectangle itself, or you might accidentally rotate it.

See? When your cursor is close to the selected area it turns into this rotating tool. Move it away until it reverts to your usual cursor, then you can start moving the rectangle. Press Enter when you're satisfied with the area you selected.
RESIZE
This isn't always necessary (pretty much never in my case) - and it's a passage I often forget myself - but it's mentioned in most of the tutorials I came across over the years, so I'd be remiss if I didn't include it in mine. After cropping, you'll want to resize your image.
IMAGE -> Image Size...

This window will pop up. Now, should the values in the Width and Height space be anything other than 540 and 400 (or the values you entered yourself, whatever they might be) you need to correct that. They've always been correct in my case, but again. Had to mention it.
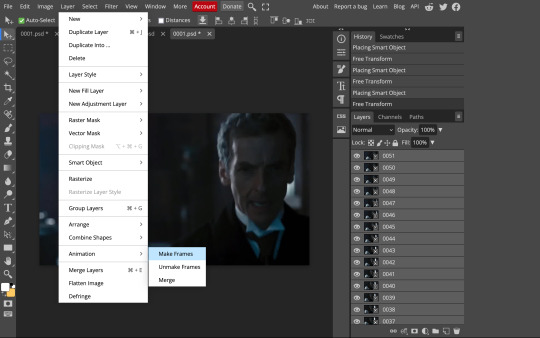
5. RASTERIZE & MAKE FRAMES
Now that your screencaps are cropped, you can go ahead and convert them.
LAYER -> Rasterize (if you skip this passage you won't be able to Sharpen (or use any filter) on your frames at once. You'll have to Sharpen your frames one by one.
Photopea doesn't feature a timeline and it's not a video editor, which makes this passage crucial. When you select all your smart objects and try to apply a filter, the filter will only by applied to ONE frame. Once you rasterize your smart objects and make them into frames, you can select them all and sharpen them at once.
Unfortunately this also means that you won't be able to - I don't know how to explain this properly so bear with me - use all smart filters/use them in the same way a photoshop user can. For example, you can sharpen / remove noise / add noise / unsharp mask... but you can't act on those filters in the same way a photoshop user can.
When you work on smart objects you can change the blend mode - which is critical if you decide to use a filter like High Pass. If you simply apply a high pass filter on photopea you won't be able to change the blend mode and your gif will look like this (following screencaps). Or rather, you will be able to change the blend mode by clicking on the little wheel next to "High pass" (circled in green in the 2nd screencap), but you'll have to apply the filter to each frame manually, one by one.

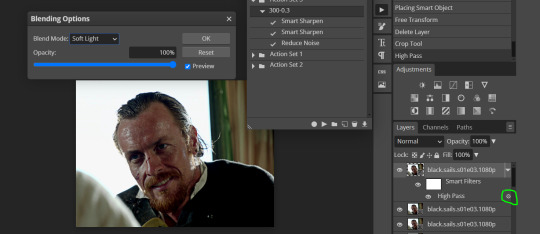
Then you can rasterize/make into frames, but it's extremely time consuming. I did it once or twice when I first started making gifs and it got old pretty soon haha.
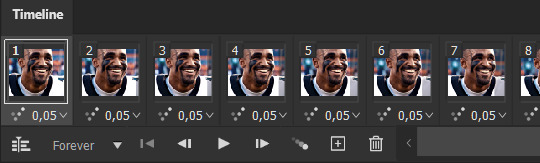
Layer -> Animation -> Make frames. This passage will add "_a_" at the beginning of all your frames and it's what allows you to make a (moving) gif. As I said in the ask, if you skip this passage your gif will not move.
6. SHARPENING
Some people prefer to color first and sharpen later, but I found that sharpening filters (more or less) dramatically alter the aspect of your gif and already brighten it a bit (depending on your settings) and you may end up with an excessively bright gif.
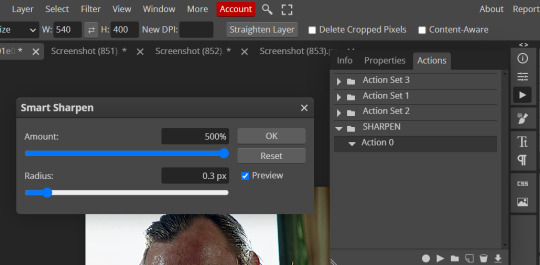
Now, sharpening settings are not necessarily set in stone. The most popular ones are 500/0.4 + 10/10, which I use sometimes. But you may also need to take into account the quality of the files you're working with + the specific tv show you're giffing. I've been using different settings for pretty much every tv show I gif, especially in the last couple months. Some examples:

followed by
OR
AMOUNT: 500% RADIUS 0.3px
followed by
AMOUNT: 20% (or 10%) RADIUS 10px
You'll just need to experiment and see what works best for your gifs.
Some gifmakers use the UNSHARP MASK filter as well (I think it's pretty popular among photopea users?) but it makes my gifs look extra grainy, makes the borders look super bright and it clashes with my coloring method(s), so I use it rarely and with very moderate settings. Something like this:

Again, depends on the gif and on what you like. I've seen it used with great results by other gifmakers!
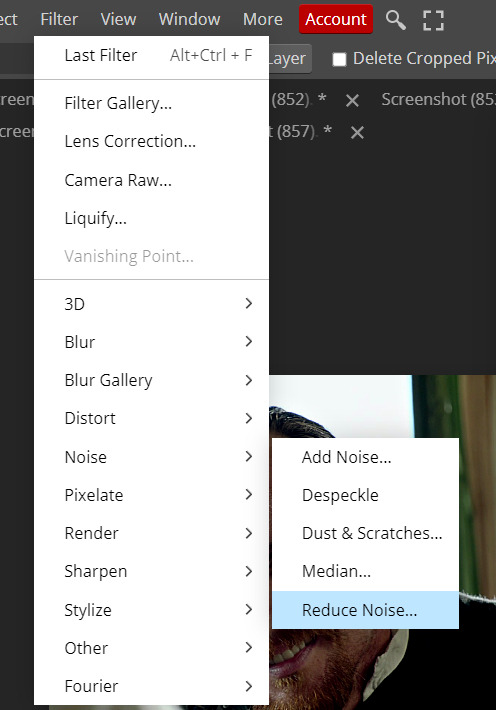
REDUCE NOISE
Sometimes - and this is especially the case for dark scenes - your gif may look excessively grainy, depending on how bright you want to make it. Reducing noise can help. Keep it mind, it can also make it worse and mess up the quality. BUT it also reduces the size of your gif. Obviously, the higher the settings, the more quality will suffer.

These are my standard settings (either 2/70% or 2/80%). It's almost imperceptible, but it helps with some of the trickier scenes.
ADDING NOISE
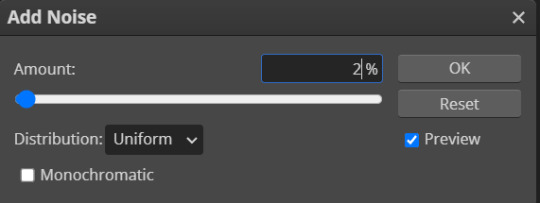
Adding noise (1% or 2% max) can sometimes help with quality (or make it worse, just like reduce noise) but it will make your gif so so so much bigger, and occasionally damage the frames, which means you won't be able to load your gif on tumblr, so I rarely use it.
You'll also want to create ACTIONS which will allow you to sharpen your gifs much faster.
HOW TO CREATE AN ACTION ON PHOTOPEA
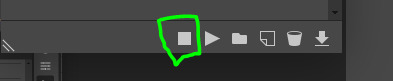
The Action Button (shaped like a Play button as you can see in the following screencaps) may not be there if you're using photopea for the first time. If that's the case click on the magnifiying glass next to "Account" (in red) and type "actions". Press Enter and the button should immediately show up.
Once you do that, click on the Folder (circled in yellow)

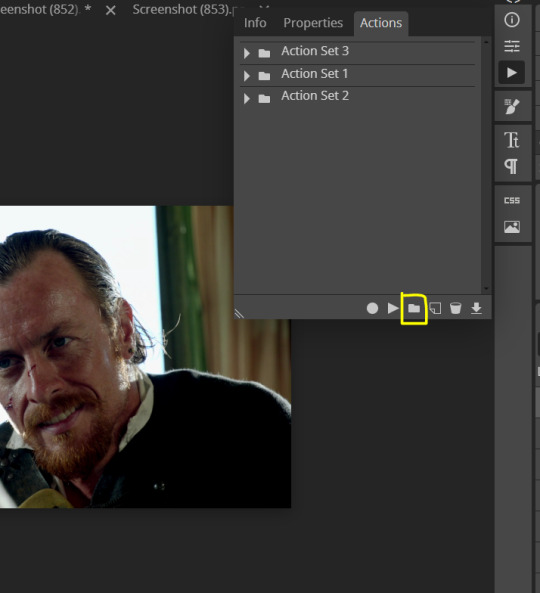
and rename it however you like.

now click on New Action (circled in red). now you can press the Recording button (circled in green)

Now
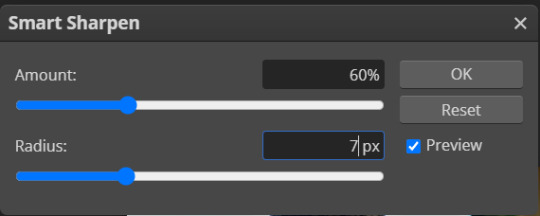
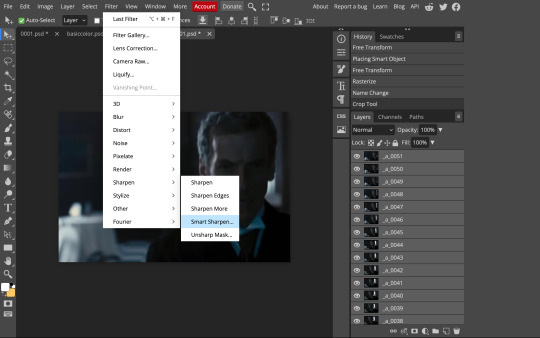
FILTERS -> Smart Sharpen
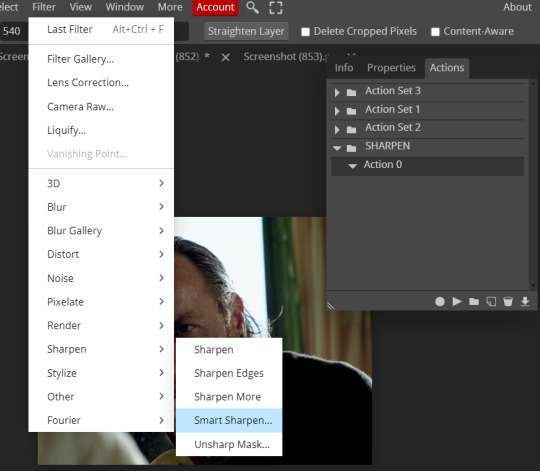
and you can enter your values. Then you repeat this passage (WITHOUT pressing rec, WITHOUT pressing new action or anything else, you just open the smart shapen window again) and, if you want, you can sharpen your gif some more (10%, 10px, or anything you want.)
Maybe, before creating an action, experiment with the settings first and see what works best.
When you're satisfied, you can PRESS STOP (it's the rec button, which is now a square) and you can DOWNLOAD your action (downwards facing arrow, the last button next to the bin. Sorry, forgot to circle it) .
You need to download your action and then upload it on your photopea. When you do, a window will pop up and photopea will ask you whether you wish to load the action every time you open the program. You choose "Okay" and the action will be loaded in the storage.
When you want to sharpen your gif, you select all your frames, then you click on the Play button, and select the Action, NOT the folder, or it won't work.

Actions can also be created to more rapidly crop and convert your frames, but it doesn't always work on photopea (for me at least). The process is exactly the same, except once you start recording you 1) crop your gif as explained in step 4, 2) convert into frames. Then you stop the recording and download the action and upload it. This won't work for the Rasterize step by the way. Just the Animation -> Make Frame step.
7. COLORING
Now you can color your gif. I won't include a coloring tutorial simply because I use a different method for every tv show I gif for. You normally want to begin with a brightness or a curve layer, but sometimes I start with a Channel Mixer layer to immediately get rid of yellow/green filters (there's a tutorial for this particular tool which you will find in the list I mention in the link below)
[Plus I'm not really an authority on this matter as my method is generally... fuck around and find out. Two years of coloring and I still have no idea what I'm doing. 70% of the time.]
Simple Gif Coloring for Beginners -> very detailed + it includes a pretty handy list of tutorials at the bottom.
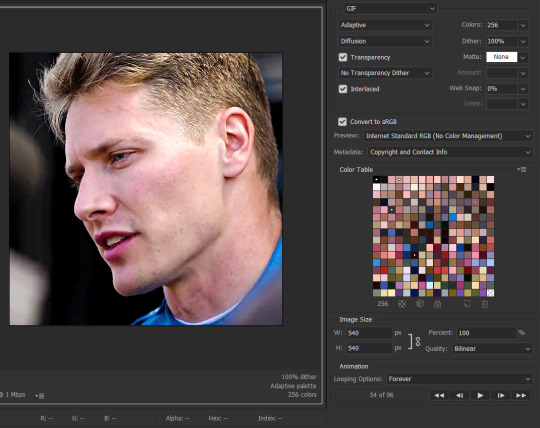
8. EXPORTING
Now you can export your gif. Some gifmakers export their (sharpened) gifs BEFORE coloring and then load the gifs on photopea to color them. I'm not sure it makes any difference.
FILE -> EXPORT AS -> GIF
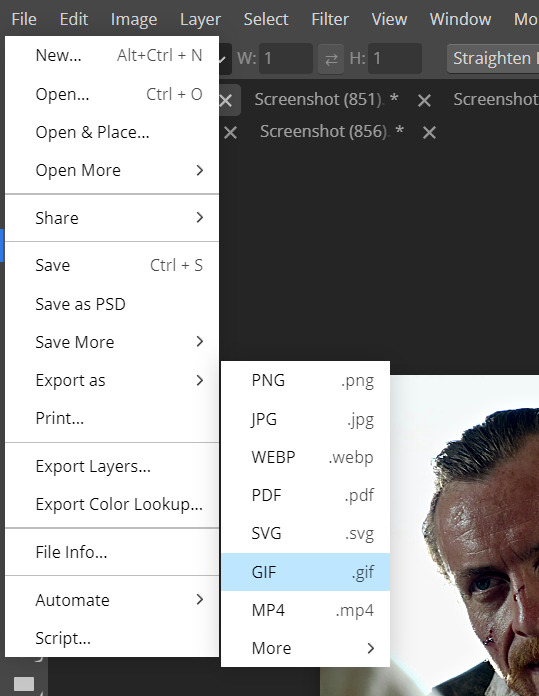
(not colored, just sharpened)
As you can see, unlike photoshop the exporting settings are pretty thread bare. The only option available is dither - it sometimes help with color banding - which, and I'm quoting from google for maximum clarity:
"refers to the method of simulating colors not available in the color display system of your computer. A higher dithering percentage creates the appearance of more colors and more detail in an image, but can also increase the file size."
SPEED
When you export your gif, it will play at a very decreased speed (100%). I usually set it at 180/190%, but as for every other tool, you might want to play around a little bit.
GIF SIZE/EZGIF OPTIMIZER (See Step 2)
And that's it.
P.S.: worth repeating
Save your work as often as you can, even while coloring or before exporting.
#photopea#my inbox is open if you have any questions <3#image heavy under the cut#photopeablr#tutorials#gif tutorial#allresources#photopea tutorial#completeresources#gifmaking
168 notes
·
View notes
Photo
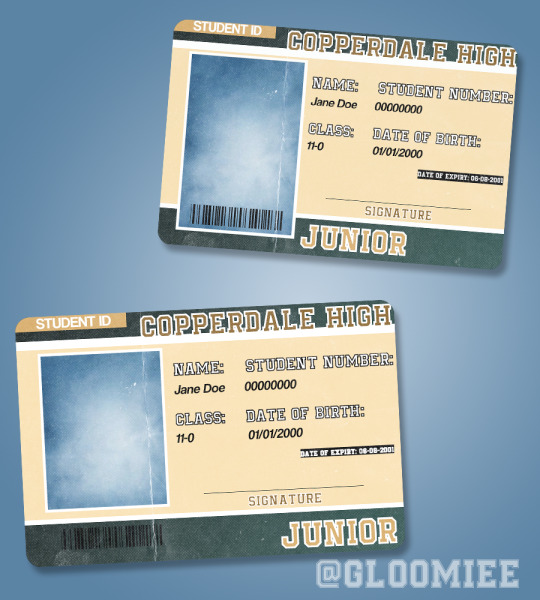
STUDENT ID TEMPLATES ✰
Annon requested this so here it is! These are psd files that can be opened in Photoshop, Photopea, or any other program that can open psd files. You can customize it to your liking, just remember to credit me lol. This is my first time making something like this is if there and any problems feel free to reach out to me ♡
Included:
• Two slightly different ID templates
• First template photo size is roughly 300 x 440, second is roughly 300 x 350
• Template itself is 863 x 570
• The fonts I used are here and here
• The doodles I used in my teen a day challenge post can be found here and here!
Download
3K notes
·
View notes
Text
tutorial contents:
1 ‣ gshade & photoshop actions
2 ‣ template or cropping & colouring
3 ‣ notifs & pop-ups
okay hi! i have a really old editing tutorial from back in january that i've been linking people to, but it's pretty outdated by now. i also keep getting anons asking about the same things, which is fine, but i always have to go searching for the post explaining it, so having it all in one place will be a lot more convenient lol
i use a ☠ copy of photoshop cc 2017 to edit my screenshots, however the majority of everything i'm doing also works on photopea
photopea is an online version of photoshop that's 100% free and works very well! i can't recommend it enough, it's fantastic
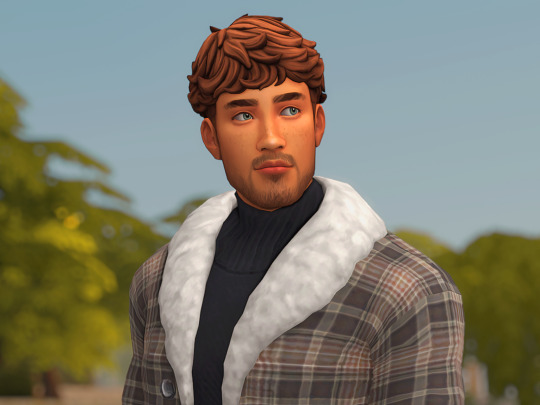
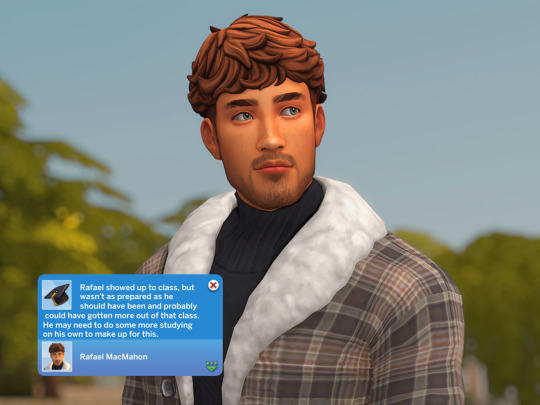
first things first, you're going to need some screenshots to edit. for the sake of this tutorial i'll be working with this one of raffy:
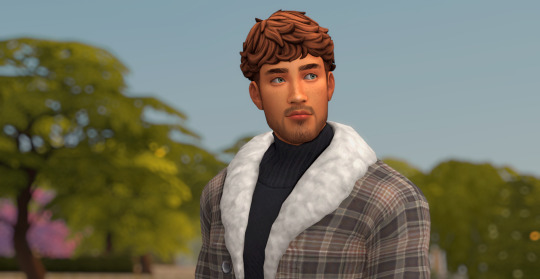
in all honesty, gshade will do most of the work for you. of course it's not needed, but i definitely don't think i could live without it! in this screenshot i used sunset n' vinyl by nesurii
when opening the screenshot, the first thing i do is run it through 2 photoshop actions:
butter action by early-grape
smooth sharp (no topaz) by poolbrop
to add actions in photoshop go:
windows > actions > the 4 lines at the upper right corner of the newly opened window > load actions > your downloads folder > open up the .atn files!
if you're using photopea, as far as i'm aware you can't use photoshop actions, but i've found that 'filter > stylize > oil paint' and 'filter > sharpen > smart sharpen' have a very similar effect when using the right settings. try these:
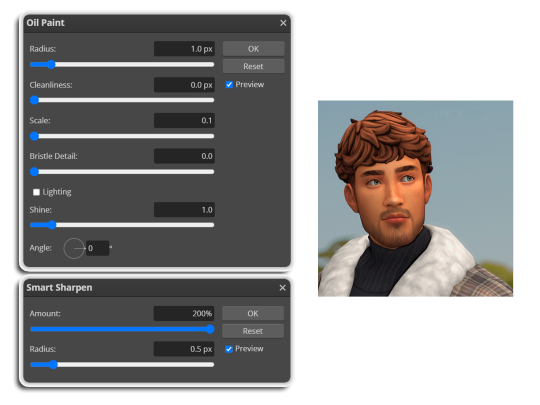
i like these two actions because they smooth everything out nicely, but keep it sharp at the same time! i always run butter before i run smooth sharp, however butter may leave you with 2 layers. make sure to merge these layers before running smooth sharp to achieve the full effect.
here's a before and after (of the photoshop action):

from here you can move on to step 2
before anything else i want to share the template that i use to make editing a lot faster. you don't need to use it but it's definitely made things a lot easier for me! it's a .psd file and will work perfectly in photopea
download (simfileshare)
if you're using the template you can skip right on to the next section, as it's already cropped to the right size and has the colouring folder included. just drag your screenshot into it and resize to fit the height.
if you're not using it, crop your edited screenshot to:
1707 width x 1280 height
then adjust the colours to your liking. it always varies slightly depending on the picture but my regular process for each screenshot would be:
up the saturation by 8%
up the lightness by 3%
up the contrast by 12%
all of this can be done by looking in the 'images > adjustments' tab
you should end up with something similar to this!
if you want to add a moodlet or social interaction or anything similar, it's all the same process. what you'll need is a screenshot of it straight from the game. i just press the 'c' key to capture them! i'll be working with these two:
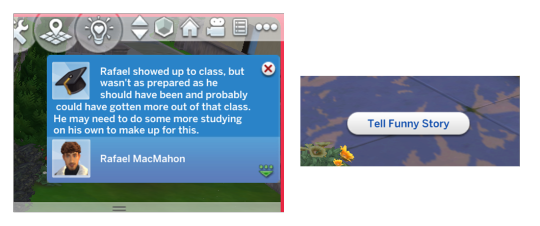
for the blue notification i'm going to select it using the box select tool. try to get it as exact as possible. one you have it selected
for photoshop users:
click on the 'select and mask...' option located at the top
adjust the global refinements at the side as follows:
smooth: 70
feather: 0.0px
contrast: 50%
shift edge: 0%
for photopea users:
go to select > modify > smooth
set it to 15
select 'ok' and press 'ctrl + c' to copy it, then 'ctrl + v' to paste it into your screenshot. adjust the size and position and you should end up with something like this:
next you want to add the transparent border around the notification. if you're using my editing template, right click on the reference notif in the layers tab and select 'copy layer style' (photopea > 'layer style > copy'). from there you can paste that layer style onto your own notif through the layers tab.
if you're not using the template, here's how to set it up on photoshop:
right click your notification layer and select 'blending options'
under styles, tick the checkboxes for stroke and drop shadow
input these settings:
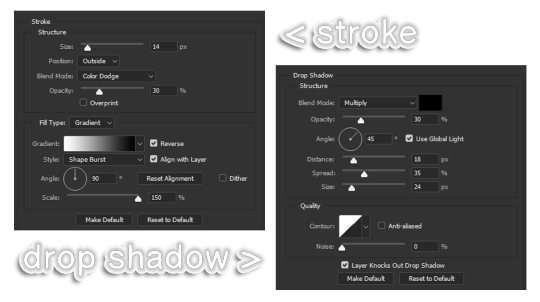
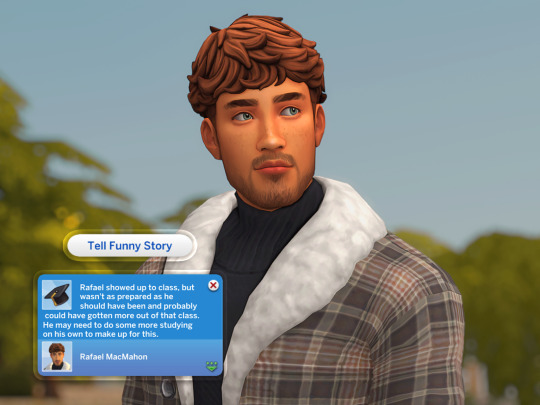
on photopea, it should be more or less the same. repeat the exact same process with the social menu option, but instead of selecting it with the box select tool, use the magic select tool. in the end you should end out with this!
from here you're finished! thanks for reading! go to file and export as png
if you've got questions never hesitate to ask, just make sure to read the faq in my pinned. i might edit this post soon to include the gen intro traits and aspirations bit, but this is all for now. hope it helps, my editing process post has been in need of a revamp for a very long time. i haven't proof-read this so apologies for any mistakes!
#ts4#sims 4#ts4 tutorial#5 anons in my inbox asking the same question after not reading my faq#this ones for you#3 anons in my inbox asking about cas pics#ones coming for you soon#okay maybe not soon but sometime#all my free time has been eaten up#i signed up for extra saturday morning classes and not having a lie in is sucking the life out of me lmao#when i'm busy i just wanna play video games and when i get the chance#to play games i just wanna sleep#its a vicious cycle#i'm currently playing resident evil biohazard tho#enjoying it very very much#i've only got 2 and 3 left to play and i've played every mainstream re game 💪💪#it was a very fun journey! i played them all within this year#long post
1K notes
·
View notes
Text
photopea gif tutorial!
i recently started learning the craft of gifmaking with the free software photopea. when i first started, i had to piece together several different tutorials as well as extrapolate from some photoshop tutorials because-- no one uses photopea.
but they should! it's free! it can run in your browser! it can do most everything photoshop can do and you don't have to deal with adobe or torrenting. so i'm making a tutorial of my photopea gifmaking process because that's what i needed a couple months ago, and i hope it can be of use to some others. let's go!
1: PREPARING
source the scene you want to gif. it's best to download your video when you can, but screen recording can work in a pinch. this is the video downloader software i use.
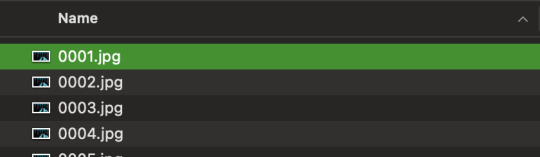
once the source video is downloaded, i like to pick out the specific moments i'm going to gif and save them as their own files-- this makes future steps easier. an individual gif shouldn't be more than 4ish seconds, so limit your selections to about that. name your files in a way that makes sense to you:

2: CONVERTING TO .JPG
i like to convert my video clips to .jpg format. it is possible to load video clips directly into photopea, but unless it is a very short <30fps clip, it is likely to freeze or crash in my experience. i use this website as it downloads a higher framerate (~25fps) than others i've used.
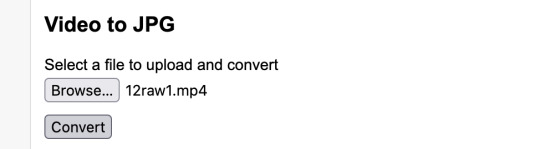
convert your video files and download the .zip folder containing your frames. make sure to unzip them and name them something helpful if you need to.
3: OPENING YOUR FRAMES IN PHOTOPEA
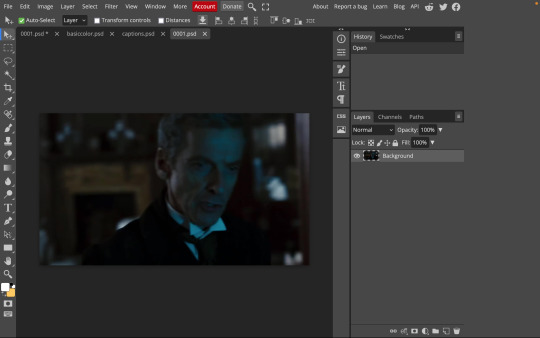
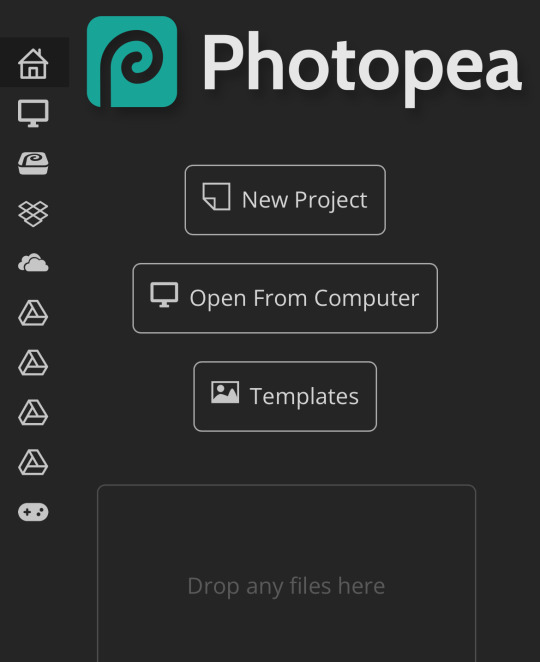
photopea looks like this when you open it:

select "open from computer" and select only the first frame of your first gif:
your environment should look like this (ignore the other projects i have open, you should just have 0001.psd or similar):
go to file> open and place, and select ALL of the rest of the frames from your first clip:
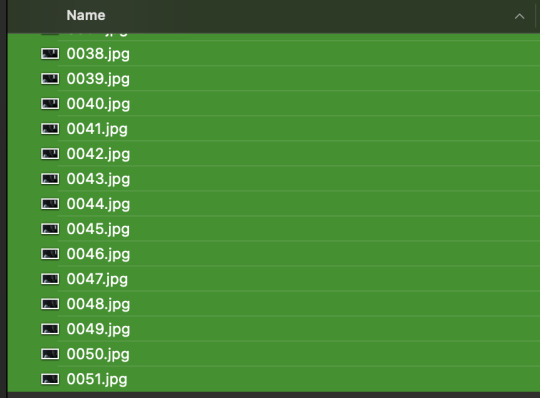
they'll load in one by one, and your environment should look like this:
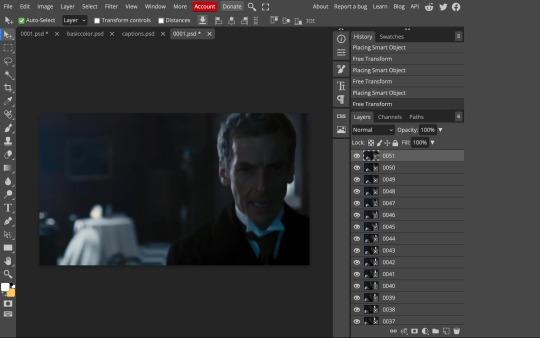
notice how all the frames have a little square in the corner? that means they are smart objects, and we need them to not be for our purposes. select all of your frames, right click, and choose rasterize:

in order to make the series of jpgs move as a gif upon download, select all of your frames and go to layer> animation> make frames:
all your layer names should now start with _a_. you can really do this at any point in the process so it's not a big deal if you forget at the beginning.
finally, you want to limit the frames in individual gifs to around 50 or less. if you find you have more, delete some frames off of the beginning or end by right clicking and selecting delete.
4: CROPPING AND RESIZING
select the crop tool on the left hand panel:

at the top bar, select fixed size:

gifs on tumblr are limited to 540px wide for single column gifs, 268px for two columns, and 178px for three columns. the height is up to you; i like to use 350px height with the 540px width.
enter your values into the W and H fields and do not press enter yet. drag the cropped area to where you want it to be-- try to line up the top and bottom edges so as not to lose too much of your image. once you're satisfied with the selection, press enter. your gif is now cropped and resized to tumblr standards.
5: SHARPENING
(if you are working with low-qual video, check out this tutorial by @hellboys before sharpening. basically filter> filter gallery > grain, select soft and play with the settings. then proceed!)
still making sure all of your layers are selected, navigate to filter> sharpen > smart sharpen:
you should see this dialog box:
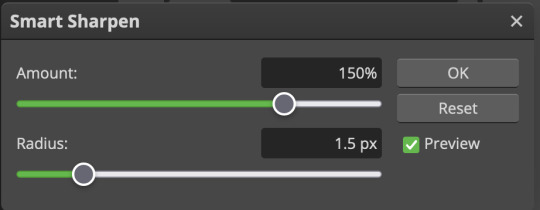
these are the settings i like to use, but you can play around to see what you like. here's the before and after of my sharpening settings:
the difference will be more noticeable once we complete the next step-- brightening and coloring.
6: BRIGHTENING & COLORING
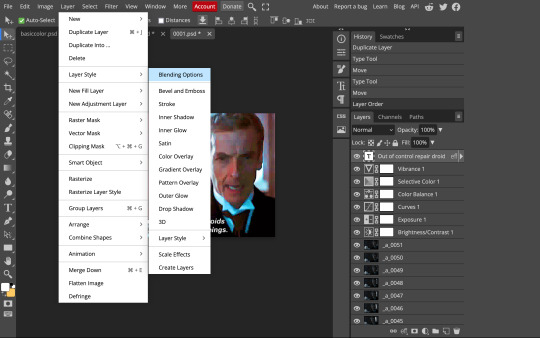
navigate to layer > new adjustment layer:
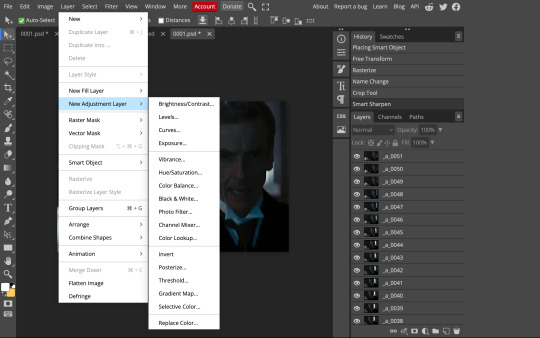
at any time, you can edit your adjustment layers by clicking this button in the right hand panel:

for each edit you make to your gif, you will add a new adjustment layer. always make sure they're at the top of your layer stack. i like to start with adjusting the brightness and exposure, which are both pretty straightforward.
additionally ,you can select a curves adjustment layer, choose the RGB channel, and drag the curve just slightly upwards to further brighten your gif, like so:
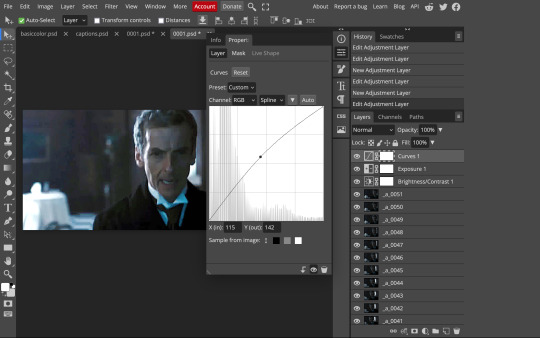
here's a before and after:
now for coloring-- i mostly use the saturation/vibrance, curves, color balance, and selective color adjustment layers. just play around with all of these until you find a style you like. i like my gifs to look really bright and colorful, so i push the saturation and try to draw out warmer tones in the color balance:
7: CAPTIONS
the font i like to use for captions is arial bold italic. you can download it (or any font of your choosing) from pretty much any free font website. if you choose to download a font not in photopea, go to file> open and select your font; it will now show up in the list of fonts.
navigate to the text button in the left hand panel:

and type in the captions for your gif. i make the font size 20 for 540px gifs.
next, while only your text layer is selected, navigate to layer> layer style > blending options:
click on drop shadow, and play around with the settings until you get something you like. here's mine:

next, click on stroke and do the same thing:
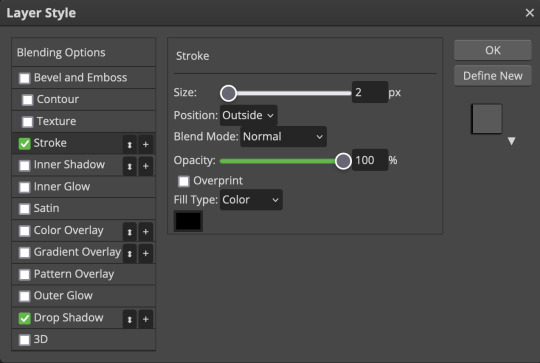
when you're done, make sure your text is your top-most layer.
8: EXPORTING
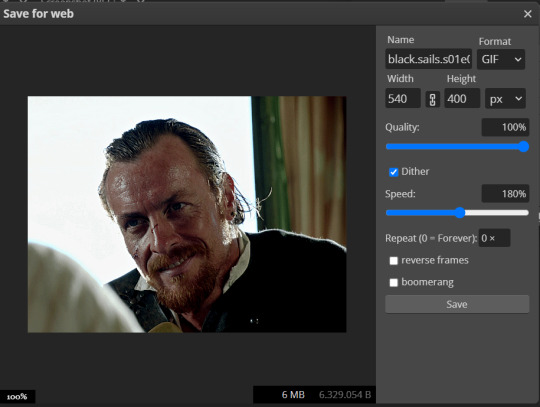
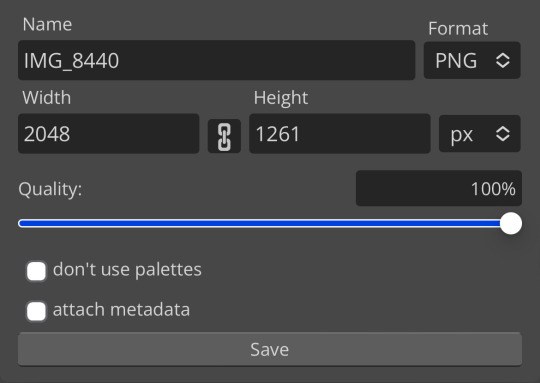
you're done! head to file> export as> GIF. you'll be prompted with a dialog that looks like this, with your gif playing (you can also do these steps without saving if you want a preview of your gif during editing):
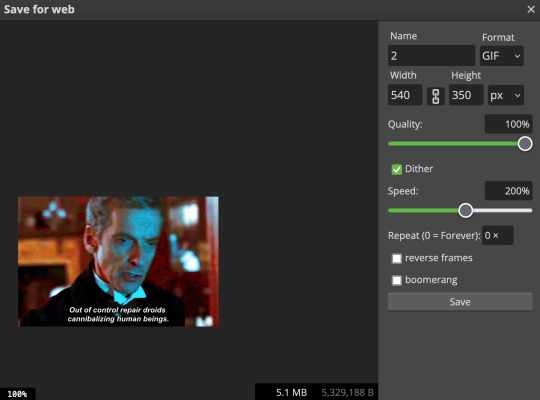
the only thing you should need to adjust is speed. this is the main difference between photopea and photoshop. the only way to specifically adjust the delay in photopea is to manually enter "_05" (or whatever amount of delay) at the end of every layer name. if you're like me you'll agree that is simply too much and settle for the speed slider.
i don't really know what logic governs the speed slider. it doesn't seem to be consistent across gifs, so play with it until it looks right. i've had it on 200% lately which seems insane but looks visually normal.
once the speed is adjusted, hit save and you're done! here's a final before and after of all the work:
BONUS: SAVING .PSD PRESETS
did you think manually creating and editing all those adjustment layers was a lot of work? here's how to streamline it for next time.
at the very bottom of your screen, below your layers, select the icon that looks like a folder (third from the right).
it will create another layer called folder 1. drag your adjustment layers into this folder, making sure they stay in the same order. your layers should look like this when you're done:
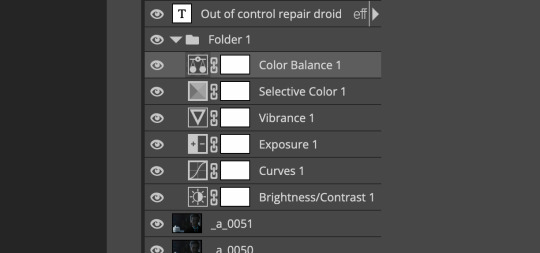
ONLY ONCE YOU HAVE SAVED YOUR GIF, delete all other layers that are not in the folder. then select file> save as PSD. save it somewhere convenient.
next time you're making gifs, after you've cropped and sharpened your frames, select file > open and choose your .psd file. it will open as another project. select the layer that says folder 1, and drag it to whatever project you're working on at the top bar. voila! your adjustment layers are applied to your new gif!
i still like to play with the settings, as coloring and brightness needs will differ from gif to gif.
thanks for reading! here's the gifset i made while making this tutorial :-)
#milk post#gif tutorial#doctor who#photopea#i can't tell if i went too detailed or not enough lol. tag me if you use this i want to see ppl's gifs!!
206 notes
·
View notes
Note
Hello!
I absolutely love your edits and gifs. I was thinking about making edits/gifs too but I'm not sure where to start : ( Would you be able to share some resources? Or any tips you have for someone that's just starting out? I'm not even sure where to download the videos from :/
Thank you in advance!
hello!! omg thank you so much for liking my gifs 🥹🫶🫶
Of course! In this post I'll share some tips that I think are helpful when making gifs, specially from asian dramas (mostly chinese and korean)!
Where to download k/cdrama videos?
dramaday (korean media only)
mkvdrama (korean, chinese, japanese, thai etc)
avistaz.to (they have the most complete catalog of asian dramas but you can only have access to the files if you register and they open for registration only every now and then so if you want to join, you have to have a invite or wait till they open)
2. Where to make gifs?
Mostly, the gifs on this website are done using Adobe Photoshop but I think for the past few years there is a lot of users who use Photopea which is an online (and free) version of photoshop.
3. How to make gifs?
Well, I think there's a some ways of making gifs but the 2 most common are through screencapping and using vapoursynth. Before I knew how to use and install vapoursynth I used the screencap method a LOT so I totally recommend you to begin giffing using the screencap method before you try other ways of giffing. Also, with this method, you can use on both Photoshop and Photopea.
In this gif tutorial made by @kylos you can learn how to install the program mpv to take screencaps and how to make gifs using the captures.
There's this complete guide on how to gif made by @cillianmurphy that is very helpful.
Also, this comprehensive giffing tutorial by @redbelles is great!
But if you want to know how to gif using vapoursynth (if you are an MAC user), i totally recommend this how to install post and COMPREHENSIVE GIFFING TUTORIAL (vapoursynth + ps cc 2018) post, both from my beloved @dingyuxi 🫶
If you don't have Photoshop and want to make gifs using Photopea, I think this and this tutorials will be great for you.
4. How to color?
Coloring gifs is something very personal to each gifmaker but if you want to know how to start doing it, i recommend you these tutorials:
becca’s mega coloring tutorial by @nataliescatorccio
coloring tutorial by @magnusedom
simple gif colouring for beginners by @kinnbig (specially focused on east & south east asian skin tones)
Finally, I recommend you looking at the resource directory from @usergif because they have a collection of tutorials and resources that are very handy when making gifs!
If you have any particular question from how I gif, I will gladly answer!
77 notes
·
View notes
Text

PSDs For Dummies <3
— as written by a dummy
hello dear readers and welcome back to canarysage, the world’s least comprehensive tutorial blog. today, we’re back at it again with photopea for dummies, and we’re tackling something i probably should have done first: psds.
example psds are: 1 (@cutesiplushi) 2 (@didlivio) & 3 (@lumieron)
what is a psd?
excellent question, dear reader! psd stands for photoshop document, and it’s a type of file format (like .png or .gif) that allows you to store a project’s individual layers! it’s a file format that, for obvious reasons, is exclusive to photoshop and photopea.
in editing circles, psd has become shorthand for filter. people use psds to save configurations of adjustment layers that are then used to filter images consistently, without having to remake them every time. when someone posts a psd, they’re posting a folder (hopefully it’s in a folder) with their specific set of adjustment layers for anyone to use!
where can i get psds?
right here on tumblr! check your favorite edit blogs, as they may have posted some, or search ‘free psd’ or ‘psd coloring’ in the search function. tumblr doesn’t allow you to upload psds directly, so you’ll be redirected to a site outside tumblr. probably either deviantart, google drive, or ko-fi, all of which are easy to use. deviantart requires you to have an account to download anything (luckily, an account is free!) and ko-fi may require you to pay money. google drive doesn’t have a search function in and of itself, but it’s extremely easy to download off of.
also, shameless self plug, but i post psds right here on canarysage! i personally use deviantart, but again, an account is free. if send me an ask, i may be able to provide you with a google drive link, if you ask really nicely (。•̀ᴗ-)✧
and of course if you don’t want to use someone else’s psd, you can always make your own.
how do i use a psd?
once you have a psd of your choice downloaded, open up photopea! or photoshop, if you’re rich like that.
once you open photopea, click this here button right in the middle of the screen, the one that says “open from computer”
from there, go to choose files and open up your psd! depending on from whom you got it, psds will look different once you open them. i’m using one of my own as an example.

you can see there’s two layers in my psd, a folder, and an image. the image is just for me so i know which psd this is once i save it—i like to save all my psds with images of real people so i know how it looks on moodboards or stimboards.
the folder is the important part here, that’s where the adjustment layers are contained. to transfer a psd, you can either go to file > new
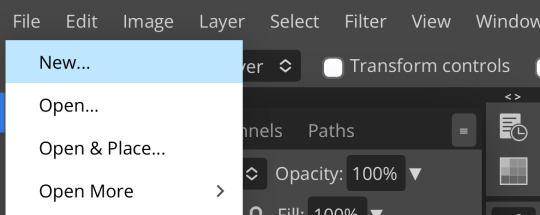
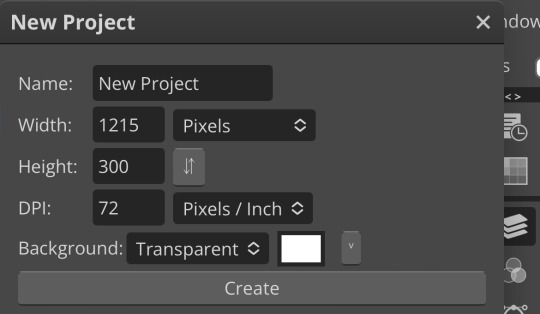
which lets you start an entirely new project, or you can open an image using file > open
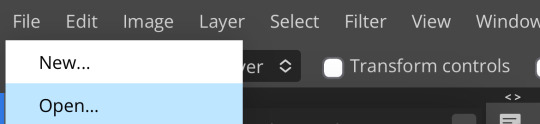
which will give you the image you selected.
as an aside, if you’re opening a psd and you already have a project in progress, make sure to click file > open and not file > open & place, as open & place won’t give you the adjustment layers.
then to move the folder, go to layer > duplicate layer into while having selected the folder (just tap on it, that will make it a lighter gray to show it’s selected) and duplicate the folder into whatever your image is
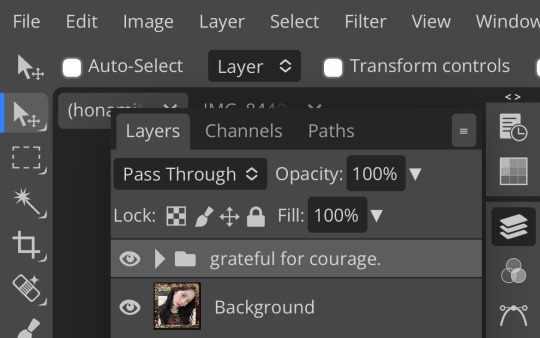

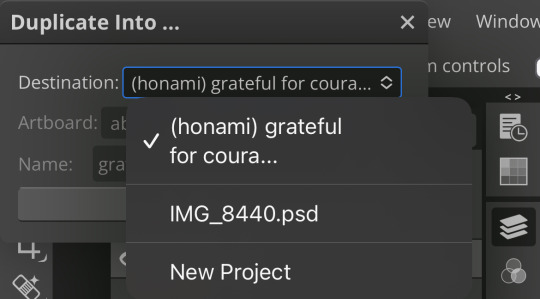
i’m moving mine to a random image of honami i found which is why it’s named like that. once the folder’s duplicated into your project, go over and take a look!
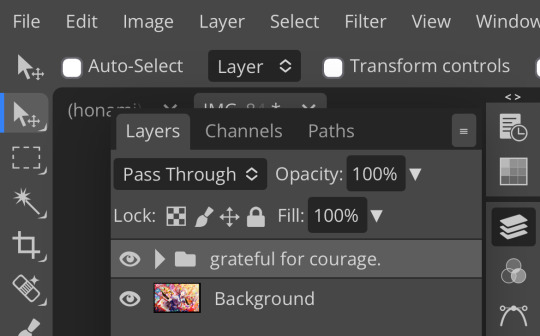
you should now see something like this! ensure that the folder is on top, as otherwise the adjustment layers won’t work.
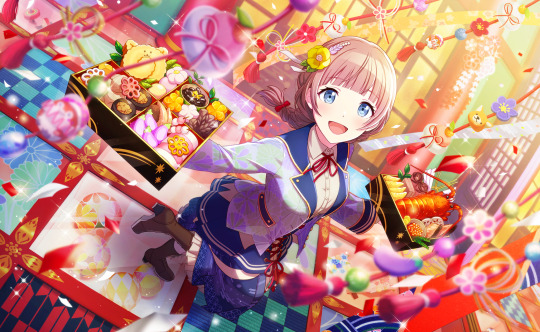
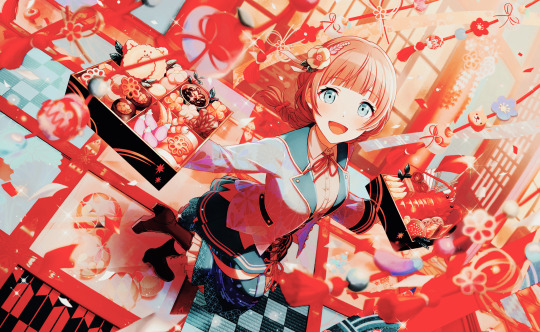
here’s the difference between the unfiltered image and the image with my psd!
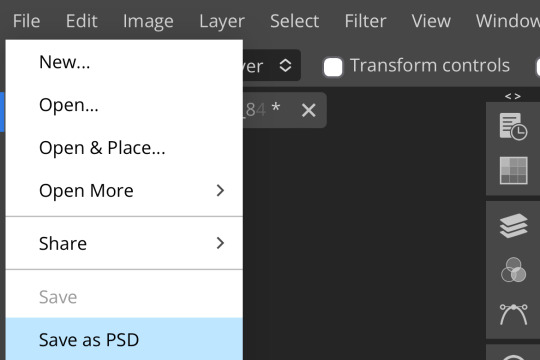
to save images in photopea (like i did just now) go to file > export as > (your preferred file format)
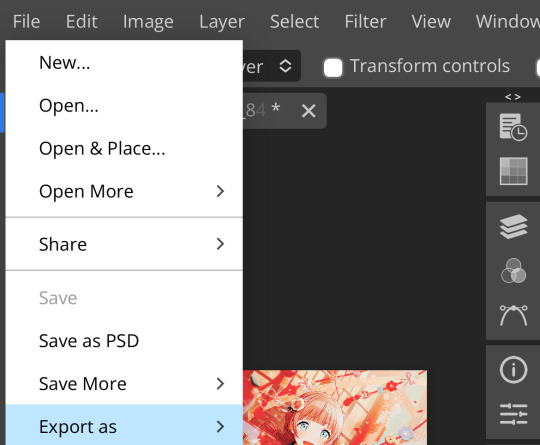
which will pull up something like this
i recommend either saving as a png (for still images) or as a gif (for… gifs) but that’s up to you! in order to save a psd, go to file > save as psd! that will save your project to your device
bear in mind that tumblr doesn’t accept psds as a file format, so if you’re going to post an edit, you have to save it as something else. also, don’t just save other people’s psds and claim them as your own—psds take a lot of time, effort, and skill, like any other art form.
can i make my own psds?
100% yes! i can’t give you a step-by-step process unfortunately, as there really is no one way to make psds. i recommend familiarizing yourself with adjustment layer and seeing what works.
shameless self plug again, but you can check out my other posts in this series to find out about some of the adjustment layers!
basically, i like to think of adjustment layers as a few different categories. light/darkness adjustments (ie: brightness/contrast, levels, curves, exposure, black & white, and threshold to a certain extent.) saturation adjustments (vibrance, hue/saturation.) color adjustments (hue/saturation, color balance, photo filter, channel mixer, selective color, gradient map depending on how you use it, and replace color.) and also, miscellaneous (posterize, which gives your images a pop-art crunchy kind of effect, invert, which… inverts your colors, and color lookup, which is a set of filters unto itself)
how you utilize adjustment layers is up to you! i personally like to use a variety and see what happens, my personal favorites being channel mixer, photo filter, and hue/saturation. you can also utilize blending modes (shameless self plug again,) or opacity.
if you have no idea where to start, you can look at other people’s psds to see their process. don’t copy or steal, for obvious reasons, but you can toggle layers on and off and see what happens and what each layer does.
making psds isn’t as intimidating as it sounds, you just have to start a project and start creating! it gets really fun once you get the hang of it (*'▽'*)
i don’t edit with photoshop or photopea, can i still use psds?
short answer: nope!
long answer: if you want use psds but you’re super used to ibis paint or whatever you currently use, have no fear! you don’t have to switch all your editing to photopea. you can make your main project in ibis or whatever as normal, then upload it to photopea and add a psd.
you can also make perfectly fine filters in ibis paint in your own right, with enough tweaking. there’s also apps such as polarr and picsart which come with filters, but i’ve never used them so i’m unable to vouch for how they work.
do i need to use psds when editing?
nope! psds are 100% optional. they’re a style like anything else—some people prefer them and some people don’t. it’s up to you.
did you genuinely write 1178 words answering questions no one asked?
yep.
what if i have a question you didn’t answer?
feel free to shoot me an ask! i don’t mind explaining further, and i promise i don’t bite. as with anything, this is just meant to explain to anyone who needs assistance—photopea for dummies by a dummy, after all. we can be confused together!
are you done now?
i am! congratulations for reading this far!
yours truly, canarysage
99 notes
·
View notes
Note
hello! would you be interested in releasing a little tutorial/guide on how to convert default skins for infants? i understand if you don't feel like it!

of course! it goes without saying that you need sims 4 studio (s4s) of course. also a photo editing program, you can use photopea for free! open s4s at the top click tools > create empty package. you should see this! click on add at the very bottom left...

line by line, copy and paste all the information down below into the "add" box that just popped up. Change the "type" to LRLE image, keep the group as is (it should be a bunch of 0s), and type in the instance numbers. (Ignore the red oval for now!) Make sure to double check! Save your package file!

Now all you need to do is important the images of the skin. All sim textures take up exactly the same amount of space and all their features are proportioned in the exact same spots so you can take any skin blend and slap it on top of a base and import it and you're done! The red oval above is the chubby state for infants and the other 3 are just default/average body states. (Even though I found like 8 separate instances of infant skin, only 1 was chubby and the rest default body states. The other 4 files didn't seem to change anything in CAS, I don't know why though!)
If you want to make more realistic alpha skin you'll need to make your own entirely from scratch, mix and match, or use another creators. (Even though all creators have open TOUs per EA's own TOU you should probably still ask just to be nice and absolutely give credit to them. And by credit I mean mention their name and/or link to their page, not any of that goofy "credits to all creators" nonsense!)
📂Download EA infant skin base!
Happy converting! 😊
❗ Postnotes: ❗ The instances for all the other ages didn't seem to change, so there's no need to update, only add-on. Also instead of creating a new package you can just add-on to an existing package file. It's just easier and safer to start brand new
437 notes
·
View notes
Note
How do you make your gifs?
Hello hello! I love talking about gifmaking, so thank you for giving me the chance to ramble.
Instead of a detailed step-by-step walkthrough, I will link tutorials and resources written by the wonderful Tumblr creators on here along the way. Everyone has their method and preferences, and there’s no right or wrong way to make gifs. I’m going to share techniques and resources I picked up along the way that work best for me—they may or may not be suited to your preferences, but I hope you’ll find some helpful things here.
(Warning: screenshot/image heavy)
USEFUL TUTORIALS AND RESOURCES
Here are some tutorials and resources that I found very useful when I got back into gifmaking:
Gifmaking tutorial using video timeline by @hope-mikaelson is identical to my own process
Gifmaking and coloring tutorial by @kitty-forman, whose process is very similar to my own
Giffing 101 by @cillianmurphy, an incredibly detailed tutorial that covers everything you need, including a step-by-step guide to using HandBrake
Gifmaking and coloring tutorial with 4K HDR footage by @sith-maul, another incredibly detailed tutorial with many useful tips
Gifmaking tutorial by @jeonwonwoo, incredibly comprehensive and covers so many aspects of gifmaking from basics, sharpening, captioning, and text effects
Gifmaking/PS tips and tricks by @payidaresque
Action pack by @anyataylorjoy, the Save action is especially a true life-saver
@usergif and @clubgif are amazing source blogs with many tutorials on gifmaking, color grading, and gif effects, can’t be thankful enough for the members for their work curating and creating for these blog!
TOOLS
Adobe Photoshop CS6 or higher, any version that supports video timeline. @completeresources has many links to download Photoshop, have a look!
Photopea is a free alternative to Photoshop, but it has a slightly different UI, check out these tutorials for gifmaking with Photopea
HandBrake or any other video encoder, especially if you’re working with .MKV formats
4Kvideodownloader for downloading from YouTube, Vimeo, Instagram, etc.
OBS Studio or any other similar screen capturing software. To prevent duplicate frames in gifs that prevents your gifs from looking smooth, try to match the recording frame rate (FPS) with the source.
IMPORTING FOOTAGE AND WORKING IN VIDEO TIMELINE
I work exclusively in video timeline instead of importing video frames to layers or loading files into stack. For videos that don’t require converting/encoding using HandBrake, especially ones that are already in .MP4 format, I tend to open the video directly on Photoshop, and trim the videos around directly.
As mentioned above, this gifmaking tutorial using video timeline is exactly how I make gifs. I find it more efficient, especially if you’re making multiple gifs from the same video/the same scene with little to no change in lighting conditions You can simply slide around sections of gifs you want to save, and they will all be the same length.
Another thing also covered in the tutorial linked is the ability to change video speed in video timeline mode. Right click on the video and set the speed before proceeding with cropping/resizing. This is also very useful when you’re making blended gifs where you need the footage to have the same length.
Slowing footage down.
As mentioned in this post, changing the FPS before slowing down the gif results in smoother gifs. Doubling the frame rate before slowing down your gifs usually yields the best result.
Speeding footage up.
I love using this to speed up slow motion B-rolls to make the speed slightly more natural. It will result in nice, smooth gifs:

(B-roll footage, normal broadcast speed)
(200% speed)
Subject won’t stay in frame?
Another feature of the video timeline mode. Keyframes are your best friend. This tutorial by @kangyeosaang covers everything you need to know about panning gifs. I use this technique regularly, it’s a life-saver.
COLORING
Here are some coloring tutorials I found very useful:
Coloring tutorial by @brawn-gp beloved, their coloring style is second to none
Mega coloring tutorial by @yenvengerberg, for stylized /vibrant coloring
Understanding Channel Mixer by @zoyanazyalensky
Coloring rainbow gifs by @steveroger, which delves deep into Channel Mixer
I tend to go for neutral-saturated coloring in general, especially for minimalist gifsets with no effects (blending/isolated coloring/overlays etc.), but the possibility is endless for stylized coloring. Here’s what my adjustment layers look like for the example gifs above.
The base footage for this Charles gifset is incredibly desaturated. I started with a Curves layer to bring contrast to the gif, as well as do some color-correcting to bring the base footage to a more neutral tone. To bump contrast, I also like to add a black and white Gradient Map layer with a Soft Light blending mode at 10%-30% opacity:
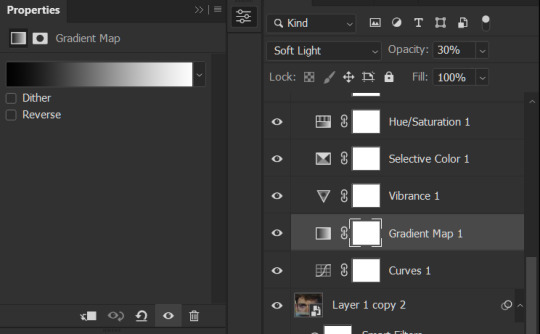
The Vibrance layer is then used to lift the saturation of the base footage, with the Selective Color, Hue/Saturation, and Channel Mixer layers to help remove the green/yellow tint to his skintone.
An underrated adjustment layer/preset in my opinion is the Color Lookup. You can layer in pre-loaded .LUT color grading presets to help speed up your process. For this gif, it’s simply a base preset Soft Warming Look to achieve a warm, pink-tinted tone.
In hindsight I feel like this gifset is too saturated, his skintone is skewing very red/pink, I could’ve bumped down the lightness of the reds with a Selective Color layer or a Hue/Saturation layer. Try to err on the side of neutral for skintones. Experiment with layer orders—there’s no right or wrong! Remember that each layer build up on the one before it.
The base footage of the Jalen gif is already quite nicely color-graded, but it’s still muddy and underexposed. As with the Charles gif, I started with a Curves layer to bring the gif to a better baseline contrast. Then I focus on brightening the gif with the Brightness/Contrast and Exposure layers.
The Hue/Saturation and Selective Color layers are to color-correct Jalen’s skin tone—it’s something I spend most of my time coloring gifs and focus a lot on, especially when color grading BIPOC skintones. Putting a Vibrance layer, upping the Vibrance and Saturation, and calling it a day would make his skintone skew very, very yellow/orange.
Focus on the reds and yellow for skintone, play around with the Saturation and Lightness sliders, use the Hue slider with caution.
It can be tricky to achieve the right skin tone when working with sports footage vs the higher quality, higher dynamic range footage of films or TV shows, but I try to keep it as close to the subject’s natural skintone as possible.
Here are some of tutorials with tips and tricks on coloring BIPOC:
How to fix orange-washed characters by @zoyanazyalensky
How to prevent pink-washing and yellow-washing by @jeonwonwoo
Coloring tutorial by @captain-hen
Changing lighting conditions?
Fret not—this is why I love working in video timeline. I’ll take this gifset as an example: it’s a deceptively difficult one to color. The footage is 720p and the sunlight shifts throughout the video, so matching across gifs was tricky.
My solution was to split the clips in sections with consistent lighting, and apply adjustment layers to the individual sections before applying general color grading layers on top of everything.
We can make use of the Fade Transition effect for sections where the lighting changes within the gif section we want to color.

(without vs with Fade on the Brightness/Contrast layer)
The difference is subtle in this example, but the brightness in the right gif is noticeably more consistent throughout. You can also add the Fade Transition effect to the beginning for a fade in, of course.
SHARPENING AND OPTIMIZING GIF QUALITY
This tutorial by @anya-chalotra covers everything you need to know about optimizing gifs for Tumblr.
Sharpening.
Sharpening is essential to making crisp gif images. Here’s another ask I answered re: my own sharpening settings and maximizing gif quality.
(base footage, unsharpened)

(color graded, unsharpened)
(color graded, sharpened)
The final gif is sharpened with Smart Sharpen, 500% at 0.3px and 10% at 10px (my standard sharpening settings).
Here are some tutorials and resources on sharpening:
Sharpening process by @anya-chalotra
Sharpening tutorial with added gaussian blur by @haleths
Sharpening action by @daenerys-stormborn
Size your gifs for Tumblr correctly.
This is essential: full width gifs are 540px wide.Two side-by-side gifs should be 268px wide. Here’s a handy post on gif size guide for Tumblr.
Incorrectly sizing your gifs will take away the quality of your gifs: undersizing your gifs will especially make them grainy, blurry, and /or pixelated, and won’t display correctly on many people’s desktop theme. Oversizing usually isn't as dramatic as undersizing, but it will make the gifset glitch when displayed, and the file size will be unnecessarily bloated.
Work with HD footage if possible.
Media fandoms (films/TV shows) are luckier than us in the sports trenches—we have to work with what we have. Broadcast footage is usually subpar: lacks contrast, pixelated, very desaturated, the list goes on. But it’s possible to still make high quality gifs from subpar footage. Here are a couple of tutorials to mask low source footage quality:
low quality video ➜ “HD” gifs tutorial by @nickoffermen
Sharpening low quality footage by @everglow-ing
(This gifset I made is from a 480p footage with horrendous lighting conditions and colors, and the end result is decent I’d say)
Save for Web (File > Export > Save for Web (Legacy) or Ctrl + Alt + Shift + S) settings.
I default to Adaptive + Diffusion but also use Adaptive + Pattern from time to time. Any combination of Adaptive or Selective + Diffusion or Pattern will give you a good result. In my experience some gifs will need the Selective color table for the colors to display correctly.
Here are my default settings:
SAVING AND EXPORTING FOR TUMBLR
Converting to frames and adjusting the gif speed.
If possible, avoid exporting your gif and reopening it to adjust the frame speed. I used to do this sometimes when I’m lazy, I have to admit, but this is where this Action as mentioned at the beginning comes in very handy. It converts all visible layer into smart object, then converts it back to frame animation.
Step-by-step:
1. Select all layers
2. Right click > Convert to Smart Object
3. Go to the Timeline menu (≡) > Convert Frames > Flatten Frames into Clips
4. Go to the Timeline menu again (≡) > Convert Frames > Convert to Frame Animation
5. In the same menu (≡), select Make Frames from Layers
6. Delete the first frame (it’s a duplicate) then set your frame speed

Now you can adjust the frame speed before exporting it (Save for Web).
Pay attention to the source framerate.
The frame delay of 0.05 s is usually the default to make gifs for TV shows and films, and it is preferred by most gifmakers. This stems from the fact that most movies and TV shows are 24 or 25 FPS. This may not be the case for all source videos: you might get 30 FPS footage, and sports or gaming footage can be 50 or 60 FPS. Gif speed also depends on the FPS of your original file. Play around with gif speed and see what feels most natural to you.
My rule of thumb is the frame delay Photoshop gives you + 0.01 s. For example, 50 FPS footage will give you 0.02 s frame delay (25 FPS gives you 0.04, 30 FPS gives you 0.03, etc.), so set it to 0.03 s. I usually err on the side of a faster frame delay for smoothness in in-game sports footage, anything else (interviews, press conferences, B-rolls) can get away with being slowed down. Again, experiment and see what you think looks best!
Keep gifs under the Tumblr file size limit (10 MB).
Cut down the number of frames. My gifs are usually around 60-70 frames for 540px full-width gifs, but depending on the coloring, sometimes you can get away with more. 268px gifs can go up to 200+ frames.
Crop your gifs. Remember to keep full-width gifs at 540px wide, but if necessary, you can crop the height. My go-to sizes are 540x540, 540x500, 540x450, and 540x400.
Amp up the contrast of your gifs. Flat colors like black cut down gif size.
The Grain filter or Noise filter, though beautiful for aesthetics or simply necessary sometimes to mask low source footage quality/pixelating, may bloat your gif size.
Play your gifs back before exporting.
Pay attention to duplicate frames or glitches, you might need to get rid of them!
Hope this is helpful! Don’t hesitate to send an Ask or DM if you need any help, I will happily answer all your questions and send over PSDs. (I’m also on Discord—just shoot me a message if you need my tag!) Happy creating :]
#tutorial#PS asks#gif tutorial#Photoshop tutorial#I guess this is more of a resource link dump than tutorial but. Hey. Why reinvent the wheel...#Sorry for the late answer I hope you see this Anon :]#completeresources#allresources#userxoames#userbarbi#usernrzr
1K notes
·
View notes
Note
hihi!!! how do you make yr rentry graphics? for example, the madohomu matching graphics u made?
Hihi~ Here’s what I use and how I make my graphics!
1. Photopea! Hosted online for absolutely free, this is an in-browser version of Photoshop
2. PSDs! These are tools used for coloring your graphics. These can be found on DeviantArt, as well as tumblr. I typically search “PSD download” + the colors I’m looking for!
3. Art! What will be featured in your graphic.
3A. Great sources of official art can be line stickers, promo art, and official merchandise!
3B. If you need transparent art, try looking up already-transparent versions of what you’re looking for! Use the keywords “render”, “transparent”, and “PNG”. (Pro tip: if you’re on your desktop using Google, and wanna avoid those annoying fake PNGs, go to the “Tools” -> “Color”, and then select “Transparent”!)
3C. If you found a transparent you wanna use, but it’s on one of those annoying wikis that makes everything tiny, open the image in a new tab and delete everything after .png in the URL!
3D. Additionally, if you’re downloading from tumblr, open any image you download in a new tab. The default tumblr file types are .pnj and .gifv. Simply replace those parts of the URLs with .png and .gif!
4. Masks! I find my masks on Pinterest, for the most part. You can find a lot of great ones all in one place here! I use this method for making my gifs custom shapes.
Hope this helps! 💖
132 notes
·
View notes
Text
So uhm... I did a thing...
✨Character Info Template✨
Been meaning to do this a long time ago (and actually started it but never finished it, lol) as a way to share some more information about my ocs without needing to use a custom page theme, but mostly because I haven't found any page theme that looks exactly as I want and allows this much customization.
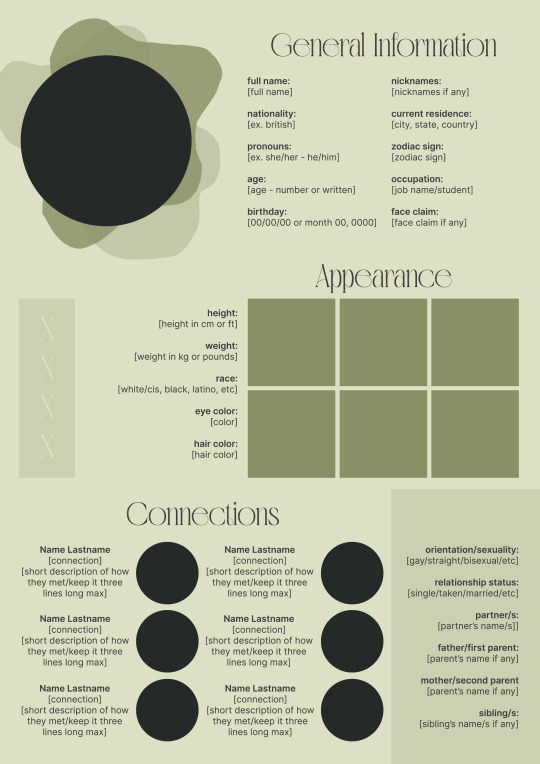
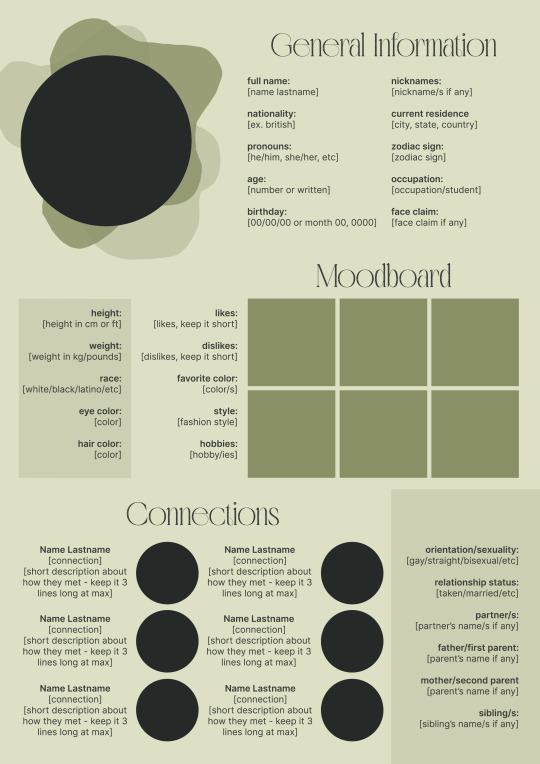
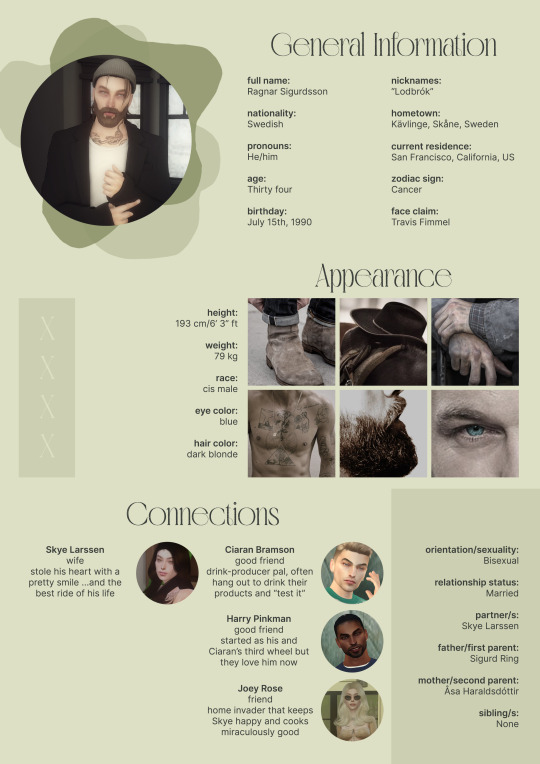
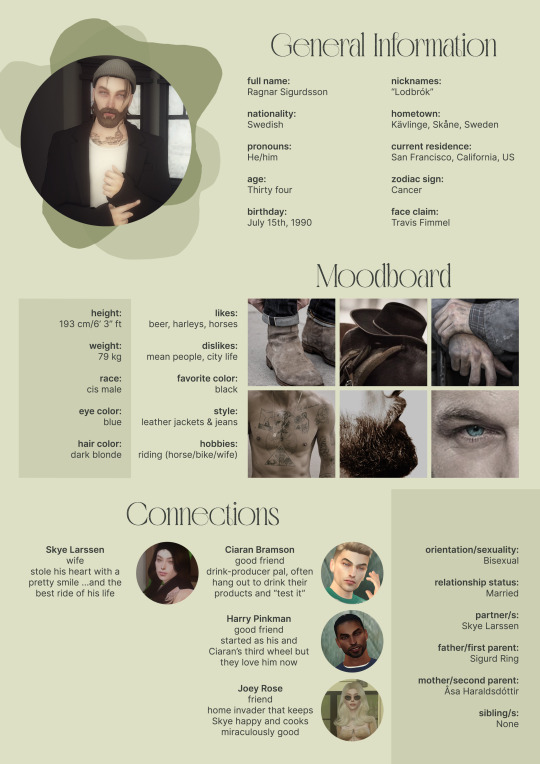
There are two versions and both are almost exactly the same; but the example shown in the left has an 'appearance' section which is small and has few quick facts regarding the oc's appearance; while the example on the right has a 'moodboard' section instead which allows you to add more info about your oc.
You can change every section/title to fit your needs like I did in the examples below; I personally removed some categories as well and got rid of some connections as this oc doesn't have that many close friends/partners to fill the original template. However, I also included an extra separated 'connections' section in the download in case you want to add more people and more information.
I recommend you stick to square-shaped pictures so it's easier to fit them to each section. Also if and when you edit the information or section titles, please select only one line at a time to replace it so you don't lose the text format. (Titles shouldn't change because that's a single format/font within the same text box, but should it change you can always hit ctrl+z hehe) When you're done, I strongly recommend you save this as a .png instead of .jpg so it's the best possible quality!
Last but not least, this is a .psd file. So you'll need either Photoshop (I did this with Photoshop Portable, but it supports newer versions of PS and it *should* support older versions too) or Photopea to open and edit this file.
Credits: Adobe Photoshop, Inter font, Golften Vintage font
>DOWNLOAD< (patreon but free :p)
(note: I'm posting this with my gaming blog because I think my fellow gamers might be interested in this, but please consider giving credits to me if you use this template by tagging @synindoodles instead of this blog)
More info on how to use and edit this template below the cut!
Layers:
>Each layer is properly named and categorized. The general layers such as the background, the icon shape and background shapes are under the groups.
>If you don't want to see/don't need one of the connections' pictures and information, I recommend you find which one it is (1, 2, 3, 4, 5 or 6) and click on the eye symbol next to the layer to hide it so that way if you ever need it, it won't be truly gone.
>To edit a text section, simply find the layer (such as General Information>Left Column) and double click on the 'T' symbol next to the layer. That way it will open edit mode and allow you to edit the text, just don't hit delete or enter while everything is selected or you'll erase it :p
>Main text sections aren't separated, they're blocks of text. I recommend you don't remove the amount (for example, if you downloaded the version with the 'appearance' section, which has 5 sections of information, don't remove the fifth line.) Either leave it empty or replace it with another data, otherwise it will look weird. The 'general information' section might look good even if you remove a few lines, just don't get rid of the whole block of text.
Pictures:
>To add a new picture, simply paste it over this document and move it using the Move Tool.
>To frame it (so it becomes a circle or fits over the shape you want), make sure the picture layer is over the layer you want, then while holding alt click between the two layers. [For example, if you want to add a new main oc picture: 1) paste the pic you want, 2) move it with the Move Tool so it's covering the big circle, 3) once you've fully covered the shape (if it isn't you can resize it by right clicking on it then on 'free transform', sometimes you might need to hold shift to proportionally resize it) make sure the newly pasted pic layer is over the layer named "picture goes here", 4) hold the alt key and hover your mouse cursor over the line between your pic layer and the circle layer until you see an arrow going down symbol, once you see it click it and tah dah! your picture should now have the same shape as the circle! - you can further move it if it doesn't fit the way you want with the Move Tool (;
Others:
>You can change every color, font and section to your liking, just don't change the general layout of the template.
>To hide/show the guides (those bright blue lines all over the document), click ctrl+,
>'Inter' is a free font and you can get it in the link above (linked with the credits), Golften Vintage is not, but you can get the demo version >here< (just scroll down and click the blue download button under license). I will not tell you how to install fonts as it might be different for everyone (for me it's C:/Windows/Fonts and I just drop the zipped files (except the .txt one) there), but google is your friend.
>I can't think of anything else that needs to be said here, but if you have any other question feel free to send me an ask or dm and I'll help you out!
>Last but not least, a like is appreciated if you plan to use this plus consider tagging @synindoodles if you use it <3
#psd template#template#characters page#muses page#muse page#muse template#character template#character page template#oc page#oc page template#synindoodles#rp resources#rp template#roleplay resources#roleplay template#writers resources#writing resources#writing template#writers template
52 notes
·
View notes
Text
First of all, I want to say thank you so much for 1000 followers - that is truly a bonkers number I never thought I'd reach, thank you to everyone who interacts with my posts or follows along with my legacies or just occasionally sees my posts on your dash - I love this community so much, and I've felt so welcomed here since I joined simblr!! Mwah ily!
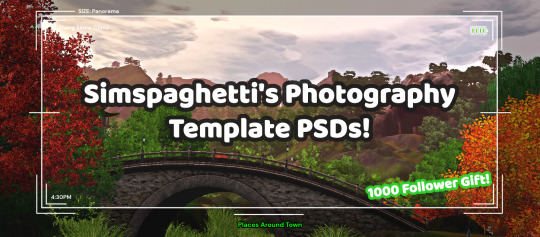
I come bringing gifts!! It's another PSD template, based off of the photography UI for Sims 3
I got the idea for this template way back when I was taking these screenshots in Gen 1 of my Blossom Random Legacy, and I figured they could really come in handy for people who are doing world adventures style gameplay :)
There are 4 sizes to choose from, each one is loosely based on a photo size in the game:
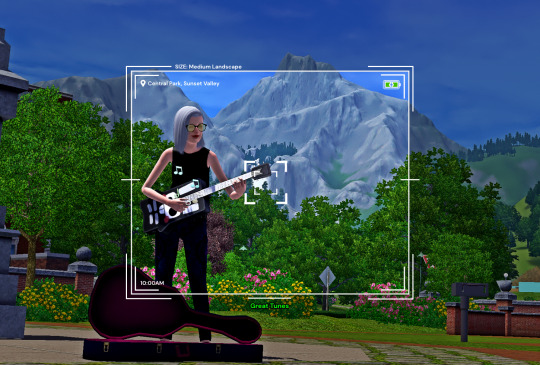
Medium Landscape
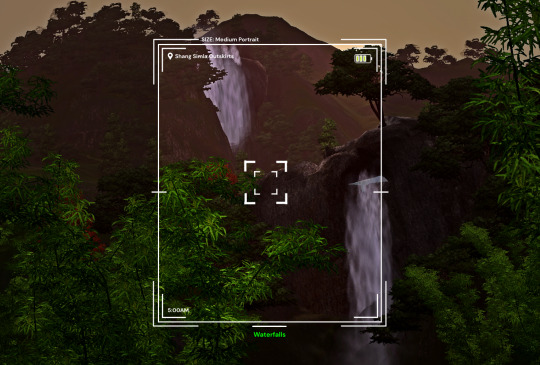
Medium Portrait
Panorama
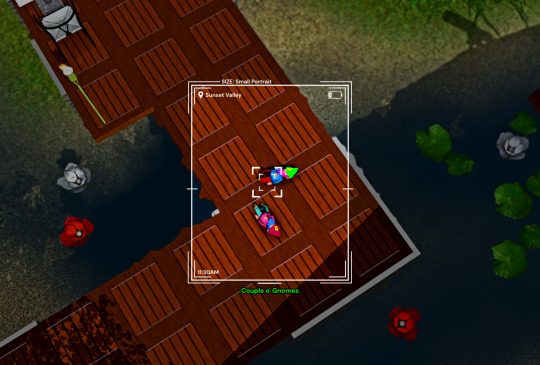
Small Portrait
They're all on a 1450x980 canvas, but you can of course crop them however you want!
It's also pretty easy to create your own custom size if you want to, as long as you have a basic knowledge of photoshop tools - every layer is completely adjustable and customizable!
Terms of Use:
Please don’t claim as your own or reupload without my permission, and credits on posts aren’t necessary, but I’d love to see you use them in your game if you do tag me!
Alter and customize the templates literally however you want, but if you're gonna reupload a downloadable variation of them I'd appreciate a link back to my blog :)
The only font used in all the templates is DM Sans (bold) it can be found here
➡️ DOWNLOAD (Simfileshare, .psd files)
Instructions: These are .psd files, so you can open them in photoshop, photopea (my personal choice of editor), gimp or another similar photo-editing software
Then just place your image at the bottom of all the layers
You can alter the text in the boxes to whatever your needs are, I recommend referring to this page on Carl's guide to see all the photography collections which inspire the green text! :)
55 notes
·
View notes
Text

THE GIFMAKER'S GUIDE TO SUBTITLES
Ever thought about subtitles? Want to learn how to make them? Look no further 'cause here's a tutorial all about them! I'm gonna show you my process of making subtitles on Photopea, but these tips can also be useful for Photoshop users as well. I hope you find this helpful!
FONT
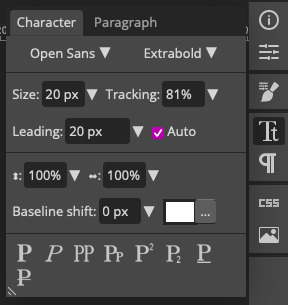
I use a font that's already in Photopea (yaay no need to download anything!) called Open Sans. It's a pretty neutral font and I really love using it for subtitles. I always set the font to Extrabold Italics. Looks the nicest in my opinion!
Here's how it should look like at the top of your workspace:

Locate the font on the left tab, then find the extra bold setting on the right tab.
SIZE
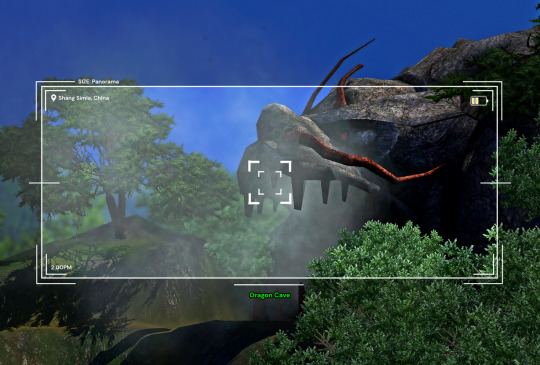
The font size will depend on the width of your gif. For a full-width gif (540px) you can get away with something bigger, but if you have a two-column gifset for example, you'll need to make it smaller. For big gifs, my go-to is either 20px or 25px. Depends on how I'm feeling.
Here's an example to better show you.

Something you also want to keep in mind when subtitling is to have a nice gap between the bottom of the gif and the text itself. "Oh, but how can I find that?" I hear you asking. By turning on distances!
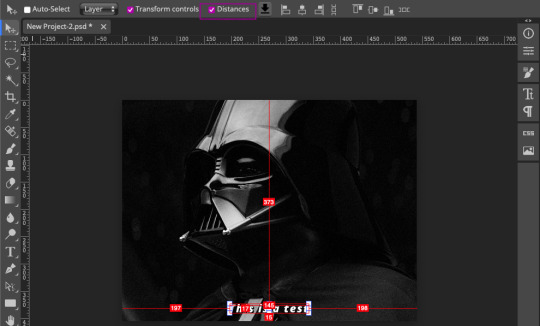
By turning on distances, you can see how big the gap is between the bottom and the text. In this example, I have it set to 15.
If you don't want to forget, you can always add a ruler and line it up with the bottom of the text. Then the rest of your subtitles (if you're making more), all go in the same place. To turn on the ruler function (if you haven't already, go to View > Rulers. You'll now see numbers on the top and the left side of your workspace. Simply drag from the top and a blue appears.

Now any text or shape will snap to that line automatically if you move it around. Now that's neat!
To finish this section off, here are the distances I use for each gif size. As you'll notice, I move the text down a little bit the smaller the gif becomes. But in the end, it's all up to you.
540px — 15
268px — 12
177px — 10
SPACING
What I like to do is increase the tracking so that there is a bit of space between the letters. I put it at 81%, but if you want the spacing to be wider that's cool too!
SHADOWS & OUTLINES
Shadows.... Very scary. But they don't have to be!
Here we have plain text. On its own, can be kinda hard to read. What we need to do in order to fix that is to add some shadows to make the text pop more.

Right-click on the text layer and open up blending options. Then check the drop shadow box and click on it. Set everything to 0, except for opacity (100%) and size (10px). Now you have a shadow all around the text.

Next to the drop shadow, click on the + sign to duplicate it. Change the angle to 137° and set the distance to 1px. Make sure to lower the size to 0.
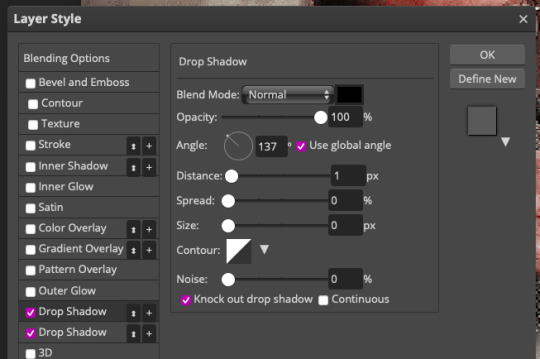
Now duplicate that layer by clicking the + sign. Everything is exactly the same here, but change the distance to 2px.
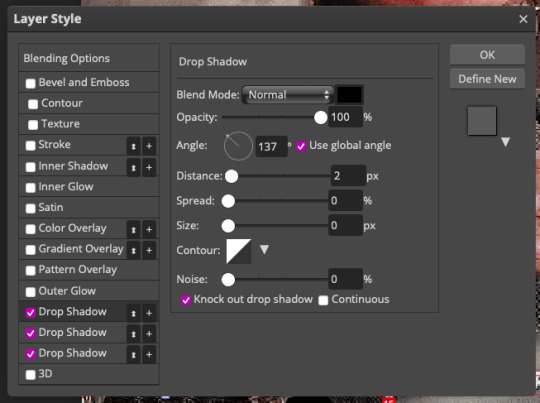
Do this once again, changing the distance to 3px. Don't go over 3px, as the shadows will start to look weird!
Now the shadows are all done! This is how it looks

COLORS
Something that's pretty common is to use white and yellow for subtitles (if there are two people speaking for example). You're more than welcome to use those colours, but something I personally like to do is incorporate the subtitles with the gif so that it looks more cohesive. I always pick my text colour after the base gif is finished. Let's take a gif from this Indiana Jones set I made a few months ago as an example:

he looks so good in this movie aND FOR WHAt-
No subtitles... But that is all about to change (oOoOooO)
Write out your text like normal and select the text layer. Go to the character tab (looks like Tt) on the right side to open up it up. Click on the colour box (in this case it's white) so that the color picker appears.
Here's what the screen looks like after all that clicking we did

Then you chose... but chose wisely... (lol I'm gonna shut up now)

After I have my colour picked, I drag the dot around to make it lighter. I don't want it to be super bright, so I drag it towards the top and middle to get a bit of grey. That way, it looks a little muted as well as lighter which is what I personally like.
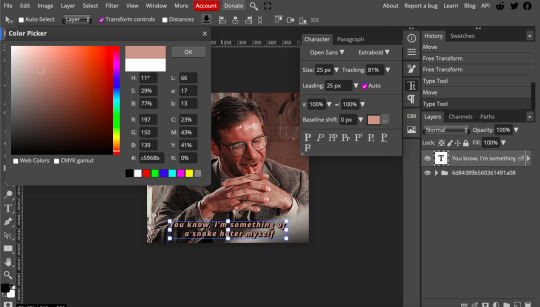
My tip here is to find the most dominant colour in your gifset if you want your subtitles to look cohesive! Here I've picked a colour, the brown wall behind him because it pops against the greyish tones on his blazer. Here's the final result!
We've now reached the end of this tutorial. I hope you've learned something new and that this makes you want to make MANY subtitles from now on. If you have any questions, don't be afraid to send me and ask. Also TAG MEEEE (#userlace) if you make something, I'd LOVE to see what beautiful gifs you make <3<3<3
121 notes
·
View notes
Text
Since sharing this post about a usful AI used to compile and graph research papers, I've realised I have a few other resources I can share with people!
Note: I haven't had a chance to use every single one of these. A group of post-grad students has been slowly compiling an online list, and these are some I've picked out that are free (or should be free and also have paid versions). However, other students using them have all verified them as safe.
Inciteful (Using Citations to Explore Academic Literature | Inciteful.xyz) – similar to connectedpapers + researchrabbit. Also allows you to connect two papers and see how they are linked. Currently free.
Spinbot (Spinbot - Article Spinning, Text Rewriting, Content Creation Tool.) – article spinner + paraphraser. Useful for difficult articles/papers. Currently free (ad version).
Elicit (Elicit: The AI Research Assistant) – AI research assistant, creates workflow. Mainly for lit reviews. Finds relevant papers, summarises + analyses them, finds criticism of them. Free (?)
Natural Reader (AI Voices - NaturalReader Home (naturalreaders.com)) – text to speech. Native speakers. Usually pretty reliable, grain of salt. Free + paid versions.
Otter AI (Otter.ai - Voice Meeting Notes & Real-time Transcription) – takes notes and transcribes video calls. Pretty accurate. Warn people Otter is entering call or it is terrifying. Free + paid versions.
Paper Panda (🐼 PaperPanda — Access millions of research papers in one click) – get research papers free. Chrome extension. Free.
Docsity (About us - Docsity Corporate) – get documents from university students globally. Useful for notes.
Desmos (Desmos | Let's learn together.) – online free graphing calculator. Free (?)
Core (CORE – Aggregating the world’s open access research papers) – open access research paper aggregation.
Writefull (Writefull X: AI applied to academic writing) – Academic AI. Paraphrasing, title generator, abstract generator, apparently ChatGPT detector now. Free.
Photopea (Photopea | Online Photo Editor) – Photoshop copy but run free and online. Same tools. Free.
Draw IO (Flowchart Maker & Online Diagram Software) – Flowchart/diagram maker. Free + paid versions.
Weava (Weava Highlighter - Free Research Tool for PDFs & Webpages (weavatools.com)) – Highlight + annotate webpages and pdfs. Free + paid versions.
Unsplash (Beautiful Free Images & Pictures | Unsplash) – free to use images.
Storyset (Storyset | Customize, animate and download illustration for free) – open source illustrations. Free.
Undraw (unDraw - Open source illustrations for any idea) – open source illustrations. Free.
8mb Video (8mb.video: online compressor FREE) – video compression (to under 8mb). Free.
Just Beam It (JustBeamIt - file transfer made easy) – basically airdrop files quickly and easily between devices. Free.
Jimpl (Online photo metadata and EXIF data viewer | Jimpl) – upload photos to see metadata. Can also remove metadata from images to obscure sensitive information. Free.
TL Draw (tldraw) – web drawing application. Free.
Have I Been Pwned (Have I Been Pwned: Check if your email has been compromised in a data breach) – lets you know if information has been taken in a data breach. If so, change passwords. Free.
If you guys have any feedback about these sites (good or bad), feel free to add on in reblogs or flick me a message and I can add! Same thing with any broken links or additions.
204 notes
·
View notes
Last Seen Blogs