#3D Modeling software
Explore tagged Tumblr posts
Visit Tumblr Blog
Explore Tumblr blogs with no restrictions, modern design and the best experience.
Last Seen Tumblr Blogs


Fun Fact
In 2020, 44% of users from Denmark used Tumblr daily.
Text
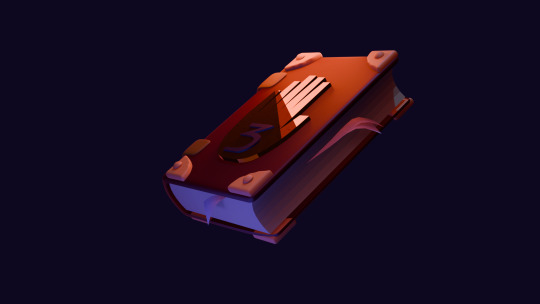
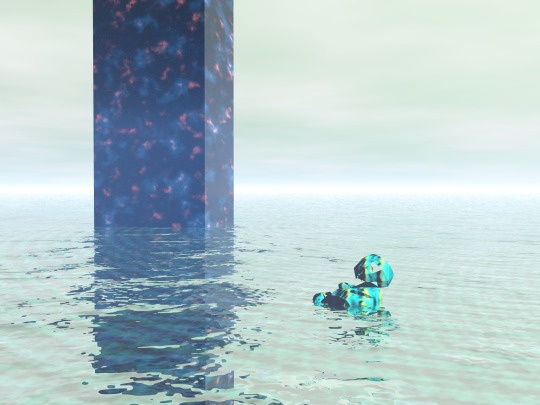
ENERGON CRYSTALS!!
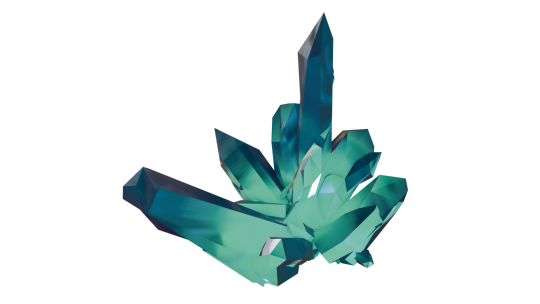
Modeled and rendered through Blender 4.3 Eevee
Instructions below of how you can make the same (beginner friendly):
First off, I watched this tutorial then made minor tweaks to the shader so it doesn't quite look like the tutorial.
My workflow:
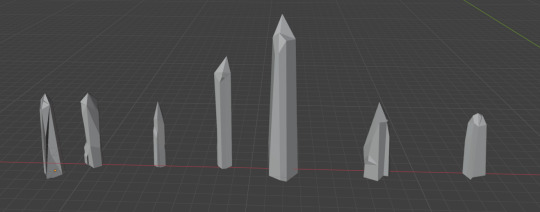
First, make your crystals individually on SEPARATE layers. Do not join them (if accidentally joined, go into edit mode and press 'P' to separate.
I made 7 crystals. Preferably make them of different sizes and heights so your resulting crystal looks nice. I made five pentagon crystals and two hexagon crystals and put each under a collection named "crystals".
Here are my crystals:
Now you are ready to create a crystal generator which you can fiddle around with to make variations of crystal clusters.
Please follow the geometry node instructions to the T.
Create a mesh plane before doing geometry nodes:
Delete "group input" node, and start with making "mesh circle" node first
At the end, make a "group input" node and connect it to the sections that says "seed". There should be three different nodes with it.
REALLY IMPORTANT: do not use "align euler to vector" node because it is deprecated; use "align rotation to vector" node instead
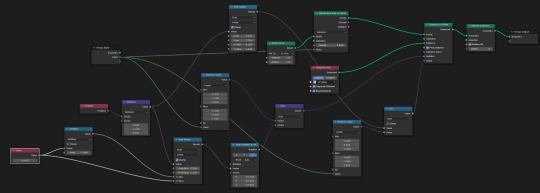
Voila! You've made a crystal generator.
Now, change around the "map range", "align rotation to vector", and "random value" nodes to create different crystals. You can also change around the seed number in your geometry node modifier.
When you get the cluster variation you want, you'll want to apply the modifier. Or, just right click on your crystal and click "convert to mesh". If you don't do this, your crystal will remain white (or have reflections of whatever HDRI you uploaded).
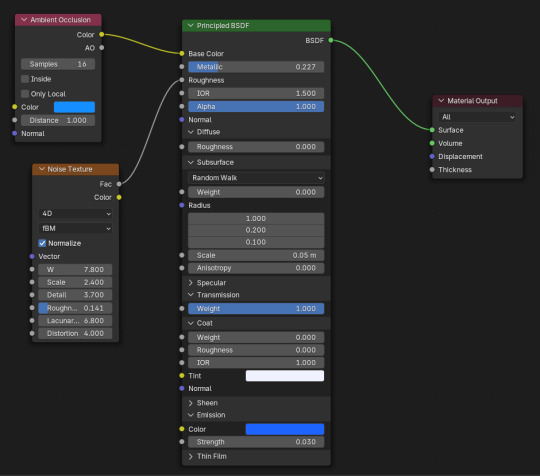
Create crystal shader:
Please check to make sure you are using Eevee render.
Change the colour of the "ambient occlusion" node to change the colour of your crystal.
Here's the changes I made
Didn't bother to make spotlight for crystal
Did not make the background black like he said.
Went into render mode or did something else so I couldn't see the HDRI environmental texture anymore
The four points above isn't really that important tbh.
Most important:
Did not bother creating the "wave texture" or "colour ramp" nodes. Therefore, no need for "mix shader" node. I couldn't get it to affect the crystal texture at the end so I just deleted all of it
I didn't use the "magic texture". This turns your crystal an iridescent colour regardless of what base colour you have selected on your "principle BSDF" node. I didn't like it, so I replaced it with an "ambient inclusion" node.
HOWEVER, you can still get an iridescent crystal through the "magic texture" node AND change the colour by adding a "hue/saturation/value" node in between. I did not do this as seen.
One last thing: I added a neon green light right underneath the centre of the crystal to make the bottom more green-blue tone. Otherwise, the crystal is just energon blue.
I think that's all the changes I made.
What's cool is that you can use the shader on the individual crystals themselves and make each one different colours so your cluster would turn out "multicoloured".
Last thing is to point your camera towards your crystal and click render then save as png, jpeg, whatever you want. Do save the blender file itself too.
I marked my crystal generator and crystal shader as an asset so I can use it on other blender files. I simply go to file on a new blender file and click "append" to whatever you named your crystal gen/shader file, and yeet them onto my new one.
#energon#maccadam#transformers#3d model#i started mere days ago#since using blender#blender#3d modeling software#blender eevee
6 notes
·
View notes
Text
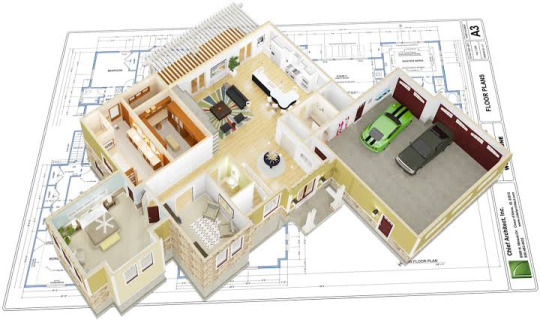
Top 5 Home Design and Construction Software
The home design and construction industry has evolved significantly with the advent of technology, leading to the development of sophisticated software tools that enhance design processes, improve collaboration, and streamline project management. Here, we explore the top five home design and construction software options available today, highlighting their features, benefits, and suitability for…
View On WordPress
#3D modeling software#Archicad review#architectural design tools#architectural visualization software#AutoCAD for architects#best home design software#BIM software#CAD software#Chief Architect features#collaborative design tools#construction project management tools#construction software#home design applications#home design software#interior design software#residential design software#Revit alternatives#SketchUp benefits
0 notes
Text
Step-by-Step Tutorial: Creating Your First Plant 3D Model
Plant 3D modeling is an essential skill for engineers and designers, offering the ability to create detailed and accurate representations of industrial plants. If you're new to this field, creating your first Plant 3D model might seem daunting. However, with a step-by-step approach, you can master the basics and set the foundation for more complex projects. This tutorial will guide you through the process of creating your first Plant 3D model, ensuring a smooth and rewarding experience.
1. Getting Started with Plant 3D Software
The first step in creating a Plant 3D model is to choose and install the right software. Popular options include AutoCAD Plant 3D, AVEVA E3D, and Intergraph Smart 3D. These tools offer comprehensive features for plant design, including libraries of standard components, parametric design capabilities, and real-time collaboration tools.
Installing Your Chosen Software:
Visit the official website of the chosen software.
Download the installer and follow the on-screen instructions.
Complete the installation process and open the software to begin your project.
2. Setting Up Your Project
Once the software is installed, the next step is to set up your project. This involves defining the project parameters, such as the project name, location, and units of measurement. Proper setup ensures that your project remains organized and that all team members are working with the same settings.
Creating a New Project:
Open the software and navigate to the project management section.
Select “Create New Project” and enter the required information.
Save the project and ensure that all settings are correct.
3. Importing or Creating a Plant Layout
The plant layout serves as the foundation for your model. You can either import an existing layout or create a new one from scratch. The layout should include the basic structure of the plant, such as buildings, equipment locations, and major pipelines.
Importing an Existing Layout:
Navigate to the import section of the software.
Select the file format (e.g., DWG, DXF) and locate the existing layout file.
Import the file into your project.
Creating a New Layout:
Use the drawing tools to outline the plant’s structure.
Add basic elements like walls, floors, and major equipment locations.
Save the layout for future use.
4. Adding Equipment and Components
With the layout in place, you can begin adding equipment and components to your model. Most Plant 3D software includes libraries of standard components, such as tanks, pumps, and valves. You can also create custom components if needed.
Adding Standard Components:
Open the component library and browse for the required equipment.
Select the component and place it in the appropriate location on the layout.
Adjust the size and orientation as needed.
5. Connecting Components with Piping
Connecting components with piping is a crucial step in creating a functional Plant 3D model. The piping should follow the layout and connect all relevant equipment, ensuring proper flow and operation.
Creating Piping Connections:
Select the piping tool from the toolbar.
2. Click on the starting point (e.g., a pump outlet) and drag the pipe to the destination (e.g., a tank inlet).
3. Adjust the pipe’s size, material, and routing as needed.
6. Applying Material and Finishing Details
After the main components and piping are in place, apply material properties and finishing details to your model. This step involves adding textures, colors, and other visual elements to make the model realistic and easy to understand.
Applying Materials:
Open the material library and select the appropriate materials for each component.
Apply the materials to the components and adjust their properties (e.g., texture, reflectivity).
Add finishing details like labels, annotations, and safety markings.
7. Performing Quality Checks
Quality checks are essential to ensure that your model is accurate and meets all project requirements. This step involves reviewing the model for errors, verifying dimensions, and ensuring that all components are correctly connected.
Conducting Quality Checks:
Use the software’s built-in tools to check for errors and inconsistencies.
Verify the dimensions and alignment of all components.
Ensure that all piping and equipment connections are correct and functional.
8. Generating Reports and Documentation
Once your model is complete and verified, generate the necessary reports and documentation. These documents are crucial for project approval, construction, and future maintenance.
Generating Reports:
Navigate to the reporting section of the software.
Select the required reports (e.g., Bill of Materials, Isometric Drawings).
Generate and save the reports for project documentation.
9. Collaborating with Team Members
Collaboration is key to the success of any Plant 3D project. Use the software’s collaboration tools to share your model with team members, gather feedback, and make necessary adjustments.
Sharing Your Model:
Save the model to a shared location (e.g., cloud storage).
Invite team members to view and edit the model.
Gather feedback and make any required changes.
10. Continuous Learning and Improvement
Plant 3D modeling is a dynamic field with continuous advancements in technology and techniques. Stay updated with the latest features, attend training sessions, and participate in forums and communities to enhance your skills.
Continuous Learning:
Follow industry blogs and websites for updates and tutorials.
Participate in online courses and webinars.
Join professional communities and forums to share knowledge and gain insights.
Conclusion
Creating your first Plant 3D model can be a rewarding experience with the right approach and tools. By following this step-by-step tutorial, you can lay a solid foundation for your Plant 3D modeling skills. Remember to start with the basics, use templates and standards, leverage advanced features like parametric design and automation, and continuously improve your knowledge and skills. With practice and dedication, you’ll be able to create detailed and accurate Plant 3D models that enhance your engineering projects.
If You Want To Explore More About 3D Modeling Services then Visit the Site: Jasmino
0 notes
Text
Top Free 3D Modeling Software 2024: Top 14 Options
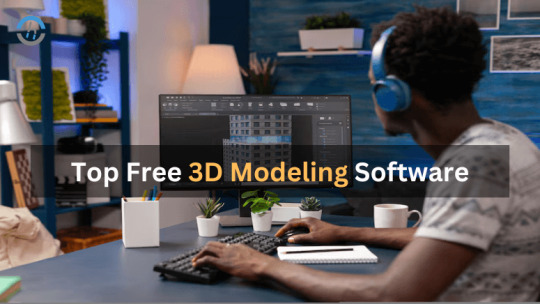
Explore the top 14 free 3D modeling software options available in 2024. Find the perfect tool for your projects today. Leading free 3D modeling software in 2024 will herald a new era in animation, architecture, and medical imagining.
Having beginners and professionals in mind, these devices provide tons of step-by-step learning, active forum support, and formerly top-end professional features.
No matter what you choose between sculpting, texture, animation, or rendering, you will be able to find an appropriate, cost-effective alternative that will allow you to create 3D art for any project.
0 notes
Text
Interactive Design Discourse: The Transformative Influence of 3D PDF Exporter in SketchUp
Introduction
SketchUp, a versatile 3D modeling software, has gained immense popularity for its intuitive interface and powerful design capabilities. As designers and architects strive to communicate their visions effectively, the need for efficient and accessible file formats becomes paramount. One such solution that has revolutionized the way SketchUp designs are shared and presented is the 3D PDF Exporter for SketchUp. In this blog, we will explore the intricacies of how the 3D PDF Exporter proves to be an invaluable tool in enhancing the SketchUp design process.
1. Preserving Design Integrity:
One of the primary challenges in sharing 3D designs is maintaining the original design integrity. 3D PDF Exporter excels in this aspect by allowing SketchUp users to export their models in a format that retains the spatial relationships, textures, and details of the original design. This ensures that stakeholders and clients experience the design exactly as intended.
2. Interactive Presentations:
Unlike traditional 2D representations, 3D PDFs enable interactive presentations that go beyond static images. With 3D PDF Exporter, SketchUp users can create dynamic presentations where viewers can rotate, pan, and zoom into the model in real time. This interactivity enhances the communication of complex designs, providing a more engaging and immersive experience for clients and collaborators.
3. Collaboration Made Easy:
Collaboration is a key aspect of the design process, and the 3D PDF Exporter facilitates seamless collaboration by providing a universally accessible file format. Stakeholders, irrespective of their location or the software they use, can open and view 3D PDFs without the need for additional plugins or software. This universal accessibility streamlines communication and ensures that everyone involved in the project can easily understand and contribute to the design discussions.
4. Annotations and Markups:
Effective communication often requires annotations and markups to highlight specific elements or provide feedback. The 3D PDF Exporter empowers SketchUp users to add annotations, comments, and markups directly within the 3D PDF file. This collaborative feature enhances communication between designers, clients, and other stakeholders, fostering a more iterative and refined design process.
5. Securing Intellectual Property:
In the world of design and architecture, protecting intellectual property is crucial. The 3D PDF Exporter includes features such as password protection and encryption, ensuring that sensitive design information remains secure during sharing and distribution. This level of security instills confidence in designers as they share their work with clients and collaborators.
6. Streamlining Documentation:
Beyond presentations, the 3D PDF Exporter aids in streamlining the documentation process. Users can embed additional information, such as specifications, material details, and project notes, directly into the 3D PDF. This comprehensive documentation ensures that all relevant information is accessible in one centralized location, simplifying the design review and approval process.
Conclusion
In the ever-evolving landscape of design, tools like the 3D PDF Exporter play a pivotal role in elevating the SketchUp experience. By preserving design integrity, fostering collaboration, and providing interactive presentations, this powerful tool has become an indispensable asset for designers, architects, and stakeholders alike. As the design industry continues to embrace innovative technologies, the 3D PDF Exporter stands as a testament to the importance of accessible and dynamic communication in the world of 3D modeling and design.
#3D PDF Exporter in SketchUp#3D PDF Exporter for SketchUp#3D modeling software#3D PDF Exporter#3D design
0 notes
Text
i love u milkshape...........
#just discovered a small offshoot of forgotten memories messing around with milkshape#and those programs where you make funney skeletal creatures and watch them to get to the other side of the room the fastest#sort of like a rudimentary ai training thing#man it has not been updated since 2013?#a fucking decade.. i thought the site was taken offline#its still there!#3d modeling#3d modeling software#abandonware#I DONT KNOW IF THE DLS WORK BUT ITS ALL THERE#i hope to see people using milkshape in the future even if its super outdated and probably runs like shit nwn#idk i just think its neat
0 notes
Text


Ummmmm blender ☝️
#gravity falls#fanart#grunkle ford#stanford pines#ford pines#digital art#3d model#blender#artists on tumblr#3d software
3K notes
·
View notes
Text
Sleepy Ankylosaurus 💤
I took an extra half hour to learn how to make grass. It surprisingly wasn’t a pain in the ass
#dinosaur#nature#amateur artist#paleontology#cretaceous#dino#jurassic#jurassic park#prehistoric#birds#digital animation#blender animation#blender#scenery#scene#animal#3d animation#3d software#paleontologist#paleo#paleomedia#ankylosaurus#jurassic world#dinosaurs#dinosaur art#work in progress#practice makes perfect#forest#blender art#3d model
1K notes
·
View notes
Text
3d modeling software | Modelcam Technologies
1 note
·
View note
Text


EchoLocation campaign poster and character select icons based on Chapter 369 of Blind Man's Bluff
For @ladyred-ms ♥
#i might be a *mite* obsessed with this universe and all it has to offer#does it show?#i'm also very desperate for a third instalment and i will never forgive Valve for depriving us#L4D2#left 4 dead 2#blind man's bluff#bmb#bmb spoilers#my art#rhiannon#lena#phil#chris#one day i will suffer modeling software UI and try my hand at 3d modeling again.
366 notes
·
View notes
Text
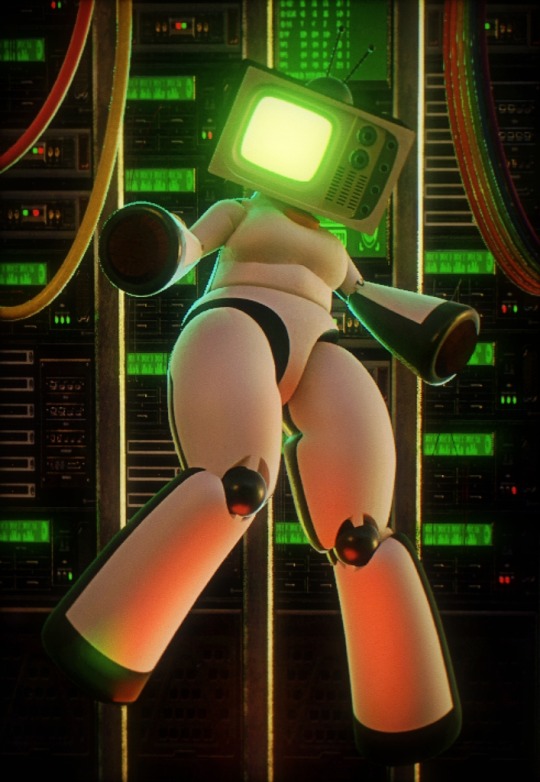
📺Server Room📺
#i finally figured out rigging#now i can use her for pose reference#drawing CiCI will be so easy heehoo#edit: i gorgot to put all the tags that make this eadier for me to find#donut posting#CiCi tv#robot girl#robot oc#my oc#original character#robosexual#robot art#robot fucker#objectum#objectophilia#techcore#blender 4.1#blender#3d model#3d modeling#3d art#3d modelling software#robophilia#i didnt give her any of her screws or her barcode cause this is just for pose references but this photo would look so nice with them#i DID give her all her cooling slots on the back of her head tho!
702 notes
·
View notes
Text


While I was away I learned how to use Bryce 3D. Crazy how you can just use old software
#bryce 3d#art#3d art#surreal#i honestly highly recommend bryce if you want to make little 3d things without the hassle of learning modelling software#it's so easy to make things and it makes them look really cool
90 notes
·
View notes
Text
HELP WANTED: LITTLEBIGPLANET FAN MOVEMENT

For the past year or so I’ve been working on a fan movement to revitalize interest in LittleBigPlanet on Sony’s terms. Think it comparable to Operation Moonfall, a fan movement for revitalizing interest in The Legend of Zelda: Majora’s Mask, which eventually led to its 3D Remake.
While I can’t promise the plan I’ve set out is guaranteed to result in a new LBP game, I do believe that it is also the best opportunity for one to be made. However, as I’ve worked behind the scenes I’ve found it impossible to maintain on my own. Therefore I must ask for help.
Operation Mushroom Tree, as it is tentatively titled, involves the creation of a professional pitch for a new LittleBigPlanet entry for modern consoles. This pitch would provide a basic outline of what a new entry would entail, and prove why the franchise would still be popular.
The goal is not to make a wishlist nor a whole new installment on our own, but a feasible design concept for a new game that the community can rally behind. While this exact pitch may not be directly used by Sony Interactive Entertainment, Operation Mushroom Tree would be a template to guide development of a new game. The design document at the forefront would show the best way to make a new installment in a way that would be enticing to shareholders and employees of Sony Interactive Entertainment, the current rights holders.
The document has been mainly continuously written by me. However, I am just beginning my journey into game development, and this project would be unsustainable on my own. I need concept artists and render artists to create mockups of believable illustrations of the game Operation Mushroom Tree provides. As well, I’d sincerely love the second opinions of other game designers who are passionate about the LBP franchise. Finally, I have only a very rudimentary idea of how LBP works on a programming and hardware level, and thus this project would benefit from an expert on such.
To be precise, I am looking for:
- 3D Modeling or Photoshop Artists to create renders and mock-ups of gameplay mechanics.
- Individuals with history in Game Design and have a fondness for the LittleBigPlanet Franchise, mainly to help write and guide the main design document.
- Individuals who have intimate knowledge of the LittleBigPlanet franchise on a hardware and software level, and can evaluate the feasibility of certain features on modern hardware.
If you or anyone you know falls into these categories, please contact me through Tumblr. If you are not in these categories, but are interested and believe you are able to help with this campaign, please contact me as well, and hopefully we can find a way to work together still. Do please provide some evidence of your past work and knowledge with your message.
I know that many out there currently are disappointed with the treatment of the LBP franchise after 2024, as am I. However, I do believe that LittleBigPlanet could thrive in today’s landscape, and would be beneficial to the games industry as a whole. Therefore, I am willing to embark on this journey, not only to entertain fans, but to help support up-and-coming developers get their first steps, as LBP did for me.
#little big planet#playstation#sony#lbp#game design#programming#3d modeling#sackboy#lbp2#lbp3#fan movement#help wanted#hardware#software#game development#dualshock#sony playstation#ps5#ps4#ps3#retro gaming#2000s nostalgia#sackgirl#british#media molecule#sony interactive entertainment
17 notes
·
View notes
Text


Recent stuff I’ve made on blender :)
#art#artists on tumblr#fanart#blender#3d software#3d model#pokemon#y2k#y2k aesthetic#tamagotchi#blendedlearning#digital art#stickers#pikachu#haunter#gastly#gengar#3d modeling
117 notes
·
View notes
Text
Psittacos on the prairie
Thats enough animations for a bit I been in a chair far too long
#birds#dinosaur#nature#amateur artist#paleontology#cretaceous#dino#jurassic#jurassic park#prehistoric#blender animation#blender#3d software#3d art#3d model#3d animation#digital animation#animation#psittacosaurus#dinosaurs#paleomedia#prehistory#practice makes perfect#jurassic world#tyrannosaurus rex#mesozoic#nature art#art#reptile#prairie
79 notes
·
View notes
Text
I first used Blender many years ago. I thought I wanted to make video games.
When I first encountered it, Blender had been newly open-sourced, and there were big deliberations in the community about whether they should allow it to "bloat" above 1.44mb - which would mean it would no longer fit on a floppy disc.
Believe me, at the time, that seemed like a big deal.
Anyway, as I got older, I spent less time thinking about making video games. Time passed, and maybe I felt i had put away childish things.
But over the last few years I've gone down the fiber arts rabbit hole, driven by this singular desire to build a loom. I've built a few (bad) looms, and I own a (pretty nice) Ashford rigid heddle loom.
But of course, what I really want is a floor loom.
So of course, I've designed myself one.
I modeled it in Blender, mostly to make sure that the various design decisions I had in mind were actually going to work in practice.
It was my first time working in Blender in a long time. I've poked it occasionally since the days of my youth, but usually just to remind myself that what I really want is to spend more time working with my hands. (I'm employed to work on a computer all day; that fact makes it less fun to work at a computer after I'm done with the workday.)
But this time, I felt the muscle memory flowing back to me. The UI has changed significantly. It's much larger (the download was like more than 300 mb). But under there, it's still my old friend. The one that I obsessively memorized vocabulary and keyboard shortcuts for - some of which still live deep in the bones of my fingers.
And when I'd finished modeling the loom, I got curious about shader functionality. Turns out Blender's had raytracing for years now! I kept adding more and more stuff to the scene until finally I rendered it, with lights and reflections and volumetrics, and realized: dang, this looks like a shot out of a noir film.
Some day, I'll build this in real life. But for now - for the busy life I have - for now, this will have to be enough.
#blender#fiber arts#3d modelling#blender3d#the unrelenting passage of time#the more things change the more they stay the same#weaving#film noir#pretty i first touched this software during the bush administration
13 notes
·
View notes